

Page 1
Page 2
Page 3
Page 4
Page 5
Page 6
This guide is a complement to Quick Start Guide. The Quick Start Guide provides instructions for quick setup, while this guide
provides details of each function and shows how to configure the smart phone appropriate to your needs.
When using this guide, please notice that features of the device may vary slightly depending on the model and software
version you have, and on your location, language, and Internet service provider. All screenshots, images, parameters and
descriptions documented in this guide are used for demonstration only.
In this guide, the following conventions are used:
Smart phone/phone Stands for Neffos C5s without any explanation.
Parameters
Underlined
Screenshots
->
Parameters provided in the screenshots are just references for configuring the smart phone, which may be
different from the actual situation. You can set the parameters according to your demand.
Italic and underlined words or phrases are hyperlinks. You can click to redirect to a specific section for more
details.
The demonstrated screenshots may look a little different from the actual UI of your smart phone due to the
various firmware versions. Please just configure your phone based on the actual UI.
The menu structure which shows the path to enter the corresponding page. For example, Settings -> WLAN
means the WLAN function page is under the Settings menu.
Ignoring the notes in the guide might result in a malfunction or damage to the device.
Page 7
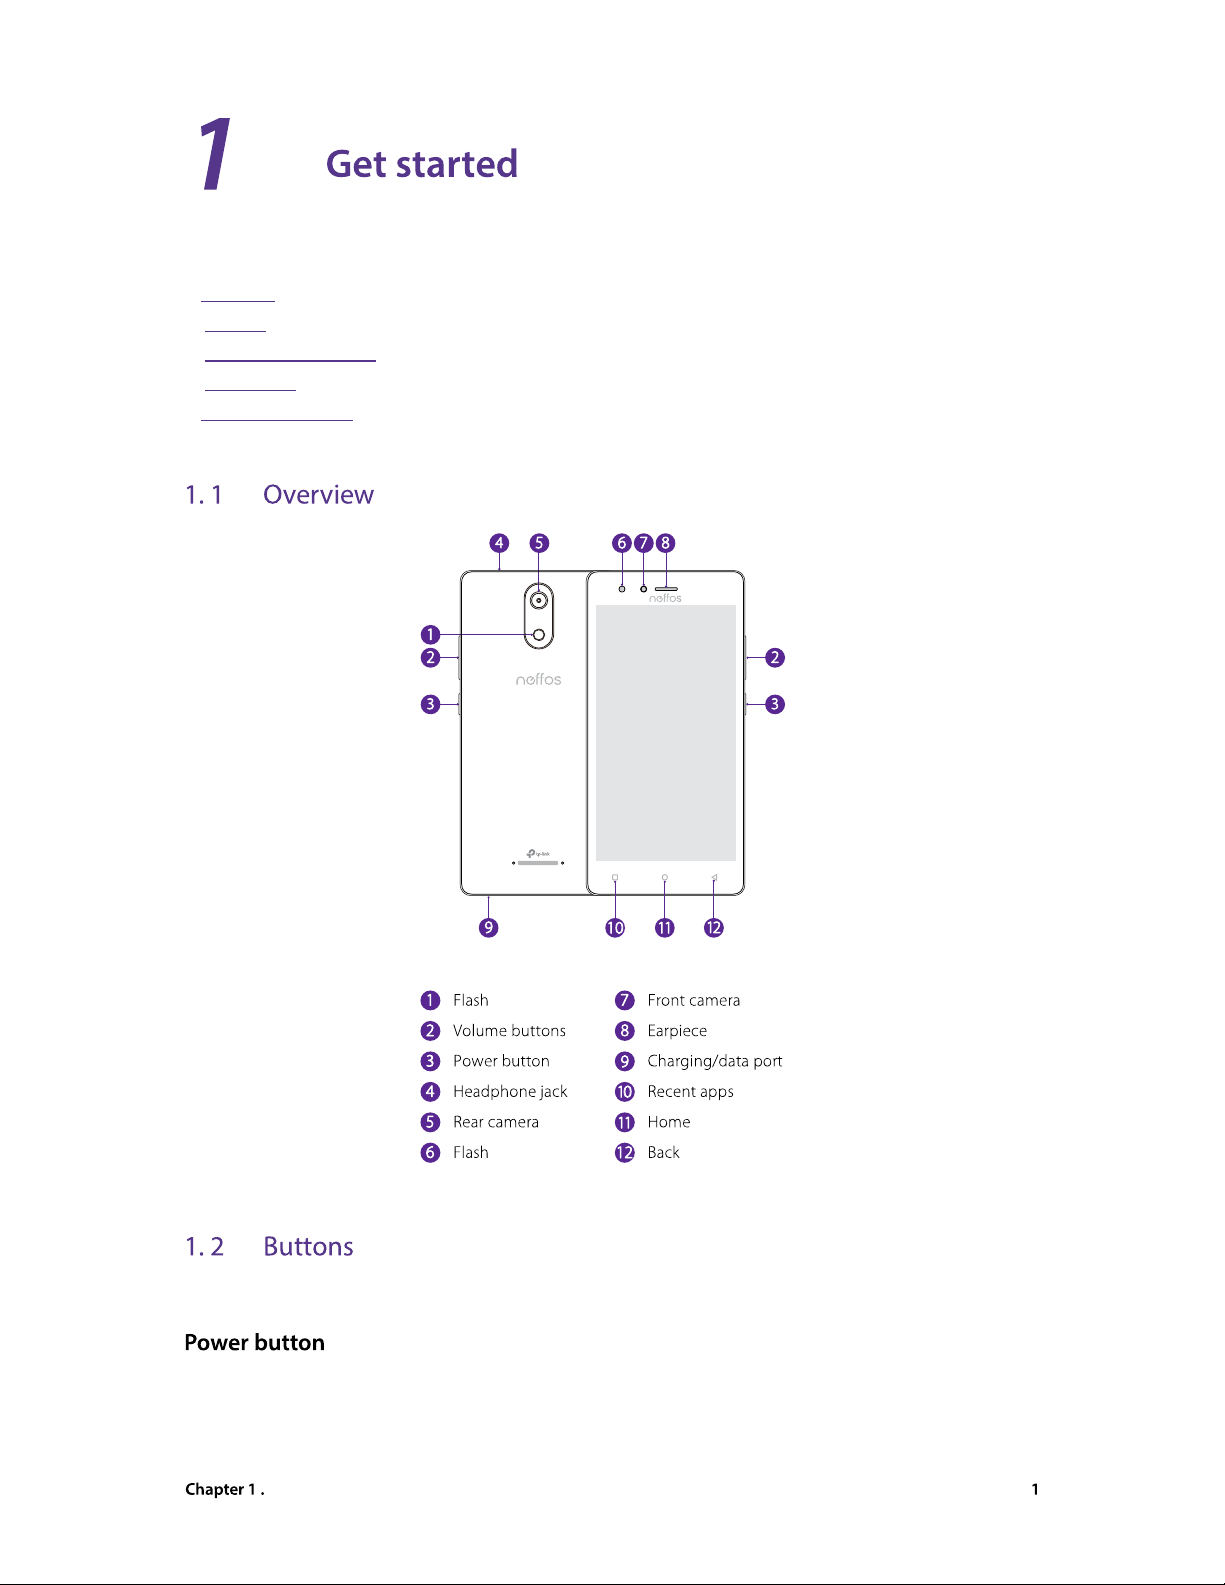
This chapter introduces the smart phone’s hardware information and guides you how to
assemble your phone when you get started on using your new phone.
• Overview
• Buttons
• Assemble your device
• Initial setup
• Charge your phone
The buttons you use with Neffos include virtual ones and physical ones.
• Lock Neffos: Locking your phone puts the display to sleep, saves the battery and prevents unmeant
operationson the screen. You can still receive phone calls, text messages, alarms and notifications as well
as listening to music and adjusting the volume. Press the Power button to manually lock the screen. Neffos
locks the screen automatically in a given period of inactivity.
Get started
Page 8
• Unlock Neffos: Press the Power button to wake the screen.
• Turn Neffos on: Press and hold the Power button until your phone vibrates and the screen turns on.
Note:
If your phone does not respond after holding down the Power button for 10 seconds, the battery may be empty.
Connect your phone to a charger to charge the battery.
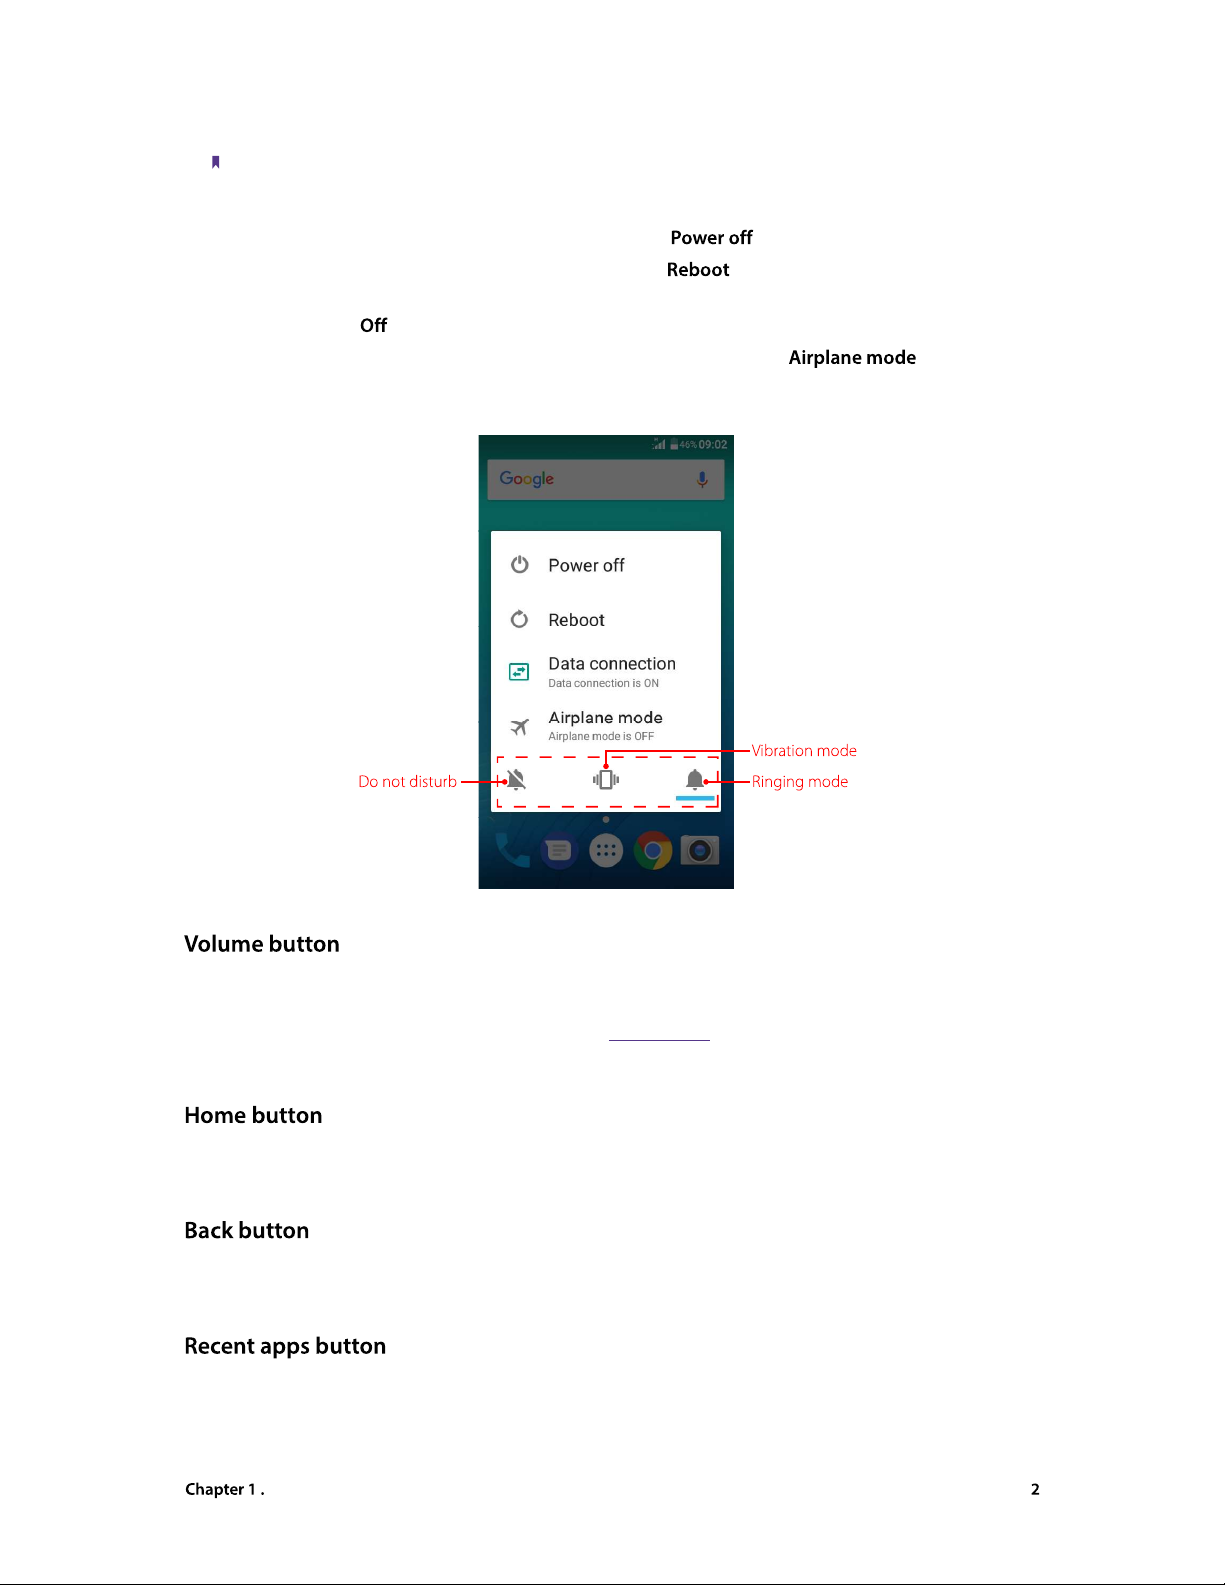
• Turn Neffos off: Press and hold the Power button, then tap .
• Reboot Neffos: Press and hold the Power button, then tap .
• Turn on/off data connection: Press and hold the Power button, then choose SIM1/SIM2 to enable data
connection, or tap to disable.
• Enable/disable airplane mode: Press and hold the Power button, then tap .
• Switch between ringing, silent and vibration mode: Press and hold the Power button, and tap the mode
you need.
• Press the Volume-up/Volume-down button to adjust the audio volume when you’re on the phone, listening
to songs, watching movies or using other media.
• Press the Volume button to take a picture. Refer to Take a photo to learn more.
• Press the Power button and Volume-down button at the same time to take a screenshot.
• Tap Home button to return to the default Home screen.
• Touch and hold Home button to open GoogleTM search.
Tap Back button to return to the previous screen or close an application. When entering text, tap Back button
to close the onscreen keyboard.
• Tap Recent apps button to display recently used applications.
• Double-tap Recent apps button to switch to the previous application.
Get started
Page 9
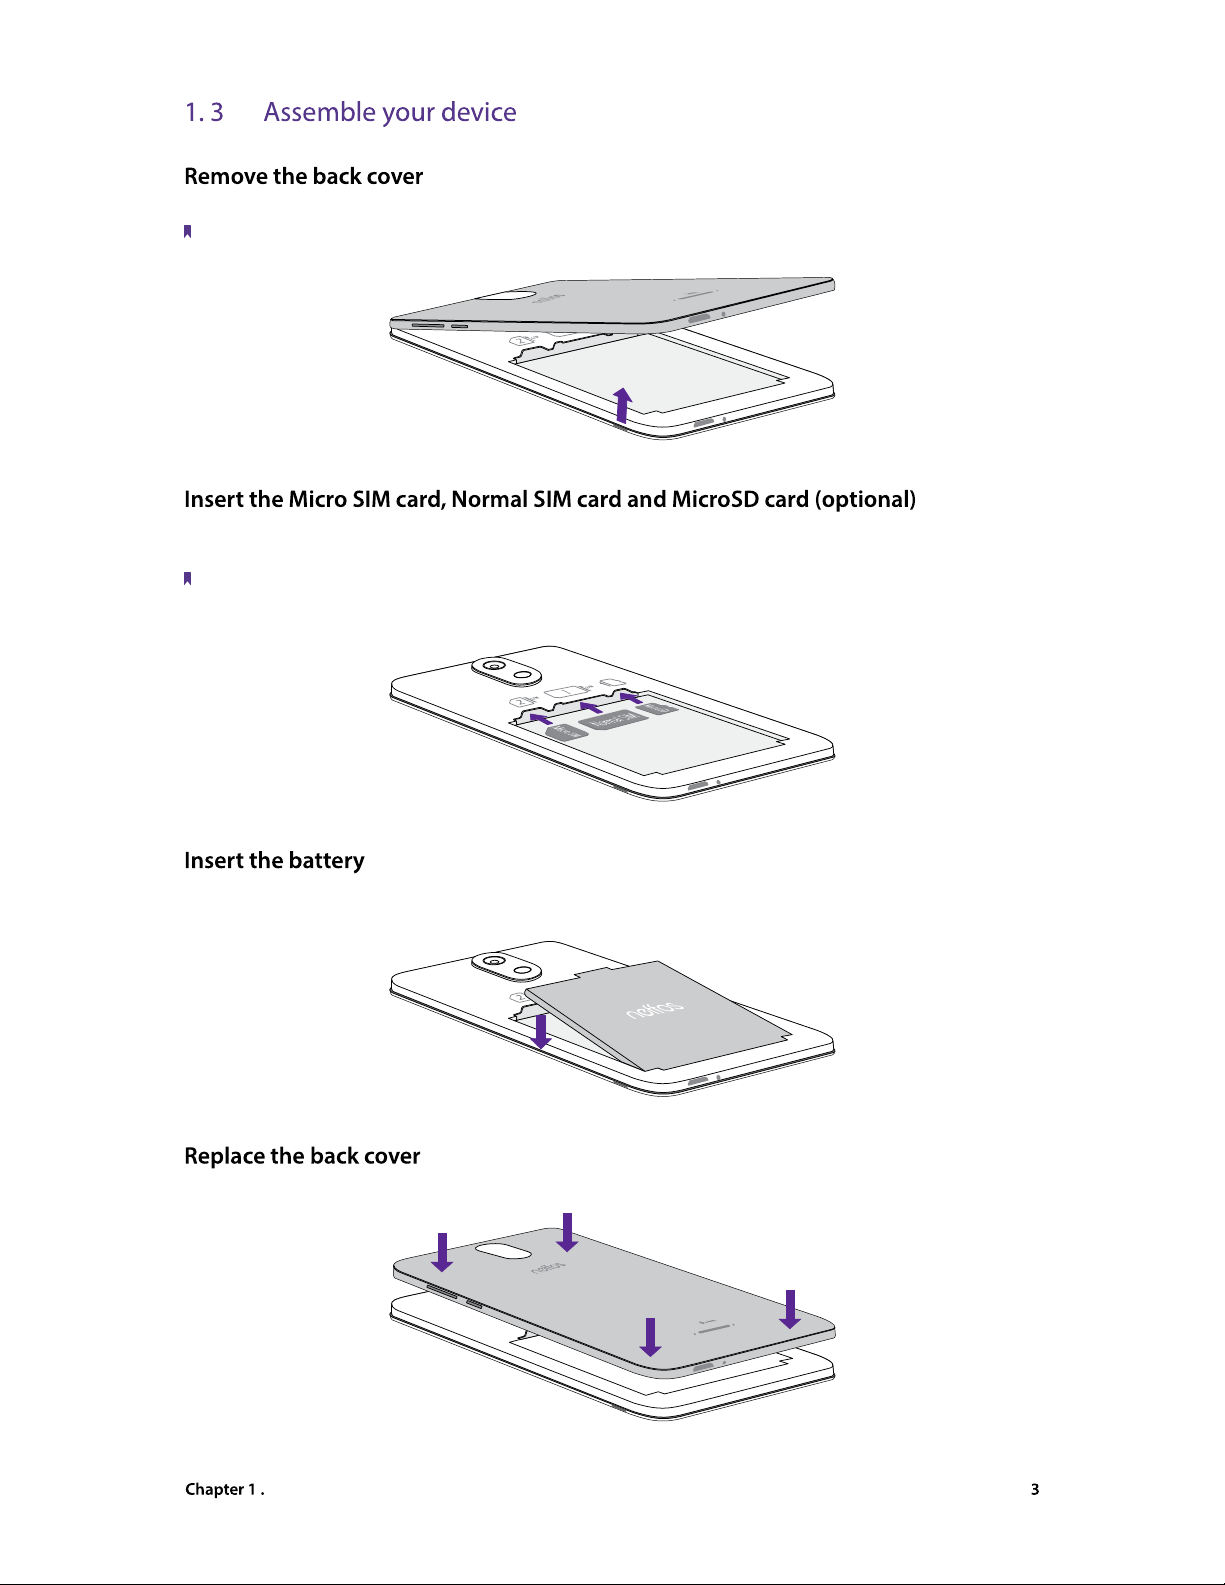
Hold your phone face down, put a fingernail in the bottom corner hole in the cover and pry the back cover off.
Note:
Do not bend or twist the back cover excessively in case you damage the phone.
Carefully slide the cards into the card slots with the gold contacts facing down. Since your phone is a dual SIM
phone, you can use one or two SIM cards by putting them in the corresponding card slots.
Note:
1. The device supports one Micro SIM card and one Normal SIM card.
2. If the card is not inserted correctly, the phone will not detect them.
Insert the battery into the opening on the back of the phone, aligning the gold contacts on the battery with the
gold contacts in your phone. Then gently press down to secure the battery.
Align the cover and press all the way around the cover’s edges, making sure it snaps into place.
Get started
Page 10
Get started
screen. Read the tips and tap
screen. Follow the onscreen
->
screen. You can configure your device in following two ways:
Tap
and follow the onscreen instructions to restore a backup or copy from a
Tap
to skip this step.
4.
screen. Your phone will automatically list available WLAN networks. Select the
->
to skip this step.
screen. Read the Google terms and conditions, then tap
screen. Set the data and
directly to skip this step. You can always adjust date and time
->
screen. Add your name to allow your phone to personalize some apps. Your name will be
after finishing. If you don’t want to set now, tap
directly.
You can always set your name in
->
screen. Select a device protection feature and then follow the onscreen
and tap
->
->
screen. You can set up a few more things there, or you can just skip by tapping
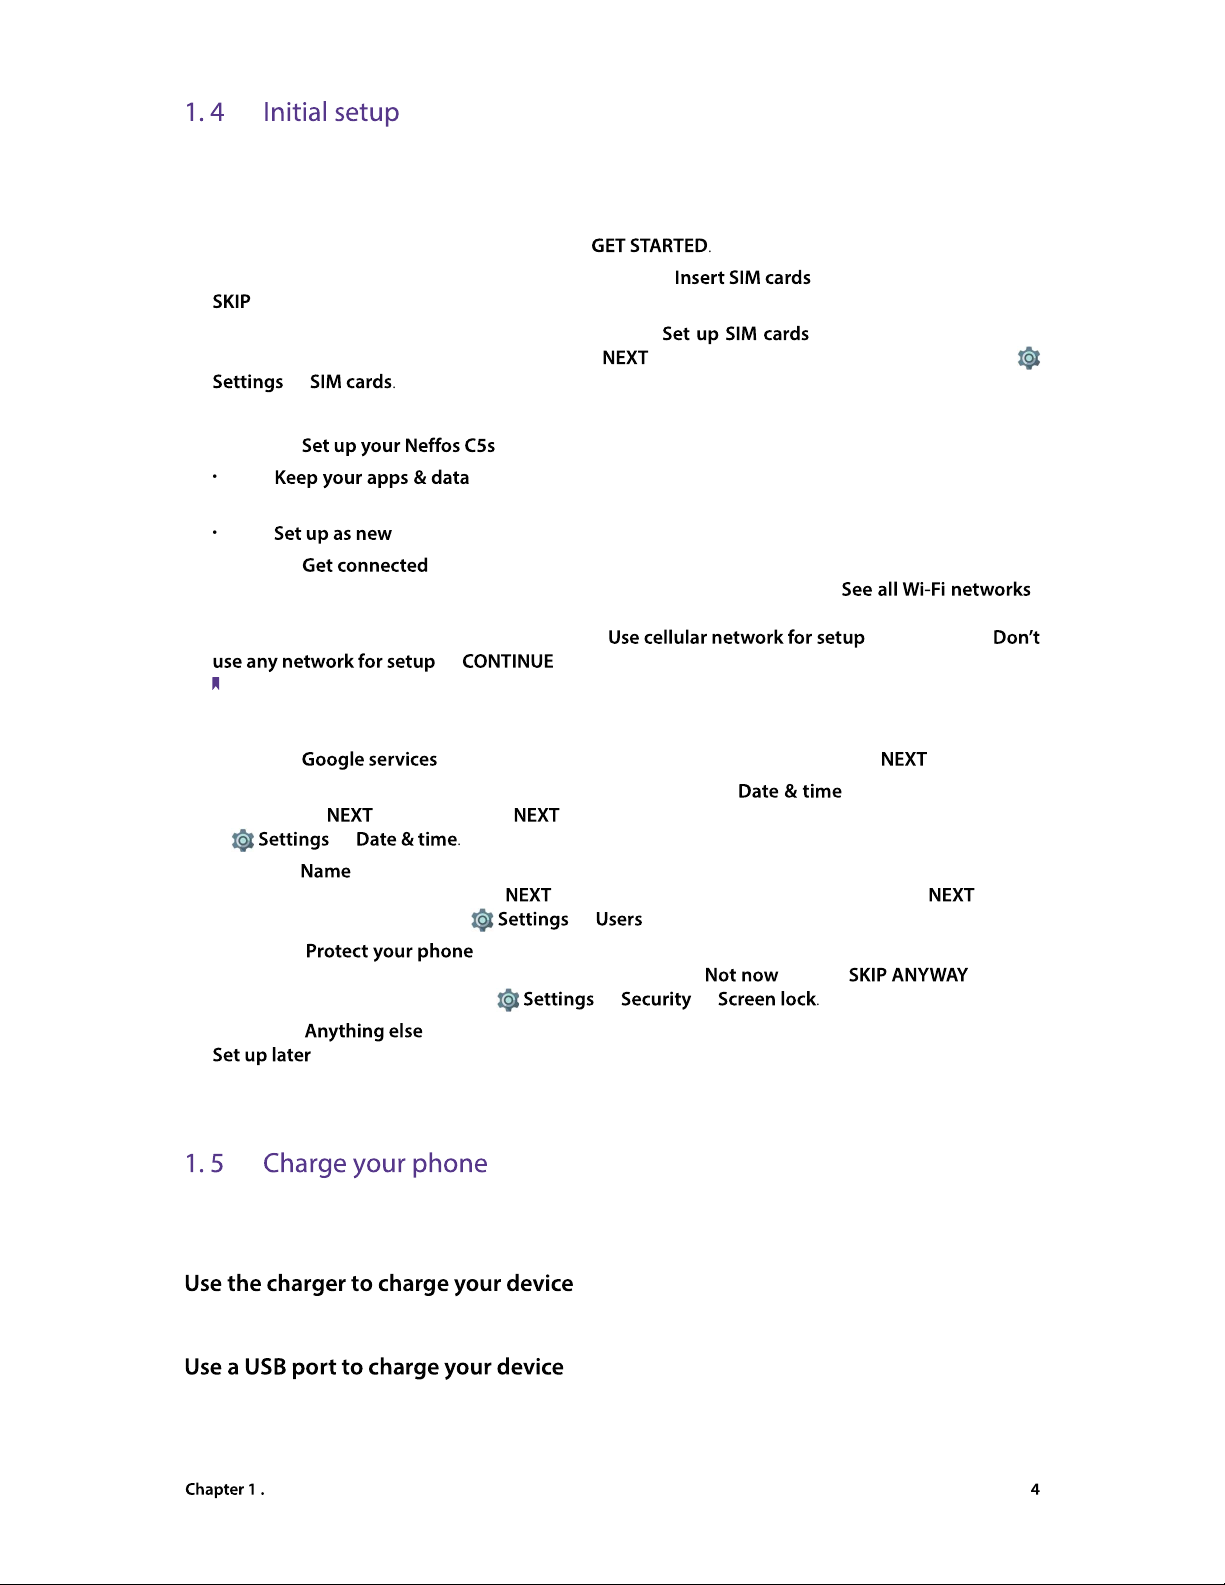
Your device displays a low battery warning when the battery is nearly empty. Charge your device immediately
Page 11
Note:
1. When charging your phone, only use genuine Neffos batteries, chargers, and USB cables. Third-party accessories are a
potential safety hazard and may impair your phone’s performance.
2. Avoid using your phone when it is charging. Do not cover your phone or the power adapter.
3. It is entirely normal that your phone may become warm after prolonged use or when exposed to high ambient
temperatures. If your phone becomes hot to the touch, stop charging it and disable unnecessary features. Place your
phone in a cool location and allow it to cool down to room temperature. Avoid prolonged contact with the surface of
your phone if it becomes hot.
4. A low battery warning will be displayed when the battery level is low. Your phone will turn off automatically when the
battery is nearly empty.
Get started
Page 12
Learn about your smart phone’s basic feature.
• Touchscreen gestures
• Home screen
• Access applications
• Status bar
• Notification Panel
• Quick Settings Panel
• Type text
• Take a screenshot
• Split-screen mode
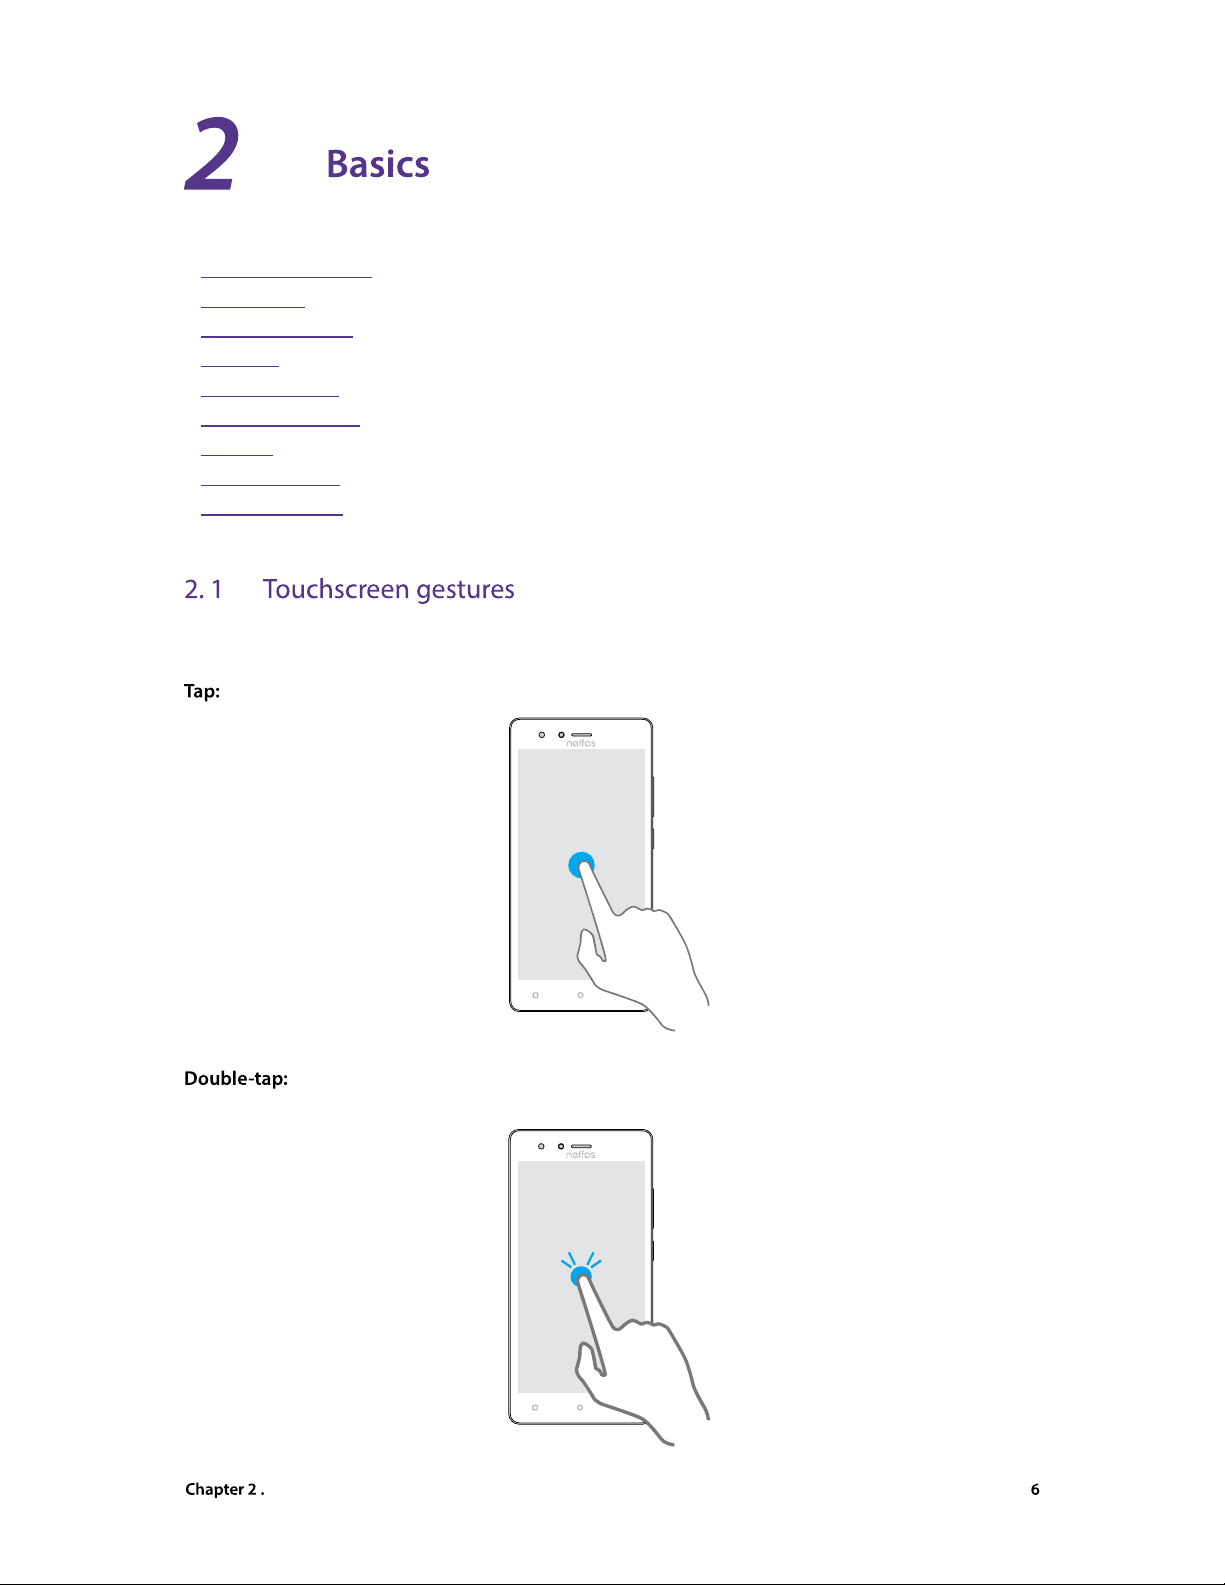
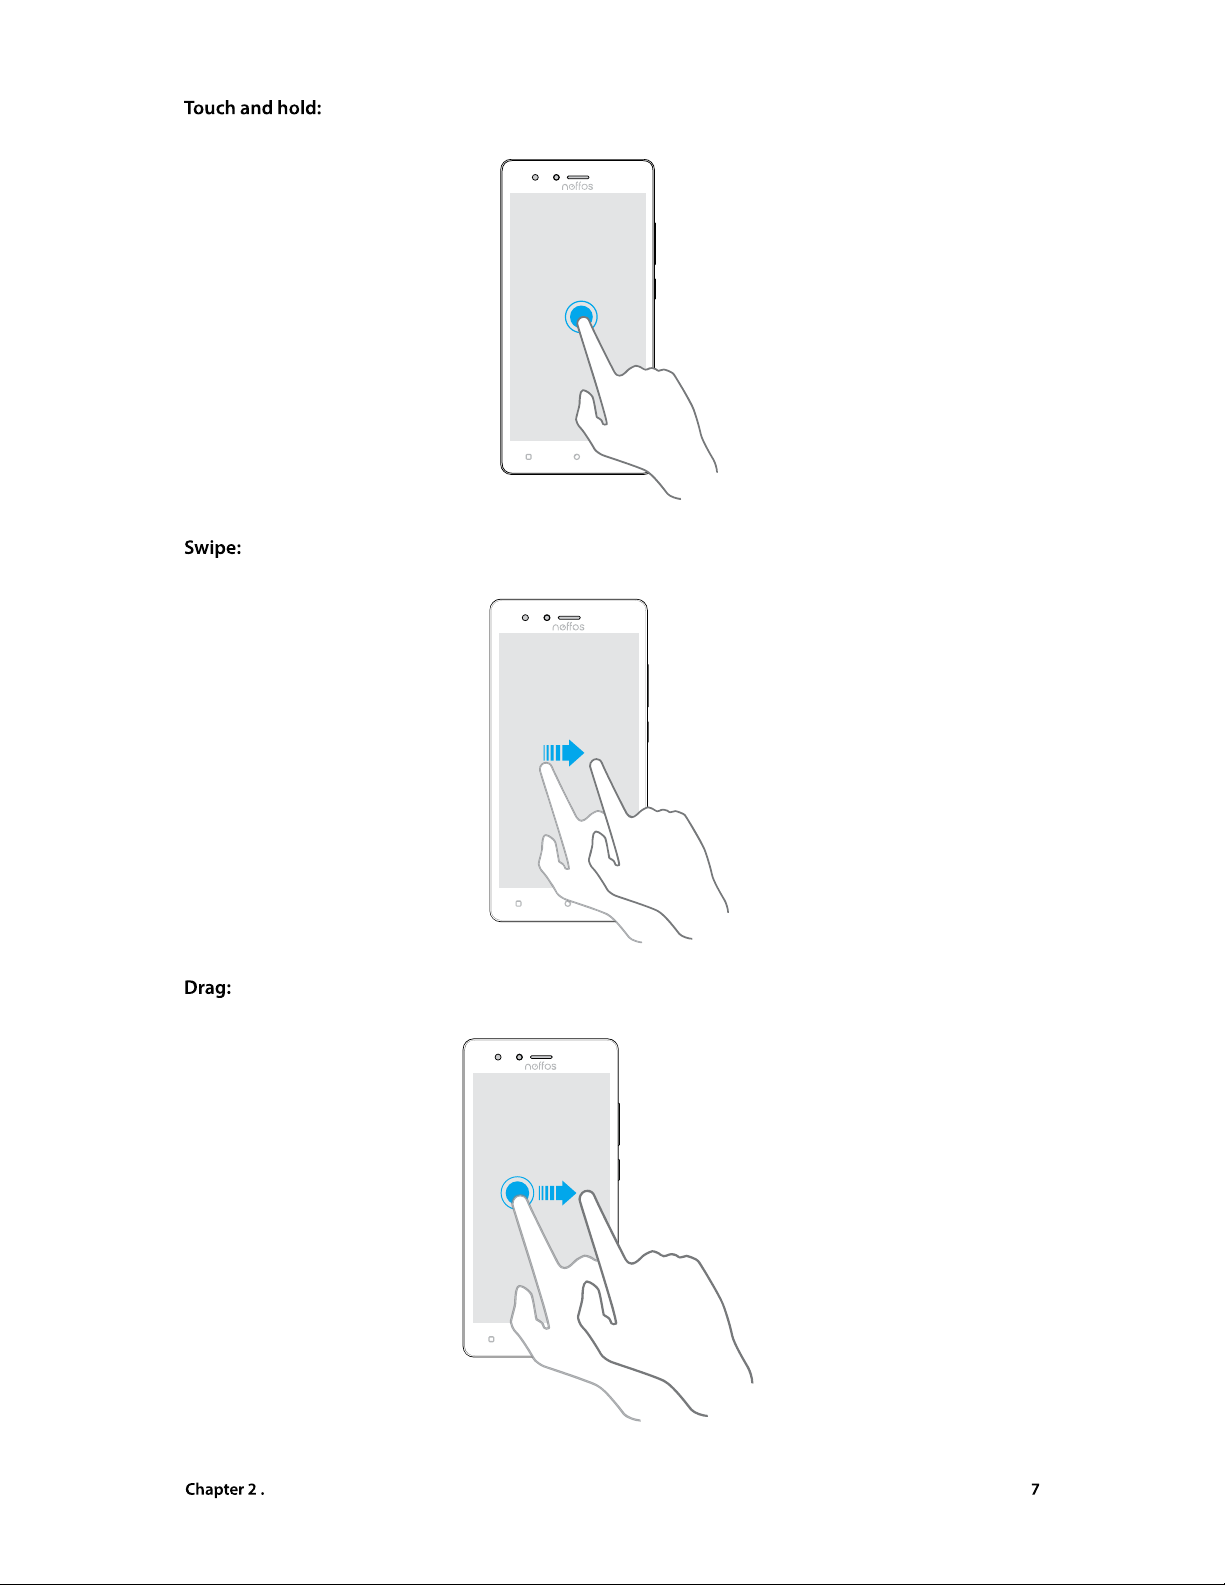
Use simple touchscreen gestures to perform a variety of tasks, such as open applications, scroll through lists,
and zoom images.
Simply tap an item once. For example, tap to select an option or open an application.
Tap the target area of the screen twice in quick succession. For example, double-tap an image in
full screen mode to zoom in or out.
Basics
Page 13
Basics
Touch and leave your finger on the screen for 2 seconds or more to activate onscreen items.
Touch and hold an item and then move it to another position. For example, you can rearrange applications
Page 14

to zoom out on a picture.
Spread two fingers apart on the screen. For example, pinch two fingers out to zoom on a picture.
Pinch two fingers together on the screen. For example, pinch two fingers together
Your Home screens are where you can find your favorite widgets and all your applications.
Basics
Page 15

Add a widget to the Home screen
Tap
and select a widget. Touch and hold the widget and drag it to a blank area on the
Tap a blank area on the Home screen (or tap Home Button/Back button) to quit the Home screen editor.
You must have enough space on the Home screen to add widgets. If there is not enough space, add another Home
Tap
4.
Tap or drag the icons in adjustment to add them to the target Home screen.
Tap a blank area on the Home screen (or tap Home Button/Back button) to quit the Home screen editor.
Touch and hold the widget, and then drag a dot on the contour line to adjust the size.
Tap a blank area (or tap Home Button/Back button) to finish.
in the
folder that contains all of your camera applications.
To name the new folder, open the folder, tap
and enter the folder name.
Add a Home screen
Move a widget
Batch moving icons
Adjust a widget size
Delete a widget
Move an application
Uninstall an application
Create a folder
Rename a folder
Add apps to a folder
Basics
Page 16

Remove apps from a folder
Touch and hold the application you want to remove, then drag it out of the folder.
on the rightest screen to add a new screen.
Tap
on the Home screen to delete it.
Touch and hold the screen you want to move and drag left or right to adjust page order..
Tap
at the top of a Home screen to set the chosen Home screen as default. On the default Home
will display at the top.
Tap
and follow the onscreen instructions to set the picture as the Home screen or lock
You also can set the Home screen wallpaper on
(see
->
Tap an icon to launch the corresponding application.
Swipe up
to launch the camera application. Swipe up
to open the Google
Tap the Home button to return to the Home screen, and then tap the
Tap Recent apps button to display the list of recently used applications.
Swipe up or down on the screen to view more recently used applications.
Tap a thumbnail to open the corresponding application.
Delete a folder
Add a Home screen
Delete a Home screen
Adjust screen order
Set the default home screen
From the Home screen:
From the Locked screen:
Switch to another application:
View more applications:
Open an application:
Change the wallpaper
Basics
Page 17

• Close an application: Swipe left or right on a thumbnail to close the corresponding application, or you can
tap on a thumbnail to close it.
• Close all applications: Tap the button of memory usage to close all applications.
Use the status bar to access the Quick Settings Panel, Notification Panel and check your phone’s status.
Status icons are displayed on the right-hand side of the status bar and tell you about your phone’s status,
including network connections, signal strength, battery, and time.
Battery low
Charging
Battery full
Battery saver enabled
Signal strength
No signal
Connected over GPRS
Connected over 3G
Connected over LTE
Headset mic inserted
WLAN
Vibrate mode enabled
Bluetooth enabled
Hotspot enabled
No SIM card installed
Do not disturb enabled
Airplane mode enabled
Data saver
Alarms enabled
Notification icons are displayed on the left-hand side of the status bar when you receive a new message and
other notifications.
Downloading status
Uploading data
Download complete
Call in progress
Missed calls
New messages
Screenshots
Basics
Page 18

Open Notification Panel:
Tap an item to view the details. New notifications, such as missed calls and messages
Swipe the notification left or right to remove the it from the list. You can also tap
Touch and hold the notification detail to open the quick settings screen. Choose
/
/
and tap
to go to the notification manage page. For more information, see
Swipe up, or tap the Home button/Back button.
Swipe down twice from the status bar, or swipe down and tap
to open
Tap the shortcut switches on the Quick Settings Panel to turn the functions on or off.
Touch and hold the shortcut icon to enter the feature’s settings page.
Swipe up, or tap the Home button/Back button.
to enter the edit page. You can:
Touch and hold a shortcut switch and then drag the icon to a position of your
Drag a shortcut switch from the bottom section of the panel to the top section.
Drag a shortcut switch from the top section of the panel to the bottom section.
Tap
->
to reset the Quick Seetings Panel to default settings.
View a notification:
Clear notifications:
Quickly manage notification:
Close Notification Panel:
Notifications
Open the Quick Settings Panel:
Use shortcut switches:
Close the Quick Settings Panel:
Rearrange shortcut switches:
Add a shortcut switch:
Remove a shortcut switch:
Reset Quick Settings Panel:
Basics
Page 19

Basics
The keyboard enables you to enter text when needed. Your Neffos C5s use Touchpal by default.
Touch and hold the letter to enter the number or symbol next to it.
You can turn on the Spell checker feature to help you enter correct words.
->
->
Turn on the switch.
Page 20

Basics
->
->
TM
keyboard or Google
Voice Typing.
Touch and hold an app, then drag it up. Then you can open another app, and it will be displayed at the
Touch and hold
swipe up or down to switch to full screen mode.
Page 21

WLAN
Your personal data and financial information may be at risk if you connect to insecure public WLAN networks.
When your phone detected available WLAN networks,
will appear in the status bar.
Tap
and select the WLAN network you want to connect to:
will display the icon in the status bar. Your phone will
(or touch and hold WLAN on the
Tap
->
to refresh the available WLAN list.
Swipe down to the bottom of the list and tap
->
->
->
and you can connect to your router by following
Tap
and press the router’s WPS button.
Tap
to generate a PIN, and then enter the PIN on the router.
->
->
->
and follow the onscreen instructions
Mobile data
Connect to computer
Bluetooth
Share your mobile data with other devices
Refresh the list:
Add a WLAN network that is not shown in the list:
Network and Share
Page 22

Connect two devices using WLAN Direct
->
->
->
Then keep the Wi-Fi Direct search screen open on both devices.
screen, tap
->
screen, you can view your
and
to disconnect. Tap a remembered group and tap
to forget the group.
->
->
, you can configure these settings:
Tap
to view the networks saved on your phone. Tap to choose
to remove the network.
Turn on the switch, and your phone will notify you when a public network is available.
There are three options:
Always stay connected to WLAN when the screen is off.
When the screen is off, only stay connected to WLAN when your phone is
Always switch to mobile data when the screen is off. (When Never is selected, your phone will
On this
screen, you can view your MAC and IP address.
Tap
and choose a SIM card for data connection. Or tap
and switch on Cellular data.
When you don’t need to access the Internet, disable mobile data to save battery power and reduce data usage.
Transfer the data on your phone to your computer or transfer the data on your computer to your phone.
Rename your device:
Manage peer device and remembered groups:
Manage saved networks:
Network notification:
Keep WLAN on during sleep:
View your MAC and IP address:
Network and Share
Page 23

You can choose from the following USB connection modes:
Charge this device:
Charge your phone only.
Transfer files between your phone and the computer.
Transfer images between your phone and the computer.
Use your phone as a MIDI input device and play MIDI files on the computer.
Show a virtual CD-ROM containing some useful software.
You can share data on your phone with other devices using Bluetooth. And you can use Bluetooth to connect
your phone to Bluetooth headsets and in-car Bluetooth to navigate or listen to music while you drive. You can
You can turn on your Bluetooth screen in following ways:
and turn on the
->
->
Turn on the switch to enable it.
screen, your phone will automatically list available devices. If the device you want to pair
->
to refresh the list, or check whether the
screen, tap
icon next to the paired device and enter the new name, then tap
to
screen, tap
icon next to the paired device and check/uncheck the premission on the
list.
screen, tap the
icon next to the paired device, and then tap
Tap the file you want to send and tap
>
for nearby devices. Select the receiving device.
When another device tries to send you files using Bluetooth, select
from the dialog
Transfer files:
Transfer photos (PTP):
Use device as MIDI:
Built-in CD-ROM:
On the Quick Settings Panel
On the Bluetooth screen
Rename paired devices
Manage permissions
Unpair Bluetooth devices
Send files:
Receive files:
Network and Share
Page 24

View received files
->
->
->
Tap
->
to complete the configuration.
You can share your phone’s mobile Internet with other devices (such as phones, tablets, or computers). The
following Internet sharing methods can be used:
Your device can’t access the Internet using WLAN when your Portable WLAN hotspot is turned on.
->
Turn on the
and
icon in the status bar.
Tap
to configure following settings. After finishing, tap
Enter the name of your hotspot and tap
Tap
to configure security setting. Your phone uses WPA2 PSK
Tap
and enter the new password (the
The hotspot password is generated randomly by your phone. For security reasons, choose a password
to display/hide your pass word.
Touch
to change the
Tap
screen, you can view the connected and blocked users. Tap
/
to stop/
Open WLAN hotsopt
Set up WLAN hotspot
Change the hotspot name:
Change the security setting:
Configure a password that is easy to remember:
Select a AP band:
Configure the maximum number of connections:
Set the time for keeping WLAN on during sleep
Manage users
Network and Share
Page 25

->
icon in the status
Pair your phone with another device
->
4.
to share your mobile data with the paired device.
Connect to mobile data
Network and Share
Page 26

Make a call
to make a call. When you are entering a number, your phone will search your
and tap SIM1/SIM2 to make SIM1 or SIM2 as the default SIM card to make calls. If you want
to change the default SIM card, or if you want to deactivate one of them, go to
->
to configure.
->
to call.
->
Tap a contact and then tap the number to dial.
Phone ->
Tap the contact directly to make a call.
Phone.
Tap the search bar and enter the name, initials, or number of a contact.
Tap the contact to dial. If no contact appear, you can tap
to dial directly, or tap
to send
Answer or reject a call
Options during a call
Call log
Call History
Import/export contacts
Call settings
Speed dial
Contacts
Dual SIM settings
Calls and Contacts
Page 27

Tap and hold
to enter
Tap
Make an emergency from unlock screen
->
Tap
You must be in an area with cellular coverage, when you have to make an emergency call.
The ability to make emergency calls depends on local regulations and carriers in your area.
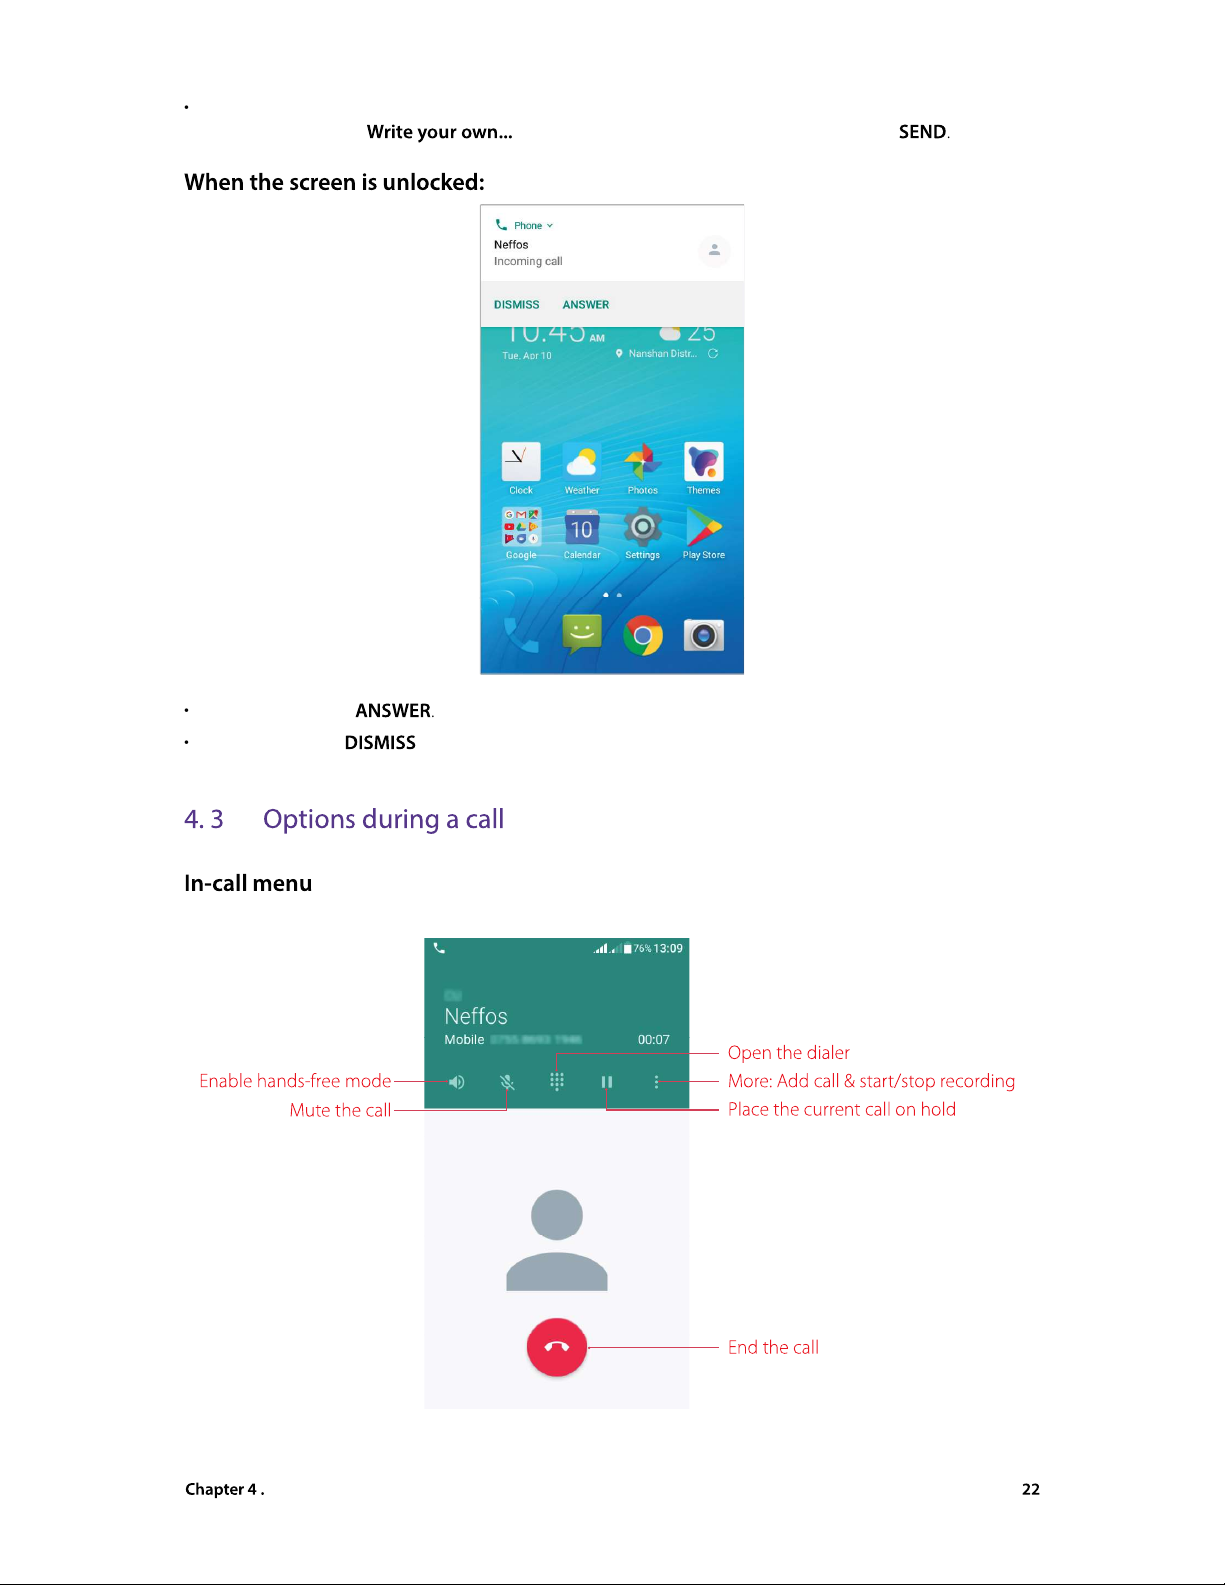
Drag
right to
Drag
left to
Make an emergency from lock screen:
Answer a call:
Reject a call:
Calls and Contacts
Page 28
Quick response message:
Drag upward to reject the call and select a quick response message to the caller.
and enter your own response message, then tap
Tap
Tap
Answer a call:
Reject a call:
Calls and Contacts
Page 29
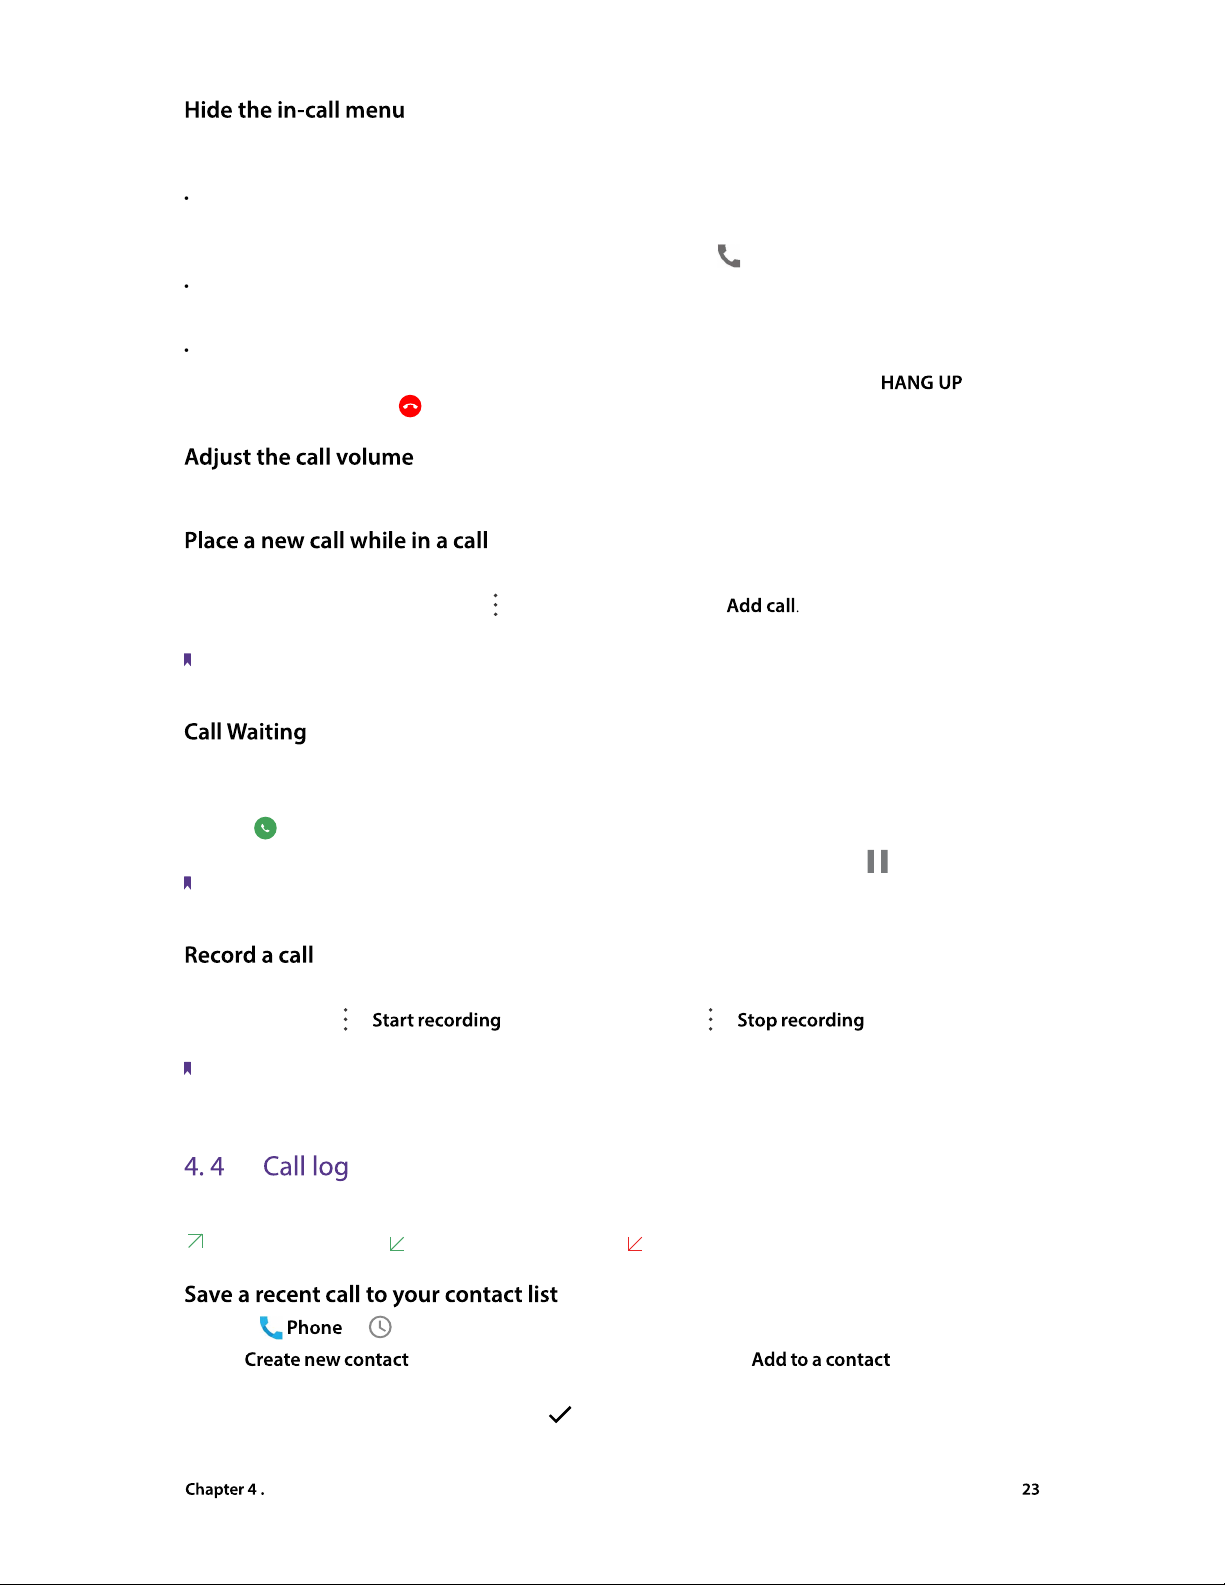
Hide the in-call menu
icon in the status bar.
To end a call, swipe down from the status bar to open the Notification Panel and tap
You can make another call while a call is in progress.
While making a call with others, tap
on the in-call menu, and tap
This function needs the support of local operator. Contact your carrier to find out how to use this feature.
When you want to answer a new incoming call while you are calling someone, you can use Call Waiting function.
When a new call comes in,
right to answer the new call. The previous call will hold on automatically.
When you want to reactivate the previous call and place the new caller on hold, tap
This function needs the support of local operator. Contact your carrier to find out how to use this feature.
You can record the call while it is in progress.
->
to start recording, and tap
->
to stop. Recording will
means outgoing calls,
means incoming calls, and
means missed calls.
->
Tap
to save the number as a new contact, or tap
to add the number
to save.
Return to the in-call menu
End a call when the in-call menu is hidden
Calls and Contacts
Page 30

->
Block the number:
Tap
->
to add the number/contact to black list. And you will no
->
->
->
Tap
to copy the number.
Tap
to open the dialer, and the number will be
->
Tap the contact you want to delete and tap
Tap
to delete.
->
->
->
and check the call logs you want to remove, then tap
->
->
->
to delete all.
->
4.
->
to configure the call settings.
Tap
and choose SIM1/SIM2 to set the ringtone you like.
Copy the number:
Edit the number before call:
Delete call history in batches
Detele all call logs
Ringtone:
Calls and Contacts
Page 31

Also vibrate for calls:
If
is enabled, your phone will vibrate when receiving incoming
Check to enable dial pad touch tones.
Tap the quick response you want to edit. Tap
after finishing.
These features may vary depending on your carrier. For more information about it, contact your carrier.
screen. You can tap
to choose SIM1/SIM2 for
Divert calls to your voicemail when your phone is switched off or when there is no cellular
Use fixed dialing numbers to restrict outgoing calls to whitelisted numbers.
If your phone can not answer or you do not want to answer the call, you can transfer
Check the box to prevent all or certain calls from reaching to or from your phone number.
Set up your Caller ID (Display your number in outgoing calls) and call waiting (notifiy
you for incoming calls during a call).
View the number you don’t want to receive texts or calls.
Tap
and enter the number you want to block, then tap
Tap
beside the number to unblock it.
You can use speed dial to make a call by just one key. This function is particularly useful for you if you dial certain
->
->
after finish. You can add up to 8 speed dial
Tap
->
to detele the speed dial.
->
Tap the figure and tap the number/contact displayed on screen.
Dialpad tones:
Voicemail:
Fixed Dialing Numbers:
Call forwarding:
Call barring:
Additional settings:
Add a speed dial
Delete a speed dial
Make a speed dial
Calls and Contacts
Page 32
screen:
You can create a new contact or add a number to a contact in following ways:
Add a contact in
-> ->
(or tap
->
) to add a new
4.
Tap
to save the new contact.
->
->
->
->
->
/
->
Add a contact from message
Add a contact in
Add a contact from the dialer
Add a contact from call log
Save a recent call to your contact list
Go to the contact list
Calls and Contacts
Page 33

and enter the name, initials, or number of a contact in the
->
->
to view the contact groups.
Tap
to create a group.
(or enter the contact name) to select the contacts you want to
4.
Tap
to finish.
Tap
->
to edit the group.
->
->
->
/
->
, you can:
and select the account (SIM1/SIM2/Phone contact)
you want to display, or customize the display options.
to view your accounts. If you want to add a new account, tap
and follow the onscreen instructions to add your account.
to set the contacts order, including sorting rule, name format, default account
Create a group
Edit a group
Delete a group
Send a group message/email
Select the account to displa
Manage accounts
Set contacts
Calls and Contacts
Page 34

Use Messages to keep in touch with your friends.
• Type of messages
• Send and reply to a message
• Search for messages
• Manage your messages
The Short Messages Service (SMS) lets you send and receive text messages to and from other mobile phones.
The Multimedia Messaging Service (MMS) lets you send and receive multimedia messages (such as pictures,
videos, and audio messages) to and from other mobile phones.
Spice up your messages by adding emoticons, images, videos, music, recordings, and more.
1. On the Home screen, open .
2. In the list of message threads, tap .
3. Select the recipient box and enter the contact name or phone number. You can also touch to open
your contact list and choose a contact or contact group.
4. Select the text field and enter your message (You can tap to add emotions and tap to add attachments).
5. Tap .
Messages
Page 35

You can reply to a message by following ways:
• On the Home screen, open . In the list of message threads, tap a contact name or phone
number to view your conversations. Select the text field and enter your message, and then tap .
• Swipe down from the top of the screen to open the Notification Panel and tap the message notification,
Select the text field and enter your message, and then tap .
• New messages will be displayed in a popup screen. You can type your messages on it and tap .
Note:
1. You can reply a call by tapping .
2. You can add the phone mumber to contacts and edit the contact by tapping .
Use the message search feature to find messages quickly.
1. On the Home screen, tap -> .
2. Enter one or more keywords. The search results will be displayed underneath the search bar.
1. On the Home screen, tap .
2. In the list of message threads, tap a contact name or phone number to view your conversations.
3. Touch and hold the message, you can copy/forward/delete/lock the message, view the message details,
select the message text and save message to SIM card.
1. On the Home screen, tap .
2. In the list of message threads, touch and hold a coversation, and then select the conversations you want
to delete.
3. Tap ->
.
On the Home screen, go to -> -> -> to delete all the threads.
Messages
Page 36

One Cell Broadcast message can reach a large number of terminals at once. You can go to ->
-> to view the cell broadcast messages.
The messages stored on the phone or on the SIM card. You can go to -> -> to
view the messages on the SIM card.
Messages
Page 37
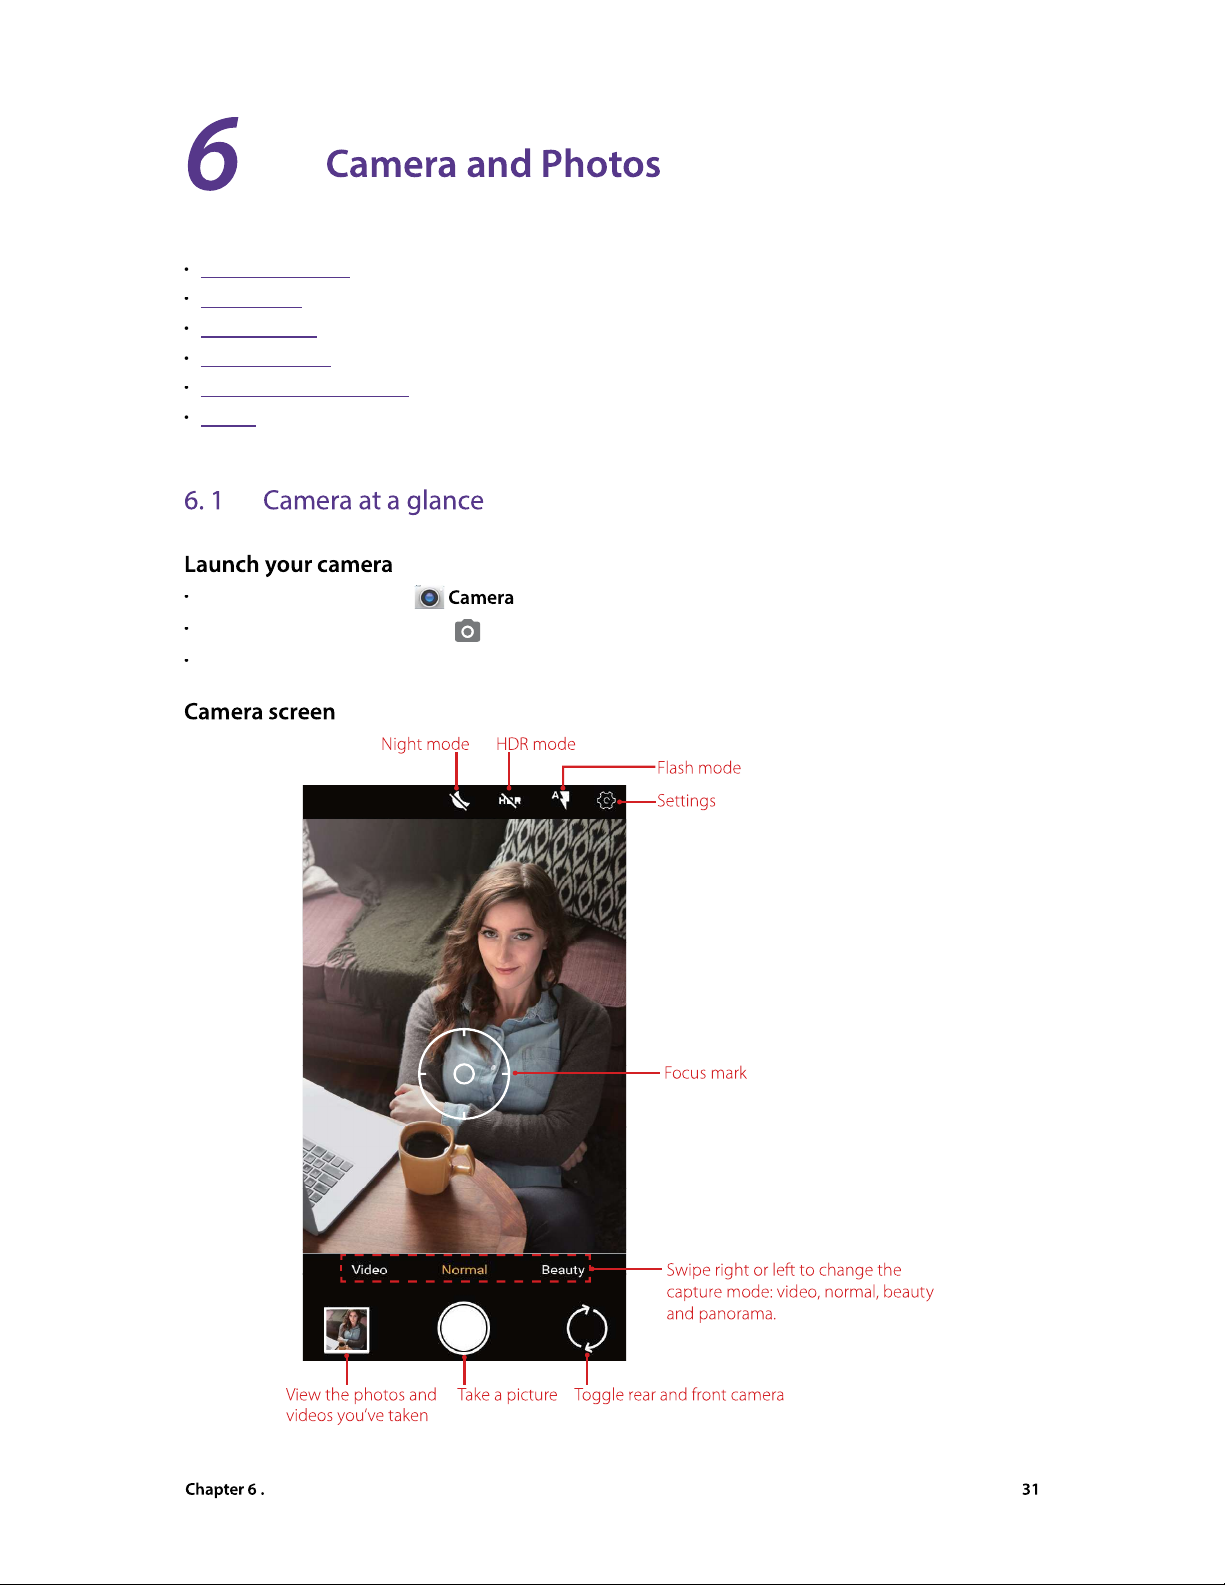
Camera at a glance
Tap
Just swipe
up.
Take a photo
Record a video
Shooting modes
Camera and video settings
Photos
On the Home screen:
On the Lock screen:
On the off screen:
Camera and Photos
Page 38

Camera and Photos
Tap
to display flash modes’ three options:
Enables the flash.
Disables the flash.
Tap the viewfinder to manually focus. A beeping sound notifies a successful focus.
To adjust the focal length, pinch two fingers together or spread them apart on the viewfinder.
Tap
to switch between the front camera and rear camera.
4.
Tap
or press the Volume button to take a photo.
mode.
4.
Tap
to record a video. Tap
to continue the recording. Tap
on
Tap
Your phone features a variety of different camera modes for different shooting scenarios.
Your phone is set to use normal mode by default. You can go to
->
to enable normal
or tap
Tap
to switch between the front camera and rear camera.
or press the Volume button to take a photo. The
or tap
directly.
.
Page 39
4.
With the capturing, the squares
will gradually change to blue
Tap
to save the capture. The camera automatically stitches the photos together to create one panoramic
Touch and hold the
or press and hold the Volume button to start the burst sequence. The number of
or Volume button to stop the burst shooting.
Tap the image thumbnail or go to
->
to view the photos.
This feature is not available in Panorama mode, Face beauty mode.
You can take up to 40 photos in one burst sequence, provided that there is enough storage space on your phone.
->
to configure the following camera settings.
GPS location info:
Tap to switch on and then take a photo.
to view the location information.
Set p
Tap to enable capture by touching the screen.
Tap
Tap
Tap
When Shutter sound is on, a shutter sound is played during taking a picture or recording a
video.
Turn on this switch, and you can take photos with faster snapshots.
Set Self timer, such as Off/2 seconds/10 seconds.
Tap to restore camera settings.
You can view the following photos and videos in
Picture size:
Touch capture:
Volume key:
Shutter sound:
ZSD
Self timer:
Video quality:
Restore defaults:
Camera and Photos
Page 40

Go to :
• Select a photo, you can manage your photo with the following options: play in slideshow, move to folder,
copy to folder use as contact photo or wallpaper, print the photo and delete from device.
• Select a video, you can manage your video with the following options: play in slideshow, play the video on
loop, move to folder, copy to folder and delete from device.
• Go to trash, you can restore the photos (videos) or permanently delete the photos (videos)
You can use the image editing tools to bring your photos to life.
Select an image you want to edit and tap , you can add a filter to the image, adjust the image parameters,
crop the image, straighten the image and rotate the image.
You can use the photos‘ video editing tools to edit a video.
Select a video you want to edit and tap , you can stabilize the video, rotate the video and clip the video.
Camera and Photos
 Loading...