

Page 1

Archer C3200
AC3200 Wireless Tri-Band Gigabit Router
RE
V1.0.0
Page 2

COPYRIGHT & TRADEMARKS
Specifications are subject to change without notice. is a registered trademark of
TP-LINK TECHNOLOGIES CO., LTD. Other brands and product names are trademarks or
registered trademarks of their respective holders.
No part of the specifications may be reproduced in any form or by any means or used to make any
derivative such as translation, transformation, or adaptation without permission from TP-LINK
TECHNOLOGIES CO., LTD. Copyright © 2015 TP-LINK TECHNOLOGIES CO., LTD. All rights
reserved.
http://www.tp-link.com
Page 3

FCC STA
TEMENT
This equipment has been tested and found to comply with the limits for a Class B digital device,
pursuant to part 15 of the FCC Rules. These limits are designed to provide reasonable protection
against harmful interference in a residential installation. This equipment generates, uses and can
radiate radio frequency energy and, if not installed and used in accordance with the instructions,
may cause harmful interference to radio communications. However, there is no guarantee that
interference will not occur in a particular installation. If this equipment does cause harmful
interference to radio or television reception, which can be determined by turning the equipment off
and on, the user is encouraged to try to correct the interference by one or more of the following
measures:
x Reorient or relocate the receiving antenna.
x Increase the separation between the equipment and receiver.
x Connect the equipment into an outlet on a circuit different from that to which the receiver
is connected.
x Consult the dealer or an experienced radio/ TV technician for help.
This device complies with part 15 of the FCC Rules. Operation is subject to the following two
conditions:
1˅ This device may not cause harmful interference.
2˅ This device must accept any interference received, including interference that may cause
undesired operation.
Any changes or modifications not expressly approved by the party responsible for compliance
could void the user’s authority to operate the equipment.
Note: The manufacturer is not responsible for any radio or TV interference caused by
unauthorized modifications to this equipment. Such modifications could void the user’s authority
to operate the equipment.
FCC RF Radiation Exposure Statement:
This equipment complies with FCC RF radiation exposure limits set forth for an uncontrolled
environment. This device and its antenna must not be co-located or operating in conjunction with
any other antenna or transmitter.
“To comply with FCC RF exposure compliance requirements, this grant is applicable to
only Mobile Configurations. The antennas used for this transmitter must be installed to
provide a separation distance of at least 27 cm from all persons and must not be co-located or
operating in conjunction with any other antenna or transmitter.”
Note: Operations are restricted to indoor usage only.
Page 4

CE Mark W
arning
Thi
s is a class B product. In a domestic environment, this product may cause radio interference, in
which case the user may be required to take adequate measures.
Na
tional Restrictions
Thi
s device is intended for home and office use in all EU countries (and other countries following
the EU directive 1999/5/EC) without any limitation except for the countries mentioned below:
Country
R
estriction Reason/remark
Bulgar
ia
N
one
General authorization required for outdoor use and
public service
Franc
e
Outdoor use limited to
10 mW e.i.r.p. within
the band 2454-2483.5
MHz
Military Radiolocation use. Refarming of the 2.4 GHz
band has been ongoing in recent years to allow current
relaxed regulation. Full implementation planned 2012
It
aly
N
one
If used outside of own premises, general authorization is
required
Lux
embourg
N
one
General authorization required for network and service
supply(not for spectrum)
N
orw
ay Impl
emented
This subsection does not apply for the geographical area
within a radius of 20 km from the centre of Ny-Ålesund
R
ussian Federation None Only for indoor applications
5150-
5250 MHz
Country
R
estriction Reason/remark
Bulgar
ia
N
ot implemented Planned
C
roatia
Lice
nse required
It
aly
General authorization required if used outside own
premises
Page 5

Lux
embourg
N
one
General authorization required for network and service
supply (not for spectrum)
Russian Federation No info
5250-5350 MHz
Country Restriction Reason/remark
Bulgaria
Not
implemented
Planned
Croatia License required
Italy
General authorization required if used outside own
premises
Luxembourg None
General authorization required for network and service
supply (not for spectrum)
Russian Federation No info
5470-5725 MHz
Country Restriction Reason/remark
Bulgaria
Not
implemented
Planned
France
Relevant+ provisions for the implementation of DFS
mechanism described in ETSI standard EN 301 893
V1.3.1 and subsequent versions
Italy
General authorization required if used outside own
premises
Luxembourg None
General authorization required for network and service
supply (not for spectrum)
Russian Federation No info
Turkey Not implemented Defence systems
Note: Please don’t use the product outdoors in France.
Canadian Compliance Statement
This device complies with Industry Canada license-exempt RSSs
. Operation is subject
to the following two conditions:
Page 6

(2)This device must accept any interference, including interference that may cause undesired
operation of the device.
To reduce potential radio interference to other users, the antenna type and its gain should be so
chosen that the equivalent isotropically radiated power (e.i.r.p.) is not more than that permitted for
successful communication.
Industry Canada Statement
Complies with the Canadian ICES-003 Class B specifications.
Cet appareil numérique de la classe B est conforme à la norme NMB-003 du Canada.
Korea Warning Statements
╏䟊 ⶊ㍶㍺゚⓪ 㤊㣿㭧 㩚䕢䢒㔶 Ṗ⓻㎇㧊 㧞㦢.
NCC Notice & BSMI Notice
⌘ʽ
ᬊվ࣏⦷䴫⌒䕫ሴᙗ䴫㇑⨶䗖⌅
CAN ICES-3 (B)/NMB-3(B)
Le présent appareil est conforme aux CNR d'Industrie Canada applicables aux appareils radio exempts
L'exploitation est autorisée aux deux conditions suivantes :
(1) l'appareil nedoit pas produire de brouillage, et
(2) l'utilisateur de l'appareil doit accepter tout brouillage radioélectrique subi, même si le brouillage
est susceptible d'en compromettre le fonctionnement.
de licence.
The device for the band 5180-5240 MHz is only for indoor usage to reduce potential for
harmful interference to co-channel mobile satellite systems.
les dispositifs fonctionnant dans la bande 5180-5240 MHz sont réservés uniquement pour
une utilisation à l’intérieur afin de réduire les risques de brouillage préjudiciable aux
systèmes de satellites mobiles utilisant les mêmes canaux.
(1) This device may not cause interference, and
ㅜҼọ㏃රᔿ䂽䅹Ṭѻվ࣏⦷ሴ乫䴫ˈ䶎㏃䁡ˈޜǃ୶㲏ᡆ֯⭘㘵൷нᗇ㠚䆺ᴤ乫⦷ǃ
࣐བྷ࣏
⦷ᡆ䆺ᴤ䁝䀸ѻ⢩ᙗᡆ࣏㜭DŽ
Radiation Exposure Statement:
This equipment complies with IC radiation exposure limits set forth for an uncontrolled
environment. This equipment should be installed and operated with minimum distance 32cm
between the radiator & your body.
Déclaration d'exposition aux radiations:
Cet équipement est conforme aux limites d'exposition aux rayonnements IC établies pour un
environnement non contrôlé. Cet équipement doit être installé et utilisé avec un minimum
de 32 cm de distance entre la source de rayonnement et votre corps.
Page 7

ᆹޘ䄞䂒৺⌘һ丵
ƽ䃻֯⭘㼍䴫Ⓚ៹ಘᡆ㜭᤹➗ᵜ⭒૱⌘᰾Ⲵ䴫Ⓚ于ර֯⭘ᵜ⭒૱DŽ
ƽ▄ᵜ⭒૱ѻࡽ䃻ݸᤄᦹ䴫Ⓚ㐊DŽ䃻֯⭘⏢億ǃತ䵗▄ࣁᡆ★ᐳ䙢㹼▄DŽ
ƽ⌘䱢▞ˈ䃻ሷ≤ᡆަԆ⏢億▁⚁ࡠᵜ⭒૱кDŽ
ƽᨂ㠷䮻䙊付֯⭘ˈԕ⻪؍ᵜ⭒૱Ⲵ䶐і䱢→䙾⟡ˈ䃻ຎᡆ㾶㫻䮻DŽ
ƽ䃻ሷᵜ⭒૱㖞᭮ᯬ䶐䘁⟡ⓀⲴൠᯩDŽ䲔䶎ᴹ↓ᑨⲴ䙊付ˈࡷн᭮൘ᇶ䮹ս㖞ѝDŽ
ƽ䃻н㾱⿱㠚ᢃ䮻⇬ˈн㾱ే䂖㠚㹼㏝؞ᵜ⭒૱ˈ䃻⭡ᦸ℺ⲴሸᾝӪ༛䙢㹼↔丵ᐕDŽ
Safety Information
z When product has power button, the power button is one of the way to shut off the product;
when there is no power button, the only way to completely shut off power is to disconnect the
product or the power adapter from the power source.
z Don’t disassemble the product, or make repairs yourself. You run the risk of electric shock and
voiding the limited warranty. If you need service, please contact us.
z Avoid water and wet locations.
This product can be used in the following countries:
AT BG BY CA CZ DE DK EE
ES FI FR GB GR HU IE IT
LT LV MT NL NO PL PT RO
RU SE SK TR UA US
z Adapter shall be installed near the equipment and shall be easily accessible.ÿÿ
z The plug considered as disconnect device of adapter.ÿÿ
ㅜഋọվ࣏⦷ሴ乫䴫ѻ֯⭘нᗇᖡ丯伋㡚ᆹޘ৺ᒢᬮ⌅䙊㹼˗㏃Ⲭ⨮ᴹᒢᬮ⨮䊑ᱲˈ៹・ণ
ڌ⭘ˈі᭩ழ㠣❑ᒢᬮᱲᯩᗇ㒬㒼֯⭘DŽࡽ丵⌅䙊ؑˈᤷ䴫ؑ㾿ᇊᾝѻ❑㐊䴫ؑDŽվ࣏⦷ሴ
乫䴫䴰ᗽ⌅䙊ؑᡆᐕᾝǃ、ᆨԕ৺䟛Ⱳ⭘䴫⌒䕫ሴᙗ䴫䁝ۉѻᒢᬮDŽ
ቁ䴫⻱⌒ᖡ丯ˈ䃻࿕䚙֯⭘DŽ
Page 8

TP-LINK TECHNOLOGIES CO., LTD
D
DECLARATION OF CONFORMITY
For the following equipment:
Product Description: AC3200 Wireless Tri-Band Gigabit Router
Model No.: Archer C3200
Trademark: TP
-LINK
We declare under our own responsibility that the above products satisfy all the technical
regulations applicable to the product within the scope of Council Directives:
Directives 1999/5/EC, Directives 2004/108/EC, Directives 2006/95/EC, Directives 1999/519/EC,
Directives 2011/65/EU
The above product is in conformity with the following standards or other normative documents
EN 300 328 V1.8.1
EN 301 489-1 V1.9.2 & EN 301 489-17 V2.2.1
EN 55022: 2010 + AC: 2011
EN 55024: 2010
EN 61000-3-2: 2006 + A1: 2009 + A2: 2009
EN 61000-3-3: 2013
EN 60950-1: 2006 + A11: 2009 + A1: 2010 + A12: 2011
EN 50385: 2002
EN 301 893 V1.7.1
The product carries the CE Mark:
Person responsible for making this declaration:
Yang Hongliang
Product Manager of International Business
Date of issue: 2015
TP-LINK TECHNOLOGIES CO., LTD.
Building 24 (floors 1, 3, 4, 5), and 28 (floors 1-4) Central Science and Technology Park, Shennan Rd,
Nanshan, Shenzhen, China
Page 9

CONTENTS
Chapter 1. Get to Know About Your Router ........................................................ 1
1.
1 Product Overview ......................................................................................................... 1
1.2 Conventions .................................................................................................................. 1
1.3 Main Features ............................................................................................................... 2
1.4 Panel Layout ................................................................................................................. 3
1.4.1 Front Panel ....................................................................................................... 3
1.4.2 Rear Panel ........................................................................................................ 4
Chapter 2. Connect Your Router .......................................................................... 6
2.
1 System Requirements .................................................................................................. 6
2.2 Installation Environment Requirements ........................................................................ 6
2.3 Connect Your Router .................................................................................................... 6
Chapter 3. Log into Your Router .......................................................................... 9
Chapter 4.
Set Up Internet Connection ............................................................. 10
4.
1 Quick Setup ................................................................................................................ 10
4.1.1 Use the Quick Setup with Auto-detection ....................................................... 10
4.2 Manual Setup .............................................................................................................. 14
4.2.1 Manually configure your Internet Connection Settings ................................... 14
Chapter 5. Set up an IPv6 Internet Connection ................................................ 19
Chapter 6.
Bandwidth Control ............................................................................ 23
Chapter 7.
Network Security .............................................................................. 26
7.
1 MAC Filtering .............................................................................................................. 26
7.2 Access Control ............................................................................................................ 28
7.3 IP & MAC Binding ....................................................................................................... 31
Chapter 8. IPTV .................................................................................................... 34
Chapter 9.
USB Settings ..................................................................................... 35
9.
1 Local Storage Sharing ................................................................................................ 35
9.2 Remote Access via FTP Server .................................................................................. 38
9.3 Media Sharing ............................................................................................................. 41
9.4 Printer Sharing ............................................................................................................ 43
Chapter 10. Parental Controls ........................................................................... 49
Chapter 11.
Guest Network ............................................................................... 52
11.
1 Create a Network for Guests ...................................................................................... 52
Page 10

1. V
isit http://tplinkwifi.net, and log in with the password you set for the router. 52
2. Go to AdvancedėGuest Network................................................................... 52
3. Enable a guest network (2.4GHz, 5GHz-1, or 5GHz), and set the network
SSID and password. ................................................................................................... 52
4. Click Save. ...................................................................................................... 53
11.2 Limit the Network Authorities for Guests .................................................................... 53
1. Go to AdvancedėGuest Network. ................................................................. 53
2. Limit the network authorities and bandwidth according to your needs. ......... 53
3. Click Save. ...................................................................................................... 54
Chapter 12. NAT Forwarding ............................................................................. 55
12.
1 Share Local Website on the Internet .......................................................................... 55
Method 1 Through Virtual Server ............................................................................... 55
Mode 1: Automatic Configuration ............................................................................... 56
Mode 2: Manual Configuration ................................................................................... 56
Method 2 Through DMZ .............................................................................................. 57
12.2 Share Local Resources on the Internet ...................................................................... 58
Method 1 Through Virtual Server ............................................................................... 58
Method 2 Through DMZ .............................................................................................. 60
12.3 Make Online Game Free from Port Restriction .......................................................... 61
12.4 Make Xbox Online Games Run Smoothly with UPnP ................................................ 62
12.5 More Applications ....................................................................................................... 63
Chapter 13. Customize Your Network Settings ............................................... 66
13.
1 LAN Settings ............................................................................................................... 66
13.1.1 Change the LAN IP address ........................................................................... 66
13.1.2 Use the Router as a DHCP Server ................................................................. 66
13.1.3 Reserve LAN IP Addresses ............................................................................ 68
13.2 Wireless Settings ........................................................................................................ 69
13.2.1 Specify Basic Wireless Settings ..................................................................... 69
13.2.2 Use WPS for Wireless Connection ................................................................. 70
13.2.3 Schedule Your Wireless Function ................................................................... 73
13.2.4 View Information ............................................................................................. 74
13.3 Register a Domain Name for Your Router .................................................................. 75
13.4 Interface Grouping ...................................................................................................... 76
13.5 Create Static Routes ................................................................................................... 78
13.6 Set up VPN Connection .............................................................................................. 80
Page 11

Chapter 14. Administrate Your Network ........................................................... 85
14.
1 Set System Time and Region ..................................................................................... 85
14.2 Update the Firmware .................................................................................................. 86
14.3 Back up and Restore Configuration Settings ............................................................. 86
14.4 Change the Administrator Account ............................................................................. 87
14.5 Local Management ..................................................................................................... 88
14.6 Remote Management ................................................................................................. 88
Appendix A: FAQ .................................................................................................... 90
Q1
. What can I do if I forgot my wireless password? ........................................................ 90
Q2. How to retrieve the username and password of the web management page? ......... 90
Q3. I cannot login the router’s web management page, what can I do? .......................... 92
Q4. How to use the WDS Bridging function to extend my wireless network? .................. 94
Q5. I cannot access the Internet even though the configuration is finished, what can I do?
.................................................................................................................................. 98
Q6. I cannot find my wireless network or I cannot connect the wireless network, what can I
do? .......................................................................................................................... 103
Appendix B: Configuring the PC ......................................................................... 109
Appendix C: Specifications ................................................................................. 112
Appendix D: Glossary .......................................................................................... 114
Page 12

Archer C3200 AC3200 Wireless Tri-Band Gigabit Router
Chapter 1. Get to Know About Your Router
1.1 Product Overview
The Archer C3200 AC3200 Wireless Tri-Band Gigabit Router integrates 4-port Switch, Firewall,
NAT-router and Wireless AP. Powered by 3x3 MIMO technology, this router delivers exceptional
range and speed, which can fully meet the need of Small Office/Home Office (SOHO) networks and
the users demanding higher networking performance. Your wireless connections are radio band
selectable to avoid interference in your area, and the four built-in Gigabit ports supply high-speed
connection to your wired devices.
The Archer C3200 provides up to 3200Mbps wireless connection with other wireless clients. The
incredible speed makes it ideal for handling multiple data streams at the same time, which ensures
your network stable and smooth. The performance of this 802.11ac wireless router will give you the
unexpected networking experience at speed much faster than 802.11n. It is also compatible with all
IEEE 802.11n, IEEE 802.11a, IEEE 802.11b and IEEE 802.11g products.
With multiple protection measures, including SSID broadcast control and wireless LAN
64/128/152-bit WEP encryption, Wi-Fi Protected Access (WPA2- PSK, WPA- PSK), as well as
advanced Firewall protections, the Archer C3200 provides complete data privacy.
The Archer C3200 provides flexible access control, so that parents or network administrators can
establish restricted access policies for children or staff. It also supports Virtual Server and DMZ host
for Port Triggering, and then the network administrators can manage and monitor the network in real
time with the remote management function.
Since the router is compatible with virtually all the major operating systems, it is very easy to
manage. Quick Setup Wizard is supported and detailed instructions are provided step by step in
this user guide. Before installing the router, please look through this guide to know all the router’s
functions.
1.2 Conventions
The router or Archer C3200 mentioned in this guide stands for Archer C3200 AC3200 Wireless
Tri-Band Gigabit Router without any explanation.
Simple Installation
Flexible Access Control
Multiple Security Protections
Incredible Speed
- 1 -
Page 13

Archer C3200 AC3200 Wireless Tri-Band Gigabit Router
1.3 Main Features
¾ Complies with IEEE 802.11ac.
¾ One 10/100/1000M Auto-Negotiation RJ45 Internet port, four 10/100/1000M Auto-Negotiation
RJ45 Ethernet ports, supporting Auto MDI/MDIX.
¾ Provides a USB 3.0 port and a USB 2.0 port supporting file sharing and print server.
¾ Provides WPA/WPA2, WPA-PSK/WPA2-PSK authentication, TKIP/AES encryption security.
¾ Shares data and Internet access for users, supporting Dynamic IP/Static IP/PPPoE/PPTP/
L2TP Internet access.
¾ Supports simultaneous 2.4GHz and 5GHz connections for 3200Mbps of total available
bandwidth.
¾ Supports Virtual Server, Special Application and DMZ host.
¾ Supports UPnP, Dynamic DNS, Static Routing.
¾ Provides Automatic-connection and Scheduled Connection on certain time to the Internet.
¾ Built-in NAT and DHCP server supporting static IP address distributing.
¾ Supports Parental Control and Access Control.
¾ Connects Internet on demand and disconnects from the Internet when idle for PPPoE.
¾ Provides WEP encryption security and wireless LAN ACL (Access Control List).
¾ Supports Flow Statistics.
¾ Supports IPv6.
¾ Supports firmware upgrade and Web management.
- 2 -
Page 14
Archer C3200 AC3200 Wireless Tri-Band Gigabit Router
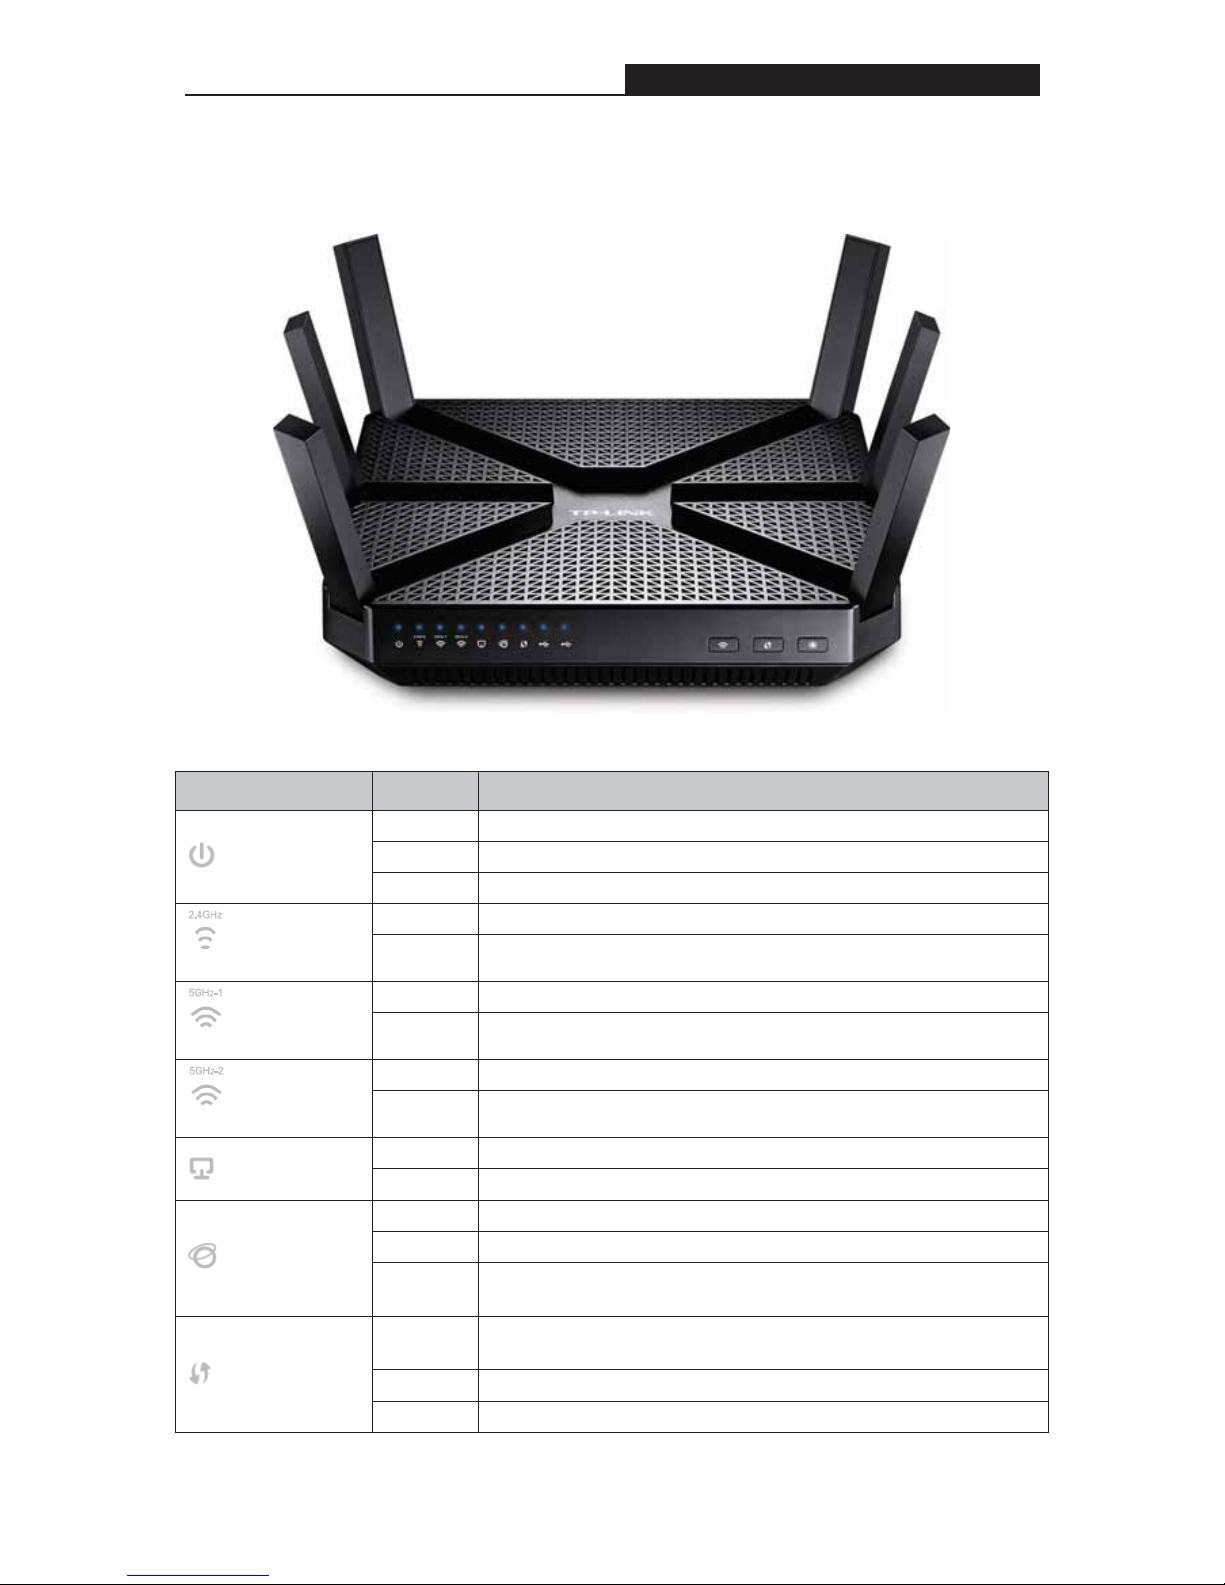
1.4 Panel Layout
1.4.1 Front Panel
The rout
er’s LEDs are located on the front panel (View from left to right).
Name Status Indication
(Power)
Flashing The router is booting or upgrading.
On The router has booted.
Off Power is off.
(2.4GHz
Wireless)
On 2.4GHz wireless is working properly.
Off 2.4GHz wireless is disabled.
(5GHz-1
Wireless)
On 5GHz-1 wireless is working properly.
Off 5GHz-1 wireless is disabled.
(5GHz-2
Wireless)
On 5GHz-2 wireless is working properly.
Off 5GHz-2 wireless is disabled.
(Ethernet)
On There is device(s) connected to the Ethernet (1/2/3/4) port(s).
Off No any device is connected to the Ethernet (1/2/3/4) port.
(Internet)
Blue The Internet port is connected, and the Internet is accessible.
Orange The Internet port is connected, but the Internet is inaccessible.
Off
The Internet port isn’t connected, and the Internet is
inaccessible.
(WPS)
Flashing
WPS button on the router is pressed, and the router is trying to
connect a wireless device to its network via WPS.
On The connection via WPS is successful.
Off The connection via WPS fails.
- 3 -
Page 15

Archer C3200 AC3200 Wireless Tri-Band Gigabit Router
(USB 1)
Flashing
The router is identifying the device connected to the USB 2.0
port.
On The device is identified successfully.
Off No device is connected to the USB 2.0 port.
(USB 2)
Flashing
The router is identifying the device connected to the USB 3.0
port.
On The device is identified successfully.
Off No device is connected to the USB 3.0 port.
))
Note:
After a device is successfully added to the network by WPS function, the WPS LED will keep on
for about 5 minutes and then turn off.
The following buttons are also located on the front panel (View from left to right).
¾
(Wi-Fi): Pressing this button for 2 seconds enables or disables the Wi-Fi function.
¾
(WPS): Pressing this button for less than 5 seconds enables the WPS function. If your
client devices, such as wireless adapters, that support Wi-Fi Protected Setup, then you can
press this button to quickly establish a connection between the router and client devices and
automatically configure wireless security for your wireless network.
¾
(LED On/Off): Pressing this button for 2 seconds turns all LEDs on or off.
1.4.2 Rear Panel
Figure 1-1 Rear Panel sketch
The following parts are located on the rear panel (View from left to right).
¾ Reset: Pressing this button for about 8 seconds enables the Reset function.
- 4 -
Page 16

Archer C3200 AC3200 Wireless Tri-Band Gigabit Router
¾ USB 2.0: The USB 2.0 port connects to a USB 2.0 storage device or a USB 2.0 printer.
¾ Internet: This port is where you will connect the DSL/cable Modem, or Ethernet.
¾ Ethernet (1, 2, 3, 4): These ports (1, 2, 3, 4) connect the router to the local PC(s).
¾ USB 3.0: The USB 3.0 port connects to a USB 3.0 storage device or a USB 3.0 printer.
¾ Power On/Off: The switch for the power.
¾ Power: The Power socket is where you will connect the power adapter. Please use the
power adapter provided.
- 5 -
Page 17

Archer C3200 AC3200 Wireless Tri-Band Gigabit Router
Chapter 2. Connect Your Router
2.1 System Requirements
¾ Broadband Internet Access Service (DSL/Cable/Ethernet)
¾ One DSL/Cable Modem that has an RJ45 connector (which is not necessary if the router is
connected directly to the Ethernet)
¾ PCs with a working Ethernet Adapter and an Ethernet cable with RJ45 connectors
¾ TCP/IP protocol on each PC
¾ Web browser, such as Microsoft Internet Explorer, Mozilla Firefox or Apple Safari
2.2 Installation Environment Requirements
¾ Place the router in a well-ventilated place far from any heater or heating vent
¾ Avoid direct irradiation of any strong light (such as sunlight)
¾ Keep at least 2 inches (5 cm) of clear space around the router
¾ Operating Temperature: 0ȭ~40ȭ (32ȯ~104ȯ)
¾ Operating Humidity: 10%~90%RH, Non-condensing
2.3 Connect Your Router
1. Connect your router as shown in the figure below. The electrical outlet shall be installed near
the device and shall be easily accessible.
- 6 -
Page 18

Archer C3200 AC3200 Wireless Tri-Band Gigabit Router
))
Note:
If your Internet connection is through an Ethernet cable from the wall instead of through a
DSL / Cable / Satellite modem, connect the Ethernet cable directly to the router’s Internet
port.
2. Verify that the following LEDs are on and stable before continuing with the configuration:
)
Note:
If the 2.4GHz, 5GHz-1, and 5GHz-2 LEDs are off, press the Wi-Fi button
for about 2
seconds, then check the LEDs again in a few seconds.
3. Connect your computer to the router.
Option 1: Wire
d
T
urn off the Wi-Fi on your computer and connect the devices as shown below.
- 7 -
Page 19

Archer C3200 AC3200 Wireless Tri-Band Gigabit Router
Option 2: Wireless
Connect wirelessly by using the SSID (network name) and Wireless Password printed on the
product label at the bottom of the router.
Option 3: Via WPS
If your computer or wireless adapter has a physical WPS button, you can use the WPS button
to quickly connect the router.
1. Press the WPS button on the router for 1 second.
2. Within 2 minutes, press the WPS button on your computer or wireless adapter for 2
seconds.
The WPS LED flashes for two minutes during the WPS process. When the WPS LED is
on, the client device has successfully connected to the router.
- 8 -
Page 20

Archer C3200 AC3200 Wireless Tri-Band Gigabit Router
Chapter 3. Log into Your Router
1. If the TCP/IP Protocol on your computer is set to the static (fixed) IP address, you need to
change it to obtain an IP address automatically.
2. Enter http://tplinkwifi.net or http://192.168.0.1
in the address bar of a web browser.
3. Use admin for both username and password, and click Login.
))
Note:
If the above screen does not pop up, it means that your Web-browser has been set to a proxy.
Go to Tools menu>Internet Options>Connections>LAN Settings, in the screen that
appears, cancel the Using Proxy checkbox, and click OK to finish it.
4. Create a new username and password for subsequent login.
- 9 -
Page 21

Archer C3200 AC3200 Wireless Tri-Band Gigabit Router
Chapter 4. Set Up Internet Connection
4.1 Quick Setup
The Quick Setup Wizard will guide you through the process to set up your router to access
the Internet.
4.1.1 Use the Quick Setup with Auto-detection
I want to: Automatically set up my router to access the Internet.
Note: If you need the IPv6 Internet connection, please refer to the section of
Manually Specify IPv6 Internet Connections.
Example:
My Internet service provider (ISP) provided me Dynamic IP as the Internet
connection type. I want to quickly configure my router for Internet connection.
How can I
do that?
1. Visit http://tplinkwifi.net
, and log in with the password you set for the router.
2. Click Quick Setup on the top of the pageˈselect your Region and Time Zone
from the drop-down list and click Next.
3. Click Auto Detect and the router will detect your connection type
automatically.
Note:
You can also choose the connection type manually. If you use DSL line and you
are only provided an account name and a password by your ISP, choose PPPoE.
If you use cable TV or fiber cable, choose Dynamic IP. If you are provided more
information such as IP address, Subnet Mask and Default Gateway, choose Static
IP. Contact your ISP if you are not sure about the Internet connection information.
- 10 -
Page 22

Archer C3200 AC3200 Wireless Tri-Band Gigabit Router
4. In this case, the router automatically detects Dynamic IP as the connection
type. Click Next.
5. Follow the instructions on the page to decide whether to clone MAC Address.
Click Next.
- 11 -
Page 23

Archer C3200 AC3200 Wireless Tri-Band Gigabit Router
6. Configure your wireless settings and click Next.
Note:
¾ You may customize your 2.4GHz/5GHz SSID and password. Once done, the
wireless connection will disconnect automatically, and you must then use the
new SSID/password to regain access to the Internet.
¾ Tick "Hide SSID" if you want to hide this wireless network name.
7. Confirm the information and click Save.
- 12 -
Page 24

Archer C3200 AC3200 Wireless Tri-Band Gigabit Router
8. Click Test Internet Connection.
I
f you successfully connect to the Internet, the screen will display as follows.
Co
mpleted!
Success! Now your computer and WiFi device can connect to the Internet!
You can connect your computer to the router's LAN port using an Ethernet cable to
join the local area network. You can also find and select the wireless network
name on your WiFi device to join the WiFi network.
- 13 -
Page 25

Archer C3200 AC3200 Wireless Tri-Band Gigabit Router
4.2 Manual Setup
Select Basic > Internet and you can check your current Internet connection settings. You can
also modify the settings according to the service information provided by your ISP.
4.2.1 Manually configure your Internet Connection Settings
I want to: View and manually modify the router's Internet connection settings.
Example:
After I finish the Quick Setup, I still cannot connect to the Internet, so I want to
check and modify the settings.
How can I
do that?
1. Visit http://tplinkwifi.net
, and log in with the password you set for the router.
2. Click Basic on the top of the page, and then click Internet on the left to enter
the setting page.
3. Select your Internet connection type from the drop-down list.
Note: If you are unsure what your connection type is, click Auto Detect. Since
different connection types need different cables and connection information, you
can also refer to the demonstrations in Step 3 to judge your connection type.
4. Follow the instructions on the page to continue the configuration. Parameters
on the figures are just used for demonstration.
¾ If you choose Dynamic IP, you need to select whether to clone the MAC
address. Dynamic IP users are usually equipped with cable TV or fiber cable.
- 14 -
Page 26

Archer C3200 AC3200 Wireless Tri-Band Gigabit Router
¾
If you choose Static IP, enter the information provided by your ISP in the
corresponding fields.
¾
If you choose PPPoE, enter the username and password provided by your
ISP. PPPoE users usually have DSL cable.
- 15 -
Page 27

Archer C3200 AC3200 Wireless Tri-Band Gigabit Router
¾ If you choose L2TP, enter the username and password and choose the
Secondary Connection provided by your ISP. Different parameters are
needed according to the Secondary Connection.
¾ If you choose PPTP, enter the username, password and choose the
Secondary Connection provided by your ISP. Different parameters are
needed according to the Secondary Connection.
- 16 -
Page 28

Archer C3200 AC3200 Wireless Tri-Band Gigabit Router
5. Click Save to make the settings take effect. To check your Internet connection,
click Network Map on the left of the page.
Note:
It may take 1-2 minutes to make the settings valid.
6. After the connection succeed, the screen will display as follows. Here we take
PPPoE as an example.
- 17 -
Page 29

Archer C3200 AC3200 Wireless Tri-Band Gigabit Router
Note:
¾ If your Internet connection type is "Bigpond Cable", please go to
"Advanced>Network>Internet".
¾ If you use Dynamic IP and PPPoE and you are provided any other
parameters that are not required on the page, please go to
"Advanced>Network>Internet" to complete the configuration.
¾ If you still cannot connect to the Internet, refer to Appendix: FAQ for further
instructions.
Completed!
Success! Now your computer and WiFi device can connect to the Internet!
You can connect your computer to the router's LAN port using an Ethernet cable to
join the local area network. You can also find and select the wireless network
name on your WiFi device to join the WiFi network.
- 18 -
Page 30

Archer C3200 AC3200 Wireless Tri-Band Gigabit Router
Chapter 5. Set up an IPv6 Internet
Connection
I want to:
Connect to IPv6 network with information provided by my ISP.
How can I
do that?
1. Visit http://tplinkwifi.net
, and log in with the password you set for the router.
2. Click Advanced > IPv6 to log into the co nf ig urati on page.
3. Enable IPv6, and select the Internet connection type provided by ISP.
Tip:
If you do not know what your Internet connection type is, contact your
ISP or judge according to already known information provided by your ISP.
- 19 -
Page 31

Archer C3200 AC3200 Wireless Tri-Band Gigabit Router
4. Fill in information as required by different connection type.
Static IP˖Fill in blanks and click Save.
Dynamic IP˖Click Advanced to have more configuration if ISP requires. Click
Save to save the settings and then click Renew to finish the configuration.
PPPoE˖
Fill in the Username and Password. Click Advanced to have more
configuration if ISP requires. Click Save
to save the settings and then click
Connect to finish the configuration.
- 20 -
Page 32

Archer C3200 AC3200 Wireless Tri-Band Gigabit Router
6to4 Tunnel˖An IPv4 Internet connection type is a prerequisite for this connection
type. (Go to ...for more information.) Click Advanced to have more configuration if
ISP requires. Click Save to save the settings and then click Connect to finish the
configuration.
5. Click Save.
6. Configure IPv6 LAN. Leave the rest of the settings as default and click
Save.
Tips: Find Help on the management interface to know more about items.
7. Click Status to check whether you succeed or not. The following figure is an
example of a successful PPPoE configuration.
- 21 -
Page 33

Archer C3200 AC3200 Wireless Tri-Band Gigabit Router
Tips: Visit FAQ if there is no Internet connection.
Completed!
Now your router has successfully connected to IPv6 Internet. Devices can
connect to the Internet wired or wirelessly.
- 22 -
Page 34

Archer C3200 AC3200 Wireless Tri-Band Gigabit Router
Chapter 6. Bandwidth Control
The Bandwidth Control feature is used to fully utilize your limit bandwidth and optimize the load
respectively. With this feature enabled, you can assign a specific minimum or maximum
bandwidth for each computer, thus minimizing the impact caused when the connection is under
heavy load.
I want to:
Use an independent bandwidth and enjoy a good Internet experience without
being affected by other users who are sharing the same router.
For example, my roommate and I share 512Kbps Upstream Bandwidth and
8Mbps Downstream Bandwidth via this router, she likes to watch live show and
play online games, which may take up much bandwidth. I don’t want to be
affected, so we agree to equally distribute the bandwidth. Our IP addresses are
192.168.1.101 and 192.168.1.110.
Tips:
To use the bandwidth control feature, you’d better set static IP Address on each
computer to be controlled o
r configure Address reservation on the router in
order to manage easily. About how to configure address reservation, please
refer to Reserve LAN IP Addresses.
How can I
do that?
1. Visit http://tplinkwifi.net, and log in with the password you set for the router.
2. Go to Advanced > Bandwidth Control page.
3. Enable Bandwidth Control.
4. Enter the Total Upstream Bandwidth and the Total Dow n s tream
Bandwidth given by your ISP. (1Mbps=1024Kbps)
5. Click Save to save the settings.
6. Click Add to add controlling rules for each computer respectively.
- 23 -
Page 35

Archer C3200 AC3200 Wireless Tri-Band Gigabit Router
¾ Add a rule for 192.168.1.101
IP Range-Enter the IP address. The field can be single IP address or IP
address range according to your demands. When you configure the single
IP address, the computer with this IP address will get independent given
bandwidth. When you configure the IP address range, all computers in the
range will share the given bandwidth.
Port Range-Keep the default settings. The port arrange of TCP protocol or
UDP protocol.
Protocol-Keep the default settings. Or you can choose the TCP protocol or
UDP protocol or both of them.
Priority-Keep the default settings. You can change the value if you want to
first guarantee the bandwidth for one computer. The smaller value has the
higher priority.
Upstream/Downstream-Enter the bandwidth according to your division.
Check to enable this entry and click OK to save the settings.
¾ Follow the steps above to add a rule for the other computer. And then you
will get the following table.
- 24 -
Page 36

Archer C3200 AC3200 Wireless Tri-Band Gigabit Router
Completed!
Now you have an independent bandwidth.
- 25 -
Page 37

Archer C3200 AC3200 Wireless Tri-Band Gigabit Router
Chapter 7. Network Security
7.1 MAC Filtering
This function exploits the uniqueness of the MAC (Medium Access Control) address, a unique
12-digit hexadecimal address (for example, D8:5D:4C:B4:46:EA) of every network device, to
determine if the device can or cannot access your wireless network.
I want to:
Prevent unauthorized users from accessing my wireless network by utilizing the
network device’s MAC address and IP address.
For example, I have a computer that is connected to my wireless network. Now,
an unknown device (an intruder) is also using my wireless network, which
affects my Internet speed. I need the following capabilities to control my wireless
network:
1. My computer is always allowed to access the wireless network.
2. The unknown device is not allowed to access the wireless network.
3. When there are guests, they can use the wireless network with my
permission.
4. I don’t need to change my network’s password.
How can I
do that?
1. Visit http://tplinkwifi.net
, and log in with the password you set for the router.
2. Go to Advanced>Wireless>MAC Filtering. Enable Wireless MAC
Filtering.
- 26 -
Page 38

Archer C3200 AC3200 Wireless Tri-Band Gigabit Router
3. Use method 1 or method 2 to configure the filtering rules.
¾ Method 1: block the unknown device (Recommended)
1) Select Block wireless access from the devices in the list below and
Click Save.
2) Select the device(s) to be blocked in the Devices Online table.
3) Click Block above the Devices Online table. The selected devices will
- 27 -
Page 39

Archer C3200 AC3200 Wireless Tri-Band Gigabit Router
be added to Devices List automatically.
¾ Method 2: allow the authorized device(s)
1) Select Allow wireless access from the devices only in the list
below and Click Save.
2) Click Add.
3) Enter the MAC Address (You can copy and paste the MAC
Address from Devices Online list if the device is connected to your
wireless network) and the Description of the allowed device.
4) Select the checkbox to enable this entry, and click OK.
Completed!
Now the intruder can no longer access your wireless network.
7.2 Access Control
I want to:
Block or allow some specific client devices to access my network (wired or
wireless) using a list of blocked devices or a list of allowed devices.
- 28 -
Page 40

Archer C3200 AC3200 Wireless Tri-Band Gigabit Router
How can I
do that?
1. Visit http://tplinkwifi.net, and log in with the password you set for the router.
2. Go to Advanced > Security > Access Control. Enable Access Control.
3. Select the Access Mode you need and click Save.
¾ In Blacklist mode, any device (wired or wireless) added to the
Devices in Blacklist will be blocked from accessing your network. It is
recommended to select this mode if you only want to block specific
devices. For specific configurations under this mode, go to Blacklist
Mode.
¾ In Whitelist mode, only devices (wired or wireless) added to the
Devices in Whitelist will be allowed to access the network. It is
recommended to select this mode if you want to grant exclusive
access to specific devices. For specific configurations under this
mode, go to Whitelist Mode.
9 Blacklist Mode
- 29 -
Page 41

Archer C3200 AC3200 Wireless Tri-Band Gigabit Router
1) Select the device(s) to be blocked.
2) Click Block. The selected device(s) will be added to Devices in
Blacklist automatically.
9 Whitelist Mode
1) Click Add to add a new entry.
2) Enter the Device Name and MAC address (You can copy and paste
the information from Devices Online list if the device is connected to
your network).
3) Click OK.
- 30 -
Page 42

Archer C3200 AC3200 Wireless Tri-Band Gigabit Router
Completed!
Now you can block or allow specific client devices to access your network
(wired or wireless) using the Blacklist or Whitelist.
7.3 IP & MAC Binding
IP & MAC Binding, namely, ARP (Address Resolution Protocol) Binding, is used to map network
device's IP address to its MAC address. This will prevent ARP Spoofing and ARP Attacks by
denying any other device other than the bound one to access the network using the bound IP
address.
I want to:
Prevent ARP Spoofing and ARP Attacks.
How can I
do that?
1. Visit http://tplinkwifi.net, and log in with the password you set for the router.
2. Go to Advanced > Security > IP & MAC Binding. Enable IP & MAC
Binding.
3. Use method 1 or method 2 to bind device (s).
¾ Method 1: bind the connected device(s)
1) Select the device to be bound in the ARP List.
- 31 -
Page 43

Archer C3200 AC3200 Wireless Tri-Band Gigabit Router
2) Click Bind to add a new binding entry.
¾ Method 2: bind the unconnected device(s)
1) Click Add to add a new entry.
2) Enter the MAC address and IP address that you want to bind.
- 32 -
Page 44

Archer C3200 AC3200 Wireless Tri-Band Gigabit Router
3) Select the checkbox to enable the entry.
4) Click OK.
Completed!
Now you don’t need to worry about ARP Spoofing and ARP Attacks.
- 33 -
Page 45

Archer C3200 AC3200 Wireless Tri-Band Gigabit Router
Chapter 8. IPTV
I want to:
Configure the Router to enable Internet Protocol Television (IPTV) Services.
For example, I already bought IPTV service, but this service can only be delivered
through the Internet. Therefore, I need to configure my router first.
How can I
do that?
1) Visit http://tplinkwifi.net
, and log in with the password you set for the router.
2) Click Advanced > Network > IPTV to open the configuration page.
3) Enable IPTV function.
4) Select the appropriate mode according to your ISP. If your ISP is not listed and
no other parameters are required, select the Bridge
mode and specify
whether each LAN port functions as the Internet supplier or IPTV supplier.
5) Select the IGMP (Internet Group Management Protocol) Proxy version, either
V2 or V3, according to your ISP.
6) Click Save.
Completed!
Configurations needed on router is done now! You may need other configurations
on your set-top box before enjoying your TV.
- 34 -
Page 46

Archer C3200 AC3200 Wireless Tri-Band Gigabit Router
Chapter 9. USB Settings
This chapter describes how to share and access USB devices connected to the router among
different clients.
The router supports most USB storage devices, such as USB external flash drives and hard
drives, and USB printers, but does not support USB 3G/4G modems.
9.1 Local Storage Sharing
I want to:
Share my USB storage devices to different users on the network.
How can I
do that?
1. Connect the USB device
Connect your USB storage device to the router’s USB port directly or via a USB
cable. Wait several seconds until the USB LED becomes solid on.
2. Ensure the USB device is identified by the router
1) Visit http://tplinkwifi.net
, and log in with the password you set for the router.
2) Select Basic > USB Settings.
3) Click Scan, then you can see the device’s information.
3. Choose the content you want to share
¾ Share the whole disk: Leave Share All enabled and you can share all
the content on the USB disk
¾ Share specific folders
˖
˖
1) Click
to disable Share All.
2) Click
add a new sharing folder.
3) According to the location of the folder, select the Volu me N a me and
Folder Path, then specify the Share Name for the sharing folder.
4) Decide the way you share the folder by ticking the boxes below:
- 35 -
Page 47

Archer C3200 AC3200 Wireless Tri-Band Gigabit Router
9 If you tick Enable Authentication, before accessing the folders you
share, clients have to type in the account name and password that you
set.
9 If you tick Enable Write Access, clients can modify the folder.
9 If you tick Enable Media Sharing enable, you can play media files on
the folders from DLNA-supported devices on your network.
5) Click OK to make the settings valid.
4. Access the USB disks you share
¾ Access from your Windows computer:
a) Press Start (
) + R on the keyboard (or select Start, then click Run)
b) Type the link \\tplinkwifi.net in the dialog box
c) Click OK
¾ Access from your Mac:
a) Select Go > Connect to Server
b) Type the link smb://tplinkwifi.net as the server address.
c) Click Connect
¾ Access from your pad:
Use a third-party app for network folders management to access from your
pad.
Completed!
Now different users on your network can access the content you share on the
USB disk.
In addition:
1. Modify the Link to the USB storage device
You can also modify the link to the USB disk by specifying the Network/Media
Server Name. For example, if you specify the Network/Media Server Name as
MyShare, you can access the USB disk by \\MyShare (smb://MyShare for Mac).
1) Visit http://tplinkwifi.net
, then log in with the password you set for the router.
2) Select Basic > USB Settings.
3) Specify the Network/Media Server Name.
- 36 -
Page 48

Archer C3200 AC3200 Wireless Tri-Band Gigabit Router
4) Click Save.
2. Set up Authentication for Security
You can also set up Authentication to prevent anonymous clients to access your
USB disks.
1) Visit http://tplinkwifi.net, then log in with the password you set for the router.
2) Select Advanced > USB Settings > Folder Sharing.
3) Specify the sharing account according to the instructions on the page.
4) Click Save.
5) Enable Authentication.
¾ If you leave Share All enable, click
to enable Authentication.
¾ If Share All is disabled, you can enable Authentication for specific folders.
- 37 -
Page 49

Archer C3200 AC3200 Wireless Tri-Band Gigabit Router
3. Detach specific volume
The router can share eight volumes at most. You can click the corresponding
to
detach the volume you do not need to share.
The figure below shows that the volume named sda1 has been detached.
Note:
¾ If you use USB hubs, make sure no more than four devices are connected to
the router.
¾ If the USB storage device requires using bundled external power, make sure
the external power has been connected.
¾ If you are using USB hard drive, please make sure its file system is FAT32 or
NTFS.
9.2 Remote Access via FTP Server
I want to:
Access to my USB disks outside my local area network.
For example:
9 Share photos and other large files with my friends without logging in to (and
paying for) a photo-sharing site or email system.
9 Get a safe backup for resources I need in a presentation.
Remove the files from my to camera’s memory card from time to time during the
journey.
How can I
do that?
Premise: Your Router Gets a Public IP
If your router is assigned by a private IP such as 192.168.x.x or 10.x.x.x, you
- 38 -
Page 50

Archer C3200 AC3200 Wireless Tri-Band Gigabit Router
cannot use this function. Follow the steps below to check the IP address of your
router:
1. Visit http://tplinkwifi.net, and log in with the password you set for the router.
2. Click Basic > Network Map on the main menu, click Internet icon to check the
IP Address of the router.
3. If the IP address is a public address, you can setup remote access via FTP
server by following the steps below:
Note: The IP address is assigned by your ISP.
Setup the FTP server through Internet
1. Connect the USB disk
Connect your USB storage device to the router’s USB port directly or via a USB
cable. Wait several seconds until the USB LED becomes solid on.
2. Enable FTP(via Internet):
1) Visit http://tplinkwifi.net, then log in with the password you set for the router.
2) Select Advanced > USB Settings > Folder Sharing. Tick the box to enable
the feature, then click Save.
Note: On the page, you can get to know and the link of FTP(via Internet). If the
Access Method of FTP
is enabled, network users can access the USB disk
connected to the router with the link of FTP; if the Access Method of FTP(via
Internet) is enable, any user with Internet connection can access the USB disk
with the link of FTP(via Internet). It is not suggested that you change the Port.
3. Specify the sharing account
To specify the sharing account, choose Use Default Account or Use New
Account for the access to the USB disk. Click Save.
4. Choose the content to share and enable Authentication
- 39 -
Page 51

Archer C3200 AC3200 Wireless Tri-Band Gigabit Router
You can choose the content to share as needed and setup Authentication for data
security by following the steps below:
¾ If you want to share the whole disk, leave Share All enabled, then click
beside Enable Authentication.
¾ If you do not want to share all the content on the USB disk:
1) Disable Share All by clicking
.
2) Click
to add an entry for the folder you want to share.
3) Fill necessary information and remember to enable Authentication for
specific folders by ticking the box.
9 If you tick Enable Write Access, clients can modify the folder.
9 If you tick Enable Media Sharing enable, you can play media files on the
folders from DLNA-supported devices on your network.
4) Click Save.
Access your USB disks through the Internet
9 Access from your Windows computer:
a) Press Start (
) + R on the keyboard (or select Start > Run)
- 40 -
Page 52

Archer C3200 AC3200 Wireless Tri-Band Gigabit Router
b) Type ftp://IP address or domain name of the router (e.g.: ftp://59.40.2.243)
in the dialog box and click OK
c) Type the account name and password you just set for the router.
9 Access from your Mac:
a) Select Go > Connect to Server
b) Type ftp://IP address or domain name of the router (e.g.: ftp://59.40.2.243
)
as the server address and click Connect
c) Type the account name and password you just set for the router.
9 Access from your pad:
Use a third-party app for network files management to access.
Note:
To setup a domain name for your router, refer to the chapter of Dynamic DNS.
Completed!
Now you or your friend can access the folders you share with any computer or pad
with Internet connection.
In addition:
If the Port is not 21, you have to type it when you access the USB disks through
the Internet. For example, if you set the domain name as MyDomainName.com,
and the Port as 2048, the link should be ftp://MyDomainName.com:2048.
Note:
z If you use USB hubs, make sure no more than four devices are connected to
the router.
z If the USB storage device requires using bundled external power, make sure
the external power has been connected.
z If you are using USB hard drive, please make sure its file system is FAT32 or
NTFS.
9.3 Media Sharing
I want to:
View photos, play music and watch movies stored on the USB disks directly
from your computer and other DLNA-supported devices.
I want to
know:
Do I have DLNA-supported devices?
Your computer supports DLNA. Your pad can be DLNA-supported with
appropriate apps. You may have other DLNA-supported devices at home,
such as TVs, DVD and Blu-ray players, games consoles, digital media
players, photo frames, cameras and more. Be specific, your Xbox and PS2/3.
How can I
do that?
1. Visit http://tplinkwifi.net, and log in with the password you set for the router.
- 41 -
Page 53

Archer C3200 AC3200 Wireless Tri-Band Gigabit Router
2. Select Advanced > USB Settings > Folder Sharing.
3. Focus on the section of Sharing Settings. Tick the check box to enable the
feature of Media Server. Click Save.
4. Focus on the section of Folder Sharing.
If the feature of Share All is enabled, all media files on your USB disks are
shared. If you disable Share All, you can tick the box to Enable Media
Sharing for specific folders as shown below:
9 If you tick Enable Authentication, before accessing the folders you
share, clients have to type in the account name and password that
you set.
9 If you tick Enable Write Access, clients can modify the folder.
Completed!
Now all DLNA-supported devices connected to the router can detect the
media files on the USB disks you share:
For example:
Enjoy Media Sharing from Windows Media Player of Windows computers:
- 42 -
Page 54

Archer C3200 AC3200 Wireless Tri-Band Gigabit Router
1) Open the Windows Media Player.
2) Click the media server name under the list of Other Libraries.
3) You can directly view photos, play music and watch movies that you share
from the USB disks.
Note: Windows system is usually equipped with Windows Media Player.
9.4 Printer Sharing
I want to:
Different computers on the same network share a print.
How can I
do that?
Step 1 Connect the Printer
Cable the printer to the USB port with the USB cable.
Step 2 Enable the Print Server
1. Visit http://tplinkwifi.net
, and log in with the password you set for the router.
- 43 -
Page 55

Archer C3200 AC3200 Wireless Tri-Band Gigabit Router
2. Click Basic > USB Settings > Print Server
3. Make sure the Print Server is enabled and the printer is detected by the router.
Note: You can check Printer Compatibility List to verify whether your printer is
supported by the Router. Printers unlisted may be incompatible with the router. To
get the list, visit http://www.tp-link.com/app/usb/
.
Step 3 Install the Driver of the Printer
You should install the driver of the printer on each computer that needs printer
service.
If you do not have the driver, contact the printer manufacturer.
Step 4 Install the TP-LINK USB Printer Controller Utility
Download and Install the TP-LINK USB Printer Controller Utility on each computer
that needs printer service. You can get the utility from this page
http://www.tp-link.com/app/usb/.
Note: PC Utility is for Windows computer and Mac Utility is for Mac computer.
- 44 -
Page 56

Archer C3200 AC3200 Wireless Tri-Band Gigabit Router
Step 5 Set up the Printer as Auto-Connect Printer.
1. Double-click the icon
on your desktop to launch the USB Printer
Controller.
2. Highlight the printer you want to share.
Windows Mac
3. Click the Auto-Connect for printing tab to pull down a list, then select Set
Auto-Connect Printer.
Windows
- 45 -
Page 57

Archer C3200 AC3200 Wireless Tri-Band Gigabit Router
Mac
4. Select the name of the printer you want to share, and then click Apply.
Windows
- 46 -
Page 58

Archer C3200 AC3200 Wireless Tri-Band Gigabit Router
Mac
Completed!
After successful setting, you will see the printer marked as Auto-Connect Printer.
Then you can print with this printer
Windows
Mac
- 47 -
Page 59

Archer C3200 AC3200 Wireless Tri-Band Gigabit Router
In addition:
Scan with the TP-LINK USB Printer Controller:
The Print Server can also allow different clients to share the scan feature of MFPs
(Multi-Function Printers). To scan with TP-LINK USB Printer Controller,
right-click the printer and then select Network Scanner. Then, a scanning window
will pop up. Finish the scanning process following instructions of the window.
- 48 -
Page 60

Archer C3200 AC3200 Wireless Tri-Band Gigabit Router
Chapter 10. Parental Controls
This function allows you to block inappropriate, explicit and malicious websites; restrict
access by certain times of day (for example, client devices can only visit www.tp-link.com
during office hours); and at the same time it protects every device on your home network
against malware and phishing through one central control point.
I want to:
Control what types of websites my children or other home network users can
visit and even the times of day they are allowed to access the Internet.
For example, I want to allow my children's devices (e.g. a computer or a tablet)
to access only the following websites, www.tp-link.com and Wikipedia.org, from
18:00 (6PM) to 22:00 (10PM) on weekdays and not other times.
How can I
do that?
1. Visit http://tplinkwifi.net
, and log in with the password you set for the router.
2. Go to Basic or Advanced > Parental Controls. Enable Parental Controls.
3. Click Add to add a restriction entry
- 49 -
Page 61

Archer C3200 AC3200 Wireless Tri-Band Gigabit Router
4. Click View Existing Devices, and click to select the device to be
controlled in the new window. Or, enter the Device Name and MAC
Address manually.
5. Click the
icon to set the Internet Access Time. Drag the cursor over the
appropriate cell(s) and click OK.
Note: To reset the Internet Access Time, click Reset.
6. Enter the Description. Select the checkbox to enable this entry and click
OK.
- 50 -
Page 62

Archer C3200 AC3200 Wireless Tri-Band Gigabit Router
¾ Specify the Content Restriction
7. Select the restriction mode.
¾ In Blacklist mode, the controlled devices cannot access any websites
containing the specified keywords during the Internet Access Time
period.
¾ In Whitelist mode, the controlled devices can only access websites
containing the specified keywords during the Internet Access Time
period.
8. Click Add a new keyword.
You can add up to 200 keywords for both Blacklist and Whitelist. Below are
some sample entries to allow access.
A. Enter a web address (e.g. www.tp-link.com) or a web address keyword
(e.g. wikipedia) to only allow or block access to the websites containing
that keyword.
B. Specify the domain suffix (eg. .edu or .org) to allow access only to the
websites with that suffix.
C. If you wish to block all Internet browsing access, do not add any
keyword to the Whitelist.
9. Enter a keyword or a website and click Save.
Completed!
Now you can control your children’s Internet access according to your needs.
- 51 -
Page 63

Archer C3200 AC3200 Wireless Tri-Band Gigabit Router
Chapter 11. Guest Network
This function allows you to provide Wi-Fi access for guests without disclosing your main
network. When you have guests in your house, apartment, or workplace, you can create a
guest network for them. In addition, you can limit the network authorities for guests to ensure
network security and privacy.
11.1 Create a Network for Guests
I want to:
Provide Wi-Fi access for guests without disclosing my main network.
How can I do
that?
1. Visit http://tplinkwifi.net
, and log in with the password you set for the router.
2. Go to AdvancedGuest Network.
3. Enable a guest network (2.4GHz, 5GHz-1, or 5GHz), and set the network
SSID and password.
- 52 -
Page 64

Archer C3200 AC3200 Wireless Tri-Band Gigabit Router
11.2 Limit the Network Authorities for Guests
I want to:
Limit the network authorities and bandwidth for guests to ensure network
security and privacy.
How can I do
that?
1. Visit http://tplinkwifi.net
, and log in with the password you set for the
router.
1. Go to AdvancedGuest Network.
2. Limit the network authorities and bandwidth according to your needs.
¾ Allow guests to see each other
Select this checkbox to allow the clients in your guest network to access
Note:
1. If you select Hide SSID, your guests and other people need to
manually input this SSID for Wi-Fi access.
2. If you select No Security, your guests and other people don’t need to
enter a password for Wi-Fi access.
4. Click Save.
Completed!
Now your guests can access your guest network using the SSID and password
you set.
Tips:
To view guest network information, go to AdvancedStatus and click 2.4G,
5G-1 or 5G-2 in the Guest Network section.
- 53 -
Page 65

Archer C3200 AC3200 Wireless Tri-Band Gigabit Router
each other.
¾ Allow guests to access my local network
Select this checkbox to allow the clients in your guest network to access
your local network, not just Internet access.
3. Click Save.
Completed!
Now users in your guest network can enjoy only the network authorities you
assigned.
Tips:
To view guest network information, go to AdvancedStatus and click 2.4G,
5G-1 or 5G-2 in the Guest Network section.
- 54 -
Page 66

Archer C3200 AC3200 Wireless Tri-Band Gigabit Router
Chapter 12. NAT Forwarding
Router’s Network Address Translation (NAT) function protects devices in the local network by
hiding the IP address of each device and use the same public IP address to communicate on the
Internet. But it also brings about the problem that external host cannot initiatively communicate
with the specified device in the local network.
With NAT forwarding the router can penetrate the isolation of NAT and external devices on the
Internet can initiatively communicate with the devices in the local network, thus to realize some
special demands.
TP-LINK router supports four NAT forwarding rules. If two or more rules are set, the priority of
implementation from high to low is Virtual Servers, Port Triggering, UPNP and DMZ.
12.1 Share Local Website on the Internet
I want to:
Share the personal website I’ve built in my home PC with my friends through the
Internet.
For example: The personal website has been built in my home PC. The PC is
connected to the router with the WAN IP address 218.18.232.154. I hope that
my friends on the Internet can visit my website in some way.
How can I
do that?
Tip: Two methods are introduced in this section. “Method 1 Though Virtual
Servers” is relatively more complex to configure but with higher security while
“Method 2 Through DMZ” is easier to configure but with lower security. Please
choose the proper method in accordance with your actual need.
Method 1 Through Virtual Server
1. Check to see the IP address of your PC. Take 192.168.0.100 as an
example. The port of HTTP service is 80.
Tip: The port varies in different service. Please verify the IP address of the
PC as the server and its internal service port. It is recommended to assign a
static IP to the PC. E.g., 192.168.0.100.
2. Visit http://tplinkwifi.net, and log in with the username and password you set
for the router.
- 55 -
Page 67

Archer C3200 AC3200 Wireless Tri-Band Gigabit Router
3. Click Advanced ->NAT Forwarding -> Virtual Servers to enter the
configuration page of Virtual Servers.
4. Click Add and then set the rules of Virtual Server.
You can select one of the two modes to configure: automatic configuration
and manual configuration. The former one is recommended in this
environment.
Mode 1: Automatic Configuration
The Service Type field lists all the common service type. Please click View
Existing Services, and select HTTP in the prompt page. The external port,
internal port and protocol will be automatically filled with contents. Fill in
PC’s IP address 192.168.0.100 in the IP Address field.
Tip:
1. It is recommended to keep the default settings of Internal Port and
Protocol.
2. When HTTP is selected, External Port will be filled with default port 80
automatically. It is recommended to change the port number to 8000 or
8080, etc.
Mode 2: Manual Configuration
If your service is not listed in the Service Type field, please fill in the
- 56 -
Page 68

Archer C3200 AC3200 Wireless Tri-Band Gigabit Router
parameters manually. Verify the port that the service type should use. The
following steps are based on the environment mentioned at the beginning.
z External Port is provided by router for Internet users. They visit the
website through the WAN IP address and the external port. This field
can be filled with a single port or a ports range. Here we use 8000.
z Internal Port is used by the server PC. The data received by External
Port will be forwarded to Internal Port. You can leave it blank if the
Internal Port is the same as the External Port. Here we use 80.
z Enter the server PC’s IP Address into the IP Address field. Here we use
192.168.0.100.
z Protocol is the protocol used by the virtual service. Please select ALL if
you aren’t clear which protocol to be used. Here we use TCP.
5. Click OK to complete the settings.
Method 2 Through DMZ
Tip: If you are not sure which specific port to open, you can use DMZ. When
DMZ is enabled, the DMZ host is exposed to the Internet, which may bring some
potential safety hazard. If DMZ is not in use, please disable it in time.
1. Verify the host PC’s IP address. For example, 192.168.0.100.
Tip: It is recommended to assign a static IP to your PC.
2. Visit http://tplinkwifi.net
, and log in with the username and password you set
for the router.
3. Click Advanced ->NAT Forwarding -> DMZ to open the DMZ configuration
page.
- 57 -
Page 69

Archer C3200 AC3200 Wireless Tri-Band Gigabit Router
4. Select the Enable DMZ checkbox.
5. Enter the PC’s IP address 192.168.0.100 into the DMZ Host IP Address
field.
6. Click Save.
Completed!
1. If Method 1 Virtual Server is used, the Internet users can enter http:// WAN
IP: External Port (in this example: http:// 218.18.232.154: 8000) to visit your
personal website.
2. If Method 2 DMZ is used, the Internet users can enter http:// WAN IP (in this
example: http:// 218.18.232.154) to visit your personal website.
Tip: Please make sure your WAN IP is a public IP address. As the WAN IP
address is dynamic, you are suggested to register a domain name for your
router, then visit the website using http:// domain name: External Port.
12.2 Share Local Resources on the Internet
I want to:
Make my office PC visit and download the files and resources in the home PC
through the Internet.
For example: The home PC is connected to the home router, whose WAN IP
address is 218.18.232.154. The FTP server has been built in the home PC.
Other PCs in the LAN can visit and download the files in the FTP server. Now I
want my office PC connected to the Internet to get the files and resources from
the FTP server.
How can I
do that?
Tip: Two methods are introduced in this section. “Method 1 Though Virtual
Servers” is relatively more complex to configure but with higher security while
“Method 2 Through DMZ” is easier to configure but with lower security. Please
choose the proper method in accordance with your actual need.
Method 1 Through Virtual Server
1. Check to see the IP address of your PC. Take 192.168.0.100 as an
example. The port of FTP service is 21.
Tip: The port varies in different service. Please verify the IP address of the
- 58 -
Page 70

Archer C3200 AC3200 Wireless Tri-Band Gigabit Router
PC as the server and its internal service port. It is recommended to assign a
static IP to the server. E.g., 192.168.0.100.
2. Visit http://tplinkwifi.net, and log in with the username and password you set
for the router.
3. Click Advanced ->NAT Forwarding -> Virtual Servers to enter the
configuration page of Virtual Servers.
4. Configure the Virtual Server rules automatically.
Select FTP in the Service Type list, the parameters will be automatically
filled in the field.
z External Port: the external port of FTP is 21.
z Internal Port: the internal port of FTP is 21.
z IP Address: enter the PC’s IP address into this field manually:
192.168.0.100.
z Protocol: the protocol used in FTP is TCP.
Tip: If you want to configure manually, please refer to “Sharing Personal
- 59 -
Page 71

Archer C3200 AC3200 Wireless Tri-Band Gigabit Router
Website in Local Network to the Internet -> Method 1 Through Virtual
Server ->Mode 2 Manual Configuration”.
5. Click OK.
Method 2 Through DMZ
Tip: If you are not sure which specific port to open, you can use DMZ. When
DMZ is enabled, the DMZ host is exposed to the Internet, which may bring some
potential safety hazard. If DMZ is not in use, please disable it in time.
1. Verify the PC’s IP address. For example, 192.168.0.100.
Tip: It is recommended to assign a static IP to your PC.
2. Visit http://tplinkwifi.net
, and log in with the username and password you set
for the router.
3. Click Advanced ->NAT Forwarding -> DMZ to open the DMZ configuration
page.
4. Select the Enable DMZ checkbox.
5. Enter the PC’s IP address 192.168.0.100 into the DMZ Host IP Address
field.
6. Click Save to complete the configuration.
Completed!
1. If Method 1 Virtual Server is used, the Internet users can enter http:// WAN
IP: External Port (in this example: http:// 218.18.232.154: 8000) to visit your
personal website.
- 60 -
Page 72

Archer C3200 AC3200 Wireless Tri-Band Gigabit Router
2. If Method 2 DMZ is used, the Internet users can enter http:// WAN IP (in this
example: http:// 218.18.232.154) to visit your personal website.
Tip: Please make sure your WAN IP is a public IP address. As the WAN IP
address is dynamic, you are suggested to register a domain name for your
router, then visit the website using http:// domain name: External Port.
12.3 Make Online Game Free from Port Restriction
I want to:
Make the home PC join the Internet online game without port restriction.
For example: Because of some port restriction, when playing the online games,
users can login normally but cannot join a team with other players. To solve this
problem, you can try to set your PC as a DMZ with all ports opened.
How can I
do that?
Tip: If you are not sure which specific port to open, you can use DMZ. When DMZ
is enabled, the DMZ host is exposed to the Internet, which may bring some
potential safety hazard. If DMZ is not in use, please disable it in time.
1. Assign you PC a static IP address, for example 192.168.0.100.
2. Visit http://tplinkwifi.net
, and log in with the username and password you set
for the router.
3. Click Advanced ->NAT Forwarding -> DMZ to open the DMZ configuration
page.
4. Select the Enable DMZ checkbox.
5. Enter the PC’s IP address 192.168.0.100 into the DMZ Host IP Address field.
6. Click Save.
- 61 -
Page 73

Archer C3200 AC3200 Wireless Tri-Band Gigabit Router
Completed!
The configuration is completed. You’ve set your PC to a DMZ host and now you
can make a team to game with other players.
12.4 Make Xbox Online Games Run Smoothly with UPnP
UPnP (Universal Plug and Play) protocol allows the applications or host devices to automatically
find the front- end NAT device and send request to it to open the corresponding ports. With UPnP
enabled, the applications or host devices in the both sides of NAT device can freely communicate
with each other realizing the seamless connection of the network. You may need to enable the
UPnP function if you want to play online games with many friends, realize point-to point
connection, use real-time communication (such as Internet telephony or telephone conference) or
have remote assistance, etc.
Tip:
1. UPnP is enabled by default in this router.
2. Only the application supporting UPnP protocol can use this function.
3. UPnP function needs the support of operating system (e.g. Windows XP/ Windows Vista/
Windows 7/ Windows 8, etc. Some of operating system need to install the UPnP
components).
For example: When you connect your Xbox to the router which has connected to the Internet to
play online games, UPnP will send request to the router to open the corresponding ports allowing
the following data penetrating the NAT to transmit. Therefore, you can play Xbox online games
smoothly.
Internet
WANLANXBO X
If necessary, you can change the status of UPnP as follows.
1. Visit http://tplinkwifi.net
, and log in with the username and password you set for
the router.
- 62 -
Page 74

Archer C3200 AC3200 Wireless Tri-Band Gigabit Router
2. Click Advanced ->NAT Forwarding -> UPnP to open the UPnP configuration
page.
3. Toggle on or off according to your needs.
12.5 More Applications
Virtual Servers
In the configuration page of Virtual Server, you can find some applications in the Service Type.
Click the corresponding option to use the application and refer to the previous examples to
complete the configuration.
Tip: If you want to provide multiple Virtual Server services to the Internet users, please avoid the
port conflict when you add several Virtual Server rules.
z DNS
Build DNS server in the local network to provide domain name resolution service. The DNS server
is composed of the domain name resolver and the domain name server. It saves all the hosts’
domain names and their corresponding IP addresses and can convert the domain name into its IP
address.
z POP3
Build POP3 mail server in the local network to provide mail services. POP3 is mainly used in
receiving mails. When the receiver is offline, the mail server will store these emails until the
- 63 -
Page 75

Archer C3200 AC3200 Wireless Tri-Band Gigabit Router
receiver check and get these emails.
z SMTP
Build the SMTP mail server in the local network to provide mail services. SMTP is used to send
and transfer the emails.
z TELNET
Build the Telnet server in the local network to enable the remote visit function of the PC. It allow
the users to log in to the remote host system in local PC.
Port Triggering
Port Triggering is mainly used in Internet games, Internet telephony, Video player, etc.
Tip:
1 According to the need, you can add several rules of Port Triggering in the router.
2. The open ports of different rules should not overlap.
3. One rule can be used only by one host at one time. Other hosts’ request will be rejected.
4. At any time, one host can only use one Port Triggering rule.
z Multiple Xboxes playing games at the same time
Set the Port Triggering rules to let the Xboxes connect to the router and work normally on the
Internet.
z MSN Gaming Zone
z Dialpad
Dialpad is a kind of toll-free Internet Telephone. After setting the Port Triggering rules, you can
use Dialpad to call your friends all over the world.
z Quick Time 4
Quick Time 4 is the media player of Apple which can be used to play the video of MOV format.
- 64 -
Page 76

Archer C3200 AC3200 Wireless Tri-Band Gigabit Router
DMZ
z Not clear about the port number
If you are not sure about which specific port to open for some special applications, such as IP
Camera, database software, etc. you can set your PC as a DMZ host.
- 65 -
Page 77

Archer C3200 AC3200 Wireless Tri-Band Gigabit Router
Chapter 13. Customize Your Network
Settings
This chapter introduces how to change the default settings or adjust the basic configuration of the
router using the web-based management page.
13.1 LAN Settings
13.1.1 Change the LAN IP address
The router is preset with a default LAN IP 192.168.1.1, which you can use to log in to its
web-based management page. The LAN IP address together with the Subnet Mask also defines
the subnet that the connected devices are on. If the IP address conflicts with another device on
your local network or your network requires a specific IP subnet, you can change it.
1. Visit http://tplinkwifi.net
, and log in with the password you set for the router.
2. Go to Advanced > Network > LAN page.
3. Type in a new IP Address appropriate to your needs.
4. Select the Subnet Mask from the drop-down list. The subnet mask together with the IP
address identifies the your local IP subnet.
5. Keep IGMP Snooping as enabled by default.
IGMP Snooping is the process of listening to IGMP (Internet Group Management Protocol)
network traffic. The function prevents hosts on a local network from receiving traffic for a
multicast group they have not explicitly joined.
6. You can configure the router’s second IP Address and Subnet Mask for LAN Interface
through which you can also access the web management page.
7. Leave the rest of the default settings as they are.
8. Click Save to make the settings effective.
13.1.2 Use the Router as a DHCP Server
You can configure the router to act as a DHCP server to assign IP addresses to its clients. To use
- 66 -
Page 78

Archer C3200 AC3200 Wireless Tri-Band Gigabit Router
the DHCP server function of the router, you must configure all computers on the LAN as "Obtain
an IP Address automatically".
1. Visit http://tplinkwifi.net
, and log in with the password you set for the router.
2. Go to Advanced > Network > DHCP Server page and select IPv4.
3. Enable DHCP and select DHCP Server.
4. Specify the IP Address Pool, the start address and end address must be on the same subnet
with LAN IP. The router will assign addresses within this specified range to its clients. It is
from 192.168.1.100 to 192.168.1.199 by default.
5. Enter a value for the Address Lease Time.
The Address Lease Time is the amount of time in which a DHCP client can lease its current
dynamic IP address assigned by the router. After the dynamic IP address expires, the user
will be automatically assigned a new dynamic IP address. The default is 1440 minutes.
6. Click Save to make the settings effective.
Note:
1. The router can be configured to work as a DHCP Relay. A DHCP relay is a computer that
forwards DHCP data between computers that request IP addresses and the DHCP server
that assigns the addresses. Each of the device's interfaces can be configured as a DHCP
relay. If it is enabled, the DHCP requests from local PCs will forward to the DHCP server that
runs on WAN side.
- 67 -
Page 79

Archer C3200 AC3200 Wireless Tri-Band Gigabit Router
2. You can also appoint IP addresses within a specified range to devices of the same type by
using Condition Pool feature. For example, you can assign IP addresses within the range
(192.168.1.50 to192.168.1.80) to Camera devices, thus facilitating the network management.
Enable DHCP feature and configure the parameters according to your actual situation on
Advanced > Network > LAN Settings page.
13.1.3 Reserve LAN IP Addresses
You can view and add a reserved address for a client. When you specify an IP address for a
device on the LAN, that device will always receive the same IP address each time when it
accesses the DHCP server. If there are some devices in the LAN that require permanent IP
addresses, please configure Address Reservation on the router for the purpose.
1. Visit http://tplinkwifi.net
, and log in with the password you set for the router.
2. Go to Advanced > Network > DHCP Server.
3. Scroll down to locate the Address Reservation table and click
to add an address
reservation entry for your device.
4. Enter the MAC address of the device for which you want to reserve IP address.
5. Specify the IP address which will be reserved by the router.
6. Check to Enable this entry and click OK to make the settings effective.
- 68 -
Page 80

Archer C3200 AC3200 Wireless Tri-Band Gigabit Router
13.2 Wireless Settings
13.2.1 Specify Basic Wireless Settings
The router’s wireless network name (SSID) and password, and security option are preset in the
factory. The preset SSID and password can be found on the product label. You can customize the
wireless settings according to your needs.
Open a web browser and log in to the web-based management page. Go to Basic > Wireless
page.
To enable or disable the wireless function:
Enable the Wireless Network 2.4GHz or 5GHz. If you don’t want to use the wireless function, just
uncheck the box. If you disable the wireless function, all the wireless settings won’t be effective.
To change the wireless network name (SSID) and wireless password:
Enter a new SSID using up to 32 characters. The default SSID is TP-LINK_XXXX and the value is
case-sensitive.
Note: If you use a wireless device to change the wireless settings, you will be disconnected when
the settings are effective. Please write down the new SSID and password for future use.
To hide SSID:
Select Hide SSID, and your SSID will not broadcast. Your SSID won’t display when you scan for
local wireless network list on your wireless device and you need to manually join the network.
- 69 -
Page 81

Archer C3200 AC3200 Wireless Tri-Band Gigabit Router
To change the mode or channel:
Go to Advanced > Wireless >Wireless Settings page and select the wireless network 2.4GHz
or 5GHz.
¾ Mode: Select the desired mode.
802.11n only: Select only if all of your wireless clients are 802.11n devices.
802.11gn mixed: Select if you are using both 802.11b and 802.11g wireless clients.
802.11bgn mixed: Select if you are using a mix of 802.11b, 11g, and 11n wireless clients.
Note: When 802.11n only mode is selected, only 802.11n wireless stations can connect to the
router. It is strongly recommended that you select 802.11bgn mixed, and all of 802.11b, 802.11g,
and 802.11n wireless stations can connect to the router.
802.11ac/n mixed (5Ghz) - Select if you are using both 802.11ac and 802.11n wireless
clients.
802.1111a/n/ac mixed (5Ghz) - Select if you are using a mix of 802.11ac, 802.11n and
802.11ac wireless clients. It is strongly recommended that you select 11a/n/ac mixed.
¾ Channel: Select the channel you want to use from the drop-down list. This field
determines which operating frequency will be used. It is not necessary to change the
wireless channel unless you notice interference problems with another nearby access
point.
¾ Channel Width: Select the channel width from the drop-down list. The default setting is
automatic, which can adjust the channel width for your clients automatically.
To change the security option
˖
˖
1. Go to Advanced > Wireless >Wireless Settings page.
2. Select the wireless network 2.4GHz or 5GHz.
3. Select an option from the Security dropdown list. The router provides four options, None,
WPA/WPA2 Personal (Recommended), WPA/WPA2 Enterprise, WEP. WPA2 uses the
newest standard and the security level is the highest. We recommend you don’t change the
default settings unless necessary.
13.2.2 Use WPS for Wireless Connection
You can use WPS feature to add a new wireless device to an existing network quickly.
1. Visit http://tplinkwifi.net, and log in with the password you set for the router.
2. Go to Advanced > Wireless >WPS page.
3. Select the wireless network 2.4GHz or 5GHz according to your wireless client.
- 70 -
Page 82

Archer C3200 AC3200 Wireless Tri-Band Gigabit Router
4. Add a new device:
If the wireless adapter supports Wi-Fi Protected Setup (WPS), you can establish a wireless
connection between the wireless adapter and the router using either Push Button Configuration
(PBC) method or PIN method.
Option 1 Use the Wi-Fi Protected Setup Button
Use this method if your client device has a Wi-Fi Protected Setup button.
Step 1: Press the WPS button on the front panel of the router for 1 second, as shown in the
following figure.
You can also keep the default WPS Status as Enabled, select the Push Button radio button
and click Connect. (Shown in the following figure)
- 71 -
Page 83

Archer C3200 AC3200 Wireless Tri-Band Gigabit Router
Step 2: Press the WPS button of the client device directly.
Step 3: The WPS LED flashes for two minutes during the WPS process.
Step 4: When the WPS LED is on, the client device has successfully connected to the router.
Refer to your client device or its documentation for further instructions.
Option 2: Enter the client device’s PIN on the router
Use this method if your client device has a Wi-Fi Protected Setup PIN number.
1. Keep the default WPS status as Enabled and select the PIN Code radio button.
2. Enter the PIN from the client device in the field on the above WPS screen. Then click
Connect button.
3. “Connect successfully” will appear on the above screen, which means the client device has
successfully connected to the router.
Option 3: Enter the router’s PIN on your client device
Use this method if your client device asks for the router’s PIN.
1. On the client device, enter the PIN number listed on the router’s Wi-Fi Protected Setup
screen. (It is also labeled on the bottom of the router.)
- 72 -
Page 84

Archer C3200 AC3200 Wireless Tri-Band Gigabit Router
2. The WPS LED flashes for two minutes during the WPS process.
3. When the WPS LED is on, the client device has successfully connected to the router.
Refer back to your client device or its documentation for further instructions.
Note:
1. The WPS LED on the router will light green for five minutes if the device has been successfully
added to the network.
2. The WPS function cannot be configured if the wireless function of the router is disabled.
Please make sure the wireless function is enabled before configuring the WPS.
13.2.3 Schedule Your Wireless Function
I want to:
Automatically turn off my wireless network (both 2.4GHz and 5GHz) at
times when I do not need the wireless connection.
For example, I want to turn it off on the weekdays when I leave home
for work. My work time is from 8:00am to 5:00pm from Monday to
Friday.
How can I
do that?
1. Visit http://tplinkwifi.net, and log in with the password you set for
the router.
2. Go to Advanced > Wireless > Wireless Schedule page.
3. Select the 2.4GHz wireless network to configure. Toggle on the
button to enable the Wireless Schedule feature.
4. Set the time. Drag the mouse to cover the time area and click Save
to make the settings effective. The selected time will be in green.
- 73 -
Page 85

Archer C3200 AC3200 Wireless Tri-Band Gigabit Router
5. Repeat steps 3 and 4 to set time for 5GHz wireless network.
Completed!
Now your wireless network will be automatically turned off from 8:00
am to 5:00 pm from Monday to Friday.
Tips:
1. If you just set time for one wireless band, the other wireless band is
still always on, so set time for both of the two bands to schedule
your whole wireless network.
2. The wireless LED (2.4GHz
, 5GHz ) will turn off if the
corresponding wireless network is disabled.
3. The wireless network will be automatically turned on after the time
period you set.
13.2.4 View Information
To view the detailed wireless network settings:
1. Open a web browser and log in to the web-based management page.
2. Go to Advanced > Status page. You can see the Wireless box.
3. Select 2.4G, 5G-1, or 5G-2 to view the wireless details.
- 74 -
Page 86

Archer C3200 AC3200 Wireless Tri-Band Gigabit Router
Tips: You can also see the wrieless details by clicking the router icon on Basic> Network Map.
To view the detailed information of the connected wireless clients:
1. Visit http://tplinkwifi.net
, and log in with the password you set for the router.
2. Go to Advanced > Wireless > Statistics page.
3. You can view the detailed information of the wireless clients, including its connected wireless
band and security option as well as the packets transmitted.
Tips: You can also see the wrieless details by clicking the wireless clients icon on Basic>
Network Map.
13.3 Register a Domain Name for Your Router
To manage the router remotely, the remote device needs to log in to http://Router’s WAN IP:port
number, which requires the remote user to know the router’s WAN IP. The ISP (Internet Service
Provider), however, usually assigns a dynamic IP to the router. When the WAN IP changes, the
user needs to reconfirm the related information. The Dynamic DNS (DDNS) links the router’s
dynamic WAN IP with a domain name, allows the remote device to log in with the domain name
and saves the trouble of reconfirming.
I want to:
Manage the router remotely with Remote PC, whose authority to
manage the router has been enabled, by logging in with the domain
name.
- 75 -
Page 87

Archer C3200 AC3200 Wireless Tri-Band Gigabit Router
For example:
Note:
9 DDNS does not work if the ISP assigns a private WAN IP address
(such as 192.168.0.x) to the router.
9 To use this function, you have to have a NO-IP account or a
Dyndns account.
How can I
do that?
1. Visit http://tplinkwifi.net, and log in with the password you set for
the router.
2. Go to Advanced>Network>Dynamic DNS.
3. Select a DDNS service provider (NO-IP or Dyndns).
Note: If you don’t have a DDNS account, select a service provider
and click Go to register to register.
4. Enter the username, password and domain name of the account
(such as lisadns.ddns.net).
5. Click Login and Save.
Completed!
Now on the PC that can manage the router remotely, log in to
http://domain name:port number (such as lisa.ddns.net:1024) to
manage the router.
13.4 Interface Grouping
I want to:
Divide my devices connected to the router into different groups and disallow
- 76 -
Page 88

Archer C3200 AC3200 Wireless Tri-Band Gigabit Router
devices' cross-group communication.
For example, in my house, devices connected to LAN1 and LAN3 are for work,
while others for entertainment. I want to isolate working devices from others while
keep all devices' access to the Internet.
How can I
do that?
1. Visit http://tplinkwifi.net
, and log in with the password you set for the router.
2. Click Advanced > Network > Interface Grouping to open the configuration
page where some interfaces can be grouped together.
3. Click to Add a new group.
- 77 -
Page 89

Archer C3200 AC3200 Wireless Tri-Band Gigabit Router
4. Name the group.
5. Check the boxes of LAN1 and LAN3 in Available LAN. Here Wi-Fi 2.4G
network and Wi-Fi 5G network are viewed as a LAN interface respectively.
6. Click Enable Group Isolation to isolate working devices and disallow other
devices from communicating with them.
7. Click OK to save the settings.
Completed!
Now your working devices connected to LAN1 and LAN3 are in an isolated group!
In addition:
VLAN function is enabled by default. You cannot disable it when IPTV is enabled.
13.5 Create Static Routes
Static routing is a form of routing that is configured manually by a network administrator or a user
by adding entries into a routing table. The manually-configured routing information guides the
router in forwarding data packets to the specific destination.
I want to:
Visit multiple networks and multiple servers at the same time.
For example, in a small office, my PC can surf the Internet, but I also
want to visit my company’s network. Now I have a switch and another
router. I connect the devices as shown in the following figure so that
the physical connection between my PC and my company’s server is
- 78 -
Page 90

Archer C3200 AC3200 Wireless Tri-Band Gigabit Router
achieved. To surf the Internet and visit my company’s network at the
same time, I need to configure the static routing.
How can I
do that?
1. Change the routers LAN IP addresses to two different IP
addresses on the same subnet. Disable Router 2’s DHCP
function.
2. Visit http://tplinkwifi.net, and log in with the password you set for
the router. Go to Network>Advanced Routing. Click Add to add
a new static routing entry.
3. Finish the settings according to the following explanations:
Destination Network: is the destination IP address that you want to
assign to a static route. This IP address cannot be on the same subnet
with the WAN IP or LAN IP of the router. In the example, the IP
address of the company network is the destination IP address, so here
enters 172.30.30.1.
Subnet Mask: determines the destination network with the destination
IP address. If the destination is a single IP address, enter
255.255.255.255; otherwise, enter the subnet mask of the
corresponding network IP. In the example, the destination network is a
single IP, so here enters 255.255.255.255.
Switc
h
- 79 -
Page 91

Archer C3200 AC3200 Wireless Tri-Band Gigabit Router
Default Gateway: is the IP address of the gateway device to which the
data packets will be sent. This IP address must be on the same subnet
with the router’s IP which sends out the data. In the example, the data
packets will be sent to the LAN port of Router 2 and then to the Server,
so the default gateway should be 192.168.0.2.
Interface: is determined by the port (WAN/LAN) that sends out the
data packets. In the example, the data is sent to the gateway through
the LAN port, so LAN should be selected.
Description: (Optional) Enter a description for this static routing entry.
4. Click OK to save the settings.
5. Check the System Routing Table below. If you can find the entry
you set in the System Routing Table, the static routing is set
successfully.
Completed!
Open a web browser on your PC. Enter the company server’s IP
address to visit the company network.
13.6 Set up VPN Connection
VPN (Virtual Private Network) is a private network established via the public network, generally
via the Internet. However, the private network is a logical network without any physical network
lines, so it is called Virtual Private Network.
With the wide application of the Internet, more and more data are needed to be shared through
the Internet. Connecting the local network to the Internet directly, though can allow the data
exchange, will cause the private data to be exposed to all the users on the Internet.
- 80 -
Page 92

Archer C3200 AC3200 Wireless Tri-Band Gigabit Router
The VPN (Virtual Private Network) technology is developed and used to establish the private
network through the public network, which can provides a secure communication to a remote
computer or remote network, and guarantee a secured data exchange.
I want to:
Establish an IPSec VPN tunnel between two units which support IPSec protocol.
For example, I am a field staff and want to set up a VPN connection with
company headquarters. Here Site A refers to my local network. And Site B refers
to the remote network which I want to connect.
The following diagram is a typical VPN topology.
How can I
do that?
1. Make sure the topology you want to build and record site A (local network)
and site B (remote network)’s LAN IP and WAN IP.
2. Configuration on site A (local network).
1) Visit http://tplinkwifi.net
, and log in with the password you set for the
router.
2) Click Advanced > Network > IPSec VPN to open the configuration
page.
- 81 -
Page 93

Archer C3200 AC3200 Wireless Tri-Band Gigabit Router
3) Click Add to set up a VPN tunnel.
- 82 -
Page 94

Archer C3200 AC3200 Wireless Tri-Band Gigabit Router
4) Enter a connection name for your IPSec VPN.
5) Enter Site B’s WAN IP address.
6) For Site A’s whole LAN here we select Subnet Address. Then input the
LAN IP range and Subnet Mask of Site A.
7) For Site B’s whole LAN here we select Subnet Address. Then input the
LAN IP range and Subnet Mask of Site B.
8) Select the Key Exchange Method for the policy. We select Auto(IKE)
here.
9) Enter the Pre-shared Key for IKE authentication. Then keep Perfect
Forward Secrecy enabled.
Note:
i. The key should consist of visible characters without blank space.
ii. Make sure Site A and Site B use the same key.
10) Leave the Advanced Settings as default value. Then click OK to save.
3. Configuration on Site B (remote network). You can do refer to step 2. Make
sure that Site A and Site B use the same pre-shared keys and Perfect
Forward Secrecy settings.
4. The Status column will change to UP if the VPN connection has been set
up successfully.
5. Check the VPN connection. You can ping site B' LAN IP from your computer
to verify that the IPSec VPN connection is set up correctly.
*To check the VPN connection, you can do the following:
1) On the host in Site A, press [Windows Logo] + [R] to open Run dialog.
Input “cmd” and hit OK.
- 83 -
Page 95

Archer C3200 AC3200 Wireless Tri-Band Gigabit Router
2) In the CLI window, type in “ping 192.168.2.x” (“192.168.2.x” can be IP
address of any host in Site B). Then press [Enter].
If Ping proceeds successfully (gets replies from host in Site B), the IPSec
connection must be working properly now.
Note:
1) The product supports a maximum of ten simultaneous connections.
2) If one of the site has been off line for a while, for example, if Site A has
been disconnected, on Site B you need to click Disable and then click
Enable after Site A back on line in order to re-establish the IPSec
tunnel.
Completed!
The VPN tunnel is established.
- 84 -
Page 96

Archer C3200 AC3200 Wireless Tri-Band Gigabit Router
Chapter 14. Administrate Your Network
This chapter will show configuration for the key functions on the Web-based management page.
14.1 Set System Time and Region
System time is the time displayed while the router is running. The system time you configure here
will be used for other time-based functions like Parental Controls and Wireless Schedule. You can
manually set how to get the system time.
1. Visit http://tplinkwifi.net, and log in with the password you set for the router. Go to Advanced >
System Tools > Time Settings page.
2. Select your Region from the drop-down list. The region is where the wireless function of the
device can be used. It may be illegal to use the wireless function of the device in a region
other than regions specified in the list. If your country or region is not listed, please contact
your local government agency for assistance.
3. Three ways for you to configure the system time:
Manually: Select your time zone and enter your local time, then click Save to make the
settings effective.
Get from PC: Click this button if you want to use the current managing PC’s time.
Get GMT: Click this button if you want to get time from the Internet. Make sure your router
can access the Internet before you select this way to get system time.
- 85 -
Page 97

Archer C3200 AC3200 Wireless Tri-Band Gigabit Router
14.2 Update the Firmware
TP-LINK R&D is dedicated to improving and richening the product features, giving you a better
network experience. We will release the latest firmware at TP-LINK official website, you can
download the latest firmware file from our website: www.tp-link.com
and upgrade the firmware to
the latest version.
1. Download the latest firmware file from our website: www.tp-link.com.
2. Visit http://tplinkwifi.net, and log in with the password you set for the router. Click Advanced >
System Tools > Firmware Upgrade.
3. Click Browse to locate the downloaded new firmware file, and click Upgrade.
4. Wait a few moments for the upgrading and rebooting.
Tips:
1. Before upgrading the firmware, it's better to back up your current settings.
2. During the upgrading process, do not turn off or reset the router.
3. The upgraded firmware version must correspond to the hardware.
14.3 Back up and Restore Configuration Settings
The configuration settings are stored as a configuration file in the router. You can back up the
configuration file to your computer for future use and restore the router to a previous settings from
the backup file when needed. Moreover, if needed you can erase the current settings and reset
the router to the default factory settings.
To back up configuration settings:
1. Visit http://tplinkwifi.net
, and log in with the password you set for the router. Click Advanced >
System Tools > Backup & Restore.
2. Click Backup to save a copy of the current settings to your local computer. A conf.bin file will
be stored to your computer.
To restore configuration settings:
1. Visit http://tplinkwifi.net
, and log in with the password you set for the router. Click Advanced >
System Tools > Backup & Restore.
- 86 -
Page 98

Archer C3200 AC3200 Wireless Tri-Band Gigabit Router
2. Click Browse to locate the backup configuration file, and click Restore. The configuration file
is conf.bin.
3. Wait a few moments for the restoring and rebooting.
Tips: During the restoring process, do not turn off or reset the router.
To reset the router to factory default settings:
1. Visit http://tplinkwifi.net
, and log in with the password you set for the router. Click Advanced >
System Tools > Backup & Restore.
2. Click Factory Restore to reset the router.
3. Wait a few moments for the resetting and rebooting.
Tips:
1. During the resetting process, do not turn off or reset the router.
2. We strongly recommend you back up the current configuration settings before resetting the
router.
14.4 Change the Administrator Account
Admin account is used to log in to the router’s web-based management page. You are required to
set the admin account at first login. You can change it on the web page.
1. Visit http://tplinkwifi.net, and log in with the password you set for the router. Click Advanced >
System Tools> Administration. Locate the Account Management section.
2. Enter the old password. Enter the new password and enter again to confirm.
3. Click Save to make the settings effective.
- 87 -
Page 99

Archer C3200 AC3200 Wireless Tri-Band Gigabit Router
14.5 Local Management
You can control the local devices’ authority to manage the router via Local Management feature.
By default all local connected devices are allowed to manage the router. You can also allow only
one device to manage the router.
1. Visit http://tplinkwifi.net
, and log in with the password you set for the router. Locate the Local
Management section
2. Keep the Port as the default setting. Enter the IP address or MAC address of the local device
to manage the router.
3. Click Save to make the settings effective. Now only the device (192.168.1.100) can manage
the router.
Note: If you want that all local devices can manage the router, just leave the IP/MAC Address
field blank.
14.6 Remote Management
By default, the remote devices are not allowed to manage the router from the Internet. Follow the
steps below to allow remote devices to manage the router.
1. Visit http://tplinkwifi.net
, and log in with the password you set for the router. Locate the
Remote Management section.
2. Tick the checkbox to enable the remote management.
3. Keep the Port as the default setting. Leave the IP/MAC Address field blank.
- 88 -
Page 100

Archer C3200 AC3200 Wireless Tri-Band Gigabit Router
4. Click Save to make the settings effective. Now all the remote device can access the router
and manage it.
Note: If you just want to allow a specific device to manage the router, you can enter the IP
address of the remote device in the IP/MAC Address field.
- 89 -
 Loading...