

Page 1
ELECTRIC UNIT HEATER
INSTALLATION
UH SERIES
INSTRUCTIONS
3KW THRU 15KW
MODEL DESIGNATION SYSTEM
EXAMPLE: H 1 H UH 15 C A 1 000
Volts Mfg. Code
Phase Control Volts
Motor Voltage Control Transformer
Model Series Control System
Heater Wattage
MODEL NUMBER CODE:
Volts: F=208, H=240, HF=240/208, G=277, P=480
Phase: 1=Single Phase, 2=Single or Three Phase,
3=Three Phase
Motor Voltage: F=208, HF=240/208, G=277,
P=480
Model Series: UH Series
Heater Wattage: 03=3.3KW, 05=5KW,
07=7.5KW,
10=10KW, 12=12KW , 15=15KW
Control System: C=Built in contactor, O=No
contactor , R=Time Delay Relay
Control Transformer: O-none, A=Included
Control Volts: 1=24, 2=120, 3=Line V oltage
Mfg. Code: May include up to three letters or
digits to identify various listed options or alternate
components.
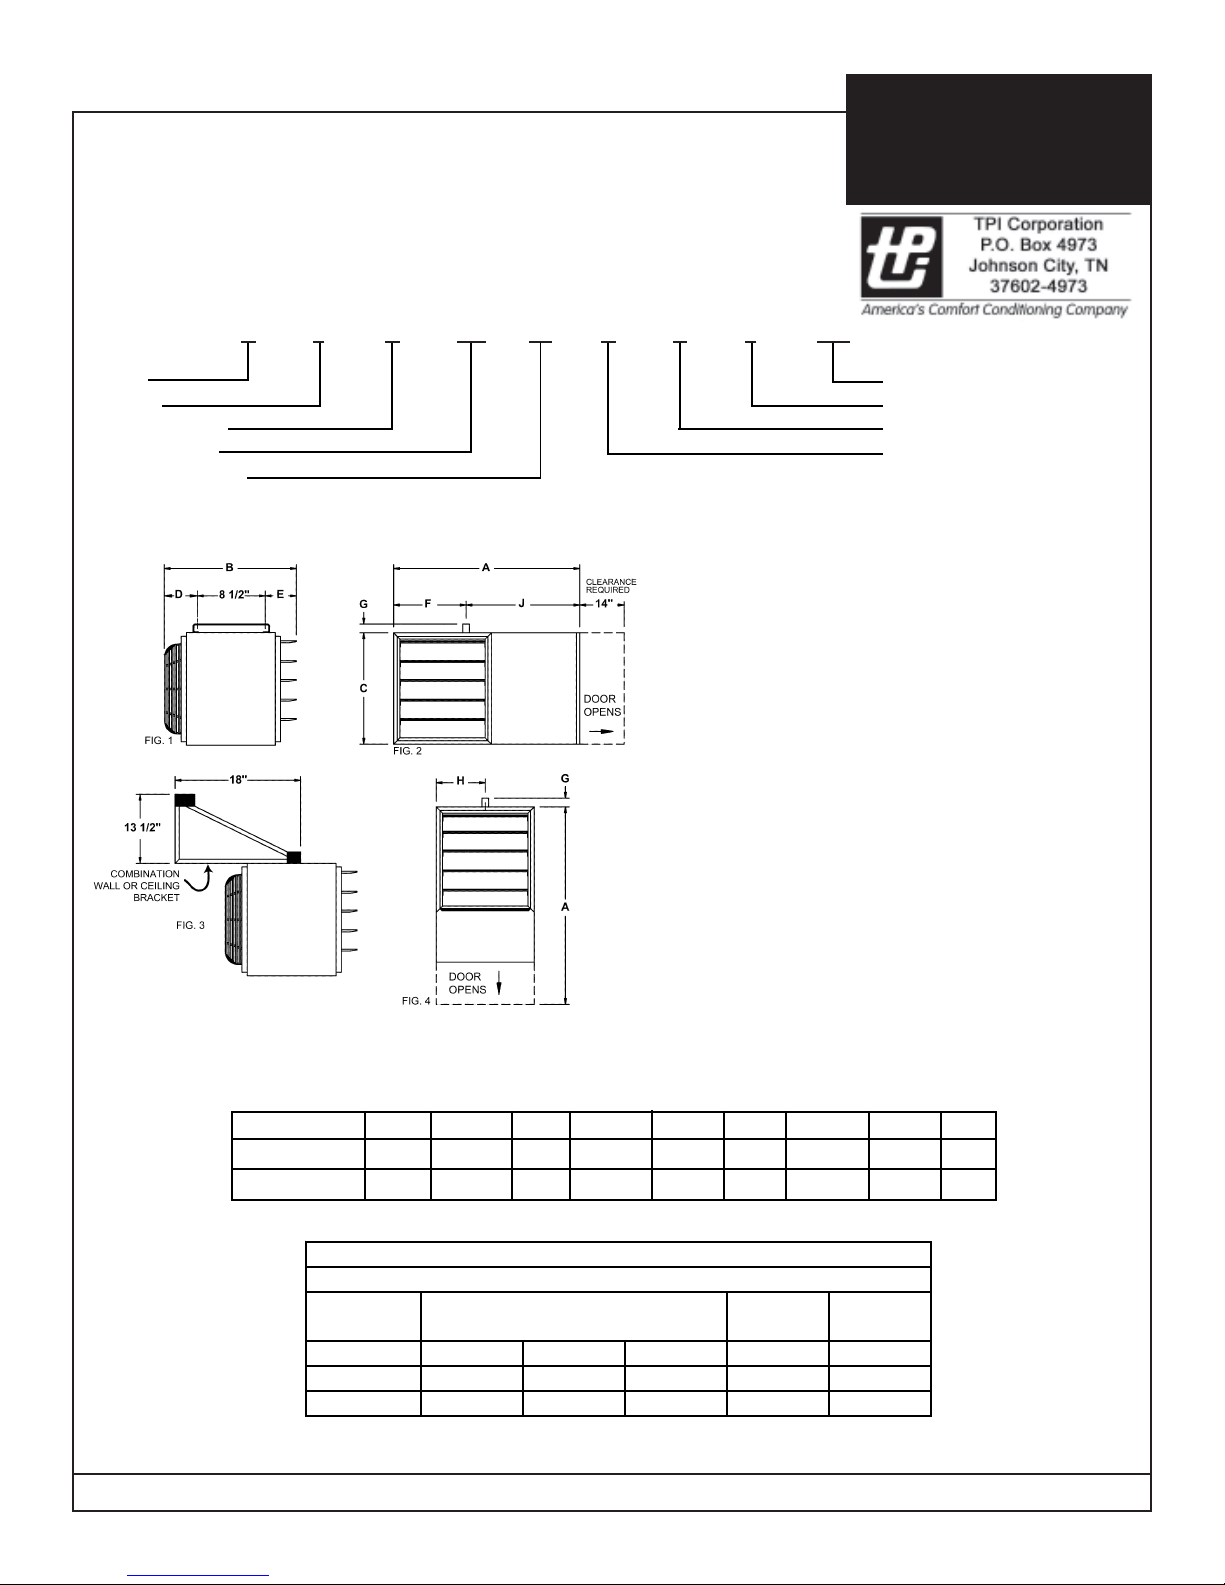
Heater Size A B C D E F G H I
3.5, 7.5, 10KW 20 18 3/4 13 5 7/8 4 3/4 9 1 5/8 6 1/2 11
12.5 & 15 KW 22 21 1/4 15 8 3/8 4 3/4 10 1 5/8 7 1/2 12
Air Flow Characteristics
Velocity of Air Movement (FPM)
Distance From Heater
Heater KW
3 & 5 105 fpm 45 fpm 17 fpm 28 ft. 45 lbs.
7.5 & 10 210 fpm 80 fpm 25 fpm 36 ft. 50 lbs.
12.5 & 15 270 fpm 95 fpm 45 fpm 46 ft. 55 lbs.
6 ft. 12 ft. 24 ft.
Throw
Distance
Approx.
Weight
IMPORTANT: OWNER SHOULD RETAIN THESE INSTRUCTIONS FOR FUTURE REFERENCE
1
Rev. 12/01 Form 9143
Page 2
GENERAL INSTRUCTIONS:
This heater has been designed, tested and manufactured to give the most reliable performance practical. Each unit is given a
final check before shipping to assure that every component is correctly wired and operating properly . The safe and dependable operation of the heater depends upon proper installation, therefore the manufacturer will not assume responsibility for
equipment installed in violation of any code or standard.
MOUNTING:
The heater can be mounted in either of two positions as shown in figures 2 and 4 and as designed for control box accessibility , mounting space, etc. The control compartment cover requires 14” clearance for opening.
The mounting handle is shipped disassembled. It is to be mounted to the appropriate side of the cabinet, as shown in figures
2 or 4, using the screws provided which are to be threaded into weld nuts on the cabinet. The heater then may be mounted
using the optional accessory wall bracket or supported from the ceiling using bolts or chains attached through 2 holes
provided in the handle. If the heater is to be mounted as shown in figure 4, the louver assembly may be repositioned to direct
the air stream as desired by removing the 3 attachment screws, pulling the assembly off, and reinstalling the desired position.
ELECTRICAL WIRING:
See diagram posted inside control compartment. The amperage load and the minimum recommended wire size is listed at
the field wiring terminal for each power supply circuit. The NEC requires that overcurrent protection and supply wiring for
electrical heating equipment be rated at least 125% of the full amp-load of the circuit. All supply wiring shall conform to the
latest edition of the NEC and to local codes having jurisdiction. Conduit openings are provided in the back of the wiring
compartment (see figure 3). Make sure all field wiring connections are properly made and are tight.
ELECTRICAL GROUND:
This heater must be grounded before operating as required by the NEC and by applicable local codes. Use a conductor of
the appropriate size, secured to the ground lug in the heater and to a grounded connection in the service panel.
THERMOSTAT:
The thermostat should be located where it will sense the free air movement within the structure. It should not be positioned or
located in direct sunlight or where it will be affected by a localized heat source such as lighting or other heaters. If wall
mounted thermostat is used, it should normally be mounted 5 feet above the floor. It should be connected to the control
terminal block in the heater as shown on the wiring diagram and per instructions packed with the thermostat. All control
circuitry must be per NEC class 1 wiring.
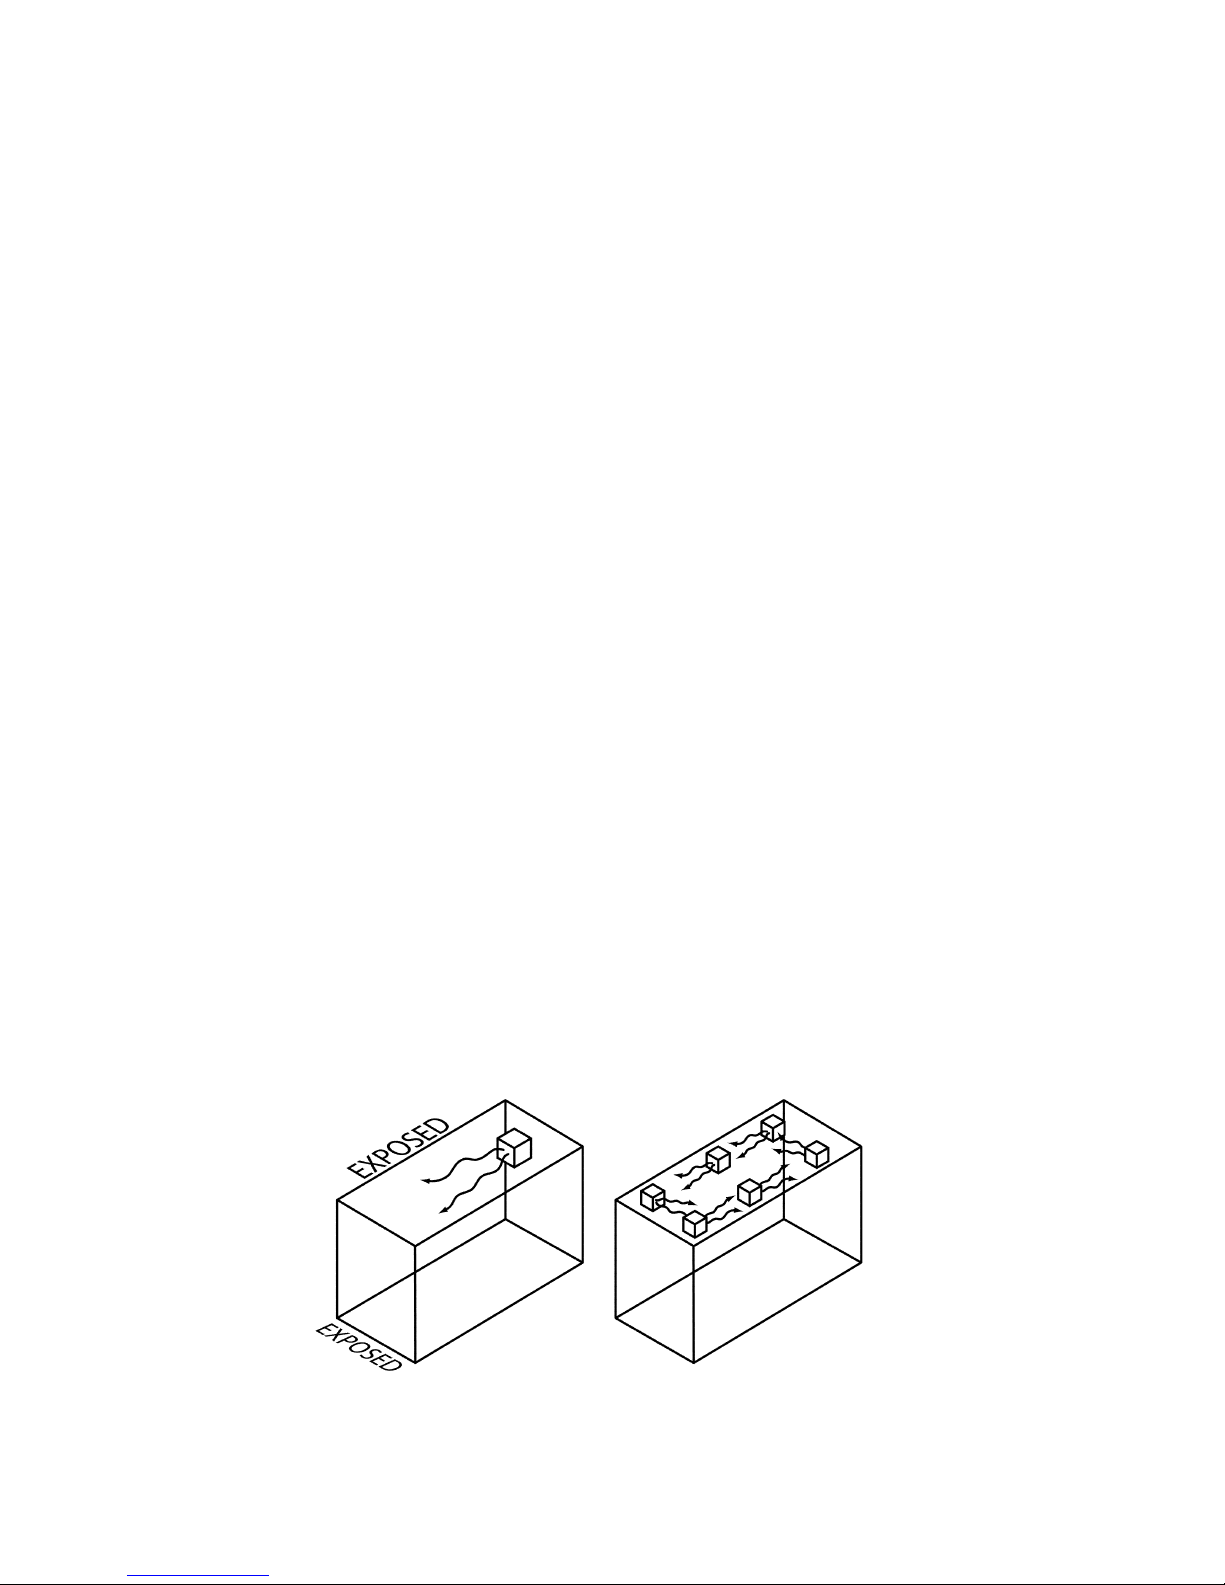
Where one or two walls are exposed to outside environment in smaller building areas, a single unit placed as figure 5 may be
sufficient. Larger building areas may require multiple units installed such as figure 6, especially where three or more wall are
exposed to outside environment. Unit should be arranged for providing perimeter air circulation where the air stream of one
supports that of another.
figure 5
figure 6
2
Page 3
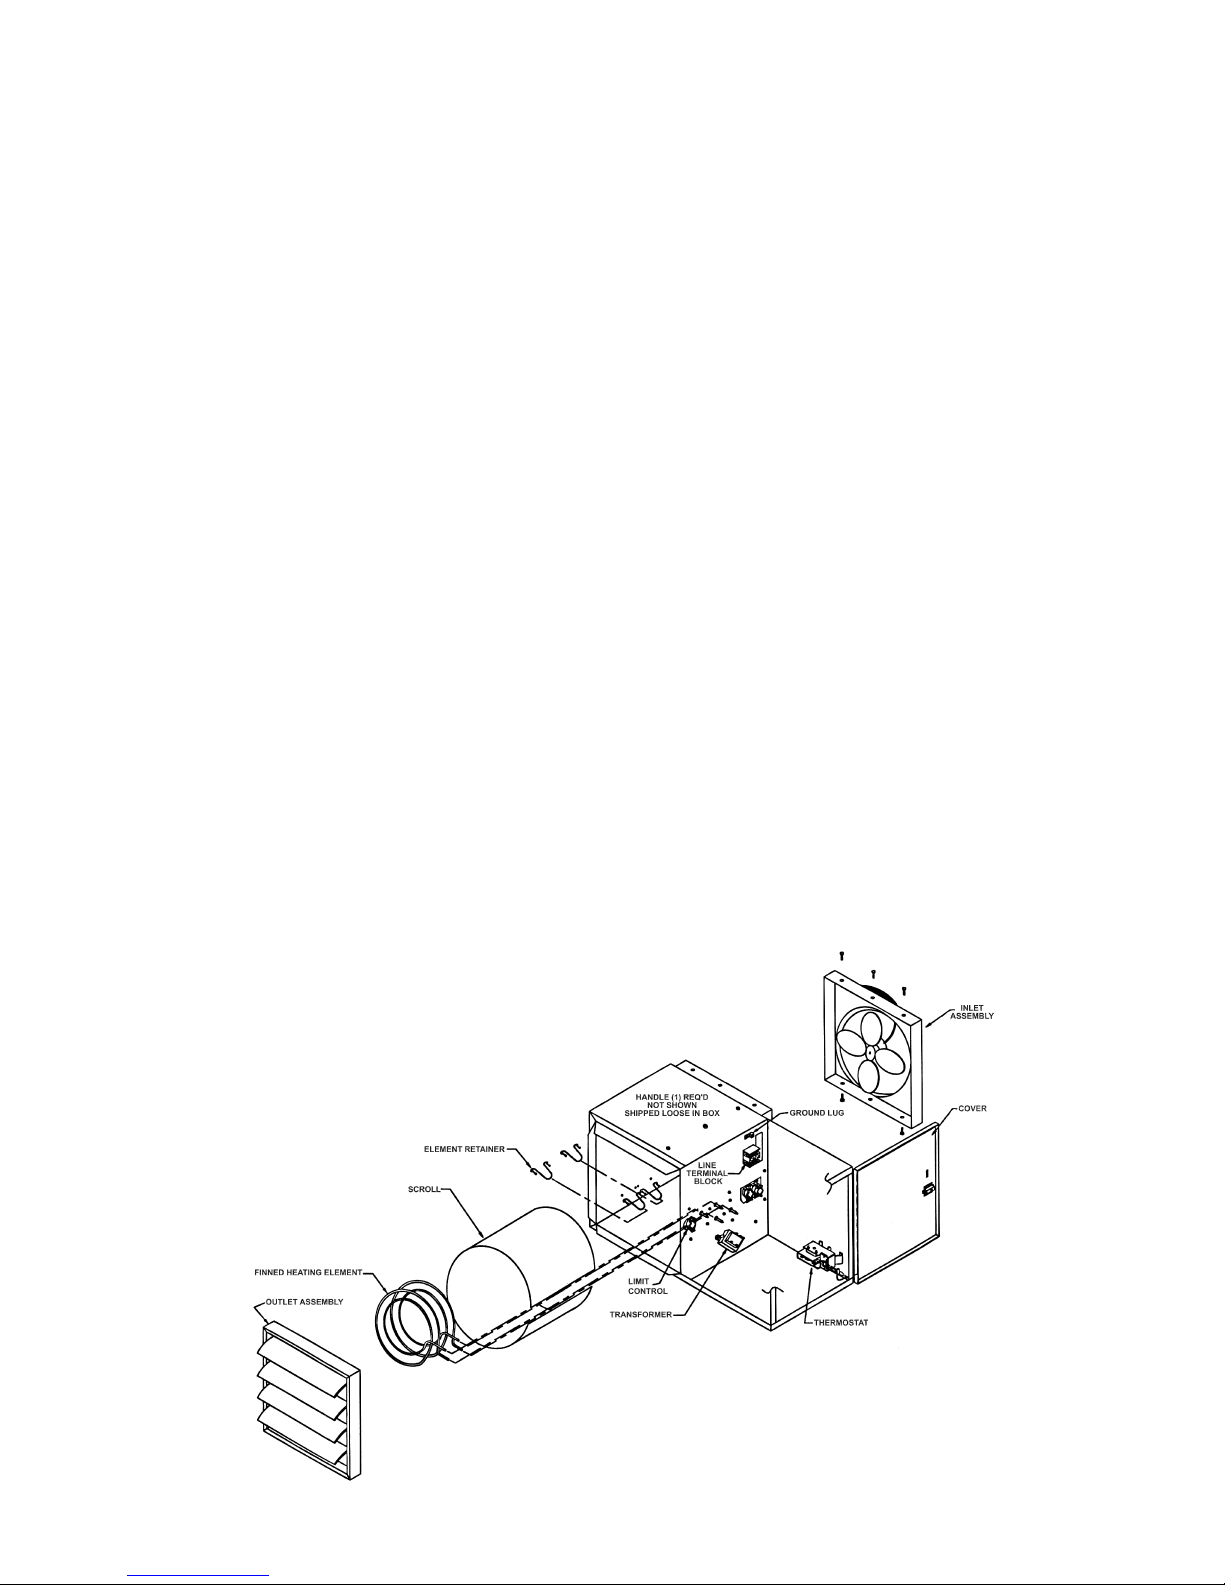
I. SERVICING THE ELEMENTS
The elements assembly , which includes the elements, the element mounting bracket, the automatic limit control and the
element restraining assembly , is designed to be removed as a unit to facilitate element replacement using standard hand
tools.
A. Removing an element
1. Open all electric power supply disconnects to the heater .
2. Disconnect all necessary wiring at element terminals.
3. Remove the outlet louver assembly by first removing the three (3) screws holding the assembly to the cabinet.
4. Remove the two screws securing the element to the bottom of the control panel.
5. Remove wire straps retaining the element to the scroll.
6. Pull the bottom of the element outward allowing the top of the element to slide out of the clearance holes in the control
panel.
7. Repeat steps 4, 5, and 6 to reach desired element.
B. Installing a new element
Be sure the replacement element matches the original part in voltage and wattage ratings as well as in physical size and
shape. Reverse the steps under removing an element. All elements must be installed in the same orientation.
II. SERVICING THE MOTOR AND FAN
A. Removing the motor and fan
1. Open all electric power supply disconnects to the heater .
2. Disconnect the motor wiring inside the control box.
3. Remove the strain relief from the cabinet and pull the motor wiring out of the control box.
4. Remove all the screws holding the inlet assembly to the cabinet. Support the weight of the motor as the last screws
are mounted.
5. Slip the inlet assembly (shroud, motor, fan and fan guard) off of the cabinet.
6. Remove the fan blade from the motor shaft.
7. Snip the wire ties securing the motor lead to the fan guard.
8. Remove the screws securing the motor to the fan guard.
B. Installing the motor and fan
Reverse the steps under removing the motor and fan. Be sure to reconnect the grounding lead as it provides the grounding
for the motor to the cabinet. Replace the motor only with an indentical part. Contact the factory for information regarding
alternate motors. T o prevent overheating and maint ain the design performance, a replacement fan blade must be indentical
to the original blade.
3
Page 4

ELECTRIC UNIT HEATER
20KW THRU 48KW
INSTALLATION AND OPERATING INSTRUCTION
MODEL DESIGNATION SYSTEM
EXAMPLE:
H 1 H UH 15 C A 1 000
VOLTS MFG. CODE
PHASE CONTROL VOLTS
MOTOR VOLTAGE CONTROL TRANSFORMER
MODEL SERIES CONTROL SYSTEM
HEATER WATTAGE
HEATER SIZE A B C D E F G H J X
20, 25, 30KW 24 28 1/2 17 9 7/8 14 1/2 4 1/8 1 1/4 1 6 17 3 /4 19
35, 40, 48KW 26 34 1/2 19 9 7/8 20 1/2 4 1/8 1 1/4 1 8 19 3 /4 25
AIR FLOW CHARACTERISTICS
MODEL NUMBER CODE:
VOLTS: F = 208, H = 240, HF = 240 /208, G = 277, P = 480
PHASE: 1 = SINGLE PHASE, 2 = SINGLE 0R THREE PHASE,
3 = THREE PHASE
MOTOR VOLTAGE: F = 208, HF = 240 /208, G = 277, P = 480
MODEL SERIES: UH SERIES
HEATER WATTAGE: 20 = 20KW, 25 = 25KW, 30 = 30KW, 40 =
40KW, 48 = 48KW
CONTROL SYSTEM: C = BUILT IN CONTACTOR, O = NO
CONTACTOR, R = TIME DELAY RELAY
CONTROL TRANSFORMER: 0 = NONE, A = INCLUDED
CONTROL VOLTS: 1 = 24, 2 = 120, 3 = LINE VOLTAGE
MFG. CODE: MAY INCLUDE UP TO THREE LETTERS OR
DIGITS TO IDENTIFY VARIOUS LISTED OPTIONS OR
ALTERNATE COMPONENTS.
ECO 1-4719 REV. 08-16-01
FORM: 9184
Page 5

GENERAL INSTRUCTIONS
This heater has been designed, tested and manufactured to
give the most reliable performance practical. Each unit is given
a final check before shipping to assure that every component is
correctly wired and operating properly. The safe and dependable operation of the heater depends upon proper installation,
therefore the manufacturer will not assume responsibility for
equipment installed in violation of any code or standard.
The NEC requires that overcurrent protection and
supply wiring for electric heating equipment be rated at least
125% of the full amp-load of the circuit.
All supply wiring shall conform to the latest edition of the NEC
and to local codes having jurisdiction. Conduit openings are
provided in the back of the wiring compartment (See figure 3).
Make sure all field wiring connections are properly made and
are tight.
MOUNTING
The heater can be mounted in either of two positions as shown
in figures 2 and 4 and as designed for control box accessibility,
mounting space, etc. The control compartment cover requires
14” clearance for opening.
The mounting handle is shipped disassembled. It is to be mounted
to the appropriate side of the cabinet, as shown in figures 2 or 4,
using the screws provided which thread into weld nuts on the
cabinet. The heater then may be mounted using the optional
accessory wall bracket or supported from the ceiling using bolts
or chains attached through 2 holes provided in the handle. If the
heater is to be mounted as shown in figure 4, the louver assembly may be repositioned to direct the air stream as desired by
removing the 3 attachment screws, pulling the assembly off,
and reinstalling the desired position.
ELECTRICAL WIRING
See diagram posted inside control compartment. The amperage
load and the minimum recommended wire size is listed at the
field wiring terminal for each power supply circuit.
ELECTRICAL GROUND
This heater must be grounded before operating as required by
the National Electric Code and by applicable local codes. Use
a conductor of the appropriate size, secured to the ground lug
in the heater and to a grounded connection in the service
panel.
THERMOSTAT
The thermostat should be located where it will sense the free
air movement within the structure. It should not be positioned
or located in direct sunlight or where it will be affected by a
localized heat source such as lighting or other heaters. If wall
mounted thermostat is used, it should normally be mounted 5
feet above the floor. It should be connected to the control
terminal block in the heater as shown on the wiring diagram
and per instructions packed with the thermostat. All control
circuitry must be per NEC class 1 wiring.
Where one or two walls are exposed to outside environment in
smaller building areas, a single unit placed like this may be
sufficient.
Larger building areas may require muliple units installed like
this, especially where three or more walls are exposed to
outside environment. Units should be arranged for providing
perimeter air circulation where the air stream of one supports
that of another.
Page 6

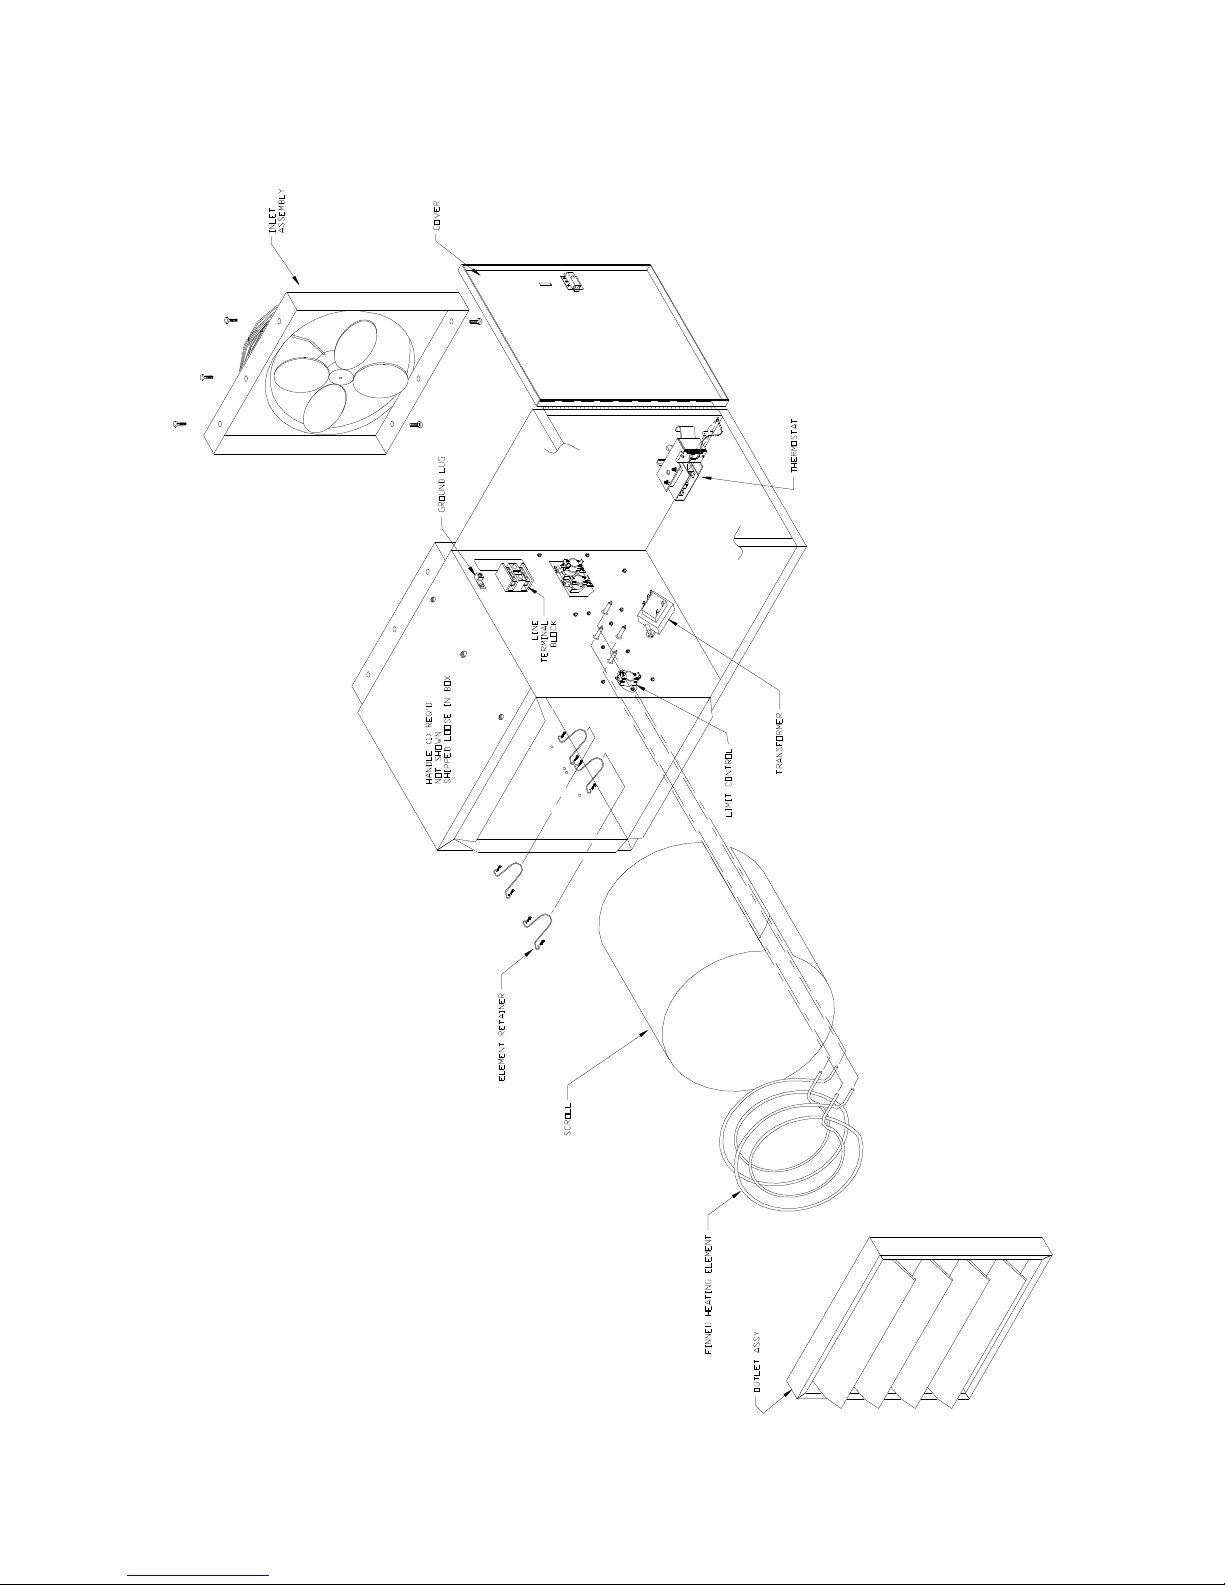
SERVICE INSTRUCTIONS
UH SERIES UNIT HEATER 20-48KW
I. SERVICING THE ELEMENTS
The element assembly, which includes the elements, the element mounting bracket, the automatic limit control and the
element restraining assembly, is designed to be removed as a unit to facilitate element replacement using standard hand
tools.
A. REMOVING AN ELEMENT
Step 1. Open all electric power supply disconnects to the heater.
Step 2. Disconnect all necessary wiring at element terminals.
Step 3. Remove the outlet louver assembly by first removing the three (3) screws holding the assembly to
the cabinet.
Step 4. Remove the two screws securing the element to the bottom of the control panel.
Step 5. Remove wire straps retaining the element to the scroll.
Step 6. Pull the bottom of the elmeent outward allowing the top of the element to slide out of the clearance
holes in the control panel.
Step 7. Repeat steps 4, 5, and 6 to reach desired element.
B. INSTALLING A NEW ELEMENT
Be sure the replacement element matches the original part in voltage and wattage ratings as well
as in phsical size and shape. Reverse the steps under removing an element. All elements must
be installed in the same orientation. The outer (longer) restraining angle must be reinstalled with
the notched end toward the fan (opposite the limit control end). Each of the element spacers
must interlock in the slots of both the inner and outer angles of the restraining assembly .
II. SERVICING THE MOT OR AND FAN
A. REMOVING THE MOTOR AND FAN
Step 1. Open all electric power supply disconnects to the heater.
Step 2. Disconnect the motor wiring inside the control box.
Step 3. Remove the strain relief from the cabinet and pull the motor wiring out of the control box.
Step 4. Remove all the screws holding the inlet assembly to the cabinet. Support the weight of the motor
as the last screws are mounted.
Step 5. Slip the inlet assembly (shroud, motor, fan and fan guard) off of the cabinet.
Step 6. Remove the fan blade from the motor shaft.
Step 7. Snip the wire ties securing the motor lead to the fan guard.
Step 8. Remove the screws securing the motor to the fan guard.
B. INSTALLING THE MOTOR AND FAN
Reverse the steps under removing the motor and fan. Be sure to reconnect the bounding lead as it
provides the bounding for the motor to the cabinet. Replace the motor only with an identical part. Contact
the factory for information reqarding alternate motors. To prevent overheating and maintain the design
performance, a replacement fan blade must be identical to the original blade.
Page 7
 Loading...