

Page 1
621
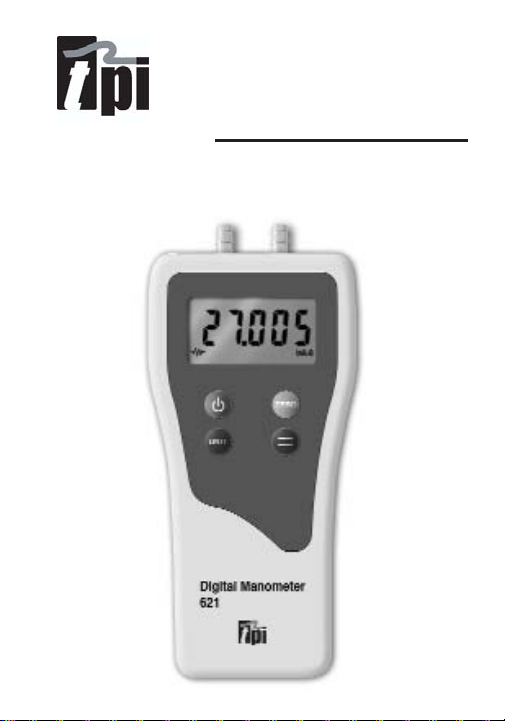
Digital Manometer
Instruction Manual
Page 2

Table of Contents
Page 3 Introduction & Product Description
Page 4 Safety Considerations
Page 5 Technical Data & International Symbols
Page 6 Features & Benefits
Page 7 Pressure Conversion Table
Page 8 Step by Step Procedures
Page 9 Accessories & Specifications
Page 10 Maintenance
Page 11 Trouble shooting guide
EC declaration of conformity
Page 3

Introduction
Congratulations
Thank you for purchasing TPI brand products. This
meter is easy to use and is built to last. It is backed
by a 2 year limited warranty. Please remember to
return your product warranty registration card.
Product Description
The TPI 621 is a hand held pressure meter with superior resolution .
TPI 610 - Single Input - 4 Function - single unit of
pressure
All these models measure over the range of -40.0 to
+120.0 mbar. Each unit has a resolution of 0.01 mbar
to +19.00 mbar and automatically auto-ranges above
± 19.00 mbar to 0.1 mbar resolution. Each model is
supplied complete with carry pouch, battery and
instruction manual.
Page 4

Safety Considerations
WARNING: Please follow the manufacturer's test
procedure whenever possible. Make sure the
pressure to be measured is not outside the range
of the TPI 621 meter.
AL
WA
YS
• Test the pressure meter before use to ensure it
is operating properly
• Ensure that the connecting hose you are using
is free from kinks or splits
• Double check all connections before testing
NEVER
• Connect the Instrument to an unknown pres-
sure source if the source is twice the working
pressure of the instrument the sensor will be
damaged and may cause injury to the user
• Tamper with the instrument or attempt to
modify it in any way. Otherwise, accident and
injury may occur and the warranty becomes
void.
Page 5

Technical Data
Controls
Turns the 621 on. Hold down to turn unit
off.
ZERO Momentarily press the button to
“ZERO” the dispaly (“ZERO” will flash on
the lower left of the LCD)
= Smoothing function to stabilize rapidly
changing pressure readings
UNITS Selects 7 units of pressure kPa, PSI, inHg,
mmHg inH2O, mmH2O, mbar
Turns the back light on (automatically turns
off after 30 seconds)
Page 6

Features & Benefits
Autoranging - Provides high resolution &
accuracy at low
Auto Power Off - Powers off after 40 minutes to
conserve battery life.
Trim Mode - Smoothing function to stabilize
erratic readings. It displays the
average value of 4 values
previously measured.
Zero Function - Provides immediate push button
zeroing for Speed and accuracy.
Units - Change the display value in any
one of the following engineering
units. kPa, PSI, inHg, mmHg,
inH20, mmH20 and mbar.
Back Light - Provides easy reading of LCD in
low light areas.
Page 7

Atmos bar inHg
inH2O
PSI mmHg
mmH20
Pascals
Atmos 1
9.86923
x 10
-1
3.34207
x 10
-2
2.458
x 10
-3
6.8046
x 10
-2
1.316
x 10
-3
0.9677
x 10
-4
9.869
x 10
-6
bar
1.01325
1
3.3864
x 10
-2
2.491
x 10
-3
6.8948
x 10
-2
1.333
x 10
-3
0.9807
x 10
-4
1.000
x 10
-5
inHg
29.9213 29.53
1
7.355
x 10
-2
2.036
3.937
x 10
-2
2.89567
x 10
-3
2.953
x 10
-4
inH2O
406.8 401.48 13.60
1
27.68 0.5354
3.937
x 10
-2
4.014
x 10
-3
PSI
14.6955 14.504 0.4912
3.6127
x 10
-2
1
1.934
x 10
-2
1.422323
x 10
-3
1.4503
x 10
-3
mmHg
760 750.06 25.400 1.868 51.715
1
7.35433
x 10
-2
7.502
x 10
-3
mmH2O
10.3327
x 10
3
10.1976
x 10
3
3.4544
x 10
2
25.400 703.07 13.599
1
.101972
Pascals
1.01325
x 10
5
1.000
x 10
5
3.386
x 10
3
2.491
x 10
2
6.8948
x 10
3
1.333
x 10
2
9.8071
1
Pressure Coverstion Table
Page 8

Step by Step Procedures
1. Press the 'ON' key and the LCD display will be
activated and automatically zeroed (if it does not
read 0.00 proceed as follows
2. Momentarily Press the key and the display
should zero within +/- 0.05 if not repeat until it
does
3. Connect pressure meter to installation or
equipment to be tested using appropriate hose
connection in accordance with the manufacturers
instructions
4. The pressure reading will appear on the display.
To activate the backlight in poor light conditions
press the key at any time
5. If the reading is erratic or changing activate the
smoothing function by pressing the '=' key
6. To convert the displayed pressure reading to
another engineering unit depress the 'UNIT' key
anytime and scroll through to the desired units of
pressure.
Page 9

Accessories & Specifications
Standard accessories
9V battery . . . . . . . . . . . . . . . . . . . . . .A009
Soft Pouch . . . . . . . . . . . . . . . . . . . . . .A600
Optional Accessories
2 metre (6 ft) nitrile rubber tubing . . . .A601
Large Zipped pouch . . . . . . . . . . . . . . .A904
Specifications
Auto Range -300.0 to -300.0 mbar
-120.4 to 120.4 inH2O
Accuracy -40.2 to 40.2 inH2O: ±(0.2% of F.V.)
<-40.2 & >40.2 inH2O: ±(1% of M.V.)
Over Pressure Protected to 15 PSI
Power Supply 9V
Relative Humidity 0% to 80%
Operating Temp. 0ºC to +40ºC
Storage Temp. -10ºC to +50ºC
Auto Power Off 40 Minutes
Input Type Differential
Page 10

Maintenance
Battery Replacement:
The 621 will display a battery symbol when the
internal 9V battery needs replacement.
Replace battery as follows:
1. Ensure instrument is switched off
2. Loosen the six cross head screws on the back
of the instrument
3. Remove the back cover
4. Remove old battery
5. Replace with new battery 9V NEDA 1604 or
equivalent
6. Reassemble the instrument in reverse order
from above being sure not to trap any wires
between the two halves of the case
7. Re-fit the six cross head screws being sure not
to over tighten
Cleaning: Use a mild detergent and a slightly damp
cloth to clean the surfaces of the instrument.
Page 11

Trouble Shooting Guide
Problem Probable Cause
Unit does not zero Zero button has not been
pushed.
Unit still does not zero If reading is greater than
0.05 and constantly
fluctuates return to local
Service Centre.
'Bat' appears on display Replace battery
immediately 9V NEDA
1505 or equivalent
EC Declaration of Conformity
This is to certify that model 610/615/620/625 conform to the protection requirements of the council
directive 89/336/EEC, in the approximation of laws of
the member states relating to Electromagnetic compatibility by application of the following standards
EN50081-1 1992 Emissions Standard
EN50082-1 1992 Immunity Standard
To ensure conformity with these standards, this
instrument must be operated in accordance with the
instructions and specifications given in this manual.
Page 12

Test Products International, Inc.
9615 SW Allen Blvd., Ste. 104
Beaverton, OR USA 97005
503-520-9197 • Fax: 503-520-1225
info@tpi-thevalueleader.com
L621M • 11/25/06 copyright © 2006 Test Products International, Inc.
 Loading...