

Page 1
AFA
INSTALLATION
3320 SERIES
1. LOCA TION OF HEA TER:
A. Heater is mounted on the wall near ceiling or floor, air flow down.
CAUTION: Do not obstruct the front grille of the heater with
curtains, furniture, etc., since the proper operation of the heater
requires a free flow intake and exhaust of air.
B. Minimum mounting height is 8” above finished floor.
C. For surface mounting use adapter AFAA/3320EX33.
D. For semi-recessed mounting, use adaptor AF AA-2/3320EX16.
2. BEFORE MOUNTING:
A. Insure that the supply voltage matches voltage rating on the label of
the heater.
B. Turn off electrical power to heater circuit.
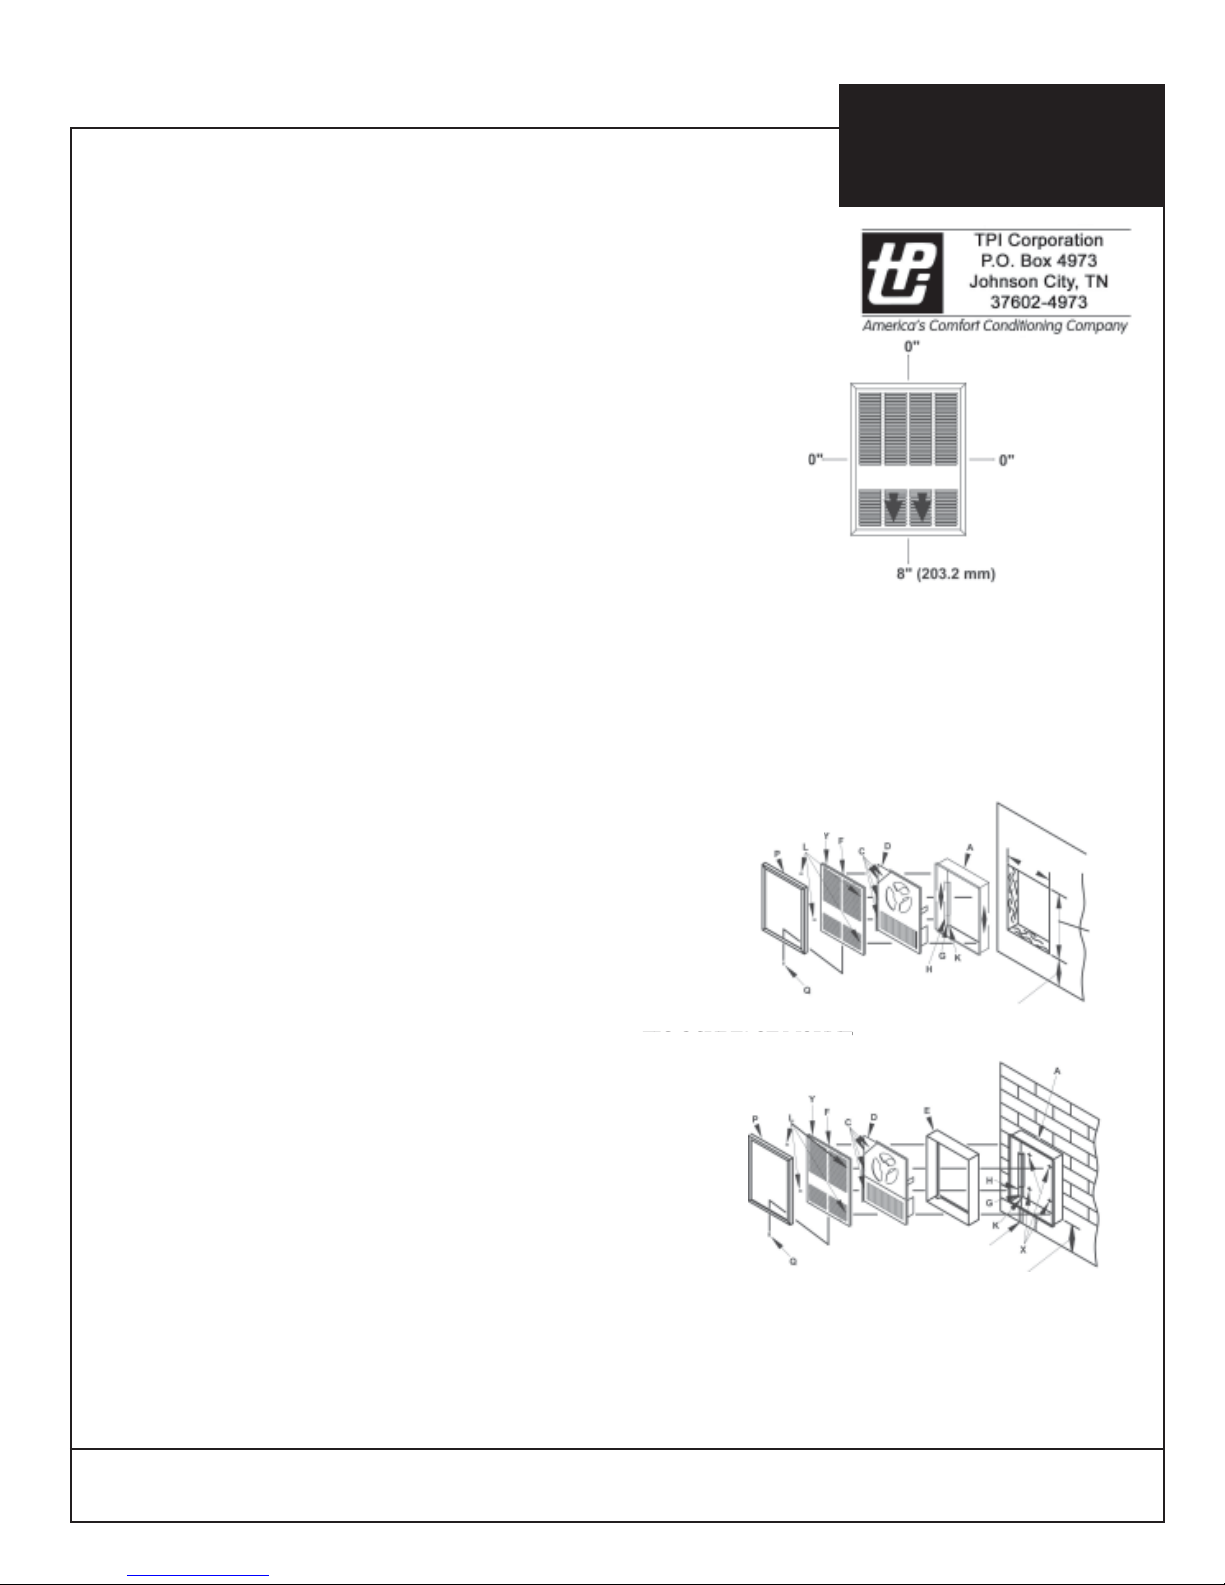
3. MOUNTING INSTRUCTIONS:
A. Disassemble heater by removing 7 screws “C” as shown in Figure
1 and 2.
B. Flush mounting, see Fig. 1.
Place rough-in box “A” between studs at desired height: secure to
studs through holes “M”. The flanges on the rough-in box must rest
on the surface of the finished wall; if the box is installed prior to the
application of the finished wall, allowance must be made for the wall
thickness.
C. Surface mounting, See Fig. 1.
Insert rough-in box “A” into surface adapter “E”. Secure the heater
rough-in box to wall at desired height through holes “X”. Be sure
that the rough in box is centered in surface adapter. For surface
mounting, bring wiring through bottom knockout “K” only.
D. Semi-recessed mounting: Secure rough-in box so that the long
flanges extend away from the finished wall equal to the depth of the
adaptor. Bring service in through top or bottom knockout “K”.
E. Place assembly “B” into rough-in box “A”. Secure with six
screws “C”.
4. WIRING INSTRUCTIONS REF: WD1, WD2, WD3, WD4, WD5, WD6
A. Bring service leads through knockout “K” on top or bottom of rough in box for flush or semi-recessed mounting, bottom knockout “K”
only for surface mounting. When wiring from the bottom, install wire
through cover “G” by removing screw “H”.
B. Attach service leads to two black leads on 208-240 volt models and
to black and white leads on 120-277 volt models, attach ground lead
to green wire with approved connectors. Comply with all national
and local codes.
C. Attach wiring compartment cover “D” to assembly with screw “C”.
5. FINAL STEPS:
A. Clean all construction dirt and debris from inside heater.
B. Attach front grille “F” with four screws “L”.
C. Place grille frame over tabs on top of grille, snap bottom in place.
For added security install screw “Q” into bottom of frame.
INSTRUCTIONS
Wall Installation
7. CLEANING AND MAINTENANCE INSTRUCTIONS:
A. At the beginning of each heating season, disconnect electrical
power at circuit breaker panel. Remove front grille.
B. Use the narrow (crevice” suction attachment of the vacuum
cleaner to remove dust and lint from heater and heating element.
C. Lubricate the motor with SAE No. 10 oil. Two (2) oil spouts are
located on front and back of motor.
D. Reinstall front grille with previously removed screws. Restore
power to the heater.
FIG. 1 FLUSH MOUNT
FIG. 1 FLUSH MOUNT
FIG. 2 SURF ACE MOUNT
FIG. 2 SURFACE MOUNT
14 1/4
(362 mm)
8” (203.2)Minimum
To Finished Floor
19 3/16
(490.5mm)
6. OPERATING INSTRUCTIONS:
A. Turn on power at the circuit breaker panel.
B. Thermostat adjustment is made by inserting a small blade screw
driver through grille opening into slot in stem. Turn thermostat
adjustment stem fully clockwise, this will energize the heating
element and after a short delay , the fan should energize, causing
warm air discharge from bottom of the grille.
C. After the desired temperature is reached, turn thermostat stem
counter clockwise until a click is heard from the thermostat.
D. Models with double-pole thermostats: T urn thermost at adjustment
stem fully counter-clockwise, this will de-energize the heating
element and fan.
IMPORTANT: OWNER SHOULD RETAIN THESE INSTRUCTIONS FOR FUTURE REFERENCE
SERVICE CABLE
OR CONDUIT
8” (203.2)Minimum
To Finished Floor
Note: This heater employs a visual alarm (light) to warn that parts of the
heater are getting excessively hot. If the alarm illuminates, immediately
disconnect power from heater and inspect for any objects on or
adjacent to the heater that may cause high temperatures. DO NOT
OPERA TE HEATER WITH THE ALARM (LIGHT) ILLUMINATED.
Form 9822 ECO # 1-5800
Page 2

3320 SERIES
THERMAL
PROTECTOR
ALARM
INDICATOR
LIGHT
THERMAL
PROTECTOR
ALARM
INDICATOR
LIGHT
THERMAL
PROTECTOR
ALARM
INDICATOR
LIGHT
ELEMENT
ELEMENT
ELEMENT
FAN DELAY
FAN DELAY
WD-1
WD-2
FAN DELAY
THERMOSTAT
DISCONNECT
THERMOSTAT
MOTOR
MOTOR
MOTOR
DISCONNECT
DISCONNECT
120-277V WHITE
208-240V BLACK
120-277V WHITE
208-240V BLACK
GND
120-277V WHITE
208-240V BLACK
BLACK
GND
LINE
BLACK
GND
LINE
BLACK
LINE
THERMAL
PROTECTOR
ALARM
INDICATOR
LIGHT
THERMAL
PROTECTOR
ALARM
INDICATOR
LIGHT
THERMAL
PROTECTOR
ALARM
INDICATOR
LIGHT
ELEMENT
ELEMENT
ELEMENT
FAN DELAY
FAN DELAY
FAN DELAY
WD-5
WD-6
THERMOSTAT
DISCONNECT
THERMOSTAT
MOTOR
MOTOR
MOTOR
DISCONNECT
DISCONNECT
120-277V WHITE
208-240V BLACK
120-277V WHITE
208-240V BLACK
GND
120-277V WHITE
208-240V BLACK
BLACK
GND
LINE
BLACK
GND
LINE
BLACK
LINE
THERMAL
PROTECTOR
ALARM
INDICATOR
LIGHT
DAY/
NIGHT
RELAY
ELEMENT
WD-3 WD-7
ELEMENT
MOTOR
THERMOSTAT
FAN DELAY
2
1
6
4
5
SET BACK T-STAT/CONTROL & POWER SUPPLIED BY OTHERS
DISCONNECT
GND
120-277V WHITE
208-240V BLACK
BLACK
LINE
THERMAL
PROTECTOR
ALARM
INDICATOR
LIGHT
DAY/
NIGHT
RELAY
WD-4
WD # MODEL # OPTIONS
WD-1
WD-2
WD-3
WD-4
WD-5
WD-6
WD-7
WD-8
All models except
E3321 , HF3325
& HF3326
E3321 , HF3325
& HF3326
3320 with Disconnect and Double Pole Thermostat
3320 with Disconnect
3320 with Disconnect and Single Pole Thermostat
3320 with Disconnect, Single Pole Thermostat and Day/Night Relay
3320 with Disconnect and Double Pole Thermostat
3320 with Disconnect
3320 with Disconnect and Single pole Thermostat
3320 with Disconnect, Single Pole Thermostat and Day/Night Relay
FAN DELAY
2
4
MOTOR
THERMOSTAT
1
6
5
SET BACK T-STAT/CONTROL & POWER SUPPLIED BY OTHERS
DISCONNECT
GND
120-277V WHITE
208-240V BLACK
BLACK
LINE
WD-8
Form 9822
ECO # 1-5800
IMPORTANT: OWNER SHOULD RETAIN THESE INSTRUCTIONS FOR FUTURE REFERENCE
 Loading...