

Page 1

Video Surveillance Camera
Easy Installation Guide
Page 2
1 1
Table of Contents
1. Unpacking the box
Video Surveillance Camera Easy Installation Guide
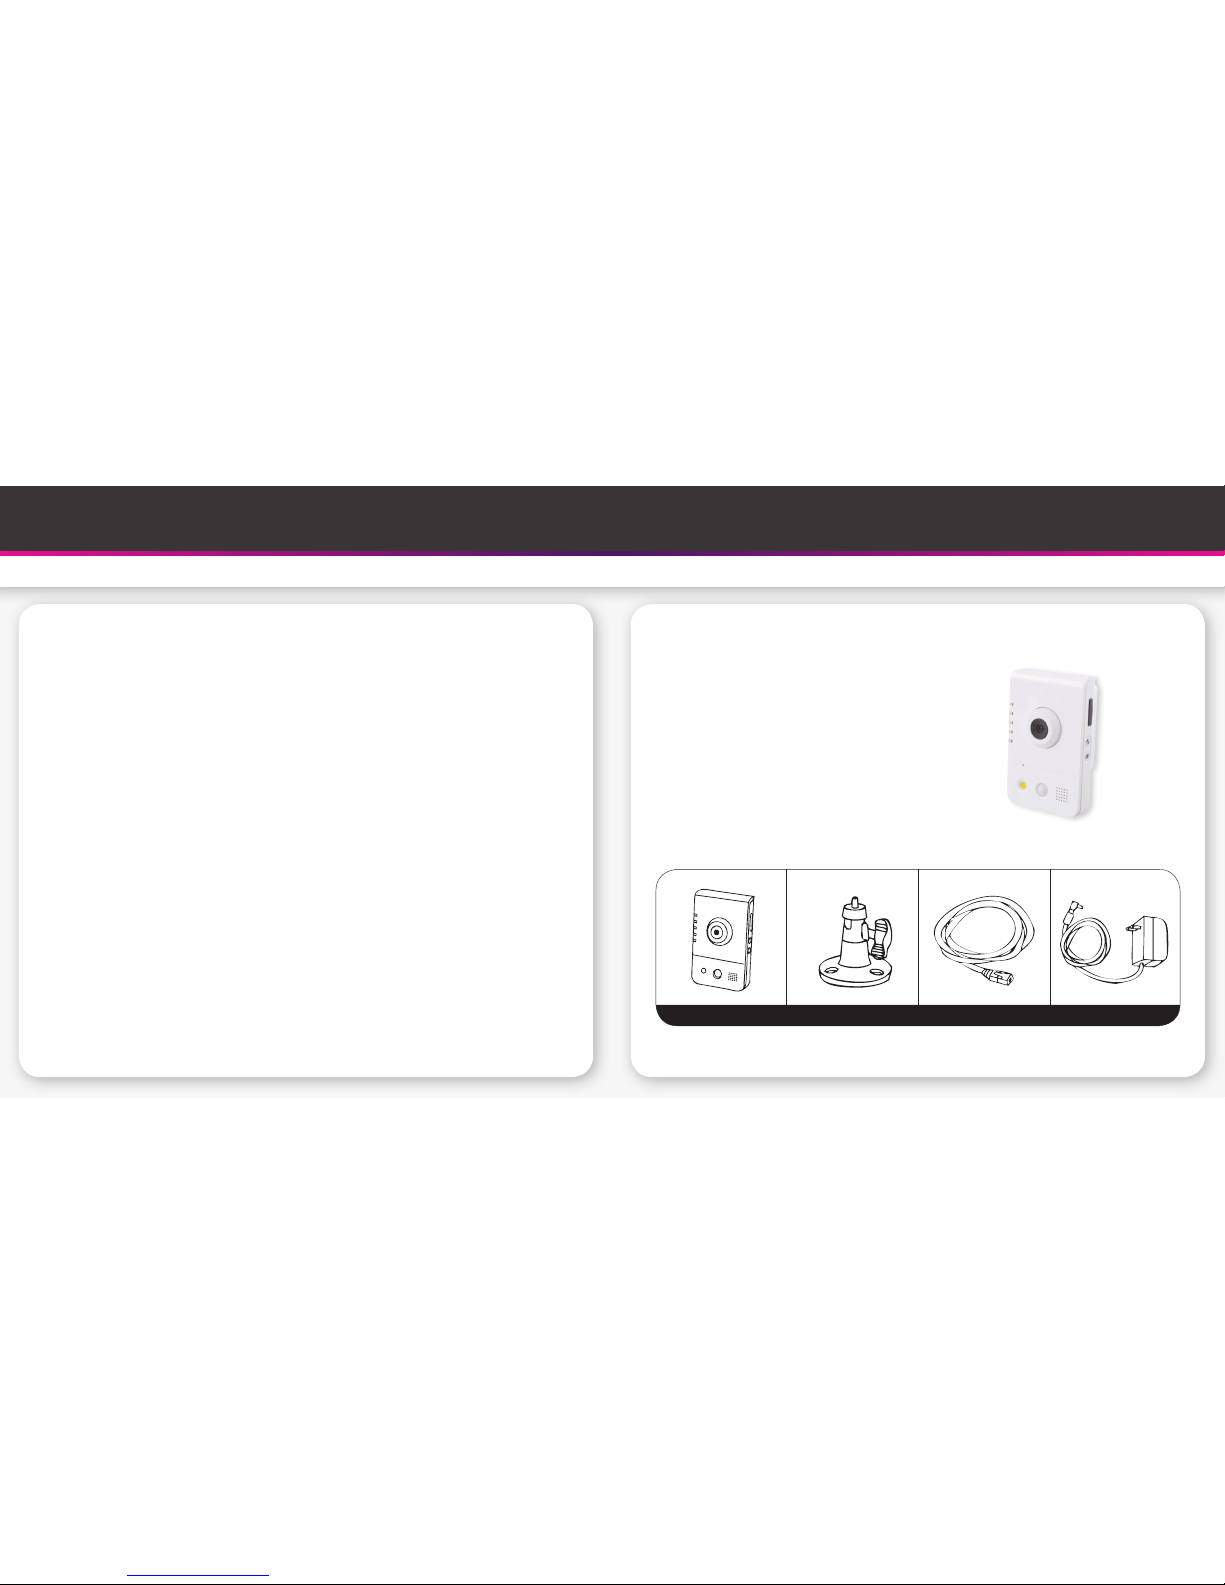
Your Video Surveillance Camera box will include the following:
• 1 x Video Surveillance Camera
• 1 x Camera Stand
• 1 x 1.5m White Flat RJ-45 Ethernet cable
• 1 x Power Adapter
Surveillance Camera Camera Stand Flat RJ-45 cable Power Adapter
1. Unpacking the box........................................................................... 1
2. Installing the Video Surveillance Camera......................................... 2
A. Wired Connection through Ethernet...................................................... 2
B. Wireless Connection............................................................................. 2
3. Video Surveillance Camera – How to Use....................................... 3
4. How to adjust the focus of the Lens............................................... 3
5. How to download & play recorded Video files................................. 4
6. Changing the Camera Name............................................................ 4
7. Manage your Video Surveillance Camera’s Settings....................... 5
8. Hardware Specifications................................................................. 5
Page 3
2
Video Surveillance Camera Easy Installation Guide
2. Installing the Video Surveillance Camera
You can install the Video Surveillance Camera in 2 ways:
A. Wired Connection through Ethernet
B. Wireless Connection
Before starting the activation process of the Video Surveillance Camera please check the
following items:
1. DHCP server setting is enabled in the modem router.
2. For wireless connection, please make sure SSID or Wireless Access Point is not hidden.
3. Adobe Flash Player (to download - http://get.adobe.com/flashplayer/) is installed on the
computer where you are going to watch the live stream.
STEP 1. Plug the power cable and the Ethernet cable into the back of the camera.
The other end of the Ethernet cable must be connected to the back of your Modem Router.
STEP 2. Check all 3 camera lights are on and wait for a
few minutes before logging into www.tpg.com.au/videosurveillance/login to activate the camera.
You will require the following 2 items:
1: Username: <e.g. test123>
2: Password: <e.g. password>
Please use the username and password you have nominated at the time of signing up with
TPG. If you have forgotten your password, you can retrieve it via www.tpg.com.au/password.
Alternatively you may contact our Customer Service on 13 14 23.
STEP 3: TPG system will check if the camera has the latest firmware. If the camera does not
have the latest firmware, the following message will be displayed.
“Camera Firmware Upgrade Required.
DO NOT Power off or Disconnect the Camera during the upgrade”
You will know the firmware upgrade is complete when the “Upgrade Complete” message is
displayed.
NOTE: Click the “Close” button and the camera is ready to use now. If you wish to connect via
Wi-Fi, please follow the steps below.
STEP 4: Click “Wireless Config” on the top right corner of the page.
STEP 5: Select your Wi-Fi network name (SSID) from the dropdown list.
STEP 6: Enter your Wi-Fi network password in the Network Key field.
STEP 7: Click “Connect”. If successful, a confirmation message will be displayed.
STEP 8: Unplug the Ethernet cable.
STEP 9: Your camera should now be connected via Wi-Fi. Log into www.tpg.com.au/video-
surveillance/login to check if live streaming is working.
Page 4
3
Video Surveillance Camera Easy Installation Guide
3. Video Surveillance Camera – How to Use 4. How to adjust the focus of the Lens
By default, the camera is positioned to focus on the largest possible range which should be ideal
for most usage. If you wish to monitor object closer than 1.5 – 2 meters to the camera, you may
need to adjust the focus of the camera.
Gently rotate the cap of the camera lens counter clockwise to focus closer, log back into www.
tpg.com.au/video-surveillance/login to check the result. Please note that there may be a 10-20
seconds delay for the focus change to be reflected in the live stream.
You may repeat this process until you find the most optimum focus for your camera.
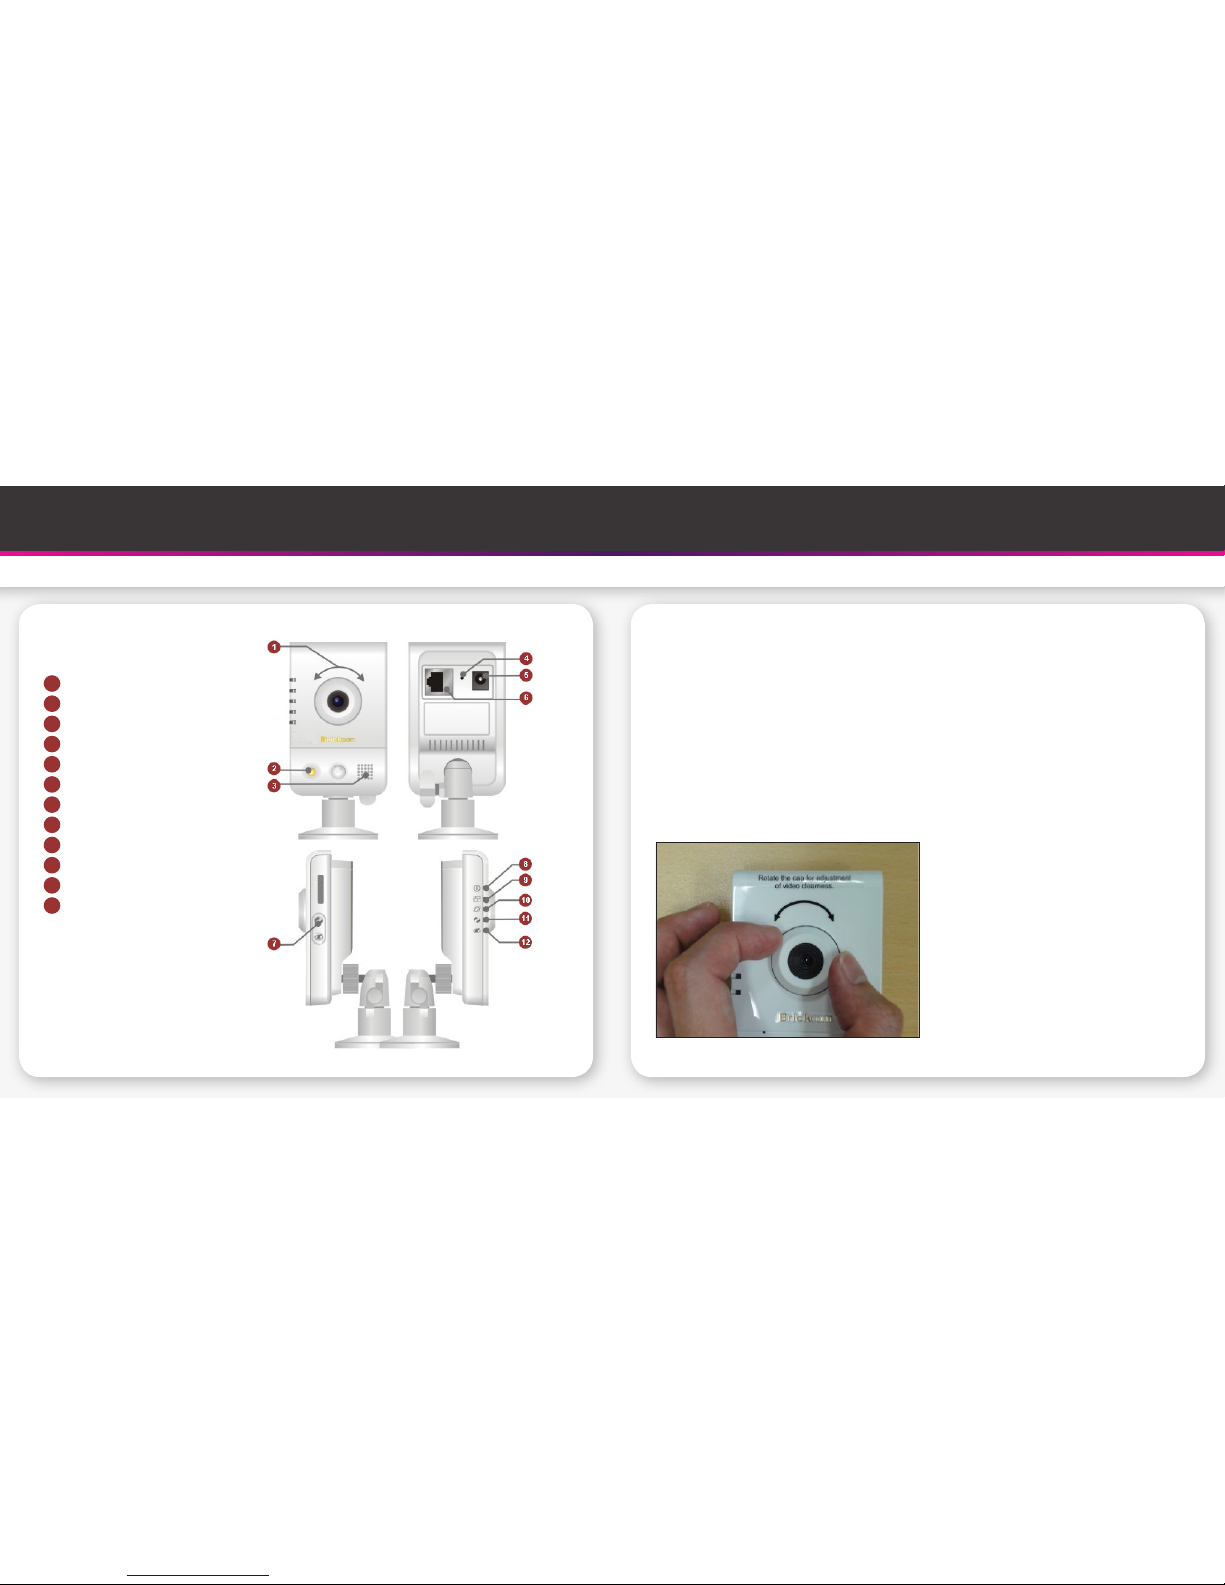
Adjustable focal Lens
Illumination LED
Speaker
Reset Button
Power Connector
Ethernet RJ45 Socket
WPS Button
Power LED
Status LED
Internet LED
WPS LED
Privacy LED
1
2
3
4
5
6
7
8
9
10
11
12
Page 5
4
Video Surveillance Camera Easy Installation Guide
5. How to download & play recorded Video les? 6. Changing the Camera Name
You can log into at www.tpg.com.au/video-surveillance/login and download recorded video files
up to 48 hours. Recorded Videos will be stored in the Cloud Storage for 48 hours and after that
the older files will be deleted. The downloaded files will be in .flv format.
In order to play the downloaded videos we recommend you to download VLC Video Player (you
can download from here - http://www.videolan.org/vlc/index.html)
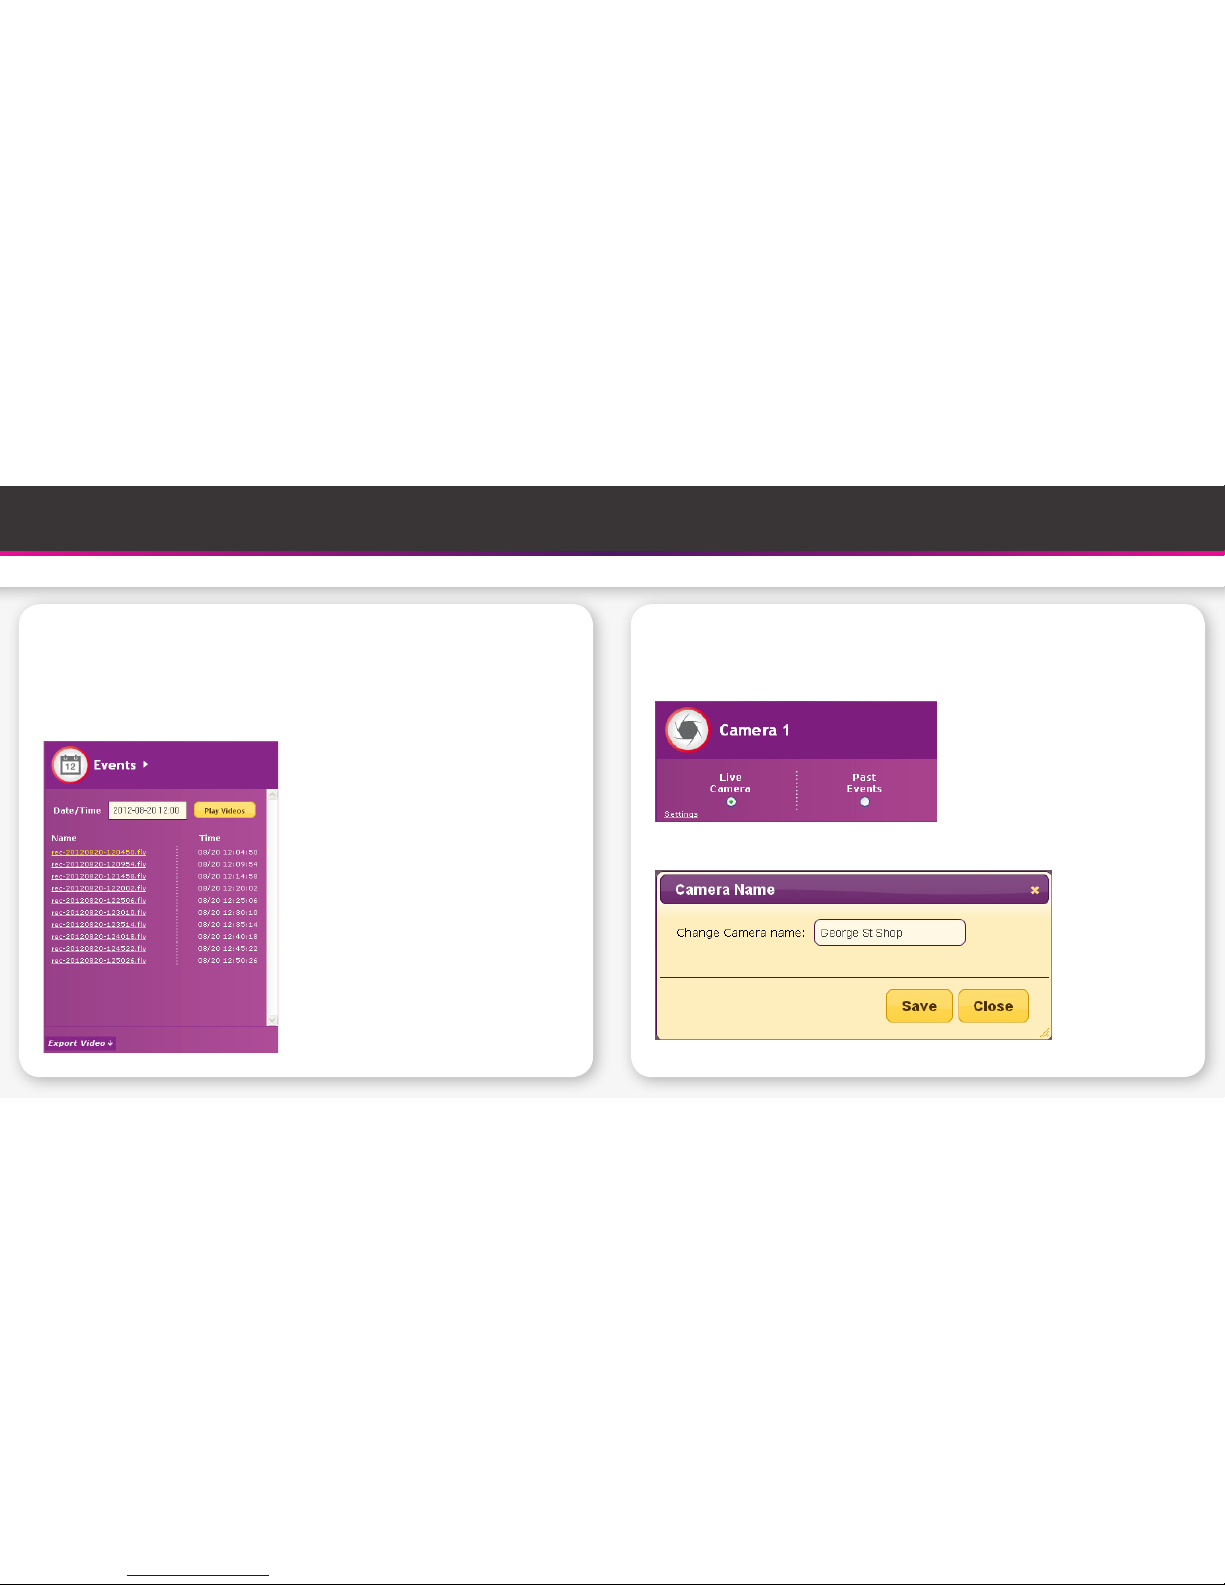
You can personalise your camera’s name, this is very handy when you have multiple TPG
ADSL2+ with Video Surveillance at different locations.
1. Click Settings
2. Change Camera name and click Save
Page 6
5
Video Surveillance Camera Easy Installation Guide
7. Manage your Video Surveillance Camera’s Settings 8. Hardware Specications
TPG Video Surveillance Control Panel
You can change the following settings depending on your need anytime by logging
at www.tpg.com.au/video-surveillance/login.
Camera Name: You can give a personalised name to your camera
Brightness: You can adjust the brightness of your video
Sharpness: You can adjust the sharpness of your video
Contrast: You can adjust the contrast of your video
Colour: You can adjust the colour saturation of your video
Mirror and Flip: You can mirror or flip your images depending on your need
LED: Customer can turn on the LED during night time or in cloudy
weather.
Model No WCB - 100Ap
Camera Position Fixed only
Sensor size/resolution 1/4” 1M CMOS
View Angle/Horizontal 54.8 degree
White LED Included
LED illumination range 5m
Wireless functionality IEEE 802.11 (b/g/n)
Micro SD/SDHC slot Disabled
Power Input DC 12V 1A
Ethernet RJ45 socket Included
 Loading...