

Page 1
1
Modem Conguration Guide
Netcomm NB9W
Conguring in Layer2 PPPoE for Windows XP and 2000
CONTENTS
1. Network Configuration
2. Re-configure In Layer2 PPPoE
3. Optional
4. Change of password
PLEASE NOTE: Please have your router powered on and connected directly
to your PC via Ethernet cable before you begin as these instruction are based
on Ethernet
1. NETWORK CONFIGURATION
PPPoE connection does not require you to have an IP address or DNS
settings manually encoded on your network card. PPPoE connection uses
authentication to establish the Internet connection and its after doing this that
your router is assigned an IP and DNS settings from TPG.
To begin, your PC needs to receive a private IP address from the router. Most
ADSL routers have DHCP enabled by default that will take care of this.
To ensure your Network Card is ready for this, please follow the following
steps:
A. Click on Start -> Settings -> Control Panel -> Network Connections
B. Find your Network Card then right click on this and select Properties
C. Double click on Internet Protocol TCP/IP
Netcomm NB9W
Page 2
2
D. Ensure “Obtain an IP address automatically” is selected
E. Ensure “Obtain DNS server address automatically” is selected
F. Click on OK
Modem Conguration Guide
2. RE-CONFIGURE IN LAYER 2 PPPoE
Reconfiguration of the router to Layer 2 PPPoE can be done
without disturbing VoIP or wireless settings (if applicable).
A. Open your browser and in the address bar type http://192.168.1.1
and press enter
B. Enter admin for both the username and password and click on
OK. If you have changed the login credential, please enter the
current username and password for your router interface
C. I n the left menu, click on Basic then ADSL Quick Setup.
Then click on Click here for other connection types
D. In the Other Connections Type window, select:
• VPI: 8
• VCI: 35
• Make sure Enable QoS is ticked
Click Next
Netcomm NB9W
Page 3
3
E. Select:
• PPPoE over Ethernet radial button
• Encapsulation: LLLC/SNAP Bridging
Click Next
F. In the PPP Username and Password page, please
select/ fill in the following fields:
• PPP Username:
- <TPGusername>@L2TP.tpg.com.au for Fixed IP
plans
OR - <TPGusername>@PPP.tpg.com.au for Dynamic
IP plans (e.g. [email protected])
• PPP Password: Your Password by default is the
same as your <TPGusername> however if you have
changed your password since registration time, please
use your current TPG password
• NAT: Enabled
• Untick Dial on Demand
You can leave the rest as is
Click Next
G. For the next page, simply click on Next
H. For the next page, click on Next
Modem Conguration Guide Netcomm NB9W
Page 4
4
Modem Conguration Guide
I. Click Next again
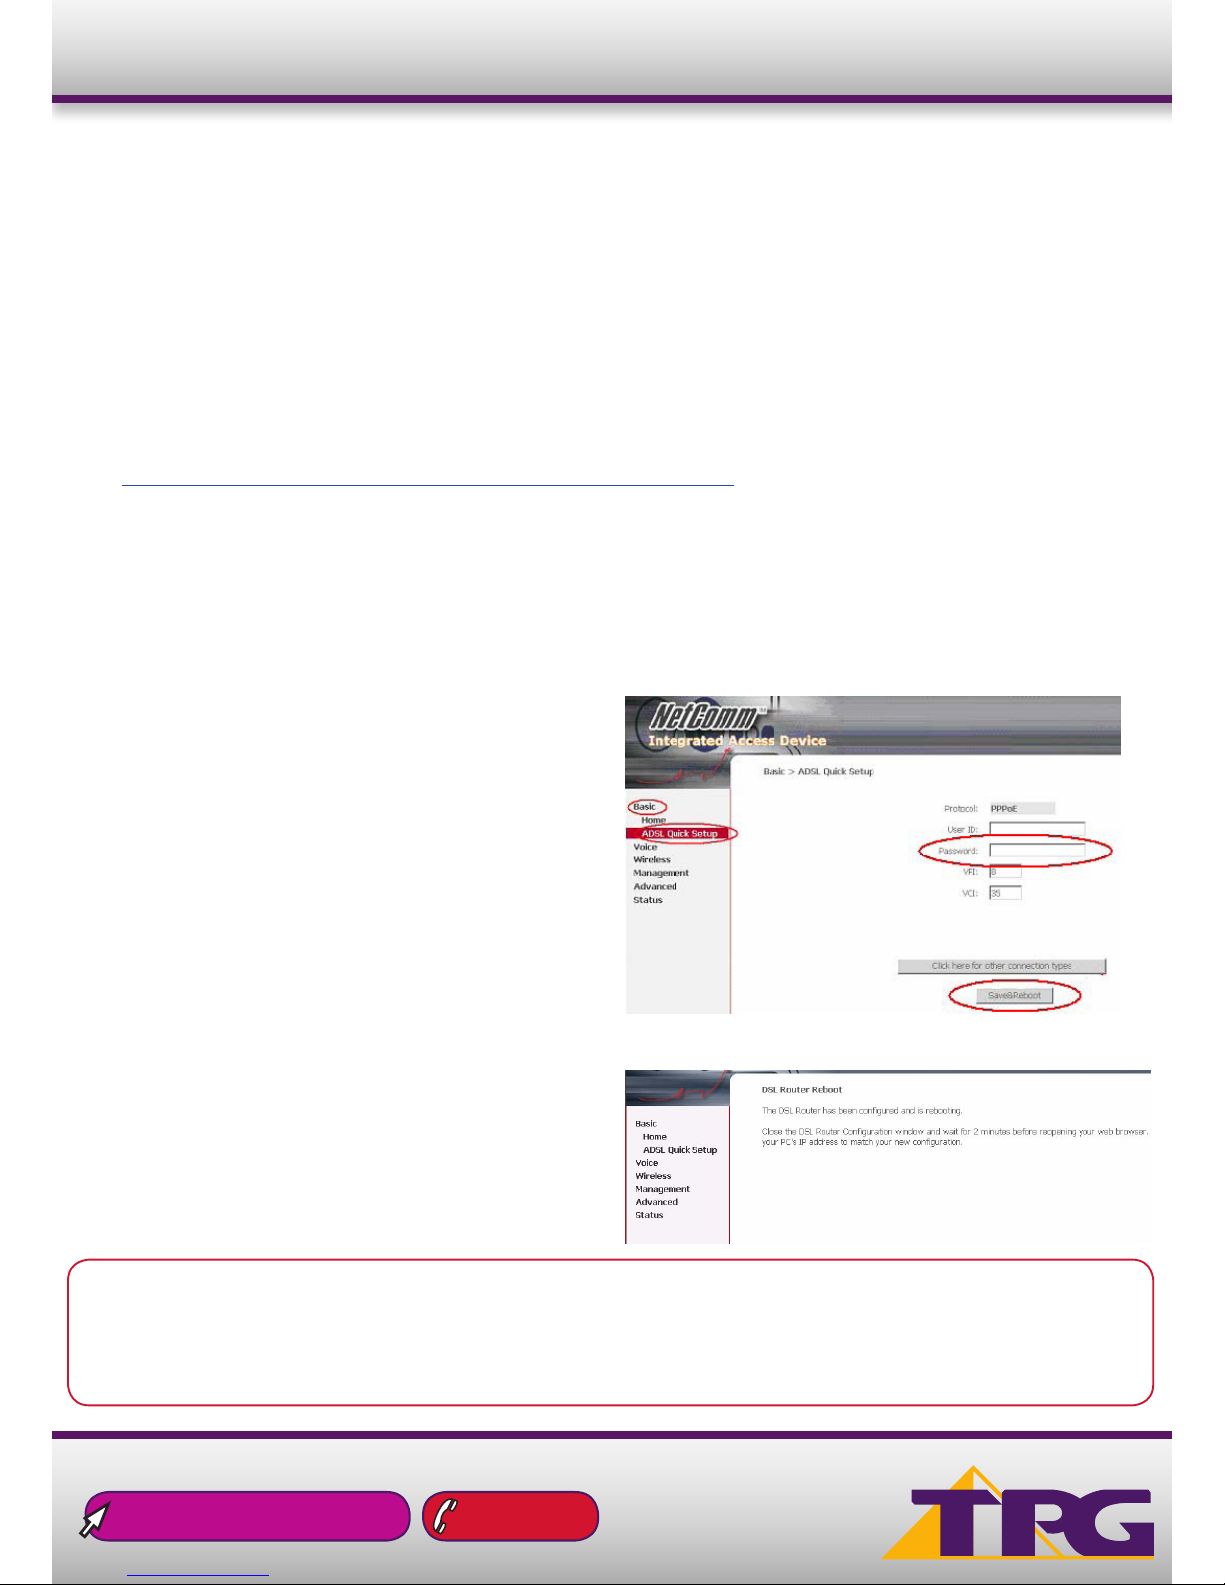
J. Click on Save and Reboot
K. Reboot will take approx 2 mins after which your router should
be ready to be used. To browse a website, please launch your
browser
L. Your VoIP and wireless setup should remain unaffected
Netcomm NB9W
Page 5
5
Modem Conguration Guide
4. OPTIONAL
Other Additional Services:
If you are reconfiguring your router from Layer 3 to Layer 2 PPPoE and you also had other services like web server, mail
server, VPN etc that were dependent on your old Layer3 IP address, please ensure that appropriate reconfiguration is done to
allow normal services to resume.
5. CHANGE OF PASSWORD
For security purposes we highly recommend that you change your password if you are using your default or if you believe
your password security has been compromised.
To change your password, first please
visit https://cyberstore.tpg.com.au/your_account/?function=changepassword. Your new password will take approximately
10-15 minutes to take effect, after which you must reconfigure your new password in your router.
To change your password in your router, please follow the following steps:
A. Open your browser and in the address bar type http://192.168.1.1 and press enter
B. Enter admin for both the username and password and click on OK. If you have changed the login credential, please enter
the current username and password for your router interface
C. In the left menu, click on Basic then ADSL Quick Setup.
D. Enter your new password and click on “Save and Reboot”
E. Reboot will take approx 2 mins after which your router
should be ready to be used. To browse a website,
please launch your browser
13 14 23tpg.com.au/support
PLEASE NOTE:
ADSL routers will by default be capable of automatic authentication. This means your router will use your credentials you have
provided to make the Internet connection. Each time your router is powered on, it will initialize this automated authentication
process after which your router will receive a public IP address (fixed or dynamic depending on your plan) and DNS settings
from TPG.
Netcomm NB9W
 Loading...