

Page 1
1
Modem Conguration Guide
HG658
Conguring in Layer2 PPPoE for Windows 10
IMPORTANT MESSAGE
Your modem has already been pre-configured, you do not need to follow each step of the set-up guide but should retain
this document in case you need to manually configure your equipment.
To configure your PC/Laptop with your wireless password including changing your wireless password, please
proceed to step 4.
Contents
1. Physical Connection
2. Network Configuration
3. Configuring Modem
4. Configuring Wireless
5. Change of Password
1. PHYSICAL CONNECTION
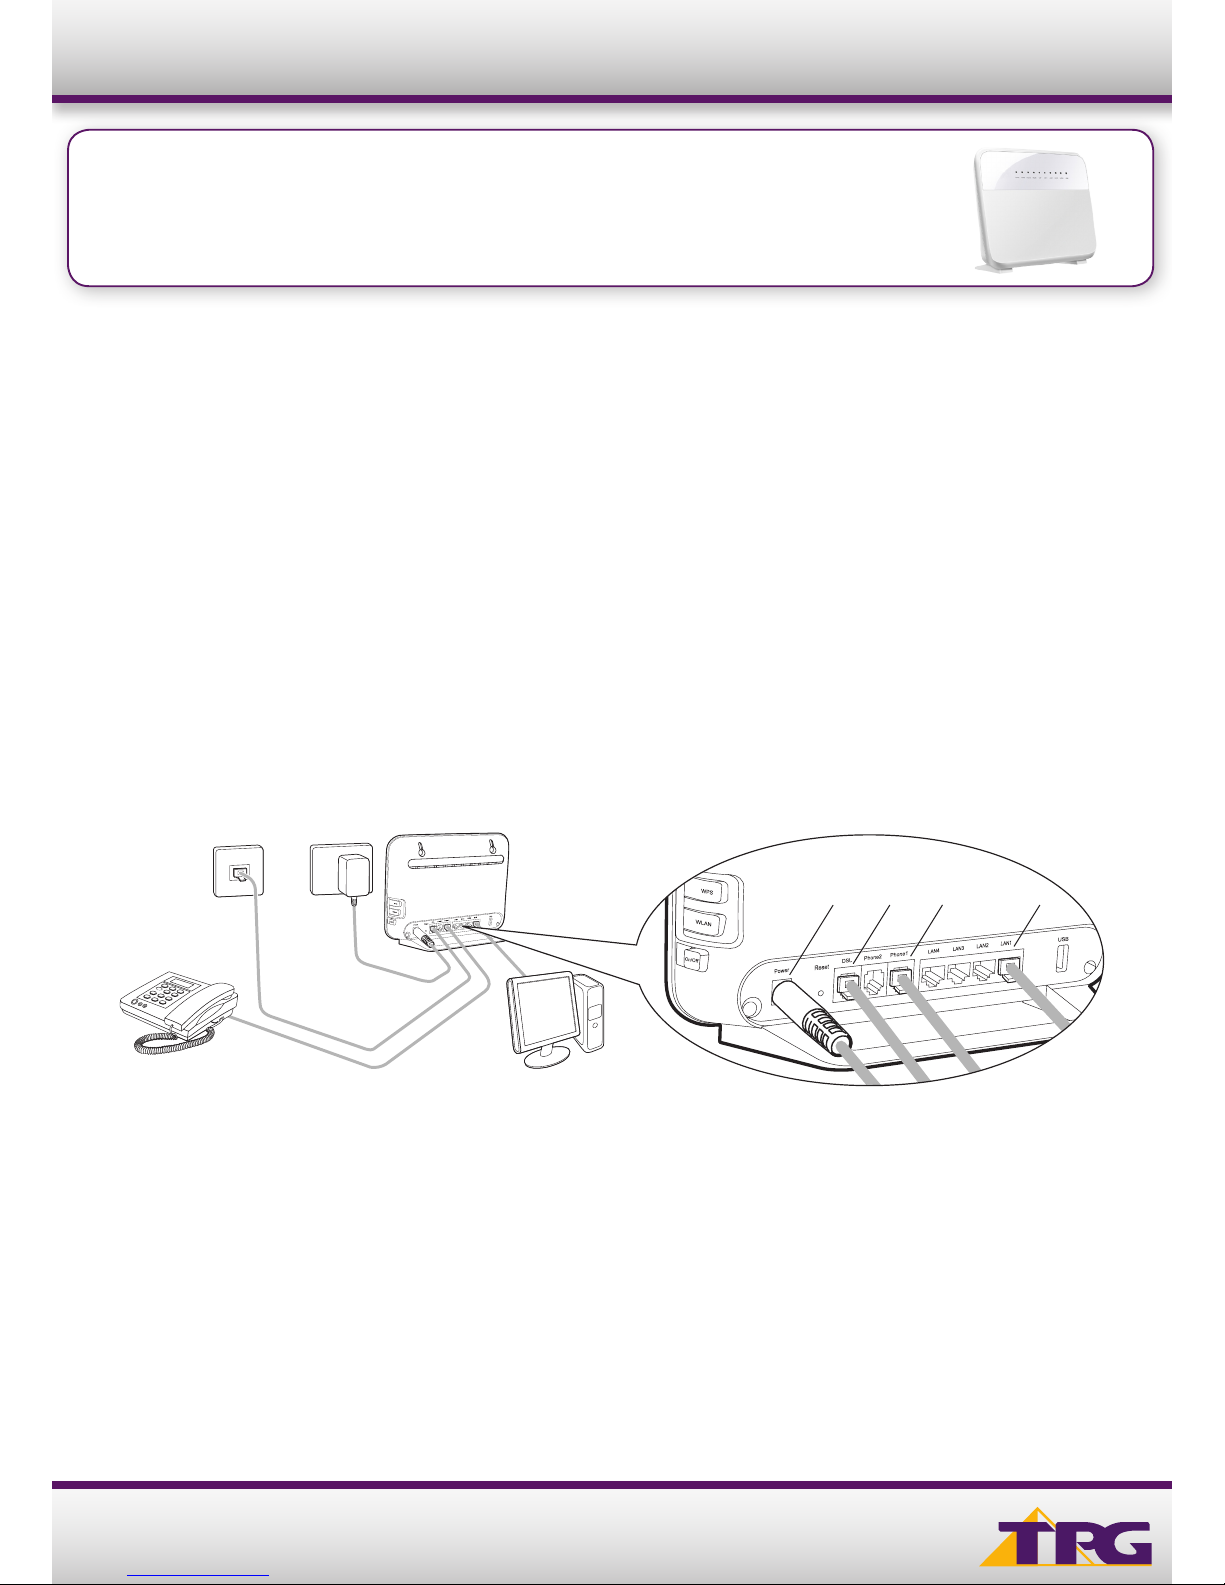
Have your modem powered on and connected directly to your PC via Ethernet Cable before you begin, as these
instructions are based on wired Ethernet connection
1. Connect the Power port on the back of your modem to your power socket.
2. Connect the DSL port on the back of the modem to your telephone wall socket.
3. Connect your telephone handset to the Phone1 port on the back of your modem.
4. Connect your PC to any of the 4 LAN ports on the back of your modem.
2. NETWORK CONFIGURATION
PPPoE connection does not require you to have an IP address or DNS settings manually encoded on your network card.
PPPoE connection uses authentication to establish the Internet connection and once connected your modem will be
assigned an IP and DNS settings from TPG.
To begin, your PC needs to receive a private IP address from the modem. Most modems have DHCP enabled by default
that will take care of this.
HG658
PC
Wi-Fi Modem
Telephone
Power Socket
Wall Socket
2
1 3
4
Page 2
2
Modem Conguration Guide
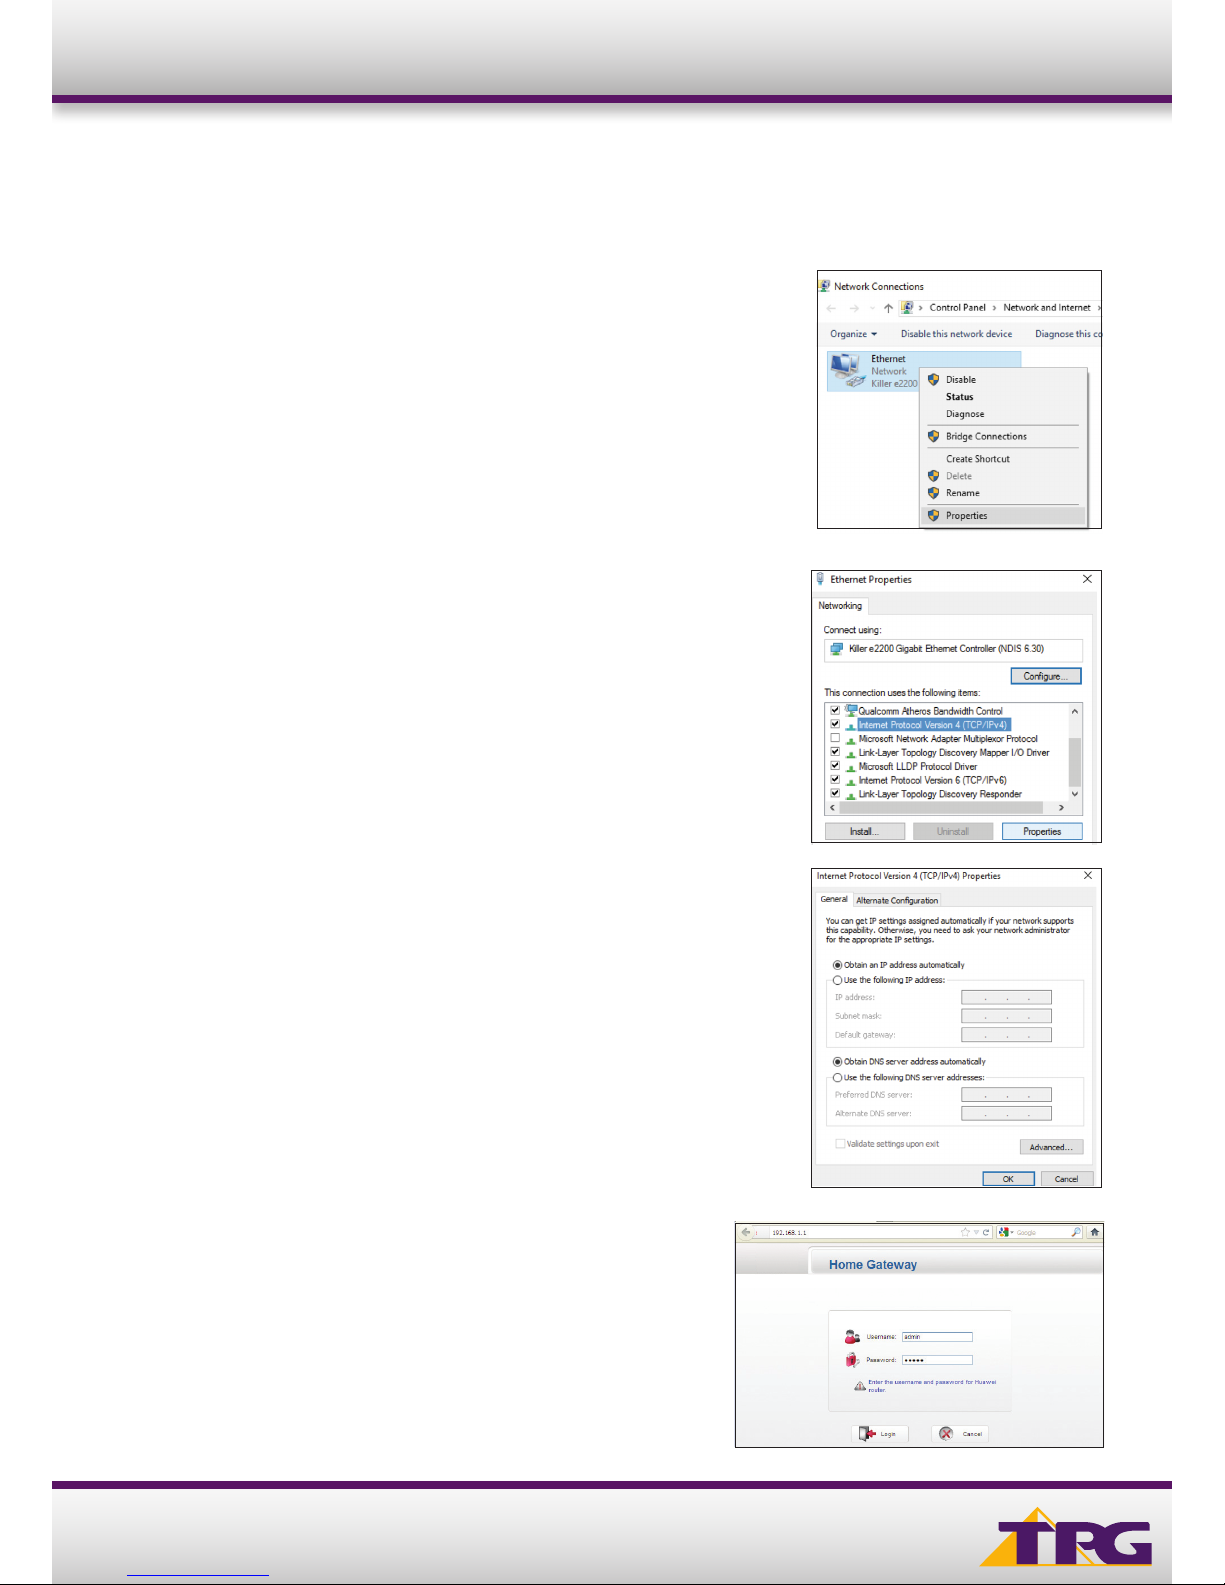
C. Under Ethernet properties, select Internet Protocol Version 4
TCP/IP v4 and then click Properties
3. CONFIGURING MODEM
A. Open your browser and in the address bar type
http://192.168.1.1 and press Enter
B. Enter admin for both the username and password and click Login.
If you have changed the login credentials, please enter the current
username and password for your modem interface.
D. Ensure “Obtain an IP address automatically” is selected
E. Ensure “Obtain DNS server address automatically” is selected
F. Click OK
HG658
To ensure your Network Card is ready for this, please follow the following steps:
A. Click Start -> Settings -> Network and Internet -> Ethernet ->
Change adapter options
B. Right click on Ethernet, and then click Properties
Page 3
3
Modem Conguration Guide HG658
4. CONFIGURING WIRELESS
Things you need to know before you begin:
By default the modem that you purchased from TPG is configured with the following wireless security settings:
SSID (name for the wireless connection): TPG-xxxx (xxxx is a random 4 digit alphanumeric code printed on the sticker
underneath your modem)
Authentication Type: WPA-PSK/WPA2-PSK
Encryption: TKIP/AES
Pre Shared Key: initially configured to be the same as your TPG password. You can enter your own text as an option.
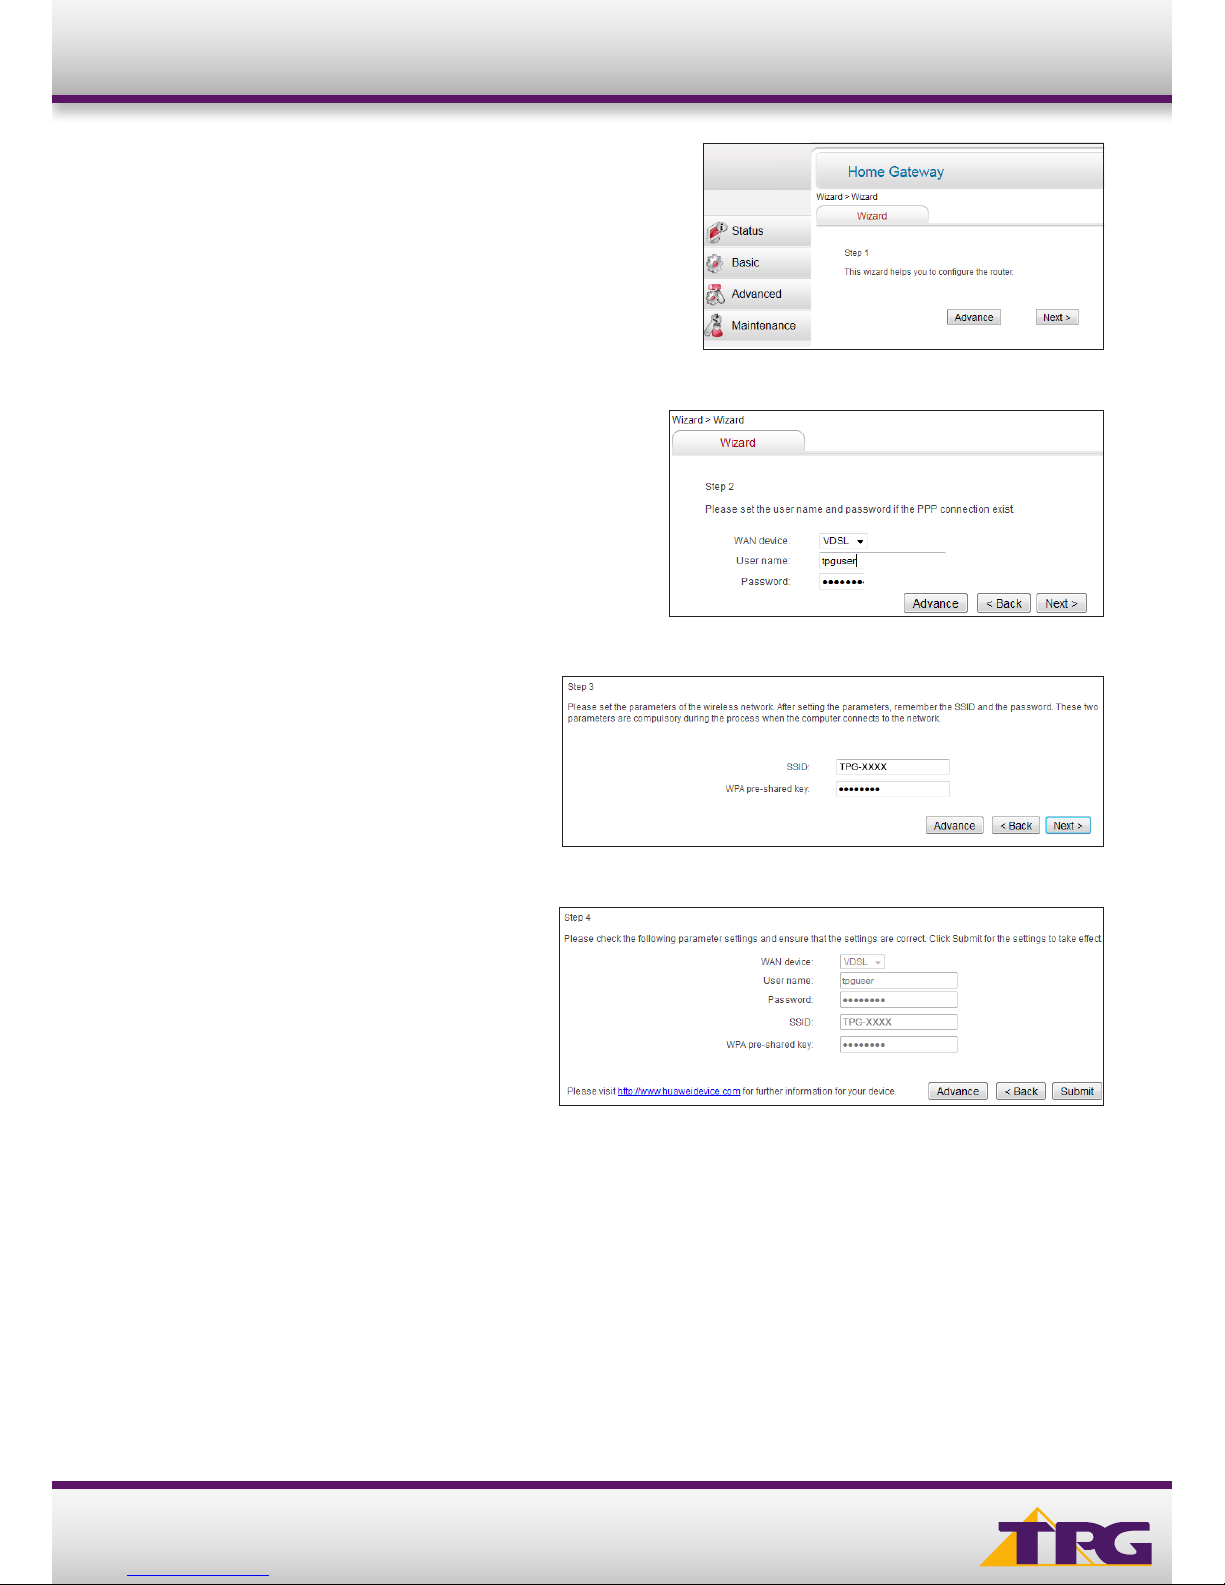
C. You will see the screen shown on the right. Click Next.
F. Click Submit.
Quick Setup complete!
E. You can change your WiFi details or elect to
keep the default settings. The default WiFi SSID is
TPG-xxxx (xxxx is a random 4 digit alphanumeric
code printed on the sticker underneath your
modem). The WiFi password is set to your TPG
password by default. Click Next.
D. Enter your TPG username and password. Click Next.
Page 4
4
Modem Conguration Guide
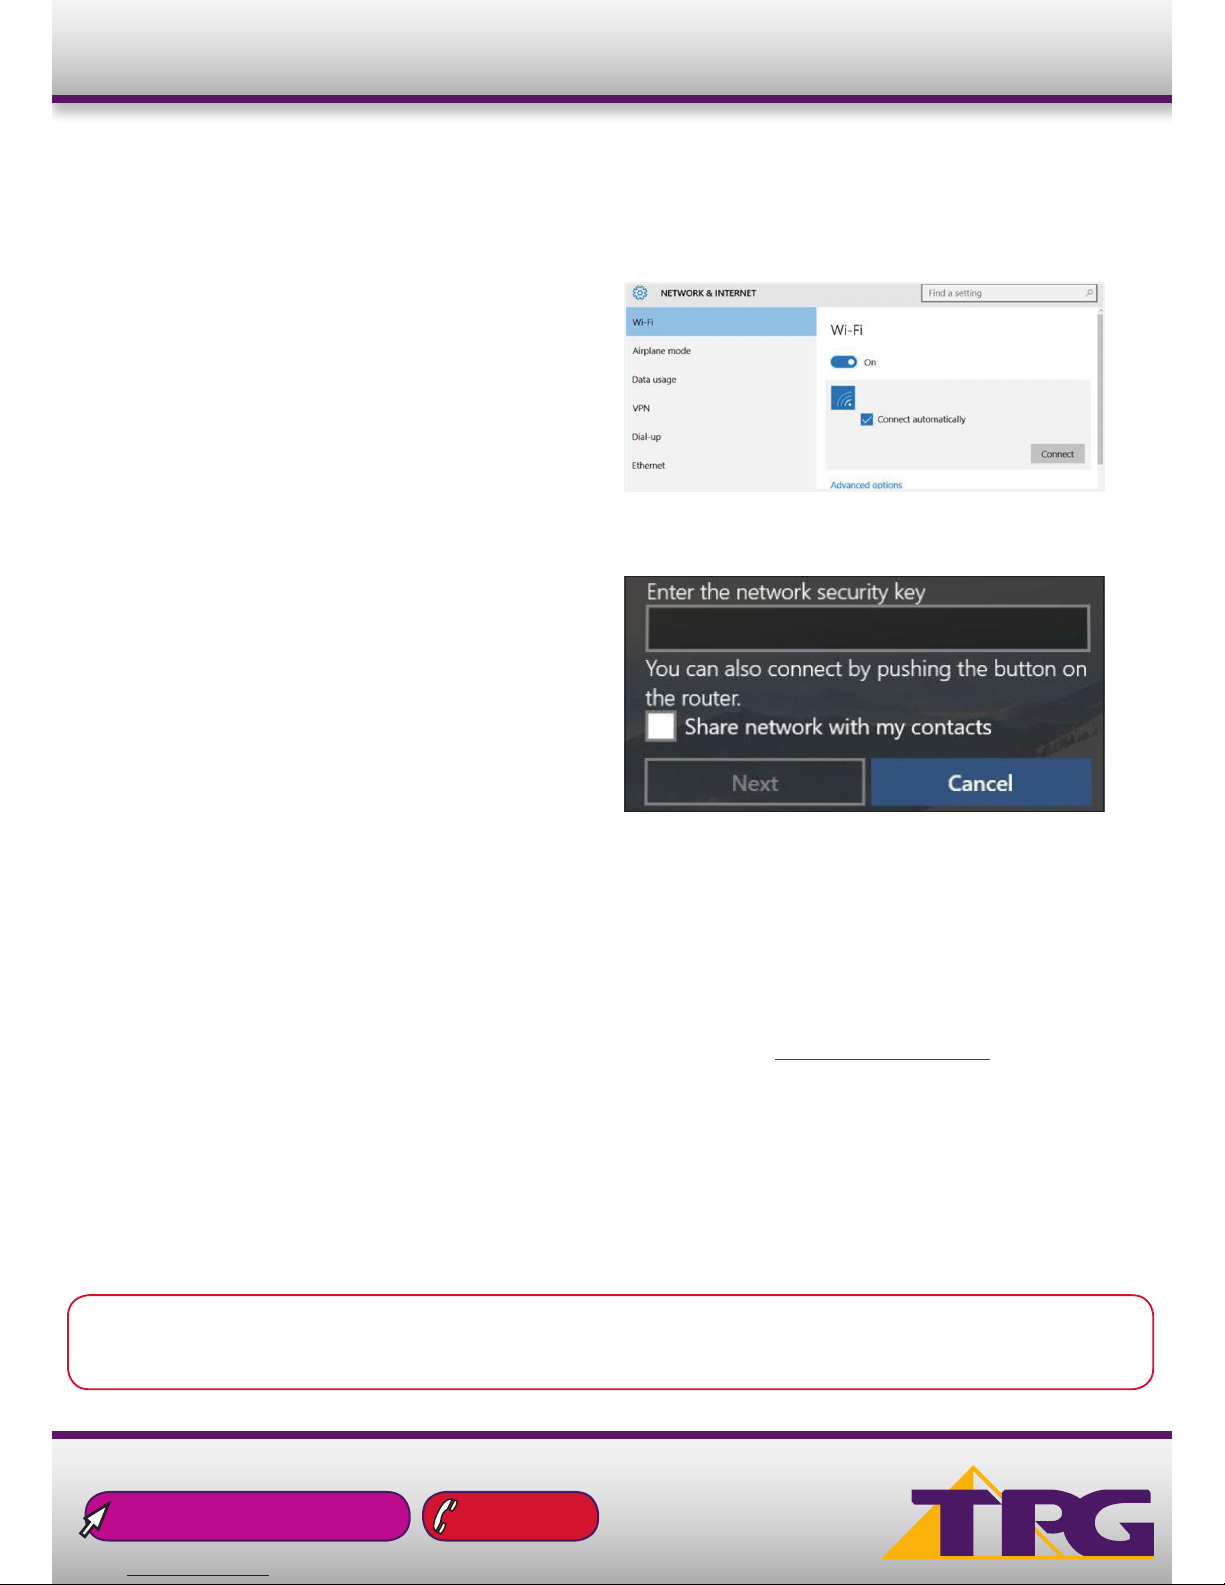
D. You will now be prompted to enter your network security
key/ Wireless password. This is the same as your TPG
password if you did not change it on the modem.
E. Click NEXT to finish.
Note: You’ll see an option that says “share this network with
my contacts”. We recommend you don’t tick this box.
F. You should now see your status as ‘Connected’.
C. Ensure Connect Automatically is ticked,
and then Click Connect.
B. Click Wi-Fi and then find the SSID (Network name) of your
modem. By default, the network name should be TPG-xxxx
(xxxx is a random 4 digit alpha numeric code).
HG658
5. CHANGE OF PASSWORD
For security purposes we highly recommend that you change your password if you are using your default or if you believe your
password security has been compromised. For password information, please visit www.tpg.com.au/support.
PLEASE NOTE:
Each time your modem is powered on, it will initialize this automated authentication process after which your modem will
receive a public IP address (fixed or dynamic depending on your plan) and DNS settings from TPG.
13 14 23tpg.com.au/support
To use Wireless, ensure that you already have set up your wireless adapter.
A. Click Start -> Settings -> Network and Internet
TPG-Y3B8
 Loading...