

Page 1
TPGBizPhone
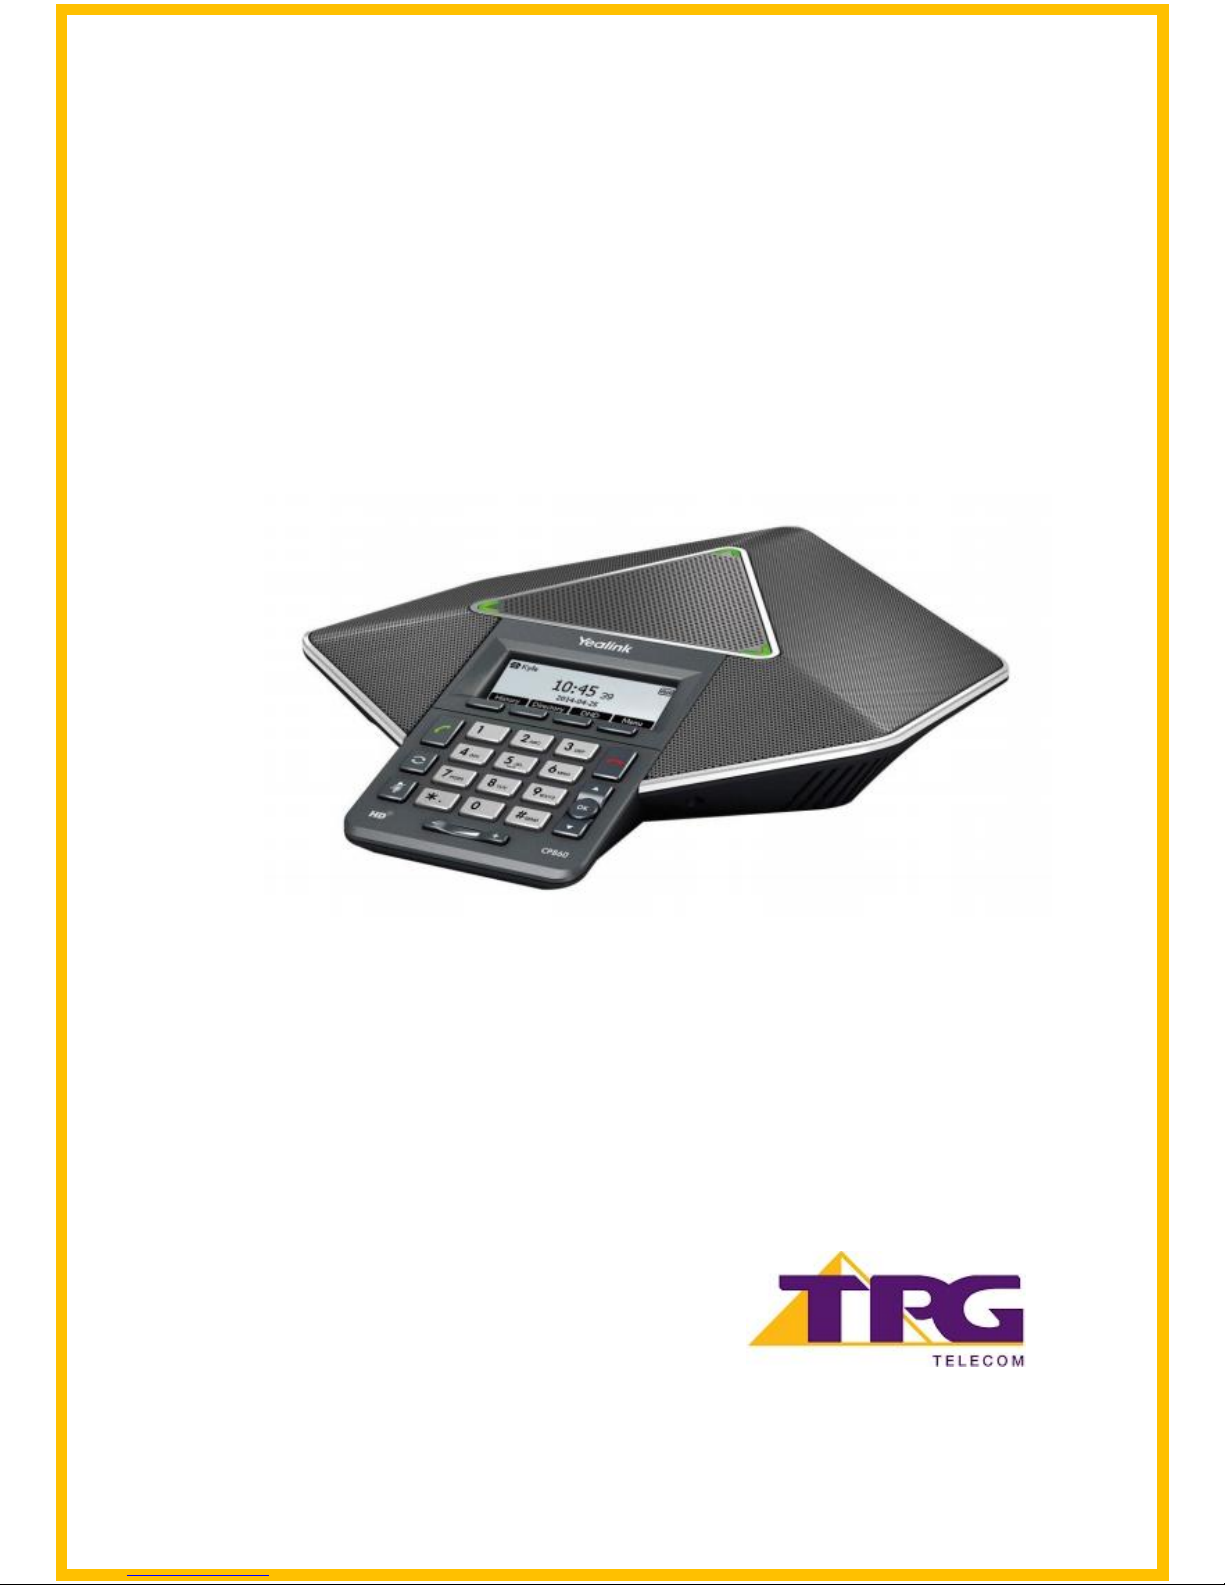
CPE860 IP Conference Phone
User Guide
Page 2

TPG BizPhone CPE860 IP Conference Phone User Guide P a g e | 2
Contents
Overview ...................................................................................................................................... 5
Hardware Component Instructions ........................................................................................... 5
Icon Instructions ...................................................................................................................... 7
LED Instructions ...................................................................................................................... 8
Customising Your Phone ............................................................................................................. 9
General Settings ...................................................................................................................... 9
Contrast ............................................................................................................................... 9
Backlight .............................................................................................................................. 9
Language ........................................................................................................................... 10
Time & Date ........................................................................................................................ 10
Audio Settings ....................................................................................................................... 11
Volume ............................................................................................................................... 11
Ring Tones ......................................................................................................................... 12
Contact Management ............................................................................................................. 12
Directory ............................................................................................................................ 12
Local Directory ................................................................................................................... 12
Blacklist ............................................................................................................................. 17
Call History Management ................................................................................................... 18
Basic Call Features .................................................................................................................... 20
Placing Calls .......................................................................................................................... 20
Placing Calls from Local Directory ..................................................................................... 21
Placing Calls from Call History ........................................................................................... 21
Answering Calls ..................................................................................................................... 22
Answering when not in another call ................................................................................... 22
Answering when in another call ......................................................................................... 22
Ending Calls ........................................................................................................................... 22
Redialling Numbers ................................................................................................................ 22
Call Mute ................................................................................................................................ 23
Call Hold/Resume ................................................................................................................... 24
Multiple Calls on Hold ........................................................................................................ 24
Do Not Disturb (DND) ............................................................................................................. 24
Call Forward ........................................................................................................................... 25
Static Forwarding ............................................................................................................... 25
Dynamic Forwarding .......................................................................................................... 26
Call Transfer .......................................................................................................................... 27
Call Waiting ............................................................................................................................ 28
Page 3

TPG BizPhone CPE860 IP Conference Phone User Guide P a g e | 3
Three-Way Conference ........................................................................................................... 28
Anonymous Call ..................................................................................................................... 30
Anonymous Call Rejection ..................................................................................................... 30
Advanced Phone Features ......................................................................................................... 31
Voice Mail .............................................................................................................................. 31
Call and Conference Recording .............................................................................................. 31
Call Recording ................................................................................................................... 32
Conference Recording ....................................................................................................... 33
Recorded Call Playback ......................................................................................................... 34
Page 4

TPG BizPhone CPE860 IP Conference Phone User Guide P a g e | 4
Getting Started
Welcome to your TPG BizPhone service!
If this is the first time you are using the TPG BizPhone CPE860 IP Conference Phone, please first
refer to the TPG BizPhone CPE860 Quick Startup Guide to assemble and start up your handset. The
BizPhone Quick Startup Guide is available on your Online Portal: https://frontier.tpgtelecom.com.au/
Topic includes:
Packaging Contents
Assembling the Phone
Startup the Phone
Basic Handset Settings
Basic Call Features
If you require additional assistance to your new handset, please contact your assigned System
Administrator.
Page 5
TPG BizPhone CPE860 IP Conference Phone User Guide P a g e | 5
Overview
Hardware Component Instructions
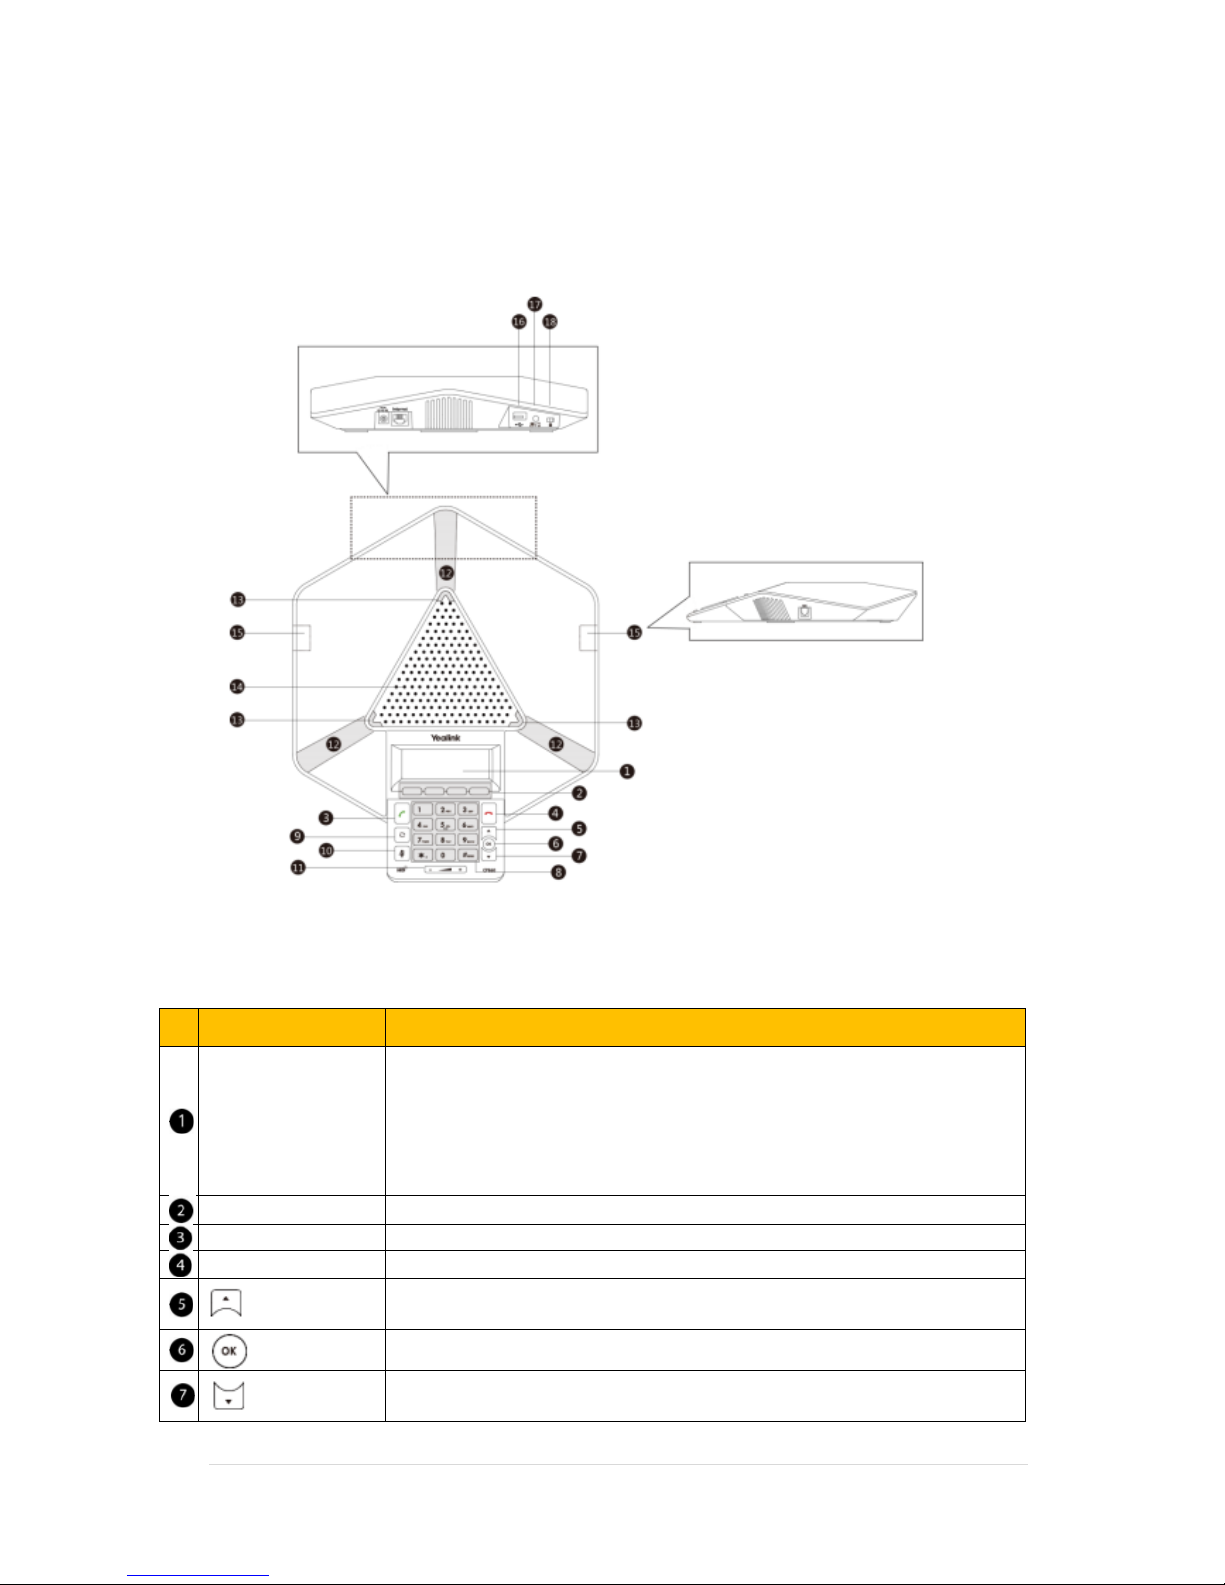
The main hardware component of the BizPhone CP860 IP Conference Phone is the LCD screen and the Keypad.
Hardware component instructions of the BizPhone CPE860 IP Conference Phone are:
Item
Description
LCD Screen
Shows information about call, messages, soft keys, time, date and other relevant
data:
Call information – Caller ID, Call Duration
Icons (for example, DND)
Missed call text or second incoming caller information
Prompt text (for example, “Saving config file!”)
Soft Keys
Label automatically to identify their context-sensitive features.
Off-hook Key
Enters the pre-dialing screen, places a call or answers a call.
On-hook Key
Ends a call or returns to the idle screen.
Scrolls through the displayed information upwards.
Views call history list when the phone is idle.
Confirms actions or answers incoming calls.
Scrolls through the displayed information downwards.
Views the directory list when the phone is idle.
Page 6
TPG BizPhone CPE860 IP Conference Phone User Guide P a g e | 6
Keypad
Provides the digits, letters, and special characters in context-sensitive
applications.
Redial Key
Redials a previously dialled number.
Mute Key
Toggles mute feature.
Volume Key
Adjusts the volume of the speaker and ringer.
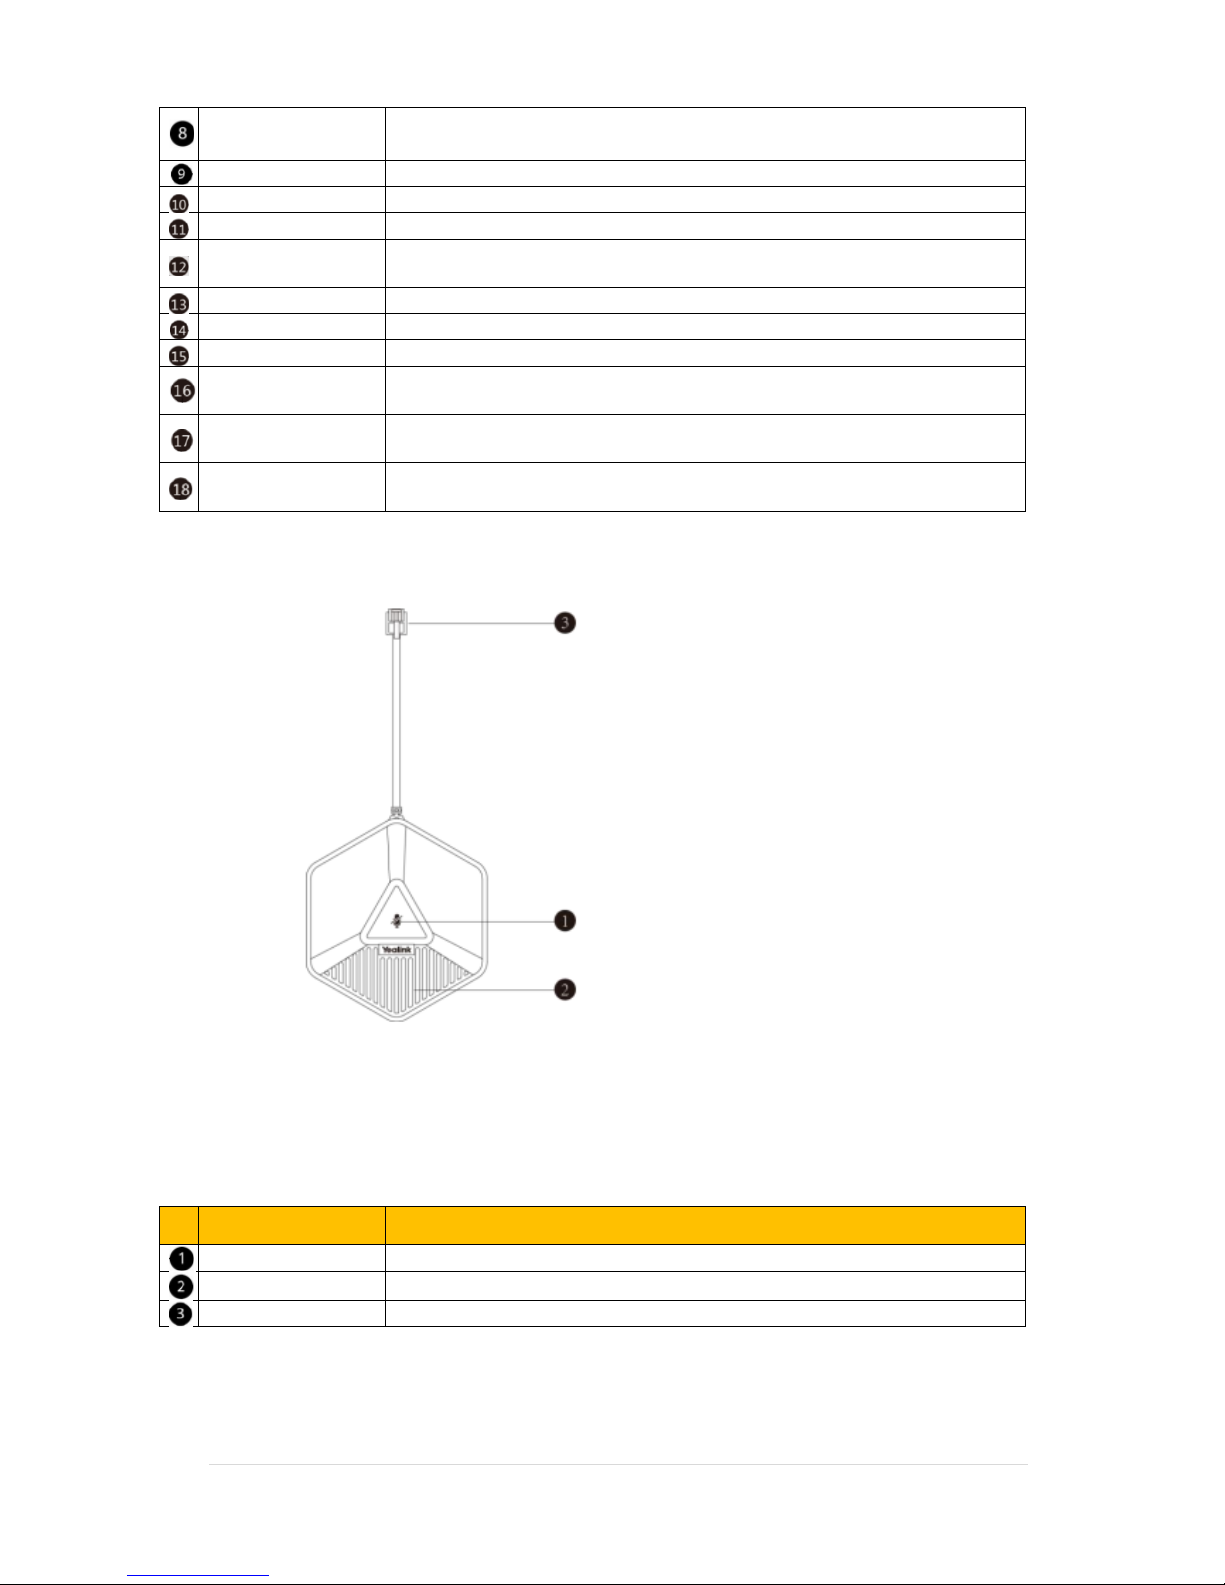
Three Internal
Microphones
Provide 10-feet (3-meters) and 360-degree coverage to transmit sound to other
phones.
LED indicators
Indicate phone and call statuses.
Speaker
Provides hands-free (speakerphone) audio output.
Tow MIC Ports
Allow you to connect two expansion microphones to your phone (optional).
US Port
Allows you to connect an USB (optional) flash drive to your phone so you can
record and play back calls.
PC/Mobile Port
Allows you to connect an optional PC or Mobile Device to your phone so you can
connect the PC or mobile device audio to your phone.
Security Slot
Allows you to connect a universal security cable to your phone so you can lock
down your phone. The phone will not be removed after locked.
The following figure shows the primary hardware component of CPE80 expansion microphone:
Note:
- The BizPhone Conference plan does not come with the CPE80 expansion microphone.
- The BizPhone Conference Plus plan comes with 2 x CPE80 expansion microphone.
Hardware component instructions of the CPE80 expansion microphone are:
Item
Description
Mute Indicator LED
Toggles and indicates mute feature.
Microphone
Transmits sound to other phones.
MIC Connector
Allows you to connect to the MIC port on the phone.
Page 7
TPG BizPhone CPE860 IP Conference Phone User Guide P a g e | 7
Icon Instructions
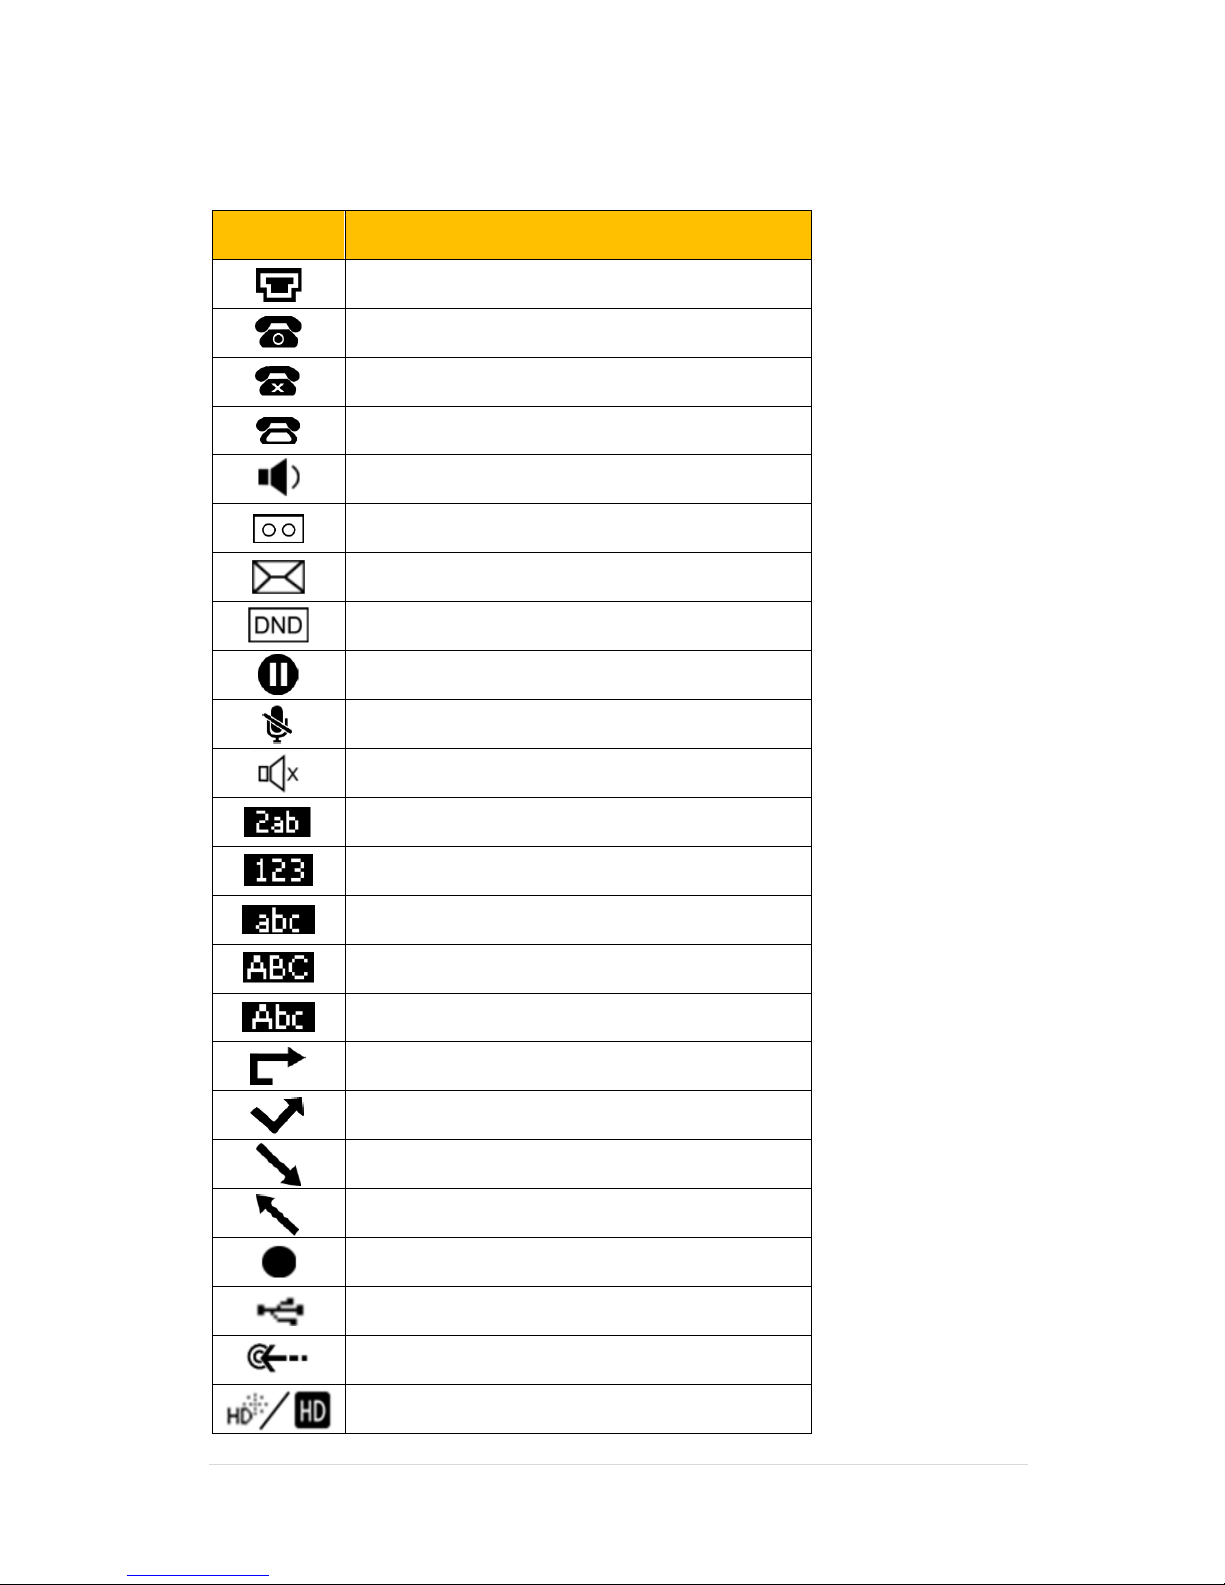
Below are the description of the icons that might appear on the LCD Screen.
Icon
Description
Network is unavailable
Registered successfully
Register failed
Registering
Hands-free speakerphone mode
Voice Mail
Text Message
Do Not Disturb
Call Hold
Call Mute
Ringer volume is 0
Alphanumeric input mode
Numeric input mode
Multi-lingual lowercase letters input mode
Multi-lingual uppercase letters input mode
Multi-lingual uppercase and lowercase letters input mode
Call Forward/Forwarded Calls
Missed Calls
Received Calls
Place Calls
Call and Conference Recording
USB flash drive is detected
USB flash drive is detecting
High Definition Voice
Page 8

TPG BizPhone CPE860 IP Conference Phone User Guide P a g e | 8
LED Instructions
Power Indicator LED
LED Status
Description
Solid Red
The phone is initialising.
The call is muted.
Flashing Red
The phone is ringing.
Solid Green
The phone places a call.
There is an active call on the phone.
Flashing Green
The call is placed on hold or is held.
Off
The phone is powered off.
The phone is idle.
Page 9
TPG BizPhone CPE860 IP Conference Phone User Guide P a g e | 9
Customising Your Phone
General Settings
Contrast
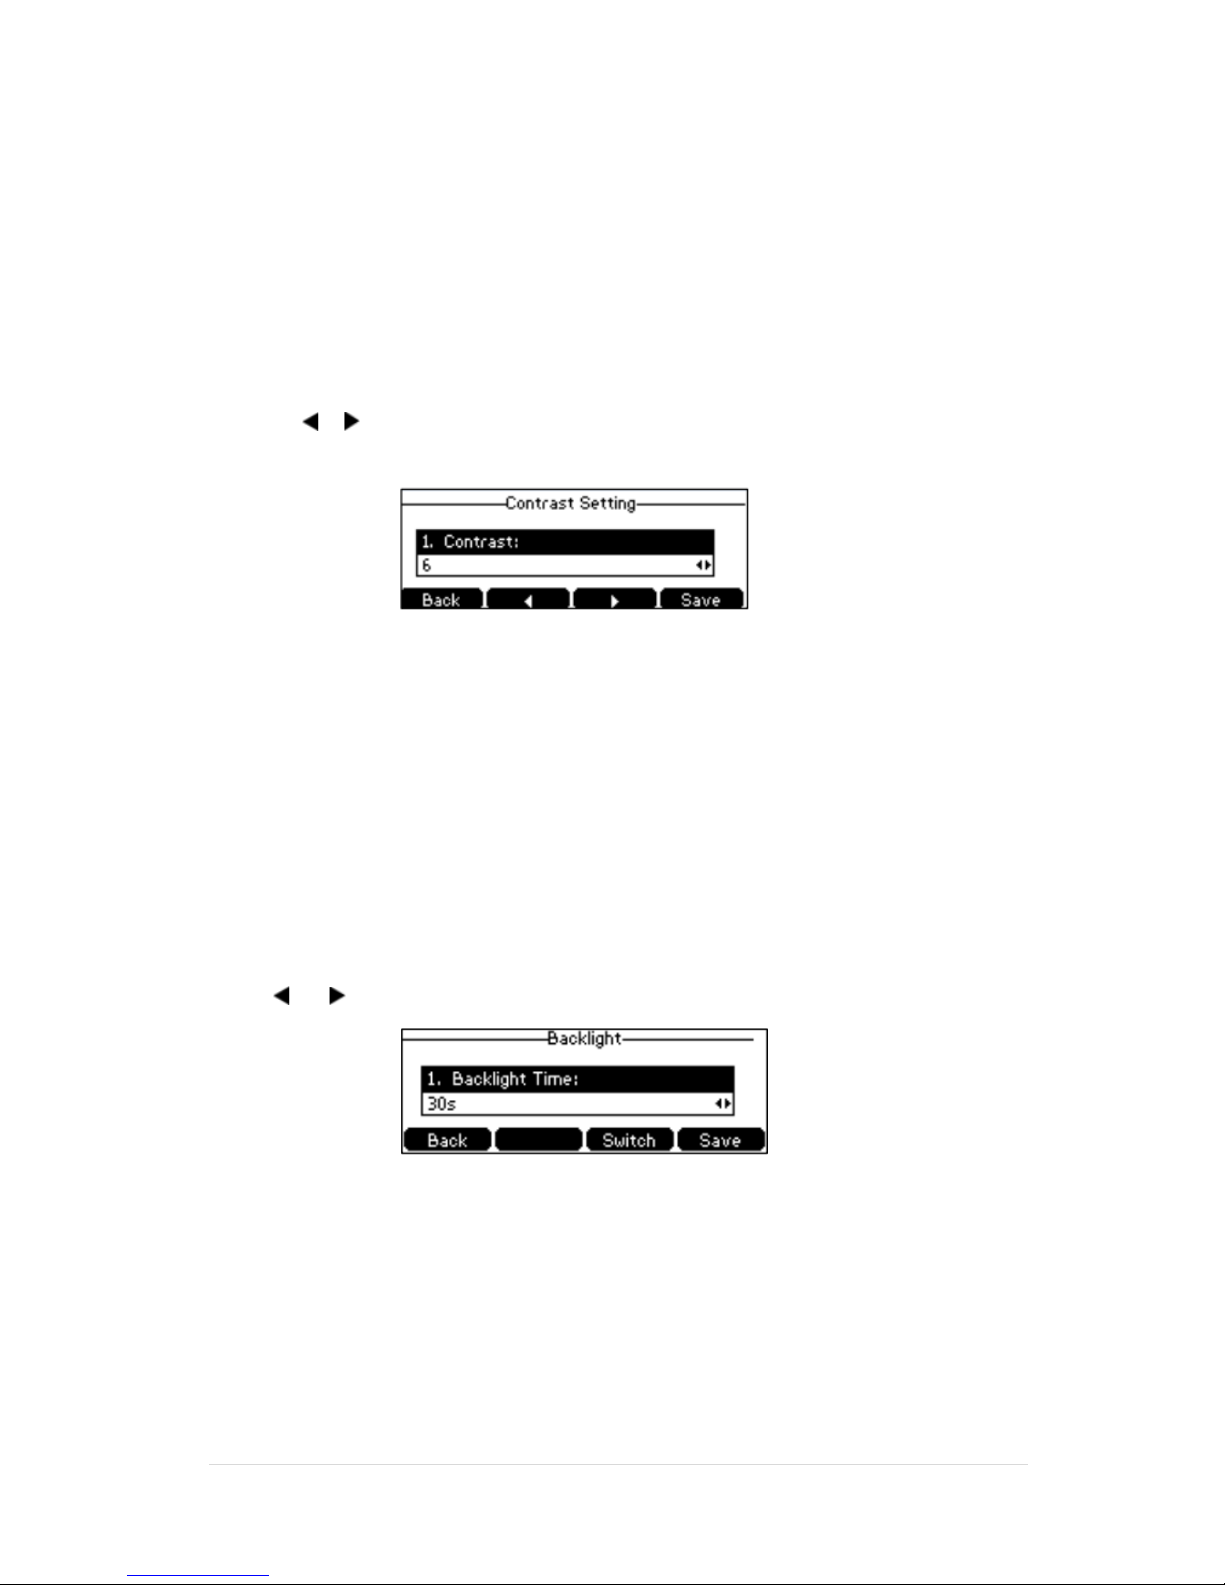
You can configure the contrast of the LCD screen to a comfortable level. The intensity of contrast ranges from 1 to 10
and the highest intensity is 10.
To configure the backlight on your phone:
1. Press Menu -> Settings -> Basic Settings -> Display -> Contrast.
2. Press the or soft key to decrease or increase the intensity of the contrast.
The default contrast level is “6”.
3. Press the Save soft key to accept the change or the Back soft key to cancel.
Backlight
You can configure the backlight to adjust the brightness of the LCD screen. Backlight on the LCD screen can be
configured from the following options:
Always On: Backlight is on permanently.
Always Off: Backlight is off permanently.
15s, 30s, 60s, 120s, 300s, 600s or 1800s: Backlight is turned off when the phone is inactive after the
designated time (in seconds).
To configure the backlight on your phone:
1. Press Menu -> Settings -> Basic Settings -> Display -> Backlight Settings.
2. Press or soft key to select the desired value from the Backlight Time field.
3. Press the Save soft key to accept the change or Back to cancel.
Page 10
TPG BizPhone CPE860 IP Conference Phone User Guide P a g e | 10
Language
The default language of the phone user interface is English.
To change the language on your phone:
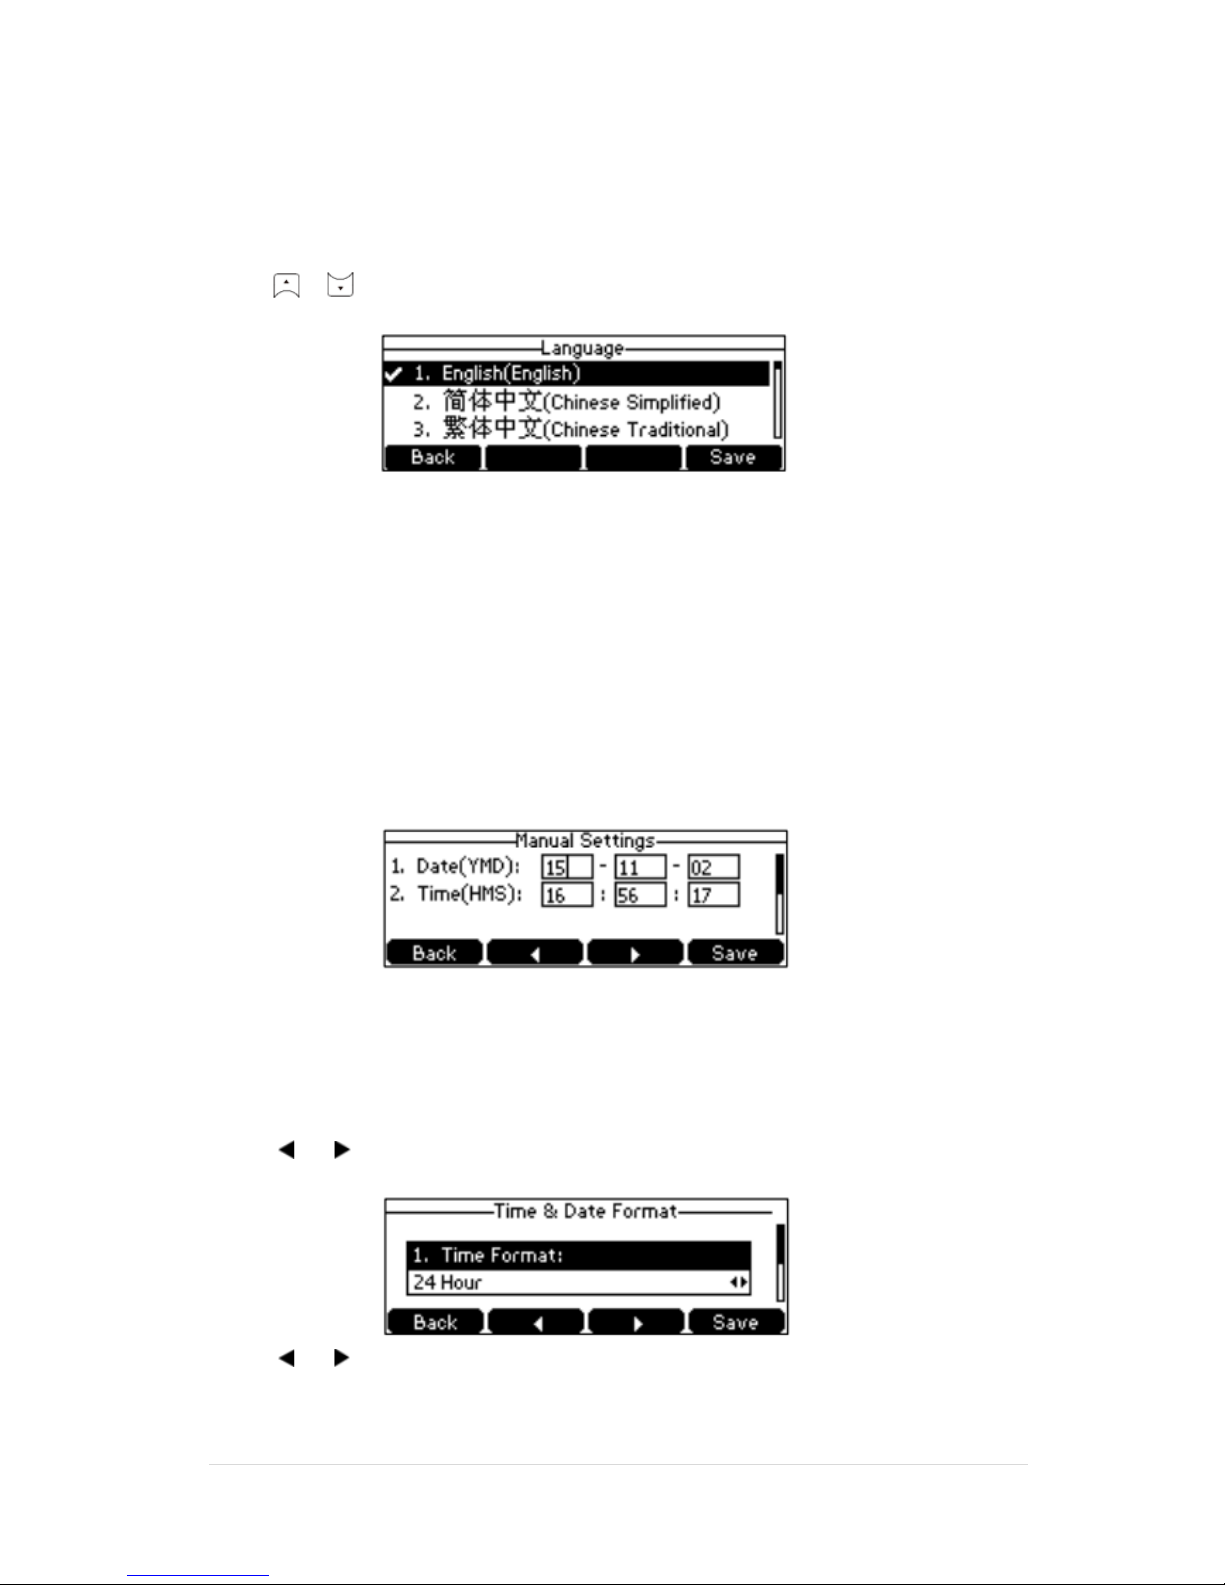
1. Press Menu -> Settings -> Basic Settings -> Language.
2. Press or to select the desired language.
3. Press the Save soft key to accept the change. Text displayed on the phone user interface will change
to the selected language.
Time & Date
The time and date are displayed on the LCD screen when the phone is idle. You can configure the date and time
manually via the phone interface.
To configure the time and date manually on your phone:
1. Press Menu -> Settings -> Basic Settings -> Time & Date -> Manual Settings.
2. Enter the specific time and date.
3. Press the Save soft key to accept the change. The time and date displayed on the LCD screen will
change accordingly.
To configure the time and date format on your phone:
1. Press Menu -> Settings -> Basic Settings -> Time & Date -> Time & Date Format.
2. Press or soft key to select the desired time format (12 Hour or 24 Hour) from the Time Format
field.
3. Press or soft key to select the desired date format from the Date Format field.
4. Press the Save soft key to accept the change or Back to cancel.
Page 11
TPG BizPhone CPE860 IP Conference Phone User Guide P a g e | 11
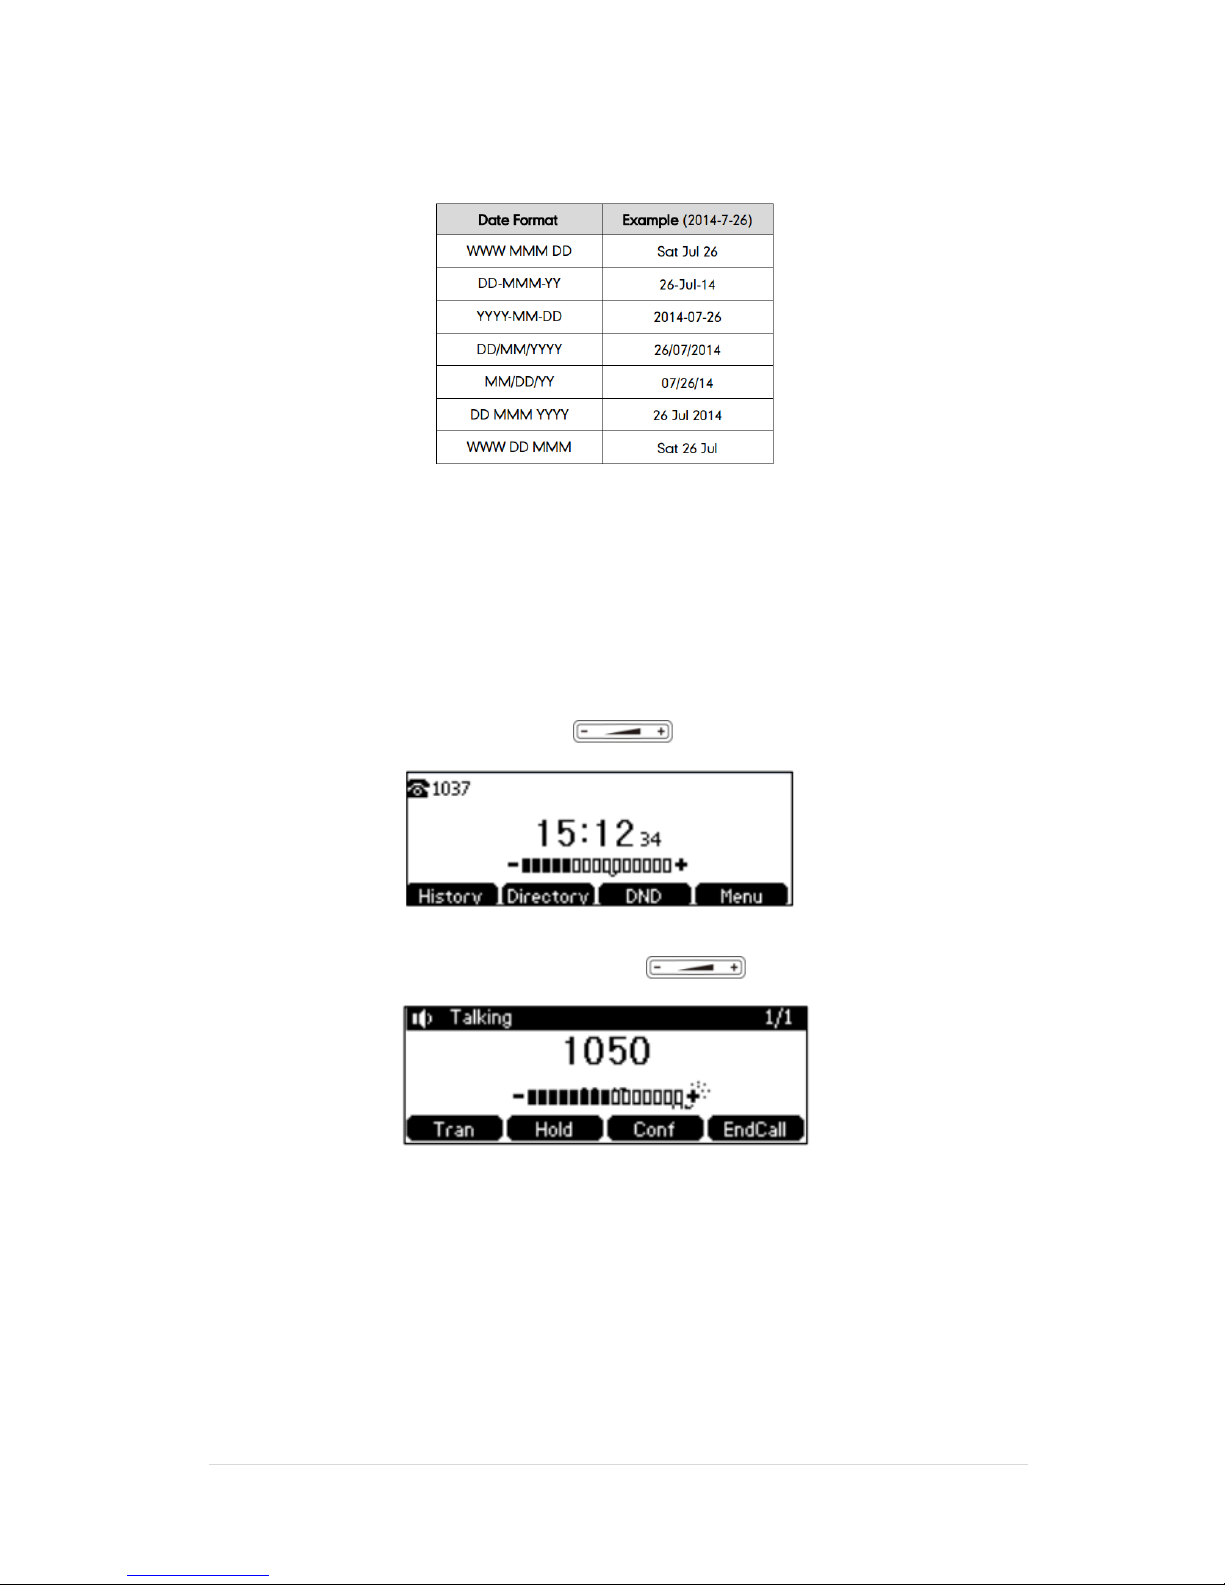
There are 7 available date formats:
Audio Settings
Volume
You can press the volume key to adjust the ringer volume when the phone is idle. You can also press the volume key
to adjust the receiver volume of currently engaged audio devices (handset, speakerphone or headset) when the phone
is in use.
To adjust the volume when the phone is idle: Press to adjust the ringer volume.
To adjust the volume when the phone is during a call: Press to adjust the speaker volume.
Page 12
TPG BizPhone CPE860 IP Conference Phone User Guide P a g e | 12
Ring Tones
Ring tones are used to indicate incoming calls. You can select different ring tones to distinguish your phone from your
neighbour’s.
To select a ring tone for your phone:
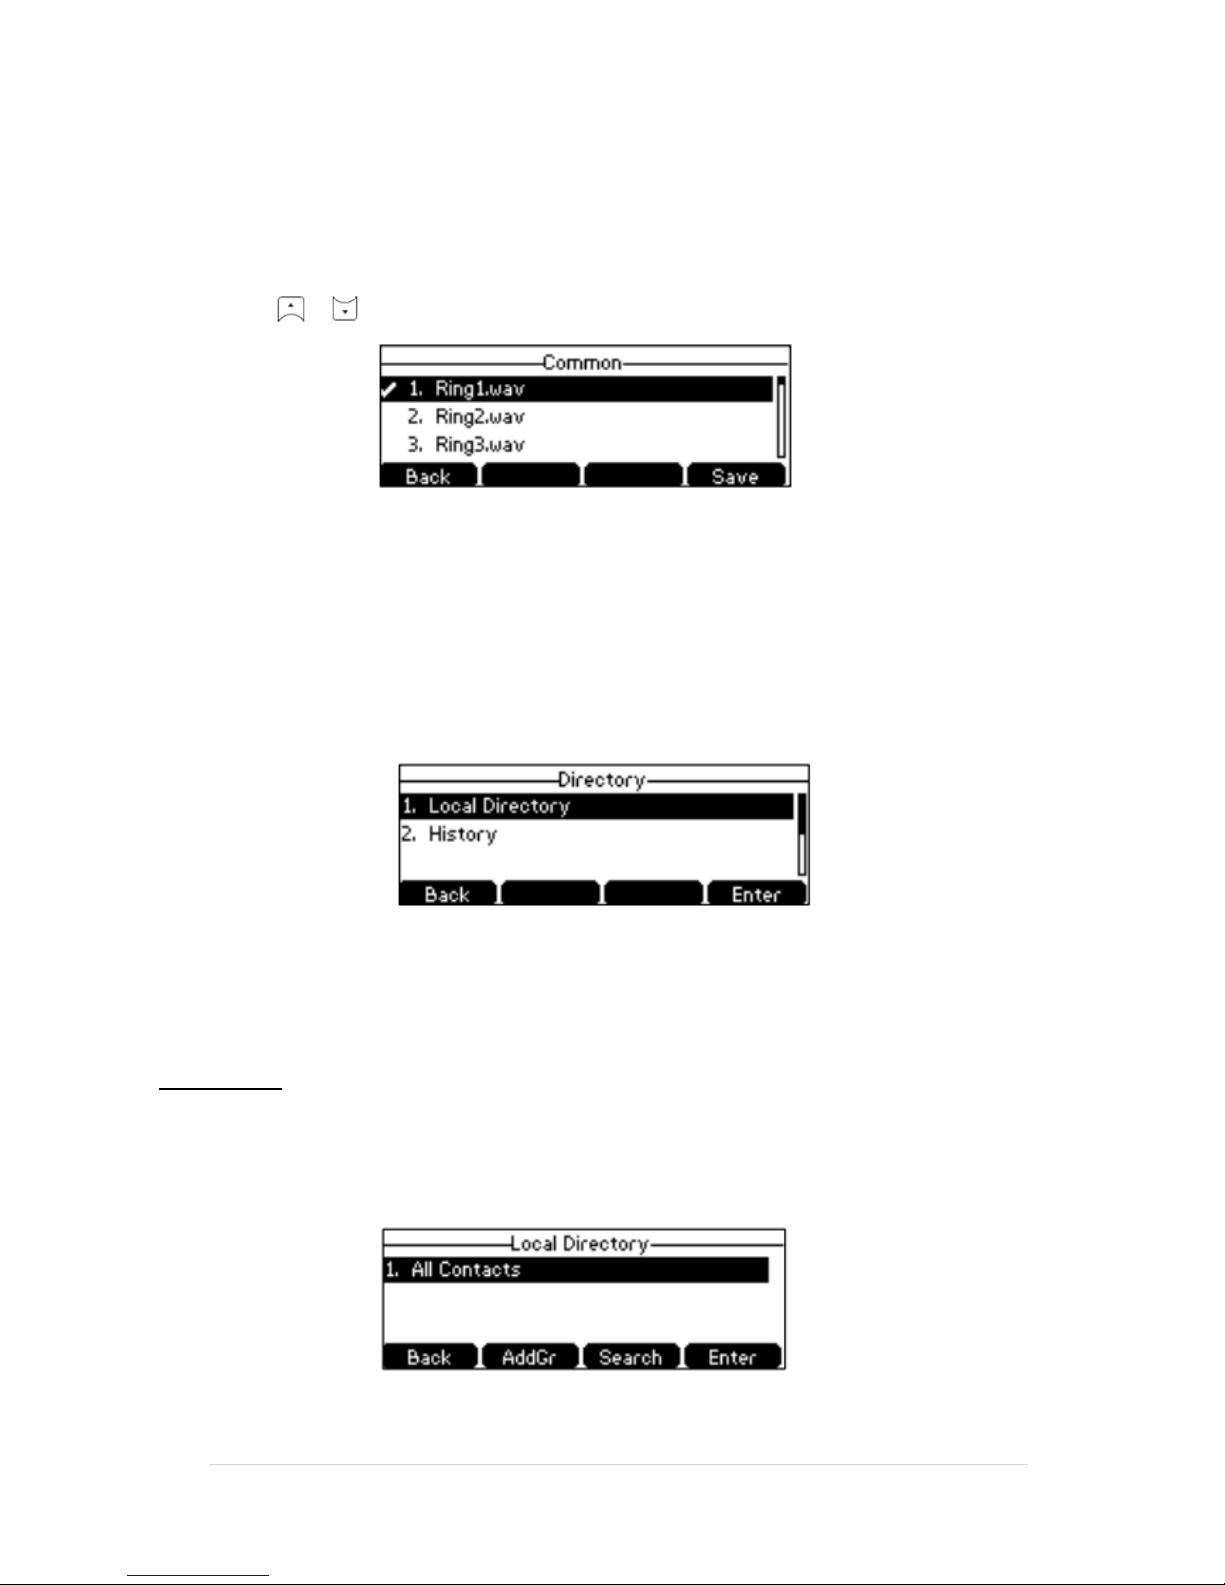
1. Press Menu -> Settings -> Basic Settings -> Sound -> Ring Tones -> Common.
2. Press or to select the desired ring tone.
3. Press the Save soft key to accept the change or Back soft key to cancel.
Contact Management
Directory
To view the directory on your phone:
Press the Directory soft key when the phone is idle. The LCD screen displays the enabled list(s) in the directory.
If there is only one list in the directory, press the Directory soft key to enter this list directly.
Local Directory
Adding Groups
To add a group to a Local Directory:
1. Press the Directory soft key.
The IP Phone enters the local directory directly as there is only Local Directory enabled in the directory
by default.
If the Local Directory is removed from the directory, press Menu -> Directory -> Local Directory to
enter the Local Directory.
Page 13
TPG BizPhone CPE860 IP Conference Phone User Guide P a g e | 13
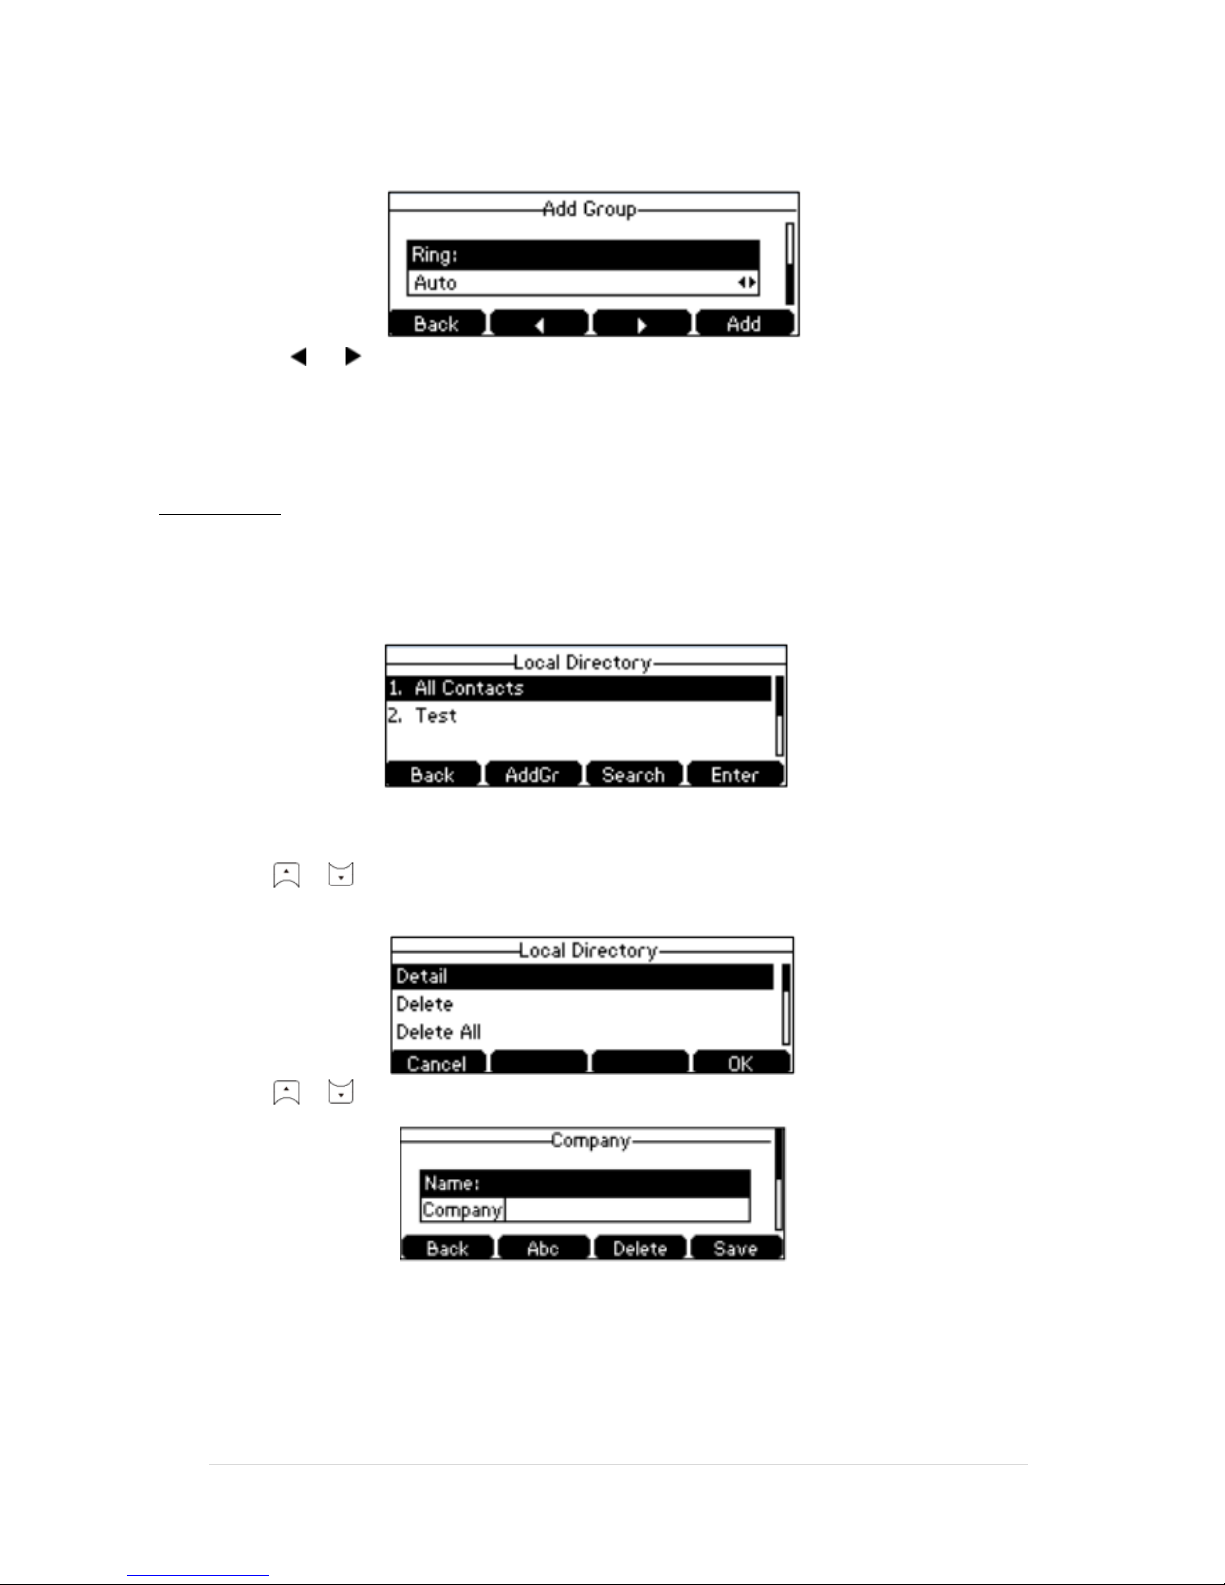
2. Press the AddGr soft key.
3. Enter the desired group name in the Name field.
4. Press or soft key to select the desired ring tone from the Ring field.
If Auto is selected, this group will use the ring tone specified for the contact.
5. Press the Add soft key to accept the change or Back soft key to cancel.
Editing Groups
To edit group in the local directory:
1. Press the Directory soft key.
The IP Phone enters the local directory directly as there is only Local Directory enabled in the directory
by default.
If the Local Directory is removed from the directory, press Menu -> Directory -> Local Directory to
enter the Local Directory.
2. Press or to highlight the desired contact group.
3. Press the Option soft key and then select Detail.
4. Press or to highlight the group information and then edit.
5. Press the Save soft key to accept the change or the Back soft key to cancel.
Page 14
TPG BizPhone CPE860 IP Conference Phone User Guide P a g e | 14
Deleting Groups
To delete a group from the local directory:
1. Press the Directory soft key.
The IP Phone enters the local directory directly as there is only Local Directory enabled in the directory
by default.
If the Local Directory is removed from the directory, press Menu -> Directory -> Local Directory to
enter the Local Directory.
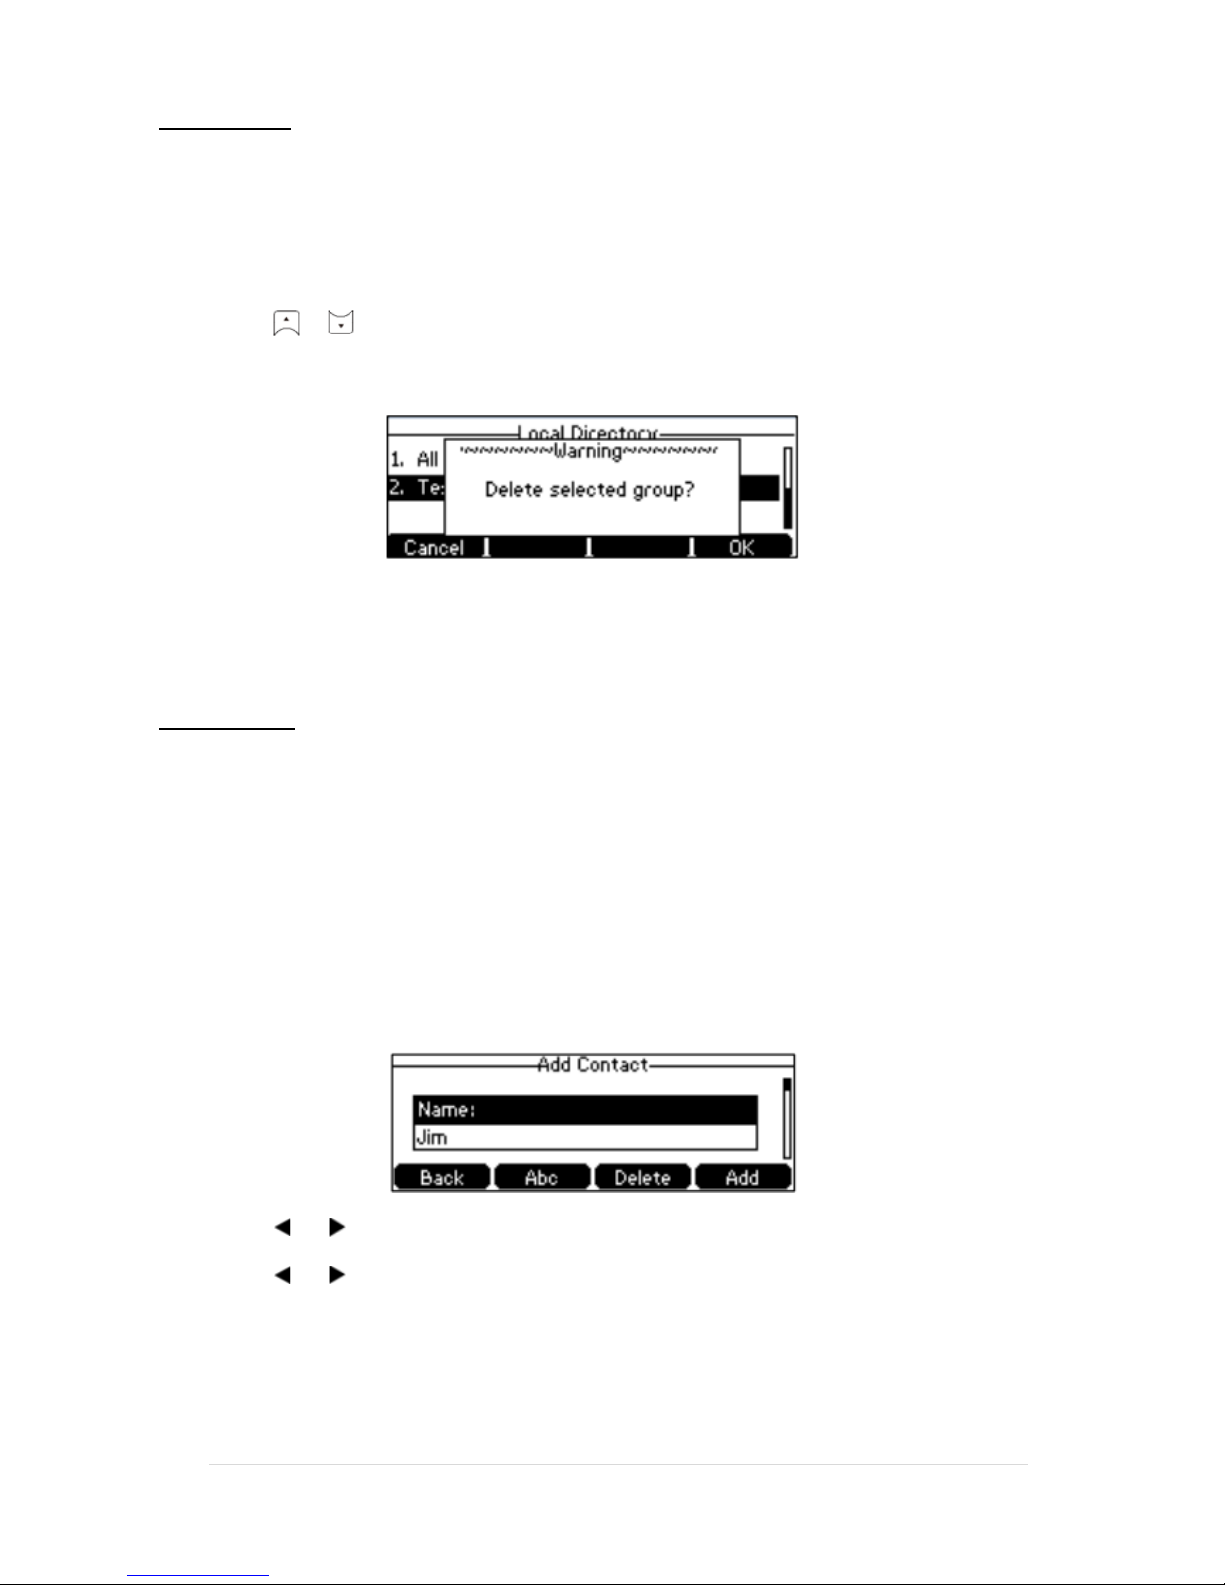
2. Press or to highlight the desired contact group.
3. Press the Option soft key and then select Delete.
The LCD screen prompts the following warning:
4. Press the OK soft key to confirm the deletion or the Cancel soft key to cancel.
You can also delete all groups from the local directory by pressing the Option soft key and then select
Delete All.
Adding Contacts
Adding Contacts Manually
To add a contact to a local directory manually:
1. Press the Directory soft key.
The IP Phone enters the local directory directly as there is only Local Directory enabled in the directory
by default.
If the Local Directory is removed from the directory, press Menu -> Directory -> Local Directory to
enter the Local Directory.
2. Select the desired contact group and press the Enter soft key.
3. Press the Add soft key.
4. Enter the name and the office, mobile or other numbers in the corresponding fields.
5. Press or soft key to select the desired ring tone from the Ring field.
If Auto is selected, this contact will use the ring tone according to the priority.
6. Press or soft key to select the desired group from the Group field.
7. Press Add soft key to accept the change or the Back soft key to cancel.
Note: If the contact already exists in the directory, the LCD screen will prompt “Contact name existed!”.
Page 15
TPG BizPhone CPE860 IP Conference Phone User Guide P a g e | 15
Adding Contacts from Call History
To add a contact to a local directory from Call History:
1. Press the History soft key.
2. Select the desired call history list and press the Enter soft key.
3. Press or to highlight the desired entry.
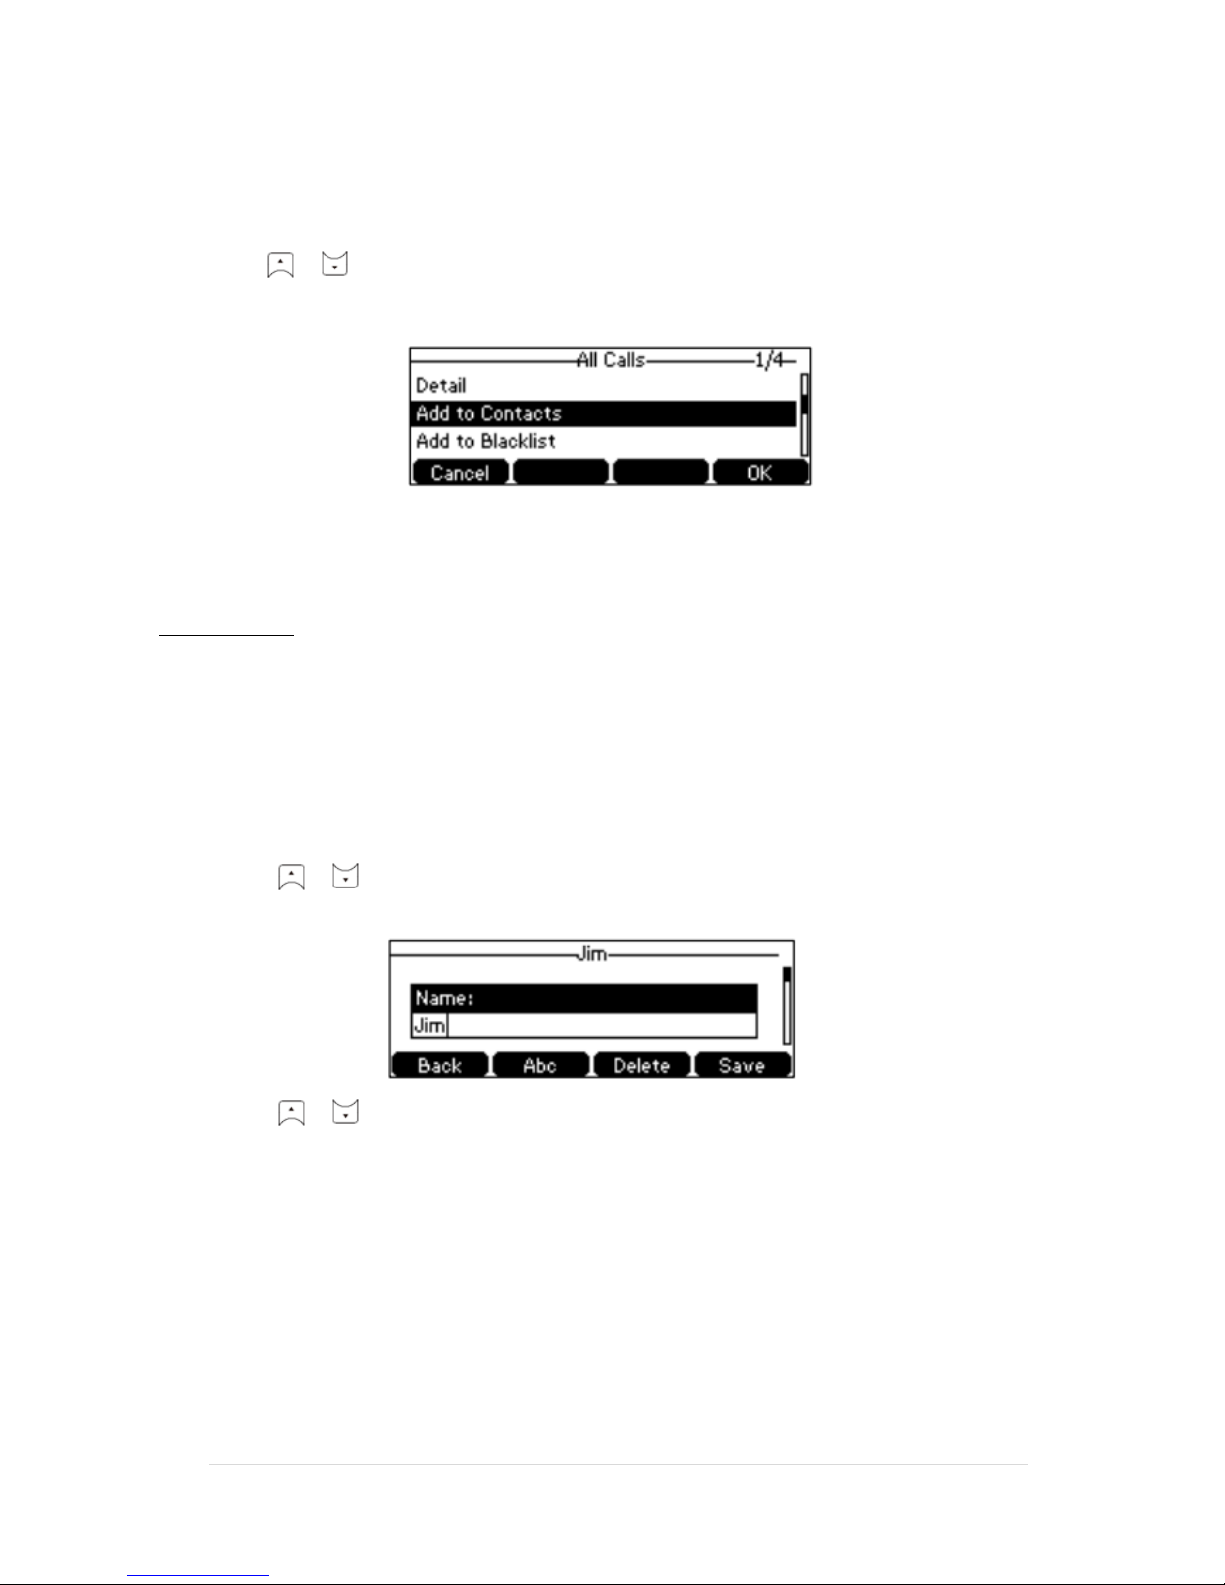
4. Press the Option soft key, and then select Add to Contacts.
5. Enter the contact name.
6. Press the Save soft key to accept the change.
Editing Contacts
To edit a contact in the local directory:
1. Press the Directory soft key.
The IP Phone enters the local directory directly as there is only Local Directory enabled in the directory
by default.
If the Local Directory is removed from the directory, press Menu -> Directory -> Local Directory to
enter the Local Directory.
2. Select the desired contact group and press the Enter soft key.
If the contact is not in any group, select All Contacts and press the Enter soft key.
3. Press or to highlight the desired contact.
4. Press the Option soft key, and then select Detail.
5. Press or to highlight the contact information and then edit.
6. Press the Save soft key to accept the change or the Back soft key to cancel.
Page 16
TPG BizPhone CPE860 IP Conference Phone User Guide P a g e | 16
Deleting Contacts
To delete a contact from the local directory:
1. Press the Directory soft key.
The IP Phone enters the local directory directly as there is only Local Directory enabled in the directory
by default.
If the Local Directory is removed from the directory, press Menu -> Directory -> Local Directory to
enter the Local Directory.
2. Select the desired contact group and press the Enter soft key.
If the contact is not in any group, select All Contacts and press the Enter soft key.
3. Press or to highlight the desired contact.
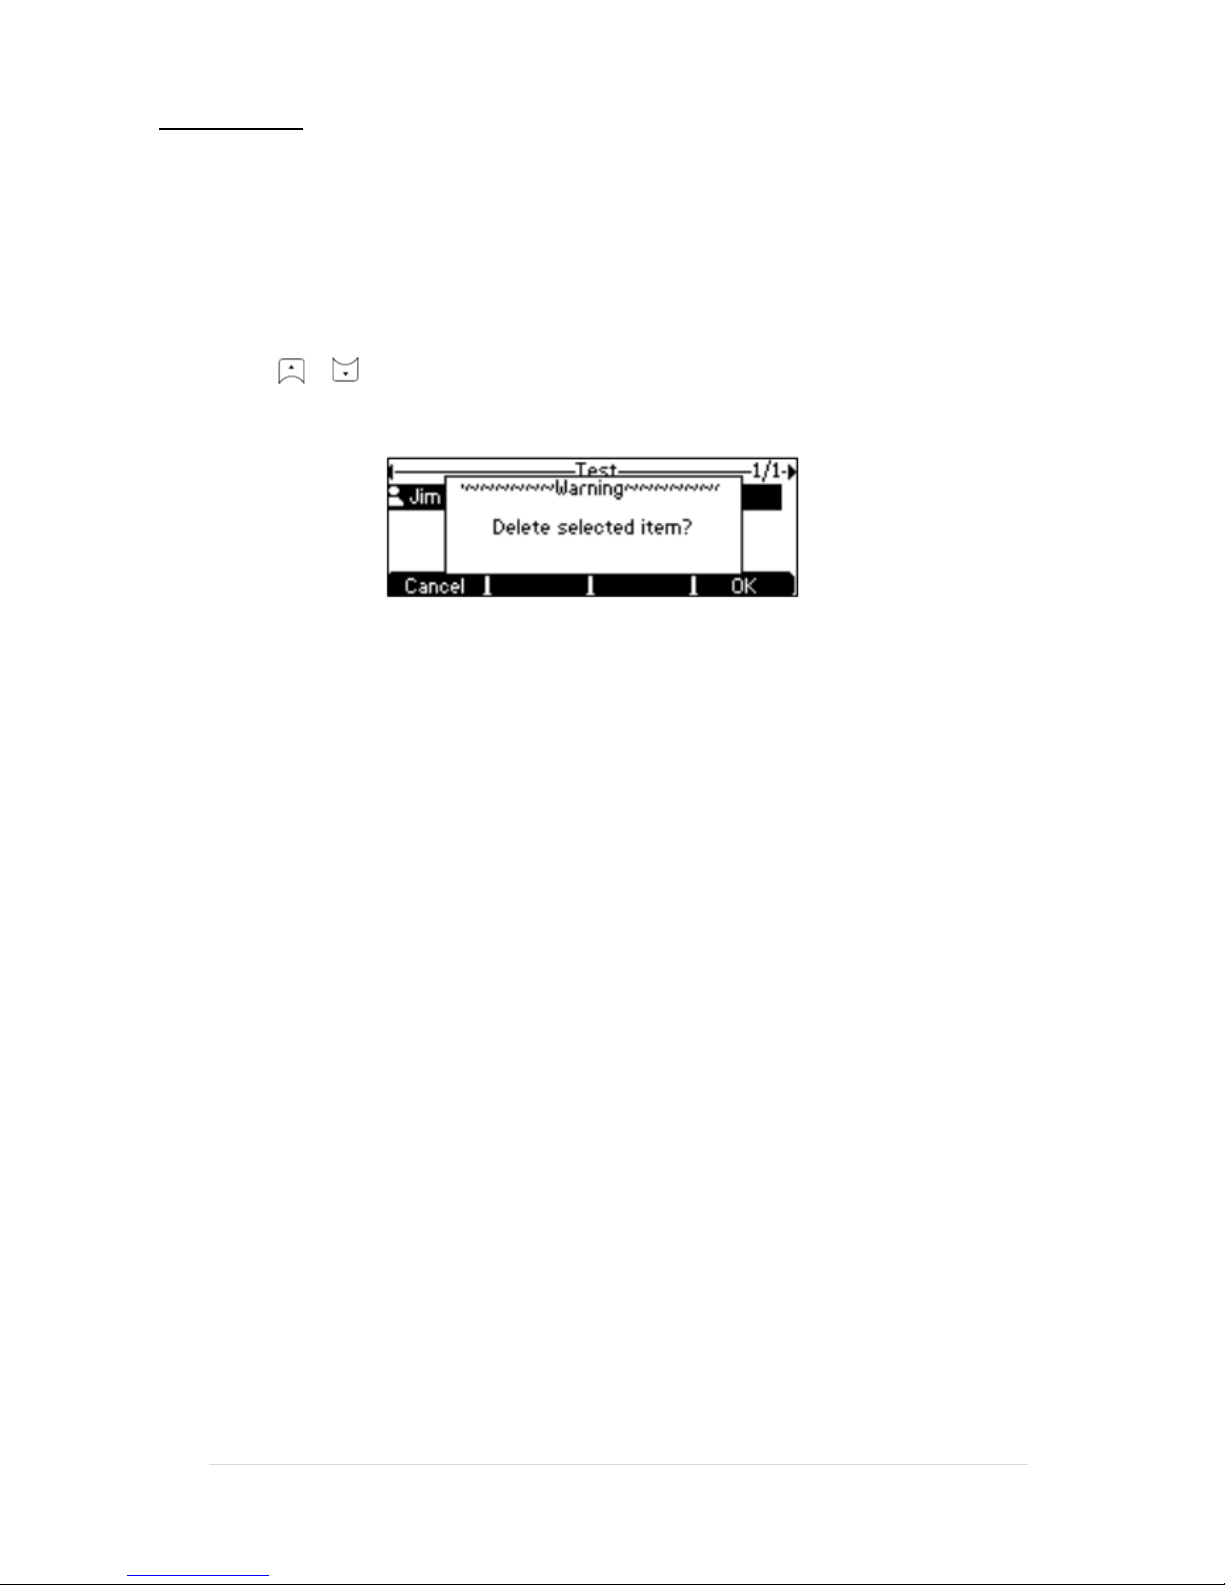
4. Press the Option soft key, and then select Delete from the prompt list.
The LCD screen prompts the following warning.
5. Press the OK soft key to confirm the deletion or the Cancel soft key to cancel.
You can also delete all contacts by pressing the Option soft key, and then select Delete All.
Page 17
TPG BizPhone CPE860 IP Conference Phone User Guide P a g e | 17
Blacklist
The build-in phone directory can store names and phone numbers for a blacklist. You can store up to 30 contacts and
add, edit, delete or even call a contact in the blacklist directory. Incoming calls from blacklist directory contacts will be
rejected automatically.
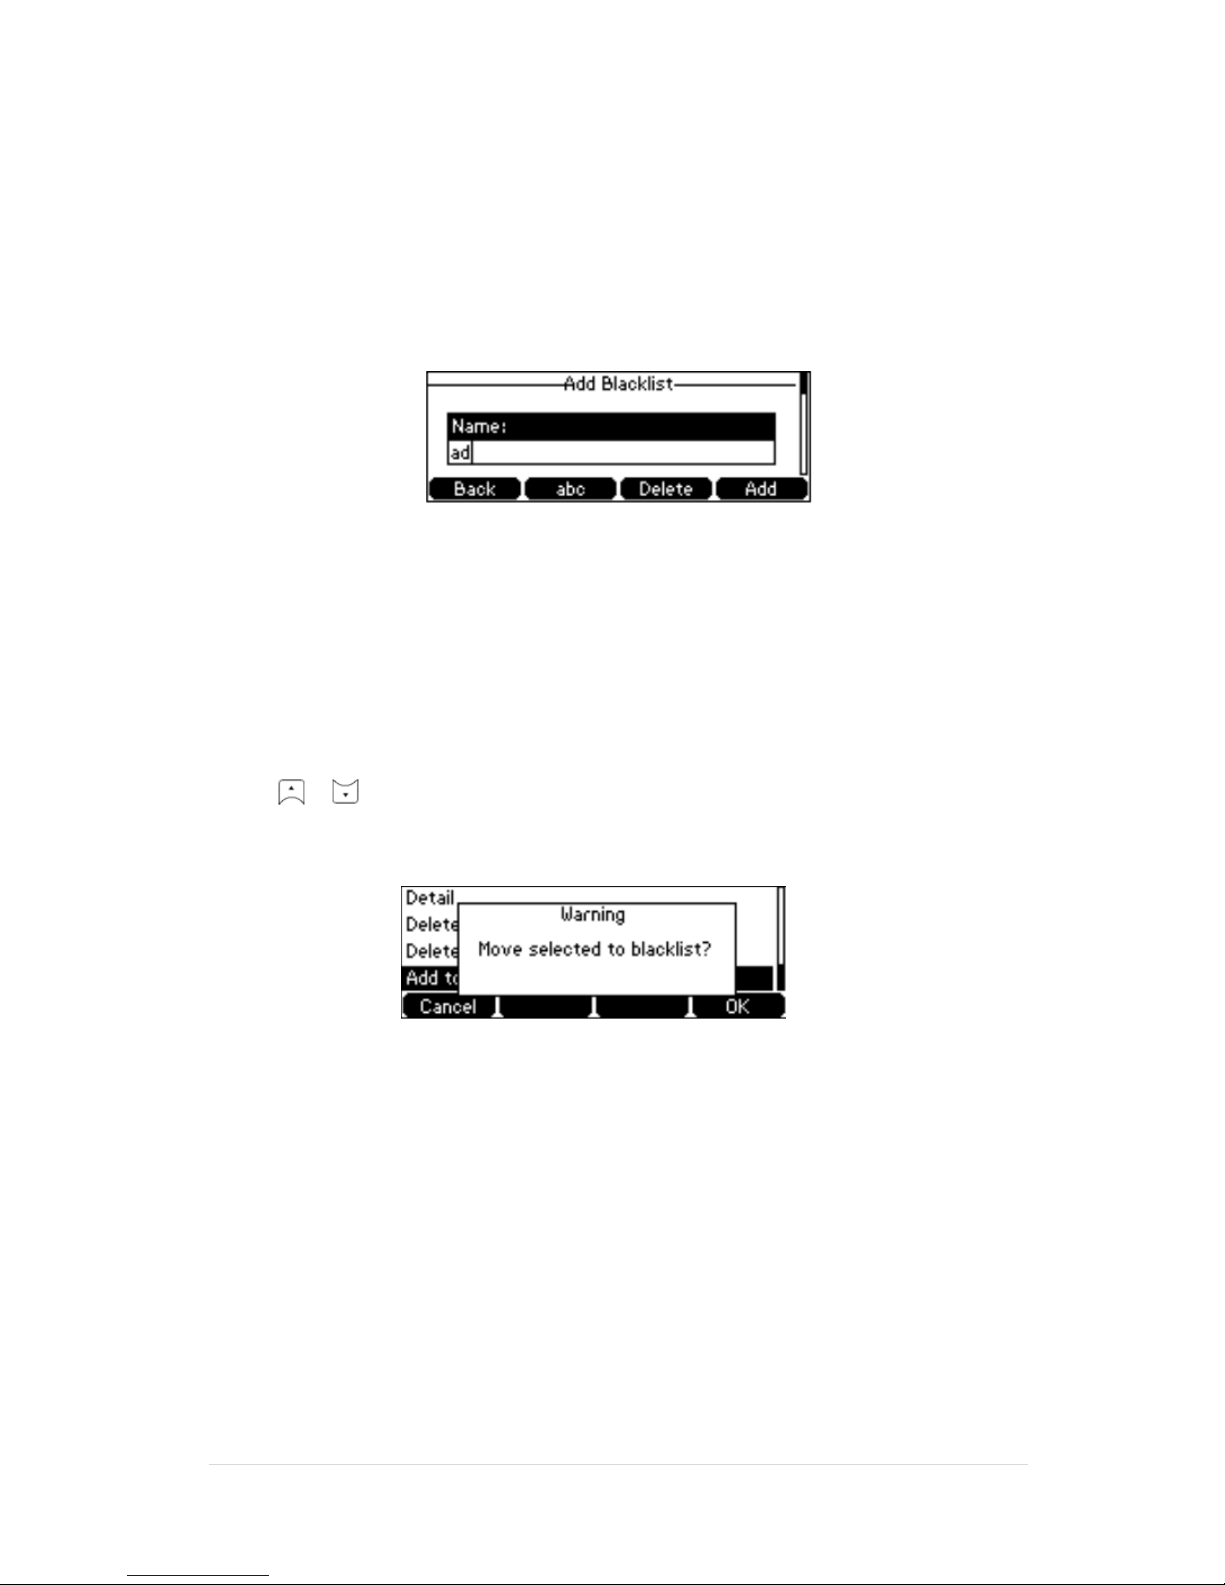
To add a contact to the blacklist directory manually:
1. Press Menu -> Directory -> Blacklist.
2. Press the Add soft key.
3. Enter the name and the office, mobile or other numbers in the corresponding fields.
4. Press the Add soft key to accept the change or the Back soft key to cancel.
To add a contact to the blacklist directory from the local directory:
1. Press the Directory soft key.
The IP Phone enters the local directory directly as there is only Local Directory enabled in the directory
by default.
If the Local Directory is removed from the directory, press Menu -> Directory -> Local Directory to
enter the Local Directory.
2. Select the desired contact group and press the Enter soft key.
3. Press or to highlight the desired contact.
4. Press the Option soft key, and then select Add to Blacklist.
The LCD screen prompts the following warning:
5. Press the OK soft key to confirm the setting.
Page 18
TPG BizPhone CPE860 IP Conference Phone User Guide P a g e | 18
Call History Management
The CP860 Conference IP Phone maintains call history call history lists of Placed Calls, Received Calls, Missed Calls
and Forwarded Calls. Call history lists support up to 400 entries. You can view call history, place a call, add a contact
or delete an entry from the call history list. Call History feature is enabled by default.
To view Call History:
1. Press the History soft key.
The LCD screen displays all call records.
2. Select the desired call history list and press the Enter soft key.
3. Press or to highlight the desired entry.
4. Press the Option soft key, and then select Detail.
The detailed information of the entry appears on the LCD screen.
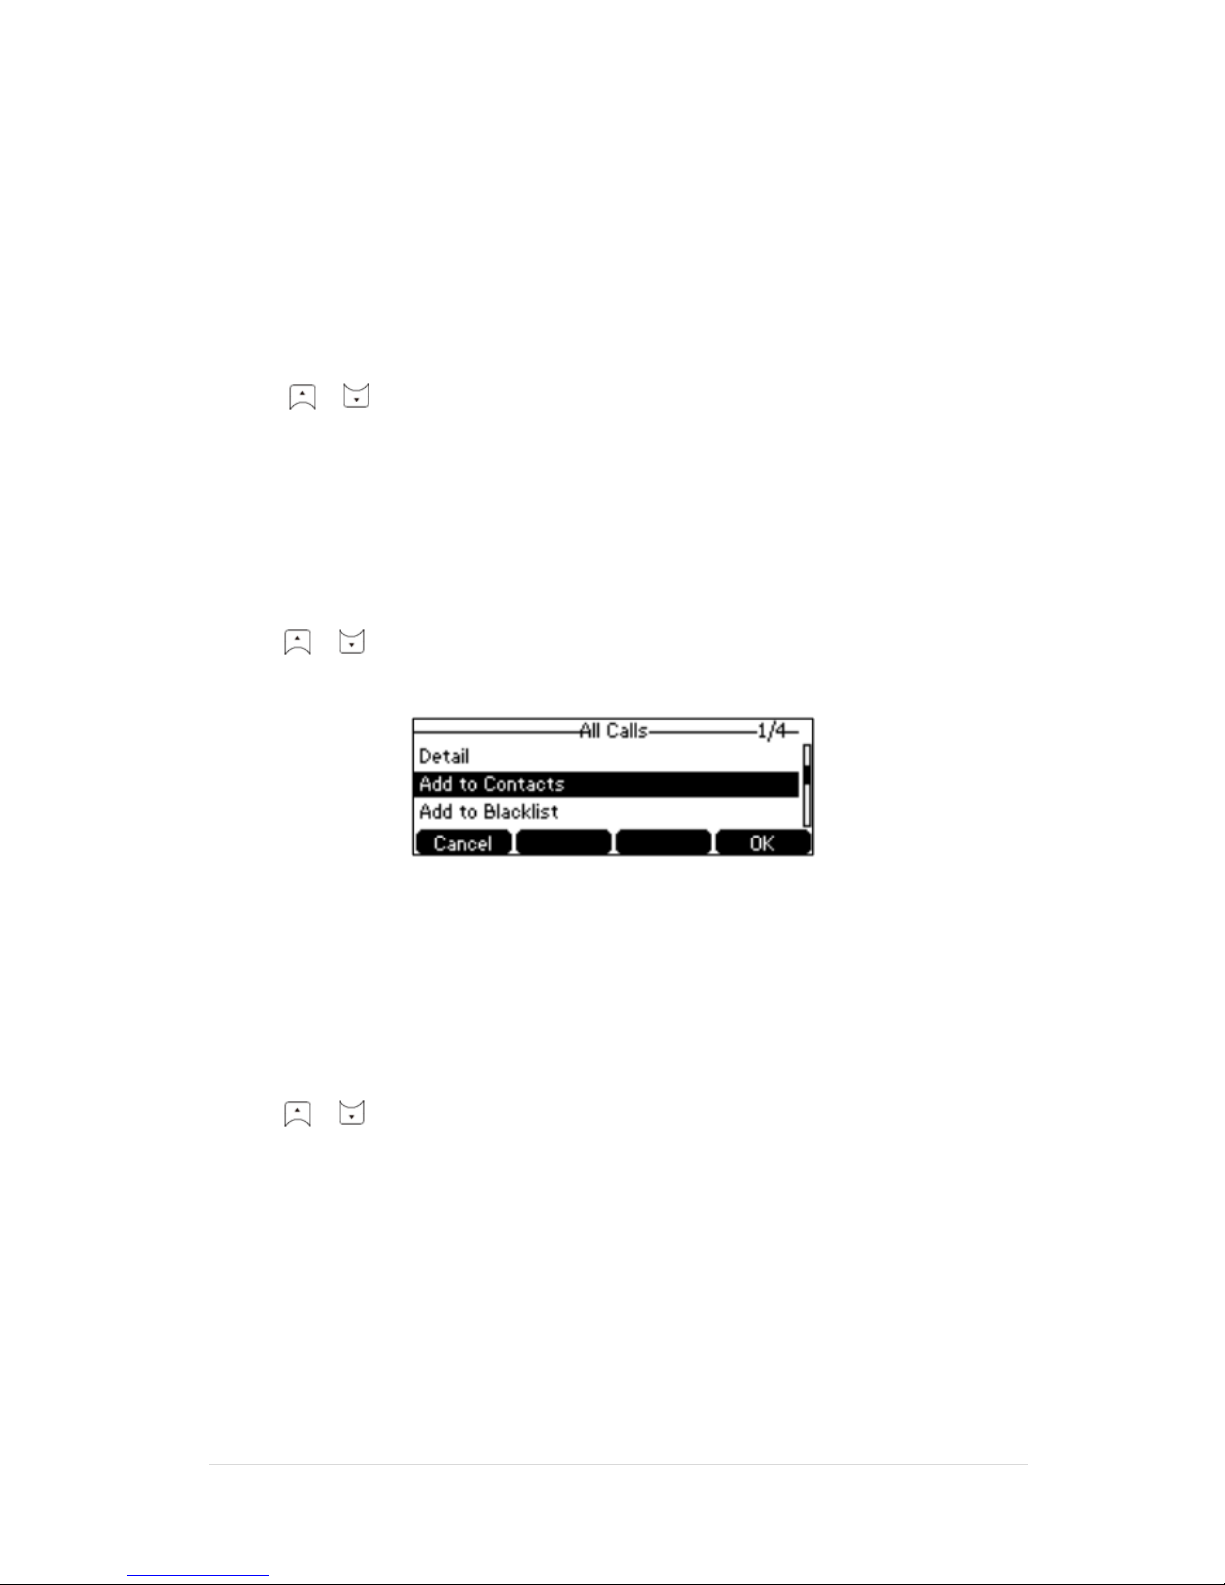
To add a contact to the Local Directory (or Blacklist) from the Call History list:
1. Press the History soft key.
2. Select the desired call history list and press the Enter soft key.
3. Press or to highlight the desired entry.
4. Press the Option soft key, and then select Add to Contacts (Add to Blacklist).
5. Enter the desired values in the corresponding fields.
6. Press the Save soft key to accept the change.
To delete an entry from the Call History list:
1. Press the History soft key.
2. Select the desired call history list and press the Enter soft key.
3. Press or to highlight the desired entry.
4. Press the Delete soft key.
Page 19
TPG BizPhone CPE860 IP Conference Phone User Guide P a g e | 19
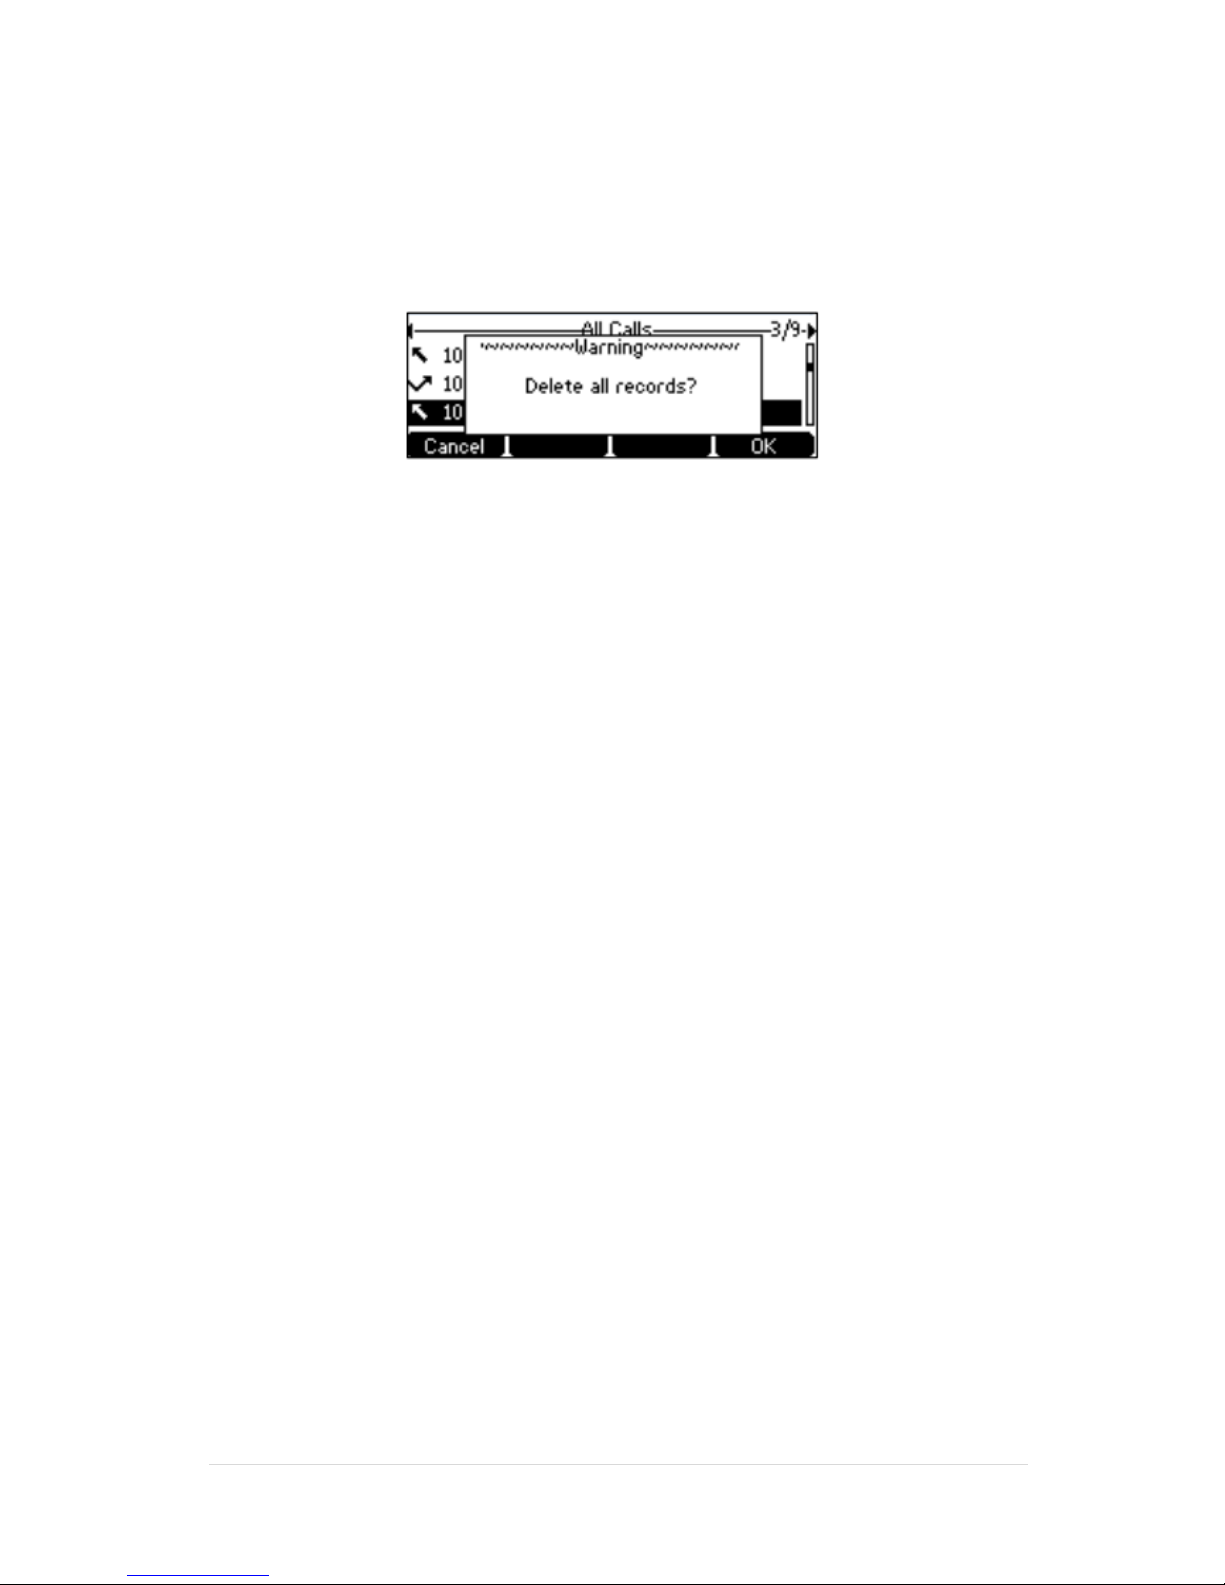
To delete all entries from the Call History list:
1. Press the History soft key.
2. Select the desired call history list and press the Enter soft key.
3. Press the Option soft key, and then select Delete All.
4. Press the OK soft key.
The LCD screen prompts “Delete all the call records?”.
5. Press the OK soft key to confirm the deletion or the Cancel soft key to cancel.
Page 20

TPG BizPhone CPE860 IP Conference Phone User Guide P a g e | 20
Basic Call Features
Placing Calls
To place call using the handset:
- Press to obtain a dial tone.
Enter the desired number using the keypad.
Press , , or the Send soft key.
- Enter the desired number using the keypad.
Press , , or the Send soft key
To place multiple calls:
- Press . The active call is placed on hold.
Enter the desired number using the keypad.
Press , , or the Send soft key.
- Press the Hold soft key to place the original call on hold.
- Press the NewCall soft key.
Enter the desired number using the keypad.
Press , , or the Send soft key
You can press or to switch between calls, and then press the Resume soft key to retrieve the desired calls.
Page 21

TPG BizPhone CPE860 IP Conference Phone User Guide P a g e | 21
Placing Calls from Local Directory
To place a call to a contact from the local directory:
1. Press the Directory soft key.
The IP phone enters the local directory directly as there is only Local Directory enabled in the directory by
default. If Local Directory is removed from the directory, press Menu -> Directory -> Local Directory to
enter the local directory.
2. Select the desired contact group and press the Enter soft key.
3. Press or to highlight the desired contact.
4. Do one of the following:
- If only one number for the contact is stored in the local directory, press the Send soft key to dial out the
number.
- If multiple numbers for the contact are stored in the local directory, press the Send soft key to display a
list of numbers. Press or to highlight the desired number. Press the Send soft key to dial out
the number.
Placing Calls from Call History
To place a call from the Call History list:
1. Press the History soft key.
2. Select the desired call history list and press the Enter soft key.
3. Press or to highlight the desired entry.
4. Press the Send soft key.
Page 22

TPG BizPhone CPE860 IP Conference Phone User Guide P a g e | 22
Answering Calls
Answering when not in another call
To answer a call:
Do one of the following:
- Press .
- Press the Answer soft key.
- Press .
Answering when in another call
If you have an active call, and an incoming call arrives on your phone, do one of the following:
- Press the Answer soft key. The incoming call is answered and the original call is placed on
hold.
- Press to access the new call.
Press , , or the Send soft key.
The incoming call is answered and the original call is placed on hold.
Ending Calls
To end a call:
Do one of the following:
- Press the End Call soft key.
- Press .
Note: To end a call placed on hold, you can press the EndCall soft key to end the call directly, or press
the Resume soft key to resume to the call before ending it.
Redialling Numbers
To redial the last dialled number from your phone: Press twice. A call to your last dialled number is
attempted.
To redial a previously dialled number from your phone:
1. Press when the phone is idle.
2. Press or to select the desired entry from the placed calls list.
3. Press , or the Send soft key.
Page 23
TPG BizPhone CPE860 IP Conference Phone User Guide P a g e | 23
Call Mute
You can mute the microphone of the active audio device (handset, headset and speakerphone) during an active call so
that the other party cannot hear you.
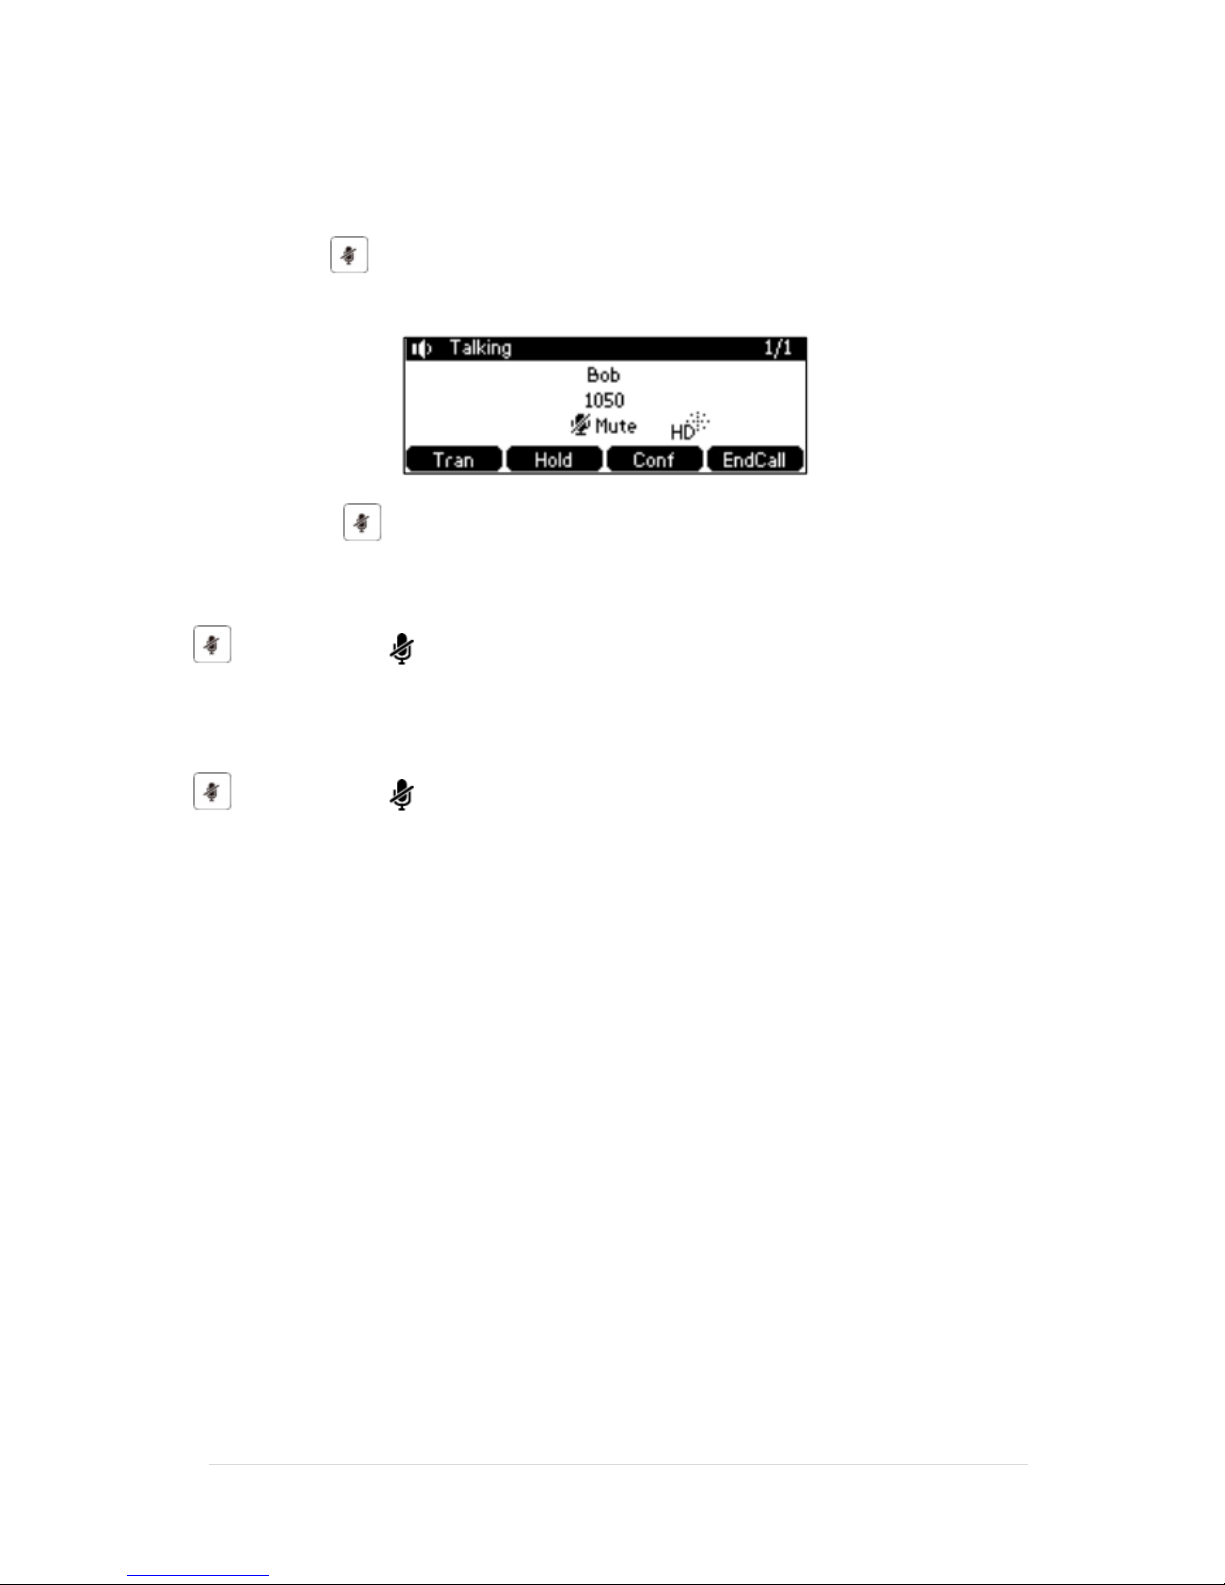
To mute a call: Press during an active call. The LCD screen indicates that the call is now muted. The mute key
LED illuminates solid red when the call is muted.
To un-mute a call: Press again to un-mute the call.
To mute a call if you use expansion microphones:
Press on the phone or tap on the top of the expansion microphone during an active call.
LED indicators on the phone and the mute indicator LED on the expansion microphone illuminate solid red.
To un-mute a call:
Press on the phone or tap on the top of the expansion microphone again to un-mute the call.
Page 24
TPG BizPhone CPE860 IP Conference Phone User Guide P a g e | 24
Call Hold/Resume
You can place an active call on hold. Only one active call can be in progress at any time. Other calls can be made and
received while placing the original call on hold. When you place a call on hold, your BizPhone service may play music
to the other party while waiting.
To place a call on Hold:
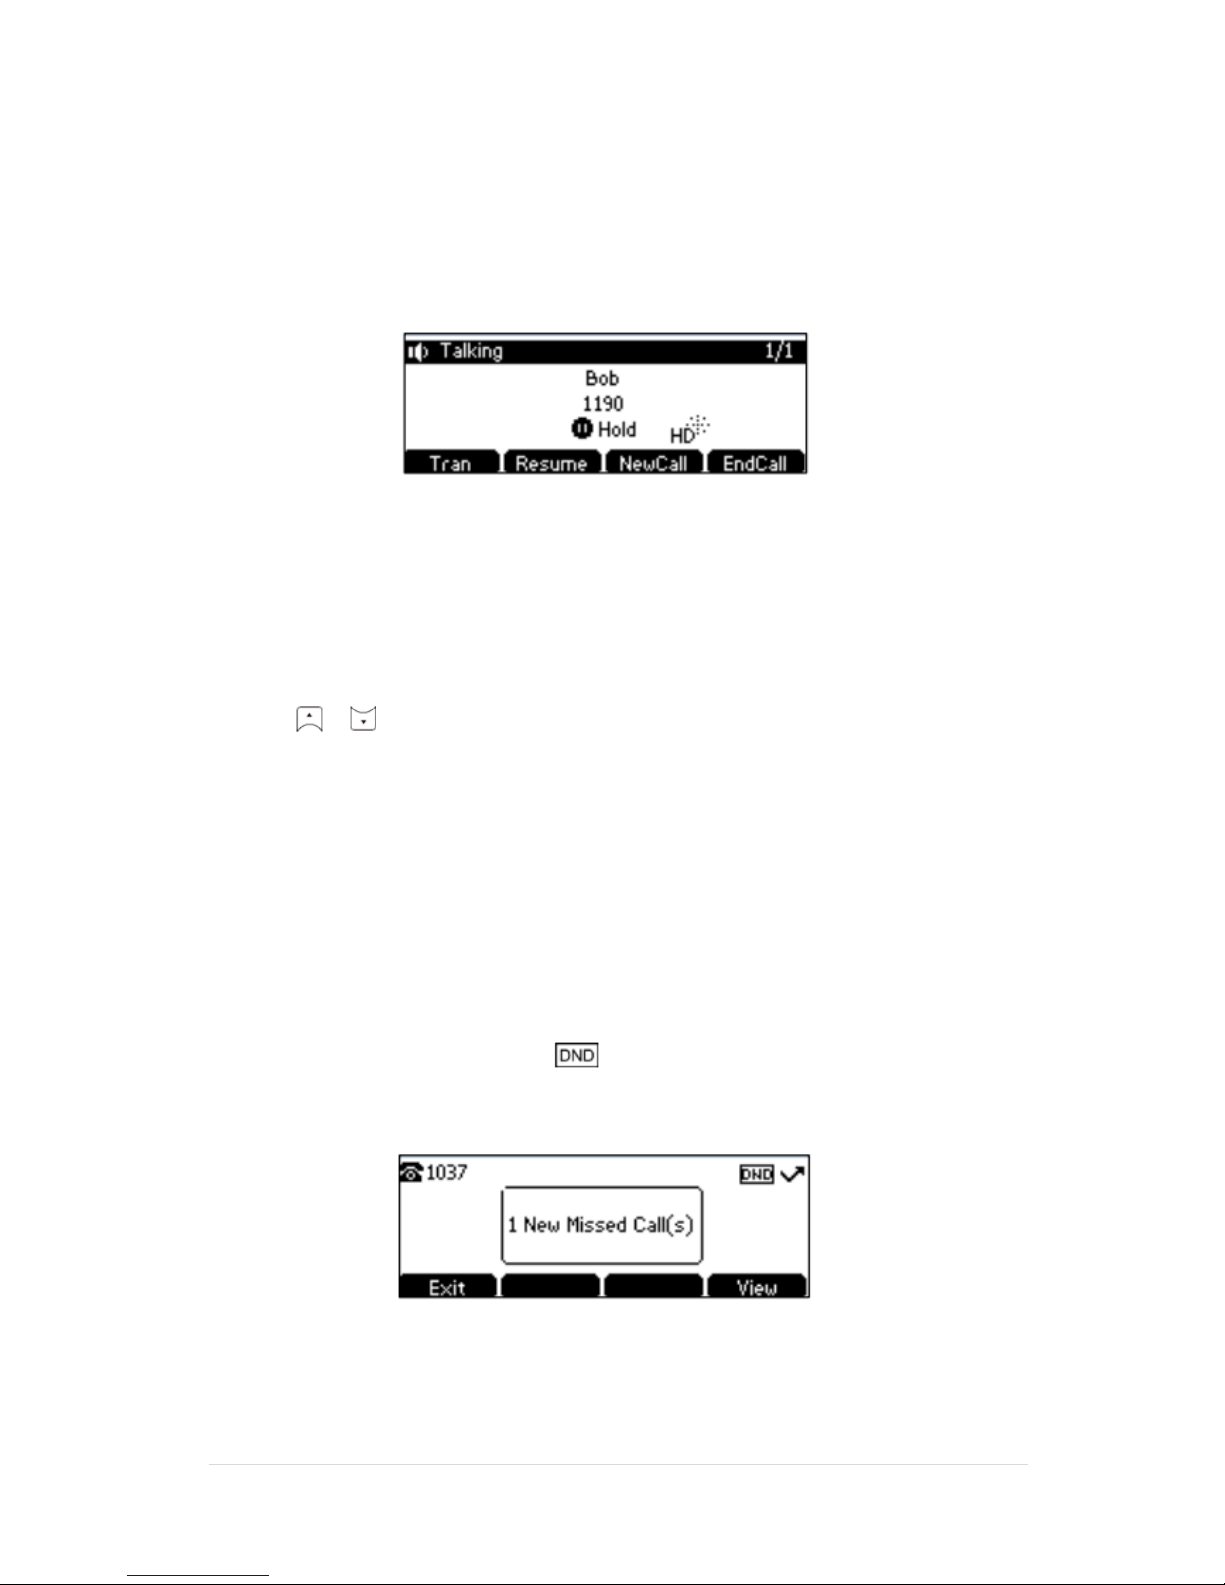
Press the Hold soft key during a call. LED indicators flash green. The LCD screen indicates that the call is on hold.
Note: the phone will beep softly every 30 seconds to remind you that you still have a call on hold.
To resume a held call: Press the Resume soft key.
Multiple Calls on Hold
If multiple calls are placed on hold, do one of the following:
- Press or to switch between the calls, and then press the Resume soft key to retrieve the desired
call.
If more than one call is placed on hold, a numbered prompt appears on the LCD screen, for example “2/3”,
indicating that this is the second call out of three calls.
Do Not Disturb (DND)
You can use DND to reject incoming calls automatically on the phone. The prompt message “n New Missed Call(s)”
(“n” indicates the number of missed calls) will appear on the LCD screen, and callers will receive a busy message. All
calls you receive while DND is enabled are logged to your missed calls list.
To activate DND on your phone:
Press the DND soft key when the phone is idle. The icon on the idle screen indicates that DND is enabled.
Incoming calls will be rejected automatically and the prompt message “n New Missed Call(s)” (“n” indicates the
number of missed calls) will appear on the LCD screen.
Note: Do Not Disturb is local to the phone, and may be overridden by the admin settings. For more information,
contact your system administrator.
Page 25
TPG BizPhone CPE860 IP Conference Phone User Guide P a g e | 25
Call Forward
You can configure your phone to forward incoming calls to another party through static forwarding. You can also
forward incoming calls while your phone is ringing (dynamic forwarding).
Static Forwarding
There are 3 types of Static Forwarding:
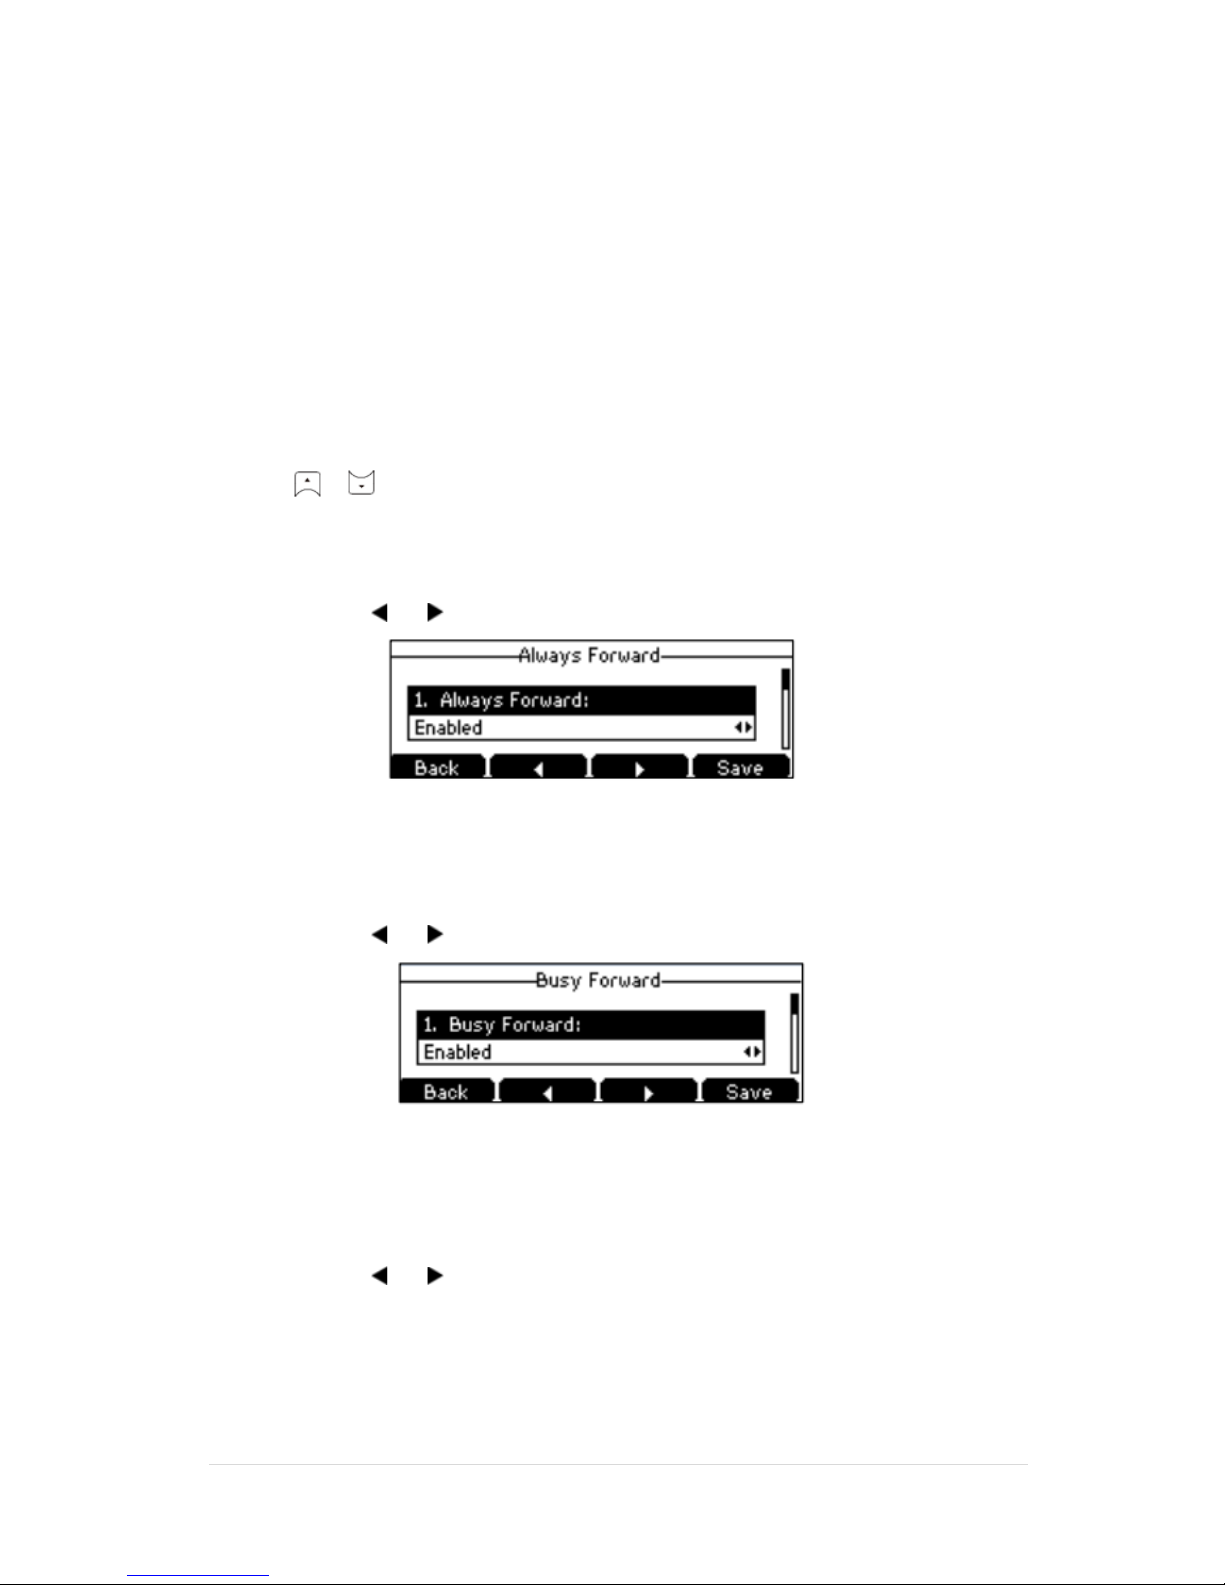
Always Forward: Incoming calls are immediately forwarded.
Busy Forward: Incoming calls are immediately forwarded if the phone is busy.
No Answer Forward: Incoming calls are forwarded if not answered after a period of time.
To enable Call Forward on your phone:
1. Press Menu -> Features -> Call Forward.
2. Press or to select the desired forwarding type.
3. Press the Enter soft key.
4. Depending on your selection
a) If you select Always Forward:
1) Press or soft key to select Enabled from the Always Forward field.
2) Enter the destination number you want to forward all incoming calls to in the Forward to
field.
3) (Optional) Enter the always forward on or off code respectively in the On Code or Off Code
field.
b) If you select Busy Forward:
1) Press or soft key to select Enabled from the Busy Forward field.
2) Enter the destination number you want to forward all incoming calls to when the phone is
busy in the Forward to field.
3) (Optional) Enter the busy forward on or off code respectively in the On Code or Off Code
field.
c) If you select No Answer Forward:
1) Press or soft key to select Enabled from the No Answer Forward field.
Page 26
TPG BizPhone CPE860 IP Conference Phone User Guide P a g e | 26
2) Enter the destination number you want to forward all unanswered incoming calls to in the
Forward to field.
3) Press or soft key to select the ring time to wait before forwarding from the After
Ring Time field. The default ring time is 12 seconds.
4) Optional) Enter the no answer forward on code or off code respectively in the On Code or
Off Code field.
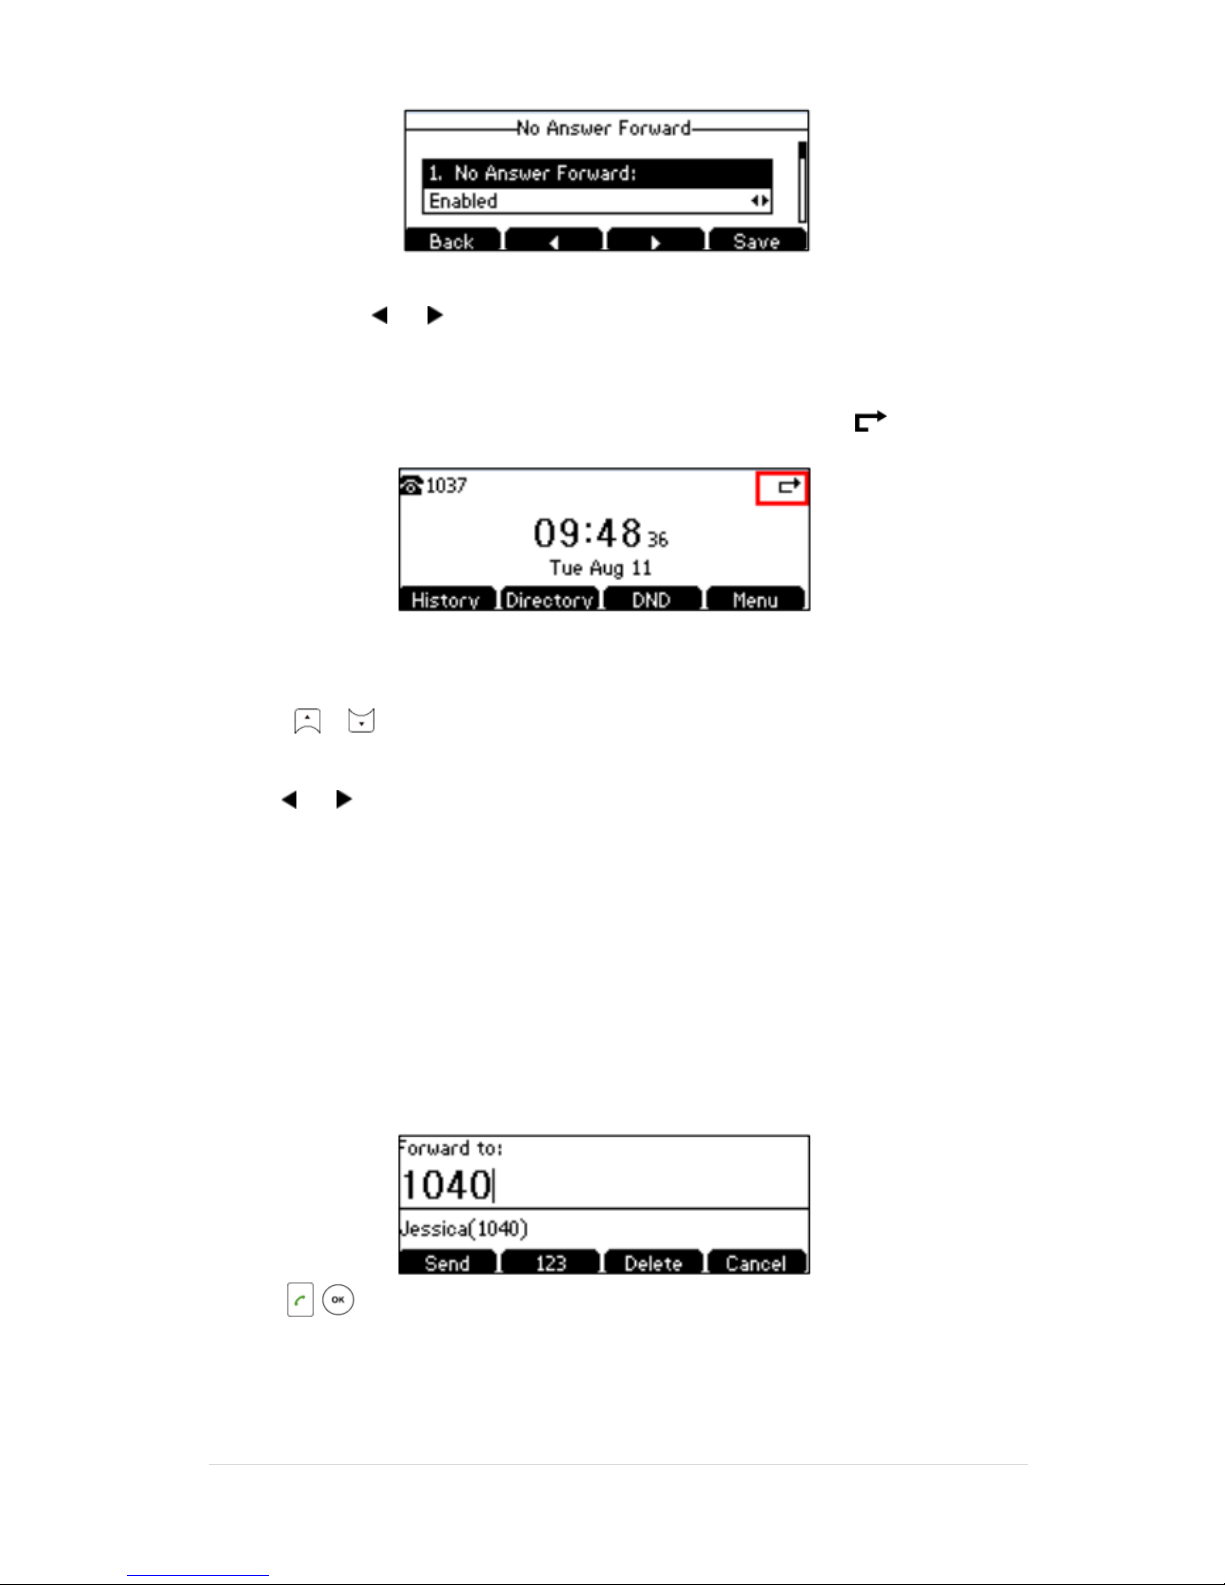
5. Press the Save soft key to accept the change or the Back soft key to cancel. The icon on the idle
screen indicates that the call forward is enabled.
To disable Call Forward on your phone:
1. Press Menu -> Features -> Call Forward.
2. Press or to select the desired forwarding type.
3. Press Enter soft key.
4. Press or soft key to select Disable to disable the call forward.
5. Press the Save soft key to accept the change.
Note: Call Forward is local to the phone, and may be overridden by the admin settings. For more information, contact
your system administrator.
Dynamic Forwarding
To forward incoming call to another party:
1. When the phone is ringing, press the Forward soft key.
2. Enter the number you want to forward the incoming call to.
3. Press , or the Send soft key. The LCD prompts a call forward message.
Page 27
TPG BizPhone CPE860 IP Conference Phone User Guide P a g e | 27
Call Transfer
You can transfer a call to another party in one of three ways:
Blind Transfer: Transfer a call directly to another party without consulting.
Semi-Attended Transfer: Transfer a call when the target phone is ringing.
Attended Transfer: Transfer a call with prior consulting.
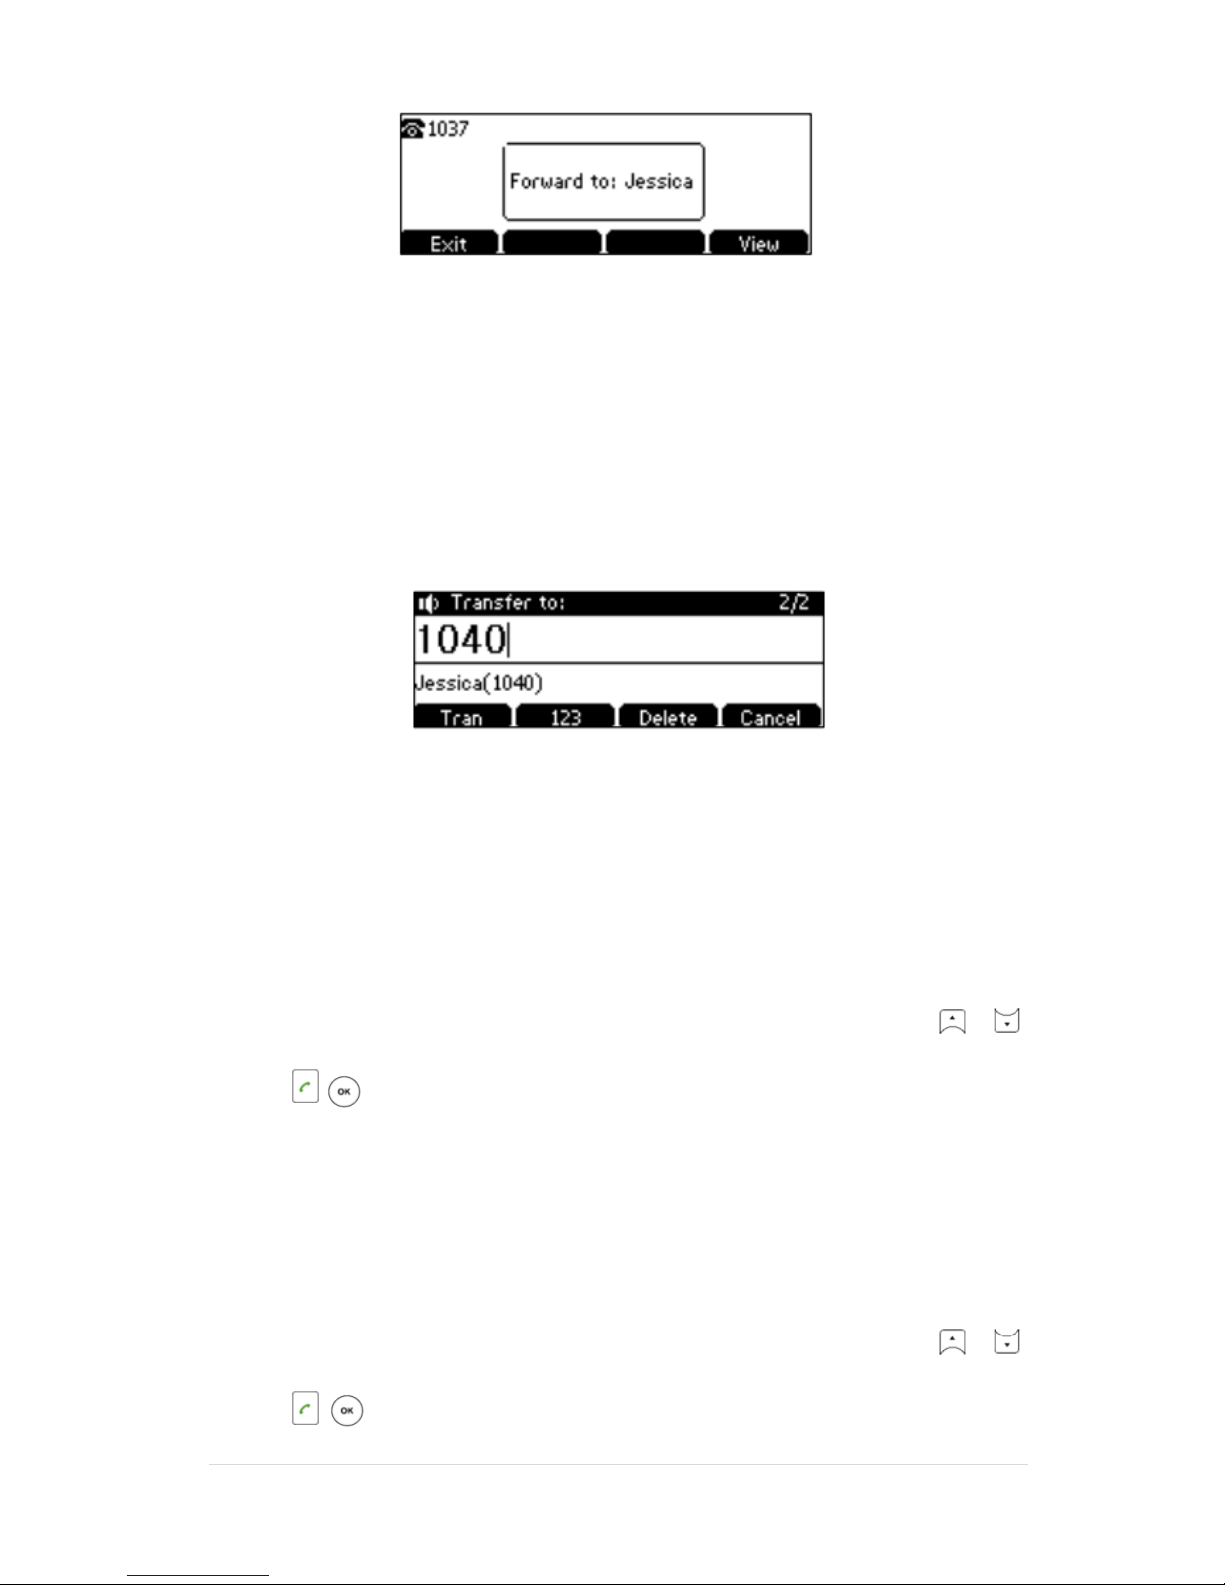
To perform a blind transfer:
1. Press the Tran soft key during a call.
2. Enter the number you want to transfer the call to.
3.
4. Press the Tran soft key to complete the transfer. Then the call is connected to the number to which you are
transferring.
To perform a semi-attended transfer:
1. Press the Transoft key during a call.
2. Do one of the following:
- Enter the number you want to transfer the call to.
- Press the Directory soft key, and then select Local Directory. Select the desired group and search
for the contact (Directory should be configured in advance).
- Press the Directory soft key, and then select History. Select the desired list and press or to
select the entry (Directory should be configured in advance).
3. Press , to dial out.
4. Press the Tran soft key to complete transfer when receiving ring back.
To perform an attended transfer:
1. Press the Tran soft key during a call.
2. Do one of the following:
- Enter the number you want to transfer the call to.
- Press the Directory soft key, and then select Local Directory. Select the desired group and search
for the contact (Directory should be configured in advance).
- Press the Directory soft key, and then select History. Select the desired list and press or
to select the entry (Directory should be configured in advance).
3. Press , to dial out.
Page 28
TPG BizPhone CPE860 IP Conference Phone User Guide P a g e | 28
4. After the party answers the call, press the Tran soft key to complete the transfer. You can cancel the
transfer before the call is connected by pressing the Cancel soft key.
Call Waiting
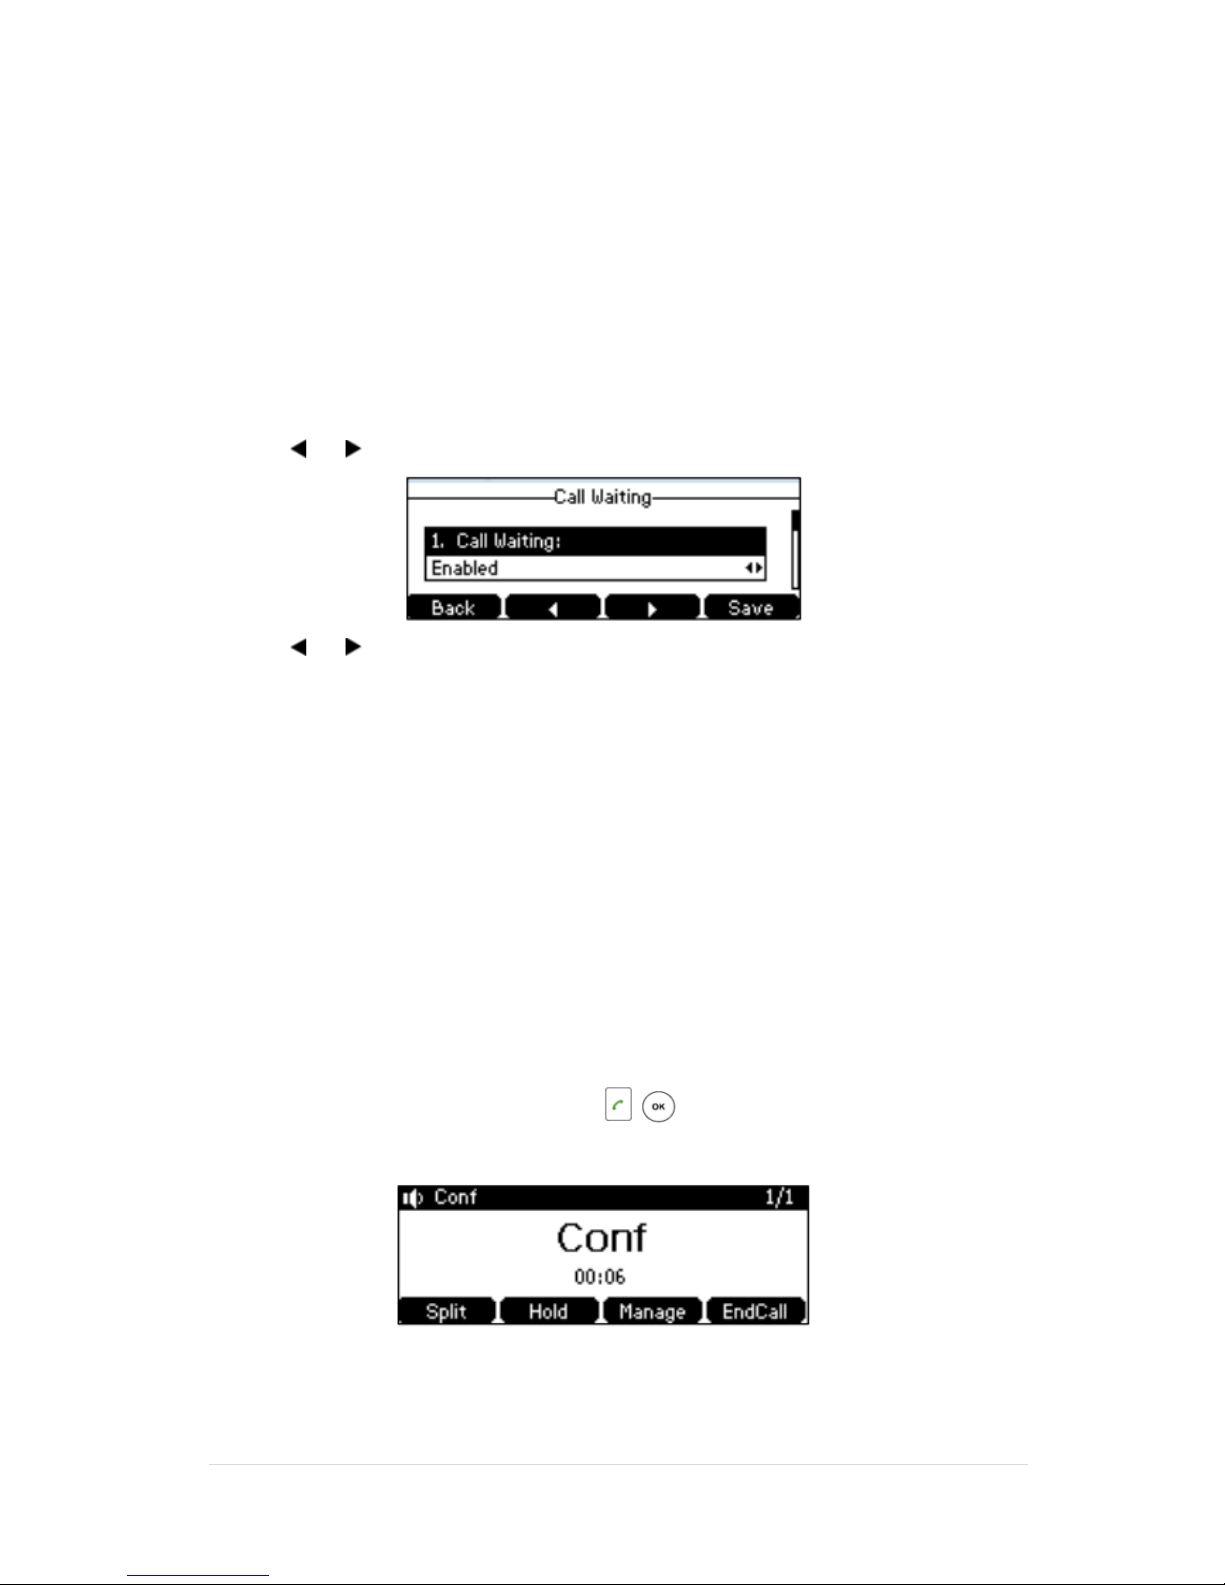
You can enable or disable call waiting on the phone. If the call waiting is enabled, you can receive another call while
there is already an active call on the phone. Otherwise, another incoming call is automatically rejected by the phone
with a busy message when there is an active call on the phone. You can also enable or disable the phone to play a
warning tone when receiving another call.
To configure call waiting on your phone:
1. Press Menu -> Features -> Call Waiting.
2. Press or soft key to select Enabled from the Call Waiting field.
3. Press or soft key to select Enabled from the Play Tone field.
4. (Optional) Enter the call waiting on code or off code respectively in the On Code or Off Code field.
5. Press the Save soft key to accept the change or the Back soft key to cancel.
Note: Call Waiting is local to the phone, and may be overridden by the admin settings. For more information, contact
your system administrator.
Three-Way Conference
The CPE860 IP Conference Phone supports up to 5 parties (including yourself) in a conference call.
To set up a conference call:
1. Place a call to the first party.
2. When the first party answers the call, press the Conf soft key to place a new call. The active
call is placed on hold.
3. Enter the number of the second party and Press , or the Send soft key.
4. When the second party answers the call, press the Conf soft key again to join all parties in
the conference.
Page 29

TPG BizPhone CPE860 IP Conference Phone User Guide P a g e | 29
To set up a conference call with an active call and a call on hold:
1. Establish two calls on the phone.
2. Press or to select an active call.
3. Press the Conf soft key to join the two calls in the conference.
To join more parties in an established conference call:
1. Press the Manage soft key after conference call is established.
2. Press the NewCall soft key to place a new call.
3. Enter the number of the second party and Press , or the Send soft key.
4. Press the Conf soft key when the party answers.
5. Repeat steps 1 to 4 to join more parties in the established conference call.
During the conference calls you can do the following actions:
- Press the Hold soft key to place the conference on hold.
- Press the Split soft key to split the conference call into two individual calls on hold.
- Press the Manage soft key, and then press or to select the desired party.
- Press the Far Mute soft key to forbid the party from speaking. The muted party can hear everyone, but no
one can hear the muted party.
- Press the Remove soft key to remove the party from the conference call.
- Press the New Call soft key to place a new call.
- Press the Back soft key to return to previous interface.
- Press to Mute the conference call.
- Press or the End Call soft key to drop the conference call.
Page 30
TPG BizPhone CPE860 IP Conference Phone User Guide P a g e | 30
Anonymous Call
You can use Anonymous Call to block your identity and phone number from appearing to the called party when you
call someone.
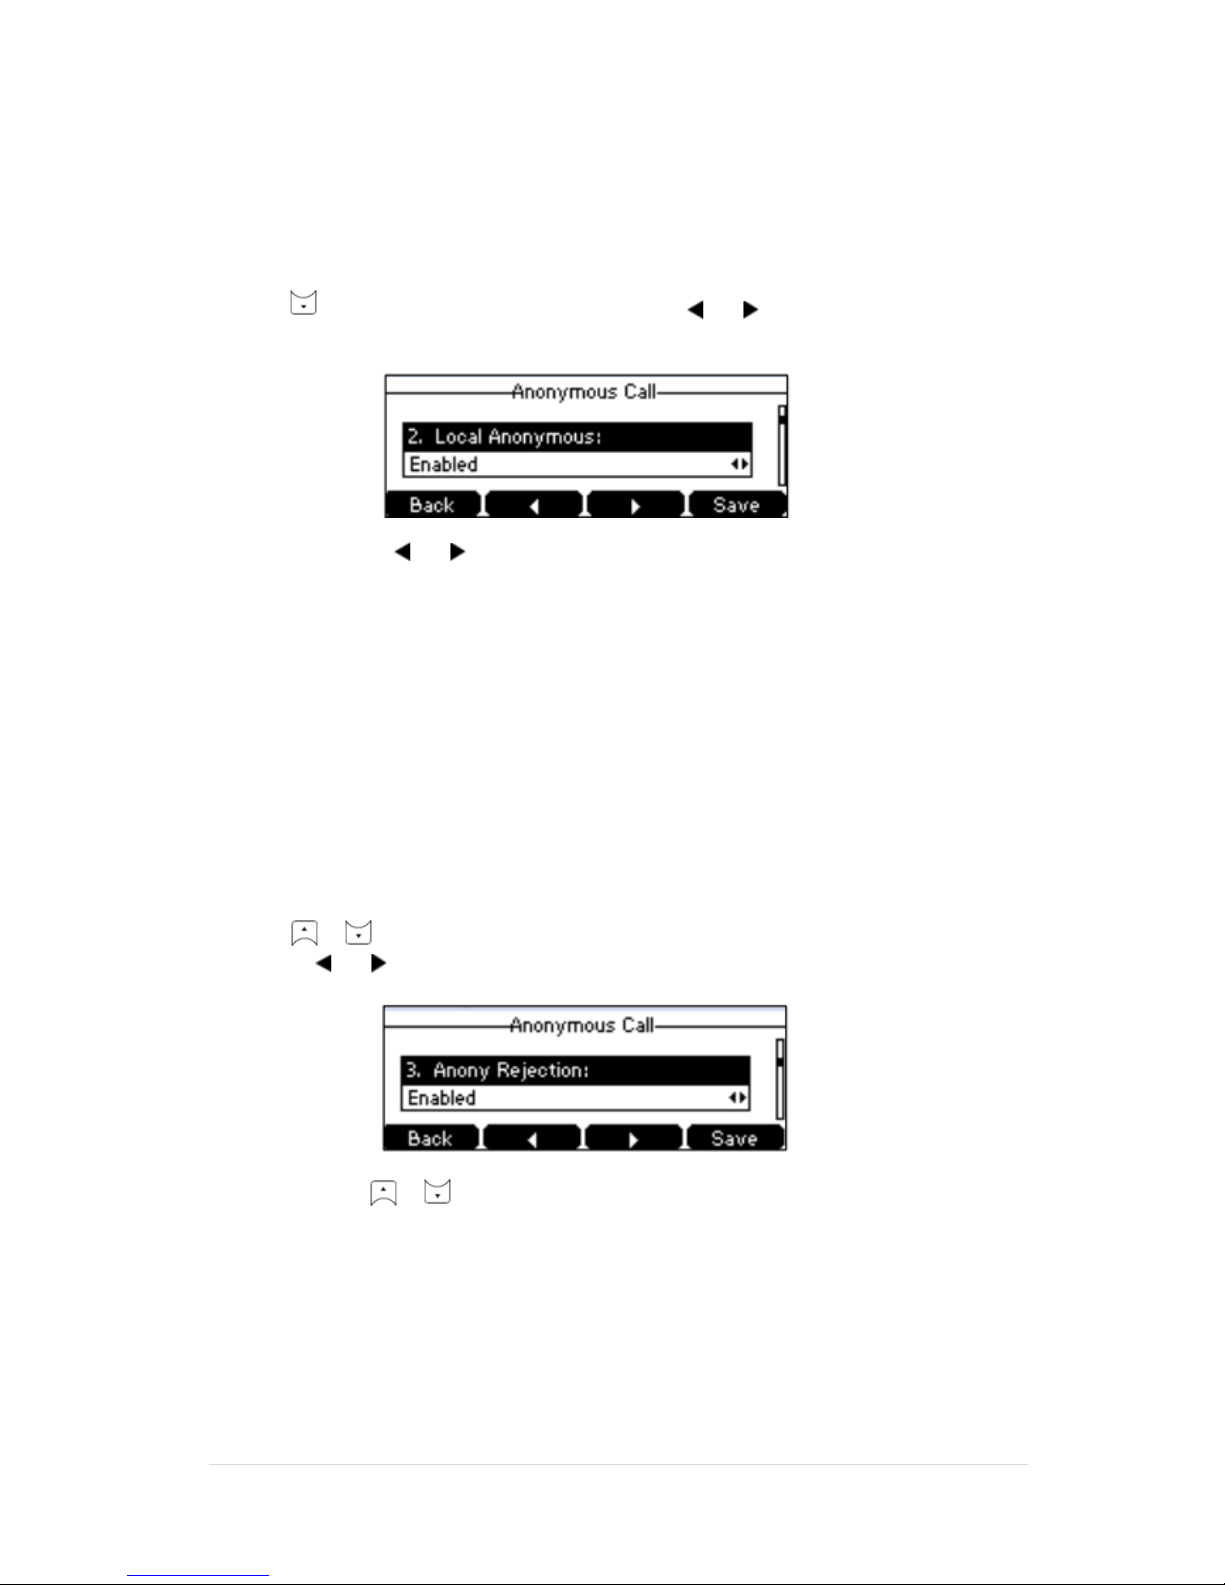
To configure Anonymous Call on the phone:
1. Press Menu -> Features -> Anonymous Call.
2. Press to select Local Anonymous and then press the or soft key to select
Enabled from the Local Anonymous field.
3. (Optional) Press the or soft key to select the desired value from the Send Anony
Code field.
The phone will send the configured on code or off code depending on your selection when
you enable or disable anonymous call feature on the phone.
4. (Optional) Enter the anonymous call on code in the On Code field.
5. (Optional) Enter the anonymous call off code in the Off Code field.
6. Press the Save soft key to accept the change or the Back soft key to cancel.
Anonymous Call Rejection
You can use Anonymous Call Rejection to reject incoming calls from anonymous callers.
To configure Anonymous Call Rejection on the phone:
1. Press Menu -> Features -> Anonymous Call.
2. Press or to scroll to the Anony Rejection field.
3. Press the or soft key to select Enabled from the Anony Rejection field.
4. (Optional) Press or to select the desired value from the Send Reject Code field.
The phone will send the configured reject on code or off code depending on your selection
when you enable or disable anonymous call rejection feature on the phone.
5. (Optional) Enter the anonymous call rejection on code in the On Code field.
6. (Optional) Enter the anonymous call rejection off code in the Off Code field.
7. Press the Save soft key to accept the change or the Back soft key to cancel.
Page 31
TPG BizPhone CPE860 IP Conference Phone User Guide P a g e | 31
Advanced Phone Features
Voice Mail
Your Voice Mailbox is pre-configured and ready to use as soon as you receive your CPE860 IP Conference Phone.
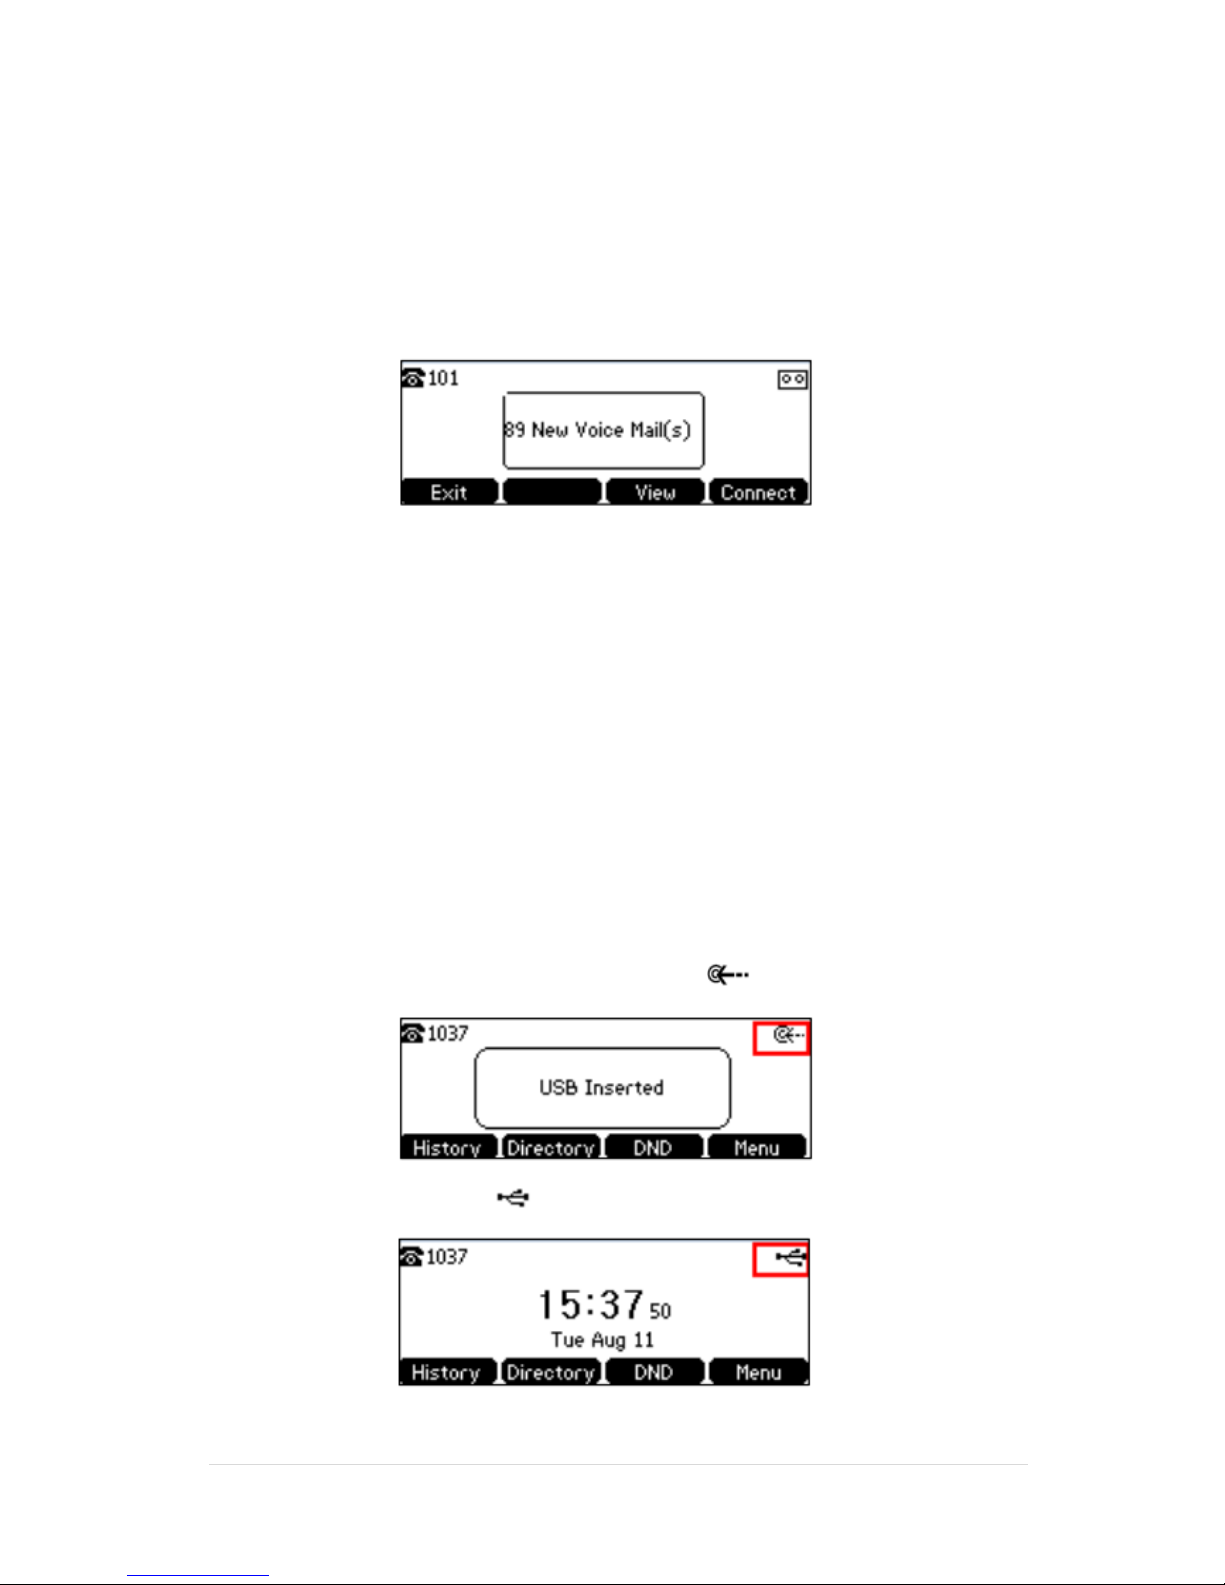
You can listen to voice mails that are stored in your voice mailbox. When receiving a new voice mail, the phone will
play a warning tone, and the power indicator LED will slow flash red. The LCD screen will prompt that the phone
receives a new message and display an icon.
To listen to Voice Mail:
1. When the LCD screen prompts that the phone receives a new voice mail, you can press the
Connect soft key to dial the Voice Portal.
2. Enter your voice portal passcode. Follow the voice prompt to listen to your Voice Mail.
Note: Your voice portal passcode is emailed to you with your BizPhone Service Completion
Advice. If you do not receive a voice mail access code, please contact your system
administrator.
Call and Conference Recording
If you insert a USB flash drive into the USB port on your phone, you can record active calls and conferences on your
phone. Recordings are stored as *.wav files on the USB flash drive.
When your phone is idle, and you insert a USB flash drive into the USB port on your phone, the phone will detect the
USB flash drive and display the prompt message “USB inserted” and the icon.
If the phone detects the USB flash drive, the icon will display on the idle screen.
Page 32
TPG BizPhone CPE860 IP Conference Phone User Guide P a g e | 32
The Start REC soft key controls the recording function, and is available:
When there are one or more calls connected to your phone
During an active call
When calls are on hold or muted
During an attended transfer
During a conference call
The Start REC soft key is not available when:
There are no connected calls on your phone
You place a new call
The phone prompts you to answer an incoming call
The recording is not be paused when the following occurs:
You place a call on hold
You mute a call
You set up a conference call
You perform the attended or semi-attended transfer
An incoming call arrive on your phone
Call Recording
To record a call:
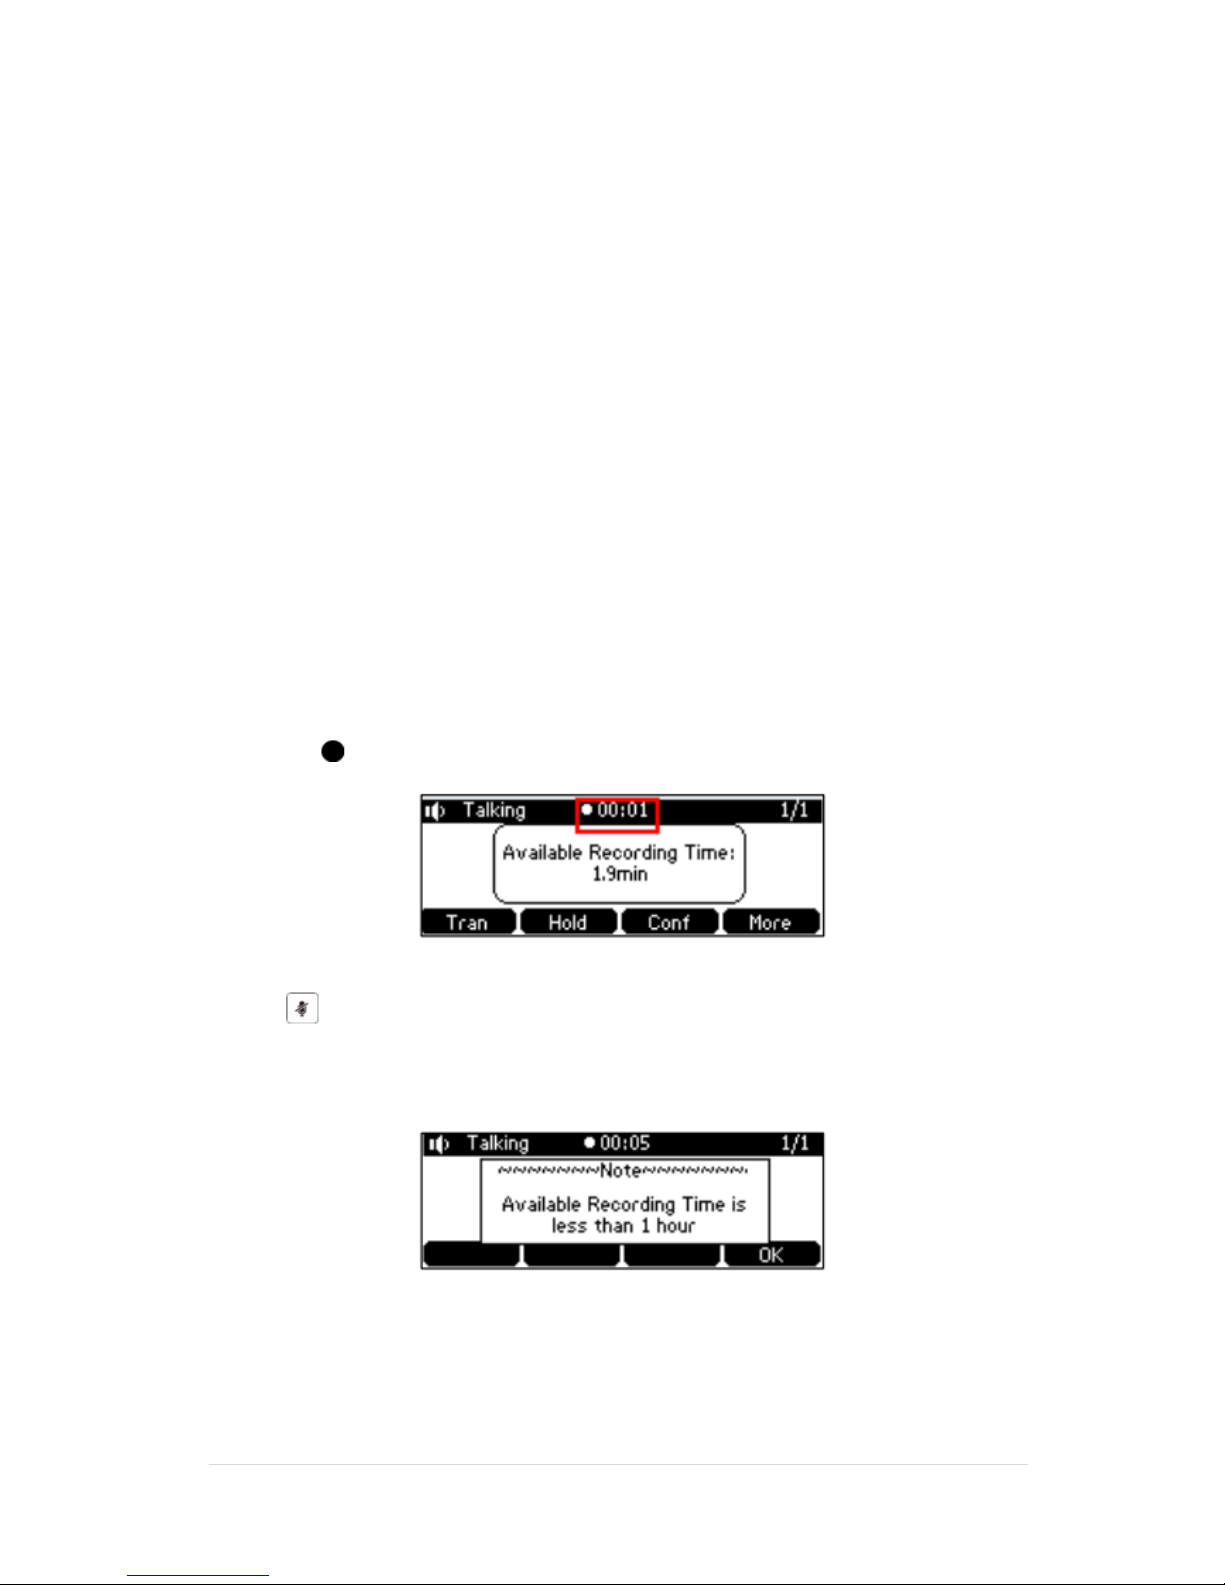
Press the More soft key, and then press the Start REC soft key during a call.
The LCD screen prompts the approximate time remaining (depending on the free space of the USB flash drive),
and displays the icon and recording duration.
If you press the Hold soft key while recording, only you are recorded.
If you press while recording, only the callee is recorded.
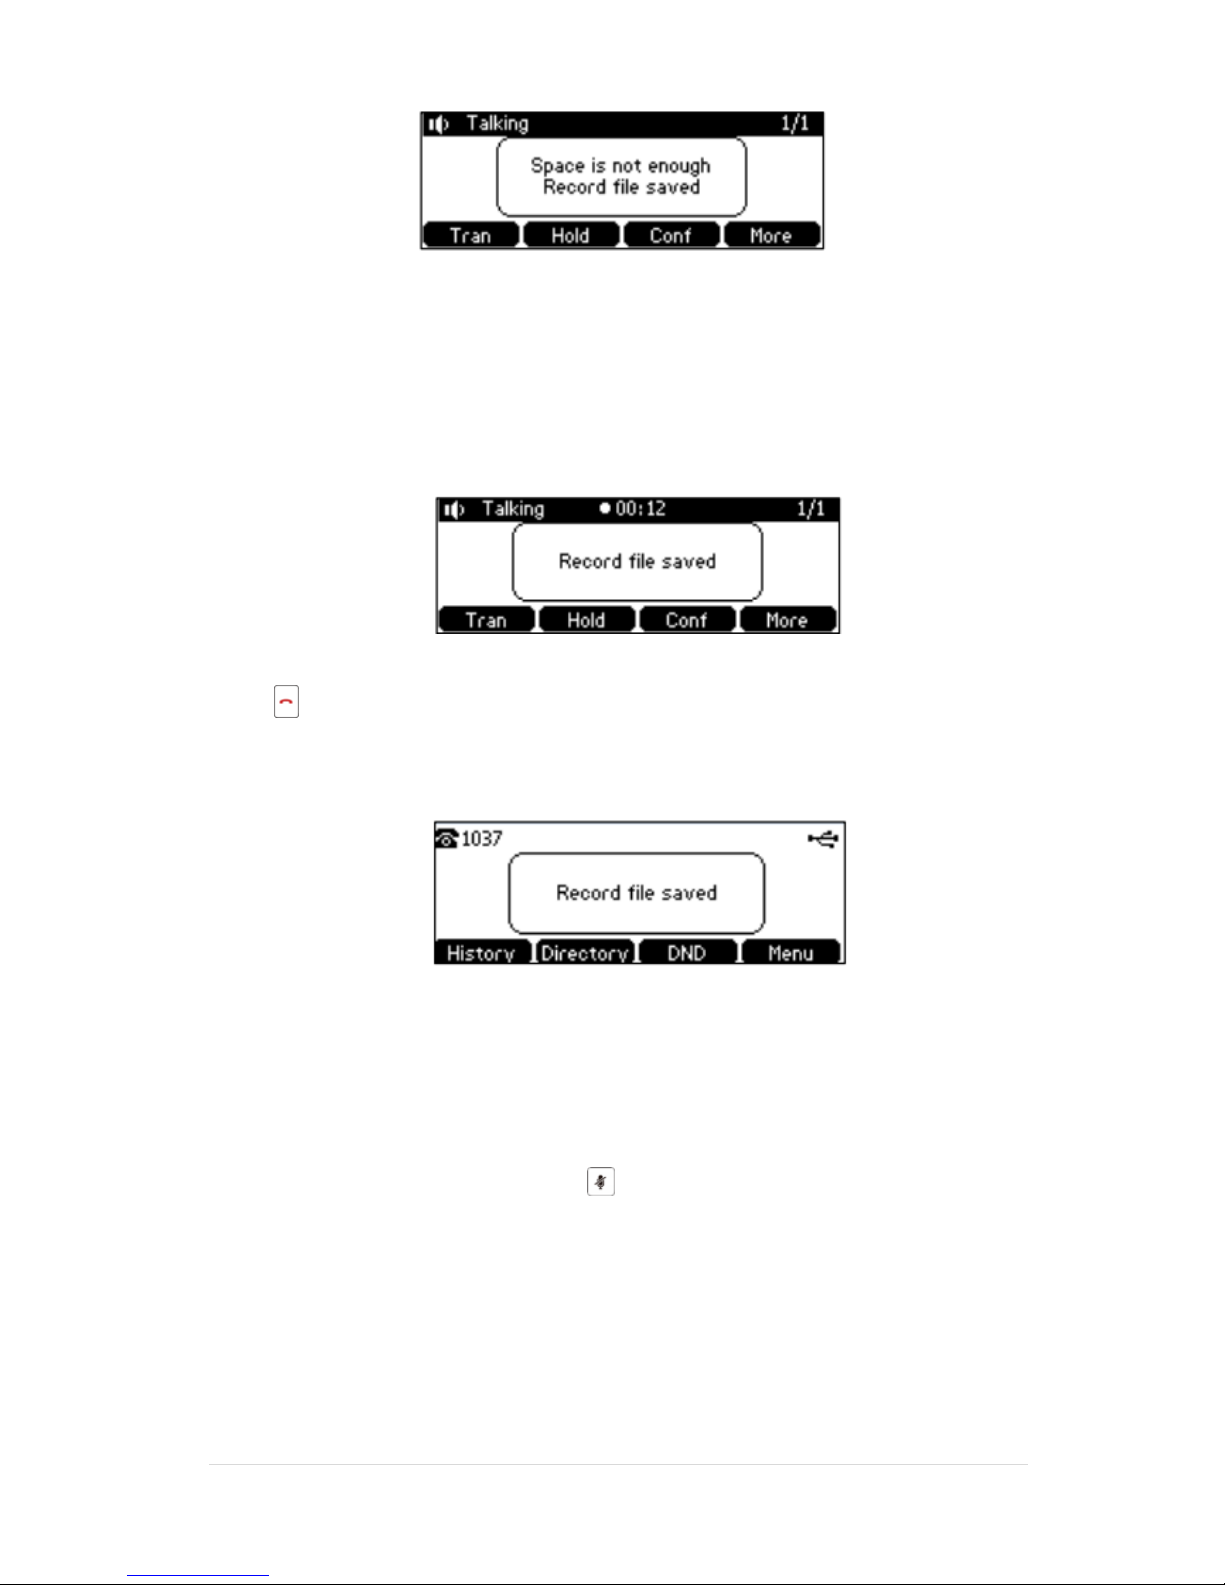
If there is insufficient free space (less than 1 hour) on the USB flash drive during recording, the LCD screen
prompts the following:
Press OK soft key to return to previous screen.
If there is insufficient free space (less than 2 minutes) on the USB flash drive during recording, recording is
automatically stopped, the LCD screen prompts the following:
Page 33
TPG BizPhone CPE860 IP Conference Phone User Guide P a g e | 33
Note: You can hold, transfer or set up a conference call while recording.
When you end a call while recording, the recording will be stopped and saved to USB flash drive automatically.
To stop recording while the phone records, do one of the following:
1. Press the More soft key, and then press the Stop REC soft key.
The LCD screen prompts “Record file saved”, and the recording icon and recording duration disappear.
2. When there is only a call on the phone, press the More soft key and then press the EndCall soft key, or
press directly.
The LCD screen prompts “Record file saved”, the recording icon and recording duration disappear, and the
phone returns to the idle screen.
The recording will be stored as a new .wav file on the USB flash drive when the phone starts recording again.
Conference Recording
You can record conference calls in the same way as other calls with the following exceptions:
All conference participants are recorded while recording. If one of the participants presses the Hold soft key, only that
participant is recorded. If one of the participants presses , only that participant is not recorded.
Page 34
TPG BizPhone CPE860 IP Conference Phone User Guide P a g e | 34
Recorded Call Playback
If you insert a USB flash drive into the USB port on your phone, you can play back recorded calls on your phone.
You can also browse and delete the recorded files on the USB flash drive.
Note: Playback can occur on the either the phone itself or on a computer using the application capable of paying .wav
files.
To browse the recorded files:
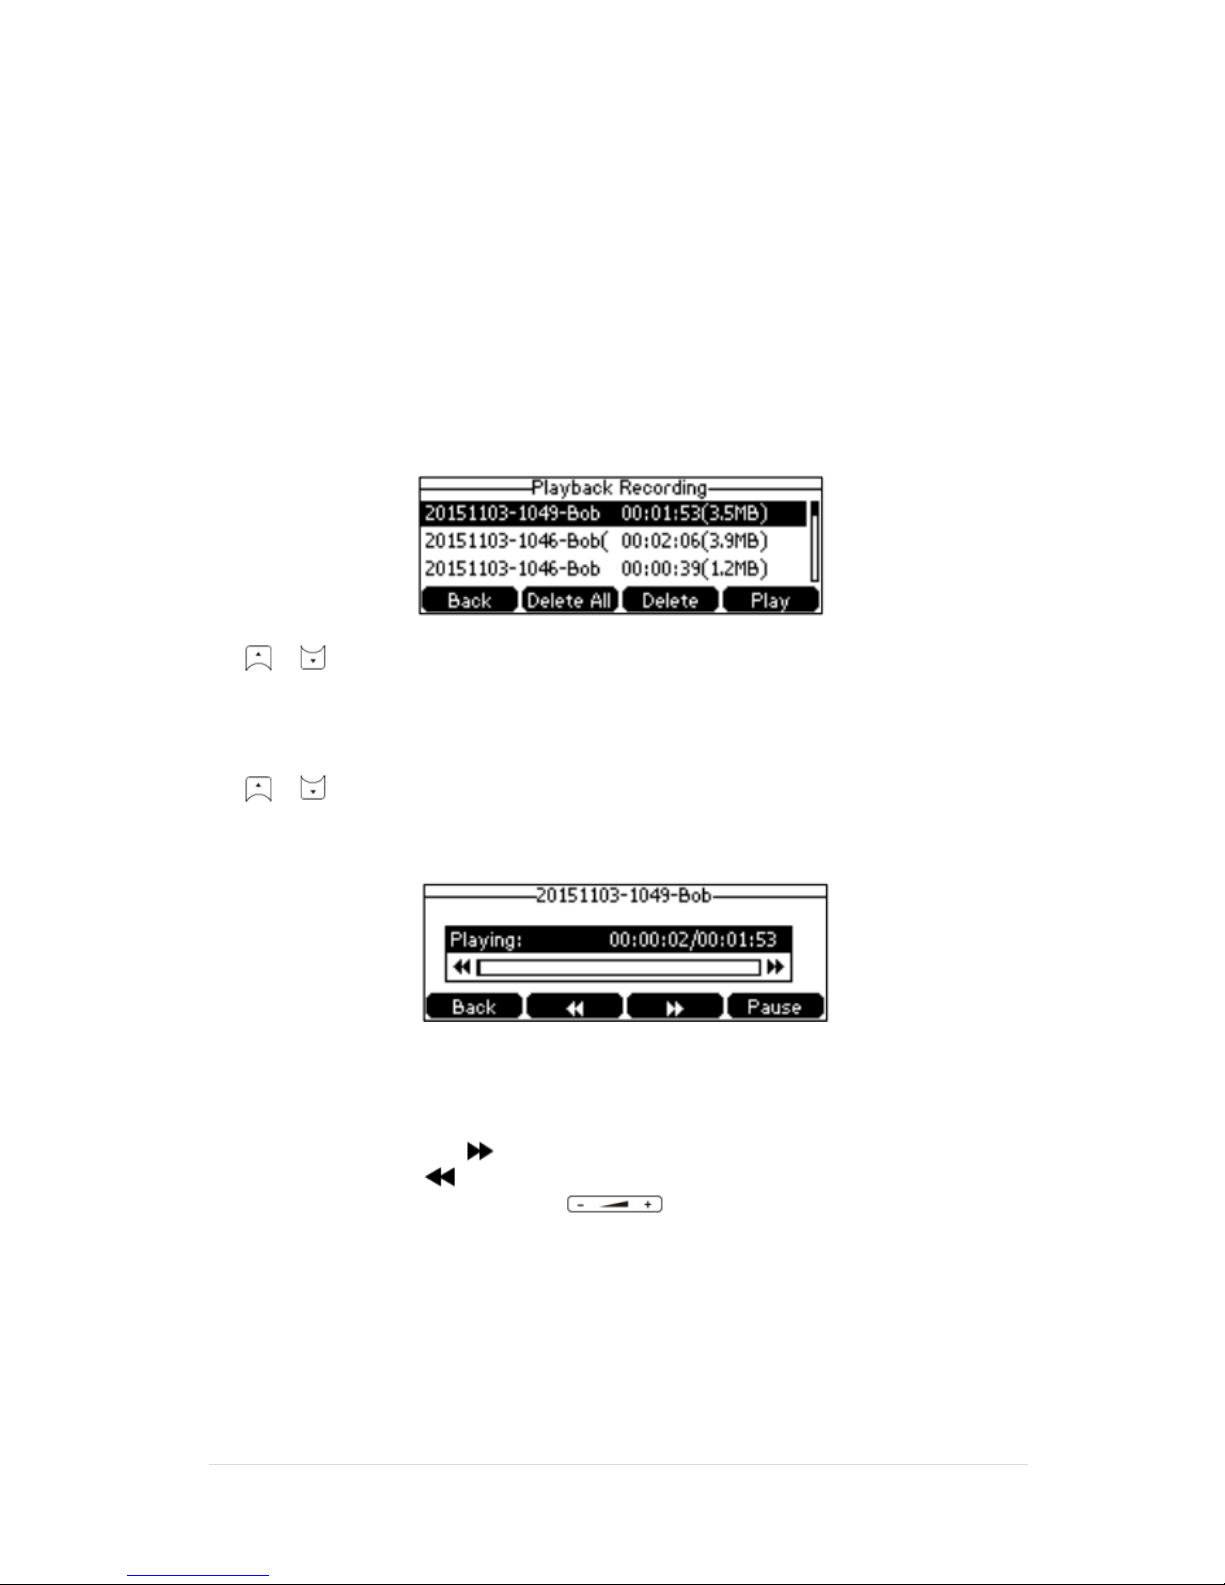
1. Press Menu -> USB Record -> Playback Recording.
The LCD screen shows all recorded files on the USB flash drive. The file name consists of the recording time and
date, the callee name (or the first person’s name you called), the recording duration and the size of the recorded
file.
2. Press or to scroll through the recorded files.
To play back a recording:
1. Press Menu -> USB Record -> Playback Recording.
2. Press or to highlight the recording you want to play back.
3. Press the Play soft key.
During the recording playback, you can do the following:
- To pause the playback: press the Pause soft key. The Play soft key appears on the LCD screen.
To continue playback, press the Play soft key.
- To skip forward the playback: press . Press once to skip forward 8 seconds.
- To rewind the playback: press . Press once to rewind 8 sconds.
- To adjust the volume of the speakerphone: press .
- To stop playback: press the Back soft key. The phone returns to the Playback Recording screen.
If you are playing back a recorded call and an incoming call arrives on your phone, the playback pauses and the phone
rings. The playback will not continue until you press the Play soft key.
Page 35

TPG BizPhone CPE860 IP Conference Phone User Guide P a g e | 35
To delete a recorded file:
1. Press Menu -> USB Record -> Playback Recording.
2. Press or to highlight the recording you want to delete.
3. Press the Delete soft key. The LCD screen prompts the following warning:
4. Press the OK soft key to confirm the deletion or the Cancel soft key to cancel.
You can also delete all recorded files by pressing the Delete All soft key.
 Loading...