

Our Network - Your Benefit
BizPhone
Small Business Phone System
User Reference Guide

P a g e | 2
Contents
BizPhone Frontier Feature Configuration ............................................................................ 4
BizPhone Frontier User Portal ......................................................................................... 5
Basic User Features............................................................................................................ 6
Call Forward No Answer .................................................................................................. 8
Call Forward Busy ........................................................................................................... 8
Call Forward Immediate (Always) .................................................................................... 9
Call Forward Not Reachable .......................................................................................... 10
Call Waiting ................................................................................................................... 10
3-Way Conference Call ................................................................................................. 11
Call Transfer .................................................................................................................. 11
Calling Number Display – Incoming ............................................................................... 12
Calling Number Display – Outgoing ............................................................................... 12
Anonymous Call Rejection ............................................................................................. 13
Automatic Call Back ...................................................................................................... 13
Do Not Disturb ............................................................................................................... 14
Do Not Disturb Reminder .............................................................................................. 14
Standard Features ................................................................................................ ............ 15
User Details ................................................................................................................... 15
Handset ......................................................................................................................... 16
Simultaneous Ring ........................................................................................................ 17
Call Forwarding Selective .............................................................................................. 23
Priority Alert ................................................................................................................... 26
Call Notify ................................................................................................ ...................... 28
Voice Mail ...................................................................................................................... 32
Configuring Voice Mail settings via Frontier ............................................................... 32
Accessing your Voice Mail ......................................................................................... 32
Voice Mail Greetings ................................ ................................................................ .. 33
Replace Handset ........................................................................................................... 35
Basic Call Logs .............................................................................................................. 36
Client Downloads .......................................................................................................... 37
Skype for Business ........................................................................................................ 40
Receptionist ...................................................................................................................... 42
Add-On Features & Services ............................................................................................. 43
BizPhone Desktop App .................................................................................................. 43
BizPhone Mobile App .................................................................................................... 47
BizPhone Receptionist App ........................................................................................... 48
User Password and Passcode Specifications ................................................................... 50

P a g e | 3
Welcome
Welcome to your TPG BizPhone service!
Inside this guide you will find information on how to use and configure the features and services offered by your TPG
BizPhone service.
As our product will continue to be upgraded with enhancements and new features, please check with your BizPhone
Administrator to ensure you have the most up-to-date guide.
You can also find How To video guides for a range of core BizPhone features at
http://www.bizphone.net.au/howtovideos.
P a g e | 4
BizPhone Frontier Feature Configuration
TPG BizPhone has many configurable features allowing you to customise your phone to suit you best.
BizPhone user
The user will have access to set or modify the end user configuration, such as: Call Forward, Call Waiting, Voice mail
settings, etc.
The username and password for each BizPhone user is emailed to your account contact along with the Service
Completion Advice.
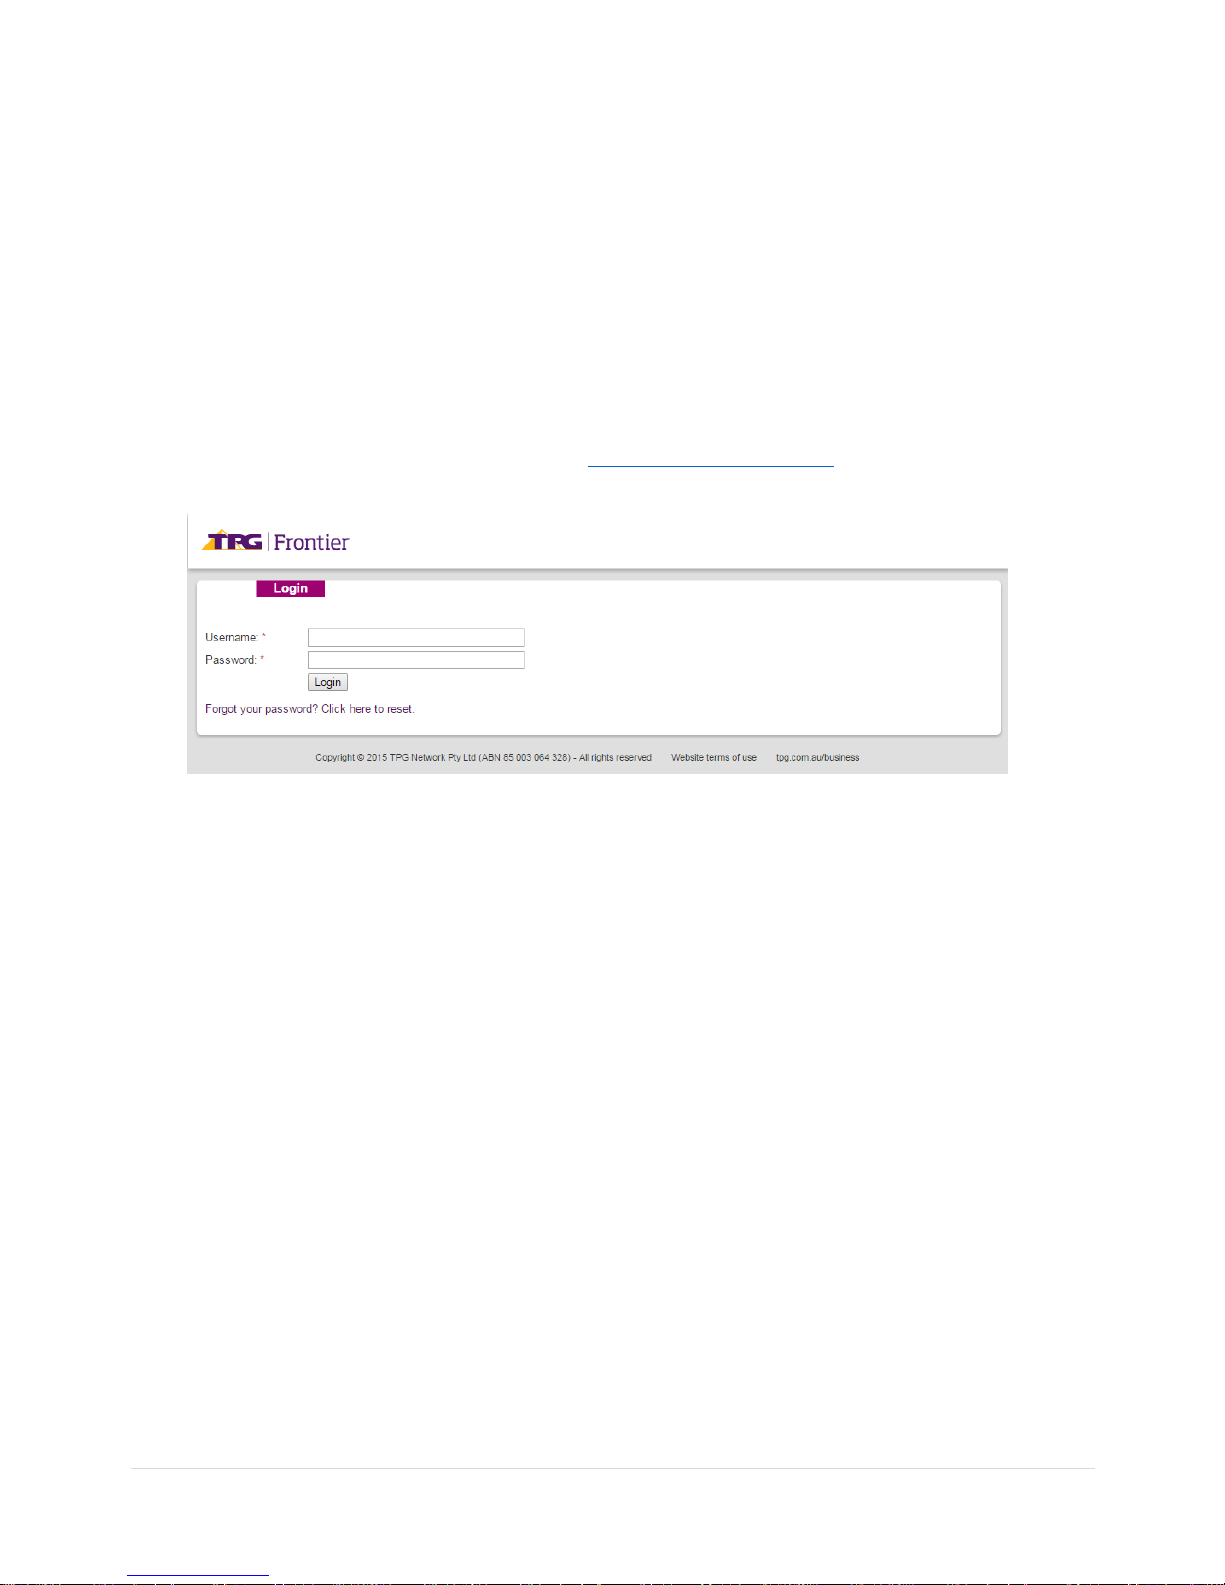
Log in to the Portal
To log in to the BizPhone Frontier Admin portal go to https://frontier.tpg.com.au/s/login via your web browser, where
the following will be displayed:
Enter your BizPhone username and password.
P a g e | 5
BizPhone Frontier User Portal
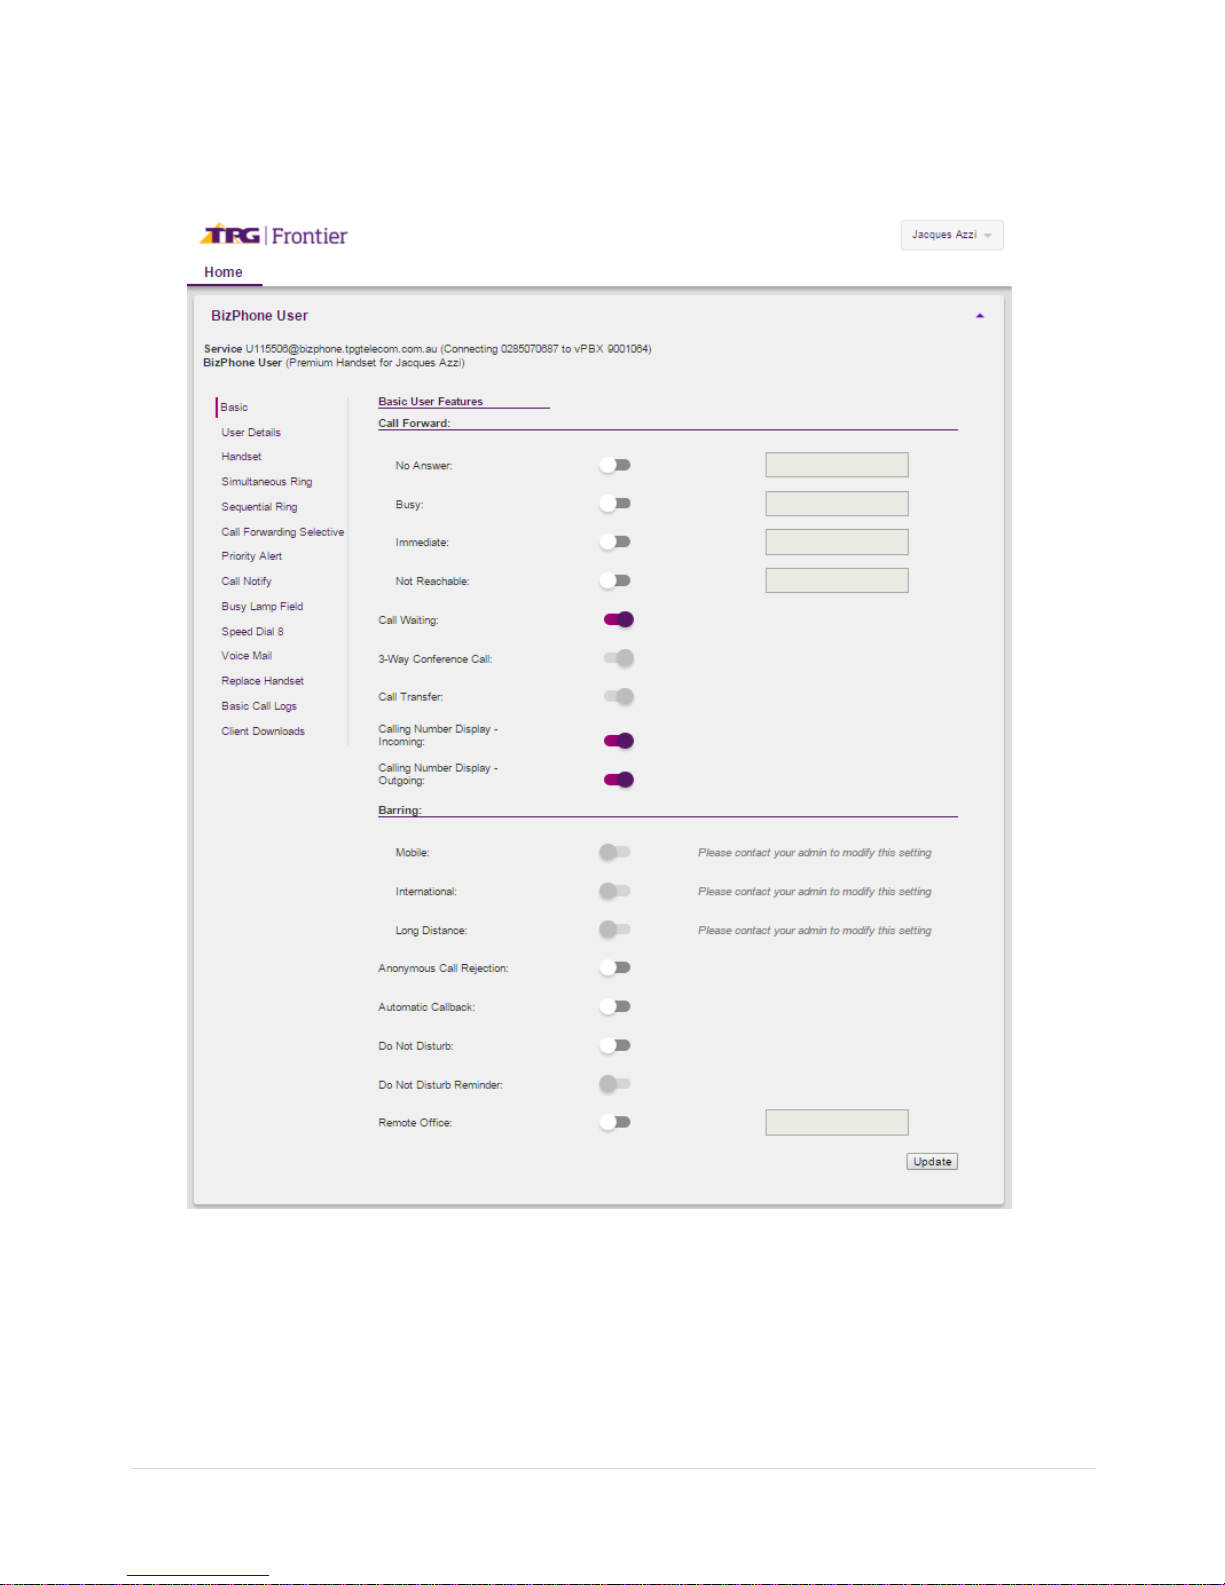
Once you log in to the Frontier portal, the BizPhone User Page (below) will appear.
For details on how to use and configure each of the BizPhone features, please refer to the relevant sections of this
document.
P a g e | 6
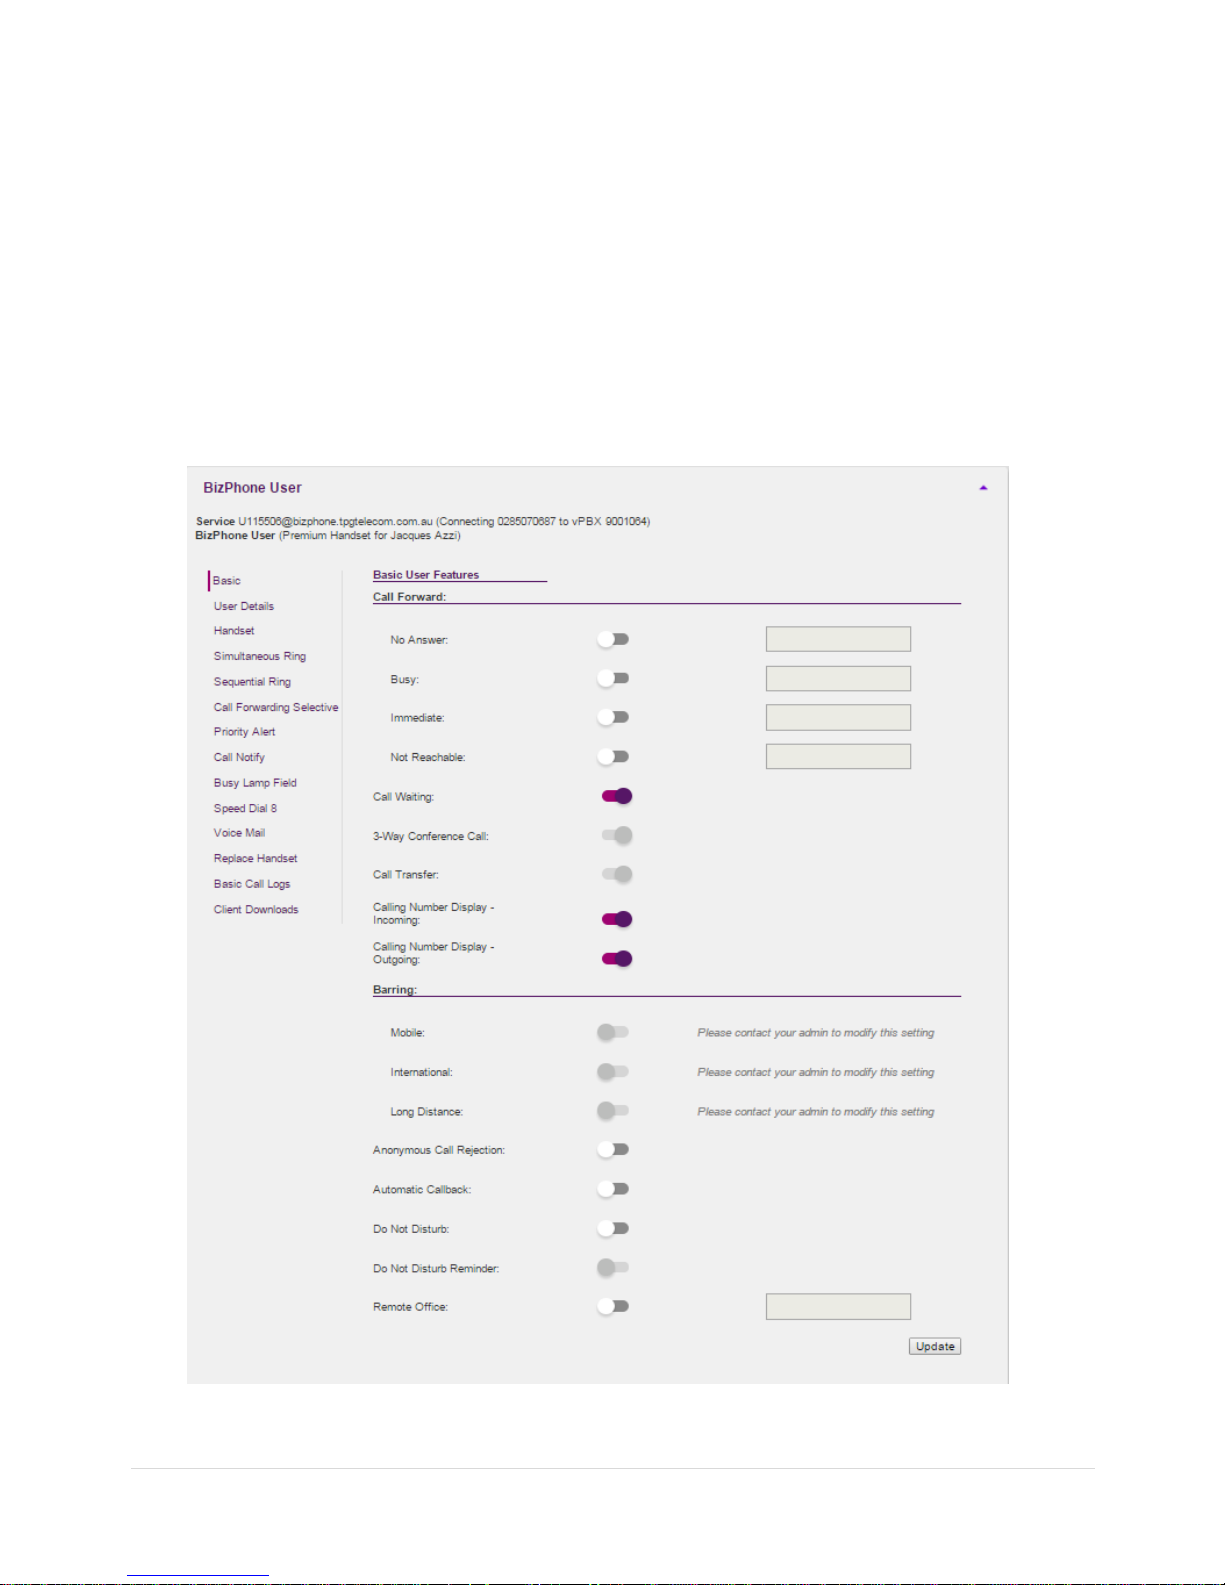
Basic User Features
By default, the Basic User Features page is displayed once you log in to the Frontier User portal. If you are on another
page and would like to return to the Basic User Features page, you can simply click “Basic” on the menu located on the
left.
The Basic User Features are available across all handsets. They are configurable from the Frontier User portal.
Alternatively, some of these features are configurable via the handsets as well.
Note: Your extension is the last 5 digits of your full geographical phone number. Your phone number is displayed next
to the Service details of the Basic User Features page.
To configure each of the Basic User Features, refer to the relevant sections.

P a g e | 7

P a g e | 8
Call Forward No Answer
Call Forward No Answer allows a user to forward incoming calls to a particular phone number if the user does not
answer the call in a specific time period.
Note: If Call Waiting is on and a call is waiting, it will be redirected after that time period.
How do you use it?
By changing your setting in Frontier, your preference will then be applied to all future calls.
Default setting: Off
How to set in Frontier:
Change the status next to Call Forward “No Answer” to active by clicking on or inactive by
clicking on . If the status is set to active, you need to enter a valid 10-digit phone or mobile
number to forward all calls to.
Click “Update” at the bottom of the screen to save the changes.
How to override on handset:
To de-activate the Call Forward No Answer feature, lift the handset and dial *93.
Or you can also use the handset menu to de-activate this feature:
DECT Handset: OK → Call Features → Call Forward → OK → Disabled → Save.
Other Handsets: Menu → Call Control → Call Forward → No Answer → Disabled → Save.
To activate, lift the handset and dial *92 and enter the phone number to forward the calls to.
Or you can also use the handset menu to activate this feature:
DECT Handset: OK → Call Features → Call Forward → OK → Enabled (enter the number to forward calls to
under Target) → Save.
Other Handsets: Menu → Call Control → Call Forward → No Answer → Enabled (enter the number to
forward calls to) → Save.
Call Forward Busy
Call Forward Busy allows the user to forward incoming calls to a particular phone number if the user is on a call.
Note: Call Waiting override Call Forward Busy.
How do you use it?
By changing your setting in Frontier, your preference will then be applied to all future calls.
Default setting: Off
How to set in Frontier:
Change the status next to Call Forward ”Busy” to active by clicking on or inactive by clicking
on . If the status is set to active, you need to enter a valid 10-digit phone or mobile number to
forward all calls to.
Click “Update” at the bottom of the screen to save the changes.
How to override on handset:
To de-activate the Call Forward Busy feature, lift the handset and dial *91.
Or you can also use the handset menu to de-activate this feature:
DECT Handset: OK → Call Features → Call Forward → OK → Disabled → Save.
Other Handsets: Menu → Call Control → Call Forward → Busy → Disabled → Save.
To activate, lift the handset and dial *90 and enter the phone number to forward the calls to.

P a g e | 9
Or you can also use the handset menu to activate this feature:
DECT Handset: OK → Call Features → Call Forward → OK → Enabled (enter the number to forward calls to
under Target) → Save.
Other Handsets: Menu → Call Control → Call Forward → Busy → Enabled (enter the number to forward calls
to) → Save.
Call Forward Immediate (Always)
Call Forward Immediate allows the user to forward all incoming calls to a particular phone number.
How do you use it?
By changing your setting in Frontier, your preference will then be applied to all future calls.
Default setting: Off
How to set in Frontier:
Change the status next to Call Forward “Immediate” to active by clicking on or inactive by
clicking on . If the status is set to active, you need to enter a valid 10-digit phone or mobile
number to forward all calls to.
Click “Update” at the bottom of the screen to save the changes.
How to override on handset:
To de-activate the Call Forward Immediate feature, lift the handset and dial *73.
Or you can also use the handset menu to de-activate this feature:
DECT Handset: OK → Call Features → Call Forward → OK → Disabled → Save.
Other Handsets: Menu → Call Control → Call Forward → Always → Disabled → Save.
To activate, lift the handset and dial *72 and enter the phone number to forward all calls to.
Or you can also use the handset menu to activate this feature:
DECT Handset: OK → Call Features → Call Forward → OK → Enabled (enter the number to forward calls to
under Target) → Save.
Other Handsets: Menu → Call Control → Call Forward → Always → Enabled (enter the number to forward
calls to) → Save.

P a g e | 10
Call Forward Not Reachable
Call Forward Not Reachable allows all calls to be automatically forwarded to a different phone number when the handset
is not accessible.
How do you use it?
By changing your setting in Frontier, your preference will then be applied to all future calls.
Default setting: Off
How to set in Frontier:
Change the status next to Call Forward “Not Reachable” to active by clicking on or inactive
by clicking on . If the status is set to active, you need to enter a valid 10-digit phone or
mobile number to forward all calls to.
Click “Update” at the bottom of the screen to save the changes.
How to override on handset:
To de-activate the Call Forward Not Reachable feature, lift the handset and dial *95.
To activate, lift the handset and dial *94 and enter the phone number to forward the calls to.
Call Waiting
Call Waiting is a service that allows the user to be alerted to an incoming call by a faint beep or click when you are
already talking on the phone. This gives the user the ability to either take that call by putting the first call on hold or just
continue with the conversation that they are currently having.
How do you use it?
To use the Call Waiting, you must already be on a call.
DECT Handset: When a second call comes through, it will appear on the phone screen, press “Accept” to speak to the
second caller without hanging up the first caller (the first caller will be put on hold).
To resume the held call, press “Swap”.
T42G Handset: When a second call comes through, press the down arrow button and the answer option will be shown
on the LCD screen. You can then press “Answer” to speak to the second caller without hanging up the first caller (the
first caller will be put on hold).
To resume the held call, press the up arrow button and press “Resume”.
T48G Handset: When a second call comes through, you will see the incoming call on the LCD screen. Click on the
incoming call and click “Answer” to speak to the second caller without hanging up the first caller (the first caller will be
put on hold).
To resume the held call, click the hold call and click “Resume”.
Default Setting: On
How to set in Frontier:
Change the status next to Call Waiting to active by clicking on or inactive by clicking on
.
Click “Update” at the bottom of the screen to save the changes.
How to override on handset:
To disable the call waiting, lift the handset and dial #43.
Or you can also use the handset menu to de-activate or activate this feature:
DECT Handset: OK → Call Features → Call Waiting → “Disabled” (to de-activate) or “Enabled” (to activate) → Save.

P a g e | 11
Other Handsets: Menu → Features → Call Waiting → “Disabled” (to de-activate) or “Enabled” (to activate) → Save.
3-Way Conference Call
3-Way Conference Call enables a user to bring a third party into an existing conversation, and allows the three parties to
listen and talk to each other.
How do you use it?
To use the 3-Way Conference Call, you must start on a connected call.
DECT Handset: When you are connected in a call, press “Options” and then select “Conference” key on the phone and
then enter the number of the third party you wish to conference in. Once the call is answered, press the “Conf” key again
to join the parties together.
Other Handsets: Press the “Conf” or “Conference” key on the phone, and then enter the number of the third party you
wish to conference in. Once they answer the call you can speak to them privately, and then press the “Conf” or
“Conference” key again to join all parties together.
Note: If either of the two parties hand up during the call, the call with the other party remains connected. It the user
hangs up, the other two parties will be disconnected.
Default Setting: On (Not configurable)
Call Transfer
Call Transfer allows a user to transfer a connected call to a third party (either internal or any phone number).
There are two types of transfer: Blind Transfer and Attended Transfer (not available on the DECT handsets).
An attended transfer allows the user to speak to the third party privately before transferring the call across.
A blind transfer simply redirects the call to the third party and the hangs up the user.
How do you use it?
To use the Call Transfer, you must start on a connected call.
DECT Handset: To transfer a call, press “Options” and select “Transfer” key on the phone. Then enter the phone
number that you wish to transfer the call to and press the “Transfer” key again. The call will then be transferred to a
third party.
Other Handsets: To transfer a received call, press the “Trans” or “Transfer” button on the phone. The existing call will be
placed on hold, and you will have two options:
1. If you want to make an “Attended” transfer, dial the third party number, speak to the third party, and press the
“Transfer” button again.
2. If you want to make a “Blind” transfer, dial the third party number and press the “Transfer” button and the call
should transfer immediately.
Default Setting: On (Not configurable)

P a g e | 12
Calling Number Display – Incoming
Calling Number Display – Incoming allows the user to display or hide the other party’s phone number when they
are calling the user.
Default Setting: On
How to set in Frontier:
Change the status next to Calling Number Display – Incoming (Caller Number Display) to active
by clicking on or inactive by clicking on .
Click “Update” at the bottom of the screen to save the changes.
Calling Number Display – Outgoing
Calling Number Display allows the user to display or hide their phone number when making an outbound call.
Default Setting: On
How to set in Frontier:
Change the status next to Calling Number Display – Outgoing (Caller Line Identifier) to active by
clicking on or inactive by clicking on .
Click “Update” at the bottom of the screen to save the changes.
How to override on handset:
To de-activate, lift the handset and dial *31 and then the user phone number will be restricted to
the other party.
To activate the Calling Number Display - Outgoing, lift the handset and dial #31.
Call Barring
Call Barring allows the admin to bar certain types of calls (Mobile, International, and Long Distance) from
being made from the user’s phone.
Default Setting: Off
How to set in Frontier:
Please contact your BizPhone administrator to change the settings for Call Barring.

P a g e | 13
Anonymous Call Rejection
Anonymous Call Rejection allows a user to reject incoming calls that do not have Caller ID Display enabled. By
enabling the service, a caller who has their caller ID blocked will have their incoming call rejected. The caller will hear a
message informing them that the user is not accepting anonymous call at this time. The user’s phone will not ring and
the user will not see any indication of the call.
How do you use it?
By changing your setting in Frontier, your preference will then be applied to all future calls.
Default setting: Off
How to set in Frontier:
Change the status next to Anonymous Call Rejection to active by clicking on or inactive by
clicking on .
Click “Update” at the bottom of the screen to save the changes.
How to override on handset:
To Activate the Anonymous Call Rejection feature, lift the handset and dial *77.
To de-activate, lift the handset and dial *87.
Or you can also use the handset menu to activate or de-activate or activate this feature:
DECT Handset: OK → Call Features → Anon. Call Rejection → OK → “Disabled” (to de-activate) or “Enabled”
(to activate) → OK.
Other Handsets: Menu → Call Control → Anonymous Call Rejection → “Off” (to de-activate) or “On” (to
activate) → Save
Automatic Call Back
Automatic Call Back allows the user who receive a busy tone to monitor the busy party and automatically
establish a call when the busy party becomes available.
How do you use it?
By changing your setting in Frontier, your preference will then be applied to all future calls. This feature
can only be activated when calling within the same group.
Default setting: Off
How to set in Frontier:
Change the status next to Automatic Call Back to active by clicking on or inactive by clicking
on .
Click “Update” at the bottom of the screen to save the changes.

P a g e | 14
Do Not Disturb
Do Not Disturb allows the users to set their phone as unavailable so that incoming calls are treated as if the
user is busy.
How do you use it?
By changing your setting in Frontier, your preference will then be applied to all future calls.
Default setting: Off
How to set in Frontier:
Change the status next to Do Not Disturb to active by clicking on or inactive by clicking on
.
Click “Update” at the bottom of the screen to save the changes.
How to override on handset:
To Activate the Do Not Disturb feature, lift the handset and dial *78 or press the “DND” key on the
phone (not available for DECT handsets).
To de-activate, lift the handset and dial *79.
Do Not Disturb Reminder
Do Not Disturb Reminder plays ring reminder when the call is blocked.
How do you use it?
By changing your setting in Frontier, your preference will then be applied in future.
Default setting: Off
How to set in Frontier:
Change the status next to Do Not Disturb Reminder to active by clicking on or inactive by
clicking on .
Click “Update” at the bottom of the screen to save the changes.
Remote Office
Remote Office allows the user to access and use their BizPhone service from any phone number (home office,
mobile phone) that you specified as your Remote Office.
How do you use it?
By changing your setting in Frontier, your preference will then be applied to all future calls.
Default setting: Off
How to set in Frontier:
Change the status next to Remote Office to active by clicking on or inactive by clicking on
.
Enter the phone number you want to access your BizPhone service from on the text box next to
Remote Office option.
Click “Update” at the bottom of the screen to save the changes.
How to override on handset (Not available for DECT handsets):
Menu → Call Control → Remote Office → “Off” (to de-activate) or “On” (to activate) → Save

P a g e | 15
Standard Features
The standard features are available on all handsets (unless specified) – configurable via the Frontier Portal and some
are configurable via the handsets.
User Details
User Details allows the user to manage and modify their details, including changing their Frontier User Portal password
and their Voice Portal passcode when required.
How do you use it?
By changing your setting in Frontier, your preference will then be applied to all future calls.
Default setting: Un-configured
How to configure in Frontier:
To access the User Details, click on the “User Details” on the menu located on the left.
Enter the user details.
User Details
Description
First Name*
Enter the first name of the user.
Last Name*
Enter the last name of the user.
Email Address*
Enter the email address of the user.
Mobile*
Enter the mobile address of the user.
Change Password
New Password
Enter a new password for your Frontier user portal (if applicable)
Please retype new
password
Retype your password you have just entered.
Change Passcode
Please enter Portal
Passcode
Enter a new passcode for your voice portal.
Please retype new
passcode
Retype your passcode you have just entered for your voice portal.

P a g e | 16
Notes:
- * in above table indicates mandatory field and cannot be empty.
- The specification for the User Password and Voice Portal Passcode are different. For User
Password, please refer to: User Password specification. For Voice Portal Passcode, please refer
to: Voice Portal Passcode specification.
Once you have finished entering the user details, click “Update” to save the details you have just entered or
modified for the user.
Handset
This page displays the User’s handset details: Device Name and MAC Address.
To access this page, click on the “Handset” menu located on the left.
Note: The Handset Details go hand-in-hand with the Replace Handset feature. If you replace your handset with a
new or replacement handset, the new or replacement handset’s details (Device name and MAC Address) will be
displayed in this page.

P a g e | 17
Simultaneous Ring
Simultaneous Ring allows incoming calls to ring on multiple phone numbers or extensions in addition to the user’s
phone.
How do you use it?
By changing your setting in Frontier, your preference will then be applied to all future calls.
Default setting: Un-configured
How to configure in Frontier:
To access the Simultaneous Ring, click on the “Simultaneous Ring” on the menu located on the left.
The Simultaneous Ring is configured in 2 parts:
1. Activate and configure Simultaneous Ring options (top part of the screen).
2. Create criteria for the Simultaneous Ring (bottom part of the screen).
Note: You need to set up a create criteria before you can activate the Simultaneous Ring feature.

P a g e | 18
Enter a Create Criteria for your Simultaneous Ring.
Create Criteria for
Simultaneous Ring
Description
Description*
Enter the description for the Simultaneous Ring criteria.
Use Simultaneous Ring
Personal
Tick this option if you want to use the Simultaneous Ring
Personal.
Holiday Schedule
(if applicable) Select the Holiday schedule from the drop
down list. This is the schedule that you would have created
under Schedules and Events.
Time Schedule
(if applicable) Select the Time schedule from the drop
down list. This is the schedule that you would have created
under Schedules and Events.
Calls From
You can specify if you want to the phone to ring
simultaneously when you receive call from:
- Any Phone Numbers, where your phone will ring
simultaneously with the specified phone number(s)
when you receive calls from any numbers.
- Following Phone Numbers, where your phone will
ONLY ring simultaneously with the specified phone
number(s) when you receive calls from the specified
phone numbers in this section. If you select this option,
you will need to specify each phone number in each
text box located under this option. You can specify up
to 12 phone numbers.
Note: * in above table indicates mandatory field and cannot be empty.
Click “Save” at the bottom of the Create Criteria section to save the Simultaneous Ring criteria you have just
created.
When the Criteria is successfully created, it will be displayed at the bottom of the screen under “Configured
Criteria”. You can update the criteria by changing the details on the criteria and click on the “Update” button
below the criteria section. Or you can delete the criteria by clicking on the “Delete” button below the criteria
section.

P a g e | 19
Note: You can create more than one Create Criteria by repeating the Create Criteria steps above.
After you create the criteria for the Simultaneous Ring, you can now activate and enter the Simultaneous Ring
options.
Simultaneous Ring Options
Description
Set Active
Enable this option to activate the Simultaneous Ring.
Do Not Ring My Simultaneous
Ring Numbers if I’m already in
a call
Enable this option if you do not want the incoming calls to
ring the additional numbers if you are already in a call
Simultaneous Ring Numbers
Phone Number
Enter the phone number(s) that you want to ring at the
same time as your phone number for any incoming calls.
Answer Confirmation Required
Enabled this option to prevent callers from being
transferred to the specified phone’s voicemail.
Click “Update” to save the changes.

P a g e | 20
Sequential Ring
Sequential Ring allows the user to receive a call on multiple phones or devices in sequential order.
How do you use it?
By changing your setting in Frontier, your preference will then be applied to all future calls.
Default setting: Un-configured
How to configure in Frontier:
To access the Sequential Ring, click on the “Sequential Ring” menu on the left.
The Sequential Ring is configured in 2 parts:
1. Activate and configure Sequential Ring options (top part of the screen).
2. Create criteria for the Sequential Ring (bottom part of the screen).
Note: You need to set up a create criteria before you can activate the Sequential Ring feature.

P a g e | 21
Enter a Create Criteria for your Sequential Ring.
Create Criteria for
Sequential Ring
Description
Description*
Enter the description for the Sequential Ring criteria.
Use Sequential Ring
Tick this option if you want to use the Sequential Ring.
Holiday Schedule
(if applicable) Select the Holiday schedule from the drop
down list. This is the schedule that you would have created
under Schedules and Events.
Time Schedule
(if applicable) Select the Time schedule from the drop
down list. This is the schedule that you would have created
under Schedules and Events.
Calls From
You can specify if you want the phone to ring sequentially
when you receive a call from:
- Any Phone Numbers, where the specified phone
number will ring in sequence to your phone when you
receive calls from any numbers.
- Following Phone Numbers, where the specified
phone will ONLY ring in sequence to your phone when
you receive calls from the specified phone numbers in
this section. If you select this option, you will need to
specify each phone number in each text box located
under this option. You can specify up to 12 phone
numbers.
Note: * in above table indicates mandatory field and cannot be empty.
Click “Save” at the bottom of the Create Criteria section to save the Sequential Ring criteria you have just
created.
When the Criteria is successfully created, it will be displayed at the bottom of the screen under “Configured
Criteria”. You can update the criteria by changing the details on the criteria and click on the “Update” button
below the criteria section. Or you can delete the criteria by clicking on the “Delete” button below the criteria
section.
Note: You can create more than one Create Criteria by repeating the Create Criteria steps above.

P a g e | 22
After you create the criteria for the Sequential Ring, you can now activate and enter the Sequential Ring
options.
Sequential Ring
Options
Description
Use Base Location First
Enable this option if you want all incoming calls to go to the
primary number first before it rings the other phone numbers.
Number of Rings*
Select the number of rings from the drop down list before the
incoming calls rings the other phone numbers.
Continue the search
process if the base
location is busy
Enable this option if you want the service to continue to search if
the primary number is busy.
Enable caller to skip the
search process.
Assumes forwarding or
messaging is enabled
Enable this option to allow callers to terminate the search process
and be put into voicemail or to the forwarding option.
Locations
ID
This is a default ID set in the system.
Phone Number
Enter the Phone number for the additional phone.
Number of Rings
Select from the drop down list the number of rings before it
reaches the specified phone number.
Answer Confirmation
Enabled this option to prevent callers from being transferred to the
specified phone’s voicemail.
Note: * in above table indicates mandatory field and cannot be empty.
Click “Update” to save the changes.

P a g e | 23
Call Forwarding Selective
Call Forwarding Selective sends specific calls to another phone number.
How do you use it?
By changing your setting in Frontier, your preference will then be applied to all future calls.
Default setting: Un-configured
How to configure in Frontier:
To access the Call Forwarding Selective, click “Call Forwarding Selective” on the menu on the left.
The Call Forwarding Selective is configured in 2 parts:
1. Activate and configure Call Forwarding Selective options (top part of the screen).
2. Create criteria for the Call Forwarding Selective (bottom part of the screen).
Notes:
- You need to enter a phone number to the “Default Forward To Number” field before you can set
up a create criteria.
- You need to set up a create criteria before you can activate the Call Forwarding Selective feature.

P a g e | 24
Enter the “Default Forward to Number” and click “Update”. The Create Criteria Options will now appear.
Enter a Create Criteria for the user’s Call Forwarding Selective.
Create Criteria for Call
Forwarding Selective
Description
Description*
Enter the description for the Call Forwarding Selective criteria.
Holiday Schedule
(if applicable) Select the Holiday schedule from the drop down list.
This is the schedule that you would have created under Schedules
and Events.
Time Schedule
(if applicable) Select the Time schedule from the drop down list.
This is the schedule that you would have created under Schedules
and Events.
Forward To
Select where you want to forward the call to.
- Default number: tick this option if you want to forward call to
the number you specified on the “Default Forward to Number”.
- Specified Number: tick this option if you want to forward calls
to a specified number and specify the phone number.
- Do Not Forward: tick this option if you do not want to call
forward.
Forward From
Select what phone number you want to call forward from.
- Any Phone Number: tick this option if you want to forward
calls from any phone number.
- Following Phone Number: tick this option if you only want to
forward calls from specific phone numbers. If you select this
option, you will need to specify each phone number in each
text box located under this option. You can specify up to 12
phone numbers.
Note: * in above table indicates mandatory field and cannot be empty.

P a g e | 25
Click “Save” at the bottom of the Create Criteria section to save the Call Forwarding Selective criteria you
have just created.
When the Criteria is successfully created, it will be displayed at the bottom of the screen under “Configured
Criteria”. You can update the criteria by changing the details on the criteria and click on the “Update” button
below the criteria section. Or you can delete the criteria by clicking on the “Delete” button below the criteria
section.
Note: You can create more than one Create Criteria by repeating the Create Criteria steps above.
After you create the criteria for the Call Forwarding Selective, you can now activate and enter the Call
Forwarding Selective options.
Call Forwarding
Selective Options
Description
Set Active*
Enable this option to activate the Call Forwarding Selective.
Play Ring Reminder*
Enable this option to play a short ring to remind the user that calls
are being forwarded to another phone number.
Default Forward to
Number*
Enter the default number to call forward to.
Note: * in above table indicates mandatory field and cannot be empty.
Click “Update” to update the Call Forwarding Selective options.

P a g e | 26
Priority Alert
When Priority Alert is enabled, the user phone will ring with a distinctive ring allowing the user to know that the calls are
from a specific person or group of people (specified in the create criteria).
How do you use it?
By changing your setting in Frontier, your preference will then be applied to all future calls.
Default setting: Un-configured
How to configure in Frontier:
To access the Priority Alert, click on “Priority Alert” menu on the left.
Select and Enter the Priority Alert Create Criteria.
Priority Alert Create
Criteria
Description
Description*
Enter the Description for the Priority Alert
Holiday Schedule
(if applicable) Select the Holiday schedule from the drop down list.
This is the schedule that you would have created under Schedules
and Events.
Time Schedule
(if applicable) Select the Time schedule from the drop down list.
This is the schedule that you would have created under Schedules
and Events.
Use Priority Alert
Enable this option to use Priority Alert
Calls from
Select “Any External Phone Number” if you wish to enable the
Priority alert for any calls from external phone or select
“Following Phone Numbers” if you wish to enable the Priority
Alert for the listed phone numbers. If you select this option, you
will need to specify each phone number in each text box located
under this option. You can specify up to 12 phone numbers.
Note: * in above table indicates mandatory field and cannot be empty.
Click “Save” at the bottom of the Create Criteria section to save the Priority Alert criteria you have just
created.

P a g e | 27
When the Criteria is successfully created, it will be displayed at the bottom of the screen under “Configured
Criteria”. You can update the criteria by changing the details on the criteria and click on the “Update” button
below the criteria section. Or you can delete the criteria by clicking on the “Delete” button below the criteria
section.
Note: You can create more than one Create Criteria by repeating the Create Criteria steps above.

P a g e | 28
Call Notify
Call Notify sends a notification message, containing the caller’s name and number, to the email address specified.
How do you use it?
By changing your setting in Frontier, your preference will then be applied to all future calls.
Default setting: Un-configured
How to configure in Frontier:
To access Call Notify, click on “Call Notify” on the menu on the left.
The Call Notify is configured in 2 parts:
1. Entering the email address for the Call Notification (top part of the screen).
2. Create criteria for the Call Notify (bottom part of the screen).
Note: You need to set up a create criteria before you can activate Call Notify feature.
Enter a Create Criteria for your Call Notify.
Call Notify Create
Criteria
Description
Description*
Enter the description for the Call Notify.
Notify
Enable this option to activate the Call Notify.
Holiday Schedule
(if applicable) Select the Holiday schedule from the drop down list.
This is the schedule that you would have created under Schedules
and Events.
Time Schedule
(if applicable) Select the Time schedule from the drop down list.
This is the schedule that you would have created under Schedules
and Events.
Calls From
Select “Any External Phone Number” if you wish to enable the
Call Notify for any calls from external phone or select “Following
Phone Numbers” if you wish to enable the Call Notify for the
listed phone numbers. Enter each of the phone numbers in each
text box under this option. You can specify up to 12 phone
numbers.
Note: * in above table indicates mandatory field and cannot be empty.

P a g e | 29
Click “Save” at the bottom of the Create Criteria section to save the Call Notify criteria you have just created.
When the Criteria is successfully created, it will be displayed at the bottom of the screen under “Configured
Criteria”. You can update the criteria by changing the details on the criteria and click on the “Update” button
below the criteria section. Or you can delete the criteria by clicking on the “Delete” button below the criteria
section.
Note: You can create more than one Create Criteria by repeating the Create Criteria steps above.
Enter the email address you wish to send call notify to in the text box next to “Send Call Notify to”
(mandatory).
Click “Save” to save the email address entered.
Example of notification email when Call Notify is activated:
Busy Lamp Field
Busy Lamp Field allows the user the watch the status of another user that are in the group of users assigned
with Busy Lamp Field.

P a g e | 30
Notes:
- The Busy Lamp Field feature is not available on the Cordless and Conference handset. It is
only available on the T42G and T48G handsets.
- The user will only be able to monitor up to 50 users.
How do you use it?
By changing your setting in Frontier, your preference will then be applied to all future calls.
You will be able to monitor the status of the users if they are added to the Assigned users list.
To see the status of a user, look at the icon next to their name.
A head/green light means their line is free.
A stop/red light means their line is in use.
To dial the user, just press the button next to their name.
Default setting: Un-configured
How to configure in Frontier:
To access the Busy Lamp Field, click on “Busy Lamp Field” menu on the left.
The user can add the available users to the assigned users group by highlighting the user that they want to
monitor from the “Available users” and click the button. The selected user should now appear in the
“Assigned users” list. Repeat the same steps if you wish to add more users to the list.
To remove the user from the “Assigned users” list, highlight the user and click the button. Repeat the
same steps if you wish to remove more users from the list.
Click “Update” to save the changes.
If this is the first time you configure Busy Lamp Field on your BizPhone service, you will need to
reboot your handset to get the Busy Lamp Field to work on your handset.
Speed Dial 8

P a g e | 31
Speed Dial 8 allows the user to define up to 8 frequently dialled numbers and have them dialled using a single key on
the handset.
How do you use it?
Once the Speed Dial 8 is configured in the Frontier portal (or handset), pick up the phone and press the single number
of the speed dial (2-9) and then press “Send”.
Default setting: Un-configured
How to configure in Frontier:
To access the Speed Dial 8, click on “Speed Dial 8” menu on the left.
Enter the phone number next to the “Phone Number” of each Speed Dial code. You can also enter the
description, for example the user’s name next to the “Description”. The number indicates the number that you
should enter for the Speed Dial.
For example: If you enter a phone number under “#2” and you wish to call the number via Speed Dial, then
you need to enter “2” on your handset.
Click “Update” to save the changes.
How to set on Handsets:
Lift the handset and dial *74.

P a g e | 32
When you hear the dial tone, enter the one-digit code (2-9) that you want to represent the number you want to
program, followed by the complete phone number and press the “#” key.
Voice Mail
The BizPhone Voice Mailbox is pre-configured and ready to use as soon as you receive your BizPhone handset.
Configuring Voice Mail settings via Frontier
By configuring the user’s Voice Mail settings via the Frontier portal, the preference will apply to all future voice mail
received by the user.
To access the Voice Mail, click on “Voice Mail” on the menu on the left.
Select and Enter the Voice mail settings.
Voice Mail Settings
Description
Enable voice mail to be used
with the voice portal
Enable this option if you wish to access your voice mail via
the voice portal.
Enable voice mail to be
forwarded as email
Enable this option to forward the user’s voice mail to an
email as an attachment (.wav file).
Note: Enabling Voicemail email notifications will mean
that you lose access to the voicemails from the voice
portal. You will only receive all your voicemails as an
attachment via email.
Delivery Email Address*
Enter the email address that you wish to receive your voice
mail on.
Note: * in above table indicates mandatory field and cannot be empty.
Click “Update” to save the changes.
Accessing your Voice Mail

P a g e | 33
You can access your Voice Mail via your BizPhone handset or any external number (including Mobile).
To access your Voice Mail via your BizPhone handset please refer to each of the handset guide (depending on your
handset model).
To access you Voice Mail via an external number:
Dial one of the following Voice Portal Number.
City
Voice Portal Number
Adelaide
80 8220 9999
Brisbane
07 3144 9999
Canberra
02 6210 9999
Melbourne
03 9909 9999
Perth
08 6266 9999
Sydney
02 8022 9999
Follow the voice prompt and enter your Mailbox ID followed by a “#”.
Note: Your Mailbox ID is your BizPhone Number.
Follow the voice prompt and enter your Voice portal passcode followed by a “#”.
Note: Your voice portal passcode is emailed to you with your BizPhone Service Completion Advice.
Press “1” to enter your Voice Mail box and then press “1” again to listen to your message(s) (follow the voice
prompt).
Voice Mail Greetings
You can also record your Voice Mail greetings via the Voice portal by following the same steps above (up to entering
your Voice portal passcode) and followed by the steps below (depending on each Greetings you want to record).
Busy Greetings
Busy Greetings is the greetings that the callers will hear if you have Do Not Disturb feature activated or if you are on a
call and do not have Call Waiting activated.
To record your Busy Greetings: Access your Voice Mail (using the steps above – up to entering your Voice Portal
passcode) and Press “1” to enter your Voice Mail box, followed by “2” to access your Busy Greetings, and then press
“1” to record your Busy Greetings. Follow the voice prompt and record your Busy Greetings.
No Answer Greetings
No Answer Greetings is the greetings that the callers will hear if you do not answer their calls.
To record your No Answer Greetings: Access your Voice Mail (using the steps above – up to entering your Voice Portal
passcode) and Press “1” to enter your Voice Mailbox, followed by “3” to access your No Answer Greetings, and then
press “1” to record your Busy Greetings. Follow the voice prompt and record your No Answer Greetings.
Extended Away Greetings
Extended Away Greetings is the greeting that the callers will hear if you plan to be away from your desk for an extended
amount of time. You are required to activate and deactivate this greeting manually.
To record your Extended Away Greetings: Access your Voice Mail (using the steps above – up to entering your Voice
Portal passcode) and Press “1” to enter your Voice Mailbox, followed by “4” to access your Extended Away Greetings,

P a g e | 34
and then press “3” to record your Extended Away Greetings. Follow the voice prompt and record your Extended Away
Greetings.
After you record your Extended Away Greetings, you are required to activate the greeting by pressing “1”.
Once you have this greeting activated, you will be reminded each time you log in to listen to messages that this greeting
is activated. To de-activate your Extended Away Greetings, follow step 1-2 above and press “2”.
Note: When the Extended Away Greetings is activated, the callers are not able to leave a voice message. Once it
is de-activated, voicemail collection is turned back on.

P a g e | 35
Replace Handset
Replace Handset allows the user to select a different MAC Address for the handset that has been assigned to them to
replace the existing handset (faulty, etc).
How do you use it?
By changing your setting in Frontier, your preference will then be applied to the user.
How to configure in Frontier:
To access Replace Handset, click on “Replace Handsets” menu on the left.
Select the MAC Address of the new handset from the drop down list next to “Select available handset”.
Click “Update” to assign the MAC Address to the user.
Note: Once you replace your existing handset with a new or replacement handset, the details on the Handset
section should be updated with the new or replacement handset details.

P a g e | 36
Basic Call Logs
Basic Call Logs allows the user to view their calls history.
How to access Basic Call Logs in Frontier:
To access the Basic Call Logs, click on “Basic Cal Logs” menu on the left.
There are 3 types of Basic Call Logs that the user can view: Placed, Received, and Missed. By default the page will
show the history for Placed calls. To view the Received or Missed calls, click on the “Received” or “Missed” under the
Basic Call Logs (next to “Placed).

P a g e | 37
Client Downloads
Client Downloads is where the user can download and access the Add-Ons such as: the Desktop and Mobile Apps for
the Softphone Plan and the Receptionist App.
Note: The links to the Apps are only available if you have purchased these Add-Ons for the user.
How to access Client Downloads in Frontier:
To access the Client Downloads, click on “Client Downloads” menu on the left.
How to download the Mobile App:
You will need to download the Mobile App via your Mobile phone. Click on either of the icons. The left one
is for Android and the right one is for iPhone (referenced under the “Broadsoft UC-One Client” next to the icon)
for information about the App. The Android App is available on Google Play and the iPhone App is available on
AppStore.
For details on what the Mobile App is and how to install it, please refer to the BizPhone Mobile App section of
this document.

P a g e | 38
How to download the Desktop App:
Click on the icon. The left one is for Windows Operating System and the right one is for Macintosh
Operating System (referenced under the “BizPhone Communicator” next to the icon). Once you click on the
icon, a window will pop up to save the BizPhone Communicator setup file. You can then save the .exe or .dmg
file for installation.
For details on what the Mobile App is and how to install it, please refer to the BizPhone Desktop App section of
this document.

P a g e | 39
How to access the Receptionist App:
Receptionist App is a web-based Application and can be accessed by clicking the , where a new tab will be
open up on the same browser. Enter the User ID and Password you have been given on your Service
Completion Advice to access the Receptionist App.
For details on how to install the BizPhone Receptionist App, please refer to BizPhone Receptionist App section
on this document.

P a g e | 40
Skype for Business
Skype for Business section is where the user can enable and download the Desktop App that has been integrated with
Skype for Business (Business Communicator for Skype for Business).
Typically, Skype for Business is used for chat, voice and video calls with other Skype for Business users. The Business
Communicator for Skype for Business allows the user to use their Skype for Business app to make external call:
After entering the phone number in the Skype for Business app, the BizPhone Communicator Desktop app will
launch and place the call.
The Skype for Business app will automatically update its status to “In a call”.
The BizPhone user’s number will be displayed.
Notes:
The link to the App is only available if you have purchased this Add-On for the user.
Skype for Business Desktop App is only available on Windows Operating System.
Although you will be able to make external calls through the Skype for Business app, incoming calls
will still need to be answered via the BizPhone Communicator Desktop App. When an incoming call is
answered, the Skype for Business status will update to “In a call”.
Users cannot use this feature to add/call an external party to a Lync/Skype meeting.
How to access Skype for Business section in Frontier:
To access the Skype for Business, click on “Skype for Business” menu on the left.
Click on the icon to download the Business Communicator for Skype for Business. Once you click on the
icon, a window will pop up to save the BizPhone Communicator setup file. You can then save the .exe file for
installation.

P a g e | 41
Follow the process on how to install the Desktop App. See BizPhone Desktop App section of this document.
Note: Before you can start using the Business Communicator for Skype for Business, you will need to
enable the Skype for Business option on the page.
Enable the Skype for Business option and click “Update”.

P a g e | 42
Receptionist
Receptionist allows the receptionist to assign or remove users that they can monitor through the Receptionist App Basic
ONLY. If you have ordered the Receptionist Advanced feature, you should be able to use the Receptionist interface to
assign and remove users and you should not use this portal configuration option to do so.
Note: The “Receptionist” menu is only available in your Frontier portal if you have been assigned the
Receptionist App license.
How do you use it?
By changing your setting in Frontier, your preference will then be applied to all future calls.
Default setting: Un-configured
How to configure in Frontier:
To access Receptionist, go to the users section under BizPhone Admin (bottom part of the main page), click
on the icon for the user that has the Receptionist feature that you wish to configure. When the BizPhone
user page appears, click on “Receptionist” menu on the left.
The receptionist can add the available users to the assigned users group by highlighting the user that they
want to monitor from the “Available users” and click the button. The selected user should now appear in
the “Assigned users” list. Repeat the same steps if you wish to add more users to the list.
To remove the user from the “Assigned users” list, highlight the user and click the button. Repeat the
same steps if you wish to remove more users from the list.
Click “Update” to save the changes.

P a g e | 43
Add-On Features & Services
The Add-On features and services are the value added features to the end user services.
BizPhone Desktop App
BizPhone Desktop App is the TPG branded UC One Communicator Desktop Softphone application that allows the user
to make and receive calls, access voicemail, and to configure their basic telephone features, such as Call Forwarding,
Do Not Disturb, etc. For full list of features, please refer to the Business Communicator User Guide Desktop.
Minimum System and Hardware Requirements
BizPhone Desktop App needs to be run on specific Operating System and hardware. The following are the Desktop App
version 21.2.0.487 minimum system and hardware requirements.
Requirements
Details
Operating System
Mac OS 10.8 Mountain Lion, Mac OS 10.9 Mavericks, Mac OS 10.10 Yosemite,
Windows Vista, Windows 7 or Windows 8/8.1 or Windows 10 (Classical view
only)
CPU
Minimum 1.5 GHz CPU, Pentium 4, dual core CPU with 2GB RAM
Disk space
The installation footprint is approximately 125 megabytes (MB) on OS X and 215
MB on Windows
Peripherals
For voice calls, a sound card, speakers, and a microphone or a headset are
required
Where do you download it?
You can download the App via the Portal (Refer to section Client Downloads).
How do you install it? (based on the Windows App)
Click on the set up (.exe or .dmg) file that you have downloaded.
Select the language from the drop down list and click “OK”.
Click “Next” on the Welcome screen.

P a g e | 44
Click “I Agree” on the License Agreement.
Click “Next” on the Install Options.

P a g e | 45
Click “Next” on the Choose Install Location.
Click “Install” on the Choose Start Menu Folder. Please wait while the BizPhone Communicator is being
installed.

P a g e | 46
Your setup is completed. Click “Next”.
Click “Finish” to close the setup.
How do you use it?
Launch the installed Application and Login. Your login details will be sent in an email with your BizPhone Service
Completion Advice.
Note: The login username is case sensitive. Your login username will start with a “U” which must be entered as
uppercase.
Please refer to the Business Communicator User Guide Desktop for the BizPhone Desktop App user manual.

P a g e | 47
TPG Branded BizPhone Communicator Desktop App
BizPhone Mobile App
BizPhone Mobile App is the Broadsoft UC One Communicator Mobile Softphone application that is available on the
User’s mobile phone to allow them to make and receive calls, and manage their telephony features. The Mobile App is
supported on different Operating Systems, such as Google Android and Apple IOS.
Where do you download it?
You can download the App via Google Play (for Android) or AppStore (for iPhone) on your mobile. You can find
information about the App in the Client Downloads section of this document.
How do you use it?
Click on the UC One Communicator icon on your mobile and login. Your login details will be sent in an email with your
BizPhone Service Completion Advice.
When you launch the App, it will ask you for login URL. Please enter https://apps.bizphone.tpg.com.au to the login URL
and click “OK” to continue to the application.
Then enter your login details (username and password) and click “Sign in”. After sign in, you can start using your Mobile
App.
Note: The login username is case sensitive. Your login username will start with a “U” which must be entered as
uppercase.

P a g e | 48
UC One Communicator Mobile App
Please refer to the Business Communicator User Guide Android and Business Communicator User Guide iPhone for the
BizPhone Mobile App user manual.
BizPhone Receptionist App
BizPhone Receptionist App is the Broadworks Attendant console that manages call distribution for front desk
operator through a web based application.
There are two types of Receptionist App available as part of the TPG BizPhone product:
Receptionist App – Basic
Receptionist App – Advanced
Receptionist App Basic
The Receptionist App Basic enables the receptionist to monitor up to 30 static phone users and have a very limited set
of features. The administrator will need to login to define the list of monitored users via the Admin Portal (Refer to
Receptionist section).
Receptionist App Advanced
The Receptionist App Advanced enables the receptionist to monitor up to 200 static phone users with an enhanced
interface that has a rich set of features including monitoring, manipulating and distributing queued calls (if Call
Queuing is activated), and may other call control features. The receptionist can use the Receptionist App to define
and customise the list of monitored users.
You will be able to upgrade from one type to another. By upgrading or changing your Reception App type, it will reprovision your Receptionist service and subsequently delete all your monitored static contacts. You will need to readd the contacts once the new service is activated.

P a g e | 49
Minimum System Requirements
BizPhone Receptionist App needs to be run on specific Operating System and certain browser. The following are the
Operating System, Browser and Java requirement for the Receptionist App.
Requirements
Details
Operating System
Windows XP with SP3 (or higher), Windows Vista, Windows 7, Windows 8, Mac
OS X 10.5 or 10.6, or Citrix XenApp 4 or 5
Browser
Internet Explorer 8.0, 9.0 or 10.0; Firefox 17 or later; Google Chrome 17.0.963.64
or later; or Safari 5 or 6
Java
Java 1.6.0_19 or higher
How do you use it?
The Receptionist console is a web-based application and accessible via the following URL:
https://apps.bizphone.tpg.com.au/receptionistconsole/
Your login details will be sent with your BizPhone Service Completion Advice.
Note: The username is case sensitive. Your login username will start with a “U” which will must be entered as
an uppercase.
Please refer to the Receptionist User Guide for the user manual and full list of supported features on the Receptionist
App.
Broadworks Receptionist App

P a g e | 50
User Password and Passcode Specifications
User Password Specifications
Cannot contain the Login ID
Cannot contain the old Password
Cannot be the reverse of the old Password
Cannot be any of the last 8 Passwords
Must contain at least 1 number(s)
Must be at least 8 characters
Voice Portal Passcode Specifications
Cannot be the user’s own extension or phone number
Cannot be the user’s own extension or phone number reversed
Cannot contain 3 or more repeated digits
Cannot be any of the last 3 Passcode(s)
Cannot be the reversed old Passcode
Must be at least 6 characters; no more than 8 characters
 Loading...