

Page 1
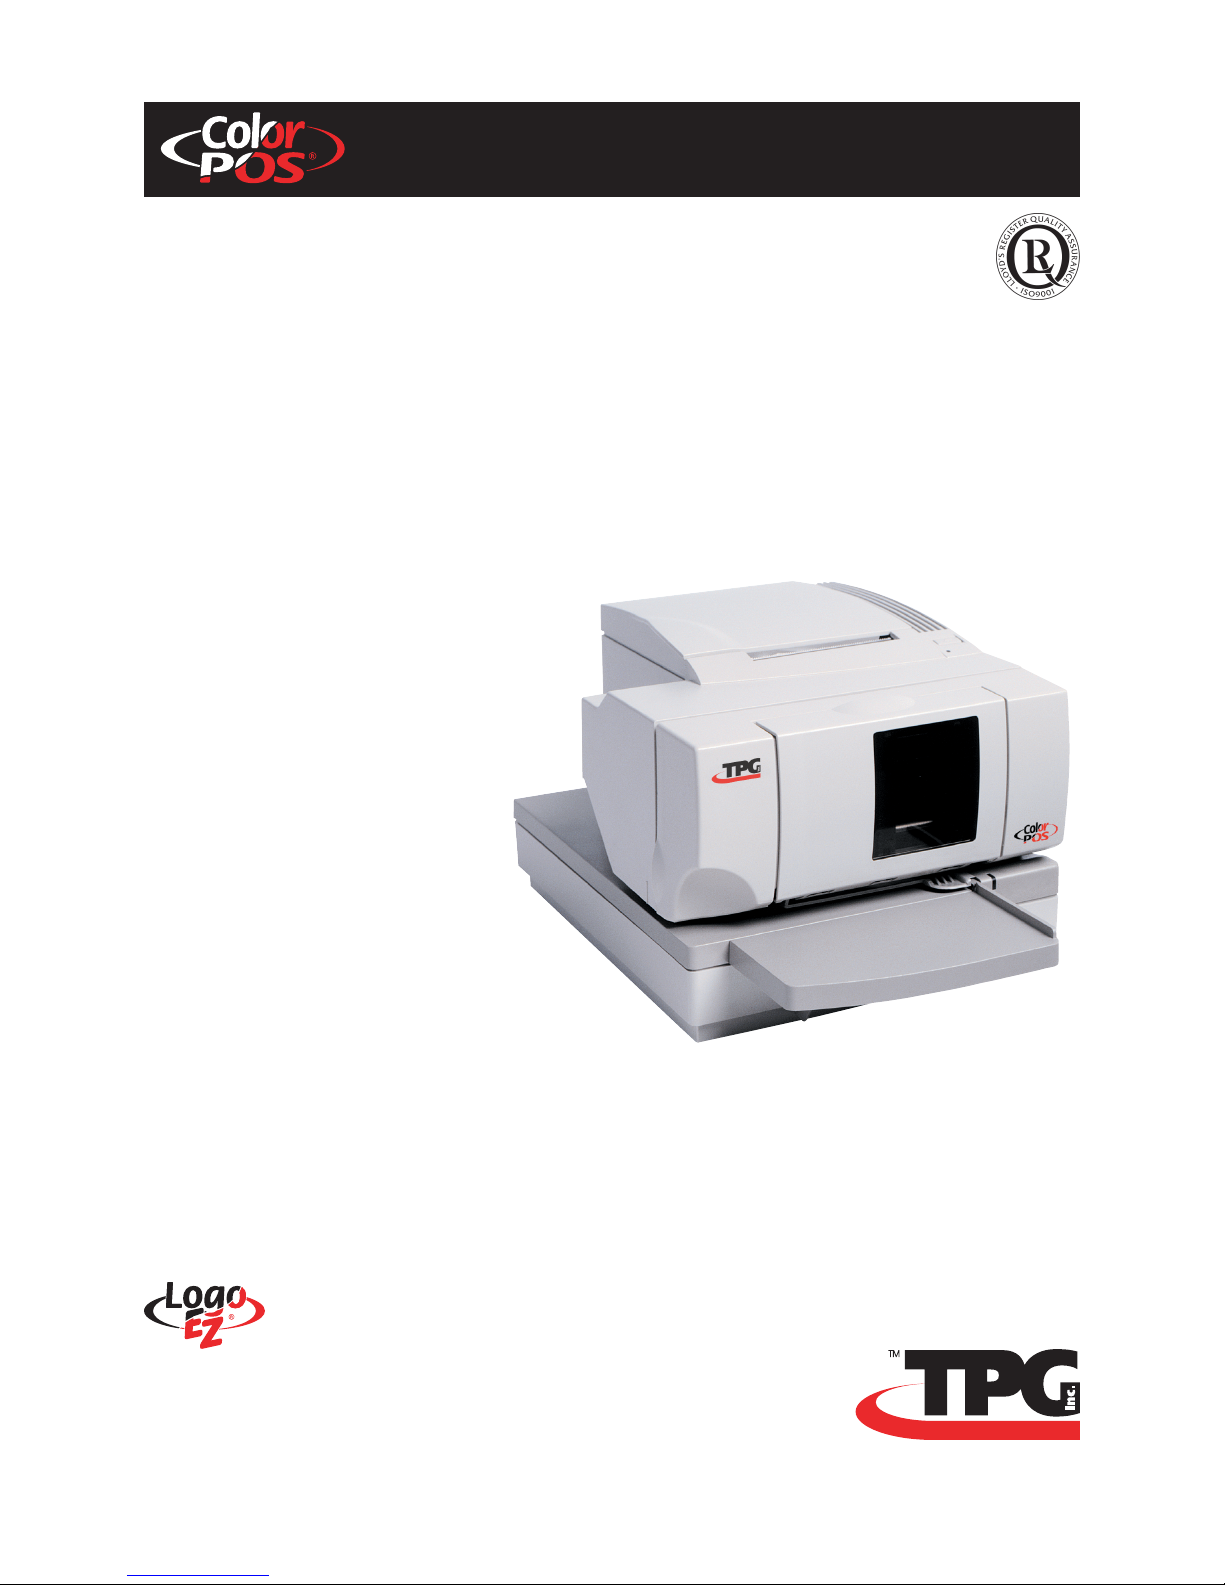
A760 Two-Color Thermal/Impact
Hybrid Printer
User Guide
New TPG, Inc. LogoEZ® colorization
utility information included.
Made under one or more of the following U.S. patents: 4886381, 5579043, 5613787, 5651624,
5713678, 5752779, 5789916, 5800080, 5879090, 5887999, 5975776, 6027266, 6085973,
6089450, 6129465, 6155483, 6404452, 6486902, 6504331, 5749277, 6722754, 6739773,
6784909. Other U.S. and international patents pending.
A760–D100
Page 2
Federal Communications Commission (FCC) Radio Frequency Interference Statement Warning
Changes or modifications to this unit not expressly approved by the party responsible for compliance could void the user’s authority to operate the
equipment.
Note
This equipment has been tested and found to comply with the limits for a Class A digital device, pursuant to Part 15 of the FCC Rules. These limits are
designed to provide reasonable protection against harmful interference when the equipment is operated in a commercial environment. This equipment
generates, uses, and can radiate radio frequency energy and, if not installed and used in accordance with the instruction manual, may cause harmful
interference to radio communications. Operation of this equipment in a residential area is likely to cause harmful interference in which case the user will be
required to correct the interference at his own expense.
Information to the User
This equipment must be installed and used in strict accordance with the manufacturer’s instructions. However, there is no guarantee that interference to
radio communications will not occur in a particular commercial installation. If this equipment does cause interference, which can be determined by turning
the equipment off and on, the user is encouraged to contact TPG, Inc. immediately.
TPG, Inc. is not responsible for any radio or television interference caused by unauthorized modification of this equipment or the substitution or attachment of
connecting cables and equipment other than those specified by TPG, Inc. The correction of interferences caused by such unauthorized modification,
substitution or attachment will be the responsibility of the user.
In order to ensure compliance with the Product Safety, FCC and CE marking requirements, you must use the power supply, power cord, and interface
cable which are sold for use with this product or which meet the following parameters:
Power Supply
UL Listed (QQGQ), Class 2 power supply with SELV (Secondary Extra Low Voltage), non-energy hazard output, limited energy source, input rated 100240 Vac, 1.5/0.8 A, 50/60 Hz, output rated 24 Vdc, 2.3 A for 55 watt unit; 100-240 Vac, 2.0A, 50/60 Hz, output rate 24 Vdc, 3.125 A for 75 watt unit.
Use of this product with a power supply other than the TPG, Inc. power supply will require you to test the power supply and TPG, Inc. printer for FCC and
CE mark certification.
Communication Interface Cable
A shielded (360 degree) interface cable must be used with this product. The shield must be connected to the frame or earth ground connection or earth
ground reference at EACH end of the cable.
Use of a cable other than described here will require that you test the cable with the TPG, Inc. printer and your system for FCC and CE mark certification.
Power Cord
A UL listed, detachable power cord must be used. For applications where the power supply module may be mounted on the floor, a power cord with Type
SJT marking must be used. For applications outside the US, power cords which meet the particular country’s certification and application requirements
should be used.
Use of a power cord other than described here may result in a violation of safety certifications which are in force in the country of use.
Industry Canada (IC) Radio Frequency Interference Statement
This Class A digital apparatus meets all requirements of the Canadian Interference-Causing Equipment Regulations.
Cet appareil numérique de la classe A respecte toutes les exigences du Règlement sur le matériel brouilleur du Canada.
Voluntary Control Council for Interference (VCCI) Radio Frequency Interference Statement
This is a Class A product based on the standard of the Voluntary Control
Council for Interference by Information Technology Equipment (VCCI). If this
equipment is used in a domestic environment, radio disturbance may arise.
When such trouble occurs, the user may be required to take corrective actions.
Disclaimer
Information in this document is subject to change without notice. Consult your TPG, Inc. sales representative for information that is applicable and current.
TPG, Inc. reserves the right to improve products as new technology, components, software, and firmware become available.
No part of this document may be reproduced, transmitted, or translated in any form or by any means, electronic or mechanical, for any purpose without the
express written permission of TPG, Inc.
Copyright
Copyright © 2004 by TPG, Inc.
950 Danby Road, Ithaca, New York 14850, USA. All rights reserved. Printed in USA. Confidential, Unpublished. Property of TPG, Inc.
Trademarks
TPG, Inc.™ is a trademark of TPG, Inc. and its subsidiaries.
Microsoft, Windows NT are registered Trademarks of Microsoft Corporation in the U.S.A. and/or other countries.
Inside Out Networks, Inside Out, EPIC, and Edgeport are trademarks of Inside Out Networks.
All other trademarks and registered trademarks are the property of their respective holders.
Patents
Made under one or more of the following U.S. patents: 4886381, 5579043, 5613787, 5651624, 5713678, 5752779, 5789916, 5800080, 5879090, 5887999,
5975776, 6027266, 6085973, 6089450, 6129465, 6155483, 6404452, 6486902, 6504331, 5749277, 6722754, 6739773, 6784909.
Other U.S. and international patents pending.
Web Site
http://www.TPGprinters.com
Page 3

Contents
Chapter 1: About this Guide ..............................................................7
How to use this guide ......................................................................7
Where to find advanced technical information ............................................7
Download manuals ............................................................................................. 7
Support ...........................................................................................................................7
Chapter 2: About the Printer ............................................................. 9
Introducing the A760 ColorPOS
About the Universal Serial Bus ................................................... 10
Advantages of USB connections ...................................................................... 10
Advantages of the TPG, Inc. USB solution...................................................... 10
About the Ethernet Interface Option ......................................... 11
®
printer ......................................9
Contents 3
Printer controls .............................................................................. 12
Available printer configurations ................................................ 13
Printer configuration identification ................................................................. 13
Standard features........................................................................... 13
Communication interfaces .................................................................................13
Options............................................................................................. 15
Chapter 3: Setting up the Printer .................................................. 16
Unpack the printer ......................................................................... 16
Check the packing list .......................................................................................... 16
Remove the packing restraints ................................................... 17
Load or change the receipt paper .............................................. 18
Installing or replacing the ribbon cassette .............................. 19
Replacing a used ribbon cassette .................................................................... 19
Installing a new ribbon cassette ....................................................................... 19
Choose a location .......................................................................... 20
Connect the cables ........................................................................ 21
Cash drawer cables ................................................................................................ 21
Communication cables ........................................................................................ 22
If installing the RS-232C communication cable: ................................. 22
If installing the USB communication cable: ...........................................22
If installing the powered USB cable .......................................................... 22
If installing the Ethernet communication cable: ................................. 23
If installing the IEEE 1284 Parallel communication cable: ............... 23
Power supply cable ............................................................................................... 23
Cable routing ............................................................................................................ 24
Test the printer ............................................................................... 24
A760-D100 10/04 189-9200303 Rev. D A760 Two-Color Thermal/Impact Hybrid Printer: User Guide
Page 4

Contents4
Chapter 4: Using the Printer ........................................................... 27
Printing on forms or checks ......................................................... 27
Verifying and validating checks .................................................. 28
Clearing check flip paper jams .................................................... 29
Printer configurations .................................................................. 30
Ethernet option........................................................................................................ 31
Configuring the printer ................................................................ 32
Communication interface ................................................................................... 33
RS-232C serial interface settings ............................................................... 33
Parallel communication ................................................................................. 33
Ethernet settings ............................................................................................... 33
Diagnostic modes................................................................................................... 34
Enable or disable data scope mode ................................................................ 34
Enable or disable receipt test mode ............................................................... 35
Enable or disable slip test mode ................................................................ 35
Enable or disable MICR test mode ............................................................ 35
Enable or disable check flip test mode ................................................... 3 6
Setting the printer emulations .......................................................................... 37
Printer settings and functions ........................................................................... 38
Select the emulation/software options sub-menu to set: .............. 38
Select the hardware options sub-menu to set: .................................... 3 9
Preventing overheating of the printhead ................................ 40
Troubleshooting the printer........................................................ 41
Printer beeps ............................................................................................................ 42
Printer will not print ............................................................................................... 42
On-line, paper status, error LED flashes ......................................................... 4 3
Slip-in LED does not light (rectangular green LED on slip table) ........ 43
Poor forms print quality ....................................................................................... 44
Poor receipt print quality ..................................................................................... 44
Slip station, MICR and flip problems................................................................ 45
Knife does not operate......................................................................................... 4 6
Other conditions ............................................................................ 46
Contacting a service representative .......................................... 46
Returning a printer ........................................................................ 47
A760 Two-Color Thermal/Impact Hybrid Printer: User Guide 189-9200303 Rev. D A760-D100 10/04
Page 5

Chapter 5: Paper and supplies ....................................................... 48
Ordering from TPG, Inc. ................................................................. 48
Ordering thermal paper ................................................................ 48
Thermal paper specifications ............................................................................. 48
Manufacturers .......................................................................................................... 48
Ordering paper from TPG, Inc. ........................................................................... 49
Ordering miscellaneous supplies ............................................... 49
Cash drawers ............................................................................................................ 49
Power supply and power cords ........................................................................50
Communication cables ........................................................................................ 50
Forms specifications .............................................................................................. 51
Slip forms - recommendations ................................................................... 5 1
Check specifications.............................................................................................. 53
MICR reader – additional information...................................................... 53
Ordering ribbon cassettes ................................................................................... 53
Ordering extended slip tables ........................................................................... 53
Documentation and LogoEZ
®
utility................................................................ 5 3
Appendix A:
USB Driver Installation .................................................................... 55
Contents 5
USB and the host system .............................................................. 55
Checking for USB support on the host computer .....................................55
The native USB solutions ............................................................. 56
TPG, Inc. vendor class USB version ................................................................... 5 6
USB printer class version ...................................................................................... 56
Installing native drivers......................................................................................... 56
Download the TPG, Inc. vendor class native driver ................................... 56
Download the Printer class native driver...................................................... 5 7
Install the native driver .........................................................................................57
Use the native driver ............................................................................................. 5 7
The RS-232C Emulation USB solution ........................................ 58
Installing the RS-232C driver ............................................................................. 5 8
Download the RS-232C driver ..........................................................................58
Install the RS-232C driver .................................................................................... 5 8
Check the RS-232C installation ........................................................................ 5 9
Configuring serial port number assignments.......................... 60
Serial port configuration methods ................................................................... 60
Using the Edgeport utility .................................................................................... 60
Starting the Edgeport utility ......................................................................... 60
Serial port assignment in the Edgeport utility ...................................... 60
Uninstalling the drivers......................................................................................... 61
USB driver installation troubleshooting .................................. 62
A760-D100 10/04 189-9200303 Rev. D A760 Two-Color Thermal/Impact Hybrid Printer: User Guide
Page 6

Contents6
This page intentionally left blank.
A760 Two-Color Thermal/Impact Hybrid Printer: User Guide 189-9200303 Rev. D A760-D100 10/04
Page 7

Chapter 1: About this Guide 7
Chapter 1: About this Guide
How to use this guide
The guide is designed to help you find the information you need quickly and easily, whether you are installing,
servicing, or making adjustments to an TPG, Inc. printer. The chapter headings are self-explanatory, and the index at
the back can also point you in the right direction.
For basic printer setup, refer to Chapter 3: Setting up the Printer. This section has been written under the
assumption that the printer will arrive pre-configured. For instructions on checking the configuration or reconfiguring
the printer, look in Chapter 4: Using the Printer.
Having problems? Check the troubleshooting section in the back of Chapter 4.
Need paper specs? Look in Chapter 5: Paper and Supplies.
Where to find advanced technical
information
Since TPG, Inc. printers are shipped pre-configured and
have been designed to operate with no maintenance,
this guide provides only essential technical and
configuration information. TPG, Inc. also has a
programming supplement for this printer with more
detailed discussion of programming capabilities. The
A760 Programming Supplement has been developed
as a companion to the User Guide and includes
additional programming information. The A760 Service
Guide is available to qualified service technicians who
have been certified
by TPG, Inc. to perform advanced procedures.
Because of the printer’s wide array of printing
capabilities, you may prefer to contact TPG, Inc. support
for more assistance.
Download manuals
The A760 Setup Guide, A760 User Guide,
and A760 Programming Supplement can be
downloaded from the TPG, Inc. Web site in .pdf
format: http://www.TPGprinters.com, in the “Service
and Support” window.
Support
For more advanced procedures and troubleshooting, you
may need to refer to the printer’s programming
or service guides or speak to TPG, Inc. technical
support. Your TPG, Inc. representative is also able to
provide you with necessary information.
Additional information about TPG, Inc.’s products
and services is posted on the TPG, Inc. Web site, at
http://www.TPGprinters.com. The Web site can also
direct you to service and support within your area,
or e-mail: [email protected].
A760-D100 10/04 189-9200303 Rev. D A760 Two-Color Thermal/Impact Hybrid Printer: User Guide
Page 8

Chapter 1: About this Guide8
This page intentionally left blank.
A760 Two-Color Thermal/Impact Hybrid Printer: User Guide 189-9200303 Rev. D A760-D100 10/04
Page 9
Chapter 2: About the Printer
Introducing the A760 ColorPOS® printer
Paper feed
button
Receipt
cover
Receipt
Front
cover
On-line,
paper status,
error LED
(green)
Chapter 2: About the Printer 9
Slip or
check
Extended
slip table
Slip in
LED (green)
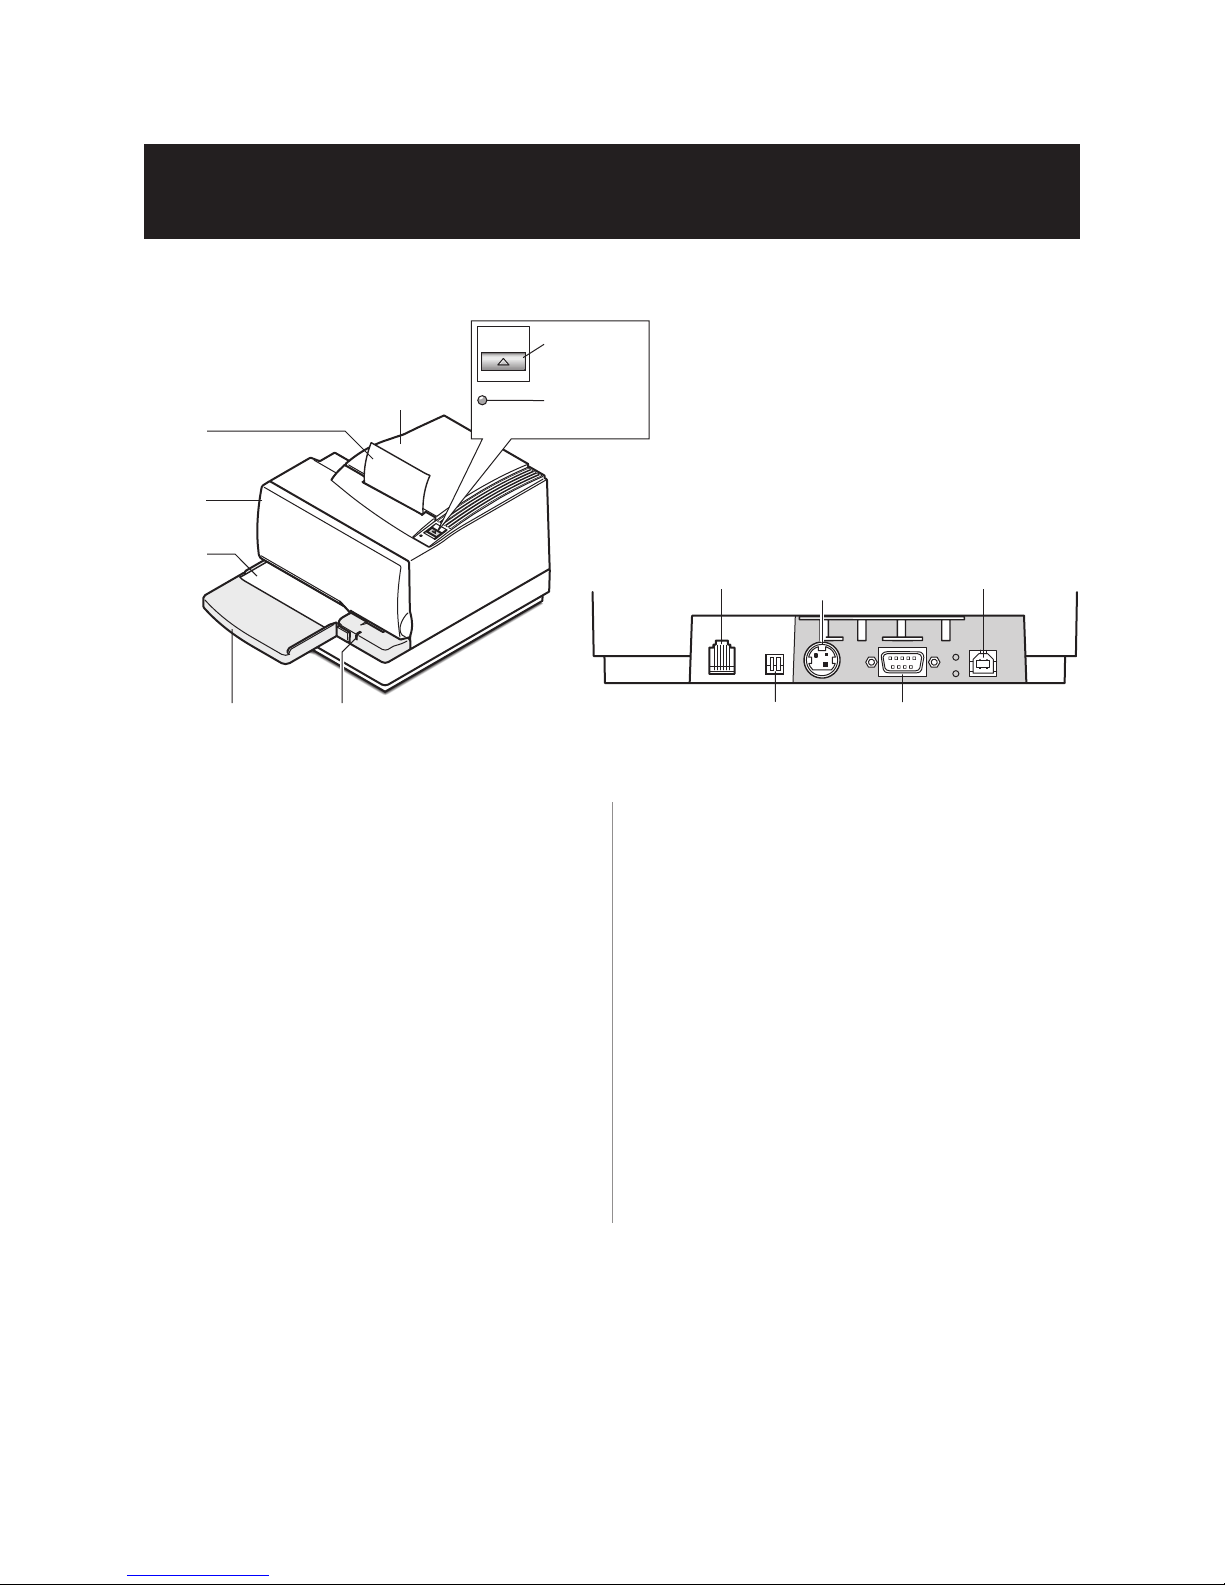
The A760 ColorPOS® two-color printer is an extremely
fast, quiet, and reliable point-of-sale (POS) printer. It
consists of two specialized printers in one compact
package: a two-color thermal printer on top that prints
receipts, and an impact slip printer in front to print on
forms and checks that you insert. The thermal printer is
optimized for ease-of-use in busy environments. There is
no ribbon or ink cartridge to change, and you load the
paper by simply dropping in a new roll. The impact printer
provides the power and flexibility necessary to print on
checks or multi-part forms up to five plies, in a wide
variety of sizes and orientations.
The A760 easily fits in anywhere. It connects to any
host computer that uses the standard 9-pin or 25-pin
RS-232C or USB (Universal Serial Bus) interface. An
IEEE 1284 parallel and an Ethernet interface are also
available.
connector
DIP
Switches
Powe r
supply
USB
connector
9-pin RS-232C
communication
connector
Cash drawer
connector
Back of printer
(RS-232C/USB
configuration
sample shown)
The printer’s standard command set allows it to work
with software written for TPG, Inc., or other compliant
printers. A variety of sensors enable the printer to
communicate its status, and the printer’s journal is kept
electronically by the host computer.
Several state-of-the-art check-handling options are
also available. The Magnetic Ink Character Recognition
(MICR) option enables the printer to read the special
codes printed on checks and send this information to
the host computer to verify the check. The check flip
option saves transaction time by making check handling
a one-step process—after reading the front of the check
and printing on the back, the printer is able to flip the
check over and print on the front of the check.
This section describes the printer’s features and options
in more detail.
This printer is compatible with TPG, Inc.’s LogoEZ® logo and colorization utility.
See Programming Supplement for more information on obtaining this utility and
®
using the LogoEZ
commands. (ColorPOS® and LogoEZ® patent pending.)
A760-D100 10/04 189-9200303 Rev. D A760 Two-Color Thermal/Impact Hybrid Printer: User Guide
Page 10

Chapter 2: About the Printer10
About the Universal Serial Bus
The Universal Serial Bus (USB) is a peripheral bus for personal computers that was first
released in January 1996. Since that time, virtually all Intel Architecture personal computers
have the hardware to support USB, and a large number of computers exist that have both the
hardware and software support required to interface with USB peripherals.
Advantages of USB connections
USB has a number of advantages over Application
Compatible Escape Commands connection schemes
(e.g., serial RS-232C, parallel IEEE 1284). These
advantages include:
• High Speed: up to 12 MB/second for high-speed
devices.
• Plug and Play: Devices are automatically recognized
and configured at installation.
• Hot plug: Bus supports installation and removal of
devices with the power applied.
• Up to 127 devices: One host can support up to 127
devices with the use of hubs.
• “Free ports”: Most PC architecture machines contain
two USB ports in the base hardware.
These advantages have become attractive to the POS
industry for a couple of reasons.
Advantages of the TPG, Inc. USB solution
TPG, Inc. provides two USB solutions. If your
application is designed to talk to the printer as an
RS-232C device, we offer an RS-232C Emulation USB
Driver. If your application is capable of talking to a
USB device, we offer a Native USB Driver.
Additional POS devices. Some POS systems are
required to host more peripherals than can be supported
by two RS-232C ports typical in a platform. With the
addition of one (or two) USB connectors, the platform
can now support the additional devices that had
previously required a serial port expander card.
Higher bandwidths. New devices coming into use have
bandwidth requirements that are higher than the
bandwidth that can be supported on Application
Compatible Escape Commands interfaces. These
devices include image scanners and printers. As
the speed and capability of POS printers increases, the
performance of the printer in an application can become
limited by the speed of the communications interface.
USB provides ample bandwidth to support current and
future POS printer requirements.
The RS-232C Emulation USB driver is compatible with
PCs that run Windows 95 (OSR 2.1 and up), 98, Me, NT
(SP 3 and higher), 2000, or XP. The native USB driver
(having two versions- TPG, Inc. solution or Printer Class
solution) is compatible with PCs that run Windows 98,
Me, 2000, or XP. See Appendix A for more information.
A760 Two-Color Thermal/Impact Hybrid Printer: User Guide 189-9200303 Rev. D A760-D100 10/04
Page 11

Chapter 2: About the Printer 11
About the Ethernet Interface Option
Ethernet is a base band Local Area Network used to
connect multiple personal computers and peripherals
(stations) over twisted pairs of wire or co-axial cable. It
closely resembles IEEE 802.3 specification jointly
developed by Digital Equipment, Intel, and Xerox.
Originally invented by Xerox, Ethernet is a carrier sense,
multiple access, collision detect network (CSMA/CD). It
is designed to serve in networks with sporadic,
occasionally heavy traffic environments.
Summary of Design Features
• Ethernet Type 10baseT
• Speed 10Mb/sec
• Cable 2 twisted pairs. Maximum cable segment length
between stations is 100m.
• Connector Shielded RJ-45 communications connector will
provide peripheral shielding capability for twisted pair cables.
• Network Status LEDS Transmit active, Receive active, Link integrity, and Board select
• MAC address configuration Stored in EEROM
• IP address configuration Specify IP, BOOTP
• Protocol Support Raw TCP, LP, TELNET with binary and timing mark support
• Client Support Windows 95,98,2000,NT with standard Native.com serial
emulation port
Windows 95,98,2000,NT with TCP/IP implemented by customer
Windows 2000,NT with standard windows drivers
UNIX with TCP/IP implemented by customer
See “If installing the Ethernet communication cable” section, page 23 this manual and
“Ethernet terminology and setup” in the A760 User programming supplement, pages 14 and 136.
TPG, Inc.’s POS implementation is 10baseT. This
configuration of speed, cable, and connector design
allows installation and reconfiguration simplicity. Print
speed may be reduced during heavy network traffic
conditions. Some 100baseT (100Mbs) environments
can be supported if the network has implemented autonegotiation features that automatically down switch to a
10Mbs data rates, upon detection of slower attached
stations.
A760-D100 10/04 189-9200303 Rev. D A760 Two-Color Thermal/Impact Hybrid Printer: User Guide
Page 12
Chapter 2: About the Printer12
Printer controls
Front
cover
Slip or
check
Receipt
Receipt
cover
Paper feed
button
On-line,
paper status,
error LED
(green)
Extended
slip table
Slip-in
LED (green)
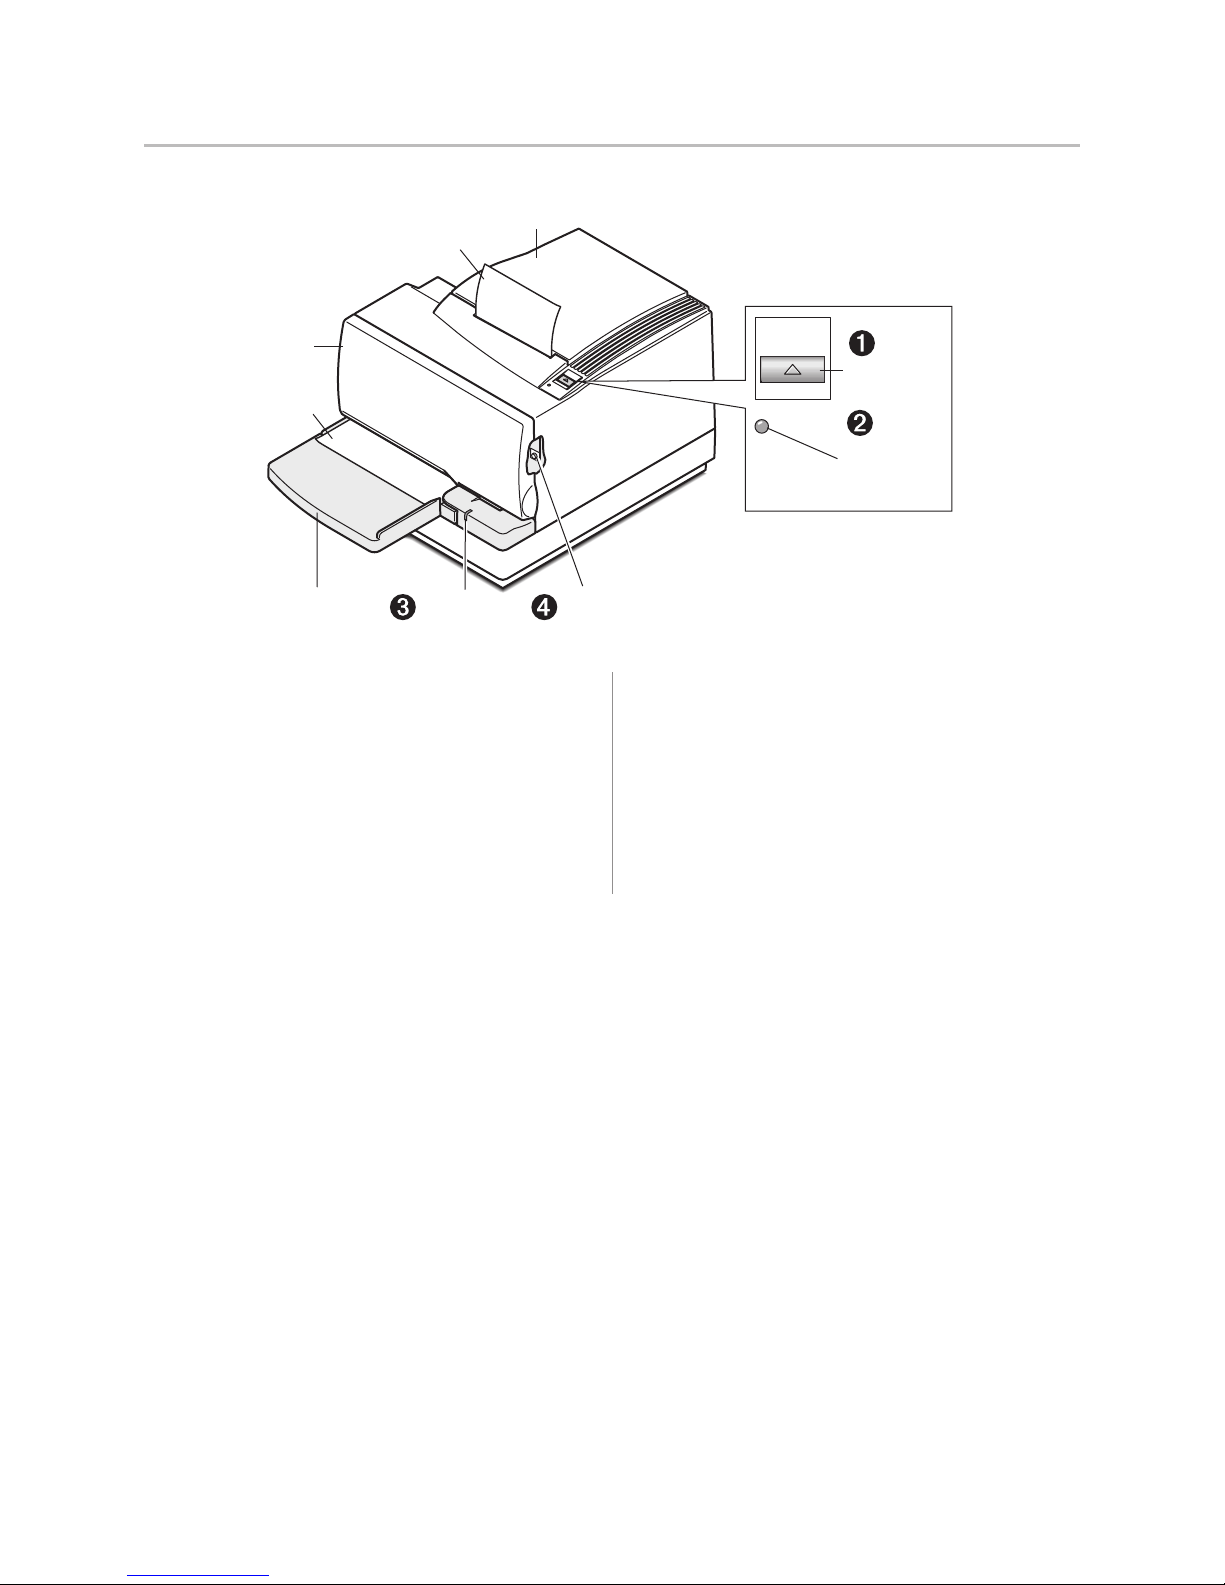
The printer has the following controls:
1 The paper feed button advances the receipt paper.
2 The on-line, paper status, error LED shows the
printer status by shining or flashing.
3 The slip-in LED indicates that a form is inserted
properly.
4 The reset button clears the printer’s memory or
begins special modes.
Reset
button
The printer also indicates its status when it is first
turned on, or after it has been reset, by beeping. A
single beep indicates the printer has successfully
completed its startup routine. If the printer beeps in a
single, double, or triple pattern at first power on, please
call your service representative.
A760 Two-Color Thermal/Impact Hybrid Printer: User Guide 189-9200303 Rev. D A760-D100 10/04
Page 13
Chapter 2: About the Printer 13
Available printer configurations
There are several configurations of the printer, depending on the combination of desired options.
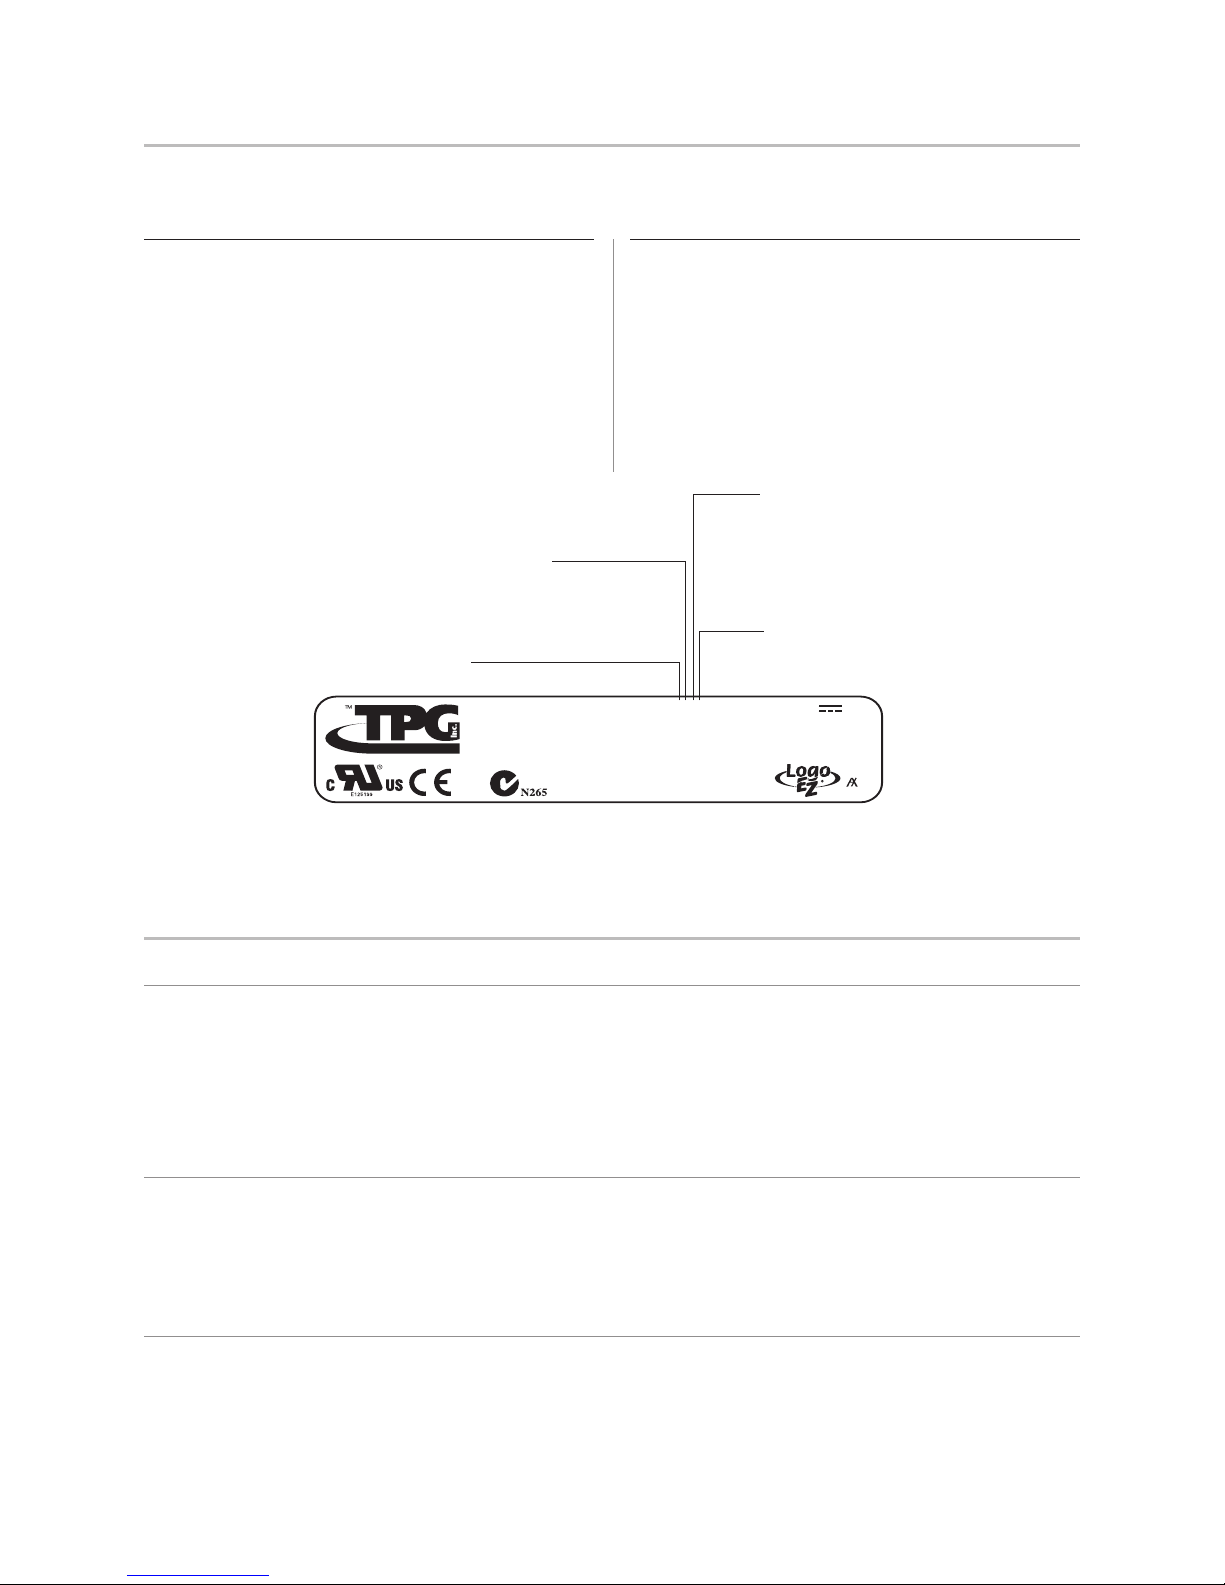
Printer configuration identification
See the sample below to determine the printer
configuration. The printer configuration identification
Communication interfaces
• RS-232C serial interface (9-pin)
• RS-232C serial interface (25-pin)
(model ID) is located on the model label attached to the
right side of the printer. This information is also shown
on the installation quality report card. The model ID
description is shown below.
• Universal Serial Bus (USB)
• Combination RS-232C (9-pin) and USB
• IEEE 1284 parallel interface
• Ethernet interface
1 = 1 MB Flash Memory
(TPG & Printer Class USB Drivers)
2 = 2 MB Flash Memory
(TPG & Printer Class USB Drivers)
3 = 1 MB USB
(Serial RS-232C USB emulation)
4 = 2 MB USB
(Serial RS-232C USB emulation)
7 = Ethernet
1 = light gray case
3 = dark gray case
Ithaca, N.Y.
Assembled in
Mexico
Canada
ICES/NMB-003
Class/Classe A
Model
Cust. Part No.
Revision
Serial No.
A760-1115
0 = no MICR
1 = MICR
2 = MICR with check flip
5 = check flip (only)
5 = knife
24V
3.2A
Important: When the USB option board is ordered, the numbers 1 or 2 shown in the second position of the
Model number designate that the printer is compatible with the Native USB drivers (TPG, Inc. vendor class and
printer class); see page 56 in this manual. When the numbers 3 or 4 are shown, the printer is compatible with the
RS-232C USB emulation drivers; see page 58 of this manual.
Standard features
Connectivity features Industry standard 9-pin and 25-pin RS-232C , USB (Universal Serial Bus), IEEE 1284
parallel or Ethernet interfaces are available options for communication with the host
computer.
These are provided via option boards: 9-pin RS-232C only, 25-pin RS-232C only,
USB only, a combined USB/9-pin RS-232C board, an IEEE 1284 parallel board or an
Ethernet board.
Cash drawer kickout connector and software support for up to two cash drawers.
Advanced interface design Sensors detect whether any of the covers are open, the paper is low in the receipt printer,
or the paper is positioned properly in the slip printer.
Software-controlled audible tone for various alerts.
Online configuration menu—the printer guides the user through its configuration
settings by printing instructions and a menu on receipt paper.
Electronics and firmware Industry-standard command set makes the printer compatible with existing software,
yet enables new features.
Remote diagnostics capability tracks important printer data.
continued...
A760-D100 10/04 189-9200303 Rev. D A760 Two-Color Thermal/Impact Hybrid Printer: User Guide
Page 14

Chapter 2: About the Printer14
Electronics and firmware 1MB flash memory standard available memory for multiple logos, graphics, user-defined
continued... character set, and user data storage. The printer is also available with 2 MB flash memory
for additional user memory. (320 kbyte to 1320 kbyte available.)
16-bit electronics architecture.
Communication rate up to 115,200 baud.
Flash download mode lets the user upgrade the printer’s firmware.
Thermal receipt printer Extremely fast and quiet two-color thermal printhead.
No ribbon or ink cartridge to change.
Drop-in paper loading. Paper type selection through command
“Set paper type” (1D 81
m n
) or configuration menu.
Double high, double wide, bold, inverse, underlined, superscript and subscript, italics,
scalable and rotated print modes.
Resident character sets: Code Pages 437 (US), 850 (Multilingual), 737 (Greek), 852 (Slavic),
858 (with Euro symbol), 860 (Portuguese), 862 (Hebrew), 863 (French-Canadian),
865 (Nordic) 866 (Cyrillic), and 1252 (Windows Latin 1).
Prints standard bar codes: Code 39, UPC-A, UPC-E, JAN8 (EAN), JAN13 (EAN), Interleaved 2 of 5,
Codabar, Code 93, Code 128, EAN 128, and PDF-417 two-dimensional code. Also prints
“ladder” bar codes.
Host-selectable 44 or 56 columns on 80 mm wide “POS grade” monochrome or
two-color thermal paper. (See page 45 for paper manufacturers.)
8 dots/mm print resolution.
Up to 53.3 lines-per-second (180 mm/second) throughput print speed (monochrome);
up to 29.3 line-per-second (100 mm/second) throughput print speed (two-color).
Standard receipt cutter.
®
LogoEZ
utility compatible (see options next page).
Impact slip printer Bi-directional impact printhead designed for a very long life.
Snap-on ribbon cassette.
Prints on forms up to five plies.
Horizontal flatbed slip table with an optional extension (which is standard with the
MICR check reader option).
Form insertion flexibility: insert forms in front or from the side.
Form alignment sensors and LED indicator.
Resident character sets: Code Pages 437 (US), 850 (Multilingual), 737 (Greek), 852 (Slavic),
858 (with Euro symbol), 860 (Portuguese), 862 (Hebrew), 863 (French-Canadian),
865 (Nordic) 866 (Cyrillic), and 1252 (Windows Latin 1).
Prints standard linear bar codes: Code 39, UPC-A, UPC-E, JAN8 (EAN), JAN13 (EAN),
Interleaved 2 of 5, Codabar, Code 93, Code 128, and EAN 128.
Double wide and rotated print modes; a double strike print mode improves contrast.
Software selectable pitch: either standard (13.9 characters per inch, 66 columns) or
compressed (17.1 characters per inch, 80 columns).
4.8 lines-per-second (16 mm/second) print speed.
Optional check handling features (see “Impact slip printer options” on the next page).
A760 Two-Color Thermal/Impact Hybrid Printer: User Guide 189-9200303 Rev. D A760-D100 10/04
Page 15

Chapter 2: About the Printer 15
Exceptions
Print speed and throughput will decline when:
Temperature is less than 25%C.
Energy setting is greater than 100%.
Dot coverage is greater than 25% or the format contains solid horizontal lines.
The printer is waiting for data or on an Ethernet interface network traffic is heavy.
Power setting is equal to 48 Watts.
Options
Connectivity Six standard plug-in printed circuit boards are available depending on the
communication interface required. Interfaces with 9-pin or 25-pin RS-232C only,
USB only, a combination 9-pin RS-232C and USB, an IEEE 1284 parallel or an Ethernet
board can be provided.
Communication cables are available for the RS-232C interfaces (see below).
Power supplies are available in 55-watt or 75-watt versions.
3-pin to 6-pin power connection adapter to allow previous version power supplies
(or terminal cables) to be connected to the A760.
Thermal receipt printer The optional receipt cutter.
Impact slip printer The slip table is available in either standard or an extended size. An extended slip table is
standard with the MICR check reader and flip options.
The Magnetic Ink Character Recognition (MICR) check reader is built into the slip station.
It reads checks that use standard E-13B or CMC-7 MICR fonts.
Check flip option: after reading the MICR line on the front of the check and printing on
the back, the printer is able to flip the check over and print on the face of the check.
Electronics and firmware 2 MB expanded flash memory is available as factory configuration.
Communication cables: RS-232C (9-pin or 25-pin) available
LogoEZ® utility Logo and colorization utility is available from your TPG, Inc. representative or
downloadable from www.TPGptinters.com Web site.
Provides a basic two-color and logo format for receipts.
A760-D100 10/04 189-9200303 Rev. D A760 Two-Color Thermal/Impact Hybrid Printer: User Guide
Page 16

Chapter 3: Setting up the Printer16
Chapter 3: Setting up the Printer
Unpack the printer
Check the packing list
Save all packing materials in case you need to repack
the printer for shipping or storage. Before installation,
check that all the items on this list have been shipped
(printers shipped in bulk may not include all these
items):
• Printer (enclosed in a plastic bag with foam pack)
• Thermal receipt sample paper roll (inside receipt
bucket)
• Test printout protecting the printhead (inside receipt
bucket)
• Cardboard support for cantilever (on slip table)
• Foam restraint for carriage (behind front cover)
• Power supply with cable connecting to printer and
power supply cord connecting to power outlet (only
if ordered with the printer)
• Ribbon cassette
• Installation quality report card: complete and return
to TPG, Inc.
®
• A760 ColorPOS
Impact Slip Printer: Setup Guide
• RS-232C Communication cable from host to printer is
available if ordered with printer. Other cables must be
obtained by the user.
Two-Color Thermal Receipt and
To report any missing materials, or to report a printer
that was damaged during shipping, call your supplier or
call an TPG, Inc. representative at:
Sales/General Information 1(800)732–8950
Service/Operational Questions 1(877)209–0156
– or –
You can visit our Web set at http://
www.TPGprinters.com and contact us by email.
1 Click on “Contact TPG, Inc.” on main page.
2 Click on your region, i.e.: “North America” for USA.
3 In the “TPG, Inc.” box, click on “Click Here to
Contact Us”.
4 Fill in form information on window that comes up.
5 Send.
A760 Two-Color Thermal/Impact Hybrid Printer: User Guide 189-9200303 Rev. D A760-D100 10/04
Page 17
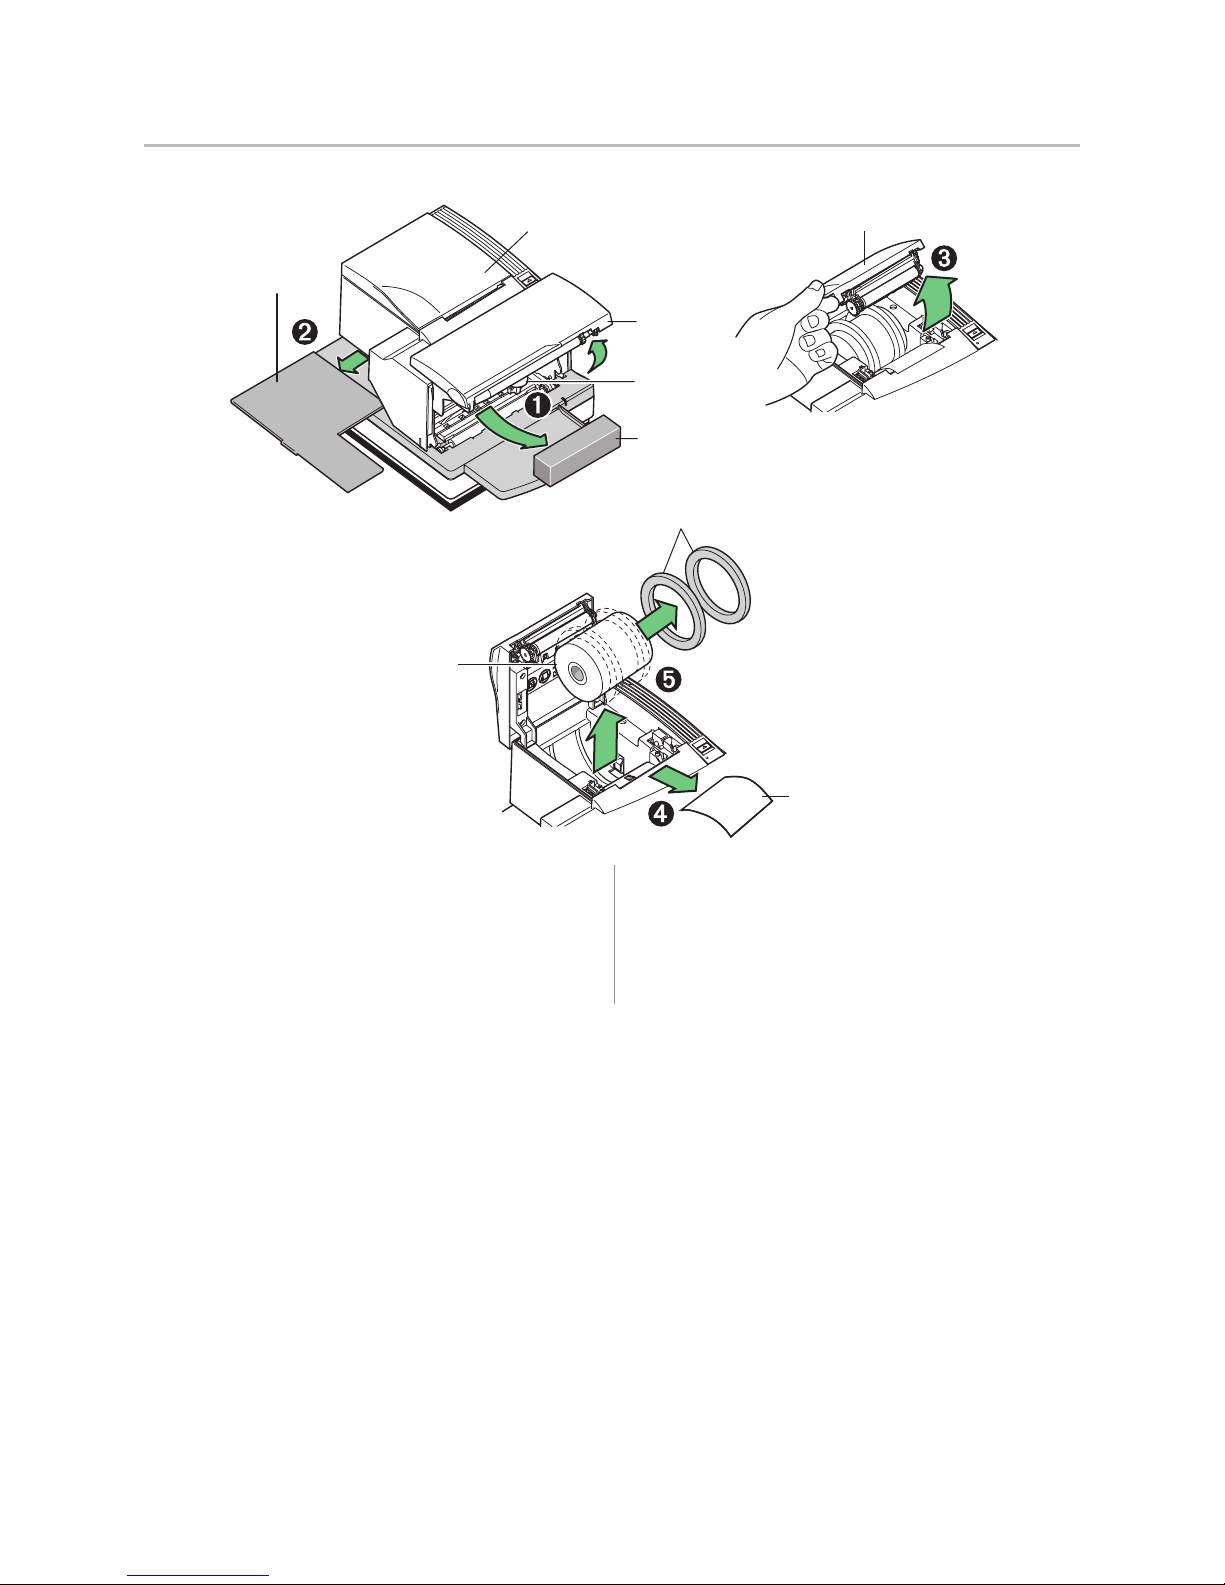
Remove the packing restraints
Chapter 3: Setting up the Printer 17
Cardboard
support
Sample
paper roll
Receipt
cover
Receipt
cover
Front
cover
Carriage
Foam
restraint
Paper roll
supports
1 Open the front cover, remove the foam restraint
holding the carriage (1).
2 Remove the cardboard support (2) from the slip path.
3 Open the receipt cover (3).
Test
printout
4 Remove the test printout (4).
5 Lift the sample thermal paper roll out of the paper
bucket and remove the paper roll supports (5).
Continue to “Load or change the receipt paper on
next page…
A760-D100 10/04 189-9200303 Rev. D A760 Two-Color Thermal/Impact Hybrid Printer: User Guide
Page 18
Chapter 3: Setting up the Printer18
Load or change the receipt paper
Change the paper when either a colored stripe appears
on the receipt paper or the printer’s on-line, paper
status, error LED slowly flashes (indicating that 15 ± 10
feet of paper remains on the roll). Change the paper as
soon as possible to avoid running out of paper part way
through a transaction.
If the on-line, paper status, error LED blinks fast, the
paper is out. Change the paper immediately or data may
be lost. The printer will not operate without paper, but it
may continue to accept data into memory from the host
computer. Because the printer cannot print any
transactions, this data in memory may be lost.
If changing the type of paper being used (monochrome
®
vs. two-color ColorPOS
version or manufacturer type),
you will need to send the “Set paper type” (1D 81 m n)
command. Use the “Set paper type” (description found
in the Programming Supplement) or selection in the
configuration menu. (See page 32 for how to enter the
configuration menu and page 48 for types of paper
available.)
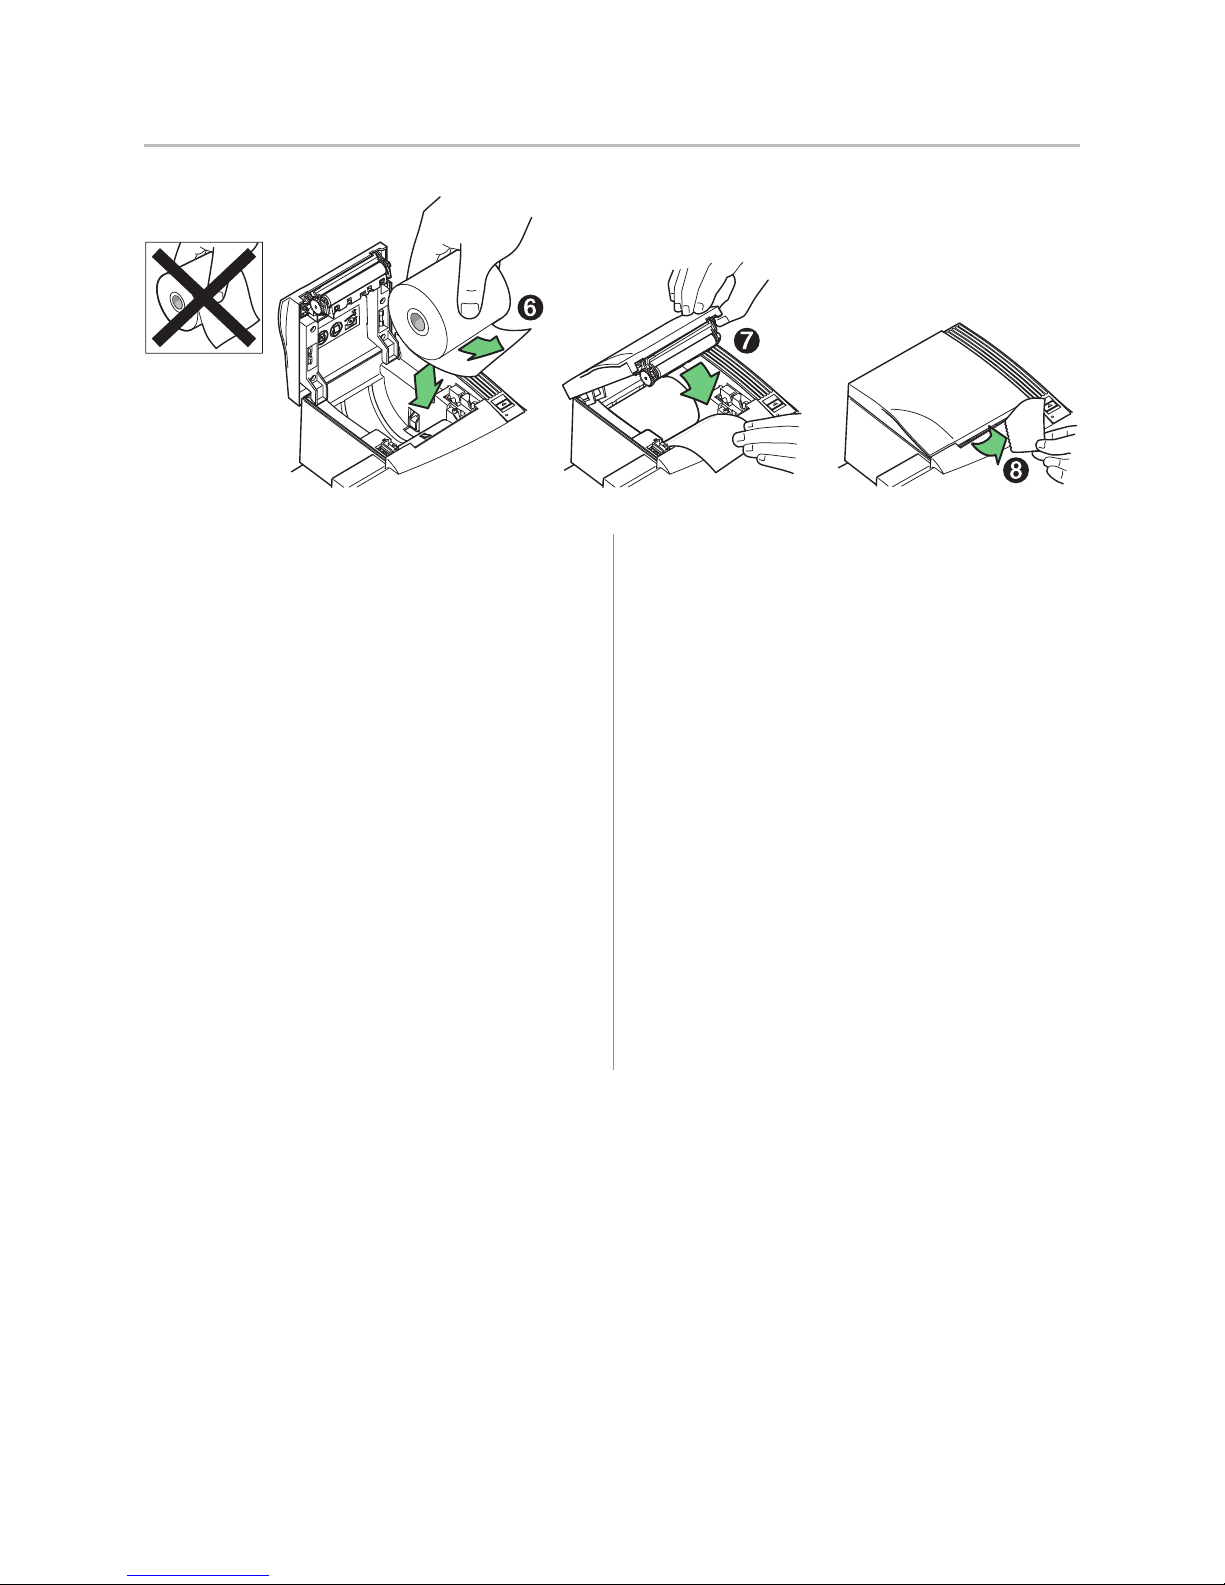
1 Open the receipt cover and remove the used roll
(if present).
2 Tear off the end of the new roll so that the edge
is loose.
3 Place the roll into the paper bucket with the paper
unrolling from the bottom of the roll (6), and with a
few inches of paper extending over the cabinet front.
Note: Paper must unroll from the bottom of the roll
to insure that the image will print.
4 Close the receipt cover while holding the paper over
the front of the cabinet (7).
5 Remove the excess paper by tearing it against the
tear-off blade (8).
6 Press the paper feed button to advance the paper
if necessary.
A760 Two-Color Thermal/Impact Hybrid Printer: User Guide 189-9200303 Rev. D A760-D100 10/04
Page 19
Chapter 3: Setting up the Printer 19
Installing or replacing the ribbon cassette
Change the impact printer’s ribbon cassette if it is printing lightly or produces marks, lines or
other inconsistent printing on the receipt.
Note: You must use an approved TPG, Inc. ribbon cassette with the check flip option
to prevent jamming or other ribbon problems.
Front
cover
Ta b
Cassette
Ta b
Knob
Cassette
Ribbon cassette
(shown in position)
Replacing a used ribbon cassette
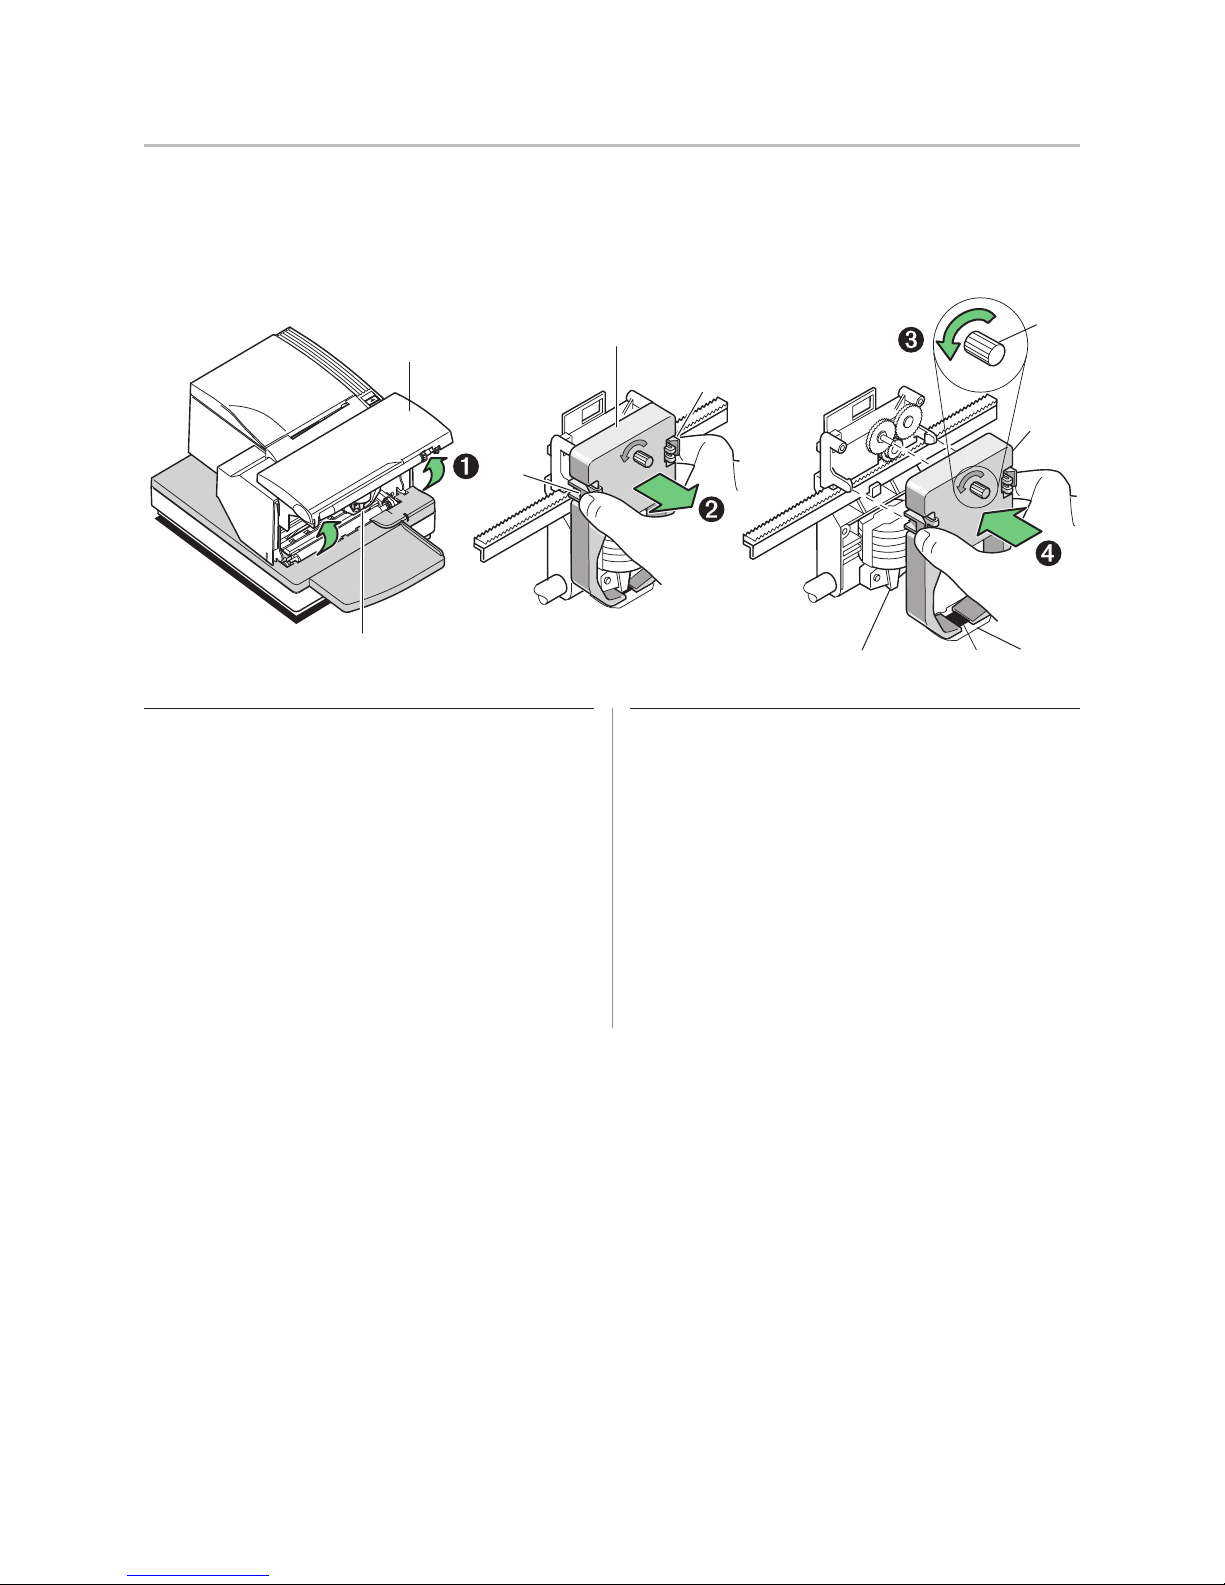
1 Open the front cover (1) by grasping the cover on each
side at the bottom and swing up.
2 Pinch in tabs (2) of the old ribbon cassette and pull
to remove it.
3 Continue to “Installing a new ribbon cassette” step 2.
Mylar
Printhead
Ribbon
shield
Installing a new ribbon cassette
1 Open the front cover (1) by grasping the cover on each
side at the bottom and swing up.
2 Unwrap the new ribbon cassette and tighten the ribbon
by turning the knob (3) on the cassette in the direction
of the arrow.
Caution: DO NOT remove the mylar shield.
3 Position the ribbon cassette onto the carriage, as
shown (4), making sure the ribbon is underneath the
printhead.
4 Snap the cassette into place and snap the front cover
closed.
A760-D100 10/04 189-9200303 Rev. D A760 Two-Color Thermal/Impact Hybrid Printer: User Guide
Page 20
Chapter 3: Setting up the Printer20
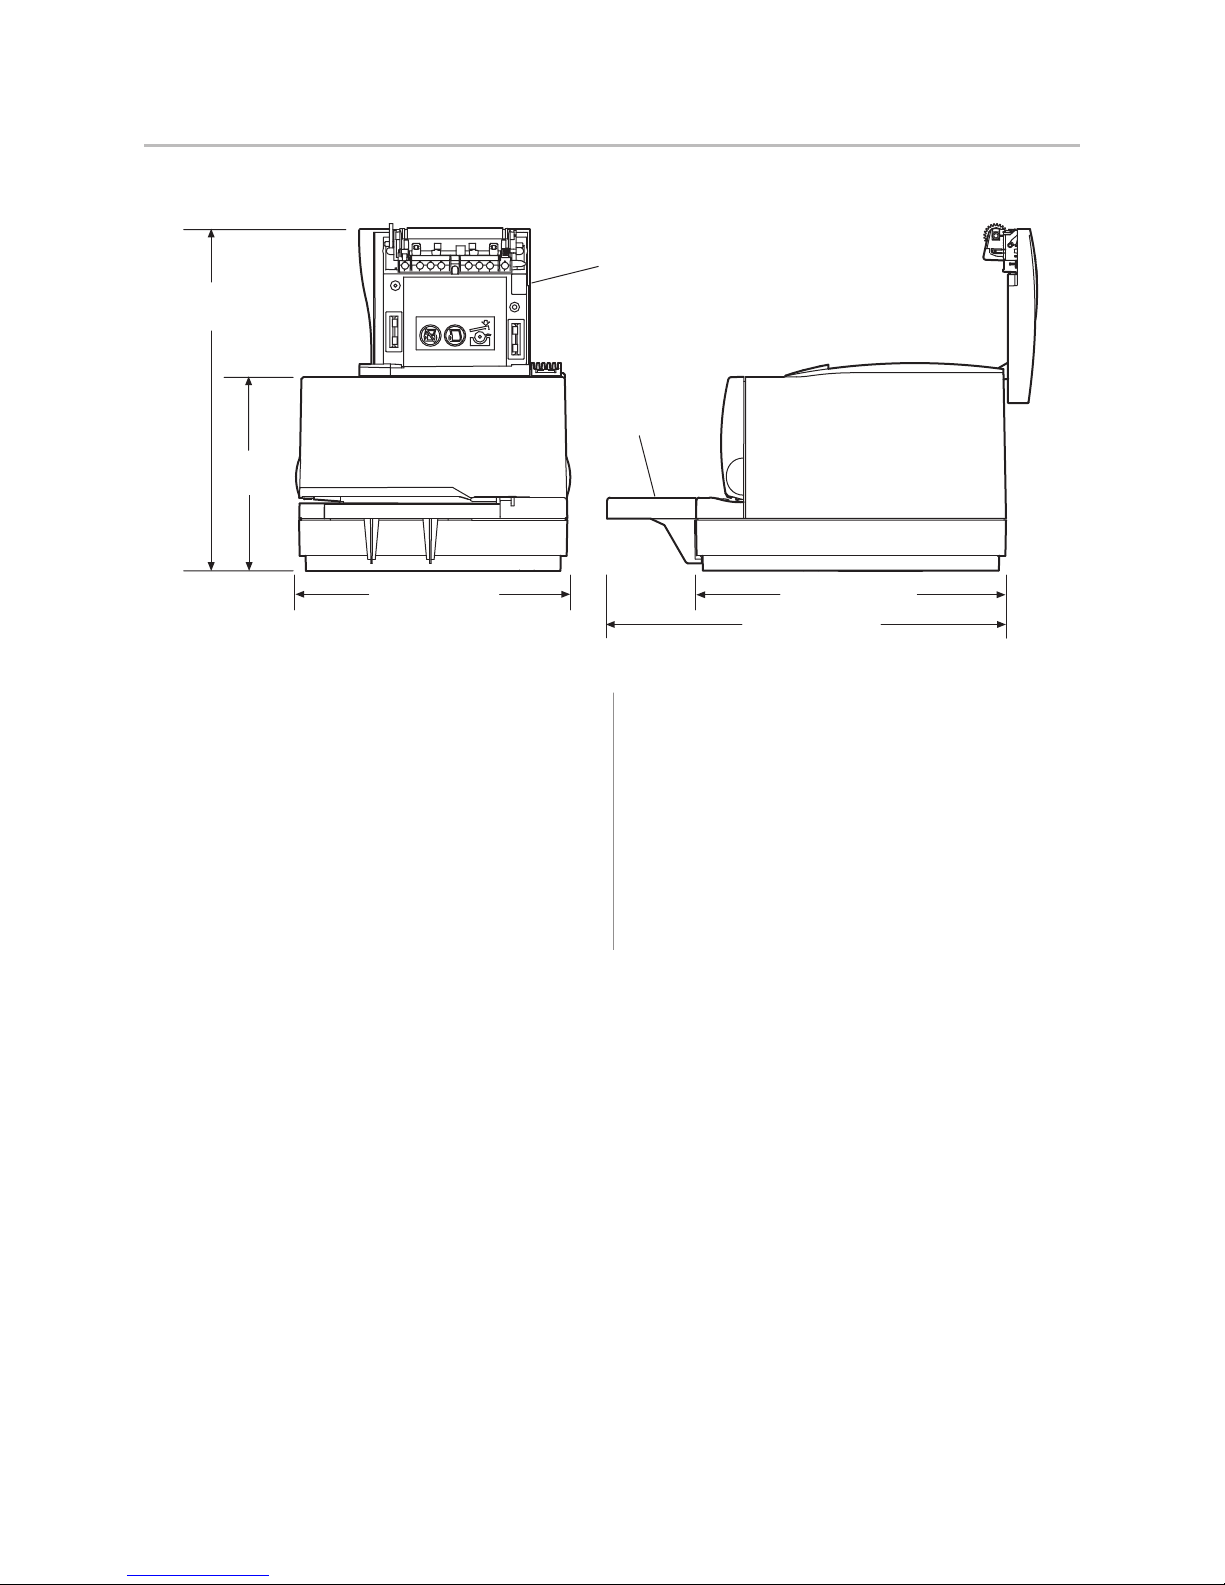
Choose a location
280 mm
(11.0)
178 mm
(7.0)
Receipt
cover
Extended
slip table
229 mm (9.0)
The A760 printer takes up relatively little counter space
and may be set on or near the host computer. With the
RS-232C interface, you can place the printer up to 50 feet
(with the USB interface up to 15 feet) from the host
computer and power supply.
Place the printer on a level surface, and make sure there is
enough room to open the receipt cover to change the paper
and to open the front cover to change the impact printer’s
ribbon cassette. Leave several inches around the printer
for connecting and accessing the cables.
264 mm (10.4)
347 mm (13.7)
If the printer has an optional Magnetic Ink Character
Recognition (MICR) check reader installed, you may
need to make additional adjustments to the printer’s
location.
Because devices such as CRT monitors or large metal
surfaces affect the printer’s magnetic field, they can
cause intermittent check reading errors.
A760 Two-Color Thermal/Impact Hybrid Printer: User Guide 189-9200303 Rev. D A760-D100 10/04
Page 21
Chapter 3: Setting up the Printer 21
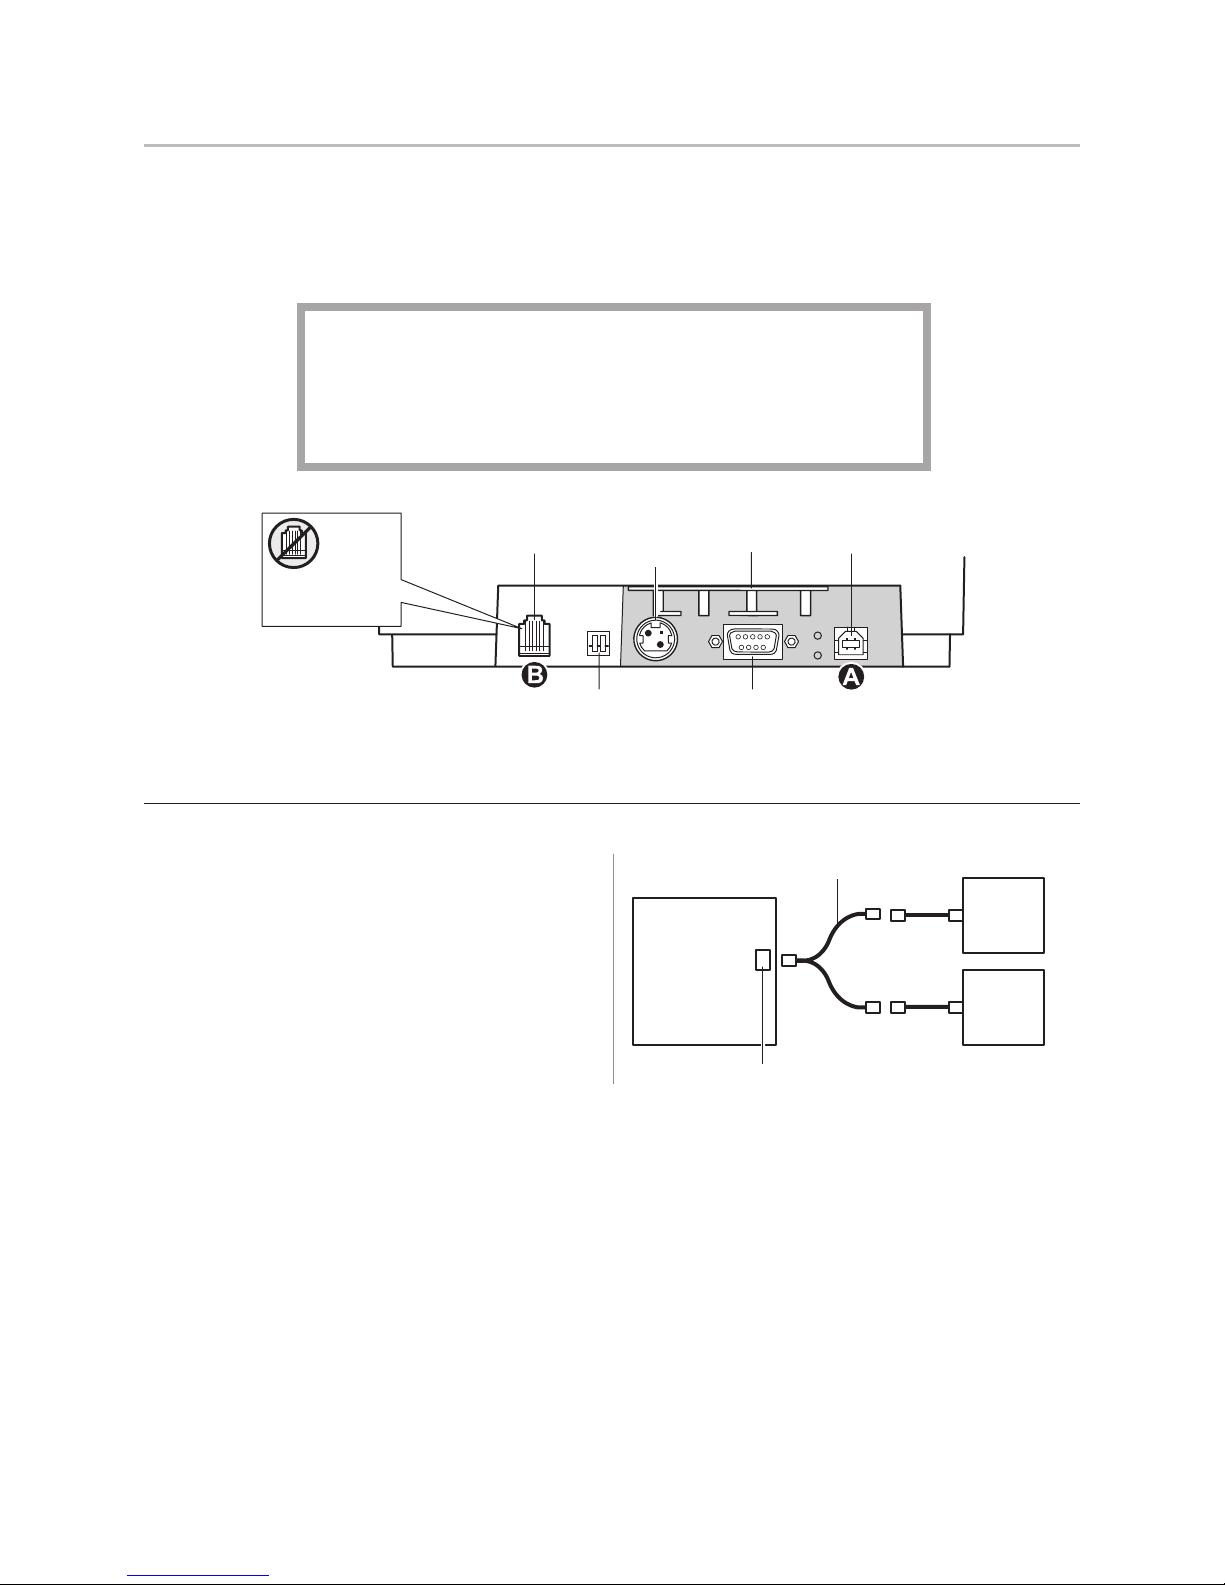
USB
P
c
Strain
Cash drawer
Connect the cables
Cable connections are made at the back of the printer.
Caution: Connect the cables to the printer before applying power.
The host computer should always be turned off before connecting communication cables.
Warning! When instructed to connect the USB cable from the host to the
printer, be careful to plug it into the USB board connector only (A).
Do not insert the USB cable into the Cash Drawer connector (B) on the
left back of the printer. Damage to the printer could occur. If you are not sure
of your printer configuration, contact TPG, Inc. before proceeding.
CAUTION:
DO NOT plug the
USB cable here.
Back of printer
arallel & Ethernet
onnectors not shown
connector
DIP
switches
Power
supply
connector
RS-232C communication
relief
connector
(9-pin shown)
connector
Note: Connector panel varies with printer configuration (parallel and ethernet connector versions not shown.)
Cash drawer cables
The cash drawer cable connects the printer to one or
two cash drawers.
Warning! Be careful to connect correct cable into
printer cash drawer connector.
1 Plug the cable into the cash drawer connector
(standard phone jack) located at the rear of the
printer.
Note: If your system has two cash drawers, attach a
Y-cable to the printer’s cash drawer connector as
shown.
Printer
Printer connector
(standard phone jack)
Y-cable
Cash
drawer
Cash
drawer
A760-D100 10/04 189-9200303 Rev. D A760 Two-Color Thermal/Impact Hybrid Printer: User Guide
Page 22
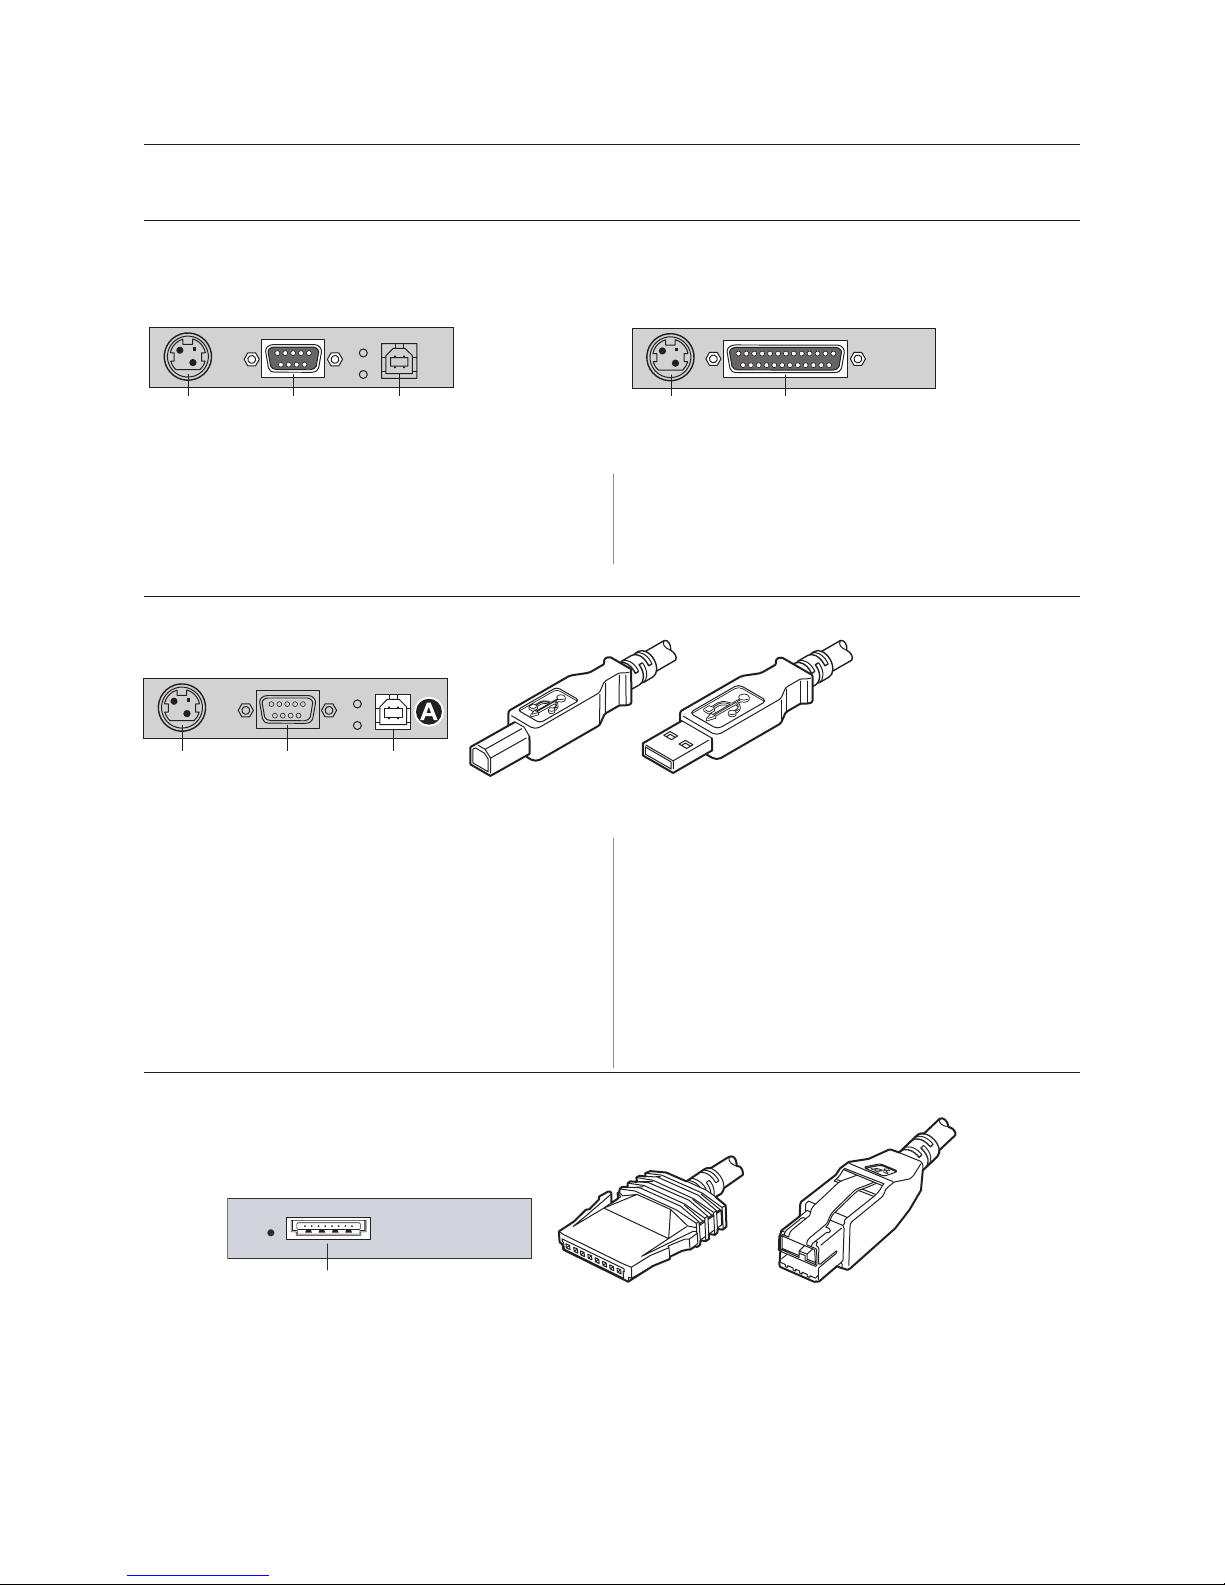
Chapter 3: Setting up the Printer22
RS-232C 25-pin or parallel
c
Communication cables
The communication cable connects the printer to the host computer.
If installing the RS-232C communication cable:
RS-232C 9-pin
communication connector panel
ommunication connector panel
Power
supply
connector
9-pin RS-232C
communication
connector
USB
connector
(not used)
1 Turn off the host computer.
2 Plug the communication cable into the connector at
the bottom back of the printer.
If installing the USB communication cable:
USB communication connector panel
Power
supply
connector
RS-232C
communication
connector
USB
connector
Printer end
of USB cable
1 Host computer can remain on.
2 Plug the printer end of the USB cable into the USB
connector port on the printer (A).
3 Route the cable from the printer as shown on the
following page to provide strain relief.
4 Plug the computer end of the USB cable into the
computer. Make sure the USB symbol on the
connector is facing up when you plug it in.
Power
supply
connector
25-pin RS-232C
communication
connector
3 Secure the connector by tightening the screws.
4 Connect the cable to the host computer.
5 Turn host computer on.
Computer end
of USB cable
After you have completed setting up the printer, you
can install the USB driver onto the host computer.
Download the USB driver to the host computer
from the TPG, Inc. corporate Web site at
http://www.TPGprinters.com. Downloads can be
found in the Service & Support section of the site.
For full instructions on downloading and installing
the drivers, see Appendix A: USB Driver Installation
page 55).
If installing the Powered USB cable:
Powered USB communication connector panel
Powered USB
connector
1 Be sure the host computer is powered off.
2 Plug the printer end of the USB cable into the USB
connector port on the printer.
A760 Two-Color Thermal/Impact Hybrid Printer: User Guide 189-9200303 Rev. D A760-D100 10/04
Printer end
of USB cable
Computer end
of USB cable
3 Route the cable from the printer as shown on the
following page to provide strain relief.
4 Plug the computer end of the USB cable into the
computer.
Page 23
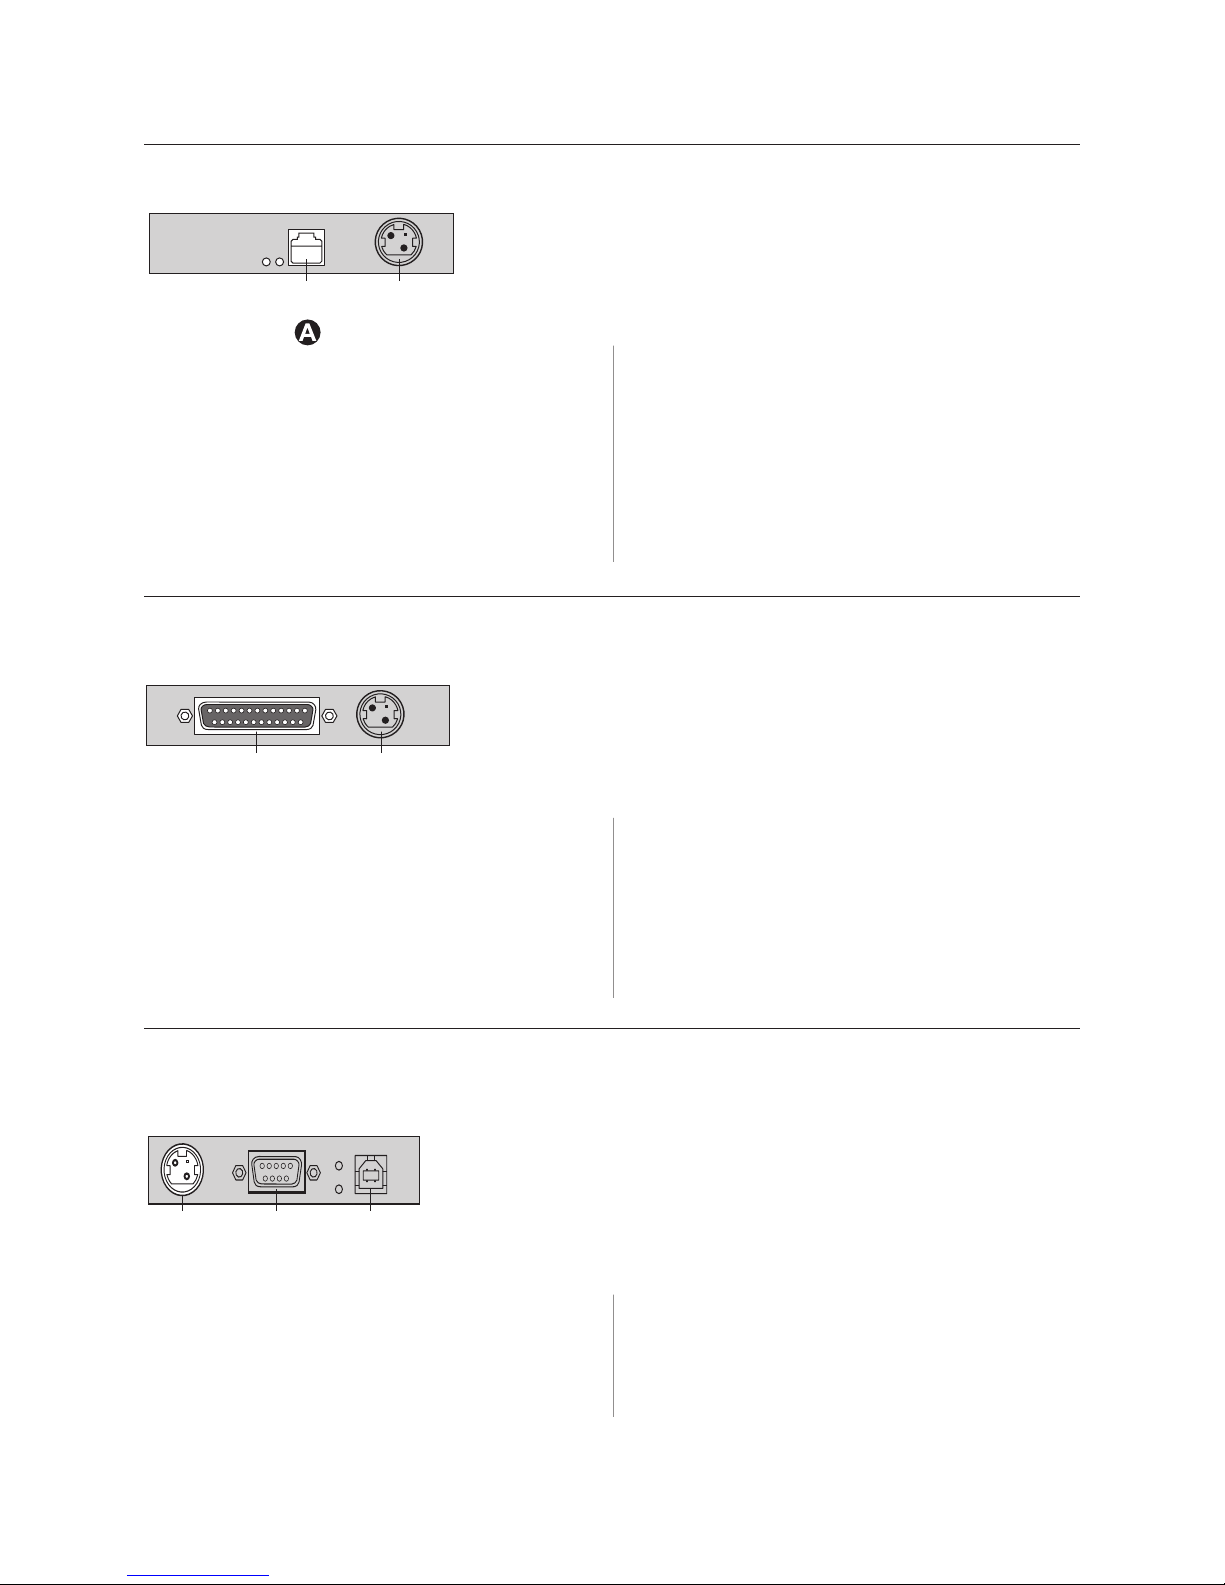
If installing the Ethernet communication cable:
IEEE parallel
c
Ethernet communication connector panel
Chapter 3: Setting up the Printer 23
Ethernet
connector
Power
supply
connector
1 Host computer can remain on.
2 Plug the printer end of the Ethernet cable into the
Ethernet connector port on the printer (A). Make
sure the connector snaps firmly in place.
3 Plug the computer end of the Ethernet cable into the
Ethernet port of the computer. Make sure the
connector snaps firmly in place.
If installing the IEEE 1284 Parallel communication cable:
ommunication connector panel
Parallel
communication
connector
Power
supply
connector
1 Turn off the host computer.
2 Plug the communication cable into the connector at
the bottom back of the printer.
3 Secure the connector by tightening the screws.
4 After you have connected the printer, you must set
the printer internal parameters for Ethernet operation.
See “Ethernet terminology and setup”, page 14 of the
A760 Programming supplement.
4 Connect the cable to the host computer.
5 Turn host computer on.
6 After you have connected the printer, you must go
into the printer configuration menu, “Communication
Interface” submenu and set the interface type to
parallel. (See page 32 to enter configuration menu.)
Power supply cable
Note: To avoid damage to the printer, connect the power supply cable last.
Communication connector panel (RS-232C/USB shown)
Power
supply
connector
1 Plug the power cord into the power supply.
2 Route the cash drawer and power supply cables
through the strain relief as shown in the next
page,
“Cable routing”.
A760-D100 10/04 189-9200303 Rev. D A760 Two-Color Thermal/Impact Hybrid Printer: User Guide
RS-232C
communication
connector
When the printer is configured for USB and the native
USB
connector
WARNING! Using this device without a grounded
outlet is a safety hazard and voids the
printer Warranty, Safety, FCC and CE
Mark designation.
3 Plug the power cord into the power supply, then plug
the power supply into an outlet. The green LED on
the top cover will light up.
Page 24
Chapter 3: Setting up the Printer24
el
I
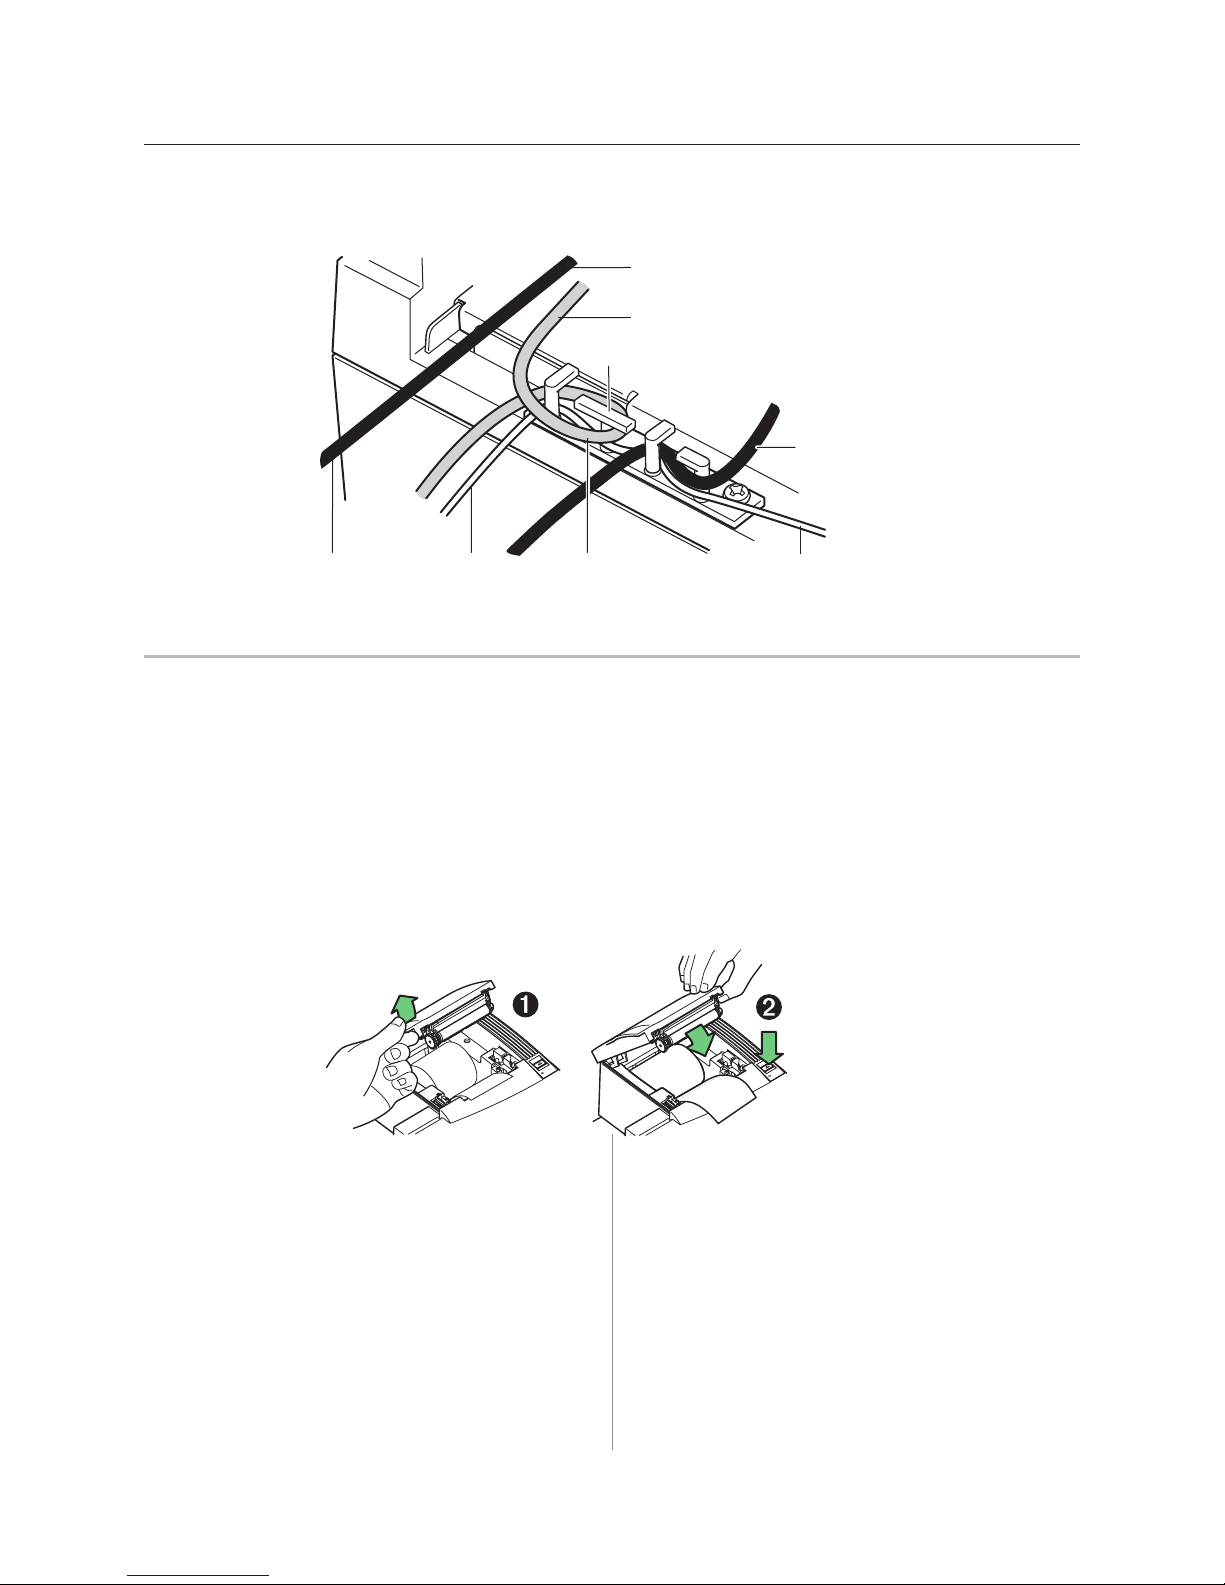
Cable routing
To prevent the printer from becoming unplugged accidentally, make sure the cables
are routed as shown in the illustration below.
To the RS-232C, IEEE 1284 parall
or Ethernet connector (when used)
To the USB
connector (when used)
Strain
relief
Power
supply
or adapter
cable
RS-232C,
EEE 1284 parallel
or Ethernet
communication
cable
Cash drawer
cable
USB
communication
cable
Cash drawer
cable
Test the printer
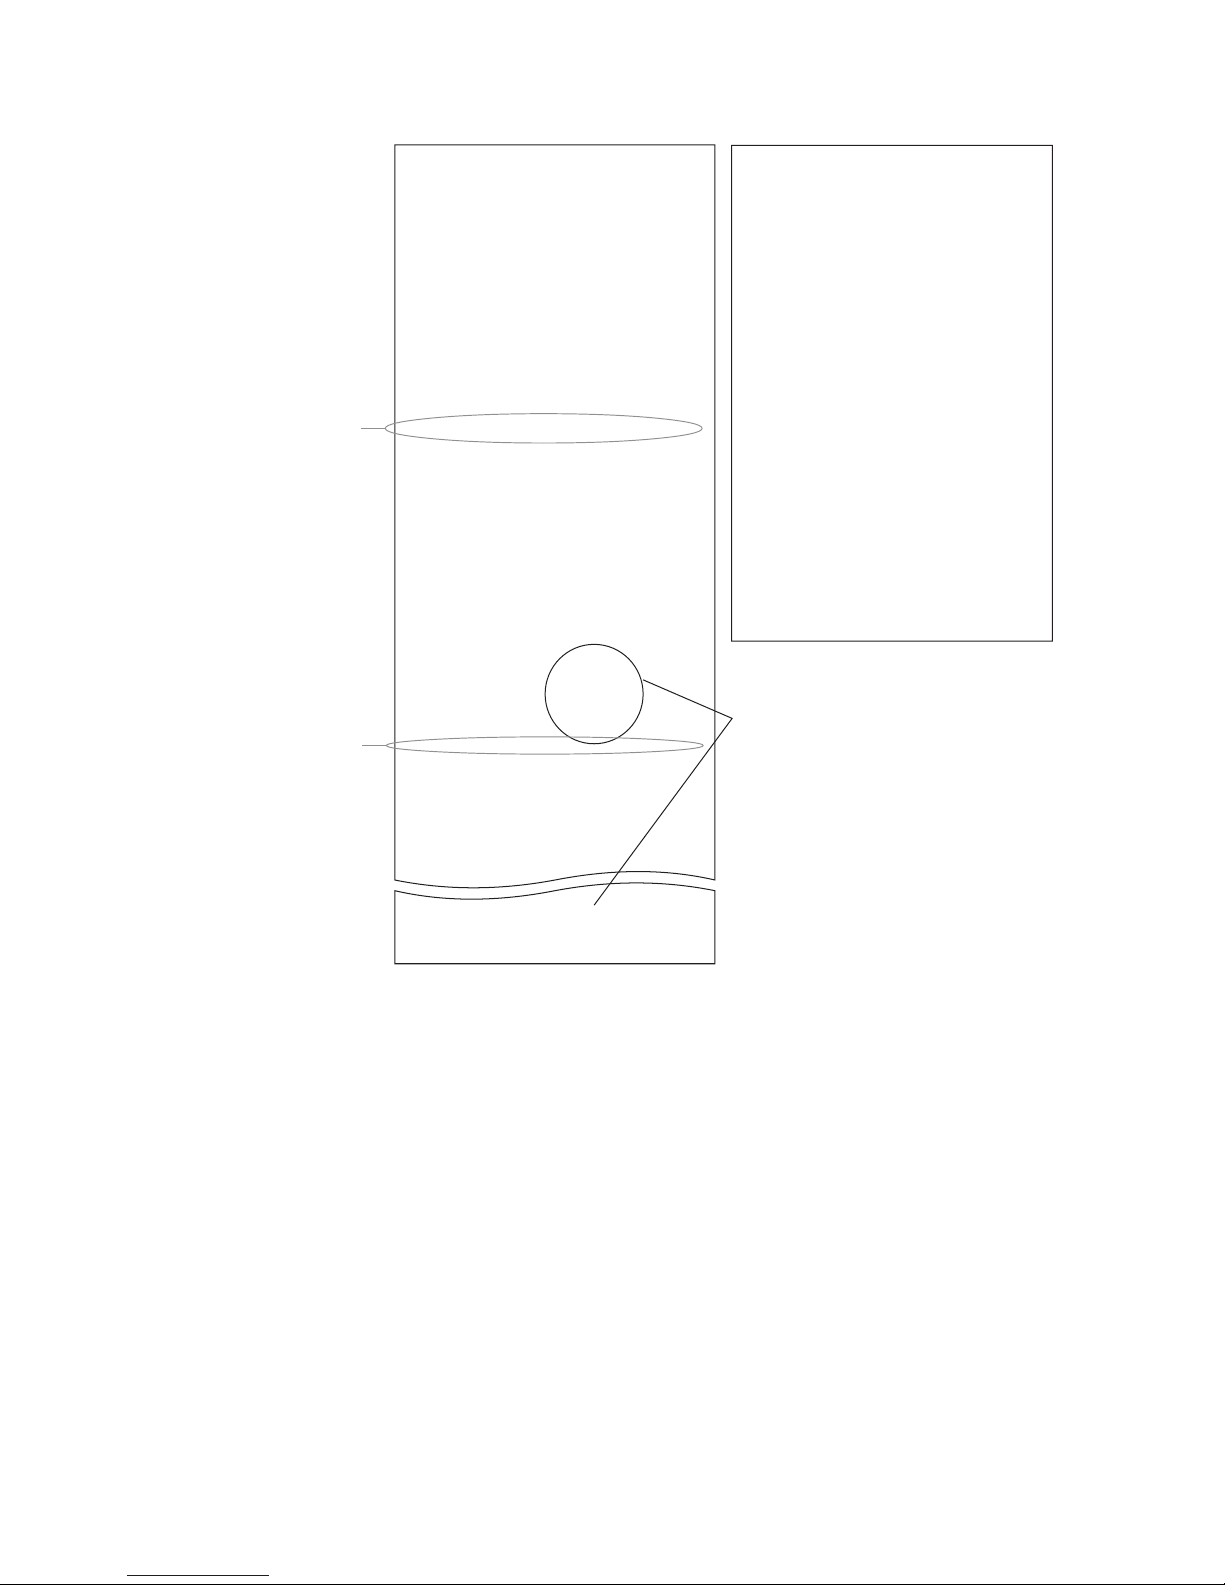
The test prints a list of various printer settings (Diagnostic form) and partially cuts
the paper if a knife is installed (see sample on next page). The test printout items
may vary depending on the printer model. This printout may be useful to a
service representative if there is a problem. If something appears to be wrong
with the test printout (such as missing or faded text), see page 44 in the troubleshooting
section in this document.
At the end of the test printout are instructions how to enter the configuration menu.
The configuration menu allows you to change the current settings of the printer.
(See page 32 for more information on changing the configurations.)
Open
receipt
cover
Push and hold
paper feed button
while closing
receipt cover
1 To run the test, either:
a Open (1) then while holding down the paper feed
button, close the receipt cover (2).
OR
b Press the paper feed button and the reset button
at the same time. The Diagnostic printout will
print.
2 When the printer begins printing let go of the paper
feed button. The diagnostic printout will print.
A760 Two-Color Thermal/Impact Hybrid Printer: User Guide 189-9200303 Rev. D A760-D100 10/04
3 Review this printout for printer settings. If you wish
to change any of these settings go to the
configuration menu as instructed at the bottom of the
printout.
Caution: Be extremely careful changing any of the
printer settings to avoid inadvertently changing other
settings that might affect the performance of the printer.
4 Make selections as instructed on the printout.
(See page 32 for more information.)
Page 25
Chapter 3: Setting up the Printer 25
*** A760 - Diagnostics Form ***
***
A760 - Printer Config Menu
***
CAUTION !!
MAIN MENU
Paper type can be changed
in the configuration menu.
Paper types and grades
available:
Type 0 - Monochrome grades
Kanzaki P-310
Type 1 - Two-color grades
Kanzaki P-310 RB
Type 4 - Two-color grades
Kanzaki P-310 BB
Type 5 - Two-color grades
Kanzaki P-320 RB
See page 48 and Programming
guide for more information.
When the printer is configured
for USB and the native USB
solution driver is used, this
location will show either: “USB
Driver Type: TPG, Inc.” or “USB
Driver Type: Printer Class”.
If the RS-232C, USB emulation
solution driver is used, nothing
is printed here. See User Guide,
Appendix A.
*** A760 - Diagnostics Form ***
Model number : A760-1125
Serial number : A012451679
Boot Firmware
Revision : V1.03
CRC : FFDE
P/N : 189-7600118A
Flash Firmware
Revision : V1.05
CRC : 7196
P/N : 189-7600117A
H/W parameters
Flash Memory Size : 1 Mbyte
Flash Logos/Fonts : 320 kbytes
Flash User Storage : 0 kbytes
SRAM Size : 256 kbytes
Head setting : D
Paper Type Name : Type 1, Version 0
Color Density Adj : 100 %
Print Density (Mono) : 100 %
Max Speed : 100 mm/sec
Max Power : 55 W
Alternate Reset : Disabled
Knife : Enabled
Paper Low Sensor : Enabled
MICR : Enabled
MICR Dual Pass : Disabled
MICR DC offset : 80
Check Flip : Enabled
Comm. Interface
RX Buffer Size : 4096
Interface type : RS232/USB
Parameters
Baud Rate : 115200
Data Bits : 8
Stop Bit : 1
Parity : NONE
Flow Control : DTR/DSR
Reception Errors : Ignore
Alternate DTR/DSR : Disabled
Resident Code Pages : 437, 850, 852. 858
Available Paper Types :
Logo(s) defined : YES
User Char(s) defined : NO
To enter Printer Config Menu :
1) Flip DIP switch #1 up
2) Reset the printer, while holding
the Paper Feed button down
860, 863, 865, 866
1252,862, 737
00.00 01.00 05.00
***
A760 - Printer Config Menu
This config menu allows you to set general printer
parameters
Sub-menus are entered and selections are made using
the Paper Feed Button
- short click : Feed Button is quickly depressed
- long click : Feed Button is held down more than
CAUTION !!
The settings are predetermined in factory and
should generally not be changed.
If you must change the settings do so carefully
to avoid changing other functions.
****************
********
**************************
Select a sub-menu :
- EXIT -> 1 click
- Print Current Configuration -> 2 clicks
- Set Communication Interface -> 3 clicks
- Set Diagnostics Modes -> 4 clicks
- Set Emulation/Software Options -> 5 clicks
- Set Hardware Options -> 6 clicks
- Set Paper Type -> 7 clicks
Enter code, then hold Button DOWN
at least 1 second to validate
then released
1 second then released
MAIN MENU
********
Important: Ensure that the
configuration settings match
your host computer, if not,
enter the configuration menu
to make changes.
Current printer tallies are
printed after the diagnostic
}
information and will vary
per printer use.
***
Sample diagnostic menu and print test for serial connection(show approximately 60% of size). Ethernet diagnostic
printout not shown. Ethernet parameters can not be changed in the configuration menu.
A760-D100 10/04 189-9200303 Rev. D A760 Two-Color Thermal/Impact Hybrid Printer: User Guide
Page 26

Chapter 3: Setting up the Printer26
This page intentionally left blank.
A760 Two-Color Thermal/Impact Hybrid Printer: User Guide 189-9200303 Rev. D A760-D100 10/04
Page 27
Chapter 4: Using the Printer
Printing on forms or checks
There are several types of transactions that may require
the insertion of a form or check into the printer:
• Credit card transaction (requiring a merchant
verification or authorization slip)
• Multiple-part forms such as credit transactions or
merchandise returns
• Electronic funds transfers
• Electronic check
Chapter 4: Using the Printer 27
• Check printing (printing the date, payee, and amount
on the check face)
• Check endorsement
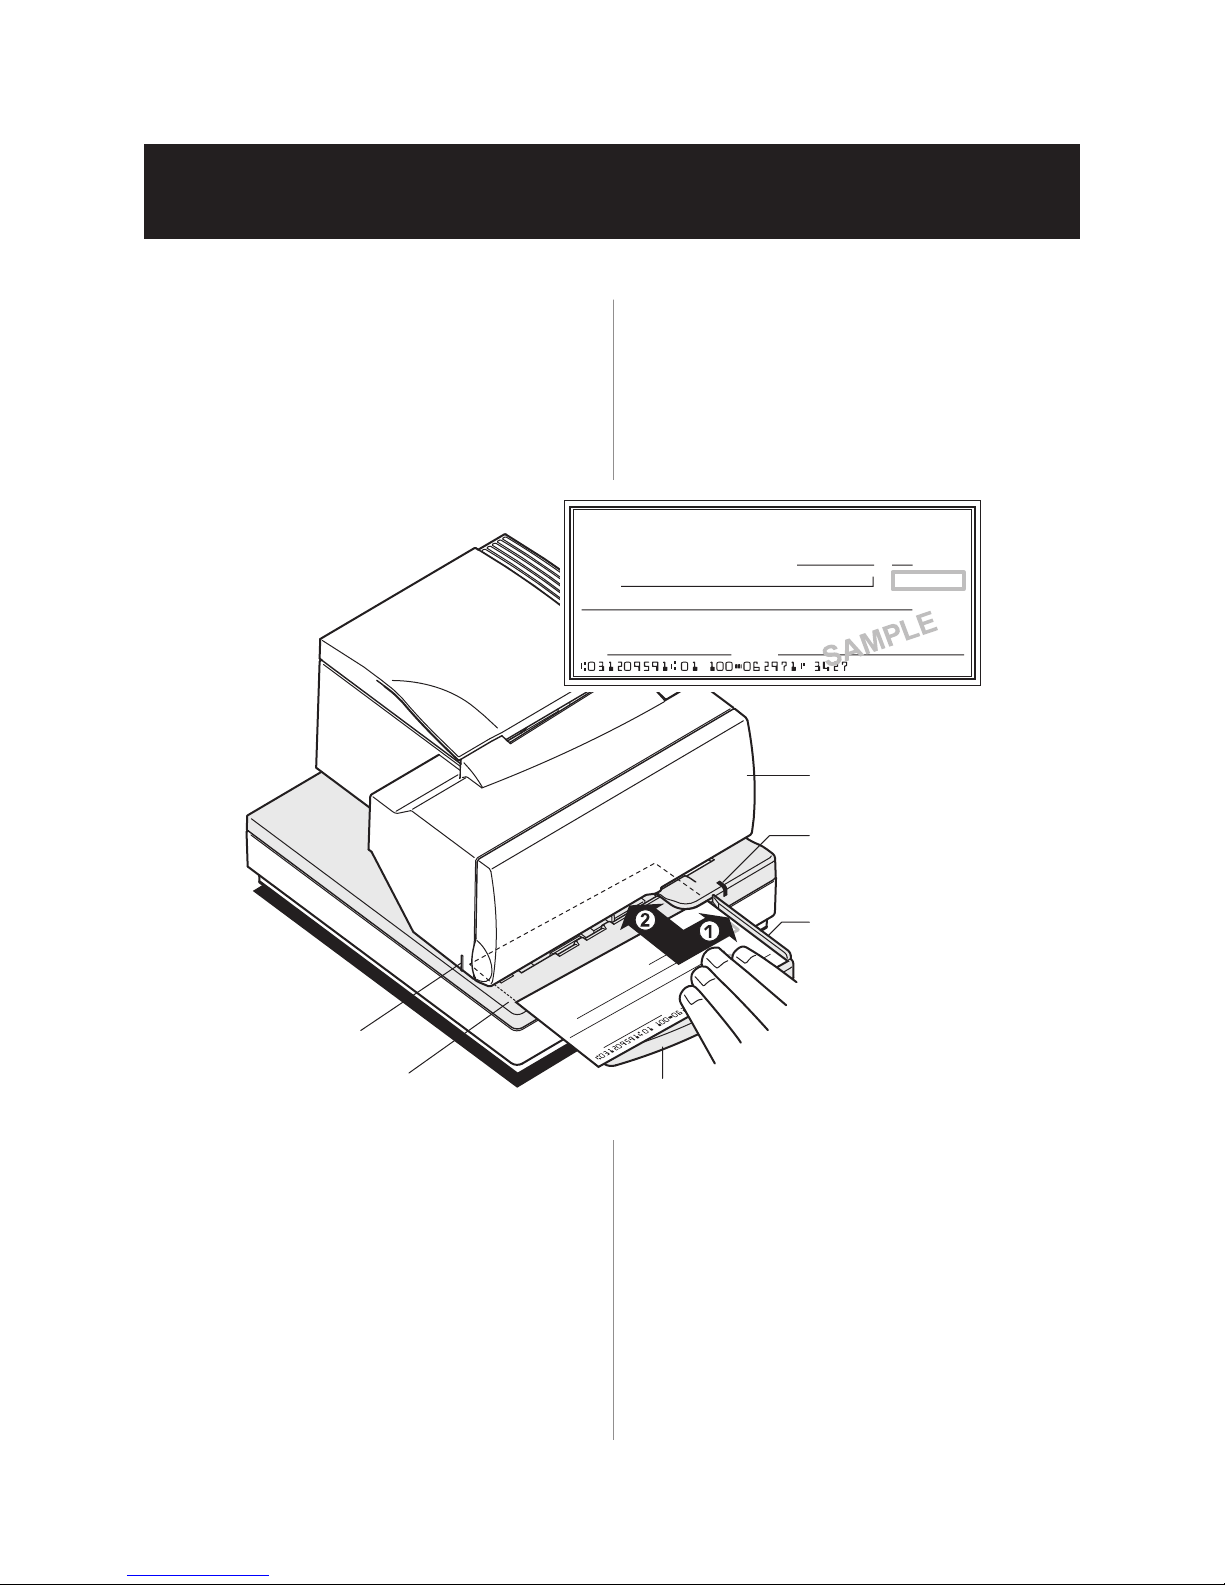
Although the illustration below shows a check being
inserted into the printer, these instructions apply to
any type of form. The A760 can print on forms up
to five parts thick.
2001
First line of
print guide
Slip
table
To print on a form or check:
1 Insert the form or check (check shown in the
illustration) from the front and place it on the slip
table with the print side up. If the form is extra long,
you may need to insert it from the side. A slight
resistance may be felt when the form comes in contact
with the form stop.
2 Slide the form or check to the right until it aligns
against the check guide.
3 Slide a short form or check toward the back of the
printer until it contacts the form stop (it will not be
able to go any further).
PAY TO TH
ORD
PAY TO THE
ORDER OF
MEMO
E
ER OF
19
$
DOLLARS
¦
Check orientation
Front cover
(non-flip model)
Green
slip-in LED
M
E
M
O
Extended
slip table
2001
19
$
DOLLARS
SAMPLE
¦
Check
guide
For a long form, position it appropriately using the
first line of print guide on the left side of the printer.
The green slip-in LED on the slip table turns on when
the form or check is properly inserted (the form has to
cover two sensors on the slip table).
4 Follow the instructions from the host computer. The
printer begins printing.
5 Remove the form or check after it has been fed back
out.
6 Follow the instructions from the host computer to
finish the transaction.
A760-D100 10/04 189-9200303 Rev. D A760 Two-Color Thermal/Impact Hybrid Printer: User Guide
Page 28
Chapter 4: Using the Printer28
Verifying and validating checks
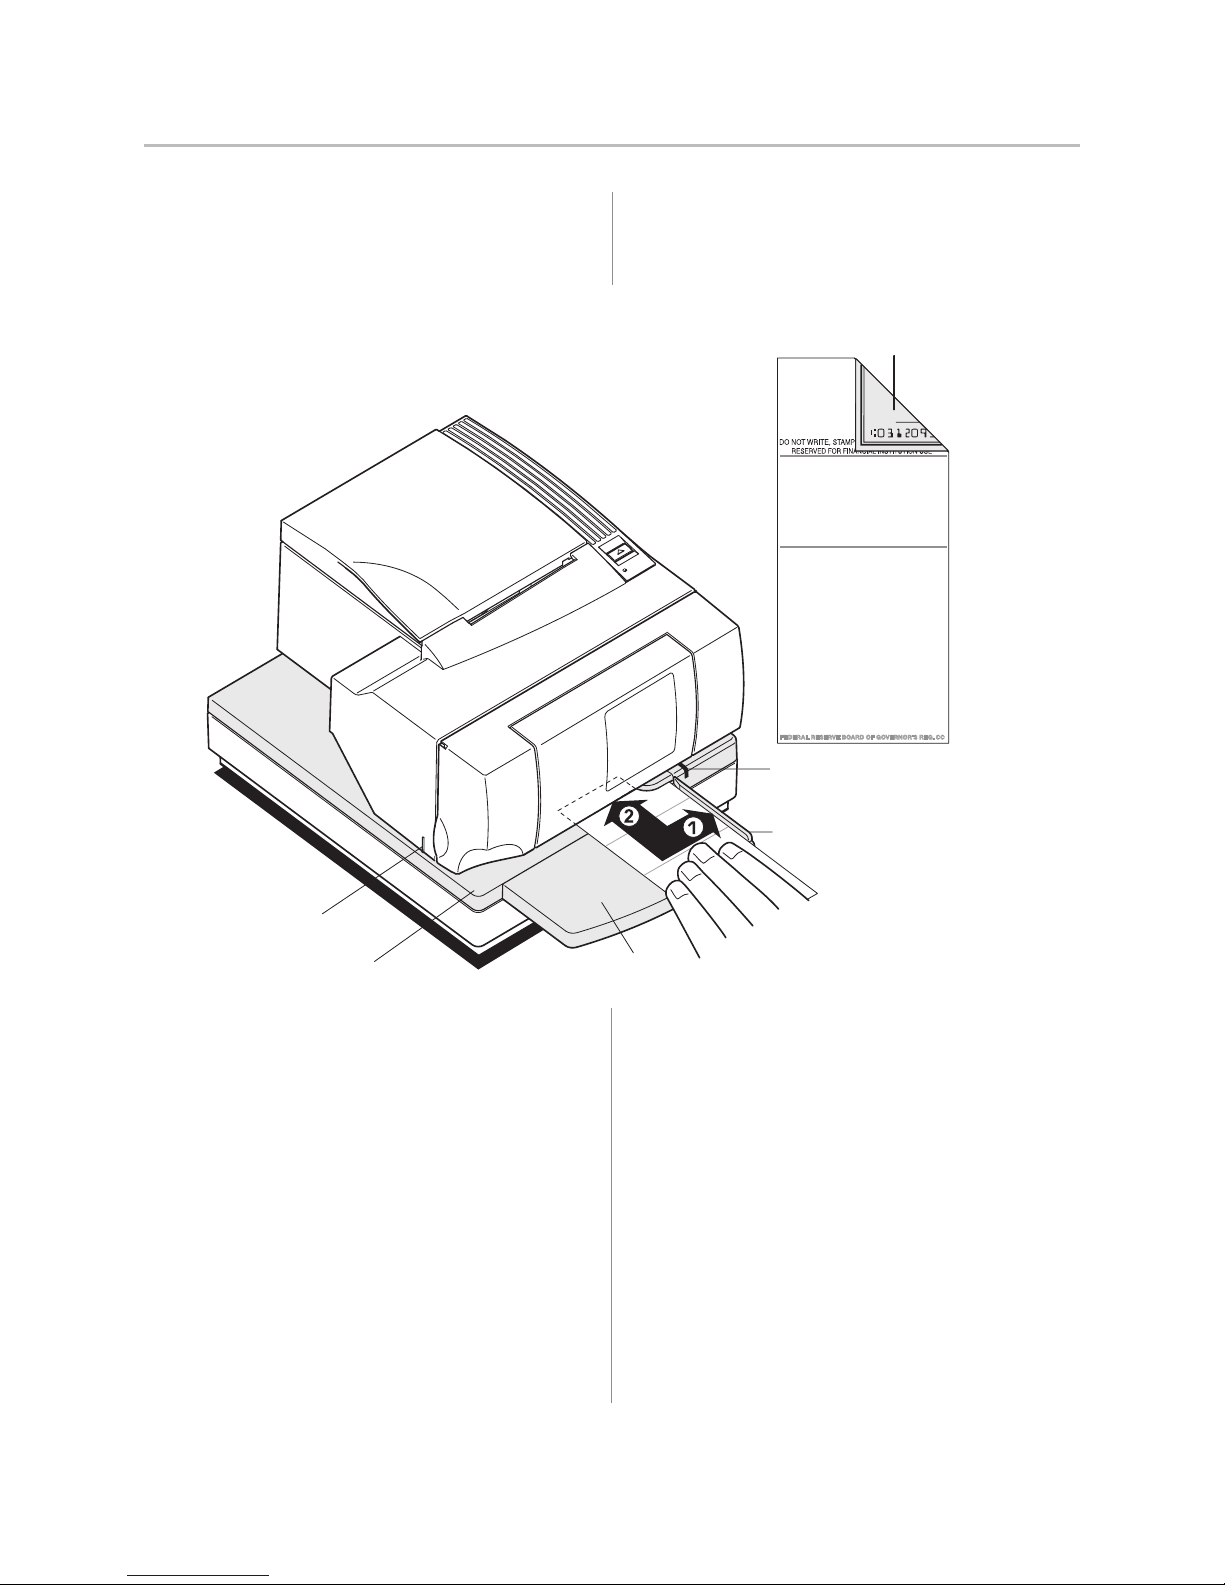
If the printer has the optional MICR check reader, checks
are verified and then validated. If the printer also has the
optional check flip feature, the printer is able to flip the
check over and print on the front of the check.
Note: To ensure that checks are properly verified and
validated, they must be free of folds and wrinkles and
inserted correctly into the MICR printer. Smooth a
wrinkled or folded check for best performance.
Check orientation - face down
Do not fold check
ENDORSE HERE
MEMO
Green
E
LIN
E
IS
S
H
U
T
N
W
O
IO
L
T
U
BE
IT
T
N
S
IG
IN
S
L
R
IA
O
C
P
N
M
A
A
T
IN
F
, S
R
E
O
IT
F
R
D
E
T W
V
R
O
E
N
S
O
E
D
R
slip-in LED
Check
guide
First line of
print guide
Slip
table
To verify and validate a check:
1 Place the check face down on the slip table, with the
bottom edge of the check to the right. Move the check
to the right until it aligns against the check guide.
2 Slide the check straight forward into the printer until it
stops. The green slip-in LED on the front of the printer
comes on.
Note: Hold the check to the right, against the check guide
and release it as soon as the printer begins to run.
3 Follow the instructions on the host computer to
complete the MICR process:
a When instructed by the host, the check is fed into
the printer, read and backed out to a position ready
Extended
slip table
b With the optional check-flip feature, the check is
Note: If the terminal indicates an incorrect read
of the MICR:
• Remove the check.
• Reinsert the check, ensuring instructions
4 Only remove the check when it is fully released by the
printer.
5 Continue to follow the instructions from the host
computer to finish the transaction.
FEDERAL RESERVE BOARD OF GOVERNOR'S REG. CC
fed into the printer, verified, fed up into the check
flip mechanism, flipped, fed back into the printer,
printed on the front and released.
1 through 3 are followed.
for endorsement, if desired.
A760 Two-Color Thermal/Impact Hybrid Printer: User Guide 189-9200303 Rev. D A760-D100 10/04
Page 29
Clearing check flip paper jams
Chapter 4: Using the Printer 29
Check
Check flip
window door
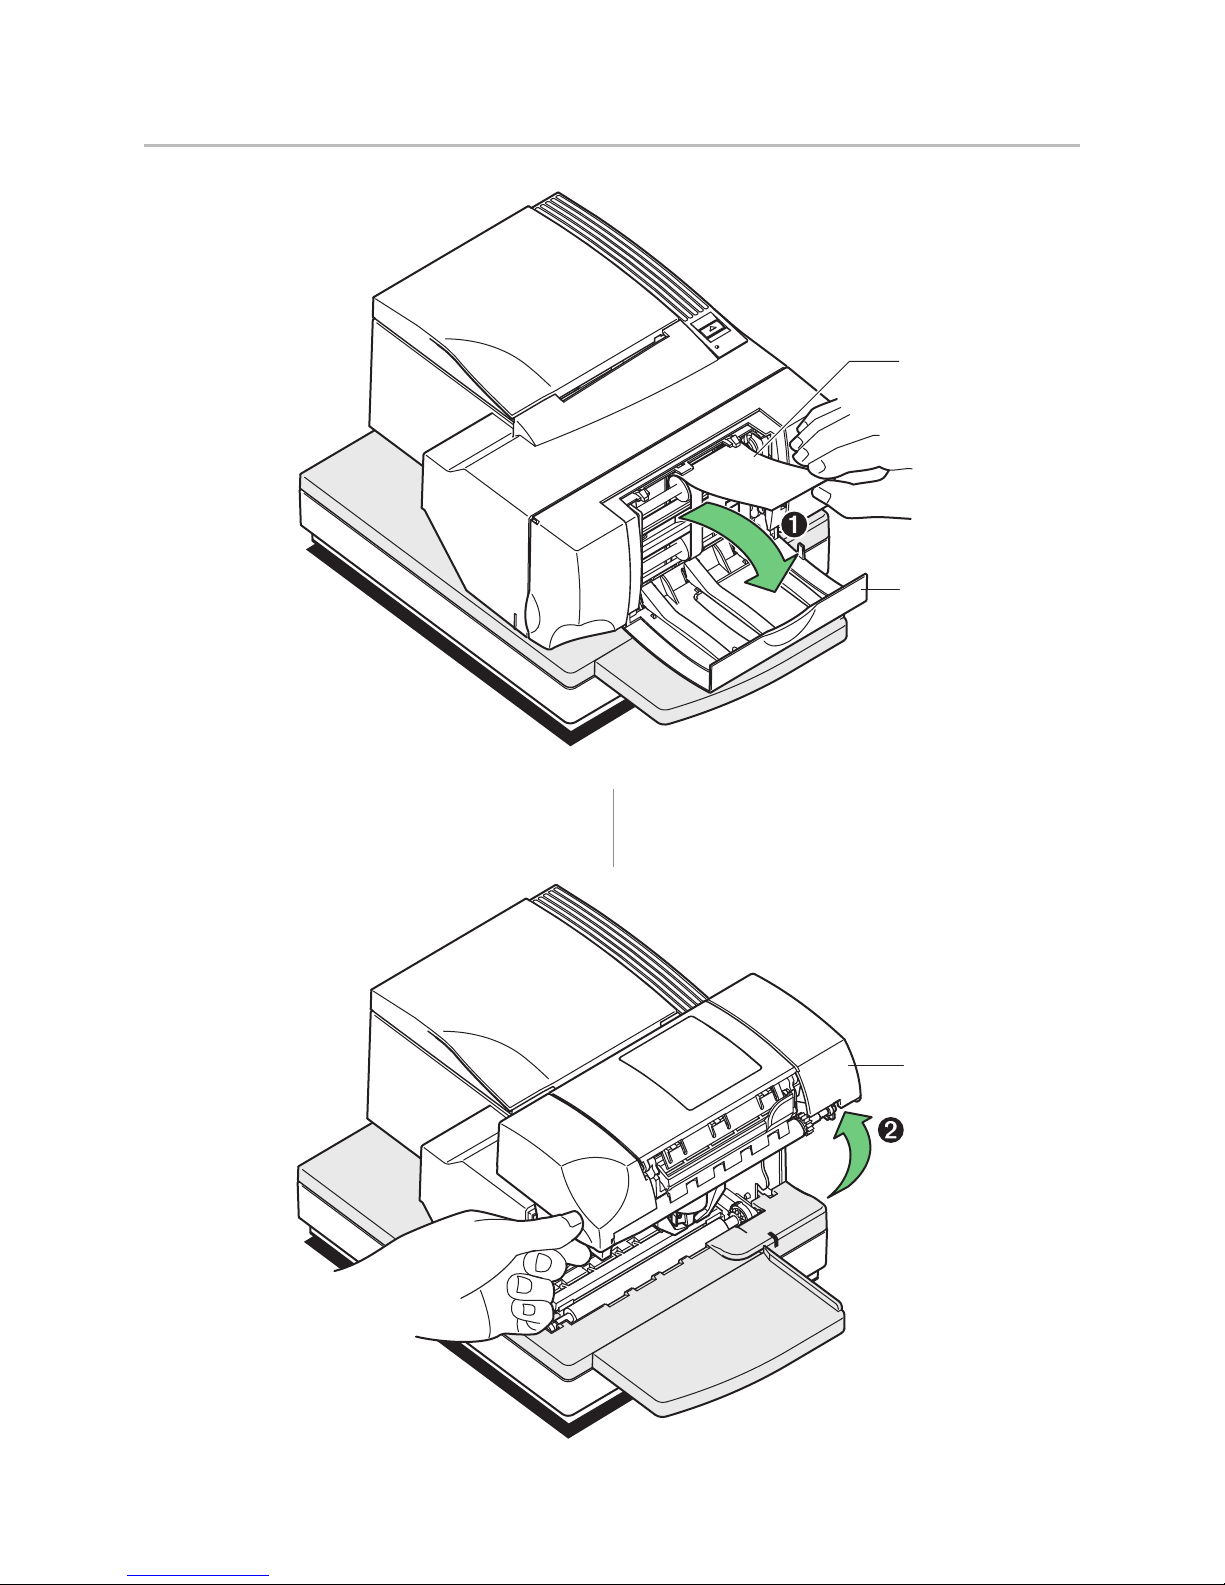
To clear a paper jam from the optional
check flip assembly:
1 Look in the window of the check flip assembly. If
the jammed check is visible, open the window and
remove it (1).
2 If the jammed check is not visible in the window,
open the front cover (2) and remove the jammed
check from behind the check flip assembly.
Front
cover
A760-D100 10/04 189-9200303 Rev. D A760 Two-Color Thermal/Impact Hybrid Printer: User Guide
Page 30

Chapter 4: Using the Printer30
Printer configurations
Printers are shipped with all the functions and parameters pre-set at the factory. Settings for
various printer parameters can be changed. This menu is printed on the receipt and scrolls through
instructions for selecting and changing user changeable functions or parameters.
Note: When changing the paper type, you will need to
either send the “Set paper type” (1D 81 m n) command
or use the “Set Paper Types” selection from the
configuration menu. See paper types available on
page 48.
Caution: Be extremely careful changing any of the printer
settings to avoid inadvertently changing other settings that
might affect the performance of the printer.
The following functions and parameters can be changed in
the scrolling configuration menu (*except as noted):
• Communication Interface
RS-232C serial interface (9-pin)
RS-232C serial interface (25-pin)
Universal serial bus (USB)
IEEE 1284 parallel
Ethernet (*cannot be set -see next page)
• RS-232C serial interface settings
Baud rate
Data bits (*can not be changed)
Stop bits (*can not be changed)
Parity (*can not be changed)
Hardware (DTR/DSR) or software (XON/XOFF)
flow control
Data reception errors
Alternate DTR/DSR
• Diagnostic Modes
Normal
Datascope
Receipt test
Slip test
MICR test
Check flip test
• Printer Emulations
A760 native mode
A756 emulation
A758 emulation
• Printer settings and functions
Emulation/software option sub-menu
Printer ID mode
Default lines per inch
Carriage return usage
Default font
Font size
Slip position (MICR printers)
Slip eject at receipt select
Hardware options sub-menu
Printhead setting
Paper type name
Color density
Print density (mono)
Power supply wattage (max power)
Alternate reset feature
Knife option
Paper low sensor
MICR option
MICR dual pass option
Check flip option
For more information about See this section
Using the configuration “Configuring the printer”
menu to configure the on page 32.
printer
A760 Two-Color Thermal/Impact Hybrid Printer: User Guide 189-9200303 Rev. D A760-D100 10/04
Page 31
Ethernet option
*** A760 - Diagnostics Form ***
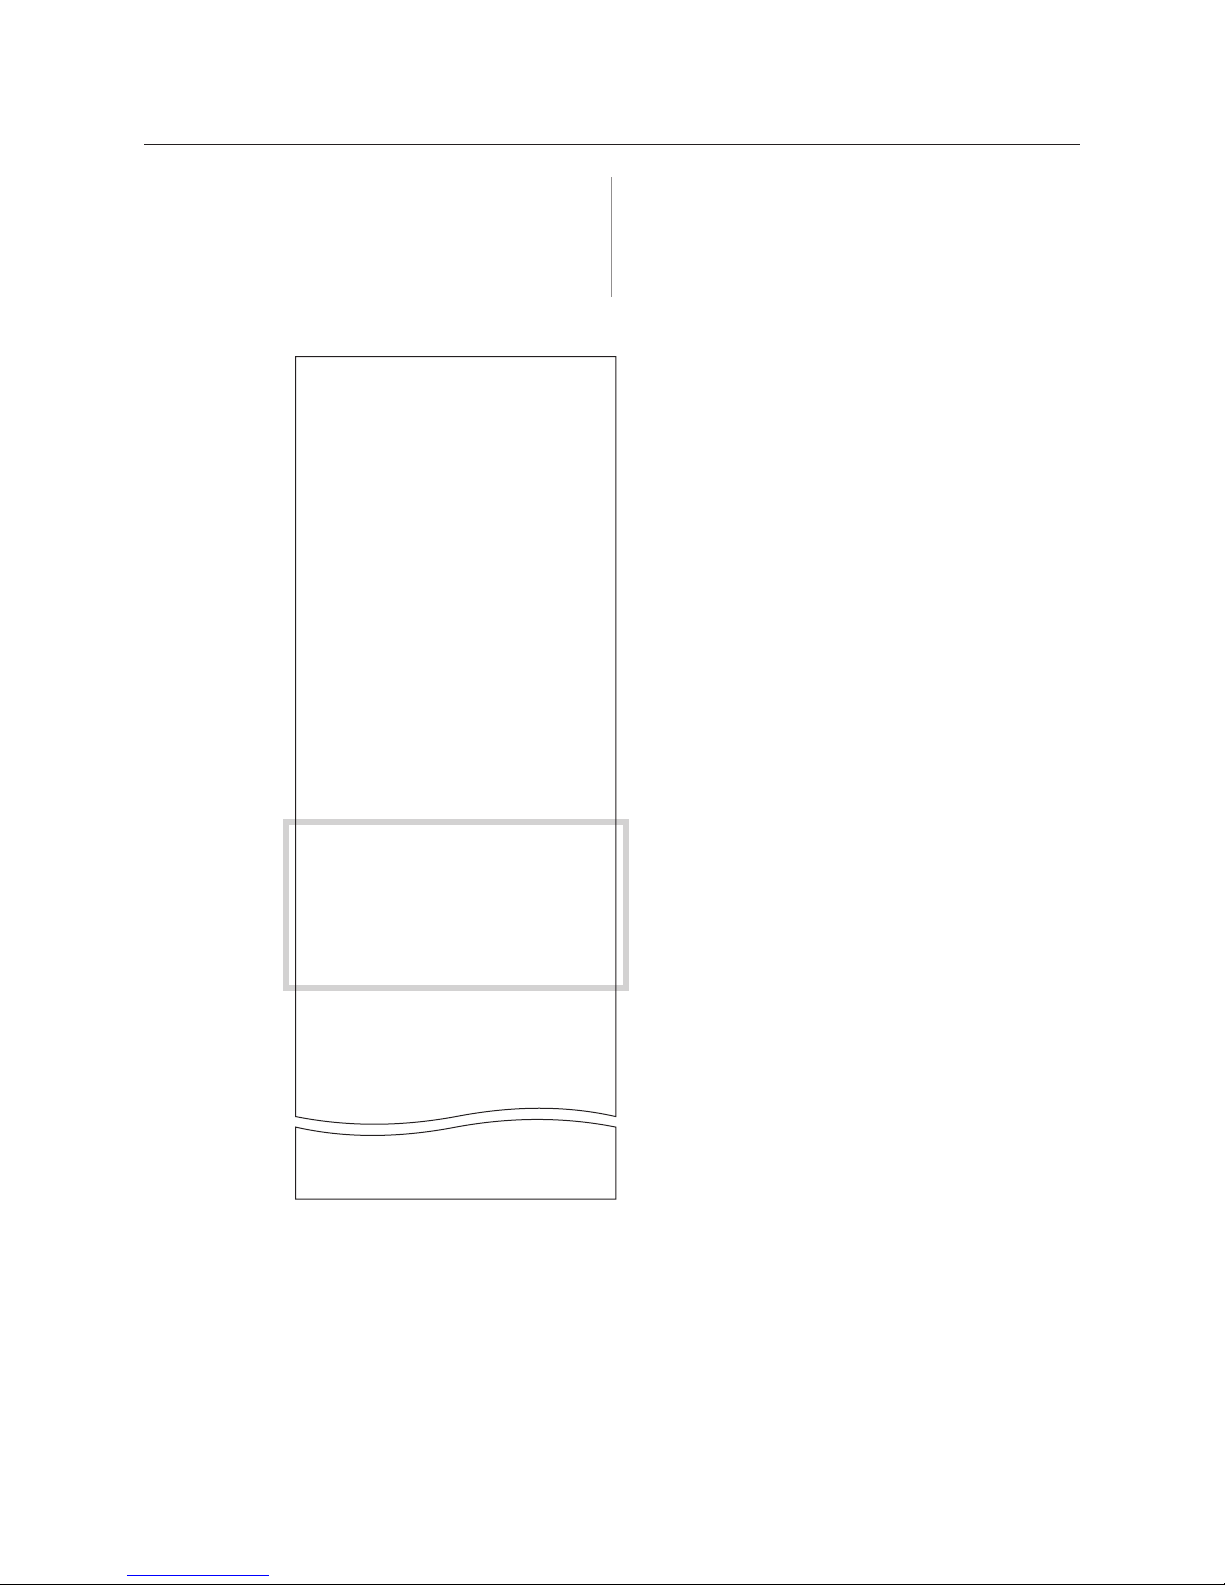
Ethernet settings can not be changed in the
configuration menu. If printer is currently configured for
Ethernet use, refer to the Diagnostic Form printout for
current settings.
*** A760 - Diagnostics Form ***
Model number : A760-1125
Serial number : A013551880
Boot Firmware
Revision : VET8t
CRC : 49F7
P/N : E 26-Nov-01
Flash Firmware
Revision : VETGe
CRC : 80CD
P/N : 10:25:04Oct 16 2001
H/W parameters
Flash Memory Size : 2 Mbyte
Flash Logos/Fonts : 320 kbytes
Flash User Storage : 0 kbytes
SRAM Size : 512 kbytes
Head setting : D
Paper Type Name : Type 0, Version 0
Print Density (Mono) : 100 %
Max Speed : 100 mm/sec
Max Power : 55 W
Alternate Reset : Disabled
Knife : Enabled
Paper Low Sensor : Enabled
MICR : Enabled
MICR Dual Pass : Disabled
MICR DC offset : 7E
Check Flip : Enabled
Comm. Interface
RX Buffer Size : 4096
Interface type : 10BaseT
Parameters
MAC Address : 00:E0:70:00:35:C0
IP Address : 10.1.2.185
Net Mask : 0.0.0.0
Gateway : 0.0.0.0
LP Daemon : Disabled
Telnet : Enabled
Raw TCPIP Port : 9001
BootP : Disabled
DHCP : Enabled
Inactivity Timeout : Enabled
Keep Alive Pings : Disabled
Resident Code Pages : 437, 850, 852. 858
Available Paper Types :
Logo(s) defined : YES
User Char(s) defined : NO
860, 863, 865, 866
1252,862, 737
00.00 01.00 05.00
Chapter 4: Using the Printer 31
To change the current Ethernet settings or to set printer
for Ethernet, see “Ethernet terminology and setup”,
page 14 of the Programming supplement.
Ethernet Sample diagnostic printout
Highlighted area shows Ethernet settings.
These settings can not be changed
through the configuration menu and must
be set by sending commands from the
host. See Ethernet terminology and setup,
page 14 of the Programming supplement.
To enter Printer Config Menu :
1) Flip DIP switch #1 up
2) Reset the printer, while holding
the Paper Feed button down
A760-D100 10/04 189-9200303 Rev. D A760 Two-Color Thermal/Impact Hybrid Printer: User Guide
Page 32
Chapter 4: Using the Printer32
***
A760 - Printer Config Menu
***
CAUTION !!
MAIN MENU
21
Configuring the printer
The configuration menu allows you to select functions
or change various settings for the printer. Instructions
printed on the receipt, guide you through the processes.
Note: When changing the paper type, you will need to
either send the “Set paper type” (1D 81 m n) command or
use the “Set Paper Type” selection from the configuration
menu. See paper types available on page 48.
Caution: Be extremely careful changing any of the
printer settings to avoid inadvertently changing other
settings that might affect the performance of the printer.
1 Open the receipt cover and check if there is paper in
the printer. If not, follow the instructions on page 18
for loading paper.
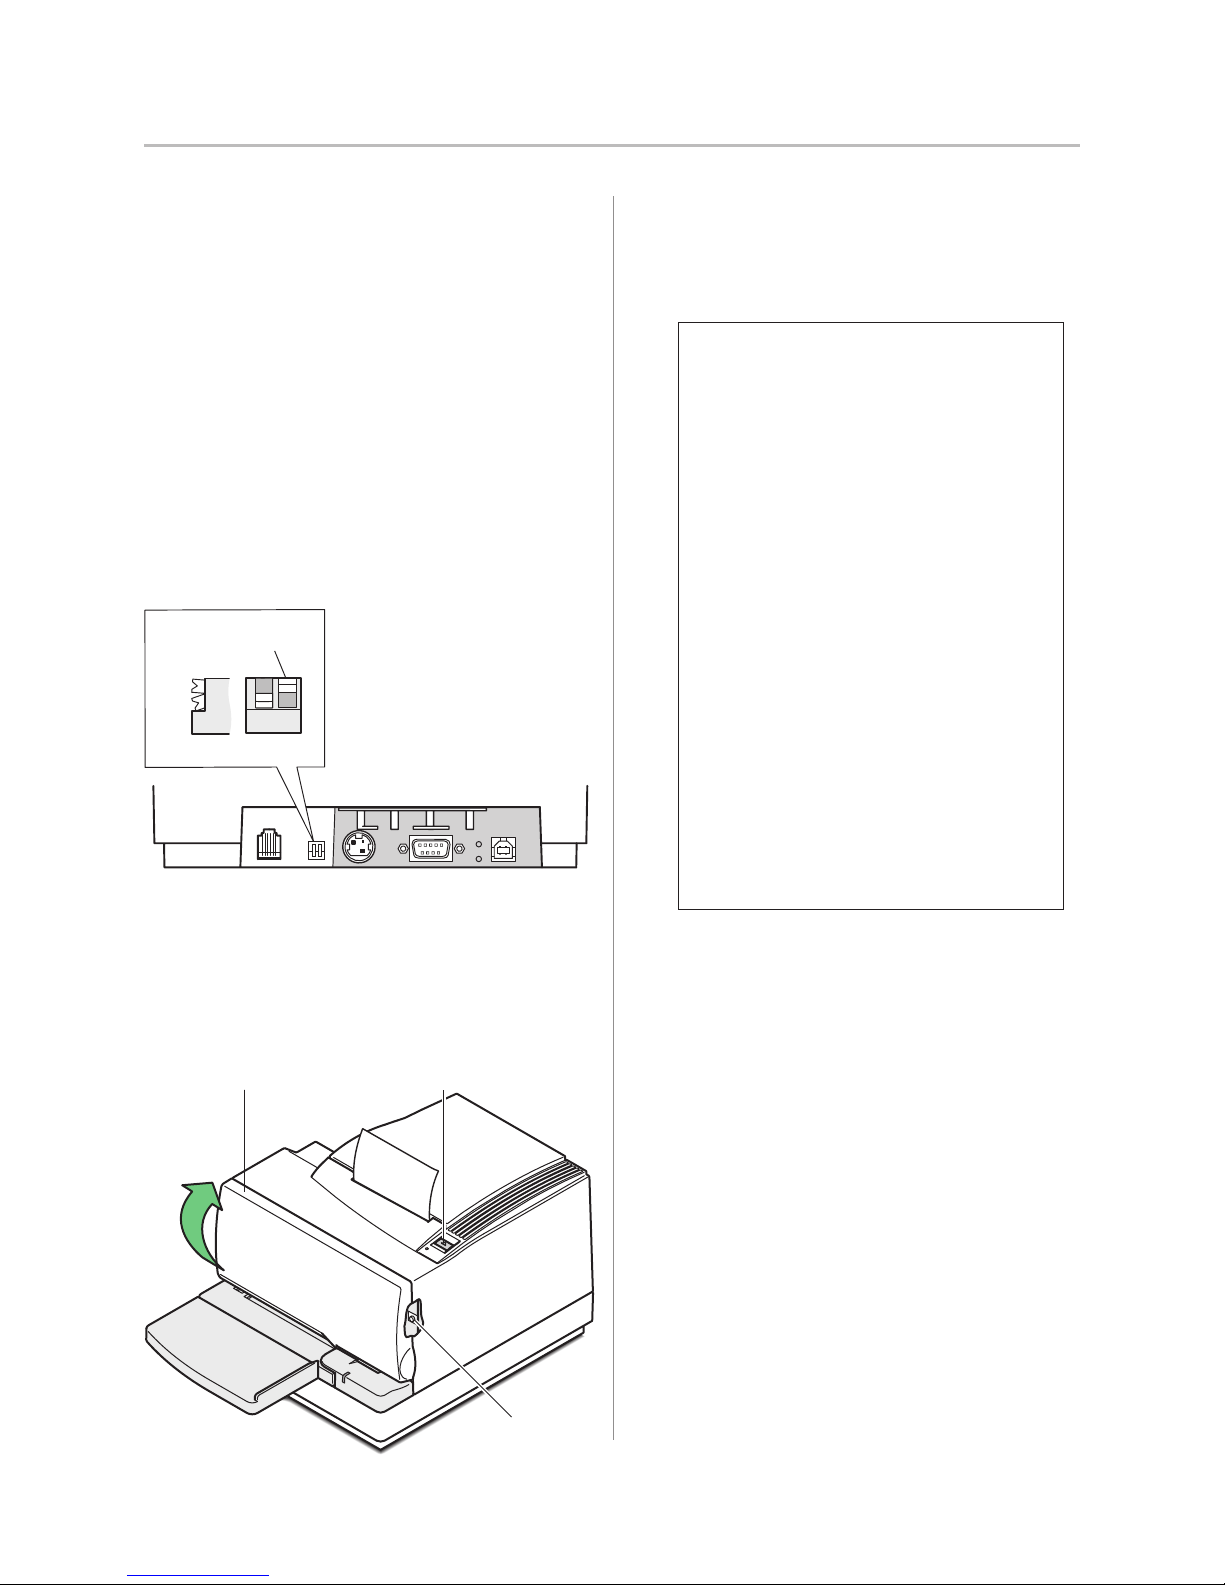
2 Turn the printer so the back is facing you.
Switch 1 is shown
in the ON position
On
Off
2-position DIP switches
Back of printer
21
• The printer beeps, prints the diagnostic form and
the configuration main menu.
• The printer pauses and waits for a main menu
selection to be made (see sample printout below.)
***
A760 - Printer Config Menu
This config menu allows you to set general printer
parameters
Sub-menus are entered and selections are made using
the Paper Feed Button
- short click : Feed Button is quickly depressed
- long click : Feed Button is held down more than
CAUTION !!
The settings are predetermined in factory and
should generally not be changed.
If you must change the settings do so carefully
to avoid changing other functions.
****************
********
then released
1 second then released
MAIN MENU
********
***
**************************
Select a sub-menu :
- EXIT -> 1 click
- Print Current Configuration -> 2 clicks
- Set Communication Interface -> 3 clicks
- Set Diagnostics Modes -> 4 clicks
- Set Emulation/Software Options -> 5 clicks
- Set Hardware Options -> 6 clicks
- Set Paper Type -> 7 clicks
Enter code, than hold Button DOWN
at least 1 second to validate
3 Set DIP switch 1 to the On position (up).
4 Open the front cover of the printer and press the
reset button while holding the paper feed button.
Front
cover
A760 Two-Color Thermal/Impact Hybrid Printer: User Guide 189-9200303 Rev. D A760-D100 10/04
Paper feed
button
Reset
button
5 Follow the printed instructions on the scrolling menu
by pressing the paper feed button as indicated below to
make selections.
• Indicate Ye s with a long click. (Press and hold
paper feed button for more than one second.)
• Indicate No with a short click. (Press paper feed
button quickly.).
6 Continue through your menu selections until you are
asked, “Save New Parameters?” Select “Yes” or “No”.
a If you wish to save, select “Yes”, then return DIP
switch 1 to the Off position (down).
b Press the reset button. The printer resets with the
new selections. You can verify the setting by
pressing the paper feed button to print out a
diagnostics form or by holding the paper feed
button and opening and closing the receipt cover.
7 If you would like to continue configuring the printer,
select “No”. The printer returns to the configuration
menu where you can set parameters again.
Page 33

Chapter 4: Using the Printer 33
Communication interface
To change the communication interface settings (except
Ethernet), enter the configuration menu, select “Set
Communication Interface” from the main menu and
answer “Yes” to “SET INTERFACE TYPE?” printed on
the receipt.
Caution: Be extremely careful changing any of the
printer settings to avoid inadvertently changing other
settings that might affect the performance of the printer.
RS-232C serial interface settings
To change the RS-232C serial interface settings, enter the configuration menu, select “Set
Communication Interface” from the main menu and answer “No” to “SET INTERFACE TYPE?”
printed on the receipt. This will take you to the instructions for selecting the RS-232C settings.
Caution: Be extremely careful changing any of the printer settings to avoid inadvertently
changing other settings that might affect the performance of the printer.
Press the paper feed button as instructed on the configuration menu to select the RS-232C
settings you want to change:
• Baud rate
115200 baud
57600 baud
38400 baud
19200 baud
9600 baud
4800 baud
2400 baud
1200 baud
• Number of data bits can not be changed (not shown
on printout)
• Stop bits can not be changed (not shown on
printout)
• Parity can not be changed (not shown on printout)
Press the paper feed button as instructed to select the
communication interface you want.
• Communication interface
RS-232C interface
USB (see Appendix A, “USB driver installation”)
IEEE 1284 parallel (see below)
Ethernet (see “Ethernet settings” below.)
• Hardware flow control
Software (XON/XOFF)
Hardware (DTR/DSR)
• Data reception errors
Ignore errors
Print “?”
• Alternate DTR/DSR
Enabled
Disabled
Note: Press the paper feed button for at least one
second to validate the selection.
For more information about See this section
Setting the RS-232C Serial “Configuring the printer”
interface settings page 32.
Parallel communication
For the printer to operate in parallel, you must go into the configuration menu,
“Communication Interface” submenu and set interface type to parallel.
Ethernet settings
For the printer to operate with Ethernet, a series of commands must be set within the printer.
These commands can only be set through the host computer and are not configurable
through the printer configuration menu.
See A760 User programming supplement, “Ethernet terminology and setup”, page 14.
A760-D100 10/04 189-9200303 Rev. D A760 Two-Color Thermal/Impact Hybrid Printer: User Guide
Page 34
Chapter 4: Using the Printer34
Diagnostic modes
To change the diagnostic modes enter the configuration
menu, select “Set Diagnostic Modes” from the main
menu and select one of the following modes:
• Normal: normal operating mode of the printer.
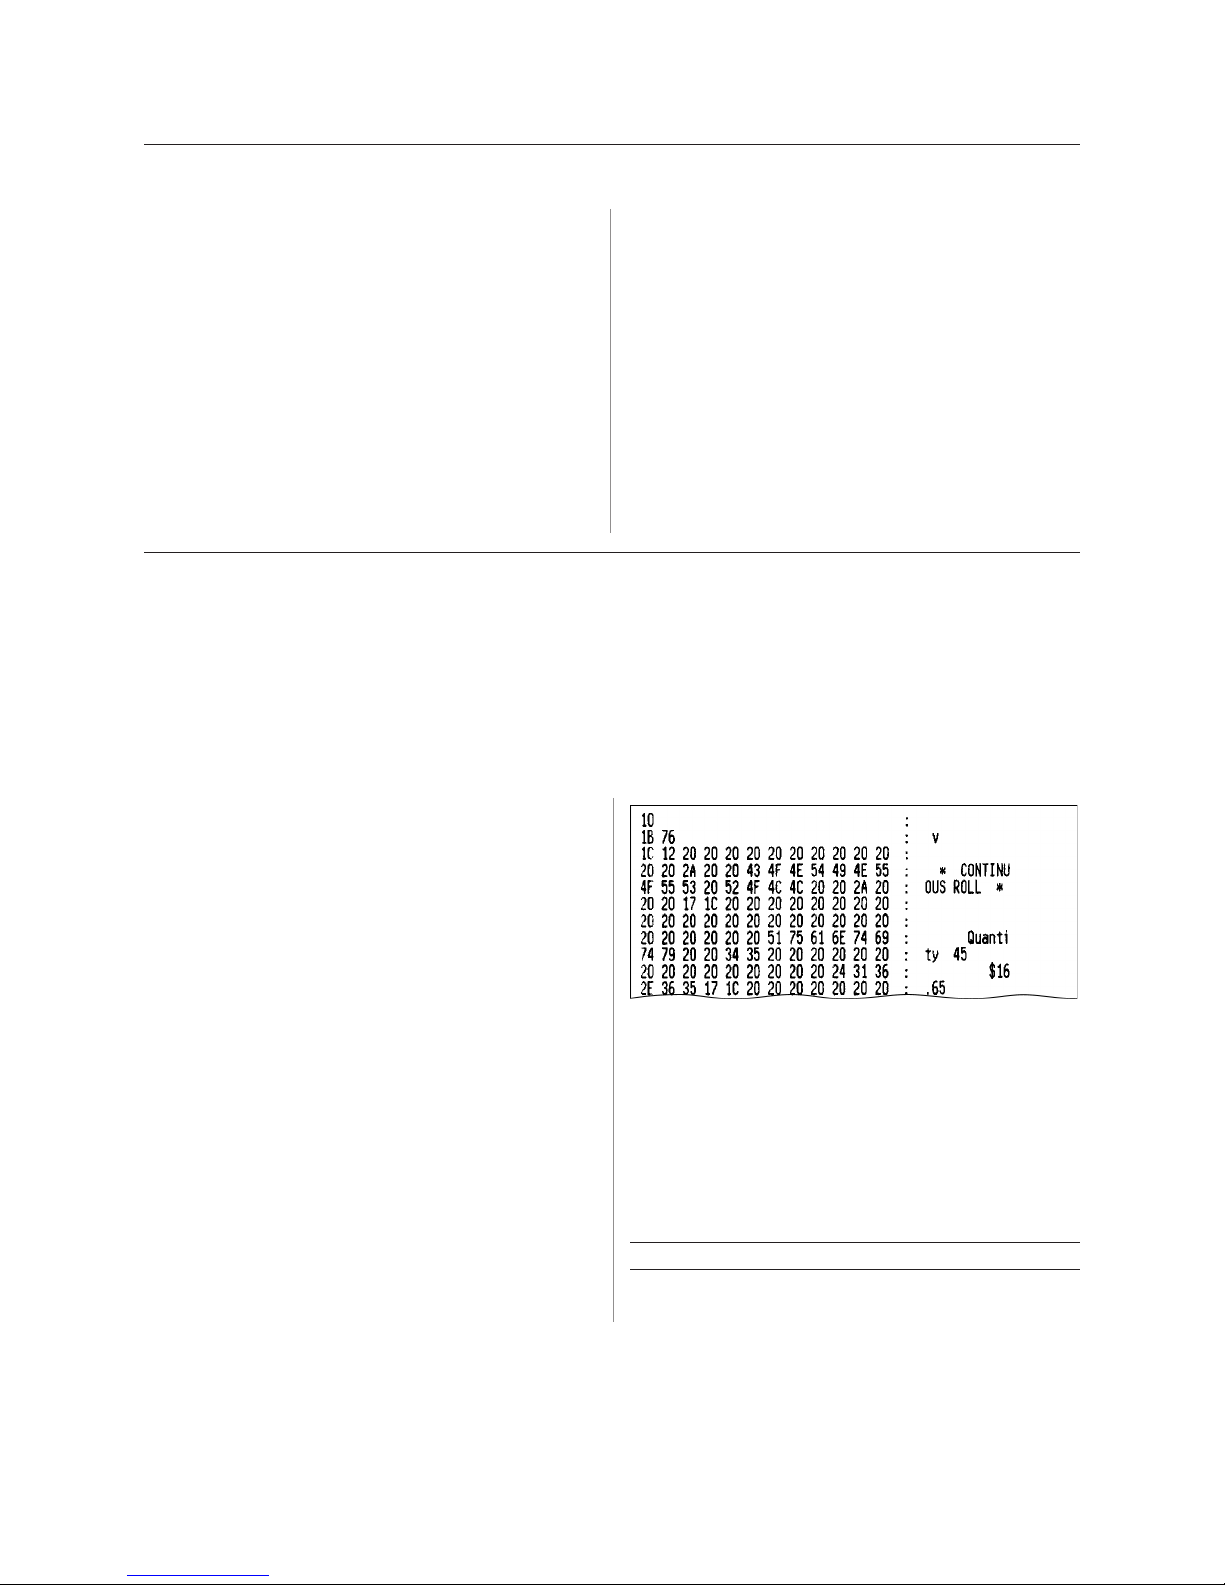
• Datascope: the receipt printer prints incoming
commands and data in hexadecimal format to help
troubleshoot communication problems.
• Receipt test: the receipt printer prints two code
pages to verify proper printing of the receipt.
• Slip test: the slip printer prints two code pages to
verify the slip printer is operating properly.
• MICR test mode: the receipt printer prints all
characters recognized by the MICR (check reader)
to verify proper reading of an inserted check.
• Check flip test: verifies that the check flip
mechanism will flip an inserted check.
Caution: Be extremely careful changing any of the
printer settings to avoid inadvertently changing other
settings that might affect the performance of the printer.
See Configuring the printer,” page 32 for instructions
on how to enter the configuration menu.
Enable or disable data scope mode
The data scope mode test prints a hexadecimal dump of all data sent to the printer: “1” prints
as hexadecimal 31, “A” as hexadecimal 41 and so on. This helps troubleshoot communication
problems and runs during a normal application (after being enabled through printer
configuration).
Note: Data scope mode is usually considered a level 1 diagnostic test.
Data scope mode is enabled and disabled by selecting the “Diagnostic Modes” sub-menu of
the configuration menu.
Press the paper feed button as instructed on the
“Diagnostic Modes Menu” to enable or disable the data
scope mode test.
• Off, normal mode (Data scope mode disabled)
• Data scope mode (enabled)
Note: Press the paper feed button for at least one
second to validate the selection.
To run the data scope mode:
1 After you have enabled the data scope mode, exit the
configuration menu.
2 Run a transaction from the host computer.
All commands and data sent from the host computer
will be printed as hexadecimal characters as shown in
the illustration.
To exit the data scope mode:
1 Enter the configuration menu again.
See “Configuring the printer,” page 32.
2 Disable the data scope mode.
3 Exit the configuration menu.
The printer is on-line and can communicate normally
with the host computer.
For more information about See this section
Enabling the data scope mode “Configuring the printer”,
page 32
A760 Two-Color Thermal/Impact Hybrid Printer: User Guide 189-9200303 Rev. D A760-D100 10/04
Page 35
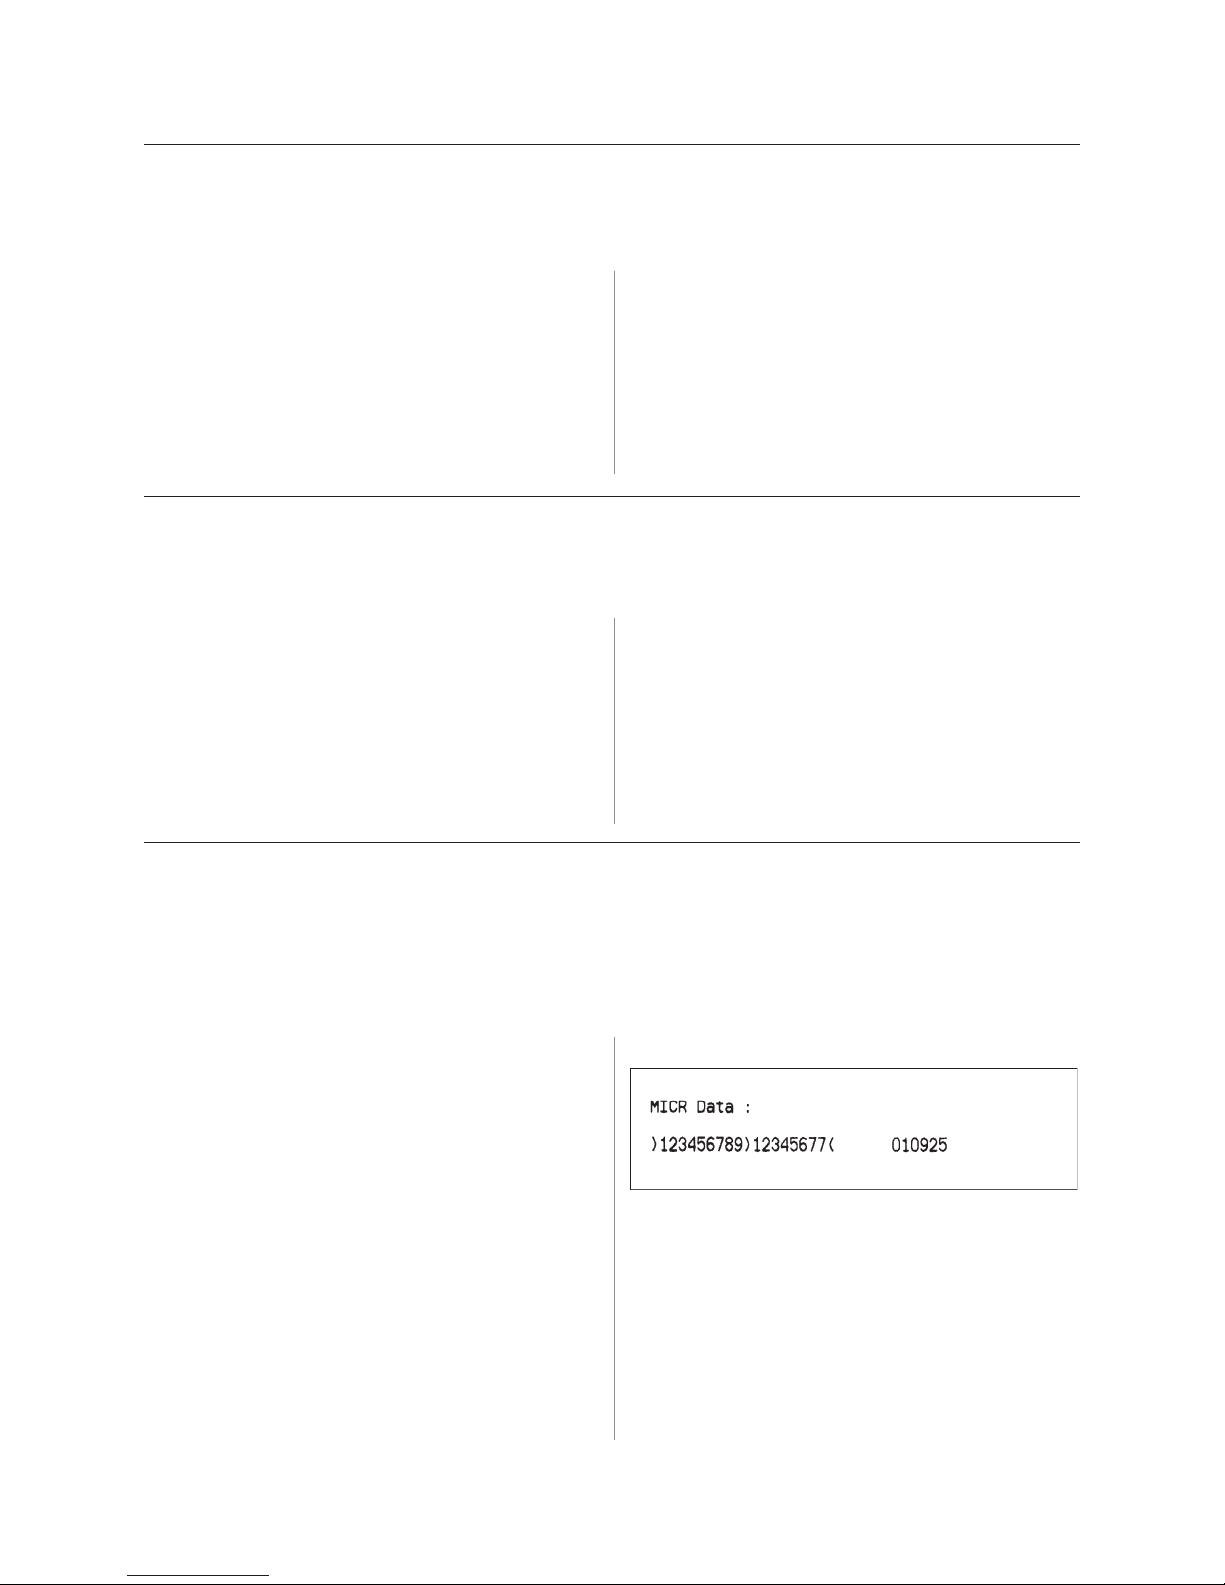
Chapter 4: Using the Printer 35
Enable or disable receipt test mode
The receipt test mode verifies proper receipt printing. Receipt test is enabled and disabled by
selecting the “Diagnostic Modes” sub-menu of the configuration menu. See “Configuring the
printer”, page 32 for instructions on how to enter the configuration menu.
To run the Receipt test mode:
1 Enable the receipt test mode in the configuration
menu.
2 Exit the configuration menu.
3 Push the paper feed button. The receipt station
prints two code pages and cuts the receipt.
4 To repeat this test, push the paper feed button again.
Enable or disable slip test mode
The slip test mode verifies proper printing on a slip. Slip test is enabled or disabled by
selecting the “Diagnostic Modes” sub-menu of the configuration menu. See “Configuring the
printer”, page 32 for instructions on how to enter the configuration menu.
To run the slip test mode:
1 Enable the slip test mode in the configuration menu.
2 Exit the configuration menu.
3 Insert a slip into the slip station.
4 Push the paper feed button. Two code pages will be
printed.
5 To repeat this test, preform steps 3 and 4 again.
To exit the receipt test mode:
1 Enter the configuration menu again. (See
“Configuring the printer”, page 32.)
2 Disable the receipt test mode.
3 Exit the configuration menu.
The printer is on-line and can again communicate
normally with the host computer.
To exit the slip test mode:
1 Enter the configuration menu again. (See
“Configuring the printer”, page 32.)
2 Disable the slip test mode.
3 Exit the configuration menu.
The printer is on-line and can again communicate
normally with the host computer.
Enable or disable MICR test mode
MICR test mode tests the MICR operation. In this mode the MICR reads the characters on a
check, but instead of transmitting the values to the software it prints them out.
MICR test is enabled or disabled by selecting the “Diagnostic Modes” sub-menu of the
configuration menu. See “Configuring the printer”, page 32 for instructions on how to enter
the configuration menu.
To run the MICR test mode:
1 Enable the MICR test mode through the
configuration menu, see page 32. Then exit the
configuration menu.
2 Insert a check into the slip station. (See “Verifying
and validating checks,” page 28.)
3 Once a check is detected by the printer, the platen
closes and the characters are read by the MICR
check reader. The decoded data is printed as
characters on receipt paper. The platen is then
opened, and the test
is re-started.
4 The printed characters should match the characters
on the check. If the MICR check reader misreads a
character, a question mark “?” is printed. If no
characters can be read, “NO MICR CHARACTERS”
is printed.
A760-D100 10/04 189-9200303 Rev. D A760 Two-Color Thermal/Impact Hybrid Printer: User Guide
To exit the MICR test mode:
1 Enter the configuration menu again.
2 Disable the MICR test mode.
3 Exit the configuration menu.
The printer returns to normal mode and can again
communicate with the host computer.
Page 36
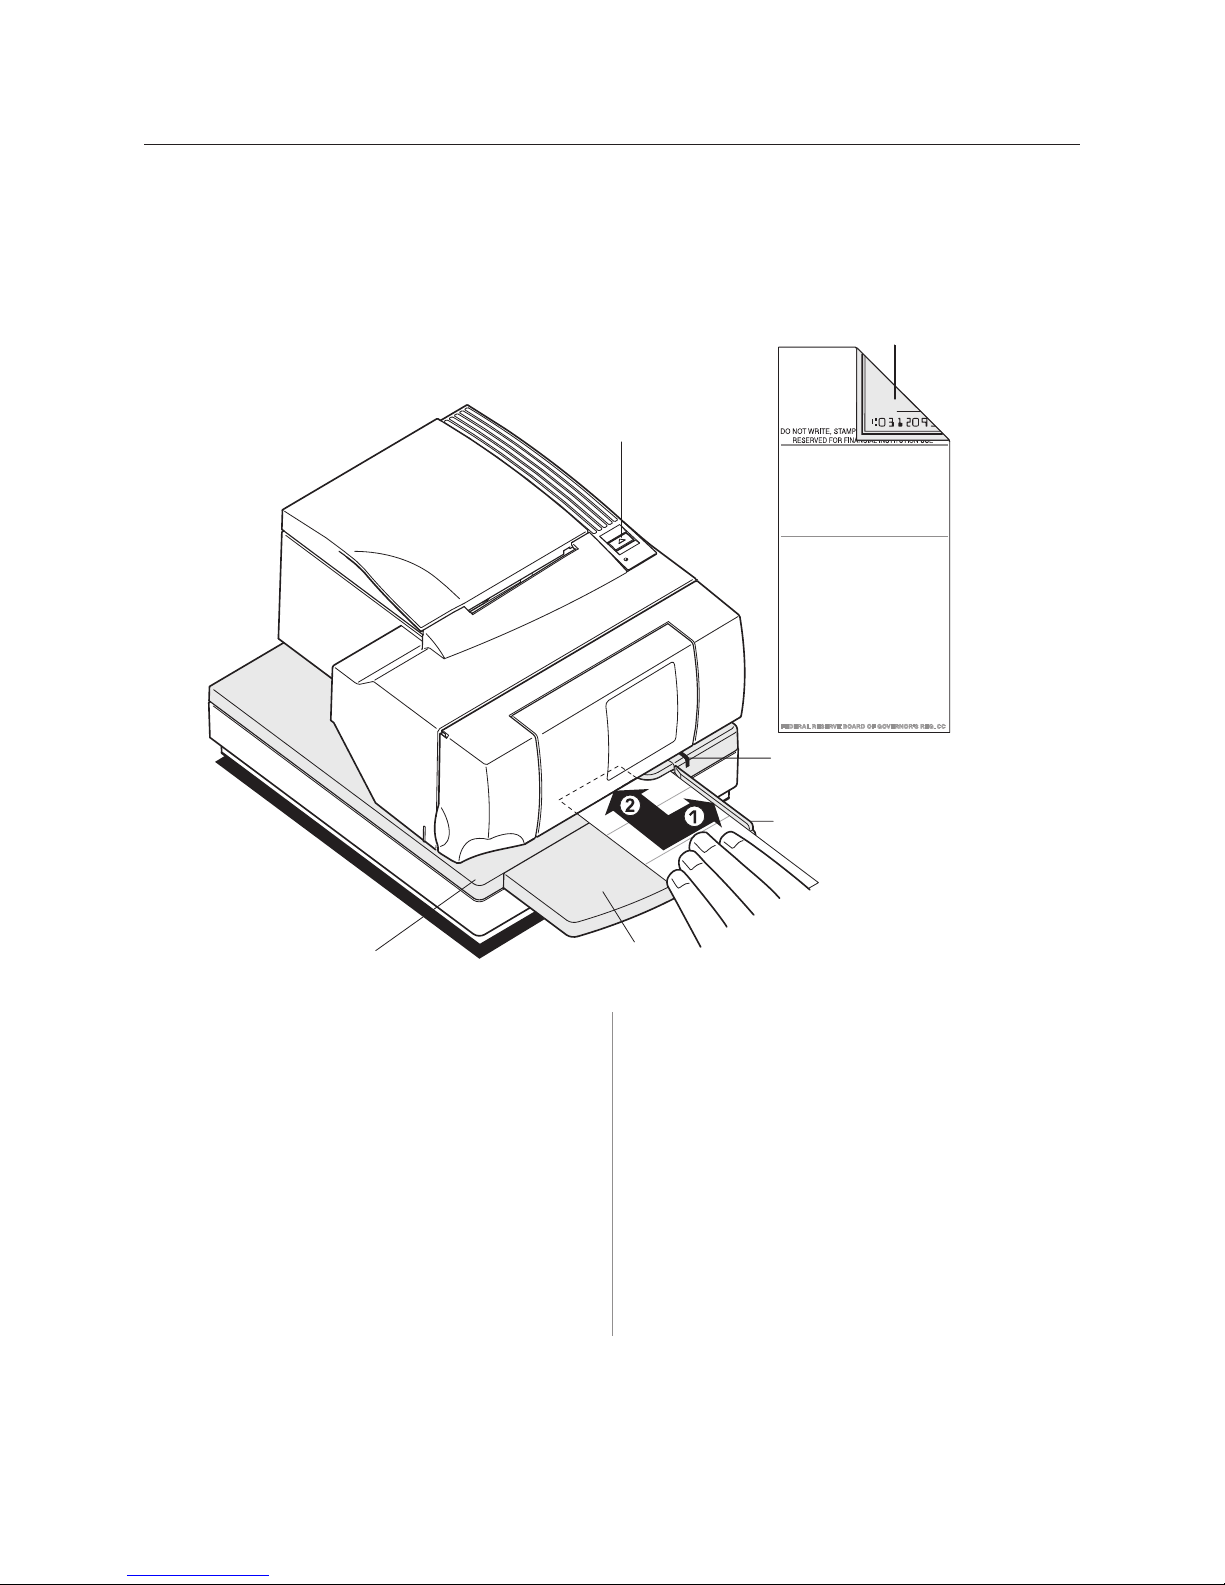
Chapter 4: Using the Printer36
Enable or disable check flip test mode
The check flip test verifies that the check flip mechanism will flip an inserted check only. It
does not read the check. Check flip test is enabled or disabled by selecting the “Diagnostic
Modes” sub-menu of the configuration menu. See “Configuring the printer”, page 32 for
instructions on how to enter the configuration menu.
Check orientation - face down
Do not fold check
ENDORSE HERE
Slip
table
Paper feed
button
AN
R FIN
D FO
E
V
R
ESE
DO NOT WRITE, STAMP OR SIGN BELOW THIS LINE
R
Extended
slip table
MEMO
Green
SE
U
N
STITUTIO
IAL IN
C
slip-in LED
Check
guide
. CC
G
'S RE
R
O
N
VER
O
F G
D O
R
A
O
B
VE
ESER
RAL R
DE
FE
To run the check flip test mode:
1 Enable the check flip test mode.
2 Exit the configuration menu.
3 Insert a check, lengthwise and face down into the
slip station as if validating. (See “Verifying and
validating checks,” page 28.)
Note: You must use a check to conduct the test. The test
will not run if a slip or form is inserted.
4 Push paper feed button.
The check is flipped and returned, but no printing is
performed.
A760 Two-Color Thermal/Impact Hybrid Printer: User Guide 189-9200303 Rev. D A760-D100 10/04
To exit the check flip test mode:
1 Enter the configuration menu and “Diagnostic
Modes”
sub-menu again. (See page 32.)
2 Disable the Check flip test mode.
3 Exit the configuration menu.
The printer is on-line and can again normally
communicate with the host computer.
Page 37

Chapter 4: Using the Printer 37
Setting the printer emulations
Printer emulations determine what commands are available to the printer. To change the
printer emulations settings, select the “Emulations/Software Options” sub-menu of the
main menu and answer “Yes” to “Set the Printer Emulations?” printed on the
receipt. This will take you to the instructions for setting the printer emulation.
Caution: Be extremely careful changing any of the
printer settings to avoid inadvertently changing other
settings that might affect the performance of the printer.
Press the paper feed button as instructed to select the
printer emulation you want.
• A760 native mode
• A758 emulation
• A756 emulation
Note: The A756 and A758 emulations do not recognize
®
the ColorPOS
commands.
Note: Press the paper feed button for at least one
second to validate the selection.
For more information about See this section
Setting the printer emulation “Configuring the printer”,
and print setup page 32 and “Emulation
modes”, page 25 of A760
Programming supplement.
A760-D100 10/04 189-9200303 Rev. D A760 Two-Color Thermal/Impact Hybrid Printer: User Guide
Page 38

Chapter 4: Using the Printer38
Printer settings and functions
To change the printer settings and functions, enter the configuration menu, select the submenu from the main menu and answer the questions printed on the receipt until you come to
the instructions for selecting the printer settings.
Caution: Be extremely careful changing any of the printer settings to avoid inadvertently
changing other settings that might affect the performance of the printer.
Note: If it becomes necessary to clear lasting printer tallies,
please contact an TPG, Inc. representative for instructions.
Press the paper feed button as instructed to select the printer settings you want.
Select the emulation/software options sub-menu to set:
• Printer ID mode
This function is used to determine what printer ID
value is returned in response to a Transmit printer ID
command (1D 49 n) when the printer is in A756
emulation mode. The printer can be configured to
send back the ID of the A760, A758 or A756.
• Default lines per inch
This function allows you to set the default for lines
per inch to either:
8.13 lines per inch
7.52 lines per inch
6.77 lines per inch
6.00 lines per inch
• Carriage return usage
This function allows the printer to ignore or use the
carriage return (hexadecimal 0D) command
depending on the application. Some applications
expect the command to be ignored while others use
the command as a print command.
• Default font
Sets the default font for monochrome, two-color, and
Application Compatible Escape Commands
emulations.
• Font size
Allows user to set font size for the emulation being
used.
• Slip position (MICR printers)
This function is used by manufacturing to align
the carriage.
• Slip eject at receipt select
When enabled the printer ejects the slip when receipt
is selected.
A760 Two-Color Thermal/Impact Hybrid Printer: User Guide 189-9200303 Rev. D A760-D100 10/04
Page 39

Select the hardware options sub-menu to set:
Chapter 4: Using the Printer 39
• Printhead setting
This setting is the printhead energy rating and must
match the rating marked on the the front right of the
thermal mechanism in the printer. Whenever a new
thermal mechanism is installed, this setting must
match the indicated energy rating on the mechanism.
(See A760 Service Guide for replacing the thremal
mechanism.)
• Paper type name
Sets the printer to optimum performance for paper
being used. This can also be done through the
command 1D 81 m n. See Programming Supplement
for command usage or page 32 to enter the
configuration menu.
Available paper types may vary.
Currently these are 4 types:
0 – monochrome, Kanzaki P–310
1 – two-color, Kanzaki P–310RB
4 – two-color, Kanzaki P–320BB
5 – two-color, Kanzaki P–320RB
(See page 48 for available paper manufacturers.)
• Color density
Adjusts printhead energy level to darken color printing
or adjust to paper variations. When the printer prints
high-density color print lines (text or graphics), it
automatically slows down. Factory setting is 100%.
WARNING: Choose an energy level no higher than
necessary to achieve a dark printout. Failure to
observe this rule may result in a printer service call or
voiding the printer warranty. Running at a higher
energy level will reduce the printhead life. Consult
your TPG, Inc. technical support if you have any
questions.
• Power supply wattage (Max power)
You can choose between a 55-watt or 75-watt power
supply. This matches the wattage of the printer to the
power supply.
55-watt power supply (standard)
75-watt power supply (Enables printer to optimize
speed at higher dot coverage.)
• Alternate reset feature
This feature allows you to reset the A760 by opening
and closing the front cover instead of using the dip
switch or reset button.
• Knife option
This should only be changed if the option is added
or removed.
• Paper low sensor
Senses when the paper roll is getting low on paper.
See Troubleshooting section “Receipt paper is low”
page 42.
• MICR option
Allows the user to enable or disable the MICR option
to read checks. This setting should only be changed
if the option is added or removed.
• MICR dual pass option
This feature when enabled allows the printer to
attempt a second reading of the check MICR number,
if the first attempt was unsuccessful.
• Check flip option
Allows the user to enable or disable the check flip
feature. This should only be changed when the
option is added or removed.
• Print density (monochrome papers only)
Adjusts printhead energy level to darken printout or
adjust for paper variations. When the printer prints
high-density color print lines (text or graphics), it
automatically slows down. Factory setting is 100%.
WARNING: Choose a print density setting no higher
than necessary to achieve acceptable print density.
Failure to observe this rule may result in a printer
service call and may void the printer warranty.
Running at a higher energy level will reduce the
printhead life. Consult your TPG, Inc. technical
support specialist if you have questions.
A760-D100 10/04 189-9200303 Rev. D A760 Two-Color Thermal/Impact Hybrid Printer: User Guide
For more information about See this section
Setting the printer functions “Configuring the printer”
and settings (See page 32.)
Page 40

Chapter 4: Using the Printer40
Preventing overheating of the printhead
There are restrictions on the duty cycle because of the heat generated by the thermal
printhead when printing solid blocks (regardless of the length of the block in relation to the
print line).
The restrictions are ambient temperature, the percentage of time (measured against one minute)
of continuous solid printing, and the amount of coverage.
Keep in mind that the ambient temperature may be affected by factors such as direct exposure
to sun or close proximity to heating elements.
Caution: When the duty cycle exceeds the limits shown
in the table, the receipt printhead will heat up and
shut down. This may damage the printhead.
Allowable duty cycle (measured over one minute of continuous printing)
Amount of solid coverage Ambient temperature
25°C 35° C 50° C
20% 100% 50% 20%
40% 50% 25% 10%
To avoid this problem, do one or a combination of the
following:
1 Reduce the amount of coverage.
2 Reduce the time of continuous solid printing.
3 Reduce the ambient temperature.
Duty cycle
Percentage of time that the specified
“Amount of solid coverage” can be printed
during a one minute period of time.
100% 20% 10% 4%
For reference:
• A typical receipt with text (contains some blank
spaces) is approximately 12% dot coverage.
• A full line of text characters (every cell on the line has
a character in it) is approximately 25% dot coverage.
• Graphics are approximately 40% dot coverage.
• Barcodes are approximately 50% dot coverage.
• A solid black line is 100% dot coverage.
Example: at 20% solid coverage,
35° C temperature, a 50% duty
cycle is to be used, resulting in
30 seconds of printing and
30 seconds without printing.
A760 Two-Color Thermal/Impact Hybrid Printer: User Guide 189-9200303 Rev. D A760-D100 10/04
Page 41

Chapter 4: Using the Printer 41
Troubleshooting the printer
The A760 ColorPOS® printer is a simple, generally trouble-free printer, however unexpected
conditions my arise. For example, the power supply may be disconnected or the thermal
printhead may overheat.
The on-line, paper status, error LED on the operator
panel may signal that something is wrong. The light on
the front right side of the printer is used only to indicate
when a form is inserted properly. It does not indicate an
error.
For some unexpected conditions, the printer
communicates the information to the host computer and
relies on the application to indicate what the condition
is.
The information on the following pages describes some
conditions that you may encounter: conditions that you
can easily fix, and others that you will need to contact a
service representative for.
You may be able to correct many of the conditions
without calling for service. However, if a condition
persists, contact a service representative. See
“Contacting a service representative” at the end of this
chapter.
If an unexpected condition has occurred, take the
following general steps:
1 Cycle the power of the printer and note its behavior.
2 Check the on-line, paper status, error LED and
compare its behavior to the following table.
Status LED behavior
Power off Off
Firmware download Fast blink
Level 0 diagnostics Fast blink
(entered at power on or in reset)
Paper low Slow blink
Temperature error
Voltage error
Cover open (receipt, slip or flip) Fast blink
Paper out
Carriage jam
Slip jam
Flip jam
Knife jam
All other states On
3 Test the receipt printer or slip printer by printing a
sample test print as described elsewhere in this
document.
4 Determine if the condition is with the thermal receipt
printer or the impact slip printer and refer to the
tables on the following pages.
If unexpected conditions arise while installing the USB
driver, take a look in Appendix A: USB Driver
Installation, “Installation troubleshooting” on page 62.
A760-D100 10/04 189-9200303 Rev. D A760 Two-Color Thermal/Impact Hybrid Printer: User Guide
Page 42

Chapter 4: Using the Printer42
Printer beeps
Condition Possible causes What to do
Printer beeps in a single, double, or triple The printer has a problem with its Contact a service representative.
pattern at first power on, the on-line, electronics.
paper status, error LED blinks in the
same pattern, and the printer won’t
power up.
Printer beeps during normal operation. The printer may be programmed to Consult your application software
manual.
beep during normal operation by
the software application used on
the host computer.
Printer will not print
Condition Possible causes What to do
The on-line, paper status, error LED is The receipt paper may be out, the Check that the receipt paper is properly
blinking and the printer won’t print. cover open, the knife jammed, the loaded and covers are closed.
supply voltage out of range, or the See the table at the beginning of this
printhead temperature out of range. section. For problems not user correctable,
contact a service representative.
Printer doesn’t have power (LED not on) Power supply may be defective. If the power supply is plugged in, but does
not come on, you will need to order a new
power supply. See “Power supply and
power cords ” page 50.
Printer has power but doesn’t print. Cables may not be connected Check all cable connections. Check that
properly. the host computer and power supply are
both on (the power supply is turned on
by plugging it into an outlet).
See “Connect the cables” page 21.
DIP switches not set correctly. Check the switch setting. DIP switch one
should be off (down) for normal operation.
All other causes. Contact a service representative.
A760 Two-Color Thermal/Impact Hybrid Printer: User Guide 189-9200303 Rev. D A760-D100 10/04
Page 43

Chapter 4: Using the Printer 43
On-line, paper status, error LED flashes
Condition Possible causes What to do
On-line, paper status, error LED Receipt paper is out. Change the Receipt paper is out. Change the paper
is blinking. paper now. Do not run a transaction immediately.
without paper. Data may be lost. See “Load and change the receipt paper”
page 18.
Receipt, front or flip cover is open. Close the cover. The printer will not
operate with any of the covers open.
The knife is jammed. Open the receipt cover and check the
knife. Clear any jammed paper you can see.
Tear off any excess paper against the
tear-off blade.
The slip is jammed. Open the front cover and clear paper
from path.
The carriage is jammed. Open front cover and clear paper
from path.
A jam during flip. If visible through front window, open
access door and clear paper jam, if not,
open front cover and clear jam.
Receipt paper is low. There are about 4.5 meters, ± 3 meters,
(15 feet, ± 10 feet) of paper left. Change
the paper soon to avoid running out of
paper part way through a transaction.
See “Load and change the receipt
paper” page 18.
AC supply voltage is out of range. If paper is not low and no conditions
indicate that the thermal printhead is too
hot, the power supply voltage is out of
range. Contact a service representative.
Thermal printhead temperature is The printhead may overheat when
out of range. printing in a room where the temperature
is above the recommended operating
temperature or when printing high density
graphics continuously, regardless of the
room temperature. In either case, the
printer will shut off. If the temperature of
the printhead is too hot, adjust the room
temperature or move the printer to a
cooler location. If the printhead is
overheating because of printing high
density graphics continuously, reduce
the demand on the printer.
Slip-in LED does not light (rectangular green LED on slip table)
Condition Possible causes What to do
LED does not light No check or form inserted into printer.
Check or form incorrectly inserted. Ensure the check or form is aligned
against the check guide.
See “Printing on forms or checks” page 27.
A760-D100 10/04 189-9200303 Rev. D A760 Two-Color Thermal/Impact Hybrid Printer: User Guide
Page 44

Chapter 4: Using the Printer44
Poor forms print quality
Condition Possible causes What to do
Printer starts to print, but stops while Communication error or Check the interface cable. Check that the
the form is being printed. software error. software is working properly.
Forms print is light or spotty. Form not inserted incorrectly. See “Printing on forms or checks” page 27.
Impact printhead is dirty or defective. Contact a service representative.
Improper internal cable connections. Contact a service representative.
Ribbon cassette is defective See “Installing or replacing the ribbon
cassette” page 19.
Ribbon cassette is worn. Replace the ribbon cassette. See “Installing or replacing the ribbon
cassette” page 19.
Light print, smudging, or slip skews. Platen gap needs adjustment. Contact a service representative.
Poor receipt print quality
Condition Possible causes What to do
Colored stripe on receipt. Paper is low. Change the paper.
Receipt does not come out all the way. Paper is jammed. Open the receipt cover, inspect the knife,
and clear any jammed paper.
Printer starts to print, but stops Paper is jammed. Open the receipt cover, inspect the knife,
while the receipt is being printed. and clear any jammed paper.
Print is light or spotty. Paper roll loaded incorrectly. Check that the paper is loaded properly.
Thermal printhead is dirty. Use recommended thermal receipt paper.
Clean the thermal printhead with an
alcohol pen prior to going back to an
approved paper. Do not spray the thermal
printhead with household cleaner as this
may damage it and the electronics. The
thermal printhead does not normally
require cleaning if the recommended
paper grades are used.
If non-recommended paper has been used
for an extended period of time, cleaning
the printhead with an alcohol pen will not
be of much benefit.
Improper internal cable connections. Contact a service representative.
continued…
A760 Two-Color Thermal/Impact Hybrid Printer: User Guide 189-9200303 Rev. D A760-D100 10/04
Printhead is defective. Contact a service representative.
Page 45

Chapter 4: Using the Printer 45
Poor receipt print quality
Condition Possible causes What to do
Color print is light. Variations in paper. Increase energy level of printhead in
“Color Density Adj” of the printer
configuration menu
(see “Configuring the printer” page 32
and the Programming Supplement).
Inconsistant printing, Paper type used and Print diagnostic form and verify
no two-color print. paper type setting do paper type setting to type 0, 1, 4, or 5
not match (see “Configuring the printer” page 32,
paper type on page 48, and the
Programming Supplement).
Vertical column of print is missing, Printhead is defective. Contact a service representative.
one side of receipt is missing, or
top or bottom half of characters
are missing.
Print cassette ribbon jams when Improper ribbon cassette. An Replace cassette with a cassette approved
check flip option is used. approved TPG, Inc. cassette must for the check flip option.
be used with the check flip option.
Slip station, MICR and flip problems
Condition Possible causes What to do
Slip table LED does not come on. Form or check not inserted properly. Line up the form or check against the
check guide (wall) and slide it toward the
back of the printer until it contacts the
form stop and can’t go any further. Extra
long forms may need to be inserted from
the side to disengage the Form Stop.
See “Printing on forms or checks” page 27
or “Verifying and validating checks”
page 28.
Forms or checks skew or There is an obstruction or paper jam Open the front cover and check for any
catch in the slip station. in the slip station. paper jams or obvious obstruction in the
slip station. Clear the obstruction or
jammed paper.
The optional check flip There is an obstruction or paper jam See “Clearing check flip paper jams”
mechanism doesn’t work. in the check flip mechanism. page 29.
continued…
A760-D100 10/04 189-9200303 Rev. D A760 Two-Color Thermal/Impact Hybrid Printer: User Guide
Page 46

Chapter 4: Using the Printer46
Slip station, MICR and check flip problems
Condition Possible causes What to do
The optional MICR (Magnetic Ink The check is inserted improperly. Make sure the check is inserted properly
Character Recognition) check reader with the MICR characters down. See
does not read or misreads checks. “Verifying and validating checks” page 28.
The check is fraudulent. Make sure that the check is not
fraudulent.
On fraudulent checks, the characters the
printer reads may be different from those
that are visible on the check face.
A nearby magnetic source is Devices, such as CRT monitors, security
interfering with the check reader. devices or large metal surfaces that are
near the printer can affect the printer’s
magnetic field, causing intermittent
reading errors when the MICR check
reader is in operation. Move the printer
away from such items or areas.
Print cassette ribbon jams when Improper ribbon cassette. Approved Replace ribbon cassette with a cassette
check flip options is used. TPG, Inc. cassette must be used with approved for the check flip option.
the check flip option.
Knife does not operate
Condition Possible causes What to do
Receipt is not cut. Paper is jammed. Open the receipt cover, inspect the knife,
and clear any jammed paper.
The printer has a knife but the Enable the knife option by reconfiguring
firmware is not configured for a knife. the printer. See “Configuring the printer”
page 32.
All other problems. Contact a service representative.
Other conditions
The following problems all need to be corrected by a qualified service representative.
See the next section, “Contacting a service representative.”
• MICR check reader not operating properly
• Forms not feeding into the slip/forms area properly
• Missing dots in slip or forms printing
• Printer will not cycle or stop when required
• Illegible characters
• Paper will not feed
• Knife will not cycle or cut
• Platen will not open or close
• Printer will not communicate with the host computer
Contacting a service representative
For serious problems, such as the printer not printing, not communicating with the host
computer, or not turning on, contact TPG, Inc. technical support at 1(877) 209-0156.
For self-maintenance organizations, a service guide, service video (when available), and other
service documents, can be obtained from TPG, Inc.
A760 Two-Color Thermal/Impact Hybrid Printer: User Guide 189-9200303 Rev. D A760-D100 10/04
Page 47
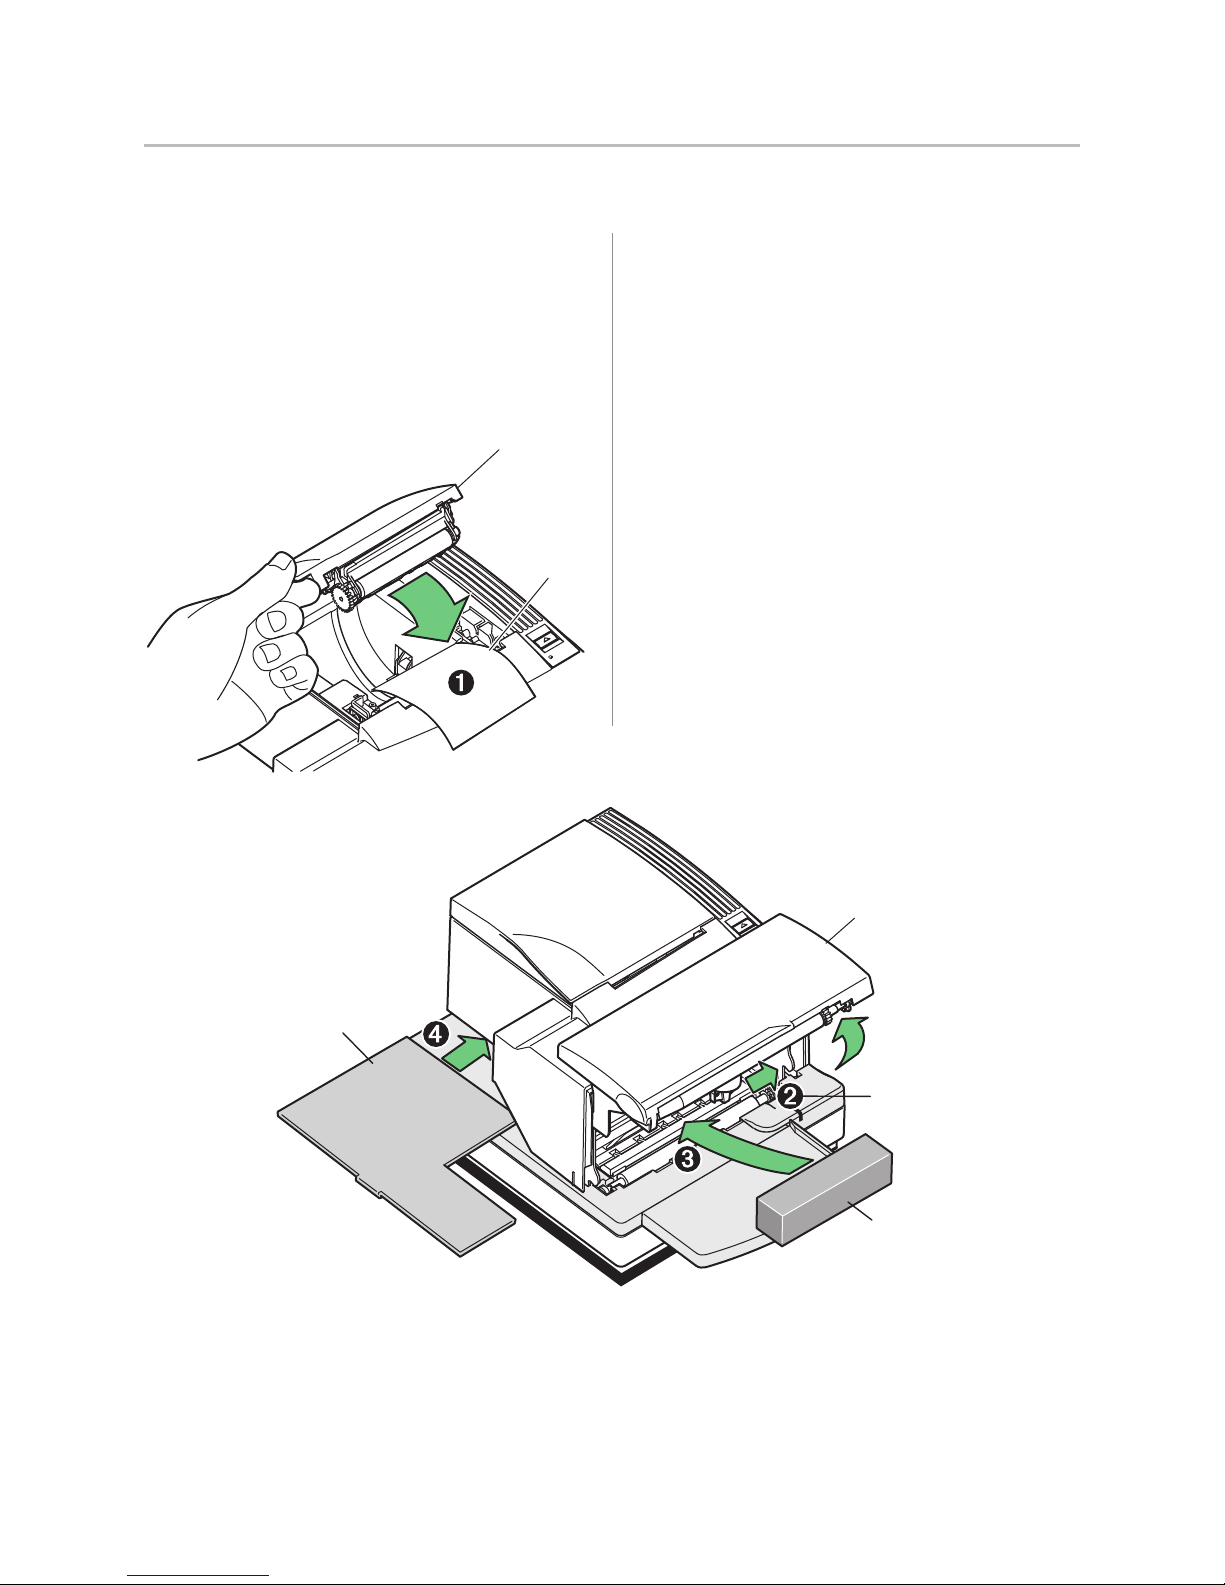
Returning a printer
Follow these instructions if you need to return a printer for servicing.
Chapter 4: Using the Printer 47
1 If you are sending the printer to TPG, Inc. for repair,
call TPG, Inc. for a Return Material Authorization
number (RMA#) at 1(877) 209-0156 in USA or email:
[email protected], or go to the TPG, Inc.
Web site at http://www.TPGprinters.com. Be prepared
to answer questions concerning shipping and billing.
Request an RMA process be sent to you, if required.
2 Pack the printer as follows:
Receipt
cover
Receipt
paper
a Place receipt paper between the receipt cover and
the printhead for protection (1).
b Remove the ribbon cassette, move the carriage to
the right (2), and place the foam restraint between
the left side of the printer and the carriage to protect
the carriage (3).
c Place the cardboard support on the slip table (4).
d Place the printer in the plastic bag and foam pack,
place the packed printer in the box and secure the
box with packing tape.
3 Write the RMA# on the outside of the box and send the
printer to the following address, according to the RMA
process:
TPG, Inc.
950 Danby Road
Ithaca, NY 14850
U.S.A.
RMA # 907456 (sample number for example only)
Cardboard
support
Front
cover
Remove ribbon cassette,
move carriage to the right
Foam
restraint
A760-D100 10/04 189-9200303 Rev. D A760 Two-Color Thermal/Impact Hybrid Printer: User Guide
Page 48

Chapter 5: Paper and Supplies48
Chapter 5: Paper and supplies
Ordering from TPG, Inc.
Printer parts, accessories, and small quantities of paper can be ordered directly from TPG, Inc.
While the TPG, Inc. part numbers are listed here for your convenience, keep in mind that these
numbers may change before this guide is outdated. To place an order or get more non-technical
information, call your TPG, Inc. representative or the sales line at (800) 732-8950.
TPG, Inc. is able to provide paper in small lots to facilitate product evaluation and testing.
Contact your TPG, Inc. representative for more information on ordering.
Ordering thermal paper
Thermal paper specifications
The printer requires qualified thermal paper with the following dimensions:
Width Diameter Length
80 ± 0.2 mm (3.15 ± 0.02") 90 mm max. (3.54") 98 meters (322 ') 2.4 mil thick
The paper must not be attached at the core. Use paper
with a colored stripe at the end to indicate that the paper
is running low.
The above lengths are based on a core diameter of
22 ± 0.5 mm (0.87") outside, 11.5 ± 0.5 mm (0.45") inside.
Manufacturers
Contact the converter of your choice to order paper.
TPG, Inc. recommends the following paper grades
produced by their respective manufacturers. There are a
number of paper converters qualified to provide this
paper, provided the POS rolls are from these
recommended grades.
Note: When changing paper type, you will need to set
the printer to that paper type by sending the “Set
Monochrome (black ink) paper:
Qualified manufacturers Phone Paper grade (density)
Appleton Papers, Inc. (USA) Voice: (800)922–1729 Optima T1030 (Light)
825 E. Wisconsin Ave. Fax: (800)922–1712 Optima T1012A (Standard)
Appleton, WI 54912 Optima POS-Plus (Light)
paper type” command (1D 81 m n) or by changing the
paper type setting in the configuration menu. (See
Programming Supplement or page 32 to enter the
configuration menu.)
Caution: Use of other (non-TPG tested/approved)
papers may result in excessive print head
contamination, light print, missing print, and/or void
the printer warranty.
Optima T2162 (Light)
Optima Superior (Standard)
Kanzaki Specialty Papers (USA) Voice: (888)526–9254 P–300 (Light)
20 Cummings St. Fax: (413)731–8864 P–310 (Standard)
Ware, MA 01082–2002 P–350 (Standard)
A760 Two-Color Thermal/Impact Hybrid Printer: User Guide 189-9200303 Rev. D A760-D100 10/04
P–354 (Standard)
P–390 (Standard)
TO–260 (Standard)
TO–381L (Standard)
Page 49

Chapter 5: Paper and Supplies 49
Jujo Thermal LTD. Voice: (358)2–8393–2900 AF50KS–E3 (Standard)
P.O. Box 92 FIN–27501 Fax: (358)2–3893–2419 AP62KS–E3 (Standard)
Kauttua, Finland
Mitsubishi Int’l Corp (USA) Voice: (212)605–2000 P–5035 (Light)
520 Madison Ave. Fax: (212)605–2597 T–8051 (Standard)
New York, New York 10022-4223 TP–8065 (Standard)
OJI Paper Company Ltd. Voice: (81)3–5550–3076 KF–60 (Standard)
5–12–8 Ginza Chuo-ku Fax: (81)3–5550–2950 PD–170R (Light)
Tokyo 104, Japan PD–160R (Standard)
Two-color paper:
Qualified manufacturers Phone Paper grade (density)
Kanzaki Specialty Papers (USA) Voice: (888)526–9254 P–310 RB (Red and Black)
20 Cummings St. Fax: (413)731–8864 P–320 RB (Red and Black)
Ware, MA 01082–2002 P–320 BB (Blue and Black)
Ordering paper from TPG, Inc.
TPG, Inc. can provide paper in small lots to facilitate product
evaluation and testing.
To order monochrome paper rolls directly from TPG, Inc., use the
following part numbers:
Standard density 50 Rolls, 90 mm dia. TPG, Inc. #A152–0034
Light density 50 Rolls, 90 mm dia. TPG, Inc. #A152–0035
Ordering miscellaneous supplies
Cash drawers
Order cash drawers from the following suppliers:
Cash drawers Number
NCR 7052–K657
M-S Cash Drawer Corp. EP–125 K seriesTM, EP–127, EP–102
TM
TM
APG Cash Drawer Model 322
Indiana Cash Drawer Model SLD
A760-D100 10/04 189-9200303 Rev. D A760 Two-Color Thermal/Impact Hybrid Printer: User Guide
TM
TM
Page 50

Chapter 5: Paper and Supplies50
Power supply and power cords
Other suppliers may use different part numbers.
Item Type Number
55-watt power supply with attached A760–K330
cable to printer and U.S. power
supply cord
75-watt power supply with attached A760–K331
cable to the printer and U.S. power
supply cord
55-watt power supply, attached cable A760–K301
75-watt power supply, attached cable A760–K302
Power supply cord (to outlet) United States A760–K320
International (no plug) A760–K321
United Kingdom A760–K322
S.E.V. A760–K323
Australia A760–K324
International (with plug) A795–K326
6-pin female to 3-pin male power adapter A760–K303
3-pin female to 6-pin male power adapter A760–K304
Power supply mounting bracket A760–K309
Communication cables
Other suppliers may use different part numbers.
Communication cables Length Order number
RS-232C 25-pin male (printer) (2 meters–6.6') A141–0005
to 9 pin female (host)
RS-232C 25-pin male (printer) (6 meters–19.7') A141–0006
to 9 pin female (host)
RS-232C 25-pin female (host) (3 meters–9.8') A141–0008
to 9-pin female (printer)
RS-232C 9-pin female (ferrite-host) (3 meters–9.8') A141–0007
to 9-pin female (printer)
USB Not available*
IEEE 1284 parallel Not available
Ethernet Not available
* Obtain a standard USB cable 3 meters (9.8') in length from any supplier.
A760 Two-Color Thermal/Impact Hybrid Printer: User Guide 189-9200303 Rev. D A760-D100 10/04
Page 51
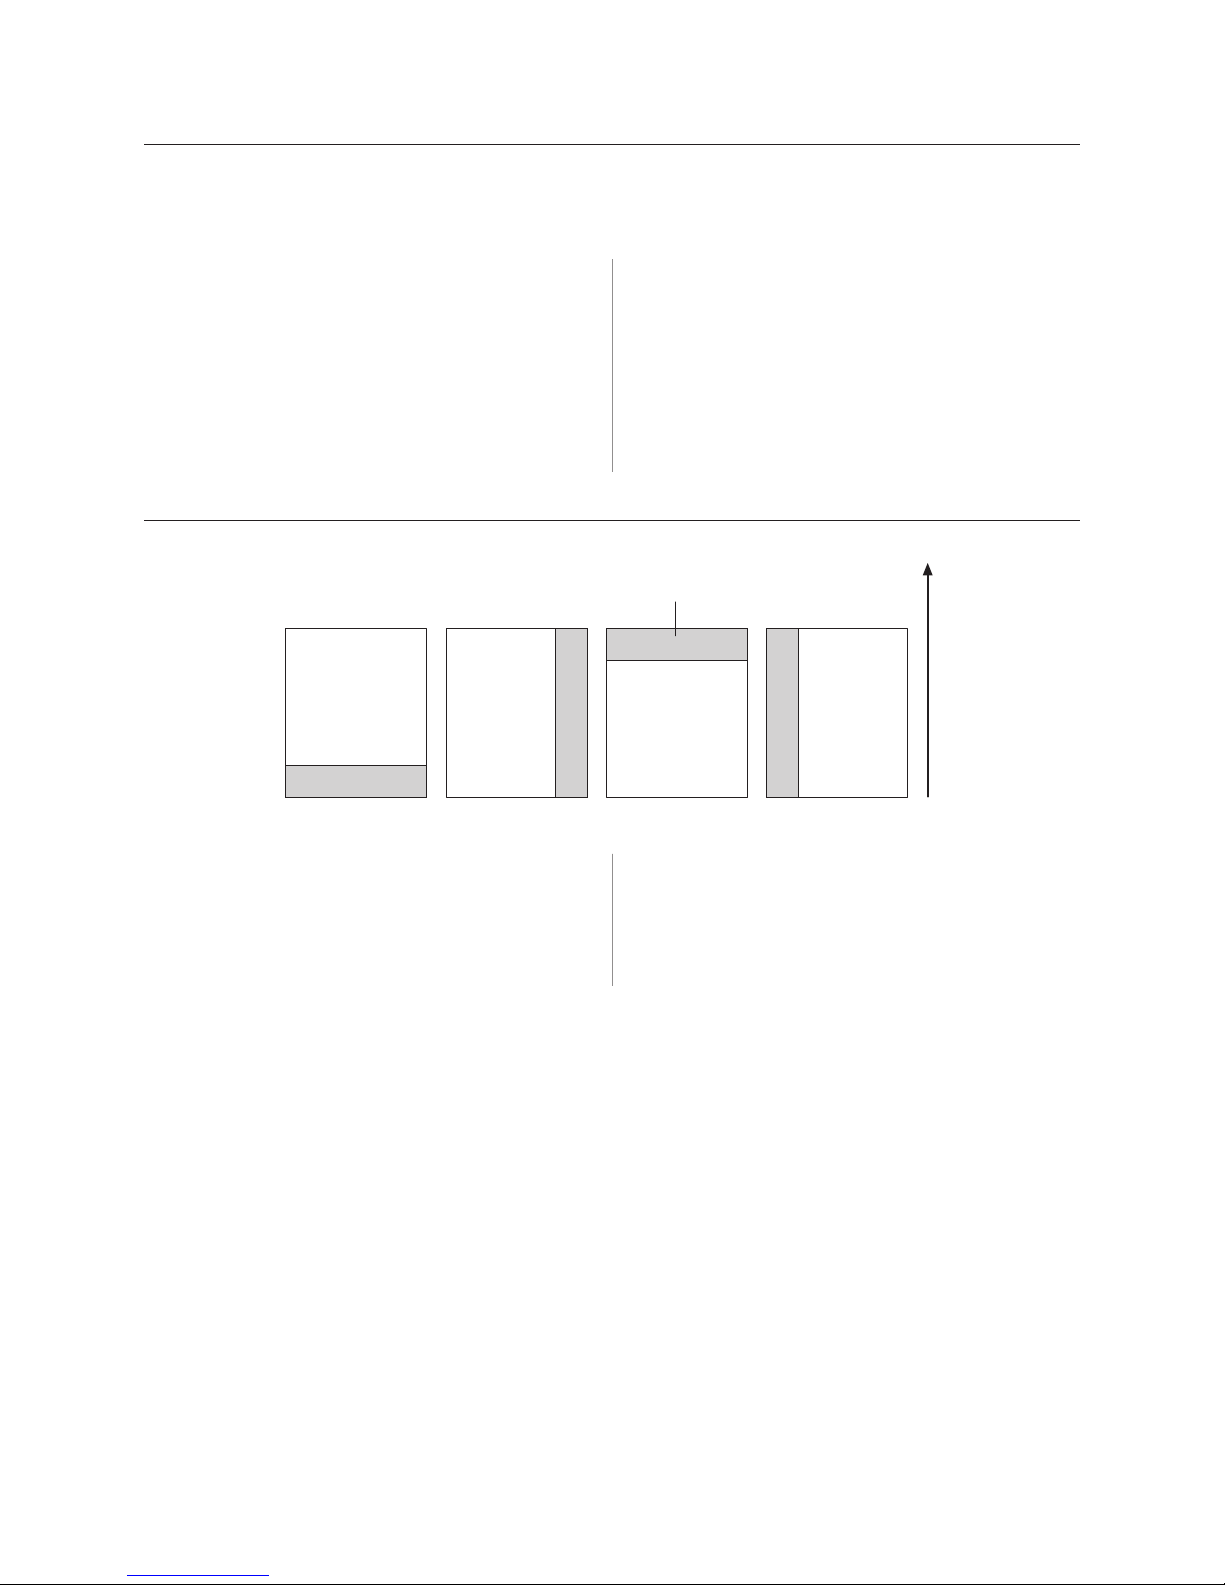
Chapter 5: Paper and Supplies 51
Forms specifications
The A760 prints on single- or multiple-part forms in the slip station (up to five-part forms).
Forms and slips must meet the following requirements:
• Front insertion (minimum):
51 mm (2.00") wide
68 mm (2.68") long
• Side insertion (minimum):
203 mm (8.0") wide
51 mm (2.0") long
• Single-ply forms should be on paper that is greater
than 15 pounds
Slip forms - recommendations
1
2
• Multiple-part forms (up to five parts) should be no
thicker than 0.40 mm (0.016") and a minimum
thickness of 0.08 mm (0.003").
Important: Do not use forms containing holes along
the top or right edge.
• Forms for use with flip check (minimum)
51 mm (2.00") wide
70 mm (2.75") long
Glued portion
23
Paper feed direction
• The slip form should be flat and void of curls or
wrinkles, especially at the top.
• Considerations for glued edges on slip paper:
a No glue on bottom edge (1).
b Right or top edge (2): Paper feeding and insertion
are affected by gluing method, length of edge, and
quality of glue used.
c Left edge or wide slip paper (3): Skewing may
occur.
A760-D100 10/04 189-9200303 Rev. D A760 Two-Color Thermal/Impact Hybrid Printer: User Guide
Page 52
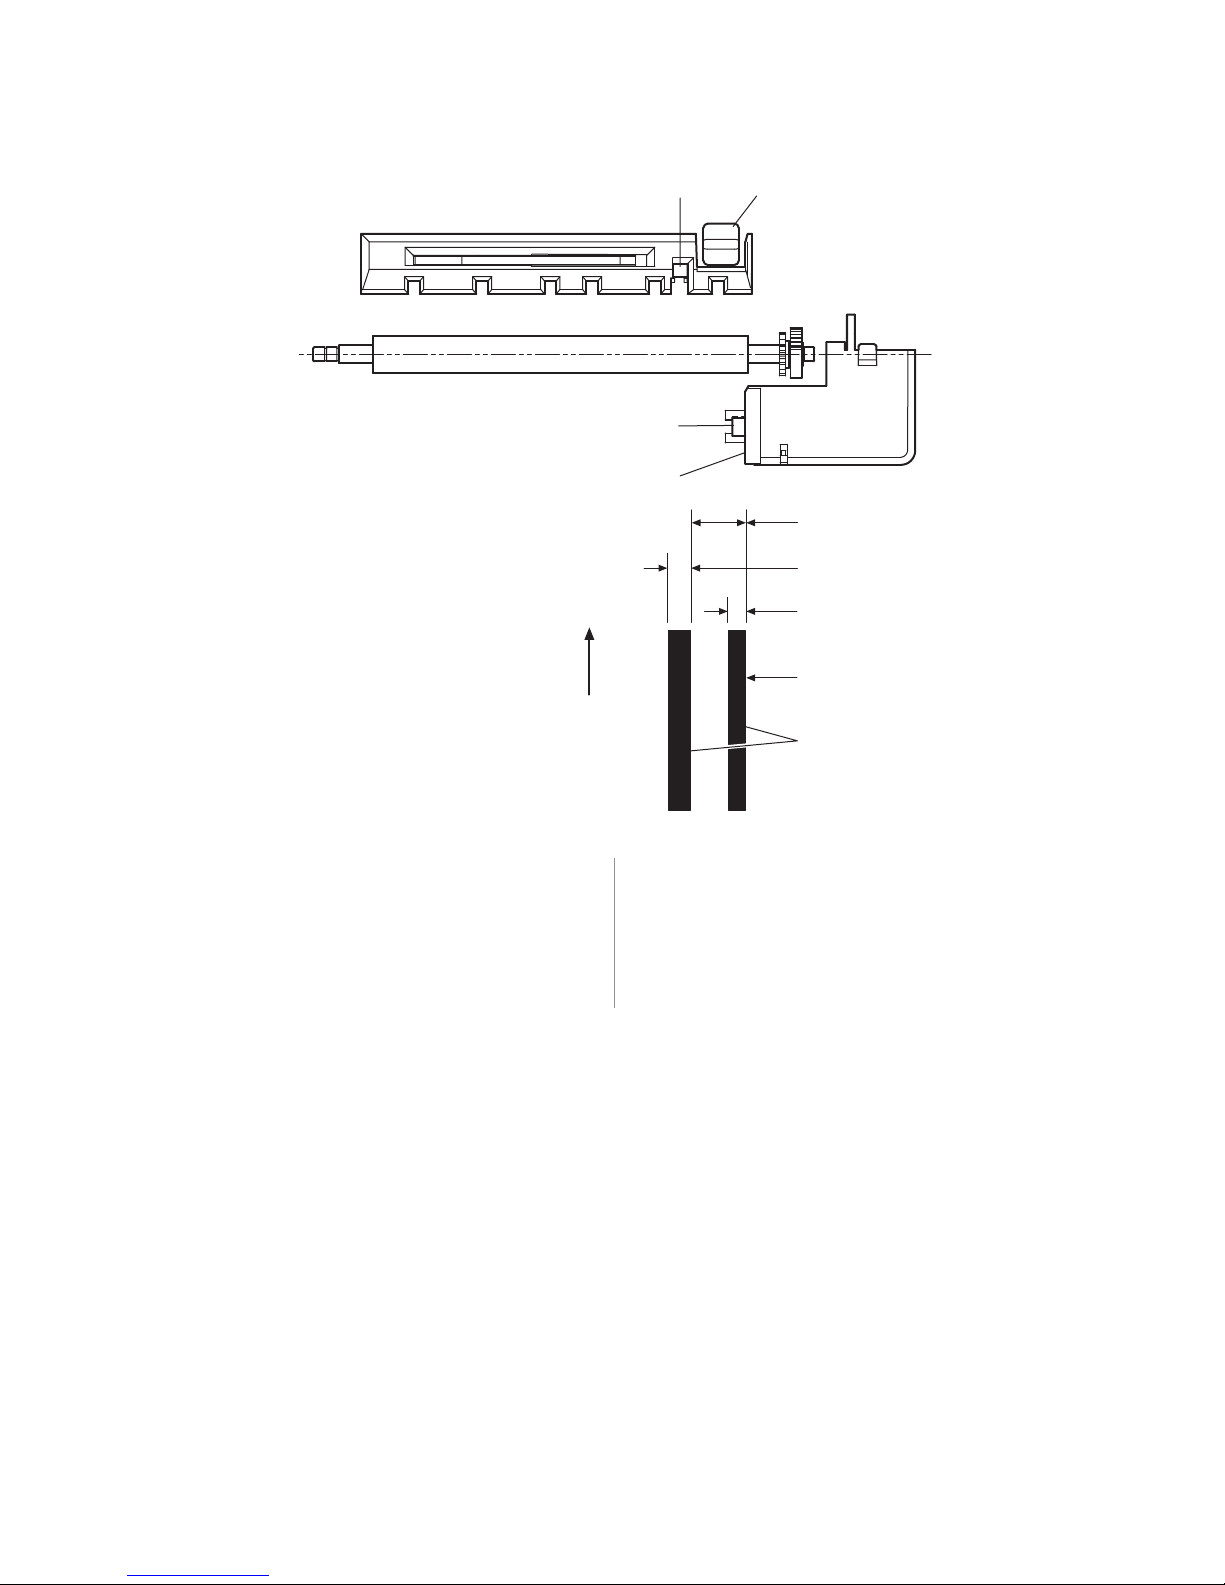
Chapter 5: Paper and Supplies52
Slip/LED
Paper feed
direction
sensor
Slip side
guide
Slip
sensor
MICR
head
19 mm
(0.747)
8 mm
(0.315)
6 mm
(0.236)
Slip
edge
Paper holes and
low reflection
prohibited areas
The Slip/LED sensors use a reflective photo sensor.
• Do not use paper that has holes or is translucent at
the Slip/LED sensor location. (See “A” in above
illustration.)
B
A
• Do not use paper that has holes on dark areas with
low reflection (less than 60% reflection) at the slip
sensor location. (See “B” in above illustration.)
• Thin paper should be used between the top and
bottom sheets of multi-ply paper. Thick paper
reduces the copy capability.
A760 Two-Color Thermal/Impact Hybrid Printer: User Guide 189-9200303 Rev. D A760-D100 10/04
Page 53

Check specifications
Chapter 5: Paper and Supplies 53
Check specifications for paper are defined by American
Standards ANSI X9.13 and ANSI X9.18, and
International Standard ISO 1004.
• Minimum check size: 70 mm (2.75") wide x 152 mm
(6.00") long
• Maximum check size: 95 mm (3.75") wide x 222 mm
(8.75") long
MICR reader – additional information
• The check must be flat and void of curls, folds, or
wrinkles (especially at the edges). Wrinkled checks
may rub against the ribbon causing them to become
ink-stained.
• Checks must be void of clips or staples. Paper jams,
MICR read errors, and/or MICR head damage could
occur.
• Immediately release the check once the printer starts
to feed it. Failure to release the check could skew it,
causing paper jams and MICR read errors.
Ordering ribbon cassettes
To order ribbon cassettes, contact your sales
representative or order from TPG, Inc. at the following
address or toll free number:
Stock numbers: A152–0004 (purple ribbon cassette—3 million character life) – Qty. 12
TPG, Inc.
950 Danby Road
Ithaca, NY 14850
Voice: 1(800)377–2750
A152–0005 (black ribbon cassette—3 million character life) – Qty. 12
A152–0011 (purple long life ribbon cassette—5 million character life) – Qty. 12
A152–0012 (black long life ribbon cassette—5 million character life) – Qty. 12
Ordering extended slip tables
Contact a sales representative to order slip tables. The
numbers listed below are for reference only. Suppliers
may use other numbers.
• Extended slip table (standard) A760–K280
• Extended slip table (short) A760–K281
Documentation and LogoEZ® utility
Contact a sales representative to order the following:
A760 ColorPOS® User Guide* A760–D100
A760 ColorPOS® User Guide Programming Supplement* A760–D100 PS
A760 ColorPOS® Service Guide A760–D200
(TPG, Inc. certified service technicians only)
A760 ColorPOS® Setup Guide* A760–D110
TPG, Inc. LogoEZ® colorization utility*
* Downloadable from TPG, Inc. Web site http://www.TPGprinters.com (documentation provided in .pdf format)
A760-D100 10/04 189-9200303 Rev. D A760 Two-Color Thermal/Impact Hybrid Printer: User Guide
Page 54

Chapter 5: Paper and Supplies54
This page intentionally left blank.
A760 Two-Color Thermal/Impact Hybrid Printer: User Guide 189-9200303 Rev. D A760-D100 10/04
Page 55

Appendix A: USB Driver Installation 55
Appendix A:
USB Driver Installation
USB and the host system
TPG, Inc. provides two USB solutions. If your application is designed to talk to the
printer as an RS-232C device, we offer an RS-232C Emulation USB Driver. If your
application is capable of talking to a USB device, we offer two Native USB Drivers;
an TPG, Inc. vendor class and a Printer class. The RS-232C Emulation USB driver
is compatible with PCs that run Windows 95 (OSR 2.1 and up), 98, Me, NT (SP 3 and
higher), 2000, or XP operating systems. The native USB driver is compatible with
PCs that run Windows 98, Me, 2000, or XP operating systems.
To install the USB driver, the host computer must be equipped with a USB port. If it
is not, you will need to install a USB interface card. Windows 95 (OSR 2.1 and up),
98, Me, 2000, and XP operating systems provide native support for USB, while the
Windows NT operating system does not, so there will be extra steps to install the
RS-232C Emulation USB driver on this operating system. Follow the instructions
that come with the driver.
Checking for USB support on the host computer
Make sure that the host computer is equipped with a USB port by checking the back of the
computer. If the computer does not have USB hardware, install a third-party USB card.
Windows 95/98/Me/2000/XP
1 If you have Windows 95, the operating system
version should read 4.00.950.B. (Right click on the
“My Computer” icon on the desktop, and choose
Properties from the pop-up menu. The version will
be listed on the General tabbed page of the System
Properties dialog.) If your system is not current, you
will need to upgrade to Windows 95 (OSR 2.1 and
up), 98, or Me, before proceeding.
2 Open the Control Panel.
3 Double click on System.
Windows NT
The Windows NT operating system does not provide native support for USB devices.
You must install the TPG, Inc. RS-232C Emulation USB driver to support USB hardware
on your PC.
4 Click the Device Manager tab.
5 In the Device Manager window, scroll down the list
of installed hardware devices until you find an entry
that reads Universal serial bus controller.
If this entry exists, the host computer is set up for USB
operation. If this entry does not appear, consult your
computer documentation to see if USB must be enabled
in the BIOS set-up.
A760-D100 10/04 189-9200303 Rev. D A760 Two-Color Thermal/Impact Hybrid Printer: User Guide
Page 56

Appendix A: USB Driver Installation56
The native USB solutions
The TPG, Inc. native USB solutions provide USB connectivity for applications that can talk
directly to a USB port. This solution is comprised of two distinct versions: an TPG, Inc.
vendor class USB and a USB Printer Class.
TPG, Inc. vendor class USB version
The TPG, Inc. vendor class USB solution provides a
vendor-specific class USB interface. This solution
works on the Windows 98, Me, 2000, and XP operating
systems and requires an TPG, Inc. printer capable of
being configured as an TPG, Inc. USB device.
USB printer class version
This solution is best for use with applications that can
communcate with a device through a vendor-specific
USB interface.
The USB printer class solution provides a standard USB
interface that is supported by many operating systems.
Drivers to support this USB interface are available for
download and installation using the following
instructions, but may not be required.
This solution works on the Windows 98, Me, 2000, and
XP operating systems, and requires an TPG, Inc. printer
capable of being configured as a USB printer class
device. This solution is best for customers who want to
use Windows printer drivers.
Installing native drivers
If you have any difficulties installing the driver or operating the printer after installation,
look in Appendix A: USB Driver Installation, “USB driver installation troubleshooting”
page 62.
Download the TPG, Inc. vendor class native driver
Printer drivers are available for download from TPG, Inc.’s corporate Web site. The host
computer must have Internet access in order to download the drivers. Keep in mind that,
as TPG, Inc. continues to improve its customer relations, the architecture of the Web site
may change.
1 Using your preferred Web browser, go to http://
www.TPGprinters.com.
2 Go to the Service & Support section off the main
page.
3 Go to the Downloads section.
4 In the pull-down menu, select “A795,” then
click continue.
5 Scroll down for “A795 Native USB Drivers”, (not
operating system dependent) and click View Detail.
Then click To Continue to download the driver.
6 Run the *.EXE that you have downloaded and
expand the files to a directory.
continued...
A760 Two-Color Thermal/Impact Hybrid Printer: User Guide 189-9200303 Rev. D A760-D100 10/04
Page 57

Appendix A: USB Driver Installation 57
Installing a native driver continued...
Download the Printer class native driver
Printer drivers are available for download from TPG, Inc.’s corporate Web site. The host
computer must have Internet access in order to download the drivers. Keep in mind that,
as TPG, Inc. continues to improve its customer relations, the architecture of the Web site
may change.
1 Using your preferred Web browser, go to http://
www.TPGprinters.com.
2 Go to the Service & Support section off the main
page.
3 Go to the Downloads section.
4 In the pull-down menu, select “A795,” then
click continue.
Install the native driver
1 Turn on the host computer.
2 Turn on the printer.
5 Scroll down for “USB Printer Class Driver”, (not
operating system dependent) and click View Detail.
Then click To Continue to download the driver.
6 Run the *.EXE that you have downloaded and
expand the files to a directory.
Windows 98/Me/2000/XP
1 When the printer is connected and turned on, the
operating system will detect the new hardware and
prompt for the location of the driver that you
downloaded.
2 The computer will prompt that a new device has been
detected. When you are given a chance to select the
driver, point the installation wizard to the files you
expanded from the downloaded file.
3 The printer beeps when the USB device has been
recognized.
Note: When a native USB solution is used, the
diagnostic printout will show either: “USB Driver
Type: TPG, Inc.” or “USB Driver Type: Printer Class”.
When the RS-232C USB Emulation is used, no driver
type will be shown.
Use the native driver
For instructions on using the native driver, please see the documentation bundled with
the *.EXE, that you have downloaded and expanded.
A760-D100 10/04 189-9200303 Rev. D A760 Two-Color Thermal/Impact Hybrid Printer: User Guide
Page 58

Appendix A: USB Driver Installation58
The RS-232C Emulation USB solution
The TPG, Inc. RS-232C Emulation USB solution eliminates any cost associated with porting
applications to USB by implementing a USB solution that emulates standard RS-232C serial
communication. Application developers only have to direct their software to the virtual
RS-232C serial port created by the TPG, Inc. RS-232C Emulation USB driver to use the printer.
The RS-232C emulation is accomplished by the use of Edgeport drivers, provided under
license to TPG, Inc. from Inside Out Networks. You need the correct model of TPG, Inc. printer
to work with this driver solution.
Installing the RS-232C USB printer driver
If you have any difficulties installing the driver or operating the printer after installation, look
in Appendix A: USB Driver Installation, “USB driver installation troubleshooting” page 62.
Download the driver
Printer drivers are available for download from TPG, Inc.’s corporate Web site. The host
computer must have Internet access in order to install the drivers. Keep in mind that, as TPG,
Inc. continues to improve its customer relations, the architecture of the Web site may change.
1 Using your preferred Web browser, go to http://
www.TPGprinters.com.
2 Go to the Service & Support section off the main
page.
3 Go to the Downloads section.
4 In the pull-down menu, select “A760,” then
click continue.
Install the driver
1 Turn on the host computer.
2 Turn on the printer.
5 Scroll down for “A760 Win [xx] RS232 Emulation USB
Drivers”, where [xx] = {“95”, “98 & Me”, “NT”, “2000
& XP”} and click View Detail. Then click To
Continue to download the driver.
6 Run the *.EXE that you have downloaded and
expand the files to a directory.
Windows 95/98/Me/XP/NT/2000
1 Go to the location where you downloaded the driver.
Double-click on the downloaded driver file.
2 The computer will prompt that a new device has been
detected. When you are given a chance to select the
driver, point the installation wizard to the files you
expanded from the downloaded file.
3 The printer beeps when the USB device has been
recognized.
Note: When a native USB solution is used, the
diagnostic printout will show either: “USB Driver
Type: TPG, Inc.” or “USB Driver Type: Printer Class”.
When the RS-232C USB Emulation is used, no driver
type is shown.
A760 Two-Color Thermal/Impact Hybrid Printer: User Guide 189-9200303 Rev. D A760-D100 10/04
Page 59
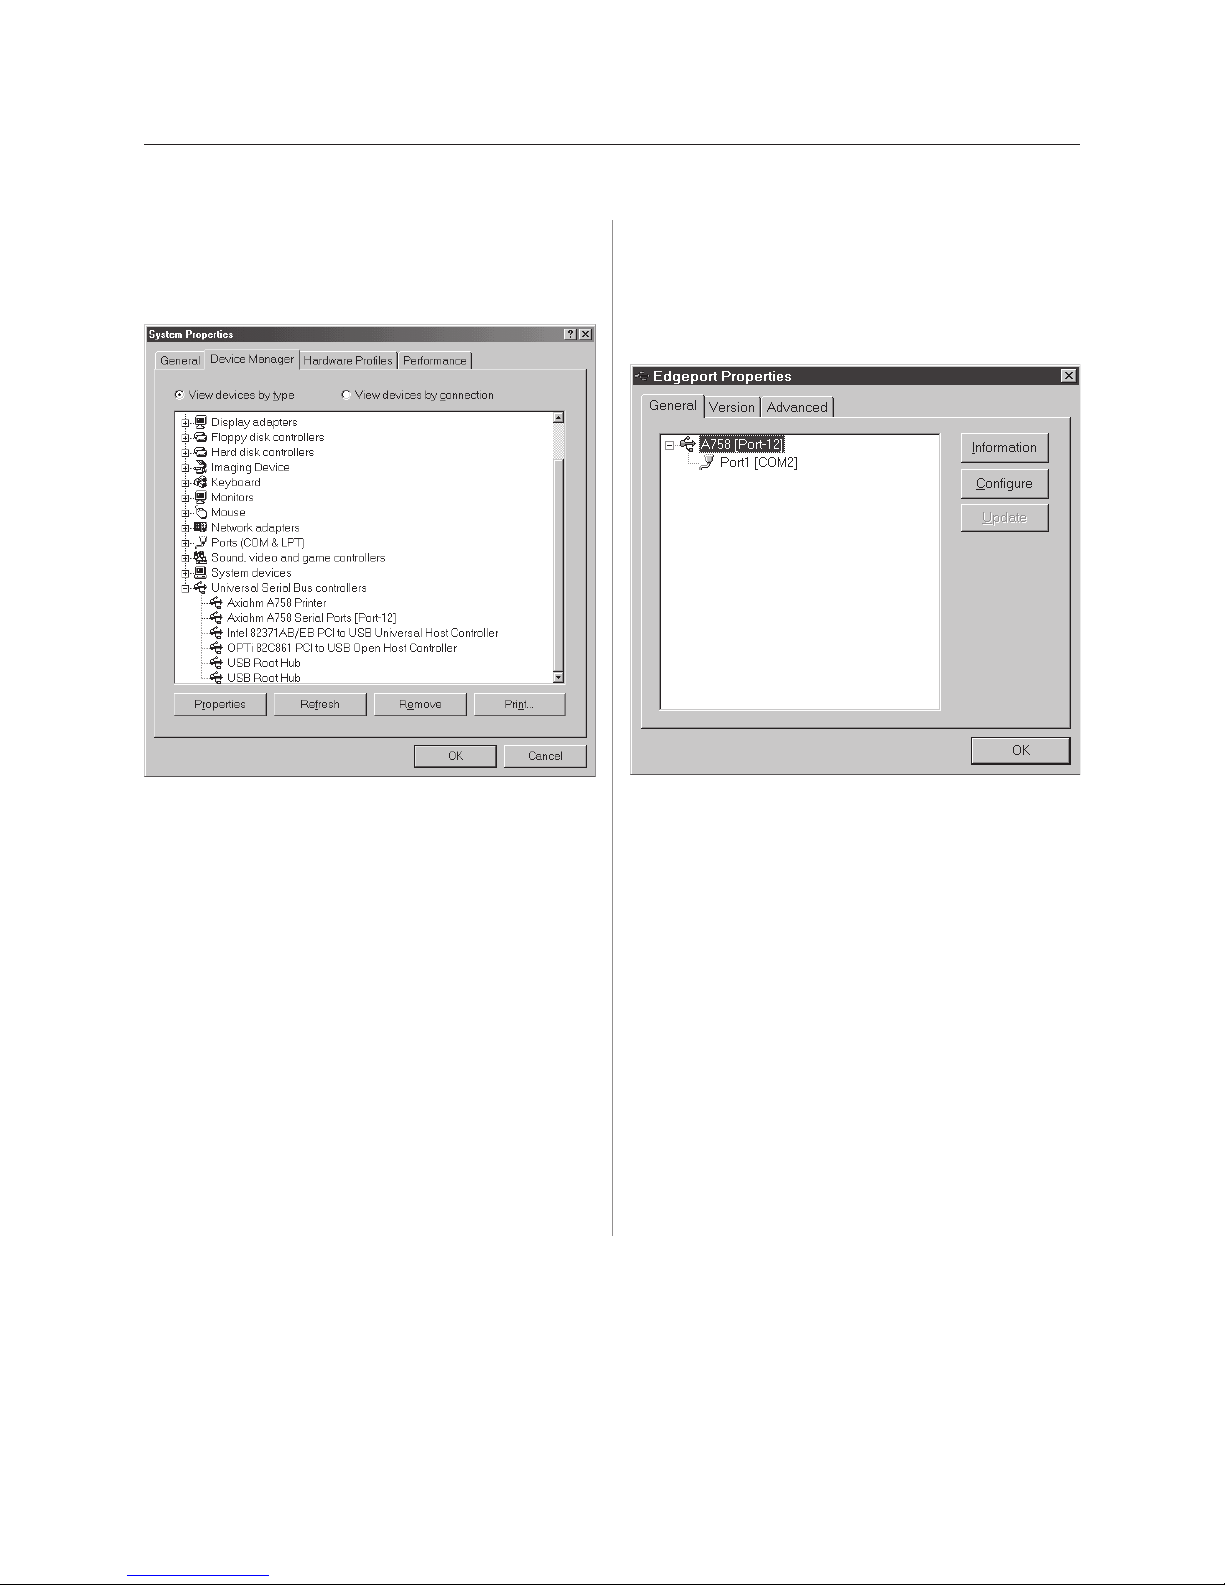
Appendix A: USB Driver Installation 59
Check the installation
After you are finished installing the drivers, you should check to make sure they were installed correctly.
Windows 95/98/Me/XP/2000
1 Open the Device Manager window, as you did when
initially checking for USB support.
Windows NT
1 Go to the Windows Start button and select
Programs>InsideOut Networks Utilities>Edgeport
Configuration Utility.
2 Scroll down to Universal Serial Bus controllers.
The following devices should be displayed:
• TPG, Inc. A758 Printer
• TPG, Inc. A758 Serial Ports [Port–#] (# is a number
indicating the location of the port)
Note: The TPG, Inc. A758 is a monochrome-only
thermal receipt printer. The TPG, Inc. A758 and A760
both use the same USB controller.
3 Scroll up to Ports.
4 You should see a COM number and port description
for the TPG, Inc. printer.
If the drivers are missing or are incorrectly listed,
the installation was not successful. Install the
drivers again.
2 A window opens up that should contain the name of
the printer and the port assignment.
If this information is not listed, the installation was not
successful. Install the drivers again.
A760-D100 10/04 189-9200303 Rev. D A760 Two-Color Thermal/Impact Hybrid Printer: User Guide
Page 60

Appendix A: USB Driver Installation60
Configuring serial port number assignments
There are three ways that the Edgeport utility assigns serial port numbers to the printer. The
serial port assignments are controlled and stored in the host computer, not the printer. You can
change the way assignments are made in the Edgeport utility.
Serial port configuration methods
Automatic (default)
When the printer is plugged into the USB port of the
host and the drivers are loaded, the printer will default
to the next available serial port number. In many cases,
this is exactly what is desired.
Assigning a serial port to the printer
If the default assignment does not meet the requirement
of the installation, you can assign a different serial port
to the printer.
Assigning a specific serial port to a specific
USB port
This option is only available in Windows 98, NT, XP
and 2000. In certain installations, it is desirable
to associate a serial port number with a specific
USB port, e.g., multiple identical printers installed
on one host.
Using the
The Edgeport utility functions the same in all systems. However, accessing it varies
according to system, so follow the access instructions that apply to the host computer.
Starting the
Windows 95/98/Me/XP/2000
1 Open the Device Manager and make sure
“View devices by type” is selected.
2 Scroll down to Universal Serial Bus controller
and expand the list by pressing the “+” button.
You will see two entries for the A758.
3 Select the printer and click Properties.
4 Select the Details tab, then press the Details button
to start the Edgeport utility.
Serial port assignment in the
• To determine the printer’s serial port assignment,
go to the General window and click on the A758
printer entry.
Edgeport
Edgeport
utility
utility
Edgeport
Window NT 4.0
1 Go to the Windows Start button and select
Programs>InsideOut Networks Utilities>Edgeport
Configuration Utility.
utility
• To assign a specific serial port to the printer, go
to the General window.
• To assign a specific serial port to a specific
USB port, go to the Advanced window.
A760 Two-Color Thermal/Impact Hybrid Printer: User Guide 189-9200303 Rev. D A760-D100 10/04
Page 61
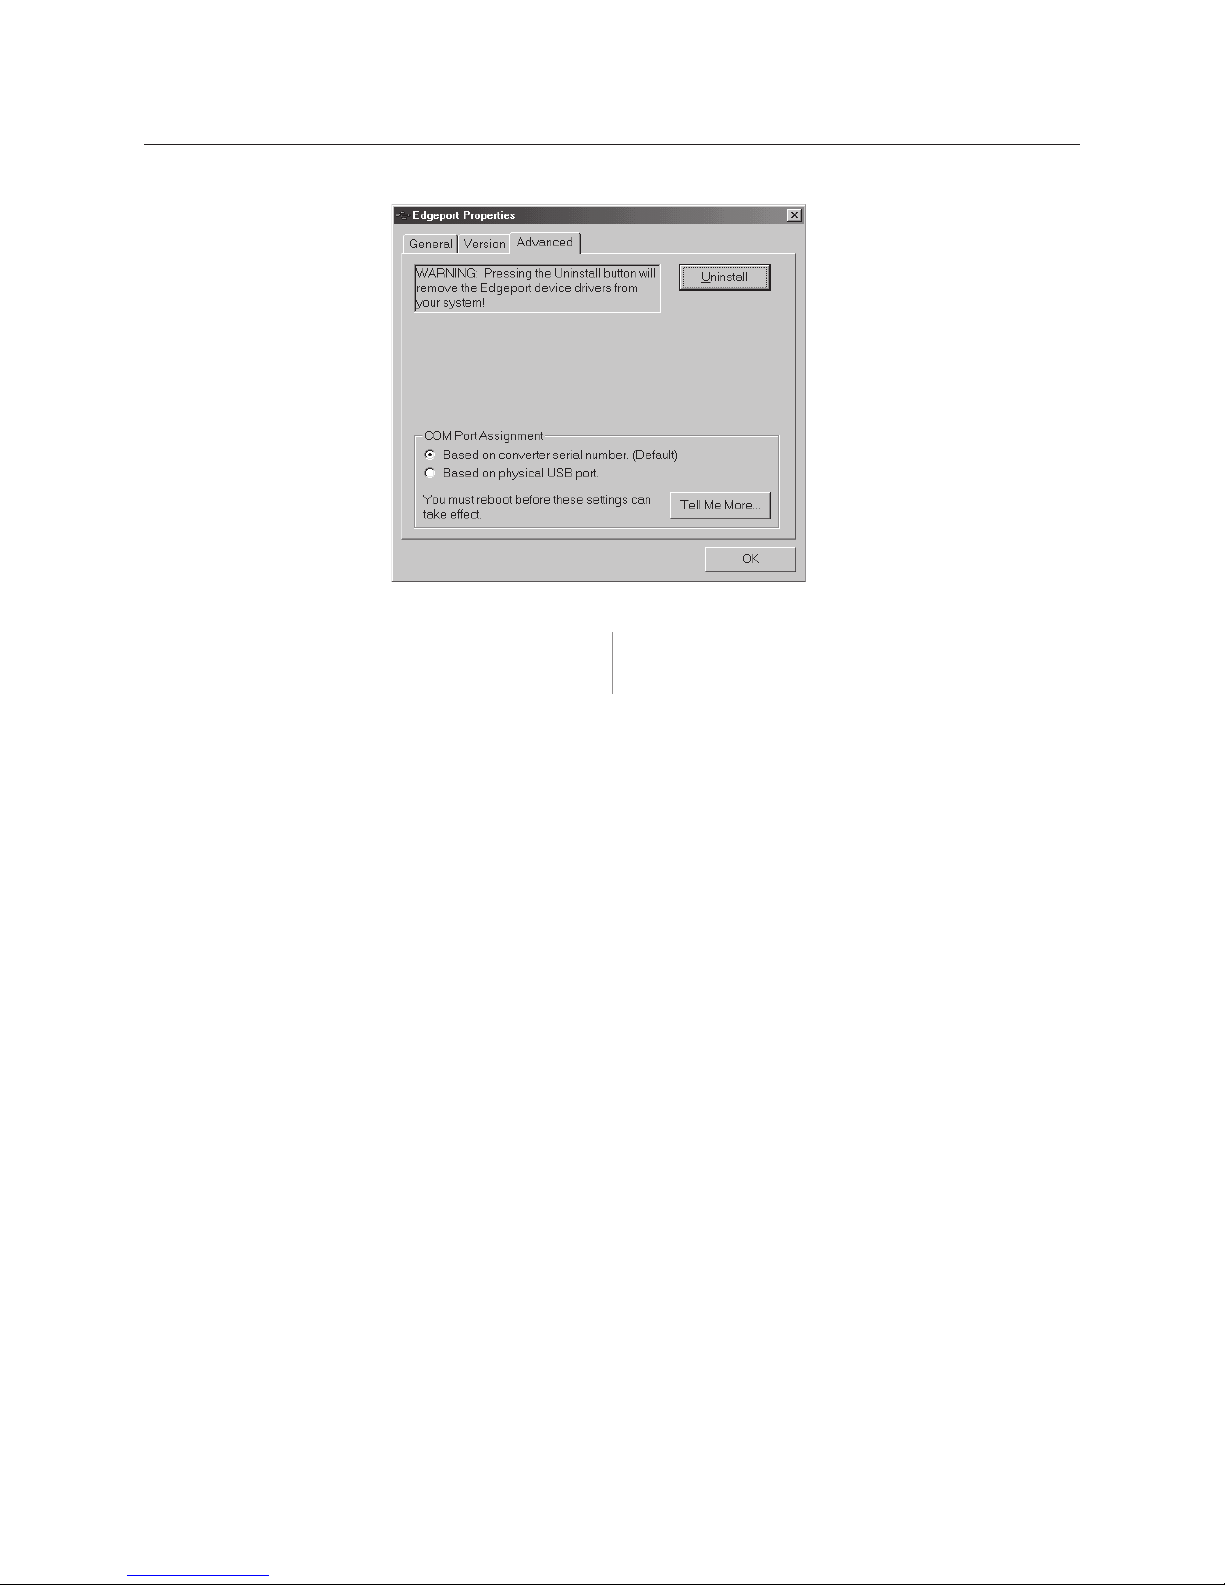
Uninstalling the drivers
Appendix A: USB Driver Installation 61
1 Start the Edgeport utility.
2 Click the Advanced tab.
3 Click the Uninstall button and follow the on-screen
instructions.
A760-D100 10/04 189-9200303 Rev. D A760 Two-Color Thermal/Impact Hybrid Printer: User Guide
Page 62

Appendix A: USB Driver Installation62
USB driver installation troubleshooting
This section lists some conditions you may run into during and immediately after driver
installation. If you think the condition may not be related to USB, look in Chapter 4: Using the
Printer, “Troubleshooting the printer.” That section describes other USB conditions which may
arise or may not be apparent until after installation.
Additional information on most of the conditions below can be found within this appendix.
Conditions Characteristics Solution
USB printer not recognized by host Red LED on USB jack is off Check that host has functional USB
computer hardware
Check the host for USB hub conflicts
Check for USB driver in
Manager
requirements for driver are met and
the correct driver was installed
Make sure the printer model you have
supports the USB driver you have
downloaded. Some printer models support
the Native USB solution and some support
the RS-232C Emulation USB solution.
USB driver is installed on LED blinks, then goes out RS-232C Emulation solution only:
host computer, but printer is Check that the
not recognized is complete; uninstall, then reinstall driver
Check that the printer firmware is
Boot V3.05, Flash V3.02 or higher
Check that the printer
communication mode is serial
and flow control is the same as the
host application
Native and RS-232C Emulation solutions:
Check for USB hub faults by plugging
printer directly into host
Make sure the printer model you are
connecting to the computer supports the USB
driver you have downloaded and installed.
; make sure system
Edgeport
Device
driver installation
USB driver is installed on Printer beeps but does not print RS-232C Emulation solution only:
host computer, printer is Check communication port
recognized, but does not print assignment of application
A760 Two-Color Thermal/Impact Hybrid Printer: User Guide 189-9200303 Rev. D A760-D100 10/04
Determine serial port assignment of
USB printer; set application to the
same port
In
Edgeport
of port numbers
, set automatic assignment
Page 63

Appendix A: USB Driver Installation 63
This page intentionally left blank.
A760-D100 10/04 189-9200303 Rev. D A760 Two-Color Thermal/Impact Hybrid Printer: User Guide
Page 64

A760 Two-Color Thermal/Impact Hybrid Printer: User Guide 189-9200303 Rev. D A760-D100 10/04
 Loading...