

Page 1
User Guide on installation of
TPCAST Wireless Adaptor for VIVE
CE-01H-UG-EN-006
新版印刷(无蓝牙)英文 2017-05-24-US.indd 1
2017/5/24 上午10:51
Page 2
What's inside the box
1
Instructions of main components
2
Connection instructions
3
Installation of Software Client
4
Operation instructions
5
Instructions on erection of PC transmitter
6
Safety and Note
7
Frequently asked questions
8
CONETENTS
新版印刷(无蓝牙)英文 2017-05-24-US.indd 2
2017/5/24 上午10:51
Page 3
Please read the user guide prior to operating of the product.
Update the soft copy of user guide on a regular basis to improve the
accuracy and completeness.
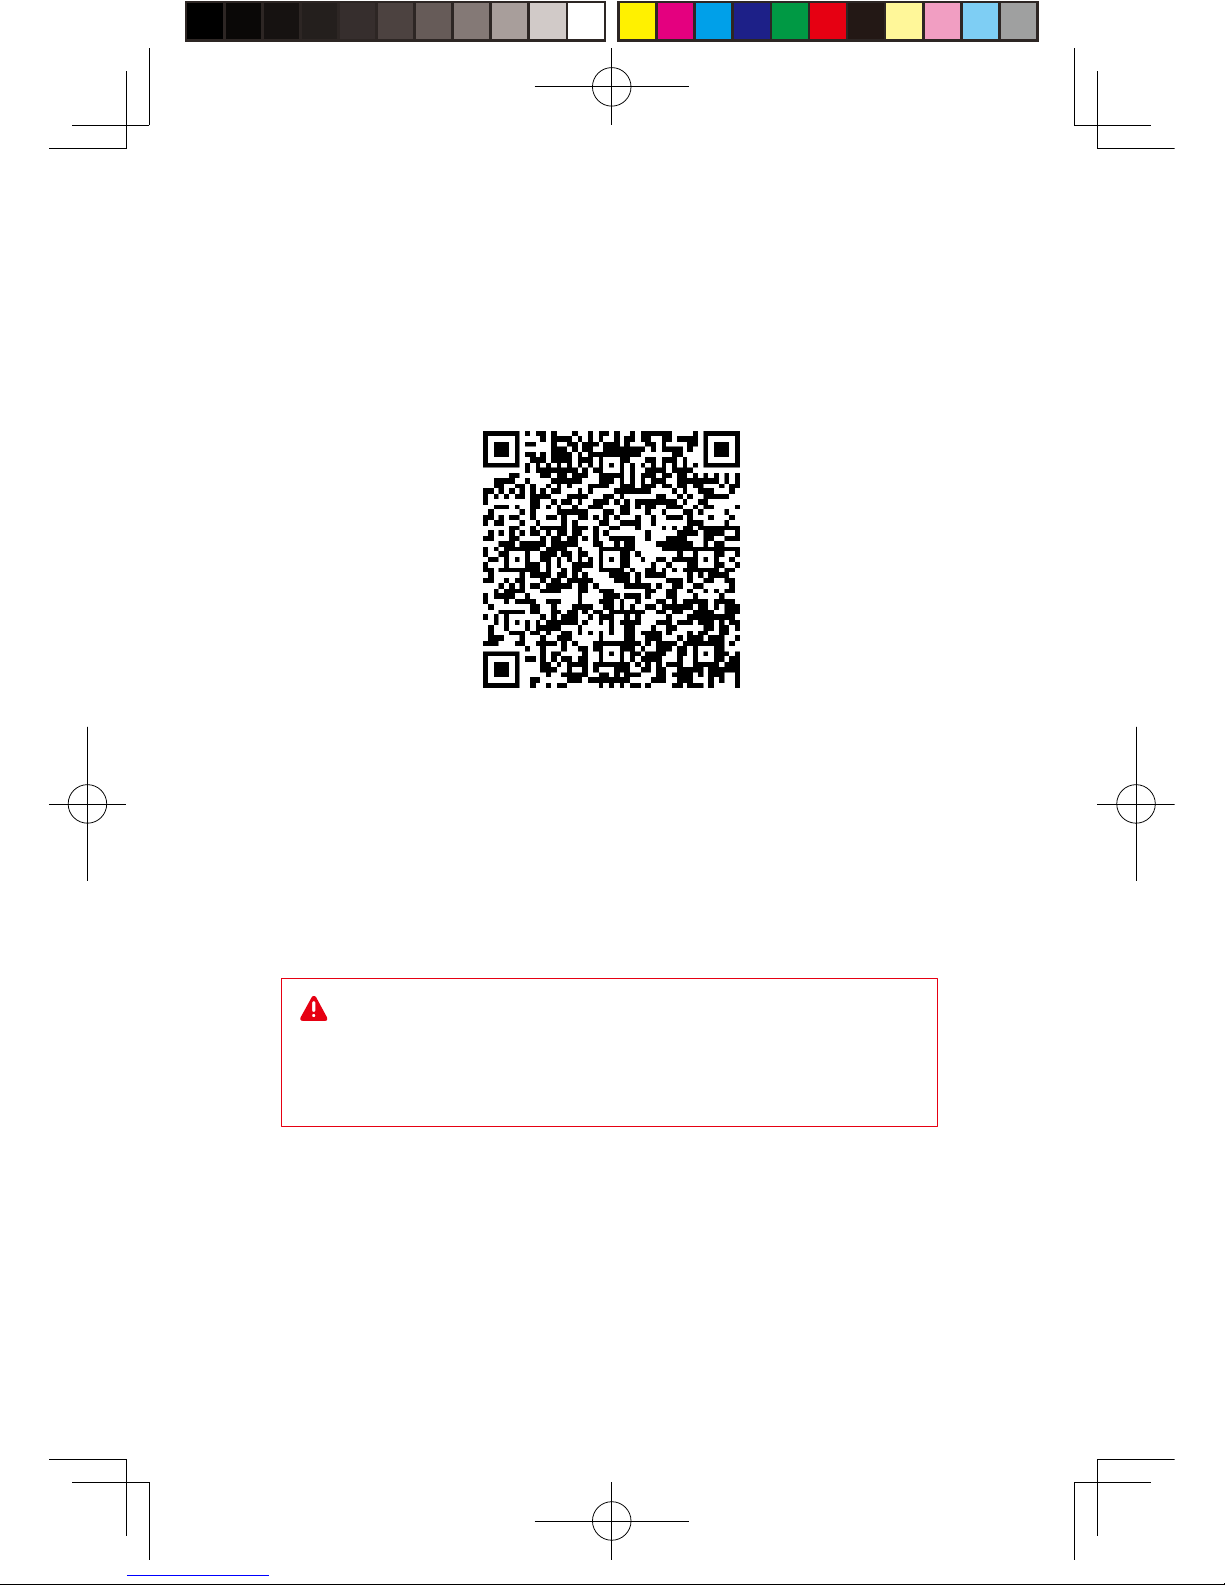
Please visit the website of www.tpcast.cn to get the up-to-date
version.
Scan code to view installation
video of Wireless Adaptor for VIVE
Because there is no cable effect, you should pay attention to
the safety of game area during using TPCAST Wireless Adaptor
for VIVE, to ensure that will not touch to the surrounding objects,
or take the experience under the care of others.
新版印刷(无蓝牙)英文 2017-05-24-US.indd 3
2017/5/24 上午10:51
Page 4
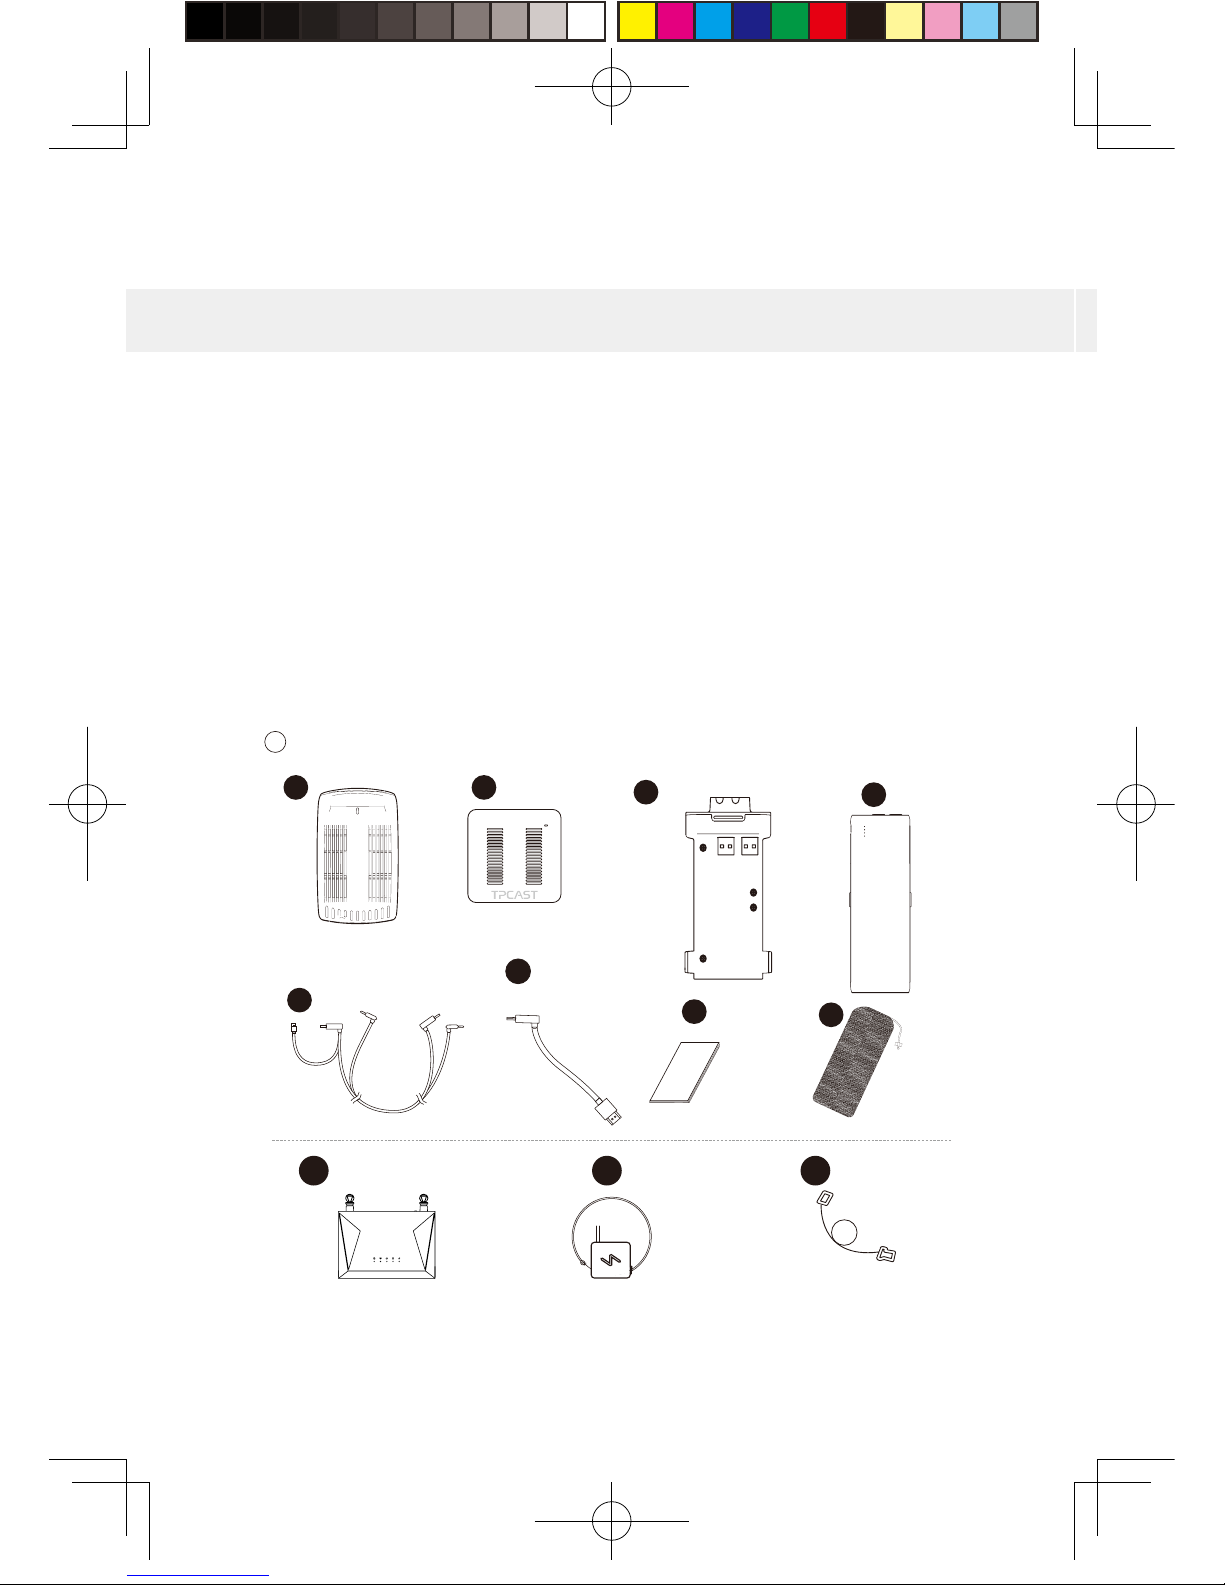
1. What's inside the box
1
9 10 11
②
PC t ransmitte r
③
Po w er box
⑦
Instructions and warranty card
④
Port a ble p o w er b ank of 20000mAh
⑤
D e dicated ca ble f or l ong distance connectio n
⑥
HDMI short connect ion cab l e
⑧
Nylon Bag
①
H M D R ecei v e r
⑨
Router
⑩
Router power supply
1 2
3
5
7
8
4
6
elbac krowteN
11
新版印刷(无蓝牙)英文 2017-05-24-US.indd 4
2017/5/24 上午10:51
Page 5
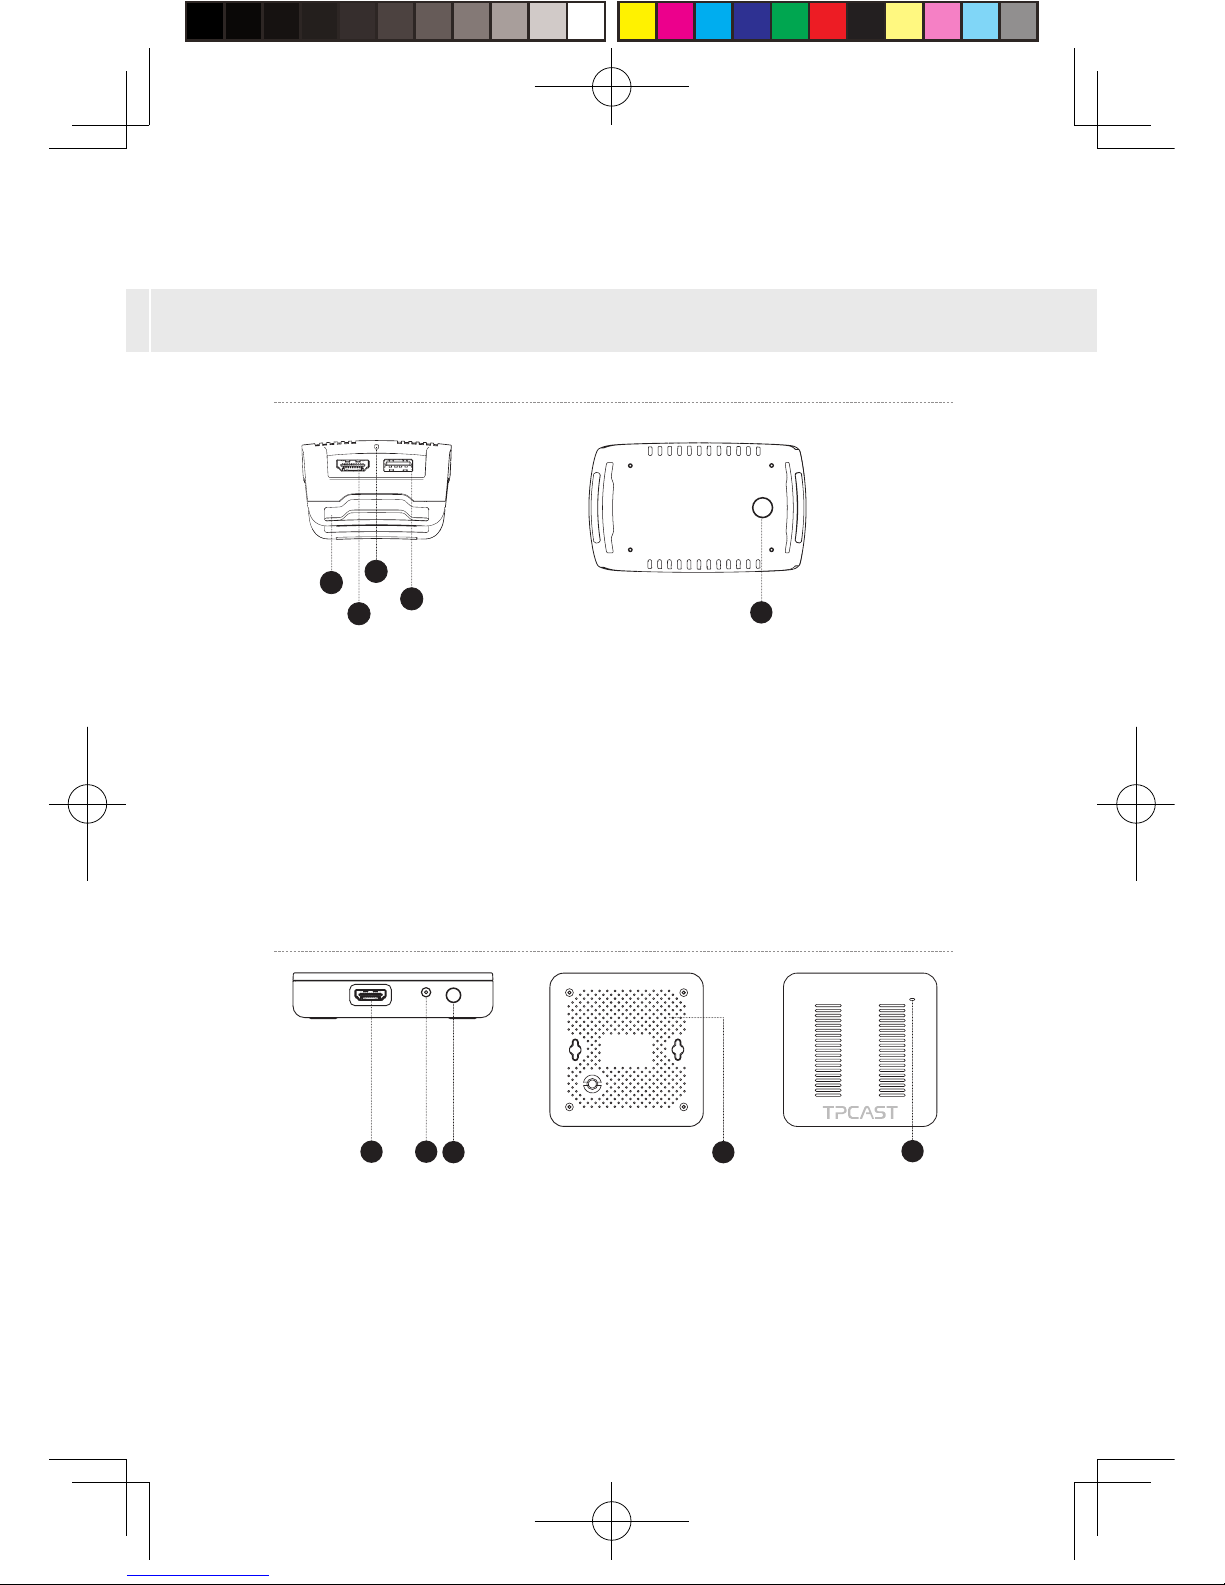
2. Instructions of main components
2
1、HMD Receiver
2、PC transmitter
①
HDMI connection port
②
DCIN pow er p ort
③
Video link pairin g b u tto n
④
Port for fix i n g t he platform
⑤
Indicator for video signal connectio n
1 2
3 4
5
①
HMD str a p and cable port
②
HDMI short connection port
③
Indicator for video signal connectio n
④
USB port
⑤
Video link pairin g b u tto n
5
1
2
3
4
新版印刷(无蓝牙)英文 2017-05-24-US.indd 5
2017/5/24 上午10:51
Page 6
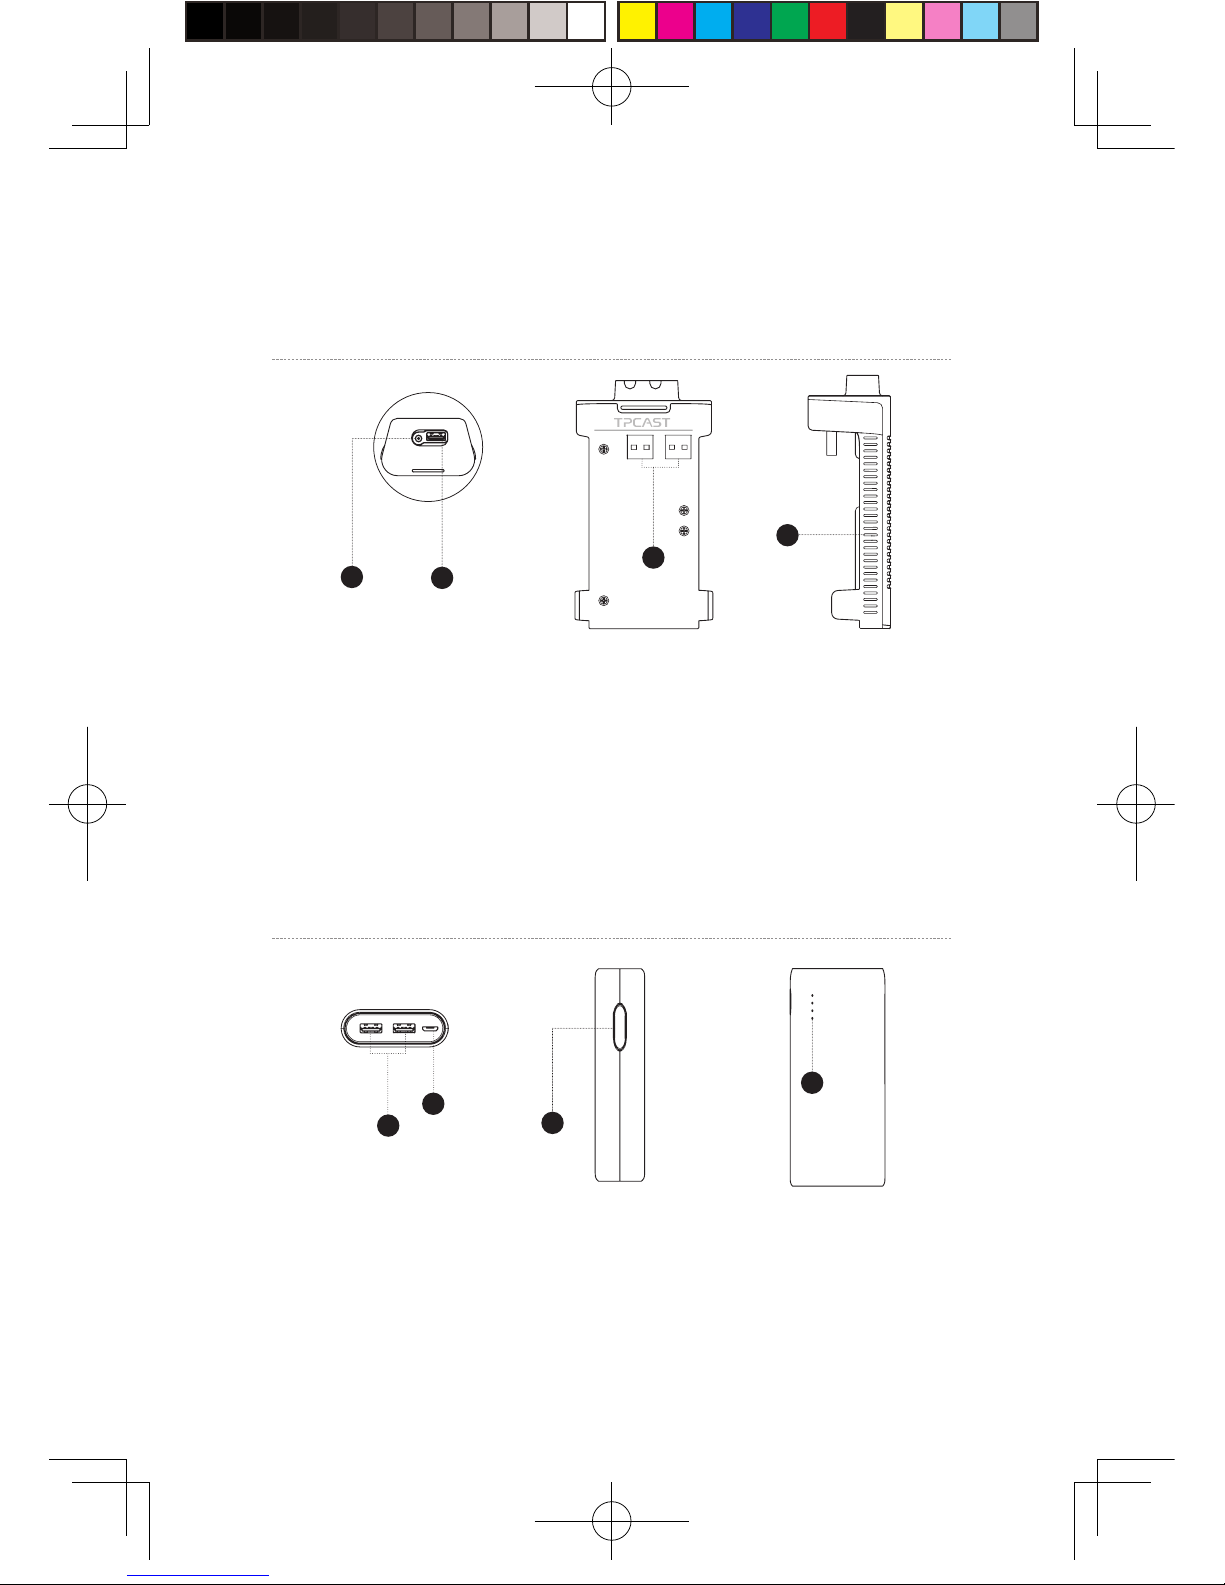
3、Pow er box
4、Portable p o wer b ank
①
DCIN pow er p ort for d e dicated long dis t ance c onnection cable
②
USB port for de dicat e d l ong distance connection cable
③
USB port for portable p o w er b ank
④
Indicator for VR wirel ess op e r atin g signal
1
2
3
4
①
USB power output port
②
Micro USB charging p ort
③
Battery indicat or b u tto n
④
Battery indicat o r
1
2
4
3
3
新版印刷(无蓝牙)英文 2017-05-24-US.indd 6
2017/5/24 上午10:51
Page 7
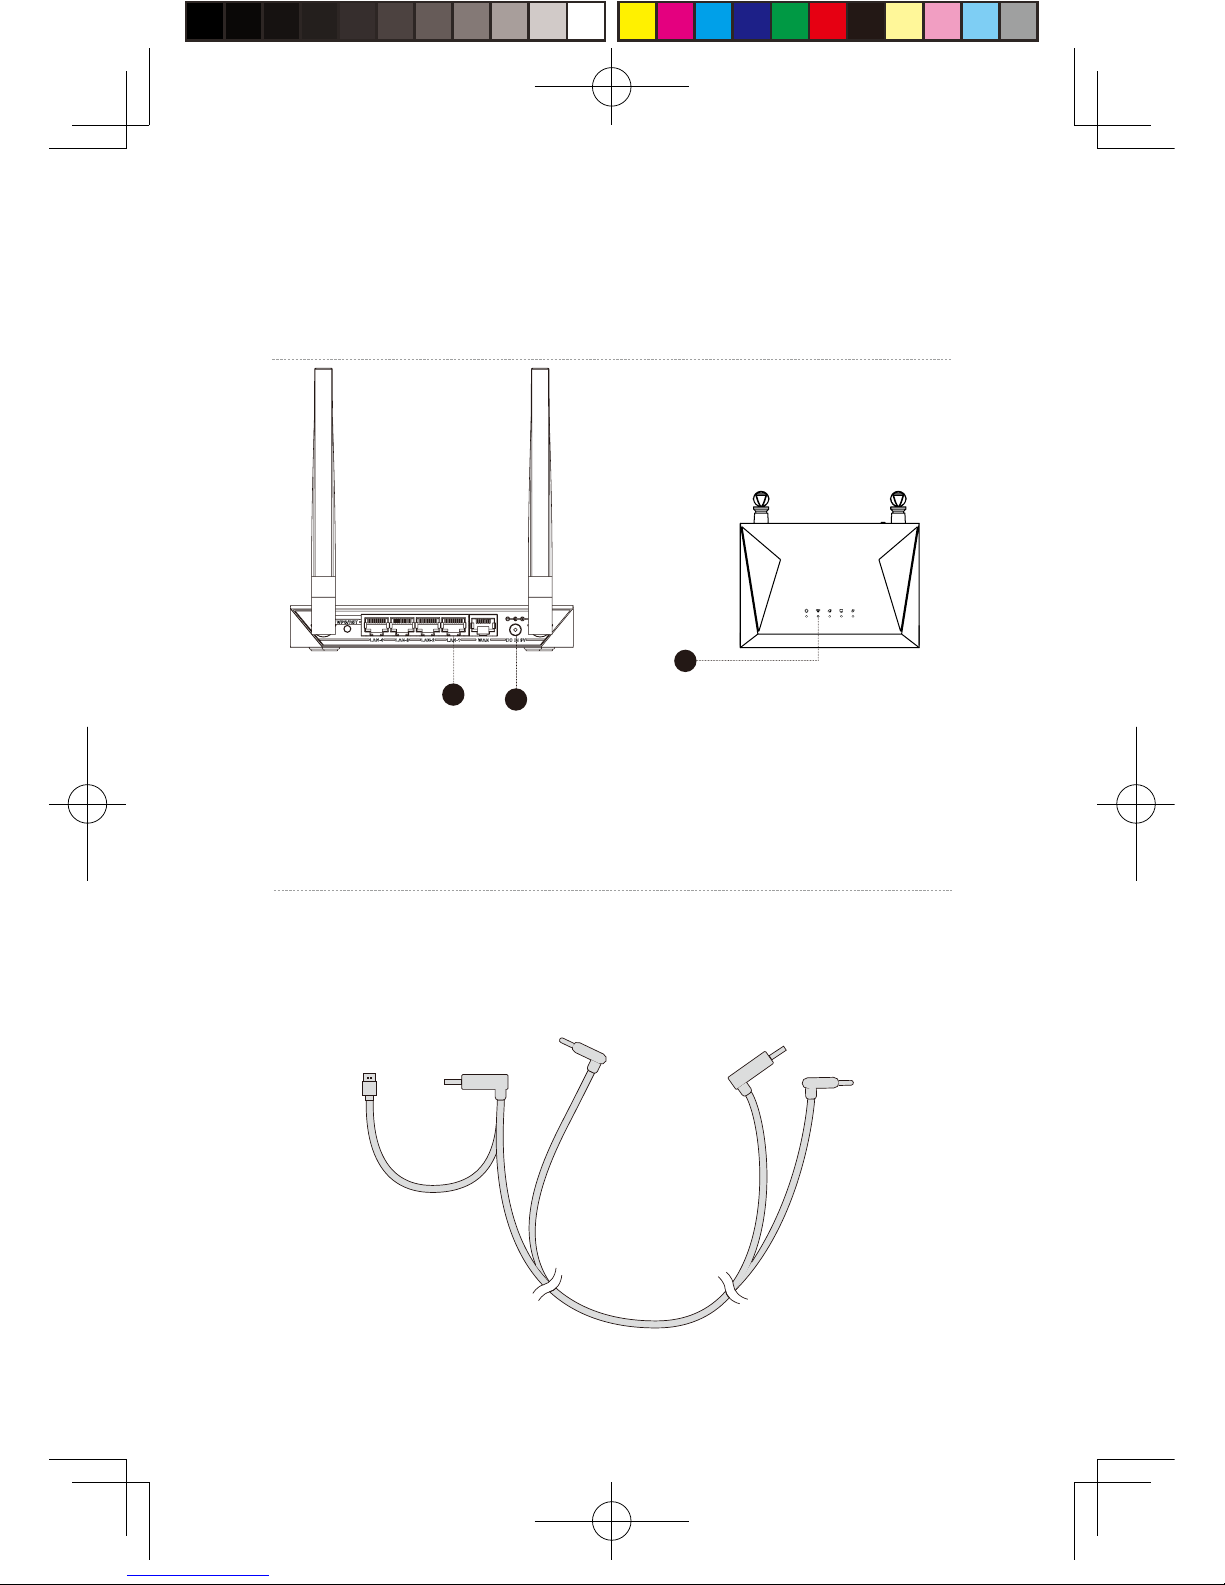
5、Route r
①
Network cable port
②
Router po w er a d a pter p ort
③
Status ligh t for t he rout er
6、Ca ble
Dedicated cable for long distance connection
1-A
1-C
1-B
1-D
1-E
USB
USB
DC
DC
4
2
3
1
新版印刷(无蓝牙)英文 2017-05-24-US.indd 7
2017/5/24 上午10:51
Page 8
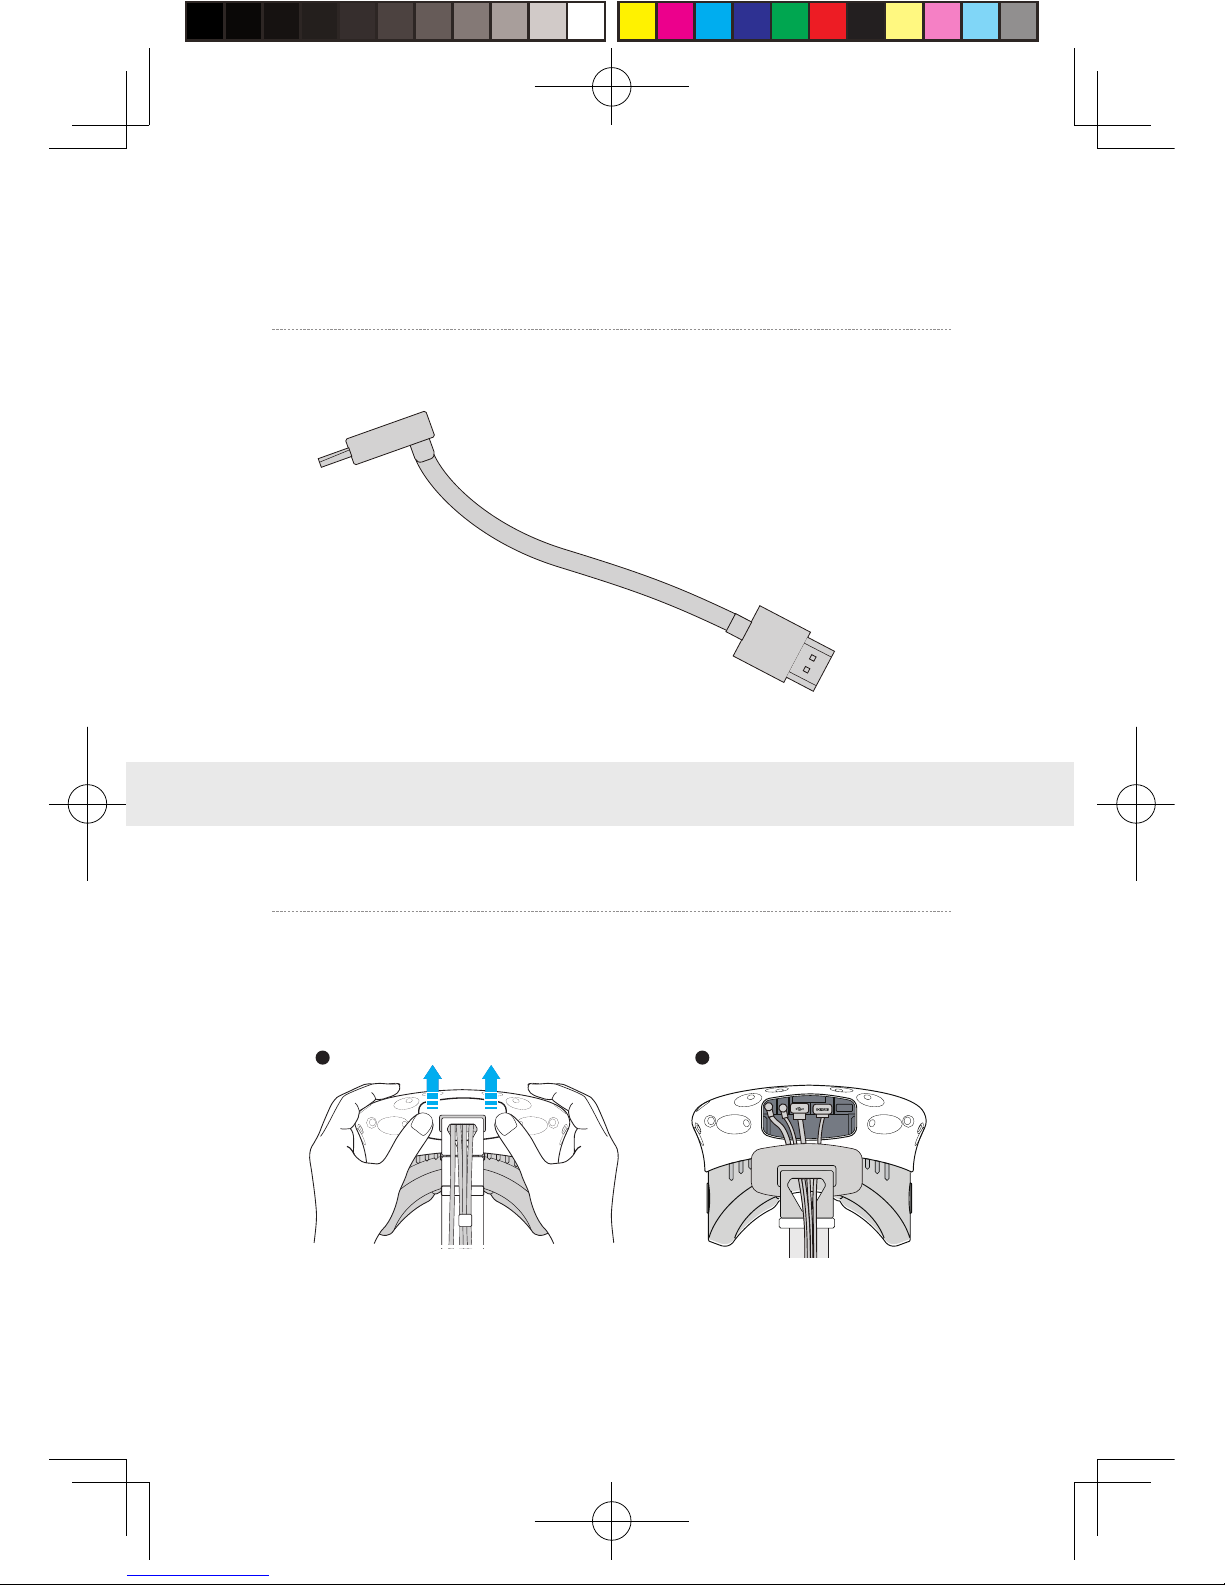
3. Connection instructions
HDMI cable for short distance connection
2-A
2-B
Step one: Unplu g t he connect e d cables
①
As shown in t he figure, op en t he comp art ment cov e r.
1、Instructions on c onnection of HM D R ecei ver
1 2
HDMI
HDMI
5
新版印刷(无蓝牙)英文 2017-05-24-US.indd 8
2017/5/24 上午10:51
Page 9
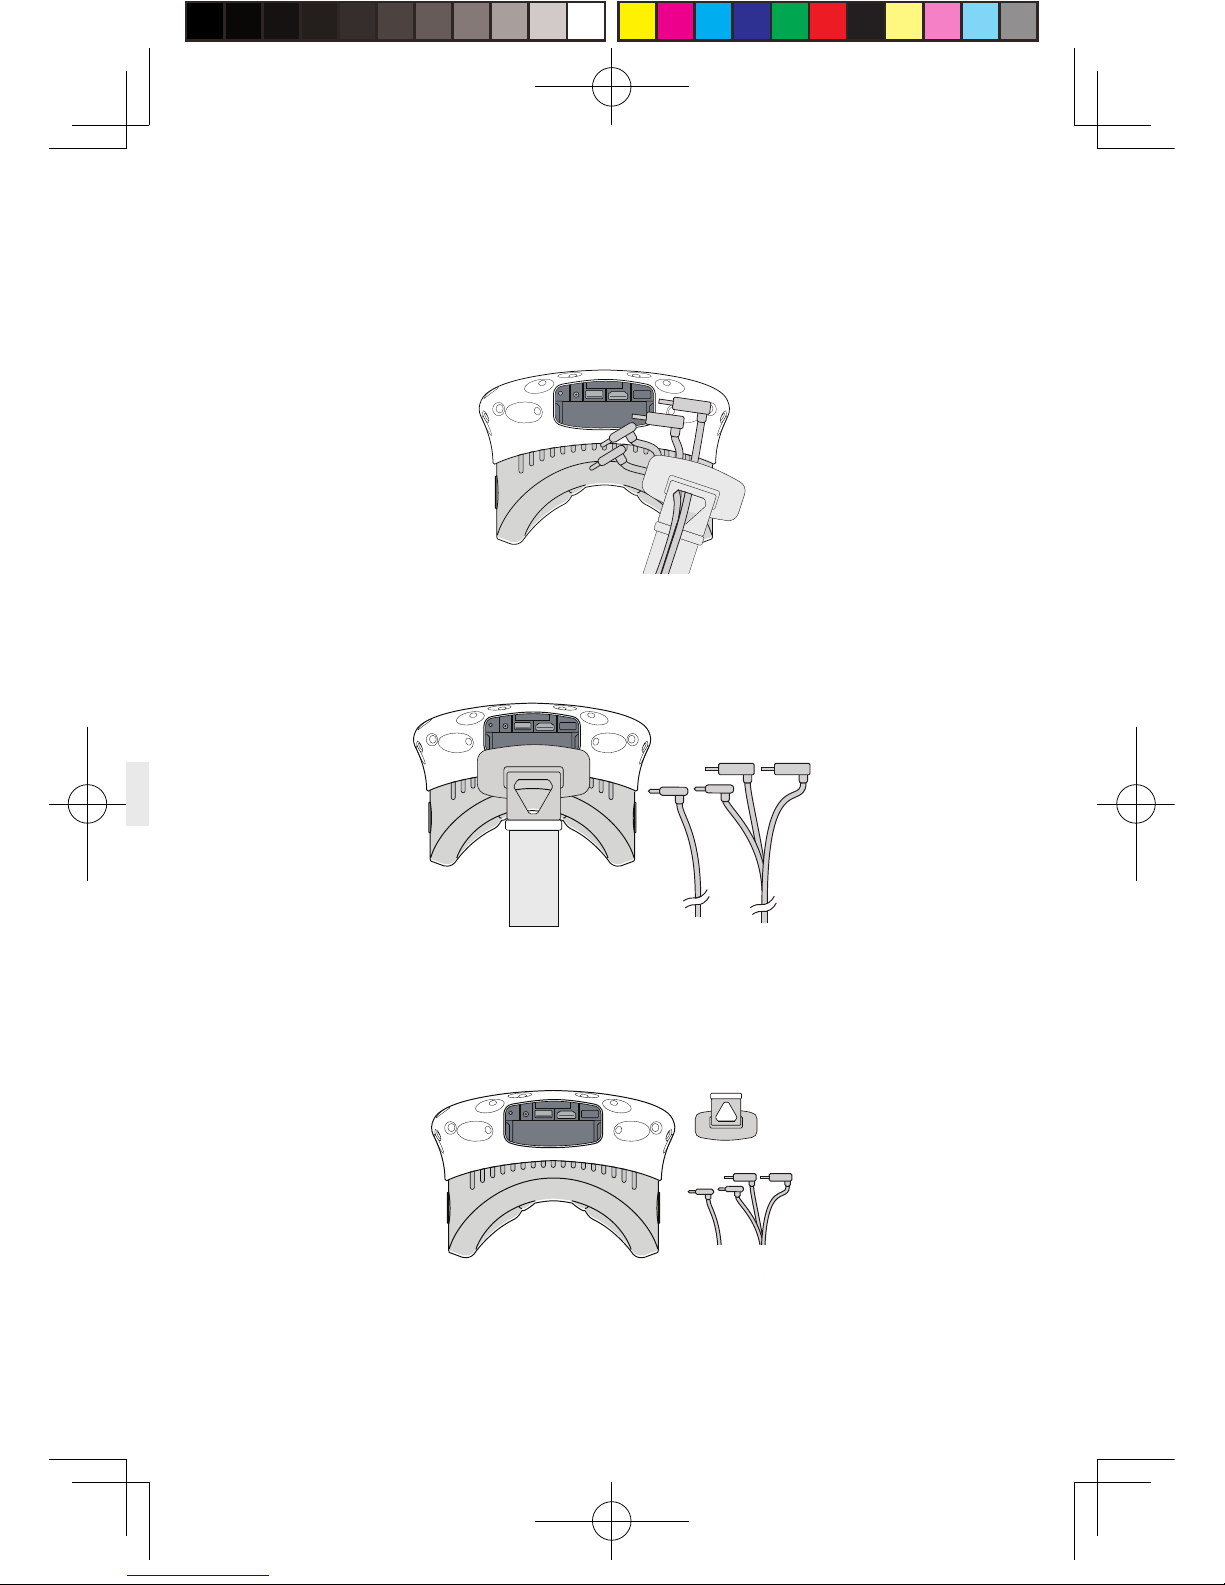
②
Unplug all power cable, 3-in-1 cable as well as the audio cable, there are four
interfaces in total.
③
Pull the 3-in- 1 cable and audio cable out of the comp art ment
and the strap t o comple t e l y sep arat e from t he H M D.
④
Separa t e t he st r ap from the compartment .
6
新版印刷(无蓝牙)英文 2017-05-24-US.indd 9
2017/5/24 上午10:51
Page 10
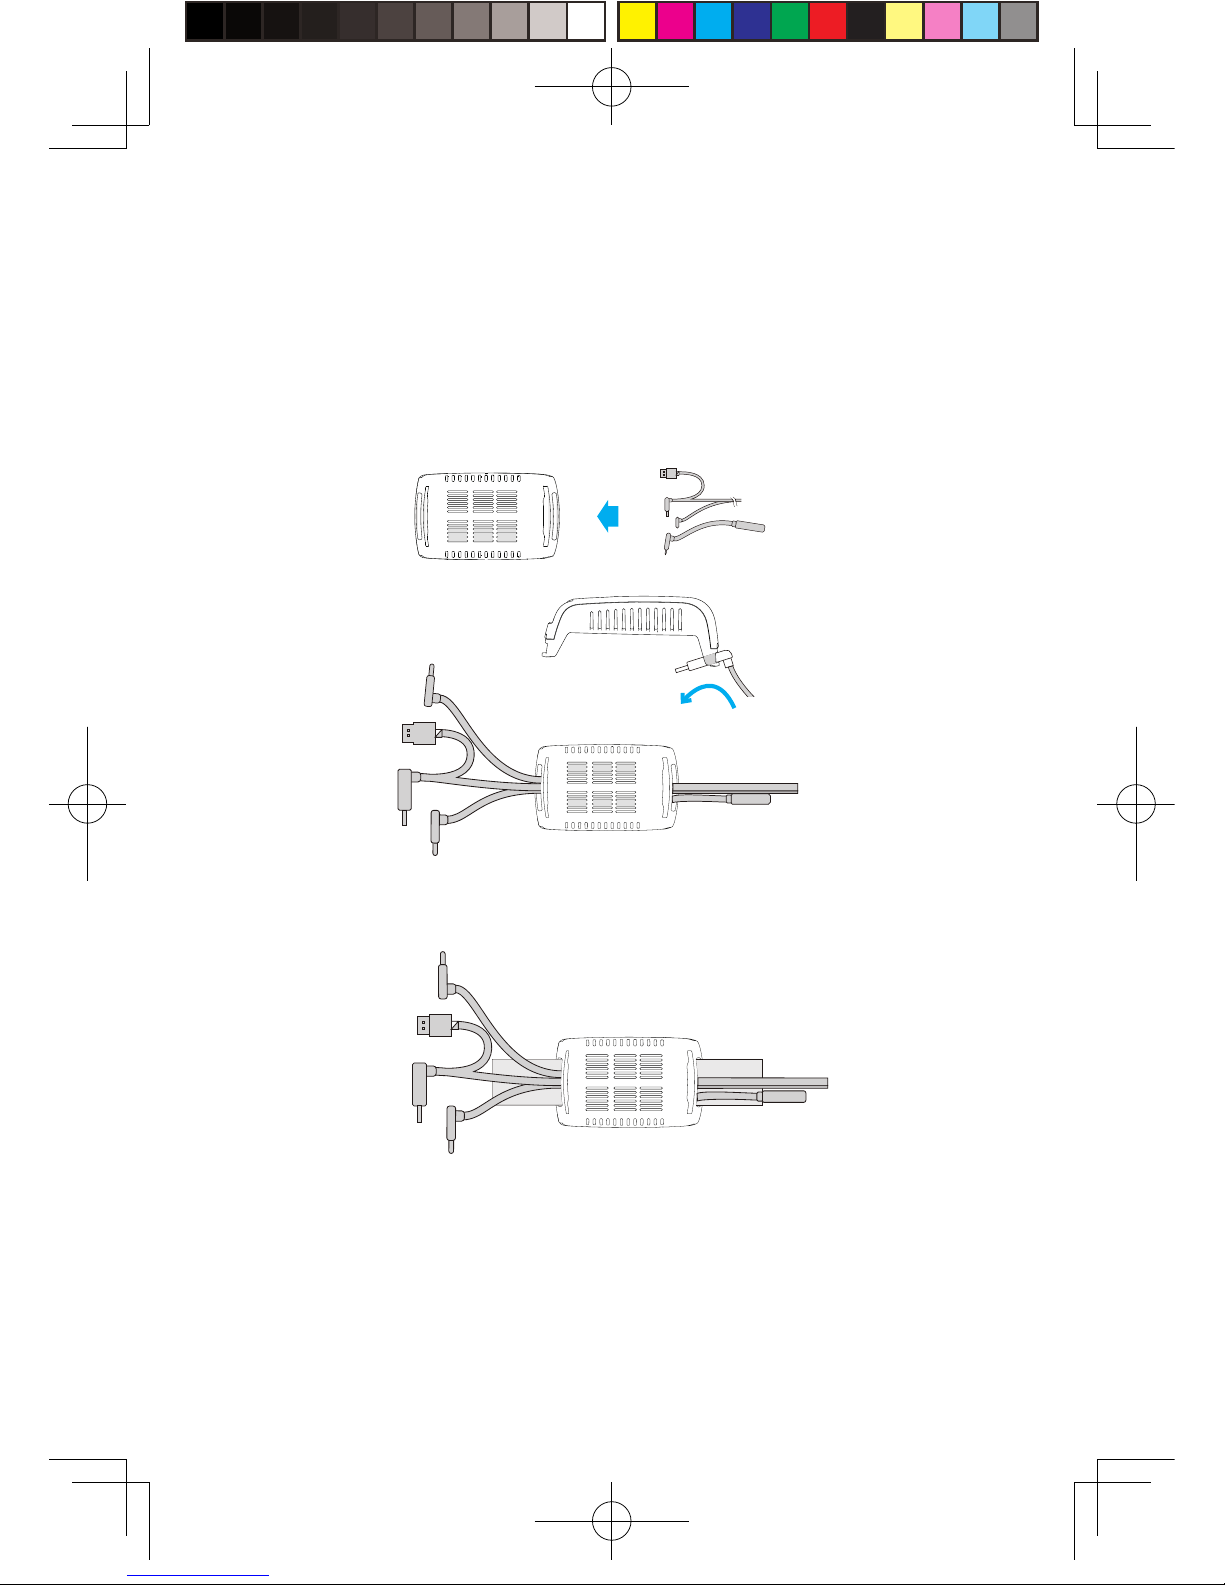
Step two: F i x t he H M D Receiv e r
①
As shown in t he figure, t hread i n all three interf aces ( 1 - a, 1-b
and 1-c) of the de dicat e d l ong distance connection cable and
audio cable from the HMD recei v er with TPCA S T side and out of
the other side.
Note: T he c urv e d USB plug through t he t hread hol e, need to
forcibly fing er a l ong t he right direction t o pass t hroug h .
Step three: Cable connection
①
As shown in the figure, thread in all three interfaces (1-a, 1-b and 1-c)
of the dedicated long distance connection cable and audio cable from the
HMD receiver with TPCAST side and out of the other side.
Note : The curved USB plug through the thread hole, need to forcibly
finger along the right direction to pass through.
②
Thread the
separate d s t r a p through t he H M D c able p orts in
turn and routed und er t he d e dicat ed long connection cable, t hen
the receiv er end will be fix e d on the HMD s t r a p .
7
新版印刷(无蓝牙)英文 2017-05-24-US.indd 10
2017/5/24 上午10:51
Page 11
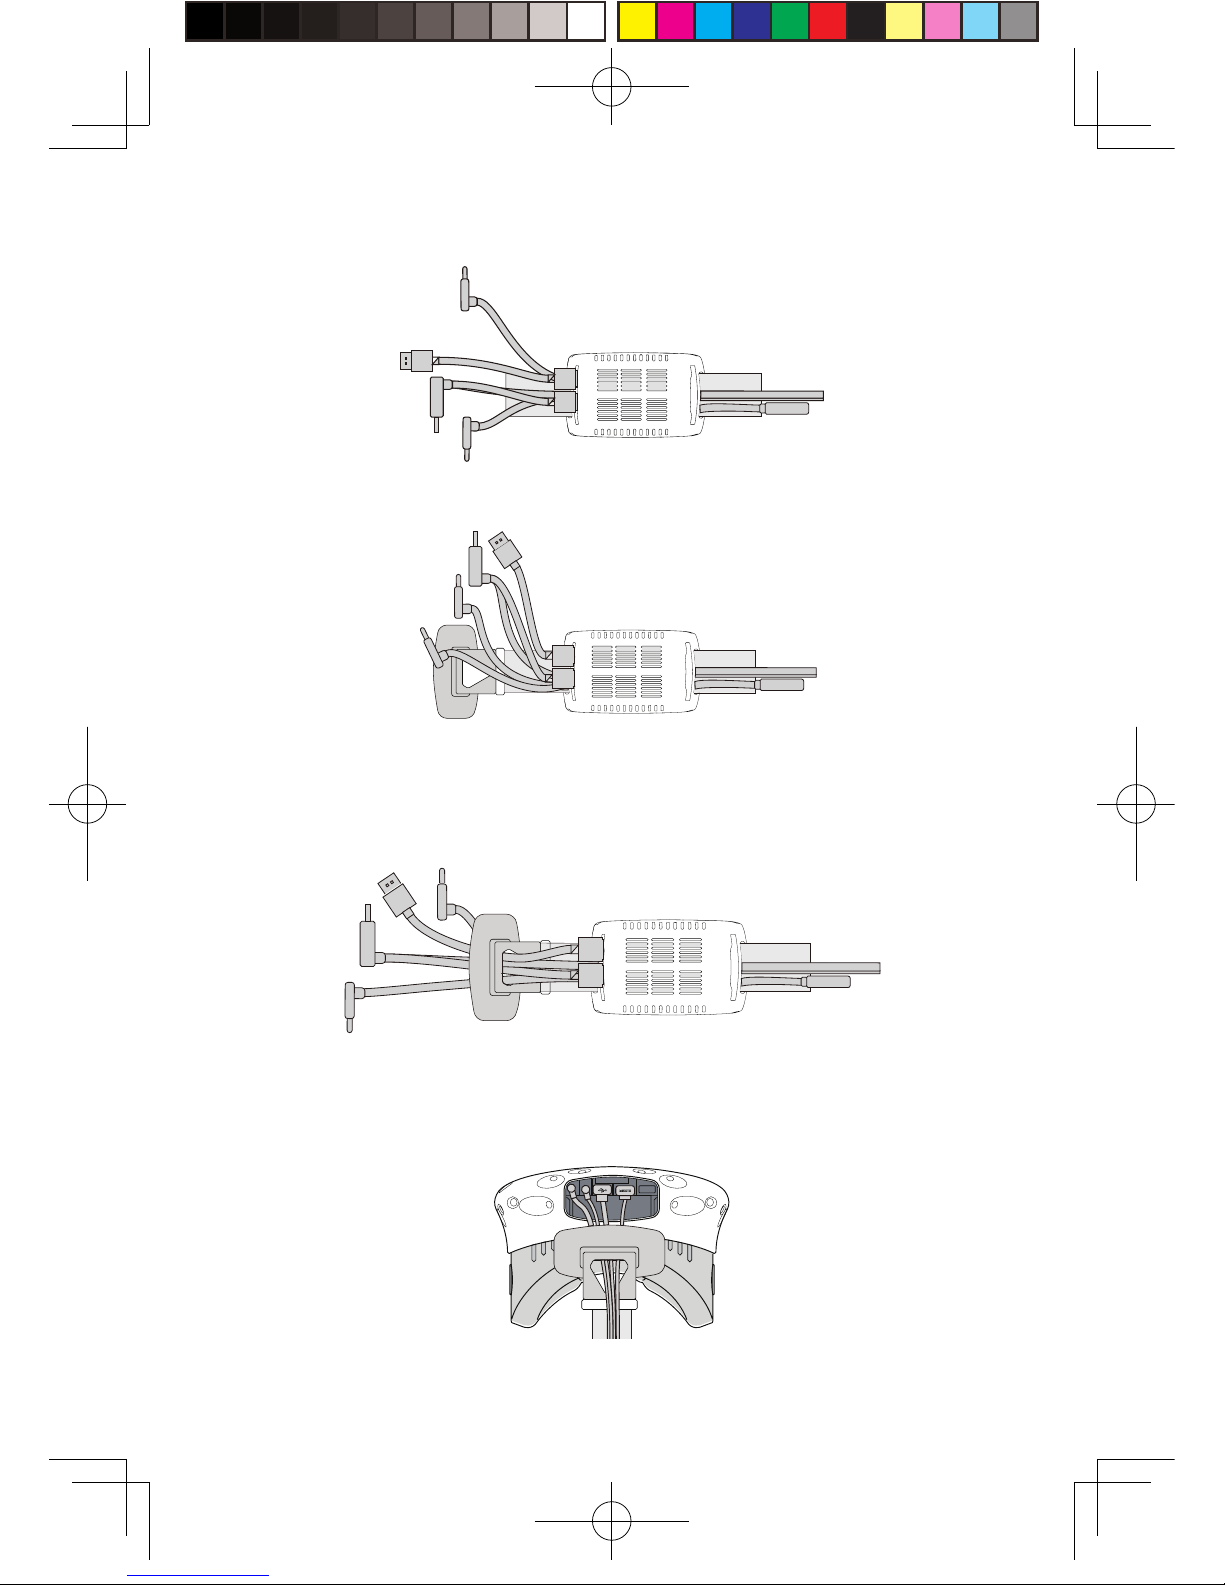
②
Reconnect s t r a p to t he compartment c o v e r.
③
Thread the 1 - a and 1 -b i nterfaces of long connection cable
through the compart ment c o v er cable port, an d t he 2 - a interfac e
of short connection cable as well.
④
In turn plug i n t hese t hree i n terfaces into t he VIVE H M D power
port, USB p ort , HDMI p ort and audio connector port.
8
新版印刷(无蓝牙)英文 2017-05-24-US.indd 11
2017/5/24 上午10:51
Page 12
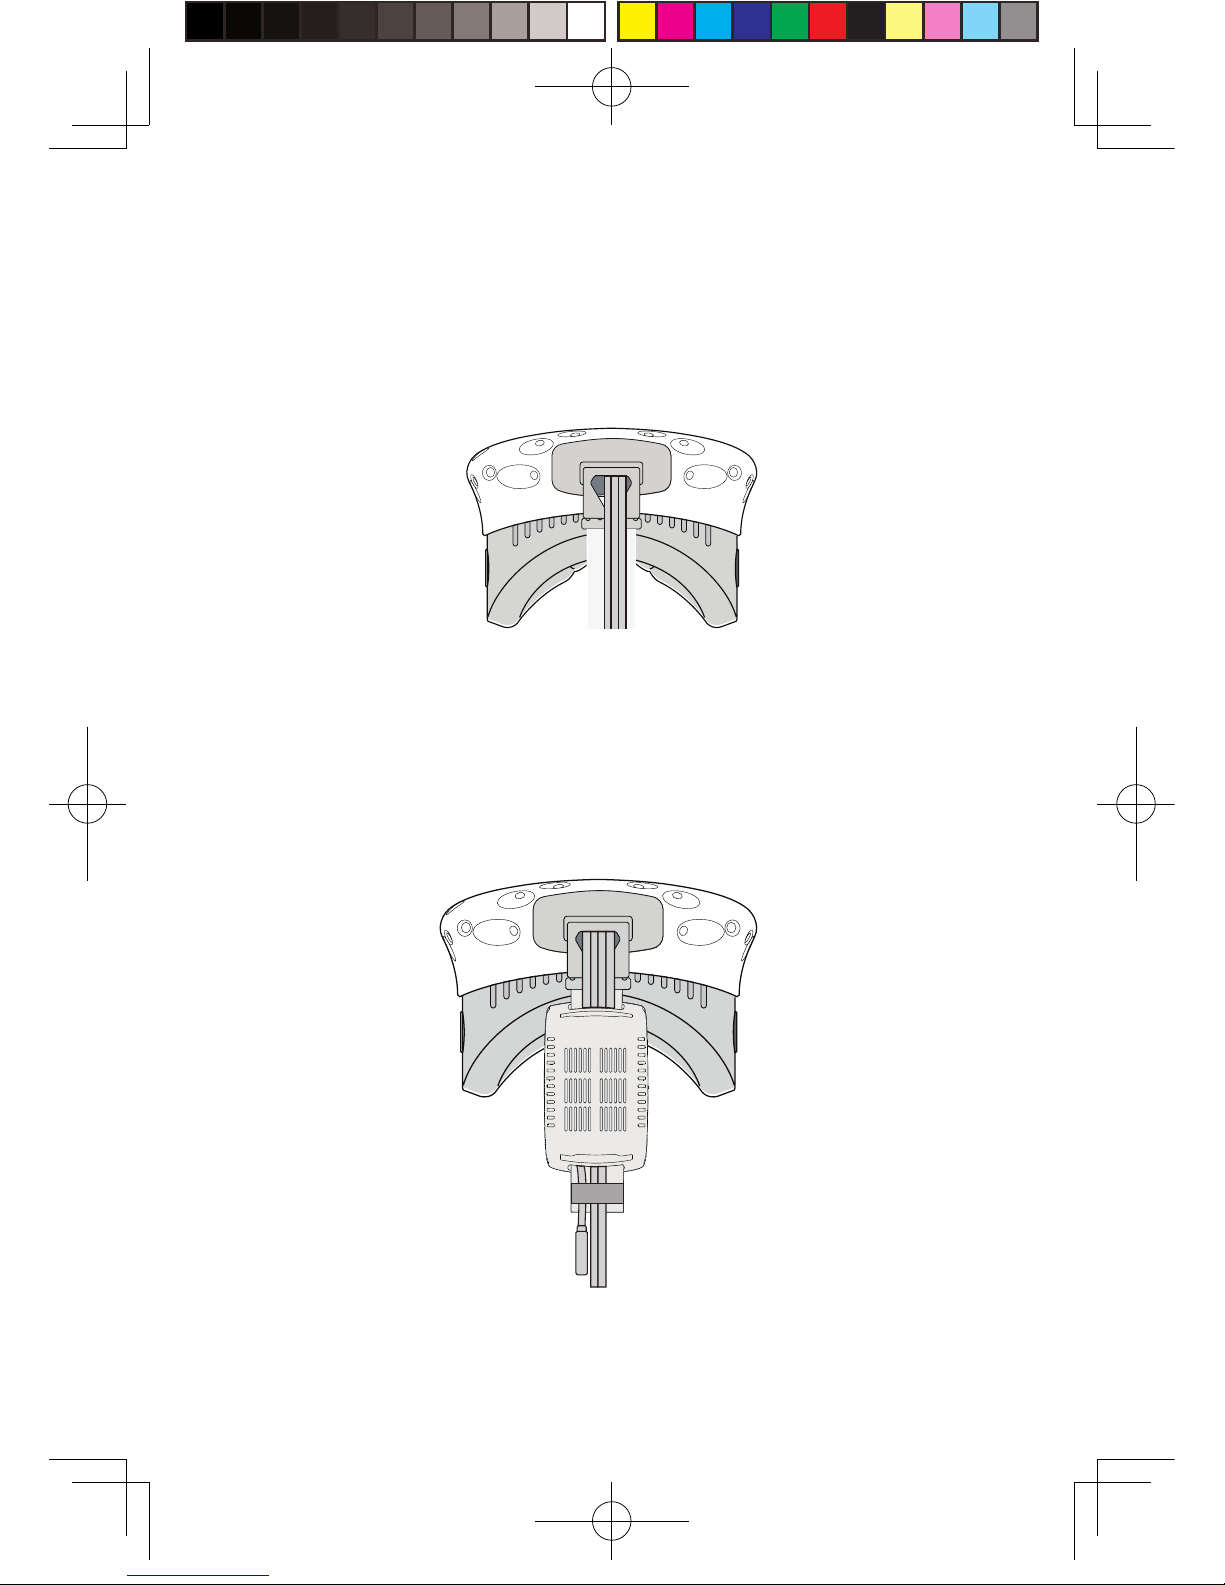
⑤
Stra igh t en out the cable, hat ch co v er back again, it is
recommended that y ou a djust t he length of t he s lidin g zone to
meet the HMD recei v er t o the end of slidin g z one and the cable
still tight.
Step f our: O v e rall adjustment
①
Slide the in t erface of l ong connection cable (to b e plugged into
the power su pply ) throug h t hese two sl eev es at the b a c k of H M D
and hang on the back.
新版印刷(无蓝牙)英文 2017-05-24-US.indd 12
2017/5/24 上午10:51
Page 13
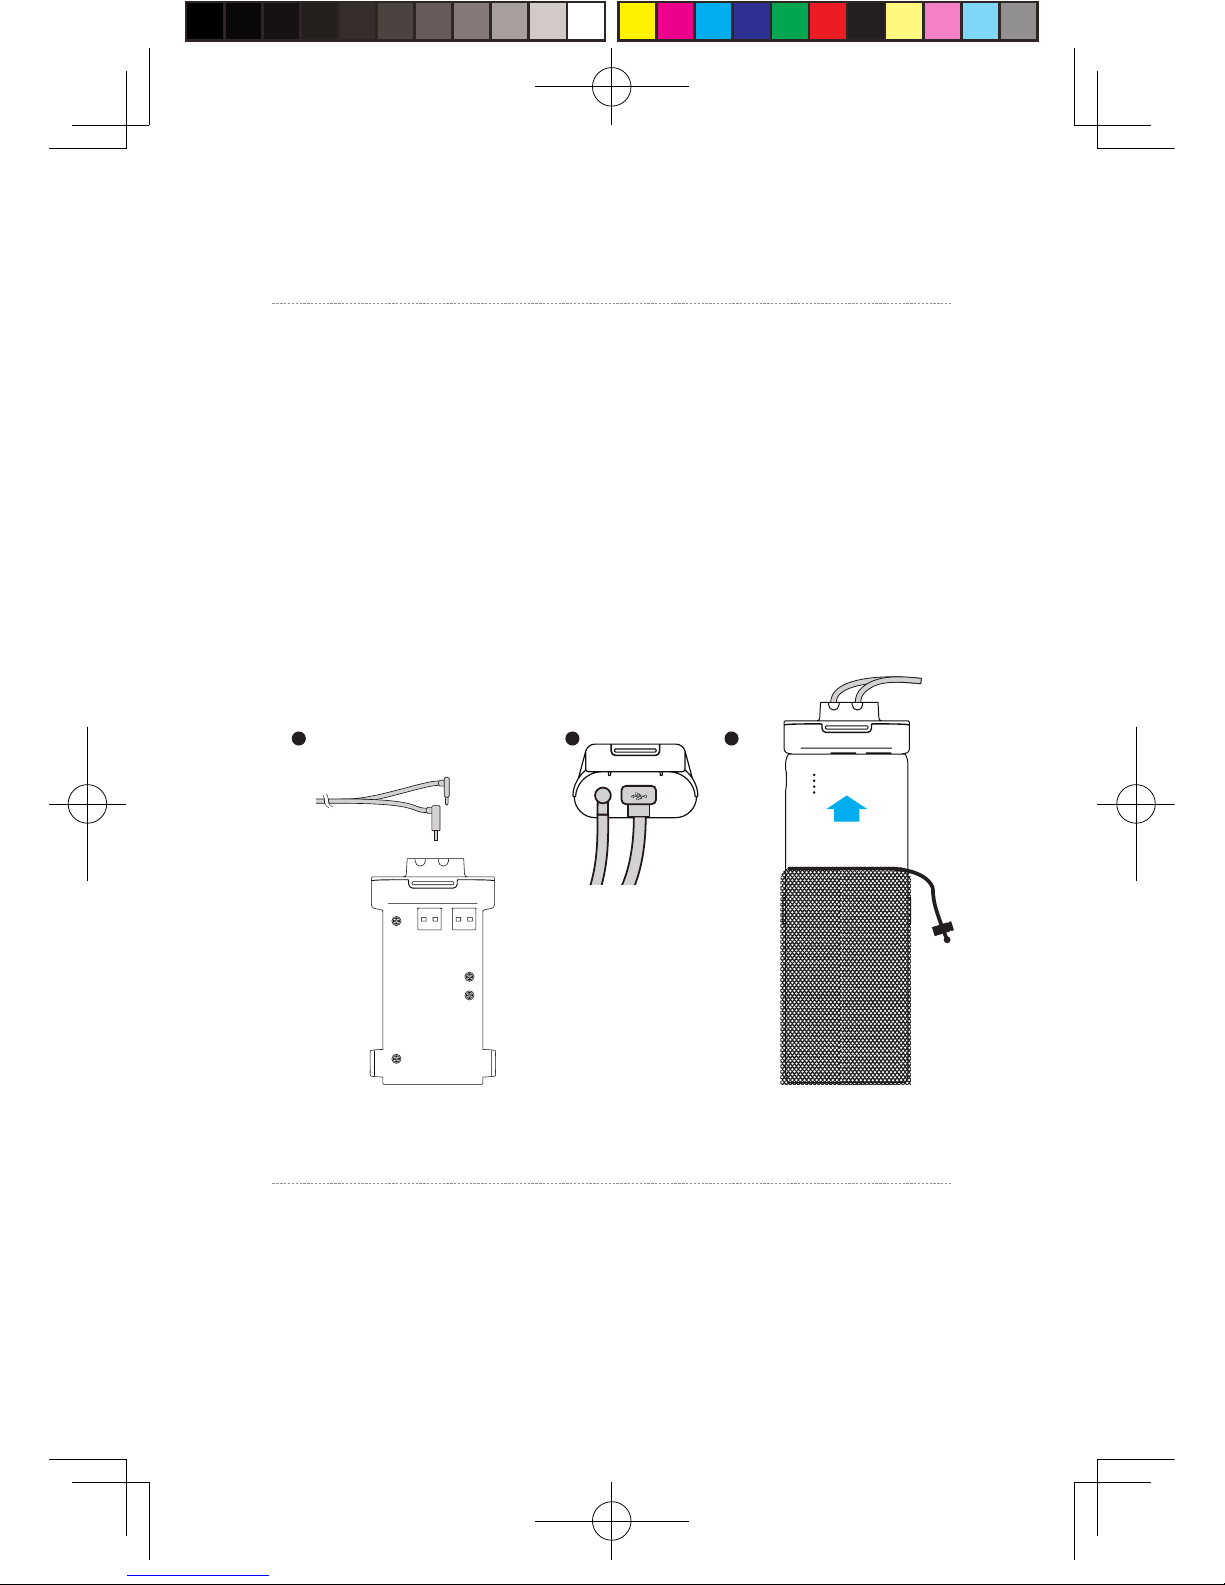
Step one: As show n i n t he figure, resp ectively connect t he d and
e interfaces of long connection cable t o t he p o wer box and HDMI
port;
Step two : A s show n i n t he figure, connect the porta ble p o w er
bank to the power b o x a n d wh en successfu lly connected, t h e blue
battery light on t he p ort a ble p o wer bank turns on t o i n dicat e
the stat e of charg e. In ord er t o i mprov e t he utiliza tion rate o f
battery charge, pleas e onl y connect to t he p ortable pow er b ank
prior to op e r a tion o f the prod uct . And a fter o pera tion, remo v e
the portable p o w er b ank i n the first place.
Step t hree: P u t t he completed p o w er supply as w e ll as t he power
box in a p ort a ble p ack and s tring t he p ack t o p revent falling o f
power supply in motion.
2、Power box connection instructions
1 2 3
10
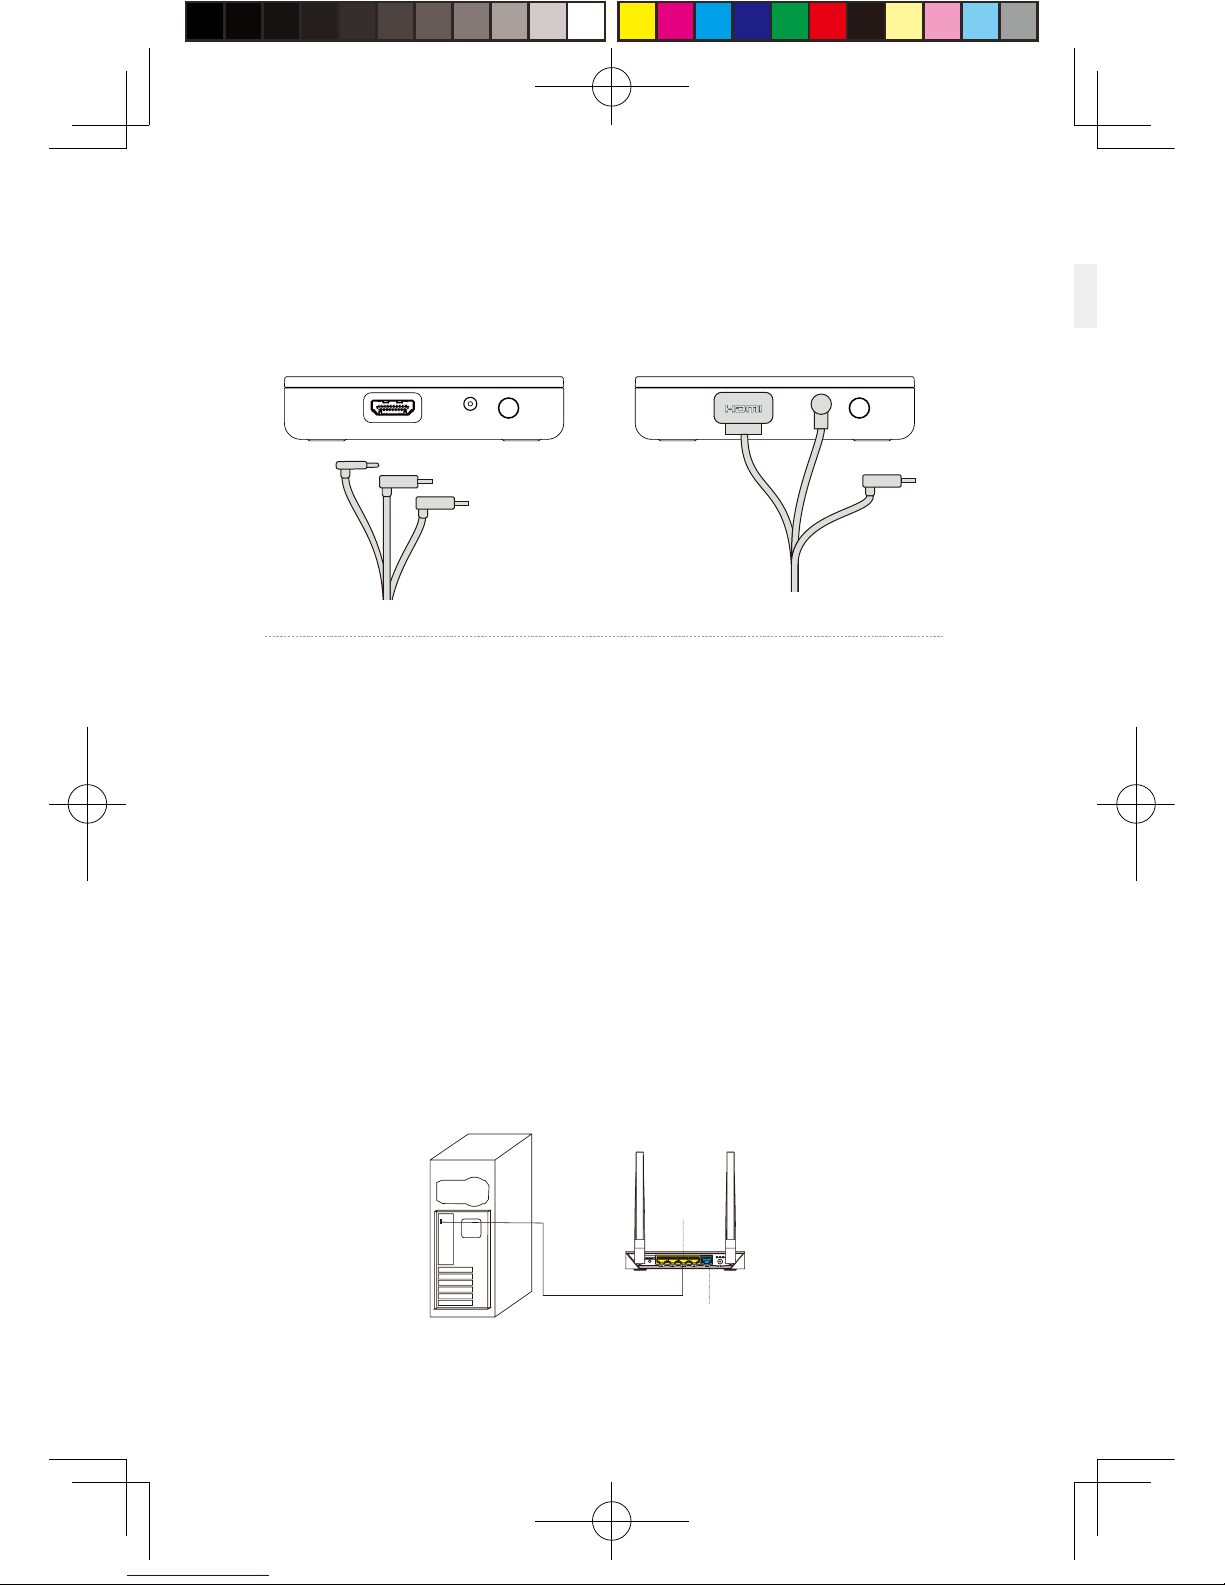
Step one: Disconnect po w er s u pply for VIVE streaming b o x .
Step two : As f or t he existing VIVE 3 -in - 1 cable d e t ached from
the HMD, connect the DCI N po w er interface and the HDMI
interface t o t he c orresp ondin g port on t he PC t r ansmitte r, and
3、Instructions on connection of PC transmitter
新版印刷(无蓝牙)英文 2017-05-24-US.indd 13
2017/5/24 上午10:51
Page 14
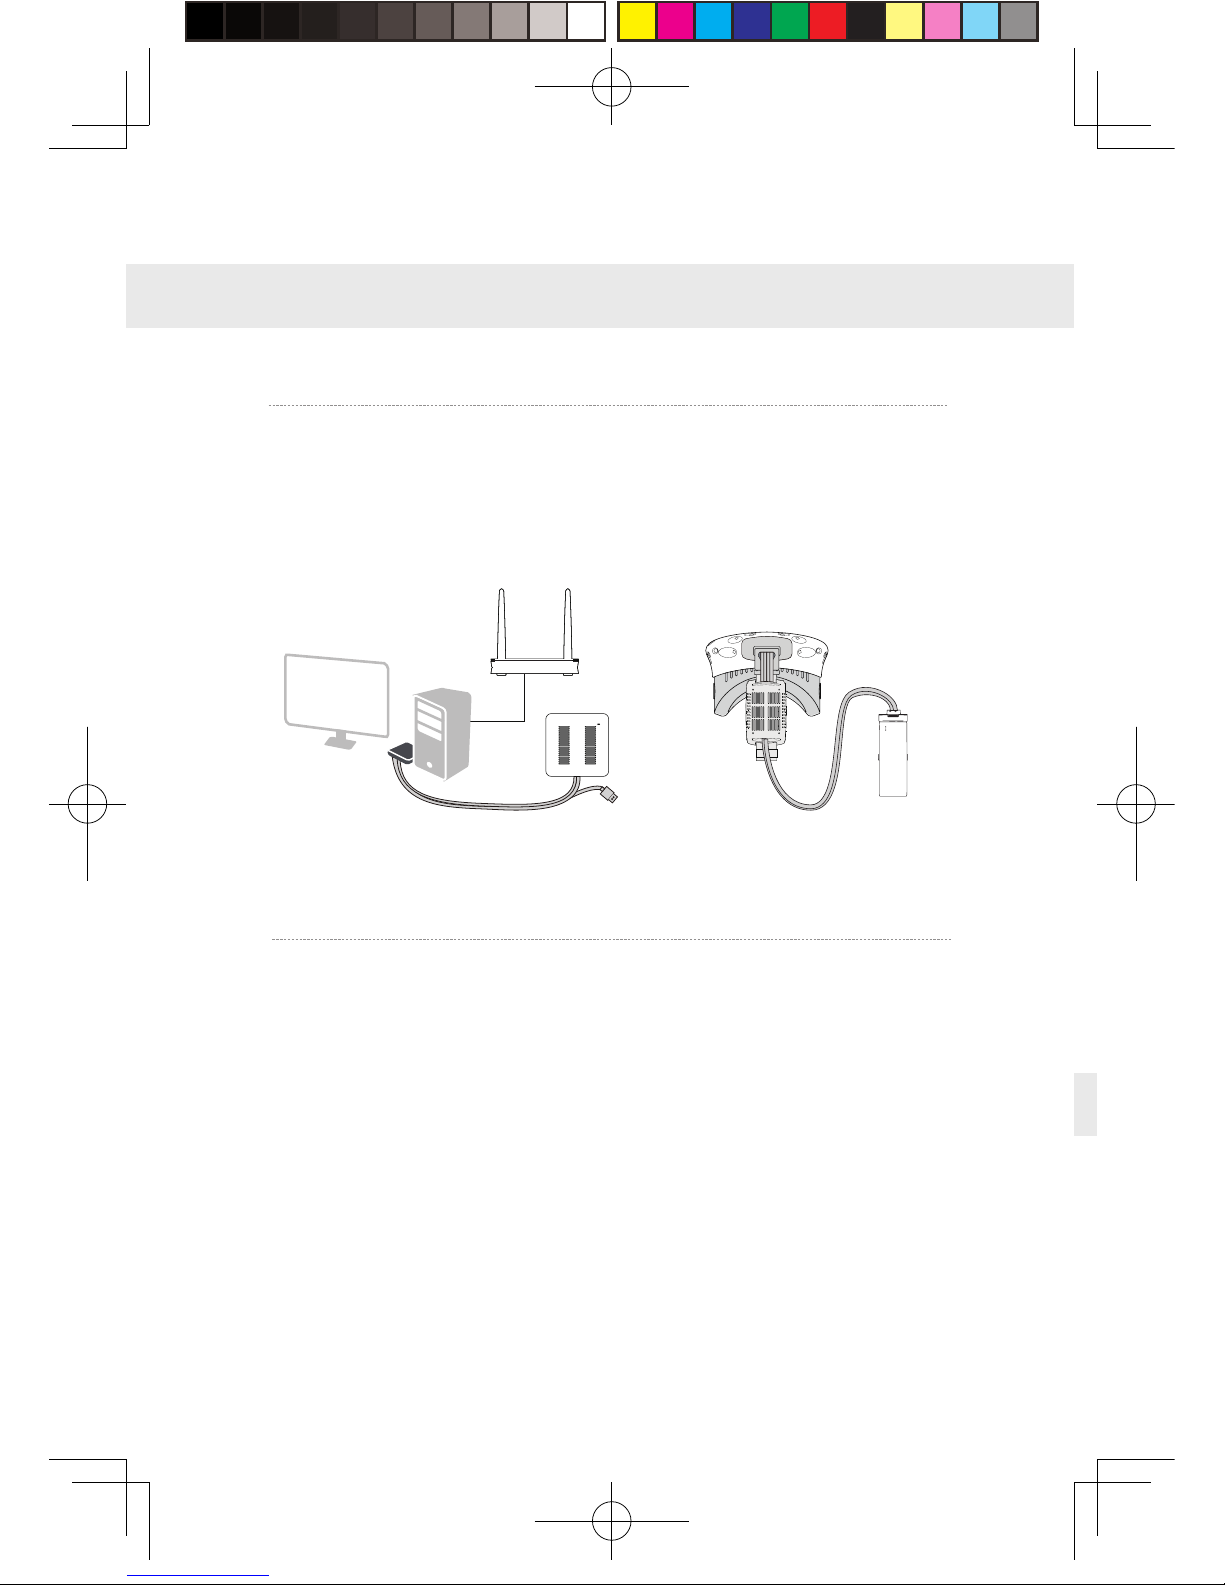
4、Instructions on connection of router
Step one: C onnect the rout er p o w er adapter and confirm p o w er
indicator on the f ront of p anel i s on.
Step two : C onnect the y e llow port of router t o t he PC host
through network ca ble, as show n i n t he figure.
Step t hree: In PC’ s network connection Settings of Wi n d o w s
system, select “Local connection” t o connect t he rout er of
wireless adaptor, chang e t he connection of TCP/IP Settin gs t o
automatically obtain I P address and DNS server address.
Note: DO N O T make any setting s i n t he rout e r. DO NO T restore
factory settings. Please use it directly w hen connectin g
network cable. In order t o optim i z e user's p rod uct experience,
we recommend t o place t he rout er in an open l ocation with a
90-degree antenna, t here i s no ob v i ous obstacles b e tween t he
router and VIVE product.
In order to ensure PC can access to the Internet normally while wireless adaptor
is in usage, it need to insert the original network cable to WAN port of the
router.
11
the USB in t erf ace i s not req uired to b e connect e d .
Step t hree: Connect power supply for VIVE streaming box.
LAN Port
WAN Port
新版印刷(无蓝牙)英文 2017-05-24-US.indd 14
2017/5/24 上午10:51
Page 15
1、Do w nl oad the soft w are client
4. Installation of software client
TPCAST Wir eless Adapto r fo r VI V E
12
Visit the we b s ite of TPCA S T wh i ch is www. tpcast .cn and l o g in,
browse the pa g e of TPCA S T wirel ess adaptor for V IVE , click t o
download the wirel ess a d a ptor for VIVE assistant. T he current
version o f c lient is compatible with Windows 7, Windows 8 o r later
version, Windo w s 10.
①
Double click the icon t o run t he d o w n loaded .exe file for
installation. If a l read y i nst a lled any o t her v ersi ons of the c lient ,
please uninstall a n d rest art t he PC according t o t he p rompt.
2、Install t he connection assist ant soft ware
②
Followin g the i nst ructions o f the system, select t he i nst a llation
path, complete t he client i nst a llation, and g ener a t e desktop
shortcut icon of wirel ess ad a ptor connection assi stant.
TPCAST
Setup.exe
新版印刷(无蓝牙)英文 2017-05-24-US.indd 15
2017/5/24 上午10:51
Page 16
1、Installa tion verif y
2、Pai r HM D recei ver with PC t ransm itte r
Veri f y a ll connections of the wireless adaptor i ncl u din g the H M D
Rece i v e r, PC transmitte r, p o w er box & p ort a ble p o wer bank,
router, and mak e sure t he p ort a ble power bank i s fully c harg e d .
5. Operation instructions
Pair H M D rec e i ver with PC tr ansmitter f or t he first time op e r a tion
only.
①
When the power i s on, t he v ideo s ignal connection indicat ors
on both rec e i v er end and transmitter will s t art blinki n g s l o wly.
②
Then keep p ushi n g the p a iring b u tton on b o t h ends for at least
5 seconds till all i n dicat ors are off.
③
Ensure there is no ob s t acl es b e tween the tra nsmitter and
receiver end and rel eas e t he pairin g b u ttons. T he video signal
indicator will return t o s l o w blinki ng mode aft er ab out 5 second s .
④
No more opera tion and w ait for about 10 seconds till the signal
indicator chang e t o fast blinking mode w h i ch means t he p a iring
is completed. In t he second o pera tion, t he signal i n dicat or will
quickly blink about 10 second s aft
er the energization.
13
新版印刷(无蓝牙)英文 2017-05-24-US.indd 16
2017/5/24 上午10:51
Page 17
3、Erect PC transmitte r
Appropriat e l y erect b ased on the current site condition for
optimal outcome, refer to t he i nst ructions on PC transmitter
setup for det a ils.
14
4、Run wirel e s s ada ptor connection assistant
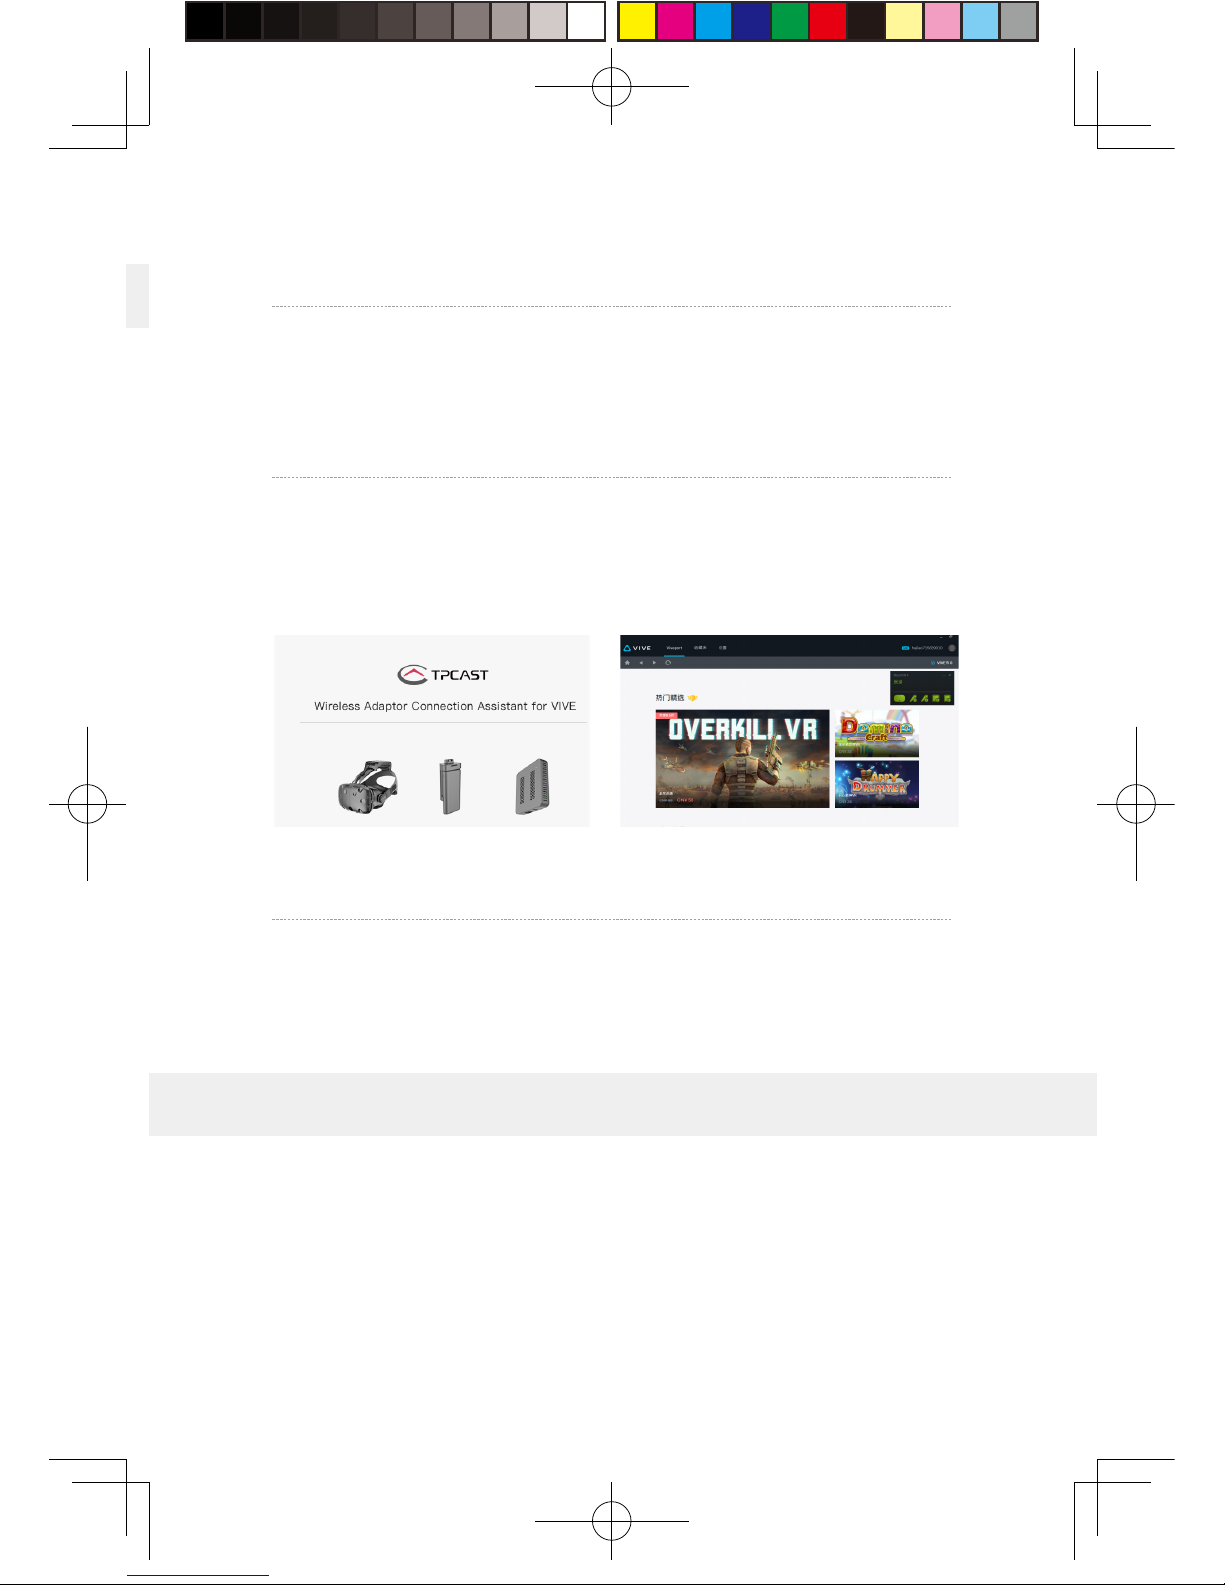
Double-click t he PC deskt o p c lient icon, then click “Start ” aft er
the client st art e d .It will aut omatically test the e n v i ronment
of wireless adaptor w orki n g in t urn .When wirel ess connection
starts, please start VIVEP ort and S t eamVR software.
5、En j oy wirel ess VR
In normal opera tion of wirel ess a d a ptor, t he i n dicat ors of b o t h
transmitter a n d recei v er end will change from fast blinki n g to
normal light mode, H M D i magin g function and manual o p e r ation
shall be normal.
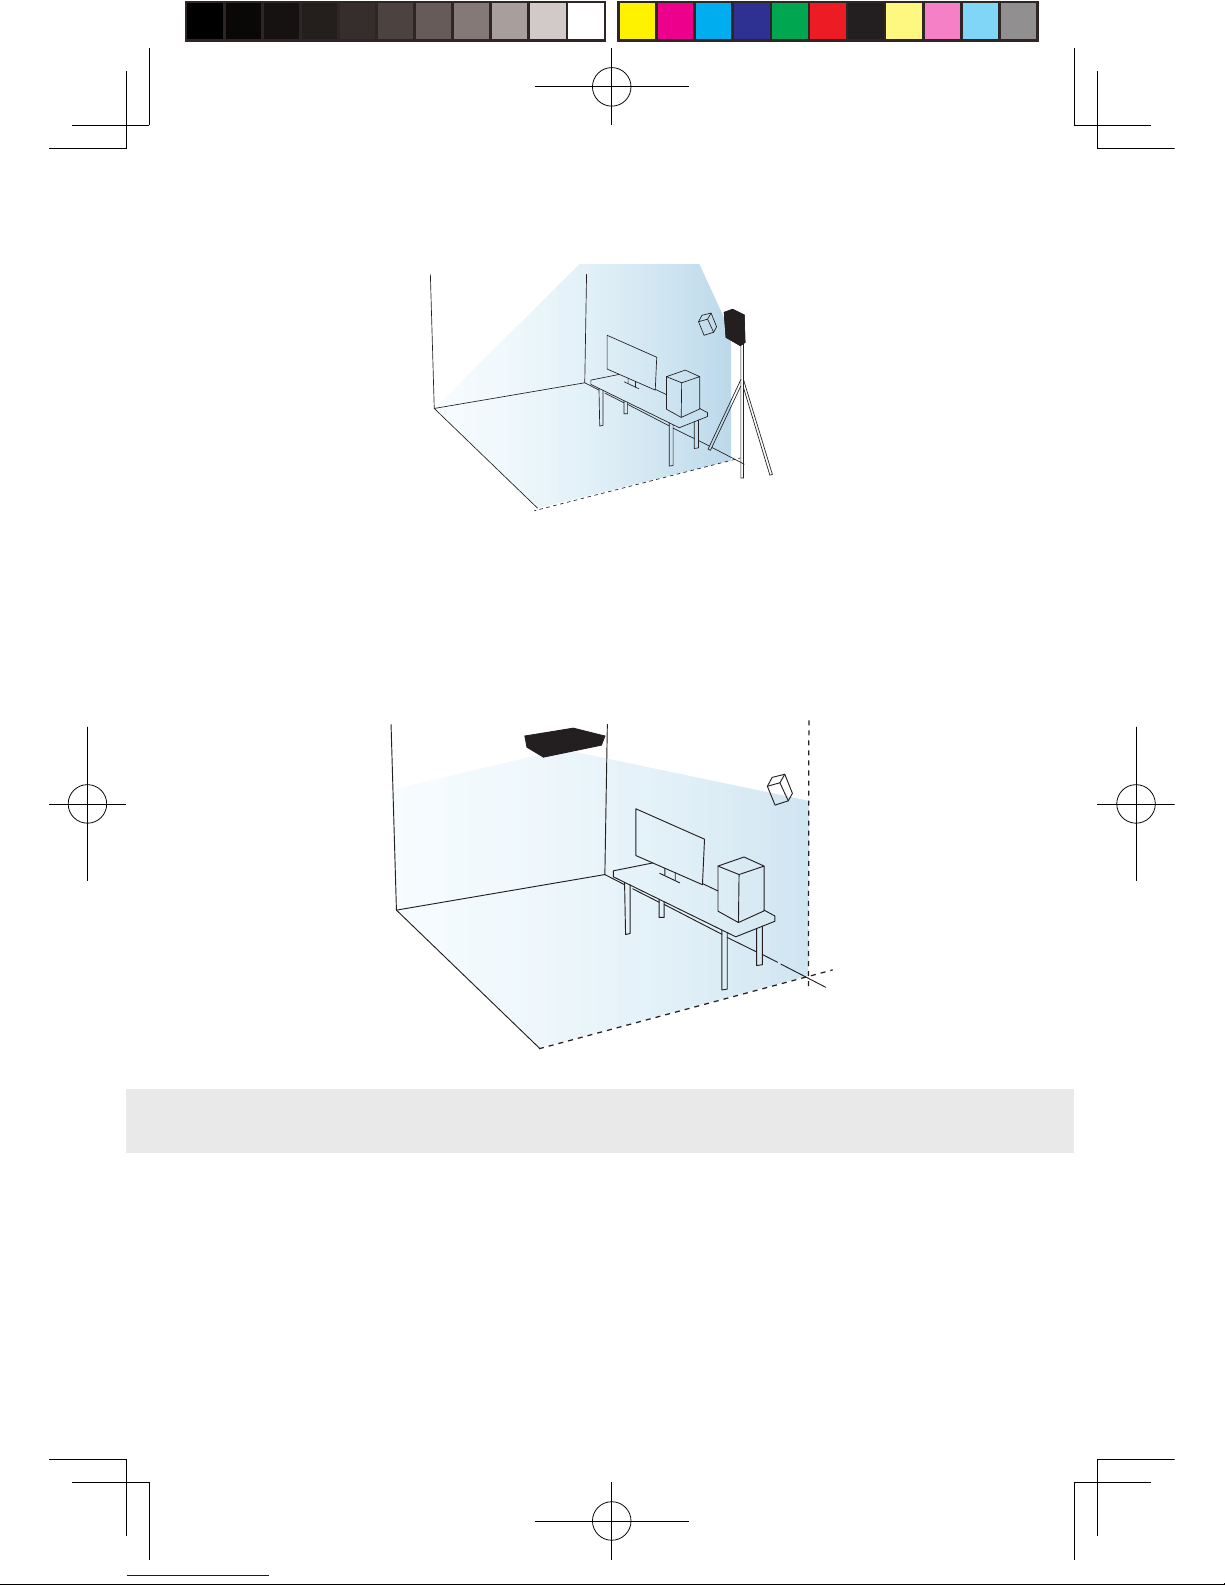
Erection of PC transmitter i s subject t o t he specific situation of
proposed location, t he set u p plan, t heref ore different setu p plan
will be applied accordingly t o different cases. We recommend t o
setup the PC t r ansmitter w here cl ose to your V IVE laser l ocator
(lighthouse) and turn the side with t a g s against the play area.
As shown belo w :
6. Instructions on setup of PC transmitter
新版印刷(无蓝牙)英文 2017-05-24-US.indd 17
2017/5/24 上午10:51
Page 18
PC transmitter
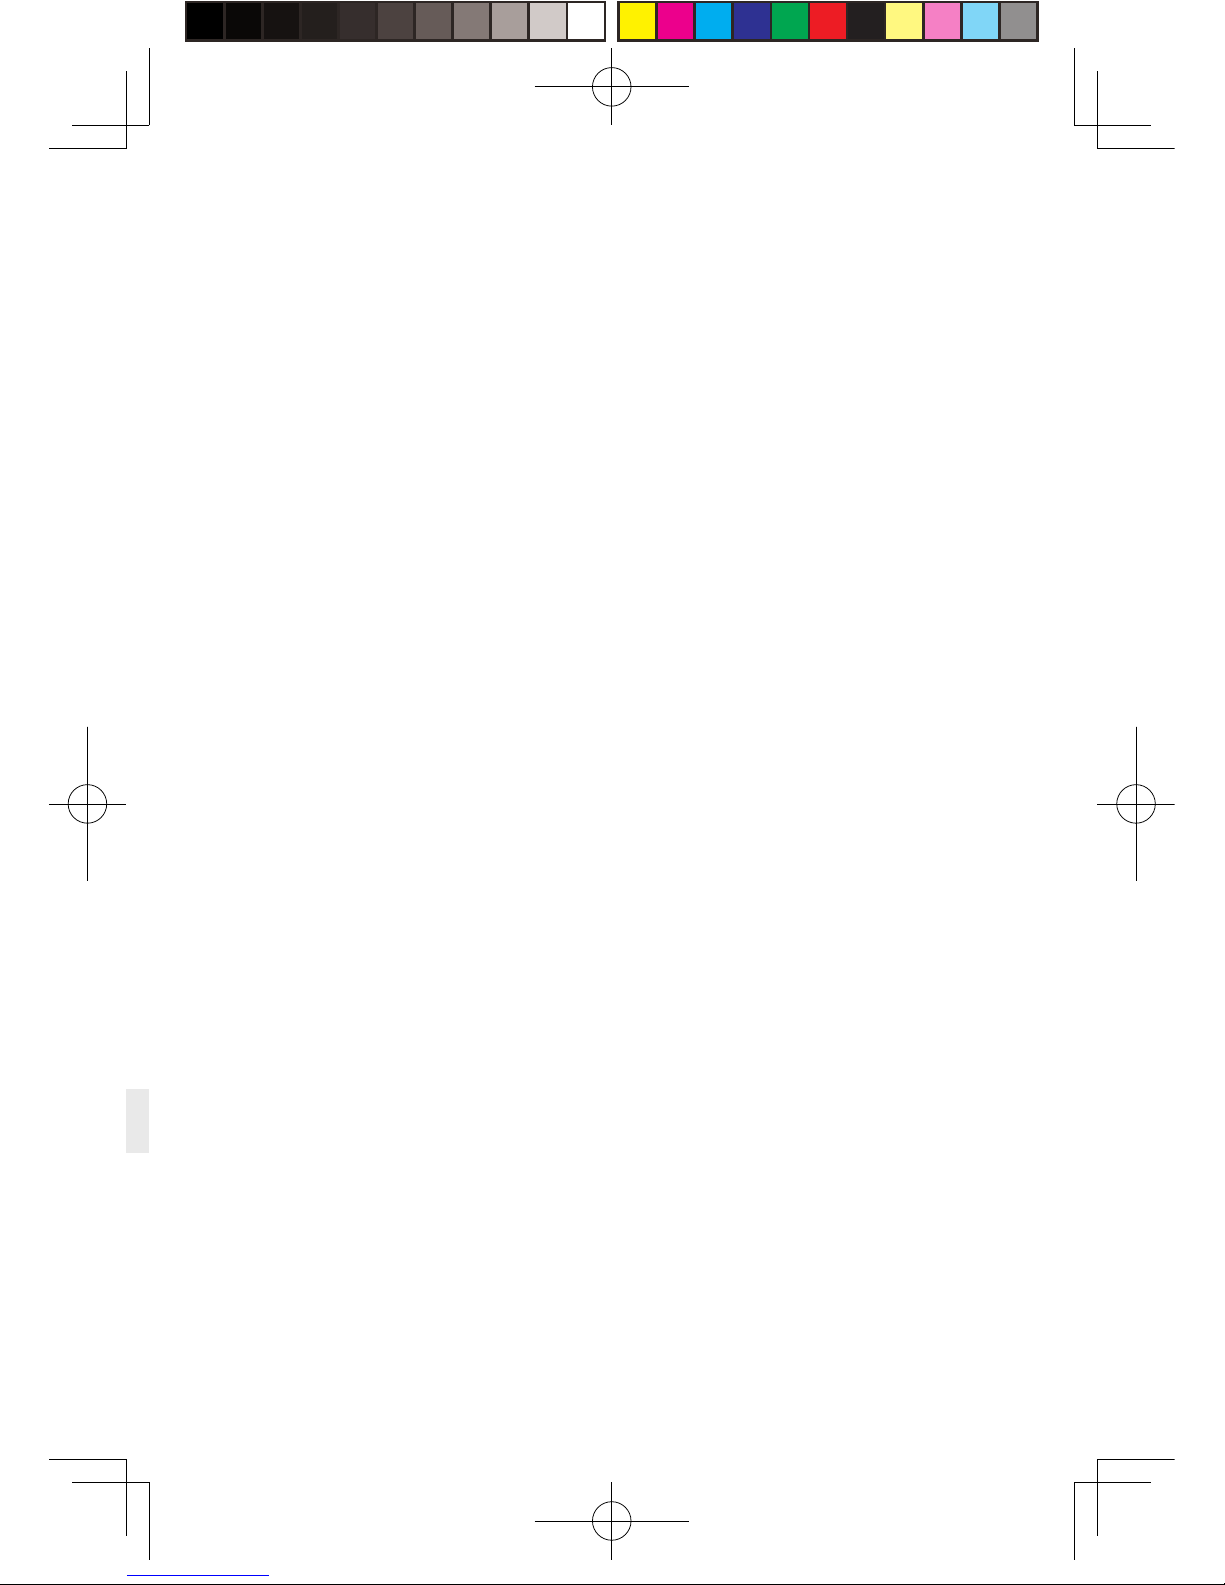
If failure of connection still occurred, follo win g t he i n structions
from above, or y ou are exp eri enci n g sluggish video pla y or
stopping in some angle, corner, w e will suggest you placing the
transmitter abo v e t he pla y area, as shown b e l o w :
Safety:
User need to pay attention t o safet y with i n the play area si nce i t ’s
free of tangling b y cable s or wires. T he user shall not bump i n t o
anyth i n g around t he play area or the play i s und er w a tch.
7. Safety and note
PC transmitter
15
新版印刷(无蓝牙)英文 2017-05-24-US.indd 18
2017/5/24 上午10:51
Page 19
16
Cable:
In order to cont a i n t he d amage may cause to t he cable s , i t ’s
suggested not p u llin g cable t o fetch the adaptor or unplu g a n y
plugs or interfac es.
Heat rejection:
The adaptor will g ener a t e heat duri n g normal ope r a tion and
the tempera t ure on t he surface ma y rise up after l ong peri o d
opera tion. Please i mmedia t e l y stop o p e r a tion and contact our
customer service when abnormal heat g ener ation occurred.
Battery safety :
The portable p o w er b ank as i ncl uded i n t he a daptor p ackag e is
power supply de dicat e d for t h is product, y ou must not repla c e with
any non-TPCA ST portable po w er b ank, and a ny damage caus e d
accordingly will wa i v e t he warrant y o f the adapto r. In ord er to
mitigate the r i sk of fire haz ard or comb ustion haz ard
, please do
not disassemble, squeeze the p ort a ble p o wer bank and shall not
expose the p o w er s u pply to environment e x ceedin g 6 0℃, or toss
into the f i re or w a ter.
Children use:
Children are not allo w e d t o use this p rod uct , please k eep this
product in approp r i a t e l ocations where beyond reach o f c h ildren
and please not grant access t o children. If e lder children are
allowed t o use t h i s product, ple a se d o p roceed under close w a tch
of adults.
Rechargin g:
The portable p o w er b ank can b e recharg ed through t he household
cell phone charged and cha r ger gre ater t h an 2A is recommended in
order to red uce t he chargin g p eriod. Nine to twe l v e hours will b e
needed to b e fully charg e d . C harger greater t han 2.4A s hall not b e
used for recharging.
新版印刷(无蓝牙)英文 2017-05-24-US.indd 19
2017/5/24 上午10:51
Page 20
Why alwa ys f a ile d the VR cont rol connection t est s ?
①
Check the test res u lts and check t he p o w er, router w het her i s
properly inst a lle d follo win g the instructions, and energiz e .
②
If still failed the test s a f t er sev e ral t r y, re-inst a ll the p ort a ble
power bank, rout er and the reb oot t he comp uter if nec essary.
③
Relaunch t he wirel e s s ad a ptor connection assistant a n d ret r y,
please contact the customer service i f t he p roblem i s still not
solved.
How to veri f y t he p a iring of recei v er end and transmitter?
①
Make sure the receiver and t r ansmitter are connected and
energized, and there is no o b s t acl es in be tween, i n compliance
with setup requi rement s .
②
Pair follo win g t he operation i nst ructions, i f t he indicators
switch from slow blinki n g mo
de to fast blinki n g mod e for
about 15 seconds after energize d , t hen t he pair i s succ essfully
1、Connection i ssues
8. Frequently Asked Questions
17
Service and maintena nce
The adaptor is non-wat erp roof p rod uct , t herefore attention shall
be attached f or p rop er p rot ection including shall not use blo w e r,
air duct, et c. t o d ry t he product when wet or t he p rod uct m ay
otherwise not b e a ble t o normally opera tin g .
Please do not disassemble t h i s p rod uct and avo id a n y surp rised
collision, otherwise, ri sk of e l ect r i c shock, short circu it and f i re
hazard would be i n v o l ved.
Please ope r a t e and maintai n i n an en v i ronment of temper a t ure
ranging from z ero t o f ort y degrees Ce l s i us.
Please use t he p art s p ermitted only an d shall not connect t o any
incompatible p rod uct s or parts.
Please refer the local regulat ions on d i spo s al of elect ronic waste s
for proper wa ste ma n agemen
t.
Please do not spread t he small s i z e objects the i n t o t he p rod ucts
through the surface v ent s .
Please do not clean t h i s p rod uct with any irritatin g chemi cal ,
detergent, liqu id d e t erg ent or aerosol.
新版印刷(无蓝牙)英文 2017-05-24-US.indd 20
2017/5/24 上午10:51
Page 21
Why frequently controller vibr a tin g or aut omatic reloca tion i s
happening duri n g pla y i ng?
Vibrating of manual cont roller i s usually caused by the
complicated am bient network condition, or caused b y wireless
channel jam which i m p a i r t he wireless signal t r a nsmi ssi on.
①
Firstly, check the l ocation of rout e r, we suggest placing on
18
2、Ab normal p roblems d urin g o pe r a tion
completed.
③
If still failed in pa i r i n g aft er repeating of st e p 2 herei n before,
please contact the customer service.
If the VR is still not l aunched two mi nut es after the in dicat ors
(both receiv er end and t ransmitter) switchin g to f ast blinki n g
mode, the indicat ors will aut omatically t urn off and s witch to
standby mode i n ord er t o save energ y. I t will be aut omatically
activate d aft er connection and launchi n g of VR.
How to connect the rout er? And connectin g PC to Ethernet?
①
Use the associa t e d Ethernet cable to connect to t he blue p ort
of router and the PC.
②
If Ethernet cable is used on PC to access t o t he Ethernet, then
connect the exis tin g Ethernet cable t o the ye llo w port .
③
If PC access the Ethernet throug h wirel ess, please mak e
sure normal oper a tion of exi s tin g wireless (or normal acc ess
of wireless), then connect t o t he rout er t hrough Ethernet ca ble
which is t o c omple t e c onnection to the router without im pair i n g
on existing wireless access.
Why router i s i ncl u d e d in the adaptor p ackag e, ma y I use m y
own router?
TPCAST W ireless A daptor for VIVE is glo bally t he first version
at t he present , and t he router is p art of t he adapto r. We will
design b uilt-in rout er i n fu t ure prod uct s. Currently, t his rout er
is cu stomi zed as w ell as optim i zed and exc l usive l y to s erve the
TPCAST wirel ess adaptor f or VIVE. For t he concern of in t erruption
may b e im p ose d on the exis tin g router, we not suggest using t he
existing rout er to c onnect to t he TPCAST W i reless Ada ptor for
VIVE.
新版印刷(无蓝牙)英文 2017-05-24-US.indd 21
2017/5/24 上午10:51
Page 22
19
an open table or g round , and a void locating in t he corner, b ack
of computer host as much as p ossible i n order to keep out a n y
obvious o b s t a cle blo c king the router and t he a d a pto r. Check i s
the manual controller vibratin g is m itiga t ed.
②
If not mitigat e d y e t , we suggest you selectin g the o ption o f
switching c hannel from t he d ropdo w n on the right b o ttom corner
of connection assistant , ma y t ry sev e ral channel s. If t he p roblem
is still not solve d , please t ry i n a different location.
Everythi n g a ppears normal on t he PC from the connection
assistant t ests t o l aunchi n g of Steam VR , how e v er, wh y is there
no content play i n g i n the HMD v i e w ?
①
Please check t he i n dicat ors of recei ver and tra nsmitte r, i f t he
indicators are of f, then check the connection o f
adaptor for VIVE
and power supply. Unplug and re-plu g p o w e r, wait for a t least 10
seconds and the c hec k t he indicat ors ag ain. If b o t h indicat ors are
in fast blinking mod e, manually shut off t he steam VR, reboot
the Steam VR. Try t o reb oot the comp u t er if t he problem is still
not solved .
②
If after 10 seconds, t he signal i n dicat or is still in slow blinkin g
mode, as the first p r i ori t y, please check i s t here any obstacl e
blocking the recei v er and t ransmitters, or repai r t he recei v er
end and transmitte r, ref er to section of o p e r a tion instructions for
details.
③
If the indictor light is normally on, please check the receiver of HMD and the
HMD short HDMI cable is loose fall off.
④
If problem still not solved, please contact the customer service.
After wireless adaptor connection is successful, start Steam VR but it displays
unready. Why does all device status icon in Steam VR display as gray?
It can return normal state by restarting VIVE HMD. Operation as below: Unplug
and replug power connector (1-B) of VIVE HMD, or unplug and replug power
connector of power box (1 - E). If still can't repair, please try to restart the PC.
Why view t urn t o black/ screen turn off ?
Off of s c reen or black screen i s caused b y t he interruption o f
video transmission, as t he f i rs
t priori t y, please check t he b a ttery
charge. If the charg e of b a ttery i s adequate, it m a y caused by
obstacle s be tween t he recei v er and tra nsmitte r. If the signal
indicator is i n fast blinki n g mode, then wa it shortly till t he
新版印刷(无蓝牙)英文 2017-05-24-US.indd 22
2017/5/24 上午10:51
Page 23
20
reconnected. If still not connect e d , ple ase disconnect and shut o f f
the connection assist ant , reb oot t he adaptor for VIVE.
Why all of sudden the vi e w t urns t o completely g r a y, t here is no
image at all?
A gra y sc reen vi e w i s usually caused by disconnection of V R
wireless control, please v eri f y the battery charg e, rout er
connection & pow er supply. Check t he connection as s i s t ant for
any warni n g in f ormation. If disconnection occurred, please retry
following the i nst ructions .
System loading error or unable t o l o ad occurred in wireless
connection assistant, how to handle ?
It may b e caused b y not restar ting PC according to p rompt
after uninstalled wirel e s s ad a ptor connection assistant. Pleas e
uninstall the current c lient , rest art PC, then reinstall client . T he
issue can be sol v e d .
The connection assi s
tant is used and successf u lly launc hed the
steam VR, what should I d o if sudden disconnection occ urred in
the middle of g ami n g ?
①
Check the connection a s s i s t ant agai n st a n y w arning i nformation.
②
Reconnect as i nst ruct e d .
③
Wa itin g duri n g t esting procedure a n d a p rompt box say i n g
waiting t o restore will p o p out after certain p eri o d , click t o
confirm. Wait till the t est s comple ted or click on the option o f
returning t o home p a g e and start testing from t he f i rst ste p.
④
If it still not o p e r a ting after completion of ste p three, y ou m ay
exit the connection assistant and unplu g the p ortable p o w e r,
reboot the system.
After successful connection o f a d a ptor, wh y d oes c o l or disorder
and distortion in imagin g occur?
Color disorde r,
blurring and dis t ortion are a ll cause by abnormal
video trans m i ssi on, please v erify a ll cable /wires u s e d for
connection of VIVE and t he a d a ptor for VIVE are original prod ucts
of HTC and TPCA S T. Veri f y a ll interfaces ag a i nst a n y unstable or
loose connection, try t o unplu g and plug all int erf aces for next
try. Please contact our cust omer servi ce i f t he problem is still not
新版印刷(无蓝牙)英文 2017-05-24-US.indd 23
2017/5/24 上午10:51
Page 24
21
3、Other questions
When using the wireless ada ptor connection assi s t ant , st eam VR
is not launched aft er p assi n g of all tests, what should I d o ?
Veri f y all settin g s i ncluding pow er b o x and rout e r, may manually
launch the Steam VR aft er v erification.
Why the camer a o f my HM D can't w ork normally ?
At present, TPCAS T wirel ess a d aptor for VIVE is t he glo b a l first
released version, t he f unction i s t emporarily una v a ila ble .
Can multiple TPCAST wireless ad a ptor f or VIVE b e used in t he
same area at the same time?
No. Currently, the v ersi on of TPCA S T wirel ess adaptor for VIVE is
for ordinary users, it t emp o rarily does not support multiple users
at the same time.
For a full charge p ort a ble p o wer bank, how long can it las t ?
It can be continuousl y o p e rating for a b out 5 hours.
How long will it tak e t o b
e fully charged?
About nine t o twe l v e hours through a 2A cha r g er or l ong er with
charger lower t han 2A. Please d o not use charg er greater t han
2.4A.
solved.
新版印刷(无蓝牙)英文 2017-05-24-US.indd 24
2017/5/24 上午10:51
Page 25
22
Indicator
Video signal
connection
indicator
Video signal
connection
indicator
HMD
receiver
Power
box
Power b o x
lamp
Portable
power
bank
Battery
charge
lamp
PC
transm itte r
Green
Green
Red
Blue
Off
Off
Off
Slow
blinking
Slow
blinking
Fast
blinking
Blinking/
normal light
Normal
light
Normal
light
Normal
light
Power off o r
system standby
Power off or syst e m
standby
To be paired
To be paired
Successfully paired with
the transmitter
Successfully paired with
the transmitter
Video in transmission
Video in transmission
System in
normal opera tio n
Each stands fo r
25% charge
Power off
Location Color Status Description
Status of indicators
Fast
blinking
新版印刷(无蓝牙)英文 2017-05-24-US.indd 25
2017/5/24 上午10:51
Decoration of Conformity
“Hereby, [Name of manufacturer/ retailer], declares that this
[type of equipment] is in compliance with the essential requirements
and other relevant provisions ofDirective 2014/53/EU.
2.4G spectrum:2.4-2.4835 GHz Power:15dBm
5G spectrum:5.15-5.25GHz Power:13dBm
Page 26
TPCAST WIRELESS ADAPTOR for VIVE LIMITED WARRANTY
PLEASE REA D THIS LIMITED W A RRANTY CA REFULLY TO
UNDERSTA ND Y OUR RI GHT S A ND OBLIG AT I ONS . THIS LIMITED
WARRANTY CONT AINS A MANDAT O RY ARBITRAT I ON CLAUSE
WITH A CLAS S A CTI ON WAIVER.
BY USING YOUR TPCA S T PRODU CT OR ACCESSO R Y, Y OU AGREE
TO THE LIMITED W A RRA NTY,INCLUDING THE MANDA TORY
ARBITRAT I ON C LAUSE AN D C L A S S ACTION WAIVER B E L O W.
IF YOU DO N O T A CCEPT THIS LIMITED WARRANTY, DO N OT
USE YOUR TPCA S T PRODU C T.IN STEAD, P L E A S E RETU RN IT TO
THE RETAILER F ROM WHOM Y O U PURCHASED I T WITHI N THE
RETAILE R ’ S RETURN PERIOD.
THIS PRODUCT IS FOR PERSONAL, NON-COMMERCI A L USE ONLY.
WARRANTY COV ERA GE IS V O I D IF USED FOR COMMERCIAL
PURPOSES.
DEFINITIONS
The following d e fin itions apply t o t h is Limite d Warranty :
1. “Product ” means t he TPCA S T WIREL E SS ADAP T OR F OR VIVE
system, which incl u d es PC Tr a nsmitte r, HMD R ecei ver, P o w er
Box, Port a ble p o wer bank, De dicat e d cable f or long distance
connection, HDMI short connection cable, router and po w er
charger for router p r o v ide d in t he box at t he time of original
purchase from an authoriz e d R e tailer.
2. “Normal Use C onditions” means common end-user us e und er
normal home conditions in accordance t o t he i nst ructions
provide d with t he P rod uct or Accessory or posted online.
3. “Acc essory” or “Accessories” means other second ary
component(s) that are i ncl u d e d in the b o x with t heProduct at
the time of sale, w h i ch i ncl udes: Port a ble p o wer bank, De dicat e d
cable for long dis t ance connection, HDMI short connection
cable, router and power char g er for rout er; pr ovided t hat the
component was manufa c t ured b y or f or TPCAST and can b e
新版印刷(无蓝牙)英文 2017-05-24-US.indd 26
2017/5/24 上午10:51
Page 27
identified by t he “TPCA S T ” t rademark, t r adename, or l o g o affixed
to the component as originally supplie d .
4. “Re t a ile r ” means a b usi ness t hat sells goods directly t o end
users, including t hos e with a p h ysical and/or online presence.
5. “State” means a St a t e, t he Dis t rict of Co l umbia, and a n y
other United S t a t es t erritory or p ossessi on.
6. “Warr ant y Perio d ” means twe l ve (12) mont hs from t he d a t e
You p urchased t he Product from an authori z e d Retailer.
7. “You” or “ Your ” means t he original p urchaser and/or original
end-user of the P rod uct .
WHAT IS COV ERED B Y THIS LIMITED WA RRA NTY?
During the Warr anty Peri o d TPCA S T warrant s t hat t he Product or
Accessory will be free from def ect s i n mat eri a l and workmanship
if used under N ormal Use C onditions.
This L i m ite d Warrant y i s given only to You, and may not b e
sold, assigned, tr a nsf erred , or giv en in full or i n p art t o any
subsequent purchaser or acq u i rer o f the Product or Accessory or
any other pers on. T h i s Li m ited Wa r r anty gives You specific leg a l
rights, and You may also hav e ot her righ t s w hich vary f rom S t a te
to Sta t e .
WHAT IS N OT COVERED B Y THIS LIMITED W A RRA NTY?
This L i m ite d Warrant y d oes not a pply other than to t he P rod uct
or Accessory. It therefore d oes not a pply t o any non-TPCAST
equipment or a n y softw are whatsoeve r, w het her d evelo p e d b y
TPCAST or a th i r d p art y, e ven if int end e d or l a b elled as for
use with the Product . T h i r d party manufacturers, suppliers , or
publishers may p r o v ide w arranties for t
heir own p rod u cts and
You ma y cont a ct t hem directly for service.
EVEN WITH RESPECT TO THE PRODU CT OR ACCES SORY Y O U
PURCHASED , THIS LIMITED WARRANTY S H ALL N O T APPLY:
新版印刷(无蓝牙)英文 2017-05-24-US.indd 27
2017/5/24 上午10:51
Page 28
1. if the P rod uct or Acces sory seri a l number, t he d a t e code, the
water i n dica t o r, or t he warrant y seal (v o idlabel) has b een remo v e d ,
erased, d e f aced , or altered , or i s illegible;
2. to any d e t eri o ration of t he cosmetic appear ance of t he Product or
Accessory due to normal wear and tear;
3. to consumable p art s, such as b a tteri es or p rot ective coatings
that are reasonably expected t o dim i n ish over time, unl ess failure
has occurred due to a mal function;
4. to malfunctions caused b y t he b a ttery, i f improperl y i nst a lle d
by You or anot her person, if t he seal s of t he battery encl osure or
the cells are b rok en or show evidence of t amp ering, or i f used i n
equipment ot her t h a n t hat for which it has been sp ecifie d ;
5. to malfunctions caused b y el ect r i cal surges or ot her el ect r i cal
current problems that are not t he f ault of t he Product or Acc essory;
6. to use not i n accord ance with t he user manual or not under
Normal Use Conditions;
7. to rough handlin g; u s e outdoors; exp osure t o liquids; dam p ness
or extreme thermal or environment al cond i t ions or a rapid c hang e in
such conditions; corrosion; or ox ida tion;
8. to use for commerci a l p urp oses, as the Prod uct i s i n tended only
for personal entertai nment purp oses;
9. to d e f e cts, conditions, or ot her issues caused b y or res u ltin g
from unauthorized modifications or connections or unaut hori z e d
opening, rep a i r b y use of unauthorized s p are p art s, or repair b y an
unauthorized p erson or l ocation;
10. to accidents, forces o f nat ure, or ot her actions beyond
the reasonable control of TPCAS T (incl u din g bu t not limited t o
deficiencies i n consumable p art s ) unl ess the defect w as caused
di
rectly by a malfunction;
11. to ph ysi cal damag e t o the surface of the Prod uct or A c c e s sory,
including b u t not lim ite d to cracks or scra t ches on t he surf aces of
the Product or A c cessory, i ncl u din g a ny screen or lens;
新版印刷(无蓝牙)英文 2017-05-24-US.indd 28
2017/5/24 上午10:51
Page 29
12. to any comp u t er or ot her product to whi ch t he P rod u ct may
connect. TPCAST d oes not w arrant t hat the op e r ation o f the Prod uct
or Accessory will be uninterrupted or error - free;
13. where the softw are l oad e d on the Prod uct , i ncl u din g but not
limited to t he op e r a ting system an d/or fi r m w are, need s to be
upgrade d , if such upda t es can be loade d b y You;
14. to any P rod uct in w h ich t he opera tin g syst em and/or fir mware
has been altered, i n clu din g a ny faile d a ttempts t o a lter the
opera tin g s yst em, regardless of whether such modif i cations are
authorized , a ppr o v ed,or ot herwise sa nctioned b y TPCA ST; or
15. to malfunctions caused b y unplu ggin g a ny cable from or
otherwise poweri n g o f f t he Product or y our comp u t er d uring a
firmware upda t e ; o r
16. to malfunctions caused b y t he use o f the P rod u ct or A c cess ory
with or connection of the Product t o an accessory not approve d or
provide d b y TPCA S T or used in any w a y ot her t han its int end e d use
and where such defect i s not t he fault o f the Product itsel f. Use of
non-TPCA S T accessori es may v o id th i s Li m ited Warr ant y.
This Lim ite d Warranty i s v alid and enforceable only i n t he Unite d
States w here t he P rod uct and Accessories are intend e d t o b e sold. A
Product or Accessory can onl y b e ret urned t o be repaired und er t h i s
Limited W arranty in t he count ry w here it was purchased. W arranty
service ava ila bilit y and resp onse times may va ry f rom count ry t o
country.
新版印刷(无蓝牙)英文 2017-05-24-US.indd 29
2017/5/24 上午10:51
Page 30
Warning: Changes or modifications to this unit not expressly approved
by the party responsible for compliance could void the user’s authority
to operate the equipment.
Note: This equipment has been tested and found to comply with the
limits for a Class B digital device, pursuant to Part 15 of the FCC Rules.
These limits are designed to provide reasonable protection against
harmful interference in a residential installation. This equipment generates,
uses and can radiate radio frequency energy and, if not installed and used
in accordance with the instructions, may cause harmful interference to radio
communications. However, there is no guarantee that interference will not
occur in a particular installation. If this equipment does cause harmful interference
to radio or television reception, which can be determined by turning the equipment
off and on, the user is encouraged to try to correct the interference by one or more
of the following measures:
● Reorient or relocate the receiving antenna.
● Increase the separation between the equipment and receiver.
● Connect the equipment into an outlet on a circuit different from that to which the
receiver is connected.
● Consult the dealer or an experienced radio/TV technician for help.
“This equipment complies with FCC RF radiation exposure limits set forth for an
uncontrolled environment.
This equipment should be installed and operated with a minimum distance of 20
centimeters between the radiator and your body.”
新版印刷(无蓝牙)英文 2017-05-24-US.indd 29
2017/5/24 上午10:51
 Loading...