

Page 1

TP UP-PN
Portable Dot Matrix Printer
User’s Manual
The contents of this manual are subject to change without notice.
Page 2

Contents
Brief introduction...............................................................................................2
Chapter 1 Features.............................................................................................3
1.1 Printing Features.................................................................................3
1.2 Print Paper..........................................................................................3
1.3 Ribbon.................................................................................................3
1.4 Character.............................................................................................3
1.5 Printing Control Commands...............................................................4
1.6 Interface..............................................................................................4
1.7 Power Supply......................................................................................4
1.8 Power On and Off Automatically .......................................................5
1.9 Black Mark Detecting.........................................................................5
1.10 Operation Environment ....................................................................5
1.11 Overall dimension.............................................................................5
1.12 Weight...............................................................................................5
Chapter 2 Installation and Operation.................................................................6
2.1 Installation ..........................................................................................6
2.2 Power Connection...............................................................................6
2.3 Loading Paper.....................................................................................7
2.4 Replacing the ribbon cassette.............................................................8
2.5 Interface Selecting..............................................................................9
2.6 Interface connection............................................................................9
2.7 Operation of Indicators and Buttons.................................................11
Chapter 3 Printing Control Commands............................................................13
3.1 Summary...........................................................................................13
3.2 Paper Feeding Commands................................................................13
1
3.3 Formatting Commands.....................................................................15
3.4 Character Setting Commands........................................................... 21
3.5 User-Defined Character Commands.................................................26
3.6 Printing Graphics Commands .......................................................... 28
3.7 Initialization Command .................................................................... 31
3.8 Data Control Commands.................................................................. 31
3.9 Hexadecimal Dumping Command...................................................32
3.10 Chinese Character Printing Commands ......................................... 32
3.11 Black Mark Detecting Command...................................................33
Chapter 4 Battery Charge and Discharge ........................................................ 36
4.1 Battery .............................................................................................. 36
4.2 Charging Method..............................................................................36
4.3 Discharging Method......................................................................... 36
4.4 Method of getting back the capacity................................................ 37
Chapter 5 Notice about the IrDA Infrared Interface........................................ 38
Chapter 6 Notice about the Rechargeable Ni-MH Battery.............................. 39
6.1 Ni-MH Rechargeable Battery characteristics...................................39
6.2 Notice:..............................................................................................40
Appendix 1 Specifications............................................................................... 42
Appendix 2 Printing Control Commands........................................................43
Appendix 3 Character Code Tables ................................................................. 45
Page 3

2
Brief introduction
TP UP-PN portable eight dot matrix printer features as following:
Ø Structure for easy paper loading
Ø Rechargeable battery pack for quick replacing and portability
Ø IrDA infrared interface for easy interfacing and communication wireless
Ø Built-in Chinese font level 1 & 2 for quick and nice printing Chinese
characters
Ø Black mark sensor for implement of printing pre-printed bill on position
Ø It has copy ability; it can provide an original and a copy.
TP UP-PN portable 8 dot matrix printer is suitable for application of mobile
instrument or such as PDA、POS etc device.
3
Chapter 1 Features
1.1 Printing Features
• Printing method: Dot matrix printing
• Copy ability: 1(original) +1
•
Model: TP UP-PN support EPSON M-190 series printer head. The main
models are shown in the follow table
Model
Character
per line
(5×7)
Character
dimension
(mm)
Print speed
(line/s)
Fast feeding
paper speed
Print density
(dot/line)
Reliability
(MCBF)
TP
UP-PN24S
24 1.7×2 .6 2.1 5.0 144
1500thous
and lines
TP
UP-PN40S
40 1.1×2.6 1.5 3.0 240
1000
thousand
lines
1.2 Print Paper
• Normal paper roll, max OD: 50mm, ID: 12.5mm
• Paper width: 57.5±0.5mm
• Paper thickness: 0.065μm,53~64g/m
2
1.3 Ribbon
•
ERC-09: cassette, purple, life: 250 thousand characters.
•
ERC-22: cassette, purple, life: 1000 thousand characters.
1.4 Character
• ANK Characters: 96 ASCII and 352 other characters: Greek, Germany,
Russian, France, Japanese Katakana, Chinese(5×7 dot matrix) and 32 user
definable characters.
Mathematical symbol, Printing mark, Block graphics.
Standard character fonts are 5×7 dot matrix. All others are 6×8 dot matrix.
•
Chinese: GB level 1 and level 2 Chinese 15×16 dot matrix.
Page 4

4
1.5 Printing Control Commands
The UP-PN provide 42 commands include ESC/POS commands 、FS
Chinese print control commands、and GS Black Mark control commands.
• Character dot graphics printing commands
ESC/P provide the functions as:
Enable printing characters and dot graphics、enlarge characters、underline
characters、user-defined characters printing、 formatting、hexadecimal
dumping.
• Chinese characters printing commands
FS commands support the GB level 1 and level 2 Chinese font、Roman、and
tabs. Refer to the chapter 3 printing control commands.
• GS FF Black Mark detecting command
Detect the Black Mark and feed paper to the beginning of next paper.
1.6 Interface
TP UP-PN provides both interfaces of RS-232 serial port and IrDA infrared
port .
• RS-232 Serial port
Baud rate: 9600bps
Handshaking: RTS/CTS
Data format: 8-bit data, none parity, 1-bit stop
Connector: 6 pin RJ-11 modular jack
Signal level: EIA level ±3~±15V
• IrDA infrared port
Communication distance: 1m(max.)
Communication angle: 30
1.7 Power Supply
• DC 6V 1500mAh rechargeable battery pack.
• Battery slowly charging on printer with external DC9~12V/300mA adaptor
• Battery fast charging on CX-101 quick charger (option)
5
1.8 Power On and Off Automatically
• Press button “On” for printer power on
• Power off automatically for 60 seconds no operations or press and keep the
button ON for 5 seconds.
1.9 Black Mark Detecting
• Black mark should be printed on printing side close edge left with a height
5mm and width 15mm;
• Reflectivity of black mark should be less than 10% and the others should be
more than 75%.
1.10 Operation Environment
• Temperature: 0~50℃
• Humidity: 10~80%RH
1.11 Overall dimension
• 153(L)×116(W)×65(H)mm
1.12 Weight
• 530g(excluding paper roll)
Page 5
6
Chapter 2 Installation and Operation
2.1 Installation
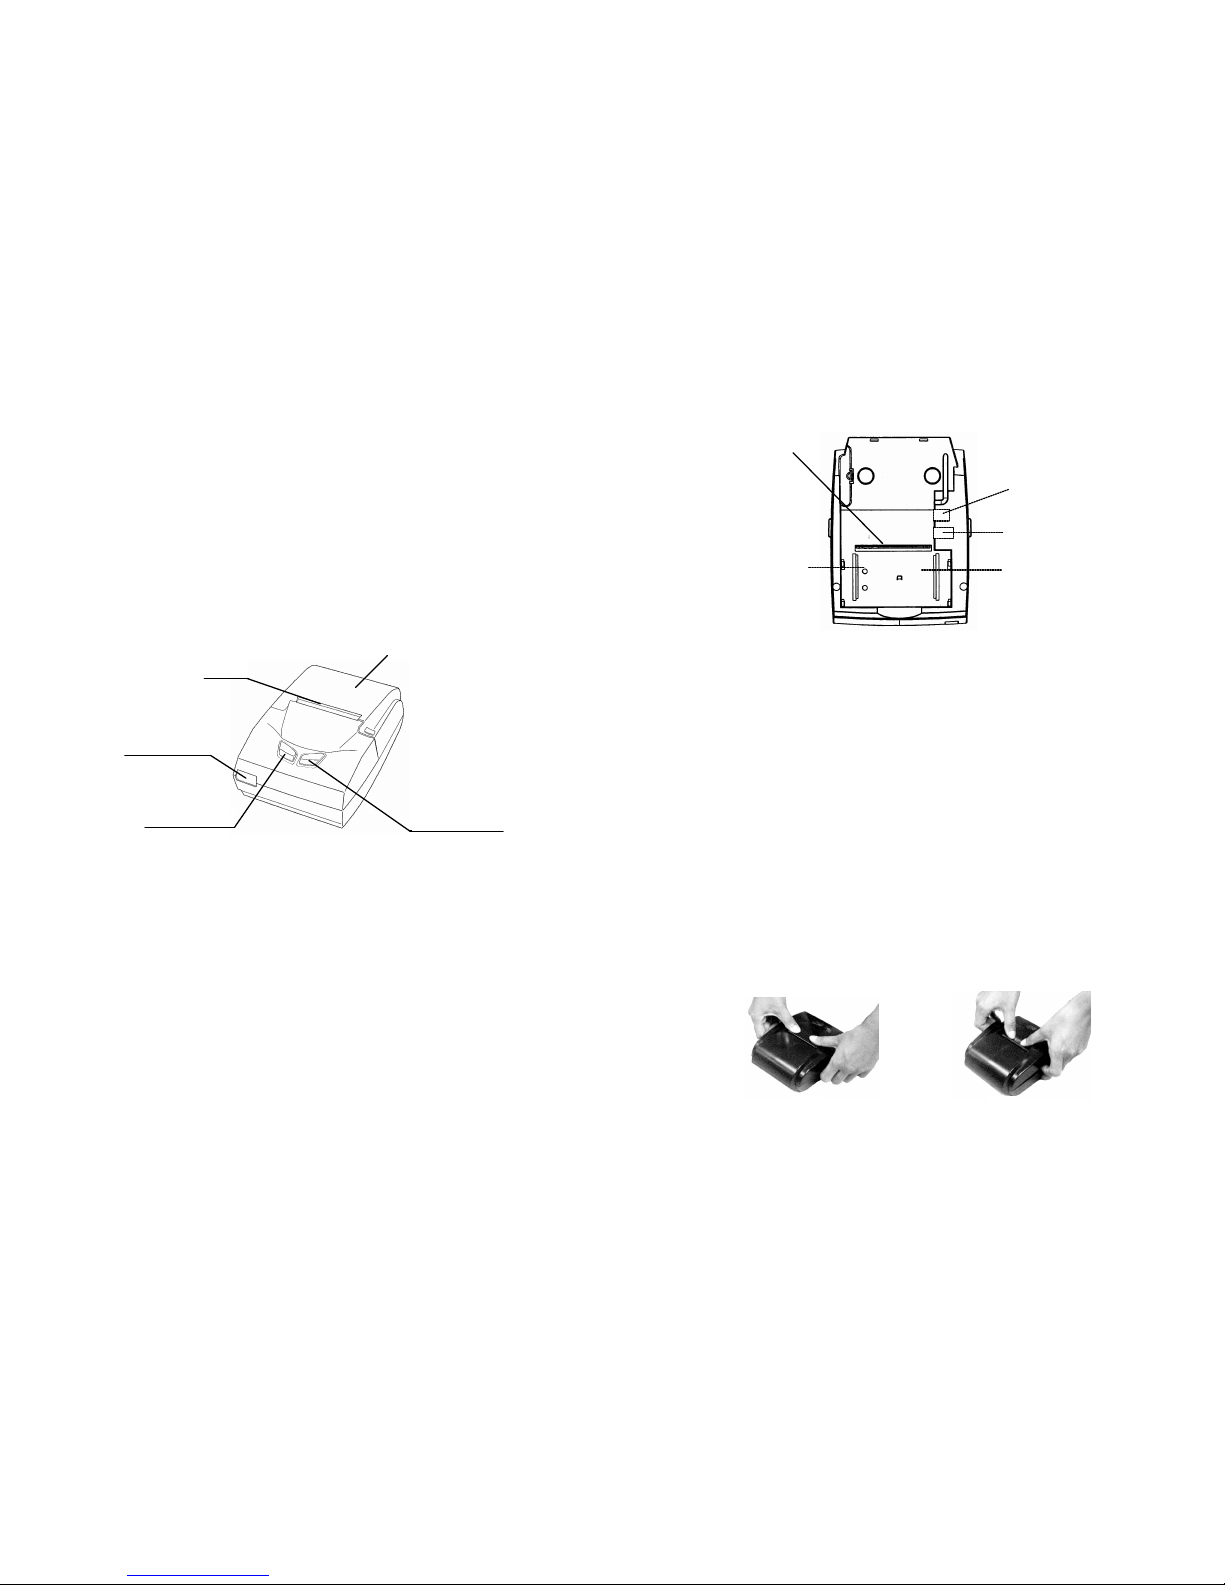
TP UP-PN portable dot matrix printer has an outline as shown figure 2-1:
Battery installation: put the battery into the battery house in the bottom of
the printer. Please notice the polarity of the battery fitting to the electrode in
the battery house. When heard a sound of “peng ” the battery has installed
and locked into the house. For taking out the battery push the release bar (see
figure 2-2) to the battery.
Figure 2-1 TP UP-PN outline
2.2 Power Connection
A rechargeable battery is packed with TP UP-PN printer. It can be
installed and locked on the bottom of the printer. DC12V/600mA adaptor pack
is used to slow charging. When the plug of the adaptor is inserted into the DC
jack on the bottom of the printer, trickle charging started. Full charging needs
14 hours. Fast charging need take off the battery and put it on the optional
quick charger CX-101 (option). Full charging needs only 4 hours. For the first
use of the printer, we recommend you charge the battery fully before you use
the printer.
ON(power on)
IrDA window
Outlet
LF (li
ne feed)
Upper Cover
7
(a) (b)
Figure 2-2 Battery installation
2.3 Loading Paper
The step of loading paper is as follows:
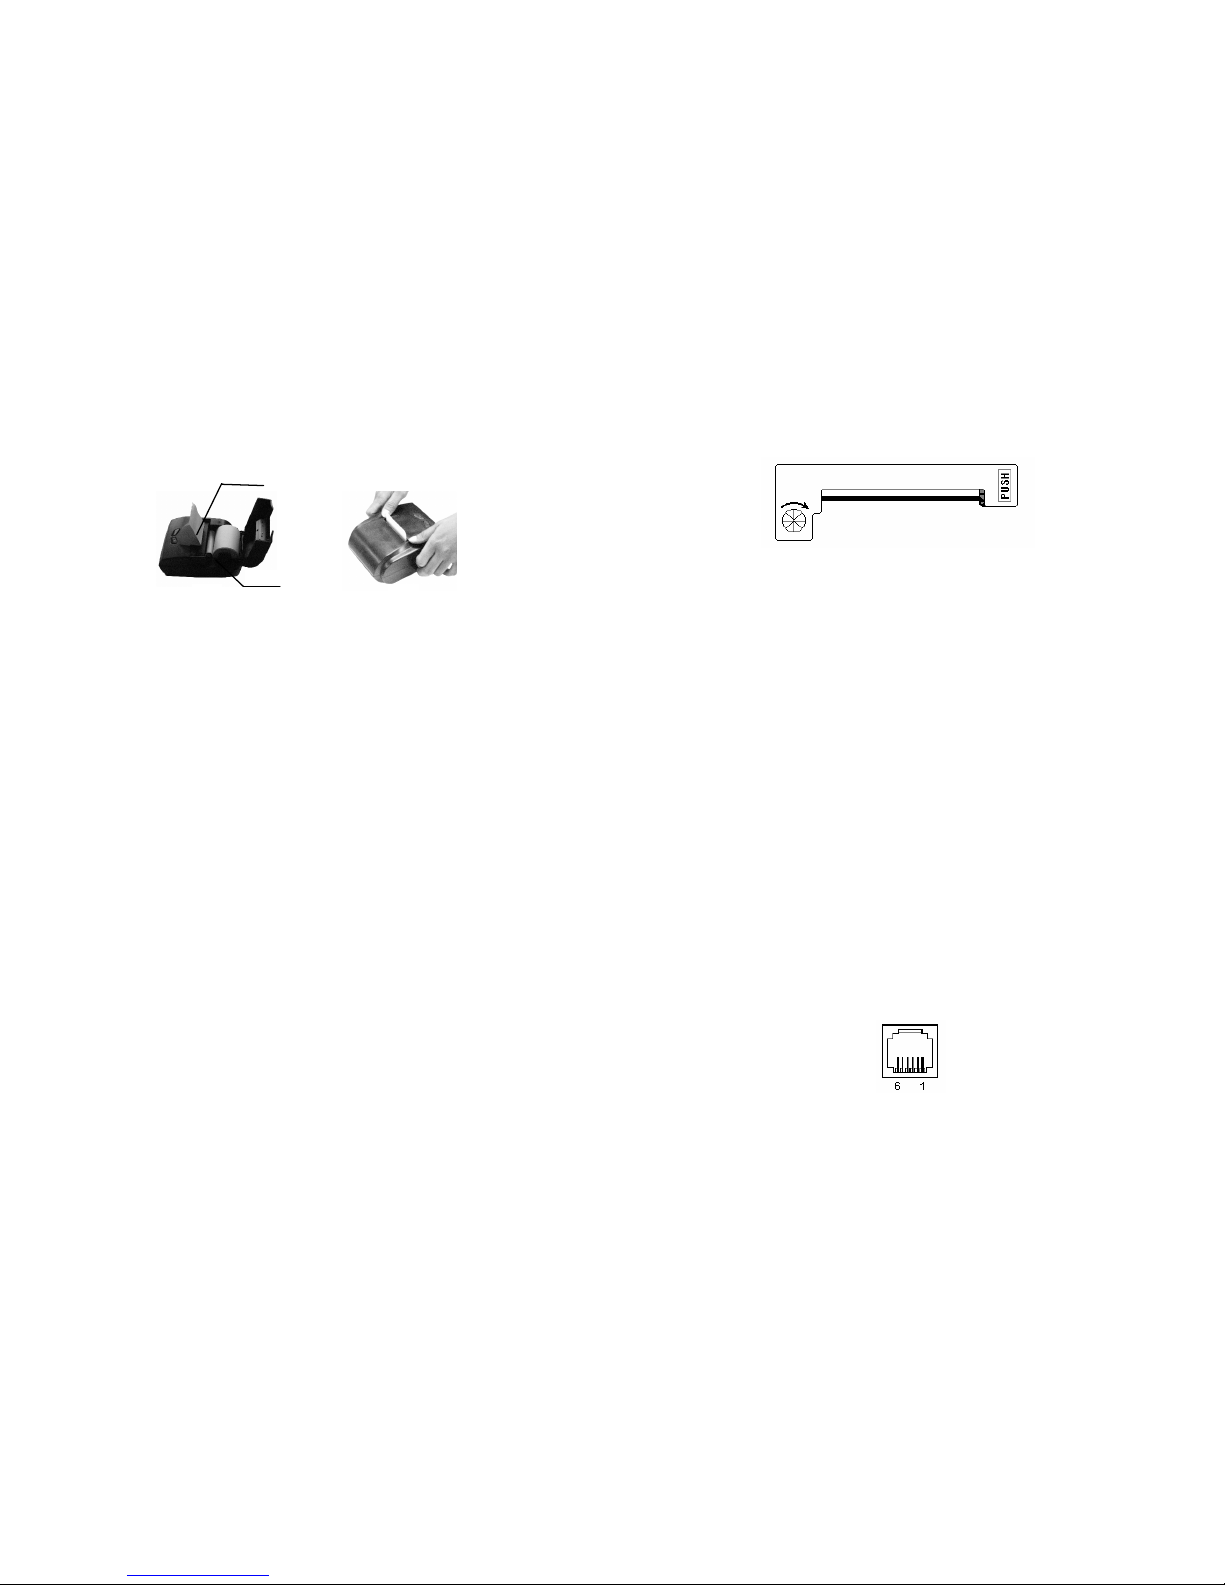
1 Open the removable cover of printer as Figure 2-3(a、b).
2 Insert the paper roll into the paper house shown as figure, the core of
the roll should be put on the paper holder. Press and keep the FL button for
feeding paper. Wait a moment for a little bit of paper into the paper entry slot.
Then release the FL button or switch off the power to stop paper feed (see
figure 2-3 c).
3 Let the paper come on from the paper exit on the top of printing
mechanism. Close the cover and let paper edge locate outside (see figure 2-3
d).
Release
Bar
Electrod
DC Jack Serial Port
Battery House
Page 6
8
holder
ribbon
(c) (d)
Figure 2-3 Loading paper
2.4 Replacing the ribbon cassette
TP UP-PN printers have a ribbon cassette loaded at ex-factory but
cassette needs to replace since it has been used for a period of time. If you
prepare to replace the cassette, you can do as the following steps:
1 Open the upper cover of the printer
2 Push the button mark with “push” (refer to figure 2-4) and take out the
cassette
3 Insert a new cassette.
Put the left end slightly on the axle of the gear that is on the left side of
printer mechanism. Mean while, keep the right end little higher than the left. If
find the left end has not fallen to the axle completely, please press the knob of
the cassette and make it slowly turned clockwise as shown by the arrow. You
can press down the right end of the cassette only after lay the left end down to
the axle deep enough. Now check the ribbon if or not it is tight and keeps on
the inside of the cassette. Turn the knob clockwise again when find the ribbon
on the outside of the cassette.
4 Finally close the cover of the printer.
9
Figure 2-4 Ribbon
2.5 Interface Selecting
TP UP-PN printer allows to select using RS-232 serial interface or IrDA
infrared interface.
1). RS-232 serial interface:
Connect the RS-232 serial interface cable specified with the printer, the
printer will set to use RS-232 serial interface.
2). IrDA infrared interface:
If there is no RS-232 serial interface cable connected with the printer, the
printer will set to use IrDA infrared interface.
2.6 Interface connection
2.6.1 Serial Interface Connection
TP UP-PN portable printer provides a RS-232 serial port socket: 6PIN
RJ-11 modular jack.
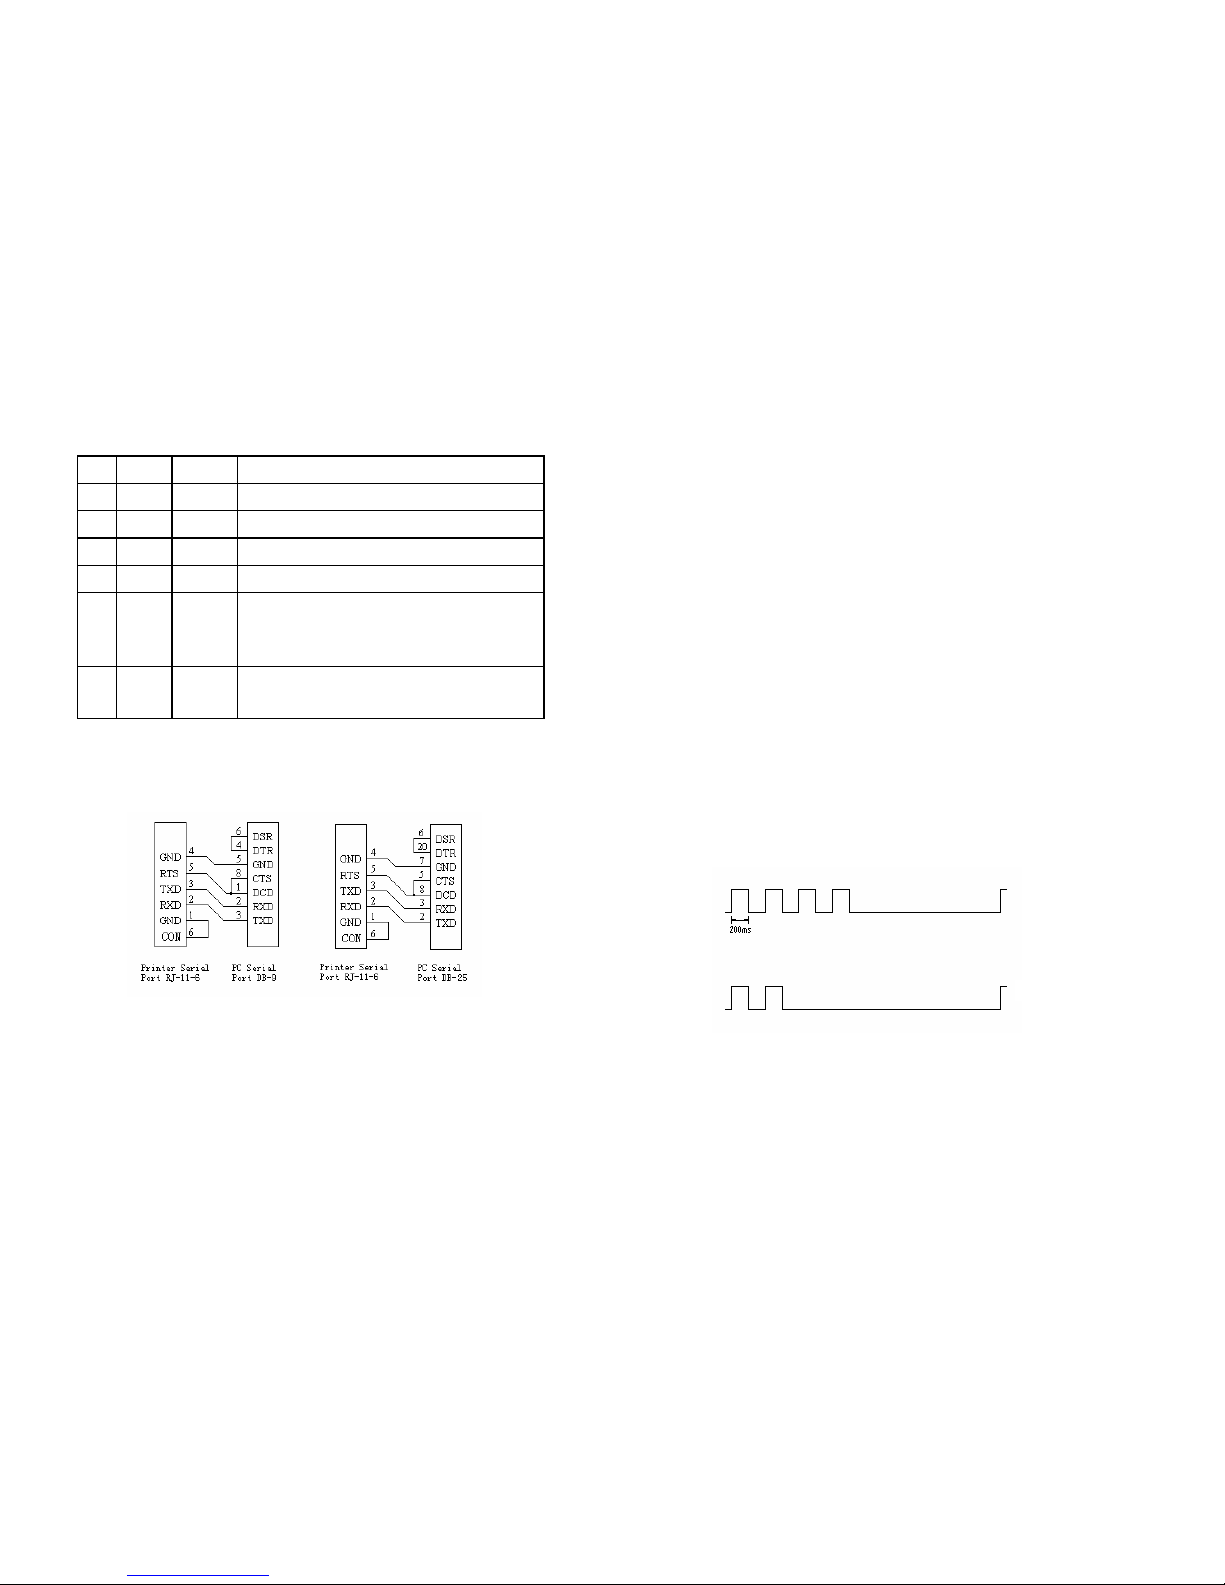
1) RJ-11 Pin Alignment
Figure 2-5 RJ-11 Pin Alignment
Page 7
10
2) Serial Port Signal Definition
Pin Signal Source Description
1 GND Printer Signal ground
2 RXD Host Printer receiving data sent by host
3 TXD Printer Printer send data to host
4 GND Printer Signal ground
5 RTS Printer
“Mark” indicates printer is busy and can’t receive
data; “Space” indicates printer is ready
to receive
data.
6 CON Printer
Connect with Pin1, set to RS-
232C serial
interface mode
Mark=logic“1”( EIA level -3V~-15V)
Space=logic“0”( EIA level +3V~+15V)
3) Connecting with Personal Computer
Figure 2-6 Connecting with PC
4) Communication Parameters:
Baud rate: 9600bps
Handshaking: RTS/CTS
Data Bit: 8
Parity: none
Stop bit: 1
11
2.6.2 IrDA Infrared Interface:
IrDA works in semiduplex mode wireless. To communicate the IrDA
infrared transmitter and receiver of the host should aim at the infrared window
of the printer.
Communication parameters are following as:
Baud rate: 9600bps
Data bit: 8
Parity: none
Handshaking: none
Distance: 1m(max.)
View angle: 30°
2.7 Operation of Indicators and Buttons
TP UP-PN has two indicators: the left one is a dichromatic light, red light
indicate charging the battery green light indicate printer under working, the
right one is a error indicator, and lights or flash when error occurs.
The power indicator turn green when turn on the printer.
The status indicator flashes when paper run out or Black Mark Detect failure.
Error indicator flashes as shown as figure 2-7(high level indicate the light
lights).
Figure 2-7 Error indicator flash mode
TP UP-PH has two buttons shown as figure 2-8: ON and LF. Their
functions are following:
Paper end
BM detect error
Page 8

12
(1) Power on: press button ON and release it until green indicator lights.
That means power is ON;
(2) Power off: Power off automatically for 60 seconds no operations.
Press button ON and keep more than 5 seconds, then release the button, the
printer will power off.
(3) Self Test: when power off, press and hold button LF, and then press
button ON, both indicators light, then release button LF and button ON, printer
will print out self-test list;
(4) Paper feed: when power on, press button LF and paper feed until
release the button;
(5) Battery discharging: when power off, press button ON more than 10
seconds, both indicators light, printer enters battery discharging status, and no
normal operations can be made. When the battery discharged to empty, printer
power off automatically.
Figure 2-8 Indicators and Buttons
ON Button
Power on indicator
Charging indicator
LF Button
Status indicator
13
Chapter 3 Printing Control Commands
3.1 Summary
TP UP-PN portable thermal printer provides a set of print control
commands includes: byte control commands、ESC control commands、FS
control commands、GS control commands. The commands provide the
functions described as following:
(1) Defining the format
(2) Enlarge character printing
(3) Printing dot matrix graphics
(4) Selecting character set
(5) User-defined characters
(6) Printing Chinese
(7) Others
The format of each printing commands is illustrated below:
Printing Command Function
Format: ASCII : the sequence in standard ASCII characters
Decimal : the sequence in decimal numbers
Hexadecimal : the sequence in hexadecimal numbers
Explanation: description of the command.
Example: Some examples are listed to illustrate the command for better
understanding.
3.2 Paper Feeding Commands
LF Print and Line Feed
Format: ASCII : LF
Decimal : 10
Hexadecimal : 0A
Explanation:
Print data of current line in buffer and feed one line. Only feed one line if
data buffer is empty.
Page 9
14
n dot-line
ESC J Perform ’n’ dot-line feed
Format: ASCII : ESC J n
Decimal : 27 74 n
Hexadecimal : 1B 4A n
Explanation:
Print the data of buffer if it exists.
Line feed n dot-lines forward. The value of n is 1~255.
Note: the line spacing may be changed after use enlarging character
command ESC V or ESC W.
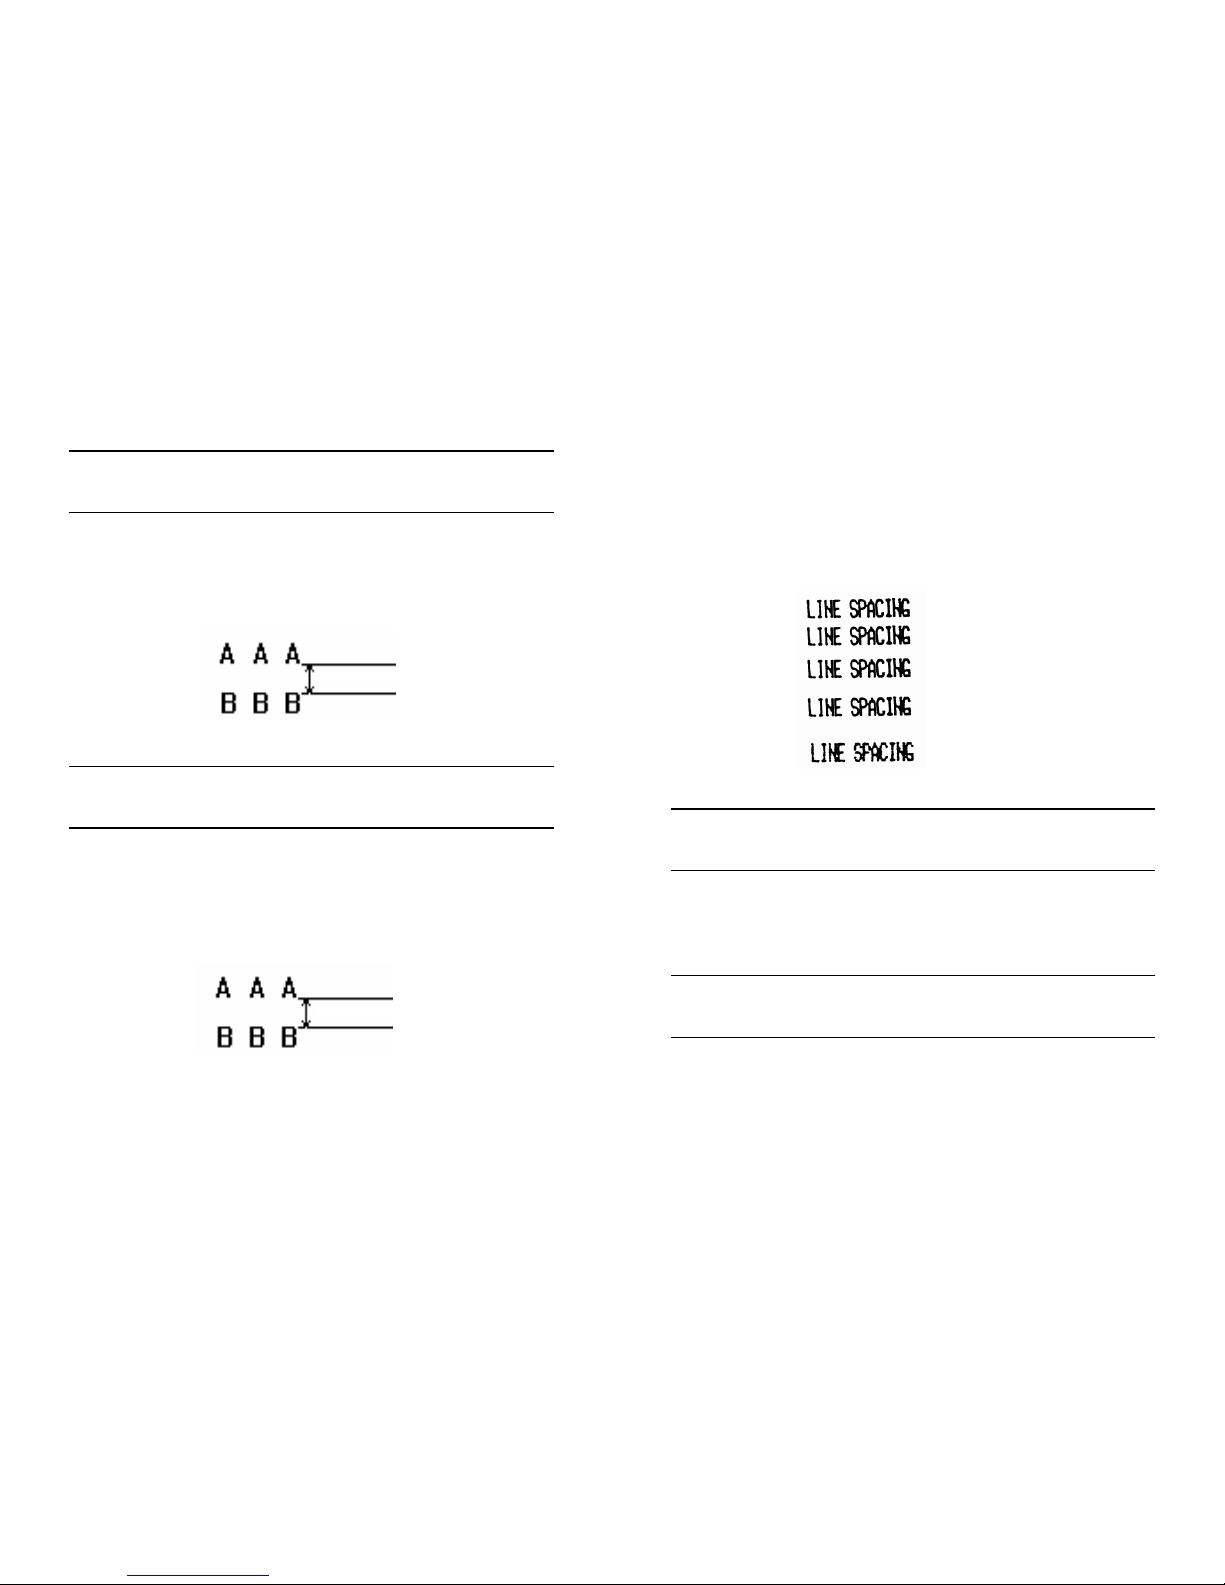
ESC 1 Set ’n’ dot-line spacing
Format: ASCII : ESC 1 n
Decimal : 27 49 n
Hexadecimal : 1B 31 n
Explanation:
Set n dot-line spacing for future Line Feed command.
The value of n ranges 0~255. Usually set n=0 before using ESC K
command to print bit-map graphics. Normally set n=3 at text printing mode.
Default value is n=3.
Example:
n dot-line
15
Observe the effect of the command by following BASIC program:
10 FOR I=1 TO 10 STEP 2
20 PRINT #1, CHR$(27);"1";CHR$(I); 'ESC 1, set line spacing.
30 PRINT #1, "LINE SPACING";CHR$(10); 'Print string and Carriage
Return.
40 NEXT I
A printout of above program on TP UP-PN is below:
FF Form Feed
Format: ASCII : FF
Decimal : 12
Hexadecimal : 0C
Explanation:
Feed paper to the beginning side of next page.
3.3 Formatting Commands
ESC C Set page length
Format: ASCII : ESC C n
Decimal : 27 67 n
Hexadecimal : 1B 43 n
Explanation:
Set page length with n character lines. The value of n should be in 0 - 255.
The page length will be defined as 256 lines if n=0.
The default value is n=40.
Page 10

16
ESC N Set bottom margin
Format: ASCII : ESC N n
Decimal : 27 78 n
Hexadecimal : 1B 4E n
Explanation:
Set bottom margin into n lines. The value of n should be in 0 - 255. The
default value is n=0.
The bottom margin means the numbers of space line from the last
printable line on one page to the end of the page.
For instance, if set bottom margin is 3 lines then issue the following code
sequence:
ASCII : ESC N ETX
Decimal : 27 78 3
Hexadecimal : 1B 4E 03
The BASIC program sending above code sequence is below:
PRINT #1, CHR$(27);"N";CHR$(3);
ESC O Cancel bottom margin
Format: ASCII : ESC O
Decimal : 27 79
Hexadecimal : 1B 4F
Explanation:
Set bottom margin to 0 line. It means that printer will prints one by one
line without space lines between two continual pages.
ESC B Set vertical tabs
Format: ASCII : ESC B n1 n2 n3 ... NUL
Decimal : 27 66 n1 n2 n3 ... 0
Hexadecimal : 1B 42 n1 n2 n3 ... 00
Explanation:
The vertical tab position is defined as n1, n2 and etc. All its values must
be limited to the range of page length set by ESC C command.
The character NUL added at last indicates the end of the command.
All the vertical tab position can be canceled by ESC B NUL command.
VT command executes the vertical tab and feed paper to the position of
17
next vertical tab.
For example: set three positions of vertical tab separately in line 2,5 and 8.
You can send following command.
ASCII : ESC B STX ENQ BS NUL
Decimal : 27 66 2 5 8 0
Hexadecimal : 1B 42 02 05 08 00
Its BASIC program is:
10 PRINT #1, CHR$(27);"B";CHR$(2);CHR$(5);CHR$(8);CHR$(0);'ESC B
command
20 PRINT #1, CHR$(11); 'VT command
30 PRINT #1, "VTAB1"; 'Print string
40 PRINT #1, CHR$(11); 'VT command
50 PRINT #1, "VTAB2"; 'Print string
60 PRINT #1, CHR$(11); 'VT command
70 PRINT #1, "VTAB3"; 'print string
The printout running this program in TP UP-PN is as follows:
VT Vertical tab
Format: ASCII : VT
Decimal : 11
Hexadecimal : 0B
Explanation:
Feed paper to the position of the next vertical tab set by ESC B.
Note: if no vertical tab setting before or the current position equals or
exceeds the last position of vertical tab, VT command only feeds paper one
line (same as LF command).
VTAB1
VTAB2
VTAB3
Page 11
18
ESC D Set horizontal tabs
Format: ASCII : ESC D n1 n2 n3 ... NUL
Decimal : 27 68 n1 n2 n3 ... 0
Hexadecimal : 1B 44 n1 n2 n3 ... 00
Explanation:
The horizontal tab position is defined as n1, n2 and etc. All its values must
be limited to the range of printing width based on the model of printer (Seeing
at Section 1.1).
The character NUL added at last indicates the end of this command.
All the setting base on ESC D can be cancel by the form ESC D of this
command.
HT command executes the horizontal tab.
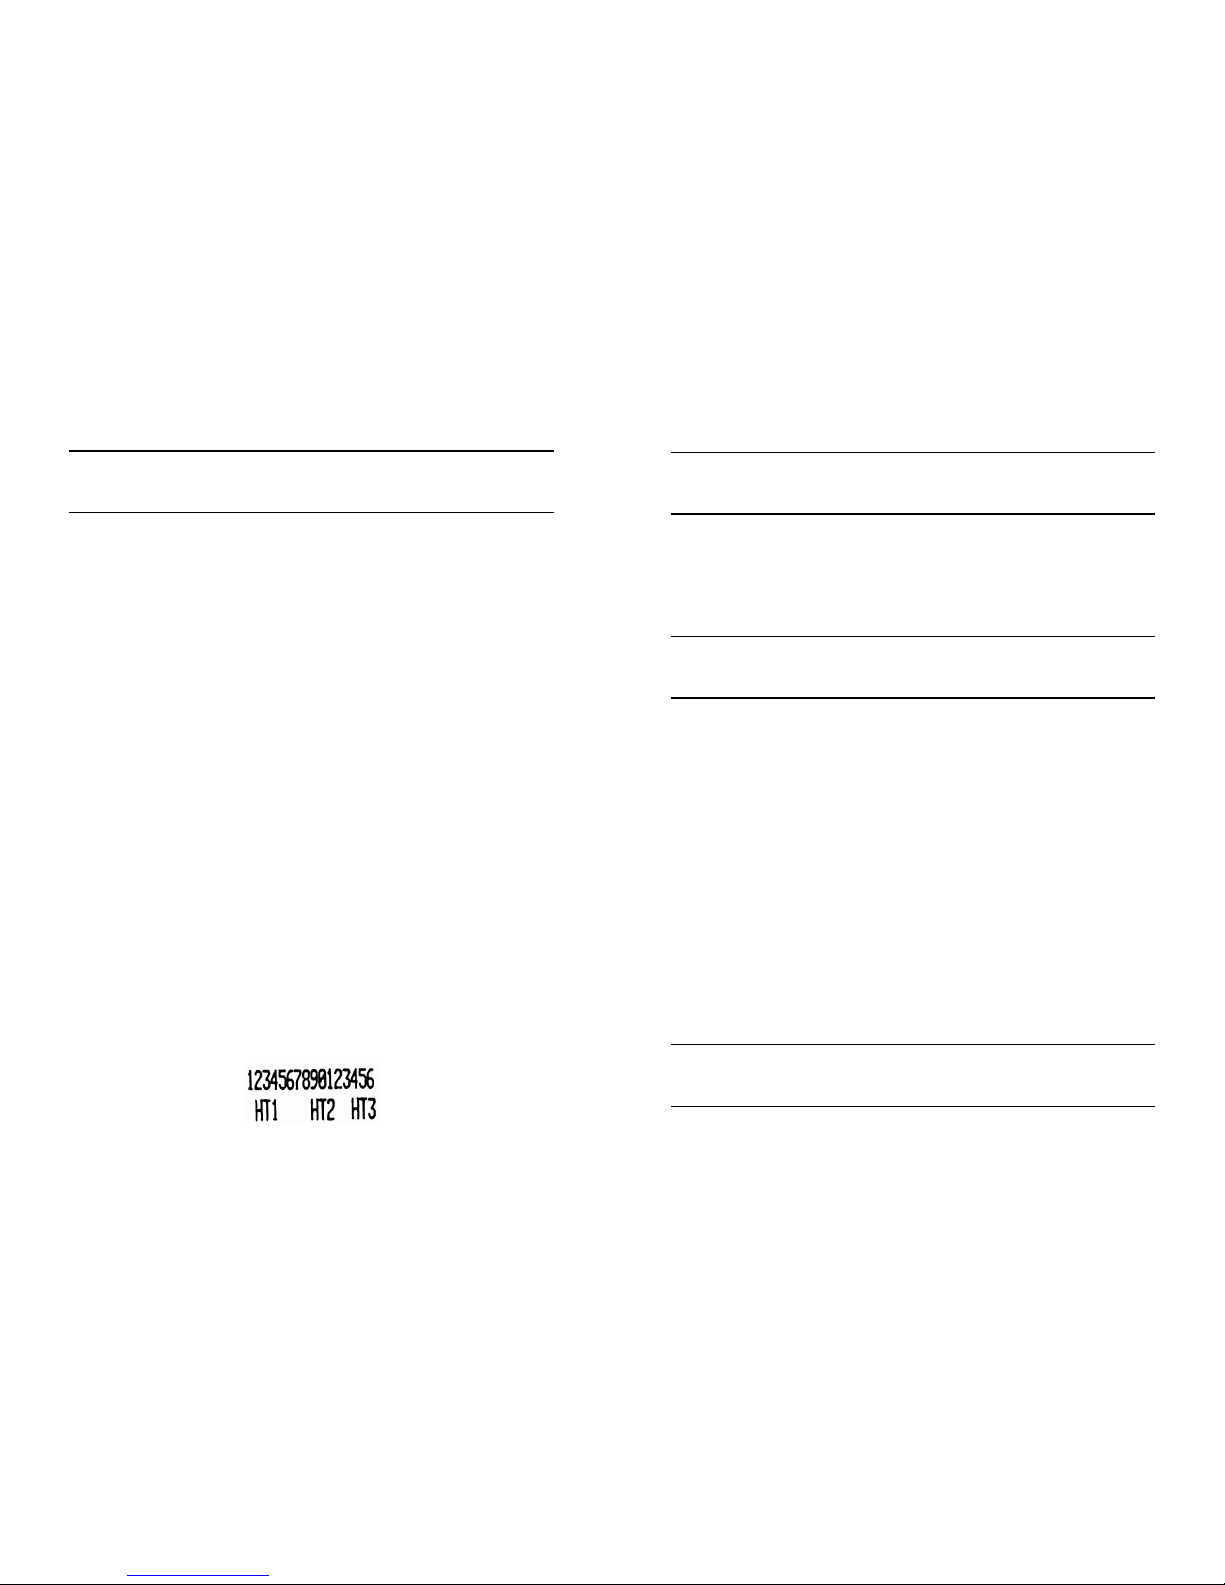
For example: set three positions of horizontal tab separately in column 2, 9
and 14. You can send following command.
ASCII : ESC D STS HT SO NUL
Decimal : 27 68 2 9 14 0
Hexadecimal : 1B 44 02 09 0E 00
Its BASIC program is:
10 PRINT #1, "1234567890123456" 'Scalar
20 PRINT #1, CHR$(27);"D";CHR$(2);CHR$(9);CHR$(14);CHR$(0); 'ESC
D command
30 PRINT #1, CHR$(9); 'HT command
40 PRINT #1, "HT1"; 'Print string
50 PRINT #1, CHR$(9); 'HT command
60 PRINT #1, "HT2"; 'Print string
70 PRINT #1, CHR$(9); 'HT command
80 PRINT #1, "HT3"; 'Print string
The printout of running this program in TP UP-PN is as follows:
19
HT Horizontal tab
Format: ASCII : HT
Decimal : 9
Hexadecimal : 09
Explanation:
Printing continues to the position of next horizontal tab set by ESC D.
If no horizontal tab setting before or if the current position equals or
exceeds the last position of horizontal tab. HT command will be no action.
ESC f Print blank character or lines
Format: ASCII : ESC f m n
Decimal : 27 102 m n
Hexadecimal : 1B 66 m n
Explanation:
If m=0,ESC f NUL n command prints n blank characters. The value of n
should be in the range of printing width specified by the model of printer.
(Seeing at Section 1.1).
If m=1, ESC f SOH n command prints n blank lines. The value of n
should range among 0 and 255.
For instance: Print 6 blank characters in one line, you can send following
command:
ASCII : ESC f NUL ACK
Decimal : 27 102 0 6
Hexadecimal : 1B 66 00 06
Another instance is printing 6 blank lines. You can send the follows:
ASCII : ESC f SOH ACK
Decimal : 27 102 1 6
Hexadecimal : 1B 66 01 06
ESC Q Set right margin
Format: ASCII : ESC Q n
Decimal : 27 81 n
Hexadecimal : 1B 51 n
Explanation:
The value of n should be in 0 to the range of printing width specified by
Page 12
20
the model of printer. (Seeing at Section 1.1).
The default value is n=0, that is, no right margin.
The position is absolutely set by this command, so it is not affected by
ESC U and ESC W character enlarge commands.
If reach to the right margin set by the command, printer would add
Carriage Return and Line Feed automatically.
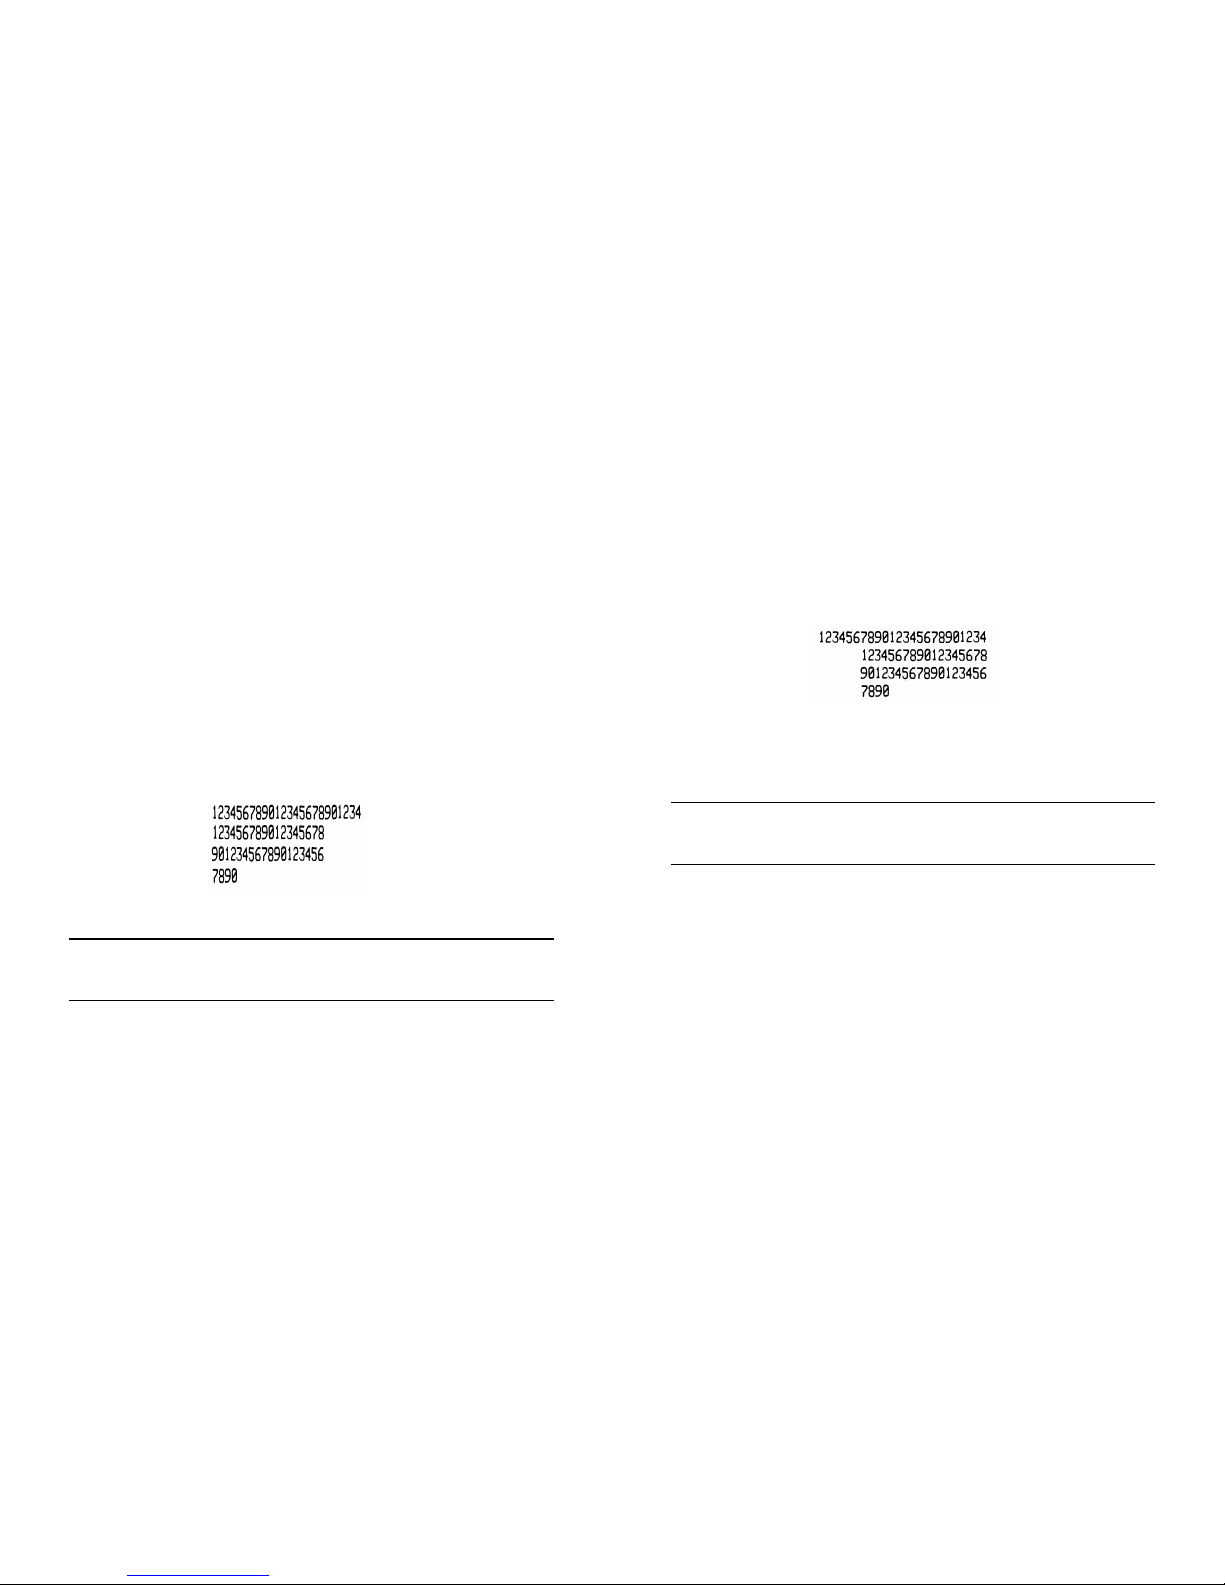
For example, to set right margin into 24,you can send following
command
ASCII : ESC Q ACK
Decimal : 27 81 6
Hexadecimal : 1B 51 06
The BASIC program for the above example is shown as follows:
10 PRINT #1, "123456789012345678901234"
20 PRINT #1, CHR$(27);"Q";CHR$(6); 'ESC Q command
30 PRINT #1, "1234567890123456789012345678901234567890"
The printout of running the program in TP UP-PN printer is shown
below:
ESC I Set left margin
Format: ASCII : ESC I n
Decimal : 27 108 n
Hexadecimal : 1B 6C n
Explanation:
The value of n should be in 0 to the range of printing width specified by
the model of printer.
The default value is n=0, that is, no left margin.
The position is absolutely set by this command, so it is not affected by
ESC U and ESC W character enlarge commands.
For instance, to set left margin into 6, you can send following command:
21
ASCII : ESC l ACK
Decimal : 27 108 6
Hexadecimal : 1B 6C 06
The BASIC program for the above example is shown below:
10 PRINT #1, "123456789012345678901234" 'Scalar
20 PRINT #1, CHR$(27);"l"; CHR$(6); 'ESC l command
30 PRINT #1, "1234567890123456789012345678901234567890"
The printout of running the program in TP UP-PN printer is shown
below:
3.4 Character Setting Commands
ESC U Enlarge width
Format: ASCII : ESC U n
Decimal : 27 85 n
Hexadecimal : 1B 55 n
Explanation:
The width of character or graphics will be n times wider than normal one.
The value of n should range in 1 - 4. The default value is n=1, that is, normal
width without enlarging.
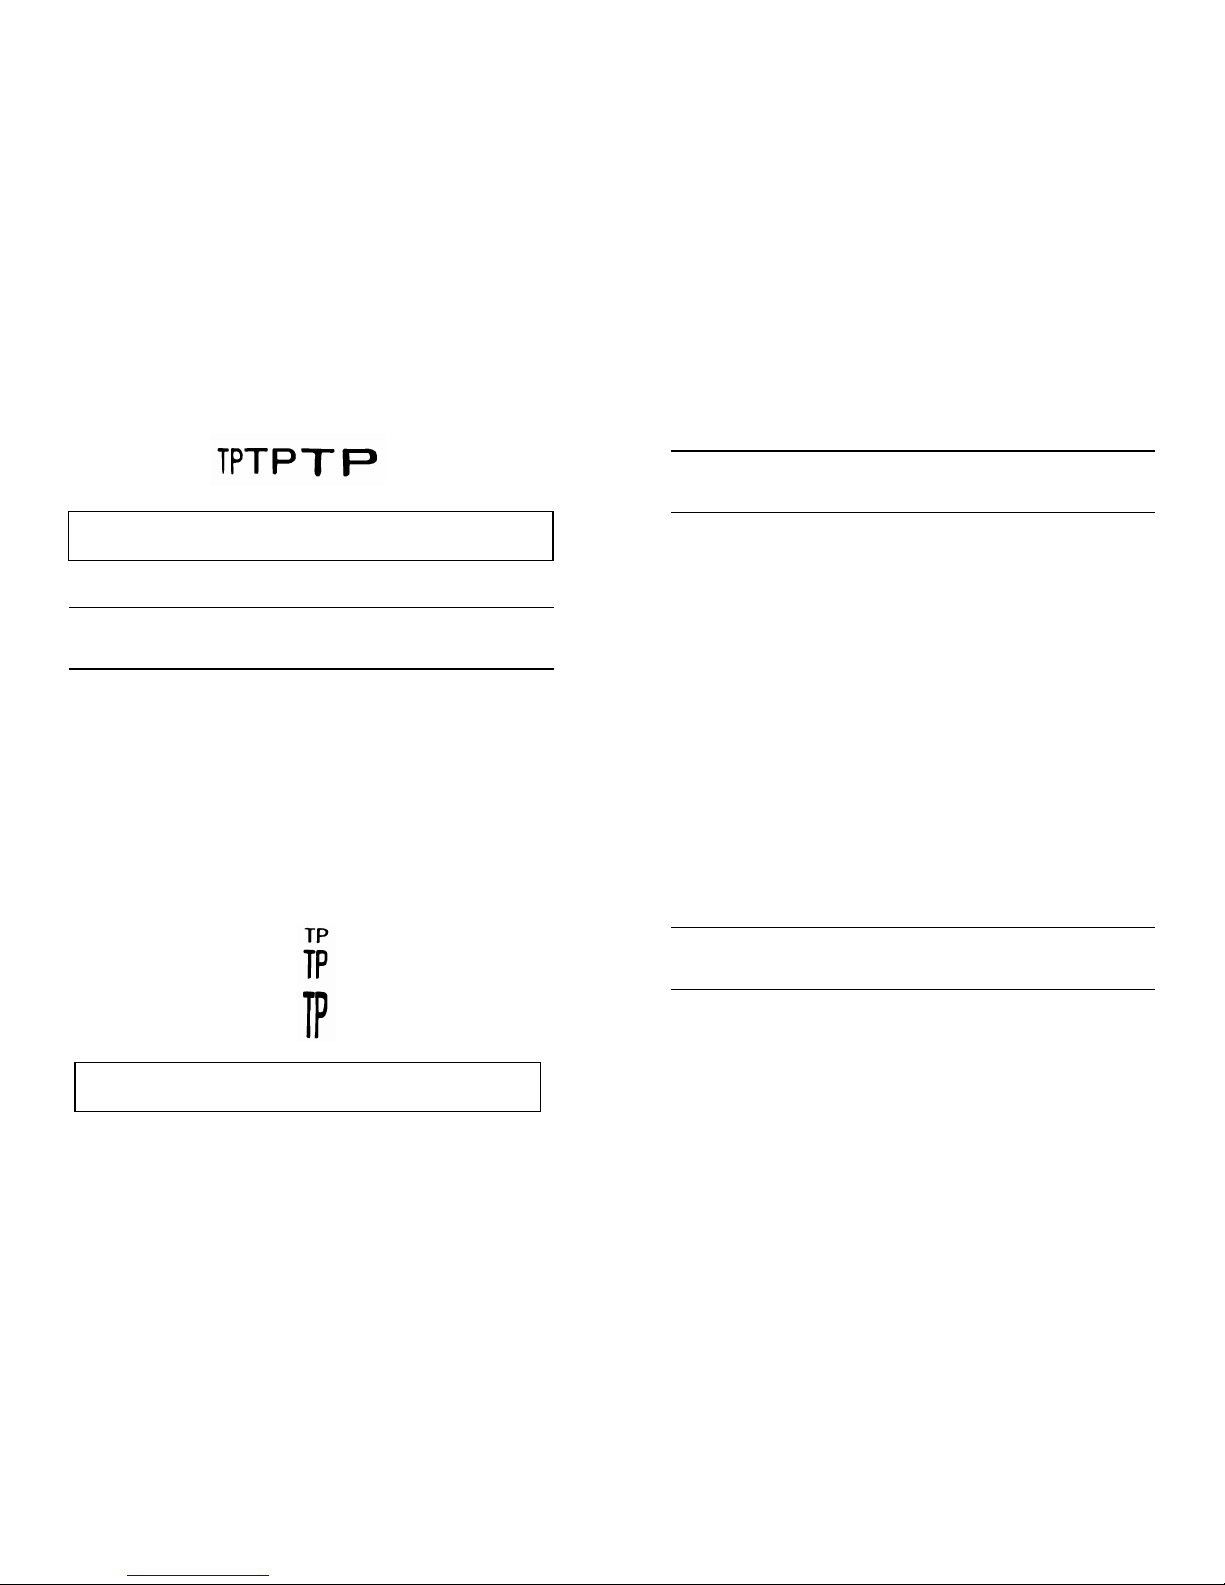
For observing the enlarging effect of ESC U command, please run
following BASIC program:
10 FOR I=1 TO 3 'From 1 to 3 times
20 PRINT #1, CHR$(27);"U";CHR$(I); 'ESC U command
30 PRINT #1, "TP"; 'Print string
40 NEXT I
50 PRINT #1, CHR$(13); 'CR command
The printout of running the program in TP UP-PN printer is shown below:
Page 13
22
Note: This command is active just after issuing ESC W SOH (n=1)
command.
ESC V Enlarge height
Format: ASCII : ESC V n
Decimal : 27 86 n
Hexadecimal : 1B 56 n
Explanation:
The height of character or graphics will be n times higher than normal
one. The value of n should range in 1 - 4. The default value is n=1, that is,
normal height without enlarging.
This command should issue at the beginning of printer operation.
For observing the enlarging effect, please use following BASIC program:
10 FOR I=1 TO 3 'From 1 to 3 times
20 PRINT #1, CHR$(27);"V";CHR$(I); 'ESC V command
30 PRINT #1, "TP" 'Print string
40 NEXT I
The printout of running the program in TP UP-PN printer is shown below:
Note: This command is active just after issuing ESC W SOH(n=1)
command.
23
ESC W Enlarge width & height
Format: ASCII : ESC W n
Decimal : 27 87 n
Hexadecimal : 1B 57 n
Explanation:
The printing width and height will be n times bigger than normal one. The
value of n should range among 1 to 4. The default value is n=1, that is, normal
width and height without enlarging.
For observing the enlarging effect of ESC W command, please run
following BASIC program:
10 FOR I=1 TO 3 'From 1 to 3 times
20 LPRINT CHR$(27);"W";CHR$(I); 'ESC W command
30 PRINT "TP" 'Print string
40 NEXT I
The printout of running the program in TP UP-PN printer is shown
below:
ESC - Turn underline on/off
Format: ASCII : ESC - n
Decimal : 27 45 n
Hexadecimal : 1B 2D n
Explanation:
Underline is turned on if n=1 and turned off if n=0.
All characters including blank ones are underscored except meet the
command of turning off underline.
The BASIC program for observing the effect of ESC – command is shown
below:
20 PRINT #1, "TP";
30 PRINT #1, CHR$(27);"-";CHR$(1); 'Turn underline on
TP
TP
Page 14

24
40 PRINT #1, "UPT"; 'UPSF prints underline
50 PRINT #1, CHR$(27);"-";CHR$(0); 'Turn underline off
60 PRINT #1, "TP"
The printout of running the program in TP UP-PN printer is shown below:
ESC 6 Select Font 1
Format: ASCII : ESC 6
Decimal : 27 54
Hexadecimal : 1B 36
Explanation:
All characters in use will be from Font 1 after issuing this command.
There are two sets of fonts available in TP UP-PN printers. Font 1 is
selected when power on or ESC @ command is active.
ESC 7 Select Font 2
Format: ASCII : ESC 7
Decimal : 27 55
Hexadecimal : 1B 37
Explanation:
All characters in use will come from Font 2 after issuing this command.
Refer to command ESC 6.
SO Select double-width printing
Format: ASCII : SO
Decimal : 14
Hexadecimal : 0E
Explanation:
All characters will be printed with double-width as normal one in the
current line after issuing the command. Carriage Return or DC4 commands
can terminate SO command.
25
However normal and width-enlarging characters can be mixed in the same
line.
DC4 Cancel double-width printing
Format: ASCII : DC4
Decimal : 20
Hexadecimal : 14
Explanation:
Cancel the double-width printing in one line selected by SO command.
This command does not cancel enlarging mode selected by ESC U and ESC W
commands.
ESC i Turn reverse printing on/off
Format: ASCII : ESC i n
Decimal : 27 105 n
Hexadecimal : 1B 69 n
Explanation:
If n=1, then turn on the reverse printing. If n=0 turn off it. Reverse
printing is white on black, as in a photographic negative.
Normal printing is black in white. It is selected when power on or issue
ESC @ command.
The BASIC program for reverse printing is as follows:
10 PRINT #1, CHR$(27);"i";CHR$(1); 'Turn reverse printing on
20 PRINT #1, " ABCDEFGHIJKLMNO"
The printout of running the program in TP UP-PN printer is shown
below:
ESC c Turn inverse printing on/off
Format: ASCII : ESC c n
Decimal : 27 99 n
Hexadecimal : 1B 63 n
Page 15
26
Explanation:
If n=1, then turn inverse printing on. If n=0, turn it off. Reverse printing
is usual in wall-mounted printer, so that the printout is easy to read. The
default is n=0.
3.5 User-Defined Character Commands
ESC & Define user-defined character
Format: ASCII : ESC & m n1 n2 ... n6
Decimal : 27 38 m n1 n2 ... n6
Hexadecimal : 1B 26 m n1 n2 ... n6
Explanation:
The command allows user to define a user-defined character. The
parameter m is the code of this character. The value of the code ranges among
32 and 255.
Parameter n1, n2, … , n6 are the structure code of the character. The
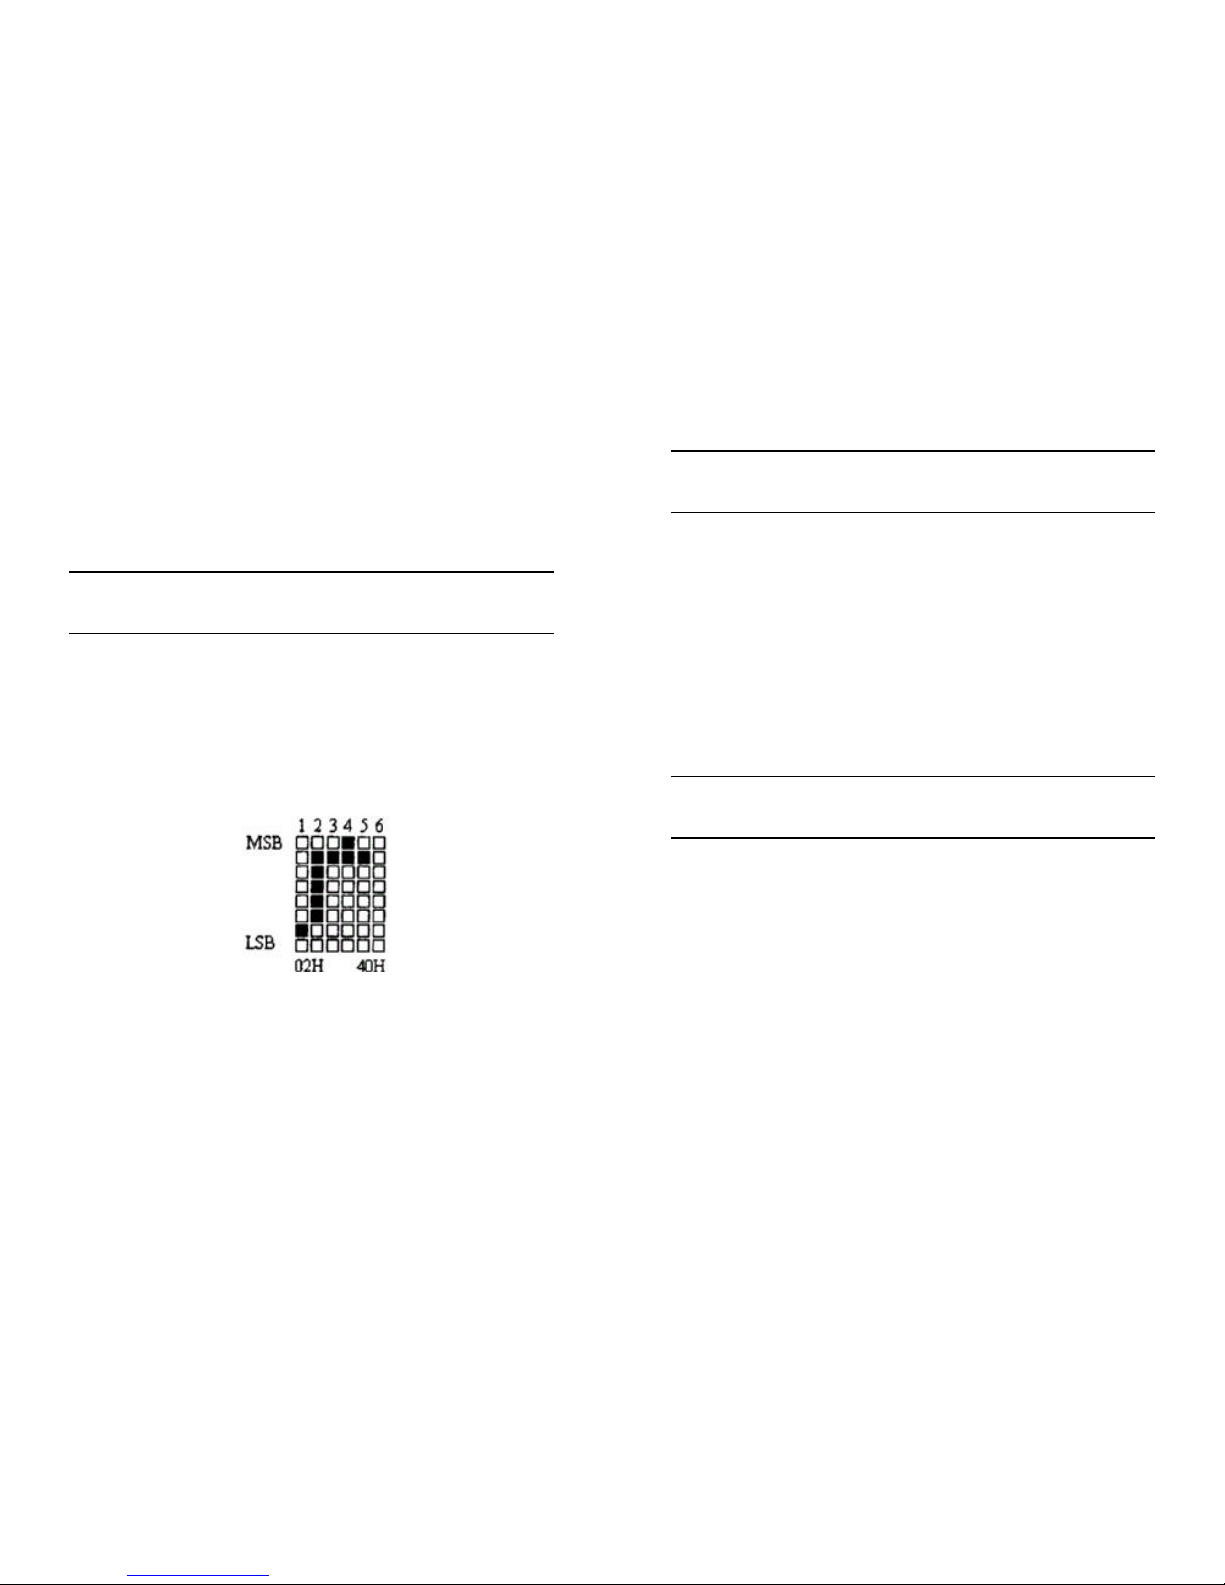
character is composed of 6X8 dot matrix, that is, 6 dot-columns by 8 dot-lines.
One byte of the data corresponds to one column of the character. The MSB of
the byte is at top of the column. Refer to following structure:
User-defined characters are stored in RAM but they will be lost when
power off.
If several ESC & commands used the identical value of the m only the
last m would be available. The number of the user-defined character is able up
to 32. Please refer to ESC % and ESC : commands.
27
ESC % Replace with user-defined character
Format: ASCII : ESC % m1 n1 m2 n2...mk nk NUL
Decimal :27 37 m1 n1 m2 n2...mk nk 0
Hexadecimal : 1B 25 m1 n1 m2 n2...mk nk 00
Explanation:
This command can replace the character n of current fonts with
user-defined character m. the user-defined character m will be printed after
issuing the command, which is substitute for the character n in current fonts.
m1, m2…mk are codes of user-defined character.
n1, n2…nk are codes of characters in current fonts and will be replaced.
Value for both m and n ranges among 32 and 255.
The value of subscript ? ranges among 1 and 32. The maximum number
of characters that can be replaced is 32.
The character NUL adds in the last to indicate the end of the command.
Please refer to ESC & and& ESC : commands.
ESC : Restore the font character
Format: ASCII : ESC :
Decimal : 27 58
Hexadecimal : 1B 3A
Explanation:
The command restores the original character of Font, which has been
replaced with the user-defined character set by ESC % command. However the
user-defined character is still in RAM and can be called back by the ESC %
command.
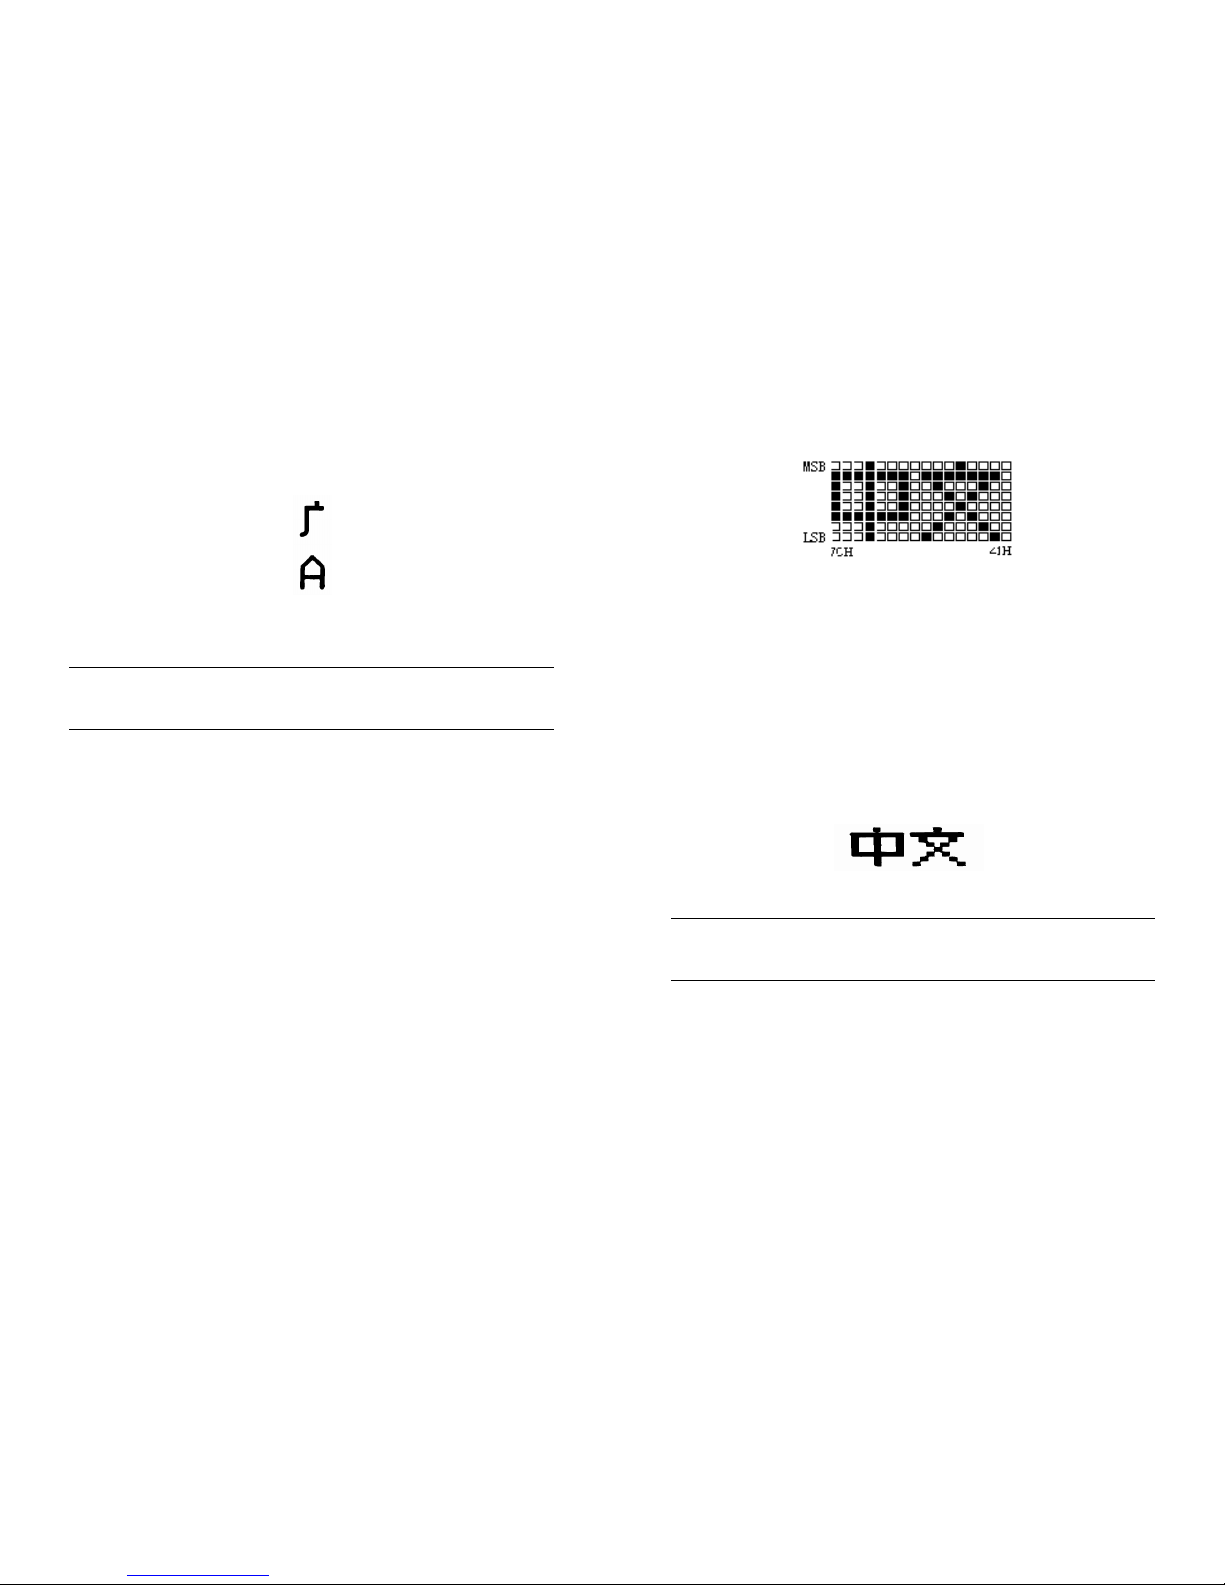
Using the following BASIC program can observe the effect of ESC &,
ESC % and ESC : commands.
10 PRINT #1, CHR$(27);"W";CHR$(2); 'Enlarge in V and H
20 PRINT #1, CHR$(27);"&";CHR$(65); 'ESC & command
30 PRINT #1, CHR$(&H02)CHR$(&H7C)CHR$(&H40);
40 PRINT #1, CHR$(&HC0)CHR$(&H40)CHR$(&H00);
50 PRINT #1, CHR$(27);"%";CHR$(65)CHR$(65)CHR$(0); 'ESC %
command
60 PRINT #1, CHR$(65) 'Print defined character
70 PRINT #1, CHR$(27);":"; 'ESC :command
Page 16
28
80 PRINT #1, CHR$(65) 'Restore the font character
The printout of running the program in TP UP-PN printer is shown below:
3.6 Printing Graphics Commands
ESC K Set bit-map graphics
Format: ASCII : ESC K n1 n2 ... data ...
Decimal : 27 75 n1 n2 ... data ...
Hexadecimal : 1B 4B n1 n2 ... data ...
Explanation:
The command set a n1×8 dot-matrix graphics. The width of the graphics
is n1 dots and the height is 8 dots. The 8 dots in each column can be indicated
by an 8-bit byte. The MSB is at the top position.
The value of n1 and n2 indicates a 16-bit binary code. n1 is used as the
lower byte and n2 the higher byte. The width of the bit -map graphics set by
ESC K command is determined by the formula n2×256+n1. According to
printer TP UP-PN, n2 should be 0 and n1 should range among 1 to the
maximum number of dots in one line specified by the model of printer.
The value of data corresponds to the byte of each dot column. The
quantity of bytes should equal n1.
For example: Printing two Chinese characters “中文” (Chinese) with
ESC K. The dot matrix of these two characters is shown as below. Each
character is composed of the 7X8 dot matrix in which dot columns are 7.
There is one dot -column space between two continual characters. So there are
total 15 dot columns and then n1=15, n2=0. All 15 bytes of the data indicated
by hexadecimal are shown as follows:
7C, 44, 44, FF, 44, 44, 7C, 00, 41, 62, 54, C8, 54, 62, 41.
29
The following BASIC program is in terms of the above instance.
10 PRINT #1, CHR$(27);"W";CHR$(2); 'enlarge in V & H
20 PRINT #1, CHR$(27);"K";CHR$(15)CHR$(0); 'ESC K
30 FOR I=1 TO 15
40 READ D: PRINT #1, CHR$(D); 'Input 15 bytes of data
50 NEXT I
60 PRINT #1, CHR$(13); 'Input CR
70 DATA &H7C,&H44,&H44,&HFF,&H44,&H44,&H7C,0
80 DATA &H41,&H62,&H54,&HC8,&H54,&H62,&H41
The printout in TP UP-PN is shown below:
ESC ' Print curving graph lines
Format: ASCII : ESC ' m n1 n2 ... nk CR
Decimal : 27 39 m n1 n2 ... nk 13
Hexadecimal : 1B 27 m n1 n2 ... nk 0D
Explanation:
The command prints curving graph lines along direction of paper feeding.
The value of m is the quantity of curves. It ranges from 1 to the maximum
number of dots in one line specified by the model of printer. (Seeing at Section
1.1)
There are m dots in a horizontal dot line. n1, n2…nk represent positions
of m curves. The value of nk should equal the value m.
Each nk should be in the range of to the maximum number of dots in one
Page 17

30
line specified by the model of printer. The last datum CR is used to make
printer print one dot -line. The entire graph with m pieces of curves can be
printed out with dot-line one by one, in which each single dot -line data is
composed of data: n1, n2…nk.
For example, if wanting to print following curving graph lines decided by
5 equations:
Y1=50+40*EXP(-0.01*X)*SIN(X/10)
Y2=50-40*EXP(-0.01*X)*SIN(X/10)
Y3=50
Y4=50+40*EXP(-0.01*X)
Y5=50-40*EXP(-0.01*X)
You can use following program for showing the above curves:
10 FOR X=0 TO 150 'Print 150 dot lines
20 Y=INT(40*EXP(-0.01*X))
30 YY=INT(Y*SIN(X/10))
40 PRINT #1, CHR$(27);CHR$(39);CHR$(5); 'ESC 'command,m=5
50 PRINT #1, CHR$(50+YY);CHR$(50-YY);CHR$(50);
60 PRINT #1, CHR$(50+Y);CHR$(50-Y);CHR$(13);
70 NEXT X
The printout of running above program in TP UP-PN printer is as below:
Paper feeding direction
31
3.7 Initialization Command
ESC @ Initialize printer
Format: ASCII : ESC @
Decimal : 27 64
Hexadecimal : 1B 40
Explanation:
The command initializes printer with following actions:
• clear printer buffer;
• restore default values;
• select font 1;
• erase user-defined characters.
3.8 Data Control Commands
CR Carriage Return
Format: ASCII : CR
Decimal : 13
Hexadecimal : 0D
Explanation:
All data in the buffer will be printed and the paper will be fed one line
forward when sending a CR command to the printer.
CAN Cancel one line
Format: ASCII : CAN
Decimal : 24
Hexadecimal : 18
Explanation:
The command cancels all characters preceding this code in the line buffer
and urges buffer pointer move back to the last Carriage Return code. It does
not cancel any control code sequence in the line.
NUL Null - Ending mark
Format: ASCII : NUL
Decimal : 0
Hexadecimal : 00
Page 18

32
Explanation:
The NUL command needs to combine several commands and ends those
commands, for example ESC B, ESC D, and ESC %. It would be no effect if
issuing alone.
3.9 Hexadecimal Dumping Command
ESC " Turn Hexadecimal Dumping on/off
Format: ASCII : ESC " n
Decimal : 27 34 n
Hexadecimal : 1B 22 n
Explanation:
If n=1, then turn on the hexadecimal dumping. If n=0, then turn off it. All
data received from the host computer will be printed out in hexadecimal at the
hexadecimal dumping mode.
For example, when host computer sends following 4 data to printer by the
statement:
PRINT #1, CHR$(0);CHR$(27);"A";CHR$(24);
The data will be printed out with hexadecimal as follows:
00 1B 41 18
The hexadecimal dumping begins to print only when the printing buffer is
full.
3.10 Chinese Character Printing Commands
FS & Enter Chinese Printing Mode
Format: ASCII : FS &
Decimal : 28 38
Hexadecimal : 1C 26
Explanation:
This command is used to enter Chinese Character Printing mode. After
receiving this command, printer ends the current line printing and start
Chinese character printing next line.
33
FS ? Exit Chinese printing Mode
Format: ASCII : FS ?
Decimal : 28 46
Hexadecimal : 1C 2E
Explanation:
This command is used to exit Chinese Character Printing mode. After
receiving this command, printer enters ASCII code mode.
FS S0 Set Chinese Double-width Print
Format: ASCII : FS S0
Decimal : 28 14
Hexadecimal : 1C 0E
Explanation:
Printer will print out Chinese characters in double-width when receiving
this command, till receiving the command ‘FS DC4’、 ‘CR’ or ‘LF’ and quit
Chinese double-width print mode.
FS DC4 Cancel Chinese Double-width Print Mode
Format: ASCII : FS DC4
Decimal : 28 20
Hexadecimal : 1C 14
Explanation:
Cancel Chinese double-width print mode.
3.11 Black Mark Detecting Command
GS FF Detect black mark and feed to next page top
Format: ASCII : GS FF
Decimal : 29 12
Hexadecimal : 1D 0C
Explanation:
The printer enters Black Mark Detecting Mode when it receives this
command. The printer detect the black mark in the rang from the beginning to
200mm of this page. Feed paper to the beginning of next page if the printer has
detected the Black Mark, or it will stop feeding paper and indicate no black
mark is found out.
Page 19
34
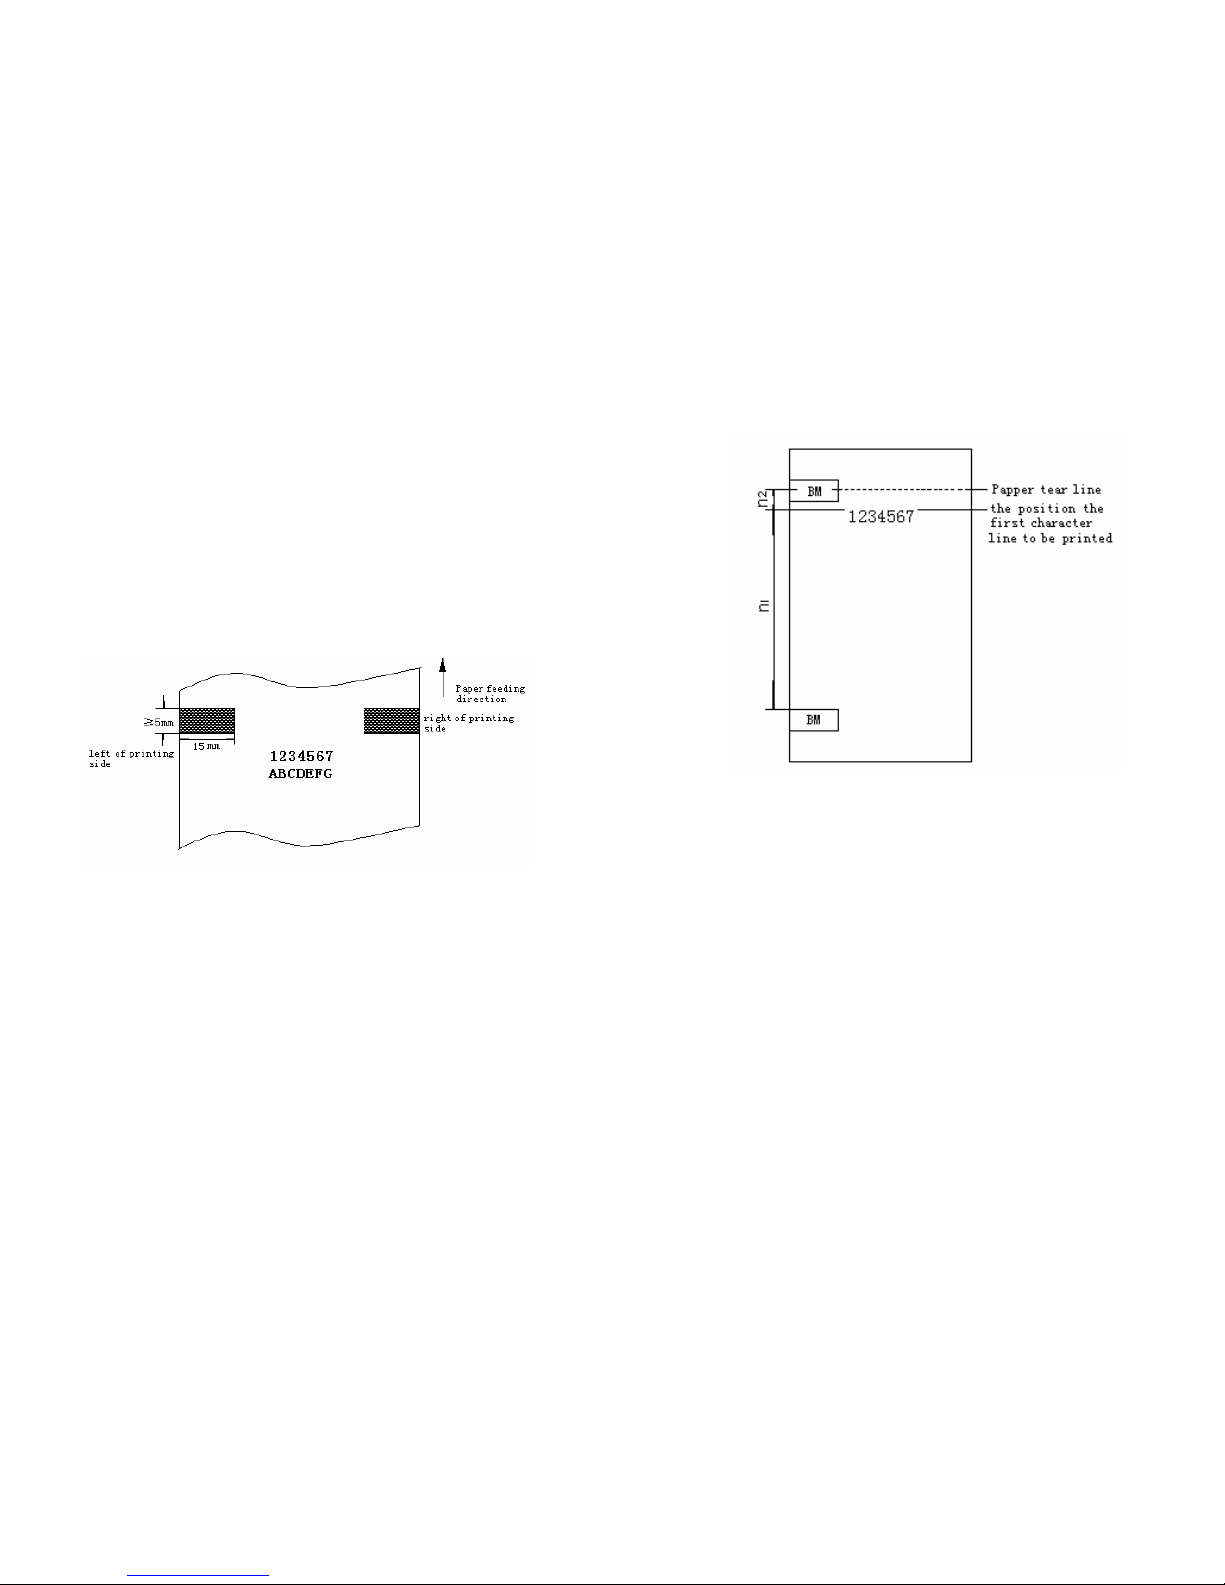
After power on, printer default the black mark has been at the paper tear
bar. The content to be printed should be between two black marks in sequence.
This command is valid only on using the paper with pre-printed black
mark.
Notice for black mark printing:
The black mark should be printed on the printing side of the paper. The
position of the black mark is the paper tearing line.
The position and size of the black mark printed are shown as below
picture.
The reflectivity of the black mark printed should be less than 10%, and
the others along the feeding direction should be more than 75%.
Explanation for printing area:
Printing area is shown as below figure.
35
n1: valid printing area.
n2: distance from the first printing line to the paper tearing line. n2=20mm.
Page 20

36
Chapter 4 Battery Charge and Discharge
4.1 Battery
The printer uses a rechargeable battery with DC 6V 1500mAh.
4.2 Charging Method
Two charging methods are used for charging the battery: slow charging on
the printer and external quick charging.
1.Slow charging on printer
Connect an external adaptor of DC12V/600mA to the DC jack of the
printer, and the battery is installed on the printer. The charging time need
12-16 hours.
2.External quick charging
Take out the battery from the printer and put it on the optional CX-101
Quick Charger, connect the adaptor of DC12V/600mA to the Charger.
The charging time need 4 hours. There are 4 indicators on the CX-101
quick charger for indicating the status of the charging. More indicators
light, more power charged.
4.3 Discharging Method
When the printer can’t work correctly due to the battery low, there may be
some power in the battery. To reduce the remember effect of the battery and
keep the capacity of the battery, strongly recommend charging after
discharging sufficiently.
1.Discharging on printer
After power off, press and hold button ON more than 10 seconds until
the both of red and green indicator light, the printer enters into
discharging state and can’t do any operations. When the both of
indicators are off, the discharging finished.
2.External quick discharging
CX-101quick charger has a quick discharging function. Put the battery on
the charger, press the button located left and down corner. The battery
enters quick discharging and then enters quick charging automatically
after finished discharging.
37
4.4 Method of getting back the capacity
If the battery discharged not entirely (the printer can work or the battery
is discharged not sufficiently before charging) and charged not entirely (the
charging time is not enough) more times, the battery capacity will reduce due
to Ni-MH battery have some remembrance effect. To get back the capacity of
the battery, 2 or 3 times of charging and discharging entirely are necessary.
The method of discharging and charging the battery is same as descriptions of
section 4.2 and 4.3.
Page 21

38
Chapter 5 Notice about the IrDA Infrared Interface
When use the IrDA infrared interface the user must notice the following:
1 The communication parameter must meet the following
Baud rate: 9600bps
Data bit: 8
Parity: none
Stop bit: 1
2 Make sure the infrared windows of the host and printer aim each other, that
is the View angle must within 30°
3 Insure there is no obstacle between the host and printer, and the distance
must within 1 meter.
4 If the clobber and lost data occurred, refer to the section 1,2,3 above
5 If the printer doesn’t work when use the IrDA infrared interface, may sure
the RS-232 communication cable has been plugged out.
39
Chapter 6 Notice about the Rechargeable Ni-MH Battery
6.1 Ni-MH Rechargeable Battery characteristics
6.1.1 Charging characteristics
The charging characteristic is affected by the current、temperature、time
etc. The current and the temperature affect Ni-MH rechargeable battery
charging characteristics obviously, temperature drop down or current increase
may cause the charging voltage rise.
We recommend you charge the battery with the current within 1C (1C=
1500mA), the temperature within 0oC~40oC. Charging the battery usually in
the temperature exceed the range will lower the capability of the battery.
Overcharge the battery from time to time may be underutilized resulting
insufficient use of the available capability.
6.1.2 Discharging characteristics
The Ni-MH rechargeable battery is similar to the Ni-Cd rechargeable
battery. The discharge voltage is about 1.2 volt. The discharging characteristics
is affected by the current、temperature etc. The higher discharge current and
lower temperature the lower discharge voltage and efficiency. The maximum
continuous discharge current is 3C.
6.1.3 Cycle life characteristics
Cycle Life of the battery is more than 500 times when it use correctly.
The battery is chemical, the capacity will be dropped down after use for many
times also long time storage. Incorrect use may drop down the cycle life of the
battery.
6.1.4 Storage characteristics
The storage characteristics include the self discharge characteristic and
long time storage characteristic.
Self discharge indicates the phenomenon that the battery discharge in
open circuit. The self discharge characteristic is affect by the environment.
Research indicates that it is the best to st ore the battery with full charge
status. The battery should be stored in the temperature about 10~30oC and the
Page 22

40
relative humidity about 45%~85%. Store in high temperature may cause
leakage, store in high relative humidity may cause corrode.
The capacity of the battery may be lower after along time storage. Charge
and discharge the battery for several times can get back the capacity. We
recommend you discharge and charge the rechargeable battery for one time at
least when you have stored the battery more than half year.
6.2 Notice:
6.2.1 Charging
1) The charging efficiency is affected by the environment. Charging in the
temperature about 10oC~30oC may has the best efficiency. It may cause the
leakage、lower the capability or the cycle life of the battery if charge it in the
temperature under zero. The charge efficiency may drop sharply when charge
the battery in the temperature higher than 40oC, also it will cause the leakage、
lower the capability of the battery. It may cause leakage and lower the capacity
if charge the battery in the temperature too high.
2) Never short circuiting the cells, use the correct polarity when charging, or it
may cause the deformation、leakage even the explosion.
3) The maximum current of external quick charging must within 1C.must use
the specified adapter to charge the battery or it may cause overheating、
leakage、even explosion.
4) The range of current slow charging on printer should be 1/30C~1/20C. The
charging time should not exceed 20 hours.
6.2.2 Discharging
1 The battery discharging temperature could be –20oC~60oC. The best
discharging temperature is 0oC~40oC
2 The best discharging current is 1/10C~1C, the maximum continuous
discharge current should not exceed 3C. Too high discharging current may
drop down the discharging efficacy and heat the battery.
3 Do not over-discharging, it may cause leakage, drop down the cycle life even
cause explosion.
41
Explanation:
C=rated charging current (or discharging current)/hour
=rated capacity mAh/h
For example: for a 1500mAh battery,
1C=1500mA
0.4C=600mA
0.1C=150mA
Page 23

42
Appendix 1 Specifications
q Printing method: Dot matrix printing
q Printing mechanism: 8 pin shuttle head
q Printing width: 57.5mm
q Printing paper: (normal paper, paper will-ended sensor)
Outside diameter:Φ50mm
Inside diameter: Φ12.5mm
Paper width:57.5±0.5mm
Paper thickness: 53~64g/m2
q Copy ability: 1(original)+1
q Ribbon cassette: ERC-09 (purple), life: 250 thousand characters
ERC-22 (purple), life: 1000 thousand characters
q Printing characters:
448 defined characters
32 user-defined characters
GB level 1 and level 2 Chinese font(15×16dot matrix)
q Printing commands: ESC/P printing control commands and FS Chinese
printing control commands.
q Interface:
Serial interface: RS-232C, RJ-11 modular jack; RTS/CTS handshaking,
baud rate 9600bps.
Infrared interface: Communication distance: 1.0m (max.). Communication
angle: 30o
q Supply power: DC 6V 1500mAh rechargeable battery.
q Overall dimension: 153(L)×116(D)×65(H)
q Weight: About 530g (excluding the paper roll)
q Working condition: Temperature 0~50oC, relative humidity 10-80%
43
Appendix 2 Printing Control Commands
Decimal
Hexade
cimal
Command Description
0 00 NUL Ending mark
9 09 HT Horizontal tab
10 0A LF Line Feed
11 0B VT Vertical Tab
12 0C FF Form Feed
13 0D CR Carriage Return
14 0E SO Set double width of character
20 14 DC4 Cancel double width of character
24 18 CAN Cancel current character-line
27 34 1B 22 ESC " n
Turn Hexadecimal Dumping
on/off
27 37 1B 25 ESC % m1 n1…mk nk NUL
Replace with user-defined
character
27 38 1B 26 ESC & m n1 n2…n6 Defined user-defined character
27 39 1B 27 ESC 'm n1 n2… nk CR Print m curving graphic lines
27 45 1B 2D ESC - n Turn underline on/off
27 49 1B 31 ESC 1 n Set ’n’ dot-line spacing
27 54 1B 36 ESC 6 Select Font 1
27 55 1B 37 ESC 7 Select Font 2
27 58 1B 3A ESC : Restore the font character
27 64 1B 40 ESC @ Initialize printer
27 66 1B 42 ESC B n1…nk NUL Set vertical Tabs
27 67 1B 43 ESC C n Set page length to equal to n lines
Page 24
44
27 68 1B 44 ESC D n1…nk NUL Set Horizontal tabs
27 74 1B 4A ESC J n Perform ‘n’ dot-line feed
27 75 1B 4B ESC K n1 n2…data… Set a n1×8 dot-matrix graphics
27 78 1B 4E ESC N n Set bottom margin
27 79 1B 4F ESC O Cancel bottom margin
27 81 1B 51 ESC Q n Set right margin
27 85 1B 55 ESC U n Enlarge in width
27 86 1B 56 ESC V n Enlarge in height
27 87 1B 57 ESC W n Enlarge in width & height
27 99 1B 63 ESC c n Inverse printing
27 102 1B 66 ESC f m n Print blank character or blank line
27 105 1B 69 ESC i n Turn reverse printing on/off
27 108 1B 6C ESC I n Set left margin
28 14 1C 0E FS S0
Set Chinese Double-width Print
Mode
28 20 1C 14 FS DC4
Cancel Chinese Double-width
Print Mode
28 38 1C 26 FS & Enter Chinese Character Mode
28 46 1C 2E FS . Exit Chinese Character Mode
29 12 1D 0C GS FF
Detect black mark and feed to next
page top
45
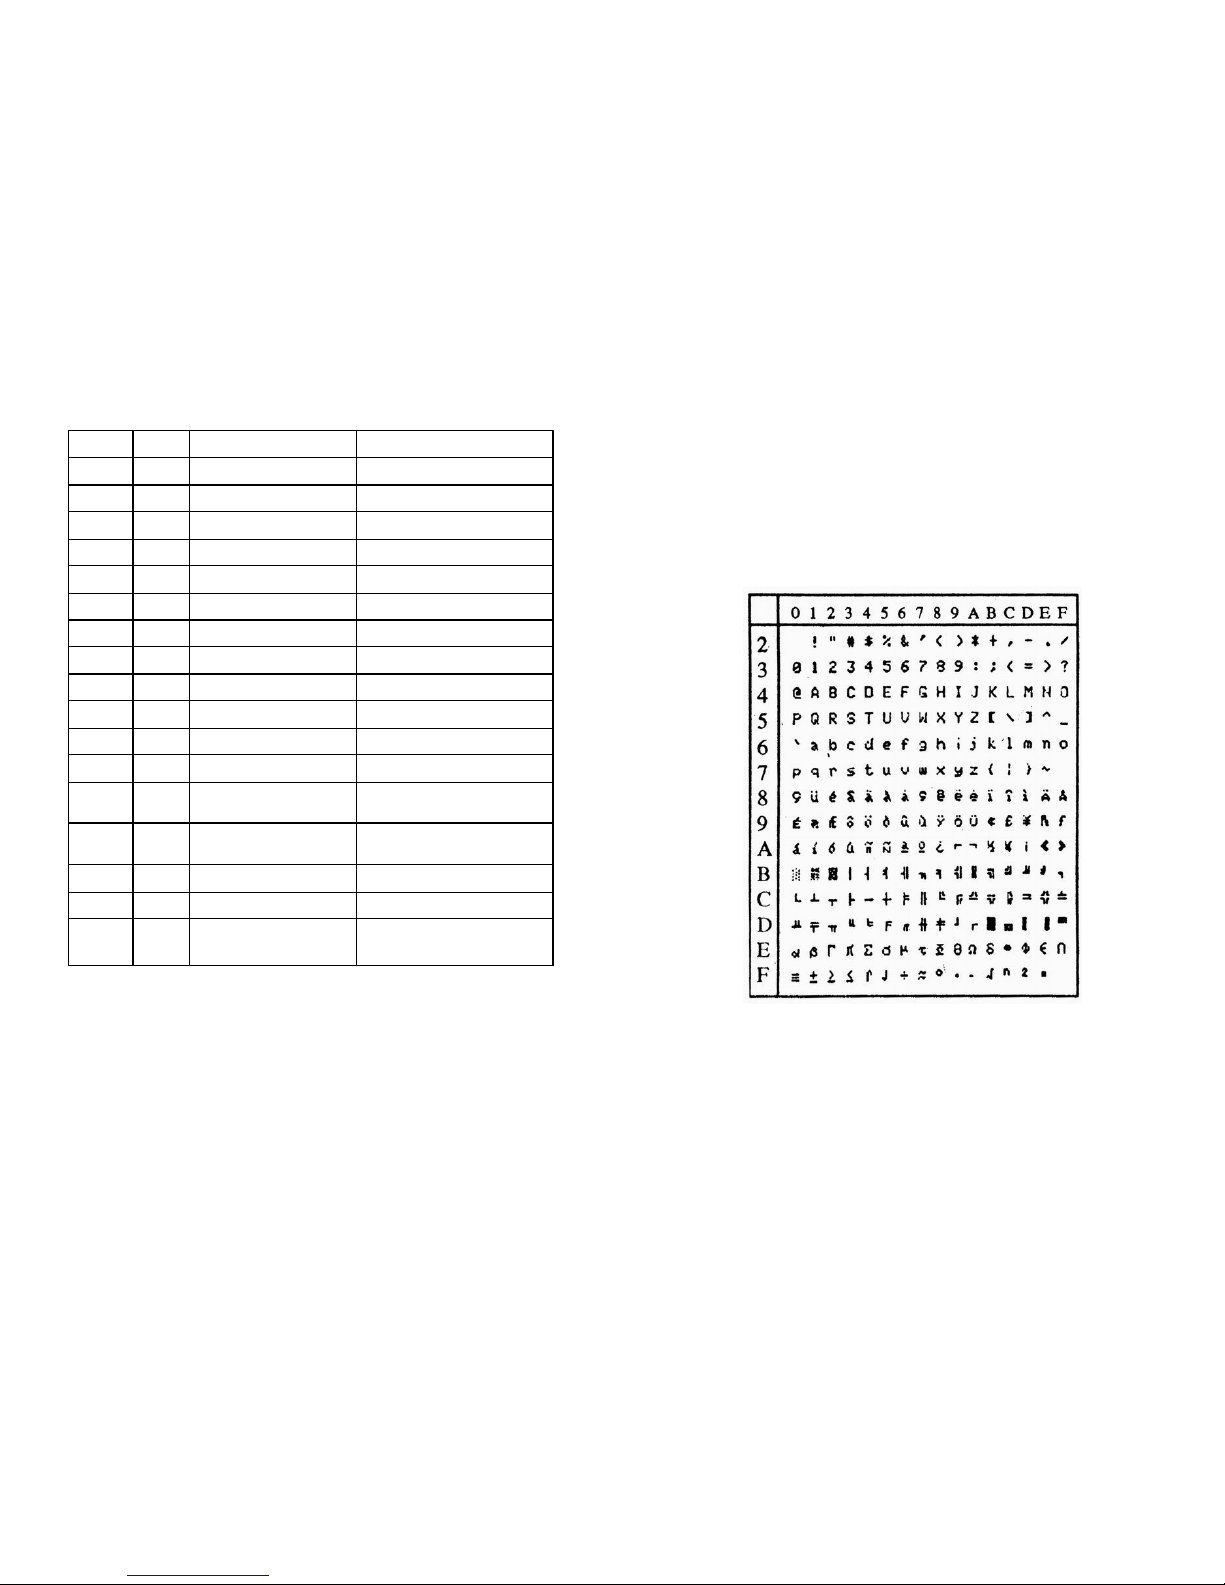
Appendix 3 Character Code Tables
Character code table 1
Page 25
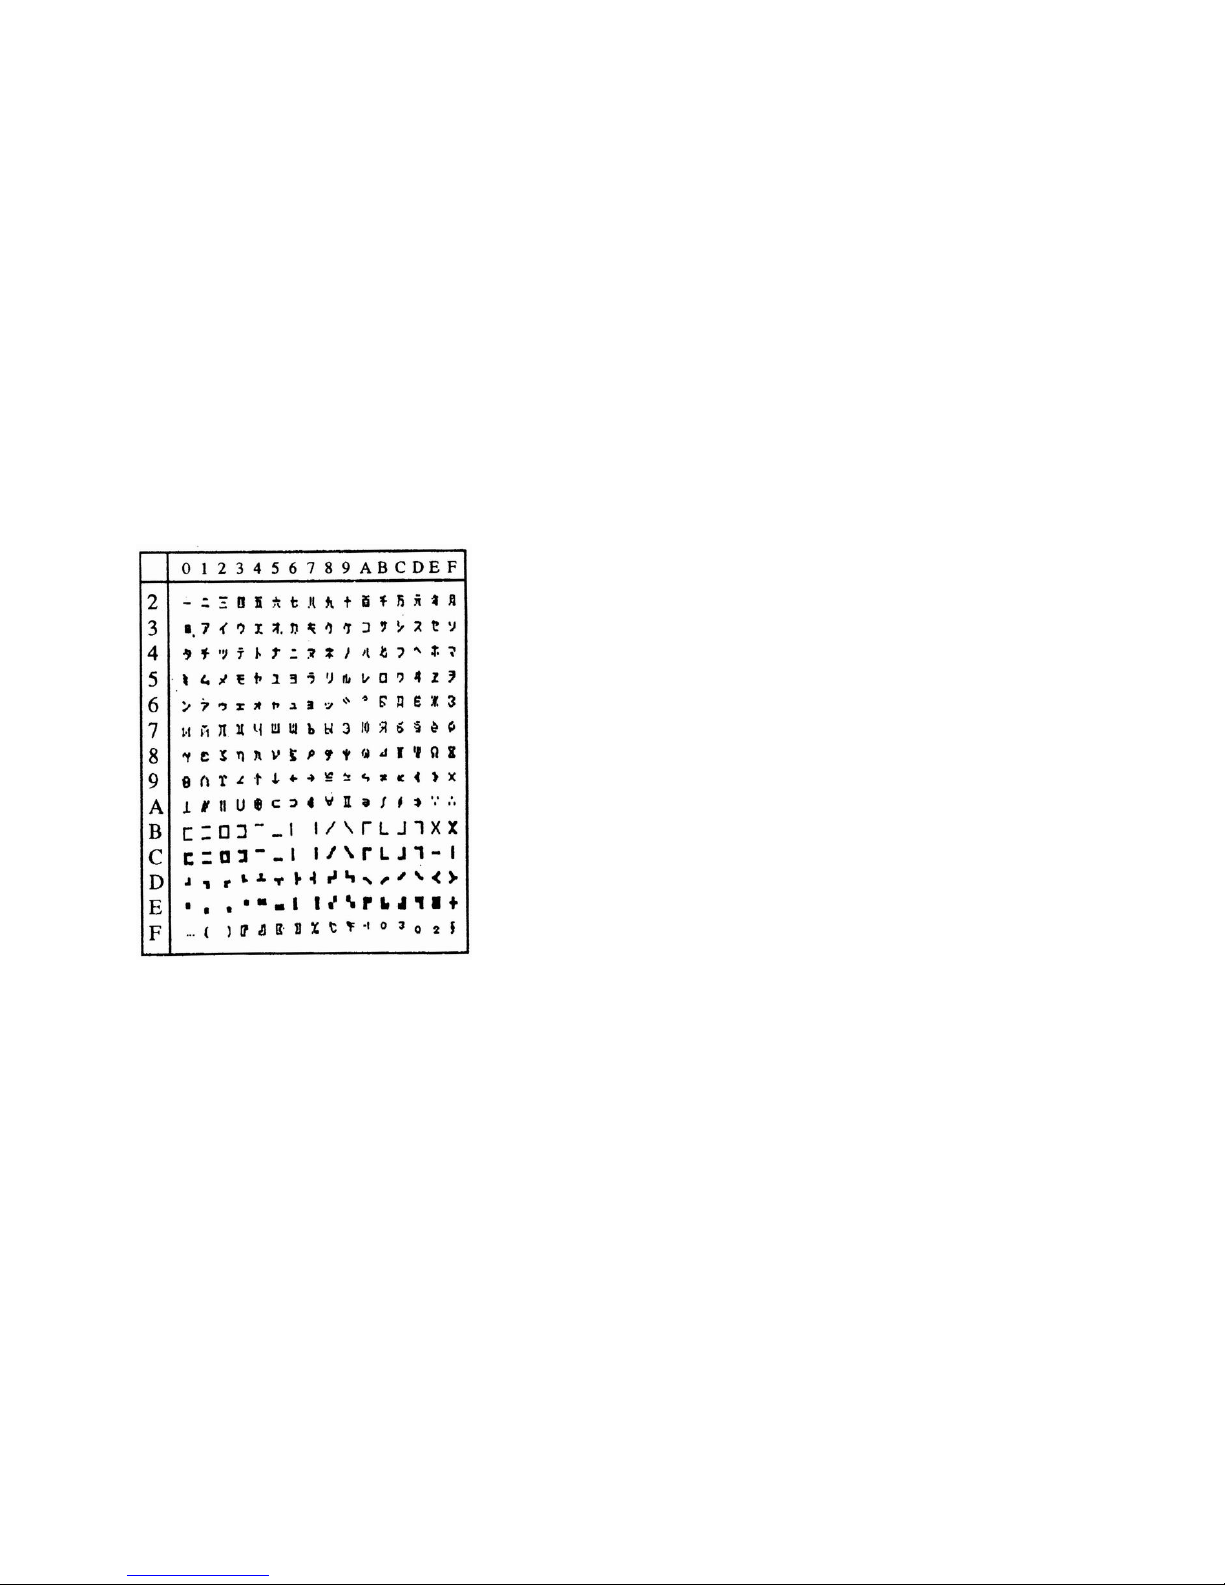
46
Character code table 2
 Loading...