

TP Challenger TP540, Challenger TP543, Challenger TP541, Challenger TP542 Instructions For Assembly, Maintenance And Safe Use
Page 1
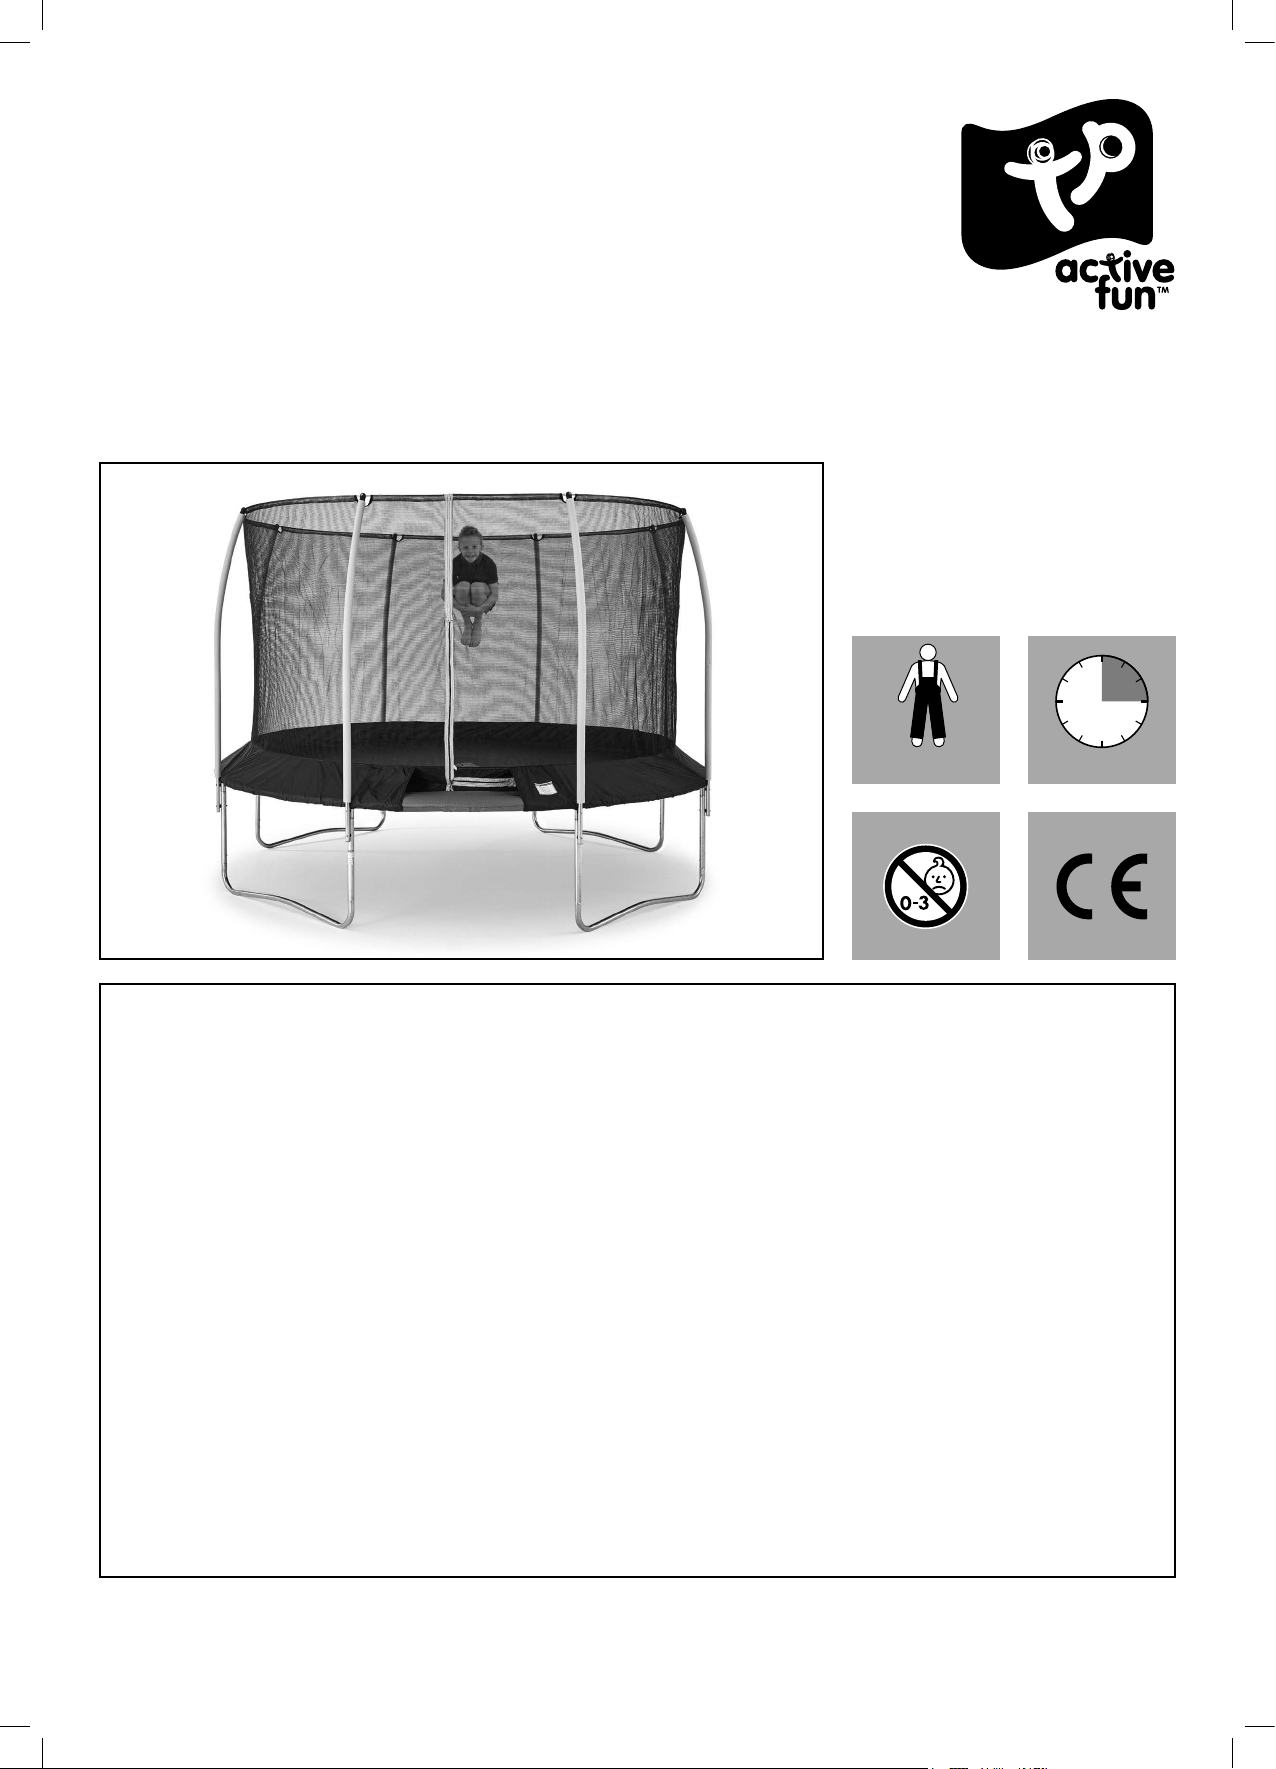
TP Challenger Trampoline
Build Time
with SurroundSafe
TP540 8ft TP Challenger Trampoline
TP541 10ft TP Challenger Trampoline
TP542 12ft TP Challenger Trampoline
TP543 14ft TP Challenger Trampoline
Instructions for assembly, maintenance and safe use. Please retain for future reference.
We constantly strive to improve our assembly instructions. To see the most current version of this instruction for assembly,
maintenance and safe use. Please visit the product page at tptoys.com
3 Hrs
WARNINGS!
l THIS PRODUCT CONTAINS SMALL PARTS AND IS NOT
SUITABLE FOR CHILDREN UNDER 36 MONTHS. SMALL
PARTS ARE A CHOKING HAZARD.
l ONLY FOR DOMESTIC USE.
l FOR OUTDOOR USE ONLY.
l TOY MUST BE ASSEMBLED BY AN ADULT IN ACCORDANCE
WITH THE ASSEMBLY INSTRUCTIONS.
l CHILDREN MUST NOT USE THE EQUIPMENT UNTIL
PROPERLY INSTALLED.
l ADULT SUPERVISION IS REQUIRED.
l ONLY ONE USER. COLLISION HAZARD.
l REMOVE ALL PACKAGING BEFORE GIVING TO YOUR
CHILDREN.
x2
l SHOES NOT TO BE WORN WHILE JUMPING.
l ALWAYS CLOSE THE NET OPENING BEFORE JUMPING
l ALWAYS JUMP IN THE MIDDLE OF THE MAT.
l DO NOT EAT WHILE JUMPING.
l DO NOT EXIT BY A JUMP.
l DO NOT USE THE MAT WHEN WET.
l EMPTY POCKETS AND HANDS BEFORE USING THE
TRAMPOLINE.
l LIMIT THE TIME OF CONTINUOUS USAGE (MAKE REGULAR
STOPS).
l DO NOT USE IN STRONG WIND CONDITIONS AND SECURE
THE TRAMPOLINE.
l THE NET SHOULD BE REPLACED EVERY 2 YEARS.
WARNING. Maximum single user weights / Age range
TP540 8ft TP Challenger Trampoline - Maximum single user weight 85kg - 6yrs+
TP541 10ft TP Challenger Trampoline - Maximum single user weight 105kg - 6yrs+
TP542 12ft TP Challenger Trampoline - Maximum single user weight 130kg - 6yrs+
TP543 14ft TP Challenger Trampoline - Maximum single user weight 135kg - 6yrs+
Robovision Ltd t/a TP Toys
Unit 11, Enterprise Way, Flitwick, Bedfordshire, MK45 5BX England
www.tptoys.com
TP540 541 542 543 Round Trampoline IN6067 Issue-E 14.10.19.indd 1 14/10/2019 11:59
Page 2

IMPORTANT, BEFORE YOU BEGIN, READ THIS MANUAL
Thank you for buying this Trampoline. The trampoline is designed and manufactured to provide
many years of fun and exercise but, for your child’s benefit and safety, please read this manual
carefully and in full before assembling and using your trampoline. Then, please retain this manual
for future reference.
ASSEMBLY
1. The trampoline must be assembled by an adult.
2. The trampoline must be erected in accordance with
the assembly instructions.
3. Enlisting the aid of a helper will make assembly easier.
4. Take care during assembly as the manufacturing
process can sometimes result in the occasional sharp
edge and small pieces of waste metalwork. The use
of gloves to protect hands from pinch points is also
recommended.
5. Any changes to this toy including changing or adding
an accessory, must be done in accordance with
our instructions. Failure to do this will render your
guarantee null and void and may make your product
unsafe.
6. Retain the instructions for assembly, maintenance and
safe use for future reference.
SITE PLANNING
1. Place the trampoline in a well-lit area.
2. Do not position the trampoline on a hard surface such
as concrete.
3. Position the trampoline on an impact-absorbing
surface, such as grass, wood chip, sand, rubber or
synthetic compounds.
4. Ensure the trampoline is on a level surface.
5. Ensure the safe play free space area (see Page 3) is
maintained.
6. Provide additional clearance for wires, tree branches,
walls, fences and other possible hazards.
7. Do not place the trampoline on top of other objects, or
store anything under the trampoline.
8. Keep away from fire.
9. Disassemble the trampoline and store away safely
when high winds are anticipated.
10. The trampoline is not intended to be buried in the
ground. Doing so will render your guarantee null and
void and make your trampoline unsafe.
11. Try to avoid moving the assembled trampoline,
because it could bend during transportation. Should it
be necessary to move the trampoline, please consider
the following:
At least four adults must be evenly spaced around the
frame to lift the trampoline off the ground.
The trampoline must be carried horizontally.
Be careful while moving the trampoline, because the
frame could bend.
CARE AND MAINTENANCE
Improper maintenance or lack of care can lead to your
trampoline deteriorating prematurely. Please follow these
care instructions to ensure that your trampoline remains
safe and lasts for as long as possible.
Ground stakes are the ideal way to stop your trampoline
frame moving while in use. However they will not
protect against wind damage. Always disassemble your
trampoline and store it away safely when high winds are
anticipated.
Metal Rust and Corrosion
1. Some areas of the trampoline are particularly prone
to rusting: Places where water can become trapped.
Hollow sections of steel (which can appear in good
condition on the outside, while hiding rust on the
inside). Sections where different metal components
join.
2. Inspect the inside of all frame tubes and poles
regularly, and remove any water from the inside
surfaces.
3. Check tube and pole connection areas for rust.
4. Use general purpose grease on steel connection
areas to reduce the chance of corrosion and wear.
5. Avoid excessively cleaning steel components, as
it may reduce the effectiveness of the protective
coatings.
6. If surface rust appears it should be removed
immediately with a wire brush or coarse sandpaper.
The affected area should then be treated using a paint
designed specifically for use on metals and in line with
the manufacturers guildelines.
Textile Care
1. Clean the trampoline mat with a soft sponge only to
avoid prematurely wearing the textiles.
2. Avoid using powerful soaps or detergents; they can
damage the textiles.
3. Wipe dry with an absorbent cloth any water left after
rain.
4. Remove shoes before using the trampoline along with
sharp objects like belt buckles.
5. Remove the textile parts, and store them safely when
the trampoline will not be used for an extended
period.
6. In certain countries during the winter period, the snow
load and the very low temperature can damage the
trampoline. It is recommended to remove the snow
and store the trampoline indoors.
7. Sunlight, rain, snow and extreme temperatures reduce
the strength of these parts over time.
SAFETY CHECKS
1. Inspect the trampoline before and after use for
component deterioration, which can happen over
time from use and from environmental and weather
conditions.
2. Replace any worn, defective, or missing parts
immediately, and through TP Toys only.
3. Regularly check all nuts and bolts for tightness and
adjust when required.
4. Check that all spring-loaded (pit pin) joints are still
intact and cannot become dislodged during play.
5. Check all surfaces for sharp and protruding edges.
6. Check the surface of the mat for foreign objects, and
remove them.
7. Use only TP Toys-made accessories with, or on, our
trampolines.
JUMPING INSTRUCTIONS
1. Users should not use the trampoline in an
inappropriate or hazardous manner.
2. Do not attempt somersaults.
3. To regain control and stop your jump, bend knees
sharply when you land.
4. Wear clothing that is free of drawstrings, hooks,
loops, buckles or anything that could get caught in the
trampoline.
TP Challenger Trampoline with SurroundSafe
2
TP540 541 542 543 Round Trampoline IN6067 Issue-E 14.10.19.indd 2 14/10/2019 11:59
Page 3
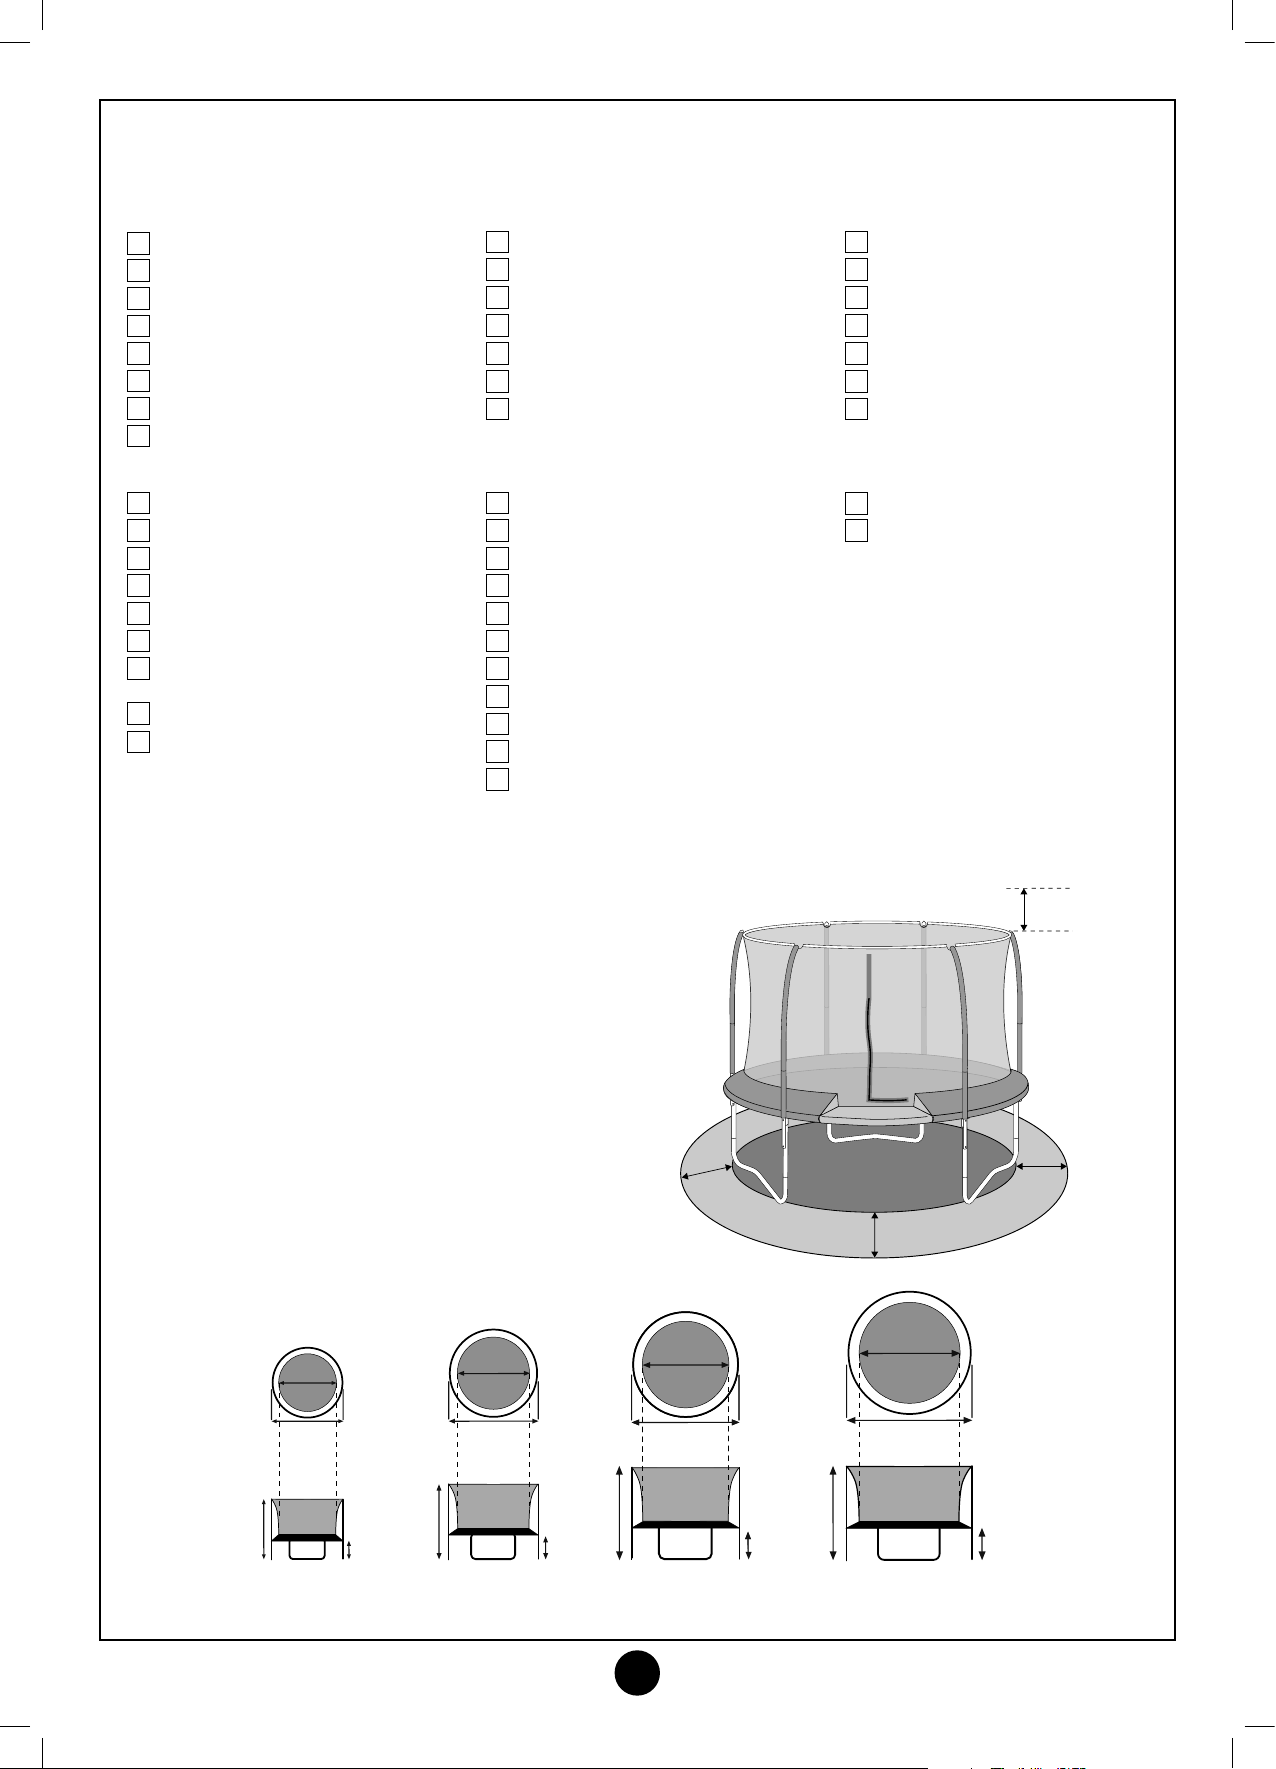
INSPECTION CHECKLIST
It is important that checks and maintenace of the main parts is carried out at the beginning of each season and also at
regular intervals. If these checks are not carried out, the trampoline can become dangerous.
Frame Tubes and Legs
Rust spots
Cracking on the curved areas
Distortion of spring holes
Twisted or stretched steel
Sharp protrusions
Broken or missing push pins
Distorted push pin holes
Broken welds
Net Upright Poles
Rusting
Cracking on the curved areas
Twisted or stretched steel
Sharp protrusions
Bent or twisted joints
Cracks in the joints
Rusty fluid leaking out of the
joints
Broken or missing push pins
Distorted push pin holes
Mat
Holes
Burn marks
Frayed yarn
Broken sewing threads
Sagging fabric
Faded or torn fabric
UV damage
Surround Net
Holes
Burn marks
Frayed yarn
Broken sewing threads
Stretched mesh
Torn edge belts
Stretched seams
Faded materials
Detached top rods
Damaged top rod connectors
UV damage
Frame Pads
Holes
Burn marks
Frayed yarn
Broken sewing threads
Stretched seams
Faded materials
UV damage
Springs
Rusting
Stretched, misshapen or
weakened
Optional Trampoline Accessories
Use TP Anchor Down/Ground stakes to secure your trampoline in use. Visit www.tptoys.com for more details.
Recommended Free Space:
The Safe Play Area refers to the zone extending 200cm
(2 metres) beyond the toy on all sides and 250cm (2.5
metres) above the toy. The Safe Play Area must be free
from all structures, landscaping, trees and branches,
rocks, wires, sprinkler heads and other similar
obstacles to safe play. Children can be seriously
injured running or colliding into such obstacles.
200cm
200cm
Dimensions:
Mat
371cm
Mat
200cm
Mat
254cm
Mat
315cm
250cm
200cm
Frame Dia
245cm
220cm
8ft
60cm
Frame Dia
10ft/305cm
250cm
260cm
Frame Dia
14ft/425cm
Frame Dia
12ft/365cm
260cm
70cm 80cm
80cm
10ft 12ft 14ft8ft
TP Challenger Trampoline with SurroundSafe
3
TP540 541 542 543 Round Trampoline IN6067 Issue-E 14.10.19.indd 3 14/10/2019 11:59
Page 4
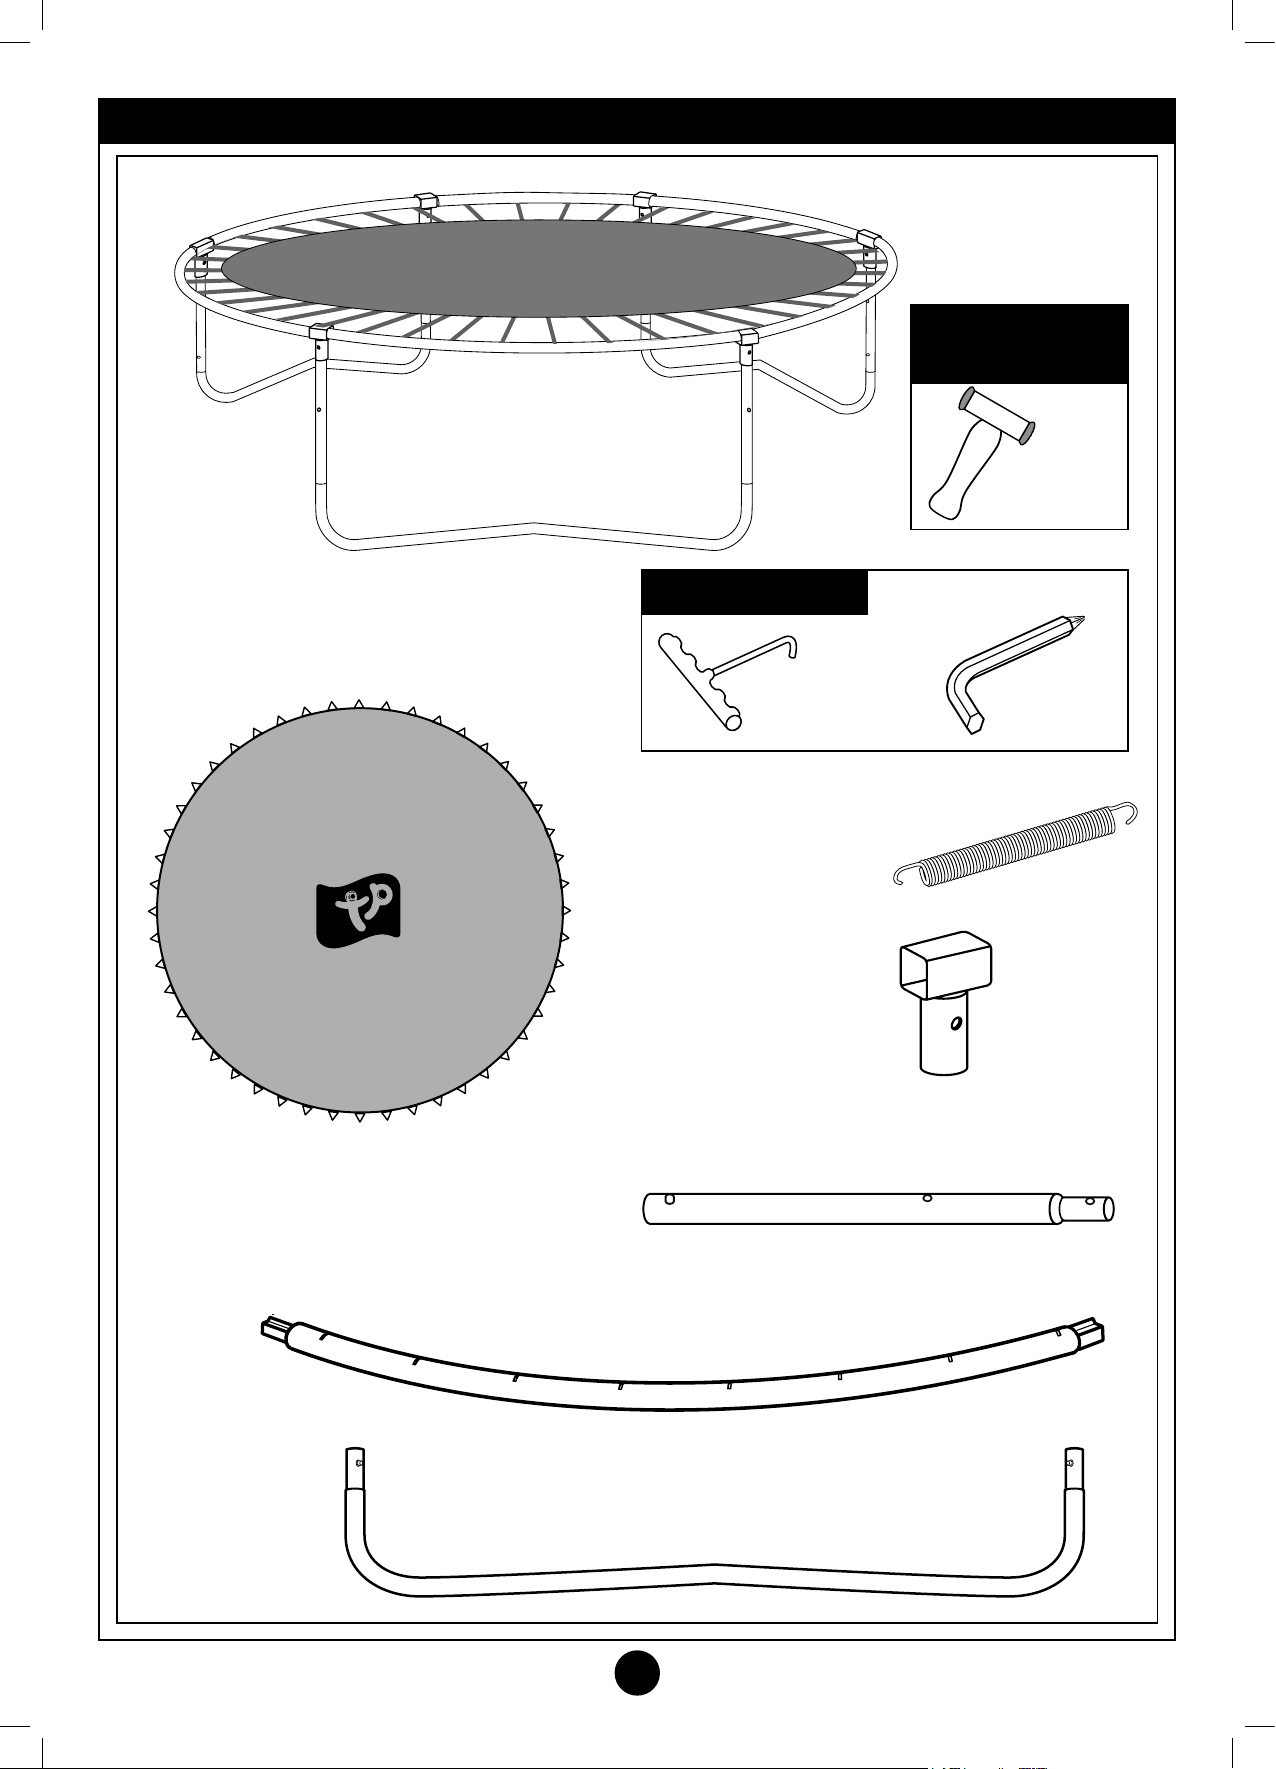
CONTENTS 8ft, 10ft, 12ft AND 14ft TRAMPOLINE FRAME - Please Check
Tool required
(not supplied)
Mallet x1
8ft FC9904 x1
10ft FC9905 x1
12ft FC9906 x1
14ft FC9907 x1
Tools supplied
FC8681 x1
8ft FC8000 x42
10ft FC8000 x60
12ft FC8000 x72
14ft FC8000 x80
8ft FC8371 x6
10ft FC8372 x6
12ft FC8373 x8
14ft FC8374 x8
8ft FC8381 x6
10ft FC8382 x6
12ft FC8383 x8
14ft FC8383 x8
FA8651
Allen Key x1
8ft FC8363 x6
10ft FC8364 x6
12ft FC8365 x8
14ft FC8366 x8
8ft FC8007 x3
10ft FC8008 x3
12ft FC8009 x4
14ft FC8010 x4
TP Challenger Trampoline with SurroundSafe
4
TP540 541 542 543 Round Trampoline IN6067 Issue-E 14.10.19.indd 4 14/10/2019 11:59
Page 5
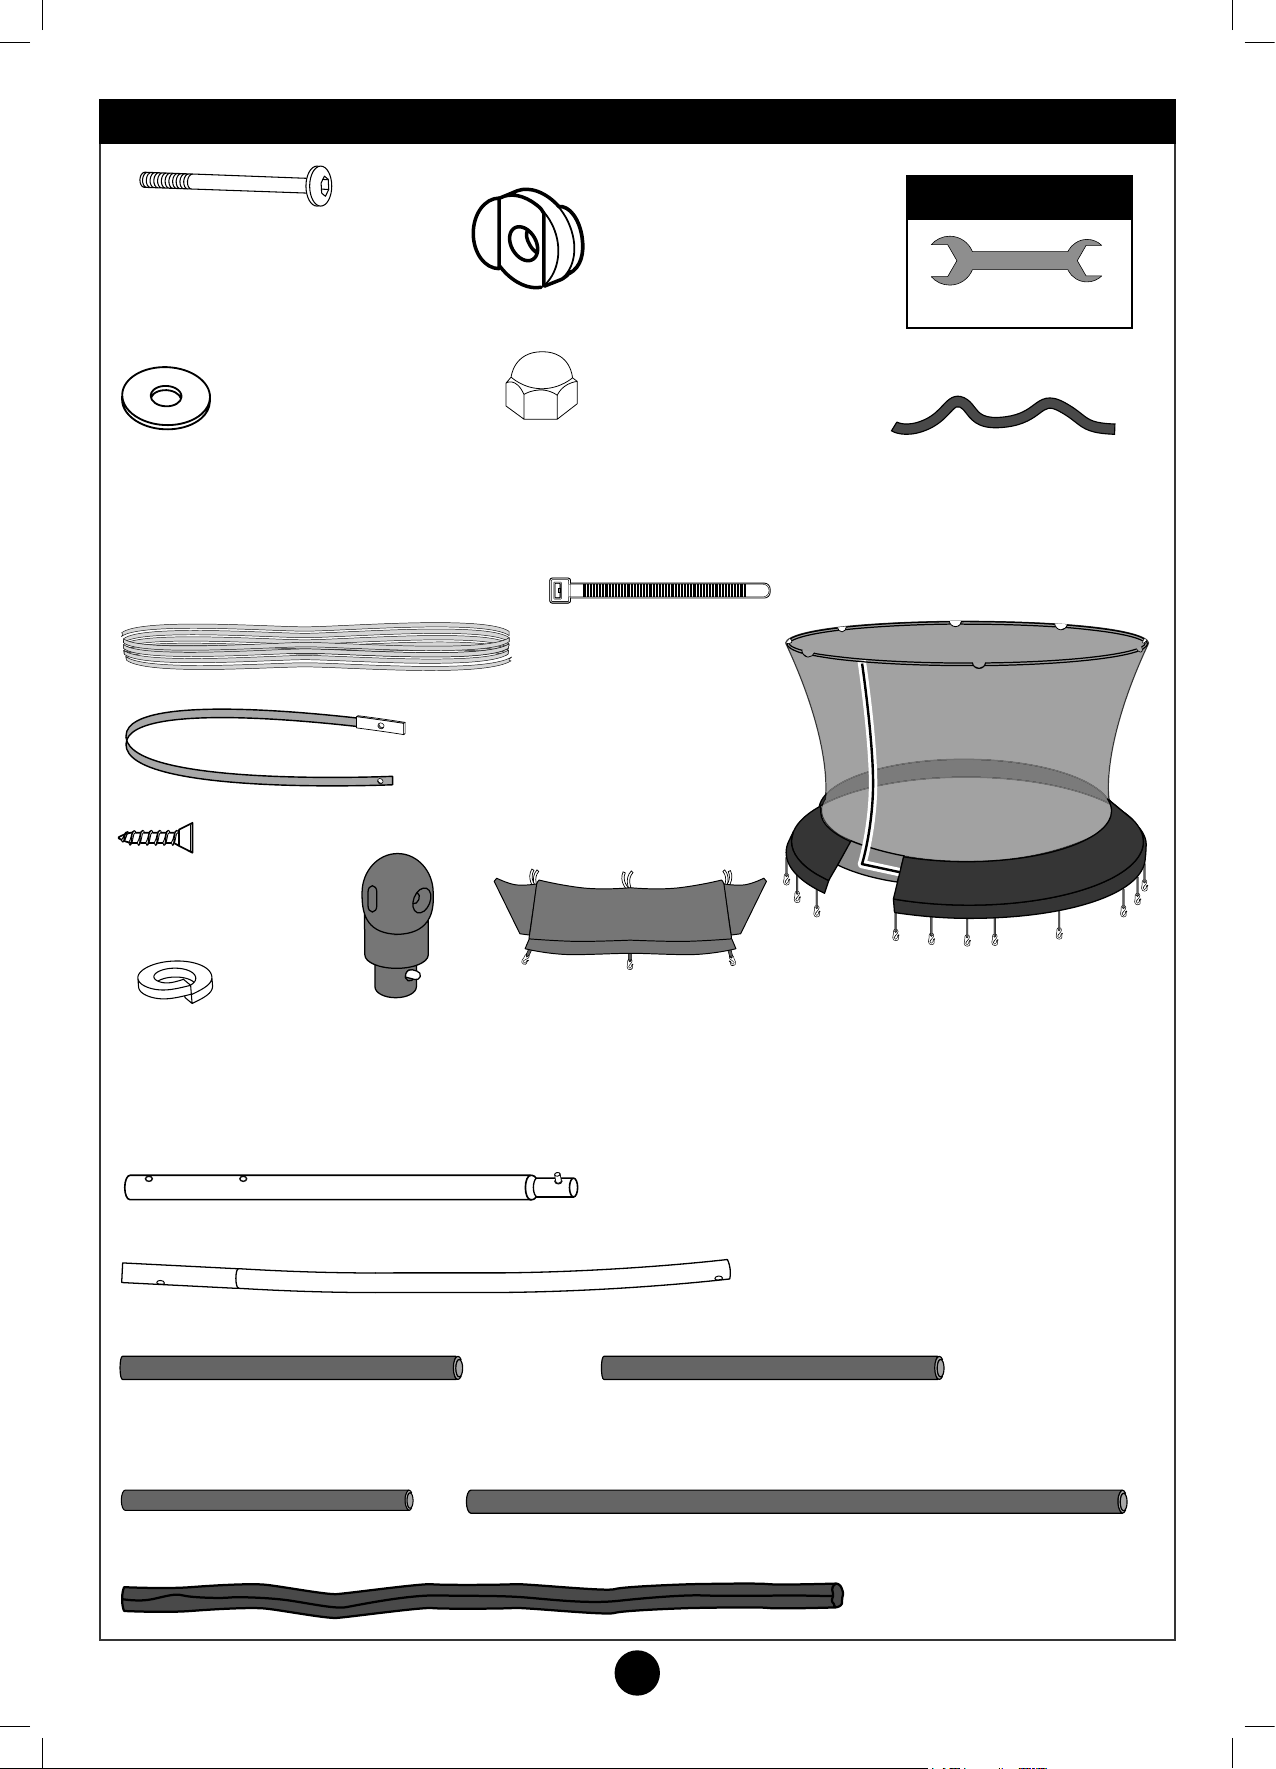
CONTENTS 8ft, 10ft, 12ft AND 14ft TRAMPOLINE FRAME - Please Check
M6 x 75mm Allen Bolt
FA8007
8ft & 10ft x12
12ft & 14ft x 16
Washer - FA5094
8ft & 10ft x12
12ft & 14ft x16
8ft 7.3m FB6043 x1
10ft 9.1m FB6045 x1
12ft 11m FB6047 x1
14ft 13.56m FB6046 x1
Bolt Spacer - PM0098
Tool supplied
8ft & 10ft x12
12ft & 14ft x16
1x Spanner
M6 Dome Nut - FA8008
8ft & 10ft x12
12ft & 14ft x16
Tie - FC8379
8ft & 10ft x18
12ft & 14ft x24
8ft, 10ft, 12ft & 14ft
PM2080 x1
FC8391 8ft x6 1080mm
FC8392 10ft x6 1390mm
FC8393 12ft x8 1280mm
FC8394 14ft x8 1510mm
FA6840
8ft & 10ft x6
12ft & 14ft x8
FA6394
8ft & 10ft x6
12ft & 14ft x8
PM1985
8ft & 10ft x6
12ft & 14ft x8
8ft DP7880 x1
10ft DP7881 x1
12ft DP7882 x1
14ft DP7883 x1
8ft TS0348 x1
10ft TS0349 x1
12ft TS0350 x1
14ft TS0351 x1
8ft FC8375 (935mm) x6 10ft FC8376 (1065mm) x6 12ft & 14ft FC8376 (1065mm) x8
8ft FC8385 (965mm) x6 10ft FC8386 (1100mm) x6 12ft & 14ft FC8386 (1100mm) x8
8ft BFM5744 (680mm) x6
10ft BFM5746 (800mm) x6
12ft & 14ft BFM5746 (800mm) x8
10ft BFM5747 (1030mm) x6
12ft & 14ft BFM5747 (1030mm) x8
8ft BFM5745 (900mm) x6
8ft FC9964 x6 10ft FC9967 x6 12ft FC9970 x8 14ft FC9973 x8
TP Challenger Trampoline with SurroundSafe
5
TP540 541 542 543 Round Trampoline IN6067 Issue-E 14.10.19.indd 5 14/10/2019 11:59
Page 6
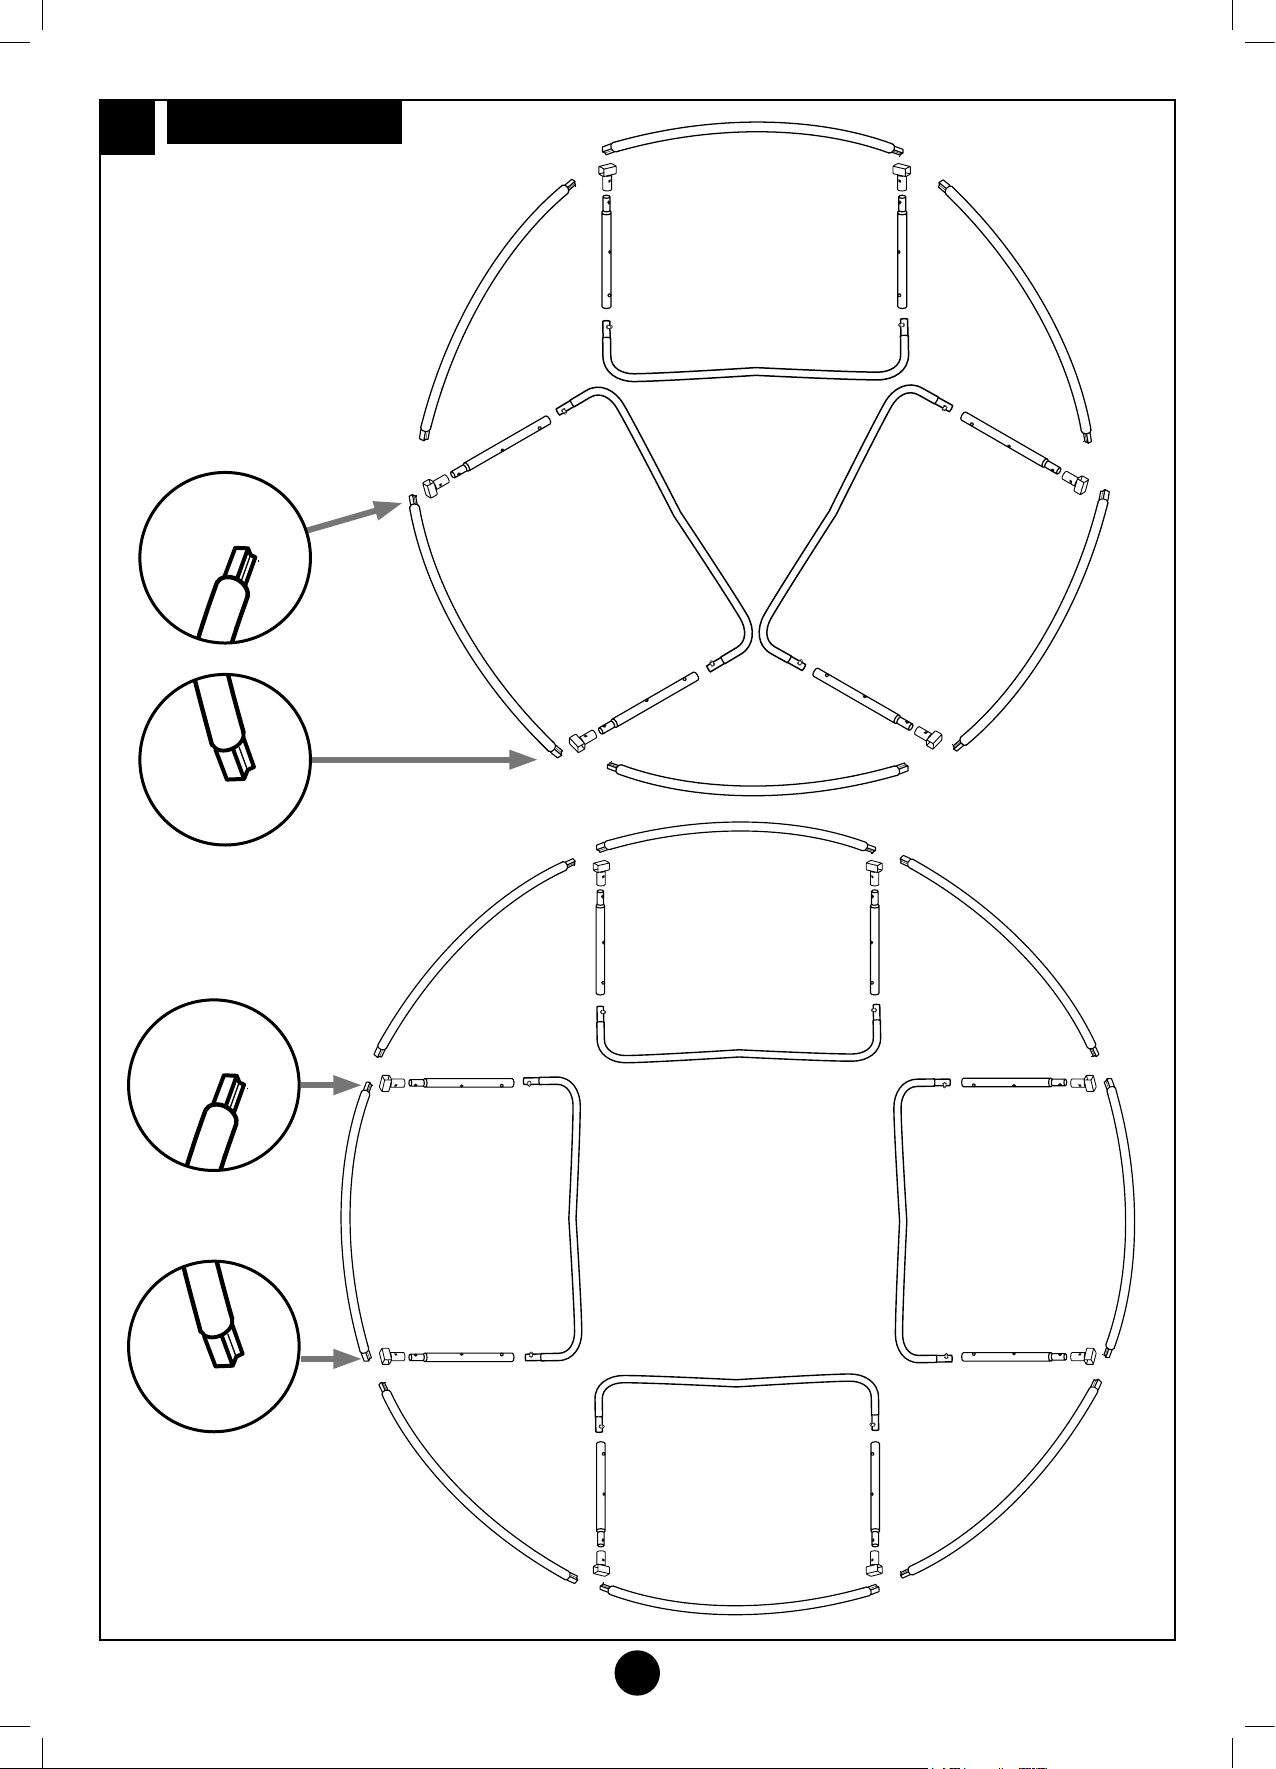
Stage
1
FRAME ASSEMBLY
Lay Out Parts like this
Disposez les pièces de la manière
suivante
Disporre i componenti come
indicato
Coloque las piezas de este
modo
Befestigung des
Sprungtuches und
der Federn
Dispor os componentes
conforme indicado
Smaller square
pressing
8ft & 10ft
Large square
pressing
Smaller square
pressing
12ft & 14ft
Large square
pressing
TP Challenger Trampoline with SurroundSafe
6
TP540 541 542 543 Round Trampoline IN6067 Issue-E 14.10.19.indd 6 14/10/2019 11:59
Page 7
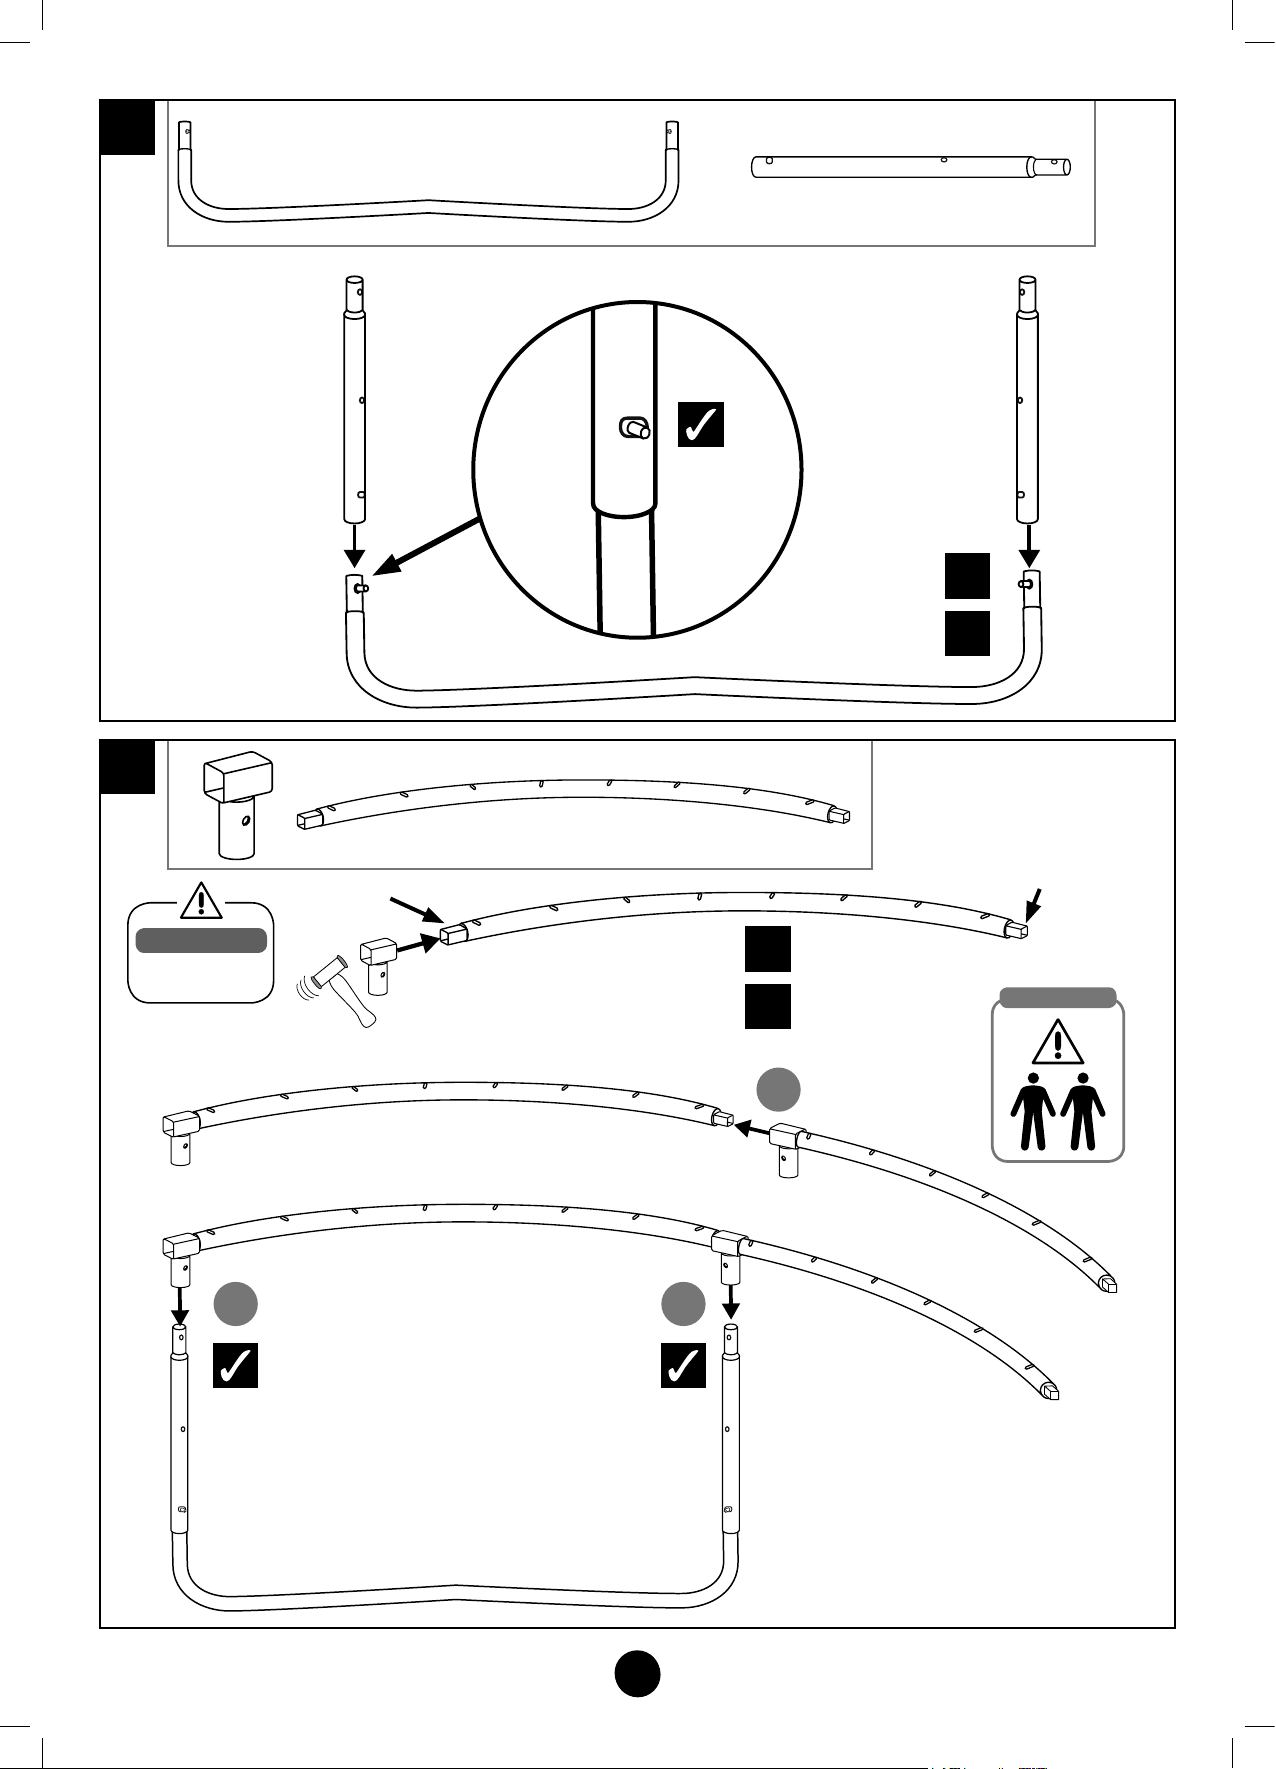
Stage
2
Stage
3
Assembly Tip
Use mallet to
help assembly.
Large square
pressing
8ft & 10ft
12ft & 14ft
X6
X8
1
8ft & 10ft
12ft & 14ft
X3
X4
Smaller square
pressing
Assembly Tip
22
TP Challenger Trampoline with SurroundSafe
7
32
TP540 541 542 543 Round Trampoline IN6067 Issue-E 14.10.19.indd 7 14/10/2019 11:59
Page 8
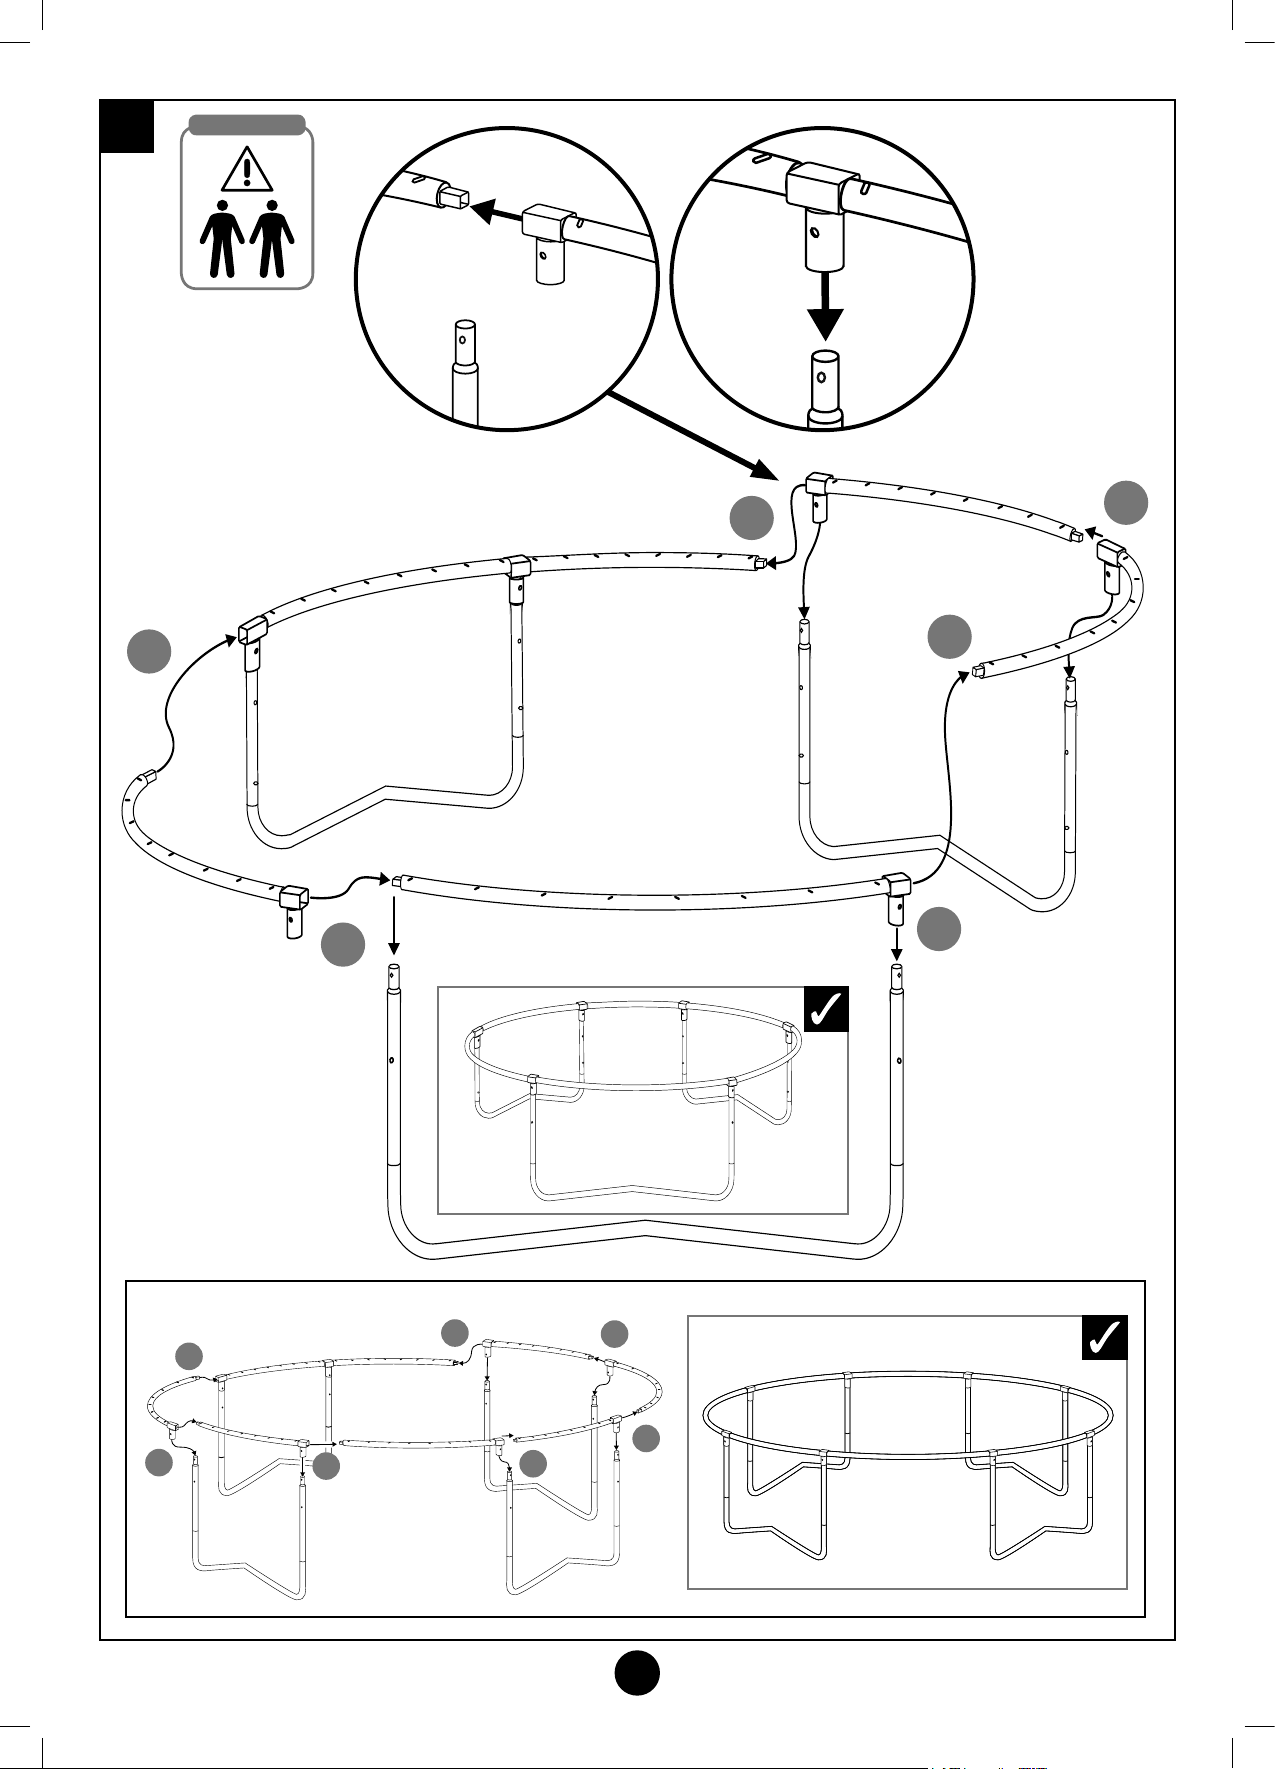
Stage
4
Assembly Tip
8ft / 10ft - 3 legs
6
1
2
3
5
4
12ft / 14ft - 4 legs
1
7
6
5
4
2
3
TP Challenger Trampoline with SurroundSafe
8
TP540 541 542 543 Round Trampoline IN6067 Issue-E 14.10.19.indd 8 14/10/2019 11:59
Page 9
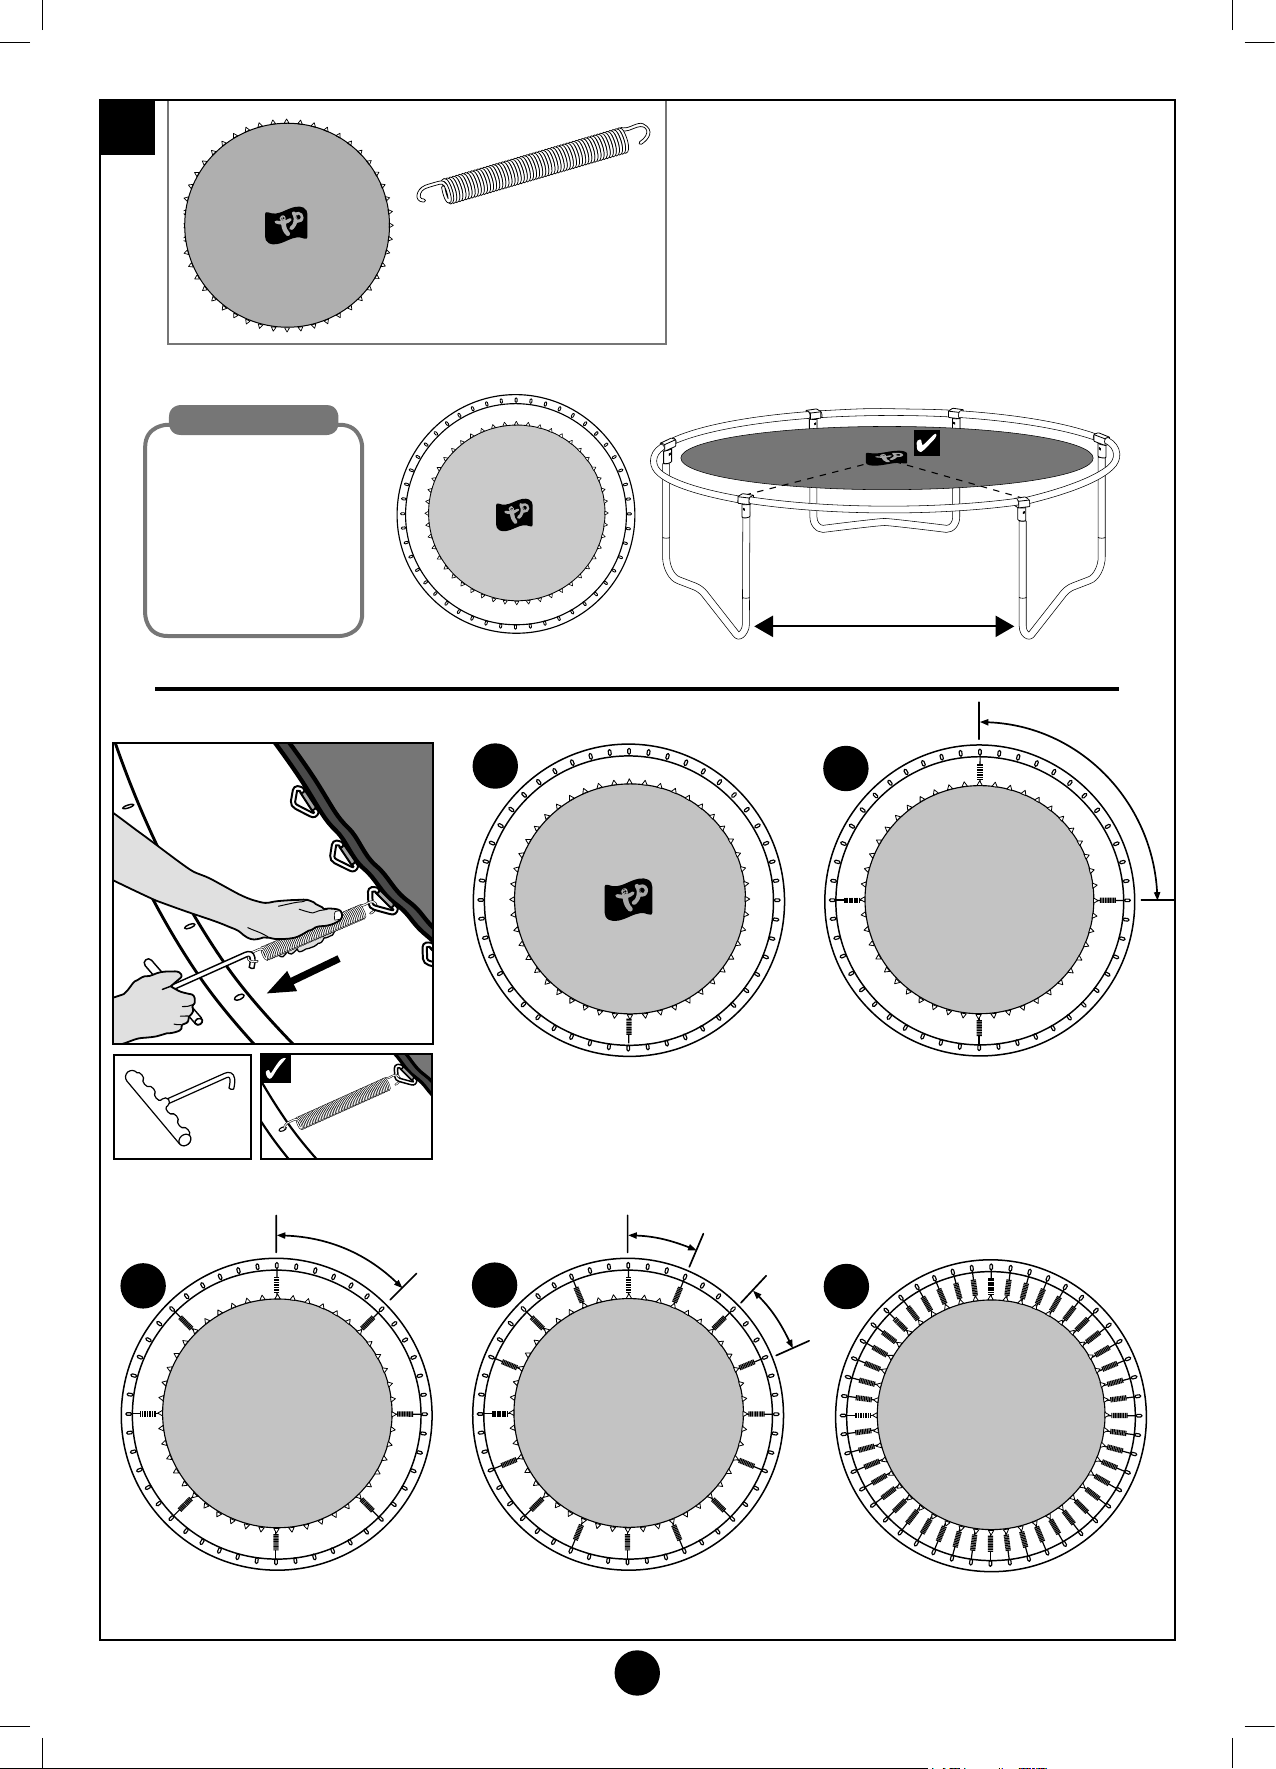
Stage
5
x1
8ft FC8000 x42
10ft FC8000 x60
12ft FC8000 x72
14ft FC8000 x80
Assembly Tip
1) Place mat inside
trampoline frame.
2) Orientate logo
to face trampoline
frame where there
are no legs.
Logo style
may vary
1
2
Logo style
may vary
3
4
5
TP Challenger Trampoline with SurroundSafe
9
TP540 541 542 543 Round Trampoline IN6067 Issue-E 14.10.19.indd 9 14/10/2019 11:59
Page 10
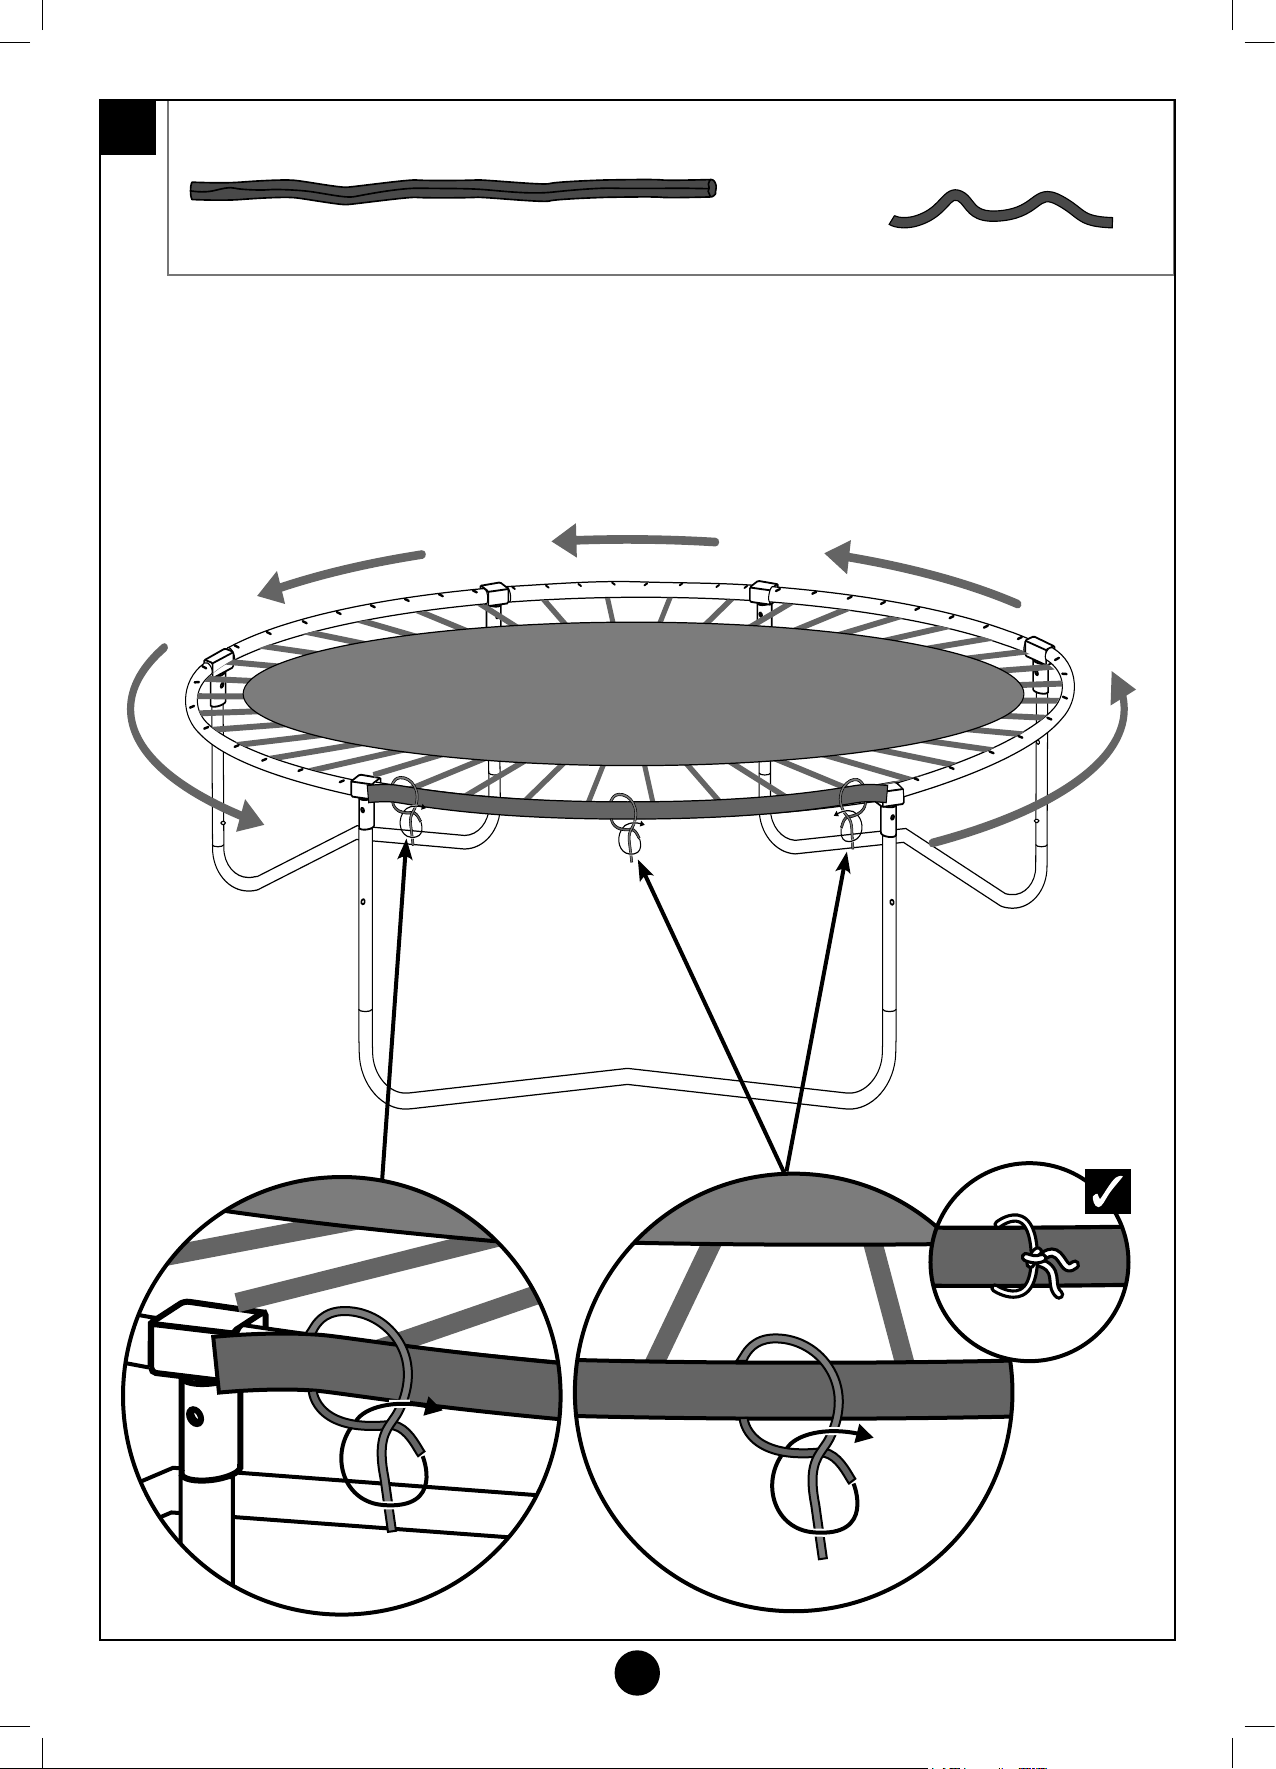
Stage
6
8ft FC9964 x6 10ft FC9967 x6
FC9970 x8 14ft FC9973 x8
12ft
Tie - FC8379
8ft & 10ft x18
12ft & 14ft x24
3 ties
per pad
TP Challenger Trampoline with SurroundSafe
10
TP540 541 542 543 Round Trampoline IN6067 Issue-E 14.10.19.indd 10 14/10/2019 11:59
Page 11
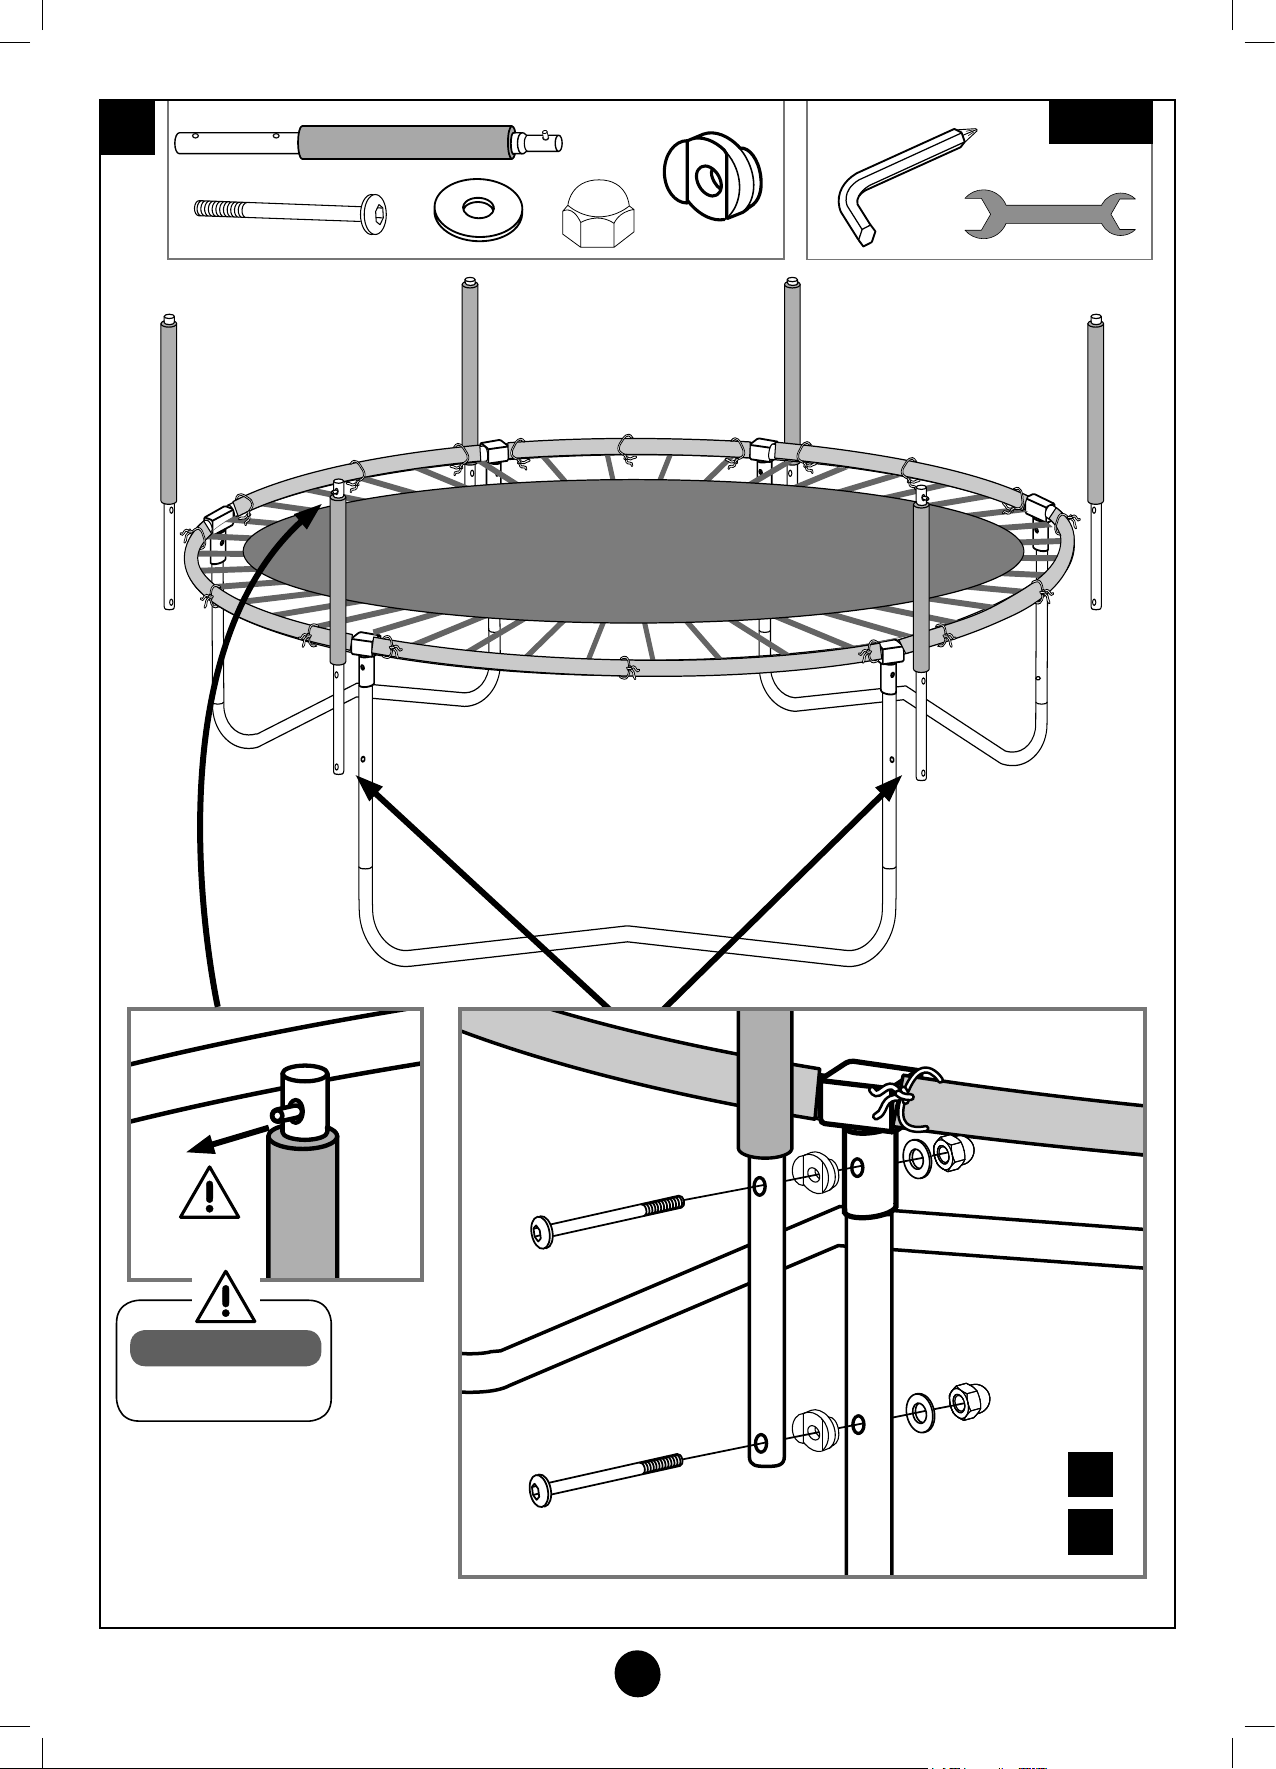
Stage
7
Tools
Warning
Pit pins must face
outwards.
8ft & 10ft
12ft & 14ft
TP Challenger Trampoline with SurroundSafe
11
32
TP540 541 542 543 Round Trampoline IN6067 Issue-E 14.10.19.indd 11 14/10/2019 11:59
X6
X8
Page 12
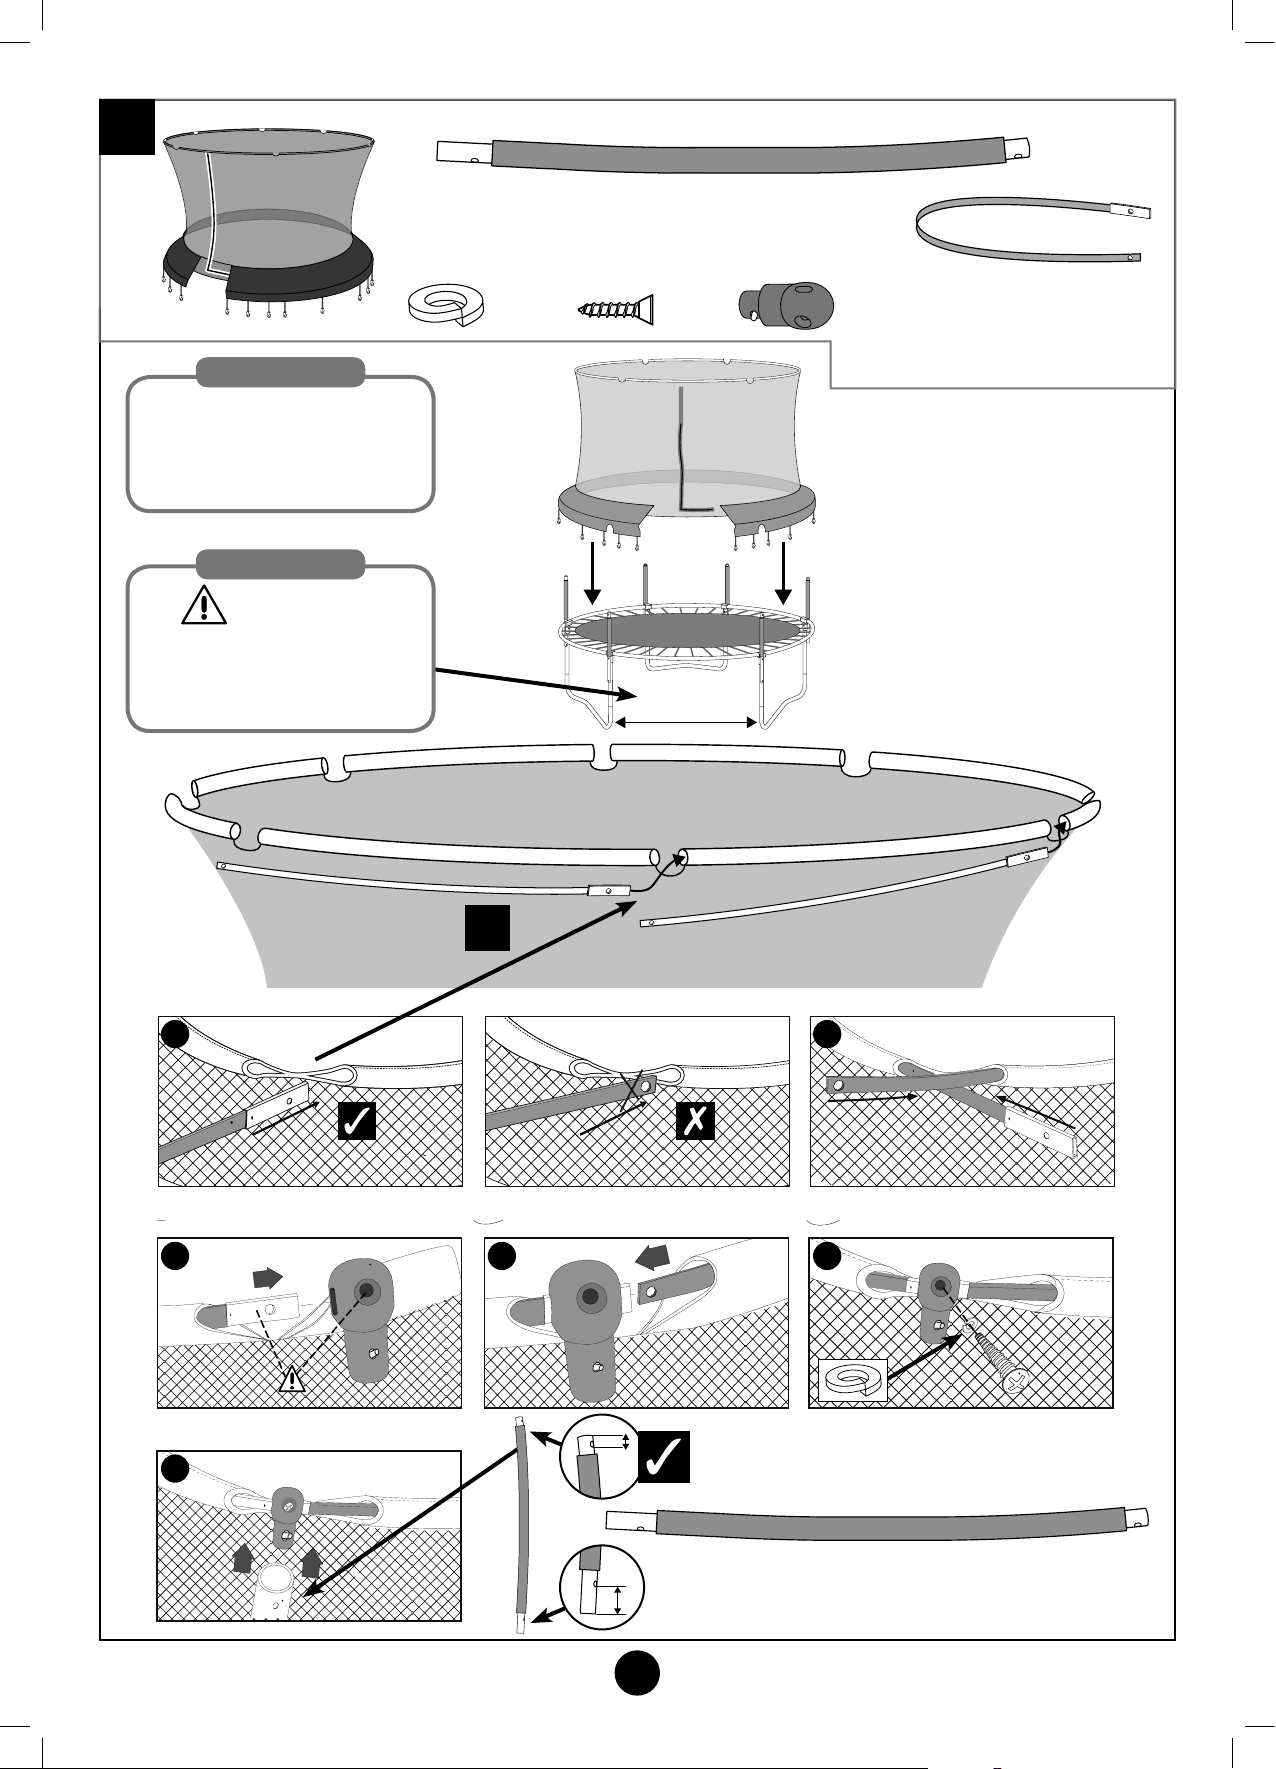
4
5
3
12
354
4
5
3
12
354
6
12
Stage
8
1
Assembly Tip
Place surround on trampoline
frame/mat as shown
to help assemble surround
top rim and uprights.
Assembly Tip
FA6394
8ft & 10ft x6
12ft & 14ft
Warning
Door/zip must be positioned
between two legs on all size
of trampolines
x8
FA6840
8ft & 10ft x6
12ft & 14ft
x8
Door Position
PM1985
8ft & 10ft x6
12ft & 14ft
x8
FC8391 8ft x6 1080mm
FC8392 10ft x6 1390mm
FC8393 12ft x8 1280mm
FC8394 14ft x8 1510mm
x8
A B
C D E
F
TP540 541 542 543 Round Trampoline IN6067 Issue-E 14.10.19.indd 12 14/10/2019 11:59
12
TP Challenger Trampoline with SurroundSafe
Page 13
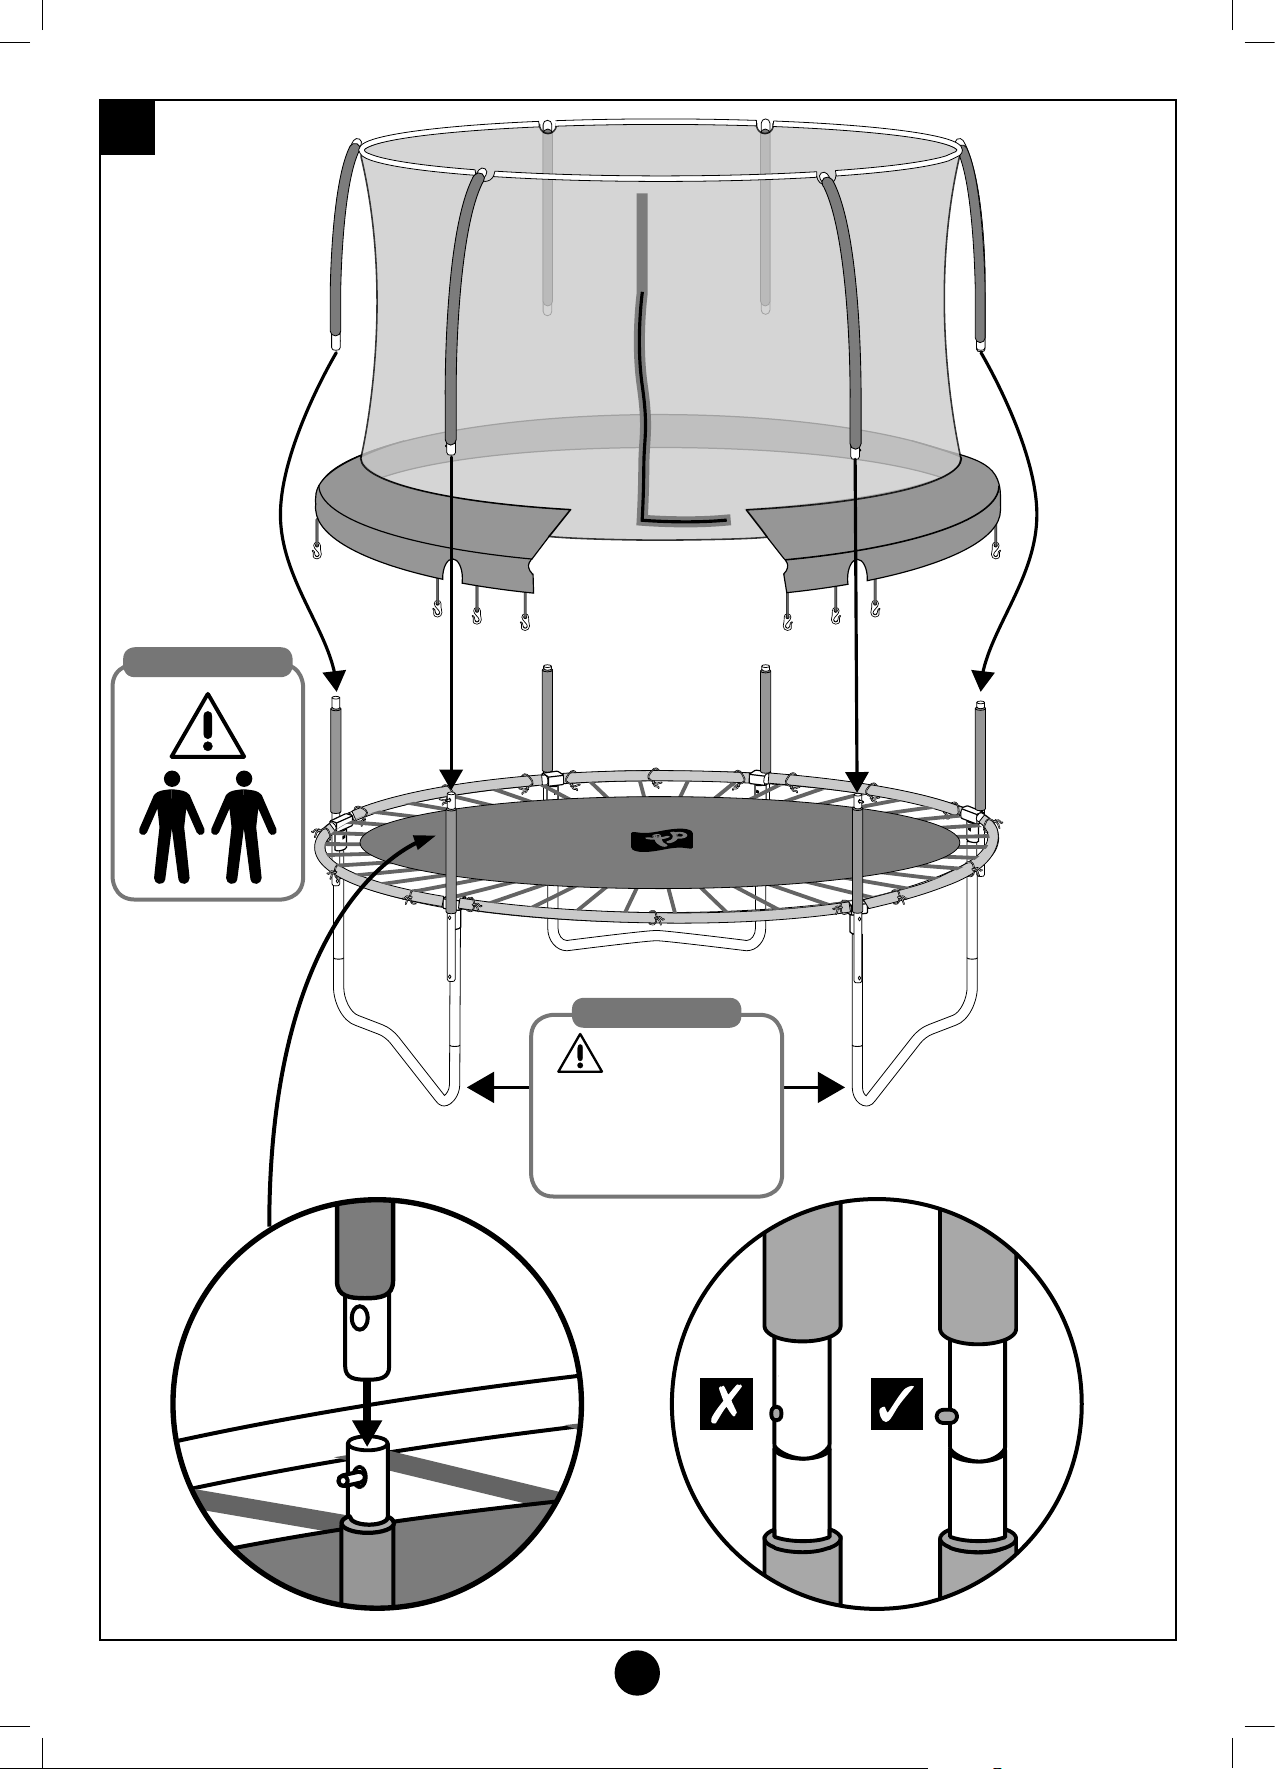
Stage
9
Assembly Tip
Assembly Tip
Warning
Door/zip must be
positioned between
two legs on all size of
trampolines
TP Challenger Trampoline with SurroundSafe
13
TP540 541 542 543 Round Trampoline IN6067 Issue-E 14.10.19.indd 13 14/10/2019 11:59
Page 14
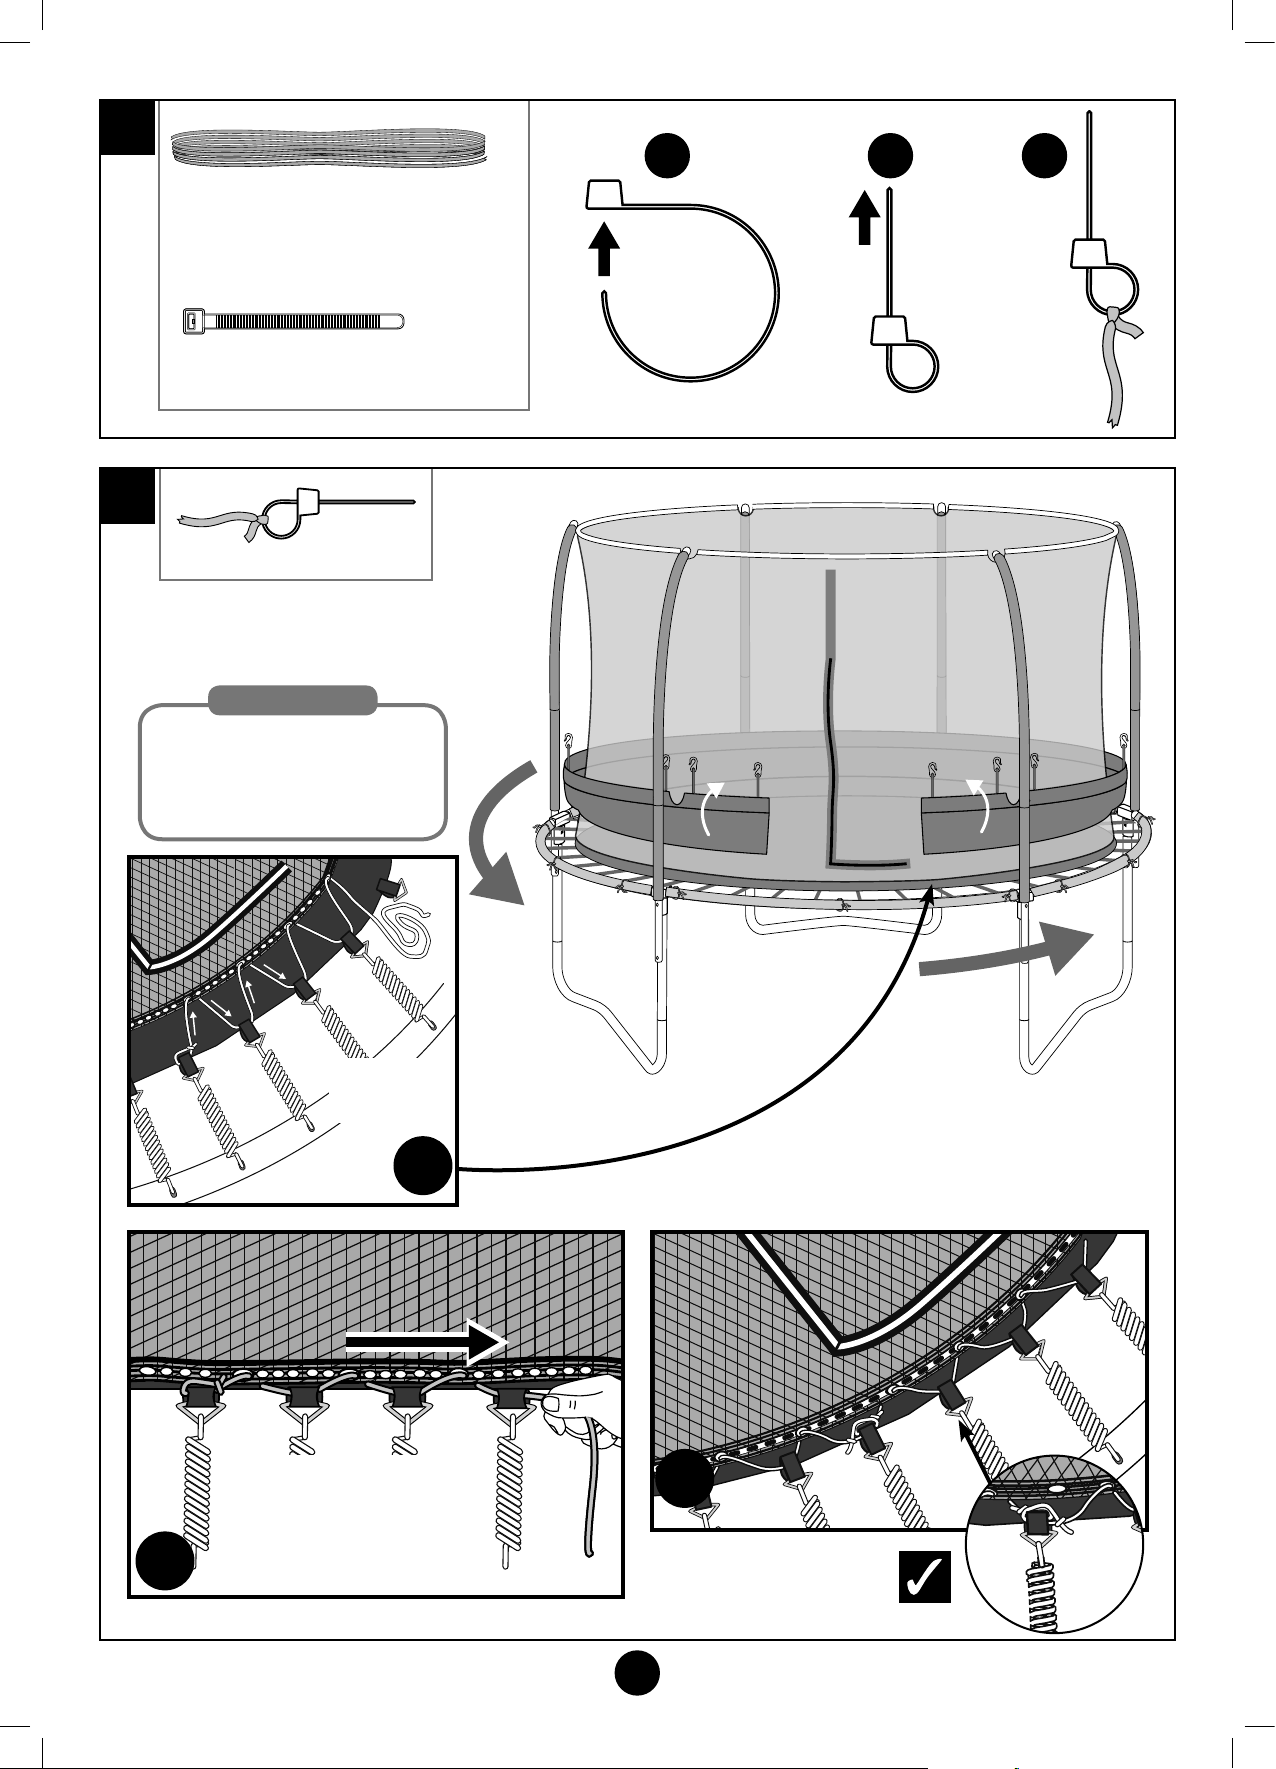
Stage
A
B
10
10
Stage
11
1 2 3
8ft 7.3m FB6043 x1
10ft 9.1m FB6045 x1
12ft 11m FB6047 x1
14ft 13.56m FB6046 x1
PM2080 x1
8ft, 10ft, 12ft & 14ft
Assembly Tip
Select adjacent hole in
surround when lacing the
surround to mat D-ring tab.
D-ring
Tab
A
Thread four holes/loops
then pull tight.
Repeat until back to start
C
B
TP Challenger Trampoline with SurroundSafe
14
TP540 541 542 543 Round Trampoline IN6067 Issue-E 14.10.19.indd 14 14/10/2019 11:59
Page 15
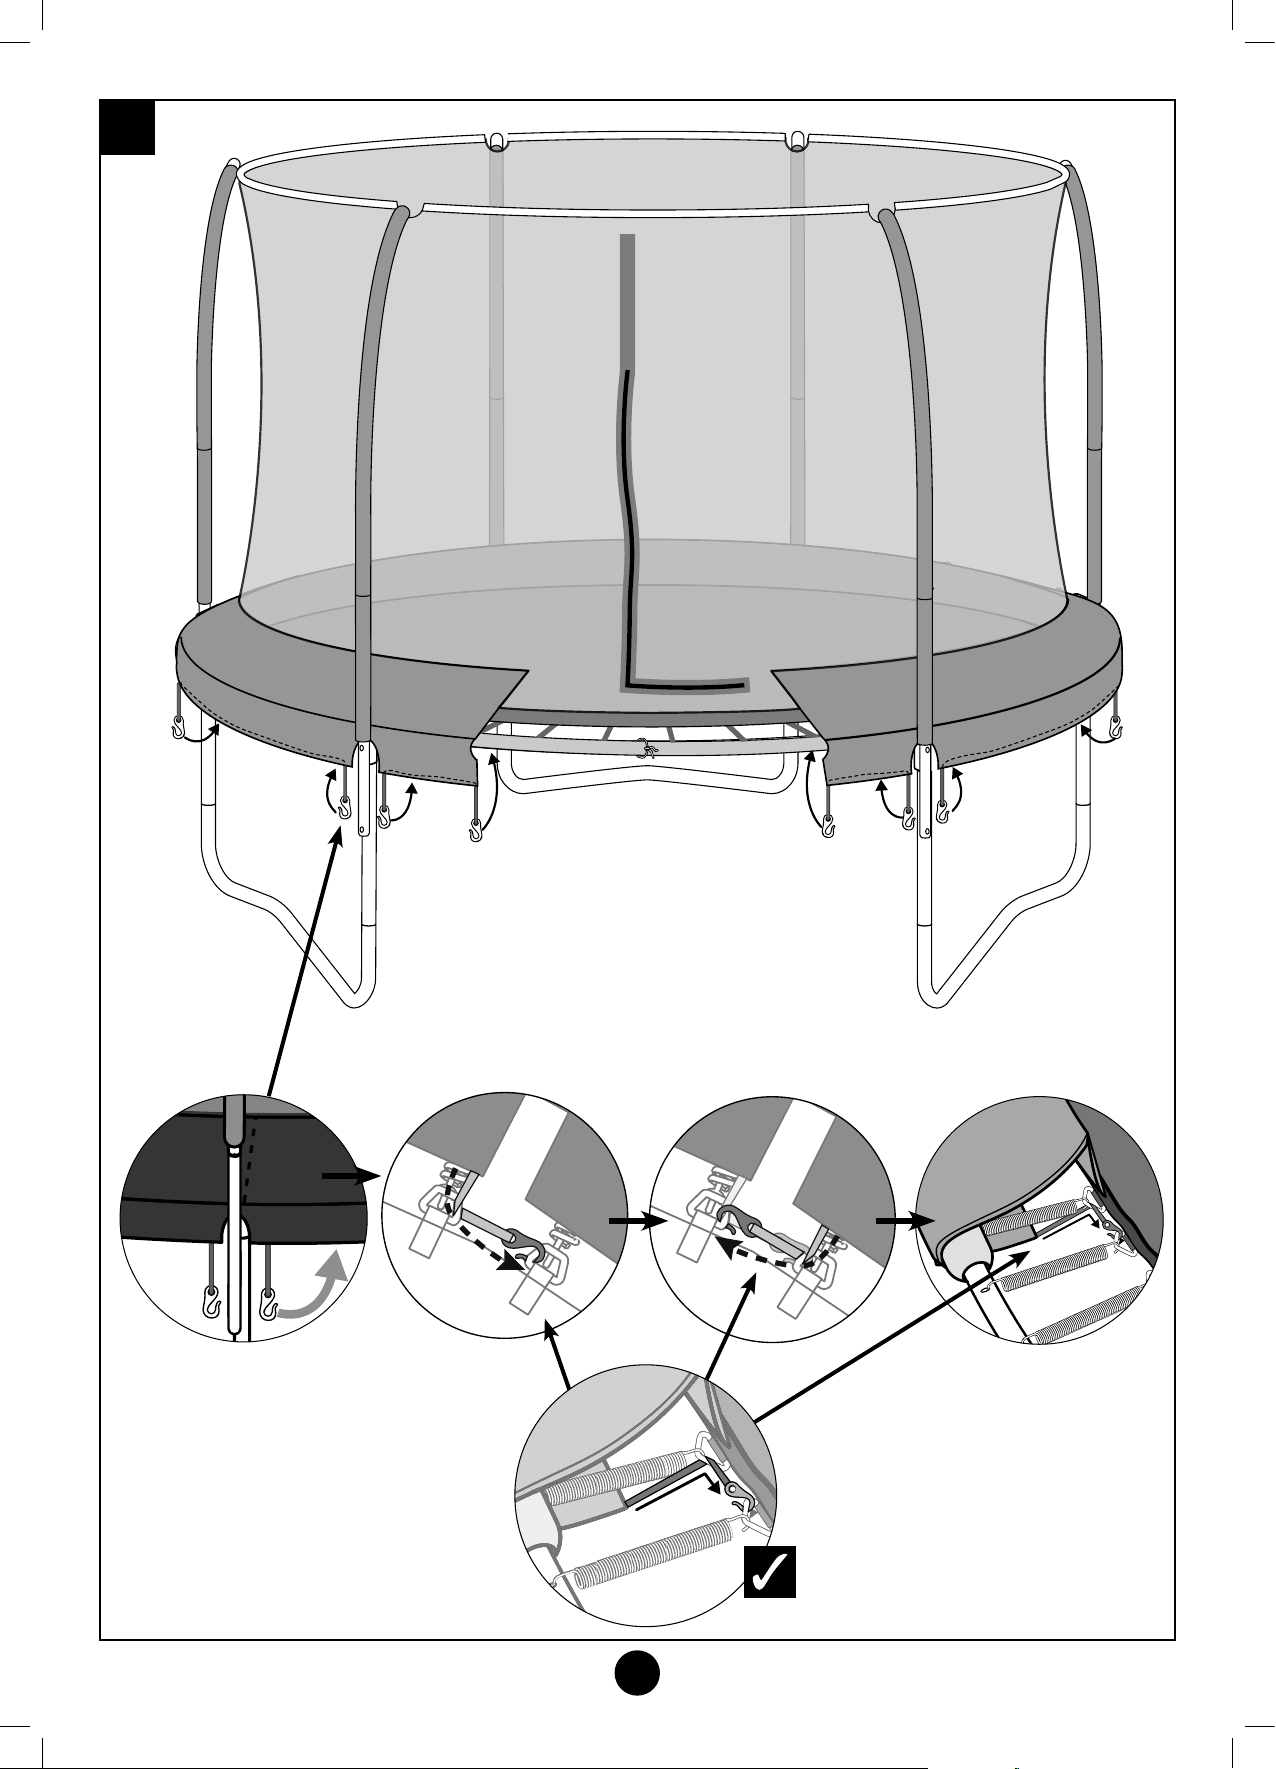
Stage
12
Outside
Skirt
Pull surround around
the uprights
Underside
Skirt
Underside
Skirt
Outside
Skirt
Repeat until all hooks
are fastened
TP Challenger Trampoline with SurroundSafe
15
TP540 541 542 543 Round Trampoline IN6067 Issue-E 14.10.19.indd 15 14/10/2019 11:59
Page 16
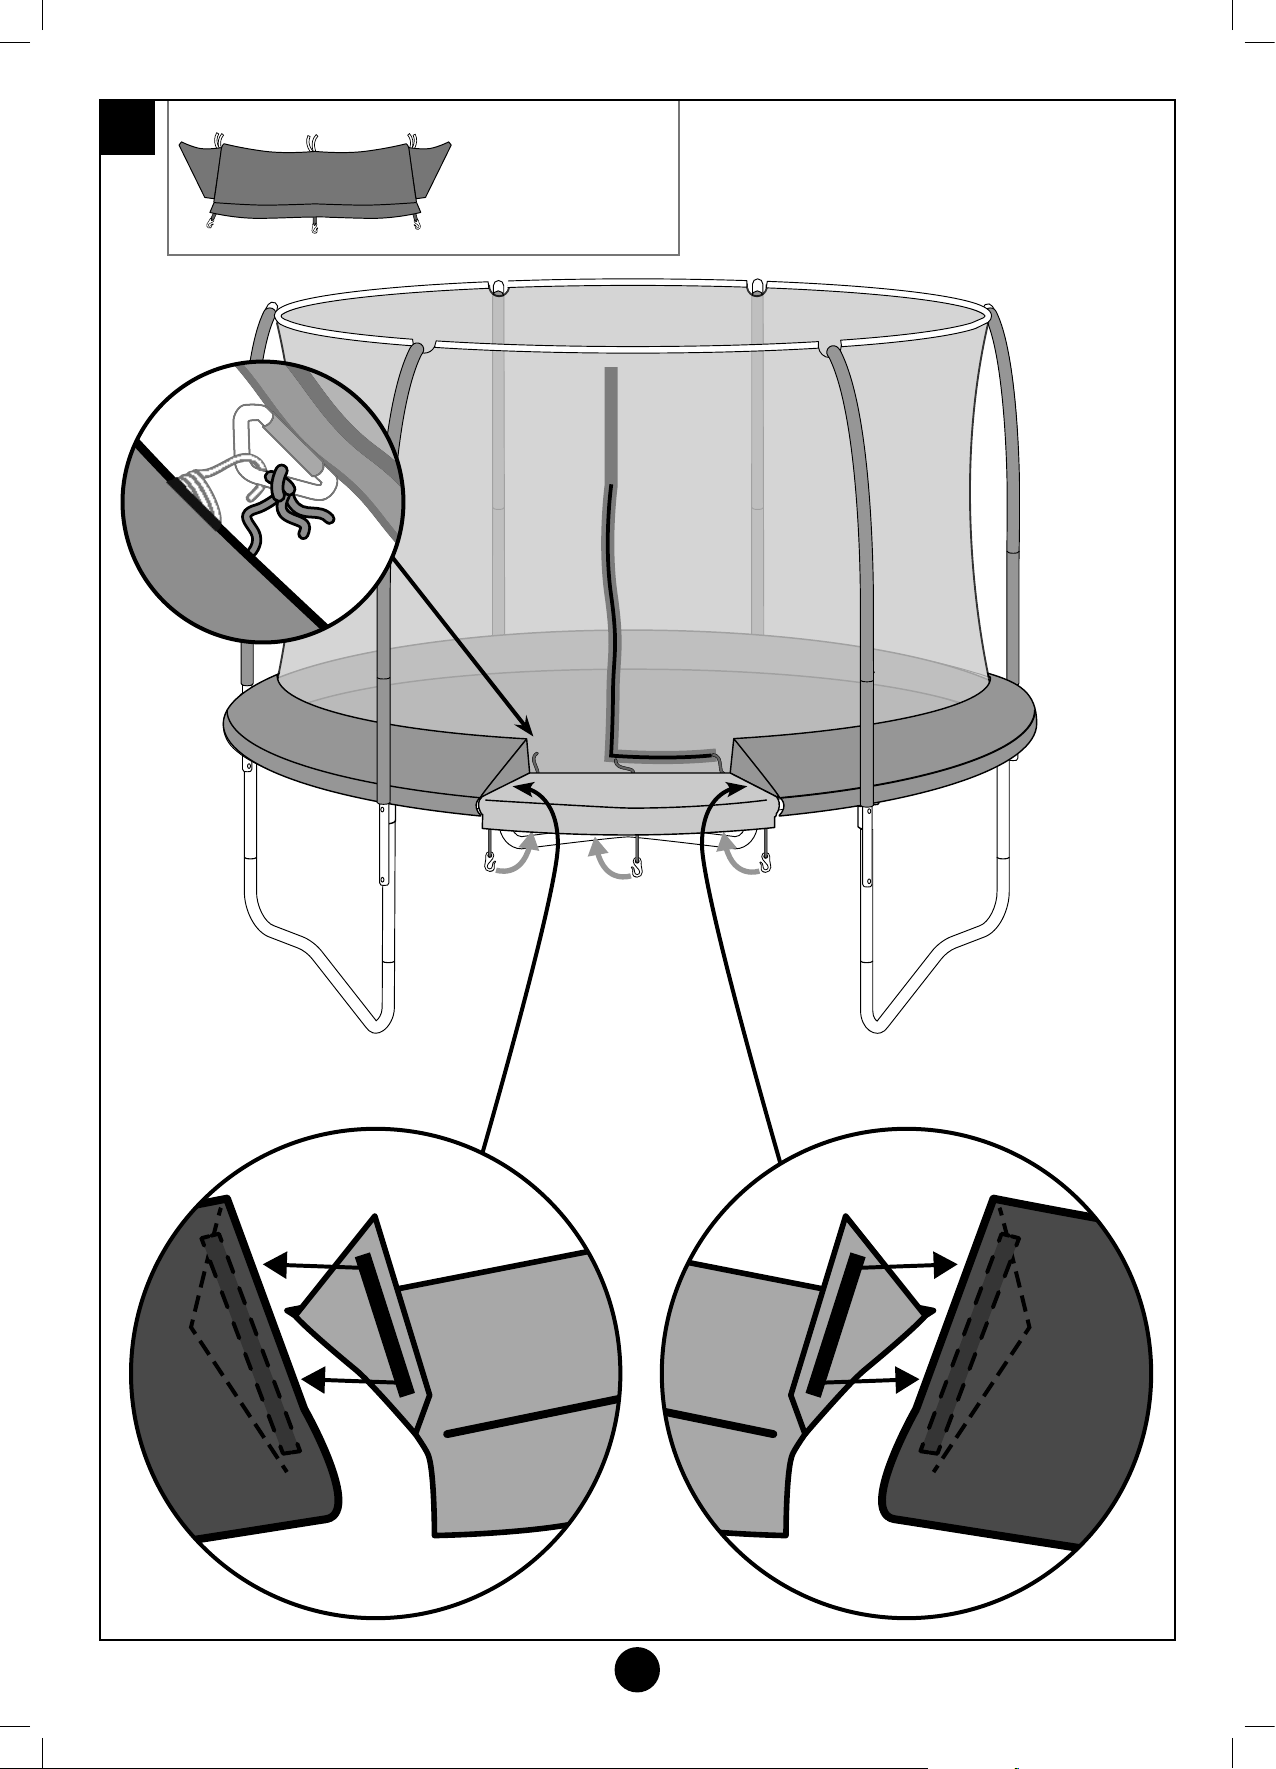
Stage
13
8ft DP7880 x1
10ft DP7881 x1
12ft DP7882 x1
14ft DP7883 x1
16
TP Challenger Trampoline with SurroundSafe
TP540 541 542 543 Round Trampoline IN6067 Issue-E 14.10.19.indd 16 14/10/2019 11:59
Page 17

TP Challenger Trampoline with SurroundSafe
17
TP540 541 542 543 Round Trampoline IN6067 Issue-E 14.10.19.indd 17 14/10/2019 11:59
Page 18

TP Challenger Trampoline with SurroundSafe
18
TP540 541 542 543 Round Trampoline IN6067 Issue-E 14.10.19.indd 18 14/10/2019 11:59
Page 19

TP Challenger Trampoline with SurroundSafe
19
TP540 541 542 543 Round Trampoline IN6067 Issue-E 14.10.19.indd 19 14/10/2019 11:59
Page 20

Thank you
Thank you for purchasing this product.
Please register your new product on line at tptoys.com
www.tptoys.com/customer/productregistration
Find out about the guarantee for this product,
visit www.tptoys.com/customer/pages/guaranteeinformation
For customer services and help with your product,
visit www.tptoys.com/customer/help
Your TP Guarantee Number/Product Batch No is
Robovision Ltd protects their unique designs worldwide with patents, trademarks and design registrations
For more information on the intellectual property of Robovision Ltd visit www.tptoys.com/intellectualproperty
Instruction Part No: IN6067 Issue-E 14.10.19
TP540 541 542 543 Round Trampoline IN6067 Issue-E 14.10.19.indd 20 14/10/2019 11:59
 Loading...