

Toy State 22608T24, 22608R58 Users manual
AIR
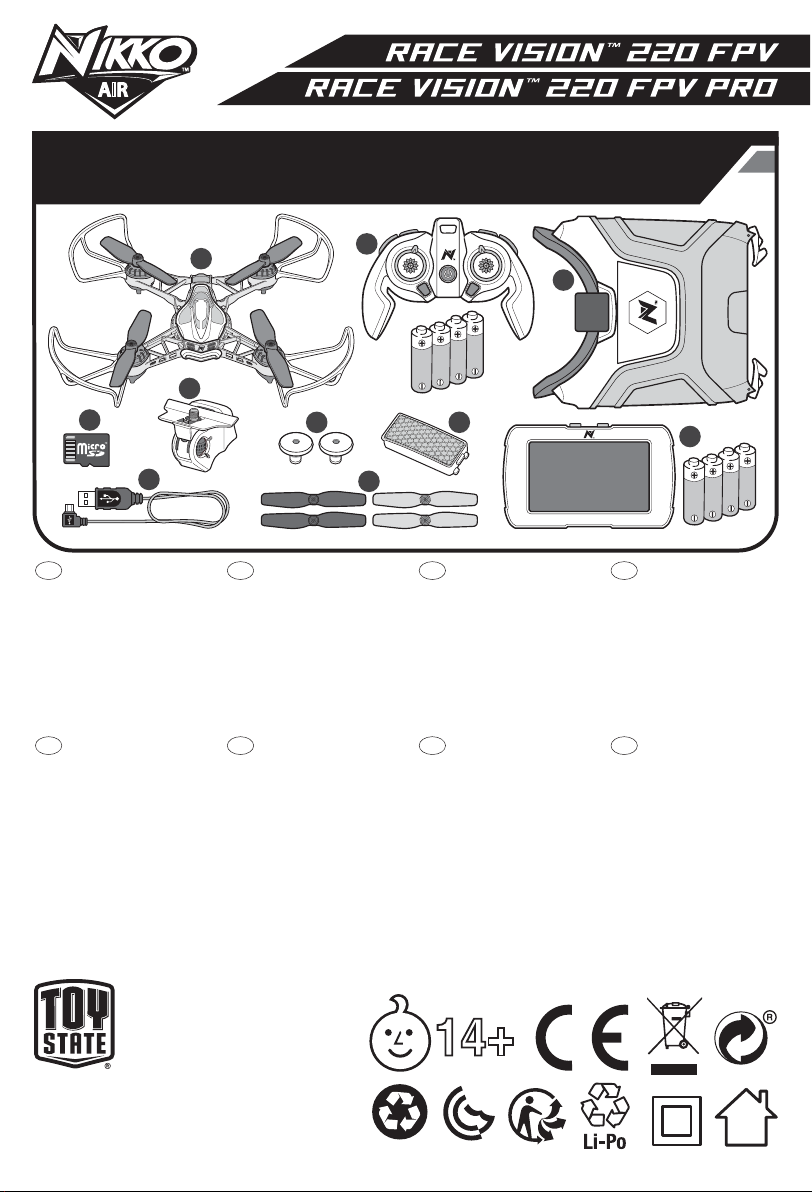
WHAT’S INCLUDED • WHAT’S INCLUDED • WHAT’S INCLUDED • WHAT’S INCLUDED •
WHAT’S INCLUDED • WHAT’S INCLUDED • WHAT’S INCLUDED • WHAT’S INCLUDED
D
H
GB
A. Drone
B. Controller + 4 AA batteries
C. FPV goggles
(included in #22608)
D. SD memory card
E. Screen holder
F. Joystick
G. Drone battery
H. USB charging cable
I. Replaceable propellers x 4
J. LCD screen + 4 AA batteries
IT
A. Drone
B. Controller + 4 AA batteries
C. FPV goggles
(included in #22608)
D. SD memory card
E. Screen holder
F. Joystick
G. Drone battery
H. USB charging cable
I. Replaceable propellers x 4
J. LCD screen + 4 AA batteries
A
E
FR
A. Drone
B. Controller + 4 AA batteries
C. FPV goggles
(included in #22608)
D. SD memory card
E. Screen holder
F. Joystick
G. Drone battery
H. USB charging cable
I. Replaceable propellers x 4
J. LCD screen + 4 AA batteries
PT
A. Drone
B. Controller + 4 AA batteries
C. FPV goggles
(included in #22608)
D. SD memory card
E. Screen holder
F. Joystick
G. Drone battery
H. USB charging cable
I. Replaceable propellers x 4
J. LCD screen + 4 AA batteries
B
C
1.5V
(AA/LR6)
1.5V
(AA/LR6)
1.5V
(AA/LR6)
1.5V
(AA/LR6)
F
I
G
DE
A. Drone
B. Controller + 4 AA batteries
C. FPV goggles
(included in #22608)
D. SD memory card
E. Screen holder
F. Joystick
G. Drone battery
H. USB charging cable
I. Replaceable propellers x 4
J. LCD screen + 4 AA batteries
NL
A. Drone
B. Controller + 4 AA batteries
C. FPV goggles
(included in #22608)
D. SD memory card
E. Screen holder
F. Joystick
G. Drone battery
H. USB charging cable
I. Replaceable propellers x 4
J. LCD screen + 4 AA batteries
J
1.5V
1.5V
(AA/LR6)
1.5V
(AA/LR6)
1.5V
(AA/LR6)
ES
A. Drone
B. Controller + 4 AA batteries
C. FPV goggles
(included in #22608)
D. SD memory card
E. Screen holder
F. Joystick
G. Drone battery
H. USB charging cable
I. Replaceable propellers x 4
J. LCD screen + 4 AA batteries
PL
A. Drone
B. Controller + 4 AA batteries
C. FPV goggles
(included in #22608)
D. SD memory card
E. Screen holder
F. Joystick
G. Drone battery
H. USB charging cable
I. Replaceable propellers x 4
J. LCD screen + 4 AA batteries
(AA/LR6)
Asst.
#22612
#22608
TOY STATE INTERNATIONAL LIMITED
66 MODY ROAD, KOWLOON, HONG KONG
www.toystate.com
www.NikkoAir.com
14+
BATTERY INSTALLATION • BATTERY INSTALLATION • BATTERY INSTALLATION •
BATTERY INSTALLATION • BATTERY INSTALLATION • BATTERY INSTALLATION •
BATTERY INSTALLATION • BATTERY INSTALLATION
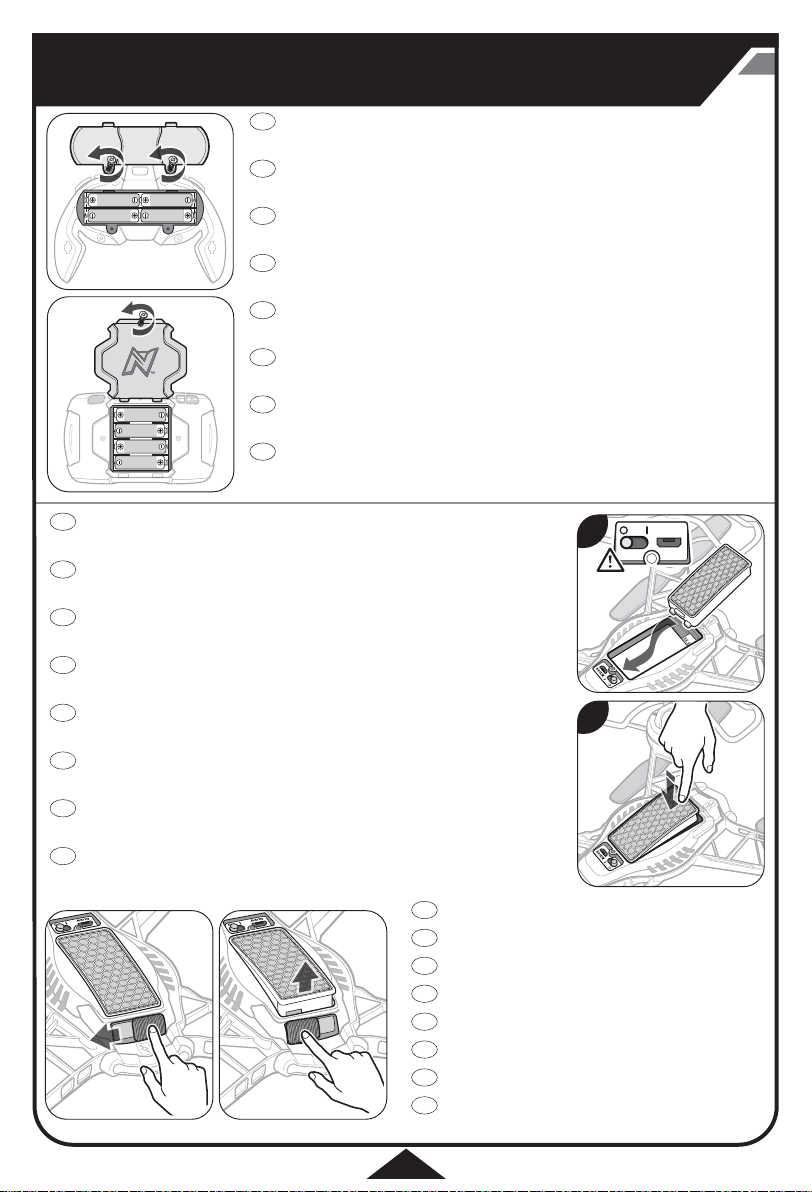
CONTROLLER & LCD SCREEN BATTERIES
GB
Caution! Make sure they are in the o position (O) before inserting or removing the battery.
• Loosen the screws on the back of the controller and LCD screen with a Phillips screwdriver and insert batteries as shown.
• Replace door and tighten screws.
CONTROLLER & LCD SCREEN BATTERIES
FR
Caution! Make sure they are in the o position (O) before inserting or removing the battery.
• Loosen the screws on the back of the controller and LCD screen with a Phillips screwdriver and insert batteries as shown.
1.5V AA 1.5V AA
1.5V AA1.5V AA
1.5V AA
1.5V AA
1.5V AA
1.5V AA
INSTALLING DRONE BATTERY
GB
Caution! Make sure the drone is in the o position (O) before inserting or removing the battery.
1. Slide the battery in to place, prong end first.
2. Push downward on the back of the battery to connect.
INSTALLING DRONE BATTERY
FR
Caution! Make sure the drone is in the o position (O) before inserting or removing the battery.
1. Slide the battery in to place, prong end first.
2. Push downward on the back of the battery to connect.
INSTALLING DRONE BATTERY
DE
Caution! Make sure the drone is in the o position (O) before inserting or removing the battery.
1. Slide the battery in to place, prong end first.
2. Push downward on the back of the battery to connect.
INSTALLING DRONE BATTERY
ES
Caution! Make sure the drone is in the o position (O) before inserting or removing the battery.
1. Slide the battery in to place, prong end first.
2. Push downward on the back of the battery to connect.
INSTALLING DRONE BATTERY
IT
Caution! Make sure the drone is in the o position (O) before inserting or removing the battery.
1. Slide the battery in to place, prong end first.
2. Push downward on the back of the battery to connect.
INSTALLING DRONE BATTERY
PT
Caution! Make sure the drone is in the o position (O) before inserting or removing the battery.
1. Slide the battery in to place, prong end first.
2. Push downward on the back of the battery to connect.
NL
INSTALLING DRONE BATTERY
Caution! Make sure the drone is in the o position (O) before inserting or removing the battery.
1. Slide the battery in to place, prong end first.
2. Push downward on the back of the battery to connect.
PL
INSTALLING DRONE BATTERY
Caution! Make sure the drone is in the o position (O) before inserting or removing the battery.
1. Slide the battery in to place, prong end first.
2. Push downward on the back of the battery to connect.
• Replace door and tighten screws.
CONTROLLER & LCD SCREEN BATTERIES
DE
Caution! Make sure they are in the o position (O) before inserting or removing the battery.
• Loosen the screws on the back of the controller and LCD screen with a Phillips screwdriver and insert batteries as shown.
• Replace door and tighten screws.
CONTROLLER & LCD SCREEN BATTERIES
ES
Caution! Make sure they are in the o position (O) before inserting or removing the battery.
• Loosen the screws on the back of the controller and LCD screen with a Phillips screwdriver and insert batteries as shown.
• Replace door and tighten screws.
CONTROLLER & LCD SCREEN BATTERIES
IT
Caution! Make sure they are in the o position (O) before inserting or removing the battery.
• Loosen the screws on the back of the controller and LCD screen with a Phillips screwdriver and insert batteries as shown.
• Replace door and tighten screws.
CONTROLLER & LCD SCREEN BATTERIES
PT
Caution! Make sure they are in the o position (O) before inserting or removing the battery.
• Loosen the screws on the back of the controller and LCD screen with a Phillips screwdriver and insert batteries as shown.
• Replace door and tighten screws.
CONTROLLER & LCD SCREEN BATTERIES
NL
Caution! Make sure they are in the o position (O) before inserting or removing the battery.
• Loosen the screws on the back of the controller and LCD screen with a Phillips screwdriver and insert batteries as shown.
• Replace door and tighten screws.
CONTROLLER & LCD SCREEN BATTERIES
PL
Caution! Make sure they are in the o position (O) before inserting or removing the battery.
• Loosen the screws on the back of the controller and LCD screen with a Phillips screwdriver and insert batteries as shown.
• Replace door and tighten screws.
1
2
REMOVING THE BATTERY
GB
• Slide the battery release tab to the left to disengage the battery from the drone.
REMOVING THE BATTERY
FR
• Slide the battery release tab to the left to disengage the battery from the drone.
REMOVING THE BATTERY
DE
• Slide the battery release tab to the left to disengage the battery from the drone.
ES
REMOVING THE BATTERY
• Slide the battery release tab to the left to disengage the battery from the drone.
IT
REMOVING THE BATTERY
• Slide the battery release tab to the left to disengage the battery from the drone.
PT
REMOVING THE BATTERY
• Slide the battery release tab to the left to disengage the battery from the drone.
NL
REMOVING THE BATTERY
• Slide the battery release tab to the left to disengage the battery from the drone.
PL
REMOVING THE BATTERY
• Slide the battery release tab to the left to disengage the battery from the drone.
MICRO USB
2
CHARGING THE DRONE • CHARGING THE DRONE • CHARGING THE DRONE •
CHARGING THE DRONE • CHARGING THE DRONE • CHARGING THE DRONE •
CHARGING THE DRONE • CHARGING THE DRONE •
1 2 3
MAX.
5V 2.4A
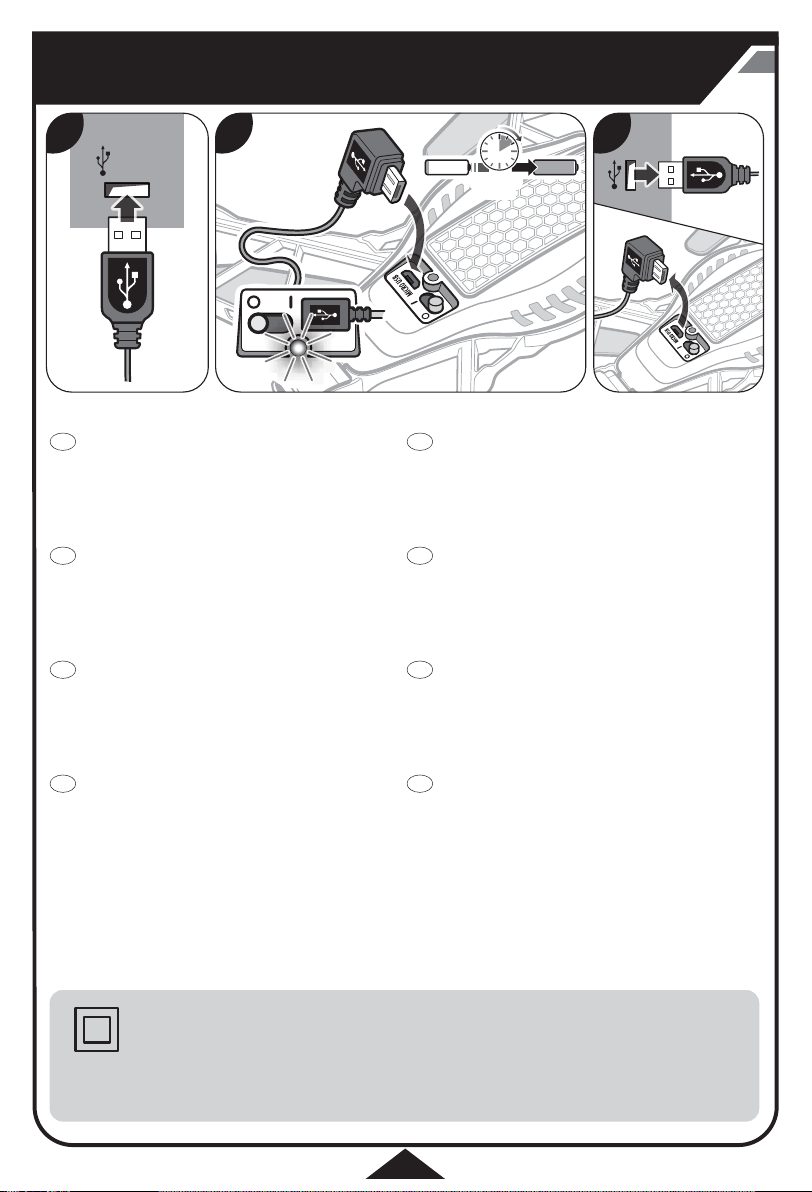
Caution! Make sure the drone is switched to the o position (O)
GB
before charging.
1. Plug the USB cord into computer or USB power block (Max 5V 2.4 A).
2. Insert the charging port to drone.
Red light = charging
No light = charged
3. Once charged disconnect charging cord from the drone and power source.
Charging precautions
• After use allow drone to cool down to room temperature before charging.
• After charging battery pack will feel warm, this is normal.
Caution! Make sure the drone is switched to the o position (O)
FR
before charging.
1. Plug the USB cord into computer or USB power block (Max 5V 2.4 A).
2. Insert the charging port to drone.
Red light = charging
No light = charged
3. Once charged disconnect charging cord from the drone and power source.
Charging precautions
• After use allow drone to cool down to room temperature before charging.
• After charging battery pack will feel warm, this is normal.
Caution! Make sure the drone is switched to the o position (O)
DE
before charging.
1. Plug the USB cord into computer or USB power block (Max 5V 2.4 A).
2. Insert the charging port to drone.
Red light = charging
No light = charged
3. Once charged disconnect charging cord from the drone and power source.
Charging precautions
• After use allow drone to cool down to room temperature before charging.
• After charging battery pack will feel warm, this is normal.
Caution! Make sure the drone is switched to the o position (O)
ES
before charging.
1. Plug the USB cord into computer or USB power block (Max 5V 2.4 A).
2. Insert the charging port to drone.
Red light = charging
No light = charged
3. Once charged disconnect charging cord from the drone and power source.
Charging precautions
• After use allow drone to cool down to room temperature before charging.
• After charging battery pack will feel warm, this is normal.
Caution! Make sure the drone is switched to the o position (O)
IT
before charging.
1. Plug the USB cord into computer or USB power block (Max 5V 2.4 A).
2. Insert the charging port to drone.
Red light = charging
No light = charged
3. Once charged disconnect charging cord from the drone and power source.
Charging precautions
• After use allow drone to cool down to room temperature before charging.
• After charging battery pack will feel warm, this is normal.
Caution! Make sure the drone is switched to the o position (O)
PT
before charging.
1. Plug the USB cord into computer or USB power block (Max 5V 2.4 A).
2. Insert the charging port to drone.
Red light = charging
No light = charged
3. Once charged disconnect charging cord from the drone and power source.
Charging precautions
• After use allow drone to cool down to room temperature before charging.
• After charging battery pack will feel warm, this is normal.
Caution! Make sure the drone is switched to the o position (O)
NL
before charging.
1. Plug the USB cord into computer or USB power block (Max 5V 2.4 A).
2. Insert the charging port to drone.
Red light = charging
No light = charged
3. Once charged disconnect charging cord from the drone and power source.
Charging precautions
• After use allow drone to cool down to room temperature before charging.
• After charging battery pack will feel warm, this is normal.
Caution! Make sure the drone is switched to the o position (O)
PL
before charging.
1. Plug the USB cord into computer or USB power block (Max 5V 2.4 A).
2. Insert the charging port to drone.
Red light = charging
No light = charged
3. Once charged disconnect charging cord from the drone and power source.
Charging precautions
• After use allow drone to cool down to room temperature before charging.
• After charging battery pack will feel warm, this is normal.
60-180
60-180
mins.
• The toy is only to be connected to Class II equipment.
• Ce jouet ne doit être raccordé qu'à un appareil de
classe II.
• Das Spielzeug darf nur an Geräte der Klasse II
angeschlossen werden.
• El juguete sólo debe ser conectado al equipo de Clase II.
• Il giocattolo deve essere collegato solo ad un impianto
di Classe II.
• O brinquedo só deve ser ligado a equipamento de
Classe II.
• Het speelgoed mag alleen worden aangesloten op klasse
II apparatuur.
• Zabawkę należy podłączać wyłącznie do urządzeń
Klasy II.
3

FLIGHT CONTROLS • FLIGHT CONTROLS • FLIGHT CONTROLS • FLIGHT CONTROLS •
FLIGHT CONTROLS • FLIGHT CONTROLS • FLIGHT CONTROLS • FLIGHT CONTROLS
ONE TOUCH STUNTS • ONE TOUCH STUNTS • ONE TOUCH STUNTS • ONE TOUCH STUNTS •
FLIPS/ROLLS EXÉCUTION DE SAUTS
CROSS AXIS ROLLS EXÉCUTION DE
2 STEP FLIPS/ROLLS 2 ÉTAPES EXÉCUTION
360˚ SPINS TOURNOIEMENTS
FUNNEL TURN VIRAGES INCLINÉS
NIKKO MODE - GREAT
FOR BEGINNERS
ADVANCED MODE STABILIZED
MANUAL MODE MANUAL FLYING
ONE TOUCH STUNTS • ONE TOUCH STUNTS • ONE TOUCH STUNTS • ONE TOUCH STUNTS
PÉRILLEUX/ROULEAUX
ROULEAUX AUTOUR
D'UN AXE TRANSVERSAL
DE SAUTS PÉRILLEUX
/ROULEAUX
À 360º
À 360°
VARIABLE FLIGHT MODES • VARIABLE FLIGHT MODES • VARIABLE FLIGHT MODES • VARIABLE FLIGHT MODES •
VARIABLE FLIGHT MODES • VARIABLE FLIGHT MODES • VARIABLE FLIGHT MODES • VARIABLE FLIGHT MODES
NIKKO MODE - GREAT
FOR BEGINNERS
ADVANCED MODE STABILIZED
MANUAL MODE MANUAL FLYING
SALTOS/ROLLEN CAPOVOLTE/ROLLIIGIROS/BUCLES GIRA/ROLA SALTO MAKEN/ROLLEN PRZEWROTY/BECZKI
ROLLEN ÜBER DIE
QUERACHSE
2 STUFEN SALTOS
/ROLLEN
360º UMDREHUNGEN GIRI A 360ºGIROS EN 360° RODA A 360º 360º DRAAIEN WIROWANIE 360º
STEILE UMDREHUNG GIRI A IMBUTOGIROS EN EMBUDO CURVA COM
NIKKO MODE - GREAT
FOR BEGINNERS
ADVANCED MODE STABILIZED
MANUAL MODE MANUAL FLYING
VARIABLE SPEEDS • VARIABLE SPEEDS • VARIABLE SPEEDS • VARIABLE SPEEDS •
VARIABLE SPEEDS • VARIABLE SPEEDS • VARIABLE SPEEDS • VARIABLE SPEEDS
CRUZADO
2 PASOS GIROS
/BUCLES
NIKKO MODE - GREAT
FOR BEGINNERS
ADVANCED MODE STABILIZED
MANUAL MODE MANUAL FLYING
ROLLII INCROCIATIGIROS EN EJE
2 PASSI CAPOVOLTE
/ROLLII
NIKKO MODE - GREAT
FOR BEGINNERS
ADVANCED MODE STABILIZED
MANUAL MODE MANUAL FLYING
ROLA SOBRE O EIXO DWARSAS ROLLEN BECZKI PO PRZEKĄTNEJ
2 PASSOS GIRA/ROLA 2 STEPS SALTO MAKEN
INCLINAÇÃO
NIKKO MODE - GREAT
FOR BEGINNERS
ADVANCED MODE STABILIZED
MANUAL MODE MANUAL FLYING
/ROLLEN
TRECHTERVORMIG
DRAAIEN
NIKKO MODE - GREAT
FOR BEGINNERS
ADVANCED MODE STABILIZED
MANUAL MODE MANUAL FLYING
2 KROK PRZEWROTY
/BECZKI
PĘTLE POZIOME
PO ELIPSIE
NIKKO MODE - GREAT
FOR BEGINNERS
ADVANCED MODE STABILIZED
MANUAL MODE MANUAL FLYING
LOW SPEEDLOW SPEED LOW SPEED LOW SPEED LOW SPEED LOW SPEED LOW SPEED LOW SPEED
MID SPEEDMID SPEED MID SPEED MID SPEED MID SPEED MID SPEED MID SPEED MID SPEED
LIFTS THE DRONE OFF
THE GROUND. THE
FURTHER YOU PUSH
THE STICK THE FASTER
THE DRONE LIFTS
THE FURTHER YOU
PUSH THE STICK THE
FASTER THE DRONE
WILL FLY IN THAT
DIRECTION
THROTTLE STICK • THROTTLE STICK • THROTTLE STICK • THROTTLE STICK •
THROTTLE STICK • THROTTLE STICK • THROTTLE STICK • THROTTLE STICK
LIFTS THE DRONE OFF
THE GROUND. THE
FURTHER YOU PUSH
THE STICK THE FASTER
THE DRONE LIFTS
THE FURTHER YOU
PUSH THE STICK THE
FASTER THE DRONE
WILL FLY IN THAT
DIRECTION
LIFTS THE DRONE OFF
THE GROUND. THE
FURTHER YOU PUSH
THE STICK THE FASTER
THE DRONE LIFTS
DIRECTIONAL STICK • DIRECTIONAL STICK • DIRECTIONAL STICK • DIRECTIONAL STICK •
DIRECTIONAL STICK • DIRECTIONAL STICK • DIRECTIONAL STICK • DIRECTIONAL STICK
THE FURTHER YOU
PUSH THE STICK THE
FASTER THE DRONE
WILL FLY IN THAT
DIRECTION
LIFTS THE DRONE OFF
THE GROUND. THE
FURTHER YOU PUSH
THE STICK THE FASTER
THE DRONE LIFTS
THE FURTHER YOU
PUSH THE STICK THE
FASTER THE DRONE
WILL FLY IN THAT
DIRECTION
LIFTS THE DRONE OFF
THE GROUND. THE
FURTHER YOU PUSH
THE STICK THE FASTER
THE DRONE LIFTS
THE FURTHER YOU
PUSH THE STICK THE
FASTER THE DRONE
WILL FLY IN THAT
DIRECTION
4
LIFTS THE DRONE OFF
THE GROUND. THE
FURTHER YOU PUSH
THE STICK THE FASTER
THE DRONE LIFTS
THE FURTHER YOU
PUSH THE STICK THE
FASTER THE DRONE
WILL FLY IN THAT
DIRECTION
LIFTS THE DRONE OFF
THE GROUND. THE
FURTHER YOU PUSH
THE STICK THE FASTER
THE DRONE LIFTS
THE FURTHER YOU
PUSH THE STICK THE
FASTER THE DRONE
WILL FLY IN THAT
DIRECTION
HIGH SPEEDHIGH SPEED HIGH SPEED HIGH SPEED HIGH SPEED HIGH SPEED HIGH SPEED HIGH SPEED
LIFTS THE DRONE OFF
THE GROUND. THE
FURTHER YOU PUSH
THE STICK THE FASTER
THE DRONE LIFTS
THE FURTHER YOU
PUSH THE STICK THE
FASTER THE DRONE
WILL FLY IN THAT
DIRECTION
POWER ON/OFFPOWER ON/OFF POWER ON/OFF POWER ON/OFF POWER ON/OFF POWER ON/OFF POWER ON/OFF POWER ON/OFF
TRIM ADJUSTMENTTRIM ADJUSTMENT TRIM ADJUSTMENT TRIM ADJUSTMENT TRIM ADJUSTMENT TRIM ADJUSTMENT TRIM ADJUSTMENT TRIM ADJUSTMENT
CHANNEL SELECTORCHANNEL SELECTOR CHANNEL SELECTOR CHANNEL SELECTOR CHANNEL SELECTOR CHANNEL SELECTOR CHANNEL SELECTOR CHANNEL SELECTOR
SYNCING CONTROLLER TO DRONE • SYNCING CONTROLLER TO DRONE •
SYNCING CONTROLLER TO DRONE • SYNCING CONTROLLER TO DRONE •
SYNCING CONTROLLER TO DRONE • SYNCING CONTROLLER TO DRONE •
SYNCING CONTROLLER TO DRONE • SYNCING CONTROLLER TO DRONE
21 3
MICRO USB
1
2
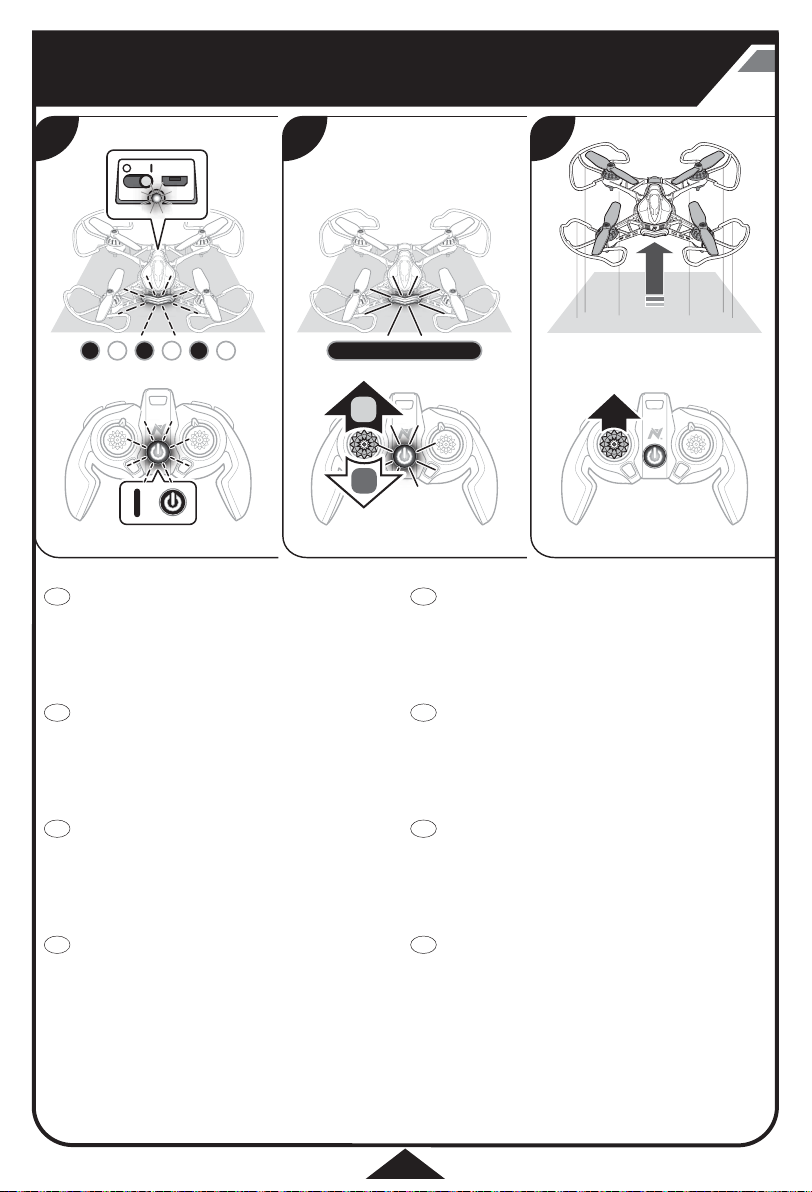
1. Turn on remote, light will blink. Turn on the drone (I) light will blink rapidly.
GB
Place drone on a flat surface.
2. Push throttle stick upward, then downward. The light on controller
and drone will turn solid.
3. The controller and drone are now synced. Gently push the throttle upward to
lift off the ground.
NOTE
• If you don’t fly within 5 seconds of syncing the drone or if you collide with an
object the drone will disarm .
• You need to sync the controller to the drone. Follow steps 1-3 above.
1. Turn on remote, light will blink. Turn on the drone (I) light will blink rapidly.
FR
Place drone on a flat surface.
2. Push throttle stick upward, then downward. The light on controller
and drone will turn solid.
3. The controller and drone are now synced. Gently push the throttle upward to
lift off the ground.
NOTE
• If you don’t fly within 5 seconds of syncing the drone or if you collide with an
object the drone will disarm .
• You need to sync the controller to the drone. Follow steps 1-3 above.
DE
1. Turn on remote, light will blink. Turn on the drone (I) light will blink rapidly.
Place drone on a flat surface.
2. Push throttle stick upward, then downward. The light on controller
and drone will turn solid.
3. The controller and drone are now synced. Gently push the throttle upward to
lift off the ground.
NOTE
• If you don’t fly within 5 seconds of syncing the drone or if you collide with an
object the drone will disarm .
• You need to sync the controller to the drone. Follow steps 1-3 above.
ES
1. Turn on remote, light will blink. Turn on the drone (I) light will blink rapidly.
Place drone on a flat surface.
2. Push throttle stick upward, then downward. The light on controller
and drone will turn solid.
3. The controller and drone are now synced. Gently push the throttle upward to
lift off the ground.
NOTE
• If you don’t fly within 5 seconds of syncing the drone or if you collide with an
object the drone will disarm .
• You need to sync the controller to the drone. Follow steps 1-3 above.
1. Turn on remote, light will blink. Turn on the drone (I) light will blink rapidly.
IT
Place drone on a flat surface.
2. Push throttle stick upward, then downward. The light on controller
and drone will turn solid.
3. The controller and drone are now synced. Gently push the throttle upward to
lift off the ground.
NOTE
• If you don’t fly within 5 seconds of syncing the drone or if you collide with an
object the drone will disarm .
• You need to sync the controller to the drone. Follow steps 1-3 above.
1. Turn on remote, light will blink. Turn on the drone (I) light will blink rapidly.
PT
Place drone on a flat surface.
2. Push throttle stick upward, then downward. The light on controller
and drone will turn solid.
3. The controller and drone are now synced. Gently push the throttle upward to
lift off the ground.
NOTE
• If you don’t fly within 5 seconds of syncing the drone or if you collide with an
object the drone will disarm .
• You need to sync the controller to the drone. Follow steps 1-3 above.
NL
1. Turn on remote, light will blink. Turn on the drone (I) light will blink rapidly.
Place drone on a flat surface.
2. Push throttle stick upward, then downward. The light on controller
and drone will turn solid.
3. The controller and drone are now synced. Gently push the throttle upward to
lift off the ground.
NOTE
• If you don’t fly within 5 seconds of syncing the drone or if you collide with an
object the drone will disarm .
• You need to sync the controller to the drone. Follow steps 1-3 above.
PL
1. Turn on remote, light will blink. Turn on the drone (I) light will blink rapidly.
Place drone on a flat surface.
2. Push throttle stick upward, then downward. The light on controller
and drone will turn solid.
3. The controller and drone are now synced. Gently push the throttle upward to
lift off the ground.
NOTE
• If you don’t fly within 5 seconds of syncing the drone or if you collide with an
object the drone will disarm .
• You need to sync the controller to the drone. Follow steps 1-3 above.
5
VARIABLE FLIGHT MODES • VARIABLE FLIGHT MODES • VARIABLE FLIGHT MODES •
VARIABLE FLIGHT MODES • VARIABLE FLIGHT MODES • VARIABLE FLIGHT MODES •
VARIABLE FLIGHT MODES • VARIABLE FLIGHT MODES •
50%
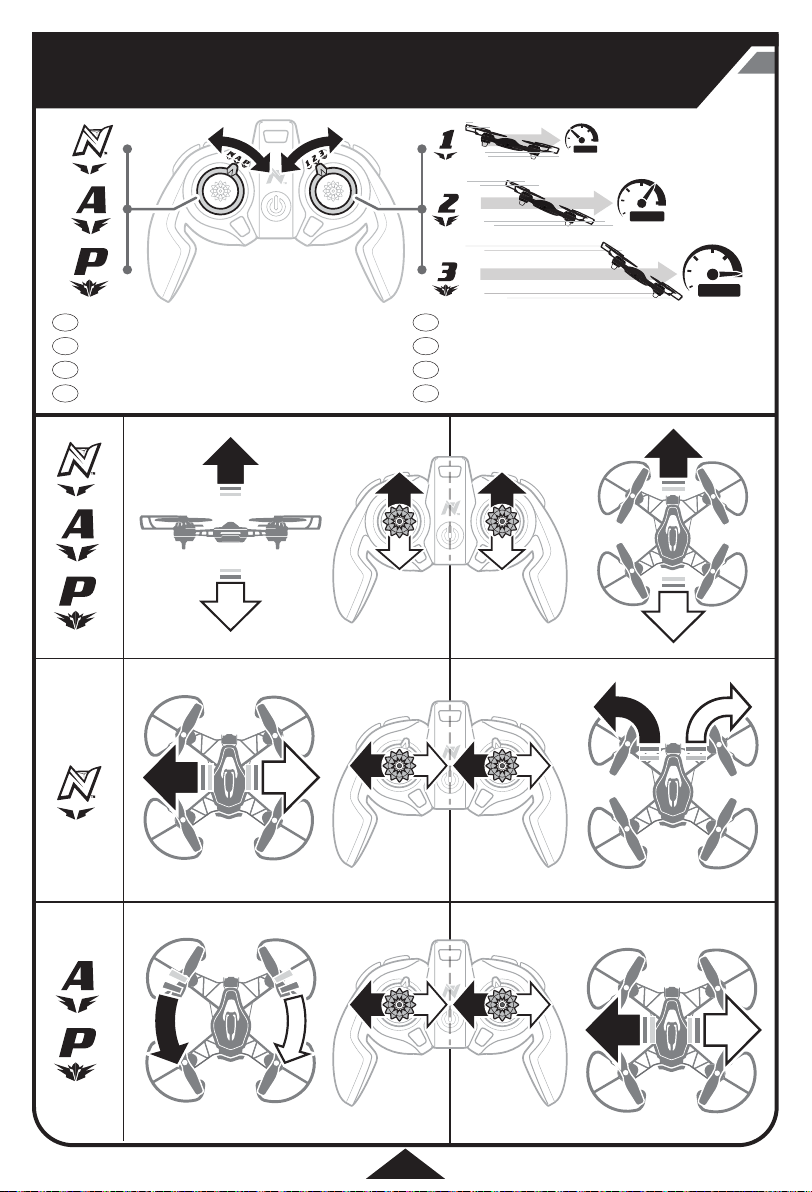
• Adjust the flight controls to match your skill level.
GB
• It’s best to start in Nikko Mode + Speed 1 until you have mastered flying.
• Adjust the flight controls to match your skill level.
FR
• It’s best to start in Nikko Mode + Speed 1 until you have mastered flying.
• Adjust the flight controls to match your skill level.
DE
• It’s best to start in Nikko Mode + Speed 1 until you have mastered flying.
• Adjust the flight controls to match your skill level.
ES
• It’s best to start in Nikko Mode + Speed 1 until you have mastered flying.
• Adjust the flight controls to match your skill level.
IT
• It’s best to start in Nikko Mode + Speed 1 until you have mastered flying.
• Adjust the flight controls to match your skill level.
PT
• It’s best to start in Nikko Mode + Speed 1 until you have mastered flying.
• Adjust the flight controls to match your skill level.
NL
• It’s best to start in Nikko Mode + Speed 1 until you have mastered flying.
• Adjust the flight controls to match your skill level.
PL
• It’s best to start in Nikko Mode + Speed 1 until you have mastered flying.
75%
100%
6
ONE TOUCH STUNTS • ONE TOUCH STUNTS • ONE TOUCH STUNTS • ONE TOUCH STUNTS •
ONE TOUCH STUNTS • ONE TOUCH STUNTS • ONE TOUCH STUNTS • ONE TOUCH STUNTS •
GB
Caution! Before using the stunt button, make sure to y at least 6 feet (2m) in the air with at least 6 feet clearance in all directions.
FR
Caution! Before using the stunt button, make sure to y at least 6 feet (2m) in the air with at least 6 feet clearance in all directions.
DE
Caution! Before using the stunt button, make sure to y at least 6 feet (2m) in the air with at least 6 feet clearance in all directions.
ES
Caution! Before using the stunt button, make sure to y at least 6 feet (2m) in the air with at least 6 feet clearance in all directions.
IT
Caution! Before using the stunt button, make sure to y at least 6 feet (2m) in the air with at least 6 feet clearance in all directions.
PT
Caution! Before using the stunt button, make sure to y at least 6 feet (2m) in the air with at least 6 feet clearance in all directions.
NL
Caution! Before using the stunt button, make sure to y at least 6 feet (2m) in the air with at least 6 feet clearance in all directions.
PL
Caution! Before using the stunt button, make sure to y at least 6 feet (2m) in the air with at least 6 feet clearance in all directions.
• FLIPS/ROLLS
• FLIPS/ROLLS
• FLIPS/ROLLS
• FLIPS/ROLLS
• FLIPS/ROLLS
• FLIPS/ROLLS
• FLIPS/ROLLS
• FLIPS/ROLLS
• CROSS AXIS ROLLS
• CROSS AXIS ROLLS
• CROSS AXIS ROLLS
• CROSS AXIS ROLLS
• CROSS AXIS ROLLS
• CROSS AXIS ROLLS
• CROSS AXIS ROLLS
• CROSS AXIS ROLLS
• 2 STEP FLIPS/ROLLS
• 2 STEP FLIPS/ROLLS
• 2 STEP FLIPS/ROLLS
• 2 STEP FLIPS/ROLLS
• 2 STEP FLIPS/ROLLS
• 2 STEP FLIPS/ROLLS
• 2 STEP FLIPS/ROLLS
• 2 STEP FLIPS/ROLLS
2x2x
ZR
ZL
L
R
R
ZR
360
360
R
R
• FUNNEL TURN
• FUNNEL TURN
• FUNNEL TURN
• FUNNEL TURN
• FUNNEL TURN
• FUNNEL TURN
• FUNNEL TURN
• FUNNEL TURN
• 360˚ SPINS
• 360˚ SPINS
• 360˚ SPINS
• 360˚ SPINS
• 360˚ SPINS
• 360˚ SPINS
• 360˚ SPINS
• 360˚ SPINS
ZL
L
7
FPV SCREEN CONTROLLER MOUNT • FPV SCREEN CONTROLLER MOUNT •
FPV SCREEN CONTROLLER MOUNT • FPV SCREEN CONTROLLER MOUNT •
FPV SCREEN CONTROLLER MOUNT • FPV SCREEN CONTROLLER MOUNT •
FPV SCREEN CONTROLLER MOUNT • FPV SCREEN CONTROLLER MOUNT
321
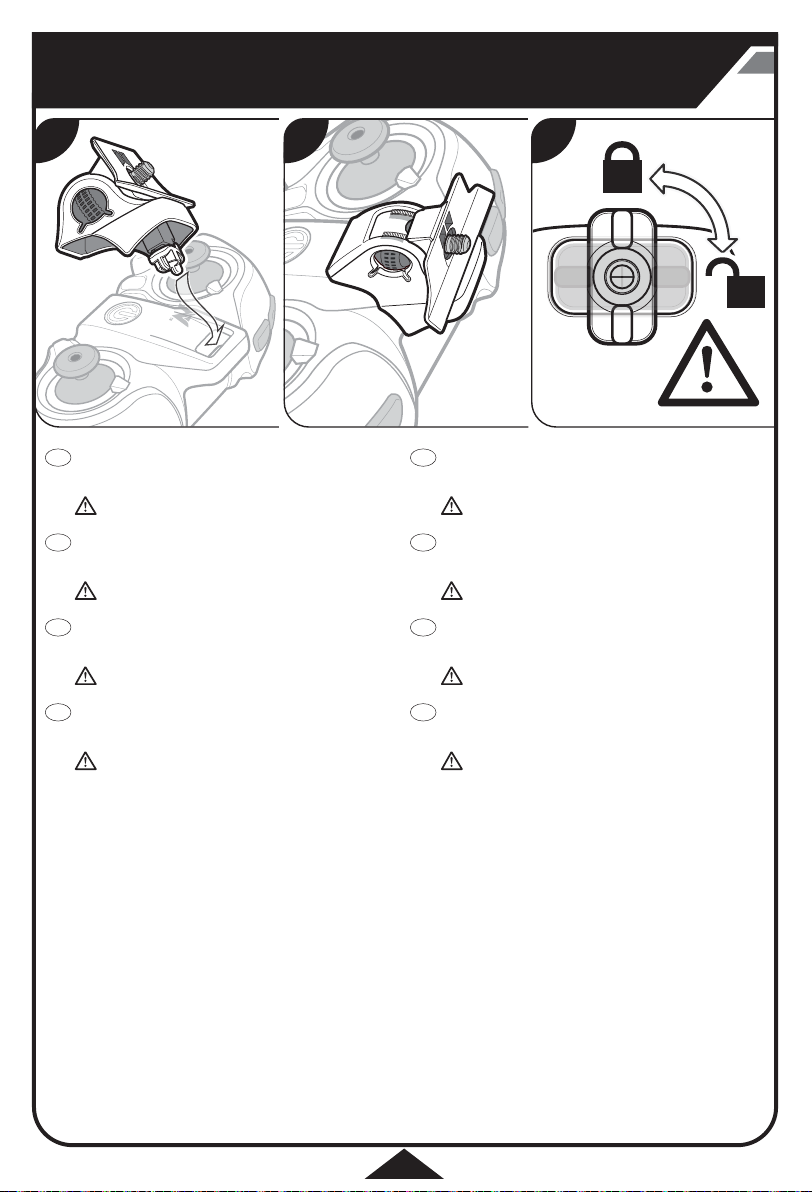
1. Insert the locking tab on the controller mount into the slot on the controller .
GB
2. Press down firmly until the mount is flush to the controller.
3. Turn the controller over. Lock the mount in position by turning the tab
counterclockwise.
MAKE SURE THE LOCKING TAB IS SECURE IN THE UPRIGHT POSITION
BEFORE ATTACHING THE FPV SCREEN.
1. Insert the locking tab on the controller mount into the slot on the controller .
FR
2. Press down firmly until the mount is flush to the controller.
3. Turn the controller over. Lock the mount in position by turning the tab
counterclockwise.
MAKE SURE THE LOCKING TAB IS SECURE IN THE UPRIGHT POSITION
BEFORE ATTACHING THE FPV SCREEN.
1. Insert the locking tab on the controller mount into the slot on the controller .
DE
2. Press down firmly until the mount is flush to the controller.
3. Turn the controller over. Lock the mount in position by turning the tab
counterclockwise.
MAKE SURE THE LOCKING TAB IS SECURE IN THE UPRIGHT POSITION
BEFORE ATTACHING THE FPV SCREEN.
1. Insert the locking tab on the controller mount into the slot on the controller .
ES
2. Press down firmly until the mount is flush to the controller.
3. Turn the controller over. Lock the mount in position by turning the tab
counterclockwise.
MAKE SURE THE LOCKING TAB IS SECURE IN THE UPRIGHT POSITION
BEFORE ATTACHING THE FPV SCREEN.
1. Insert the locking tab on the controller mount into the slot on the controller .
IT
2. Press down firmly until the mount is flush to the controller.
3. Turn the controller over. Lock the mount in position by turning the tab
counterclockwise.
MAKE SURE THE LOCKING TAB IS SECURE IN THE UPRIGHT POSITION
BEFORE ATTACHING THE FPV SCREEN.
1. Insert the locking tab on the controller mount into the slot on the controller .
PT
2. Press down firmly until the mount is flush to the controller.
3. Turn the controller over. Lock the mount in position by turning the tab
counterclockwise.
MAKE SURE THE LOCKING TAB IS SECURE IN THE UPRIGHT POSITION
BEFORE ATTACHING THE FPV SCREEN.
1. Insert the locking tab on the controller mount into the slot on the controller .
NL
2. Press down firmly until the mount is flush to the controller.
3. Turn the controller over. Lock the mount in position by turning the tab
counterclockwise.
MAKE SURE THE LOCKING TAB IS SECURE IN THE UPRIGHT POSITION
BEFORE ATTACHING THE FPV SCREEN.
1. Insert the locking tab on the controller mount into the slot on the controller .
PL
2. Press down firmly until the mount is flush to the controller.
3. Turn the controller over. Lock the mount in position by turning the tab
counterclockwise.
MAKE SURE THE LOCKING TAB IS SECURE IN THE UPRIGHT POSITION
BEFORE ATTACHING THE FPV SCREEN.
8

FPV SCREEN • FPV SCREEN • FPV SCREEN • FPV SCREEN • FPV SCREEN • FPV SCREEN •
FPV SCREEN • FPV SCREEN
MICRO SD CARD • MICRO SD CARD • MICRO SD CARD • MICRO SD CARD •
MICRO SD CARD • MICRO SD CARD • MICRO SD CARD • MICRO SD CARD
1. Insert Micro SD card into FPV screen.
GB
2. To remove the SD card push on the SD card slot
to eject from FPV screen.
3. Use a SD card reader to retrieve the images
(card reader not included).
1. Insert Micro SD card into FPV screen.
FR
2. To remove the SD card push on the SD card slot
to eject from FPV screen.
3. Use a SD card reader to retrieve the images
(card reader not included).
1. Insert Micro SD card into FPV screen.
DE
2. To remove the SD card push on the SD card slot
to eject from FPV screen.
3. Use a SD card reader to retrieve the images
(card reader not included).
1. Insert Micro SD card into FPV screen.
ES
2. To remove the SD card push on the SD card slot
to eject from FPV screen.
3. Use a SD card reader to retrieve the images
(card reader not included).
ATTACHING SCREEN TO CONTROLLER • ATTACHING SCREEN TO CONTROLLER • ATTACHING SCREEN TO CONTROLLER • ATTACHING SCREEN TO CONTROLLER •
ATTACHING SCREEN TO CONTROLLER • ATTACHING SCREEN TO CONTROLLER • ATTACHING SCREEN TO CONTROLLER • ATTACHING SCREEN TO CONTROLLER
1. Insert Micro SD card into FPV screen.
IT
2. To remove the SD card push on the SD card slot
to eject from FPV screen.
3. Use a SD card reader to retrieve the images
(card reader not included).
1. Insert Micro SD card into FPV screen.
PT
2. To remove the SD card push on the SD card slot
to eject from FPV screen.
3. Use a SD card reader to retrieve the images
(card reader not included).
1. Insert Micro SD card into FPV screen.
NL
2. To remove the SD card push on the SD card slot
to eject from FPV screen.
3. Use a SD card reader to retrieve the images
(card reader not included).
1. Insert Micro SD card into FPV screen.
PL
2. To remove the SD card push on the SD card slot
to eject from FPV screen.
3. Use a SD card reader to retrieve the images
(card reader not included).
21
1. Line up the hole on bottom of the LCD screen to the red screw on controller
GB
mount.
2. Place LCD screen on mount. Spin tightening ball on controller mount to secure
LCD screen in place. Spin ball until screen is securely attached.
1. Line up the hole on bottom of the LCD screen to the red screw on controller
FR
mount.
2. Place LCD screen on mount. Spin tightening ball on controller mount to secure
LCD screen in place. Spin ball until screen is securely attached.
1. Line up the hole on bottom of the LCD screen to the red screw on controller
DE
mount.
2. Place LCD screen on mount. Spin tightening ball on controller mount to secure
LCD screen in place. Spin ball until screen is securely attached.
1. Line up the hole on bottom of the LCD screen to the red screw on controller
ES
mount.
2. Place LCD screen on mount. Spin tightening ball on controller mount to secure
LCD screen in place. Spin ball until screen is securely attached.
CAMERA ADJUSTMENT • CAMERA ADJUSTMENT • CAMERA ADJUSTMENT • CAMERA ADJUSTMENT •
CAMERA ADJUSTMENT • CAMERA ADJUSTMENT • CAMERA ADJUSTMENT • CAMERA ADJUSTMENT
Gently rotate the angle of the camera up or downward.
GB
Gently rotate the angle of the camera up or downward.
FR
Gently rotate the angle of the camera up or downward.
DE
Gently rotate the angle of the camera up or downward.
ES
Gently rotate the angle of the camera up or downward.
IT
Gently rotate the angle of the camera up or downward.
PT
Gently rotate the angle of the camera up or downward.
NL
Gently rotate the angle of the camera up or downward.
PL
1. Line up the hole on bottom of the LCD screen to the red screw on controller
IT
mount.
2. Place LCD screen on mount. Spin tightening ball on controller mount to secure
LCD screen in place. Spin ball until screen is securely attached.
1. Line up the hole on bottom of the LCD screen to the red screw on controller
PT
mount.
2. Place LCD screen on mount. Spin tightening ball on controller mount to secure
LCD screen in place. Spin ball until screen is securely attached.
1. Line up the hole on bottom of the LCD screen to the red screw on controller
NL
mount.
2. Place LCD screen on mount. Spin tightening ball on controller mount to secure
LCD screen in place. Spin ball until screen is securely attached.
1. Line up the hole on bottom of the LCD screen to the red screw on controller
PL
mount.
2. Place LCD screen on mount. Spin tightening ball on controller mount to secure
LCD screen in place. Spin ball until screen is securely attached.
9
 Loading...