

Page 1
英文 Page 1 of 8
2008-6-19
WT-549 USER MANUAL (full features, US version)
Congratulations
You hav e just purchased a qualified 2 way radio. Please read this manual carefully
before use for correct operation. Y ou should also handle this manual with care for
future reference.
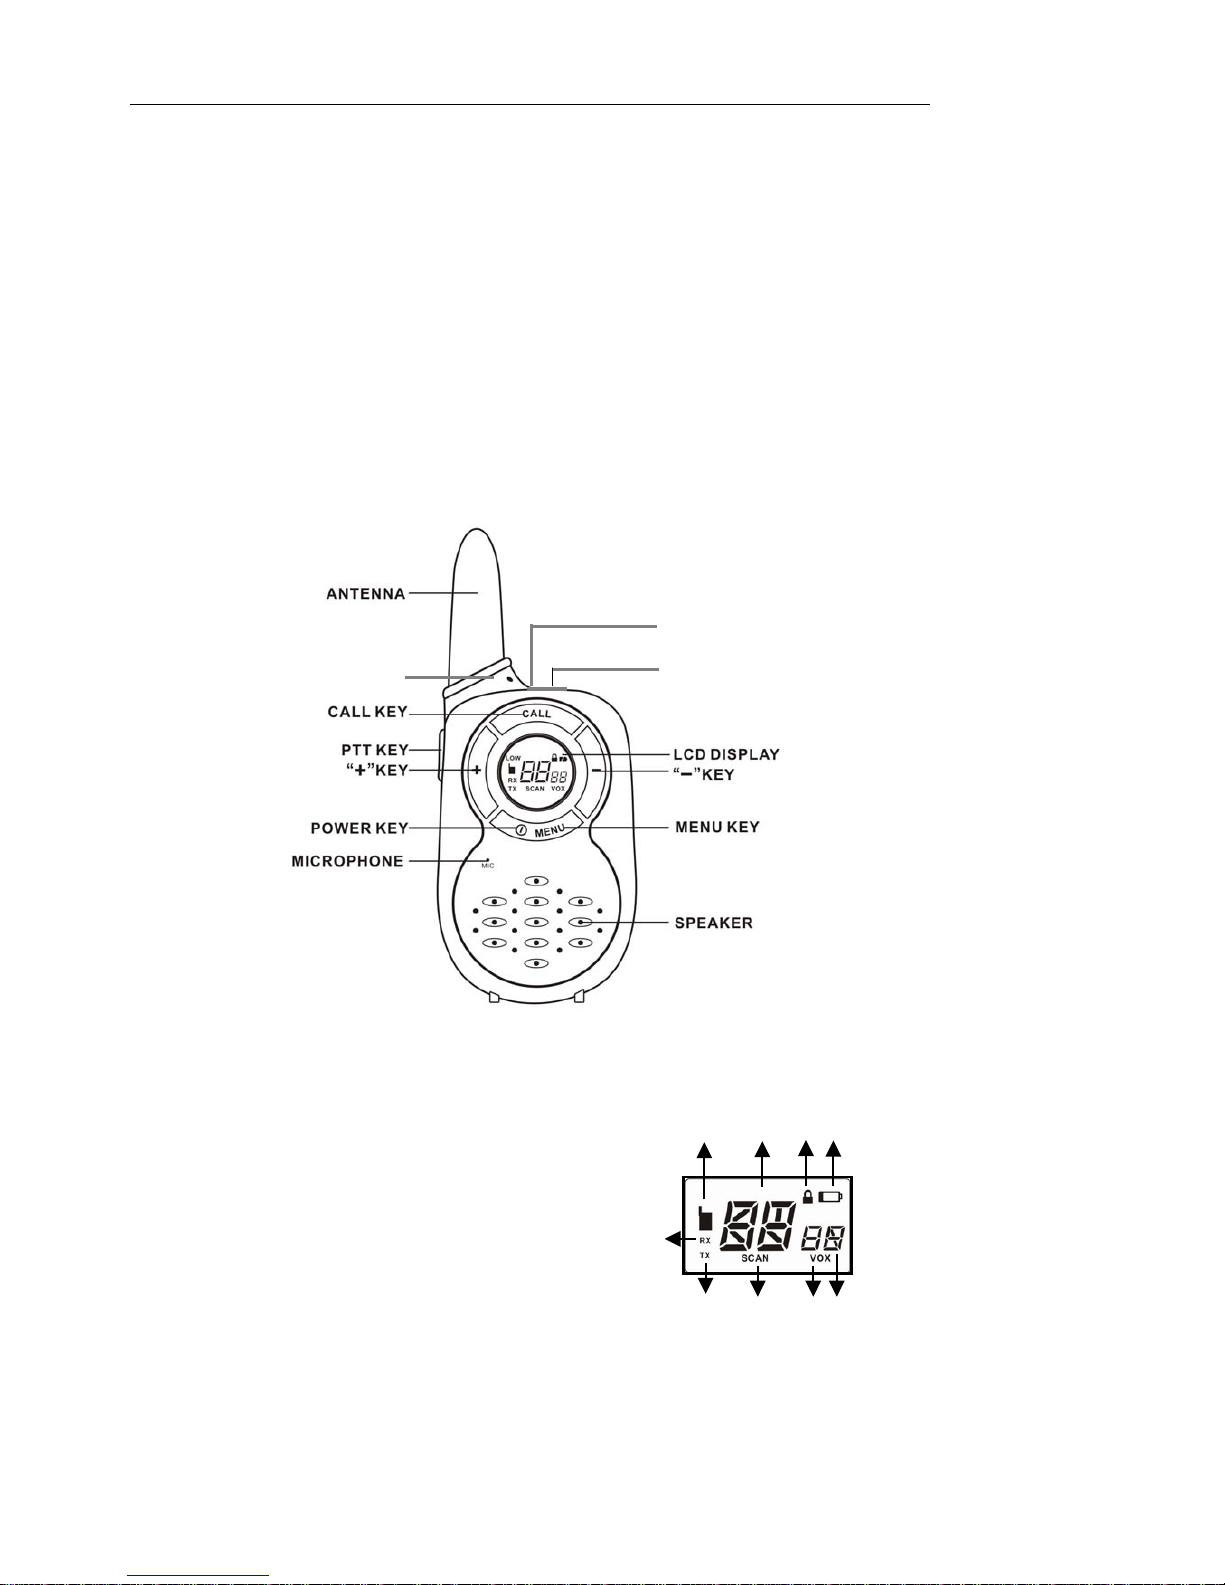
BUTTONS AND CONTROLS
Main Screen (Fig.1)
1. Operation Mode Indicator
2. Channel Number Display
3. Key Lock Indicator
4. Battery Icon
5. Sub code
6. VOX
7. Channel Scan Indicator
8. Transmission Indictor
9. Reception Mode
CHARGER JACK
EARPHONE/ MIC JACK
NECK STRAP HOLE
Fig.1
1
2 3 4
5 6
7 8 9
Page 2
英文 Page 2 of 8
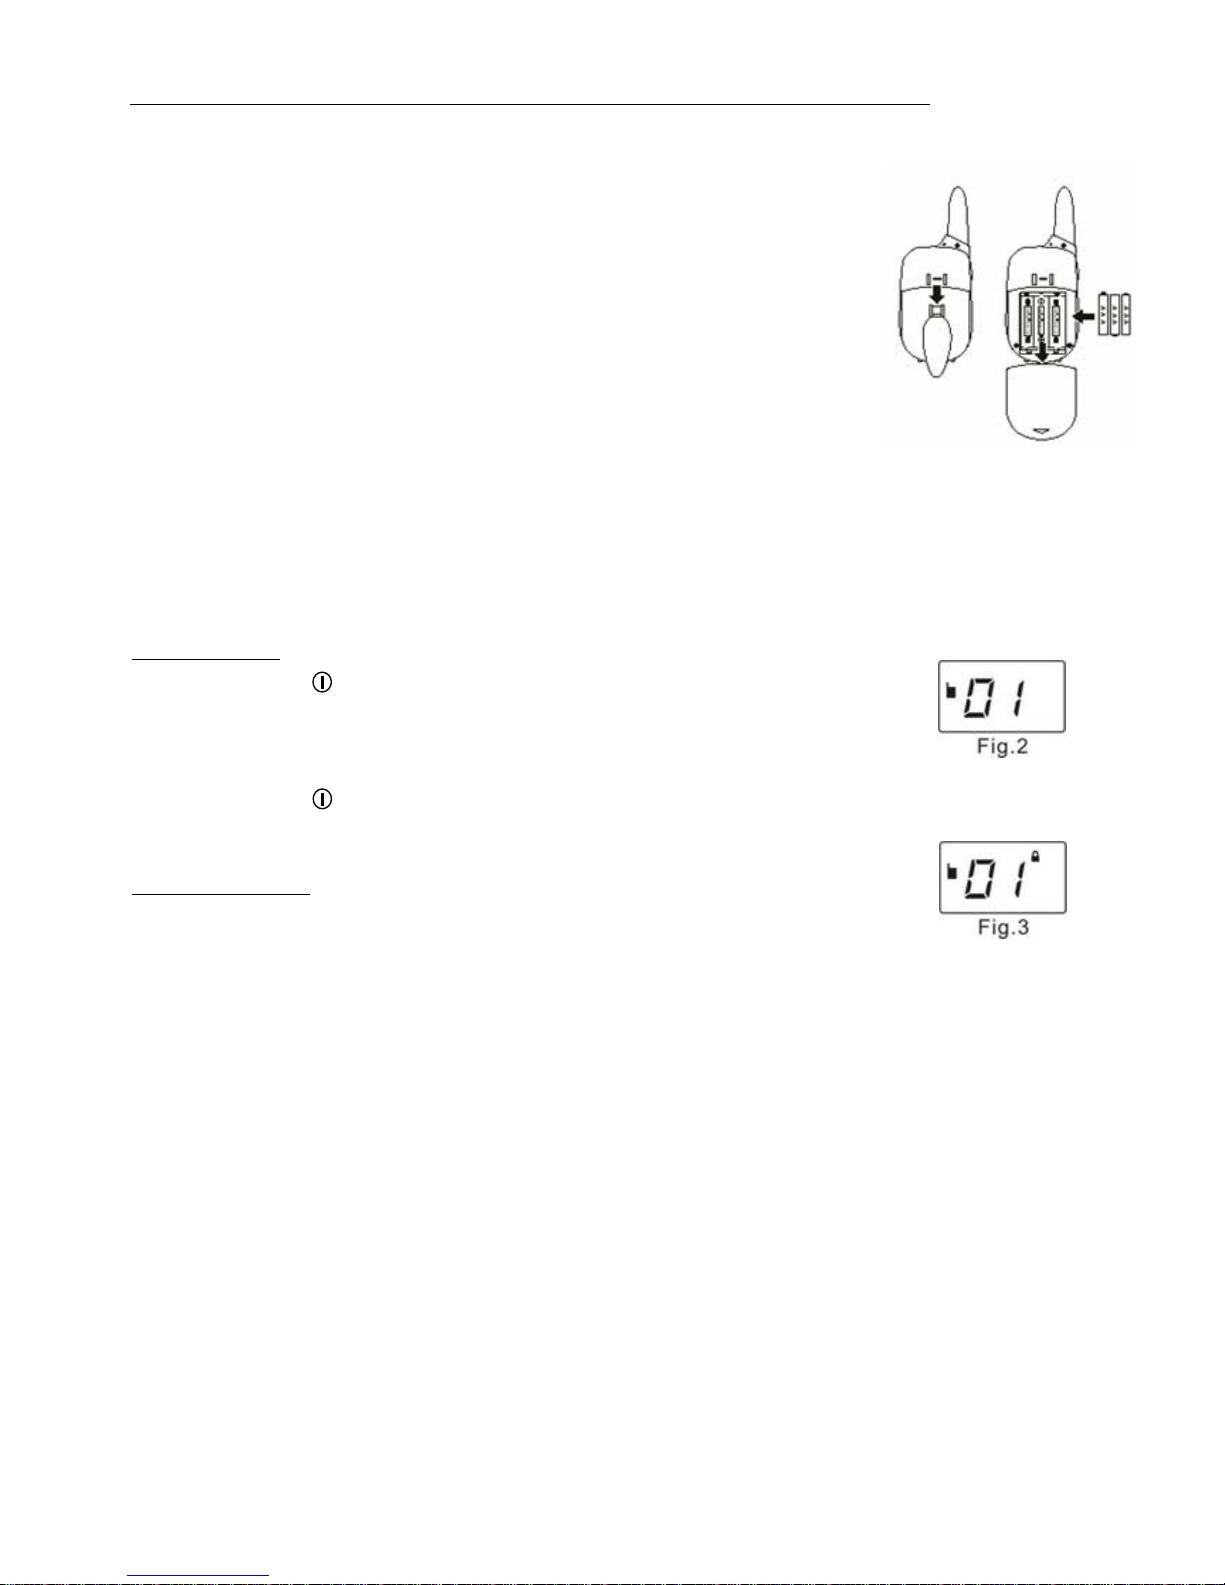
Battery Installation
1. Turn off the radio and remove the belt clip.
2. Open the battery compartment door.
3. Insert 3 x “AAA ” alkaline batteries according to the anode-cathode signs
shown in the battery compartment.
4. Close the battery compartment door.
Note:
1. Don’t mixed use new & old, different styles, alkaline & rechargeable and
different capacity batteries.
2. Danger of explosion if battery is incorrectly replaced. Replace only with
the same or equivalent type. (TSUEN SHING, BT-101-AC)
3. Attention should be drawn to the environmental aspects of battery disposal.
Quick Guide
A. Start to Operate
UPower On / Off
1. Press and hold key for 2 seconds to turn on the unit.
2. A “Bi” sound indicates the unit is ready for use and the LCD display will show all
icons.
3. After 1 second, the unit will go to standby mode. (Fig.2)
4. Press and hold key for 2 seconds again to power off the unit. A “Bi” sound
will also be heard, indicating the radio is going to be switched off.
ULock / Unlock Key
1. Press and hold MENU key for 2 seconds to lock the key. (Fig. 3)
2. Only PTT & CALL buttons can be activated during key locked operation.
2. To unlock the key, press and hold MENU button for 2 seconds.
Page 3
英文 Page 3 of 8
B. “Walkie Talkie” Operation
USelect the same channel as that of your friend’sU. e.g. CH=01, SC-38
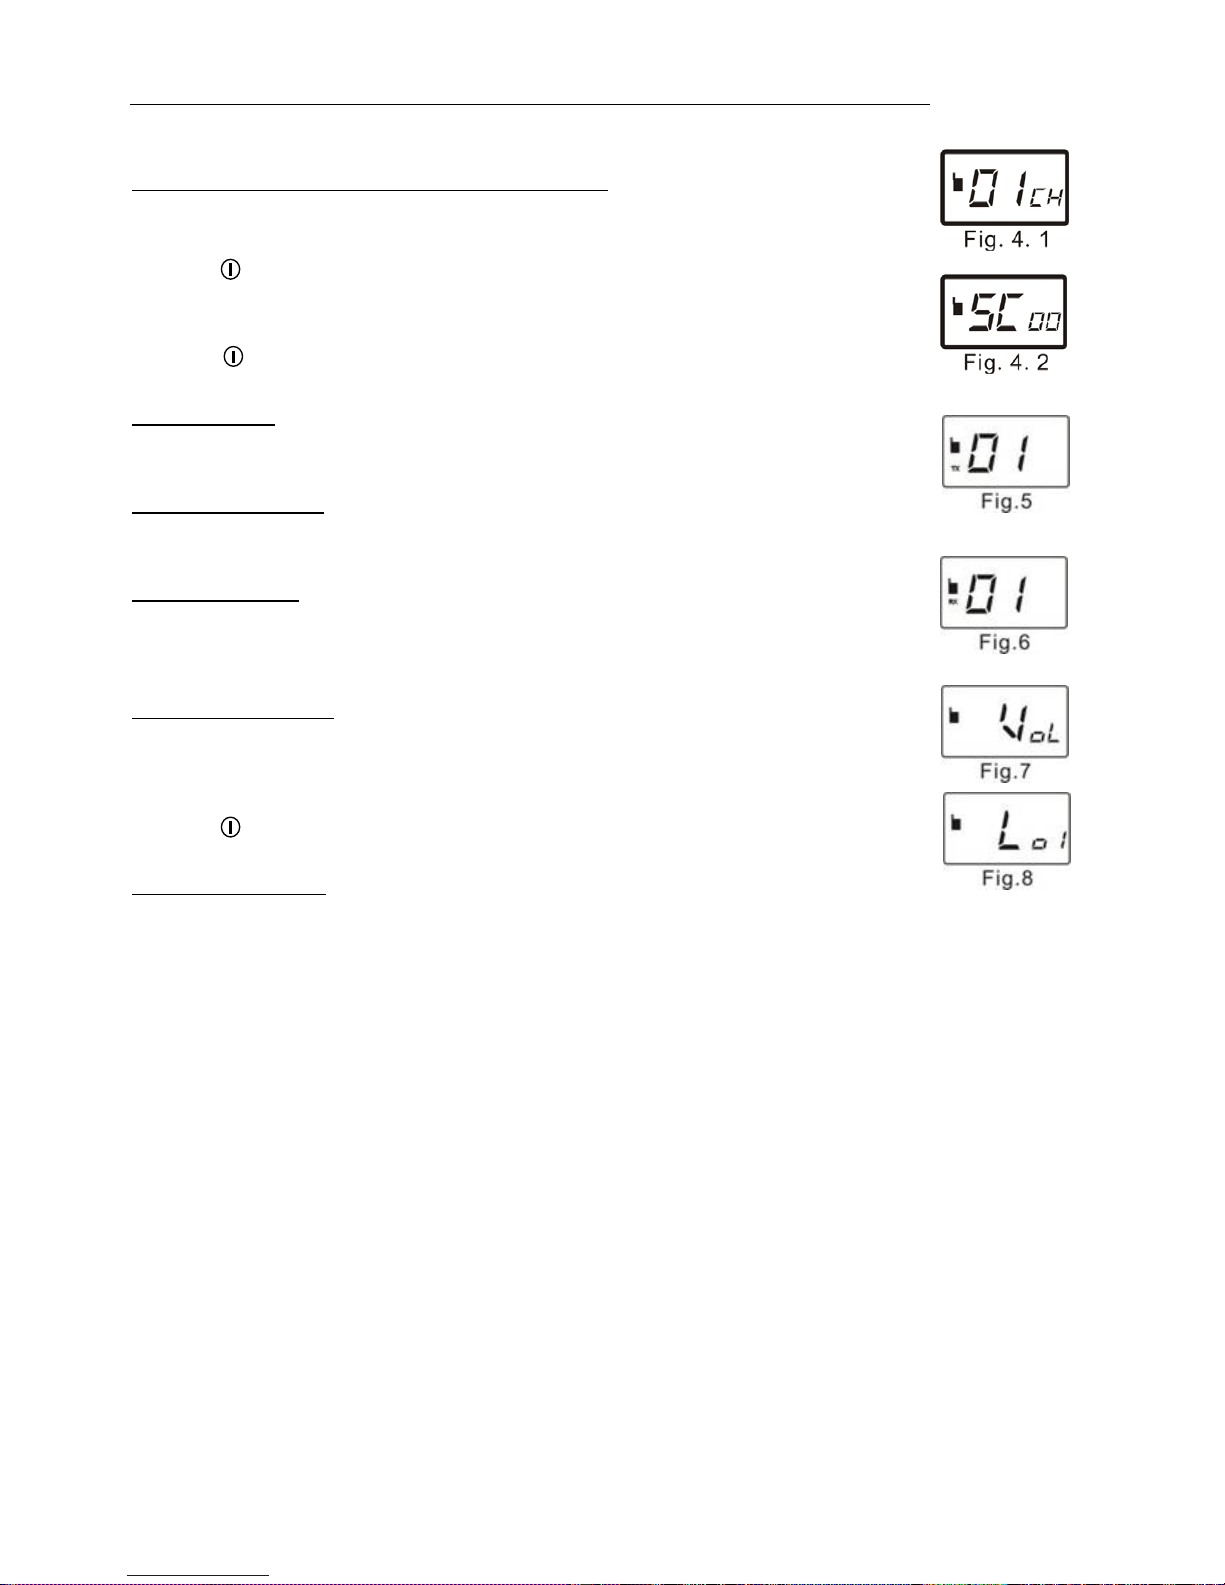
1. Press MENU key once to enter channel selection menu.(Fig.4.1)
2. Press + or – key to change the channel.
3. Press key to confirm the setting and return the main screen.
4. Press MENU key twice to enter subcode selection menu.(Fig.4.2)
5. Press + or – key to change the subcode.
6. Press key to confirm the setting and return the main screen.
UTo Make a Call
Press CALL button once to make a call ring tone, “TX” shows. (Fig.5)
UTransmitting Signal
Press and hold PTT button and speak into the microphone. “TX” shows.(Fig.5)
UTo Receive a Call
Release CALL or PTT key and wait for signal. “RX” means the radio i s in receiving
status. You can hear the call tone or the voice from other user.(Fig.6)
UAdjust Volume Level
1. Press + or – key to enter Fig.7.
2. You will see the same display as Fig. 8 after a half second.
3. Press + or – button to adjust the volume level from 01 to 07
4. Press key to confirm the setting and return the main screen.
UTalk Over Earphone
Simply plug the earphone into the earphone jack, press PTT key of the earphone
and speak.
Page 4
英文 Page 4 of 8
Function Setup Procedure
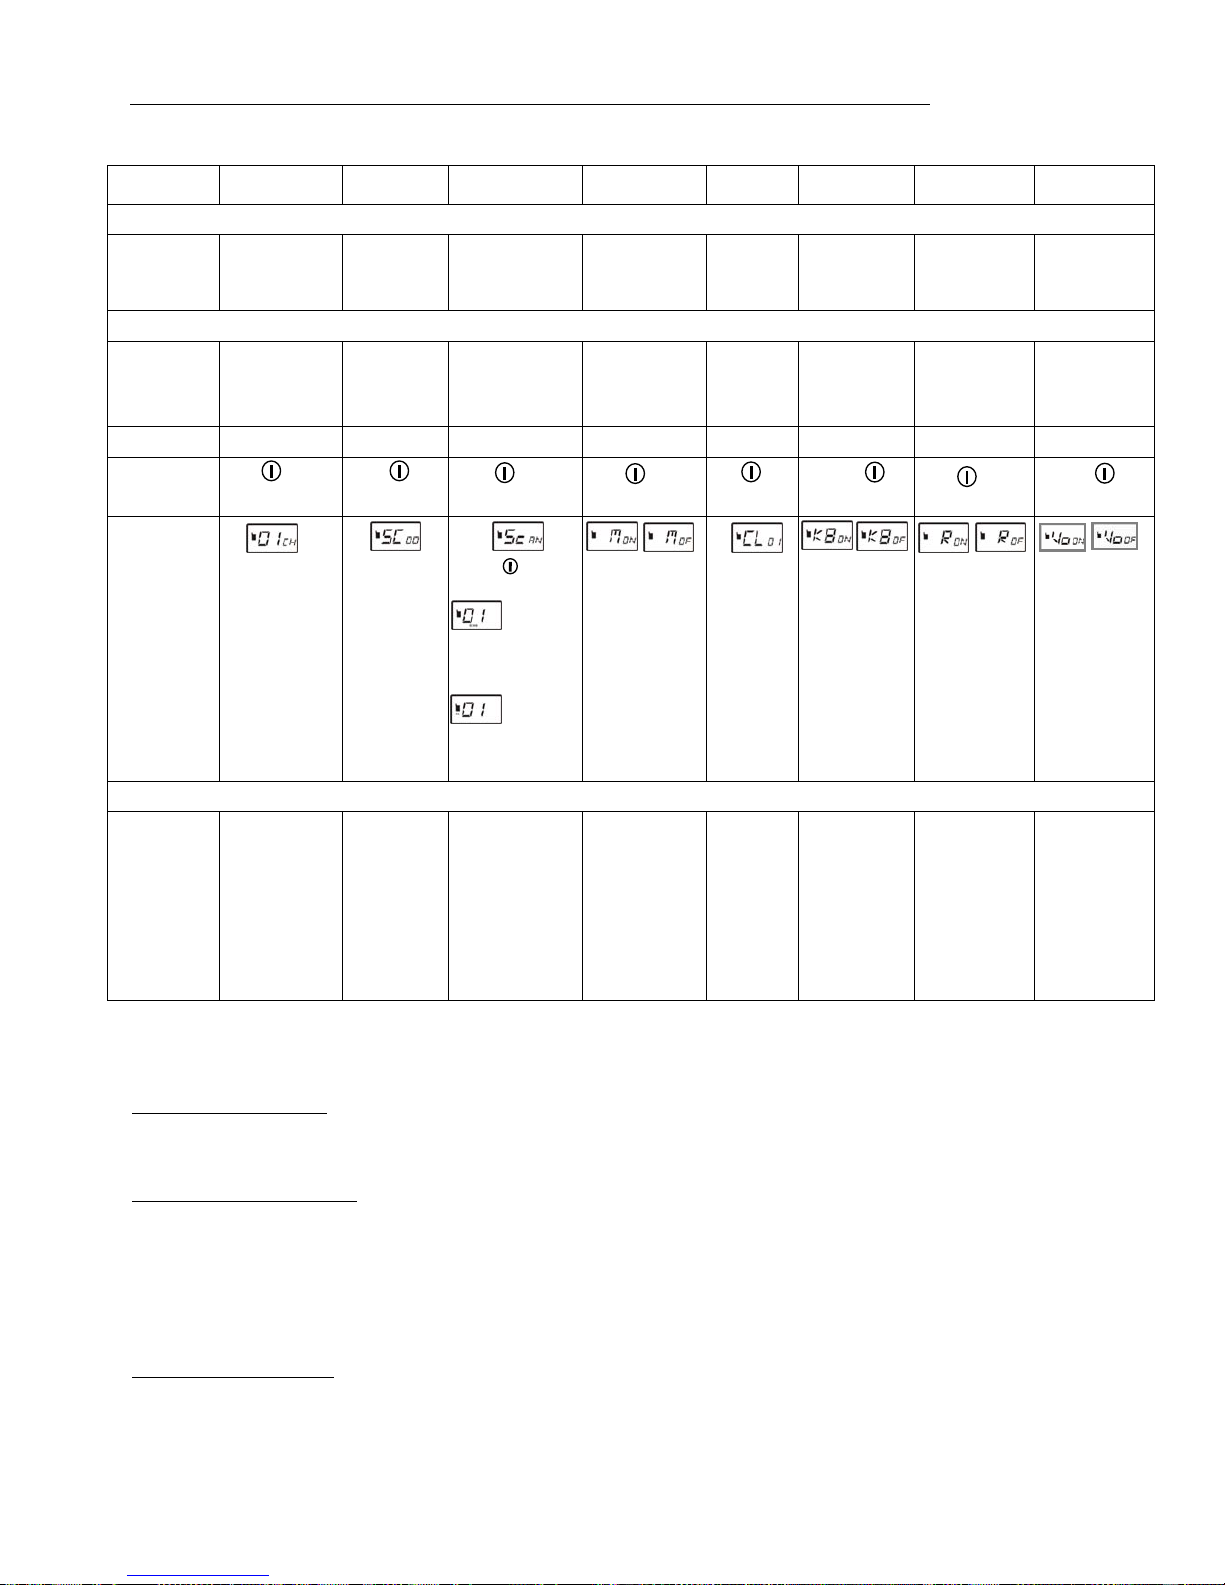
You may simply set up the function by referring the table below:
Function
Channel
Selection
Subcode
Selection
Auto Channel
Scan
Monitor Call Tone Key Tone Roger Beep VOX
Application
Select the channel
for communication
Select the
subcode
Scan the channel
automatically to
identify the occupied
channel
Received all signal
in the same
channel during
weak transmission
Call your
partner by
sending a call
tone
Activate/inactive
the key beep
according to your
own preference
Let your partner
know the
conversation is
ended.
Voice activates
transmission.
Operation
Number of
time to press
MENU key for
entering the
selection menu
1 2 3 4 5 6
7
8
Selection Key + / - + / - NOT appliable + / - + / - + / - + / - + / Confirmation
Key
LCD Display
Press +/- to select
the channel.
Press +/- to
select
subcode.
Press to start
channel scanning.
Start
channel scanning
from the present
channel.
Channel
scanning stops until
the signals is
detected.
Press +/- to
activate / inactive
the monitor
function.
Press +/- to
select the call
tone.
Press +/- to
activate / inactive
the key beep
function.
Press +/- to
activate /
inactive the
roger beep
function.
Press +/- to
activate / inactive
the VOX function.
Remark:
Two radios hav e to
be in the same
channel in order to
communicate
each other.
Two radios
have to be in
the same
subcode in
order to
communicate
each other.
If no signal detected
within 10 seconds or
any keys pressed,
the channel
scanning function
will be interrupted. It
will then maintain
previous channel.
The monitor
function will
automatically turn
off by press any
key except PTT
and CALL keys.
Loud noise results
if use monitor
function under
good transmission.
The default
setting of Call
Tone is 01.
The default
setting of Key
Beep is ON.
The default
setting of Roger
Beep is ON.
The default
setting of VOX is
OFF.
User can talk and
communicate with
each other without
pressing and
holding the PTT
button when
activating VOX.
B. Other Functions
UAuto Squelch (SQ)
Auto Squelch Control eliminates unwanted interference during communication.
ULow Battery Indication
When the battery level becomes low, the battery icon flashes twice per second.
When the battery is too low, the unit will be off automatically.
Changing or recharging batteries is recommended, or the radio does not operate
properly.
URecharging Function
Please charge the rechargeable batteries before first time usage. The battery icon
shows while charging until the batteries are fully charged.
1. Use the supplied AC/DC Charger or desktop charger for the unit to charge.
Page 5
英文 Page 5 of 8
2. Supply power : 7.5V/600mA
3. Charging time is not over 6 hours.
A. Recharging by AC / DC adaptor
Simply plug the charging adaptor into the charger jack and then turn on the r adio,
the battery level icon shows while charging until the batteries are fully charged.
B. Recharging by desktop charger
B1. Plug desktop charger into any nearby standard household electrical outlet.
B2. Insert the rechargeable batteries into radio, place them on the desktop
charger.
B3. Battery icon appears and red light at desktop charger lights on when the radio
is in charging.
B4. Battery icon disappears and red light at desktop charger lights off when the
radio is fully charged.
Attention:
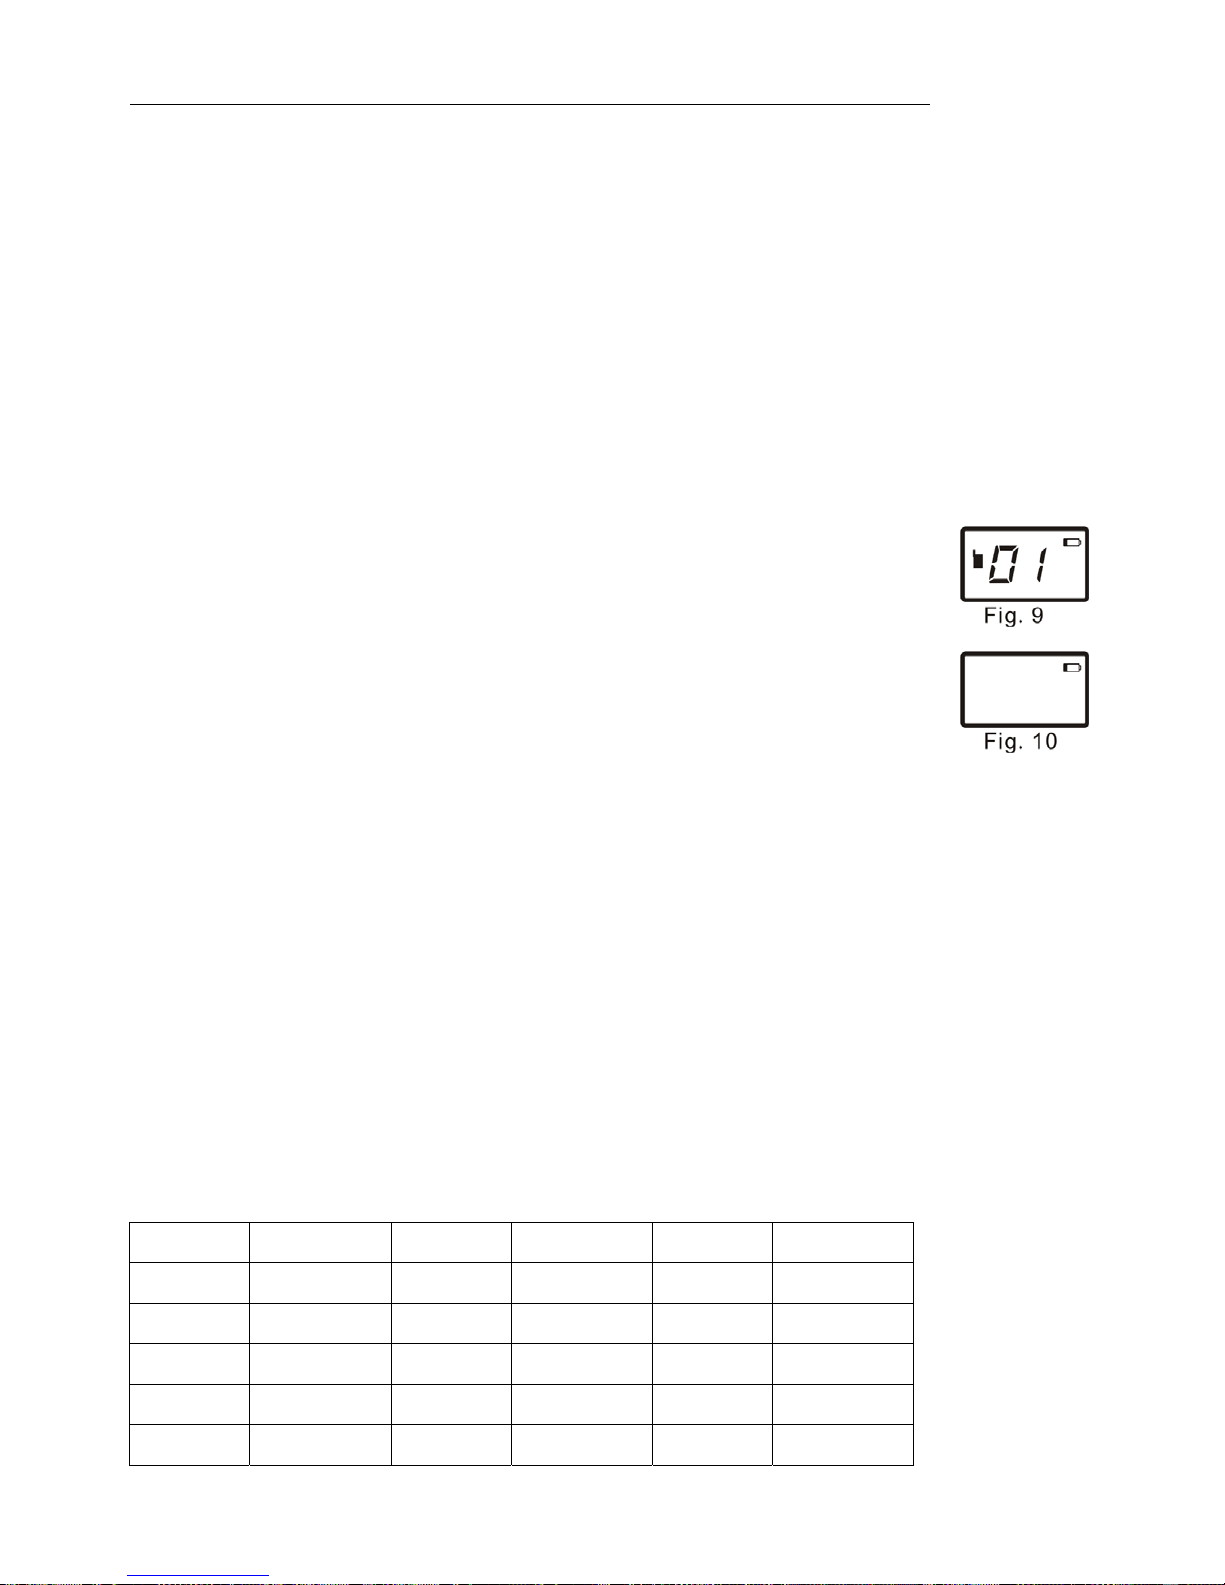
* If the radio is ON while charging, the LCD screen as Fig.9.
* If the radio is OFF while charging, the LCD screen as Fig.10.
* While charging all functions is available for use except PTT & CALL key.
TECHNICAL SPECIFICATIONS
Description Specifications
Power Output ≤ 0.5W
Operating Frequency 462.5625 ~ 462.7125MHz
467.5625 ~ 467.7125MHz
462.5500 ~ 462.7250MHz
Channel 22
CTCSS 38
Modulation FM
Talk Range Up to 3km in clear unobstructed conditions
Power Source 3 AAA Alkaline Batteries or Rechargeable
Batteries(600mAh)
Battery Life 15 hours for Rechargeable batteries
(5% Transmitting, 5% Reception, 90% Standby)
Recharging Time Fully recharge needs 6 hours
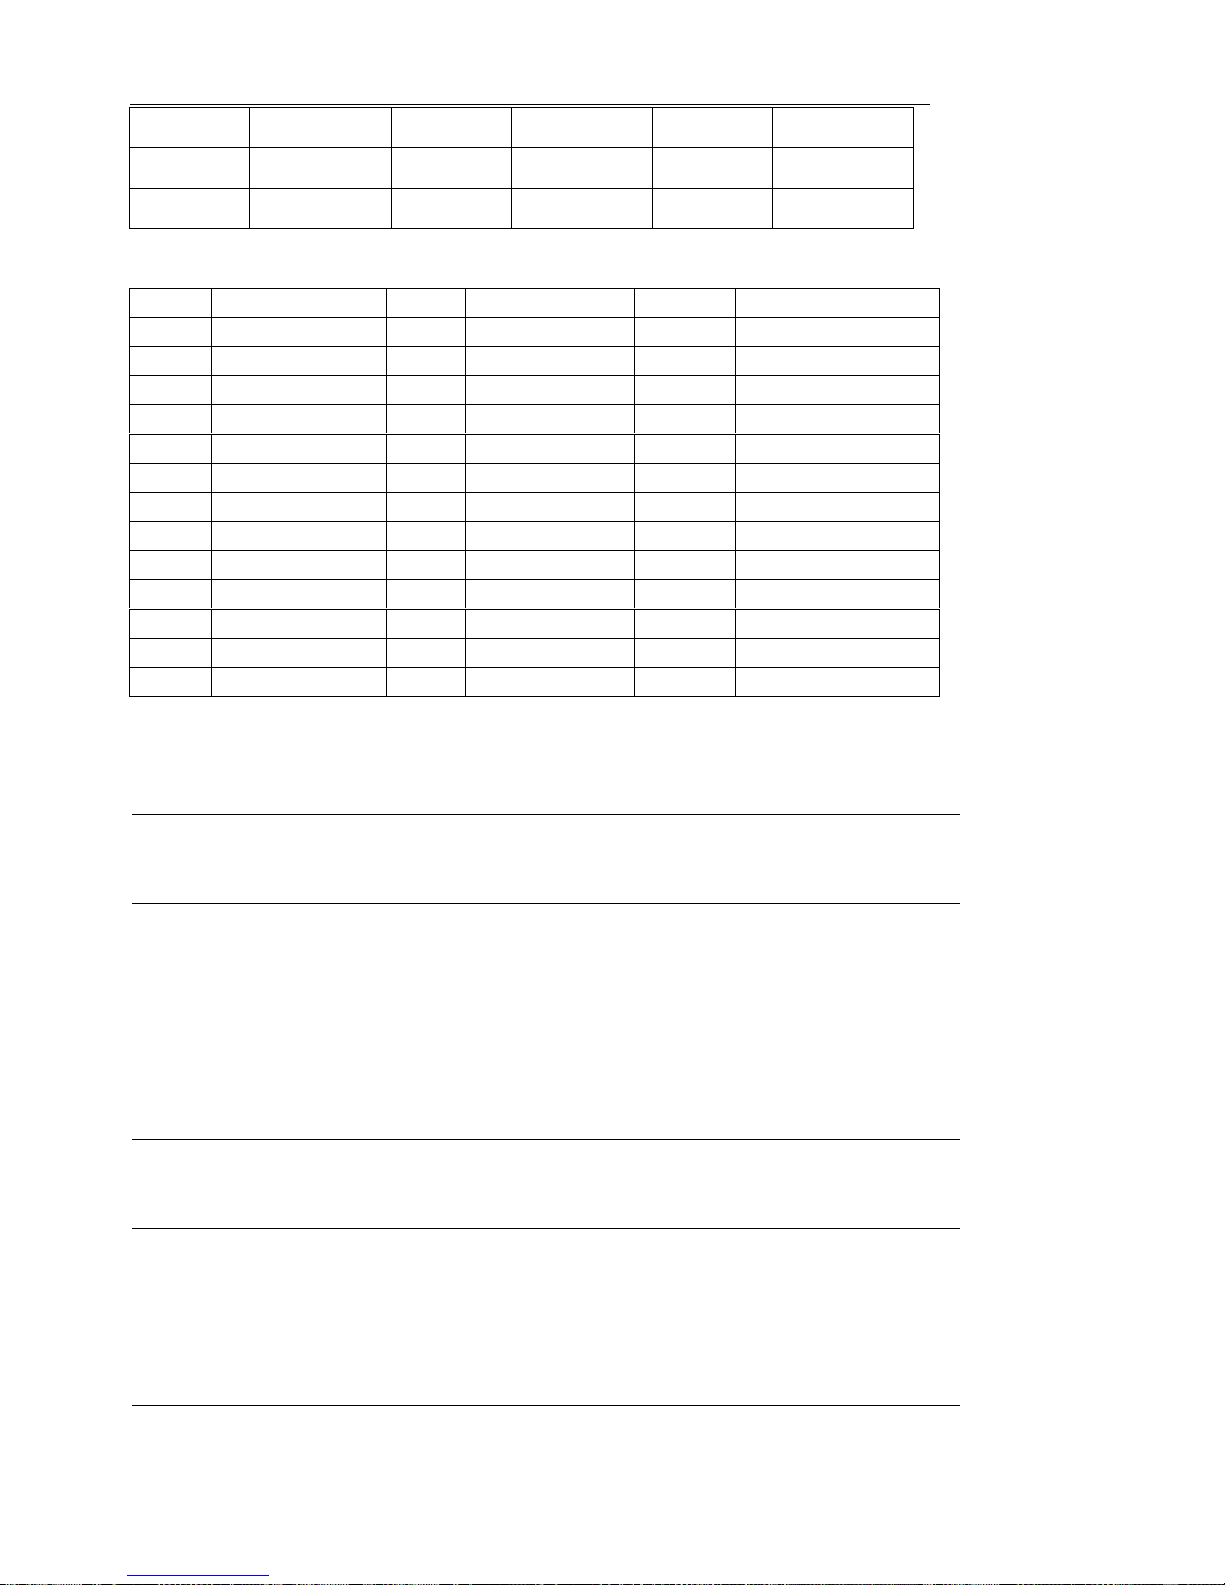
FRS+GMRS Transmit-Receive Frequencies (MHz)
CHANNEL FREQUENCY CHANNEL FREQUENCY CHANNEL FREQUENCY
1 462.5625 9 467.5875 17 462.6000
2 462.5875 10 467.6125 18 462.6250
3 462.6125 11 467.6375 19 462.6500
4 462.6375 12 467.6625 20 462.6750
5 462.6625 13 467.6875 21 462.7000
Page 6
英文 Page 6 of 8
6 462.6875 14 467.7125 22 462.7250
7 462.7125 15 462.5500
8 467.5625 16 462.5750
Interference Eliminator Code Chart(Hz)
0BTrouble Shooting
Problem Solution
No Power - Reposition or replace batteries
Message Not Transmitted - Make sure the PTT button is completely pressed as
you transmit.
- Reposition or replace batteries
Message Not Received - Confirm radios have the same channel settings.
- Make sure PTT is not inadvertently being pressed.
- Obstructions operating indoors or in vehicles
may interfere with communication.
- Change your location.
- Check to make sure volume is loud enough to be
heard.
- Reposition or replace batteries
Hearing Other
Conversation or Noise on a
Channel
- Shared channel may be in use, try another.
Limited Talk Range - Steel/concrete structures to each other, heavy
foliage will decrease communication range, check
for clear line of sign to improve transmission.
- Wearing radio close to body such as in a pocket
or on a belt will decrease range, change location
of radio.
Heavy Static or
Interference
- Radio are too close to each other. Radio must be
at least 15 feet apart, increase your distance.
Code Frequency Code Frequency Code Frequency
1 67.0 14 107.2 27 167.9
2 71.9 15 110.9 28 173.8
3 74.4 16 114.8 29 179.9
4 77.0 17 118.8 30 186.2
5 79.7 18 123.0 31 192.8
6 82.5 19 127.3 32 203.5
7 85.4 20 131.8 33 210.7
8 88.5 21 136.5 34 218.1
9 91.5 22 141.3 35 225.7
10 94.8 23 146.2 36 233.6
11 97.4 24 151.4 37 241.8
12 100 25 156.7 38 250.3
13 103.5 26 162.2
Page 7

英文 Page 7 of 8
- Radio are too far apart. Obstacles interfere with
transmission.
- Talk range is up to 3 km in clear and unobstructed
conditions.
Caution:
- Please avoid charging for non-rechargeable batteries in the product as
charging operation can only be performed with suitable rechargeable
batteries.
- Please use only supplied accessories or optional accessories produce by our
company or it might cause defect or damage to the unit.
- Please refer our distributor for optional accessories produce by our company.
- To reduce the risk of electric shock, do not expose this appliance to rain or
moisture.
- Do not hold the antenna while the radio is in use, or transmissions quality
affected.
- Your walkie talkie set has been fully adjusted prior to shipment from the
factory. Never open your communicator’ s case or adjust the settings inside
the communicator.
- Never change or replace anything in your communicator except the battery.
- To clean your radio, use a soft cloth dampened with water. Do not use
corrosive chemical solvent, they may harm the body of the unit and leak
inside, causing permanent damage.
Warning: Changes or modifications to this equipment not expressly approved by the party
responsible for compliance could void the user's authority to opera te the equipmen t.
Warning: Any adjustment to this equipment is recommended to be performed by or under the
immediate supervision and responsibility of a person certified as technically qualified to
perform transmitter maintenance and repair duties in the private land mobile services and
fixed services by an organization or committee representative of users of those services.
Warning: Replacement of any tr ansmitter component (crystal, semiconductor, etc.) for this
equipment could result in violation of FCC rules.
Notes: This equipment has been tested and found to comply with the limits
for a Class B digital device, pursuant to part 15 of the FCC Rules. These limits
are designed to provide reasonable protection against harmful interference
in a residential installation, this equipment generates, uses and can radiate
harmful interference to radio communications.
However, there is no guarantee that interference will not occur in a particular
installation. If this equipment does cause harmful interference to radio or
television reception, which can be determined by turning the equipment off
and on, the user is encouraged to try to correct the interference by one or
more of the following measures:
Page 8

英文 Page 8 of 8
- Reorient or relocate the receiving antenna.
- Increase the separation between the equipment and receiver.
- Connect the equipment into an outlet on a circuit different from that to
which the receiver is connected.
- Consult the dealer or an experienced radio/TV technician for help.
Before any station transmits on any channel authorized in the GMRS from any points (a
geographical location) within or over the territorial limits of any area, where radio services
are regulated by the FCC, the responsible party must obtain the license (a written
authorization from the FCC for a GMRS system).
To apply for a GMRS system license, user may file online through the Univers al Licensing
system (ULS), or file FCC Form 605 manually.
Additional GMRS information may be obtained from any of the following sources:
(a) FCC National Call Center at 1-888-225-5322.
(b) FCC World Wide Web homepage:
HUhttp://www.fcc.gov/wtb/prsUH.
(c) In writing, to the FCC, Attention: GMRS, 1270 Fairfield Road, Gettysburg, PA
17325-7245.
The licensee is responsible for the proper operation of the GMRS system at all times. The
licensee is also responsible for the appointment of a station operator. The licensee may limit
the use of repeater to only certain user stations.
Your wireless hand-held portable transceiver contains a low power transmitter. When the
Push-to-Talk (PTT) button is pushed it sends out radio frequency (RF) signals. The device
is authorized to operate at a duty factor not to exceed 50%. In August 1996, the Federal
Communications Commissions (FCC) adopted RF exposure guidelines with safety levels
for hand-held wireless devices.
CAUTION: To maintain compliance with the FCC's RF exposure guidelines hold the
transmitter and antenna at least 1 inch (2.5 centimeters) from your face and speak in a
normal voice, with the antenna pointed up and away from the face. If you wear the handset
on your body while using the headset accessory, use only the supplied belt clip for this
product and when transmitting, take it out of the belt to ensure that the antenna is at least 1
inch (2.5 centimeters) from your body.
Use only the supplied antenna. Unauthorized antennas, modifications, or attachments
could damage the transmitter and may violate FCC regulations.
This device complies with part 15 of the FCC Rules. Operation is subject to the following
two conditions: (1) This device may not cause harmful interference, and (2) this
device must accept any interference received, including interference that may
cause undesired operation.
 Loading...