


“Touch & Go”
Owner's manual

1. BASIC INFORMATION BEFORE OPERATION
Foreword
COMMON ILLUSTRATIONS FOR ALL VEHICLE MODELS
In this manual, illustrations showing the typical "Touch & Go" layout, USB port
and rear view camera location, etc. has been used. The actual design and button position may differ depending on the vehicles. For the correct location of
these items, please refer to Section 3 and the pictorial index of the “Owner’s
Manual”.
ENGINE SWITCH NAMES AND MODES
This manual has been written using a vehicle with a gasoline engine vehicle
(without a smart entry & start system) as an example. For vehicles with a smart
entry and start system and hybrid vehicles, please refer to the following table to
confirm the engine switch name and mode.
Vehicle system Switch name and mode
Vehicles without a
smart entry & start
system
Vehicles with a smart
entry & start system
Hybrid vehicles “POWER” switch ACCESSORY ON OFF
Engine switch ACC ON OFF (LOCK)
“ENGINE START
STOP” switch
ACCESSORY
IGNITION
ON
OFF
i
1. BASIC INFORMATION BEFORE OPERATION
SYMBOLS USED IN ILLUSTRATIONS
Safety symbol
The symbol of a circle with a slash through it means “Do not”, “Do not
do this”, or “Do not let this happen”.
Arrows indicating operations
Indicates the action (pushing, turning, etc.)
used to operate switches and other
devices.
Indicates the outcome of an operation (e.g.
a lid opens).
HOW TO READ THIS MANUAL
No. Name Description
Operational Outlines An outline of the operation is explained.
Main Operations The steps of an operation are explained.
Related Operations A main operation’s supplementary operations are described.
Information Useful information for the user is described.
ii

1. BASIC INFORMATION BEFORE OPERATION
iii

1. BASIC INFORMATION BEFORE OPERATION
iv

TABLE OF CONTENTS
1 QUICK GUIDE 9
2 NAVIGATION SYSTEM 19
3 APPLICATION 77
4
AUDIO SYSTEM
5 Bluetooth® HANDS-FREE SYSTEM 137
6 VEHICLE INFORMATION 167
7 SETUP 173
95
8 REAR VIEW MONITOR SYSTEM 193
INDEX 201
1

1. BASIC INFORMATION BEFORE OPERATION
Introduction
"Touch & Go" OWNER’S MANUAL
This manual explains the operation of the “Touch & Go”. Please read this manual carefully to ensure proper use. Keep this manual in your vehicle at all times.
The screen shots in this document and the actual screens of the “Touch & Go”
differ depending on whether the functions and/or a contract existed and the map
data available at the time of producing this document.
NAVIGATION SYSTEM
The Navigation System is one of the most technologically advanced vehicle accessories ever developed. The system receives satellite signals from the Global
Positioning System (GPS) operated by the U.S. Department of Defense. Using
these signals and other vehicle sensors, the system indicates your present position and assists in locating a desired destination.
The navigation system is designed to select efficient routes from your present
starting location to your destination. The system is also designed to direct you
to a destination that is unfamiliar to you in an efficient manner. The system is
developed by “Harman International” using “Navteq” maps. The calculated
routes may not be the shortest nor the least traffic congested. Your own personal local knowledge or “short cut” may at times be faster than the calculated
routes.
The navigation system’s database includes Point of Interest categories to allow
you to easily select destinations such as restaurants and hotels. If a destination
is not in the database, you can enter the street address or a major intersection
close to it and the system will guide you there.
The system will provide both a visual map and audio instructions. The audio instructions will announce the distance remaining and the direction to turn in approaching an intersection. These voice instructions will help you keep your eyes
on the road and are timed to provide enough time to allow you to maneuver,
change lanes or slow down.
Please be aware that all current vehicle navigation systems have certain limitations that may affect their ability to perform properly. The accuracy of the vehicle’s position depends on the satellite condition, road configuration, vehicle
condition or other circumstances. For more information on the limitations of the
system, refer to page 70.
2

1. BASIC INFORMATION BEFORE OPERATION
CAUTION
NOTICE
IMPORTANT INFORMATION ABOUT THIS MANUAL
For safety reasons, this manual indicates items requiring particular attention
with the following marks.
● This is a warning against anything which may cause injury to people if the warning is
ignored. You are informed about what you must or must not do in order to reduce the risk
of injury to yourself and others.
● This is a warning against anything which may cause damage to the vehicle or its equip-
ment if the warning is ignored. You are informed about what you must or must not do in
order to avoid or reduce the risk of damage to your vehicle and its equipment.
3
1. BASIC INFORMATION BEFORE OPERATION
CAUTION
SAFETY INSTRUCTION
To use this system in the safest possible
manner, follow all the safety tips shown
below.
This system is intended to assist in reaching the destination and, if used properly,
can do so. The driver is solely responsible
for the safe operation of your vehicle and
the safety of your passengers.
Do not use any feature of this system to
the extent it becomes a distraction and
prevents safe driving. The first priority
while driving should always be the safe operation of the vehicle. While driving, be
sure to observe all traffic regulations.
Prior to the actual use of this system, learn
how to use it and become thoroughly familiar with it. Read the entire "Touch & Go"
Owner’s manual to make sure you understand the system. Do not allow other people to use this system until they have read
and understood the instructions in this
manual.
For your safety, some functions may become inoperable when driving. Unavailable screen buttons are dimmed.
● For safety, the driver should not operate
the navigation system while he/she is
driving. Insufficient attention to the road
and traffic may cause an accident.
● While driving, be sure to obey the traffic
regulations and maintain awareness of
the road conditions. If a traffic sign on
the road has been changed, route guidance may not have the updated information such as the direction of a one way
street.
While driving, listen to the voice instructions as much as possible and glance at
the screen briefly and only when it is safe.
However, do not totally rely on voice guidance. Use it just for reference. If the system cannot determine the current vehicle
position correctly, there is a possibility of
incorrect, late, or non-voice guidance.
The data in the system may occasionally
be incomplete. Road conditions, including
driving restrictions (no left turns, street closures, etc.) frequently change. Therefore,
before following any instruction from the
system, look to see whether the instruction
can be done safely and legally.
This system cannot warn about such
things as the safety of an area, condition of
streets, and availability of emergency services. If unsure about the safety of an area, do not drive into it. Under no
circumstances is this system a substitute
for the driver’s personal judgement.
Use this system only in locations where it
is legal to do so.
4

1. BASIC INFORMATION BEFORE OPERATION
5

TABLE OF CONTENTS
QUICK GUIDE
1
1. CONTROLS AND FEATURES........ 10
OVERVIEW BUTTONS......................... 10
SYSTEM FUNCTION INDEX ................ 12
TOUCH SCREEN OPERATION ........... 14
NAVIGATION SYSTEM
2
1. NAVIGATION OPERATION ............ 20
QUICK REFERENCE............................ 20
NAVIGATION SYSTEM FUNCTION
INDEX................................................. 22
MAP SCREEN OPERATION ................ 24
MAP ICONS .......................................... 28
2. DESTINATION SEARCH................. 34
DESTINATION SEARCH ...................... 34
3. ROUTE GUIDANCE ........................ 42
STARTING ROUTE GUIDANCE........... 42
ROUTE GUIDANCE.............................. 44
SETTING AND DELETING THE
ROUTE ............................................... 46
4. MY DESTINATIONS........................ 54
REGISTERING A ENTRY ..................... 54
DISPLAYING AND EDITING THE
ENTRY INFORMATION ..................... 60
SENDING STORED CONTACTS
TO A USB MEMORY.......................... 62
5. NAVIGATION SETTING.................. 63
MAP SETTINGS.................................... 63
ROUTE SETTINGS............................... 66
TRAFFIC MESSAGE SETTINGS ......... 68
6. NAVIGATION SYSTEM
INFORMATION ............................. 70
LIMITATIONS OF THE NAVIGATION
SYSTEM ............................................. 70
MAP DATABASE UPDATES................. 72
MAP INFORMATION............................. 74
APPLICATION
3
1. APPLICATIONS OPERATION ....... 78
QUICK REFERENCE ............................ 78
PICTURE SLIDESHOW ........................ 79
2. CONNECTED SERVICE................. 81
CONNECTED SERVICE
OVERVIEW......................................... 81
BEFORE USING CONNECTED
SERVICE ............................................ 84
OPERATING NAVIGATION
FUNCTION USING CONNECTED
SERVICE ............................................ 86
OPERATING AN APPLICATION
USING CONNECTED SERVICE ........ 91
AUDIO SYSTEM
4
1. AUDIO SYSTEM OPERATION....... 96
QUICK REFERENCE ............................ 96
SOME BASICS...................................... 98
RADIO OPERATION ........................... 100
CD PLAYER OPERATION .................. 104
USB MEMORY/iPod OPERATION...... 110
AUX DEVICE OPERATION................. 116
Bluetooth
STEERING SWITCHES ...................... 126
AUDIO SYSTEM OPERATING
®
AUDIO OPERATION......... 118
HINTS ............................................... 129
6

Bluetooth® HANDS-FREE
5
SYSTEM
1. BASIC INFORMATION
BEFORE OPERATION ............... 138
QUICK REFERENCE .......................... 138
HANDS-FREE SYSTEM...................... 142
CONNECTING A Bluetooth
PHONE.............................................. 145
REGISTERING A ENTRY.................... 149
®
2. TELEPHONE OPERATION .......... 154
CALLING ON A Bluetooth®
PHONE.............................................. 154
RECEIVING CALLS ON A
Bluetooth
TALKING ON A Bluetooth
PHONE.............................................. 159
®
PHONE ........................... 158
®
3. SHORT MESSAGE
FUNCTION .................................. 162
SHORT MESSAGE FUNCTION .......... 162
VEHICLE INFORMATION
6
1. VEHICLE INFORMATION............. 168
QUICK REFERENCE .......................... 168
FUEL CONSUMPTION........................ 169
TYRE PRESSURE WARNING
SYSTEM............................................ 171
SETUP
7
1. SETUP OPERATION .................... 174
QUICK REFERENCE.......................... 174
GENERAL SETTINGS ........................ 175
DISPLAY SETTINGS .......................... 178
Bluetooth
TELEPHONE SETTINGS.................... 188
AUDIO SETTINGS .............................. 189
VEHICLE SETTINGS .......................... 192
8
®
SETTINGS ........................ 181
REAR VIEW MONITOR SYSTEM
1. REAR VIEW MONITOR
SYSTEM ...................................... 194
REAR VIEW MONITOR SYSTEM
OPERATION..................................... 194
DRIVING PRECAUTIONS (WITH REAR
VIEW MONITOR GUIDE LINES)...... 198
INDEX
ALPHABETICAL INDEX ................... 202
1
2
3
4
5
6
7
8
7

8

1
QUICK GUIDE
CONTROLS AND FEATURES
1
1. OVERVIEW BUTTONS ................. 10
2. SYSTEM FUNCTION INDEX......... 12
3. TOUCH SCREEN
OPERATION................................ 14
INPUT SCREEN OPERATION ............. 14
LIST SCREEN OPERATION................. 17
1
2
3
4
5
6
7
8
9
1. CONTROLS AND FEATURES
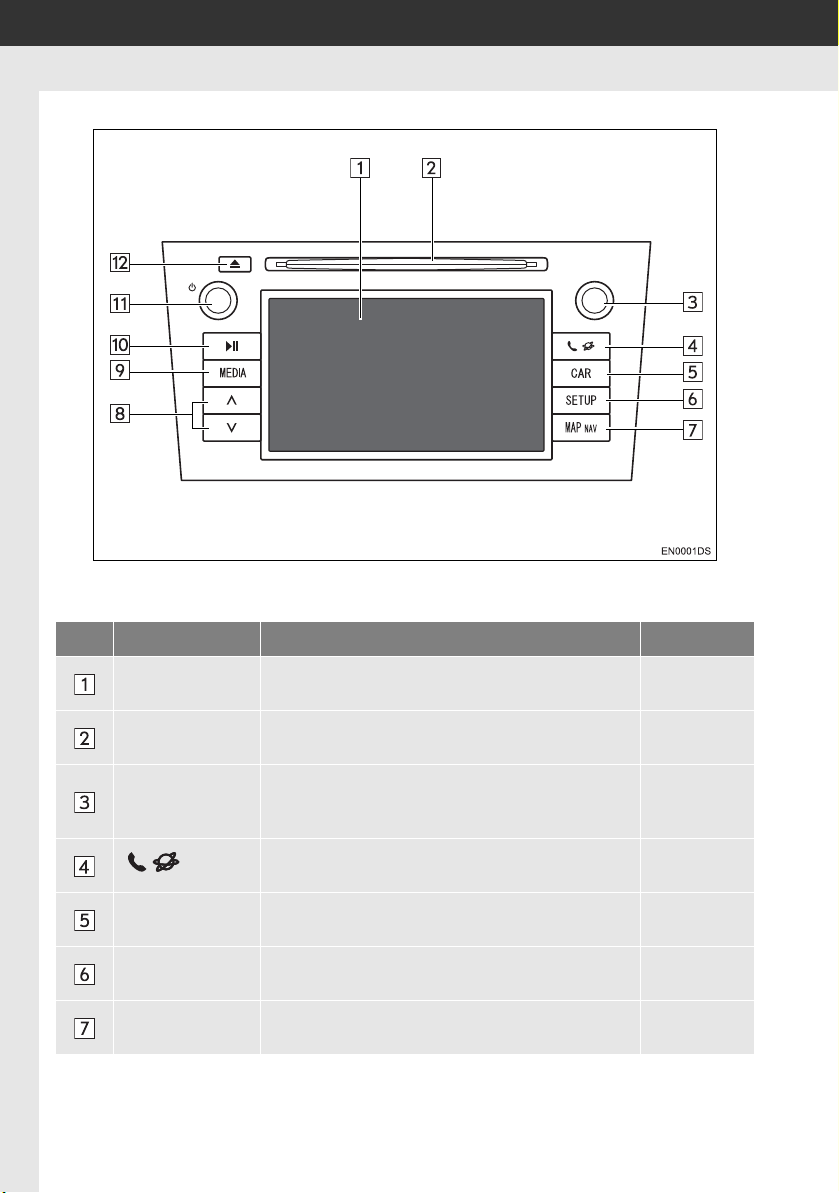
1. OVERVIEW BUTTONS
z The actual design and button position may differ depending on the vehicle. For
details, see Section 3 of “Owner’s Manual”.
No. Name Function Page
Touch screen
display
Disc slot
Tune/Scroll knob
button
“CAR” button*
“SETUP” button
“MAP NAV” button
10
By touching the screen with your finger, you can
control the selected functions.
Insert a disc into this slot. The CD player turns on
immediately.
Turn this knob to select radio station bands, tracks
and files. Also, the knob can be used for selection
from the list display.
Press this button to access the Bluetooth® handsfree system and applications.
Press this button to access the vehicle information
system.
Press this button to customize the function settings.
Press this button to access the navigation system. 19
14
104
98
77, 137
167
173
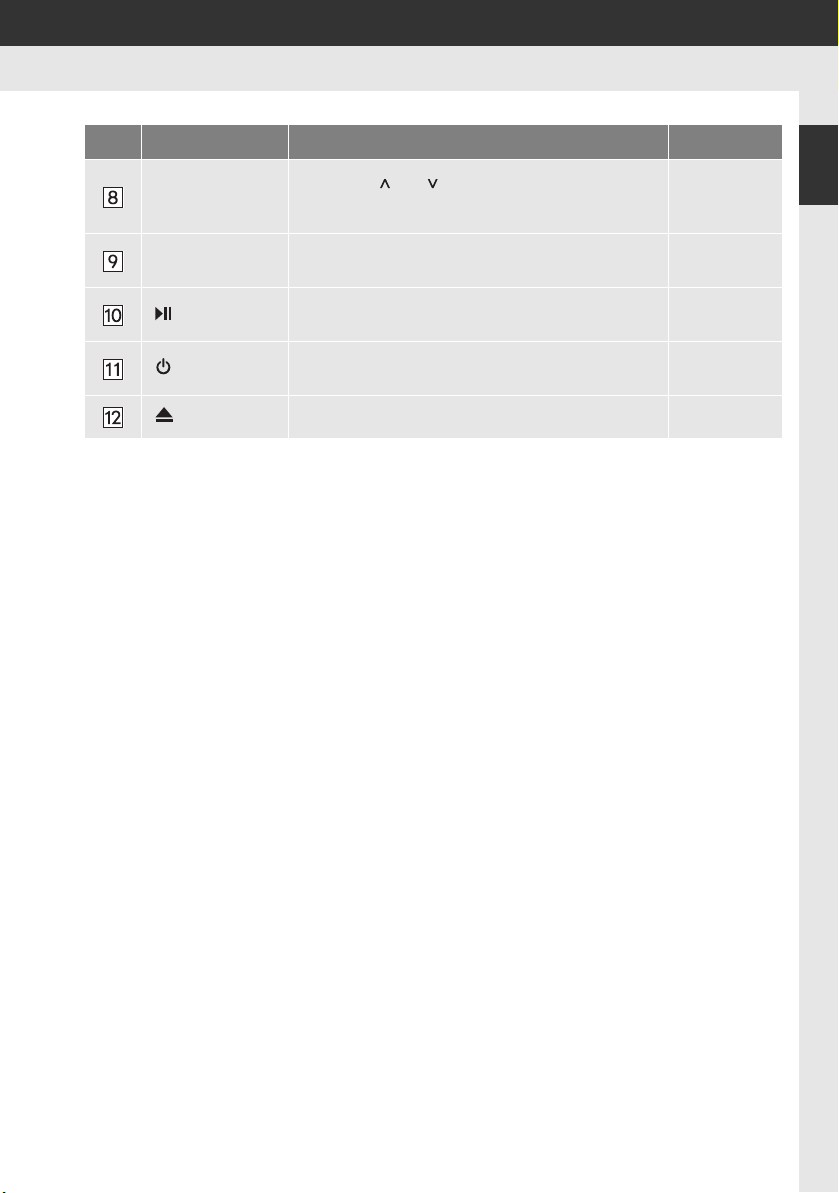
1. CONTROLS AND FEATURES
No. Name Function Page
Seek/Track
button
“MEDIA” button
button*
knob
Press the “ ” or “ ” button to seek up or down for
a radio station, or to access a desired track or file.
Press this button to access the audio system. The
audio system turns on in the last mode used.
Press this button to pause or resume playing the
music.
Press this knob to turn the audio system on and off,
and turn it to adjust the volume.
101, 106,
108, 113,
96, 98, 99
button Press this button to eject a disc. 104
*: If equipped
124
—
98
1
QUICK GUIDE
11
1. CONTROLS AND FEATURES
2. SYSTEM FUNCTION INDEX
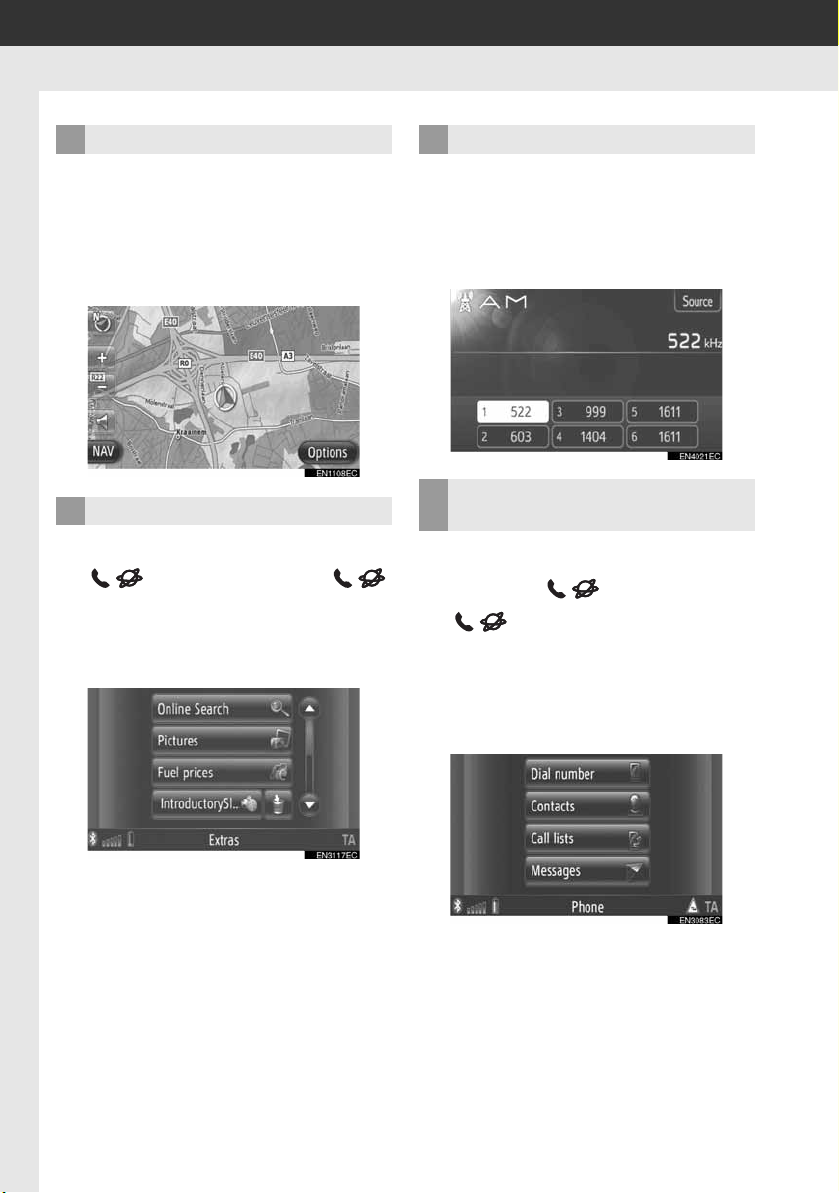
NAVIGATION SYSTEM
To access the navigation system, press
the “MAP NAV” button. Each time the
“MAP NAV” button is pressed, the screen
will change between the map screen and
“Navigation” menu screen. For details, see
page 19.
APPLICATION SYSTEM
To access the application system, press
the button. Each time the
button is pressed, the screen will change
between the “Phone” menu screen and the
“Extras” menu screen. The driver can use
applications. For details, see page 77.
AUDIO SYSTEM
To access the audio system, press the
“MEDIA” button. The audio control screen
will be displayed. Audio sources: Radio,
CDs, iPod, USB, AUX and Bluetooth
dio. For details, see page 95.
®
au-
Bluetooth® HANDS-FREE SYSTEM
To access the Bluetooth
tem, press the button. Each time
the button is pressed, the screen
will change between the “Phone” menu
screen and the “Extras” menu screen. The
driver can make or receive phone calls
without taking their hands off the steering
wheel. For details, see page 137.
®
hands-free sys-
12
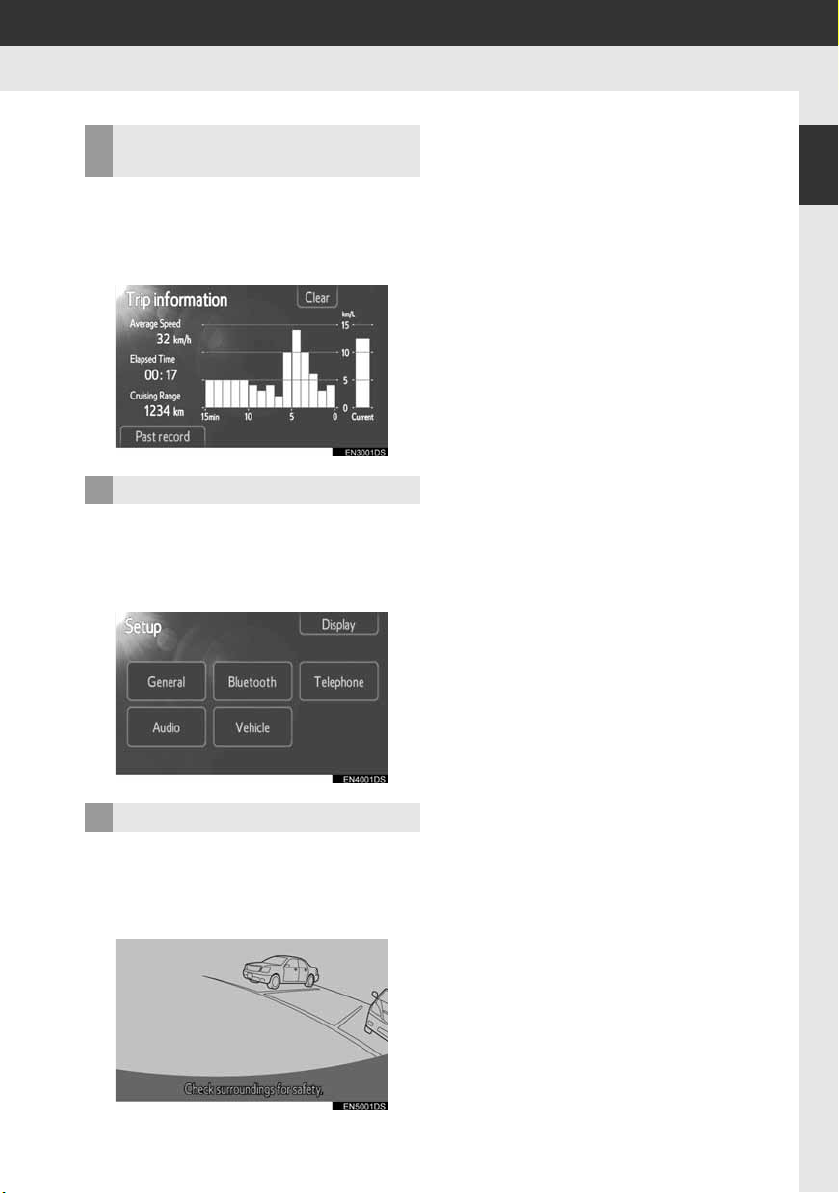
VEHICLE INFORMATION (IF EQUIPPED)
1. CONTROLS AND FEATURES
1
To access the vehicle information system,
press the “CAR” button. Fuel consumption and tyre pressure can be checked. For
details, see page 167.
SETUP
To customize the function settings, press
the “SETUP” button. The interface language can also be changed from the setup
menu. For details, see page 173.
QUICK GUIDE
REAR VIEW MONITOR SYSTEM
Shifting into the “R” position will automatically show the view behind the rear of the
vehicle on the display screen. For details,
see page 193.
13

1. CONTROLS AND FEATURES
NOTICE
INFORMATION
INFORMATION
3. TOUCH SCREEN OPERATION
This system is operated mainly by the
screen buttons.
z To prevent damage to the screen, lightly
touch the screen buttons with your finger.
When a screen button is touched, a beep
sounds. (To set a beep sound, see page
175.)
z Do not use objects other than your finger
to touch the screen.
● To prevent the 12-volt battery from being
discharged, do not leave the system on
longer than necessary when the engine
is not running.
● If the system does not respond to a
touch on a screen button, move your finger away from the screen and then
touch it again.
● Dimmed screen buttons cannot be oper-
ated.
● Wipe off fingerprints using a glass clean-
ing cloth. Do not use chemical cleaners
to clean the touch screen.
● The displayed image may become
darker and moving images may be
slightly distorted when the display is
cold.
● Under extremely cold conditions, the
screen may not be displayed and the
data input by a user may be deleted.
Also, the screen buttons may be harder
than usual to depress.
● When you look at the screen through
polarized material such as polarized
sunglasses, the screen may be dark and
hard to see. If so, look at the screen
from different angles, adjust the screen
settings (See “DISPLAY SETTINGS” on
page 178.), or take off your sunglasses.
INPUT SCREEN OPERATION
When searching for an address or a
name, letters and numbers can be input via the screen.
INPUTTING LETTERS AND NUMBERS
1 Touch the keys directly to input letters
or numbers.
: Touch to delete one letter. Touch
and hold to continue deleting letters.
2 Touch “OK”.
● When a character is input, a hint will
appear displaying a possible match for
the word to be searched.
● Currently unavailable screen buttons will
be dimmed.
● When an entry is too long to be dis-
played in the input field, the last section
of the input text will be displayed with
the initial section displayed as “...”.
14
1. CONTROLS AND FEATURES
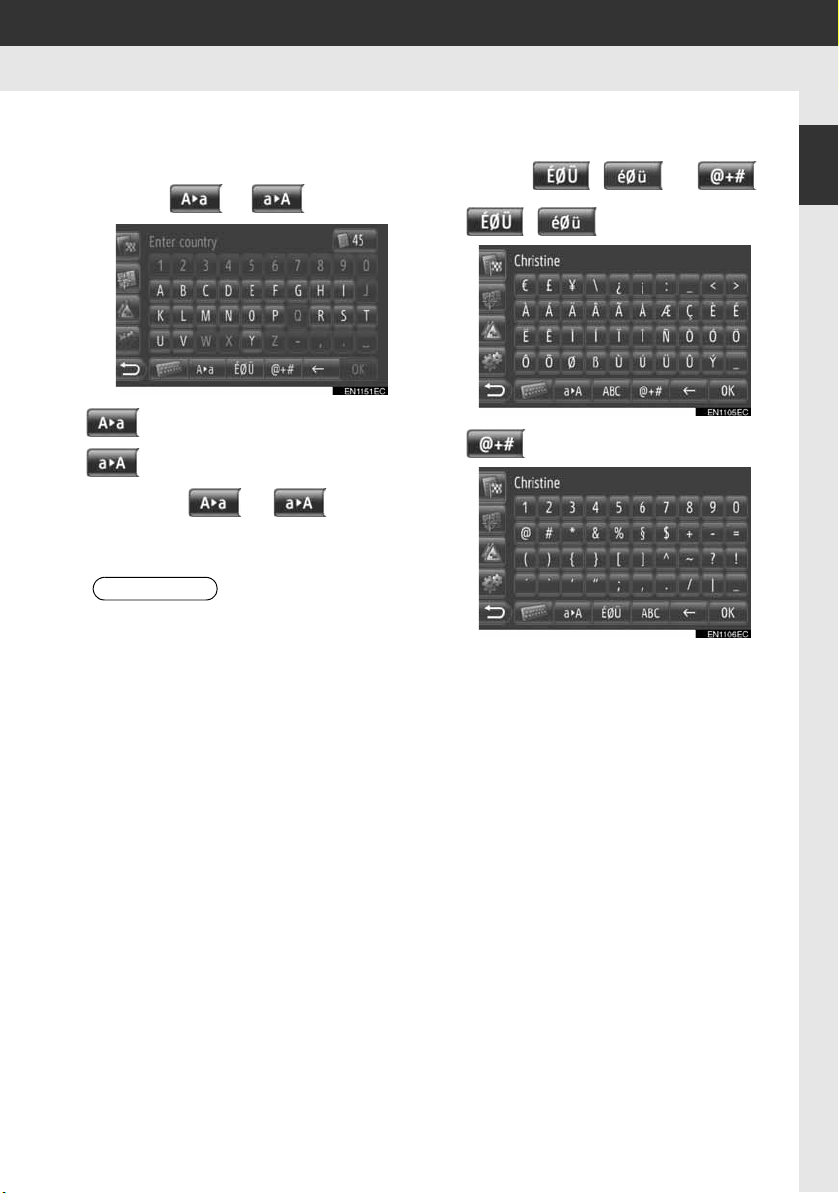
INFORMATION
■CHANGING BETWEEN LOWER
CASE AND UPPER CASE
1 Touch or .
: Touch to enter in lower case.
: Touch to enter in upper case.
z Each time or is touched,
input will change between upper case and
lower case input.
● In the following situations, the input
mode will automatically change between
upper and lower case.
• When the keyboard layout is
changed to upper case input, the layout will automatically change back to
lower case input after one letter has
been entered.
• When “/”, “&”, “.” or “(” is input, the
keyboard layout will automatically be
changed to upper case input.
• When all characters are deleted, the
keyboard layout will automatically
change to upper case input.
■INPUTTING SYMBOLS
1 Touch ( ) or .
X ( ) keyboard layout
X
keyboard layout
2 Touch the symbol keys directly to input
symbols.
1
QUICK GUIDE
15
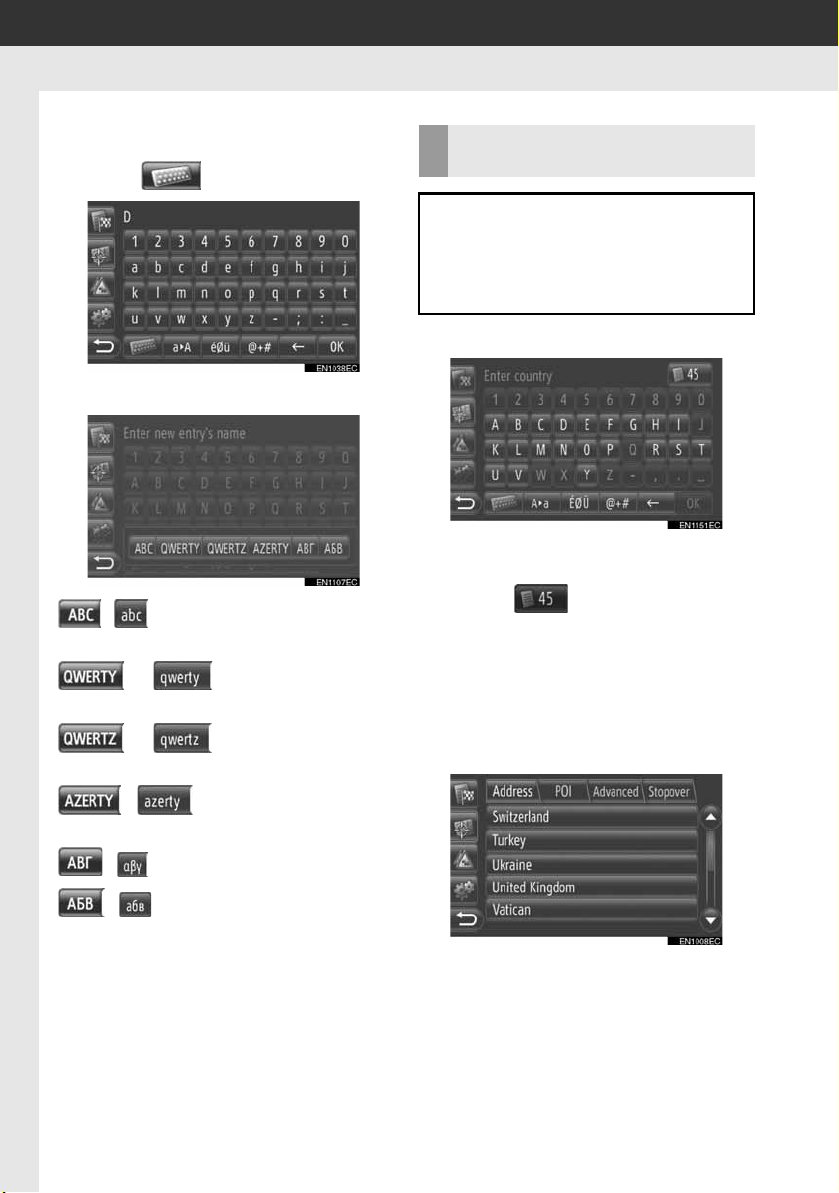
1. CONTROLS AND FEATURES
■CHANGING KEYBOARD LAYOUT
1 Touch .
2 Touch the desired item.
( ): Latin characters, “ABC”-Lay-
out
( ): Latin characters,
“QWERTY”-Layout
( ): Latin characters,
“QWERTZ”-Layout
ENTERING FROM THE LIST OF MATCHING ENTRIES
On certain screens, a candidate entry
text or word prediction list based on the
input letters will be displayed. The desired item can be selected and entered.
1 Enter letters.
z If a candidate entry text displayed in the
input field is what is desired, touch “OK”.
z Touching displays the candidate
entry text list. The number of matching
items is shown. Up to 300 items are displayed.
z The list will be displayed automatically, if
the number of matching entries is 5 or
less.
2 Touch desired item.
( ): Latin characters, “AZ-
ERTY”-Layout
( ): Cyrillic characters
( ): Greek characters
16
1. CONTROLS AND FEATURES
: This indicates the displayed screen’s
position.
INFORMATION
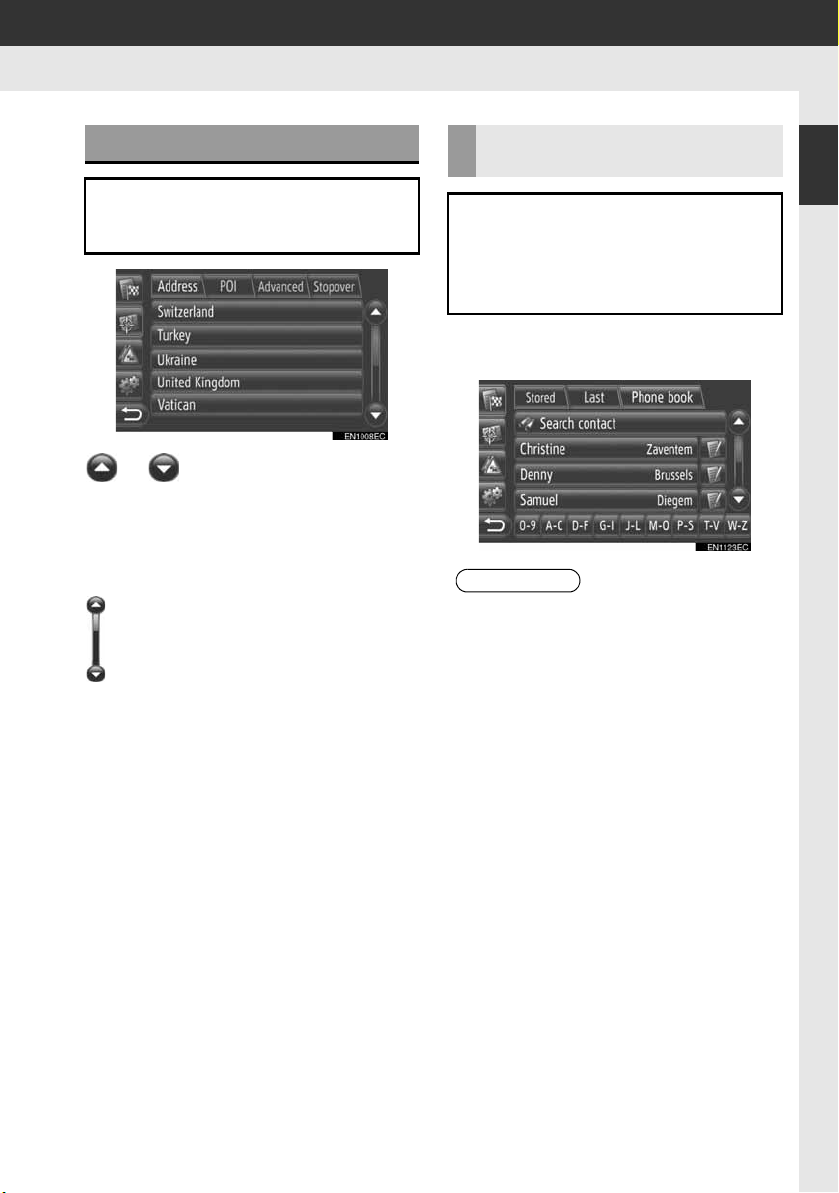
LIST SCREEN OPERATION
When a list is displayed, use the appropriate screen button to scroll through
the list.
or : Touch to shift to the next or
previous page.
z By touching and holding this screen but-
ton, the screen can be scrolled up or
down. Scrolling will automatically stop
when the top/bottom of the list is reached.
CHARACTER JUMP BUTTONS IN LISTS
Some lists contain character screen
buttons, “A-C”, “D-F” etc., which allow a direct jump to list entries that begin with the same letter as the
character screen button.
1 Touch one of the character screen but-
tons.
● Every time the same character screen
button is touched, the list starting with
the subsequent character is displayed.
1
QUICK GUIDE
17

NAVIGATION OPERATION
1
1. QUICK REFERENCE .................... 20
2. NAVIGATION SYSTEM
FUNCTION INDEX ...................... 22
3. MAP SCREEN OPERATION......... 24
TO DISPLAY MAP SCREEN................. 24
MAP SCREEN OPERATION................. 24
4. MAP ICONS .................................. 28
DISPLAYING VARIOUS
INFORMATION ON THE MAP............ 28
POI* ICONS........................................... 28
TRAFFIC MESSAGES .......................... 32
DESTINATION SEARCH
2
1. DESTINATION SEARCH .............. 34
DESTINATION SEARCH ON THE
“My destinations” SCREEN................. 34
DESTINATION SEARCH ON THE
“Enter destination” SCREEN............... 36
18

2
NAVIGATION SYSTEM
ROUTE GUIDANCE
3
1. STARTING ROUTE
GUIDANCE ................................. 42
STARTING ROUTE GUIDANCE
SCREEN ............................................. 42
SETTING THE ROUTE.......................... 43
2. ROUTE GUIDANCE ...................... 44
ROUTE GUIDANCE SCREEN .............. 44
VOICE GUIDANCE................................ 45
3. SETTING AND DELETING
THE ROUTE................................ 46
SETTING FROM THE
“Options” SCREEN.............................. 46
ADDING DESTINATIONS ..................... 49
DETOURING A SEGMENT ON
THE ROUTE........................................ 51
RECALCULATING THE ROUTE BY
THE TRAFFIC MESSAGES................ 53
3. SENDING STORED
CONTACTS TO A USB
MEMORY..................................... 62
SENDING STORED CONTACTS
TO A USB MEMORY.......................... 62
NAVIGATION SETTING
5
1. MAP SETTINGS ............................ 63
SETTING THE MAP.............................. 63
2. ROUTE SETTINGS........................ 66
SETTING THE ROUTE OPTIONS........ 66
3. TRAFFIC MESSAGE
SETTINGS................................... 68
TRAFFIC MESSAGE SETTINGS ......... 68
NAVIGATION SYSTEM
6
INFORMATION
1
2
3
4
5
6
7
8
MY DESTINATIONS
4
1. REGISTERING A ENTRY ............. 54
REGISTERING A NEW ENTRY ............ 54
2. DISPLAYING AND EDITING
THE ENTRY INFORMATION...... 60
DISPLAYING AND EDITING THE
ENTRY INFORMATION ...................... 60
Some of the functions cannot be operated while driving.
*: Point of Interest
1. LIMITATIONS OF THE
NAVIGATION SYSTEM............... 70
2. MAP DATABASE UPDATES ........ 72
UPDATE MAP ....................................... 72
3. MAP INFORMATION..................... 74
19
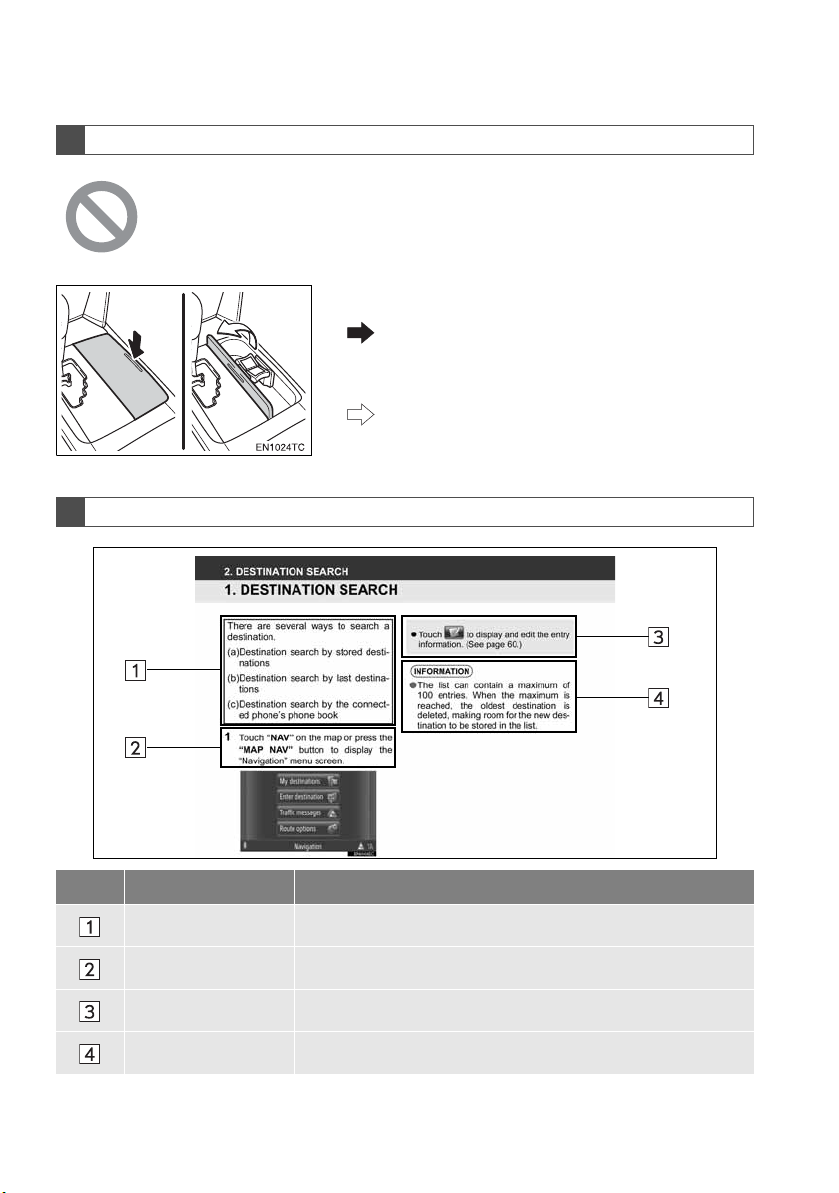
1. NAVIGATION OPERATION
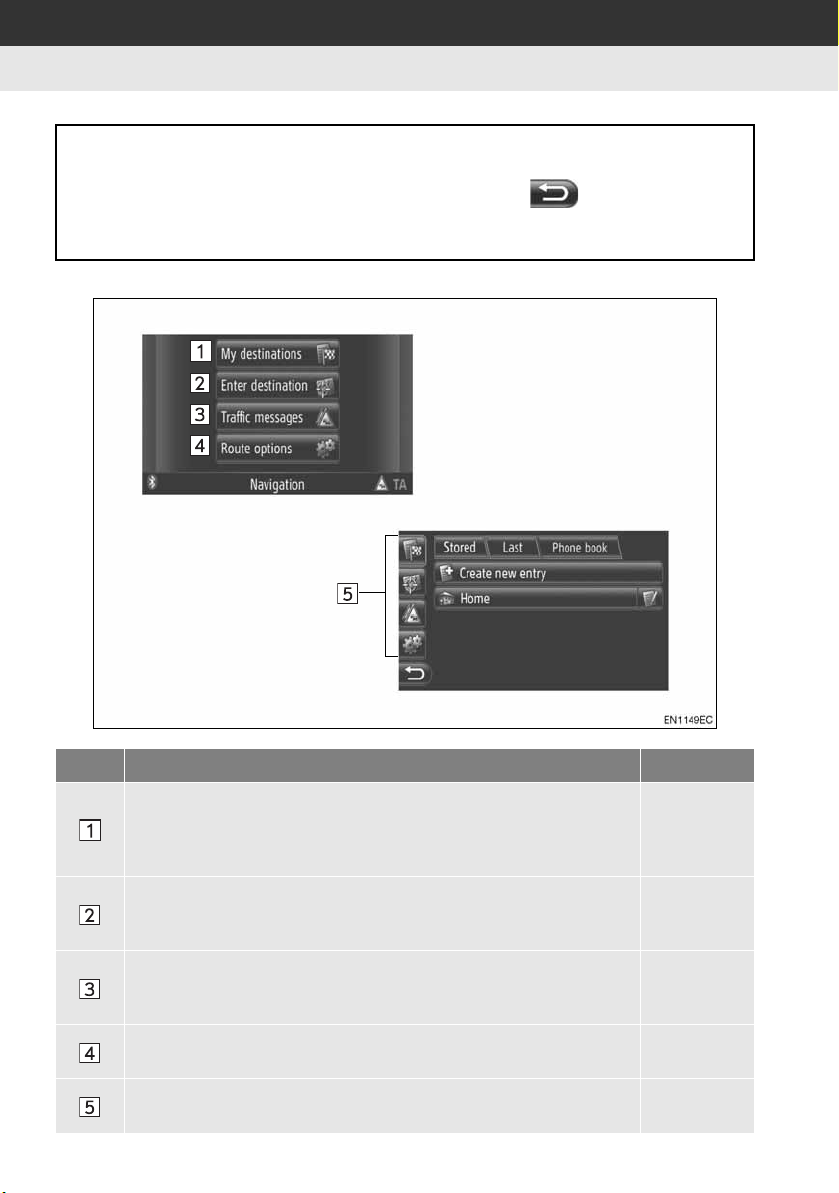
1. QUICK REFERENCE
To display the “Navigation” menu screen, touch “NAV” on the map or press the
“MAP NAV” button. When “NAV” is touched or the “MAP NAV” button is pressed,
the screen that was last displayed is returned to. Touch to display the “Navigation” menu screen. From this screen, destinations can be entered and route-related settings can be changed.
X“Navigation” menu screen
No. Function Page
Touch to display the “My destinations” screen.
A destination can be entered by selecting an item from the list of stored
destinations, last destinations or the addresses from the connected
phone’s phone book.
Touch to display the “Enter destination” screen.
A destination can be entered by address, POI or using advanced options. It can also be added as a stopover to a destination.
Touch to display the “Traffic messages” screen.
It contains a list of traffic messages relating to the set route, all traffic
messages and warnings.
Touch to display the “Route options” screen.
The route preferences and avoidance criteria can be adjusted.
Touch the corresponding icon to change to the “My destinations”, “Enter destination”, “Traffic messages” or “Route options” screen.
20
34
36, 49
32
66
32, 34, 36,
49, 66
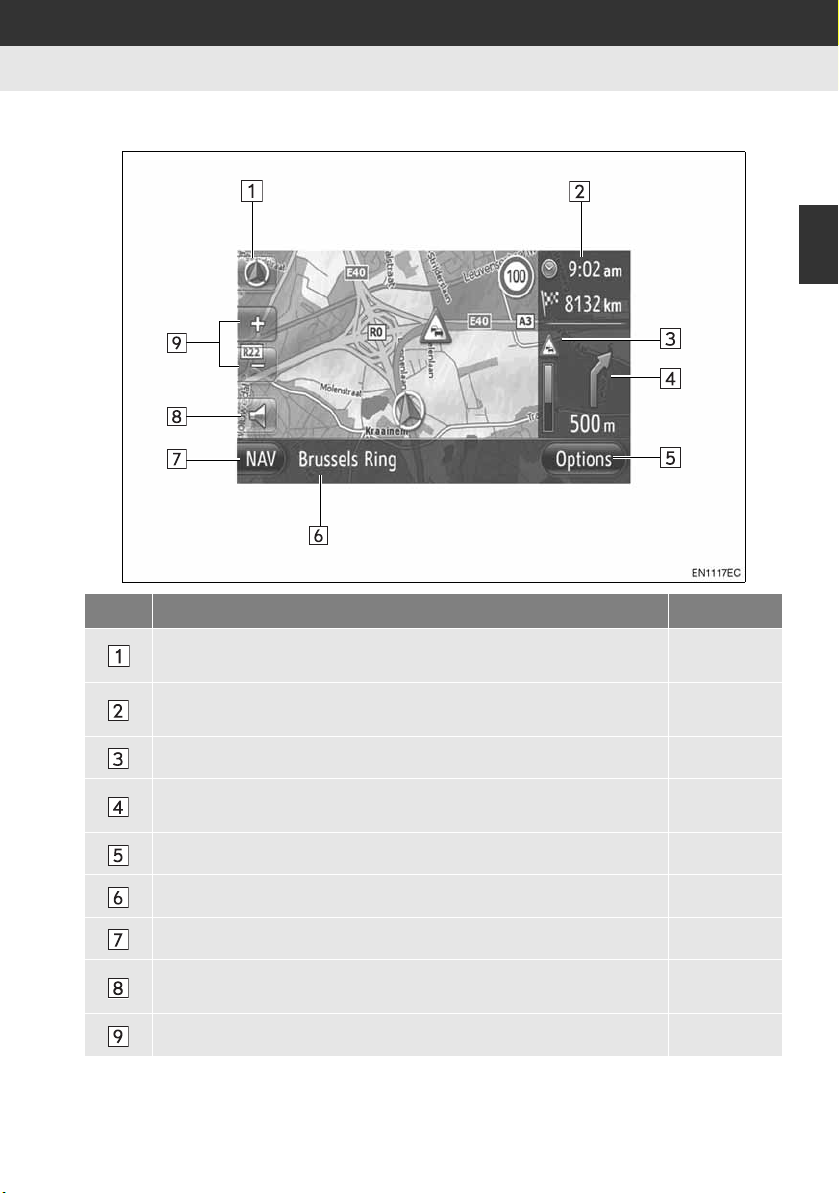
XOverview guidance screen
1. NAVIGATION OPERATION
2
NAVIGATION SYSTEM
No. Function Page
This symbol indicates a map layout. Touching this symbol changes the
map layout.
Displays the distance, the estimated travel time to the destination, or
the estimated arrival time at the destination.
Displays traffic information on the route. 33
Displays the distance to the next turn with the arrow indicating the turn
direction.
Touch to display the “Options” screen. 46
Displays the current street name. 44
Touch to display the “Navigation” menu screen. 20
Touch to hear voice guidance and/or adjust the volume of voice guidance.
Touch to change the map scale. 26
26
44
44
45
21

1. NAVIGATION OPERATION
2. NAVIGATION SYSTEM FUNCTION INDEX
XMap
Displaying maps Page
Viewing the map screen 24
Displaying the current vehicle position 24
Viewing the current vehicle position vicinity map 25
Changing the scale 26
Changing the map layout 26
Displaying Point of Interest Icons 28
Viewing traffic messages 32
Searching destination Page
Searching the destination 34
Setting the entry registered with the system as the destination 34
XRoute guidance
Before starting route guidance Page
Recalculating the route 43
Viewing alternative routes 42
Starting route guidance 42
Before starting or during route guidance Page
Viewing the route 46
Adding destinations 49
Recalculating the route 47
Changing the estimated travel/arrival time display 65
During route guidance Page
Stopping route guidance 46
Adjusting route guidance volume 45
Displaying the entire route map 46
22

1. NAVIGATION OPERATION
XMemory point
Memory point Page
Registering the entry 54
Editing the entry 60
Loading the entry from external devices 58
2
NAVIGATION SYSTEM
23
1. NAVIGATION OPERATION
INFORMATION
INFORMATION
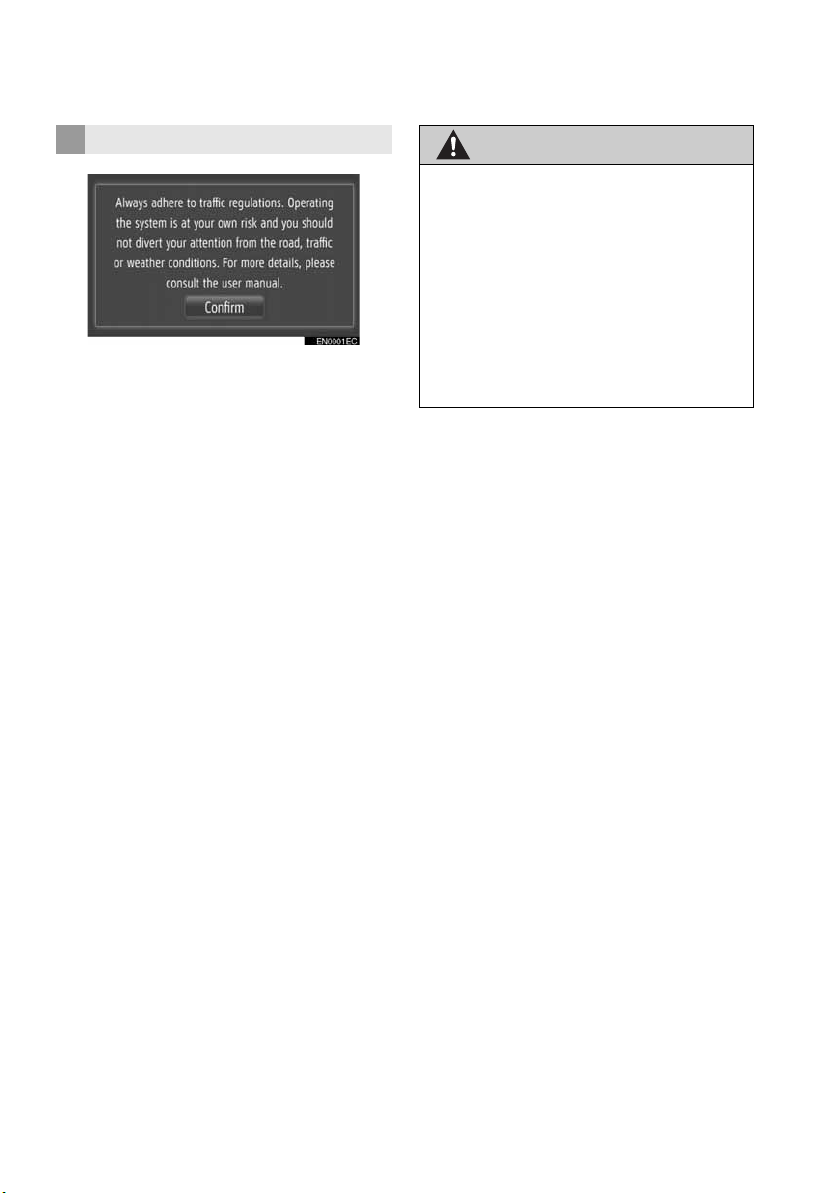
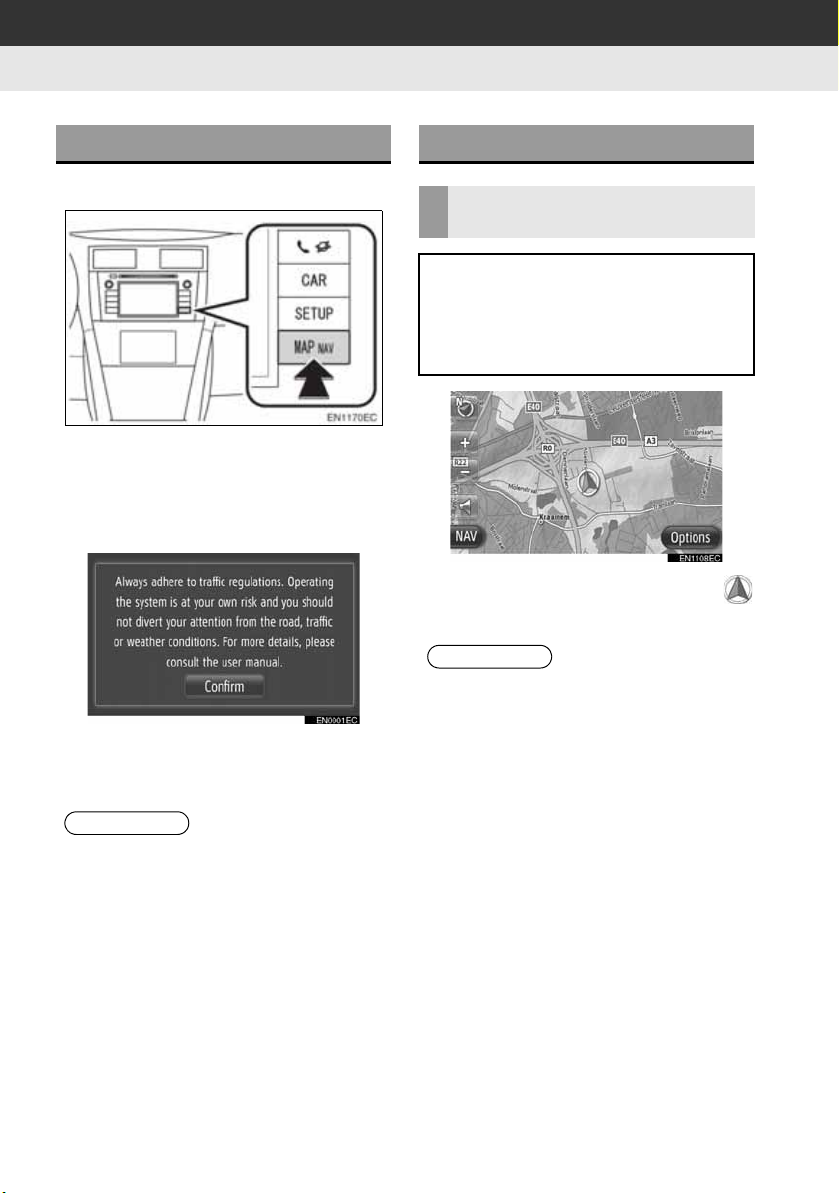
3. MAP SCREEN OPERATION
TO DISPLAY MAP SCREEN
1 Press the “MAP NAV” button.
z When the “MAP NAV” button is pressed,
any of the “Navigation” screens is displayed, press the “MAP NAV” button
again.
2 Touch “Confirm”.
z After about a few seconds, the caution
screen automatically switches to the map
screen.
● The caution screen will be displayed
when the screen is changed to the map
screen for the first time after the engine
switch has been in the “ACC” or “ON”
position.
MAP SCREEN OPERATION
CURRENT VEHICLE POSITION DISPLAY
When starting the navigation system,
the current position is displayed first.
This screen displays the current vehicle position and a map of the surrounding area.
z The current vehicle position mark
appears in the centre of the map screen.
● While driving, the current vehicle posi-
tion mark is fixed on the screen and the
map moves.
● The current position is automatically set
as the vehicle receives signals from the
GPS (Global Positioning System). If the
current position is not correct, it is automatically corrected after the vehicle
receives signals from the GPS.
● After 12-volt battery disconnection, or on
a new vehicle, the current position may
not be correct. As soon as the system
receives signals from the GPS, the correct current position is displayed.
24
1. NAVIGATION OPERATION
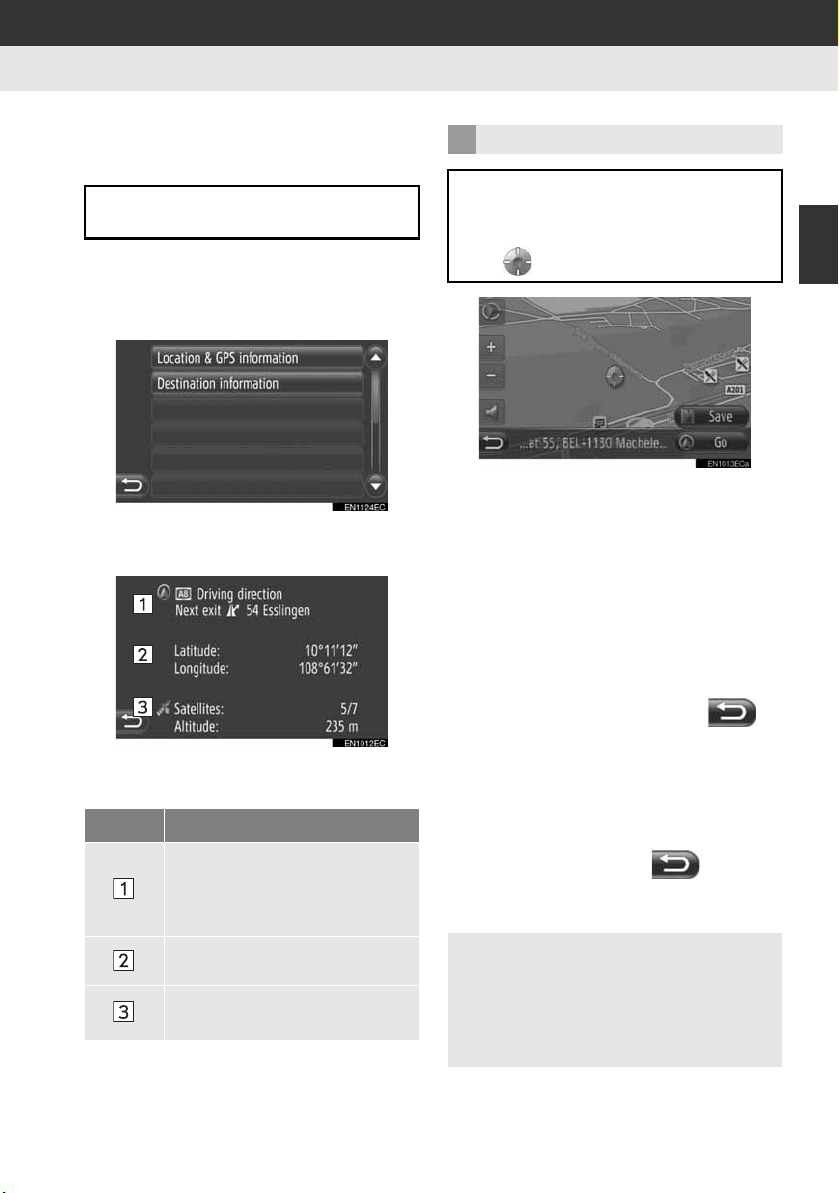
■CURRENT LOCATION AND GPS IN-
FORMATION
Current location, geo-coordinates and
GPS information are displayed.
1 Touch “Options” on the map.
2 Touch “Location & GPS informa-
tion”.
3 An information screen will be dis-
played.
z On this screen, the following information is
displayed.
No. Information
The information provided varies,
depending whether the road currently being travelled on is a motorway or a street.
Latitude and Longitude
Amount of available satellites
and the altitude.
SCREEN SCROLL OPERATION
When any point on the map is touched,
that point moves to the centre of the
screen and is shown by the cursor
mark .
z If a finger is continuously held on the
screen, the map will continue scrolling in
that direction until the finger is removed.
z A street name or geo-coordinates of the
touched point will be shown, depending
on the scale of the map.
z After the screen is scrolled, the map
remains centred at the selected location
until another function is activated. The current vehicle position mark will continue to
move along your actual route and may
move off the screen. When is
touched, the current vehicle position mark
returns to the centre of the screen and the
map moves as the vehicle proceeds along
the designated route.
z When the scroll feature is used, the cur-
rent vehicle position mark may disappear
from the screen. Touch to display
the current vehicle position on the map
screen.
z When “Go” is touched, the starting
route guidance screen is displayed.
(See page 42.)
z When “Save” is touched, the point is
registered in the “Stored” list on the “My
destinations” screen. (See page 56.)
2
NAVIGATION SYSTEM
25
 Loading...