

Toyota TNS 200, TNS 300 Installation Instructions Manual
INSTALLATION INSTRUCTIONS
TOYOTA MOTOR CORPORATION
PART NUMBER
Manual Ref. Nr. 2N2RW3/W-1-0
FOR
**
W3*R
TOYOTA NAVIGATION SYSTEM
MR2 (RHD)
NAVIGATION KIT
08545-00802, -00806
08-02
MR2 (W3) TNS 200/300
MR2 (RHD) - 2
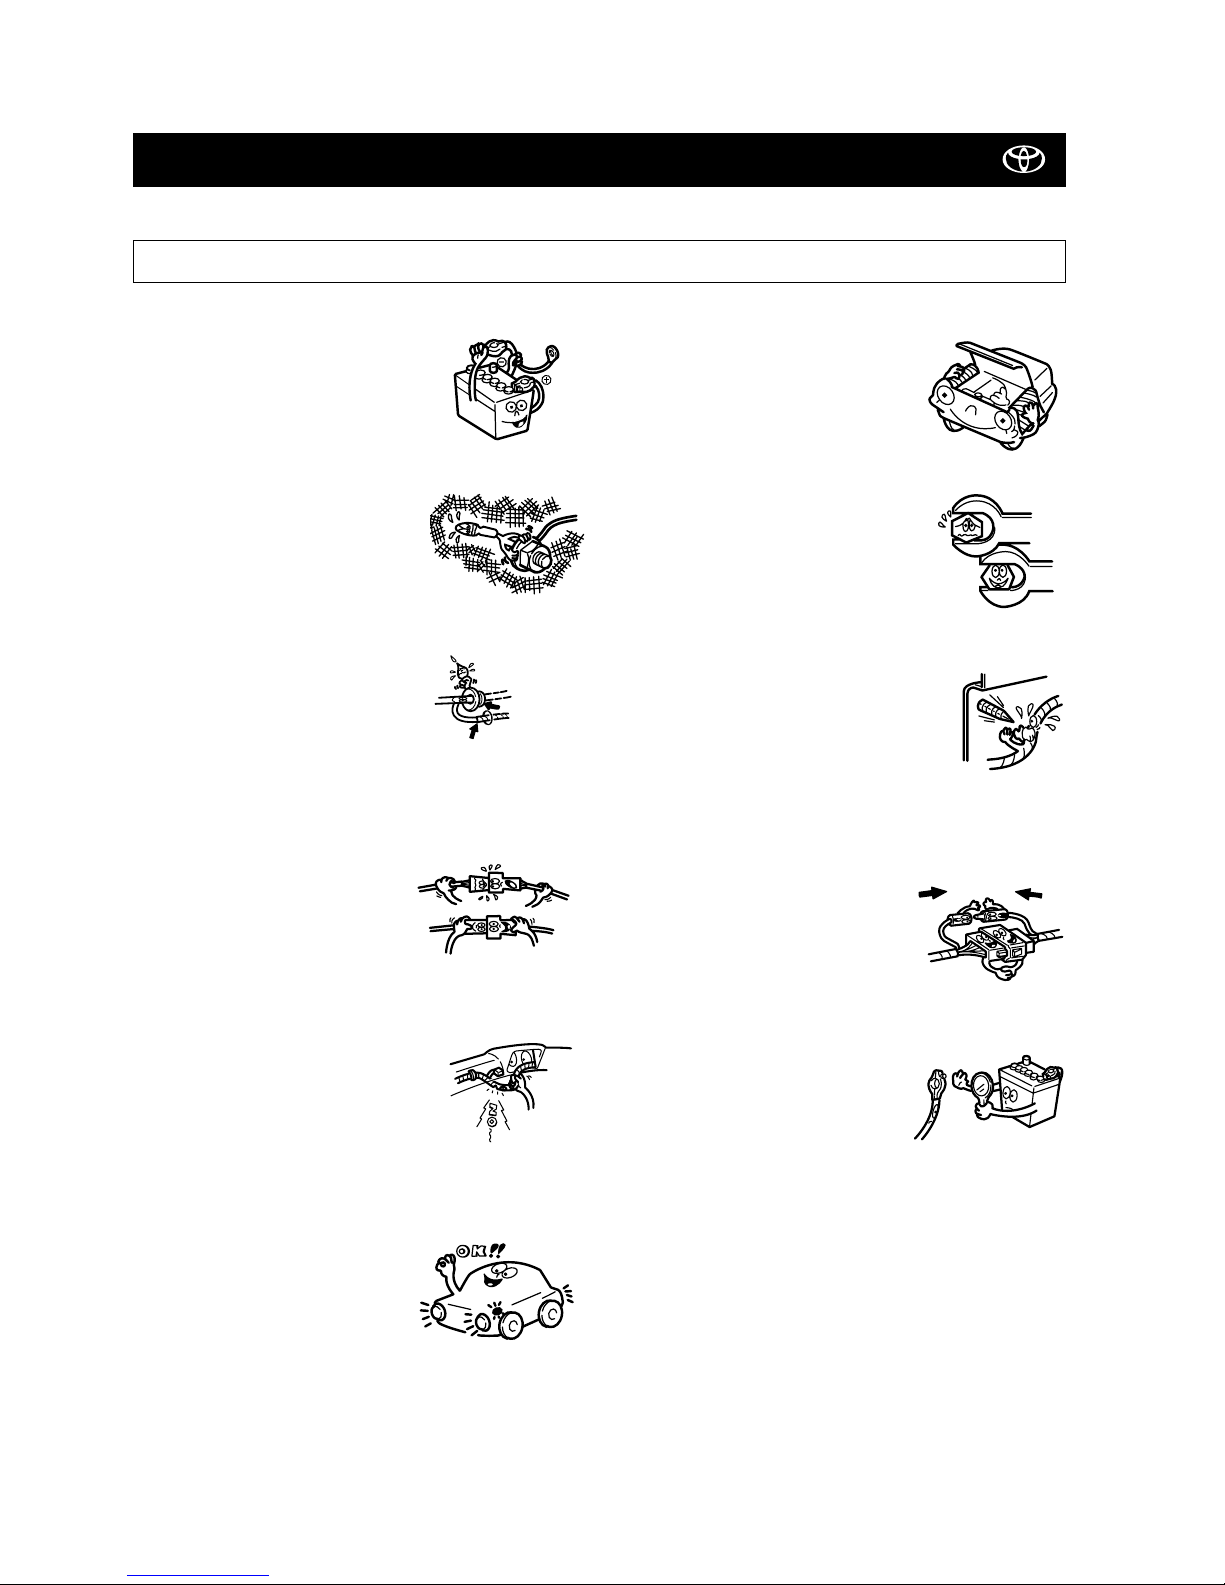
PRECAUTIONS
• Do not pinch the rear wiring or harness in the tightened part.
PLEASE READ THOROUGHLY THESE PRECAUTIONS BEFORE THE INSTALLATION
• Be sure to disconnect the negative
(-) lead from the battery terminals.
• When passing the wires through the
dashboard or other panels, use a
grommet to ensure waterproofing.
• Protect the wiring with tape when it is
passed through a hole.
• When disconnecting the connectors,
be sure to grip the connector body.
Do not tug on the wiring.
• Do not forcibly pull any car wiring harness.
Rough tugging may result in opened connections, or a broken wire or harness.
•
Confirm that lamps, horn, wiper and
other car accessories operate normally.
• Protect your car with fender covers, seat
and so on.
• Use the correct tool when tightening
bolts or nuts.
• Before drilling a hole, check that the rear of
the mounting wall is clear.
• Be sure to firmly tighten connectors
and terminals.
• Before connecting the power wiring to
the battery, check the wiring connections, harness, etc. to see that they
are properly secured.
• Check body and trim near area of installation to be certain no
dirt or scratches resulted from the installation.
waterproof - O.K. !!
Taping
Grommet
Insert
completely
Stop it !

Precautions ................................................................................................................................................................... 2
Application Chart ........................................................................................................................................................... 4
Component Parts ........................................................................................................................................................... 5
Required Parts ............................................................................................................................................................... 6
Wiring Connection ......................................................................................................................................................... 7
Installation Overview ..................................................................................................................................................... 8
Vehicle Disassembly ...................................................................................................................................................... 9
Installation of the GPS Antenna ..................................................................................................................................... 13
Wire Harness Installation .............................................................................................................................................. 15
Installation of the Computer .......................................................................................................................................... 19
Installation of Navigation Disc ....................................................................................................................................... 21
Post-Installation Inspection ........................................................................................................................................... 22
Reassembling ................................................................................................................................................................ 22
08-02
MR2 (W3) TNS 200/300
MR2 (RHD) - 3
TABLE OF CONTENTS
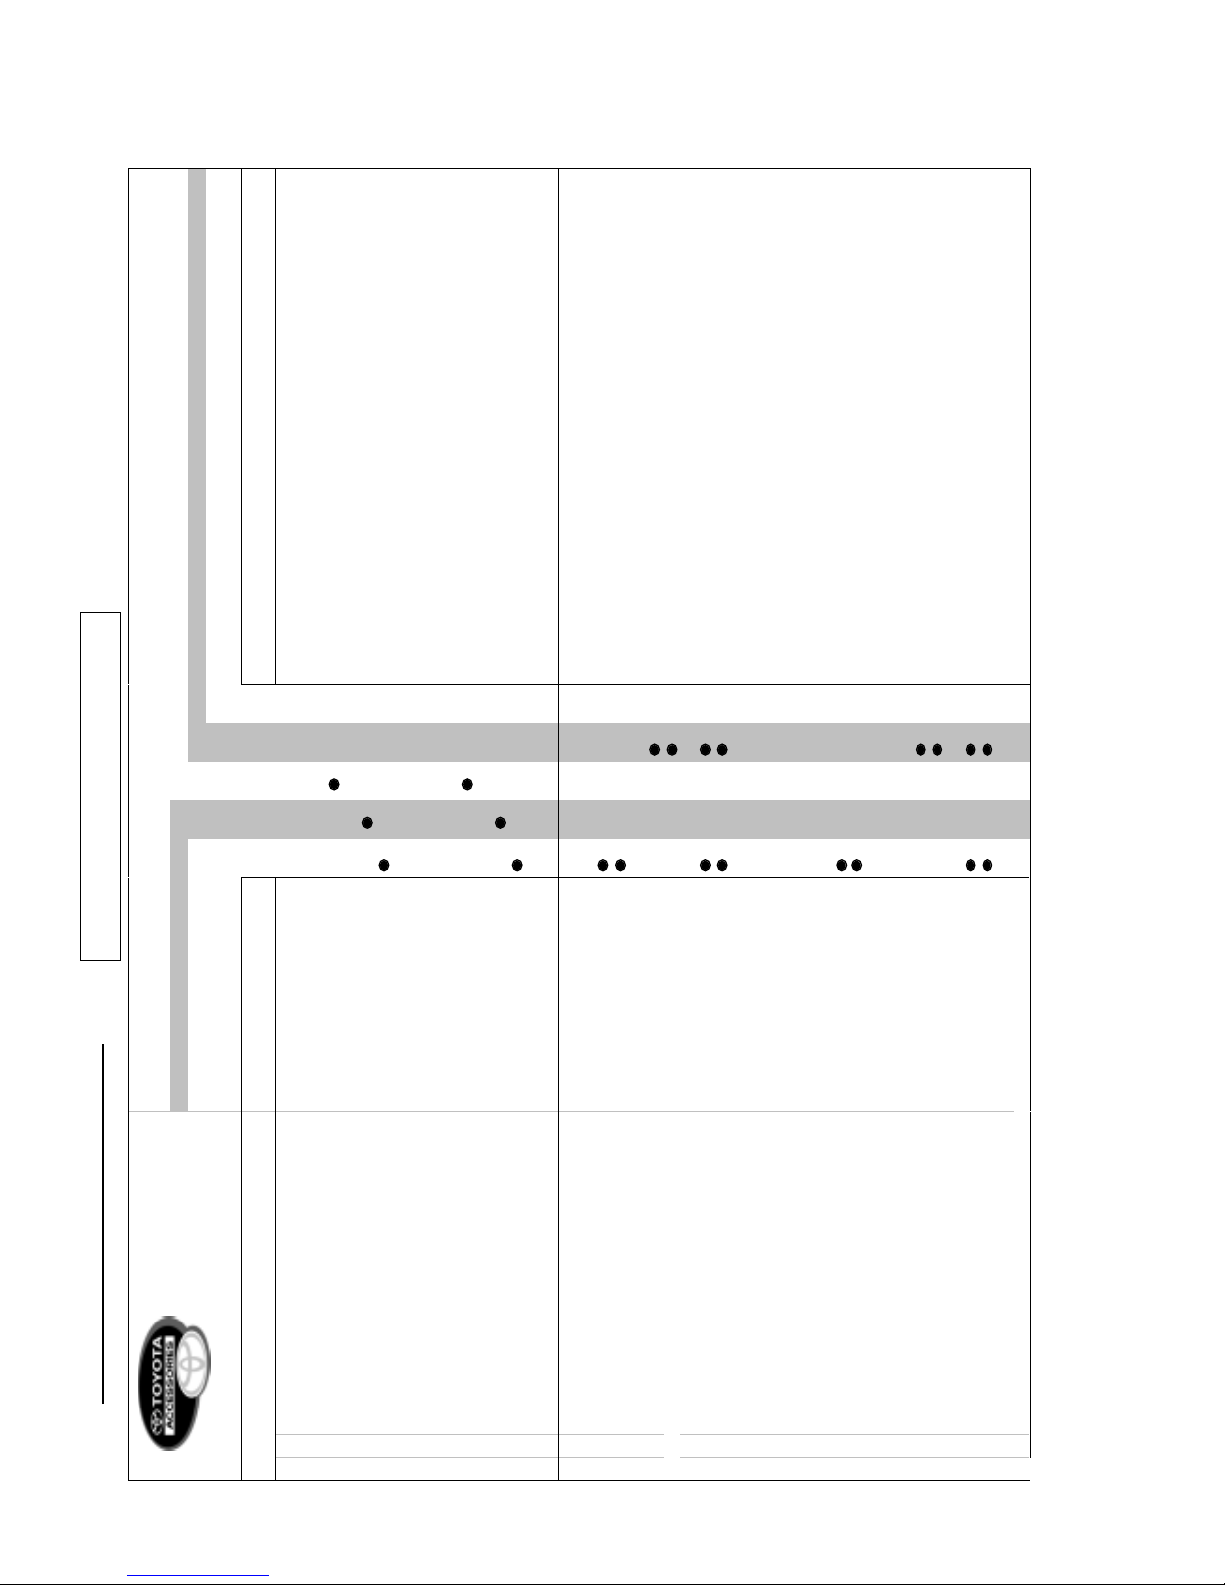
0.6 In-Dash CD-Changer (orange) (08601-00913)
0.6 CD-Deck (orange) (08601-00908)
Navigation System TNS300 (08545-00806) / Navigation System TNS200 (08545-00802)
Hide-Away CD-Changer (08601-00911)
1
Cassette-Tuner (only) 08600-00964 (orange)
F/K (08695-17801) + Cover plate (55522-42010)
2
Cassette-Tuner + CD-Deck 08600-00964 (orange)
F/K (08695-17801)
3
Cassette-Tuner + CD-Changer 08600-00864 (orange)
F/K (08695-17801)
08600-00964 (orange)
(1) F/K (08695-17801) + Cover plate (55522-42010)
4
CD-Tuner (only) 08600-00966 (orange)
F/K (08695-17801) + Cover plate (55522-42010)
5
CD-Tuner + CD-Deck 08600-00966 (orange)
F/K (08695-17801)
6
CD-Tuner + CD-Changer 08600-00966 (orange)
F/K (08695-17801)
08600-00966(orange)
(1) F/K (08695-17801) + Cover plate (55522-42010)
7
Cassette-Tuner (only) MOP-Unit or 08600-00954 (orange)
F/K (08695-17801)
8
Cassette-Tuner + CD-Changer MOP-Unit
(1) -
or 08600-00954 (orange)
(1) F/K (08695-17801)
9
Cassette-Tuner + Navigation (TBT) MOP-Unit
(2) -
or 08600-00954 (orange)
(2) F/K (08695-17801)
10
Cassette-Tuner + CD-Changer + Navigation (TBT) MOP-Unit
(1) (2) -
or 08600-00954 (orange)
(1) (2) F/K (08695-17801)
11
CD-Tuner (only) MOP-Unit
-
or 08600-00959 (orange)
F/K (08695-17801)
12
CD-Tuner + CD-Chan
g
er MOP-Unit
(
1
)
-
or 08600-00959
(
oran
g
e
)
(
1
)
F/K
(
08695-17801
)
13
CD-Tuner + Navigation (TBT) MOP-Unit
(2) -
or 08600-00959 (orange)
(2) F/K (08695-17801)
14
CD-Tuner + CD-Changer + Navigation (TBT) MOP-Unit
(1) (2) -
or 08600-00959 (orange)
(1) (2) F/K (08695-17801)
Wide 2-DIN Head-Unit Wide 2-DIN Head-Unit
+ ADD-ON UNIT
(
S
)
HEAD UNITCOMBINATION REQUIRED ADDITIONAL PARTS
1.4 DIN Head-Unit
AUDIO & NAVIGATION APPLICATION CHART
TMME-CA Division Dev. Dept. II - August 26th, 2002
MR2 MMC (**W3*)
(
LHD + RHD
)
About the Subwoofer (PZ426-B0250-00) . (1) in the luggage area . (2) in the storage box behind the seat
Page 1 of 1
p. 1/1

COMPONENT PARTS 08545-00802, 00806
MR2 (W3) TNS 200/300
08-02MR2 (RHD) - 5
1
2
3
5
6
7
8
9
10
11
No. Part name Quantity
COMPUTER 1
WIRE HARNESS 1
GPS ANTENNA 1
COMPUTER BRACKET 2
BOLT (M5x8) 4
CORD CLAMP 2
FOAM 2
WIRE TIE 5
EARTH PLATE 1
BUTYL TAPE 4
11
10
9
8
7
6
5
3
2
1
MR2 (W3) TNS 200/300
MR2 (RHD) - 608-02
NAVIGATION DISC
To be ordered separately.
Please refer to the list of available disc for turn by turn Navigation Systems (Access to accessories).
OWNER’S MANUAL
To be ordered separately.
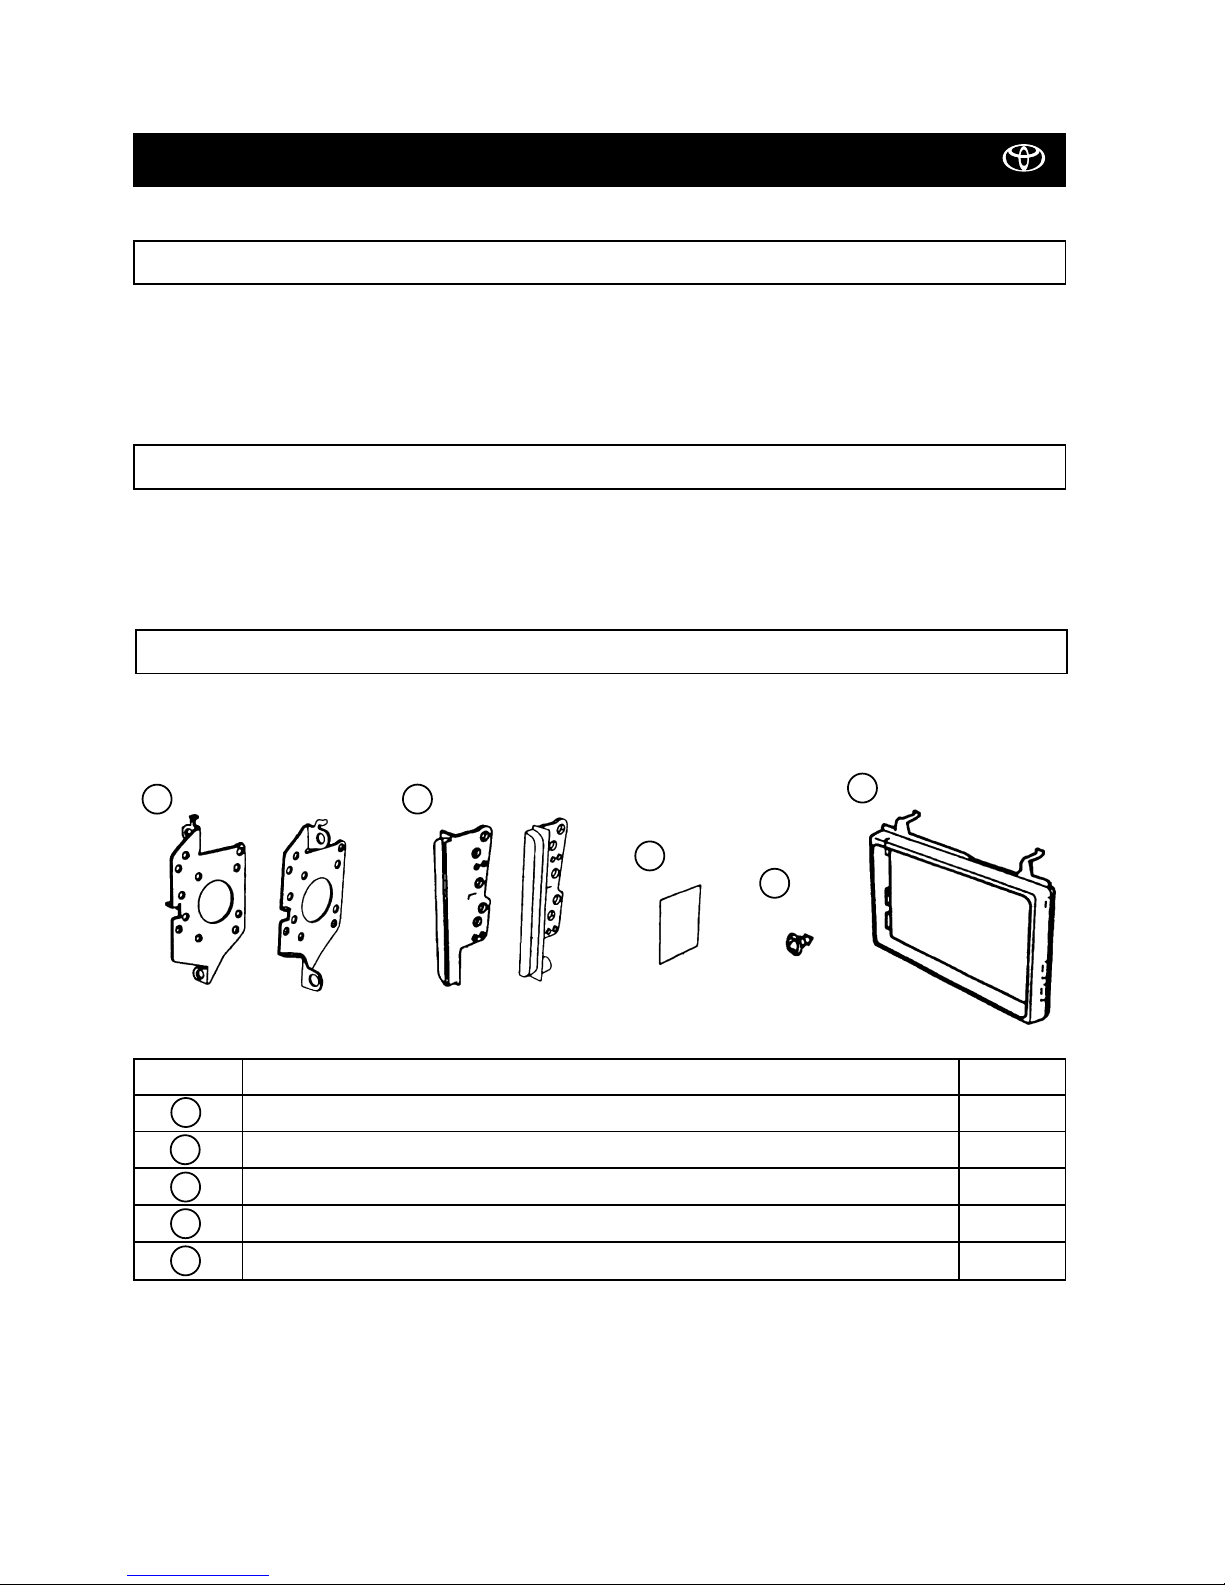
REQUIRED PARTS
AUDIO FITTING KIT 08695-17801
A
B
C
D
E
No. Part name Quantity
RADIO BRACKET 2
(*)
AUDIO SIDE PANEL 2
(*)
PAD 2
SCREW 4
AUDIO CLUSTER 1
EDC
B
A
(*): Not used for Wide 2-DIN radio installation.
(*)
(*)
Only used for radioless vehicles.
MR2 (W3) TNS 200/300
MR2 (RHD) - 7 08-02
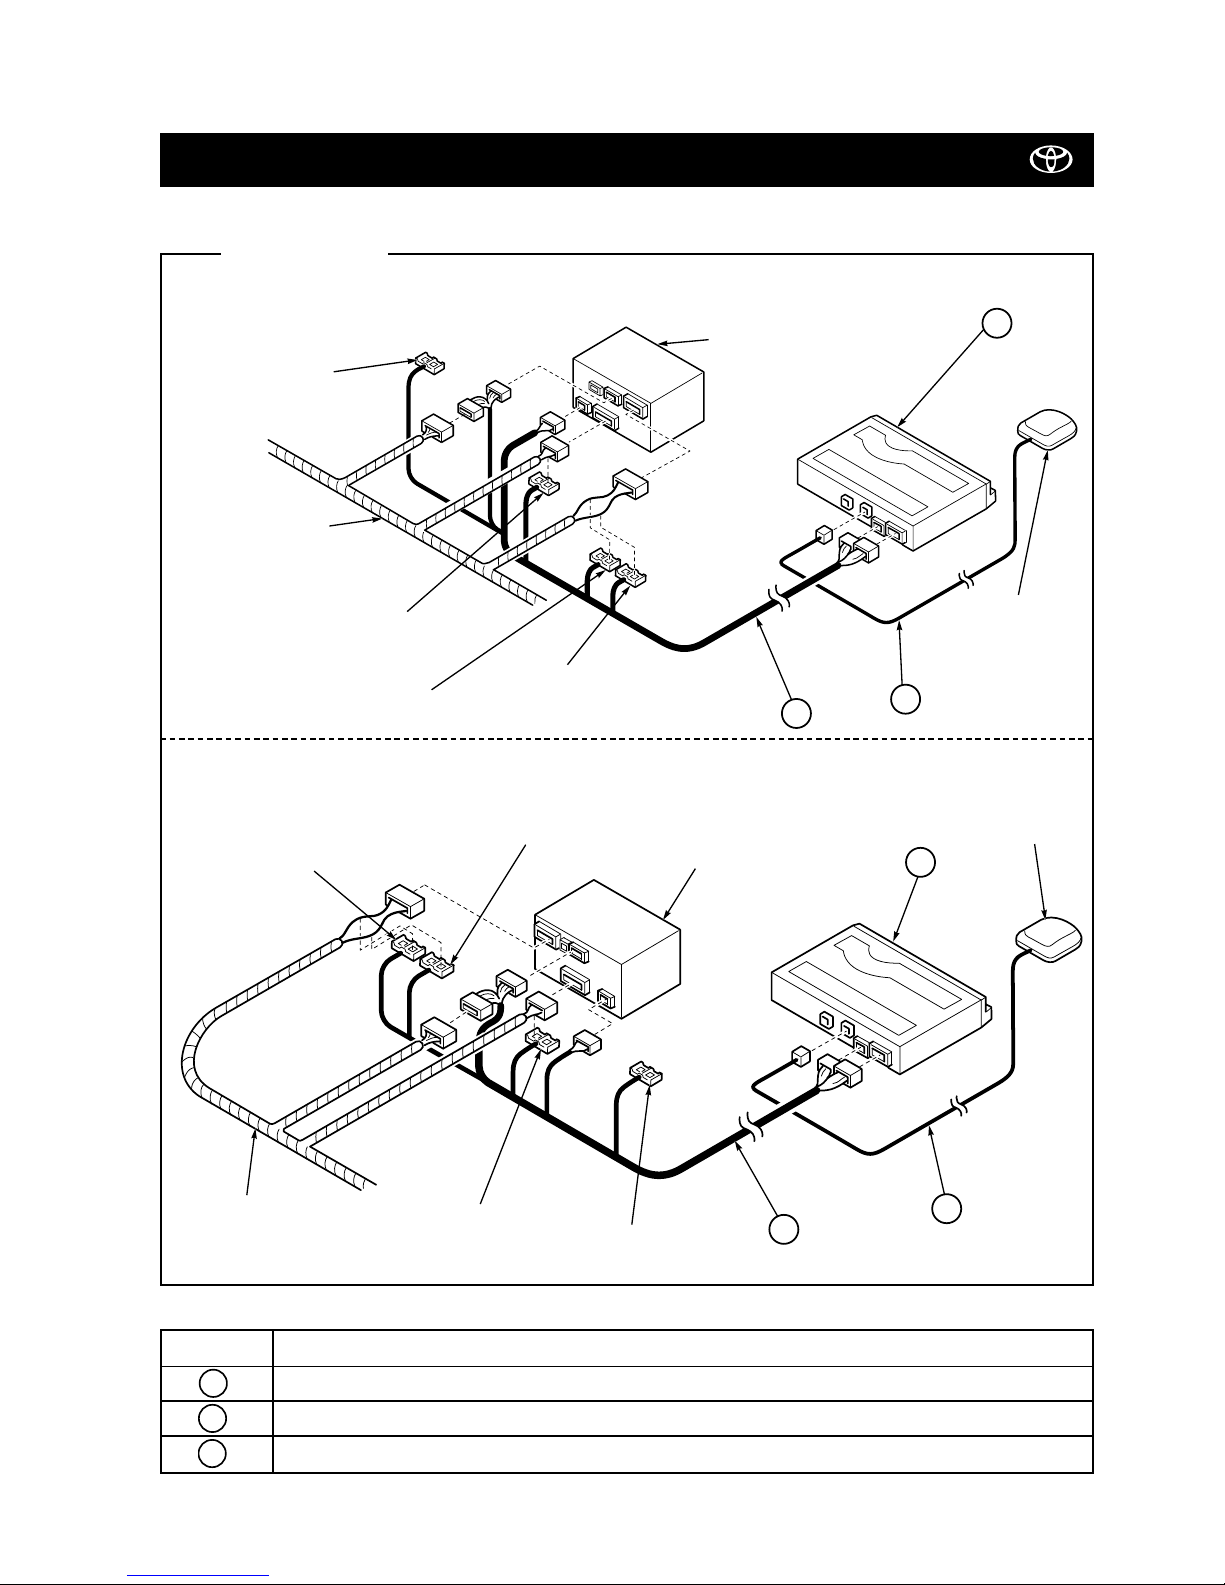
WIRING CONNECTION
CASSETTE TAPE PLAYER TYPE
8P
1P
13P
8P
18P
12P
10P
Connection Method:
Vehicle Wire harness
Splicing Connector (TX
- Wire)
Splicing Connector
(Speed Sensor Wire)
Splicing Connector
(TX
+ Wire)
Splicing Connector
(Reverse Sensor Wire)
GPS Antenna
Cassette tuner with multi-display
123
CD PLAYER TYPE
No. Part name
COMPUTER
WIRE HARNESS
GPS ANTENNA
3
2
1
Vehicle wire harness
Splicing connector
(Speed sensor wire)
Splicing connector
(TX- sensor wire)
Splicing connector
(Reverse sensor wire)
10P
8P
18P
1P
13P
8P
GPS antenna
12P
1
Splicing connector
(TX+ sensor wire)
3
2
CD tuner with
multi-display
 Loading...