

Toyota Coaster 2015, Coaster 2016, Coaster 2017, Coaster 2018 Owner's Manual
For your safety and comfort,
NOT FOR REPRODUCTION
read carefully and keep in the vehicle.
Foreword
NOT FOR REPRODUCTION
Welcome to the growing group of value−c onsc ious people who dri ve Toyotas. We
are proud of the adv anced engineer ing and qual ity constructi on of eac h vehi cle we
build.
This Owner ’s Manual expl ains the operation of your new Toyota. Please read
it thoroughly and have all the occupants follow the inst ructi ons carefully.
Doing so will help you enjoy many years of safe and trouble−free motoring.
For important information about this manual and your Toyota, read the f ollowing pages carefull y.
When it comes to servi ce, remember that your Toyota dealer knows y our vehi cle
very well and is i nterest ed in y our complete satisfac tion. Your Toyota dealer will
provide quality maintenance and any other assistance you may require.
Please leave t his Owner’s Manual in thi s vehi cle at the time of resale. The next
owner will need this information also.
All information and specificat ions in this manual are current at the time of printing.
However, bec ause of Toyota’s policy of continual pr oduct i mprovement , w e reser ve
the right to make changes at any time without notic e.
Please note that this manual applies to all models and explains all equipment ,
including options. Therefore, you may find some explanations for equipment
not installed on your vehicle.
ã 2015 TOYOTA MOTOR CORPORATION
All ri ghts reserved. This material may not be repr oduced or copi ed, in whole or i n
part, without the written permission of Toyota Motor Corporation.
i
Important information about this manual
NOT FOR REPRODUCTION
Safety and vehicle damage warnings
Throughout thi s manual, you wil l see safety and vehic le damage war nings. You must follow these warnings c areful ly to
avoid possible injury or damage.
The ty pes of warnings, what they look like, and how they are
used in this manual are expl ained as follows:
CAUTION
This is a warning against anything which may cause
injury to people if the warning is ignored. You are
informed about what you must or m ust not do in or der
to reduce the risk of injur y to yourself and others.
NOTICE
This is a warning against anyt hing which may cause
damage t o the vehicle or its equipment if t he warning
is ignored. You are informed about what you must or
must not do in order to avoid or reduce the risk of
damage to your vehicle and its equipment.
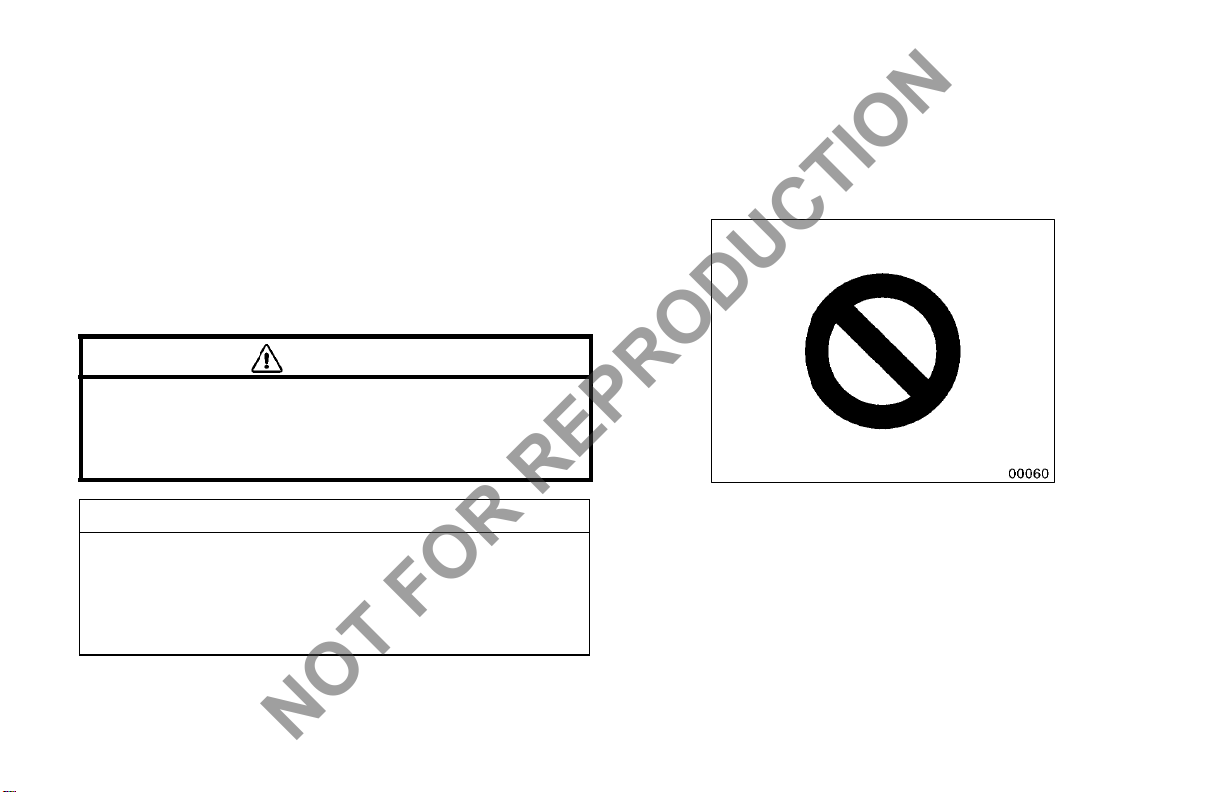
Safety symbol
When you see the safety symbol
shown above, it means: “Do not...”;
“Do not do this” ; or “Do not let this
happen”.
ii
Important information about your Toyota
NOT FOR REPRODUCTION
Accessories, spare parts and
modification of your Toyota
A wide variety of non−genuine spare parts and accessor ies
for Toyota vehic les are curr ently available i n t he mar ket.
Using these s pare parts and ac cess ories which ar e not
genuine Toyota products may advers ely affect the safety of
your vehicle, even though thes e parts may be appr oved by
certain authorities in your country. Toyota theref ore cannot
accept any liability or guar antee spare part s and acc essories whic h are not genuine Toyota products, nor for replacement or inst allat ion involving such parts.
This vehicle should not be modified with non−genui ne
Toyota products. M odific ation wit h non−genuine Toyota
products could affect its performance, safety or durability, and may even violate governmental regulations . In
addition, damage or performance problems result ing from
the modificat ion may not be covered under warranty.
iii
Use only low sulphur diesel fuel ( 50 ppm or less of sulphur cont ents) . See “Fuel ” in Section 2 for details.
As the installation of an RF−transmitter system in your
vehicle could affect electronic systems such as multiport
fuel injection system/sequential multiport fuel injection
system, electronic engine cont rol system and anti−lock
brake system, be sure to check with your Toyota dealer
for precautionar y meas ures or special inst ruc tions regar ding installation.
Fuel information
Installation of an
RF−transmitter system
Maintenance schedule
NOT FOR REPRODUCTION
Please refer t o the s eparate “Warranty and Service
Booklet”.
Operation of the power steering
When the steering wheel is turned to t he ex treme right or
left position, r educe the force applied and do not attempt
to t urn it further. Applying excessiv e force to the s teeri ng
wheel may caus e damage to its power steering mec hanism.
iv

Table of contents
NOT FOR REPRODUCTION
1 OPERATION OF INSTRUMENTS AND CONTROLS Page
1 Ov erview of instr uments and controls
2 Keys and Doors 7.............................................
3 Seats, Seat belts , Steering wheel and Mirror s 21...................
4 Lights, Wipers and Defogger 33.................................
5 Gauges , Meters and Service reminder indicator s 39................
6 Engine (ignition) s witch, Transmission and Parking brake 49.........
7 Air conditioning system 57.....................................
8 Other equipment 69...........................................
2 INFORMATION BEFORE DRIVING YO UR TOYOTA 75............
3 STARTING AND DRIVING 87....................................
4 IN CASE OF AN EMERGENCY 101..............................
5 CORROSION PREVENTION AND APPEARANCE CARE 125......
6 MAINTENANCE REQUIREMENTS 131...........................
7DO−IT−YOURSELF MAINTENANCE
1 Introduc tion 135..............................................
2 Engine and Chass is 141.......................................
3 Electric al components 153.....................................
8 SPECIFICATIONS 165..........................................
9 INDEX 173.....................................................
1...........................
v

NOT FOR REPRODUCTION
vi
SECTION 1− 1
NOT FOR REPRODUCTION
OPERATION OF I NSTRUMENTS AND
CONTROLS
Overview of instruments and controls
Instrument panel overview 2....................................
Instrument cluster overview 4...................................
Indicator symbols on the instrument panel 5......................
1
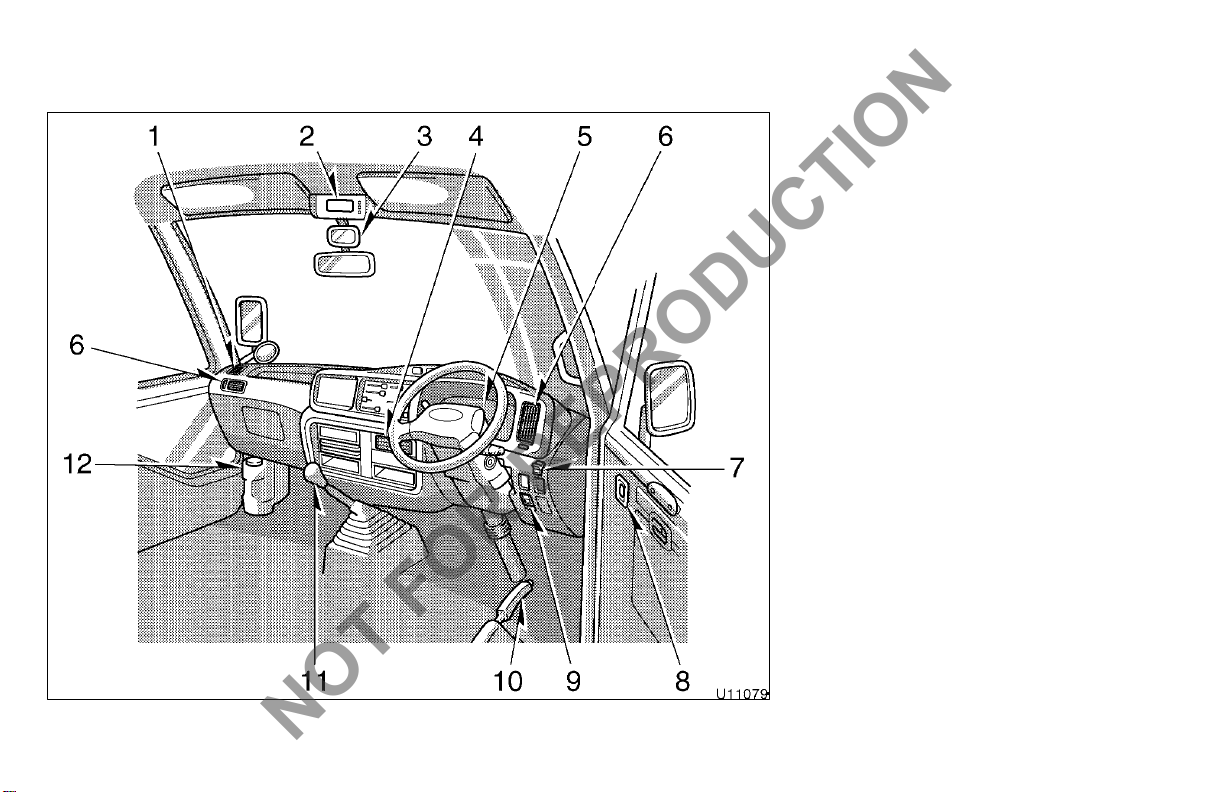
Instrument panel overview
NOT FOR REPRODUCTION
1. Side defroster outlet
2. Clock
3. Passenger s’ door chec k mirror
4. Center vent
5. Instr ument cluster
6. Side vents
7. Passenger s’ door cont rol switch
8. Power door lock switch
9. Fuel filler door opener
10. Parking brake lever
11. Manual trans missi on gear shift lev er or
automatic t ransmi ssi on s hift lever
12. Windshi eld washer f luid tank
2
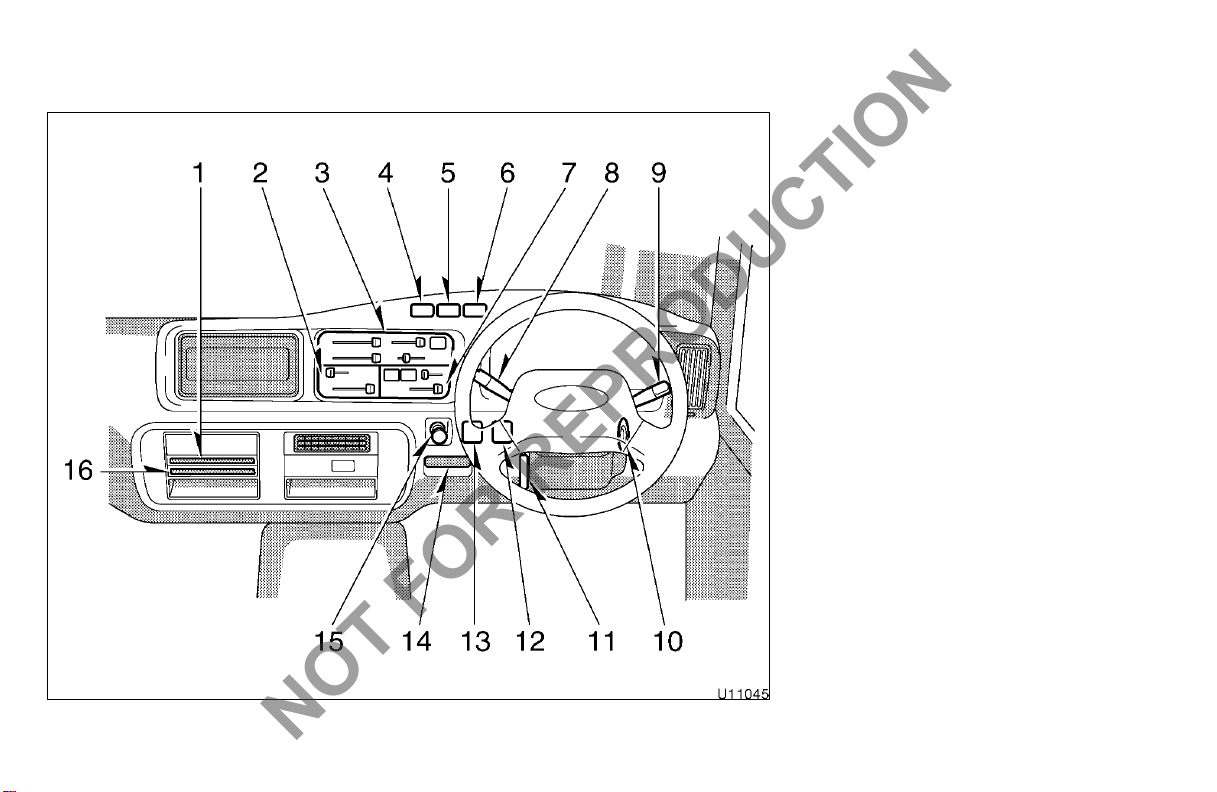
1. Auxiliary box
NOT FOR REPRODUCTION
2. Rear heater cont rols
3. Front heater c ontrols
4. Emergency flasher switch
5. Front interior light s witc h
6. Rear interior light sw itc h
7. Cooler controls
8. Wiper, washer and ex haust retarder
switches
9. Headlight and turn signal switches
10. Engine switch
11. Tilt and teles copic steering lock r elease
lever
12. DPF (Diesel Particulate Filter) system
manual regenerati on switch
13. Rear window defogger switch
14. Ashtray
15. Cigarett e lighter
16. Cup hol der
3
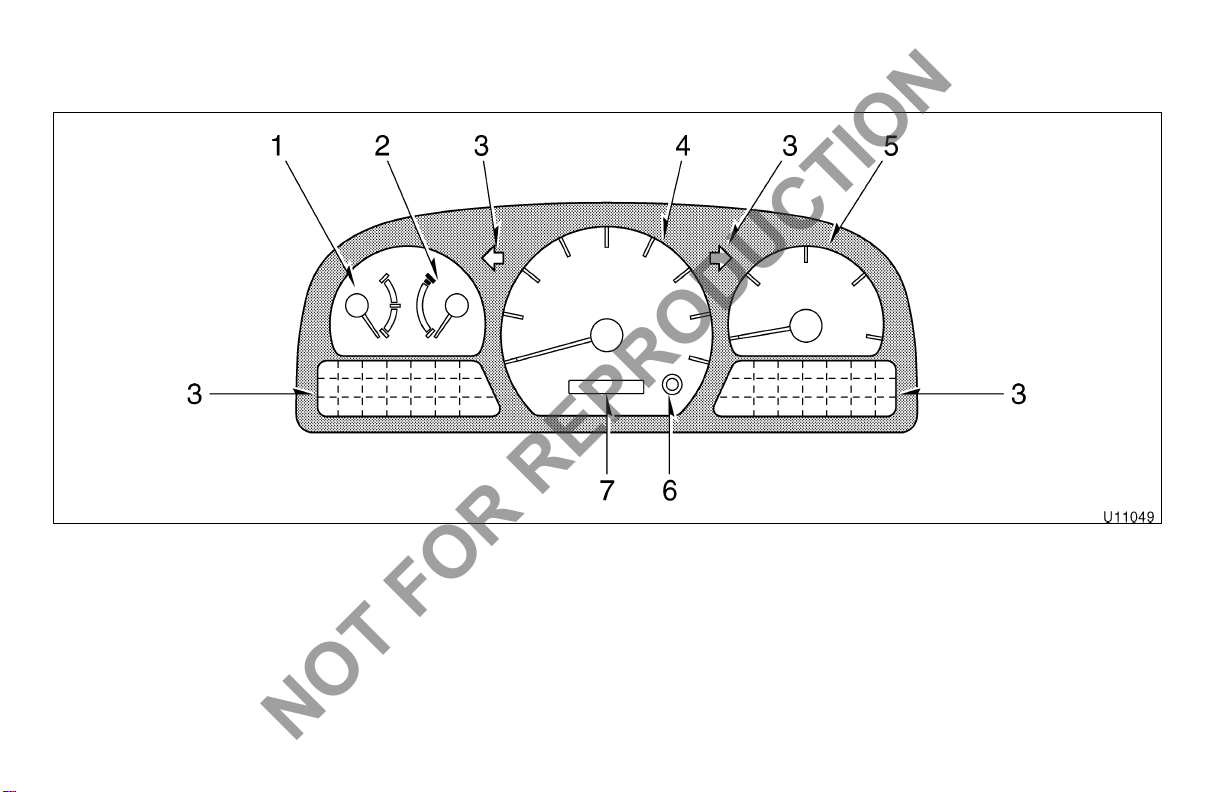
Instrument cluster overview
NOT FOR REPRODUCTION
1. Fuel gauge
2. Engine coolant temper ature gauge
3. Servic e reminder indi cator s and
indicator lights
4
4. Speedometer
5. Tachometer
6. Odometer, tri p meter and meter light
control knob
7. Odometer, two trip meter s and meter
light cont rol display
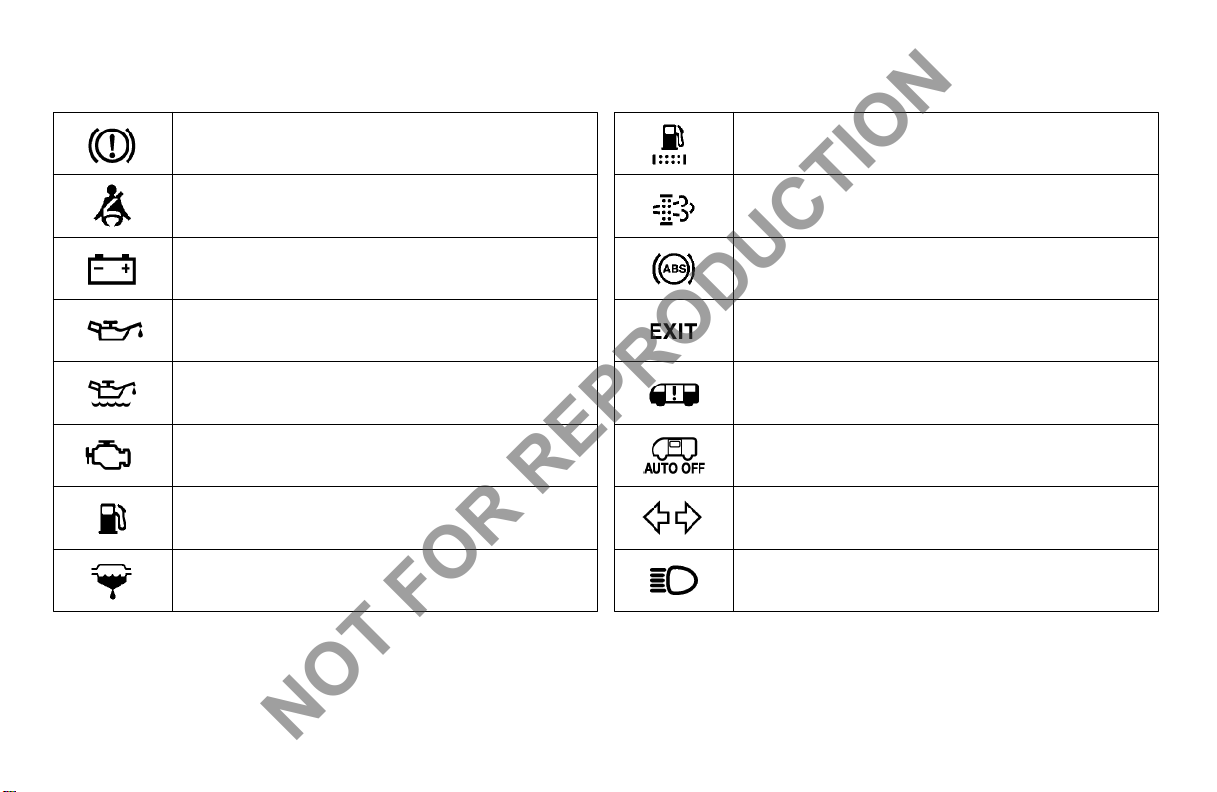
Indicator symbols on the instrument panel
NOT FOR REPRODUCTION
Brake system warning light
Driver ’s seat belt r eminder light
Charging system warning light
Low engine oil pressure warning light
Low engine oil level warning l ight
Malfunction indicator lamp
Low fuel level warning light
Fuel filter warning light
*
*
*
*
*
*
*
Fuel filter replacement war ning light
DPF (Diesel Particulate Filter) system indicator
*
light
Anti−lock brake system warning light
*
Emergency door war ning light
Open passengers’ door warning light
Passengers’ door indicator light
Turn si gnal indicator lights
Headlight high beam indicator light
*
*
*
*
5
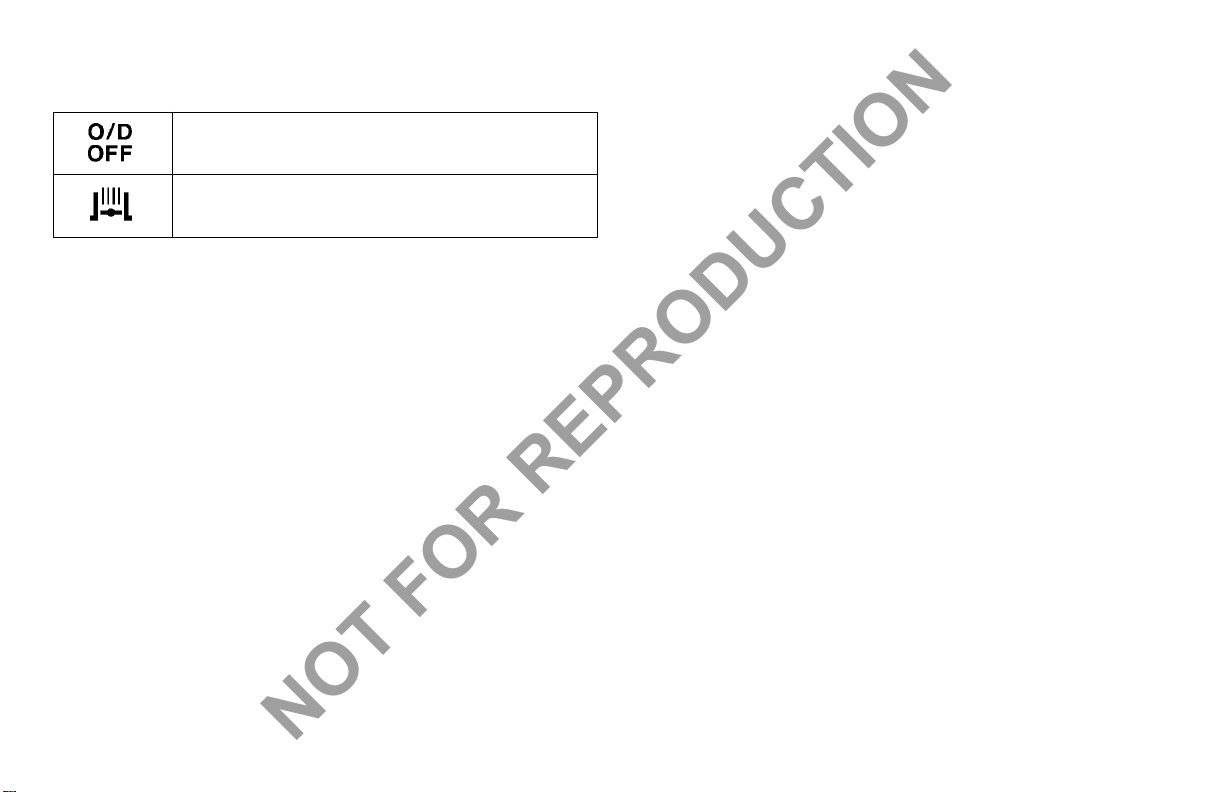
Overdrive−off indicator light
NOT FOR REPRODUCTION
Exhaust retarder indicator light
*
The i ndicator s marked with
For details , see “Serv ice reminder indi cator s and warning
buzzers” in Section 1−5.
are service reminder indicator s.
6
SECTION 1− 2
NOT FOR REPRODUCTION
OPERATION OF I NSTRUMENTS AND
CONTROLS
Keys and Doors
Keys 8........................................................
Driver’s door 8.................................................
Passengers’ door 9............................................
Side windows 17...............................................
Engine access hole covers 18...................................
Fuel tank cap 19...............................................
7
Keys Driver’s door
NOT FOR REPRODUCTION
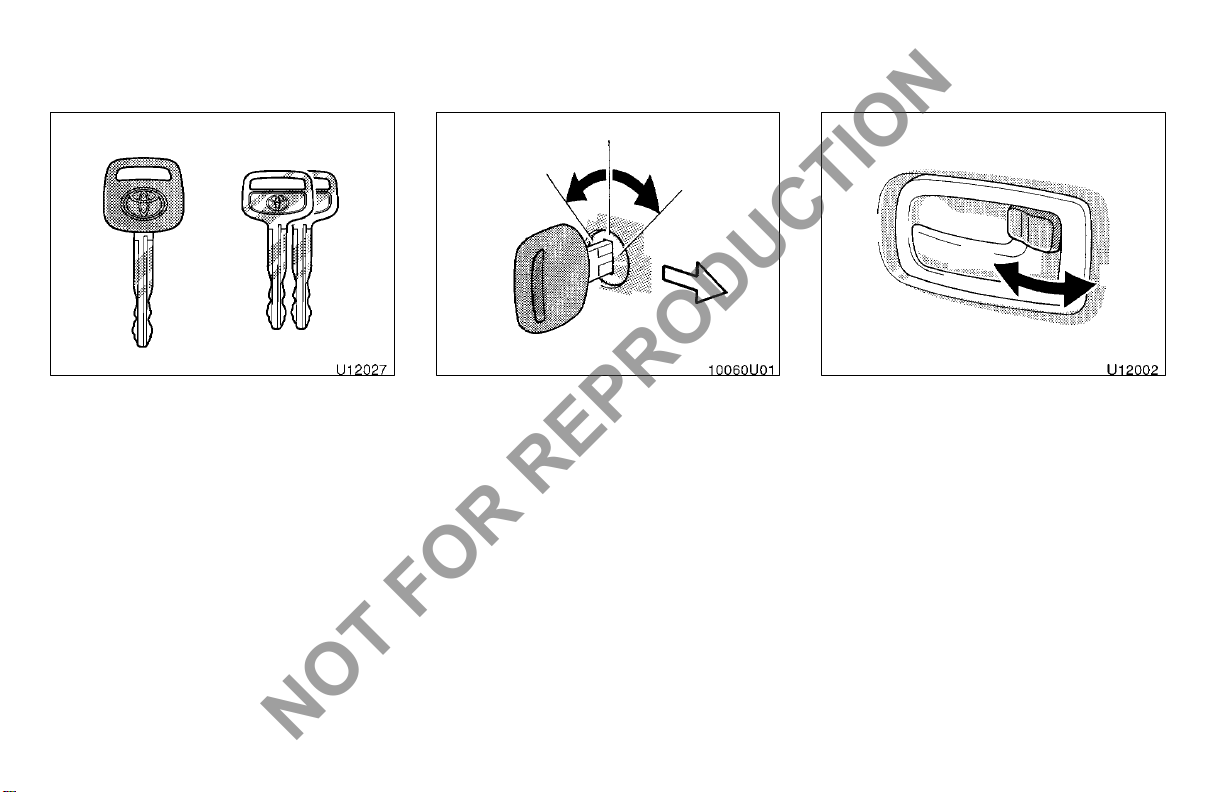
These keys work in ever y lock.
Since the doors can be locked wi thout a
key, y ou s hould al ways carry a spare k ey
in c ase you acc identall y lock y our key
inside the v ehicl e.
Unlock
Lock
Front
LOCKING AND UNLOCKING WITH KEY
Turn the key towards the front of the
vehicle t o lock and t owards the back to
unlock.
Vehicles with a power door lock system—The driver ’s door and glide type passengers’ door and/or emergenc y door depending on the vehicle’s equipment lock or
unlock simultaneously.
Lock
LOCKING AND UNLOCKING WITH INSIDE LOCK KNOB
Turn the l ock knob forward to l ock and
backward to unlock.
If you want to lock the door from the
outside, s et the knob in t he l ock ed position before c losi ng the door. The outs ide
door handle must be held up whil e the
door is being cl osed. Be c areful not to
lock your keys in the vehicle.
Unlock
8
Passengers’ door (glide
NOT FOR REPRODUCTION
type)—
—Passengers’ door precautions
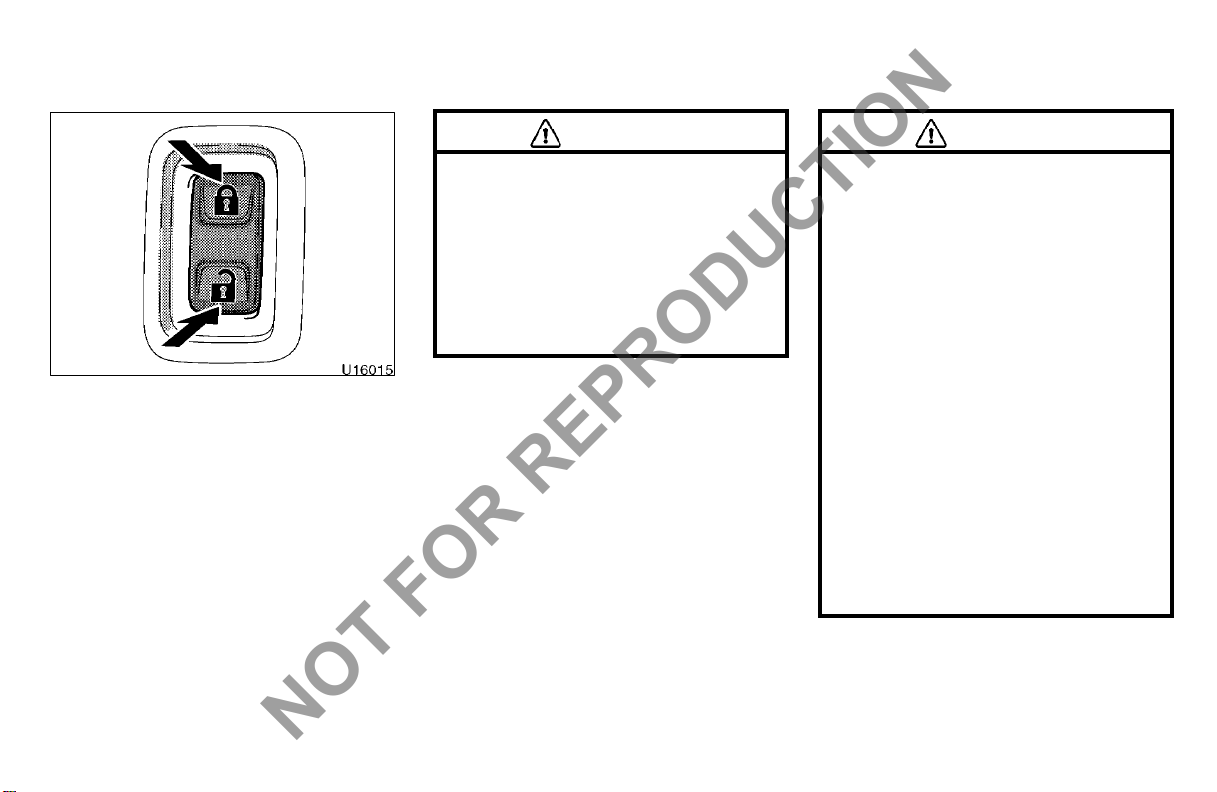
LOCKING AND UNLOCKING WITH POWER DOOR LOCK SWITCH
Push the switch.
To lock: Push the swi tch on the upper
side.
To unlock : Push the swi tch on the lower
side.
The driver ’s door and glide t ype pas sengers’ door and/or emergency door depending on the vehicle’s equipment lock and
unlock simultaneously.
CAUTION
Before dr iving, be sur e that t he door
is closed and locked, especially when
small children are in the vehicle.
Along with the proper use of seat
belts, locking the door helps prevent
the driver f rom bei ng thr own out f rom
the vehicle in an accident. It also
helps prevent the door from being
opened unintentionally.
CAUTION
Observe t he following pr ecautions
while driving. Failure to do so may
cause the d oor t o open unexpectedly
and occupant to fall out of the vehicle, resulting in death or serious
injury.
D Ensure that the door i s properly
closed.
D Always lock the door.
D Do not operate the insi de handle of
the door while driving.
When children are in the vehicle, observe the following precautions. F ailure to do so may result in death or
serious injury.
D Do not allow children to play in the
vehicle. If a child is accidentally
locked i n the vehicle, they could
have heat exhaustion or other injuries.
9
Do not allow a child to open or
NOT FOR REPRODUCTION
D
close the passengers’ door. Doing
so may cause the passengers’ door
to move unexpect edly, or cause t he
child’s hands, head, or neck to be
caught by the closi ng passengers’
door.
—Manual operation
Unlock
Unlock
Lock
Lock
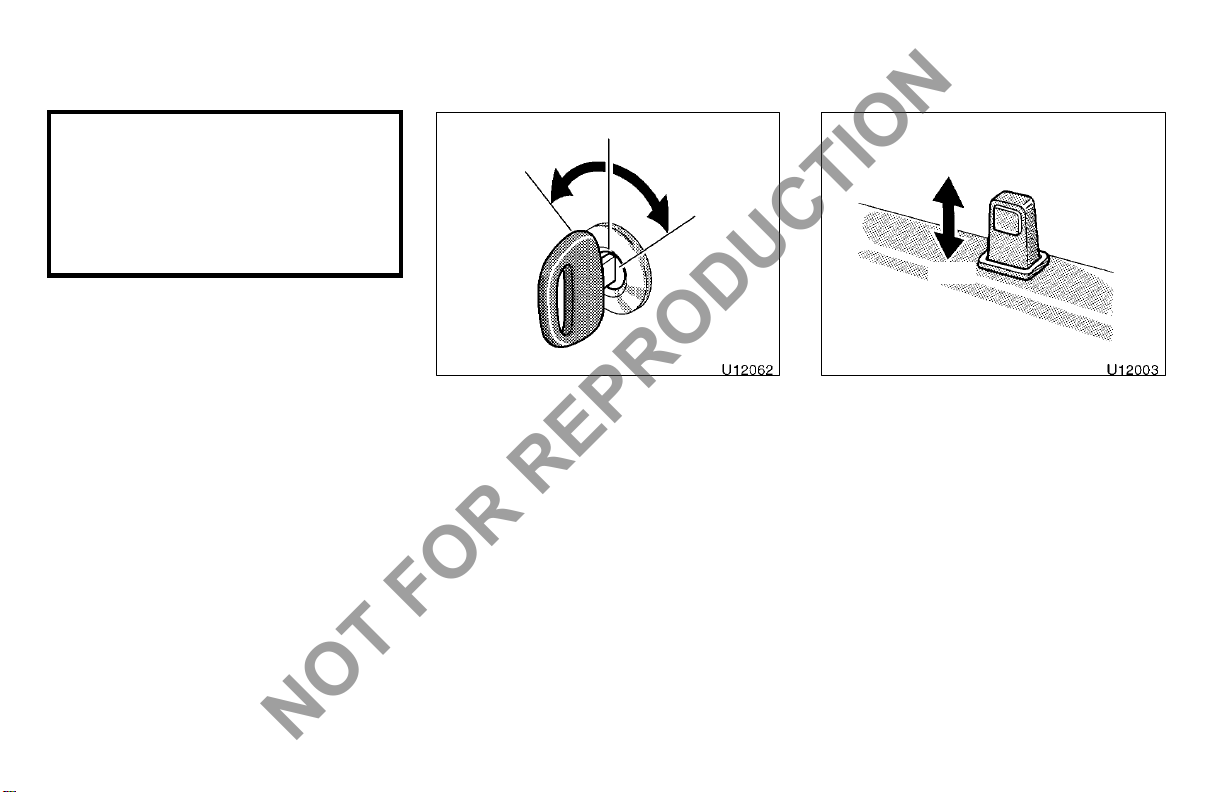
LOCKING AND UNLOCKING WITH KEY
Turn t he key counterclockwise to lock
and clockwise to unlock.
The key can be removed only at the center position.
10
LOCKING AND UNLOCKING WITH INSIDE LOCK BUTTON
Push in t he lock button to l ock and pull
it out to unlock.
If you want to lock the door from the
outside, push in t he butt on before closi ng
the door. Be careful not to lock y our k eys
in the vehic le.
CAUTION
NOT FOR REPRODUCTION
CAUTION
Before dr iving, be sur e that t he door
is closed and locked, especially when
small children are in the vehicle.
Along with the proper use of seat
belts, locking the door helps prevent
the passengers from being thrown out
from the vehicle in an accident. It
also hel ps prevent the door from being opened unintentional ly.
Open
Open
Outside Inside
OPENING FROM INSIDE AND OUTSIDE
The door can be opened as shown.
When operating the passengers’ door,
observe the following precautions.
Failure to do so may cause parts of
the body to be caught, resulting in
death or serious injury.
D When opening or closi ng the pas-
sengers’ door, thoroughly check to
make sure the surr ounding area is
safe.
D Do not leave the passengers’ door
at half−opened position because the
passengers’ door is not latched at
this position. The passengers’ door
may move unexpectedly on an incline.
11
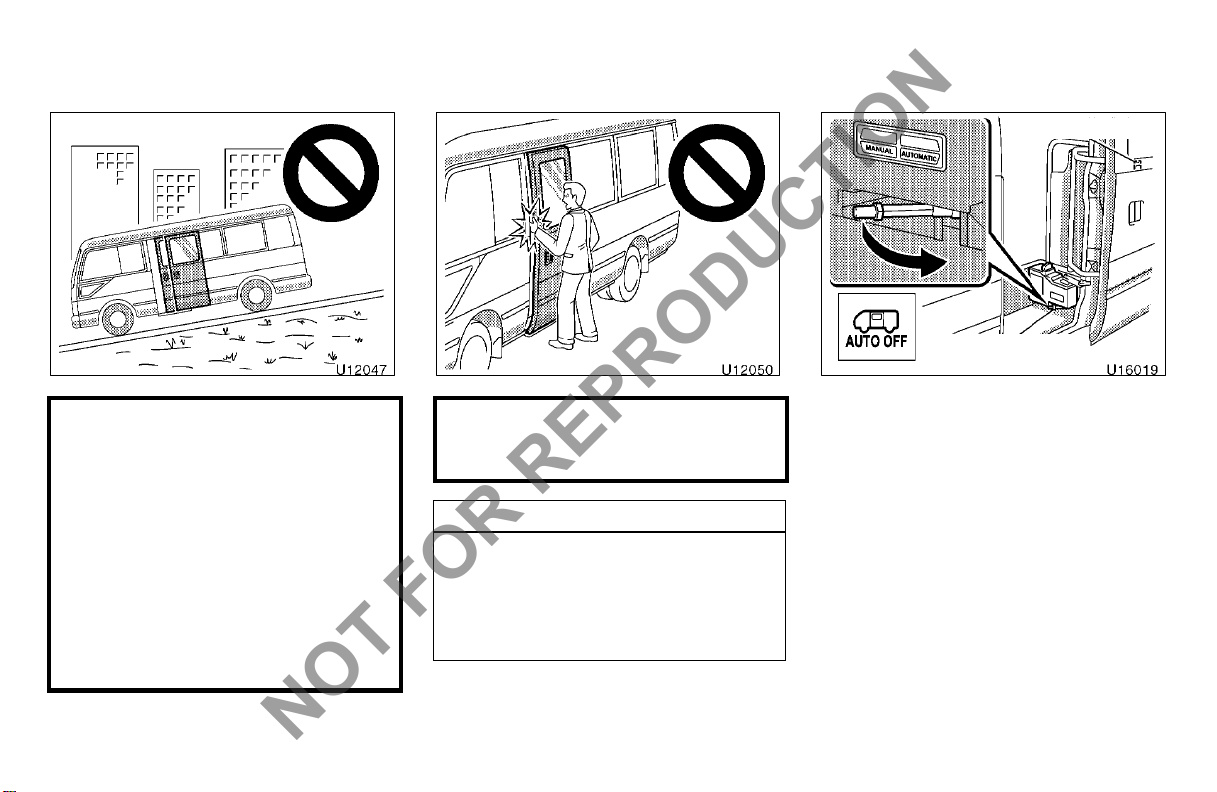
—Automatic operation
NOT FOR REPRODUCTION
Push in lock button
Manual/automatic
change lever
D When the vehicle is stopped on a
slope, t he door will slide faster
when opening or closing, so be especially careful that the passenger s
do not get hit or pinched by the
door.
D Open the passenger s’ door f ully
while passengers are getti ng on or
off on a downward slope. Do not
operate the outside handle or inside
handle while the door is open as
the door could suddenly close by
itself causing injury.
12
D When closing the passengers’ door,
take extr a care to prevent your fi ngers etc. fr om being caught.
NOTICE
z Do not hol d any part other than the
grip.
z Do not cl ose t he door by applying
the brakes. Doing so could cause
the door to be damaged.
SETTING FOR ELECTRICAL OPERATION
Push in the door lock but ton and place
the manual/automat ic change lever in
the “AUTOMATIC” position.
If manual operation is needed, move the
manual/automatic change lever to the
“MANUAL” pos ition and lift the lock button
up. The passengers’ door indicator light
(“AUTO OFF” light) on t he instrument
cluster comes on when the engine switch
is tur ned to the “ON” position, i ndicat ing
that the manual/automat ic change lever is
in the “MANUAL” position.
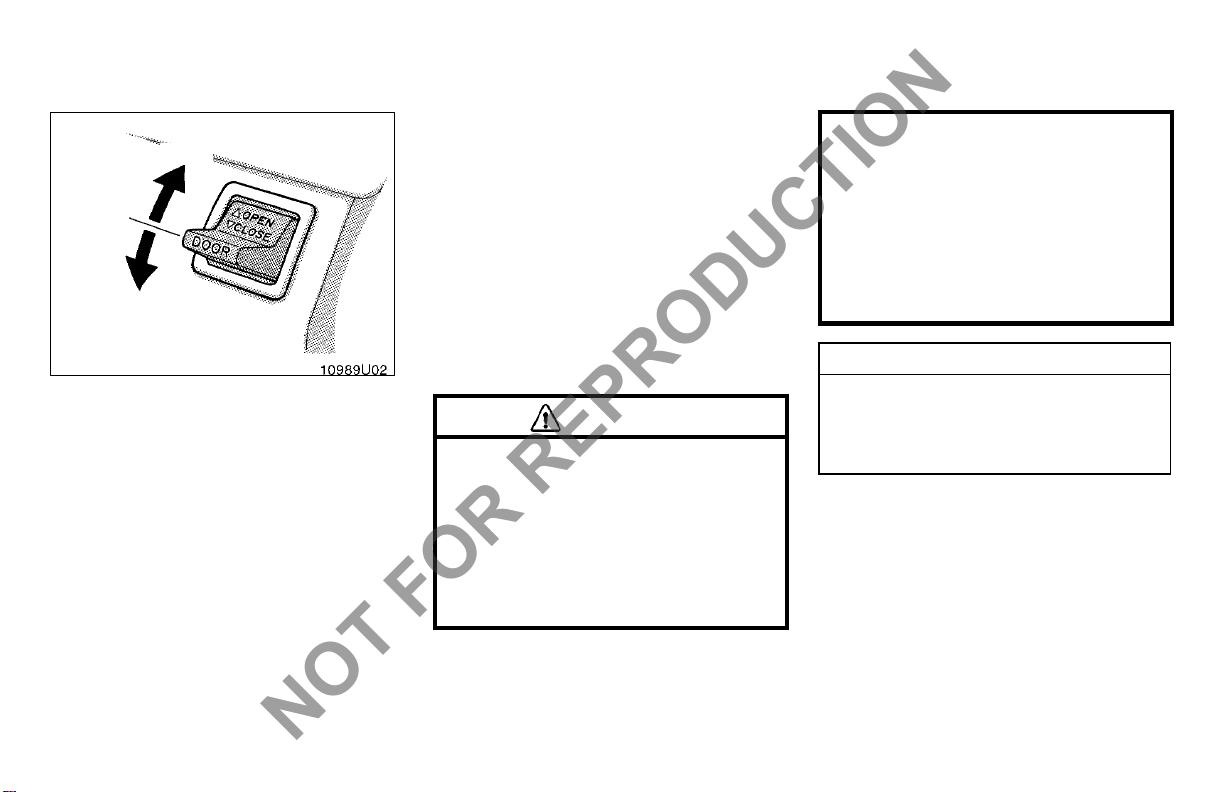
Open
NOT FOR REPRODUCTION
Close
OPERATING PASSENGERS’ DOOR CONTROL SWITCH
Push the swit ch t o the “OPEN” positi on
to open the door and to the “CLOSE”
to close.
The engine switch must be in the “ON”
position.
The door will move while the switch is
being operated and stop when released.
A buzzer will briefl y sound when the door
starts opening or clos ing.
If the door wi ll not be locked when it is
closed, try again with t he engine runni ng
and all other electric al components off.
The accelerator pedal cannot be pres sed
while the door is open.
D If the door stil l does not operate, c heck
the circuit breaker. See “ Checki ng the
circuit breaker” in Section 7−3.
D If the passengers’ door control switch
is released partway through the door
closing operation, the door will s top
moving. Af ter this the door may not
close completely, ev en if the switch is
pressed to the “ CLOSE” position again.
In that case, open the door fully and
then att empt the close operation again.
CAUTION
Observe t he following pr ecautions
when t he automatic passengers’ door
system is on. Failure to do so may
cause death or serious injury.
D Befor e operating t he contr ol switch,
make sure the vehicle is compl etely
stopped and that the parking brake
is firmly applied.
D Check t he safet y of the surrounding
area to make sur e there are no obstacles or anything that could
cause any of your belongings to get
caught.
D If anyone is in the vicinity, make
sure they are safe and let them
know that the passengers’ door is
about to open or close.
NOTICE
Do not let passengers ride or put
their feet on the door arm or link. It
may damage the door−opening mechanism.
13
LEAVING THE VEHICLE UNATTENDED
NOT FOR REPRODUCTION
When the pass engers’ door is set to automatic operation, the passengers’ door can
be opened from the outside by pushing
the emergency open button. To prevent
unwanted entry while the vehi cle is left
unattended, we recommend set ting the
passengers’ door to manual operation and
locking the pas sengers ’ door. Set the passengers’ door to automatic operation again
before driving the vehic le.
Passengers’ door (folding
type)—
—Passengers’ door precautions
CAUTION
Observe t he following pr ecautions
while driving. Failure to do so may
cause the door to open unexpectedly
and occupant to fall out of the vehicle, resulting in death or serious
injury.
D Ensure that the door is properly
closed.
D Always lock the door.
D Do not operate the insi de handle of
the door while driving.
When children are in the vehicle, observe the following precautions. F ailure to do so may result in death or
serious injury.
D Do not allow children to play in the
vehicle. If a child is accidentally
locked i n the vehicle, they could
have heat exhaustion or other injuries.
D Do not allow a child to open or
close the passengers’ door. Doing
so may cause the passengers’ door
to move unexpect edly, or cause t he
child’s hands, head, or neck to be
caught by the closi ng passengers’
door.
14
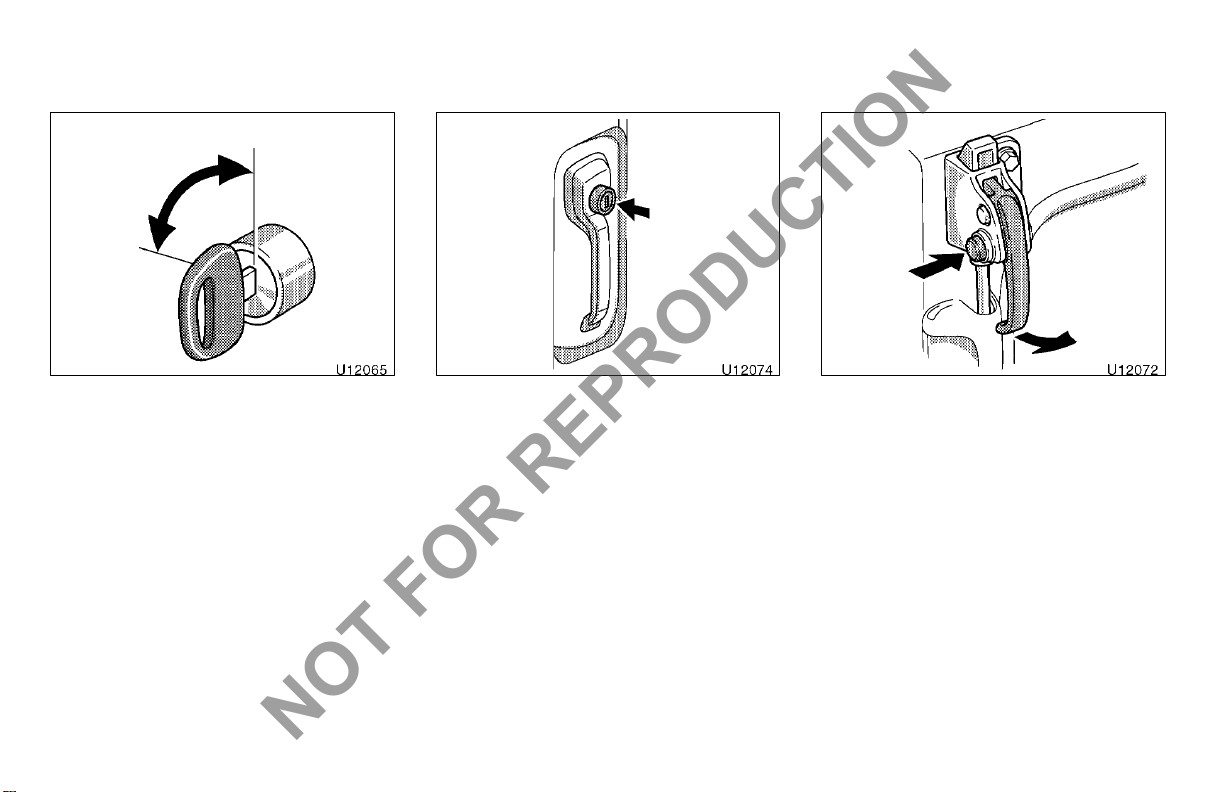
—Manual operation
NOT FOR REPRODUCTION
Unlock
Lock
Open
Press
Hold up
LOCKING AND UNLOCKING WITH KEY
Turn t he key counterclockwise to lock
and clockwise to unlock.
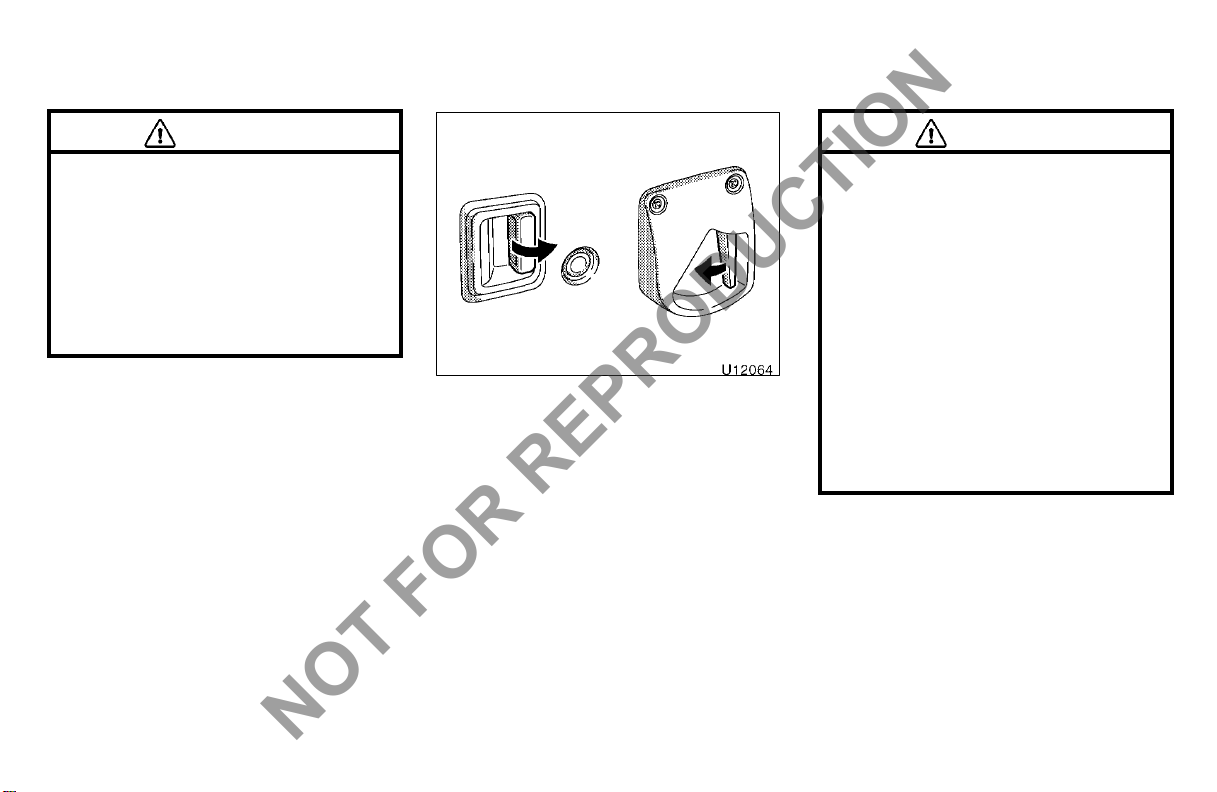
OPENING FROM OUTSIDE
The door can be opened by pushing the
lock release button.
OPENING FROM INSIDE
The door can be opened by pulling the
lever while pressi ng the button.
15

CAUTION
NOT FOR REPRODUCTION
When operating the passengers’ door,
observe the following precautions.
Failure to do so may cause parts of
the body to be caught, resulting in
death or serious injury.
D When opening or closi ng the pas-
sengers’ door, thoroughly check to
make sure the surr ounding area is
safe.
D If anyone is in the vicinity, make
sure they are safe and let them
know that the passengers’ door is
about to open or close.
D When closing the passengers’ door,
take extr a care to prevent your fi ngers etc. fr om being caught.
NOTICE
Do not hold any part other than the
grip.
—Automatic operation
Automatic
operation
Manual
operation
SETTING FOR AUTOMATIC OPERATION
Push the cancel switch.
If manual operation is needed, push the
cancel s witc h. The pass engers’ door indicator li ght (“AUTO OFF” light) on the i nstrument cluster comes on when the engine switch is turned t o the “ON” position,
indicating that manual operati on is sel ected.
Open
Close
OPERATING PASSENGERS’ DOOR CONTROL SWITCH
Push the swit ch t o the “OPEN” positi on
to open the door and to the “CLOSE”
to close.
The engine switch must be in the “ON”
position.
The door will move while the switch is
being operated and stop when released.
A buzzer will briefl y sound when the door
starts opening or clos ing.
If the door wi ll not be locked when it is
closed, try again with t he engine runni ng
and all other electric al components off.
16

The accelerator pedal cannot be pres sed
NOT FOR REPRODUCTION
while the door is open.
If the door does not operate, wait a few
minutes unti l the cir cuit breaker resets automatically. If the door s till does not operate, have the electrical system checked
by your Toyota dealer as soon as possible.
CAUTION
Observe t he following pr ecautions
when t he automatic passengers’ door
system is on. Failure to do so may
cause death or serious injury.
D Befor e operating t he control switch,
make sure the vehicle is compl etely
stopped and that the parking brake
is firmly applied.
D Check t he safet y of the surrounding
area to make sur e there are no obstacles or anything that could
cause any of your belongings to get
caught.
NOTICE
Do not let passengers ride or put
their feet on the door arm or link. It
may damage the door−opening mechanism.
LEAVING THE VEHICLE UNATTENDED
When the pass engers’ door is set to automatic operation, the passengers’ door can
be opened from the outside by pushing
the emergency open button. To prevent
unwanted entry while the vehi cle is left
unattended, we recommend set ting the
passengers’ door to manual operation and
locking the pas sengers ’ door. Set the passengers’ door to automatic operation again
before driving the vehic le.
Side windows
Unlock
Push t he lever to unlock and slide the
window.
Make sure the window is loc ked into plac e
after closing.
17
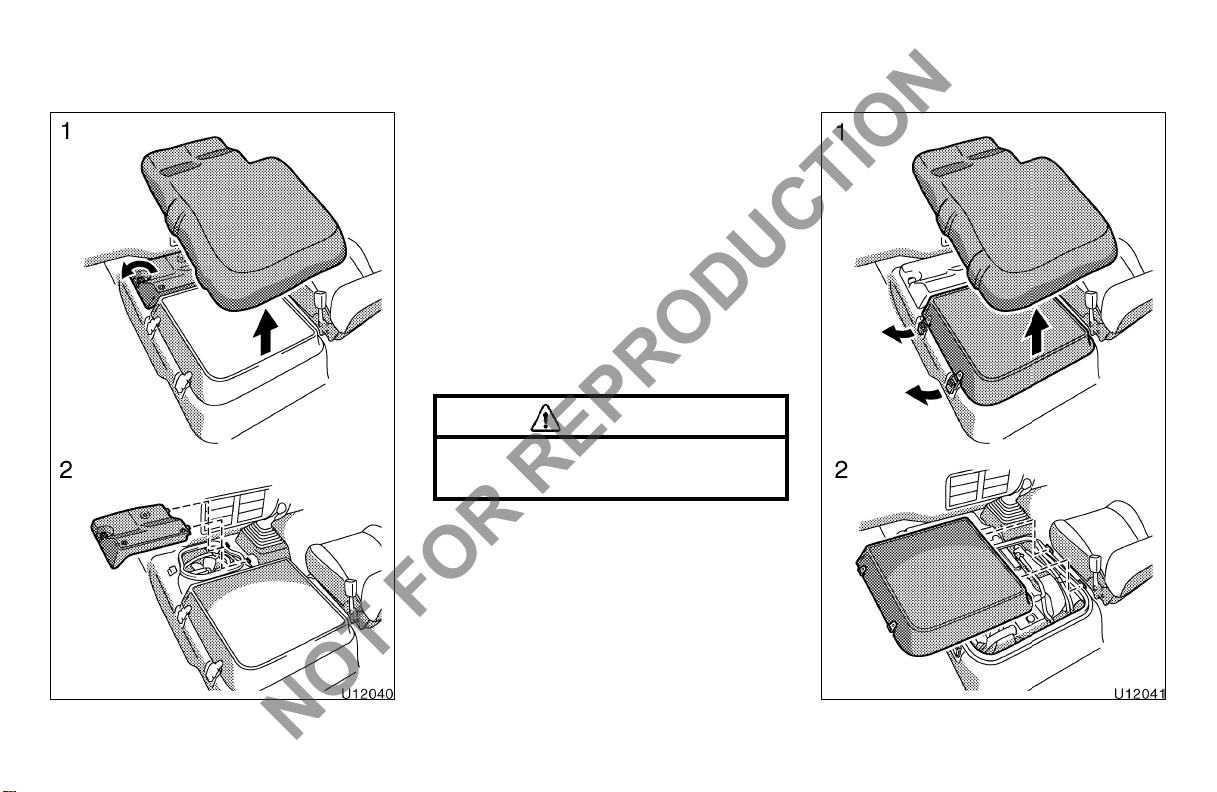
Engine access hole covers
NOT FOR REPRODUCTION
ENGINE ACCESS HOLE COVER (front)
To open the front engine access hole
cover:
1. Remove the carpet and turn the
knob counterclockwise.
2. Remove the cover.
Before closing the fr ont engine access
hole cov er, chec k that you have not forgotten any tool s, rags, etc.
When closing the front engine acc ess hole
cover, hook the cover edge i nto t he hole
and turn the knob clockwise.
CAUTION
After closing the cover, make sure it
is securely locked.
18
ENGINE ACCESS HOLE COVER (rear )
NOT FOR REPRODUCTION
To open the rear engine access hole
cover:
1. Remove the carpet and release the
latches.
2. Remove the cover.
Before closing the engine access hole
cover, check that you have not f orgott en
any tools, rags , etc. When closi ng the
rear engine access hole cover, hook the
cover edge into the hole and loc k the
latches.
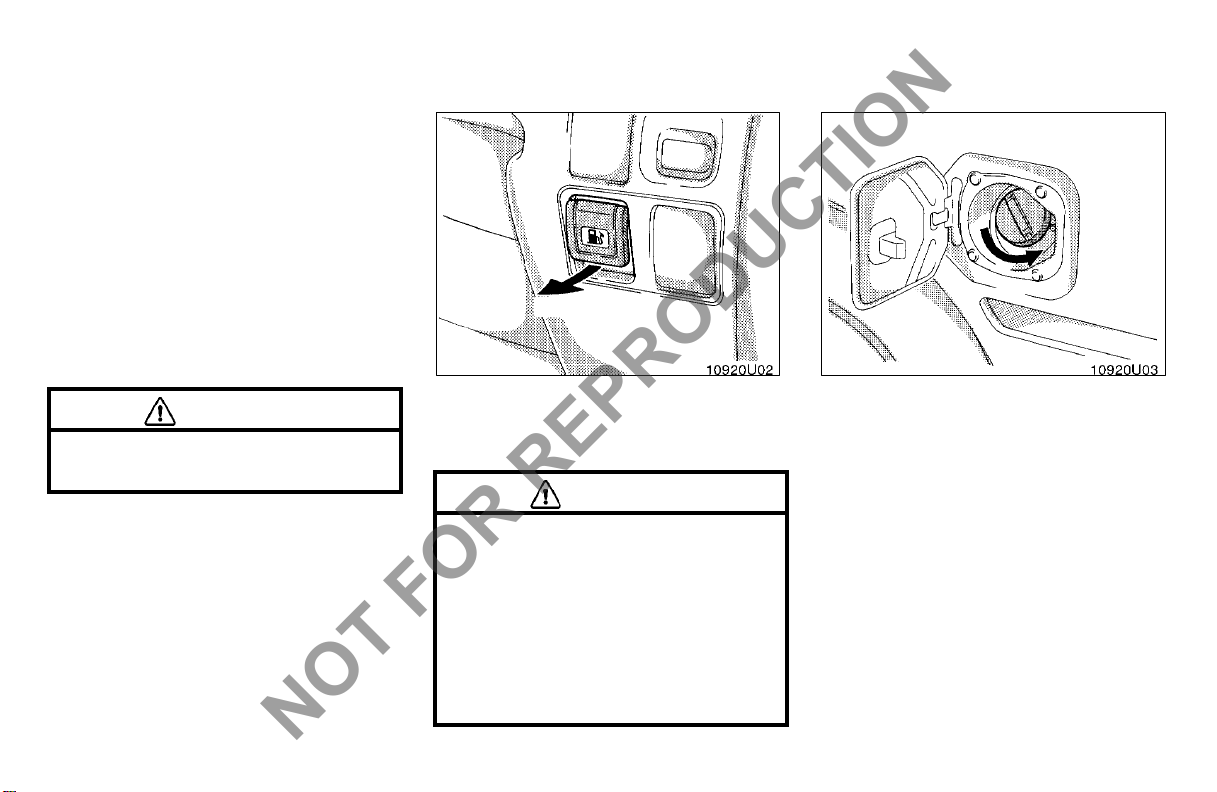
Fuel tank cap (with fuel filler door opener)
Open
CAUTION
After closing the cover, make sure
that it i s securely locked.
1. To open the fuel filler door, pull the
lever.
When refueling, turn off the engine.
CAUTION
D Do not smoke, cause spar ks or al-
low open flames when refueling.
The fumes are flammable.
2. To remove the fuel tank cap, turn
the cap slowly counterclockwi se,
then pause slightl y before removing
it.
It is not unusual to hear a sl ight swoos h
when the cap is opened. When installing,
turn the cap clock wise till you hear a
click.
D When opening the cap, do not re-
move t he cap quickly. In hot weat her, fuel under pressure could cause
injury by spraying out of the filler
neck if the cap is suddenly removed.
19
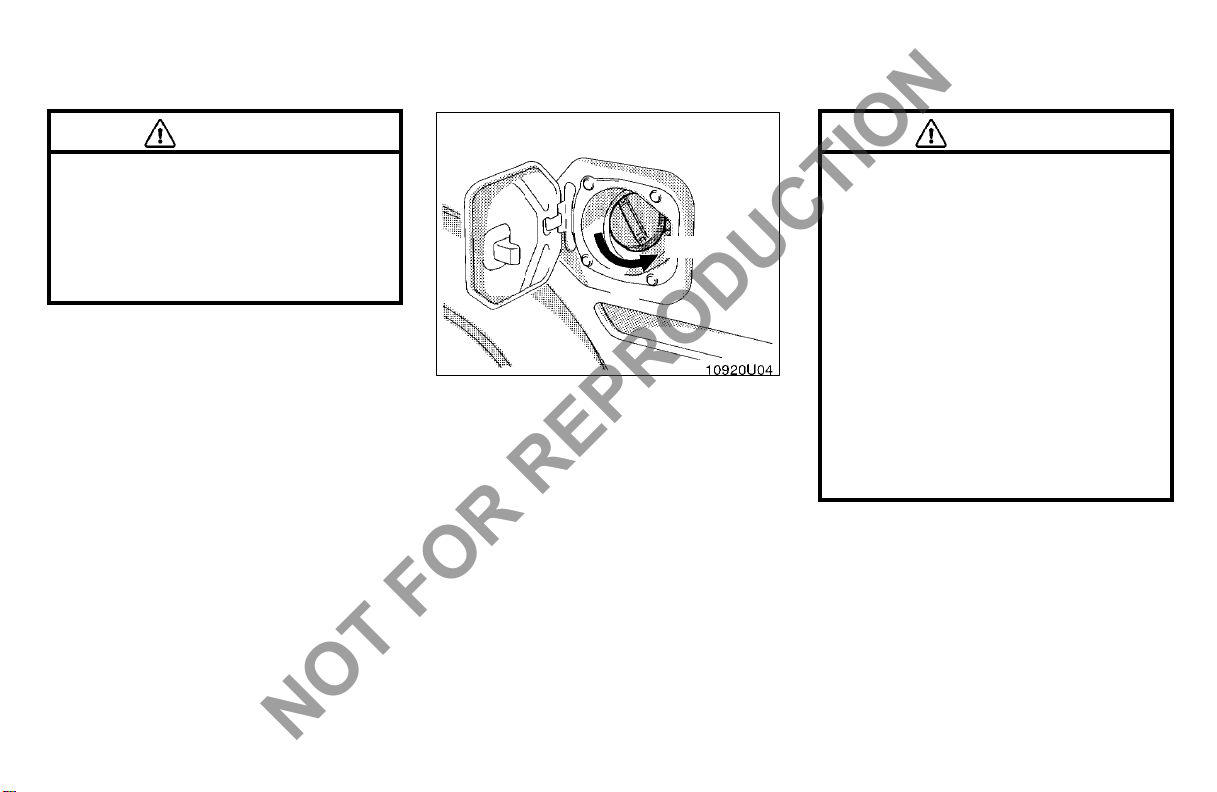
Fuel tank cap
NOT FOR REPRODUCTION
(without fuel filler door
opener)
CAUTION
D Make sure the cap is t ightened se-
curely to prevent fuel spillage in
case of an accident.
D Use only a genuine Toyota fuel t ank
cap for replacement. I t has a built−
in check valve.
Open
To remove the fuel tank cap, open the
fuel filler door, turn the cap slowly
counterclockwise, then pause slightly
before removing it.
When refueling, turn off the engine.
It is not unusual to hear a sl ight swoos h
when the cap is opened. When installing,
turn the cap clock wise till you hear a
click.
CAUTION
D Do not smoke, cause spar ks or al-
low open flames when refueling.
The fumes are flammable.
D When opening the cap, do not re-
move t he cap quickly. In hot weat her, fuel under pressure could cause
injury by spraying out of the filler
neck if the cap is suddenly removed.
D Make sure the cap is t ightened se-
curely to prevent fuel spillage in
case of an accident.
D Use only a genuine Toyota fuel t ank
cap for repl acement. It is designed
to regulate f uel tank pressure.
20
SECTION 1− 3
NOT FOR REPRODUCTION
OPERATION OF I NSTRUMENTS AND
CONTROLS
Seats, Seat belts, Steering wheel and Mirrors
Seats 22......................................................
Driver’s seat 22................................................
Driver’s head restraint 24.......................................
Seat belts 24..................................................
Child restraint 28..............................................
Tilt and telescopic steering wheel 31............................
Outside rear view mirrors 31....................................
21
Seats
NOT FOR REPRODUCTION
While the vehicle is bei ng dri ven, all v ehicle occupants should have t he seatbac k
upright, sit well bac k in t he seat and properly wear t he seat belts pr ovided.
CAUTION
Driver’s seat—
—Seat adjustment
precautions
Adjust the dr iver ’s seat so t hat the foot
pedals, steering wheel and inst rument
panel controls ar e wit hin easy reach of
the driver.
CAUTION
D Whil e adjusting t he seat, do not put
your hands under t he seat or near
the moving parts. Otherwise, your
hands or fingers may be caught and
injured.
D Do not drive the vehicle unless the
occupants ar e properly seated. Do
not allow any occupants to sit on
top of a folded−down seatback, or
in the luggage compar tment or cargo area. If t he occupants ar e improperly seated or restrai nted by
seat belts, death or ser ious injury
could result in the event of emergency braking, sudden swerving or
an accident.
D Duri ng driving, do not allow any
passengers to stand up or move
around between seats. Otherwise,
death or serious inj uries can occur
in t he event of emergency br aking,
sudden swerving or an accident.
22
D Do not adjust the seat while the
vehicle is moving as the seat may
unexpectedly move and cause the
driver to l ose cont rol of the vehi cle.
D Aft er adjusting the seat posi tion, re-
lease t he lever and try sliding the
seat forward and backward to make
sure it is locked in positi on.
D Make sure the seatback is securely
locked by pushing forward and rearward on the top of the seatback.
Failure to do so will prevent the
seat belt from oper ating properly.
D Do not put objects under the seats
except for putting t hem in the auxiliary box. Otherwise, the objects
may int erfere with the seat−lock
mechanism or unexpectedly push
up t he seat position adjust ing lever
and the seat may suddenly move,
causing the driver to lose contr ol of
the vehicle.
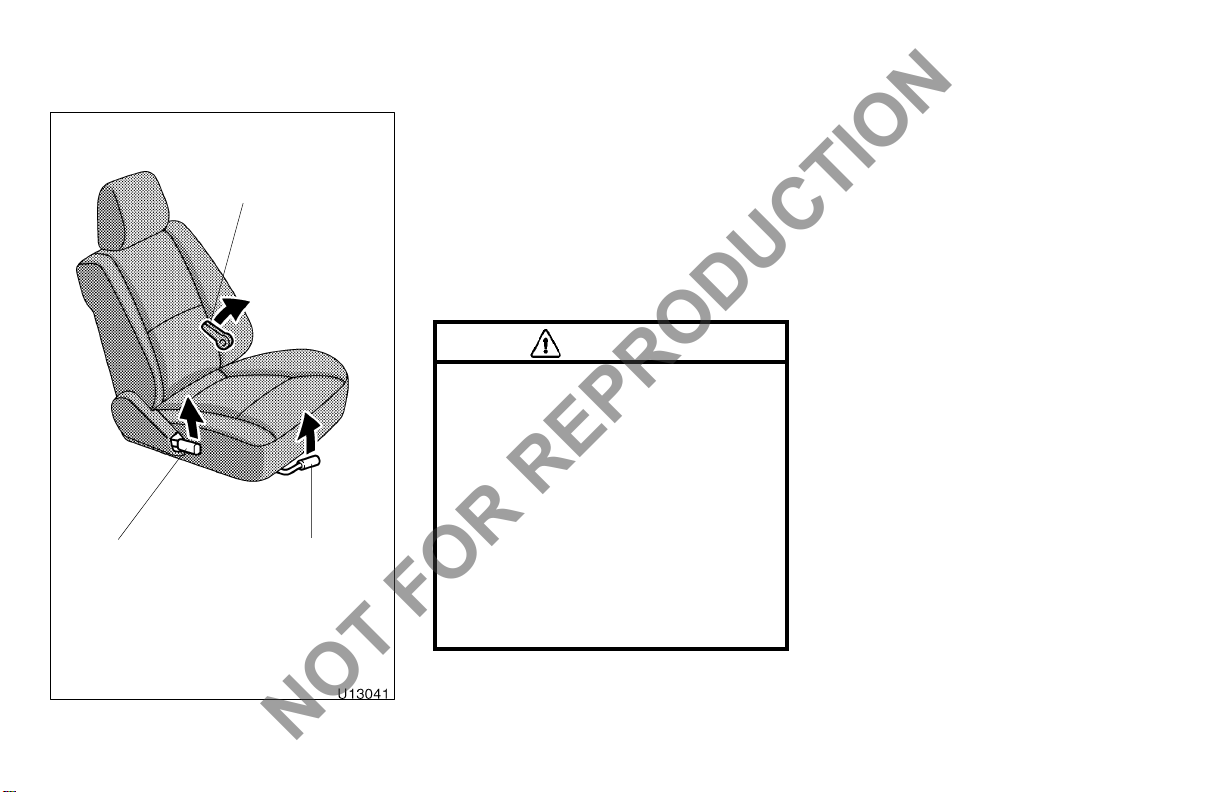
—Adjusting driver’s seat
NOT FOR REPRODUCTION
Lumbar support
control lever
Seatback lock
release lever
Seat position
lock release lever
ADJUSTING SEAT POSITION
Pull the lock release lever up. Then
slide the seat to t he desired position
with slight body pressure and release
the lever.
ADJUSTING SEATBACK ANGLE
Lean f orward and pull the lock release
lever. Then lean back to the desi red
angle and release the lever.
CAUTION
Avoid reclining the seatback any
more than needed. The seat belts provide maximum protection in a frontal
or rear collision when you are sitting
up straight and well back in the seat .
If you are recl ined, the lap belt may
slide past your hips and apply restraint f orces directly t o the abdomen
or your neck may contact the shoulder belt. In the event of a frontal
collision, the more the seat is reclined, the greater the risk of death
or serious inju ry.
ADJUSTING SEAT LUMBAR SUPPORT
Pull the lever forward or backward.
Pulling the lever forward will increase the
amount of your lower back.
23
 Loading...