

Page 1
Page 2
Page 3
1
OVERVIEW
FEATURES/OPERATIONS SAFETY AND EMERGENCY FEATURES
TABLE OF CONTENTS
Item Page no.
OVERVIEW
Engine compartment 7
Fuel tank door opener and cap 6
Hood release lever 6
Indicator symbols 4-5
Instrument cluster 4-5
Instrument panel 2-3
Light control-Instrument panel 6
FEATURES/OPERATIONS
Air conditioning/Heating 18
Audio 16-17
Automatic transmission 8-9
Clock 14
Cruise control 15
Cup holders 13
Keyless entry 14
Lights & turn signals 11
Moonroof 15
Parking brake 12
Seat adjustments-Front 10
Seat adjustments-Rear 10
Tilt steering wheel 9
Windows-Power 13
Wiper & washer lever-Front/Rear 12
SAFETY AND EMERGENCY FEATURES
Airbag-Supplemental Restraint System 19-20
Door locks-Power 19
Seat belts 19
Spare tire & tools 21
Page 4
3
OVERVIEW FEATURES/OPERATIONS
SAFETY AND EMERGENCY FEATURES
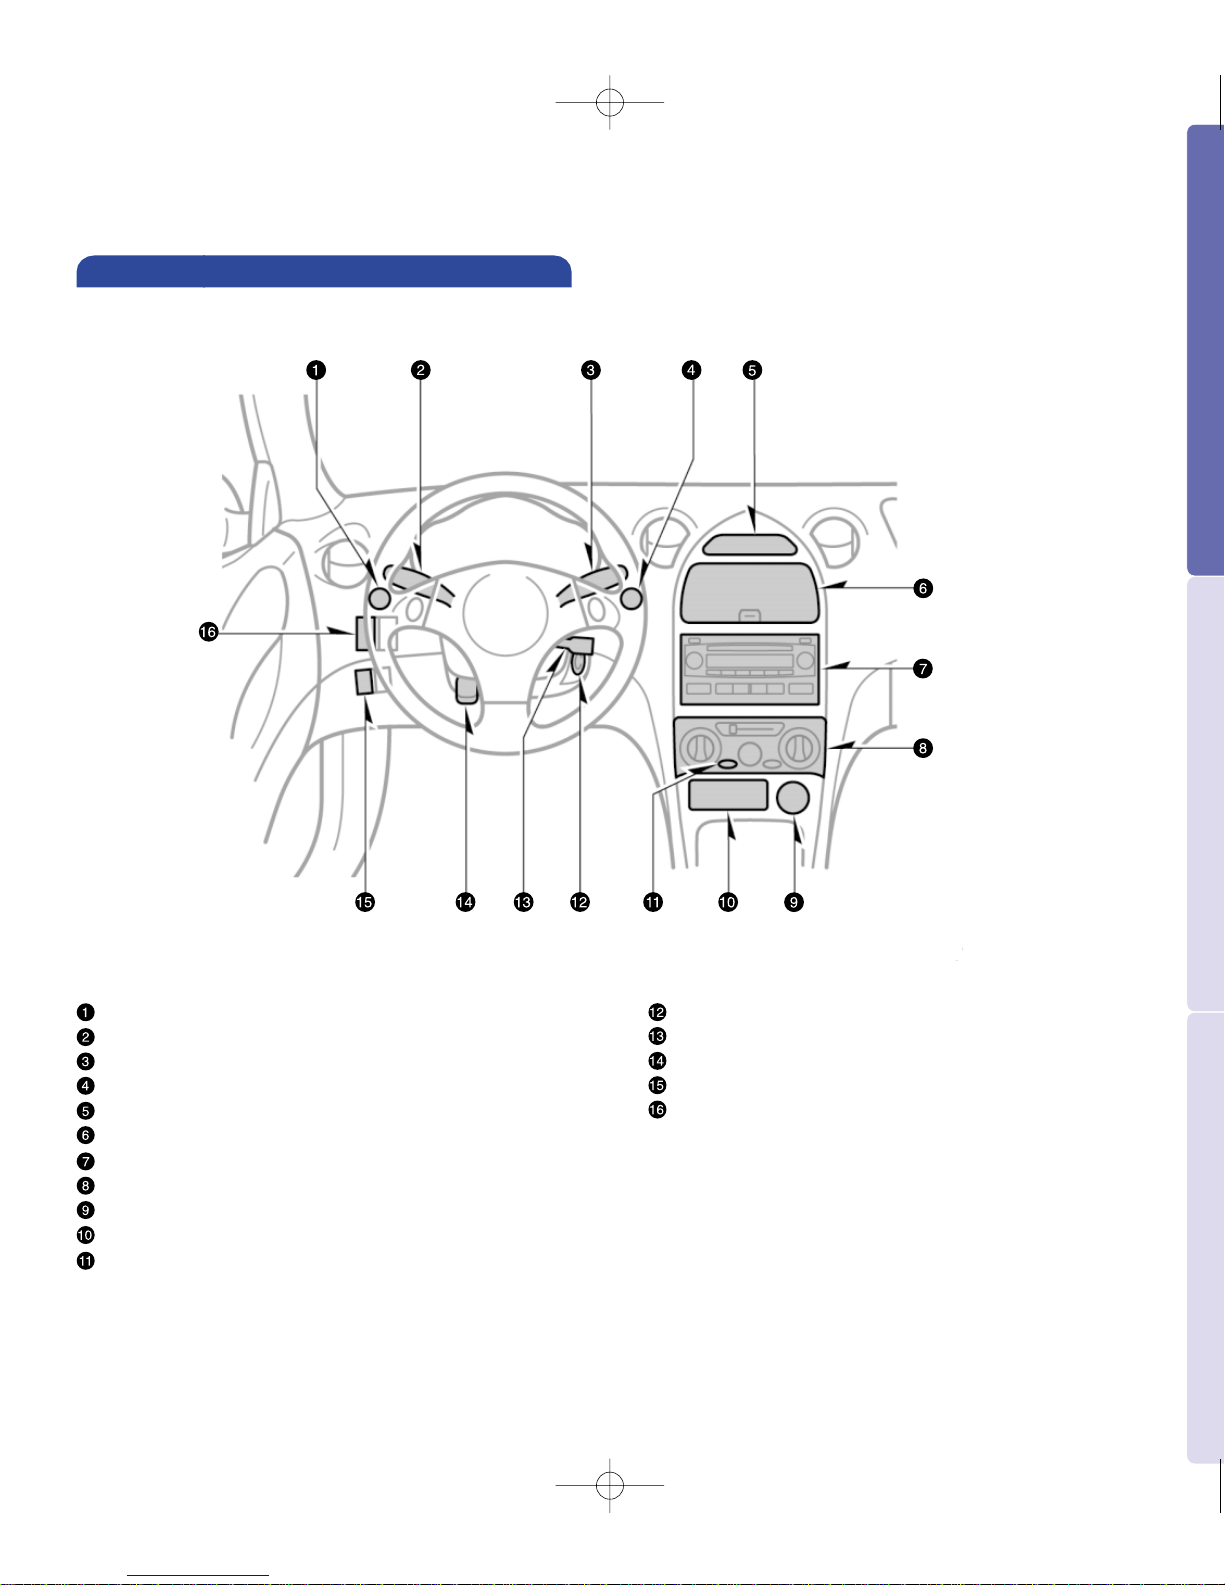
Ignition switch
Cruise control lever*
Tilt steering lock release lever
Headlight beam level control dial*
Window lock switch*
*If installed
2
OVERVIEW
Instrument panel light control knob
Headlight, turn signal, and front fog* light
Front/Rear* wiper and washer controls
Emergency flasher switch
Clock
Auxiliary box
Audio
Air conditioning*/Heater controls
Cigarette lighter
Ashtray
Rear window defogger switch
Instrument panel
2005 Celica Ins 10/26/04 6:00 PM Page 2
Page 5
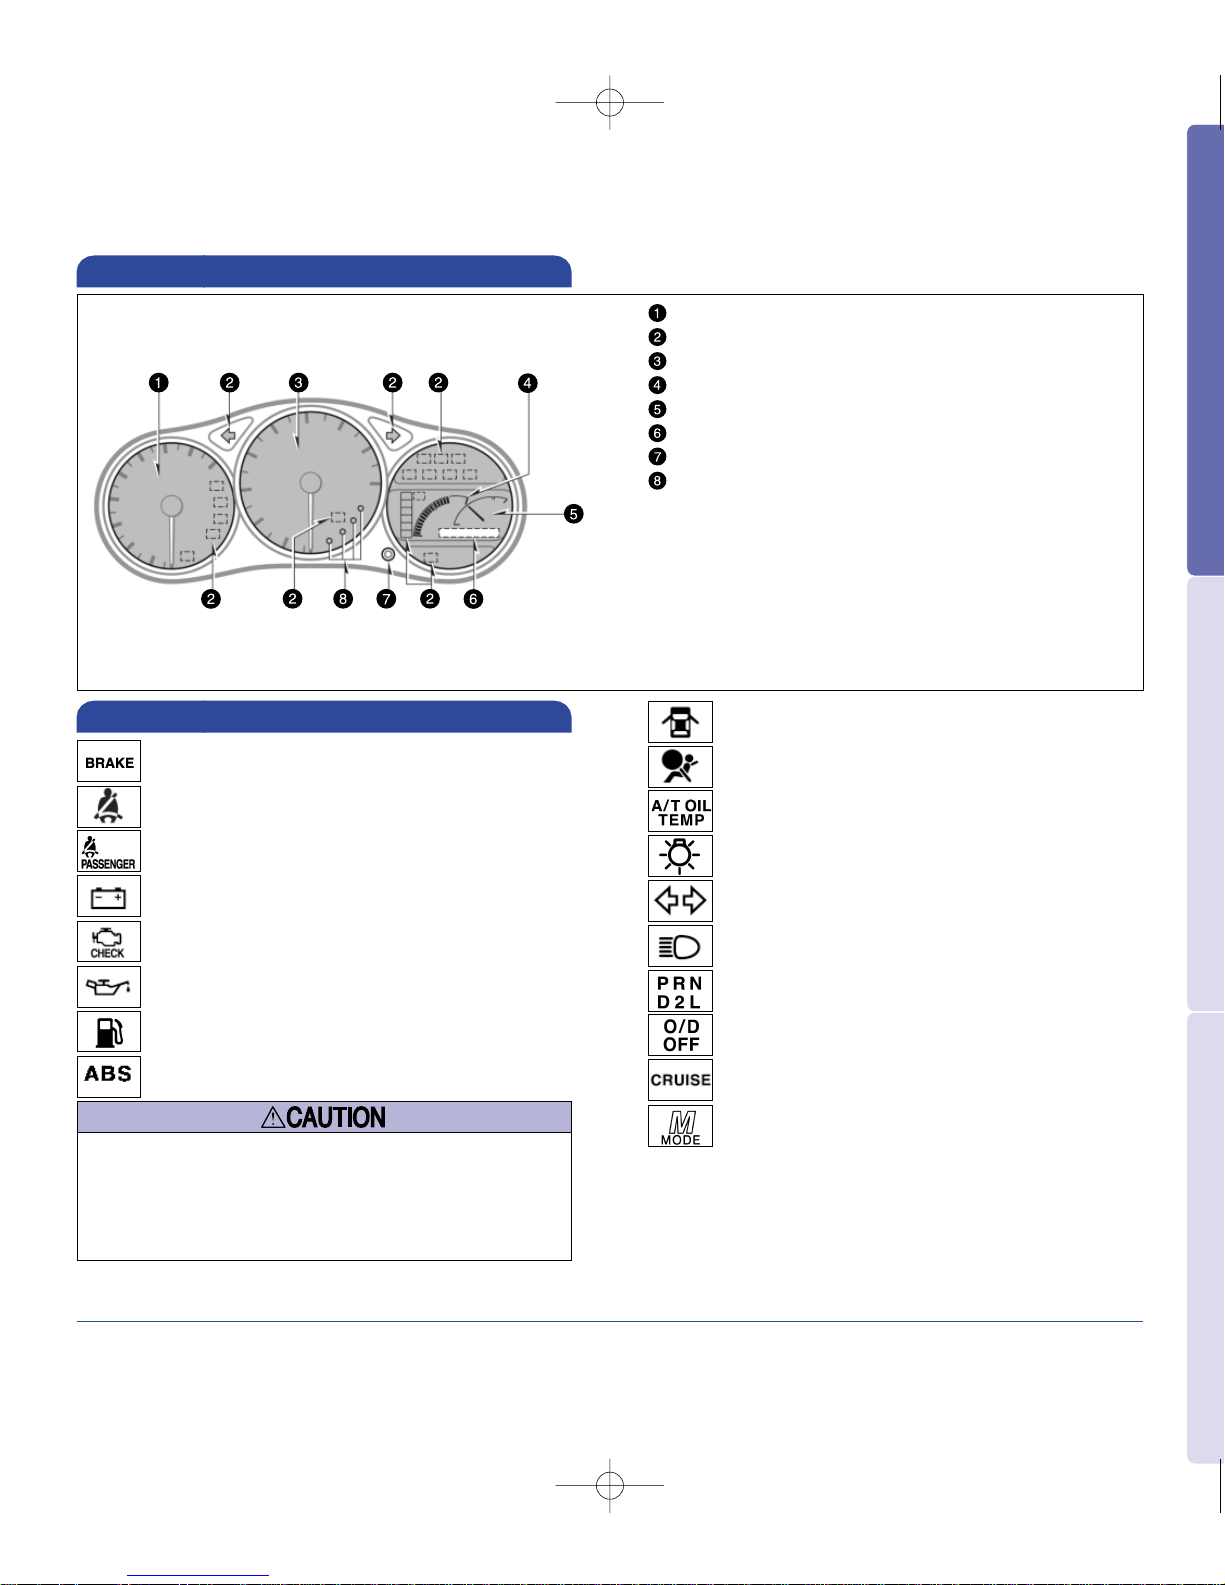
5
OVERVIEW FEATURES/OPERATIONS
SAFETY AND EMERGENCY FEATURES
3
If this light flashes, refer to “Cruise control,” Section 1-7, 2005
Owner’s Manual.
Open door warning light
1
Turn signal indicator light
Headlight high beam indicator light
Cruise control indicator light
3
M mode indicator light
2
Overdrive-off indicator light
Automatic transmission indicator lights
Airbag SRS warning light
1
Headlight low beam indicator light
Automatic transmission fluid temperature
warning light
1
Tachometer
Service reminder indicators and indicator lights
Speedometer
Fuel gauge
Engine coolant temperature gauge
Odometer and two trip meters
Trip meter reset knob
Gear position indicator lights*
*GT-S Automatic transmission models
4
OVERVIEW
Driver’s seat belt reminder light
1
Front passenger’s seat belt reminder light
1
Brake system warning light
1
Battery warning light
1
Low engine oil pressure warning light
1
Low fuel level warning light
1
Anti-lock Brake System warning light
1
Malfunction indicator light
1
1
For details, refer to “Service reminder indicators and warning
buzzers,” Section 1-6, 2005 Owner’s Manual.
2
If this light flashes, refer to “Automatic transmission,” Section
1-7, 2005 Owner’s Manual.
When the Anti-lock Brake System (ABS) function is in
action, you may feel the brake pedal pulsating and
hear a noise. In this situation, to let the Anti-lock
Brake System work for you, just hold the brake pedal
down more firmly. Do not pump the brake as this will
result in reduced braking performance.
Indicator symbols
Instrument cluster
2005 Celica Ins 10/26/04 6:00 PM Page 4
Page 6

To open from driver side seat Pull up on the
opener.
To remove the fuel tank cap Turn the cap
counterclockwise, then pause slightly before
removing it. After removing, hang the tether on
the fuel tank door.
To replace the fuel tank cap Turn clockwise until
a click is heard. If not tightened enough, Check
Engine “ ” indicator may illuminate.
7
OVERVIEW FEATURES/OPERATIONS
SAFETY AND EMERGENCY FEATURES
Engine compartment
GT models (1ZZ-FE engine)
GT-S models (2ZZ-GE engine)
Power steering fluid reservoir
Engine oil level dipstick
Engine coolant reservoir
Engine oil filler cap
Battery
Brake fluid reservoir
Fuse blocks
Radiator
Electric cooling fans
A/C condenser
Windshield and rear window washer fluid tank
Note: Regularly scheduled maintenance, including
oil changes, will help extend the life of
your vehicle and maintain performance.
Please refer to the “Owner’s Warranty
Information Booklet,” “Scheduled
Maintenance Guide” or “Owner’s Manual
Supplement.”
6
OVERVIEW
Fuel tank door opener and cap
To release the hood Pull the lever inside vehicle.
To open the hood Insert finger through the
opening between the hood and bumper. Pull up
on the catch lever inside the compartment and
lift the hood.
Hood release lever
To adjust the brightness of the instrument panel
lights Turn the dial right to increase, or left to
decrease the brightness of the instrument panel
lights.
Light control-Instrument panel
2005 Celica Ins 10/26/04 6:00 PM Page 6
Page 7

9
OVERVIEW FEATURES/OPERATIONS
SAFETY AND EMERGENCY FEATURES
To shift manually, move the shift lever into the “M”
position. The M mode indicator light and current
gear position are displayed.
To upshift Push the “UP” switch on the back of
the steering wheel.
To downshift Push the “DOWN” switch on the
front of the steering wheel.
Refer to the Owner’s Manual for more details.
Driving in M mode
Tilt steering wheel
To change the steering wheel angle Push the lock
release lever down, set the desired angle and return
the lever to its locked position.
Note: Do not attempt to adjust while the vehicle
is in motion.
Lock release button
With the brake pedal depressed, shift while
holding the lock release button in (the ignition
switch must be in the “ON” position).
Shift while holding the lock release button in.
Shift normally.
To select “M,” shift the shift lever to the left
from ”D.”
Park Engine starting and key removal
Reverse
Neutral
Drive Overdrive on*
Second gear Increased engine braking
First gear Maximum engine braking
P
R
N
D
2
L
8
FEATURES/OPERATIONS
Automatic transmission (if installed)
To turn “ON” or “OFF” Depress the overdrive
switch to choose either three-speed (“OFF”) or fourspeed (“ON”) operation. During normal driving
conditions, always drive with overdrive “ON;” this
allows the transmission to shift automatically into
four-speed operation at higher speeds, improving
fuel economy. If the indicator light on the
instrument cluster is illuminated, overdrive is “OFF.”
Overdrive switch does not activate when driving in M
mode.
Manual “Manual” shifting (with M mode only)
With M (Manual) mode
Overdrive switch
Overdrive switch
Overdrive switch
“O/D OFF”
Indicator light
“O/D OFF”
Indicator light
Lock release
button
Lock release
button
2005 Celica Ins 10/26/04 6:01 PM Page 8
Page 8

11
OVERVIEW FEATURES/OPERATIONS
SAFETY AND EMERGENCY FEATURES
Lights & turn signals
Headlights
Parking, tail, license plate, side marker and
instrument panel lights Twist the lever knob to
position 1.
Headlights and all of the above Twist the lever
knob to position 2.
High beams Push the lever forward.
Low beams
High beam flasher Pull the lever toward you.
Note: Daytime running light system
Automatically turns on the headlights at reduced
intensity.
Turn signals
Right or left turn Push the lever up or down.
Lane change Move the lever up or down to
position 7 and hold.
Indicator light
Indicator light
10
FEATURES/OPERATIONS
Seat adjustments-Front
Position lever
Seatback angle lever
Cushion angle knob
To fold rear seats down
Place the shoulder belt in the hanger.
Pull the lock release knob and fold down each
seatback.
See Seat in section 1-3 of the Owner’s Manual for
more information, including folding seat
arrangements.
Seat adjustments-Rear
Lock release knobs
Headlight beam level control (if installed)
To adjust beam level Turn the wheel down to lower,
or up to raise. Higher number means lower beam.
2005 Celica Ins 10/26/04 6:01 PM Page 10
Page 9

Rear intermittent Twist the lever knob to
position 7.
Rear normal speed Twist the lever knob to
position 8.
Rear wash and wipe Twist the lever knob upward
or downward to position 9.
*if installed
13
OVERVIEW FEATURES/OPERATIONS
SAFETY AND EMERGENCY FEATURES
Windows-Power (if installed)
Window operation
To open or close Push down or pull up on the
switch.
Automatic down operation (Driver side only) Push
the switch completely down and release to fully
open. To stop window mid-way, pull up on the
switch.
Window lock switch
Push the switch to deactivate the passenger
windows.
Cup holders
Front Rear
Window lock switch
12
FEATURES/OPERATIONS
Intermittent speed Push the lever down to
position 1.
Interval adjuster* Twist the band to adjust the
intermittent speed.
Slow speed Push the lever down to position 3.
Fast speed Push the lever down to position 4.
Single wipe Push the lever up to position 5.
Wash and wipe Pull the lever toward you.
Wiper & washer lever-Front/Rear
Parking brake
To set Pull the lever up.
To release (1) Pull the lever up slightly, (2) press
the lock release button, and (3) lower.
Indicator light
Front operation
Rear operation
2005 Celica Ins 10/26/04 6:01 PM Page 12
Page 10

15
OVERVIEW FEATURES/OPERATIONS
SAFETY AND EMERGENCY FEATURES
To turn the system “ON” or “OFF” Press the
button.
To set a speed Bring the vehicle to the desired
speed. Push the lever down toward “- SET.”
To cancel the preset speed Pull the lever to
“CANCEL.” The set speed may also be cancelled
by either of the following:
- Depress the brake pedal.
- Depress the clutch pedal (manual transmission).
To resume set speed after cancel Push the lever
up toward “+ RES.” If vehicle speed falls below
25 mph, the set speed will not be resumed.
NOTE: To raise set speed, push up toward “+RES.” To
lower set speed, push down toward “-SET.” Refer to
the Owner’s Manual for more details.
Turning system on/off Setting a speed
Indicator light
Cruise control (if installed)
Moonroof (If installed)
Tilting operation Sliding operation
To tilt up and open Push “OPEN” briefly one
time to tilt up, and then again to open from tilt
position. Push “OPEN” and hold for 2 seconds to
slide open from closed position.
To tilt down or close Push “CLOSE” briefly.
NOTE: If battery is disconnected, the moonroof
needs to be reinitialized. Refer to the Owner’s
Manual for more details.
14
To activate alarm with remote Push “PANIC.”
Refer to the Owner’s Manual for more details.
Alarm operation
Keyless entry (if installed)
Locking operation
Unlocking operation
To lock Push “LOCK.”
To unlock driver door Push “UNLOCK” once.
To unlock all the doors Push “UNLOCK” twice.
NOTE: After unlocking, if a door is not opened within
thirty(30) seconds, all doors will relock for safety.
FEATURES/OPERATIONS
To reset the hour Push “H.”
To reset the minutes Push “M.”
To zero out minutes Push “:00.”
Refer to the Owner’s Manual for more details.
Clock
2005 Celica Ins 10/26/04 6:01 PM Page 14
Page 11

17
OVERVIEW FEATURES/OPERATIONS
SAFETY AND EMERGENCY FEATURES
CASSETTE TAPE PLAYER
CD PLAYER
To play Insert a cassette tape.
To fast forward Push “ .”
To rewind Push “ .”
To select a direction Push “ .”
To eject a cassette tape Push “ .”
To play Insert a compact disc.
To select a track Push either side of “SEEK/TRACK.”
To scan tracks on a disc Push “SCAN.” Push again to
hold selection.
To eject a compact disc Push “ .”
To view CD text Push “TEXT” to display disc
information. Refer to the Owner’s Manual for more
details.
Type 2 and 3 only are equipped with ···
CD Changer
-To load one disc Push “LOAD” and insert 1 disc.
-To load multiple disc Push and hold “LOAD” until
your hear a beep. Insert one disc.
Note: Wait until the green indicator illuminates to
insert next disc.
Refer to the Owner’s Manual for more details.
RADIO
To select a station Push either side of “SEEK/TRACK.”
To scan stations Push “SCAN.” (Push and hold to scan
preset station). Push again to hold selection.
To select the band Push “AM,” “FM,” “FM1,” or
“FM2.”
-To preset a station Tune in the desired station and
press a preset button (1-6) until you hear a beep.
-To select a preset station Push desired preset
button (1-6).
Type 2 and 3 are equipped with
...
RDS (Radio Data System-FM only)
-Push TYPE “ ” or “ ” to view current program
genre. Push again within 6 seconds to select new
genre.
-Push “SEEK/TRACK” or “SCAN” to find same genre
program.
-Push “TEXT” to receive information transmitted from
Radio Stations.
BASIC OPERATION
To turn on the audio system Push “PWR.VOL,”
“AM,” “FM,” “FM1,” “FM2,” “TAPE,” or “DISC.”
To turn off the system Push “PWR.VOL.”
To adjust the volume Turn “PWR.VOL.”
To adjust tone and balance Push the “TUNE/AUDIO
CONTROL” knob. The mode changes with each push
in succession from Bass, Treble, Fade, Balance. Turn
the knob right or left to adjust each mode.
16
FEATURES/OPERATIONS
Type 1
Type 2
*Functions for buttons 1-6 are indicated above each
button on LCD.
*Functions for buttons 1-6 are indicated above each
button on LCD.
Type 3
*Functions for buttons 1-6 are indicated above each
button on LCD.
Audio
>
>
2005 Celica Ins 10/26/04 6:01 PM Page 16
Page 12

19
OVERVIEW FEATURES/OPERATIONS
SAFETY AND EMERGENCY FEATURES
Airbag-Supplemental Restraint System
Door locks-Power (if installed)
The Airbag Supplemental Restraint System (SRS)
front and side* airbags are designed to provide
further protection for the driver and front passenger
in addition to the primary safety protection provided
by the seat belts.
Please read the following caution boxes, and refer
to the Owner’s Manual for more details.
*If installed
SAFETY AND
EMERGENCY FEATURES
If belt is fully extended, then retracted even
slightly, it cannot be re-extended beyond that point,
unless fully retracted again. This feature is used to
help hold child restraint systems securely.
To find more information about seat belts, and how
to install a child restraint system, refer to the
Owner’s Manual.
Keep as low on
hips as possible
Take up
slack
Too high
Seat belts
To lock Push down on the front of the switch
To unlock Push down on the back of the switch
18
Air conditioning (if installed)/Heating
Temperature selector
Air intake selector Select fresh or recirculate
cabin air.
Air flow selector (See “To select air flow vents”
below)
“A/C” Switch* Air conditioning system on/off
switch. Use with “ ” for best cooling
performance.
Fan speed selector
*If installed
To select air flow vents
Turn the air flow selector to select one of the
following:
FEATURES/OPERATIONS
Instrument panel vents
Floor and panel vents
Floor vents
Floor and windshield vents
Windshield vents Use fresh air “ ” to reduce
window fogging.
Refer to the Owner’s Manual for more details.
2005 Celica Ins 10/26/04 6:01 PM Page 18
Page 13

20
•The driver and front passenger airbag Supplemental Restraint
System (SRS) is designed only as a supplement to the primary
protection of the seat belt systems of the driver and front
passenger. The front seat occupants are particularly susceptible
to injury if they do not wear their seat belts; when sudden
braking or a collision occurs, they may be thrown forward. To
obtain maximum protection in an accident, the driver and all
passengers in the vehicle should always wear their seat belts
when driving because serious injuries or death can result to
unrestrained occupants. For instructions and precautions
concerning the seat belt system, see “Seat belts” in the
Owner’s Manual.
•Toyota strongly urges the use of a proper child restraint system
on the rear seat that conforms to the size of the child.
According to accident statistics, a child is safer when properly
restrained in the rear seat than on the front seat.
•Never
use a rear-facing child restraint system in the front seat.
The force of the rapid inflation of the passenger airbag can
cause severe injury or death to a child.
•Unless it is unavoidable, do not install a forward-facing child
restraint system in the front seat. If you must install a forwardfacing child restraint system in the front seat, move the seat as
far back as possible.
•Make sure you have complied with all installation instructions
provided by the child restraint manufacturer and the system is
properly secured.
•The SRS side airbags (optional) are designed to deploy in
certain types of severe side impact collisions. In all other
collisions, the side airbags will not deploy. For instructions and
precautions, see the Owner’s Manual.
•Do not lean against the side doors when the vehicle is in use.
The side airbags inflate with considerable speed and force.
Death or serious injury could result.
•Do not modify, cover or replace the surface of the front seats.
Such changes could disable the system or prevent the airbags
from activating correctly, resulting in death or serious injury.
Page 14

Page 15

 Loading...