

Page 1

1 QUICK GUIDE 11
2 BASIC FUNCTION 31
3 AUDIO SYSTEM 69
4 VOICE COMMAND SYSTEM 127
5 INFORMATION 139
6 PERIPHERAL MONITORING SYSTEM 145
7 PHONE 155
8 NAVIGATION SYSTEM 195
9 Entune App Suite 261
INDEX 275
1
4Runner_Navi_U
Page 2

Introduction
NAVIGATION AND MULTIMEDIA SYSTEM OWNER’S MANUAL
This manual explains the operation of the system. Please read this manual
carefully to ensure proper use. Keep this manual in your vehicle at all times.
The screen shots in this document and the actual screens of the system differ
depending on whether the functions and/or a contract existed and the map data
available at the time of producing this document.
Please be aware that the content of this manual may be different from the system in some cases, such as when the system’s software is updated.
NAVIGATION SYSTEM (ENTUNE PREMIUM AUDIO)
The Navigation System is one of the most technologically advanced vehicle accessories ever developed. The system receives satellite signals from the Global
Positioning System (GPS) operated by the U.S. Department of Defense. Using
these signals and other vehicle sensors, the system indicates your present position and assists in locating a desired destination.
The navigation system is designed to select efficient routes from your present
starting location to your destination. The system is also designed to direct you
to a destination that is unfamiliar to you in an efficient manner. The system uses
AISIN AW maps. The calculated routes may not be the shortest nor the least
traffic congested. Your own personal local knowledge or “short cut” may at
times be faster than the calculated routes.
The navigation system’s database includes Point of Interest categories to allow
you to easily select destinations such as restaurants and hotels. If a destination
is not in the database, you can enter the street address or a major intersection
close to it and the system will guide you there.
The system will provide both a visual map and audio instructions. The audio instructions will announce the distance remaining and the direction to turn in when
approaching an intersection. These voice instructions will help you keep your
eyes on the road and are timed to provide enough time to allow you to maneuver, change lanes or slow down.
Please be aware that all current vehicle navigation systems have certain limitations that may affect their ability to perform properly. The accuracy of the vehicle’s position depends on satellite conditions, road configuration, vehicle
condition or other circumstances. For more information on the limitations of the
system, refer to page 257.
2
Page 3

IMPORTANT INFORMATION ABOUT THIS MANUAL
CAUTION
NOTICE
For safety reasons, this manual indicates items requiring particular attention
with the following marks.
● This is a warning against anything which may cause injury to people if the warning is
ignored. You are informed about what you must or must not do in order to reduce the risk
of injury to yourself and others.
● This is a warning against anything which may cause damage to the vehicle or its equip-
ment if the warning is ignored. You are informed about what you must or must not do in
order to avoid or reduce the risk of damage to your vehicle and its equipment.
SYMBOLS USED IN ILLUSTRATIONS
Safety symbol
The symbol of a circle with a slash through it means “Do not”, “Do not do
this” or “Do not let this happen”.
Arrows indicating operations
Indicates the action (pushing, turning,
etc.) used to operate switches and other
devices.
3
Page 4

HOW TO READ THIS MANUAL
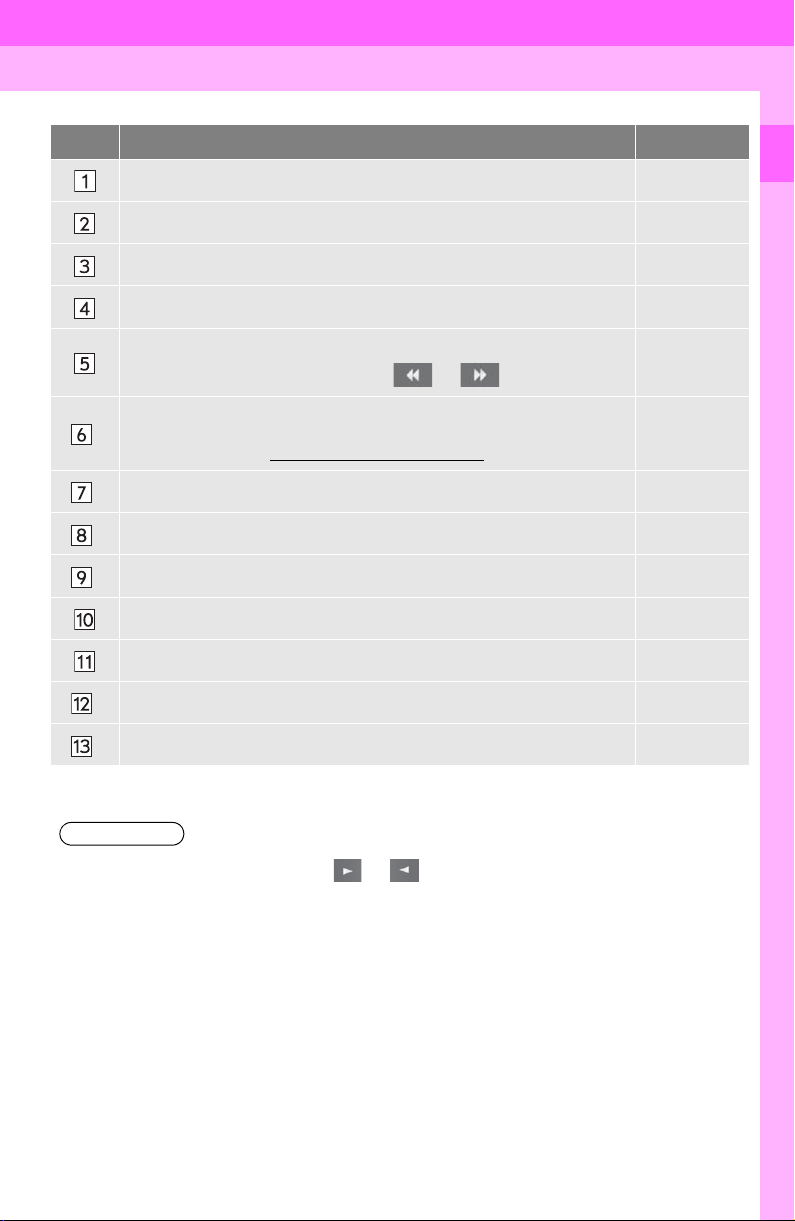
No. Name Description
Operational
Outlines
Main Operations The steps of an operation are explained.
Related Operations A main operation’s supplementary operations are described.
Information Useful information for the user is described.
An outline of the operation is explained.
4
Page 5
SAFETY INSTRUCTION
CAUTION
(ENTUNE AUDIO PLUS)
SAFETY INSTRUCTION
(ENTUNE PREMIUM AUDIO)
To use this system in the safest possible
manner, follow all the safety tips shown
below.
Do not use any feature of this system to
the extent it becomes a distraction and
prevents safe driving. The first priority
while driving should always be the safe operation of the vehicle. While driving, be
sure to observe all traffic regulations.
Prior to the actual use of this system, learn
how to use it and become thoroughly familiar with it. Read the entire manual to make
sure you understand the system. Do not
allow other people to use this system until
they have read and understood the instructions in this manual.
For your safety, some functions may become inoperable when driving. Unavailable screen buttons are dimmed.
● For safety, the driver should not operate
the system while he/she is driving. Insufficient attention to the road and traffic
may cause an accident.
To use this system in the safest possible
manner, follow all the safety tips shown
below.
This system is intended to assist in reaching the destination and, if used properly,
can do so. The driver is solely responsible
for the safe operation of your vehicle and
the safety of your passengers.
Do not use any feature of this system to
the extent it becomes a distraction and
prevents safe driving. The first priority
while driving should always be the safe operation of the vehicle. While driving, be
sure to observe all traffic regulations.
Prior to the actual use of this system, learn
how to use it and become thoroughly familiar with it. Read the entire manual to make
sure you understand the system. Do not
allow other people to use this system until
they have read and understood the instructions in this manual.
For your safety, some functions may become inoperable when driving. Unavailable screen buttons are dimmed. Only
when the vehicle is not moving, can the
destination and route selection be done.
5
Page 6

CAUTION
● For safety, the driver should not operate
the system while he/she is driving. Insufficient attention to the road and traffic
may cause an accident.
● While driving, be sure to obey the traffic
regulations and maintain awareness of
the road conditions. If a traffic sign on
the road has been changed, route guidance may not have the updated information such as the direction of a one way
street.
While driving, listen to the voice instructions as much as possible and glance at
the screen briefly and only when it is safe.
However, do not totally rely on voice guidance. Use it just for reference. If the system cannot determine the current position
correctly, there is a possibility of incorrect,
late, or non-voice guidance.
The data in the system may occasionally
be incomplete. Road conditions, including
driving restrictions (no left turns, street closures, etc.) frequently change. Therefore,
before following any instructions from the
system, look to see whether the instruction
can be done safely and legally.
This system cannot warn about such
things as the safety of an area, condition of
streets, and availability of emergency services. If unsure about the safety of an area, do not drive into it. Under no
circumstances is this system a substitute
for the driver’s personal judgement.
Use this system only in locations where it
is legal to do so. Some states/provinces
may have laws prohibiting the use of video
and navigation screens next to the driver.
6
Page 7

7
Page 8

TABLE OF CONTENTS
QUICK GUIDE
1
1. BASIC FUNCTION........................... 12
BUTTONS OVERVIEW ......................... 12
“Apps” SCREEN .................................... 14
HOME SCREEN .................................... 16
2. QUICK REFERENCE....................... 20
“Setup” SCREEN ................................... 20
3. NAVIGATION OPERATION ............ 22
REGISTERING HOME .......................... 22
REGISTERING PRESET
DESTINATIONS.................................. 24
OPERATION FLOW: GUIDING
THE ROUTE........................................ 26
SETTING HOME AS
THE DESTINATION ............................ 27
4. FUNCTION INDEX........................... 28
FUNCTION INDEX ................................ 28
BASIC FUNCTION
2
1. BASIC INFORMATION BEFORE
OPERATION.................................. 32
INITIAL SCREEN ................................... 32
TOUCH SCREEN GESTURES.............. 34
TOUCH SCREEN OPERATION ............ 35
HOME SCREEN OPERATION .............. 36
ENTERING LETTERS AND
NUMBERS/LIST SCREEN
OPERATION........................................ 37
SCREEN ADJUSTMENT ....................... 40
2. Bluetooth® SETTINGS................... 42
REGISTERING/CONNECTING
Bluetooth
SETTING Bluetooth
®
DEVICE ............................. 42
®
DETAILS ............. 48
3. OTHER SETTINGS ......................... 56
GENERAL SETTINGS ........................... 56
VOICE SETTINGS ................................. 62
DRIVER SETTINGS............................... 63
MAINTENANCE ..................................... 64
8
Page 9

AUDIO SYSTEM
3
INFORMATION
5
1
1. BASIC OPERATION........................ 70
QUICK REFERENCE ............................ 70
SOME BASICS...................................... 72
2. RADIO OPERATION ....................... 77
AM/FM RADIO....................................... 77
XM Satellite Radio ................................. 87
INTERNET RADIO ................................ 93
3. MEDIA OPERATION ....................... 94
CD ......................................................... 94
USB MEMORY ...................................... 97
iPod ..................................................... 101
Bluetooth
AUX ..................................................... 110
®
AUDIO ............................... 105
4. AUDIO REMOTE CONTROLS ...... 112
STEERING SWITCHES ...................... 112
5. SETUP ........................................... 115
AUDIO SETTINGS .............................. 115
6. TIPS FOR OPERATING THE
AUDIO SYSTEM .......................... 117
OPERATING INFORMATION ............. 117
VOICE COMMAND SYSTEM
4
1. VOICE COMMAND SYSTEM
OPERATION ................................ 128
VOICE COMMAND SYSTEM.............. 128
CASUAL SPEECH
RECOGNIZATION ............................ 134
COMMAND LIST ................................. 135
2. MOBILE ASSISTANT
OPERATION ................................ 137
MOBILE ASSISTANT .......................... 137
1. USEFUL INFORMATION.............. 140
RECEIVING WEATHER
INFORMATION ................................. 140
RECEIVING TRAFFIC MAP
INFORMATION ................................. 142
DATA SERVICES SETTINGS ............. 143
PERIPHERAL MONITORING
6
SYSTEM
1. REAR VIEW MONITOR
SYSTEM ...................................... 146
REAR VIEW MONITOR SYSTEM ....... 146
REAR VIEW MONITOR SYSTEM
PRECAUTIONS ................................ 148
THINGS YOU SHOULD KNOW .......... 153
PHONE
7
1. PHONE OPERATION
(HANDS-FREE SYSTEM FOR
CELLULAR PHONES) ................ 156
QUICK REFERENCE .......................... 156
SOME BASICS .................................... 157
CALLING ON THE Bluetooth
PHONE.............................................. 160
RECEIVING ON THE Bluetooth
PHONE.............................................. 165
TALKING ON THE Bluetooth
PHONE.............................................. 166
®
Bluetooth
FUNCTION ........................................ 169
PHONE MESSAGE
®
®
®
2. SETUP........................................... 174
PHONE/MESSAGE SETTINGS .......... 174
3. WHAT TO DO IF... ....................... 186
TROUBLESHOOTING......................... 186
2
3
4
5
6
7
8
9
9
Page 10

TABLE OF CONTENTS
NAVIGATION SYSTEM
8
1. BASIC OPERATION...................... 196
QUICK REFERENCE .......................... 196
MAP SCREEN OPERATION ............... 199
MAP SCREEN INFORMATION ........... 204
TRAFFIC INFORMATION.................... 208
2. DESTINATION SEARCH............... 211
DESTINATION SEARCH SCREEN..... 211
SEARCH OPERATION........................ 213
STARTING ROUTE GUIDANCE ......... 223
3. ROUTE GUIDANCE....................... 227
ROUTE GUIDANCE SCREEN ............ 227
TYPICAL VOICE GUIDANCE
PROMPTS......................................... 232
EDITING ROUTE................................. 233
4. MEMORY POINTS......................... 238
MEMORY POINTS SETTINGS ........... 238
5. SETUP ........................................... 247
DETAILED NAVIGATION
SETTINGS ........................................ 247
TRAFFIC SETTINGS........................... 251
6. TIPS FOR THE NAVIGATION
SYSTEM ....................................... 257
GPS (GLOBAL POSITIONING
SYSTEM) .......................................... 257
MAP DATABASE VERSION AND
COVERED AREA.............................. 259
Entune App Suite
9
1. Entune App Suite
OVERVIEW.................................. 262
Entune App Suite SERVICE................. 262
2. Entune App Suite
OPERATION................................ 267
Entune App Suite ................................. 267
3. SETUP........................................... 274
Entune App Suite SETTINGS .............. 274
INDEX
ALPHABETICAL INDEX................... 276
10
Page 11

1
QUICK GUIDE
BASIC FUNCTION
1
1. BUTTONS OVERVIEW ................. 12
2. “Apps” SCREEN .......................... 14
1
2
3
4
3. HOME SCREEN ............................ 16
STATUS DISPLAY................................. 18
QUICK REFERENCE
2
1. “Setup” SCREEN ......................... 20
NAVIGATION OPERATION
3
1. REGISTERING HOME .................. 22
2. REGISTERING PRESET
DESTINATIONS........................... 24
3. OPERATION FLOW: GUIDING
THE ROUTE................................ 26
4. SETTING HOME AS THE
DESTINATION ............................ 27
FUNCTION INDEX
4
1. FUNCTION INDEX ........................ 28
5
6
7
8
9
11
Page 12
1. BASIC FUNCTION
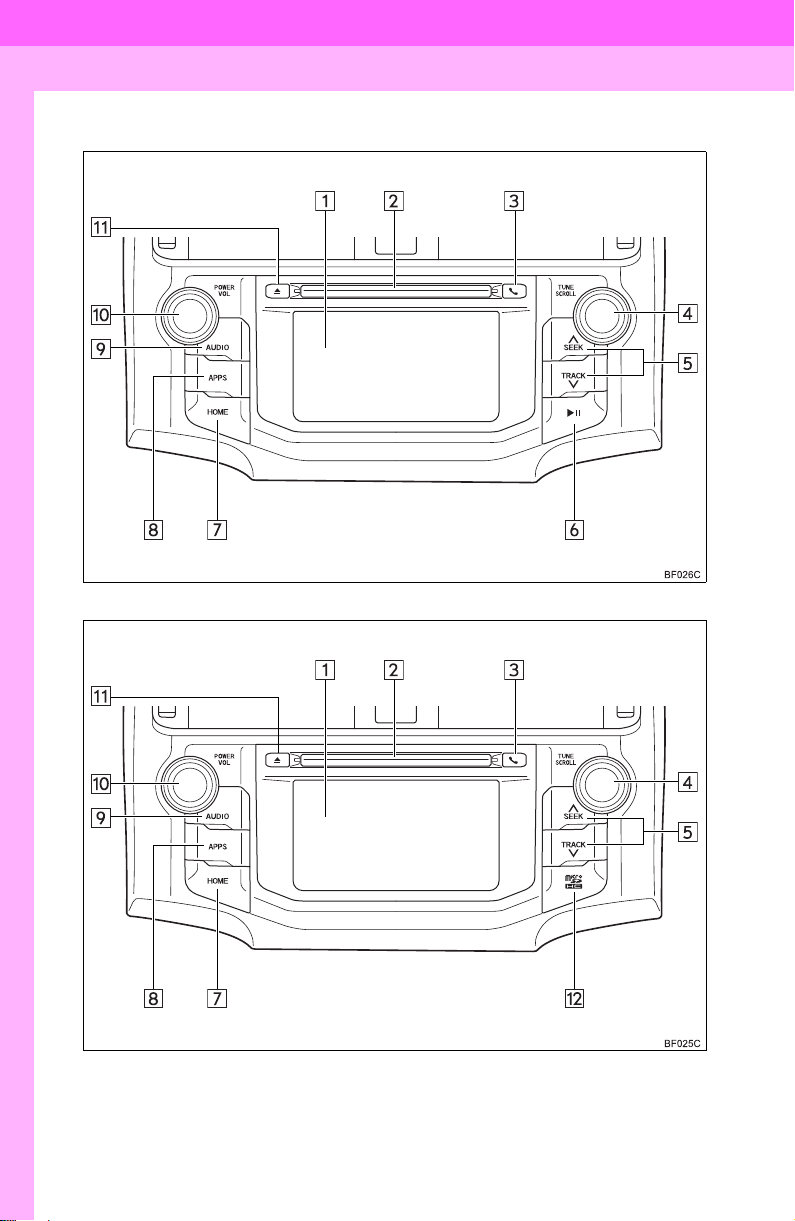
1. BUTTONS OVERVIEW
Entune Audio Plus
Entune Premium Audio
12
Page 13
1. BASIC FUNCTION
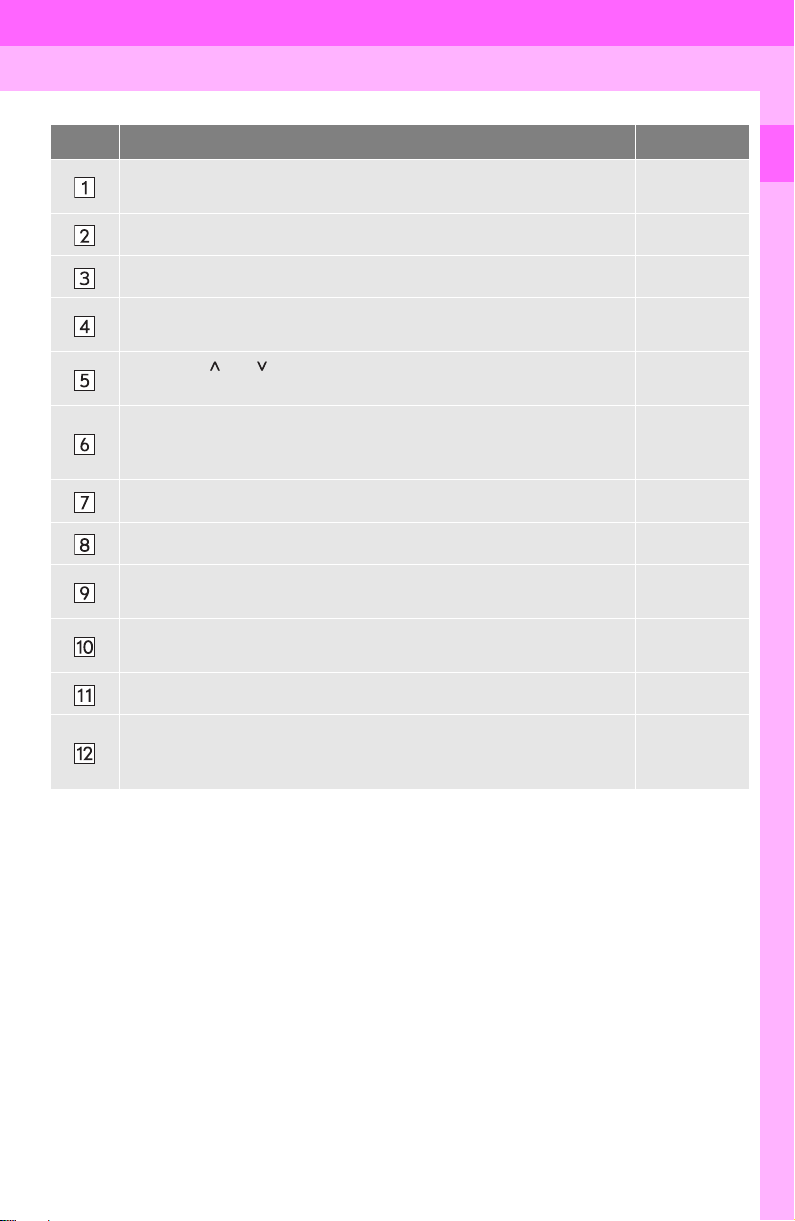
No. Function Page
By touching the screen with your finger, you can control the selected
functions.
34, 35
Insert a disc into this slot. The CD player turns on immediately. 74
Press to access the Bluetooth® hands-free system. 156
Turn to select a radio station or skip to the next or previous track/file.
Press the “ ” or “ ” button to seek up or down for a radio station or to
access a desired track/file.
77, 87, 94,
97, 101, 105
77, 87, 94,
97, 101, 105
77, 87, 94,
Press to play/pause.
97, 101,
105, 110
Press to display the home screen. 16, 36
Press to display the “Apps” screen. 14
Press to access the audio system. The audio system turns on in the
last mode used.
Press to turn the audio system on and off, and turn it to adjust the volume.
70, 72, 73
72
Press to eject a disc. 74
1
QUICK GUIDE
MAP card slot
Do not eject the microSD card, as doing so may deactivate the navigation system.
260
13
Page 14
1. BASIC FUNCTION
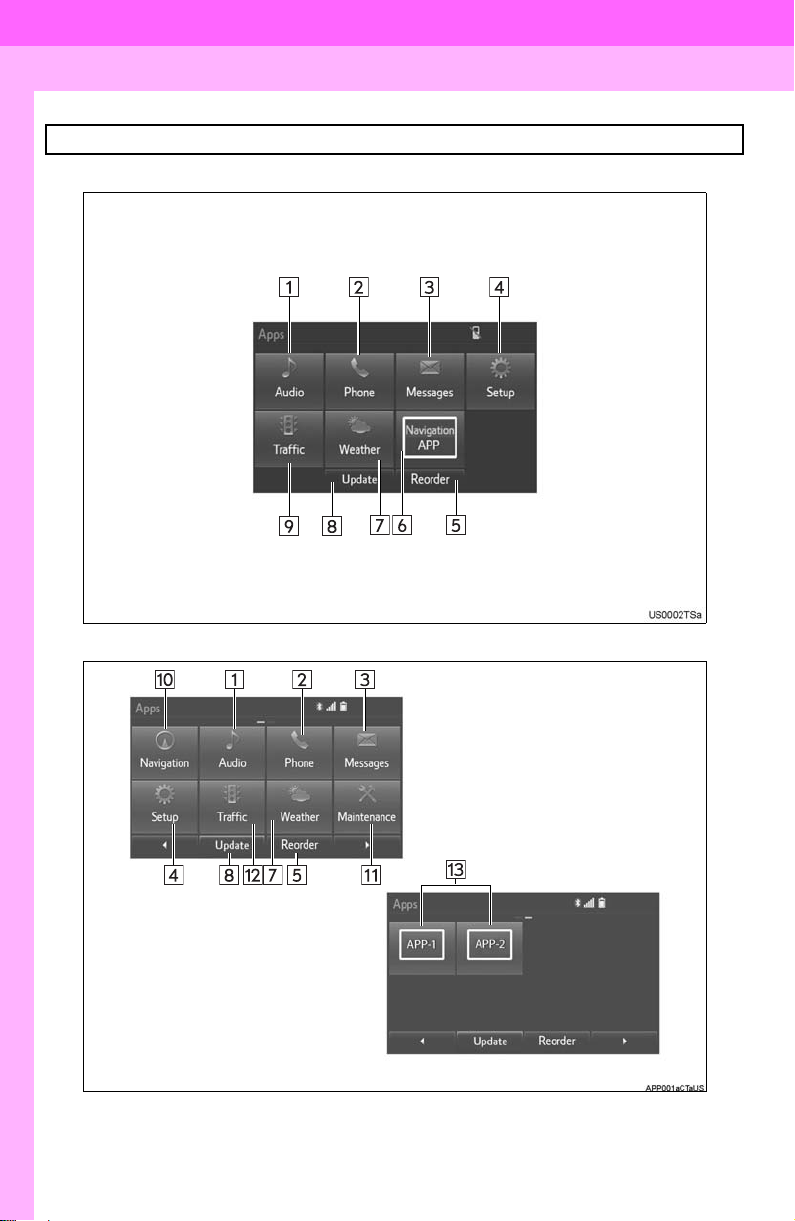
2. “Apps” SCREEN
Press the “APPS” button to display the “Apps” screen.
Entune Audio Plus
Entune Premium Audio
14
Page 15
1. BASIC FUNCTION
INFORMATION
No. Function Page
Select to display the audio control screen. 70
Select to display the hands-free operation screen. 156
Select to display the “Message Inbox” screen. 169
Select to display the “Setup” screen. 20
Select to reorder the applications.
Select the desired application then or to reorder.
If a turn-by-turn navigation application has been downloaded to a connected phone, the application will be displayed and can be used.
*
For details, refer to http://www.toyota.com/entune/
Select to display weather information. 140
*
Select to update the applications. 268
*
Select to display the traffic map information. 142
*
Select to display the map screen. 196
Select to display the “Maintenance” screen. 64
Select to display traffic information. 208
*
.
269
1
QUICK GUIDE
Select to display the application screen. 267
*
*: Available in the 48 states, D.C. and Alaska
● When there are two pages, select or to change the page.
15
Page 16
1. BASIC FUNCTION
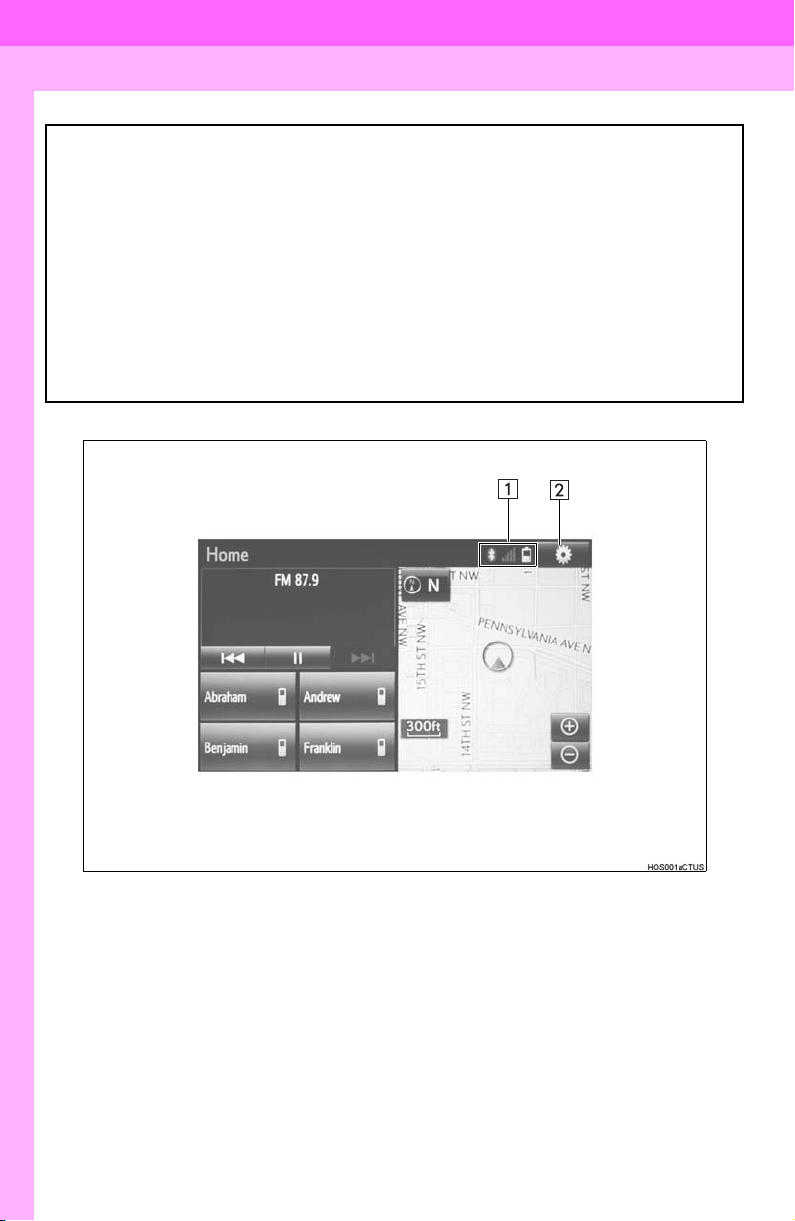
3. HOME SCREEN
Press the “HOME” button to display the home screen.
The home screen can display multiple information screens, such as the audio system screen, hands-free screen and navigation screen, simultaneously. When
hands-free mode is selected, it is possible to make a call on the home screen if the
desired phone number is registered to one of the 4 displayed buttons. In order to
register the contact, select and hold the desired button and register the desired
contact by obey displayed messages on the screen. (P.164)
When a screen is selected, the selected screen is switched to a full-screen display.
The home screen can be set to either a three-way split screen or a two-way split
screen.
For details about setting the home screen: P.36
Three-way split screen
16
Page 17
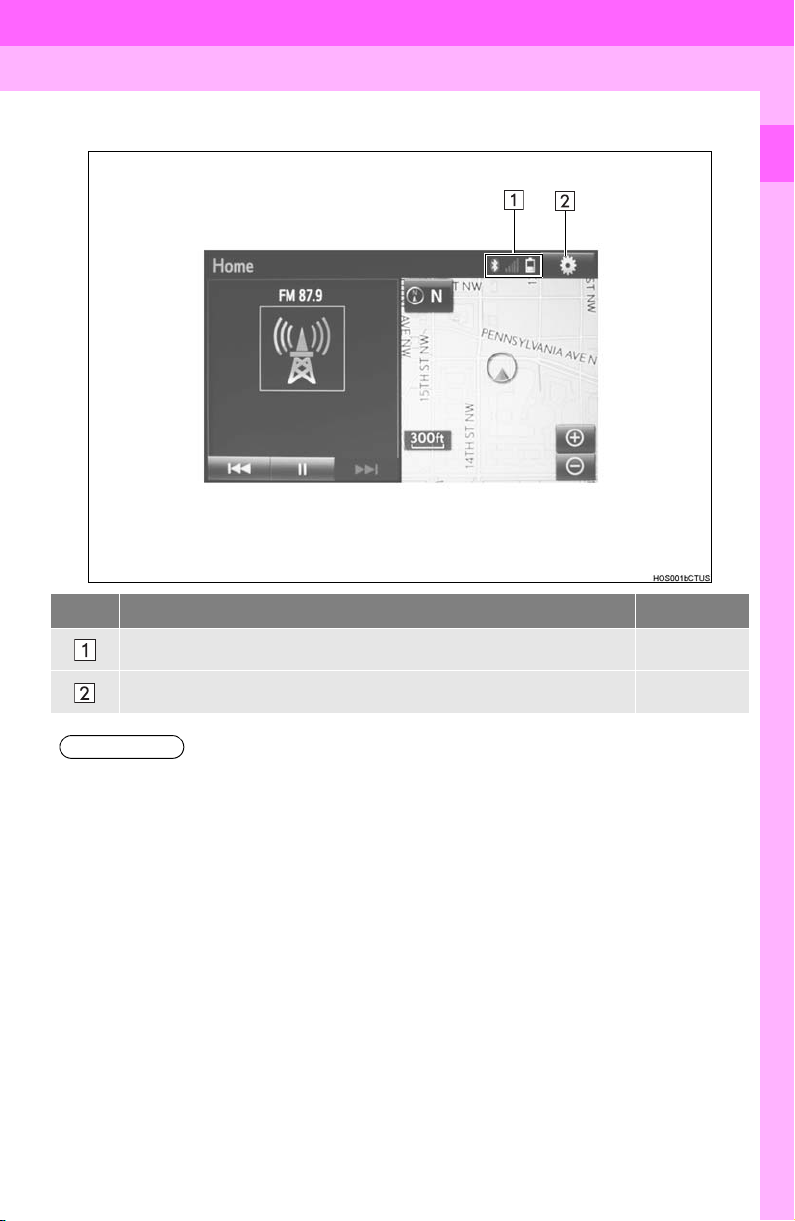
Two-way split screen
INFORMATION
1. BASIC FUNCTION
1
QUICK GUIDE
No. Function Page
Displays the condition of the Bluetooth® connection 18
Select to display the “Setup” screen. 20
● Entune Audio Plus only: Turn-by-turn navigation application screen can be displayed.
17
Page 18
1. BASIC FUNCTION
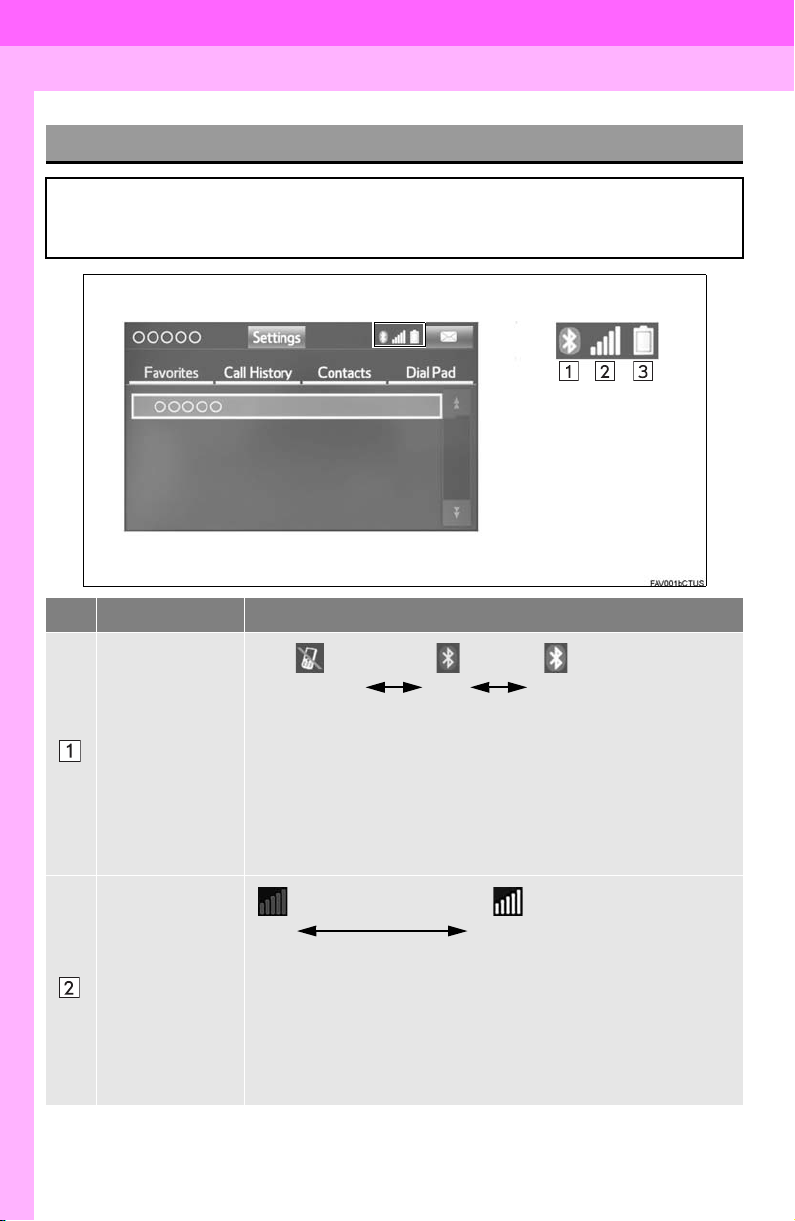
STATUS DISPLAY
The condition of the Bluetooth® connection, as well as the level of reception and
the amount of cellular phone battery charge left, are displayed on the status display.
No. Indicators Conditions
(Gray) (Blue)
No connection Poor Good
®
The condition of
the Bluetooth
connection
An antenna for the Bluetooth
ment panel. The condition of the Bluetooth
®
riorate and the system may not function when a Bluetooth
is used in the following conditions and/or places:
The cellular phone is obstructed by certain objects (such as when
it is behind the seat or in the glove box or console box).
The cellular phone is touching or is covered with metal materials.
Leave the Bluetooth
Bluetooth
®
connection is good.
®
phone in a place where the condition of the
connection is built into the instru-
Poor Excellent
The level of reception does not always correspond with the level
The level of reception
displayed on the cellular phone. The level of reception may not be
displayed depending on the phone you have.
When the cellular phone is out of the service area or in a place
inaccessible by radio waves, “No Service” is displayed.
“Rm” is displayed when receiving in a roaming area. While roam-
ing, display “Rm” top-left on the icon.
The receiving area may not be displayed depending on the type of
phone you have.
18
®
connection may dete-
®
phone
Page 19

1. BASIC FUNCTION
No. Indicators Conditions
The amount of
battery charge
left
Empty Full
The amount displayed does not always correspond with the
amount displayed on the Bluetooth
The amount of battery charge left may not be displayed depend-
ing on the type of the Bluetooth
This system does not have a charging function.
®
®
device connected.
1
QUICK GUIDE
device.
19
Page 20
2. QUICK REFERENCE
2. QUICK REFERENCE
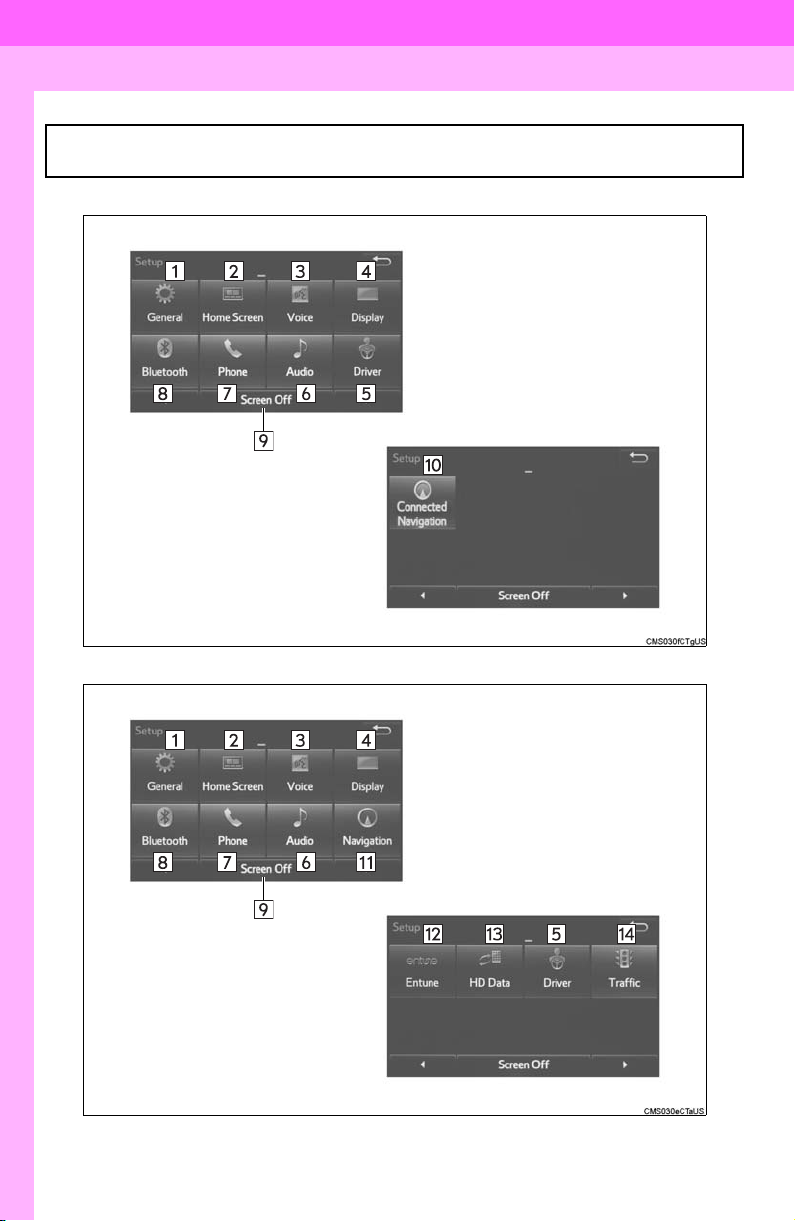
1. “Setup” SCREEN
The items shown on the “Setup” screen can be set. Press the “APPS” button, then
select “Setup” to display the “Setup” screen.
Entune Audio Plus
Entune Premium Audio
20
Page 21
2. QUICK REFERENCE
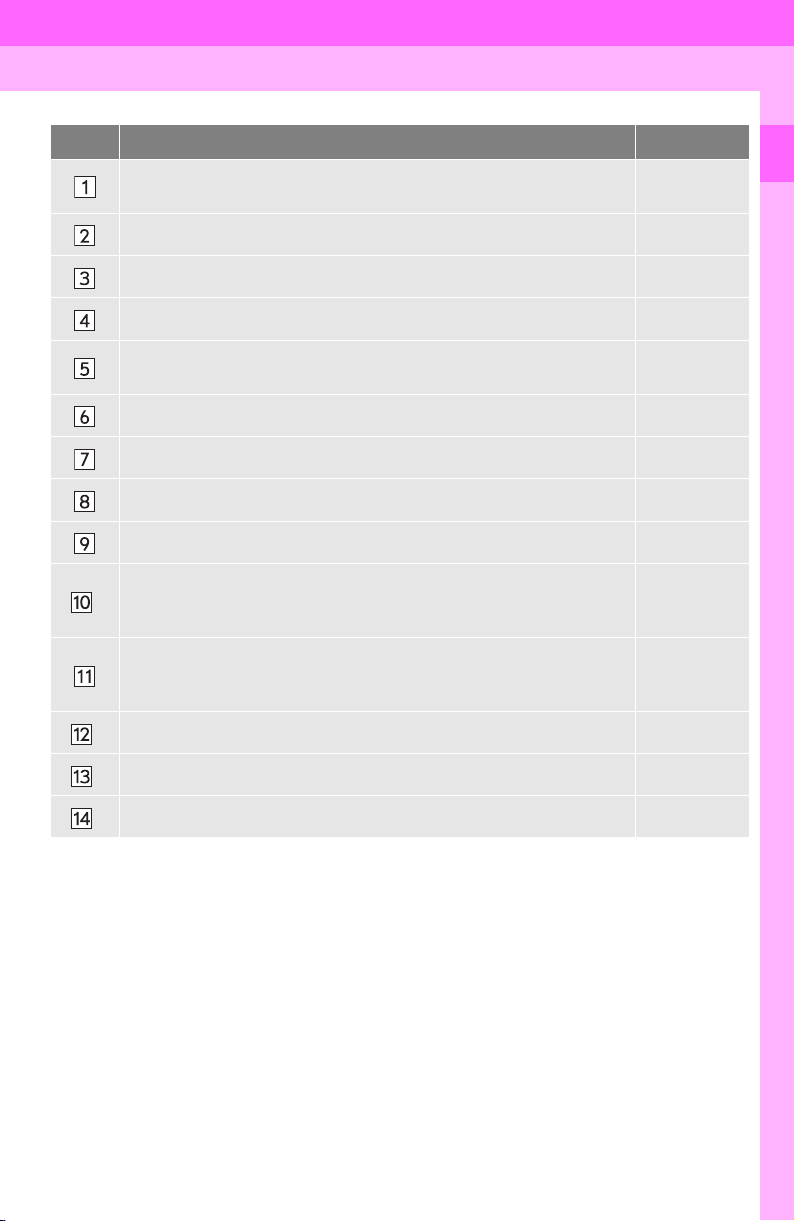
No. Function Page
Select to change the selected language, operation sound, automatic
screen change settings, etc.
56
Select to customize the home screen. 36
Select to set the voice settings. 62
Select to adjust the contrast and brightness of the screens, etc. 40
Select to link the driver’s cellular phone settings. (audio presets, language, etc.)
63
Select to set audio settings. 115
Select to set the phone sound, contacts, message settings, etc. 174
Select to set Bluetooth® phones and Bluetooth® audio devices. 48
Select to turn the screen off. To turn it on, press any button.
Select to change the phone data plan pop-up message timing. (“Connected Navigation” is downloadable application via smartphones using
*
a cellular data connection.)
Select to set memory points (home, preset destinations, address book
entries, areas to avoid), navigation details or to delete previous desti-
238, 247
nations.
1
QUICK GUIDE
Select to set Entune App Suite settings. 274
*
Select to set data services settings. 143
*
Select to set traffic information. 251
*
*: Available in the 48 states, D.C. and Alaska
21
Page 22
3. NAVIGATION OPERATION
*: Entune Premium Audio only
1
2
3
4
5
6
3. NAVIGATION OPERATION
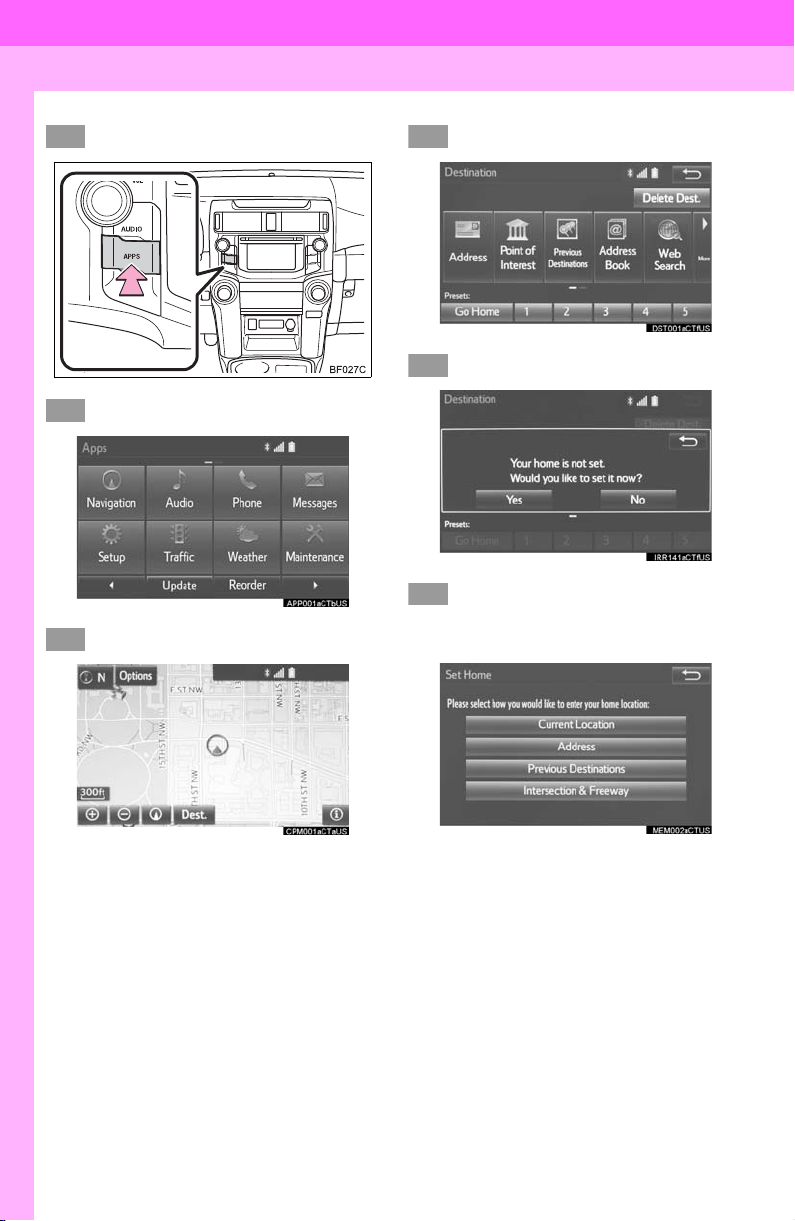
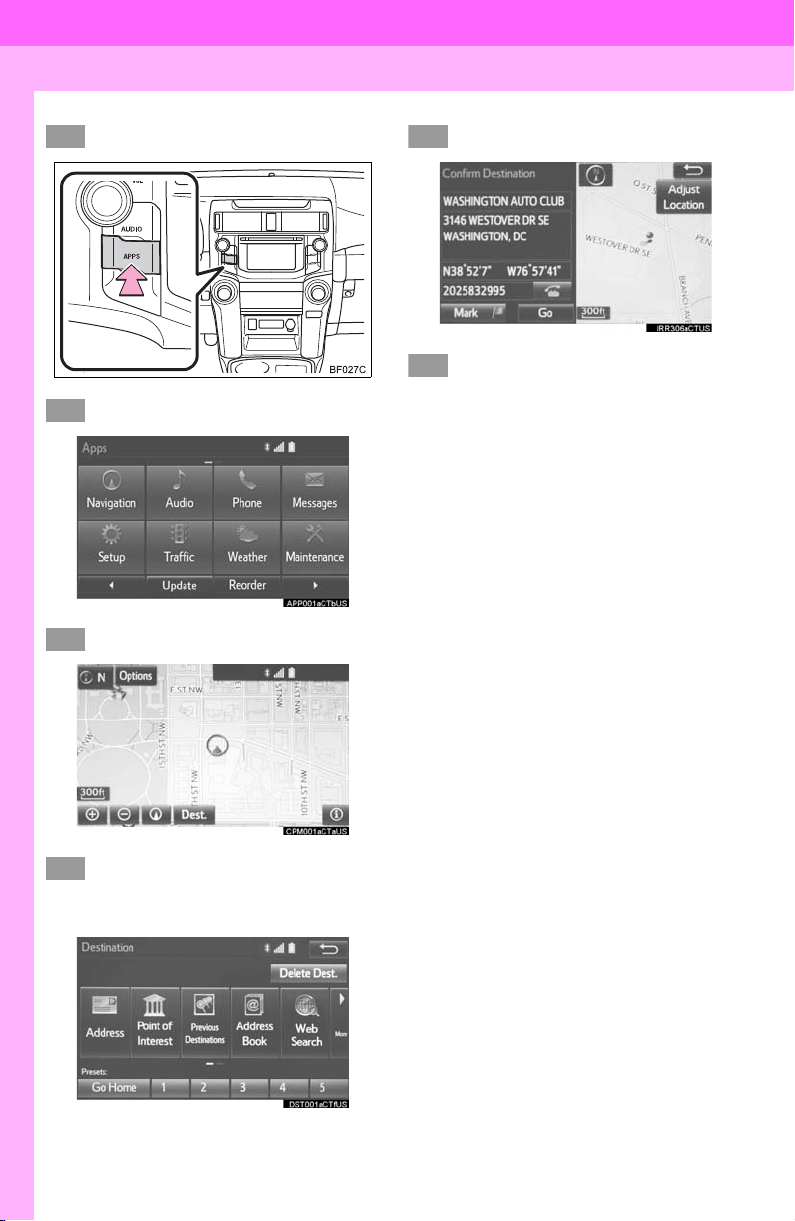
1. REGISTERING HOME*
Press the “APPS” button.
Select “Navigation”.
Select “Dest.”.
Select “Go Home”.
Select “Yes”.
There are different kinds of methods to search for your home.
(P.211)
22
Page 23

3. NAVIGATION OPERATION
7
8
Select “Enter”.
Select “OK”.
Registration of home is complete.
Registering home in a different way
P.239
Editing the name, location, phone num-
ber and icon
P.239
Setting home as the destination
P.214
1
QUICK GUIDE
23
Page 24
3. NAVIGATION OPERATION
*: Entune Premium Audio only
1
2
345
6
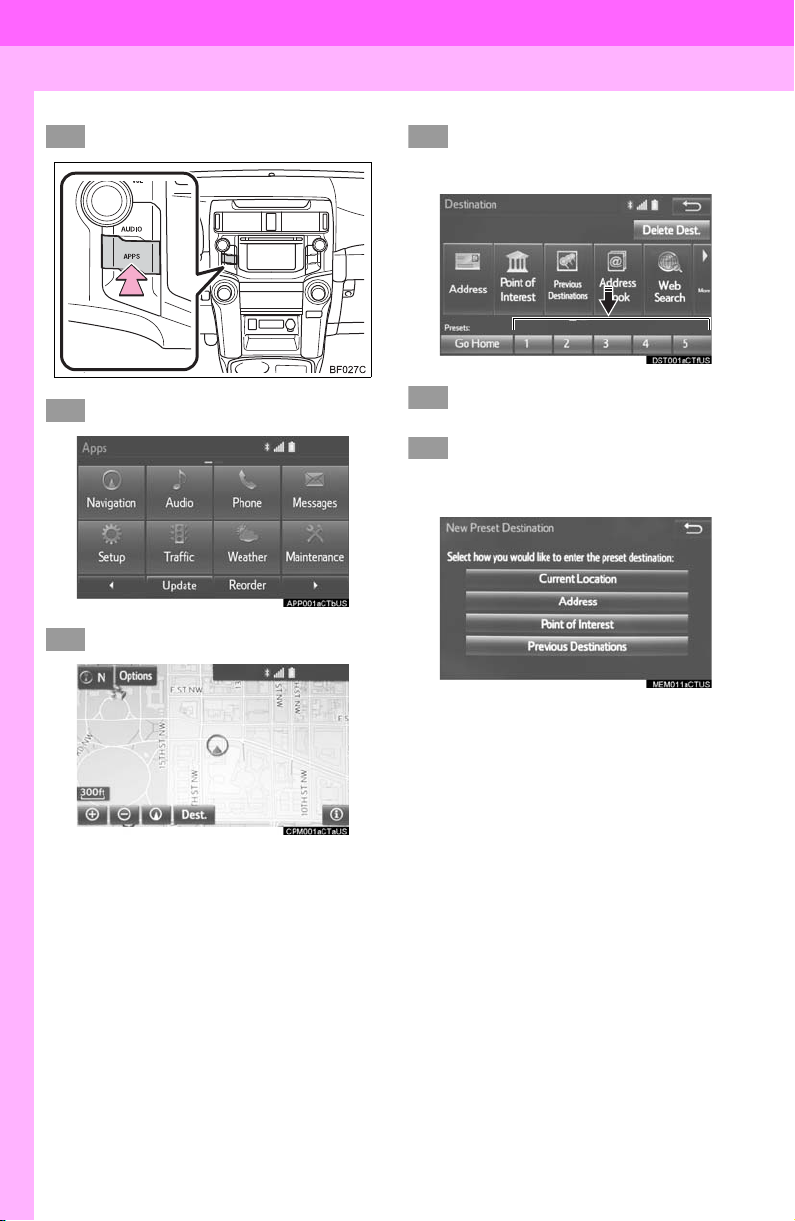
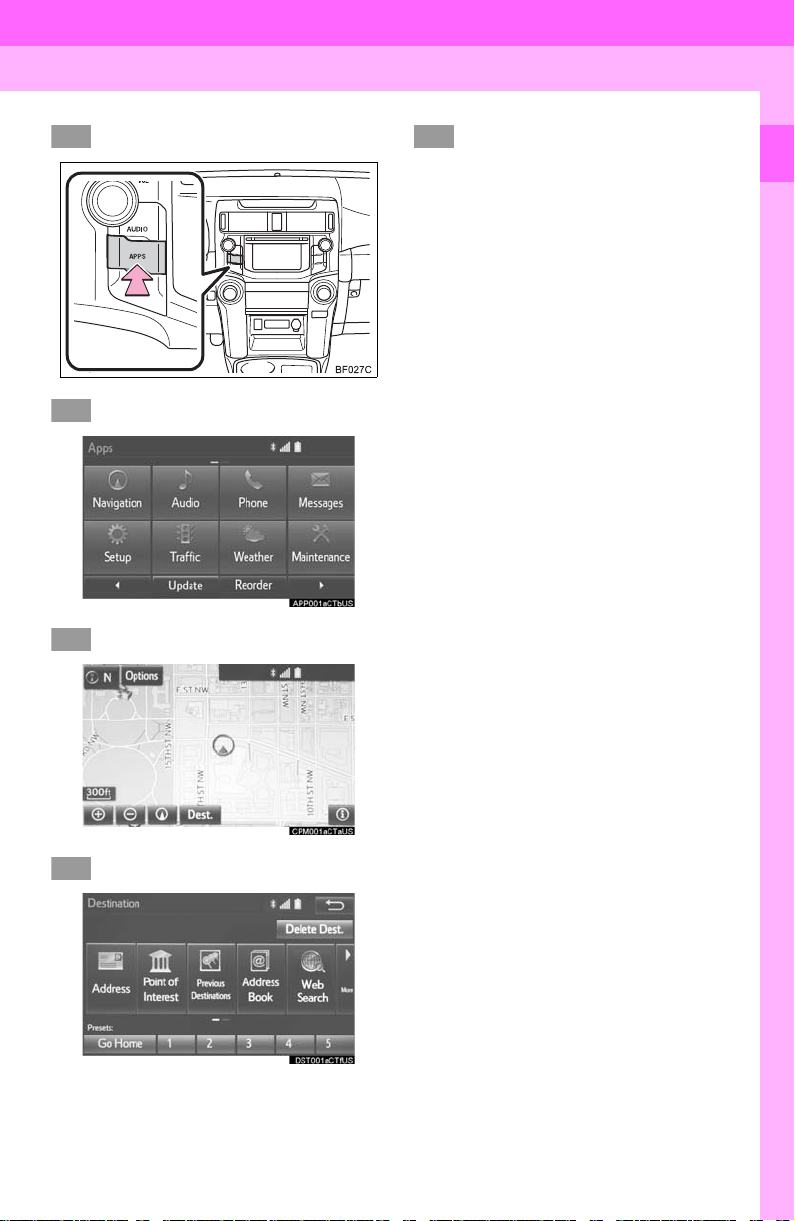
2. REGISTERING PRESET DESTINATIONS*
Press the “APPS” button.
Select “Navigation”.
Select “Dest.”.
Select one of the preset destina-
tion buttons.
Select “Yes”.
There are different kinds of methods to search for a destination.
(P.211)
24
Page 25

3. NAVIGATION OPERATION
7
8
9
Select “Enter”.
Select a position for this preset
destination.
Select “OK”.
Registration of preset destinations is
complete.
Registering preset destinations in a dif-
ferent way
P.240
Editing the name, location, phone num-
ber and icon
P.241
Setting preset destinations as the desti-
nation
P.214
1
QUICK GUIDE
25
Page 26
3. NAVIGATION OPERATION
*: Entune Premium Audio only
1
2
3
4
5
6
3. OPERATION FLOW: GUIDING THE ROUTE*
Press the “APPS” button.
Select “Navigation”.
Select “Dest.”.
Select “Go”.
Select “OK”.
Selecting routes other than the one recommended. (P.223)
Guidance to the destination is displayed
on the screen and can be heard via
voice guidance.
There are different kinds of methods to search for a destination.
(P. 2 11 )
26
Page 27
3. NAVIGATION OPERATION
*: Entune Premium Audio only
1
2
3
4
5
4. SETTING HOME AS THE DESTINATION*
Press the “APPS” button.
Select “Navigation”.
Select “Dest.”.
Select “OK”.
Selecting routes other than the one recommended. (P.223)
Guidance to the destination is displayed
on the screen and can be heard via
voice guidance.
1
QUICK GUIDE
Select “Go Home”.
27
Page 28

4. FUNCTION INDEX
1. FUNCTION INDEX
Map*
Displaying maps Page
Viewing the map screen 196
Displaying the current position 199
Viewing the current position vicinity map 203
Changing the scale 199
Changing the map orientation 200
Displaying map information 204
Displaying the estimated travel/arrival time to the destination 227
Selecting the map mode 201
Displaying traffic information 208
Searching for destinations Page
Searching for the destination 213
Changing the search area 214
Route guidance*
Before starting or during route guidance Page
Starting route guide 223
Editing the route 233
Viewing the entire route map 228
Pausing guidance 226
Adjusting route guidance volume 62
Deleting the destination 234
Address book Page
Registering address book entries 242
Marking icons on the map 243
*: Entune Premium Audio only
28
Page 29

4. FUNCTION INDEX
Useful functions
Information Page
Displaying vehicle maintenance* 64
Hands-free system (for cellular phone) Page
Registering/connecting Bluetooth® phone 42
Making a call on a Bluetooth® phone 160
Receiving a call on the Bluetooth® phone 165
Voice command system Page
Operating the system with your voice 128
Peripheral monitoring system Page
Viewing behind the rear of the vehicle 146
*: Entune Premium Audio only
1
QUICK GUIDE
29
Page 30

4. FUNCTION INDEX
30
Page 31

2
BASIC FUNCTION
1
2
BASIC INFORMATION BEFORE
1
OPERATION
1. INITIAL SCREEN ........................... 32
2. TOUCH SCREEN GESTURES ...... 34
3. TOUCH SCREEN
OPERATION................................ 35
4. HOME SCREEN OPERATION ...... 36
5. ENTERING LETTERS AND
NUMBERS/LIST SCREEN
OPERATION................................ 37
ENTERING LETTERS AND
NUMBERS .......................................... 37
LIST SCREEN ....................................... 37
6. SCREEN ADJUSTMENT ............... 40
Bluetooth® SETTINGS
2
1. REGISTERING/CONNECTING
Bluetooth
REGISTERING A Bluetooth® PHONE
FOR THE FIRST TIME ....................... 42
REGISTERING A Bluetooth
PLAYER FOR THE FIRST TIME ........ 43
PROFILES............................................. 44
CERTIFICATION ................................... 45
®
DEVICE .................... 42
®
AUDIO
2. SETTING Bluetooth®
DETAILS ..................................... 48
“Bluetooth* Setup” SCREEN.................. 48
REGISTERING A Bluetooth
DEVICE ............................................... 49
DELETING A Bluetooth
DEVICE ............................................... 50
CONNECTING A Bluetooth
DEVICE ............................................... 51
EDITING THE Bluetooth
INFORMATION ................................... 53
“System Settings” SCREEN................... 54
OTHER SETTINGS
3
®
®
®
®
DEVICE
1. GENERAL SETTINGS .................. 56
GENERAL SETTINGS SCREEN........... 56
2. VOICE SETTINGS......................... 62
VOICE SETTINGS SCREEN................. 62
3. DRIVER SETTINGS ...................... 63
MANUALLY SELECT LINKED
SETTINGS .......................................... 63
4. MAINTENANCE ............................ 64
3
4
5
6
7
8
9
*: Bluetooth is a registered trademark of Bluetooth SIG, Inc.
31
Page 32

1. BASIC INFORMATION BEFORE OPERATION
CAUTION
*: Entune Premium Audio only
1. INITIAL SCREEN
Vehicles without a smart key system
1 When the engine switch is turned to the
“ACC” or “ON” position, the initial
screen will be displayed and the system will begin operating.
Vehicles with a smart key system
1 When the engine switch is turned to
ACCESSORY or IGNITION ON mode,
the initial screen will be displayed and
the system will begin operating.
Images shown on the initial screen can
be changed to suit individual preferences. (P.59.)
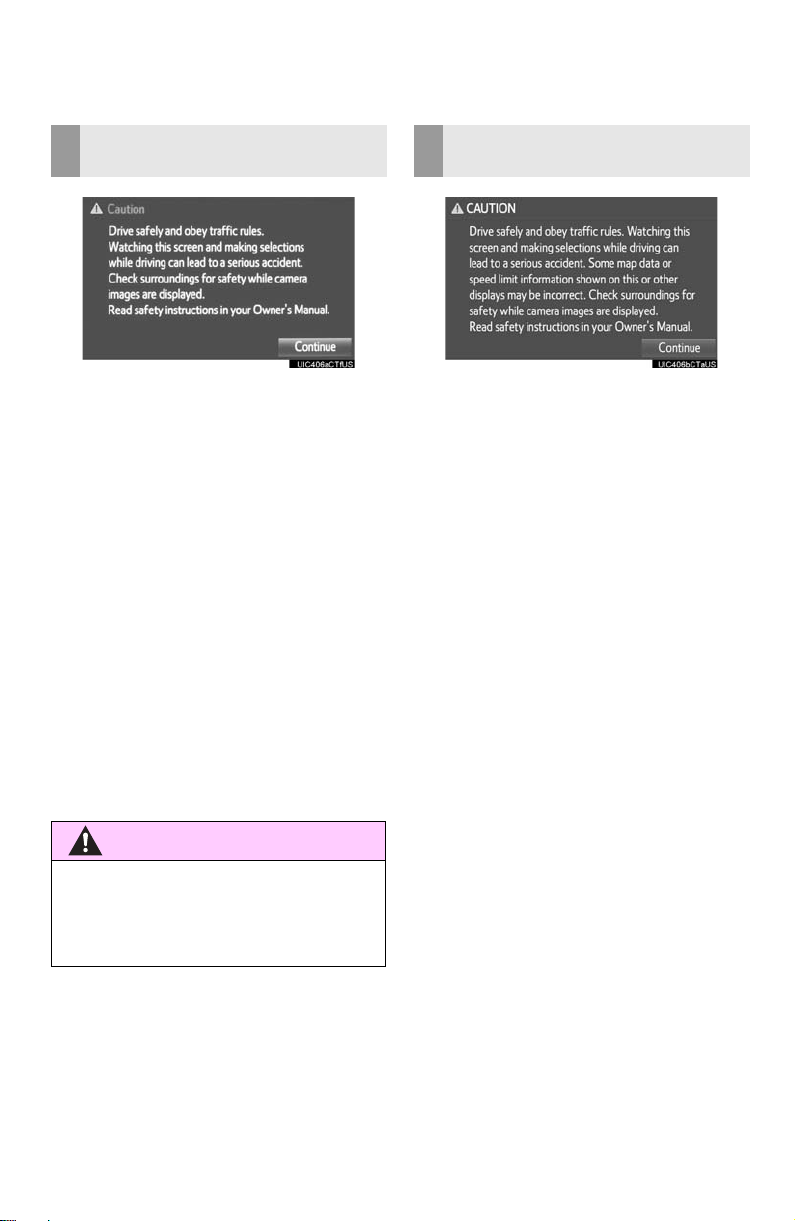
After a few seconds, the “Caution” screen
will be displayed.
After about 5 seconds, the “Caution”
screen automatically switches to the next
screen.
MAINTENANCE
INFORMATION*
This system reminds users when to replace certain parts or components and
shows dealer information (if registered) on the screen.
When the vehicle reaches a previously
set driving distance or date specified
for a scheduled maintenance check,
the “Maintenance Reminder” screen
will be displayed when the system is
turned on.
To prevent the screen from being dis-
played again, select “Do Not Tell Me
Again”.
To register maintenance information:
P. 6 4
If is selected, the registered
phone number can be called.
● When the vehicle is stopped with the
engine running, always apply the parking brake for safety.
32
Page 33

RESTARTING THE SYSTEM
When system response is extremely
slow, the system can be restarted.
1 Press and hold the “POWER/VOL”
knob for 3 seconds or more.
1. BASIC INFORMATION BEFORE OPERATION
2
BASIC FUNCTION
33
Page 34

1. BASIC INFORMATION BEFORE OPERATION
INFORMATION
2. TOUCH SCREEN GESTURES
Operations are performed by touching the touch screen directly with your finger.
Operation method Outline Main use
Tou ch
Quickly touch and release
once.
1
Drag*
Touch the screen with
your finger, and move the
screen to the desired position.
1
Flick*
Quickly move the screen
by flicking with your finger.
*1: The above operations may not be performed on all screens.
*2
: Entune Premium Audio only
Changing and selecting various settings
Scrolling the lists
Scrolling the map screen*
Scrolling the main screen page
Scrolling the map screen*
● Flick operations may not be performed smoothly in high altitudes.
2
2
34
Page 35

1. BASIC INFORMATION BEFORE OPERATION
NOTICE
INFORMATION
3. TOUCH SCREEN OPERATION
This system is operated mainly by the
buttons on the screen. (Referred to as
screen buttons in this manual.)
When a screen button is touched, a
beep sounds. (To set the beep sound:
P. 5 6 )
● To prevent damaging the screen, lightly
touch the screen buttons with your finger.
● Do not use objects other than your finger
to touch the screen.
● Wipe off fingerprints using a glass clean-
ing cloth. Do not use chemical cleaners
to clean the screen, as they may damage the touch screen.
● If the system does not respond to touch-
ing a screen button, move your finger
away from the screen and then touch it
again.
● Dimmed screen buttons cannot be oper-
ated.
● The displayed image may become
darker and moving images may be
slightly distorted when the screen is
cold.
● In extremely cold conditions, the map
may not be displayed and the data input
by a user may be deleted. Also, the
screen buttons may be harder than
usual to depress.
● When you look at the screen through
polarized material such as polarized
sunglasses, the screen may be dark and
hard to see. If so, look at the screen
from different angles, adjust the screen
settings on the “Display Settings” screen
or take off your sunglasses.
● When is displayed on the screen,
select to return to the previous
screen.
2
BASIC FUNCTION
35
Page 36

1. BASIC INFORMATION BEFORE OPERATION
INFORMATION
4. HOME SCREEN OPERATION
The home screen can display multiple
information screens, such as the audio
system screen and hands-free screen,
simultaneously.
1 Press the “HOME” button.
2 “Home” screen is displayed.
When a screen is selected, the selected
screen will change to a full-screen display.
CUSTOMIZING THE HOME
SCREEN
The display items/area on the home
screen can be changed.
1 Select .
2 Select “Home Screen”.
3 Select “Two Panel” or “Three Panel”.
4 Select the desired area.
5 Select the desired item.
6 Select “OK”.
● When the selected item is already being
displayed and another area is selected
for that item, the item that it is replacing
will be displayed in the original item’s
location.
36
Page 37

1. BASIC INFORMATION BEFORE OPERATION
INFORMATION
5. ENTERING LETTERS AND NUMBERS/LIST SCREEN OPERATION
When searching by an address, name,
etc., or entering data, letters and numbers can be entered via the screen.
ENTERING LETTERS AND
NUMBERS
No. Function
Select to enter desired characters.
Text field. Entered character(s) will
be displayed.
During character entry, when there is
only one available option for the next
character(s), the next character(s)
will be displayed in gray text in the
text field automatically. Gray text is
entered by selecting this button.
LIST SCREEN
The list screen may be displayed after
entering characters.
DISPLAYING THE LIST
1 Enter characters and select “OK”.
Matching items from the database are
listed even if the entered address or name
is incomplete.
The list will be displayed automatically if
the maximum number of characters is
entered or matching items can be displayed on a single list screen.
2
BASIC FUNCTION
Select to erase one character.
Select to display the alphabet keys.
Select to display other symbols.
On certain letter entry screens, letters can
be entered in upper or lower case.
: Select to enter in lower case.
: Select to enter in upper case.
Keyboard layout can be changed.
(P.56)
● The number of matching items is shown
on the right side of the screen. If the
number of matching items is more than
999, the system displays “” on the
screen.
37
Page 38

1. BASIC INFORMATION BEFORE OPERATION
■SELECTING ALL ITEMS
Some lists contain “Select All”. If “Se-
lect All” is selected, it is possible to
select all items.
1 Select “Select All”.
“Unselect All”: Unselect all items in the
list.
LIST SCREEN OPERATION
When a list is displayed, use the appropriate screen button to scroll through
the list.
Icon Function
Select to skip to the next or previous page.
Select and hold or to
scroll through the displayed list.
This indicates the displayed
screen’s position.
If appears to the right of an
item name, the complete name is
too long to display.
Select to scroll to the end of
the name.
Select to move to the begin-
ning of the name.
38
Page 39

1. BASIC INFORMATION BEFORE OPERATION
INFORMATION
SORTING
The order of a list displayed on the
screen can be sorted in the order of
distance from the current location,
date, category, etc.
1 Select “Sort”.
2 Select the desired sorting criteria.
CHARACTER JUMP BUTTONS
IN LISTS
Some lists contain character screen
buttons, “ABC”, “DEF” etc., which allow a direct jump to list entries that begin with the same letter as the
character screen button.
1 Select the desired character jump but-
tons.
● Every time the same character screen
button is selected, the list starting with
the subsequent character is displayed.
2
BASIC FUNCTION
39
Page 40

1. BASIC INFORMATION BEFORE OPERATION
INFORMATION
INFORMATION
6. SCREEN ADJUSTMENT
The contrast and brightness of the
screen display and the image of the
camera display can be adjusted. The
screen can also be changed to either
day or night mode.
1 Press the “APPS” button.
2 Select “Setup”.
● When the screen is viewed through
polarized sunglasses, a rainbow pattern
may appear on the screen due to optical
characteristics of the screen. If this is
disturbing, please operate the screen
without polarized sunglasses.
CHANGING BETWEEN DAY
AND NIGHT MODE
Depending on the position of the headlight switch, the screen changes to day
or night mode. This feature is available
when the headlight is switched on.
1 Select “Day Mode”.
3 Select “Display”.
4 Select the items to be set.
No. Function Page
Select to adjust the screen
display.
Select to adjust the camera
display.
Select to turn day mode on/
off.
● If the screen is set to day mode with the
headlight switch turned on, this condition
is memorized even with the engine
turned off.
41
40
40
Page 41

ADJUSTING THE CONTRAST/
BRIGHTNESS
1. BASIC INFORMATION BEFORE OPERATION
The contrast and brightness of the
screen can be adjusted according to
the brightness of your surroundings.
1 Select “General” or “Camera”.
2 Select the desired item.
General
Camera
Screen button Function
“Brightness” “+”
“Brightness” “-”
“Contrast” “+”
“Contrast” “-”
Select to brighten the
screen.
Select to darken the
screen.
Select to strengthen the
contrast of the screen.
Select to weaken the
contrast of the screen.
2
BASIC FUNCTION
3 Select “OK”.
41
Page 42

2. Bluetooth® SETTINGS
1. REGISTERING/CONNECTING Bluetooth® DEVICE
REGISTERING A Bluetooth®
PHONE FOR THE FIRST TIME
To use the hands-free system, it is
necessary to register a Bluetooth
®
phone with the system.
Once the phone has been registered, it
is possible to use the hands-free system.
This operation cannot be performed
while driving.
For details about registering a
®
Bluetooth
1 Turn the Bluetooth
device: P.49
®
connection setting
of your cellular phone on.
This function is not available when
Bluetooth
lular phone is set to off.
®
connection setting of your cel-
2 Press the “APPS” button.
5 When this screen is displayed, search
for the device name displayed on this
screen on the screen of your
Bluetooth
For details about operating the Bluetooth
device, see the manual that comes with it.
To cancel the registration, select “Can-
cel”.
6 Register the Bluetooth
your Bluetooth® device.
A PIN-code is not required for SSP
(Secure Simple Pairing) compatible
Bluetooth
type of Bluetooth
nected, a message confirming registration may be displayed on the Bluetooth
device’s screen. Respond and operate the
Bluetooth
mation message.
®
device.
®
device using
®
devices. Depending on the
®
device according to the confir-
®
device being con-
®
®
3 Select “Phone”.
Operations up to this point can also be
performed by pressing the switch on
the steering wheel or switch on the
instrument panel.
4 Select “Yes” to register a phone.
42
Page 43

2. Bluetooth® SETTINGS
7 Check that the screen is displayed
when registration is complete.
The system waits for connection requests
coming from the registered device.
®
At this stage, the Bluetooth
not yet available.
functions are
8 Select “OK” when the connection sta-
tus changes from “Connection waiting...” to “Connected”.
If an error message is displayed, follow
the guidance on the screen to try again.
REGISTERING A Bluetooth®
AUDIO PLAYER FOR THE
FIRST TIME
To use the Bluetooth® Audio, it is necessary to register an audio player with
the system.
Once the player has been registered, it
®
is possible to use the Bluetooth
dio.
This operation cannot be performed
while driving.
For details about registering a
Bluetooth
®
device: P.49
Au-
1 Turn the Bluetooth
of your audio player on.
This function is not available when the
Bluetooth
audio player is set to off.
®
connection setting of your
®
connection setting
2 Press the “AUDIO” button.
3 Select “Source” on the audio screen
or press “AUDIO” button again.
4 Select “ Audio”.
5 Select “Yes” to register an audio play-
er.
6 Follow the steps in “REGISTERING A
Bluetooth® DEVICE” from “STEP 2”.
(P.49)
2
BASIC FUNCTION
43
Page 44

2. Bluetooth® SETTINGS
INFORMATION
PROFILES
This system supports the following services.
Bluetooth®
Device
Bluetooth
Phone/
Bluetooth
®
®
Bluetooth® Specification
Audio
Player
Bluetooth®
Device
HFP (Hands-Free Profile)
OPP (Object Push Profile)
PBAP (Phone Book AcBluetooth
Phone
®
cess profile)
MAP (Message Access
Profile)
SPP (Serial Port Profile)
A2DP (Advanced Audio
Bluetooth
®
Distribution Profile)
Audio
Player
AVRCP (Audio/Video Re-
mote Control Profile)
1
*
: Entune Audio Plus
2
: Entune Premium Audio
*
Spec. Function
Registering a
Bluetooth
®
vice
Profile Function
Hands-free
system
Transferring the
contacts
Bluetooth
®
phone message
Connected navi-
1
/Entune
gation*
App Suite*
2
Bluetooth® audio
system
de-
Require-
ments
Ver. 2.0
Require-
ments
Recommen-
dations
Ver. 3.0
+EDR
Recommen-
dations
Ver. 1.0 Ver. 1.6
Ver. 1.1 Ver. 1.2
Ver. 1.0 Ver. 1.1
Ver. 1.0
Ver. 1.1
Ver. 1.0 Ver. 1.2
Ver. 1.0 Ver. 1.4
● If your cellular phone does not support HFP, registering the Bluetooth® phone or using
OPP, PBAP, MAP or SPP profiles individually will not be possible.
®
● If the connected Bluetooth
the Bluetooth
®
device function may not work properly.
● Refer to http://www.toyota.com/entune/
device version is older than recommended or incompatible,
to find approved Bluetooth® phones for this sys-
tem.
Bluetooth is a registered trademark of Bluetooth SIG, Inc.
44
Page 45

2. Bluetooth® SETTINGS
CAUTION
CERTIFICATION
U.S.A. (Entune Audio Plus)
FCC ID: AJDK066
This device complies with part 15 of the
FCC Rules. Operation is subject to the
following two conditions: (1) This device
may not cause harmful interference,
and (2) this device must accept any
interference received, including
interference that may cause undesired
operation.
● FCC WARNING:
Changes or modifications not expressly
approved by the party responsible for
compliance could void the user’s authority to operate the equipment.
● RF Exposure Compliance:
This equipment complies with FCC radiation exposure limits set forth for an
uncontrolled environment and meets the
FCC radio frequency (RF) Exposure
Guidelines. This equipment should be
installed and operated keeping the radiator at least 20cm or more away from
person’s body.
● Co-location:
This transmitter must not be co-located
or operated in conjunction with any other
antenna or transmitter.
Canada (Entune Audio Plus)
IC: 775E-K066
This device complies with Industry
Canada license-exempt RSS standard(s). Operation is subject to the following two conditions: (1) this device
may not cause interference, and (2)this
device must accept any interference,
including interference that may cause
undesired operation of the device.
Le présent appareil est conforme aux
CNR d'Industrie Canada applicables
aux appareils radio exempts de licence.
L'exploitation est autorisée aux deux
conditions suivantes: (1)l'appareil ne
doit pas produire de brouillage, et (2)
l'utilisateur de l'appareil doit accepter
tout brouillage radioélectrique subi,
même si le brouillage est susceptible
d'en compromettre le fonctionnement.
2
BASIC FUNCTION
45
Page 46

2. Bluetooth® SETTINGS
CAUTION
CAUTION
U.S.A. (Entune Premium Audio)
● RF Exposure Compliance:
This equipment complies with IC radiation exposure limits set forth for an
uncontrolled environment and meets
RSS-102 of the IC radio frequency (RF)
Exposure rules. This equipment should
be installed and operated keeping the
radiator at least 20 cm or more away
from person’s body.
Cet équipement est conforme aux limites d’exposition aux rayonnements
énoncées pour un environnement non
contrôlé et respecte les règles d’exposition aux fréquences radioélectriques
(RF) CNR-102 de l’IC. Cet équipement
doit être installé et utilisé en gardant une
distance de 20 cm ou plus entre le dispositif rayonnant et le corps.
● Under Industry Canada regulations, this
radio transmitter may only operate using
an antenna of a type and maximum (or
lesser) gain approved for the transmitter
by Industry Canada. To reduce potential
radio interference to other users, the
antenna type and its gain should be so
chosen that the equivalent isotropically
radiated power (e.i.r.p.) is not more than
that necessary for successful communication.
Conformément à la réglementation
d'Industrie Canada, le présent émetteur
radio peut fonctionner avec une antenne
d'un type et d'un gain maximal (ou
inférieur) approuvé pour l'émetteur par
Industrie Canada. Dans le but de réduire
les risques de brouillage radioélectrique
à l'intention des autres utilisateurs, il faut
choisir le type d'antenne et son gain de
sorte que la puissance isotrope rayonnée équivalente (p.i.r.e.) ne dépasse
pas l'intensité nécessaire à l'établissement d'une communication satisfaisante.
FCC ID: ACJ932YEAP01A727
This device complies with part 15 of the
FCC Rules. Operation is subject to the
following two conditions: (1) This device
may not cause harmful interference,
and (2) this device must accept any
interference received, including
interference that may cause undesired
operation.
● FCC WARNING:
Changes or modifications not expressly
approved by the party responsible for
compliance could void the user’s authority to operate the equipment.
Any unauthorized changes or modifications to this equipment would void the
user’s authority to operate this device.
● Radio frequency radiation exposure
information:
This equipment complies with FCC radiation exposure limits set forth for an
uncontrolled environment. This equipment should be installed and operated
with minimum distance of 20cm between
the radiator and your body. This transmitter must not be co-located or operated in conjunction with any other
antenna or transmitter.
46
Page 47

Canada (Entune Premium Audio)
This device complies with Industry
Canada license-exempt RSS standard(s). Operation is subject to the following two conditions: (1) this device
may not cause interference, and (2)this
device must accept any interference,
including interference that may cause
undesired operation of the device.
Le présent appareil est conforme aux
CNR d'Industrie Canada applicables
aux appareils radio exempts de licence.
L'exploitation est autorisée aux deux
conditions suivantes: (1)l'appareil ne
doit pas produire de brouillage, et (2)
l'utilisateur de l'appareil doit accepter
tout brouillage radioélectrique subi,
même si le brouillage est susceptible
d'en compromettre le fonctionnement.
This radio transmitter (identify the
device by certification number, or model
number if Category II) has been
approved by Industry Canada to operate with the antenna types listed below
with the maximum permissible gain and
required antenna impedance for each
antenna type indicated. Antenna types
not included in this list, having a gain
greater than the maximum gain indicated for that type, are strictly prohibited
for use with this device.
Le présent émetteur radio (identifier le
dispositif par son numéro de certification ou son numéro de modèle s'il fait
partie du matériel de catégorie II) a été
approuvé par Industrie Canada pour
fonctionner avec les types d'antenne
énumérés ci-dessous et ayant un gain
admissible maximal et l'impédance requise pour chaque type d'antenne. Les
types d'antenne non inclus dans cette
liste, ou dont le gain est supérieur au
gain maximal indiqué, sont strictement
interdits pour l'exploitation de l'émetteur.
2. Bluetooth® SETTINGS
2
BASIC FUNCTION
47
Page 48

2. Bluetooth® SETTINGS
2. SETTING Bluetooth® DETAILS
1 Press the “APPS” button.
2 Select “Setup”.
3 Select “Bluetooth*”.
4 Select the desired item to be set.
“Bluetooth* Setup” SCREEN
Function Page
Registering a Bluetooth® device 49
Deleting a Bluetooth® device 50
Connecting a Bluetooth® device 51
Editing the Bluetooth® device information
Bluetooth® system settings 54
*: Bluetooth is a registered trademark of
Bluetooth SIG, Inc.
53
48
Page 49

2. Bluetooth® SETTINGS
DISPLAYING THE “Bluetooth*
Setup” SCREEN IN A
DIFFERENT WAY
From the phone/message settings
screen
1 Press the “APPS” button.
2 Select “Setup”.
3 Select “Phone”.
4 Select “Connect Phone”.
From the status display
1 Select status display area on the
screen.
REGISTERING A Bluetooth®
DEVICE
Up to 5 Bluetooth® devices can be registered.
®
Bluetooth
and audio players (AVP) can be registered simultaneously.
This operation cannot be performed
while driving.
compatible phones (HFP)
1 Display the “Bluetooth* Setup” screen.
(P.48)
2 Select “Add”.
When another Bluetooth® device is con-
nected
To disconnect the Bluetooth® device,
select “Yes”.
When 5 Bluetooth® devices have al-
ready been registered
A registered device needs to be replaced.
Select “Yes”, and select the device to be
replaced.
3 When this screen is displayed, search
for the device name displayed on this
screen on the screen of your
Bluetooth
®
device.
2
BASIC FUNCTION
*: Bluetooth is a registered trademark of
Bluetooth SIG, Inc.
49
Page 50

2. Bluetooth® SETTINGS
INFORMATION
For details about operating the Bluetooth
device, see the manual that comes with it.
To cancel the registration, select “Can-
cel”.
4 Register the Bluetooth
®
device using
your Bluetooth® device.
A PIN-code is not required for SSP
(Secure Simple Pairing) compatible
Bluetooth
type of Bluetooth
nected, a message confirming registration may be displayed on the Bluetooth
device’s screen. Respond and operate the
Bluetooth
mation message.
®
devices. Depending on the
®
device according to the confir-
®
device being con-
5 Check that the screen is displayed
when registration is complete.
The system waits for connection requests
coming from the registered device.
®
At this stage, the Bluetooth
not yet available.
functions are
6 Select “OK” when the connection sta-
tus changes from “Connection waiting...” to “Connected”.
®
DELETING A Bluetooth®
DEVICE
1 Display the “Bluetooth* Setup” screen.
(P.48)
2 Select “Remove”.
3 Select the desired device.
®
4 Select “Yes” when the confirmation
screen appears.
5 Check that a confirmation screen is
displayed when the operation is complete.
● When deleting a Bluetooth® phone, the
contact data will be deleted at the same
time.
If an error message is displayed, follow
the guidance on the screen to try again.
50
*: Bluetooth is a registered trademark of
Bluetooth SIG, Inc.
Page 51

2. Bluetooth® SETTINGS
INFORMATION
CONNECTING A Bluetooth®
DEVICE
Up to 5 Bluetooth® devices (Phones
(HFP) and audio players (AVP)) can be
registered.
®
If more than 1 Bluetooth
device has
been registered, select which device to
connect to.
1 Display the “Bluetooth* Setup” screen.
(P.48)
2 Select the device to be connected.
Supported profile icons will be displayed.
: Phone
3 Select the desired connection.
When another Bluetooth® device is con-
nected
To disconnect the Bluetooth® device,
select “Yes”.
4 Check that a confirmation screen is
displayed when the connection is complete.
If an error message is displayed, follow
the guidance on the screen to try again.
● It may take time if the device connection
is carried out during Bluetooth
playback.
● Depending on the type of Bluetooth
device being connected, it may be necessary to perform additional steps on
the device.
● When disconnecting a Bluetooth
device, it is recommended to disconnect
using this system.
®
audio
®
®
2
BASIC FUNCTION
: Audio player
: Phone/Entune App Suite service
(Entune Premium Audio only)
The profile icon for a currently connected
device will be displayed in color.
Selecting a profile icon which is not cur-
rently connected will switch the connection to the function.
If the desired Bluetooth® device is not
on the list, select “Add” to register the
device. (P.49)
*: Bluetooth is a registered trademark of
Bluetooth SIG, Inc.
51
Page 52

2. Bluetooth® SETTINGS
■AUTO CONNECTION MODE
To turn auto connection mode on, set
“Bluetooth* Power” to on. (P.54)
Leave the Bluetooth
®
device in a location where the connection can be established.
Vehicles without a smart key system
When the engine switch is turned to the
“ACC” or “ON” position, the system
searches for a nearby registered device.
The system will connect with the regis-
tered device that was last connected, if it
is nearby.
Vehicles with a smart key system
When the engine switch is turned to
ACCESSORY or IGNITION ON mode, the
system searches for a nearby registered
device.
The system will connect with the regis-
tered device that was last connected, if it
is nearby.
■CONNECTING MANUALLY
When the auto connection has failed or
“Bluetooth* Power” is turned off, it is
®
necessary to connect Bluetooth
ually.
man-
■RECONNECTING THE Bluetooth
PHONE
If a Bluetooth® phone is disconnected
due to poor reception from the
®
Bluetooth
switch is in the following, the system
automatically reconnects the
Bluetooth
Vehicles without a smart key system
The engine switch is in the “ACC” or
“ON” position.
Vehicles with a smart key system
The engine switch is in ACCESSORY
or IGNITION ON mode.
network when the engine
®
phone.
®
1 Press the “APPS” button and select
“Setup”.
2 Select “Bluetooth*”.
3 Follow the steps in “CONNECTING A
Bluetooth
(P.51)
*: Bluetooth is a registered trademark of
Bluetooth SIG, Inc.
52
®
DEVICE” from “STEP 2”.
Page 53

2. Bluetooth® SETTINGS
INFORMATION
EDITING THE Bluetooth®
DEVICE INFORMATION
The Bluetooth® device’s information
can be displayed on the screen. The
displayed information can be edited.
1 Display the “Bluetooth* Setup” screen.
(P.48)
2 Select the desired device to be edited.
3 Select “Device Info”.
4 Confirm and change the Bluetooth
device information.
No. Information
The name of the Bluetooth® device.
Can be changed to a desired name.
(P.54)
Select to set the Bluetooth® audio
player connection method. (P.54)
Device address is unique to the device and cannot be changed.
Phone number of the Bluetooth
phone.
Compatibility profile of the
Bluetooth
Select to reset all setup items.
● If 2 Bluetooth® devices have been regis-
tered with the same device name, the
®
devices can be distinguished referring to
the device’s address.
● Depending on the type of phone, some
information may not be displayed.
®
device.
2
BASIC FUNCTION
®
*: Bluetooth is a registered trademark of
Bluetooth SIG, Inc.
53
Page 54

2. Bluetooth® SETTINGS
INFORMATION
CHANGING A DEVICE NAME
1 Select “Device Name”.
2 Enter the name and select “OK”.
● Even if the device name is changed, the
name registered in your Bluetooth
device does not change.
SETTING AUDIO PLAYER
CONNECTION METHOD
®
1 Select “Connect Audio Player
From”.
2 Select the desired connection method.
“Vehicle”: Select to connect the audio
system to the audio player.
“Device”: Select to connect the audio
player to the audio system.
Depending on the audio player, the “Vehi-
cle” or “Device” connection method may
be best. As such, refer to the manual that
comes with the audio player.
To reset the connection method, select
“Default”.
“System Settings” SCREEN
The Bluetooth® settings can be confirmed and changed.
1 Display the “Bluetooth* Setup” screen.
(P.48)
2 Select “System Settings”.
3 Select the desired item to be set.
*: Bluetooth is a registered trademark of
Bluetooth SIG, Inc.
54
Page 55

2. Bluetooth® SETTINGS
INFORMATION
No. Information Page
Select to set Bluetooth
connection on/off.
Displays system name.
Can be changed to a desired name.
PIN-code used when the
Bluetooth
istered. Can be changed to
a desired code.
Device address is unique
to the device and cannot be
changed.
Select to set the phone
connection status display
on/off.
Select to set the connection status display of the
audio player on/off.
Compatibility profile of the
system device.
Select to reset all setup
items.
®
device was reg-
®
55
55
55
CHANGING “Bluetooth*
Power”
1 Select “Bluetooth* Power”.
When “Bluetooth* Power” is on:
Vehicles without a smart key system
The Bluetooth® device is automatically
connected when the engine switch is
turned to the “ACC” or “ON” position.
Vehicles with a smart key system
The Bluetooth
connected when the engine switch is
turned to ACCESSORY or IGNITION
ON mode.
When “Bluetooth* Power” is off:
The Bluetooth
and the system will not connect to it next
time.
● While driving, the auto connection state
can be changed from off to on, but cannot be changed from on to off.
EDITING THE Bluetooth* NAME
®
device is automatically
®
device is disconnected,
2
BASIC FUNCTION
1 Select “Bluetooth* Name”.
2 Enter a name and select “OK”.
EDITING THE PIN-CODE
1 Select “Bluetooth* PIN”.
2 Enter a PIN-code and select “OK”.
*: Bluetooth is a registered trademark of
Bluetooth SIG, Inc.
55
Page 56

3. OTHER SETTINGS
1. GENERAL SETTINGS
Settings are available for system time,
operation sounds, etc.
1 Press the “APPS” button.
2 Select “Setup”.
3 Select “General”.
4 Select the items to be set.
GENERAL SETTINGS
SCREEN
56
Page 57

3. OTHER SETTINGS
No. Function
Select to change the time zone and
set the daylight saving time on/off.
(P.58)
Select to change the language.
Select to change the unit of measure
*
for distance.
Select to change the unit of temperature.
Select to set the sound beeps on/off.
Select to change the screen button
color.
Select to change the keyboard layout.
Select to set automatic screen
changes from the audio control
screen to the home screen to on/off.
When set to on, the screen will automatically return to the home screen
from the audio control screen after
20 seconds.
Select to set a pop-up message displayed on an iPhone connected via
Bluetooth
®
on/off when an application on the iPhone needs to be activated.
No. Function
Select to set the animations on/off.
Select to customize the startup image. (P.59)
Select to customize the screen off
image. (P.60)
Select to delete personal data.
(P.61)
Select to update software versions.
For details, contact your Toyota
dealer.
Select to update “Gracenote” database versions. For details, contact
your Toyota dealer.
Select to display the software information. Notices related to third party
software used in this product are enlisted. (This includes instructions for
obtaining such software, where applicable.)
Select to reset all setup items.
*: Entune Premium Audio only
2
BASIC FUNCTION
57
Page 58

3. OTHER SETTINGS
SYSTEM TIME SETTINGS
Used for changing time zones and the
on/off settings of daylight saving time.
1 Display the “General Settings” screen.
(P.56)
2 Select “System Time”.
3 Select the items to be set.
No. Function
Select to change the time zone.
(P.58)
Select to set daylight saving time on/
off.
4 Select “OK”.
■SETTING THE TIME ZONE
1 Select “Time Zone”.
2 Select the desired time zone.
58
Page 59

3. OTHER SETTINGS
CUSTOMIZING THE STARTUP
AND SCREEN OFF IMAGES
An image can be copied from a USB
memory and used as the startup and
screen off images.
Vehicles without a smart key system
When the engine switch is turned to
the “ACC” or “ON” position, the initial
screen will be displayed. (P.32)
Vehicles with a smart key system
When the engine switch is turned to
ACCESSORY or IGNITION ON mode,
the initial screen will be displayed.
(P.32)
When “Screen Off” on the “Setup”
screen is selected, the screen is turned
off and the desired screen off image
that is set is displayed. (To turn the
screen off: P.20)
■TRANSFERRING IMAGES
1 Open the cover and connect a USB
memory.
Type A
Type B
2
BASIC FUNCTION
Turn on the power of the USB memory if it
is not turned on.
2 Press the “APPS” button.
3 Select “Setup”.
4 Select “General”.
5 Select “Customize Startup Image” or
“Customize Screen Off Image”.
6 Select “Transfer”.
7 Select “Yes”.
59
Page 60

3. OTHER SETTINGS
INFORMATION
■SETTING THE STARTUP IMAGES
● When saving the images to a USB,
name the folder that the startup image is
saved to “StartupImage” and name the
folder that the screen off image is saved
to “DisplayOffImage”. If these folder
names are not used, the system cannot
download the images. (The folder
names are case sensitive.)
● The compatible file extensions are JPG
and JPEG.
● Image files of 5 MB or less can be trans-
ferred.
● Up to 3 images can be downloaded.
● Files with non-ASCII filenames can not
be downloaded.
1 Display the “General Settings” screen.
(P.56)
2 Select “Customize Startup Image”.
3 Select the desired image.
4 Select “OK”.
■SETTINGS THE SCREEN OFF IM-
AGES
1 Display the “General Settings” screen.
(P.56)
2 Select “Customize Screen Off Im-
age”.
3 Select the desired image.
60
4 Select “OK”.
Page 61

3. OTHER SETTINGS
NOTICE
■DELETING TRANSFERRED IMAG-
ES
1 Display the “General Settings” screen.
(P.56)
2 Select “Customize Startup Image” or
“Customize Screen Off Image”.
3 Select “Delete All”.
4 Select “Yes”.
DELETING PERSONAL DATA
1 Display the “General Settings” screen.
(P.56)
2
2 Select “Delete Personal Data”.
BASIC FUNCTION
3 Select “Delete”.
4 Select “Yes” when the confirmation
screen appears.
Registered or changed personal settings
will be deleted or returned to their default
conditions.
For example:
• General settings
• Navigation settings*
• Audio settings
• Phone settings
*: Entune Premium Audio only
Vehicles without a smart key system
● Entune Premium Audio only: Make sure
the map microSD card is inserted when
deleting personal data. The personal
data cannot be deleted when the map
microSD card is removed. To delete the
data, after inserting the map microSD
card, turn the engine switch to the “ACC”
or “ON” position.
Vehicles with a smart key system
● Entune Premium Audio only: Make sure
the map microSD card is inserted when
deleting personal data. The personal
data cannot be deleted when the map
microSD card is removed. To delete the
data, after inserting the map microSD
card, turn the engine switch to ACCESSORY or IGNITION ON mode.
61
Page 62

3. OTHER SETTINGS
INFORMATION
2. VOICE SETTINGS
Voice volume, etc. can be set.
1 Press the “APPS” button.
2 Select “Setup”.
3 Select “Voice”.
4 Select the items to be set.
● “Voice Settings” screen can also be dis-
played from the voice recognition top
screen. (P.130)
VOICE SETTINGS SCREEN
No. Function
Select to adjust the volume of voice
guidance.
Select to set the voice guidance
*
during route guidance on/off.
Select to set the voice recognition
prompts.
62
Select to train voice recognition.
The voice command system adapt
the user accent.
Select to set the voice prompt interrupt on/off.
Select to set the web search engine.
The search engines are Entune App
*
Suite applications. (P.267)
Select to set the voice recognition
tutorial.
Select to reset all setup items.
*: Entune Premium Audio only
Page 63

3. OTHER SETTINGS
3. DRIVER SETTINGS
The driver settings feature will allow
the system to link some preferences
(such as audio presets, button colors,
language, etc.) to a paired Bluetooth
phone.
1 Press the “APPS” button.
2 Select “Setup”.
3 Select “Driver”.
4 Select “Enable this Feature”.
MANUALLY SELECT LINKED
SETTINGS
®
1 Display the driver settings screen.
(P.63)
2 Select “Manually Select Linked Set-
tings”.
3 Select the desired phone.
After a few seconds, loaded screen auto-
matically switches to the home screen.
2
BASIC FUNCTION
63
Page 64

3. OTHER SETTINGS
*: Entune Premium Audio only
INFORMATION
4. MAINTENANCE
*
When this system is turned on, the
“Maintenance Reminder” screen displays when it is time to replace a part
or certain components. (P.32)
1 Press the “APPS” button.
2 Select “Maintenance”.
3 Select the desired item.
No. Function
Select to set the condition of parts or
components.
Select to add new information items
separately from provided ones.
Select to cancel all conditions which
have been entered.
Select to reset the item which have
expired conditions.
Select to call the registered dealer.
Select to register/edit dealer information. (P.65)
When set to on, the indicator will illuminate. The system is set to give
maintenance information with the
“Maintenance Reminder” screen.
(P.32)
● When the vehicle needs to be serviced,
the screen button color will change to
orange.
64
Page 65

3. OTHER SETTINGS
INFORMATION
MAINTENANCE INFORMATION
SETTING
1 Select the desired part or component
screen button.
When the vehicle needs to be serviced,
the screen button color will change to
orange.
2 Set the conditions.
No. Function
Select to enter the next maintenance
date.
Select to enter the driving distance
until the next maintenance check.
Select to cancel the conditions which
have been entered.
Select to reset the conditions which
have expired.
DEALER SETTING
Dealer information can be registered in
the system. With dealer information
registered, route guidance to the dealer is available.
1 Select “Set Dealer”.
2 Select the desired item to search for
the location. (P.211)
The editing dealer screen appears after
setting the location.
2
BASIC FUNCTION
3 Select “OK” after entering the condi-
tions.
● For scheduled maintenance information,
refer to “Scheduled Maintenance Guide”
or “Owner’s Manual Supplement”.
● Depending on driving or road conditions,
the actual date and distance that maintenance should be performed may differ
from the stored date and distance in the
system.
65
Page 66

3. OTHER SETTINGS
3 Select the items to be edited.
No. Function Page
Select to enter the name of
a dealer.
Select to enter the name of
a dealer member.
Select to set the location. 66
Select to enter the phone
number.
Select to delete the dealer
information displayed on
the screen.
Select to set the displayed
dealer as a destination.
66
66
66
223
■EDITING DEALER OR CONTACT
NAME
1 Select “Edit” next to “Dealer” or “Con-
tact”.
2 Enter the name and select “OK”.
■EDITING THE LOCATION
1 Select “Edit” next to “Location”.
2 Scroll the map to the desired point
(P.203) and select “OK”.
■EDITING PHONE NUMBER
1 Select “Edit” next to “Phone #”.
2 Enter the phone number and select
“OK”.
66
Page 67

3. OTHER SETTINGS
2
BASIC FUNCTION
67
Page 68

3
AUDIO SYSTEM
BASIC OPERATION
1
1. QUICK REFERENCE..................... 70
2. SOME BASICS............................... 72
TURNING THE SYSTEM ON AND
OFF ..................................................... 72
SELECTING AN AUDIO SOURCE........ 73
DISC SLOT ............................................ 74
USB/AUX PORT .................................... 74
SOUND SETTINGS ............................... 75
VOICE COMMAND SYSTEM ................ 76
RADIO OPERATION
2
1. AM/FM RADIO............................... 77
OVERVIEW............................................ 77
PRESETTING A STATION .................... 80
SELECTING A STATION FROM
THE LIST ............................................. 80
CACHING A RADIO PROGRAM ........... 81
RADIO BROADCAST DATA
SYSTEM .............................................. 82
TRAFFIC ANNOUNCEMENT
(FM RADIO)......................................... 83
USING HD Radio™ TECHNOLOGY...... 83
AVAILABLE HD Radio™
TECHNOLOGY.................................... 84
TROUBLESHOOTING
GUIDE ................................................. 86
2. XM Satellite Radio........................ 87
OVERVIEW............................................ 87
HOW TO SUBSCRIBE TO AN XM
Satellite Radio...................................... 89
DISPLAYING THE RADIO ID................. 91
PRESETTING A CHANNEL................... 91
SELECTING A CHANNEL FROM
THE LIST ............................................. 91
IF THE SATELLITE RADIO TUNER
MALFUNCTIONS ................................ 92
68
3. INTERNET RADIO......................... 93
LISTENING TO INTERNET RADIO ....... 93
Page 69

3
AUDIO SYSTEM
1
2
MEDIA OPERATION
3
1. CD .................................................. 94
OVERVIEW ........................................... 94
PLAYING AN AUDIO CD ...................... 96
PLAYING AN MP3/WMA/AAC DISC..... 96
2. USB MEMORY............................... 97
OVERVIEW ........................................... 97
PLAYING A USB AUDIO..................... 100
3. iPod.............................................. 101
OVERVIEW ......................................... 101
iPod AUDIO ......................................... 104
4. Bluetooth® AUDIO ...................... 105
OVERVIEW ......................................... 105
CONNECTING A Bluetooth
DEVICE............................................. 109
LISTENING TO Bluetooth
AUDIO............................................... 109
®
®
5. AUX .............................................. 110
OVERVIEW ......................................... 110
AUDIO REMOTE CONTROLS
4
1. STEERING SWITCHES............... 112
SETUP
5
1. AUDIO SETTINGS ...................... 115
AUDIO SETTINGS SCREEN............... 115
TIPS FOR OPERATING THE
6
AUDIO SYSTEM
1. OPERATING INFORMATION ..... 117
RADIO.................................................. 117
CD PLAYER AND DISC ...................... 118
iPod...................................................... 120
FILE INFORMATION ........................... 122
TERMS ................................................ 124
ERROR MESSAGES........................... 126
3
4
5
6
7
8
9
69
Page 70

1. BASIC OPERATION
1. QUICK REFERENCE
The audio control screen can be reached by the following methods:
Using the “AUDIO” button
Press the “AUDIO” button to display the audio screen.
Using the “APPS” button
Press the “APPS” button, then select “Audio” to display the audio screen.
Entune Audio Plus
Entune Premium Audio
70
4RUNNER_Navi_U
Page 71

1. BASIC OPERATION
INFORMATION
Function Page
Using the radio 77, 87, 93
Playing an audio CD or MP3/WMA/AAC disc 94
Playing a USB memory 97
Playing an iPod 101
Playing a Bluetooth® device 105
Using the AUX port 110
Using the steering wheel audio switches 112
Audio system settings 115
● The display and button positions will differ depending on the type of the system.
3
AUDIO SYSTEM
71
4RUNNER_Navi_U
Page 72

1. BASIC OPERATION
CAUTION
NOTICE
2. SOME BASICS
This section describes some of the basic features of the audio system. Some
information may not pertain to your
system.
Vehicles without a smart key system
Your audio system works when the engine switch is in the “ACC” or “ON” position.
Vehicles with a smart key system
Your audio system works when the engine switch is in ACCESSORY or IGNITION ON mode.
● For vehicles sold in U.S.A.:
Part 15 of the FCC Rules
FCC WARNING: Changes or
modifications not expressly approved by
the party responsible for compliance
could void the user’s authority to operate
the equipment.
● Laser products (Entune Audio Plus)
• USE OF CONTROL OR
ADJUSTMENT OR PERFORMANCE
OF PROCEDURES OTHER THAN
THOSE SPECIFIED HEREIN MAY
RESULT IN HAZARDOUS
RADIATION EXPOSURE.
•THE USE OF OPTICAL
INSTRUMENTS WITH THIS
PRODUCT WILL INCREASE EYE
HAZARD.
● Laser products (Entune Premium Audio)
THIS PRODUCT IS A CLASS LASER
PRODUCT. USE OF CONTROLS OR
ADJUSTMENTS OR PERFORMANCE
OF PROCEDURES OTHER THAN
THOSE SPECIFIED HEREIN MAY
RESULT IN HAZARDOUS RADIATION
EXPOSURE. DO NOT OPEN COVERS
AND DO NOT REPAIR BY YOURSELF.
REFER SERVICING TO QUALIFIED
PERSONNEL.
● To prevent the battery from being dis-
charged, do not leave the audio system
on longer than necessary when the
engine is not running.
TURNING THE SYSTEM ON
AND OFF
“POWER/VOL” knob: Press to turn the
audio system on and off. The system turns
on in the last mode used. Turn this knob to
adjust the volume.
“AUDIO” button: Press to display screen
buttons for the audio system.
A function that enables automatic return
to the home screen from the audio
screen can be selected. (P. 56 )
72
4RUNNER_Navi_U
Page 73

1. BASIC OPERATION
INFORMATION
SELECTING AN AUDIO
SOURCE
1 Press the “AUDIO” button.
2 Select “Source” or press “AUDIO”
button again.
3 Select the desired source.
REORDERING THE AUDIO
SOURCE
1 Display the “Select Audio Source”
screen. (P.73)
2 Select “Reorder”.
3
AUDIO SYSTEM
3 Select the desired audio source then
or to reorder.
● Dimmed screen buttons cannot be oper-
ated.
● When there are two pages, select
or to change the page.
4 Select “OK”.
73
4RUNNER_Navi_U
Page 74

1. BASIC OPERATION
NOTICE
INFORMATION
INFORMATION
DISC SLOT
INSERTING A DISC
1 Insert a disc into the disc slot.
After insertion, the disc is automatically
loaded.
EJECTING A DISC
1 Press the button and remove the
disc.
USB/AUX PORT
1 Open the cover and connect a device.
Type A
Type B
● Never try to disassemble or oil any part
of the CD player. Do not insert anything
other than a disc into the slot.
● The player is intended for use with 4.7
in. (12 cm) discs only.
● When inserting a disc, gently insert the
disc with the label facing up.
74
Turn on the power of the device if it is not
turned on.
● The AUX port only supports audio input.
● If a USB hub is plugged-in, two devices
can be connected at a time.
● Even if a USB hub is used to connect
more than two USB devices, only the
first two connected devices will be recognized.
4RUNNER_Navi_U
Page 75

1. BASIC OPERATION
*: If equipped
SOUND SETTINGS
AUTOMATIC SOUND
LEVELIZER (ASL)
The system adjusts to the optimum volume and tone quality according to vehicle speed to compensate for
increased vehicle noise.
1 Display the “Audio Settings” screen.
(P.115)
Type A
2 Select “Automatic Sound Levelizer”.
3 Select “High”, “Mid”, “Low”, or
“Off”.
Type B
2 Select “Auto Sound Levelizer”.
SURROUND*
1 Display the “Audio Settings” screen.
(P.115)
2 Select “Surround”.
TONE AND BALANCE
TONE:
How good an audio program sounds is
largely determined by the mix of the
treble, mid and bass levels. In fact, different kinds of music and vocal programs usually sound better with
different mixes of treble, mid and bass.
BALANCE:
A good balance of the left and right stereo channels and of the front and rear
sound levels is also important.
Keep in mind that when listening to a
stereo recording or broadcast, changing the right/left balance will increase
the volume of 1 group of sounds while
decreasing the volume of another.
3
AUDIO SYSTEM
4RUNNER_Navi_U
75
Page 76

1. BASIC OPERATION
1 Select “Sound” on the audio control
screen.
2 Select the desired screen button.
No. Function
Select “+” or “-” to adjust highpitched tones.
Select “+” or “-” to adjust mid-
pitched tones.
Select “+” or “-” to adjust lowpitched tones.
Select to adjust the sound balance
between the front and rear speakers.
Select to adjust the sound balance
between the left and right speakers.
VOICE COMMAND SYSTEM
1 Press this switch to operate the voice
command system.
The voice command system and its list
of commands can be operated.
(P.128)
76
4RUNNER_Navi_U
Page 77

2. RADIO OPERATION
Top screen
Option screen
1. AM/FM RADIO
OVERVIEW
The radio operation screen can be reached by the following methods:
Select “AM” or “FM” on the “Select Audio Source” screen. (P.73)
■CONTROL SCREEN
Entune Audio Plus
3
AUDIO SYSTEM
77
Page 78

2. RADIO OPERATION
Top screen
Option screen
Entune Premium Audio
■CONTROL PANEL
78
Page 79

2. RADIO OPERATION
INFORMATION
No. Function
Select to scroll the page of preset buttons.
Select to display the option screen.
Select to display the audio source selection screen.
Select to display the sound setting screen.
Select to display a list of receivable stations/channels.
Select to scan for receivable stations/channels.
Select to store information of the audio currently being broadcast on the radio.
Select to tune to preset stations/channels.
Select to display the additional text information.
Analog FM only: Select to display RBDS text messages.
Select to turn HD Radio mode on/off.
When the “HD Radio™” indicator is off, the station list shows only analog broadcasts.
3
AUDIO SYSTEM
Cache radio only: Select to play/pause.
Select to display the cache radio operation buttons. (P.81)
Turn to step up/down frequencies.
Turn to move up/down the list. Also, the knob can be used to enter selections on the
list screens by pressing it.
Press to seek for a station/channel.
Press and hold for continuous seek.
Press to turn mute on/off.
*
Press to select an audio mode.
Turn to adjust volume.
Press to turn the audio system on/off.
Press and hold to restart the audio system.
*: Entune Audio Plus only
● The radio automatically changes to stereo reception when a stereo broadcast is received.
● The radio automatically blends to an HD Radio signal in AM or FM where available.
79
Page 80

2. RADIO OPERATION
INFORMATION
PRESETTING A STATION
Radio mode has a mix preset function,
which can store up to 36 stations (6
stations per page x 6 pages) from any
of the AM, FM or SAT bands.
1 Tune in the desired station.
2 Select “(add new)”.
To change the preset station to a different
one, select and hold the preset station.
3 Select “Yes” on the confirmation
screen.
4 Select “OK” after setting the new pre-
set station.
SELECTING A STATION
FROM THE LIST
A station list can be displayed.
1 Select “Station List”.
2 FM radio only: Select the desired pro-
gram genre.
3 Select the desired station and select
“OK”.
● The number of preset radio stations dis-
played on the screen can be changed.
(P. 11 6 )
80
Page 81

2. RADIO OPERATION
INFORMATION
*: Entune Premium Audio only
■REFRESHING THE STATION LIST
1 Select “Refresh” on the station list
screen and the following screen will be
displayed.
“Cancel Refresh”: Select to cancel the
refresh.
“Source”: Select to change to another audio source while refreshing.
● The audio system sound is muted during
refresh operation.
● In some situations, it may take some
time to update the station list.
CACHING A RADIO
PROGRAM*
A radio program can be cached and
played back in a time-shifted manner.
PLAYING BACK THE CACHE
MANUALLY
The broadcast cached in the program
cache can be played back manually.
1 Display the cache radio operation but-
tons. (P.77)
2 Select the desired cache radio opera-
tion button.
3
AUDIO SYSTEM
No. Function
Hides the cache operation buttons
Skips backward 2 minutes
Fast rewinds continuously
Returns to the live radio broadcast
Fast forwards continuously
Skips forward 2 minutes
Shows the current playback location
relative to the cached broadcast recording time with a bar scale.
81
Page 82

2. RADIO OPERATION
INFORMATION
AUTOMATIC PLAYBACK OF
THE CACHE
If the radio broadcast is interrupted by
another audio output, such as an
incoming phone call, the system will
automatically cache the interrupted
portion and perform time-shift
playback when the interruption ends.
To manually operate the cache
operation: (P.81)
● The system can store up to 20 minutes.
Cached data will be erased when the
radio mode or station is changed or
when the audio system is turned off.
● If noise or silence occurs during the
caching process, cache writing will continue, with the noise or silence recorded
as is. In this case, the cached broadcast
will contain the noise or silence when
played back.
RADIO BROADCAST DATA
SYSTEM
SELECTING A DESIRED
GENRE
1 Select “Station List”.
2 FM radio only: Select a desired genre
of station and select a desired station.
The genre list is in the following order:
• Classical
• Country
• EasyLis (Easy Listening)
• Inform (Information)
•Jazz
•News
•Oldies
• Other
• Pop Music
• Religion
•Rock
• R&B (Rhythm and Blues)
• Sports
•Talk
• Traffic (Not available when “HD Radio™”
indicator is off.)
• Alert (Emergency Alert)
This audio system is equipped with Radio Broadcast Data Systems (RBDS).
RBDS mode allows text messages to
be received from radio stations that utilize RBDS transmitters.
When RBDS is on, the radio can
— only select stations of a particular
program type,
— display messages from radio stations,
— search for a stronger signal station.
RBDS features are available only
when listening to an FM station that
broadcasts RBDS information and the
“FM Info” indicator is on.
82
Page 83

2. RADIO OPERATION
INFORMATION
TRAFFIC ANNOUNCEMENT
(FM RADIO)
A station that regularly broadcasts traffic information is automatically located.
1 Select “Station List”.
2 Select the desired traffic program sta-
tion.
● If a traffic program station is found, the
name of the traffic program station will
be displayed for a while.
USING HD Radio™
TECHNOLOGY
HD Radio™ Technology is the digital
evolution of analog AM/FM radio. Your
radio product has a special receiver
which allows it to receive digital
broadcasts (where available) in
addition to the analog broadcasts it
already receives. Digital broadcasts
have better sound quality than analog
broadcasts as digital broadcasts
provide free, crystal clear audio with no
static or distortion. For more
information, and a guide to available
radio stations and programming, refer
to www.hdradio.com
HD Radio Technology manufactured
under license from iBiquity Digital
Corporation. U.S. and Foreign
Patents. HD Radio™ and the HD, HD
Radio, and “Arc” logos are proprietary
trademarks of iBiquity Digital Corp.
.
3
AUDIO SYSTEM
83
Page 84

2. RADIO OPERATION
AVAILABLE HD Radio™
TECHNOLOGY
MULTICAST
On the FM radio frequency most digital
stations have “multiple” or supplemental programs on one FM station.
1 Select the “HD)” logo.
2 Select the desired channel.
Turning the “TUNE/SCROLL” knob can
also select the desired multicast channel.
PRESERVING A MUSIC
INFORMATION
Tag information in the music broadcasting is preserved in the system and
transmits to an iPod.
1 Select “Tag” to bookmark the music
information.
2 Connect an iPod. (P.74)
Turn on the power of the iPod if it is not
turned on.
Once an iPod is connected, the music tag
moves from the radio into the iPod.
When the iPod is connected to iTunes, the
“tagged” information of the songs which
were tagged while listening to the radio
can be viewed. Then a user may decide to
purchase the song or CD/Album which
had been listened to on their radio.
84
Page 85

INFORMATION
● The tag information can not be pre-
served while scanning or caching the
radio station.
● If tagging the music information fails,
“Saving the HD Radio tag was unsuccessful.” will be displayed on the screen.
If this occurs, tag the information again.
● HD Radio™ stations can be preset.
● An orange “HD)” logo indicator will be
displayed on the screen when in digital.
The “HD)” logo will first appear in a gray
color indicating the station is indeed (an
analog and) a digital station. Once the
digital signal is acquired, the logo will
change to a bright orange color.
● The song title and artist name will
appear on the screen when available by
the radio station. The radio station can
send album pictures when available.
● As a user works through the analog
radio stations, (where applicable) the
radio receiver will automatically tune
from an analog signal to a digital signal
within 5 seconds.
2. RADIO OPERATION
3
AUDIO SYSTEM
85
Page 86

2. RADIO OPERATION
TROUBLESHOOTING GUIDE
Experience Cause Action
Mismatch of time alignment- a user may hear a
short period of programming replayed or an echo,
stutter or skip.
Sound fades, blending in
and out.
Audio mute condition when
an HD2/HD3 multicast
channel had been playing.
Audio mute delay when selecting an HD2/HD3 multicast channel preset.
Text information does not
match the present song audio.
The radio stations analog
and digital volume is not
properly aligned or the station is in ballgame mode.
Radio is shifting between
analog and digital audio.
The radio does not have
access to digital signals at
the moment.
The digital multicast content is not available until
HD Radio™ broadcast can
be decoded and make the
audio available. This takes
up to 7 seconds.
Data service issue by the
radio broadcaster.
None, radio broadcast issue. A
user can contact the radio station.
Reception issue, may clear-up as
the vehicle continues to be driven.
Turning the indicator of the “HD
Radio™” button off can force radio
in an analog audio.
This is normal behavior, wait until
the digital signal returns. If out of
the coverage area, seek a new
station.
This is normal behavior, wait for
the audio to become available.
Broadcaster should be notified.
Complete the form;
www.ibiquity.com/automotive/report_radio_station_experiences.
No text information shown
for the present selected frequency.
86
Data service issue by the
radio broadcaster.
Broadcaster should be notified.
Complete the form;
www.ibiquity.com/automotive/report_radio_station_experiences.
Page 87

2. RADIO OPERATION
*: If equipped
2. XM Satellite Radio*
OVERVIEW
The satellite radio operation screen can be reached by the following methods:
Select “XM” on the “Select Audio Source” screen. (P.73)
■CONTROL SCREEN
3
AUDIO SYSTEM
■CONTROL PANEL
87
Page 88

2. RADIO OPERATION
CAUTION
NOTICE
No. Function
Select to scroll the page of preset buttons.
Select to display the option screen.
Select to scan for receivable channels.
Select “Additional Information” to display the information.
Select to display the audio source selection screen.
Select to display the sound setting screen.
Select to display a list of receivable channels.
Select to tune to preset channels.
Turn to step up/down channels.
Turn to move up/down the list. Also, the knob can be used to enter selections on the
list screens by pressing it.
Press to seek for a channel.
Press and hold for continuous seek.
Press to turn mute on/off.
*
Press to select an audio mode.
Turn to adjust volume.
Press to turn the audio system on/off.
Press and hold to restart the audio system.
*: Entune Audio Plus only
● FCC WARNING: Changes or modifications in construction not expressly approved by the
party responsible for compliance could void the user's authority to operate the equipment.
● Radio frequency exposure.
This device is approved for Mobile Application only and, to comply with applicable FCC
radio frequency exposure regulations, must be used with a distance of at least 7.9 in.
(20cm) between the antenna and the body of any person at all time during use.
● THIS DEVICE COMPLIES WITH PART15 OF THE FCC RULES.
● OPERATION IS SUBJECT TO THE FOLLOWING TWO CONDITIONS,
1) THIS DEVICE MAY NOT CAUSE HARMFUL INTERFERENCE AND
2) THIS DEVICE MUST ACCEPT ANY INTERFERENCE RECEIVED, INCLUDING
INTERFERENCE THAT MAY CAUSE UNDESIRED OPERATION.
88
Page 89

HOW TO SUBSCRIBE TO AN
NOTICE
XM Satellite Radio
To listen to a satellite radio broadcast
in the vehicle, a subscription to the XM
Satellite Radio service is necessary.
An XM Satellite Radio is a tuner designed exclusively to receive broadcasts provided under a separate
subscription. Availability is limited to
the 48 contiguous U.S. states and
some Canadian provinces.
HOW TO SUBSCRIBE
It is necessary to enter into a separate
service agreement with XM Satellite
Radio in order to receive satellite
broadcast programming in the vehicle.
Additional activation and service subscription fees apply that are not included in the purchase price of the vehicle
and digital satellite tuner.
For complete information on subscrip-
tion rates and terms, or to subscribe to
XM Satellite Radio:
U.S.A.
Refer to www.siriusxm.com
1-877-447-0011.
Canada
Refer to www.xmradio.ca
1-877-438-9677.
or call
or call
2. RADIO OPERATION
● XM Radio ServicesLegal Disclaimers
and Warnings
• Fees and TaxesSubscription fee,
taxes, one time activation fee, and
other fees may apply. Subscription
fee is consumer only. All fees and
programming subject to change.
Subscriptions subject to Customer
Agreement available at
www.siriusxm.com.
www.xmradio.ca
service only available in the 48
contiguous United States and
Canada.
Explicit Language NoticeChannels
with frequent explicit language are
indicated with an “XL” preceding the
channel name. Channel blocking is
available for XM Satellite Radio
receivers by notifying XM at;
U.S.A. Customers:
Visit www.siriusxm.com
1-877-447-0011
Canadian Customers:
Visit www.xmradio.ca
1-877-438-9677
● It is prohibited to copy, decompile, disas-
semble, reverse engineer, hack, manipulate, or otherwise make available any
technology or software incorporated in
receivers compatible with the XM Satellite Radio System or that support the XM
website, the Online Service or any of its
content. Furthermore, the AMBE
compression software included in this
product is protected by intellectual property rights including patent rights, copyrights, and trade secrets of Digital Voice
Systems, Inc.
● Note: this applies to XM receivers only
and not XM Ready devices.
(U.S.A.) or
(Canada) XM
or calling
or calling
®
voice
3
AUDIO SYSTEM
89
Page 90

2. RADIO OPERATION
INFORMATION
INFORMATION
INFORMATION
● XM Radio ServicesDescriptions
• Radio and Entertainment
XM offers more than 170 satellite radio
channels of commercial-free music
and premier sports, news, talk, and
entertainment. XM is broadcast via satellites to millions of listeners across the
continental United States. XM subscribers listen to XM on satellite radio
receivers for the car, home, and portable use. More information about XM is
available online at www.siriusxm.com
(U.S.A.) or www.xmradio.ca (Canada).
● XM Radio ServicesSubscription
Instructions
• For XM Services requiring a subscription (such as XM Radio, and some
Infotainment & data services), the following paragraph shall be included.
Required XM Radio and some Infotainment & data services monthly subscriptions sold separately after trial
period. Subscription fee is consumer
only. All fees and programming subject
to change. Subscriptions are subject to
the Customer Agreement available at
www.siriusxm.com
www.xmradio.ca
only available in the 48 contiguous
United States (U.S.A.) or 10 Canadian
provinces (Canada). 2011 Sirius XM
Radio Inc. Sirius, XM and all related
marks and logos are trademarks of Sirius XM Radio Inc. All other marks,
channel names and logos are the
property of their respective owners.
For more information, program schedules, and to subscribe or extend subscription after complimentary trial
period; more information is available
at:
USA Customers:
Visit www.siriusxm.com
1-877-447-0011
Canadian Customers:
Visit www.xmradio.ca
1-877-438-9677
(U.S.A.) or
(Canada). XM service
or call
or call
● XM Satellite Radio is solely responsible
for the quality, availability and content of
the satellite radio services provided,
which are subject to the terms and conditions of the XM Satellite Radio customer service agreement.
● Customers should have their radio ID
ready; the radio ID can be found by tuning to “Ch 000” on the radio. For details,
see “DISPLAYING THE RADIO ID”
below.
● All fees and programming are the
responsibility of XM Satellite Radio and
are subject to change.
SATELLITE TUNER
TECHNOLOGY NOTICE
Toyota’s satellite radio tuners are
awarded Type Approval Certificates
from XM Satellite Radio Inc. as proof of
compatibility with the services offered
by XM Satellite Radio.
● Satellite tuner
The tuner supports only Audio Services
(Music and Talk) and the accompanying
Text Information of XM
®
Satellite Radio.
90
Page 91

2. RADIO OPERATION
DISPLAYING THE RADIO ID
Each XM tuner is identified with a
unique radio ID. The radio ID is required when activating an XM service
or when reporting a problem.
If “Ch 000” is selected using the “TUNE/
SCROLL” knob, the ID code, which is 8
alphanumeric characters, will be displayed. If another channel is selected, the
ID code will no longer be displayed. The
channel (000) alternates between displaying the radio ID and the specific radio
code.
PRESETTING A CHANNEL
1 Tune in the desired channel.
2 Select “(add new)”.
SELECTING A CHANNEL
FROM THE LIST
1 Select “Channel List”.
2 Select the desired program genre.
3 Select the desired channel and select
“OK”.
3
AUDIO SYSTEM
To change the preset channel to a differ-
ent one, select and hold the preset station/
channel.
3 Select “Yes” on the confirmation
screen.
4 Select “OK” after setting the new pre-
set channel.
91
Page 92

2. RADIO OPERATION
INFORMATION
IF THE SATELLITE RADIO TUNER MALFUNCTIONS
When problems occur with the XM tuner, a message will appear on the screen. Referring to the table below to identify the problem, take the suggested corrective action.
Message Explanation
The XM antenna is not connected. Check whether the XM antenna
“Check Antenna”
“Ch Unauthorized”
“No Signal”
“Loading”
“Channel Off Air”
-----
“Chan Unavailable”
cable is attached securely.
A short circuit occurs in the antenna or the surrounding antenna cable. See a Toyota certified dealer for assistance.
You have not subscribed to XM Satellite Radio. The radio is being
updated with the latest encryption code. Contact XM Satellite Radio
for subscription information. When a contract is canceled, you can
choose “Ch 000” and all free-to-air channels.
The premium channel you selected is not authorized. Wait for about
2 seconds until the radio returns to the previous channel or “Ch 001”.
If it does not change automatically, select another channel. To listen
to the premium channel, contact XM Satellite Radio.
The XM signal is too weak at the current location. Wait until your vehicle reaches a location with a stronger signal.
The unit is acquiring audio or program information. Wait until the unit
has received the information.
The channel you selected is not broadcasting any programming. Select another channel.
There is no song/program title or artist name/feature associated with
the channel at that time. No action is required.
The channel you selected is no longer available. Wait for about 2
seconds until the radio returns to the previous channel or “Ch 001”.
If it does not change automatically, select another channel.
● Contact the XM Listener Care Center at 1-877-447-0011 (U.S.A.) or 1-877-438-9677
(Canada).
92
Page 93

2. RADIO OPERATION
*: Entune Premium Audio only
INFORMATION
3. INTERNET RADIO
*
LISTENING TO INTERNET
RADIO
One of Entune App Suite features is
the ability to listen to internet radio. In
order to use this service, a compatible
phone and the system needs to be set
up. For details: P.267
1 Select the internet radio application.
The internet radio application screen is
displayed.
Perform operations according to the dis-
played application screen.
For the instrument panel operation
method: P. 7 3
If a compatible phone is already regis-
tered, it will be connected automatically.
● Other applications can be activated
while listening to internet radio.
● Some parts of applications can be
adjusted using the switches on the
steering wheel.
● For additional information, refer to
http://www.toyota.com/entune/
1-800-331-4331.
or call
3
AUDIO SYSTEM
93
Page 94

3. MEDIA OPERATION
1. CD
OVERVIEW
The CD operation screen can be reached by the following methods:
Select “CD” on the “Select Audio Source” screen. (P.73)
Insert a disc. (P.74)
■CONTROL SCREEN
■CONTROL PANEL
94
Page 95

No. Function
INFORMATION
Displays cover art
Select to display a track/file list.
Select to display the audio source selection screen.
3. MEDIA OPERATION
Select to display the sound setting screen.
Select to play/pause.
Shows progress
Select to set repeat playback.
Select to set random playback.
Audio CD: Select to display a track list.
MP3/WMA/AAC disc: Select to display a folder list.
To return to the top screen, select “Now Playing” on the list screen.
Disc slot
Turn to select a track/file.
Turn to move up/down the list. Also, the knob can be used to enter selections on the
list screens by pressing it.
Press to select a track/file.
Press and hold to fast forward/rewind.
Press to play/pause.
*
Press to select an audio mode.
Turn to adjust volume.
Press to turn the audio system on/off.
Press and hold to restart the audio system.
3
AUDIO SYSTEM
Press to eject a disc.
*: Entune Audio Plus only
● If a disc contains CD-DA files and MP3/WMA/AAC files, only the CD-DA files can be
played back.
● If a CD-TEXT disc is inserted, the title of the disc and track will be displayed. Up to 32
characters can be displayed.
● If the disc contains no CD-TEXT, only the track number would be displayed on the
screen.
95
Page 96

3. MEDIA OPERATION
PLAYING AN AUDIO CD
REPEATING
The track currently being listened to
can be repeated.
1 Select the repeat button to change on/
off.
RANDOM ORDER
Tracks can be automatically and randomly selected.
1 Select the random button to change
on/off.
PLAYING AN MP3/WMA/AAC
DISC
REPEATING
The file currently being listened to can
be repeated.
1 Select the repeat button to change on/
off.
RANDOM ORDER
Files can be automatically and randomly selected.
1 Select the random button to change
on/off.
96
Page 97

3. MEDIA OPERATION
2. USB MEMORY
OVERVIEW
The USB memory operation screen can be reached by the following methods:
Select “USB (DEVICE NAME)” on the “Select Audio Source” screen. (P.73)
Connect a USB memory. (P.74)
■CONTROL SCREEN
■CONTROL PANEL
3
AUDIO SYSTEM
97
Page 98

3. MEDIA OPERATION
No. Function
Select to display the audio source selection screen.
Select to display the sound setting screen.
Select to play/pause.
Shows progress
Select to set repeat playback.
Select to set random playback.
Select to display the play mode selection screen.
To return to the top screen, select “Now Playing” on the list screen.
Displays cover art
Select to display file/track list.
Turn to select a file/track.
Turn to move up/down the list. Also, the knob can be used to enter selections on the
list screens by pressing it.
Press to select a file/track.
Press and hold to fast forward/rewind.
Press to play/pause.
*
Press to select an audio mode.
Turn to adjust volume.
Press to turn the audio system on/off.
Press and hold to restart the audio system.
*: Entune Audio Plus only
98
Page 99

3. MEDIA OPERATION
CAUTION
NOTICE
INFORMATION
● Do not operate the player’s controls or connect the USB memory while driving.
● Do not leave your portable player in the car. In particular, high temperatures inside the
vehicle may damage the portable player.
● Do not push down on or apply unnecessary pressure to the portable player while it is con-
nected as this may damage the portable player or its terminal.
● Do not insert foreign objects into the port as this may damage the portable player or its
terminal.
● If tag information exists, the file names will be changed to track names.
3
AUDIO SYSTEM
99
Page 100

3. MEDIA OPERATION
PLAYING A USB AUDIO
REPEATING
The file/track currently being listened
to can be repeated.
1 Select the repeat button to change on/
off.
RANDOM ORDER
Files/tracks can be automatically and
randomly selected.
1 Select the random button to change
on/off.
100
 Loading...