

Page 1

2009
Quick Reference Guide
Page 2

2009
4Runner
!
A word about safe vehicle operations
This Quick Reference Guide is a summary of basic vehicle
operations. It contains brief descriptions of fundamental
operations so you can locate and use the vehicle’s main
equipment quickly and easily.
The Quick Reference Guide is not intended as a substitute for
the Owner’s Manual located in the vehicle’s glove box. We
strongly encourage you to review the Owner’s Manual and
supplementary manuals so you will have a better understanding
of the vehicle’s capabilities and limitations.
Your dealership and the entire staff of Toyota Motor Sales,
U.S.A., Inc. wish you many years of satisfied driving in your
new 4Runner.
This Quick Reference Guide is not a full description of
4Runner operations. Every 4Runner owner should review the
Owner’s Manual that accompanies this vehicle.
Pay special attention to the boxed information highlighted in
color throughout the
Owner’s Manual. Each box contains safe
operating instructions to help you avoid injury or equipment
malfunction.
All information in this
Quick Reference Guide is current at
the time of printing. Toyota reserves the right to make
changes at any time without notice.
Spare tire & tools
Tool location
Removing the spare tire
(1) Assemble the jack handle.
(2) Insert the jack handle end through the opening in the bumper, and into
the lowering screw.
(3) Turn the jack handle counterclockwise.
Refer to the
Owner’s Manual for tire changing and jack positioning
procedures.
(1)
Page 3

1
OVERVIEW
FEATURES/OPERATIONS SAFETY AND EMERGENCY FEATURES
Engine maintenance 7
Fuel tank door release and cap 6
Hood release 7
Indicator symbols 4-5
Instrument cluster 4
Instrument panel 2-3
Keyless entry
1
6
Air Conditioning/Heating 17
Audio 18-19
Auto lock functions
1,2
8
Automatic Transmission 8
Bottle holders 23
Clock 13
Cruise control 16
Cup holders 22
Door locks 20
Four-wheel drive 9
Garage door opener (HomeLink
®)3
21
Light control-Instrument panel 13
Lights1& turn signals 14
Moonroof
1
22
Parking brake 12
Power outlets-12V DC 23
Power outlets-115V AC 23
Rear seat entertainment system 20
Seat adjustments-Front 10
Seat adjustments-Rear 11
Seat heaters 16
Seats-Head restraints 12
Tilt and telescopic steering wheel 10
VSC OFF button 21
Windows
1
15
Window-Rear hatch
1
15
Windshield wipers & washers 13
Doors-Child safety locks 24
Seat belts 24
Seat belts-Shoulder belt anchor 24
Spare tire & tools 25
Tire Pressure Monitoring (warning) System 24
OVERVIEW
FEATURES/OPERATIONS
SAFETY AND
EMERGENCY FEATURES
INDEX
1
Visit your Toyota dealer for information on customizing this feature.
2
Programmable by customer. Refer to the Owner’s Manual for instructions and
more information.
3
HomeLink®is a registered trademark of Johnson Controls, Inc.
Page 4
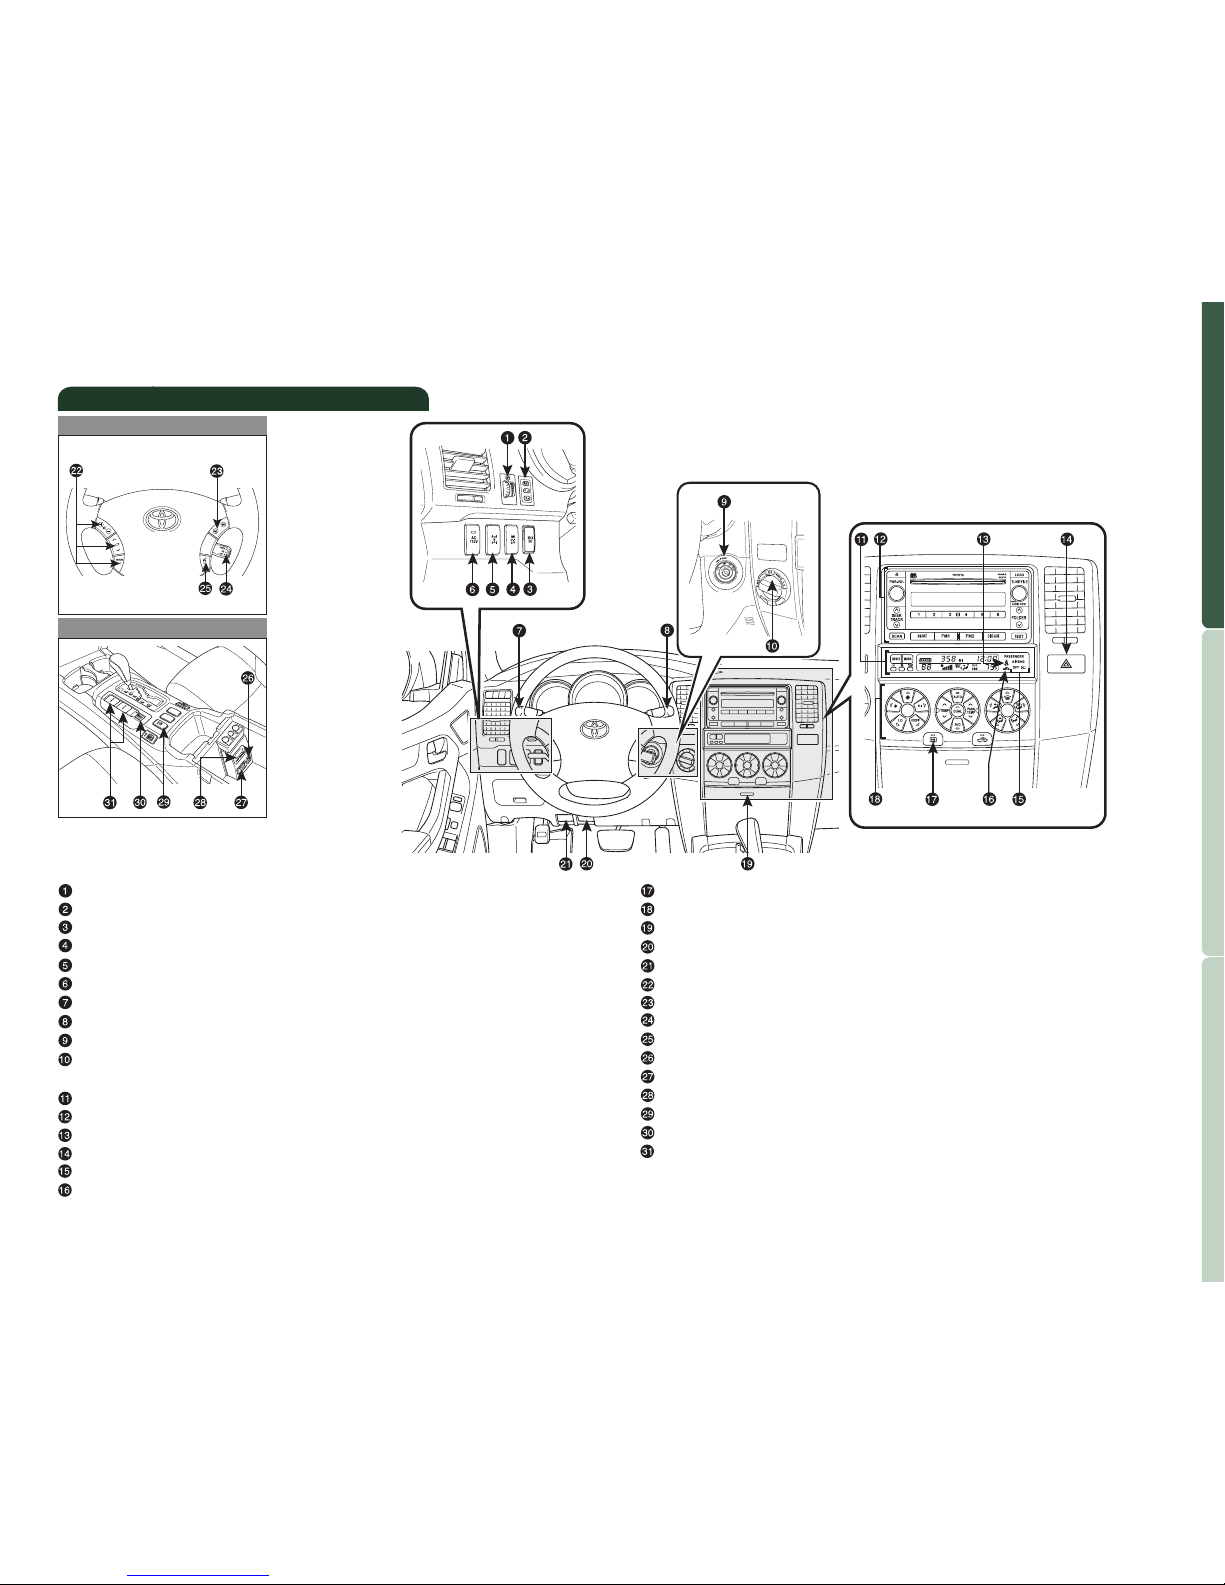
Instrument panel light control
Driving position memory switches
1
“RSCA OFF” (Roll Sensing of Curtain shield Airbags “OFF”) switch
1
VSC OFF switch
1
Center differential lock switch
1
115V AC Power outlet ON/OFF switch
1
Headlight, turn signal and front fog light1control
Wiper and washer controls
Engine switch
Four-wheel drive selector
1
(full-time 4WD models) or two wheel/
four-wheel drive selector
1
(part-time 4WD models)
Multi-information display
Audio system or navigation system
2
Front passenger seat belt reminder light
Emergency flasher switch
Front passenger occupant classification indicator
Engine immobilizer/Theft deterrent system indicator
1
2 3
OVERVIEW
FEATURES/OPERATIONS
SAFETY AND EMERGENCY FEATURES
OVERVIEW
Instrument panel
Steering wheel controls
Rear console box
Back window and outside rearview mirror defogger1switch
Air Conditioning controls
Auxiliary boxes
Hood release
Fuel tank door opener
Steering wheel audio controls
1,2
Telephone switches
1,2
Cruise control
Navigation voice command button
1,2
AUX adapter
115V AC Power outlet
1
A/V input adapter
1
Downhill Assist Control switch
1
Power back window switch
12V DC Power outlet/Cigarette lighter
1
If equipped
2
For vehicles with a navigation system, refer to the “Navigation System
Owner’s Manual.”
Page 5
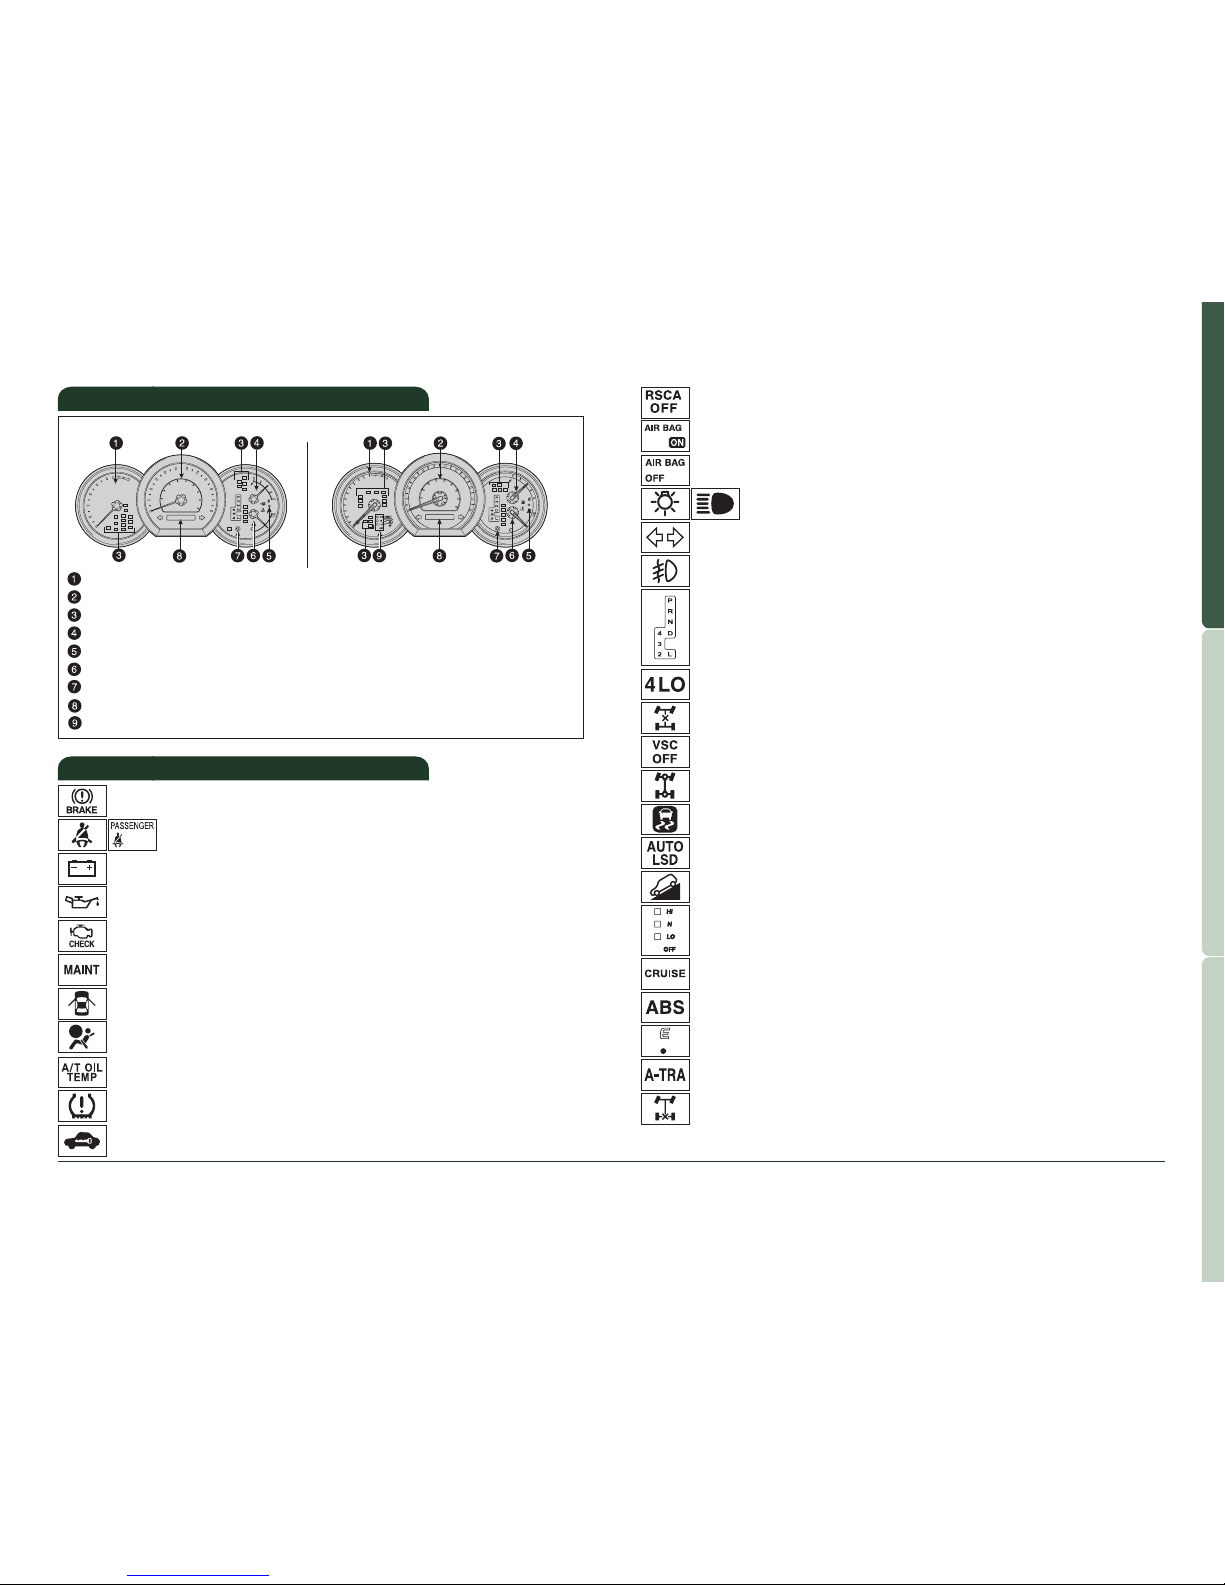
4 5
OVERVIEW
FEATURES/OPERATIONS
SAFETY AND EMERGENCY FEATURES
OVERVIEW
Automatic Transmission fluid temperature warning
1
Low Tire Pressure Warning
1
Open door warning
1
Airbag SRS warning
1
Tachometer
Speedometer
Service indicator and reminder
Fuel gauge
Low fuel level warning
Engine coolant temperature
Trip meter reset knob
Odometer and two trip meters
Height control indicator
Instrument cluster
Charging system warning
1
Low engine oil pressure warning
1
Brake system warning
1
Malfunction/Check Engine indicator
1
Engine oil replacement reminder
1
Indicator symbols
Driver/Front passenger seat belt reminder
1
Limited model only
Automatic Transmission indicator
AIR BAG ON indicator
Turn signal indicator
Front fog light indicator
Four-wheel drive indicator
3
Low speed four-wheel drive indicator
3
Center differential lock indicator
3
Slip indicator
Vehicle Stability Control “OFF” indicator
1
Downhill Assist Control indicator
AUTO Limited Slip Differential indicator
Cruise control indicator
5
Height control indicator
4
Roll Sensing of Curtain shield Airbag OFF indicator
2
Engine immobilizer/Theft deterrent system indicator
Headlight high beam indicator
Anti-lock Brake System warning
1
4
If “OFF” indicator flashes, refer to “Electronically modulated air suspension” Section 2-4,
2009 Owner’s Manual.
5
If this light flashes, refer to “Cruise control,” Section 2-4, 2009 Owner’s Manual.
1
For details, refer to “If a warning light turns on or warning buzzer sounds...” Section 5-2,
2009 Owner’s Manual.
2
For details, see “SRS airbags” Section 1-7, 2009 Owner’s Manual.
3
If this light flashes, refer to “Four-wheel drive system,” Section 2-4, 2009 Owner’s Manual.
AIR BAG OFF indicator
Low fuel level warning
1
Rear differential lock indicator
Active traction control indicator
Page 6
76
OVERVIEW
FEATURES/OPERATIONS
SAFETY AND EMERGENCY FEATURES
OVERVIEW
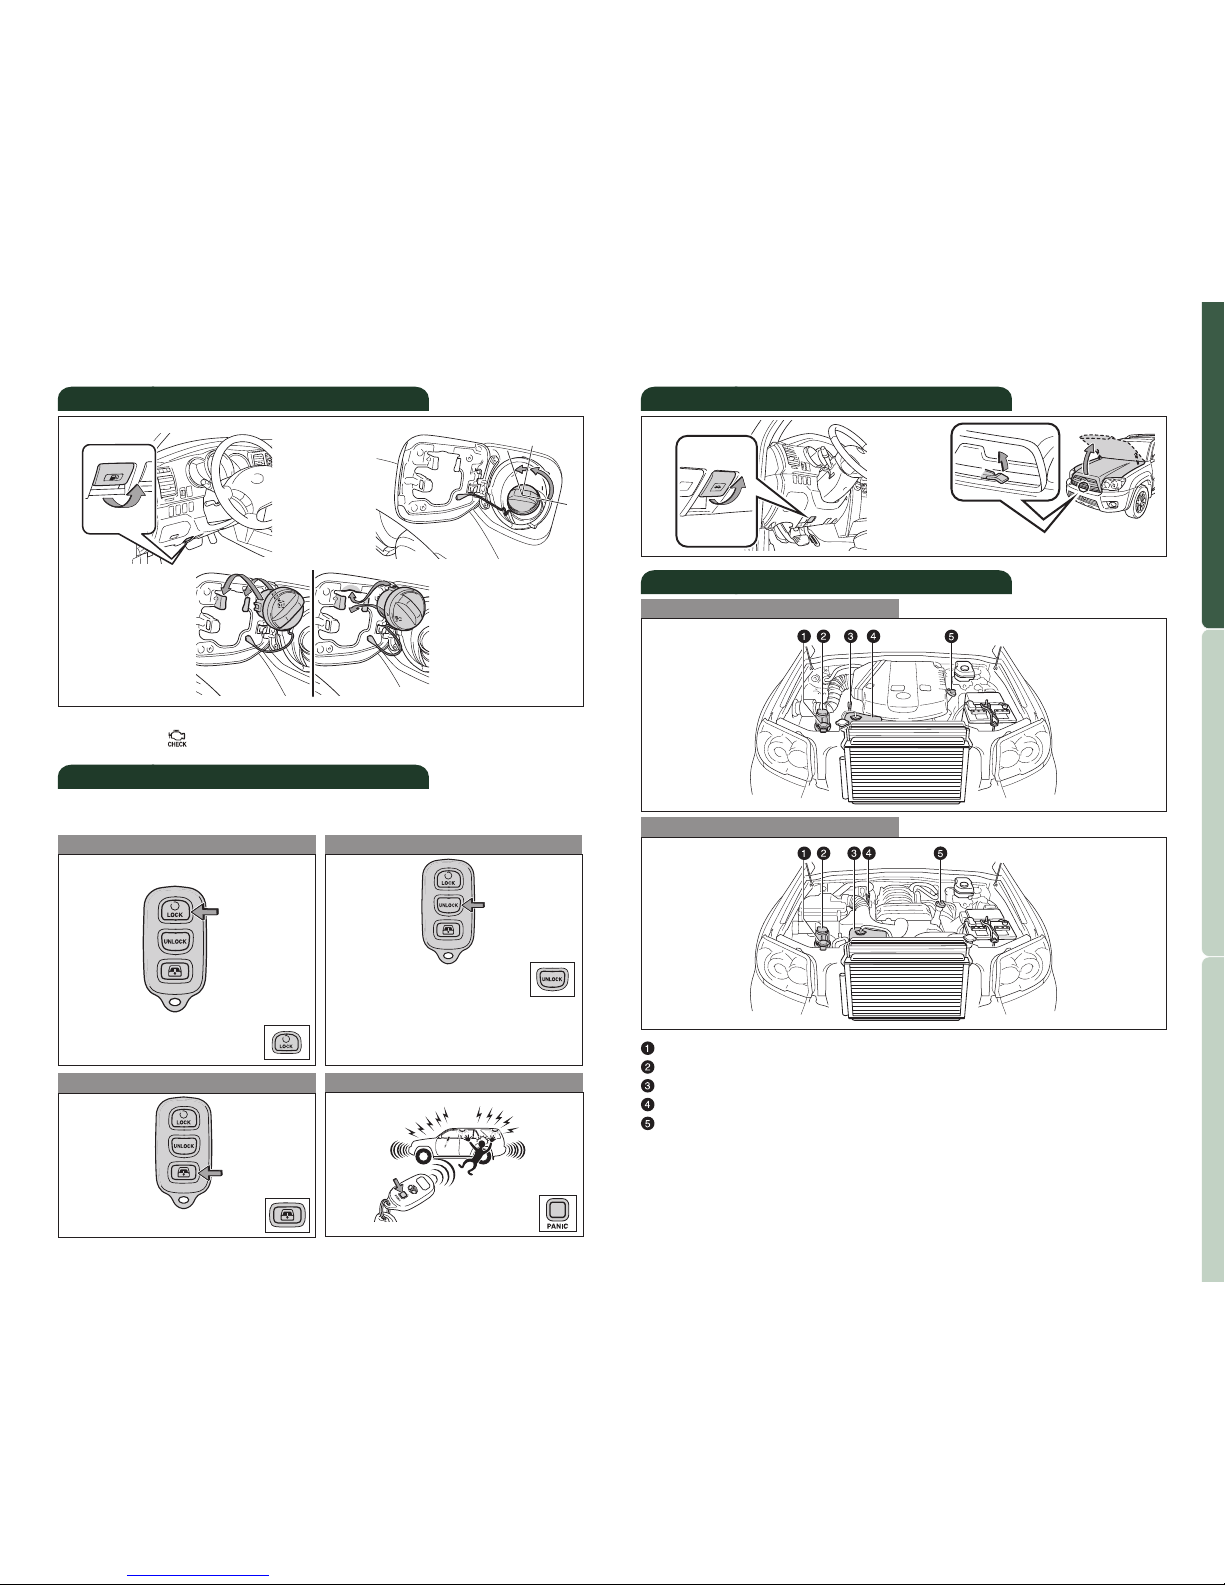
NOTE: Tighten until one click is heard. If the cap is not tightened enough,
Check Engine “ ” indicator may illuminate.
Fuel tank door release and cap
Pull up
Turn
Store
NOTE: If a door is not opened within
30 seconds of unlocking, all doors will
relock for safety.
Panic button
Keyless entry (if equipped)
Locking operation
Unlocking operation
Back window operation
Beep sound can be switched ON or OFF. Refer to the Owner’s Manual for
more details.
Push
Push and hold
Push ONCE: Driver door
TWICE: All doors
Push and hold
Windshield and back window washer fluid tank
Power steering fluid reservoir
Engine oil level dipstick
Engine coolant reservoir
Engine oil filler cap
Note: Regularly scheduled maintenance, including oil changes, will
help extend the life of your vehicle and maintain performance.
Please refer to the “Owner’s Warranty Information Booklet,”
“Scheduled Maintenance Guide” or “Owner’s Manual
Supplement.”
Engine maintenance
6 cylinder (1GR-FE) engine
8 cylinder (2UZ-FE) engine
Hood release
Pull
Pull up latch and
raise hood
Page 7
9
OVERVIEW
FEATURES/OPERATIONS
SAFETY AND EMERGENCY FEATURES
8
FEATURES/OPERATIONS
Auto lock functions
Automatic door locks can be programmed to operate in four different
modes, or turned OFF.
-Doors lock when shifting from Park.
-Doors lock when the vehicle speed goes above approximately 12 mph.
-Doors unlock when shifting into Park.
-Doors unlock when the engine switch is set from “ON” to “ACC” or
“LOCK” and driver’s door is opened.
Refer to the Owner’s Manual for more details.
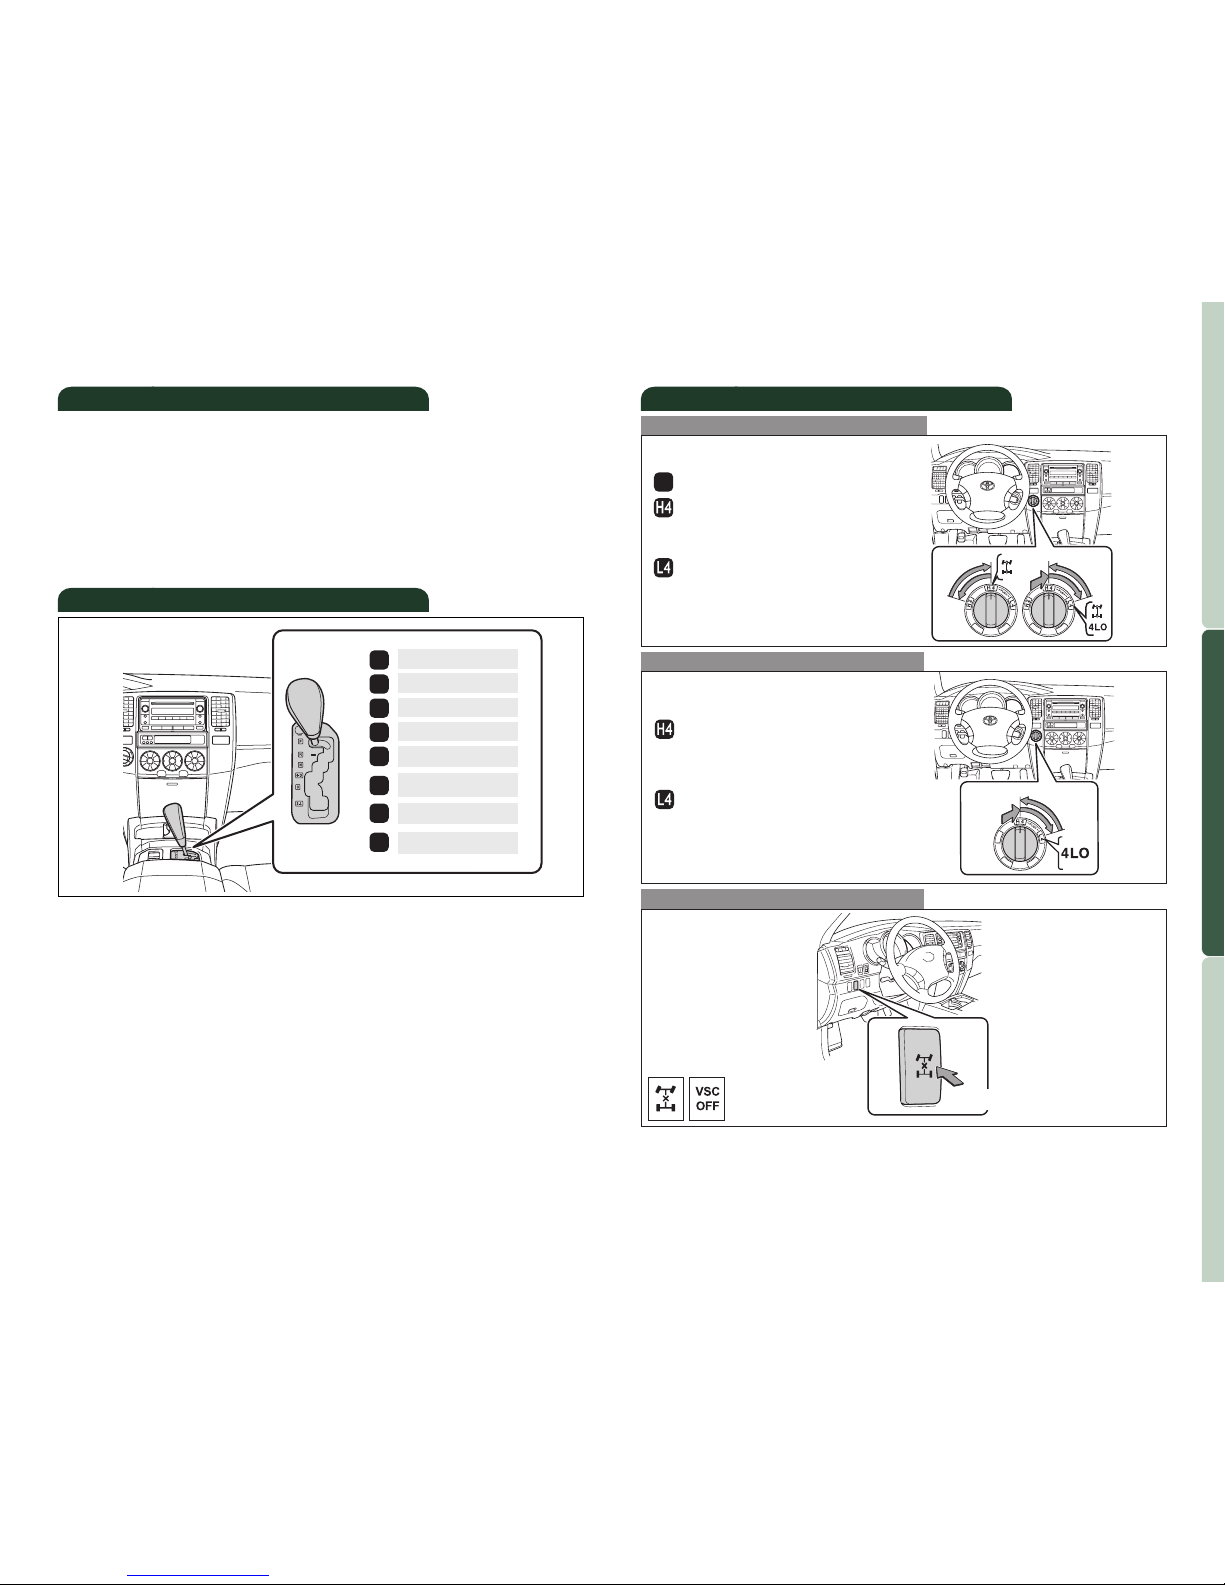
Automatic Transmission
* The engine switch must be “ON” and the brake pedal depressed to shift
from Park.
Downshifting increases power going uphill, or provides engine braking
downhill. For best fuel economy during normal driving conditions, always
drive with the shift lever in the “D” position.
Park*
Reverse
Neutral
Drive
Third gear
Second gear
First gear
P
RND432L
Fourth gear
Four-wheel drive (if equipped)
H2
Full-time four-wheel drive models
High speed (2WD)
High speed (4WD)
Turn to “H4” with speed
below 62 mph.
Low speed (4WD)
Shift to “N” position, then
push and turn to “L4.”
Center differential lock button
For best fuel economy and performance under normal driving
conditions:
•“H2” position
(part-time four-wheel drive models)
•
“H4” position (full-time four-wheel drive models), center differential
unlocked (center differential lock indicator and “VSC OFF” indicator are
not illuminated).
Center differential lock/unlock
High speed
Turn to “H4” with speed
below 62 mph.
Low speed
Shift to “N” position, then
push and turn to “L4.”
Part-time four-wheel drive models
Page 8
10 11
OVERVIEW
FEATURES/OPERATIONS
SAFETY AND EMERGENCY FEATURES
FEATURES/OPERATIONS
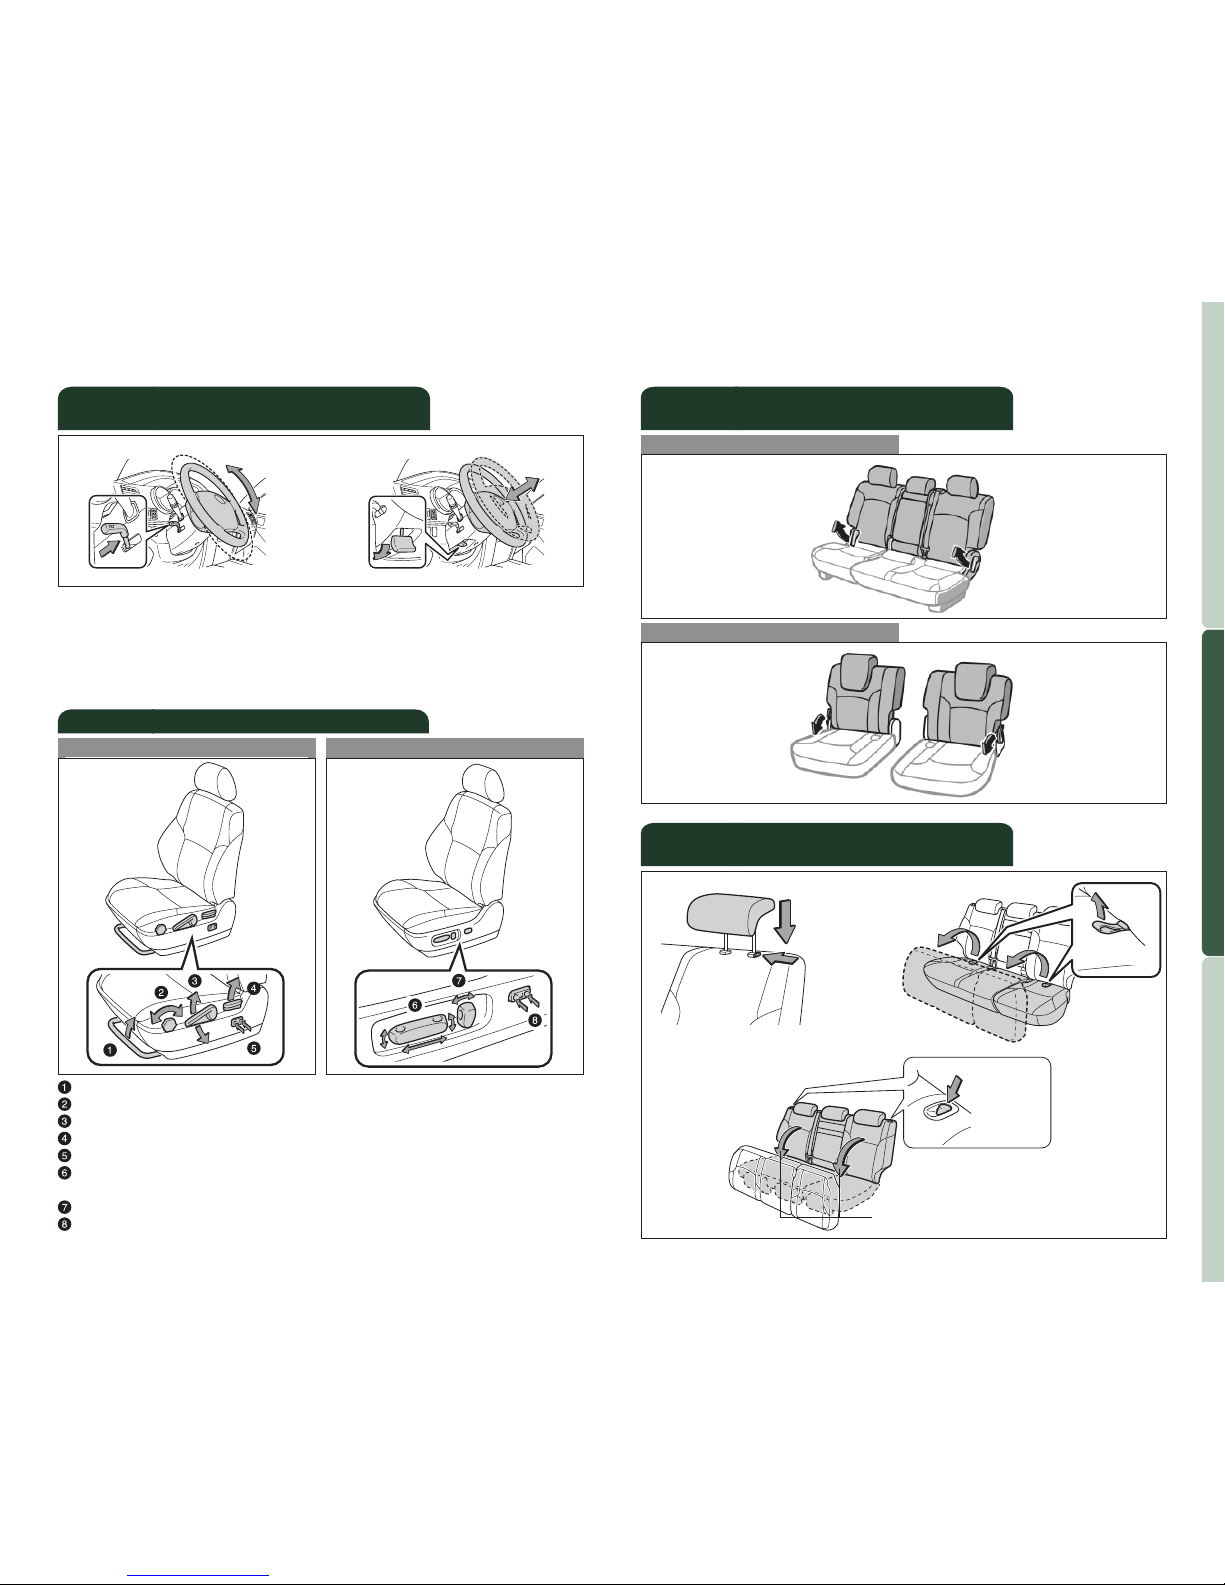
Seat position (forward/backward)
Cushion angle (driver side only)
Height crank (driver side only)
Seatback angle
Lumbar support (driver side only)
Driver seat: position, cushion angle and height
Passenger seat: position
Seatback angle
Lumbar support (driver side only)
Seat adjustments-Front
Manual seat
Power seat
To change the angle Hold the steering wheel, pull the lock release
lever, tilt to the desired angle, and release the lever.
To change the column length Push the lock release lever down, set
the desired length, and return the lever to its locked position.
Note: Do not attempt to adjust while the vehicle is in motion.
Tilt and telescopic (if equipped)
steering wheel
Second row seats
Third row seats
Seatback angle
Seatback angle
Seatback angle
Seatback angle
Seat adjustments-Rear
(vehicles with third row seats)
Seat adjustments-Rear
(vehicles without third row seats)
(1) Push
(2) Lower
(3) Pull up
(5) Fold down
(4) Push down
(1) Angle (2) Column length
(1)
(2)
Page 9
12 13
OVERVIEW
FEATURES/OPERATIONS
SAFETY AND EMERGENCY FEATURES
FEATURES/OPERATIONS
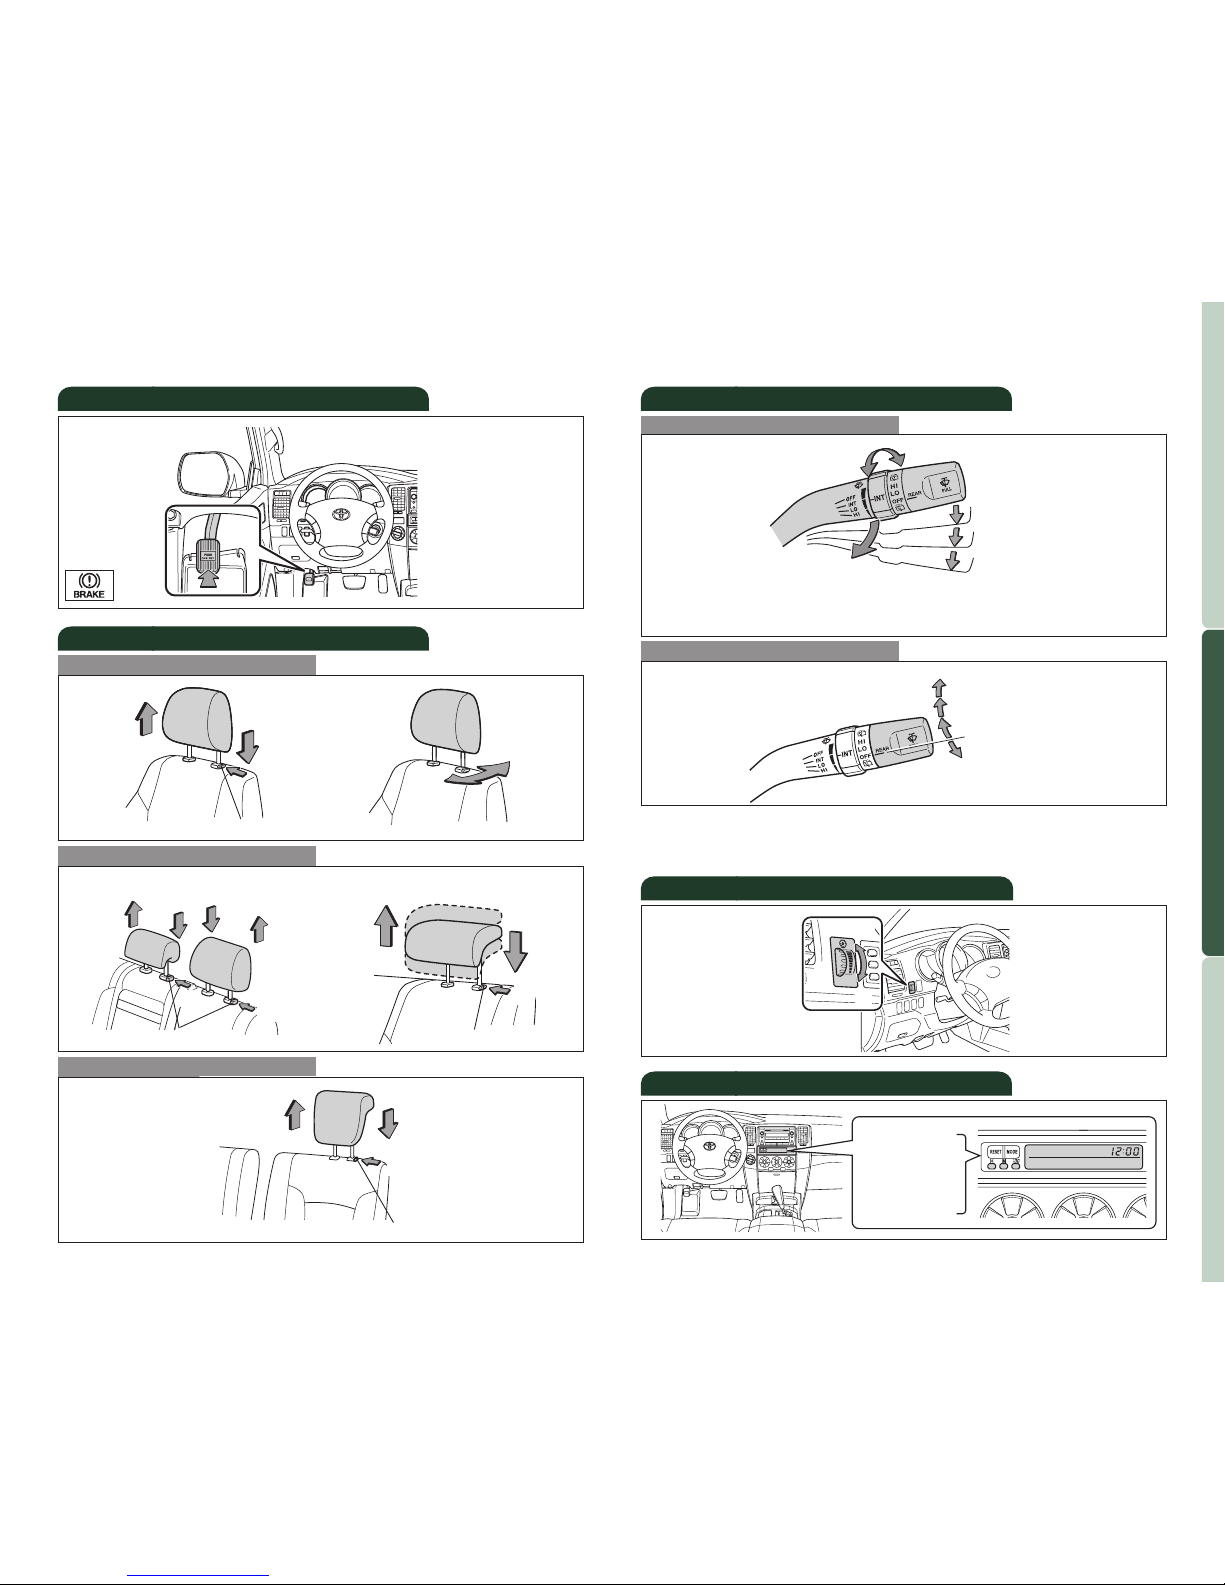
Windshield wipers & washers
Rear
Front
Interval wipe
Slow
Fast
Pull to wash and wipe
Adjust interval*
Wash and wipe
Wipe
Interval wipe
Wash and wipe
NOTE: Rear wiper and washer operate only when rear window is fully
closed. If battery is disconnected, rear washer will not function until rear
window is reinitialized by being fully opened and then closed.
Light control-Instrument panel
Brightness control
+
Clock
H- Hour set
M- Minute set
:00- R
ound off
minutes
* Intermittent windshield wiper interval adjustment
Rotate to increase/decrease wipe frequency.
Seats-Head restraints
Front
Second row
Third row
Lock release button
Lock release button
Lock release button
Lock release button
With third seat Without third seat
Parking brake
Set: Depress
Release: Depress again
(2)
(1)
(2)
(1)
(2)
(2)
(1)
(2)
(1)
(1)
-
Page 10
15
OVERVIEW
FEATURES/OPERATIONS
SAFETY AND EMERGENCY FEATURES
14
FEATURES/OPERATIONS
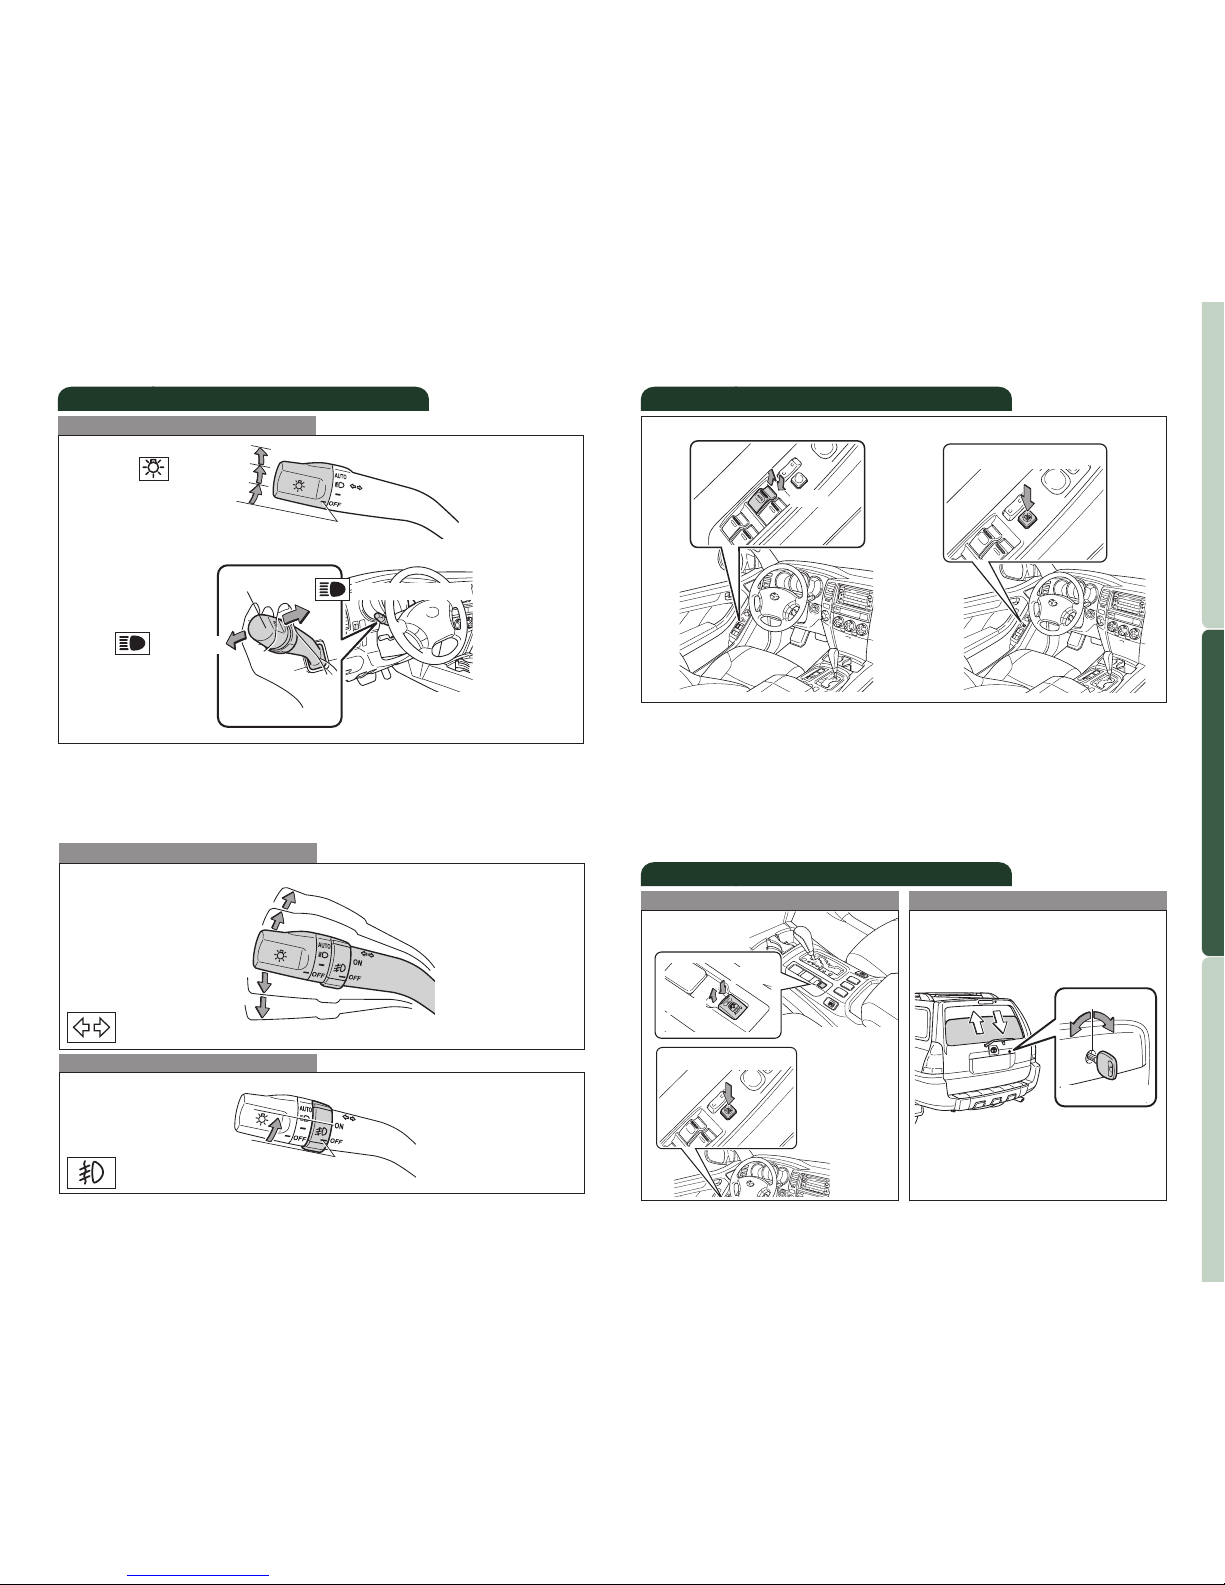
Lights & turn signals
Turn signals
Headlights
AUTO*
High beam flasher
* If equipped
Low beam
Front fog lights (if equipped)
Headlights
-Daytime Running Light system (if equipped)
Automatically turns on the headlights at a reduced intensity.
-Automatic light cut off system Will automatically turn lights off after a
delay of 30 seconds, or the lock switch on remote may be pushed after
locking.
Front fog lights come on only when the headlights are on low beam.
Parking lights
High beam
Right turn
Turn
Lane change
Lane change
Left turn
Operating from inside
Windows
Driver side
Automatic operation (driver side only) Push the switch completely down
or pull it completely up and release to fully open or close. To stop window
midway, lightly push the switch in the opposite direction.
Window lock switch Deactivates all passenger windows. Driver’s window
remains operable.
NOTE: If the battery is disconnected, the window will need to be
reinitialized. Refer to the
Owner’s Manual for more details.
Window-Rear hatch
Operating from outside
Up
Down
Window lock switch
Window lock switch
Open
Open
Turn and hold
Close
Close
NOTE: If the battery is disconnected, the rear hatch window will need to
be reinitialized. Refer to the
Owner’s Manual for more details.
Page 11
17
OVERVIEW
FEATURES/OPERATIONS
SAFETY AND EMERGENCY FEATURES
16
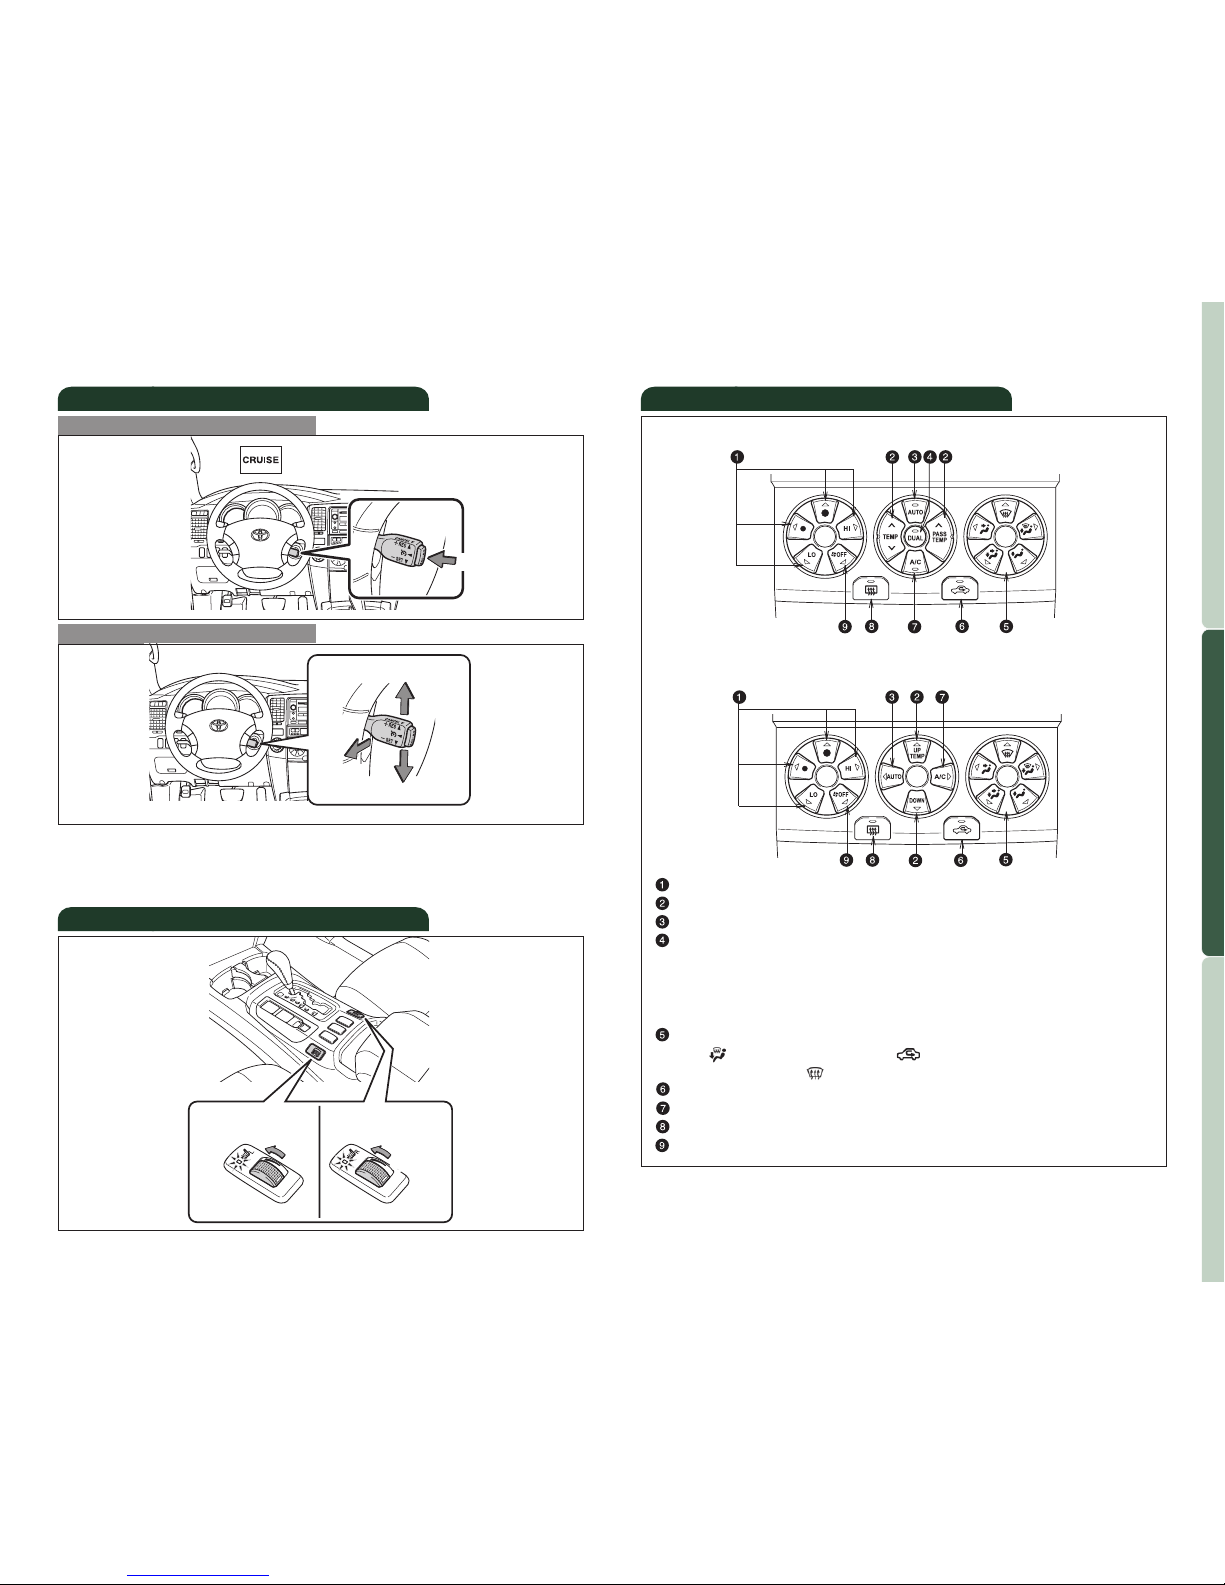
Cruise control
1
The set speed may also be cancelled by depressing the brake pedal.
2
The set speed may be resumed once vehicle speed exceeds 25 mph.
Refer to the
Owner’s Manual for more details.
Turning system ON/OFF
Functions
System ON/OFF
Resume2/Increase speed
Set/Decrease speed
Cancel
1
Seat heaters (if equipped)
Left front seat
Right front seat
Air Conditioning/Heating
W
ith “DUAL” button
Fan speed
Temperature selector
Automatic climate control ON/OFF
“DUAL” button
Indicator ON: Separate temperature settings for driver and
passenger.
Indicator OFF: Synchronize temperature settings for driver and
passenger.
Airflow vent
In “ ” mode, use fresh air (“ ” indicator OFF) to reduce
window fogging. “ ” mode uses fresh air only.
Fresh or recirculated cabin air
Air Conditioning ON/OFF
Rear defogger
Climate control OFF
Without “DUAL” button
FEATURES/OPERATIONS
Page 12
19
OVERVIEW
FEATURES/OPERATIONS
SAFETY AND EMERGENCY FEATURES
18
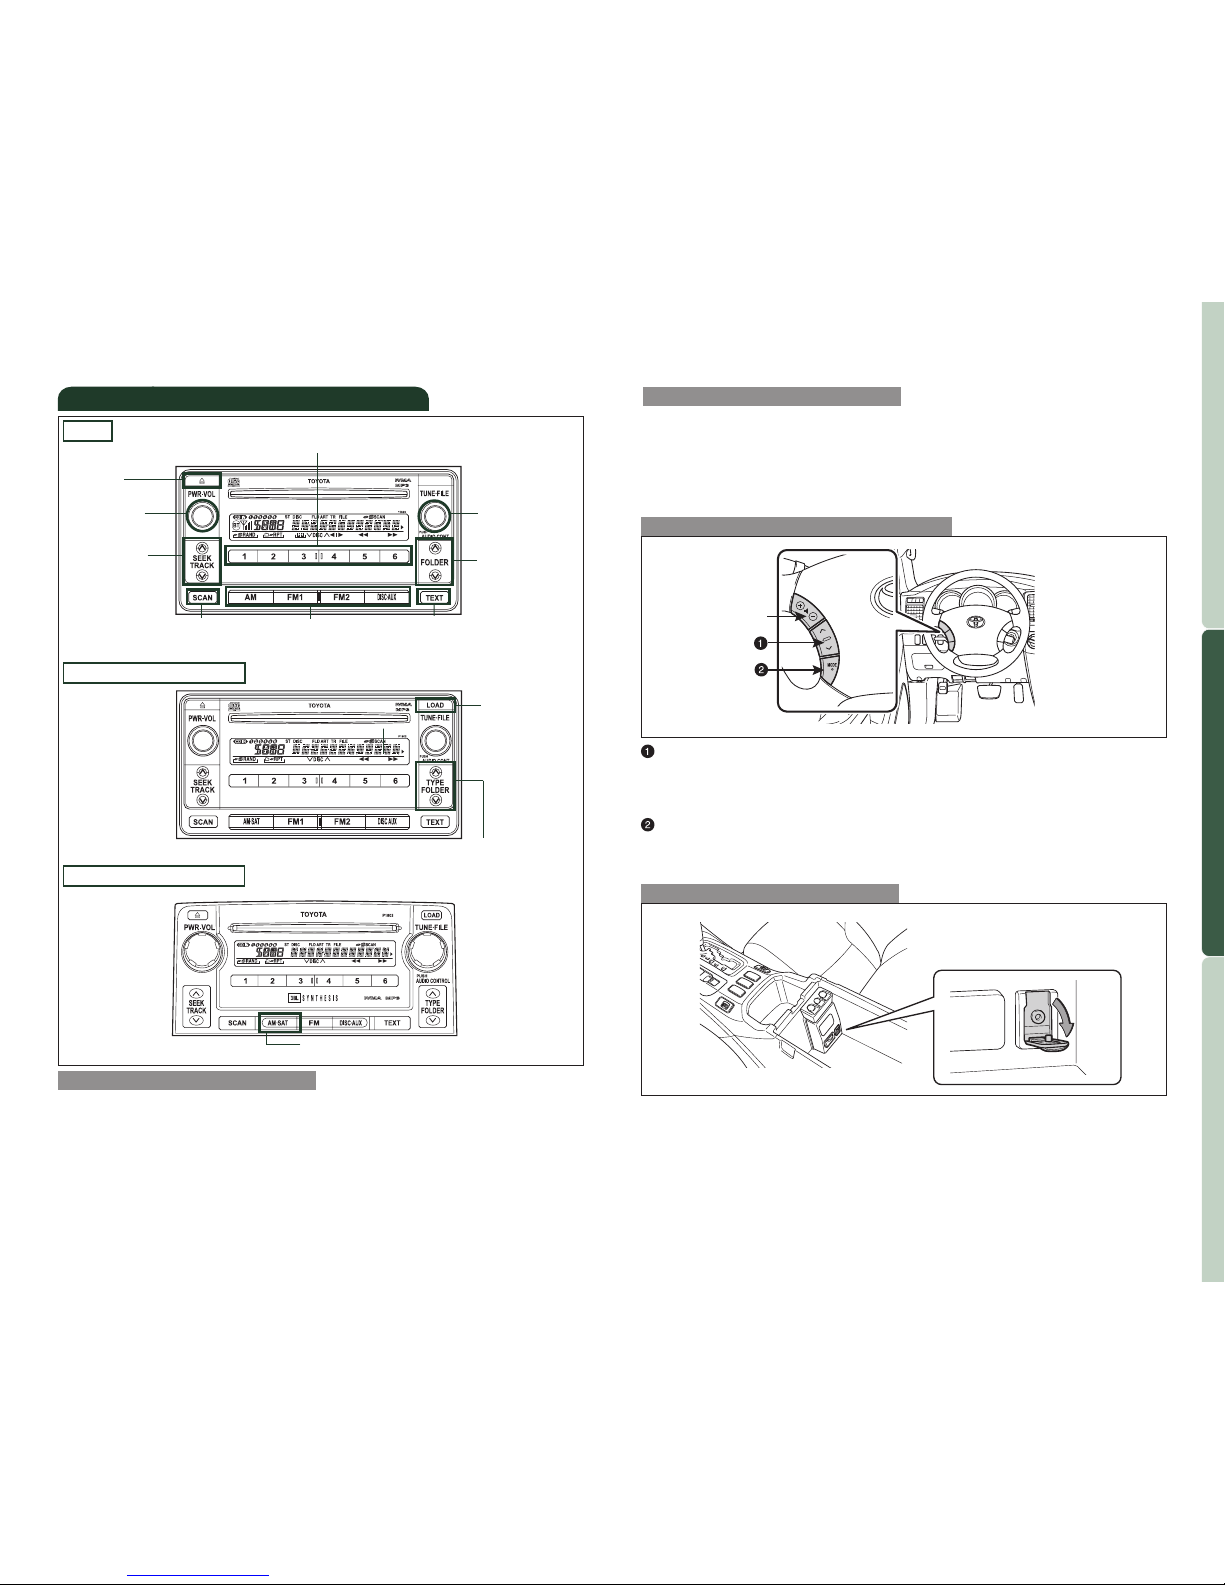
CD PLAYER
To scan tracks on a disc Push “SCAN.” Push again to hold selection.
CD Changer (Types 2 and 3)
-To load one disc
Push “LOAD” and insert one disc.
-To load multiple discs Push and hold “LOAD” until you hear a beep.
Insert one disc. Shutter will close and then re-open for next disc.
To select a file (MP3/WMA only) Turn “TUNE.FILE.”
To select a folder (MP3/WMA only) Push either side of “FOLDER” or
“TYPE/FOLDER.”
Audio
Type 2 additional functions
Type 3 additional functions
View radio/CD
information
Eject CD
Push to turn
ON/OFF
Push to adjust
tone & balance
Push to skip
up/down folder
Seek station/
CD track select
Station/CD
track scan
Mode
Load CD(s)
Preset buttons - functions in other
modes indicated above number.
View genre/Push to skip up/down folder
Type 1
AM/Satellite radio
“ ”
-In radio mode
Push to select a preset station; push and hold to seek
the next strong station.
-In CD mode Push to skip up or down to next/previous track.
“MODE”
Push to turn audio ON and select an audio mode. Push and hold to turn
audio system OFF.
By inserting a mini plug into the AUX audio jack, you can listen to music
from a portable audio device through the vehicle’s speaker system while
in AUX mode.
>
>
Steering wheel controls (if equipped)
AUX adapter
RADIO
To preset stations Tune in the desired station and hold down a preset
button (1-6) until you hear a beep. Push desired preset button (1-6) to
select.
To scan stations Push “SCAN.” Push and hold to scan preset stations. Push
again to hold selection.
Center console
FEATURES/OPERATIONS
Volume control
Page 13
21
OVERVIEW
FEATURES/OPERATIONS
SAFETY AND EMERGENCY FEATURES
20
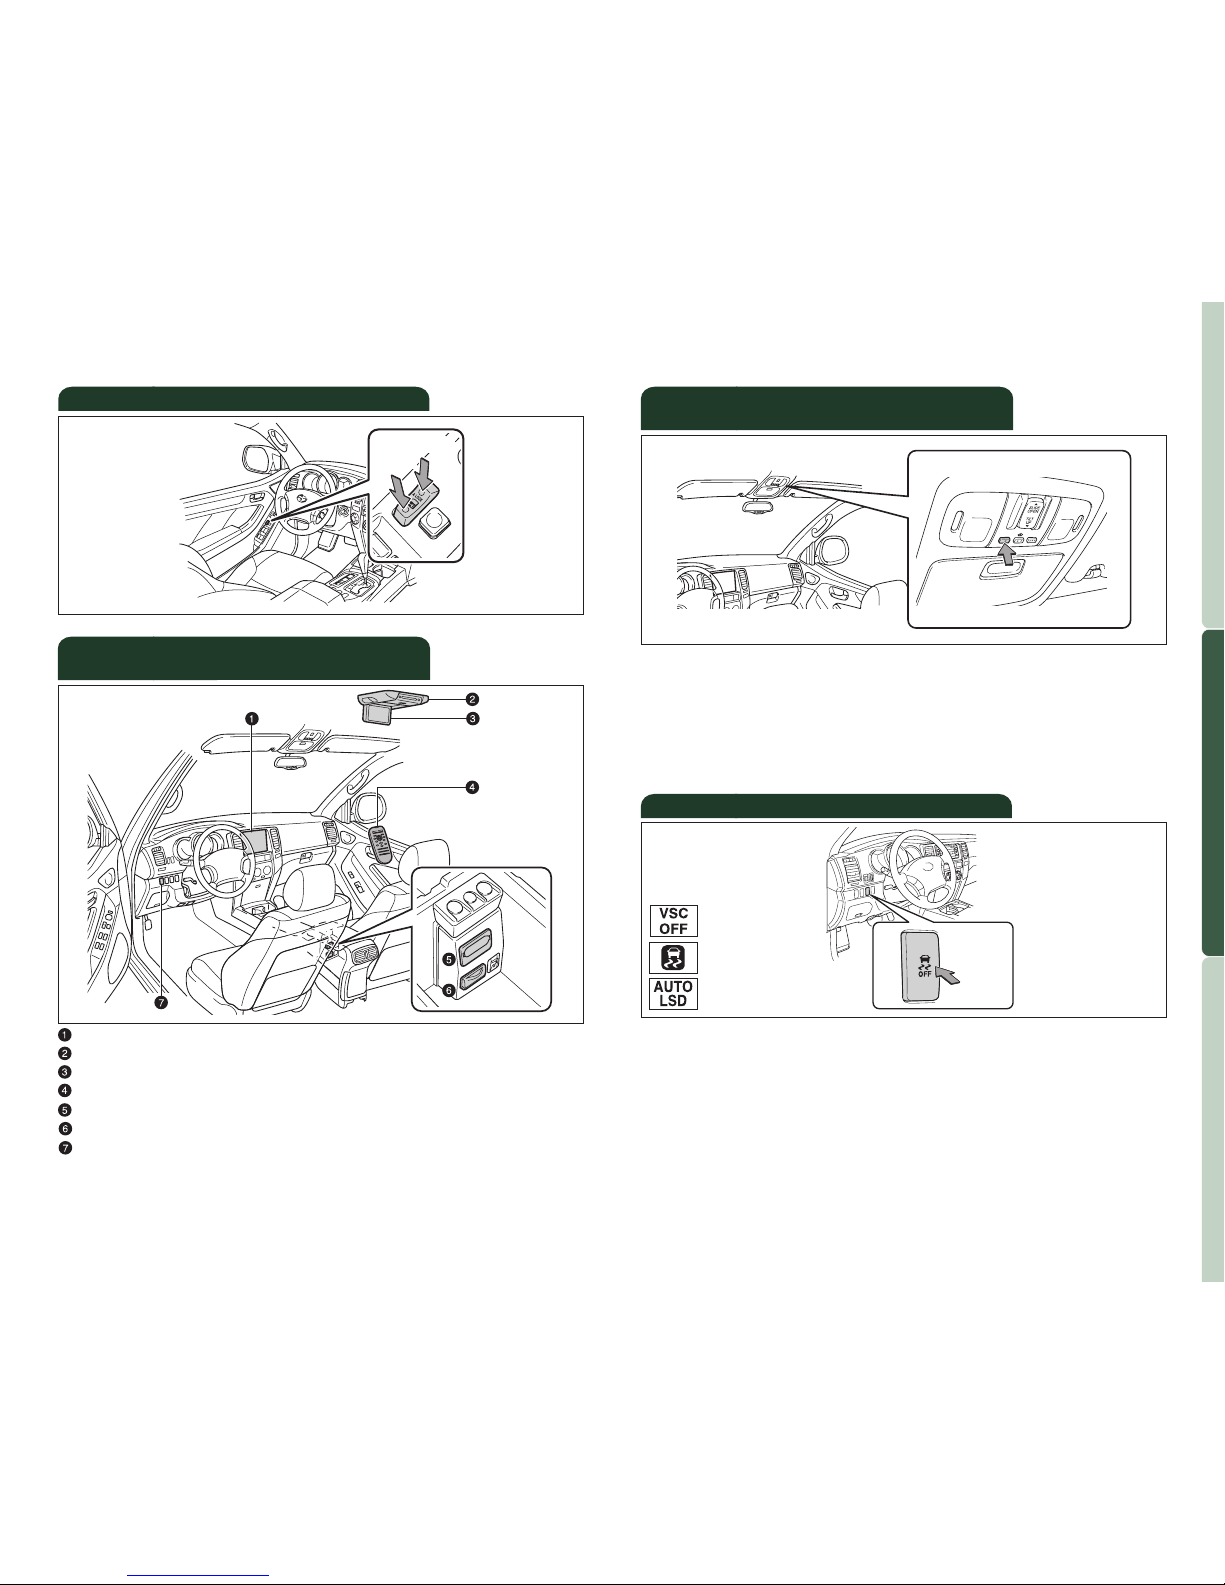
Front audio system
DVD player
DVD screen
Remote control
A/V input adapter
115V AC Power outlet
115V AC Power outlet ON/OFF switch
Door locks
Unlock
Lock
Rear seat entertainment system
(if equipped)
The VSC OFF button is used to switch between modes related to the TRAC,
VSC and Auto LSD functions.
Refer to Section 2-4 of the
Owner’s Manual for more information.
Garage door openers manufactured under license from HomeLink®* can be
programmed to operate garage doors, estate gates, security lighting, etc.
Refer to the Owner’s Manual for more details.
For programming assistance, contact the Toyota Customer Experience
Center at 1-800-331-4331, or visit http://www.homelink.com.
* HomeLink®is a registered trademark of Johnson Controls, Inc.
Garage door opener (HomeLink®)*
(if equipped)
VSC OFF
FEATURES/OPERATIONS
VSC OFF button
Page 14
23
OVERVIEW
FEATURES/OPERATIONS
SAFETY AND EMERGENCY FEATURES
22
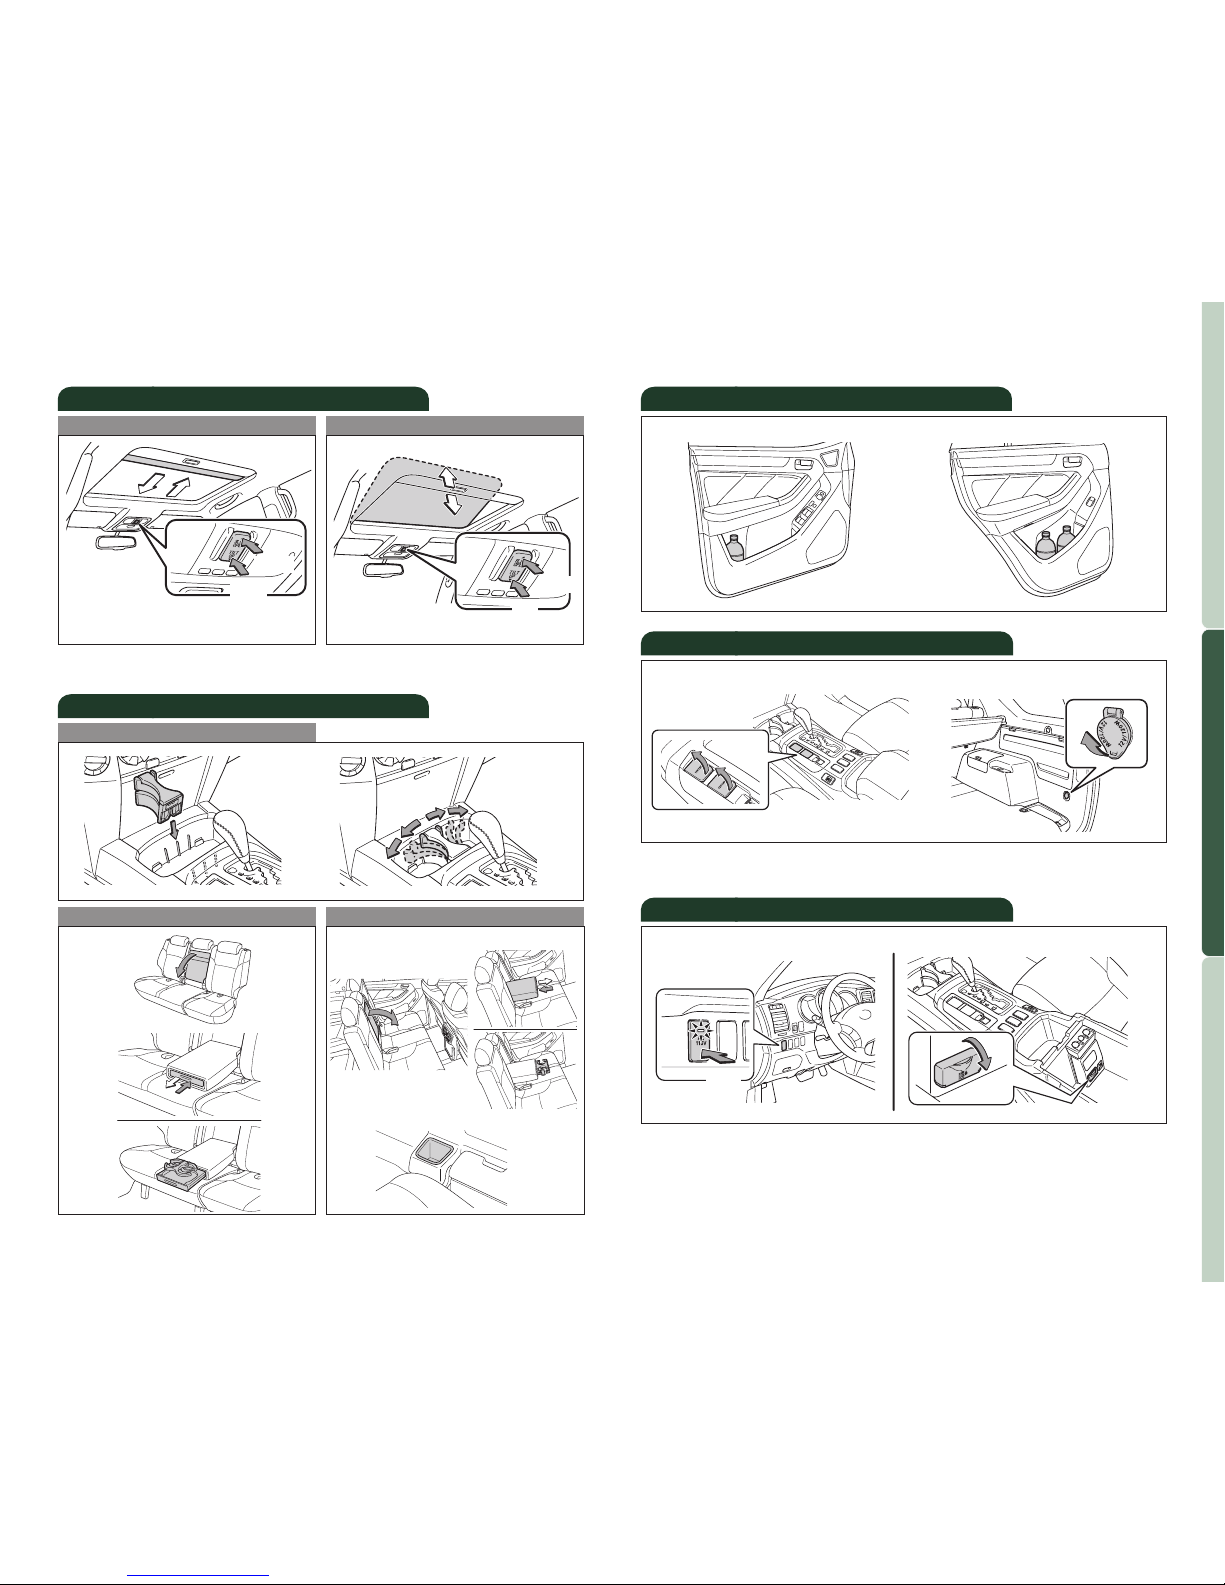
Moonroof (if equipped)
NOTE: If battery is disconnected, the moonroof will need to be
reinitialized. Refer to the
Owner’s Manual for more details.
Cup holders
Center console
Rear (with third seats)
Second row seat
Third row side trim
Rear (without third seats)
Sliding operation Tilting operation
Open
Close
Close
Tilt
Power outlets-12V DC
ON/OFF switch
Inside center console
Push
Auxiliary box
Luggage compartment
NOTE: Designed for car accessories. Engine switch must be in the “ACC” or
“ON” position to be used.
NOTE: Engine switch must be in the “ON” position to be used.
Bottle holders
Front doors
Rear doors
FEATURES/OPERATIONS
Push once to open/close completely.
To stop partway, press switch lightly.
Power outlets-115V AC (if equipped)
Page 15
24
SAFETY AND
EMERGENCY FEATURES
If tire pressure becomes critically low on any of the tires (including the
spare), indicator light will come on. Correctly adjusting tire inflation will
turn off the light after a few minutes. If the light does not turn off, have
the system checked by your T
oyota dealer.
Refer to the
Owner’s Manual for more details.
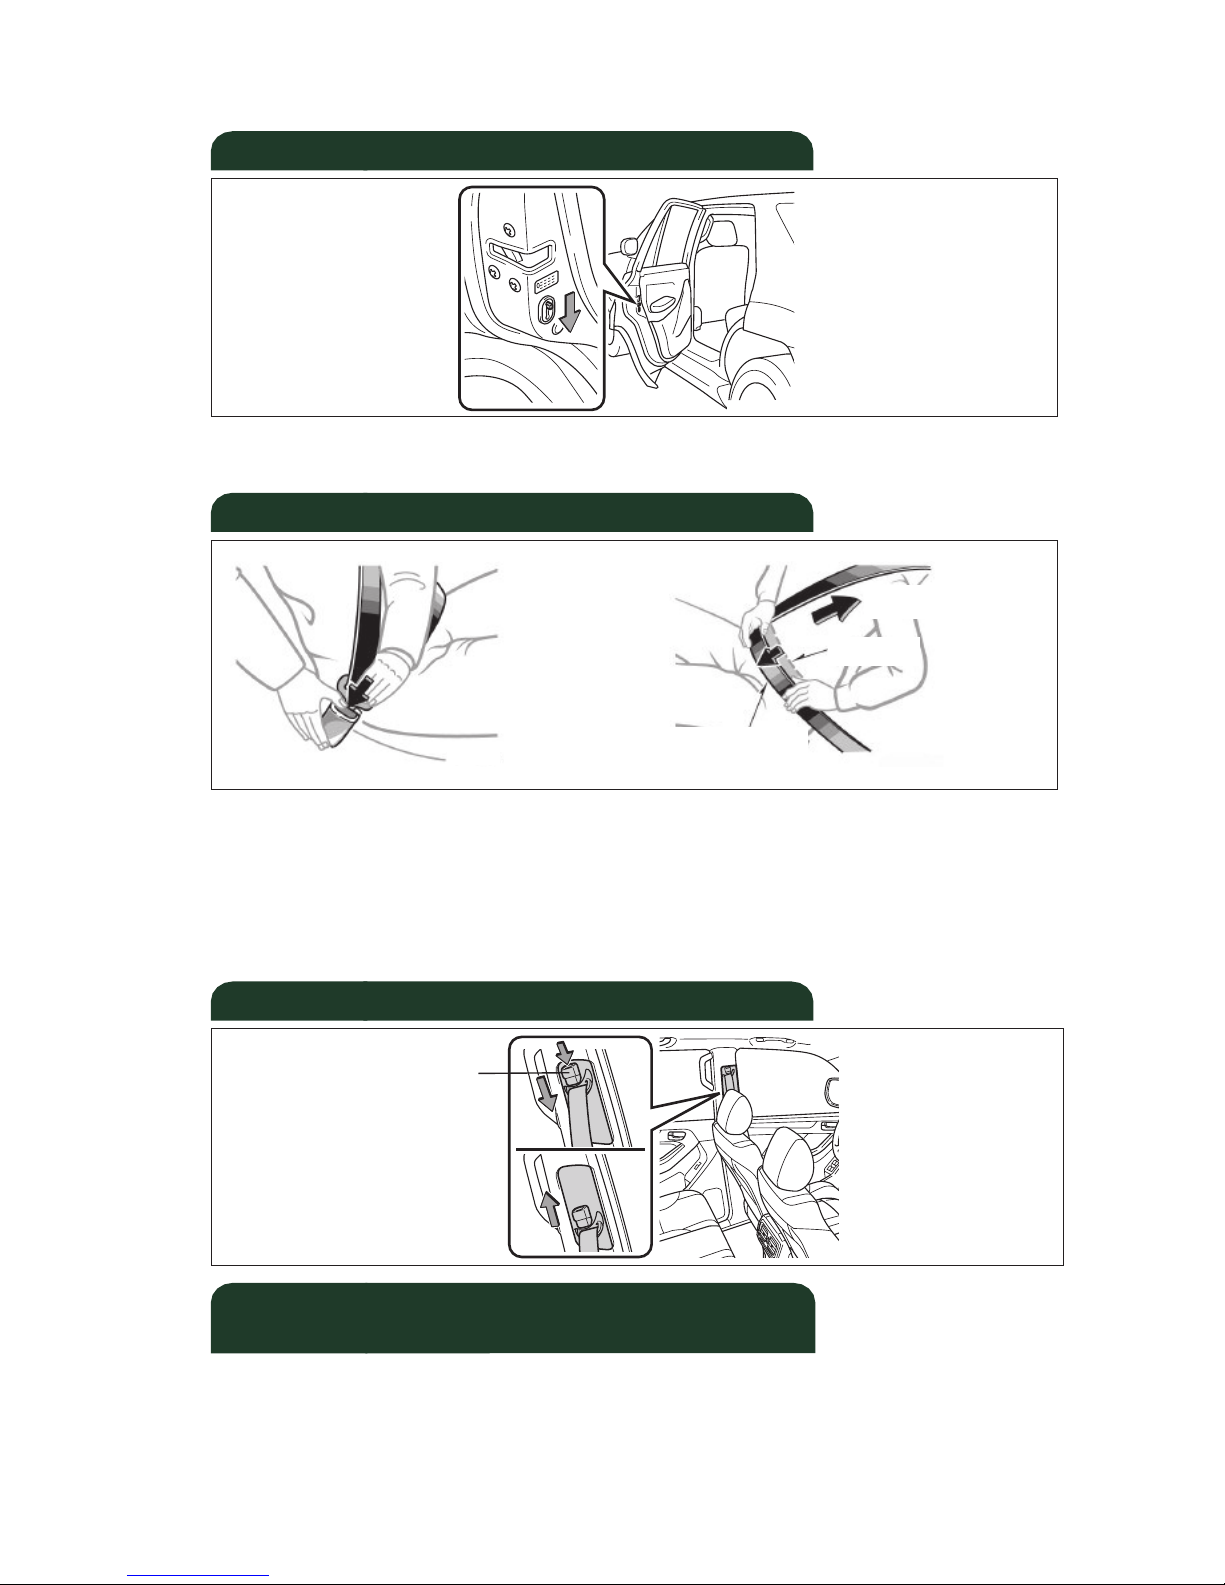
Seat belts-Shoulder belt anchor
Push up or squeeze lock
release to lower
Moving the lever to “LOCK” will allow the door to be opened only from
the outside.
Doors-Child safety locks
Rear door
If belt is fully extended, then retracted even slightly, it cannot be
re-extended beyond that point, unless fully retracted again. This feature
is used to help hold child restraint systems securely.
To find more information about seat belts, and how to install a child
restraint system, refer to the
Owner’s Manual.
Keep as low on
hips as possible
Take up slack
Too high
Seat belts
Tire Pressure Monitoring (warning)
System
Page 16
25
OVERVIEW
FEATURES/OPERATIONS
SAFETY AND EMERGENCY FEATURES
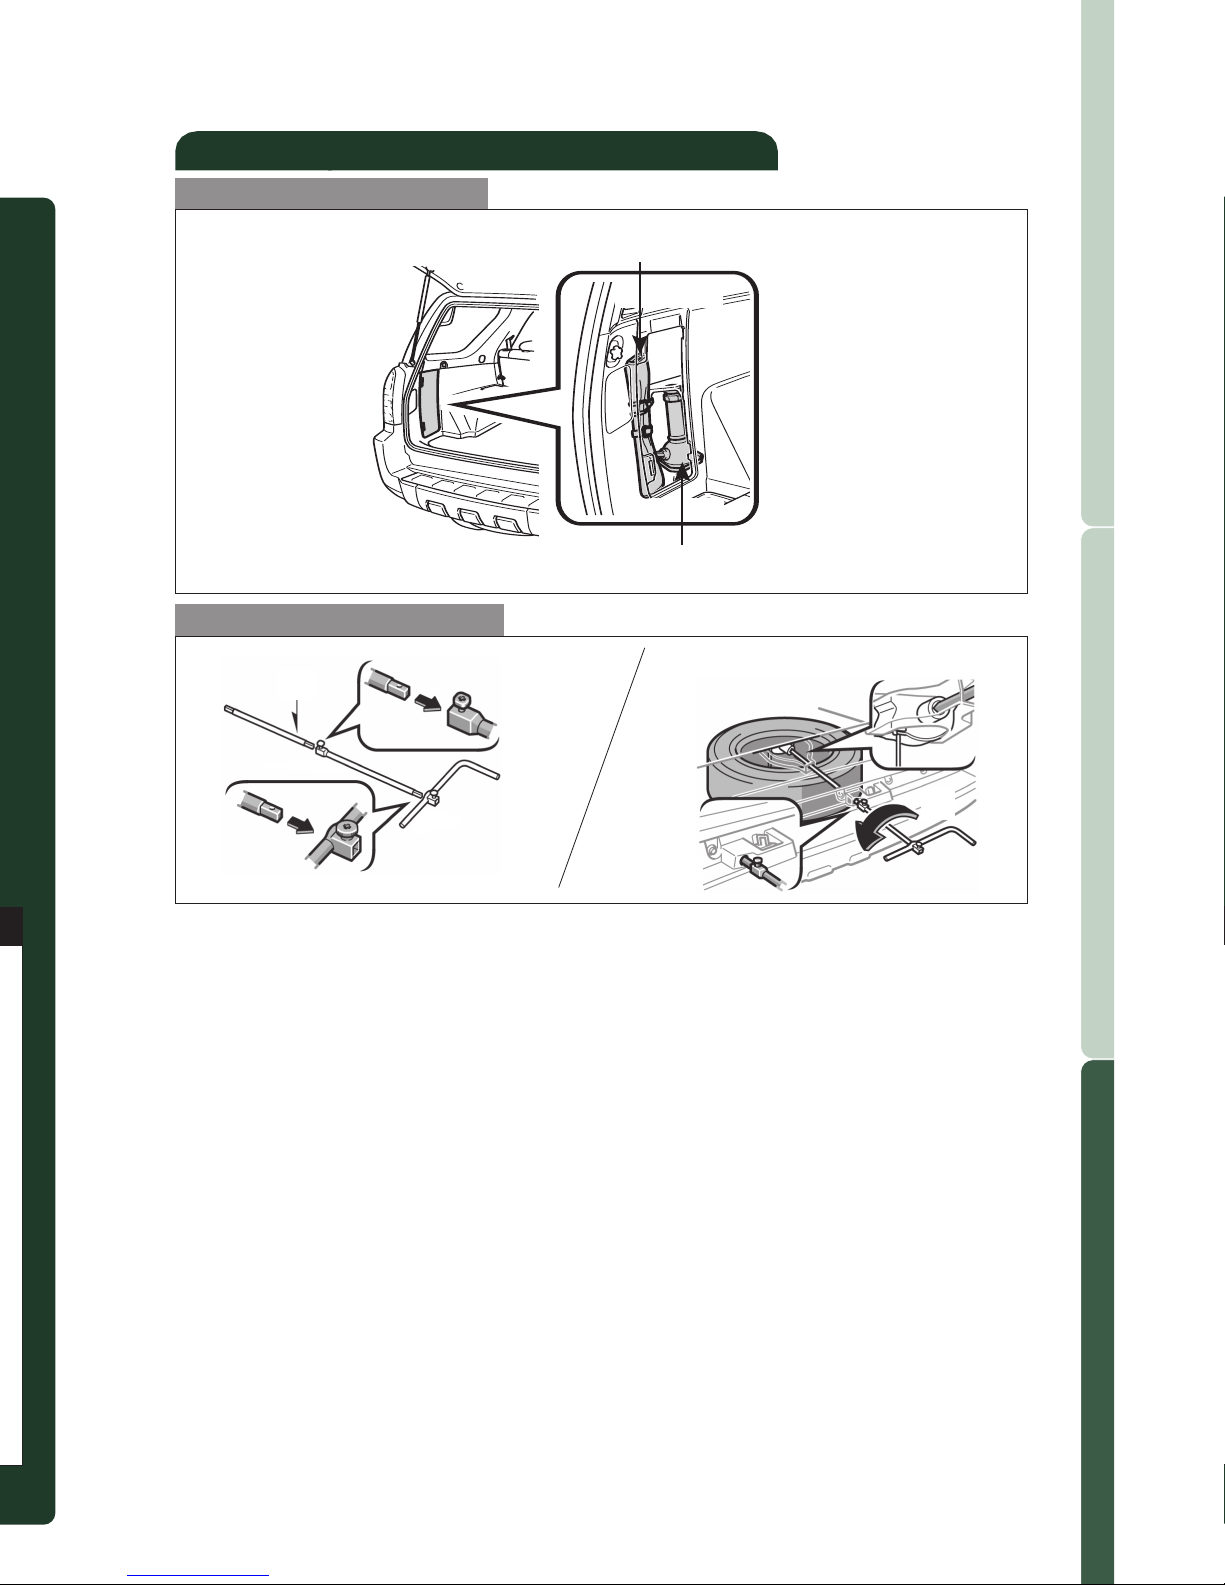
Spare tire & tools
Tool location
Removing the spare tire
(1) Assemble the jack handle.
(2) Insert the jack handle end through the opening in the bumper, and into
the lowering screw.
(3) Turn the jack handle counterclockwise.
Refer to the
Owner’s Manual for tire changing and jack positioning
procedures.
Tool bag
Jack
(1)
(2)
(3)
Page 17

MN 00505-QRG09-4RUN
Printed in the USA 7/08
 Loading...