

Page 1
NAVIGATION SYSTEM
QUICK REFERENCE GUIDE
CUSTOMER EXPERIENCE CENTER
1-8 00 -331- 43 31
00505-NAV11-RAV4
Printed in U.S.A. 8/10
10-TCS-04053
RAV4
2011
Page 2
1
TABLE OF CONTENTS
LIMITATIONS OF THIS QUICK REFERENCE GUIDE 1
BASIC OPERATION 2
DESTINATION INPUT 3
By Address 3
DESTINATION INPUT - POINTS OF INTEREST (POI) 5
Points of Interest by Name 5
Points of Interest by Category 6
DESTINATION INPUT - TELEPHONE NUMBER 7
Business or Registered Addresses 7
SET HOME 8
ADDITIONAL NAVIGATION FEATURES 10
Search Area 10
Route Preferences 10
3 Routes 10
Screen Preferences 10
Beep Setting 11
Volume Setting 11
Keyboard Setting 11
Screen Transition 11
Freeway Exit Info Mode 11
Estimated Distance and Time 12
Operation of Vehicle Emergency Screen 12
XM NAVTRAFFIC
®
13
This Quick Reference Guide is designed to provide information
on the basic operation and key features of the navigation system.
The Quick Reference Guide is not intended as a substitute for the
Navigation Owner’s Manual. We strongly encourage you to review the
Navigation Owner’s Manual so you will have a better understanding of
the navigation system capabilities and limitations.
LIMITATIONS OF THIS QUICK REFERENCE GUIDE
14
Press the
MENU
panel button
followed by
.
step
1
Select preferences.
step
2
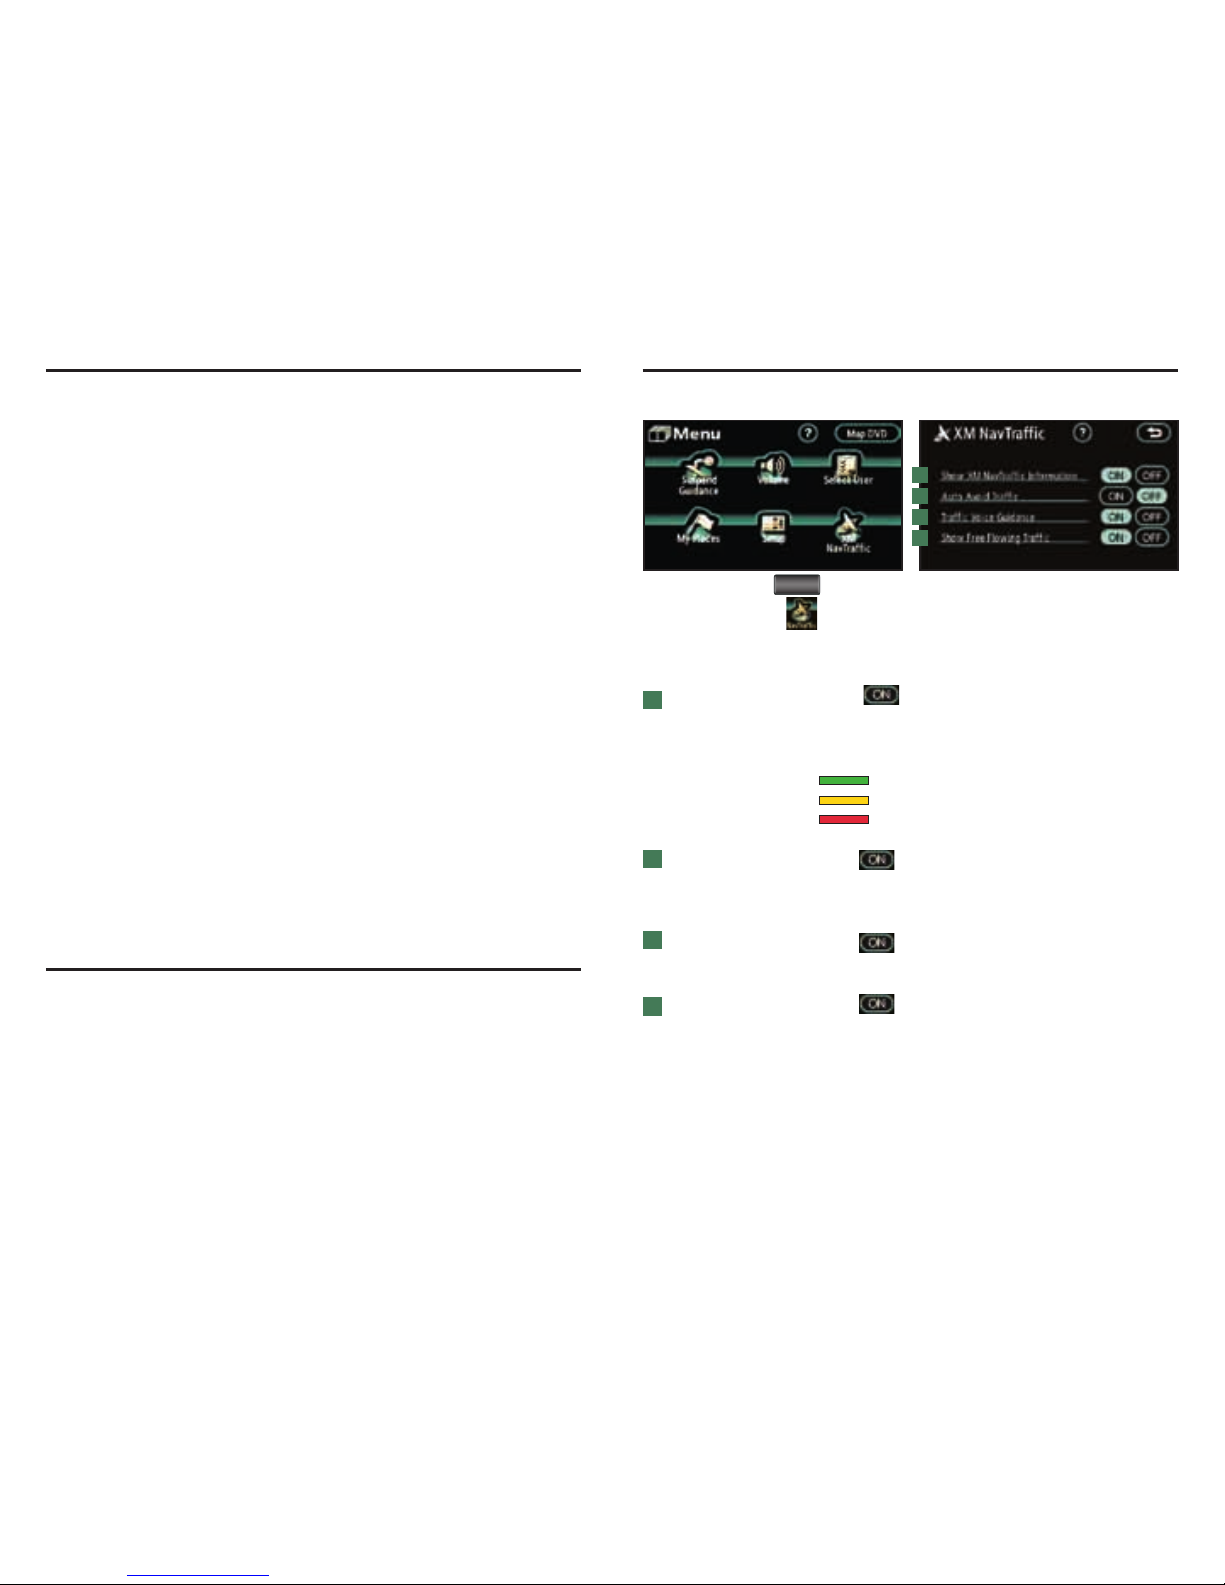
XM NAVT RAFF IC® PR EFER ENCE S
Show XM
NavTraffi c
Information:
Auto Avoid Traffi c:
Traffi c Voice
Guidance:
Show Free
Flowing Traffi c:
1
4
3
2
1
Touch to overlay traffi c event and fl ow indicators
on the map. Traffi c fl ow is displayed by colored lines right
along the side of the freeways:
Free fl ow traffi c
Moderate traffi c
Heavy congestion
Touch to have the system automatically select
another route when moderate or heavy traffi c is detected
during route guidance.
Touch to receive voice notifi cation of traffi c events
within 20 miles along the current route.
Touch to show free fl ow traffi c information.
Free fl ow traffi c is displayed with green colored lines
alongside freeways or highways.
2
3
4
Page 3
2
BASIC OPERATION
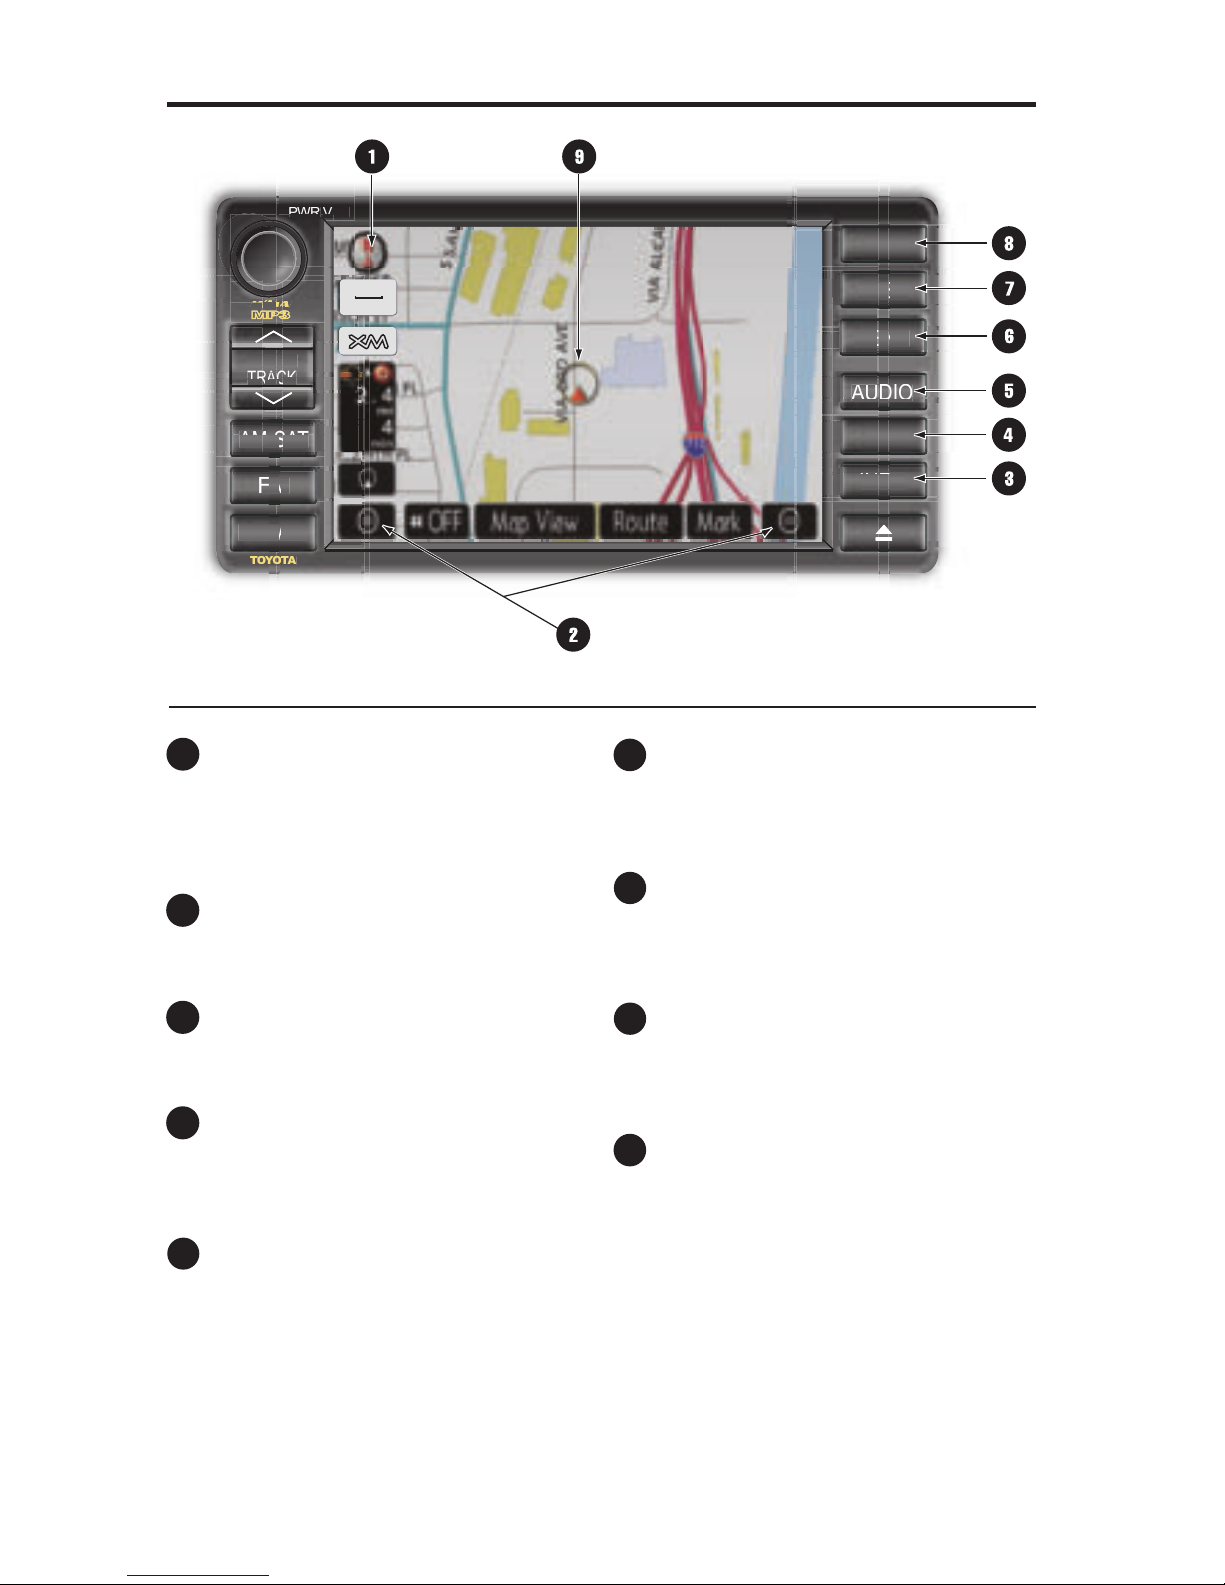
NORTH-UP OR COMPASS MODE
Icon
Touch to change the map display
between North-up or Head-up
perspectives.
ZOOM IN/ZOOM OUT Icons
Touch to magnify or reduce the
map scale.
INFO Button
Access Maintenance, Calendar,
Language and Screen Settings.
DISPLAY/TILT Button
Adjust the contrast, brightness or
turn off the screen. Change the angle
of the screen for best viewing.
AUDIO Button
Set the radio station presets, adjust
the balance and tone controls.
MENU Button
Access Voice Guidance Volume,
Select User, My Places, Setup and
Suspend Guidance.
DESTINATION Button
Input the destination by one of
several methods and initiate route
guidance.
MAP/VOICE Button
Repeat the last voice guidance
prompt, cancel the map scrolling
feature, or show the current position.
CURRENT VEHICLE POSITION
Mark
Indicates the current position of the
vehicle and its directional heading.
£
Ó
Î
{
x
È
Ç
n
AM•SAT
DISC•AUX
INFO
AUDIO
MENU
DEST
TUNE SEEK
FM
TRACK
PWR•VOL
WMA
TOYOTA
AM
•
DI
•
A
A
EK
U
N
W
E
S
C
•
VOL
VO
D
E
S
MAP
VOICE
OAUF
DISP
TILT
300ft
GPS
Page 4
3
DESTINATION INPUT
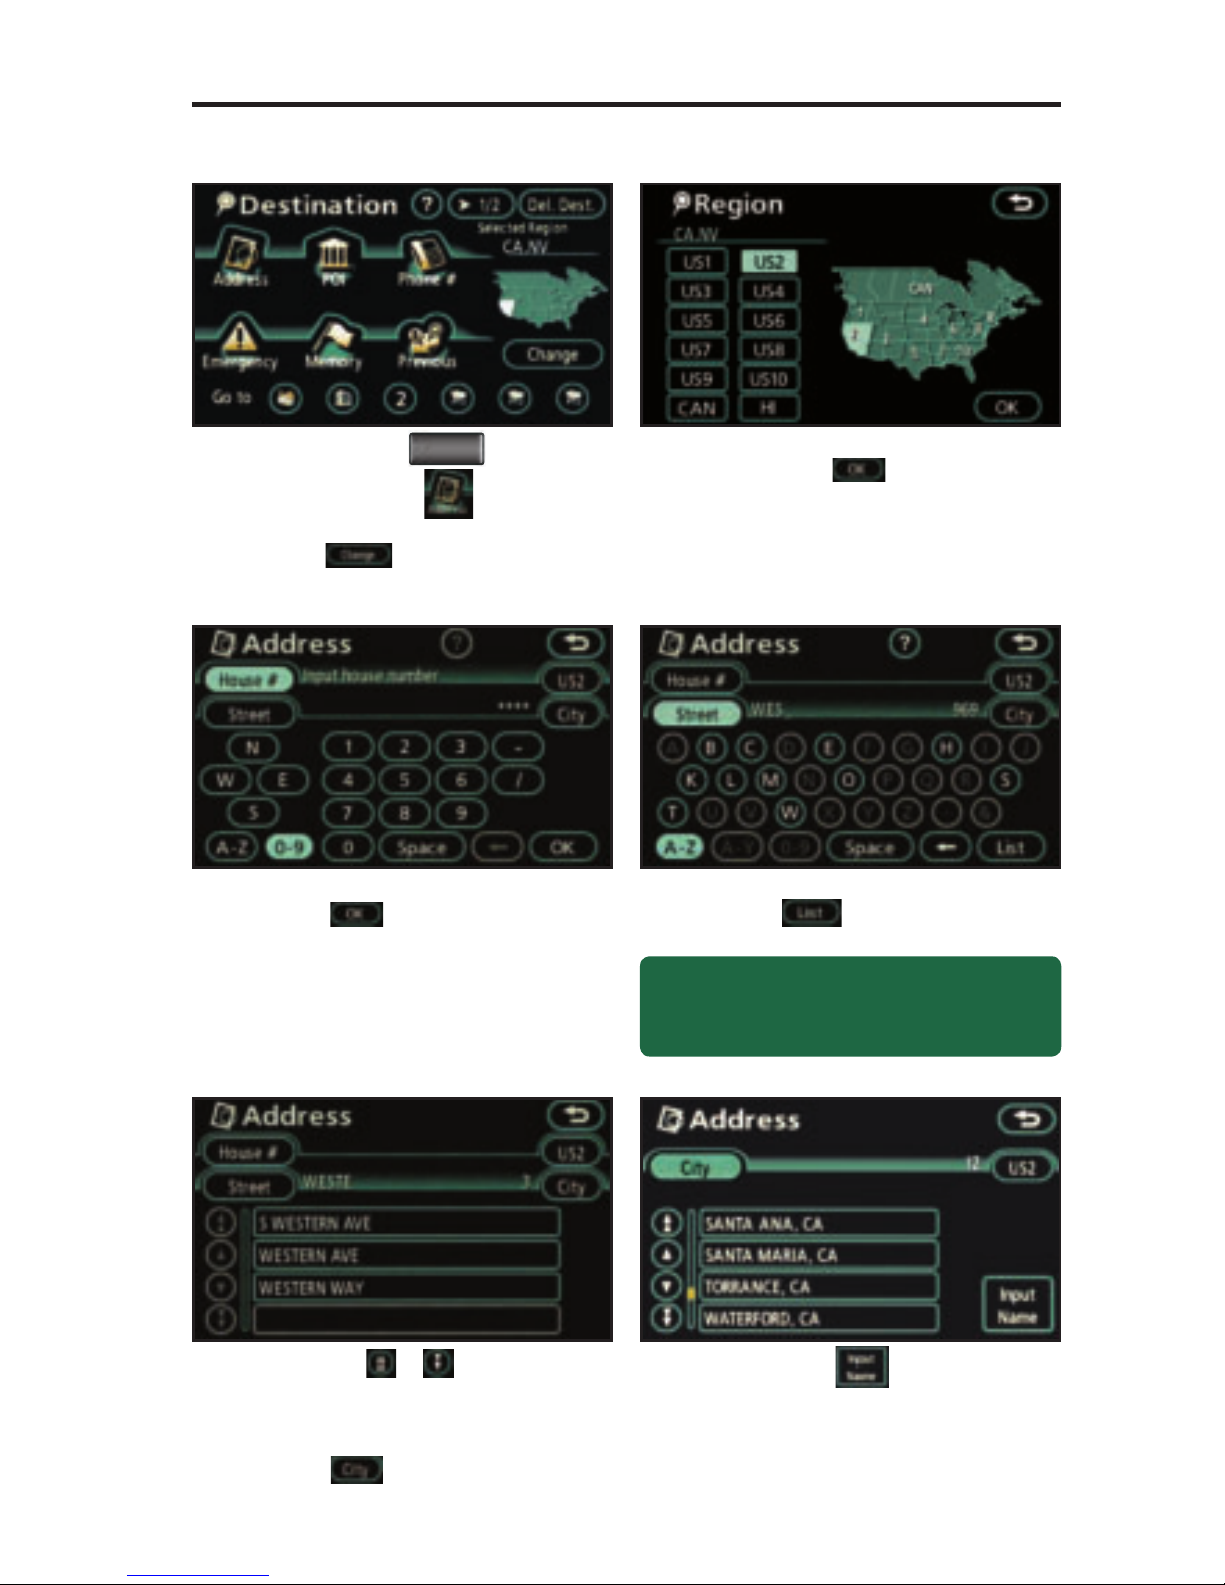
BY ADDRESS
Press the
DEST
panel button
followed by and move to
step 3. To change Region, touch
and move to step 2.
Input the house number and touch
.
Input the street name. Touch
to show all matching
streets.
Use
or to scroll up or
down. Touch the desired street
and go to step 8. If the street you
are looking for is not listed, touch
and go to step 6.
Touch to type in the city
name or select from a previously
selected city. If the city is not
available try the next largest city
in the vicinity.
Select the desired Region and
touch .
step
1
step
2
step
3
step
4
step
5
step
6
Quick Tip - Enter the street name without
prefi xes such as North or the letter N. The
system will display all of the options available.
Page 5
4
DESTINATION INPUT
BY ADDRESS
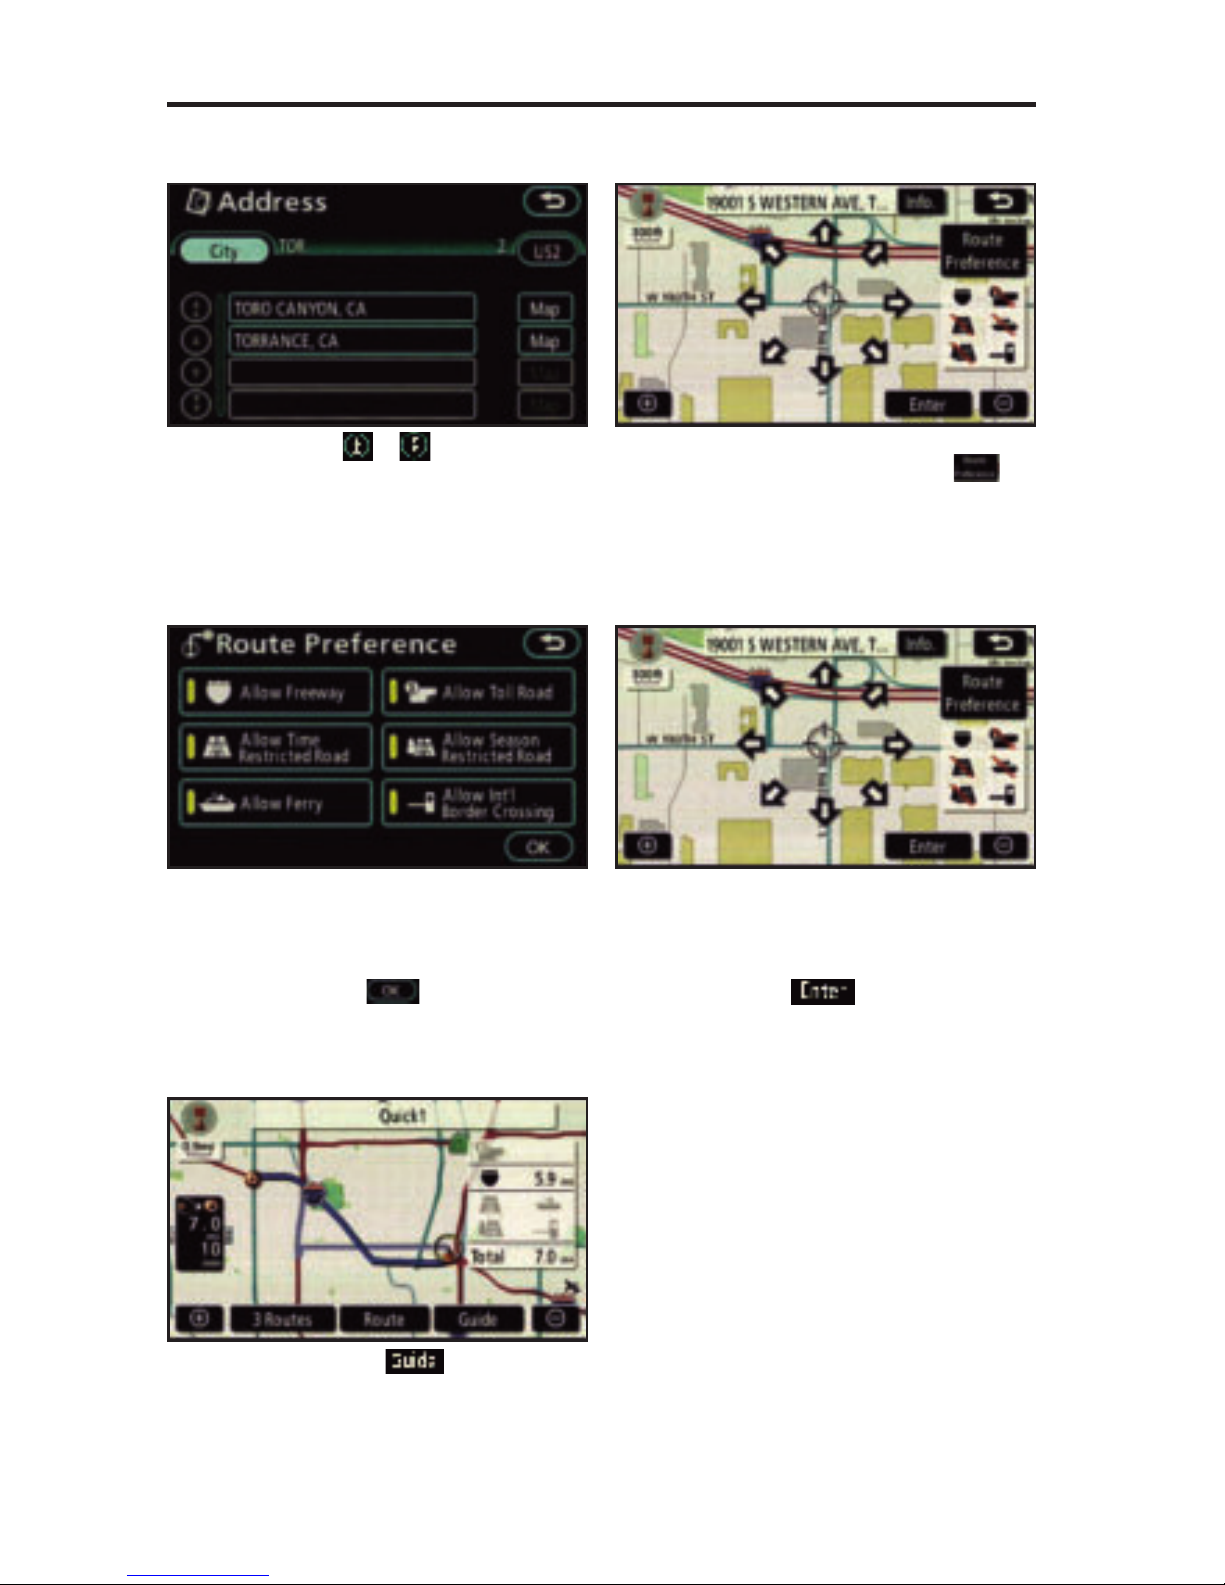
If necessary, use the arrow
keys to adjust the position
on the map to put you closer
to your destination. Touch
to confi rm the
position.
Select the desired Route
Preference by touching .
Select the desired Route
Preference(s) for the trip. When
the yellow bar appears, the route
preference has been selected.
Touch to confi rm your
selection.
Use or to scroll up or
down. Touch the desired city.
Select the desired street.
Touch to start route
guidance.
step
7
step
8
step
9
step
10
step
11
Page 6
5
DESTINATION INPUT - POINTS OF INTEREST (POI)
POINTS OF INTEREST BY NAME
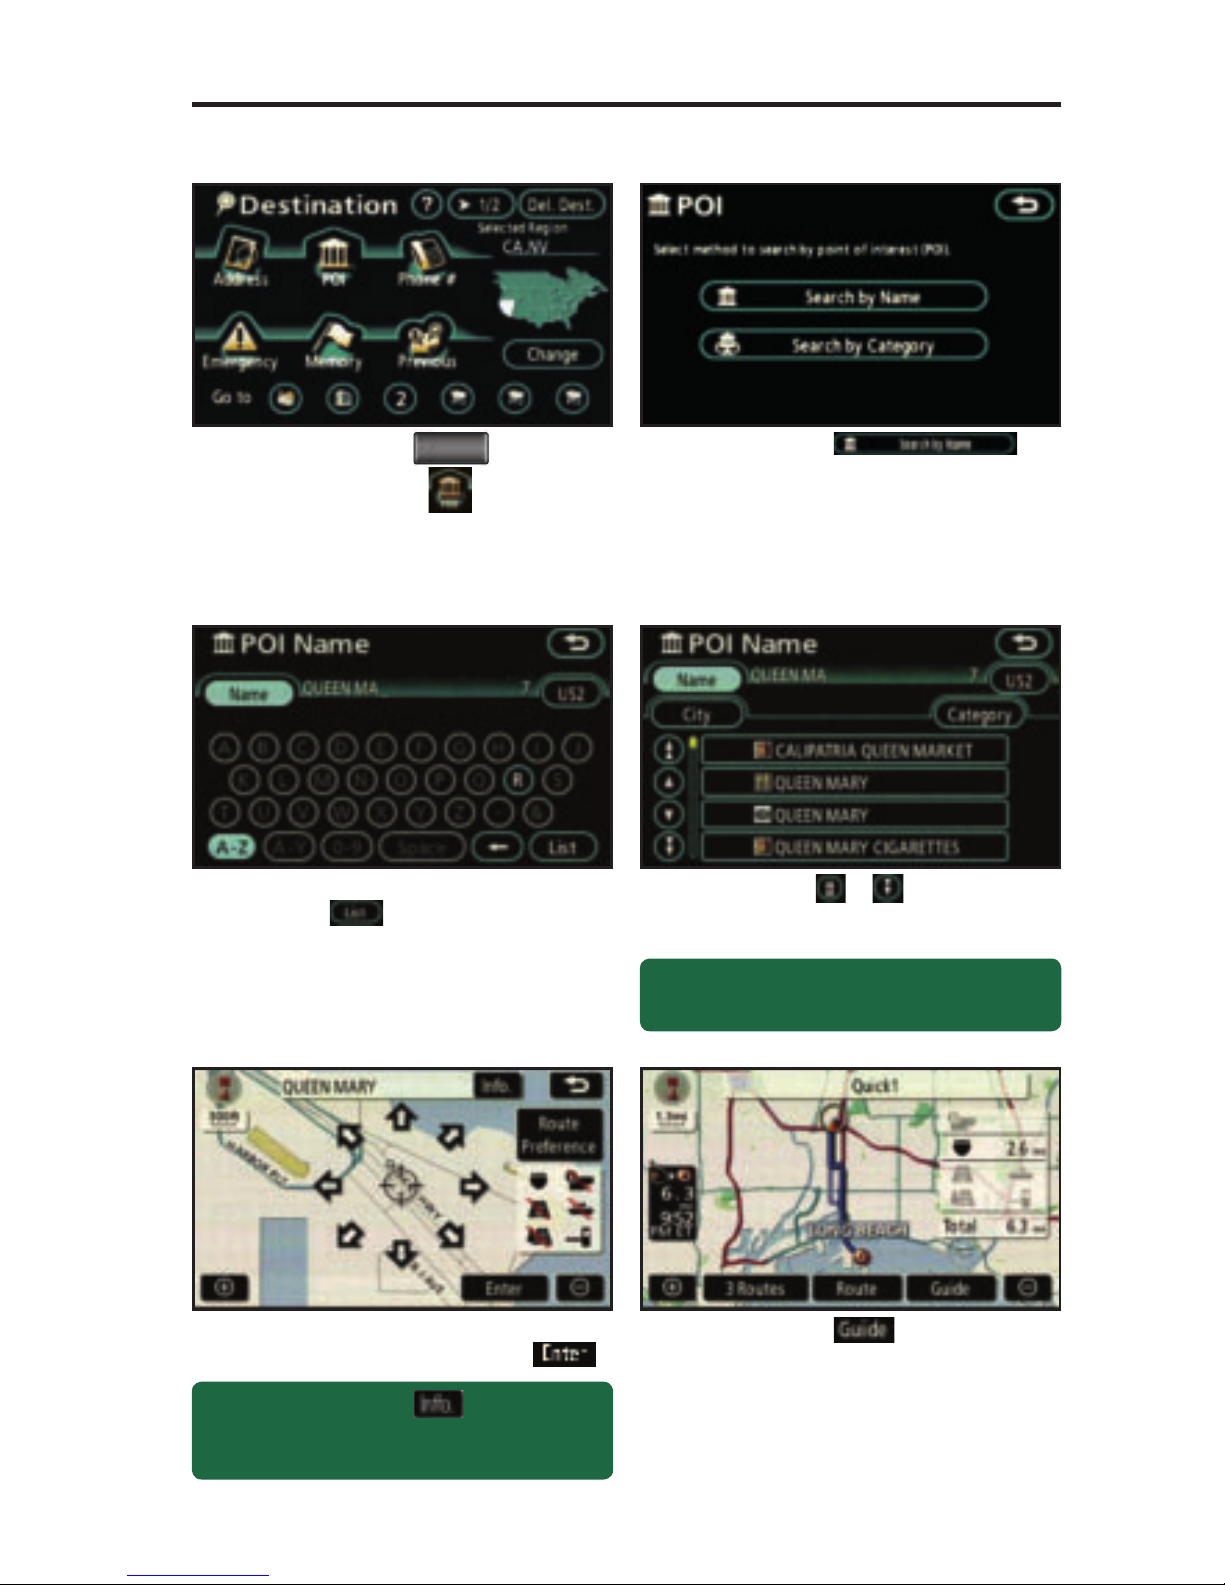
Quick Tip - Touching the button next to
the POI name will display the address and
telephone number.
Press the
DEST
panel button
followed by .
Touch
.
Input the POI name and touch
.
Use
or to scroll up
or down. Touch the desired
destination.
See page 10 to select the desired
Route Preference. Touch
.
step
1
step
2
step
3
step
4
step
5
Touch to start route
guidance.
step
6
Quick Tip - If the POI isn’t listed in the database
verify the spelling and Region for accuracy.
Page 7
6
DESTINATION INPUT - POINTS OF INTEREST (POI)
POINTS OF INTEREST BY CATEGORY
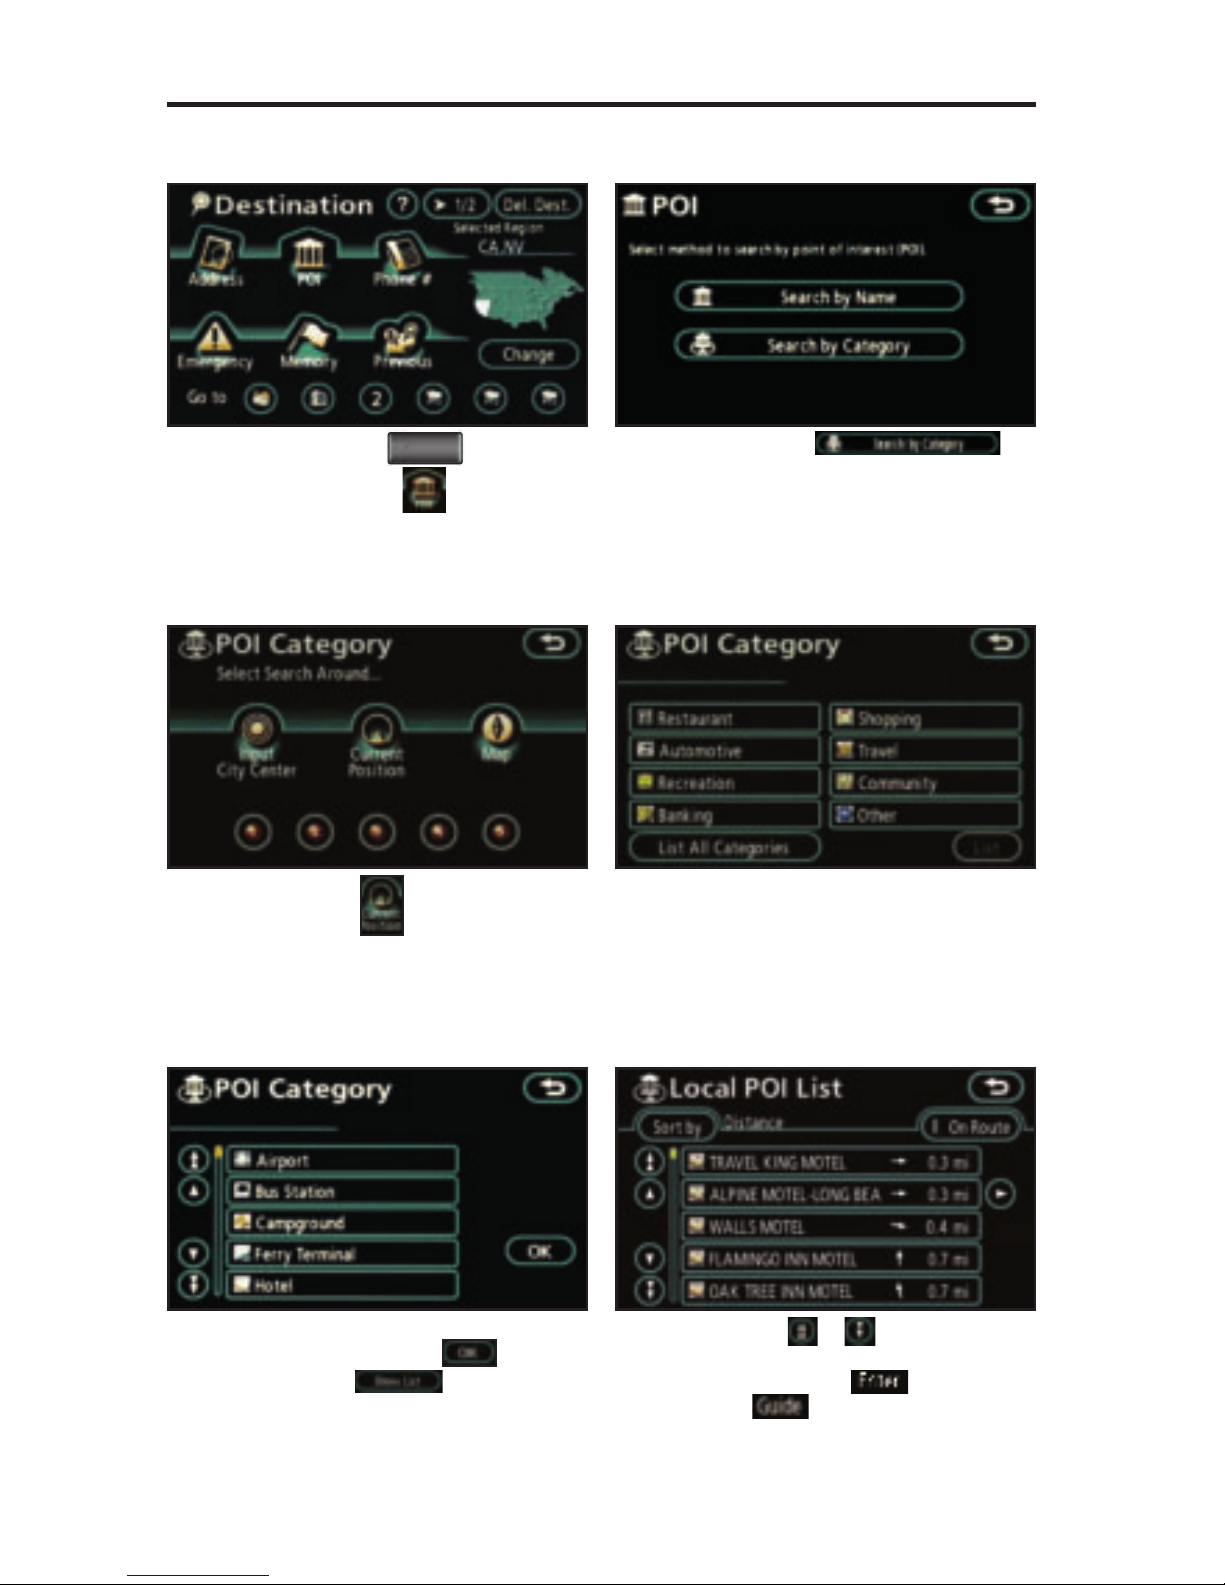
Press the
DEST
panel button
followed by .
Touch
.
Touch
.
Touch the desired category icon.
Touch the desired sub-category
icon followed by and then
touch .
step
1
step
2
step
3
step
4
step
5
Use or to scroll up or
down. Touch the point of interest
followed by and then
.
step
6
Page 8
7
DESTINATION INPUT - TELEPHONE NUMBER
BUSINESS OR REGISTERED ADDRESSES
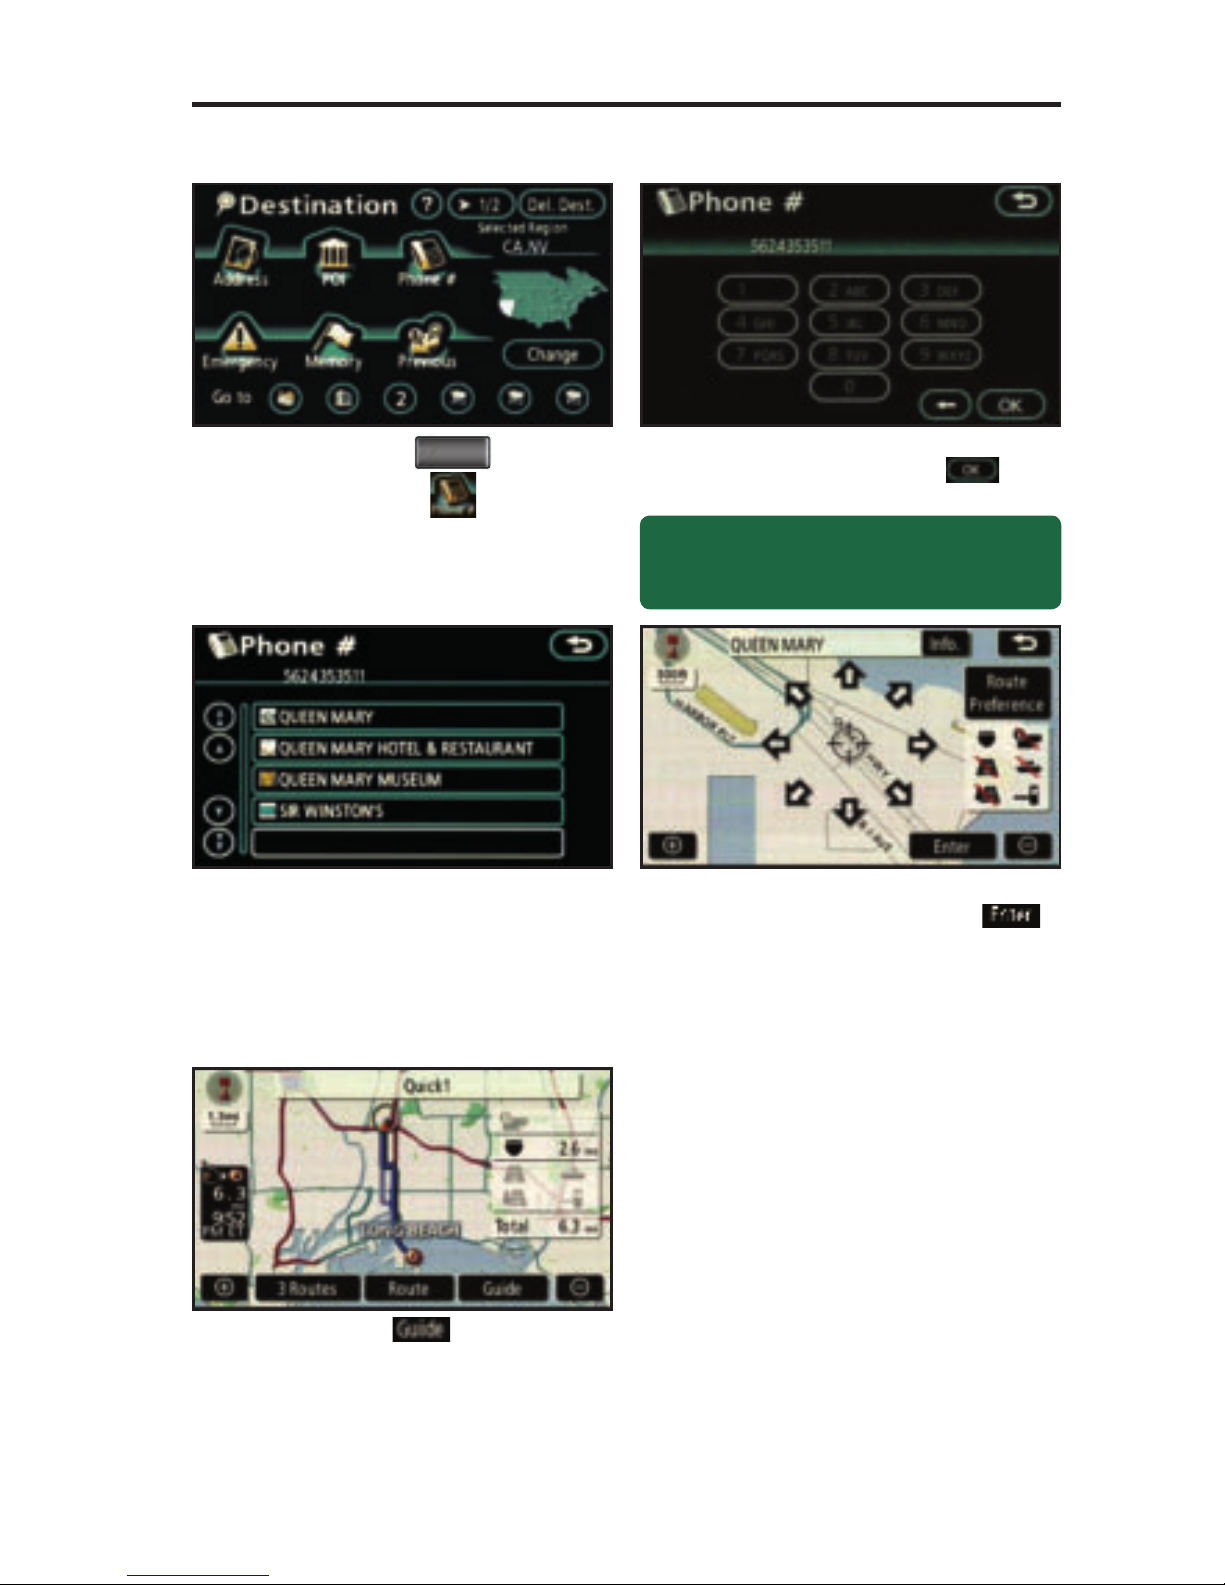
Press the
DEST
panel button
followed by .
Input the area code and telephone
number followed by
. It is
not necessary to dial “1.”
Select the business or registered
address from the screen.
See page 10 to select the desired
Route Preference. Touch
.
Touch
to start route
guidance.
step
1
step
2
step
3
step
4
step
5
Quick Tip - Personal telephone numbers cannot
be used for Destination input unless previously
added in the Address Book.
Page 9
8
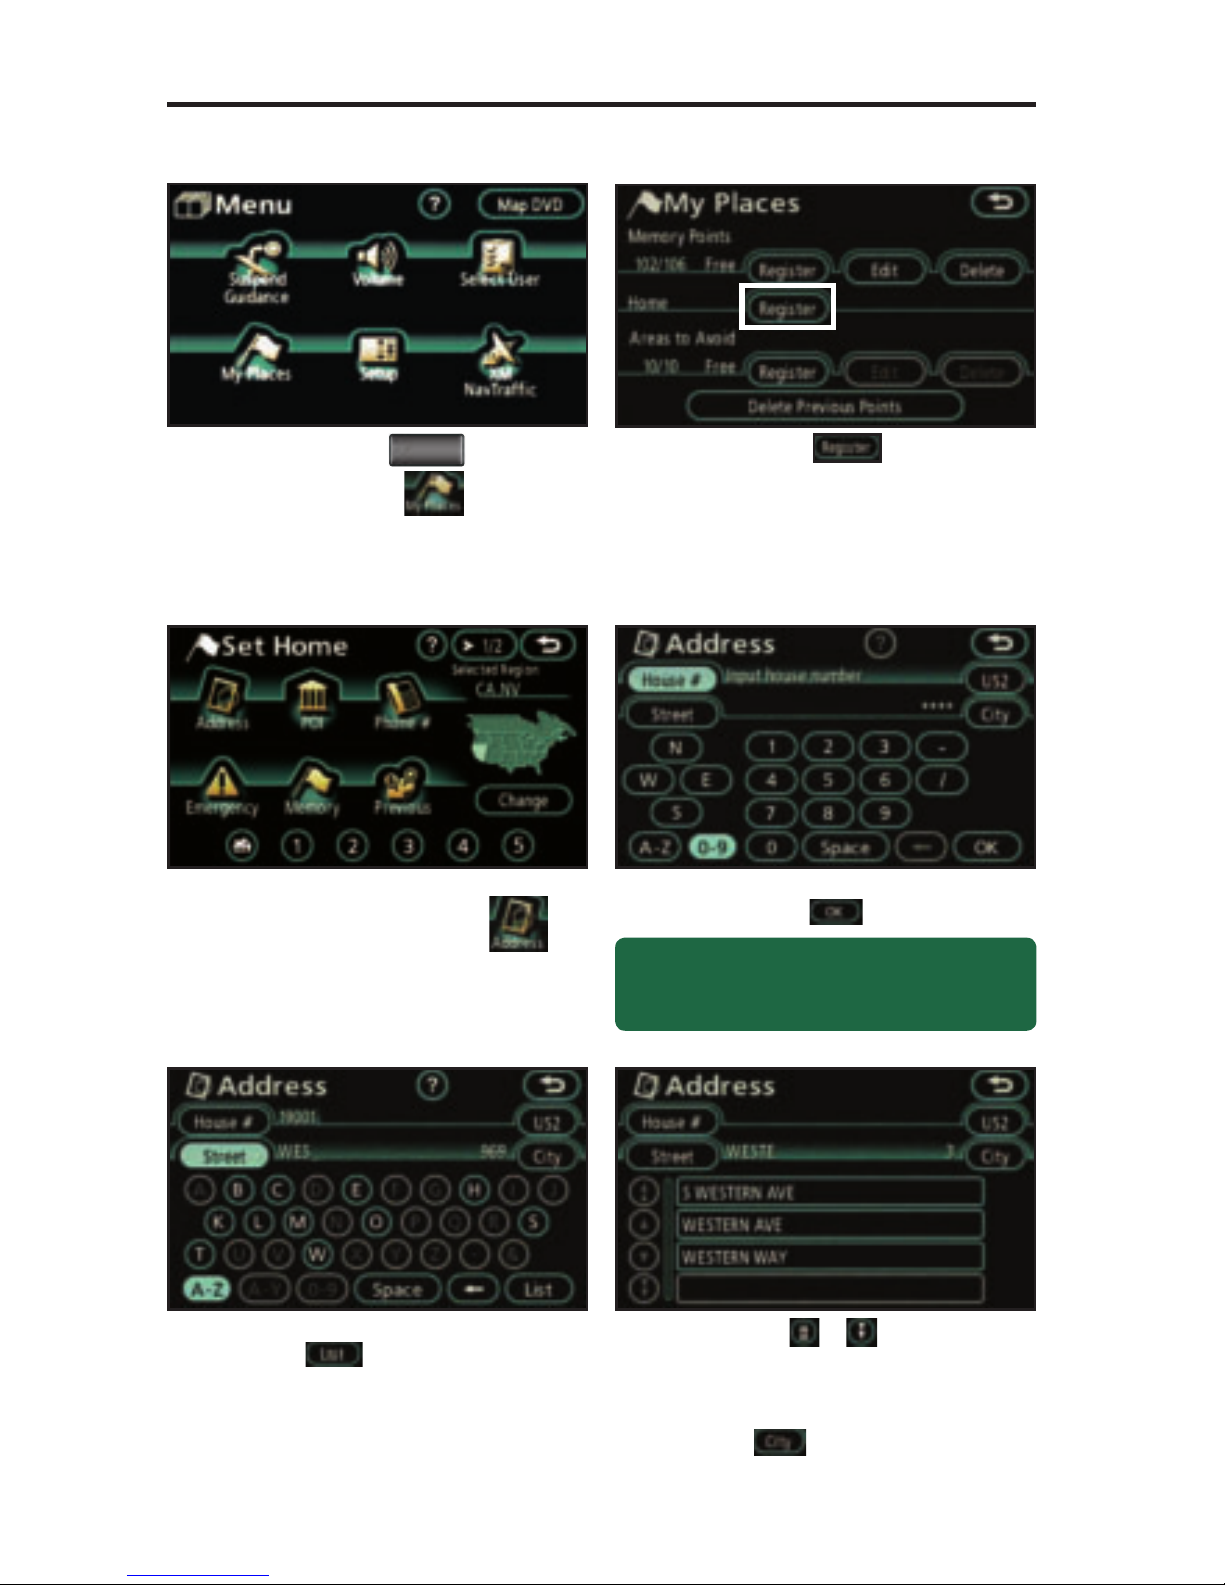
SET HOME
Press the
MENU
panel button
followed by .
Touch
to input your
home address.
Make sure that you are in the
desired Region. Touch .
Input the house number and
touch
.
Input the street name. Touch
to show all matching
streets.
step
1
step
2
step
3
step
4
step
5
Tip - For security reasons, use a point close
to your home instead of your actual home
address.
Use or to scroll up or
down. Touch the desired street
and go to step 9. If the street you
are looking for is not listed, touch
and go to step 7.
step
6
Page 10
9
SET HOME
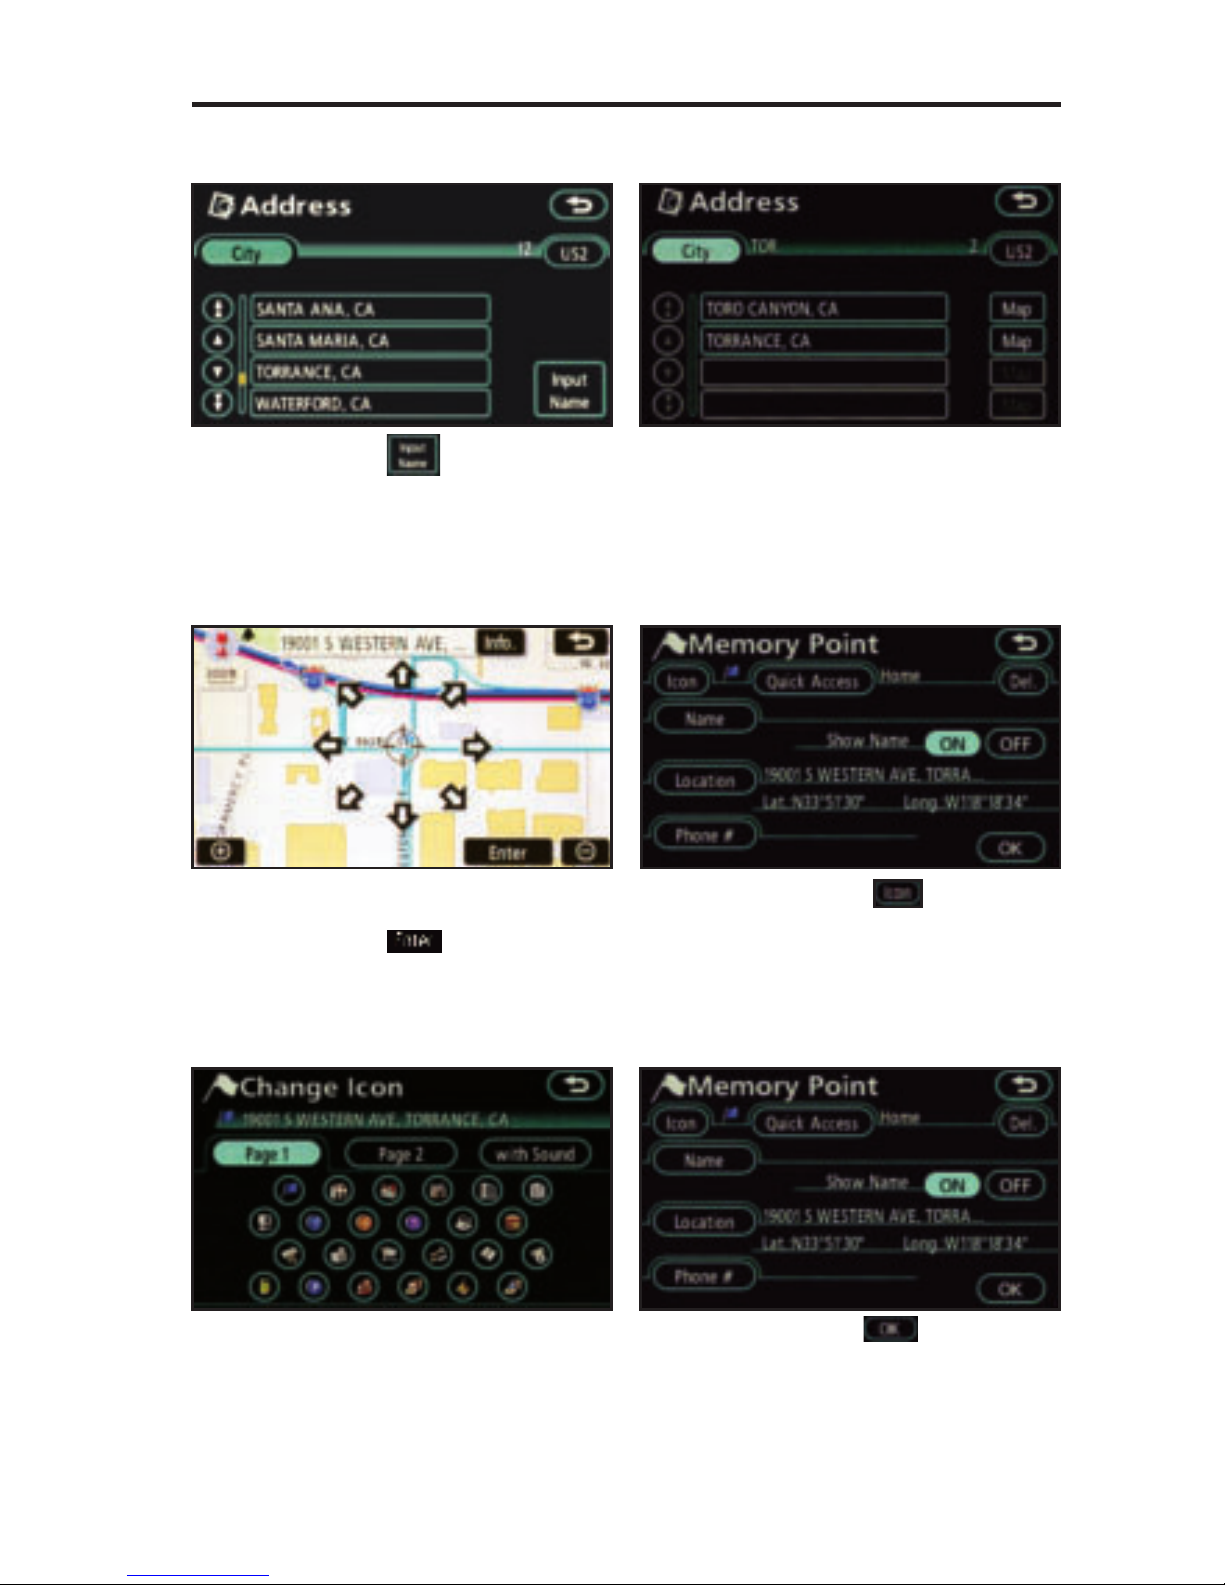
Touch the desired city. Select the
desired street.
Touch the desired icon for
your home.
Touch at the bottom of
the screen.
step
8
step
9
step
11
step
12
Touch to type in the city
name or select from a previously
selected city. If the city is not
available try the next largest city
in the vicinity.
step
7
If necessary use the arrow keys
to adjust the position on the map.
Touch to confi rm the
position.
Touch at the top left
of the screen to change the
home icon.
step
10
Page 11
10
ADDITIONAL NAVIGATION FEATURES
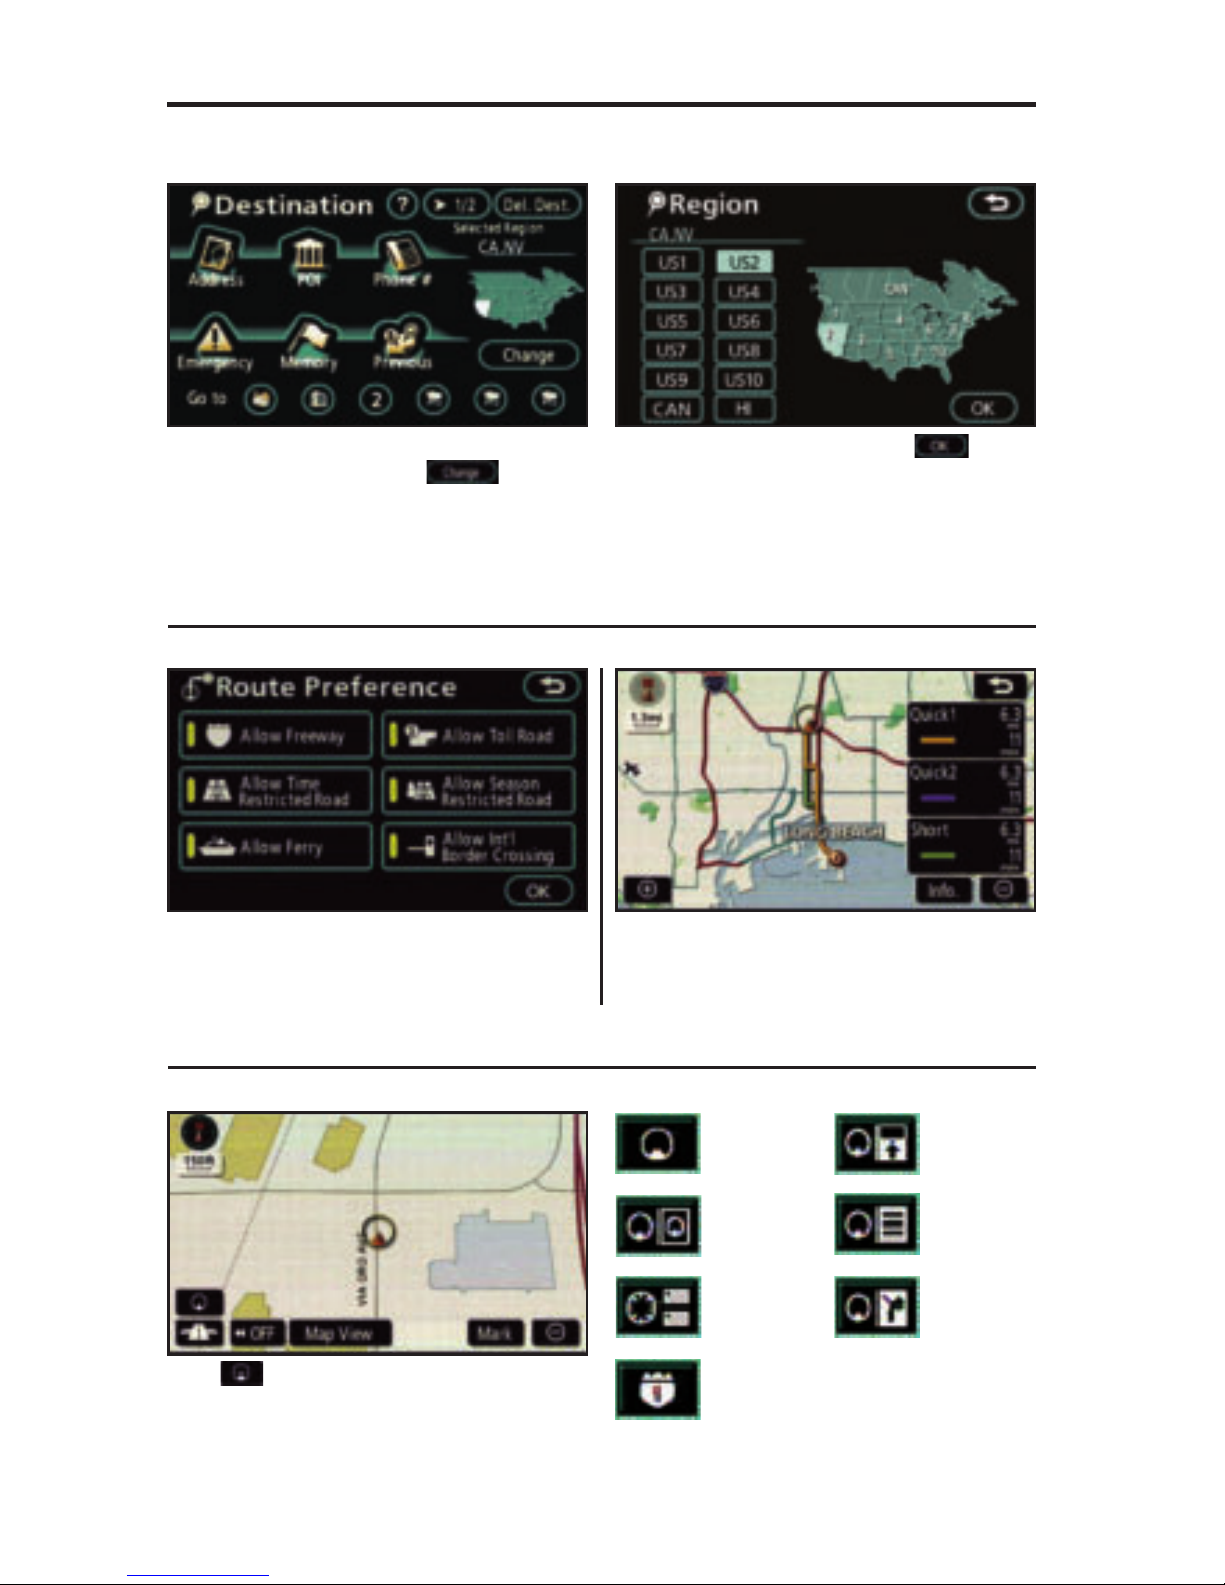
SEARCH AREA
Prior to inputting the desired address select the
appropriate Region by pressing . If the
incorrect Region is chosen, the system will either
fi nd an address that closely matches in that area or
will indicate that the address cannot be found.
Select the desired Region and touch .
Touch to select from seven different screen
viewing options. Three screen preferences
are available when the map is visible and four
additional are available during route guidance only.
SCREEN PREFERENCES
Single Map
Dual Map
Compass
* Turn List
* Arrow
* Freeway
Information
* Intersection
Guidance
* Selections available
when in guidance
mode.
Once the address has been inputted, select
the desired route preference(s) for the trip. For
example, if Toll Road is not selected, the system
will route over non-toll roads which may take
longer to reach the destination.
ROUTE PREFERENCES
3 ROUTES
One of three routes may be chosen for the trip.
Quick 1 offers the shortest route by time; Quick 2
is the second fastest route; Short is the most direct
route based upon driven mileage. The system does
not account for traffi c signals or traffi c fl ow.
Page 12
11
ADDITIONAL NAVIGATION FEATURES
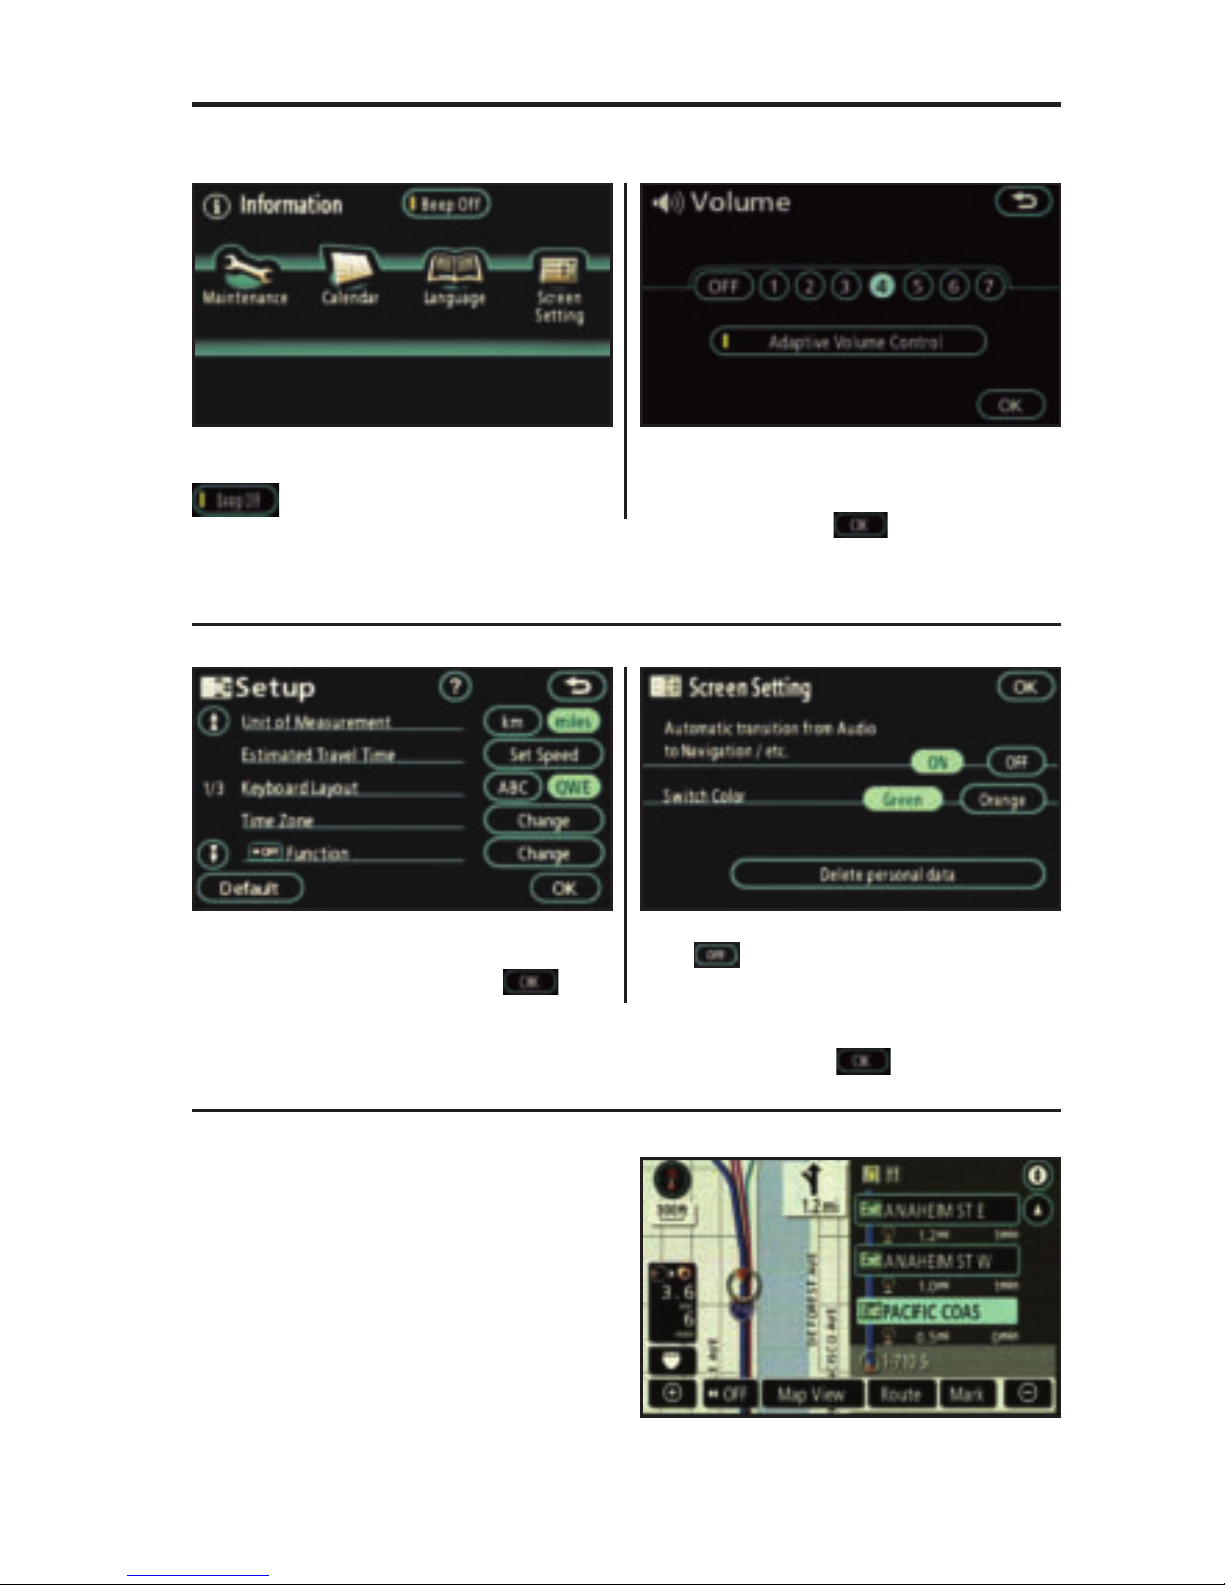
KEYBOARD SETTING
PRESS MENU > SETUP
Set the layout of the keyboard as alphabetical
or standard QWERTY keyboard. Touch
to
confi rm your selection.
PRESS MENU > VOLUME
The Volume feature allows for the adjustment of
the voice guidance commands. Touch the desired
volume level and touch
to confi rm your
selection.
BEEP SETTING VOLUME SETTING
SCREEN TRANSITION
PRESS INFO > SCREEN SETTING
Touch to prevent the system from reverting
to the map display. Once the screen transition is
switched off, the audio or climate control screen
(if equipped) will remain without reverting to
the map display. Touch to confi rm your
selection.
PRESS INFO > BEEP OFF
Switch off the confi rmation tone by touching
at the top of the screen. When the
yellow bar appears this feature has been disabled.
FREEWAY EXIT INFO MODE
*
During Route Guidance on a Freeway or Toll Road,
a variety of points of interest such as Gas Stations,
Restaurants or Hotels can be viewed during your
trip.
To access this feature, select Freeway Exit Info
Mode from the Screen Preferences (see page 10).
Upcoming freeway exits will be listed by the
number or name along with the POIs in the vicinity
of the exit ramp. Select the desired exit from the
list to see the POIs at that particular exit.
* This feature is only available while in Route Guidance and traveling on a freeway or Toll Road.
Page 13
12
ADDITIONAL NAVIGATION FEATURES
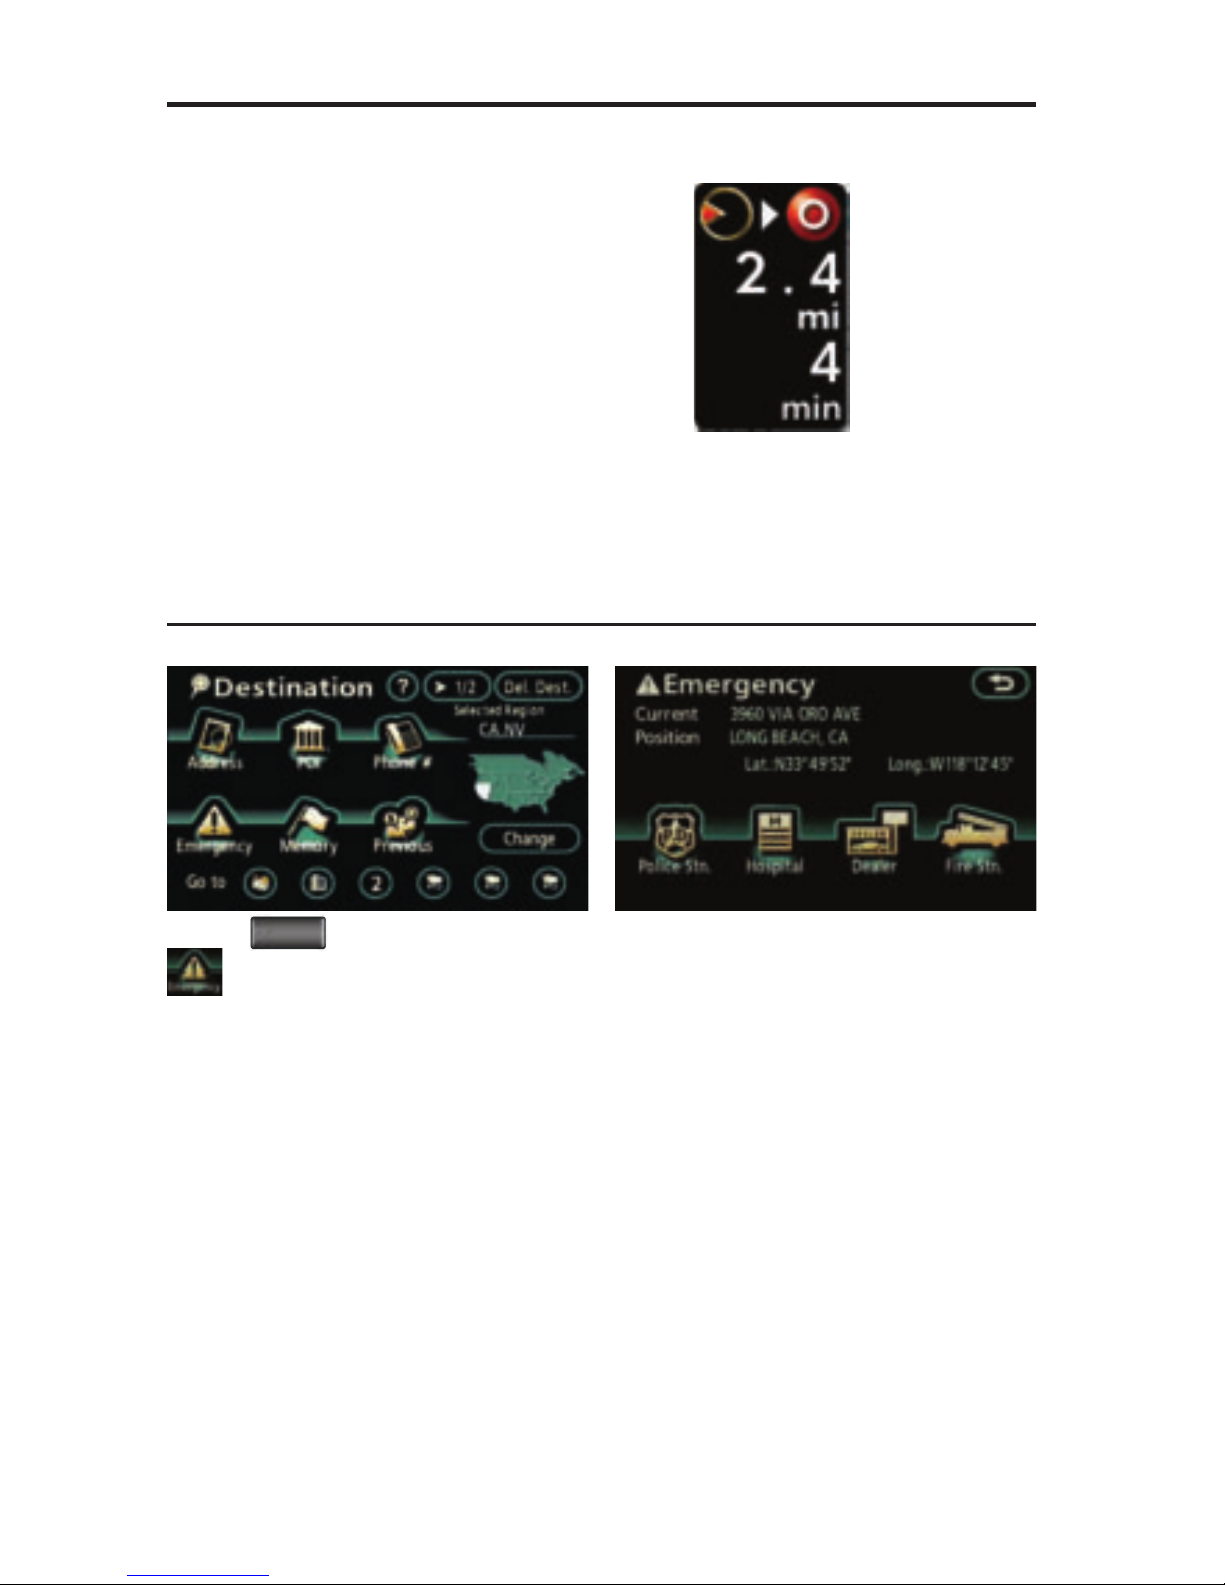
OPERATION OF VEHICLE EMERGENCY SCREEN:
Touch the desired destination. The system will
provide a list of locations sorted by distance. If the
vehicle is in motion, the system will route you to the
nearest location automatically.
Press the
DEST
panel button followed by
to access four emergency destinations:
• Police Stn. • Hospital • Dealer • Fire Stn.
ESTIMATED DISTANCE AND TIME
†
The navigation system will provide an estimate
of the distance and time to the destination
based upon the suggested route during
guidance. The system automatically calculates
the remaining miles until you arrive at the
destination. Based upon the distance traveled,
the system will also provide an estimated time
until arriving at your destination.
The system can be customized to match
your driving habits. To adjust the speed for
residential, main streets or freeways please
refer to the Navigation Owner’s Manual for a
complete description of this feature.
†
The system does not account for traffi c
signals or traffi c fl ow.
Page 14
13
XM NAVTRAFFIC
®
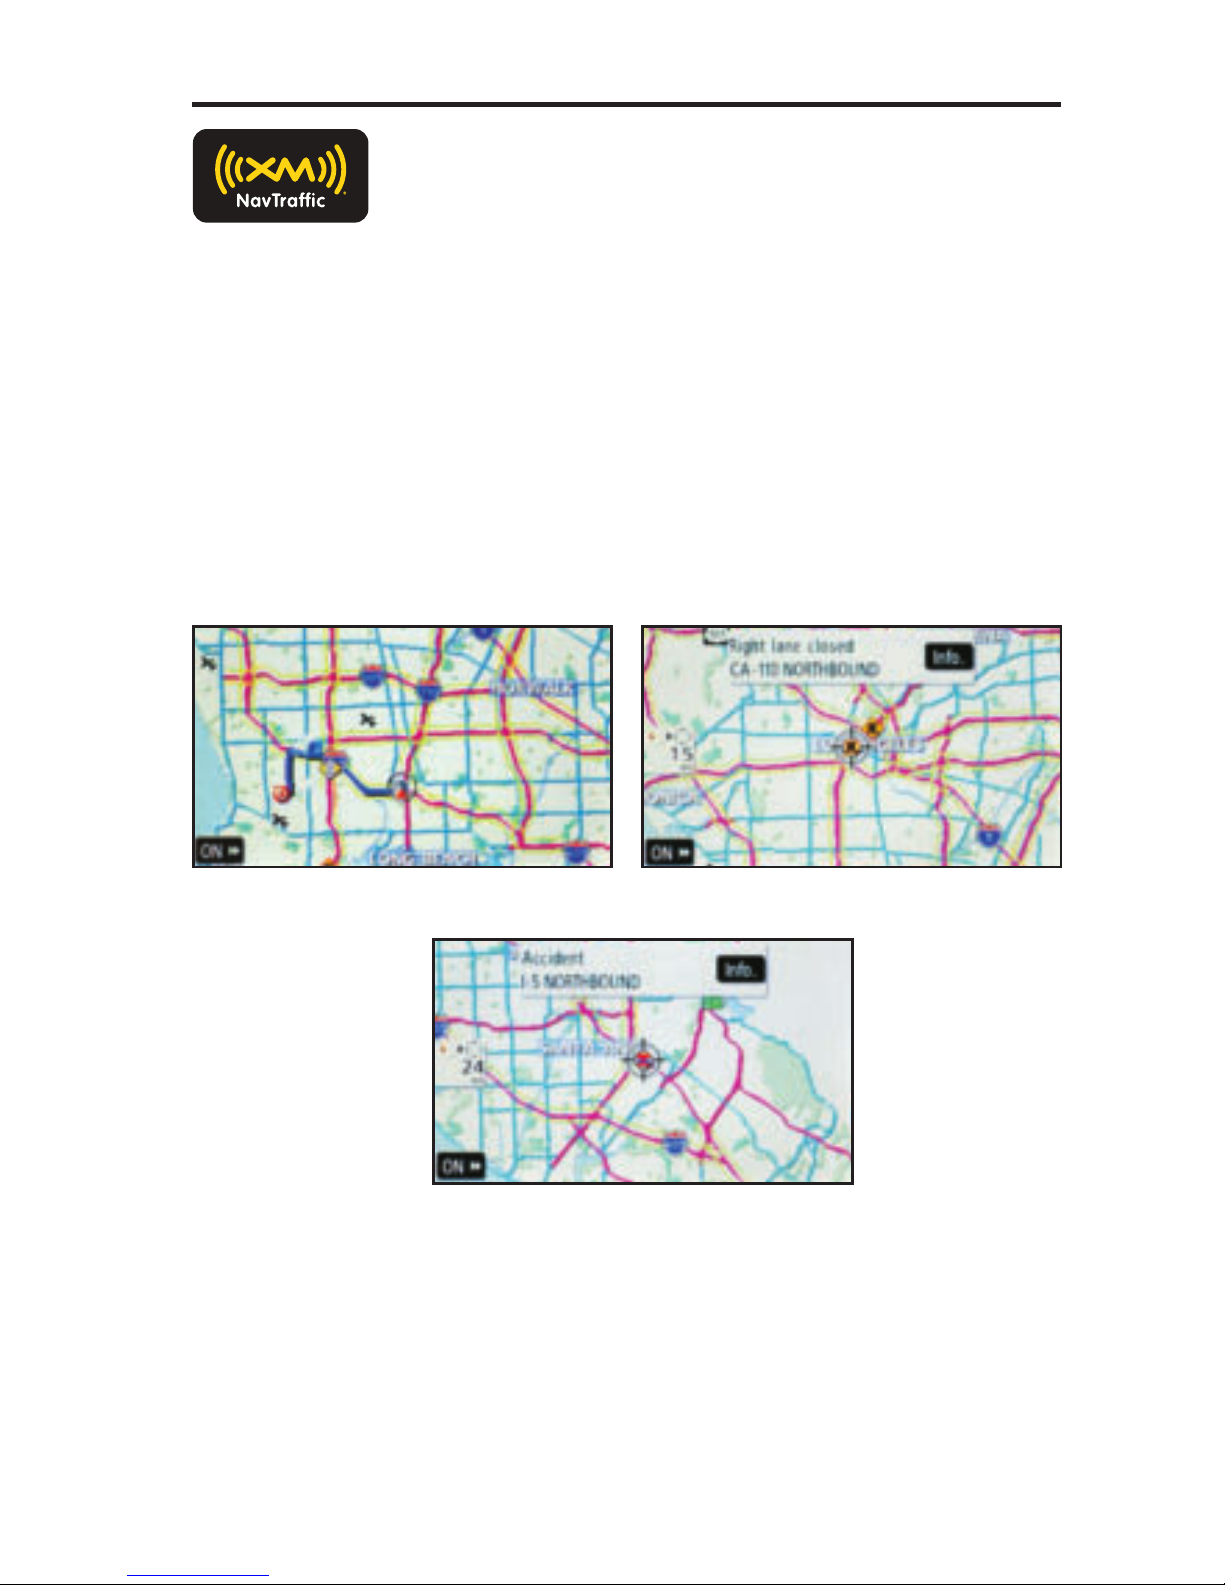
Route guidance with fl ow information and
traffi c events.
Accidents and disabled vehicles.
Traffi c events - road construction.
XM NavTraffi c® integrates with your navigation system to display traffi c information.
Traffi c events and fl ow data are updated every 2 minutes from a variety of sources.
XM NavTraffi c® service is available in 100 major metropolitan areas across the US
and Canada with more to come.
New RAV4 owners with factory-installed navigation receive a 90-day complimentary
trial subscription from XM.*
Traffi c information provided by XM NavTraffi c®:
http://www.xmradio.com/navtraffi c/index.xmc
* An XM Data Receiver must be purchased to enable XM NavTraffi c®. See your Toyota dealer for details.
 Loading...