

Page 1

MN 00505-NAV09-RUN
Printed in the USA 07/08
2009 Navigation System Quick Reference Guide
Page 2
1
TABLE OF CONTENTS
LIMITATIONS OF THIS QUICK REFERENCE GUIDE 1
BASIC OPERATION 2
DESTINATION INPUT 3
By Address 3
Voice Recognition Sequence 5
Tips for Using Voice Recognition 5
By Address - Voice Recognition 5
DESTINATION INPUT - POINTS OF INTEREST (POI) 7
Points of Interest by Name 7
Points of Interest by Category 8
Points of Interest by Category - Voice Recognition 9
DESTINATION INPUT - TELEPHONE NUMBER 10
Business or Registered Memory Points 10
REGISTER HOME 11
BLUETOOTH TELEPHONE PAIRING 13
CALLING BY VOICE RECOGNITION 14
ADDITIONAL NAVIGATION FEATURES 15
Search Area 15
Route Preferences 15
3 Routes 15
Screen Preferences 15
Beep Setting 16
Volume Setting 16
Keyboard Setting 16
Screen Transition 16
Freeway Exit Info Mode 16
Estimated Distance and Time 17
Operation of Your Vehicle Emergency Screen 17
VOICE COMMANDS 18
NOTE ON VOICE RECOGNITION 18
This Quick Reference Guide is designed to provide information on the
basic operation and key features of the navigation system. The Quick
Reference Guide is not intended as a substitute for the Navigation
Owner’s Manual. We strongly encourage you to review the Navigation
Owner’s Manual so you will have a better understanding of the navigation
system capabilities and limitations.
LIMITATIONS OF THIS QUICK REFERENCE GUIDE
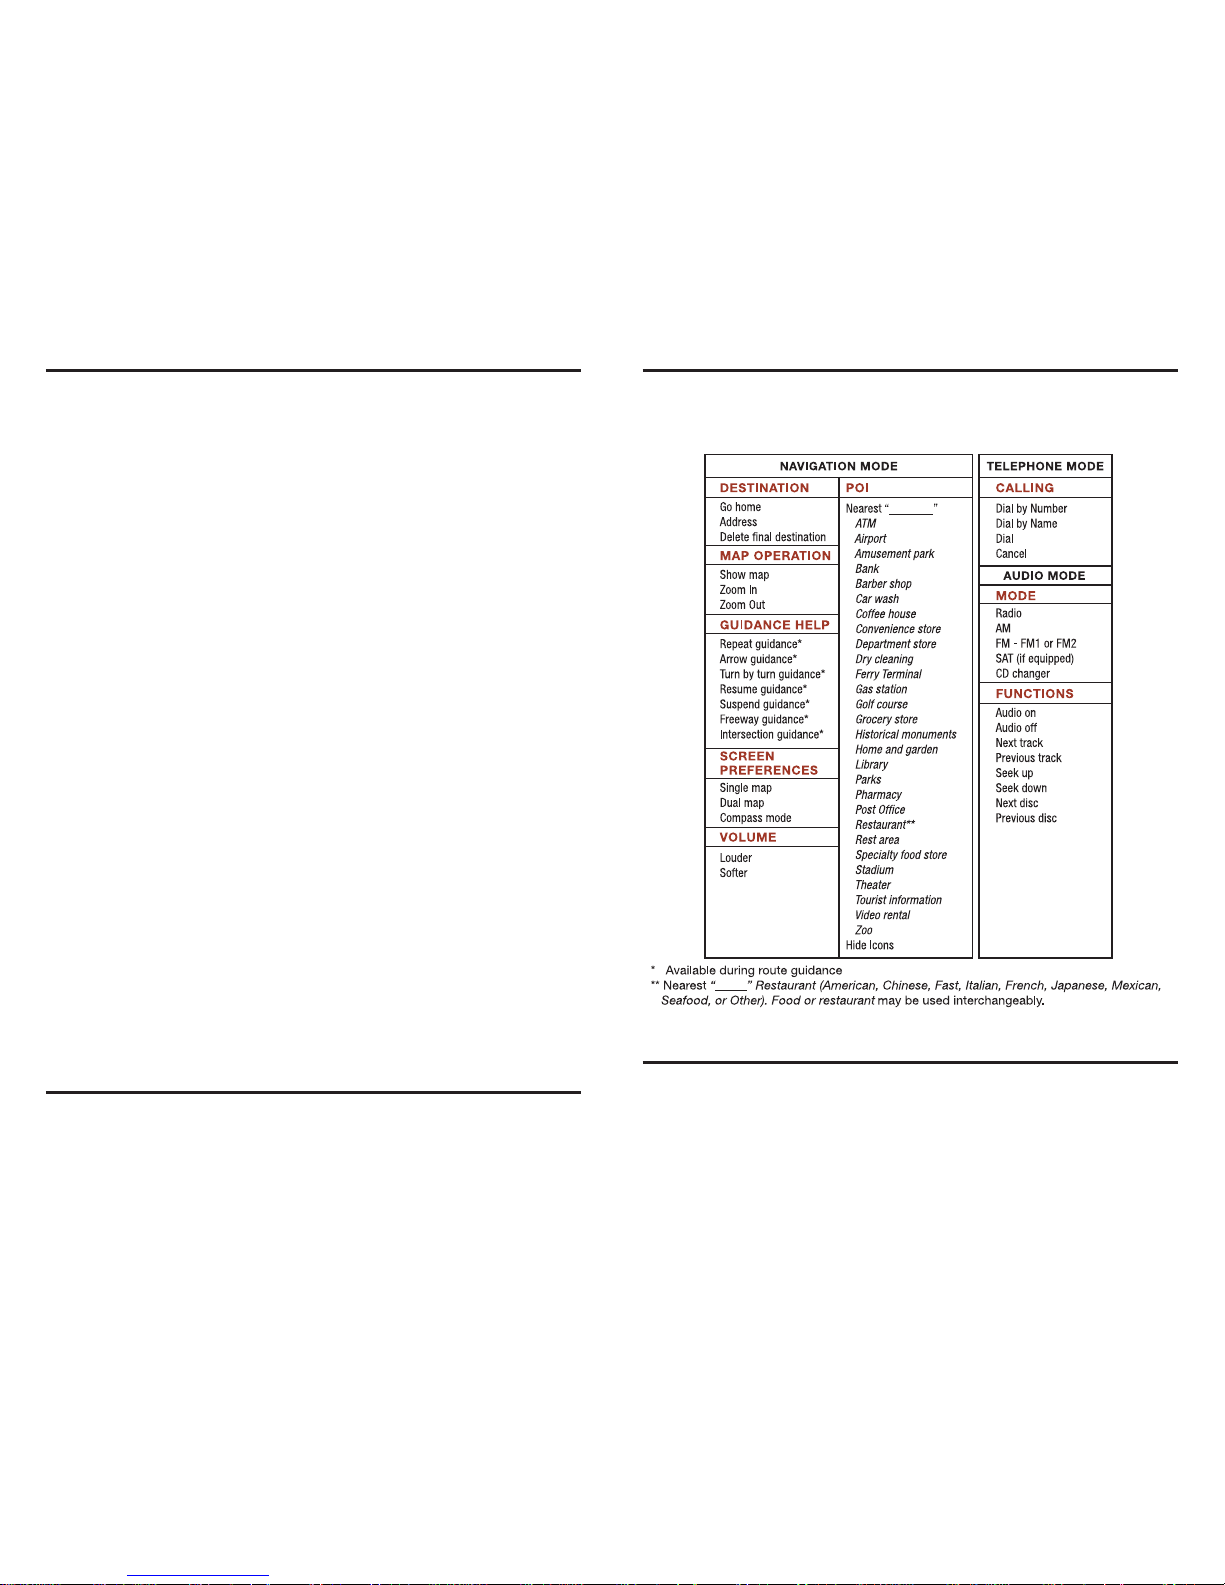
18
VOICE COMMANDS
Press the voice command button on the steering wheel to activate the voice recognition
feature. After you hear a beep, say one of the voice commands listed or say “Help” for
additional options. Please refer to the Navigation Owner’s Manual for additional
information.
The navigation system voice recognition feature will compare your spoken
words with computer-generated word patterns preprogrammed in the
system database. If the system does not provide your intended match,
please try a different pronunciation. Voice-activation names are not
available for every street and city. Please see the Tips for Using Voice
Recognition section on page 5 for more information about this feature.
NOTE ON VOICE RECOGNITION
Page 3
2
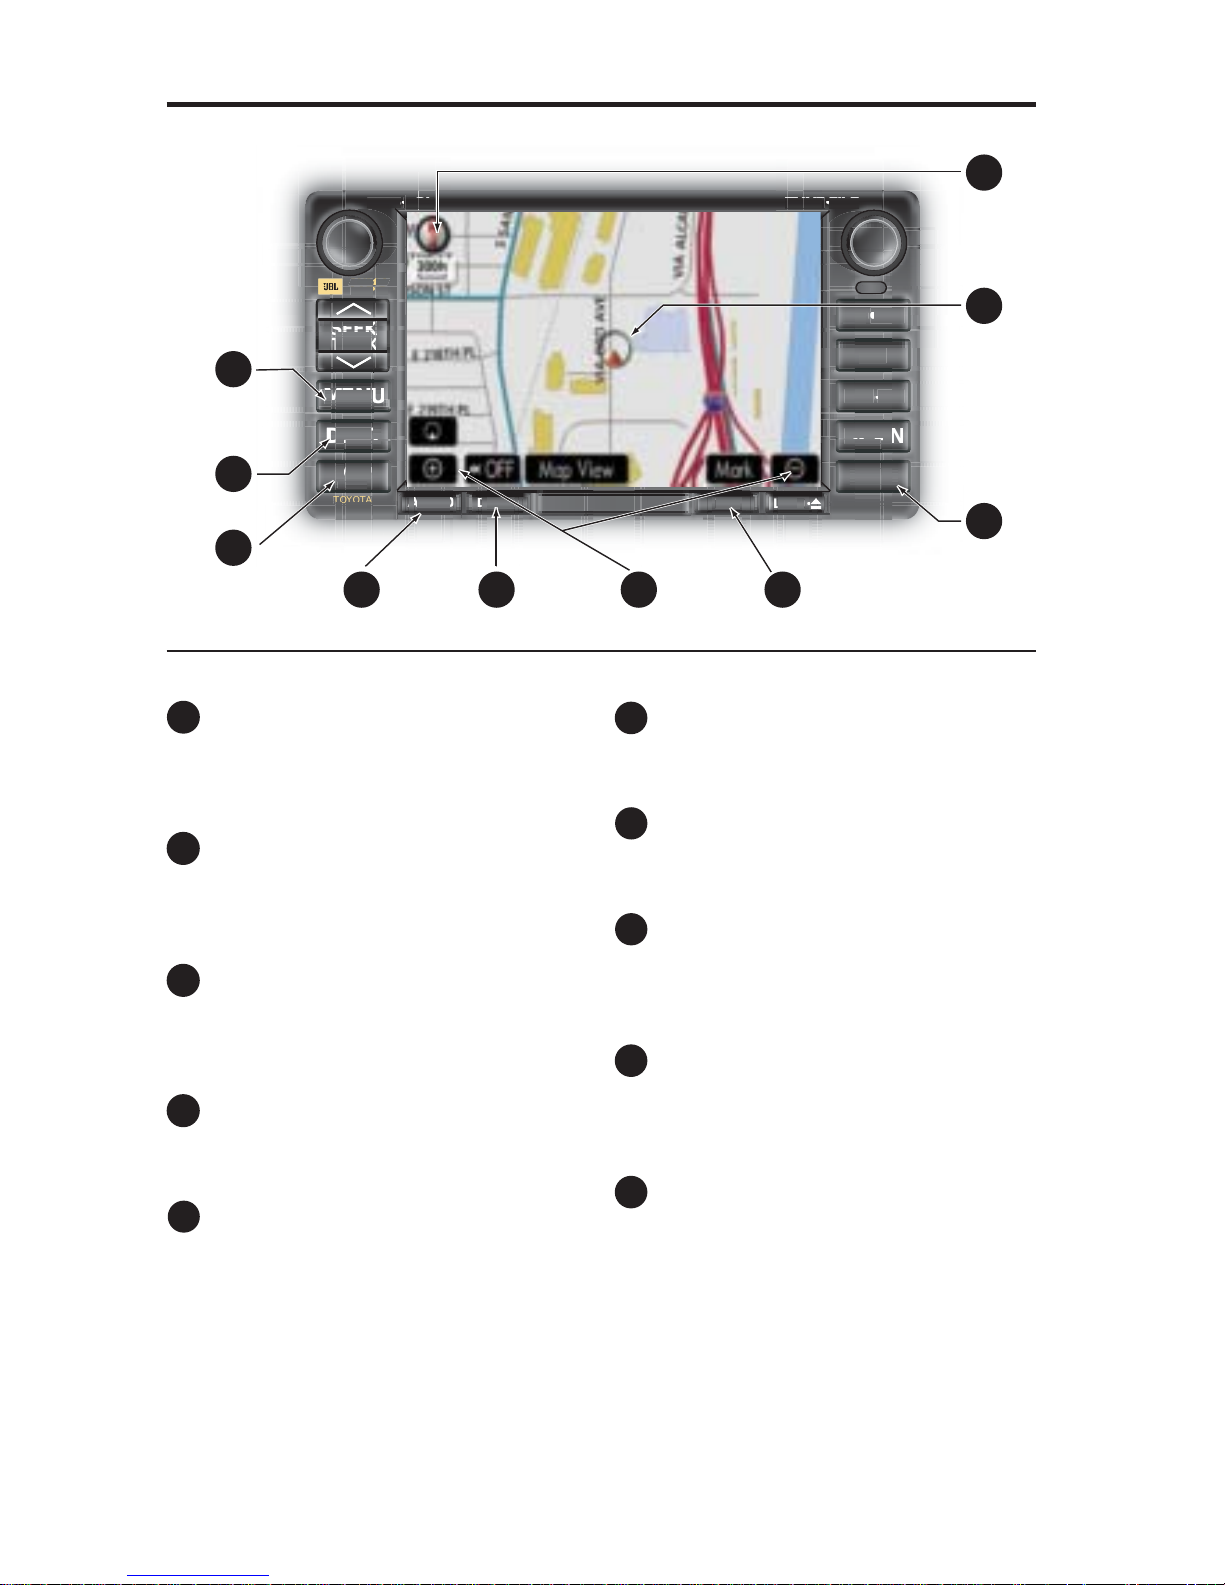
BASIC OPERATION
MENU Button
Access Voice Guidance Volume,
Select User, My Places, Setup and
Suspend Guidance.
DESTINATION Button
Input the destination by one of
several methods and initiate route
guidance.
MAP/VOICE Button
Repeat the last voice guidance
prompt or cancel the map scrolling
feature.
AUDIO Button
Set the radio station presets, adjust
the balance and tone controls.
DISPLAY Button
Adjust the contrast, brightness or
turn off the screen.
ZOOM IN/ZOOM OUT Icons
Touch to magnify or reduce the
map scale.
TILT Button
Adjust the angle of the screen for
best viewing.
INFO Button
Access Maintenance, Telephone,
Calendar, Language and Screen
Settings.
CURRENT VEHICLE POSITION
Mark
Indicates the current position of the
vehicle and its directional heading.
NORTH UP OR COMPASS MODE
Icon
Touch to change the map display
between North-up or Head-up
perspectives.
£
Ó
Î
{
x
È
Ç
n
£ä
MENU
SCAN
DISC•AUX
FM
AM • SAT
INFO
SEEK
DEST
MAP
VOICE
TRACK
AUDIO
PWR•VOL
TUNE
•
FILE
DISPLAY
TILT
LOAD
•
WMA
MP3
TOYOTA
E7007
DISC
X
AU
OINF
T
T
A
P
V
O
ICE
A
UDI
O
I
O
A
A
SA
E7007
A
CK
SPL
A
TIL
T
V
1
2
3
4 5
6
7
8
9
10
Page 4
3
DESTINATION INPUT
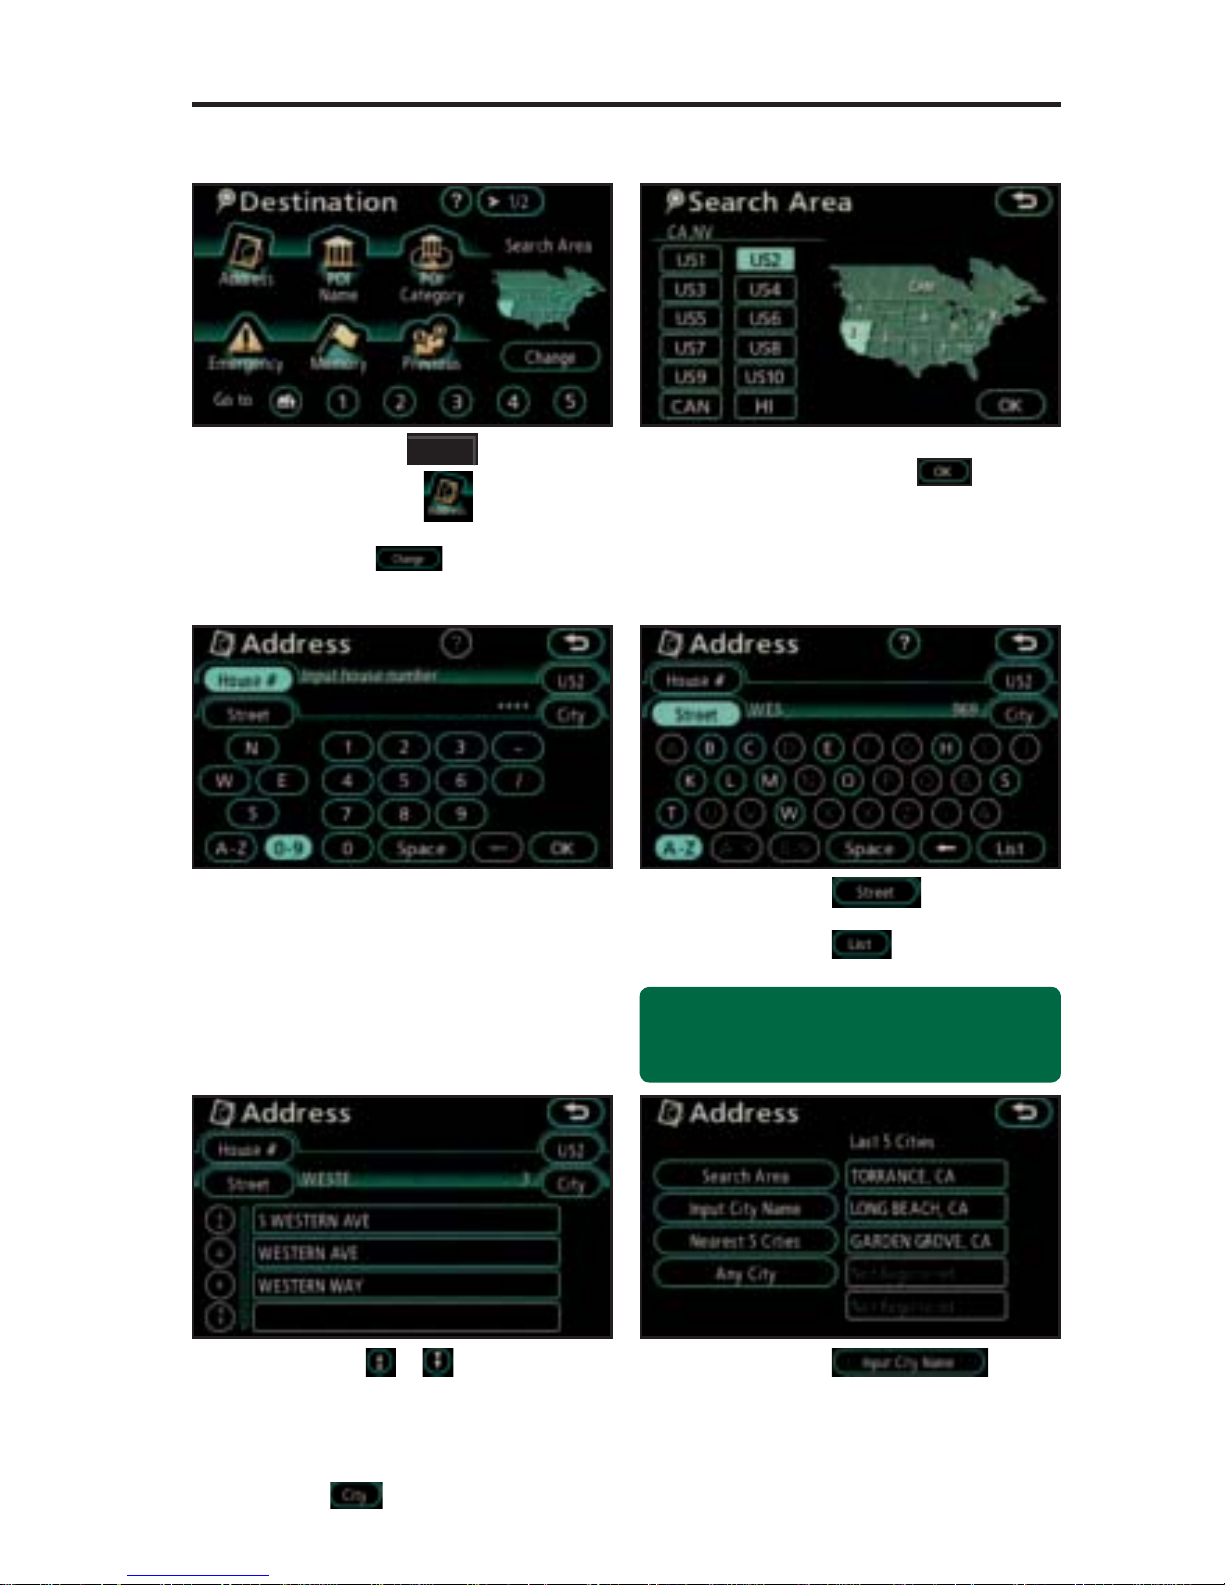
BY ADDRESS
Press the
DEST
panel button
followed by and move to
step 3. To change Search Area,
touch and move to step 2.
Input the house number using the
number keys.
Touch
and input the
street name using the letter keys.
Touch
to see all of the
available options.
Use or to scroll up or
down one page if necessary.
Touch the desired street and go
to step 8. If the street you are
looking for is not listed, touch
and go to step 6.
Touch to type
in the city name or select from a
previously registered city. If the
city is not available try the next
largest city in the vicinity.
step
1
step
2
step
3
step
4
step
5
step
6
Select the appropriate Search
Area, then touch to confi rm
the selection.
Quick Tip - Enter the street name without
prefi xes such as North or the letter N. The
system will display all of the options available.
Page 5
4
DESTINATION INPUT
BY ADDRESS
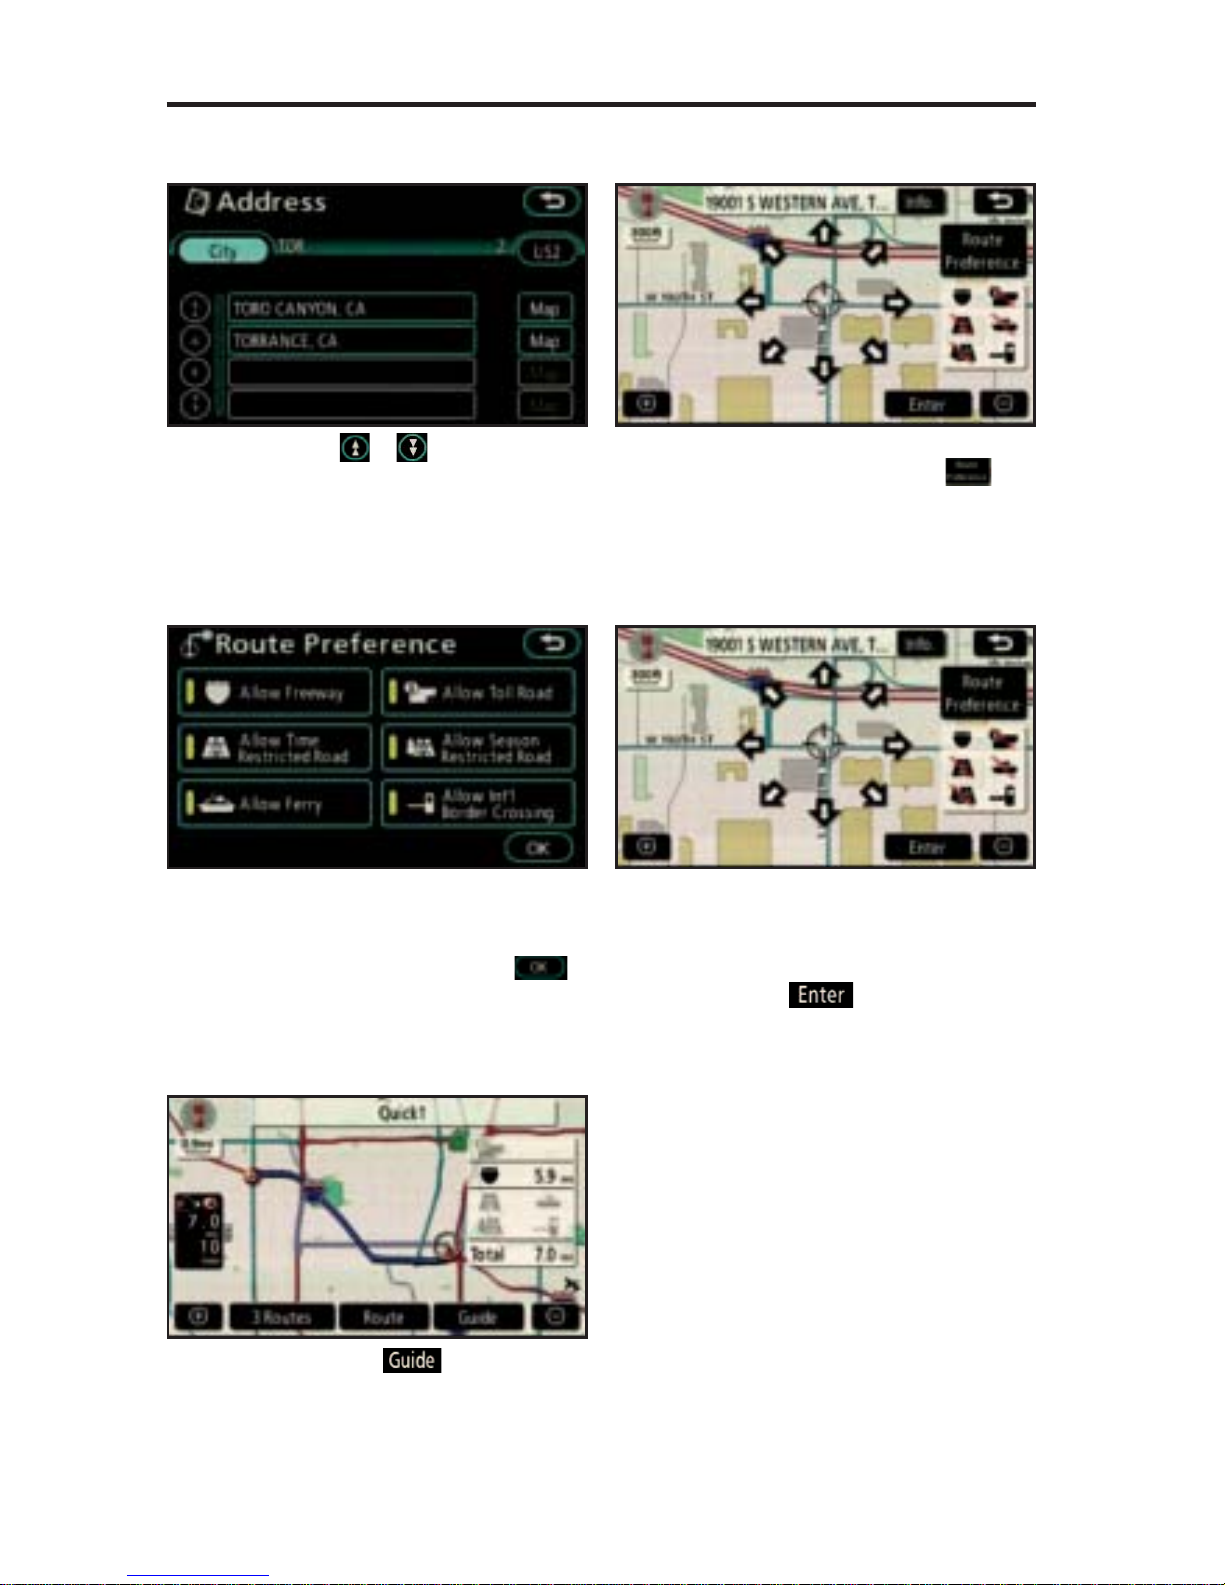
If necessary, use the arrow
keys to adjust the position
on the map to put you closer
to your destination. Touch
to confi rm the
position.
Select the desired Route
Preference by touching .
Select the desired Route
Preference(s) for the trip. When
the yellow bar appears, the route
has been selected. Touch
to confi rm your selection.
Use or to scroll up or
down one page if necessary.
Touch the desired city. Then touch
the desired street.
Touch .
step
7
step
8
step
9
step
10
step
11
Page 6
5
DESTINATION INPUT
BY ADDRESS - VOICE RECOGNITION
TIPS FOR USING VOICE RECOGNITION
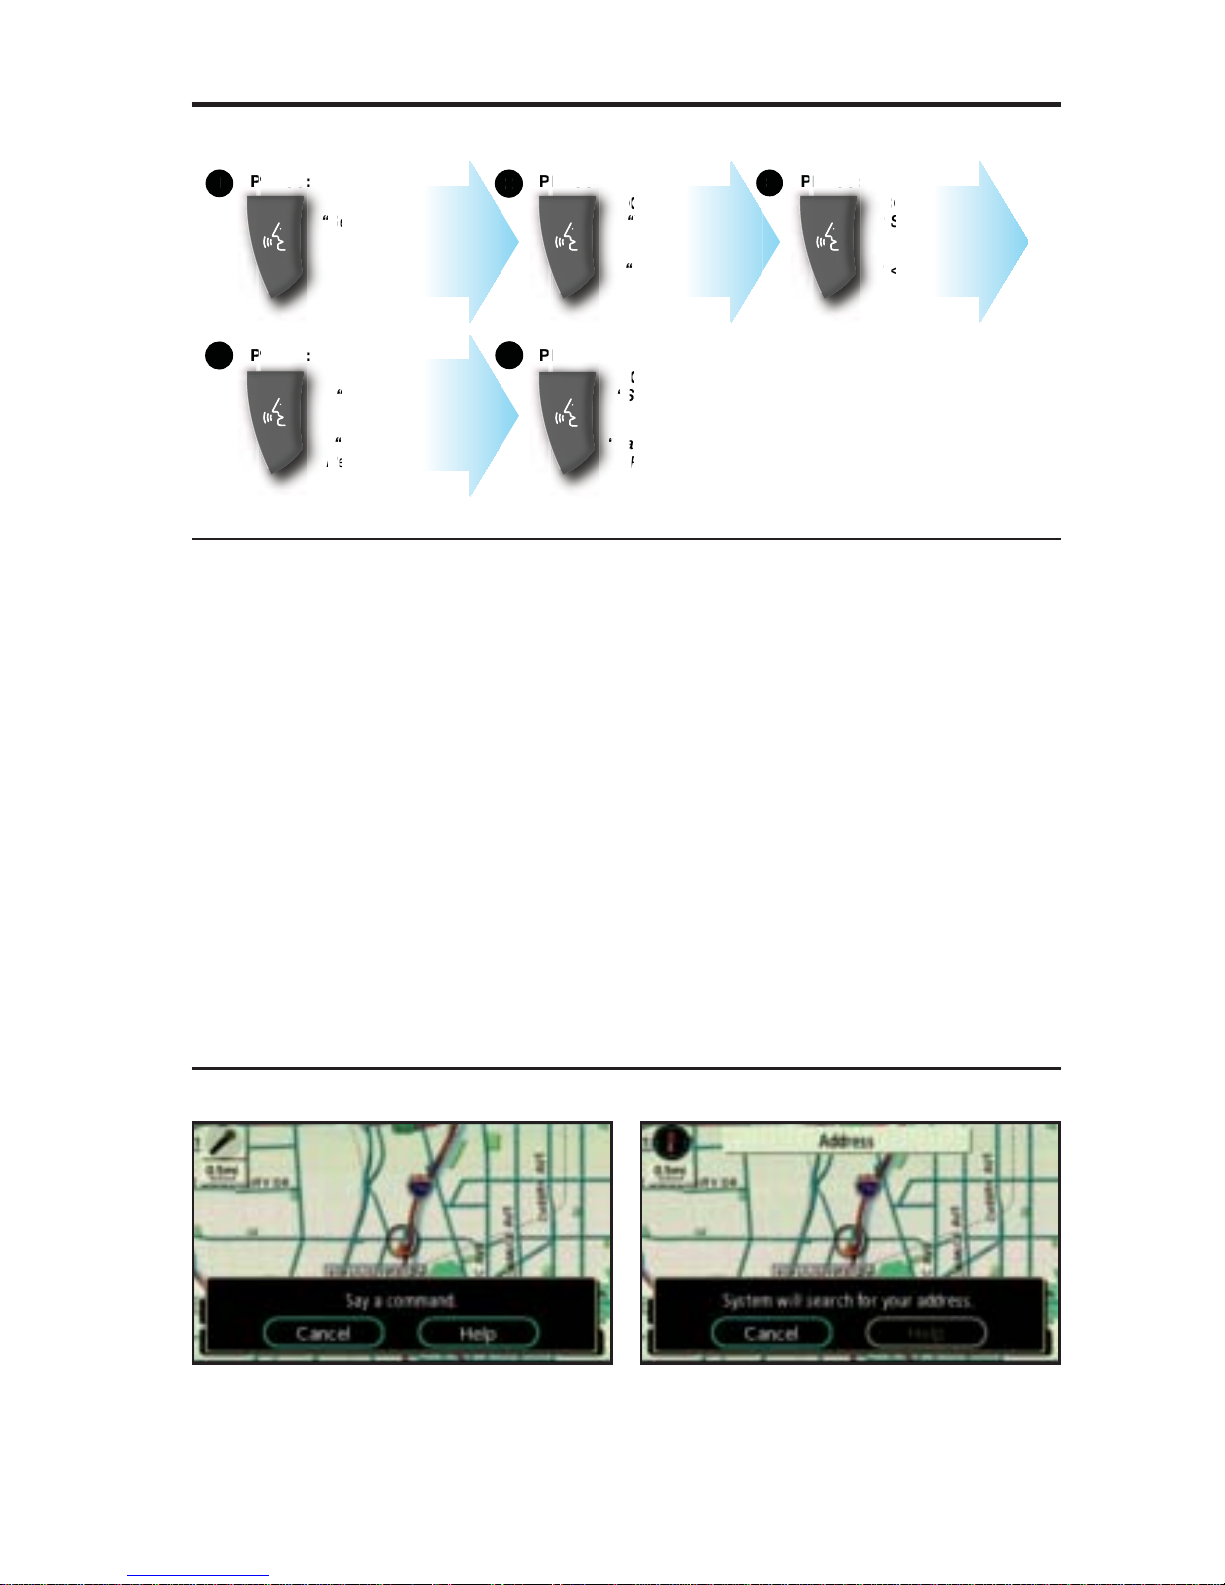
VOICE RECOGNITION SEQUENCE
PRESS: PRESS:
COMPUTER:
“Select Command.”
REPLY:
“Address”
COMPUTER:
PRESS:
“Select State.”
REPLY:
“<state name>”
COMPUTER:
“Select City.”
REPLY:
“<city name>”
PRESS: PRESS:
COMPUTER:
“Select Street.”
REPLY:
“<street name>”
COMPUTER:
“Select Address.”
REPLY:
“<address number>”
1
2
3
4
5
Ref. Tips 4 and 5
below.
Ref. Tip 6 below.
e
SS:
4
R
RE
SS:
SS:
R
ESS:
O
“
S
SS:
Numbered street names should be
spoken as in these examples:
1st Street, say: “First Street”
15th Street, say: “Fifteenth Street”
190th Street, say: “One Hundred
Ninetieth Street”
tip
1
tip
2
tip
3
tip
4
tip
5
Have the full and correct address in
mind, so you can speak it as prompted.
The system will ask for the state, city,
and street name followed by the house
number as separate inputs.
Before using voice recognition, roll up
all windows and set the climate control
fan on low or off to reduce background
noise in the cabin.
Speak at a normal volume and pace,
and pronounce words clearly.
When saying street names, include
North, South, East or West and Street,
Avenue, Boulevard, etc. in the name.
Say a street address number as single
digits. Examples:
125, say: “One two fi ve”
2000, say: “Two zero zero zero”
32307, say: “Three two three zero
seven”
tip
6
Press the voice command button
on the steering wheel and wait
for the beep. After the beep say,
“Address.”
The system will confi rm your
input by repeating “Address” and
displaying the command at the
top of the screen.
step
1
step
2
Page 7
6
DESTINATION INPUT
BY ADDRESS - VOICE RECOGNITION
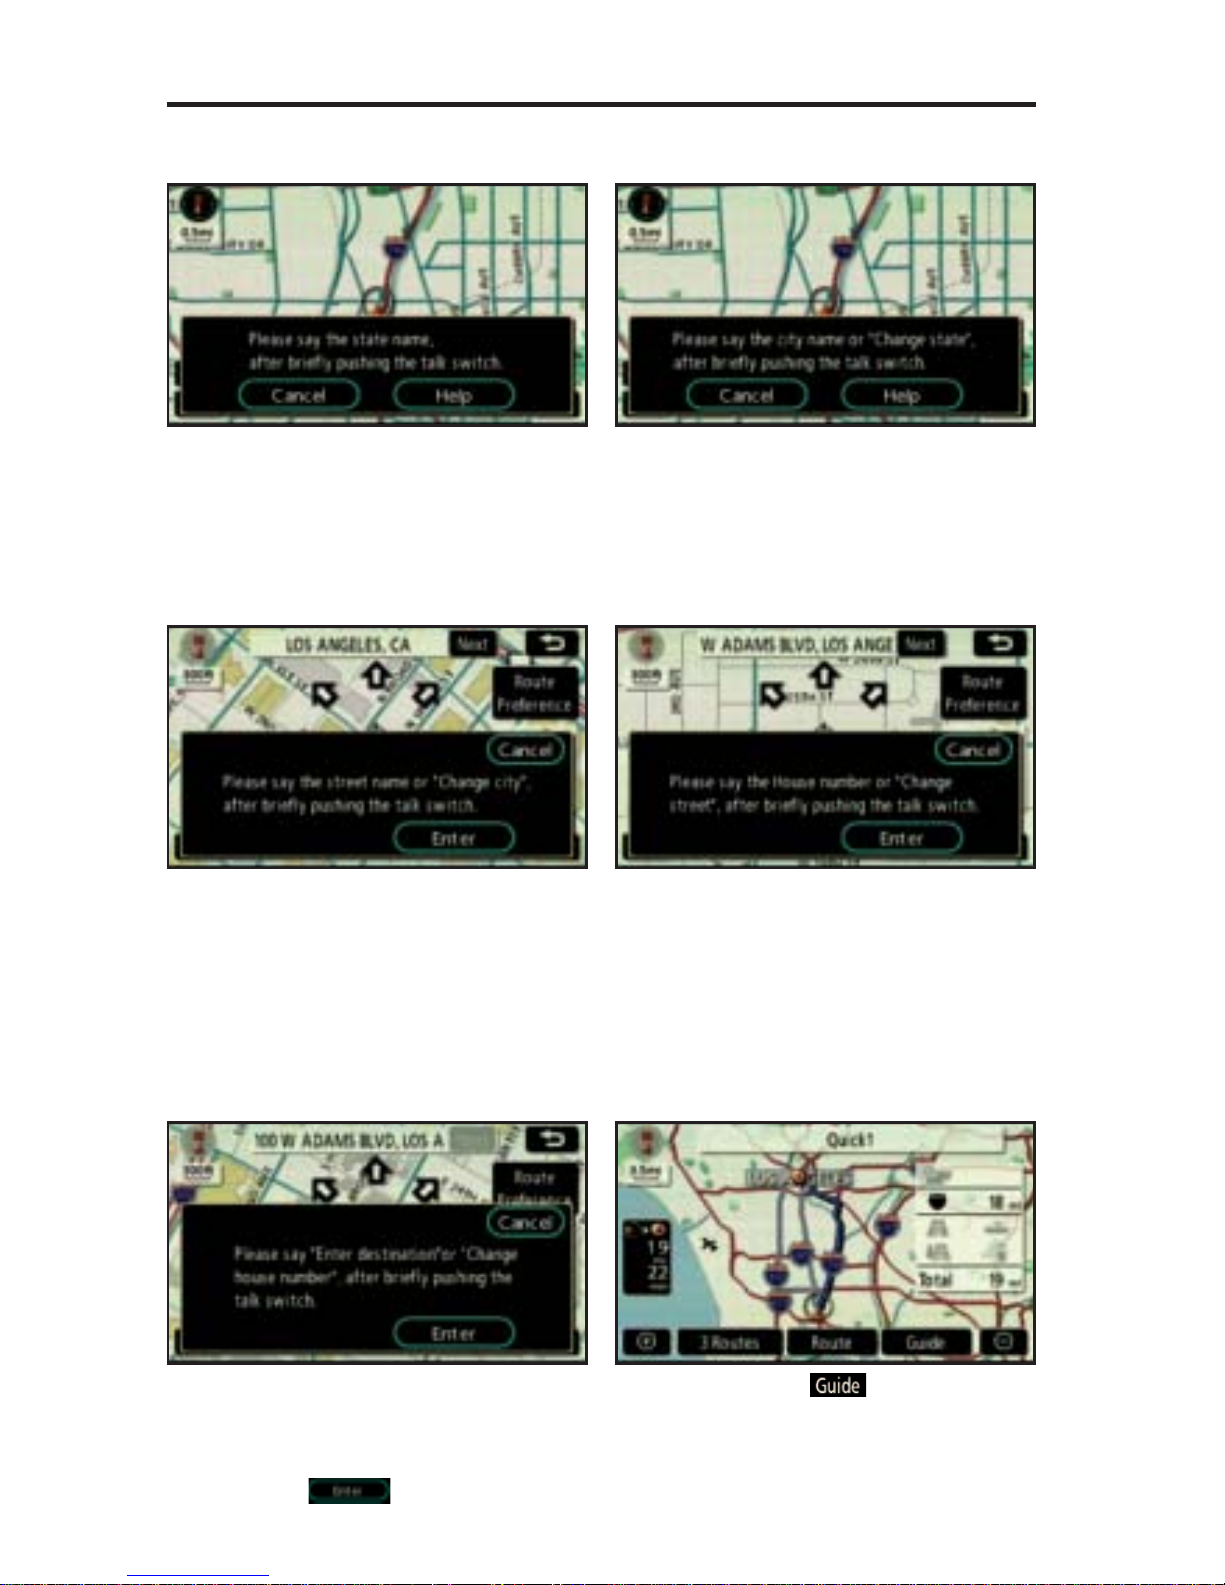
Press the voice command button
on the steering wheel and wait
for the beep. After the beep say,
“Enter destination” or touch
.
Touch
.
Press the voice command button
on the steering wheel and wait
for the beep. After the beep say
the appropriate state.
Press the voice command button
on the steering wheel and wait for
the beep. After the beep say the
appropriate city.
Press the voice command button
on the steering wheel and wait
for the beep. After the beep say
the appropriate street.
Press the voice command button
on the steering wheel and wait for
the beep. After the beep say the
appropriate numerical address.
step
3
step
4
step
5
step
6
step
7
step
8
Page 8
7
DESTINATION INPUT - POINTS OF INTEREST (POI)
POINTS OF INTEREST BY NAME
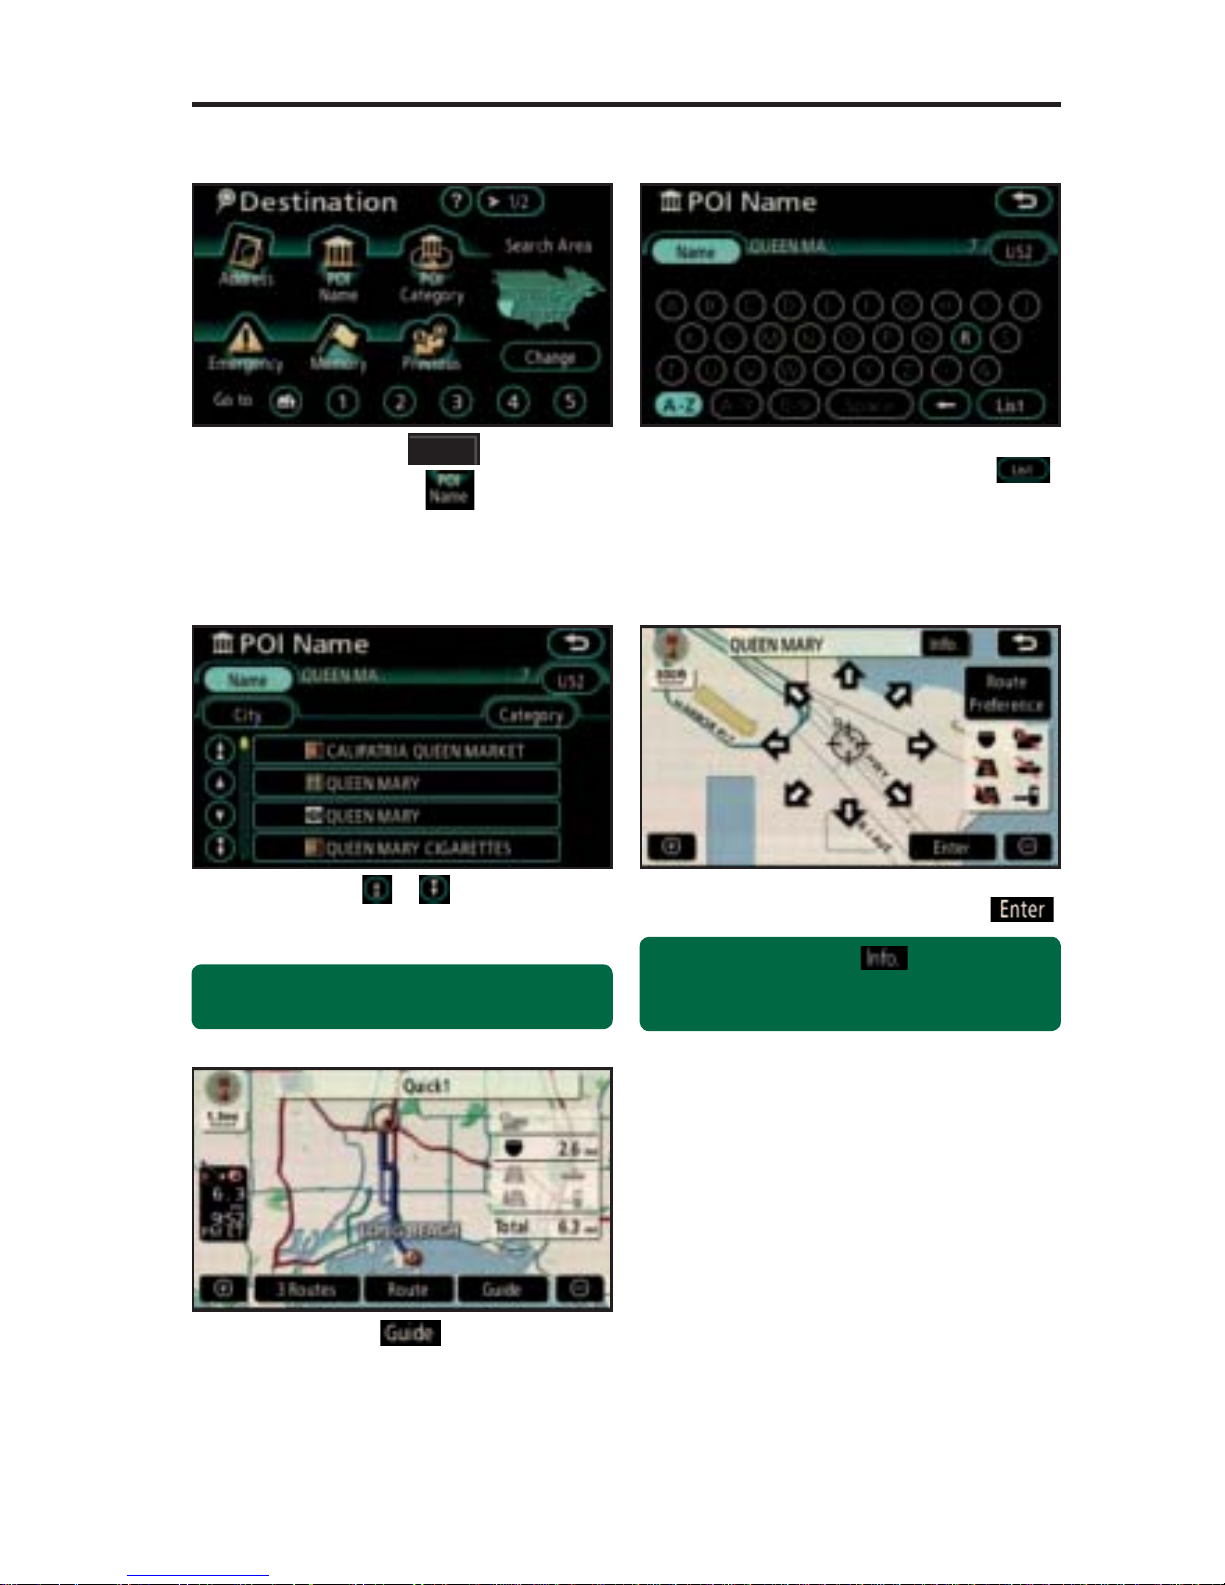
Quick Tip - Touching the button next to
the POI name will display the address and
telephone number.
Press the
DEST
panel button
followed by to access points
of interest by name.
Input the POI name using the
letter keys and then touch .
Use or to scroll up or
down one page if necessary.
Touch the desired selection.
See page 15 to select desired
Route Preferences. Touch
.
Touch
.
step
1
step
2
step
3
step
4
step
5
Quick Tip - If the POI isn’t listed in the database
verify the spelling and Search Area for accuracy.
Page 9
8
DESTINATION INPUT - POINTS OF INTEREST (POI)
POINTS OF INTEREST BY CATEGORY
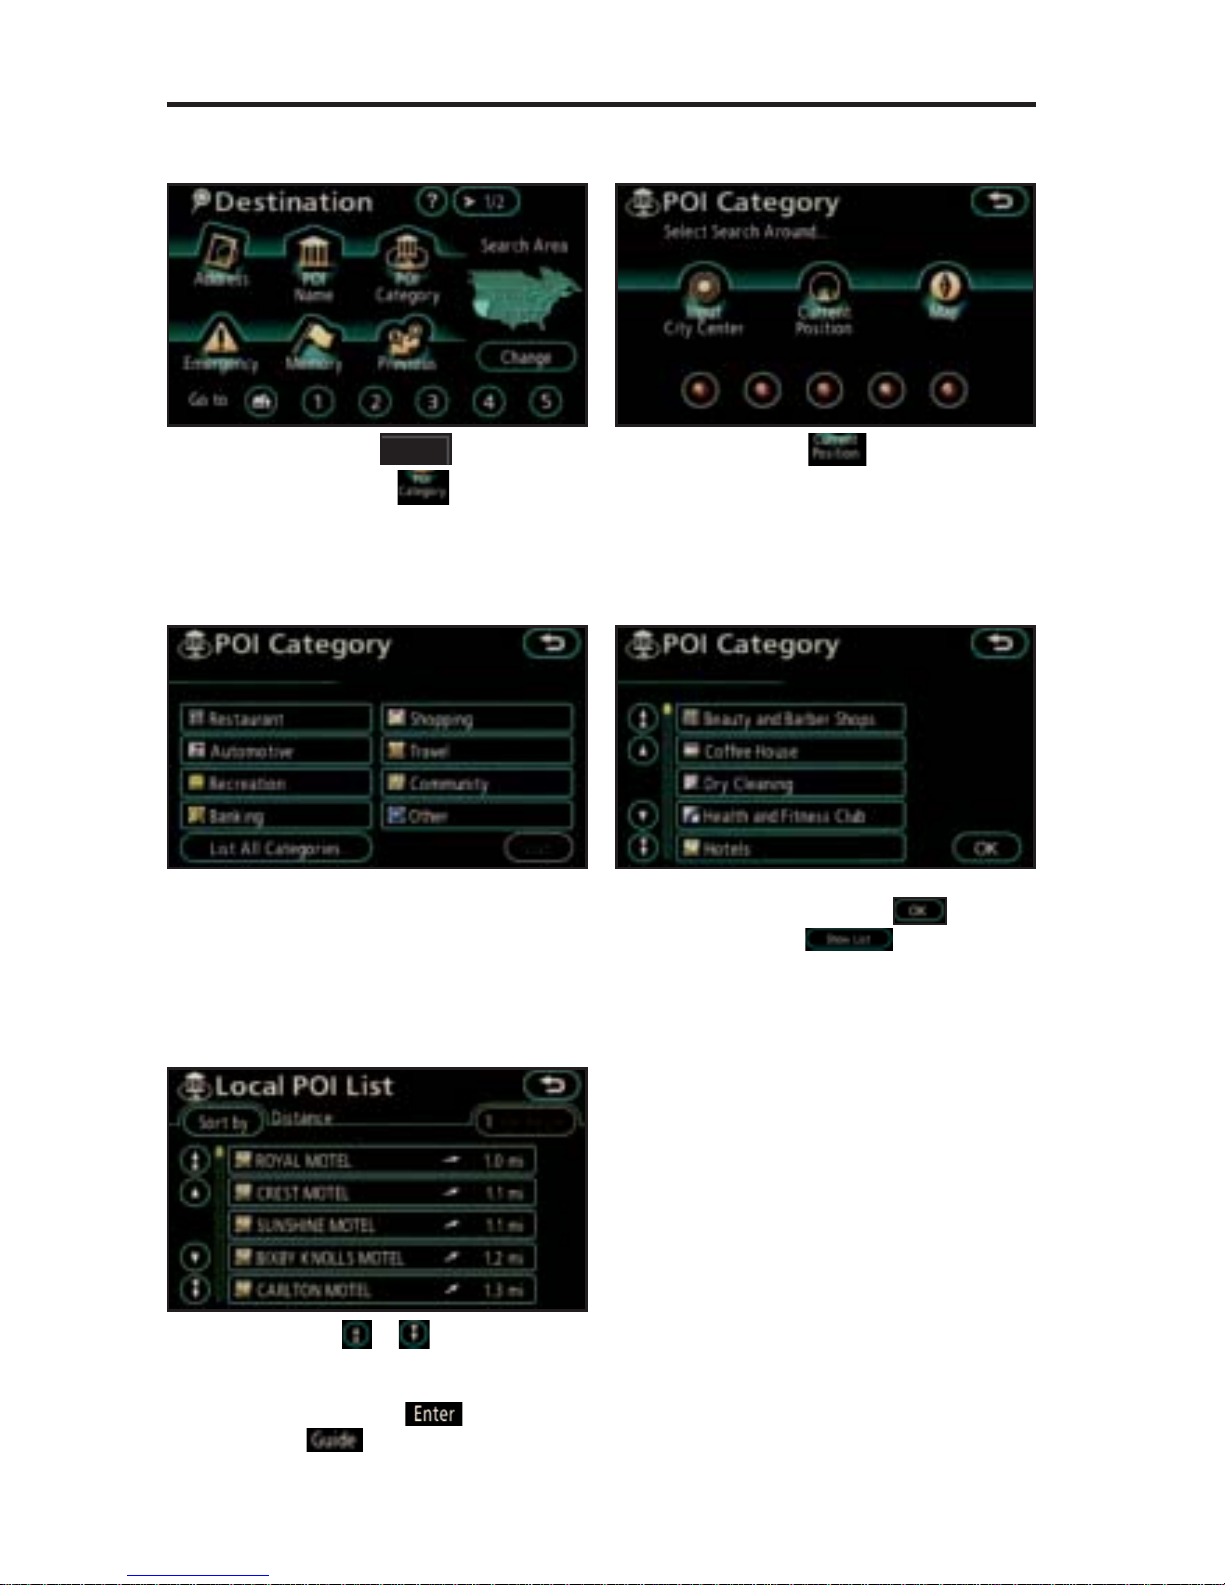
Press the
DEST
panel button
followed by to access the
points of interest by category.
Touch to search for points
of interest in the vicinity.
Touch the desired category icon. Touch the desired sub-category
icon followed by and then
touch to see the points
of interest in the vicinity.
Use
or to scroll up or
down one page if necessary.
Touch the point of interest
followed by and then
.
step
1
step
2
step
3
step
4
step
5
Page 10
9
DESTINATION INPUT - POINTS OF INTEREST (POI)
POINTS OF INTEREST BY CATEGORY - VOICE RECOGNITION
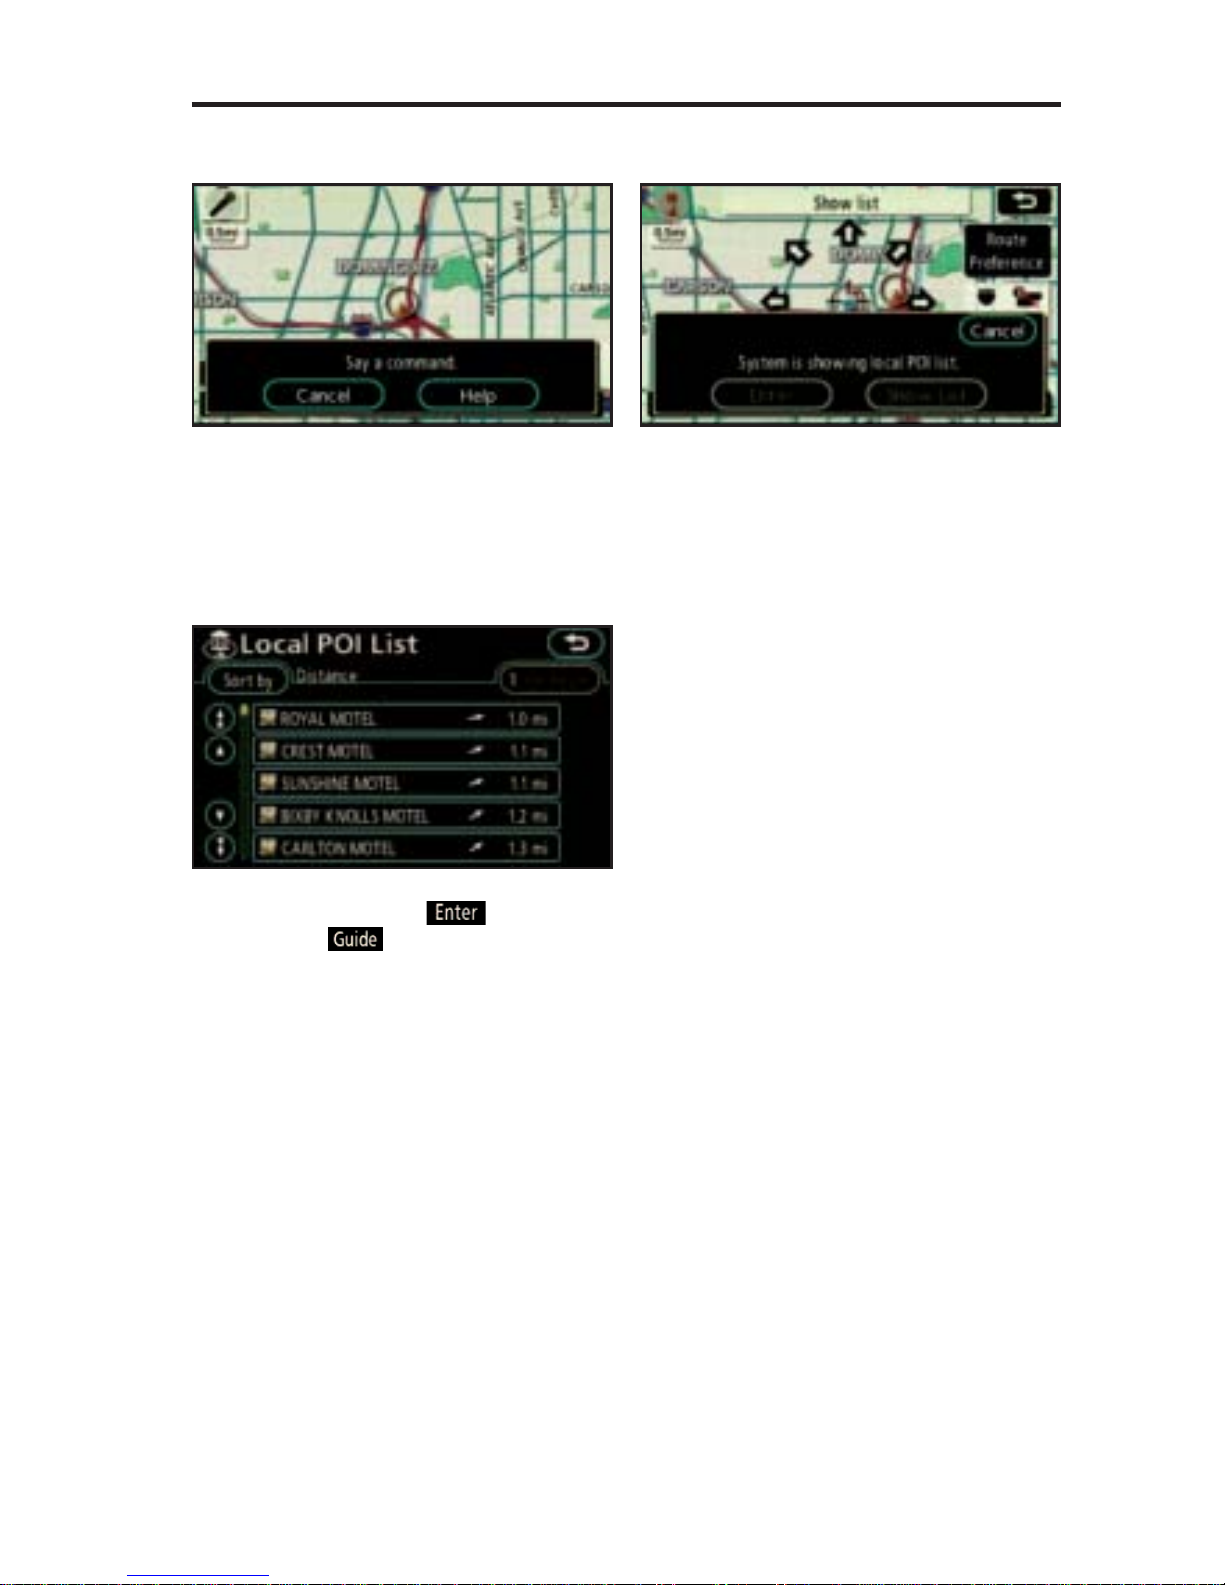
Press the voice command button
on the steering wheel and wait for
the beep. After the beep say,
“Nearest hotel.” Most POI
categories can be found by saying,
“Nearest <POI category.>” See
page 18 for a list.
step
1
step
2
step
3
Press the voice command button
on the steering wheel and wait
for the beep. After the beep say,
“Add to destination” or “Replace
destination.” To see a list say,
“Show list.”
Touch the point of interest
followed by
and then
.
Page 11
10
DESTINATION INPUT - TELEPHONE NUMBER
BUSINESS OR REGISTERED MEMORY POINTS
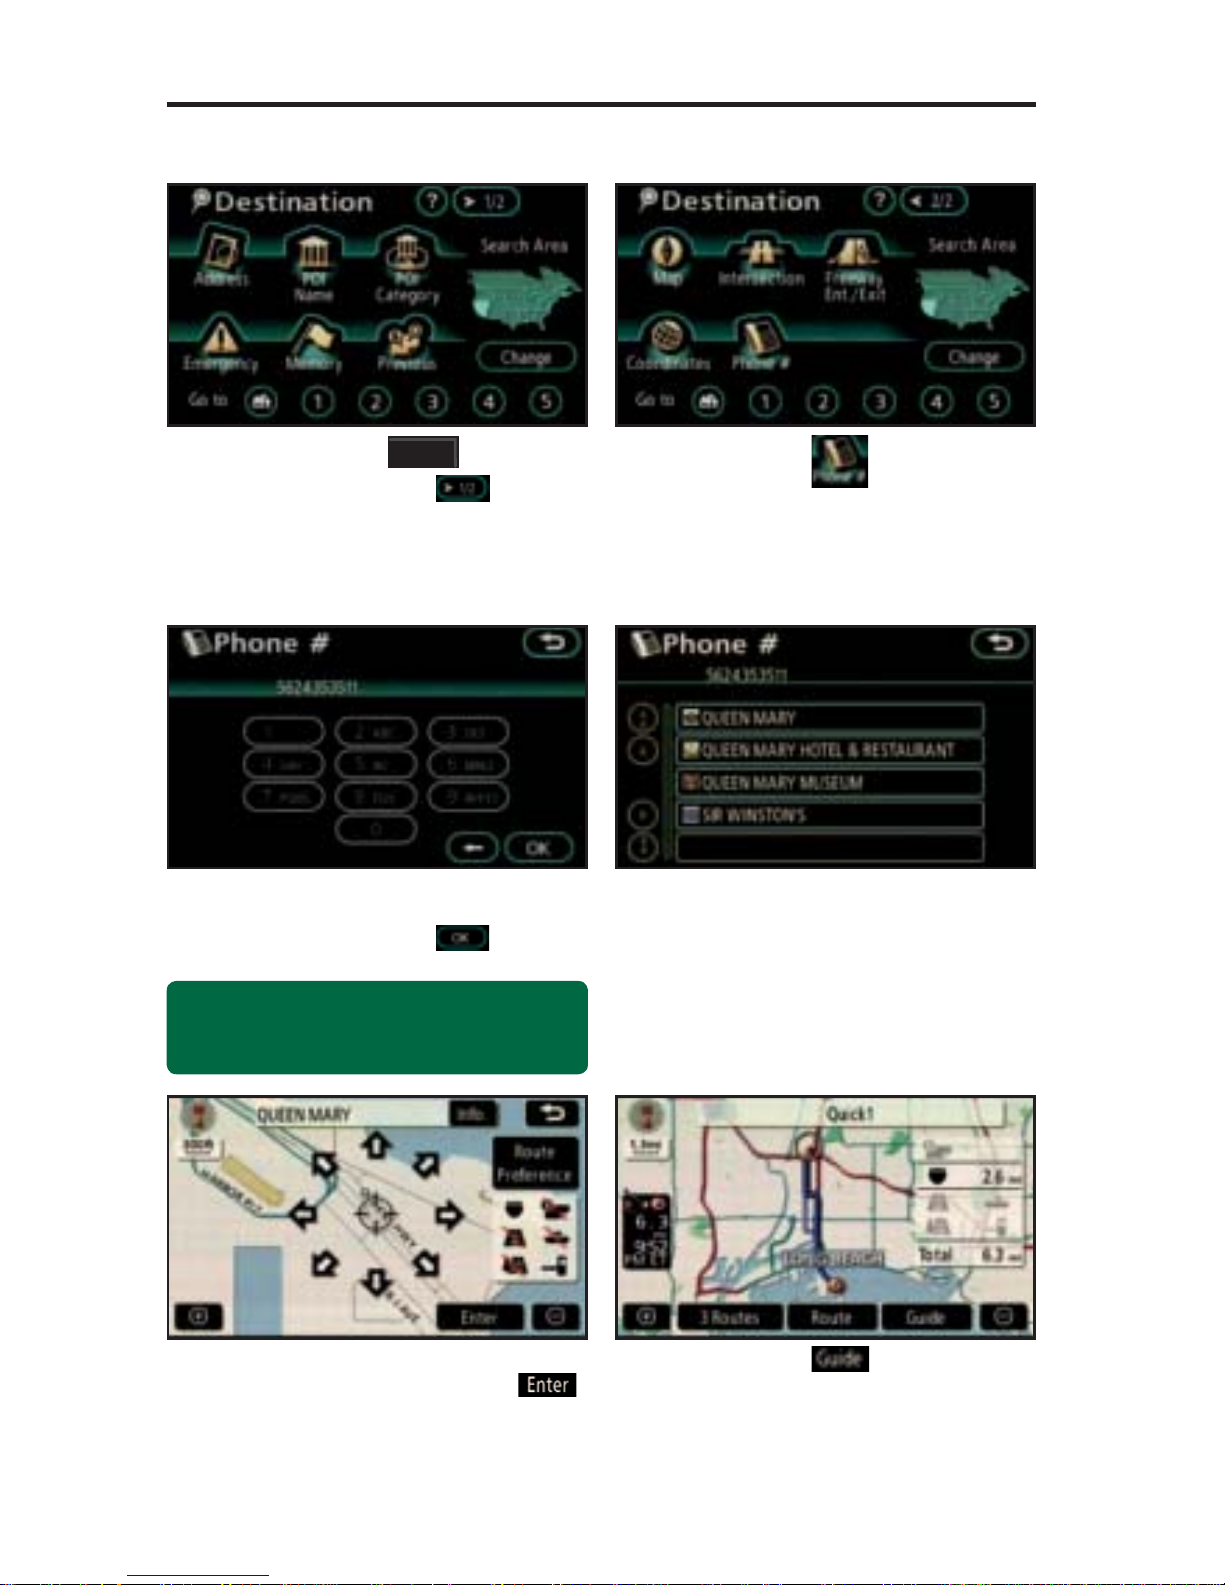
Press the
DEST
panel button
followed by the icon.
Touch
to input telephone
number.
Input the area code and telephone
number using the number keys
followed by the
icon. It is
not necessary to dial “1.”
Select the business or assigned
memory point from the screen.
See page 15 to select desired
Route Preferences. Touch
.
Touch
.
step
1
step
2
step
3
step
4
step
5
step
6
Quick Tip - Personal telephone numbers cannot
be used for Destination input unless previously
added as a Memory Point.
Page 12
11
REGISTER HOME
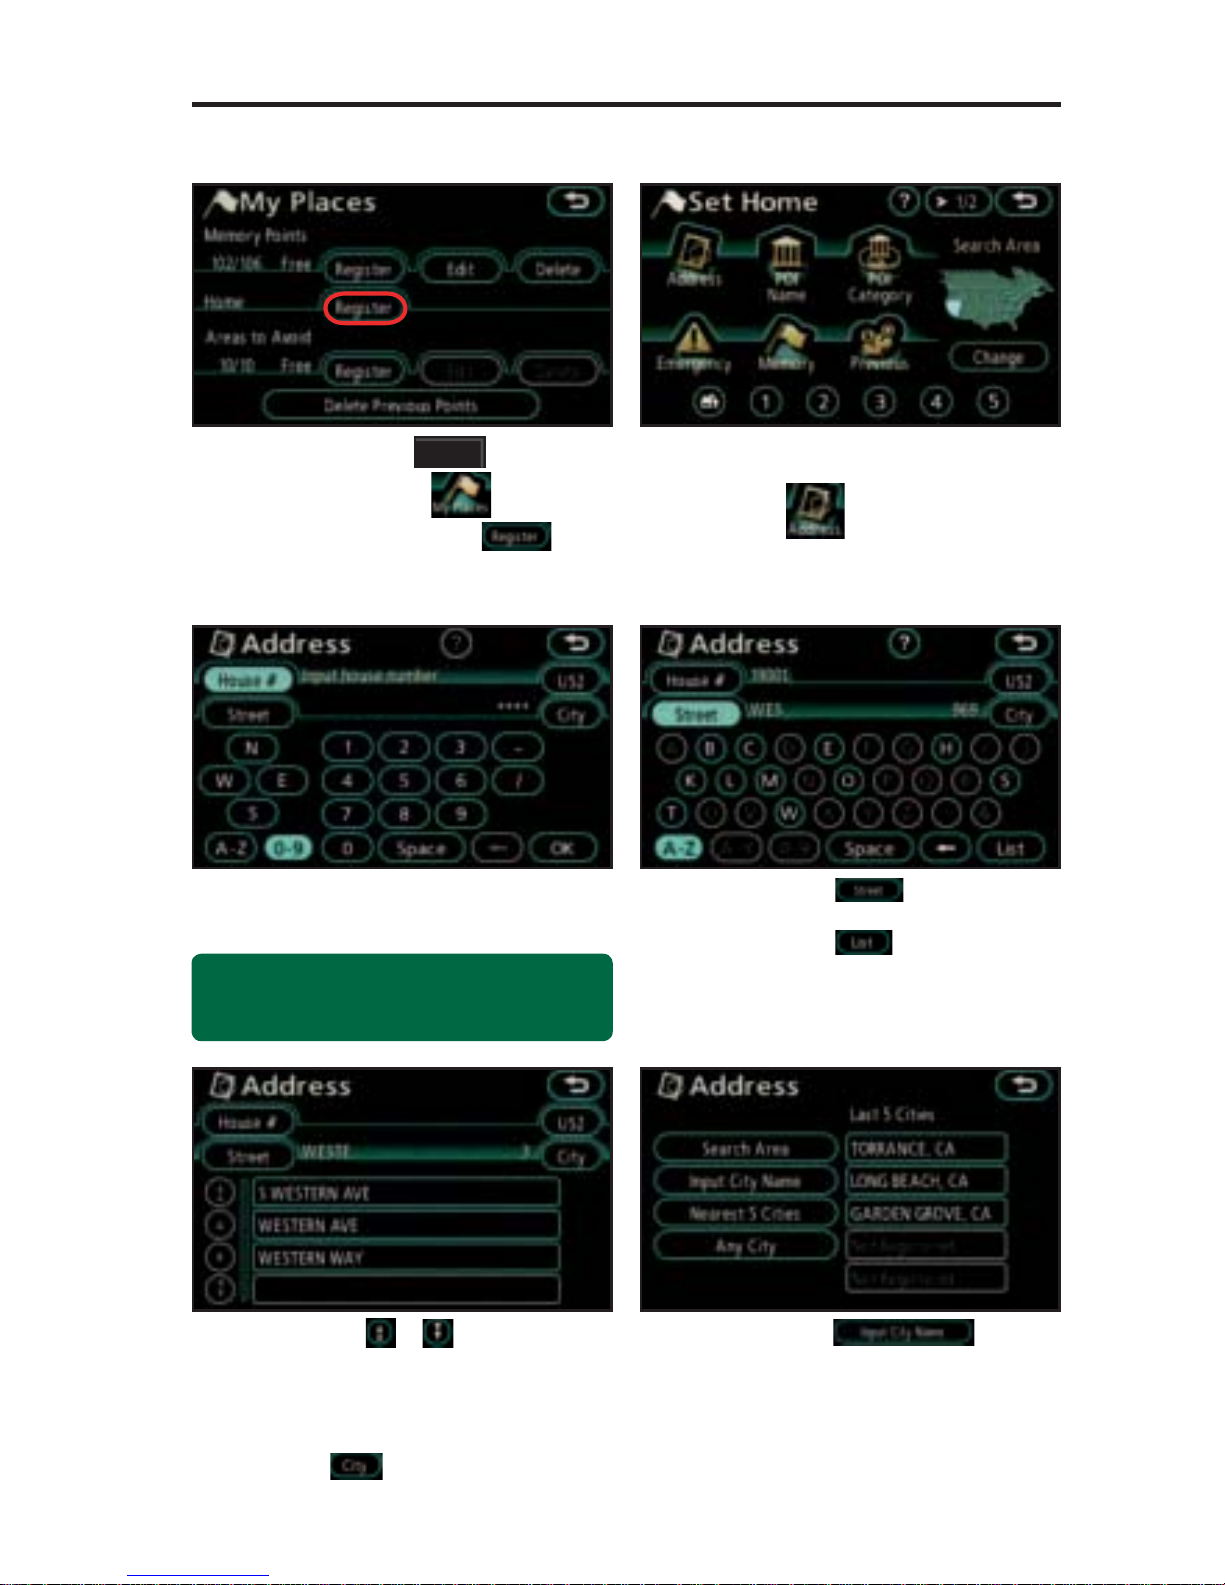
Press the
MENU
panel button
followed by to register
your home. Touch to
input your home address.
Make sure that you are in the
desired Search Area. Touch
to begin address input.
Input the house number using the
number keys.
Touch
and input the
street name using the letter keys.
Touch to see all of the
available options.
Touch or select
from a previously registered city.
step
1
step
2
step
3
step
4
step
6
Tip - For security reasons, use a point close
to your home instead of your actual home
address.
Use or to scroll up or
down one page if necessary.
Touch the desired street and go
to step 8. If the street you are
looking for is not listed, touch
and go to step 6.
step
5
Page 13
12
REGISTER HOME
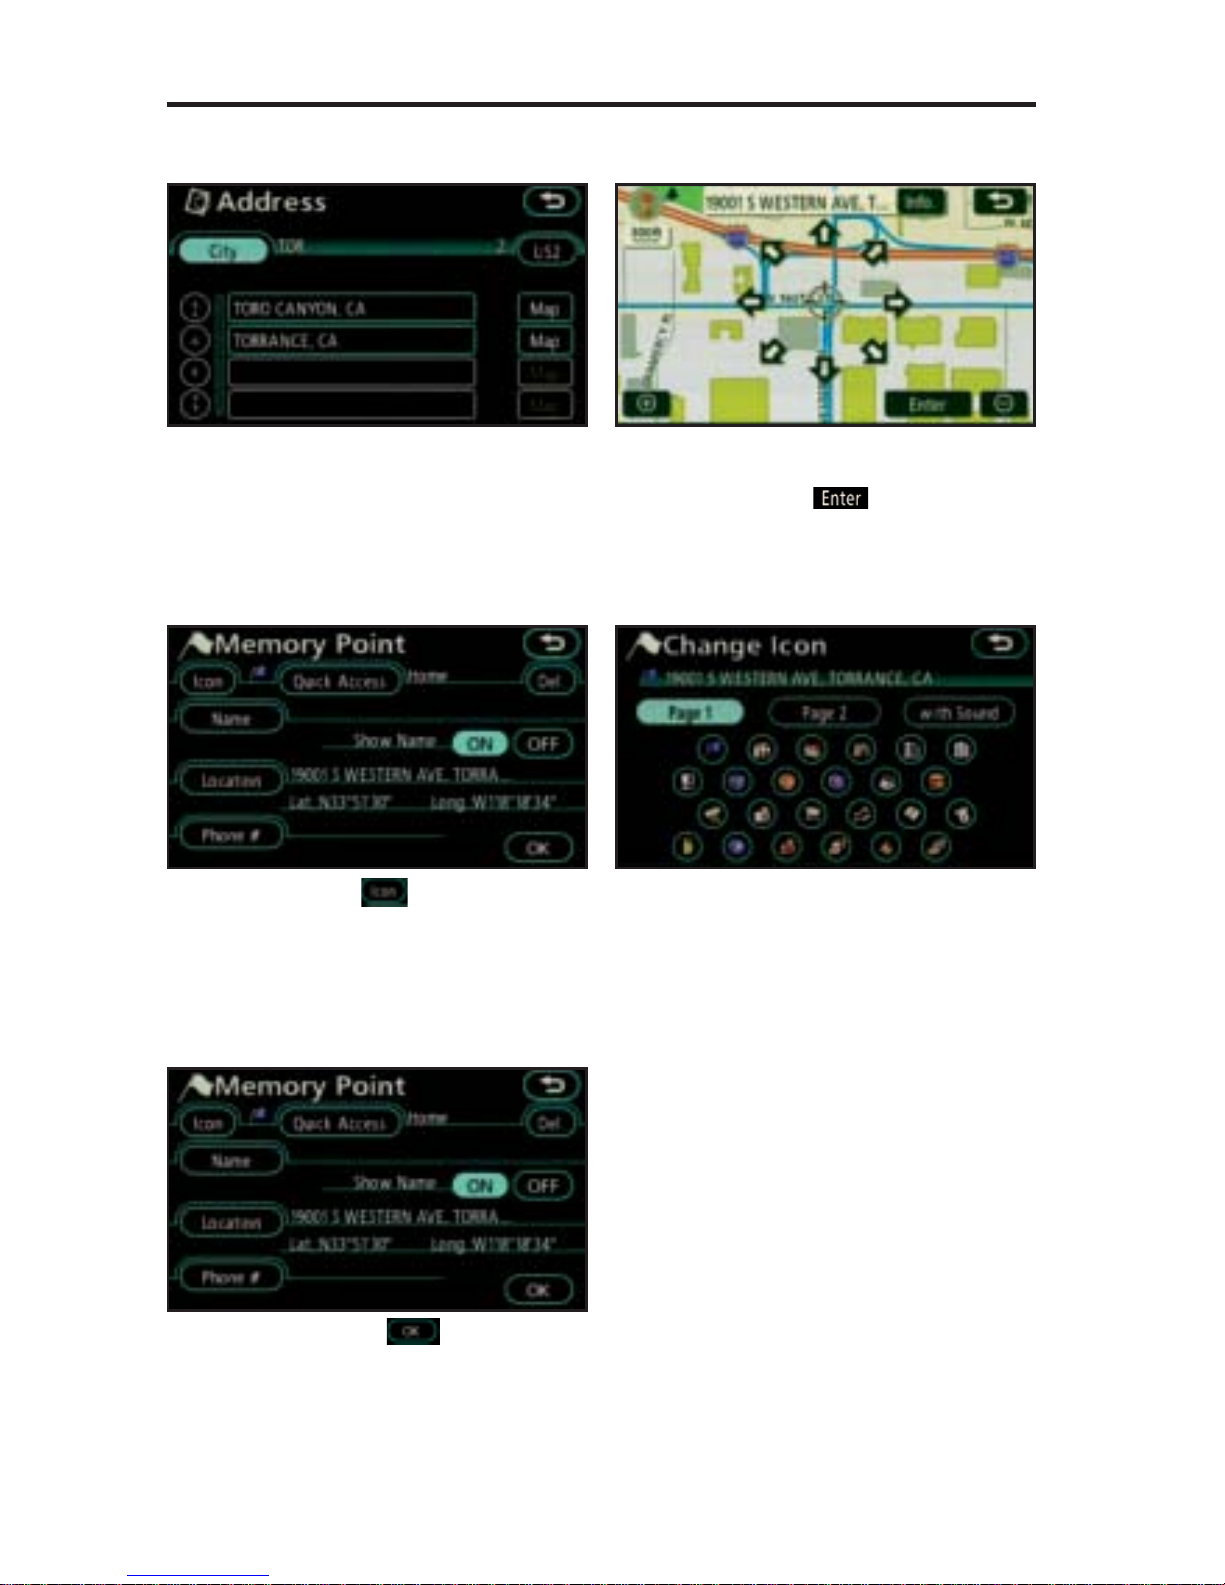
If necessary use the arrow keys
to adjust the position on the map.
Touch to confi rm the
position.
Touch at the top left of the
screen to change the home icon.
Touch the desired icon for
your home.
Touch at the bottom of
the screen.
step
8
step
9
step
10
step
11
Touch the desired city. Select the
desired street.
step
7
Page 14
13
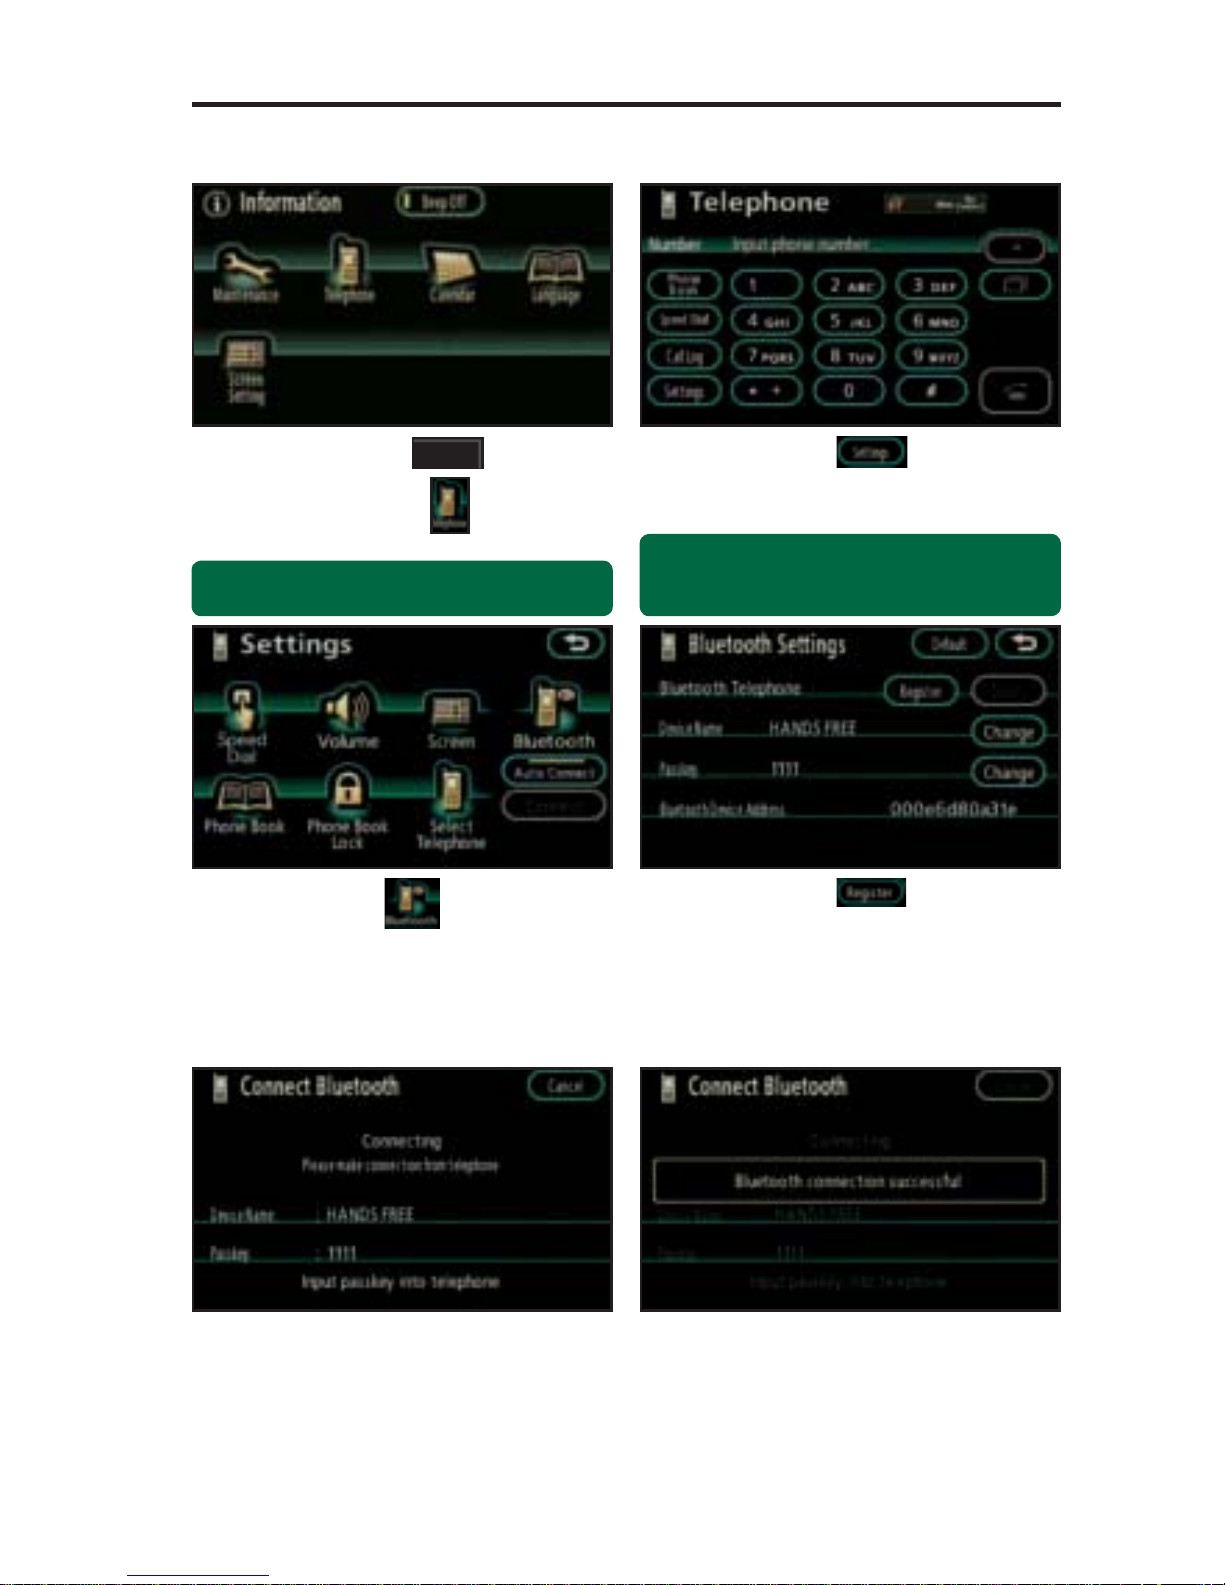
BLUETOOTH TELEPHONE PAIRING
Quick Tip - Verify that the Bluetooth feature has
been switched ON and is visible to other Bluetooth
devices.
Press the
INFO
panel button
followed by to pair a
Bluetooth device.
Touch
.
Touch to begin the pairing
process.
Touch .
In the approved Bluetooth cell
phone, input the passkey listed
on the screen. Please refer to the
cell phone manufacturer’s owner’s
manual for pairing procedures.
Upon connection, the system will
indicate that the pairing process
was successful.
step
1
step
2
step
3
step
4
step
5
step
6
Quick Tip - Verify the Bluetooth cell phone has been
approved by visiting www.Toyota.Letstalk.com.
Page 15
14
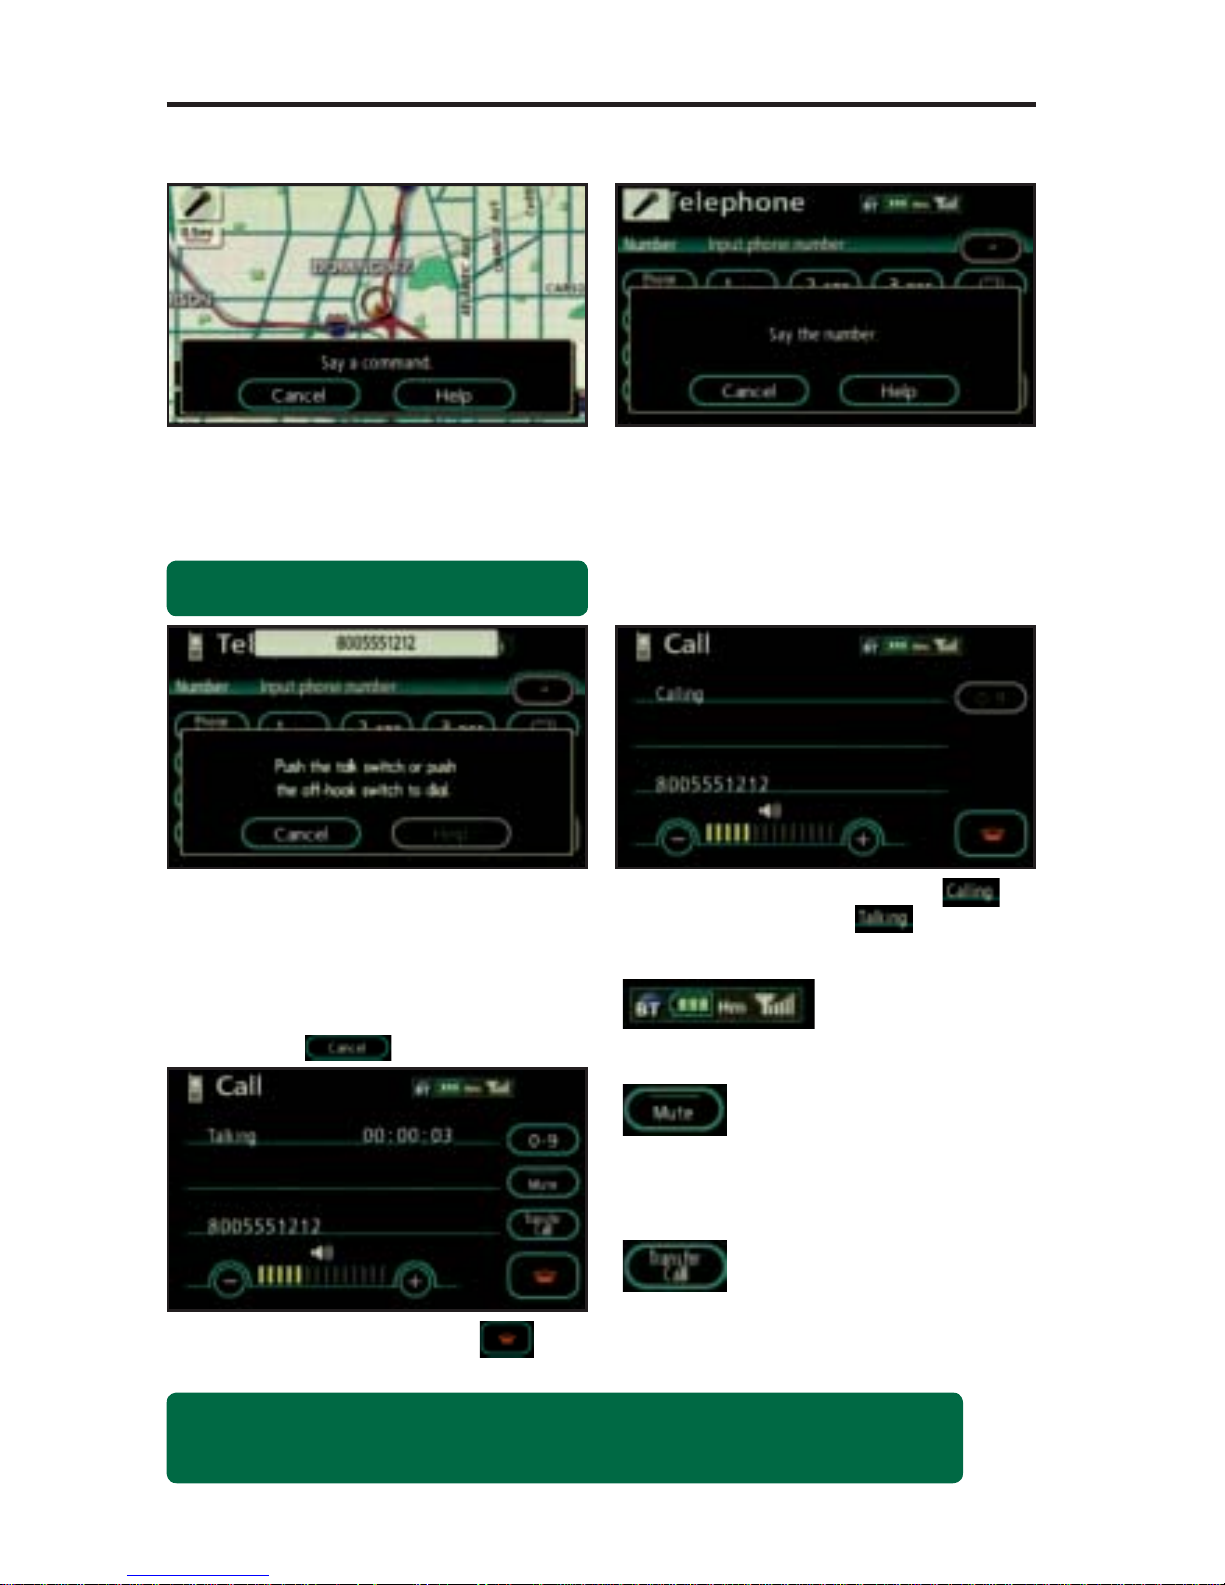
CALLING BY VOICE RECOGNITION
Some Bluetooth equipped cell phones may or may
not show battery or signal strength on the display.
Touch the Mute icon to mute the conversation.
When muted the yellow indicator above the icon
will appear. Touch the Mute icon to unmute the
active call.
Touch the Transfer Call icon to transfer the active
call to the paired cell phone for a private
conversation.
Press the voice command button
on the steering wheel and wait for
the beep. After the beep say, “Dial
by number.”
Press the voice command button
on the steering wheel and wait
for the beep. After the beep say
the numbers individually and at a
moderate speed (e.g.“Eight, zero,
zero, fi ve, fi ve, fi ve...”).
Press the voice command button
on the steering wheel and wait
for the beep. After the beep say,
“Dial.” If the incorrect number
has been inputted or if you wish
not to complete the call, touch
.
The call is active after
changes to .
To end the call touch
.
Quick Tip - A noisy environment may prevent the voice recognition system from understanding your
commands. It is recommended that you reduce background noise (including passenger conversation
and wind noise) prior to using the Voice Recognition system.
step
1
step
2
step
3
step
4
step
5
Quick Tip - Speak clearly and at a moderate speed
after the beep sound has played.
Page 16
15
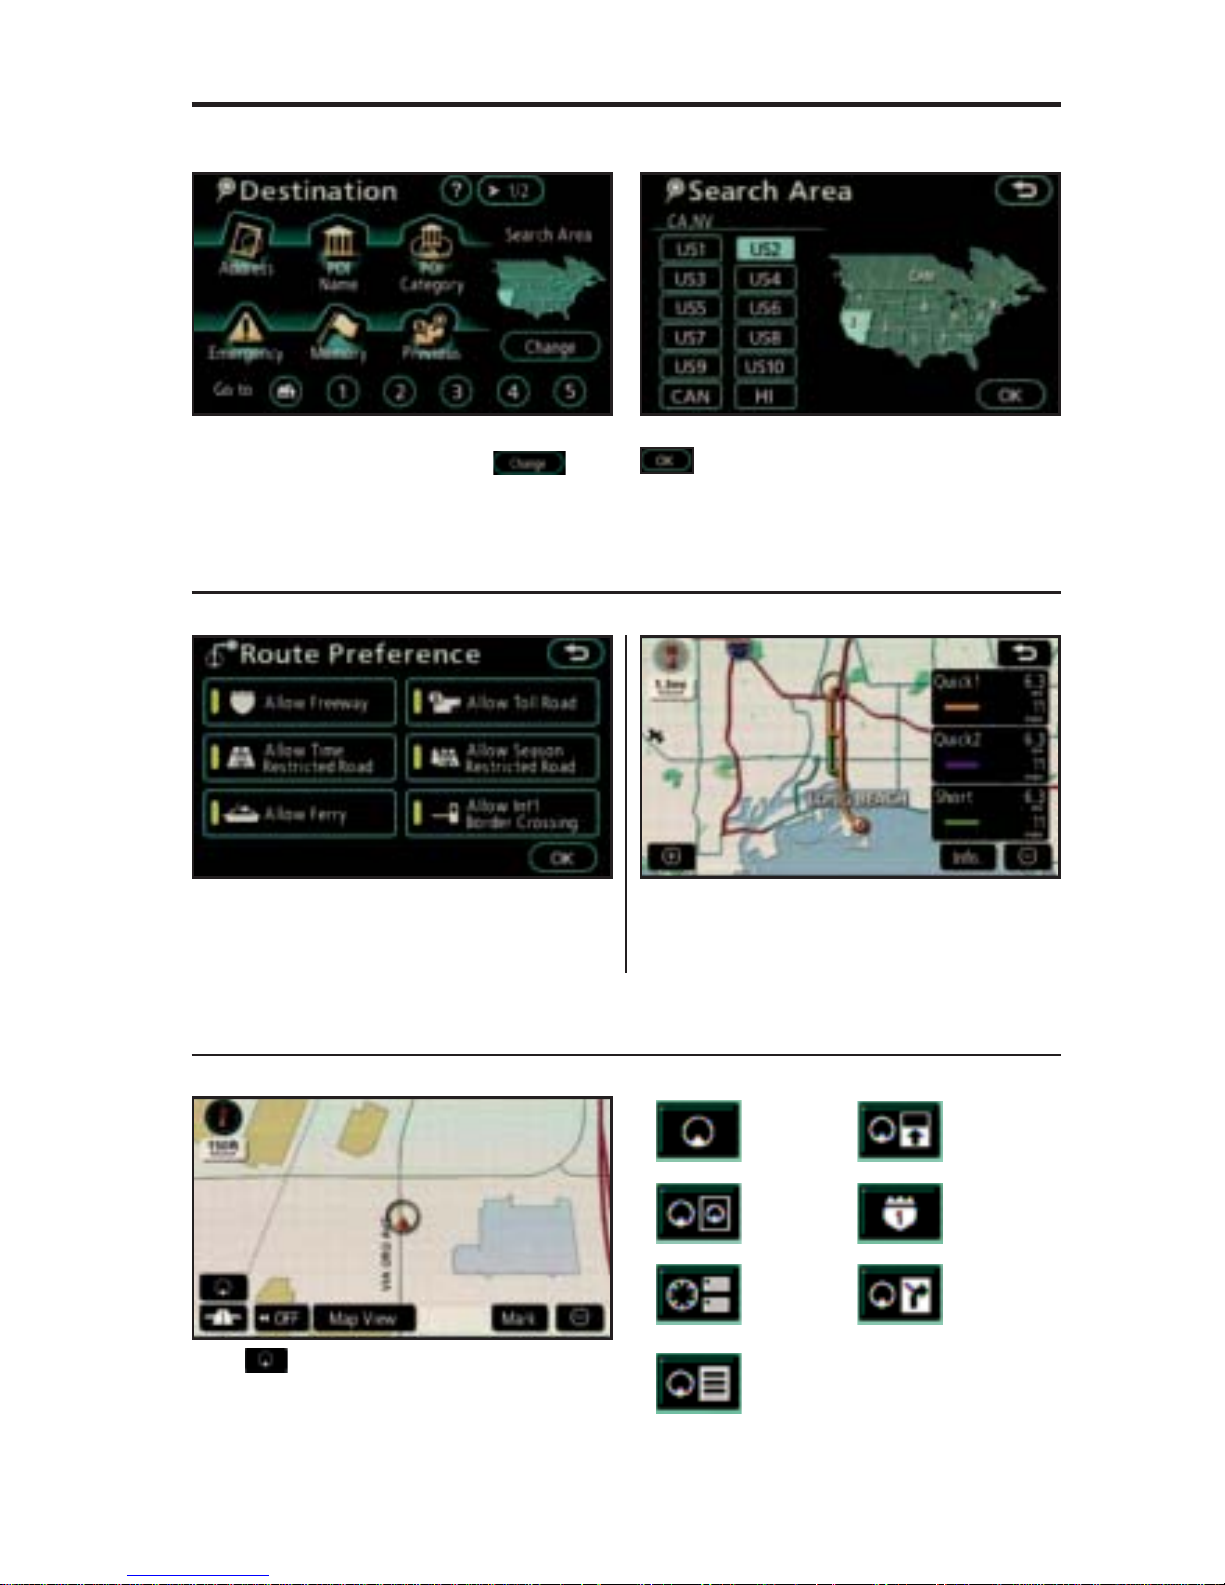
Once the address has been inputted, select the
desired route preference(s) for the trip. For
example, if Allow Toll Roads is not selected, the
system will route over non-toll roads which may
take longer to reach the destination.
SEARCH AREA
ROUTE PREFERENCES
Prior to inputting the desired address select the
appropriate Search Area by pressing . If
the incorrect Search Area is chosen, the system
will either fi nd an address that closely matches in
that area or will indicate that the address cannot
be found.
Touch to select from seven different screen
viewing options. Three screen preferences
are available when the map is visible and four
additional are available during route guidance only.
Please refer to the list of screen preferences.
SCREEN PREFERENCES
One of the three routes may be chosen for the trip.
Quick 1 offers the shortest route by time; quick 2 is
the second fastest route; short is the most direct
route based upon driven mileage. The system does
not account for traffi c signals or traffi c fl ow.
ADDITIONAL NAVIGATION FEATURES
Single Map
Mode
Dual Map
Mode
Compass
Mode
*Turn List
Mode
*Arrow
Guidance
Mode
*Freeway Exit
Info Mode
*Intersection
Guidance
Mode
* Selections available
when in guidance
mode.
3 ROUTES
Select the appropriate Search Area, then touch
to confi rm the selection.
Page 17
16
ADDITIONAL NAVIGATION FEATURES
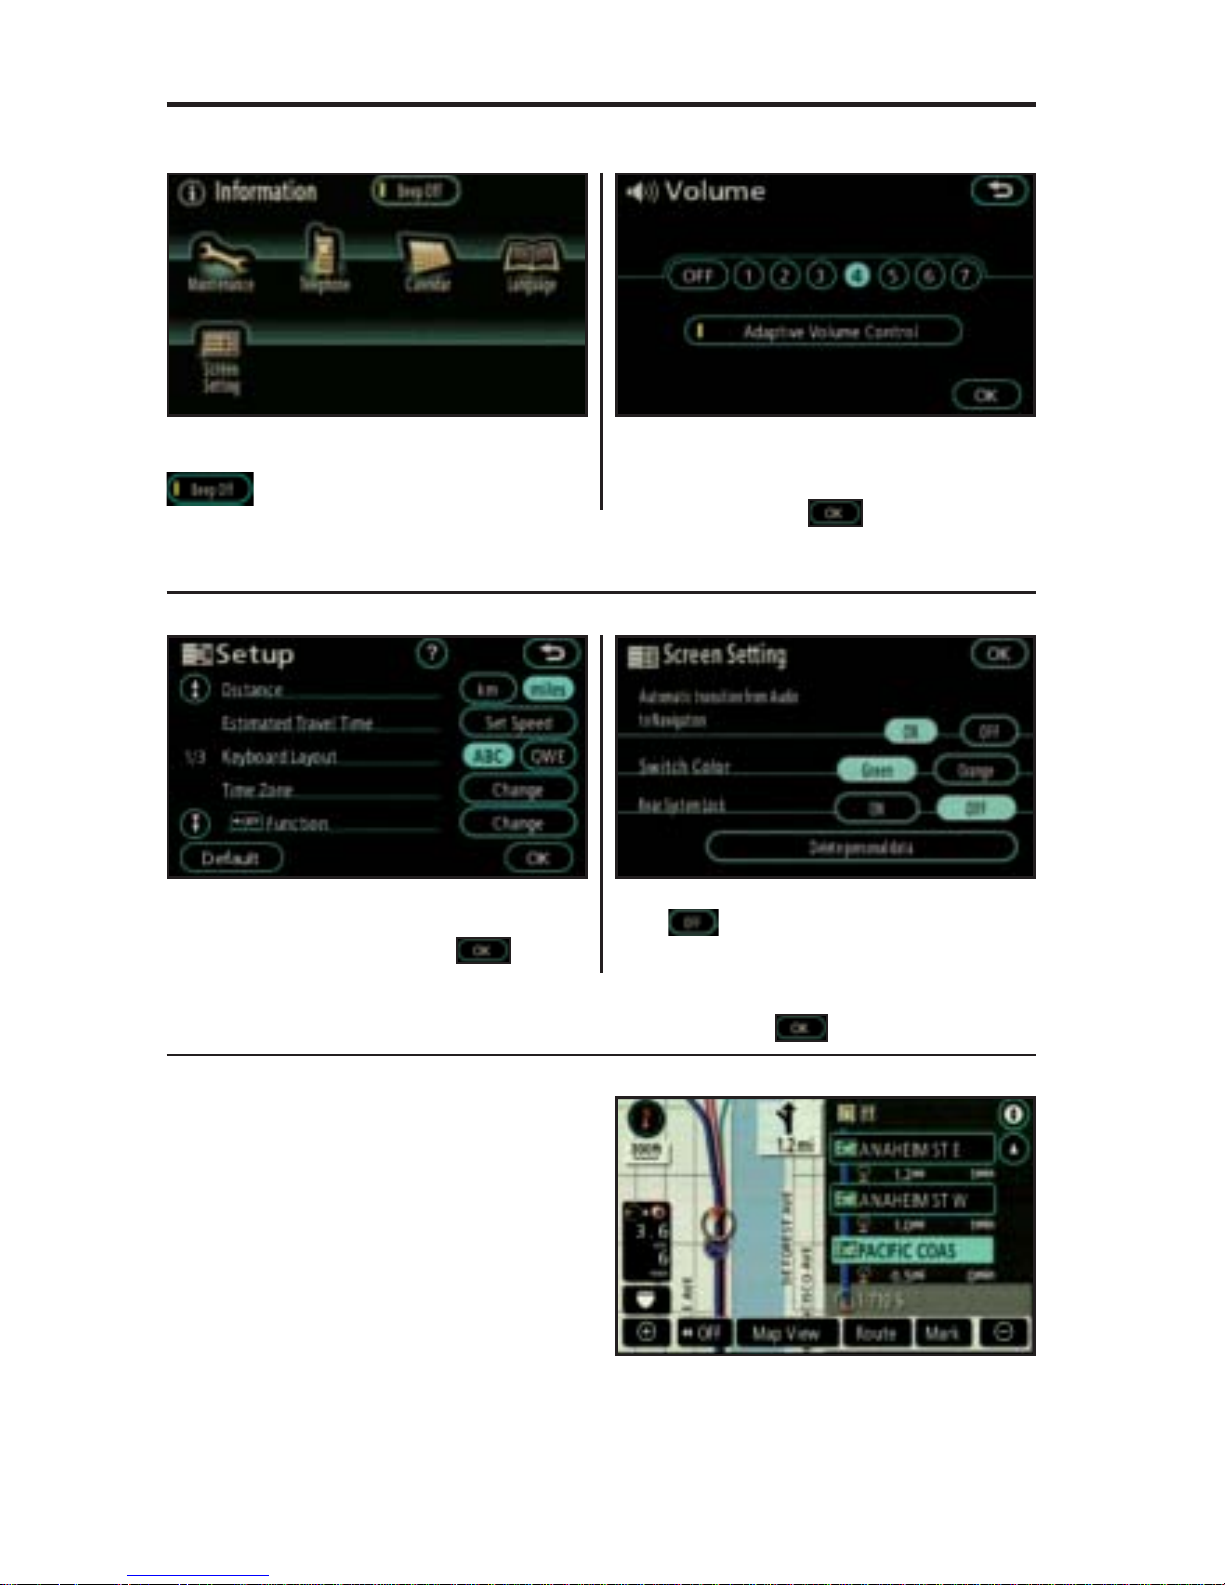
KEYBOARD SETTING
PRESS MENU > SETUP
Set the layout of the keyboard as alphabetical or
standard QWERTY keyboard. Touch to
confi rm your selection.
PRESS MENU > VOLUME
The Volume feature allows for the adjustment of
the voice guidance commands. Touch the desired
volume level and touch
to confi rm your
selection.
BEEP SETTING VOLUME SETTING
PRESS INFO > BEEP OFF
Switch off the confi rmation tone by touching
at the top of the screen. When the
yellow bar appears this feature has been disabled.
FREEWAY EXIT INFO MODE*
During Route Guidance on a Freeway or Toll
Road, a variety of points of interest such as Gas
Stations, Restaurants or Hotels can be viewed
during your trip.
To access this feature, select Freeway Exit Info
Mode from the Screen Preferences. Upcoming
freeway exits will be listed by the number or
name along with the POIs in the vicinity of the
exit ramp. Select the desired exit from the list to
see the POIs at that particular exit.
* This feature is only available while in Route Guidance and travelling on a freeway or Toll Road.
SCREEN TRANSITION
PRESS INFO > SCREEN SETTING
Touch to prevent the system from reverting
to the map display. Once the screen transition is
switched off, the audio or climate control screen
(if equipped) will remain without reverting to the
map display. Touch to confi rm your selection.
Page 18
17
ADDITIONAL NAVIGATION FEATURES
OPERATION OF YOUR VEHICLE EMERGENCY SCREEN
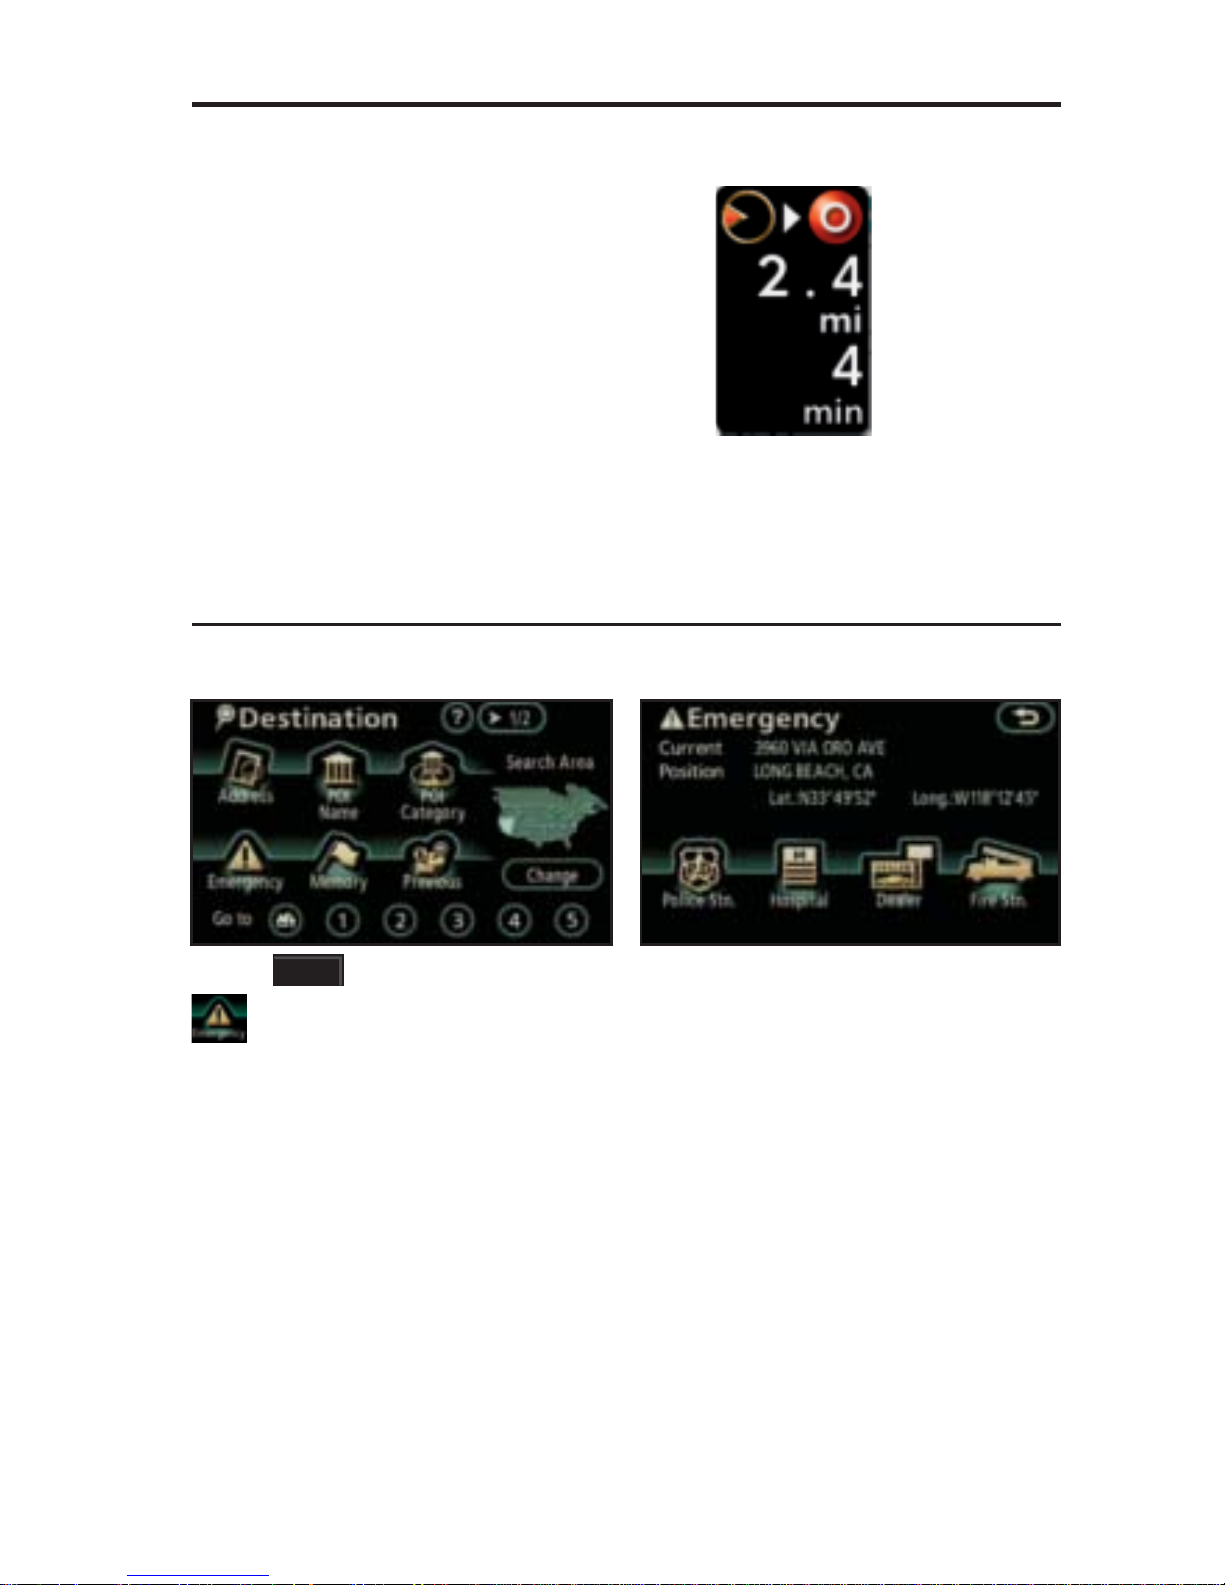
ESTIMATED DISTANCE AND TIME*
The navigation system will provide an estimate
of the distance and time to the destination
based upon the suggested route during
guidance. The system automatically calculates
the remaining miles until you arrive at the
destination. Based upon the distance traveled,
the system will also provide an estimated time
until arriving at your destination.
The system can be customized to match
your driving habits. To adjust the speed for
residential, main streets or freeways please
refer to the Navigation Owner’s Manual for a
complete description of this feature.
* The system does not account for traffi c
signals or traffi c fl ow.
Once selected, the system will provide a list of
locations sorted by distance. If the vehicle is in
motion, the system will route you to the nearest
location automatically.
Press the
DEST
panel button followed by
to access four emergency destinations:
• Police Stn. • Hospital • Dealer • Fire Stn. Touch
the desired destination.
 Loading...