

Page 1
Page 2
2005 Land Cruiser
This Pocket Reference Guide is a summary
guide for basic vehicle operations. It contains
brief descriptions of fundamental operations
so you can locate and use the vehicle’s main
equipment quickly and easily.
The Pocket Reference Guide is not intended
as a substitute for the Owner’s Manual
located in the vehicle’s glove box. We
strongly encourage you to review the
Owner’s Manual and supplementary manuals
so you will have a better understanding of
the vehicle’s capabilities and limitations.
Your dealership and the entire staff of Toyota
Motor Sales, U.S.A., Inc., wish you many
years of satisfied driving in your new Land
Cruiser.
A word about safe vehicle operations
!
This Pocket Reference Guide is not a full
guide to Land Cruiser operations. Every
Land Cruiser owner should review the
Owner’s Manual that accompanies this
vehicle.
Pay special attention to the boxed
information highlighted in yellow
throughout the
contains safe operating instructions to
help you avoid injury or equipment
malfunction.
Utility vehicles have a significantly higher
rollover rate than other types of vehicles. See
page 24 in this guide for important rollover
information.
All information in this
is current at the time of printing.
Guide
Toyota reserves the right to make changes
at any time without notice.
Owner’s Manual. Each box
Pocket Reference
Page 3

TABLE OF CONTENTS
Item Page no.
OVERVIEW
Clock 6
Engine compartment 7
Fuel tank door opener and cap 6
Hood release lever 6
Indicator symbols 4-5
Instrument cluster 4-5
Instrument panel 2-3
Light control-Instrument panel 7
FEATURES/OPERATIONS
Air conditioning/Heating 18-19
Antenna-Power 12
Audio 16-17
Auto lock functions-Programmable
Automatic transmission 8
Cruise control 14
Cup holders 20
Engine immobilizer 19
Four-wheel drive 9
Garage door opener (HomeLink®)
Keyless entry
2
Lights2& turn signals 12
Moonroof 15
Parking brake 13
Power outlets 20
Seat adjustments-Front 11
Seat adjustments-Rear 11
Seats-Head restraints 11
Tilt and telescopic steering wheel 10
Wiper & washer lever-Front/Rear 13
Windows 14
Windows-Power rear quarter 15
SAFETY AND EMERGENCY FEATURES
ATRAC (Active Traction Control) 22
Airbag-Supplemental Restraint System 23
Door locks 21
Doors-Child safety locks 21
Rollover Information 24
Seat belts 21
Seat belts-Shoulder belt anchor 22
Spare tire & tools 25
VSC (Vehicle Stability Control) 22
1, 2
3
OVERVIEW FEATURES/OPERATIONS
9
15
10
SAFETY AND EMERGENCY FEATURES
1
Programmable by consumer.
2
Visit your Toyota dealer for information on
customizing this feature.
3
HomeLink®is a registered trademark of Johnson Controls, Inc.
1
Page 4
OVERVIEW
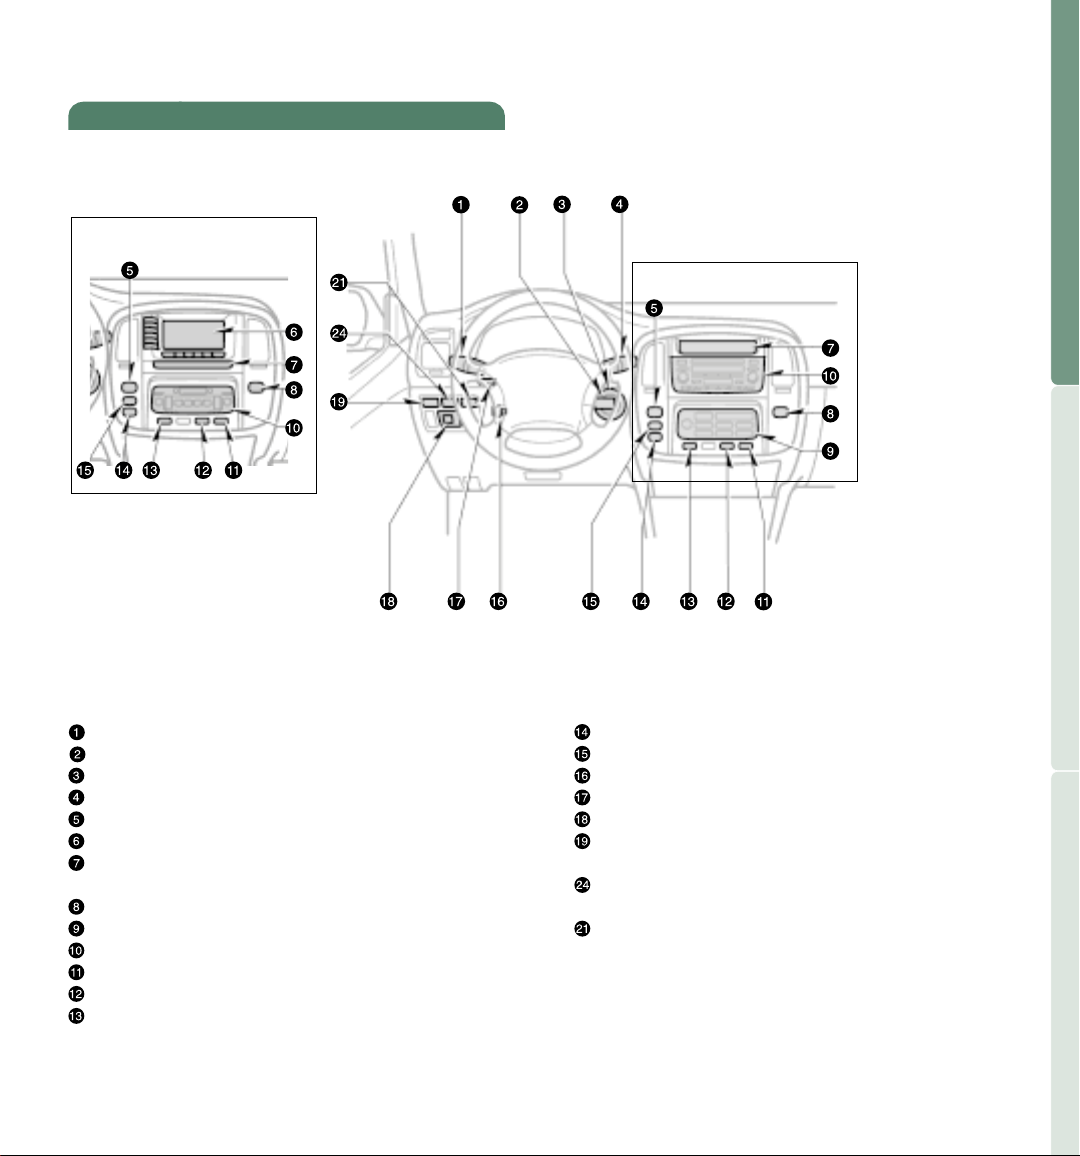
Instrument panel
OVERVIEW FEATURES/OPERATIONS
With navigation system
1
Headlight, turn signal and front fog light controls
Cruise control lever
Ignition switch
Front/Rear wiper and washer controls
Emergency flasher switch
Navigation system and A/C controls
1,2
Clock, outside temperature and trip information
display
Front passenger’s seat belt reminder light
Air conditioning/Heater controls
Audio
Outside rear view mirror heater switch
Rear air conditioning switch
Rear window defogger switch
Center differential lock switch
Power antenna switch
Power tilt and telescopic steering switch
Instrument panel light control dial
Power rear view mirror controls
Power quarter window switch
(left-hand side)
Power quarter window switch
(right-hand side)
“RSCA OFF” (Roll sensing of curtain shield airbags
“OFF”) switch
1
If installed
2
For details, refer to the Navigation System
1
Owner’s Manual.
SAFETY AND EMERGENCY FEATURES
2
3
Page 5
OVERVIEW
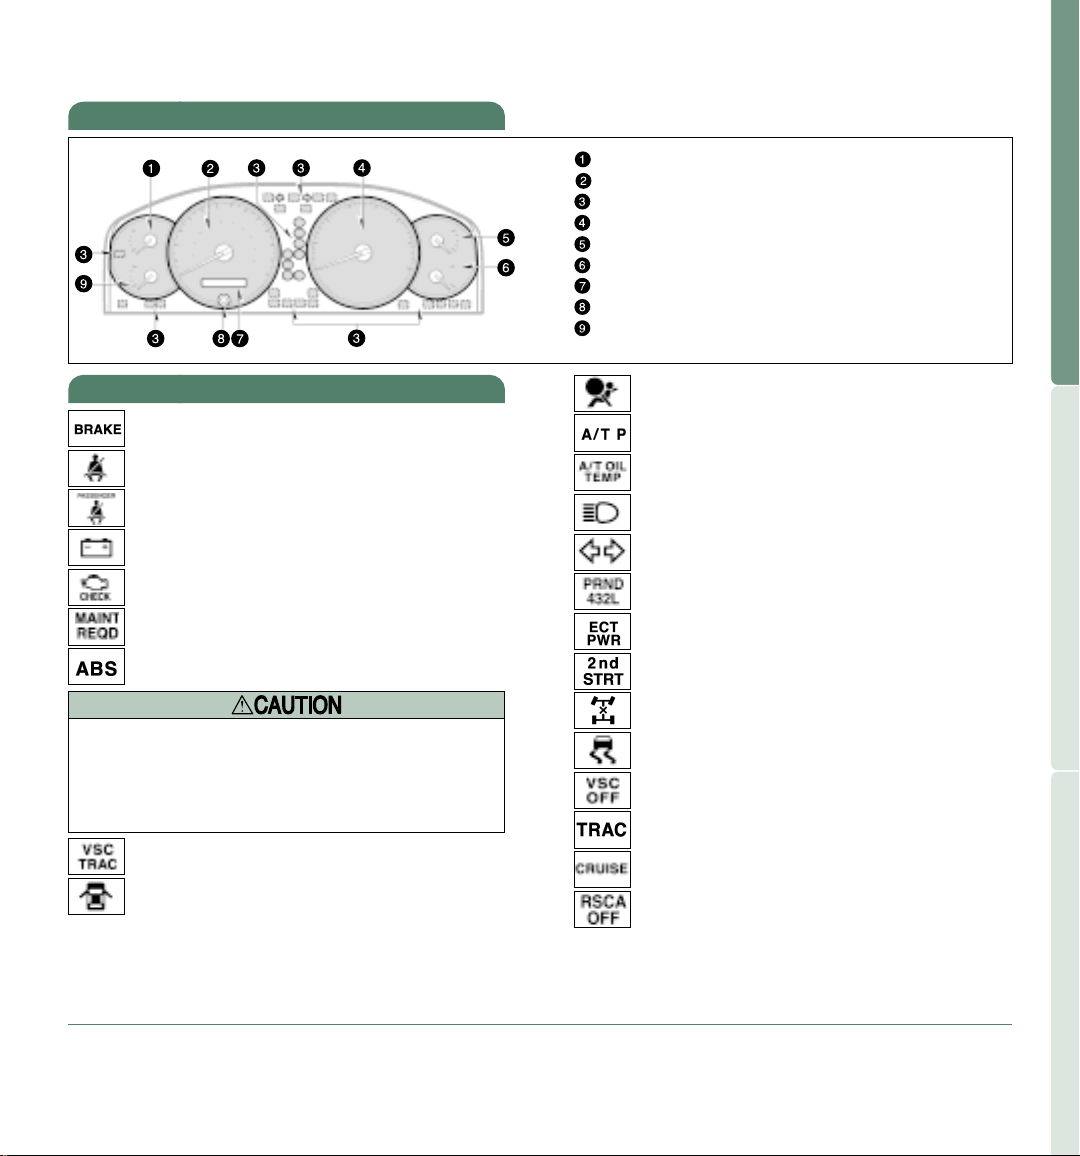
Instrument cluster
Indicator symbols
Brake system warning light
Driver’s seat belt reminder light
Front passenger’s seat belt reminder light
Battery warning light
Malfunction indicator light
Engine oil replacement reminder light
Anti-lock Brake System warning light
When the Anti-lock Brake System (ABS) function is in
action, you may feel the brake pedal pulsating and
hear a noise. In this situation, to let the Anti-lock
Brake System work for you, just hold the brake pedal
down more firmly. Do not pump the brake as this will
result in reduced braking performance.
Vehicle Stability Control/Active Traction
Control warning light
Open door warning light
1
1
1
1
1
1
1
1
Voltmeter
OVERVIEW FEATURES/OPERATIONS
Speedometer
Service reminder indicators and indicator lights
Tachometer
Engine oil pressure gauge
Engine coolant temperature gauge
Odometer and two trip meters
Trip meter reset knob
Fuel gauge
Airbag SRS warning light
Unengaged “Park” warning light
Automatic transmission fluid temperature
warning light
1
Headlight high beam indicator light
1
1
1
Turn signal indicator light
Automatic transmission indicator lights
Driving pattern (“POWER” mode) indicator
light
Automatic transmission second start indicator
light
Center differential lock indicator light
Slip indicator light
Vehicle Stability Control off indicator light
Active Traction Control indicator light
Cruise control indicator light
Roll sensing of curtain shield airbags off
indicator light
3
2
SAFETY AND EMERGENCY FEATURES
1
For details, refer to “Service reminder indicators and warning
buzzers,” Section 1-6, 2005 Owner’s Manual.
2
If this light flashes, refer to “Cruise control,” Section 1-7, 2005
Owner’s Manual.
4
3
For details, refer to “Roll sensing of curtain shield airbags off
switch,” Section 1-3, 2005 Owner’s Manual.
5
Page 6
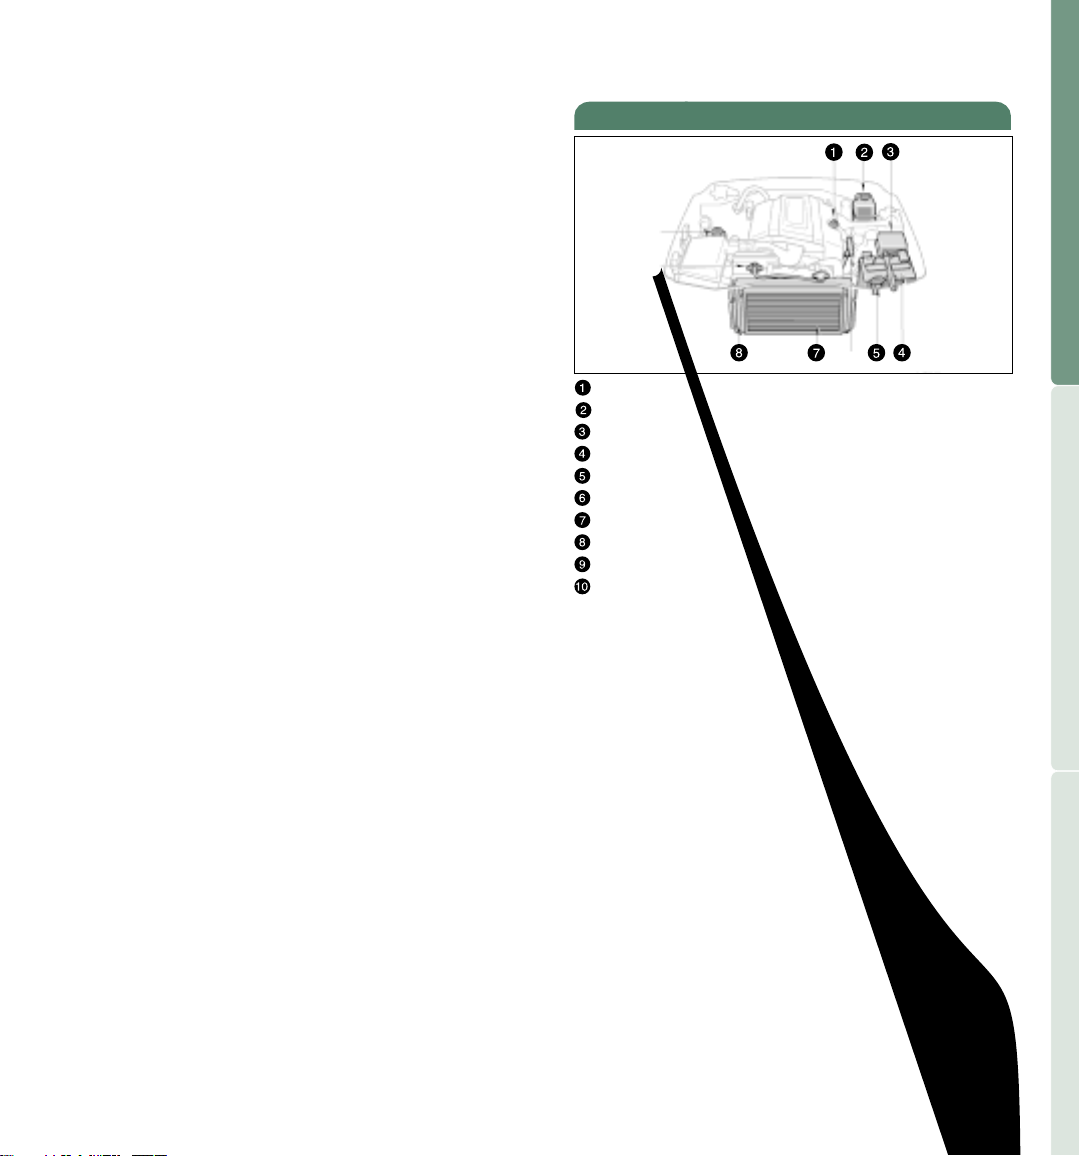
Engine compartment
Engine oil filler cap
Brake fluid reservoir
Fuse block
Battery
Windshield and rear window washer fluid tank
Engine oil level dipstick
A/C condenser
Radiator
Engine coolant reservoir
Power steering fluid reservoir
Note: Regularly scheduled maintenance, including
oil changes, will help extend the life of
your vehicle and maintain performance.
Please refer to the “Owner’s Warranty
Information Booklet,” “Scheduled
Maintenance Guide” or “Owner’s Manual
Supplement.”
OVERVIEW FEATURES/OPERATIONS
SAFETY AND EMERGENCY FEATURES
7
Page 7
N
L
FEATURES/OPERATIONS
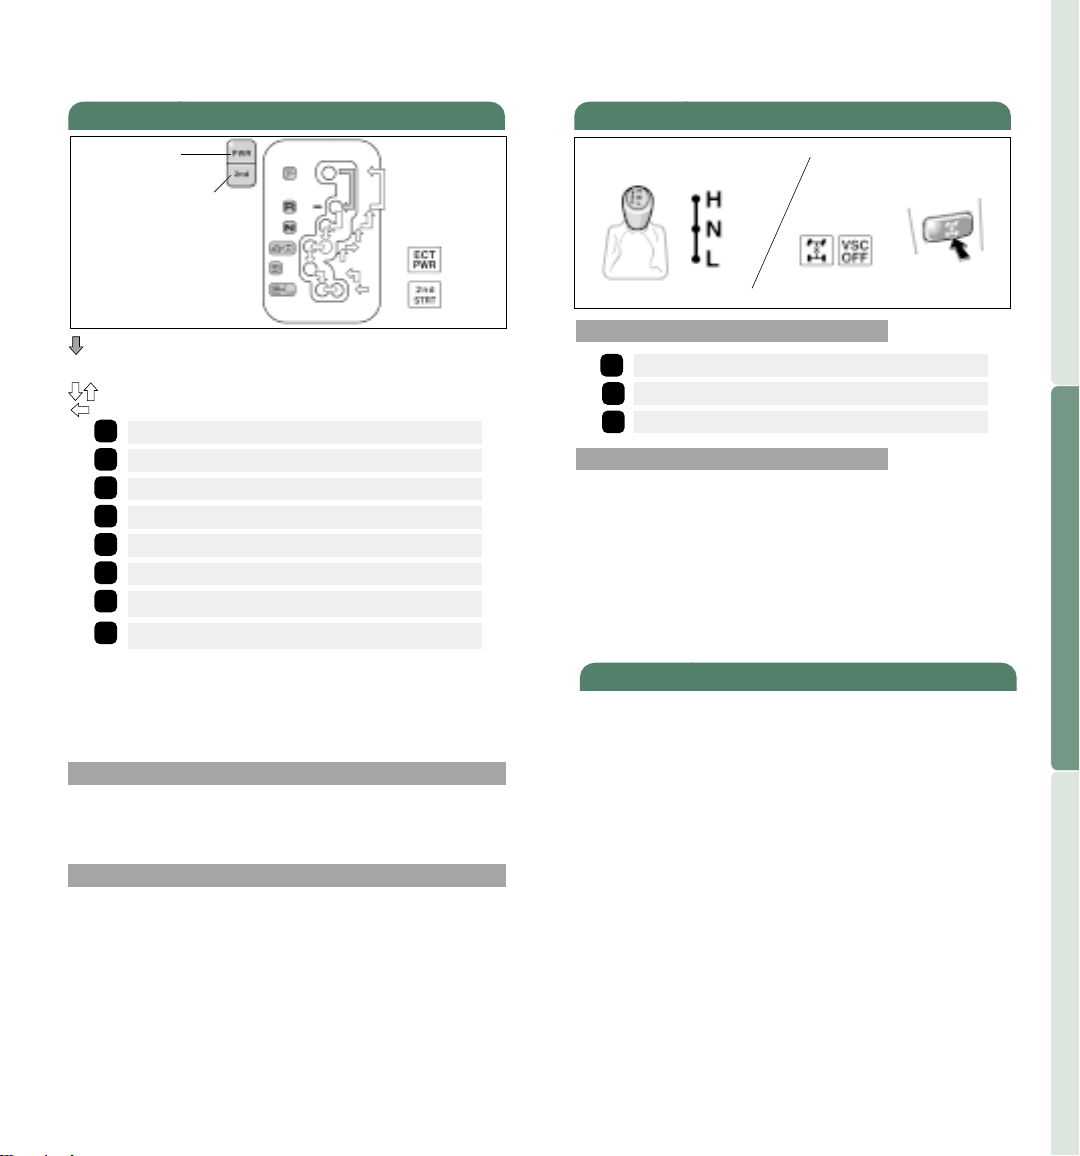
Automatic transmission
Drive pattern
selector button
Second start mode
selector button
Indicator lights
When shifting from “P” (Park), the ignition switch
must be “ON,” and the brake pedal depressed.
Shift normally.
Park Engine starting and key removal
P
Reverse
R
Neutral
N
Drive Overdrive “ON”
D
Fourth gear Overdrive “OFF”
4
Third gear
3
2
Second gear Increased engine braking
L
First gear Maximum engine braking
*Downshifting increases power going uphill, or
provides engine braking going downhill. For best fuel
economy during normal driving conditions, always
drive with the shift lever in the “D” position.
Second start mode selector button “2nd”
For starting in sand, mud, ice or snow Depress the
brake, then push “2nd” to start the vehicle in second
gear.
Driving pattern selector button “PWR”
The transmission is shifted up and down at a higher
vehicle speed than in Normal mode, and a more
powerful acceleration is achieved. For ordinary
driving, Toyota recommends using the Normal mode
to improve fuel economy.
Increased engine braking
Four-wheel drive
Four-wheel drive
control lever
Indicator lights
Four-wheel drive control lever
High speed position
H
Neutral position
Low speed position
Center differential lock button
To turn the center differential lock mode on/off
Push the button.
For best fuel economy and performance under
normal driving conditions “H” position, center
differential unlocked (Center differential lock and
“VSC OFF” indicator lights are not illuminated).
Refer to the Owner’s Manual for more details.
Center differential
lock button
Auto lock functions-Programmable
Automatic door locks can be programmed to operate
in 4 different modes.
Auto shift-locking only Doors lock when shifting
from Park. No unlock function.
Auto speed-locking only Doors lock when the
vehicle speed goes above about 12 mph. No unlock
function.
Auto ignition-unlocking only Doors unlock when
ignition key turned to the “ACC” or “LOCK”
position. No lock function.
Auto shift-unlocking only Doors unlock when
shifting into Park. No lock function.
Refer to the Owner’s Manual for more information
on this feature, and how to change modes.
OVERVIEW FEATURES/OPERATIONS
SAFETY AND EMERGENCY FEATURES
8
9
Page 8
FEATURES/OPERATIONS
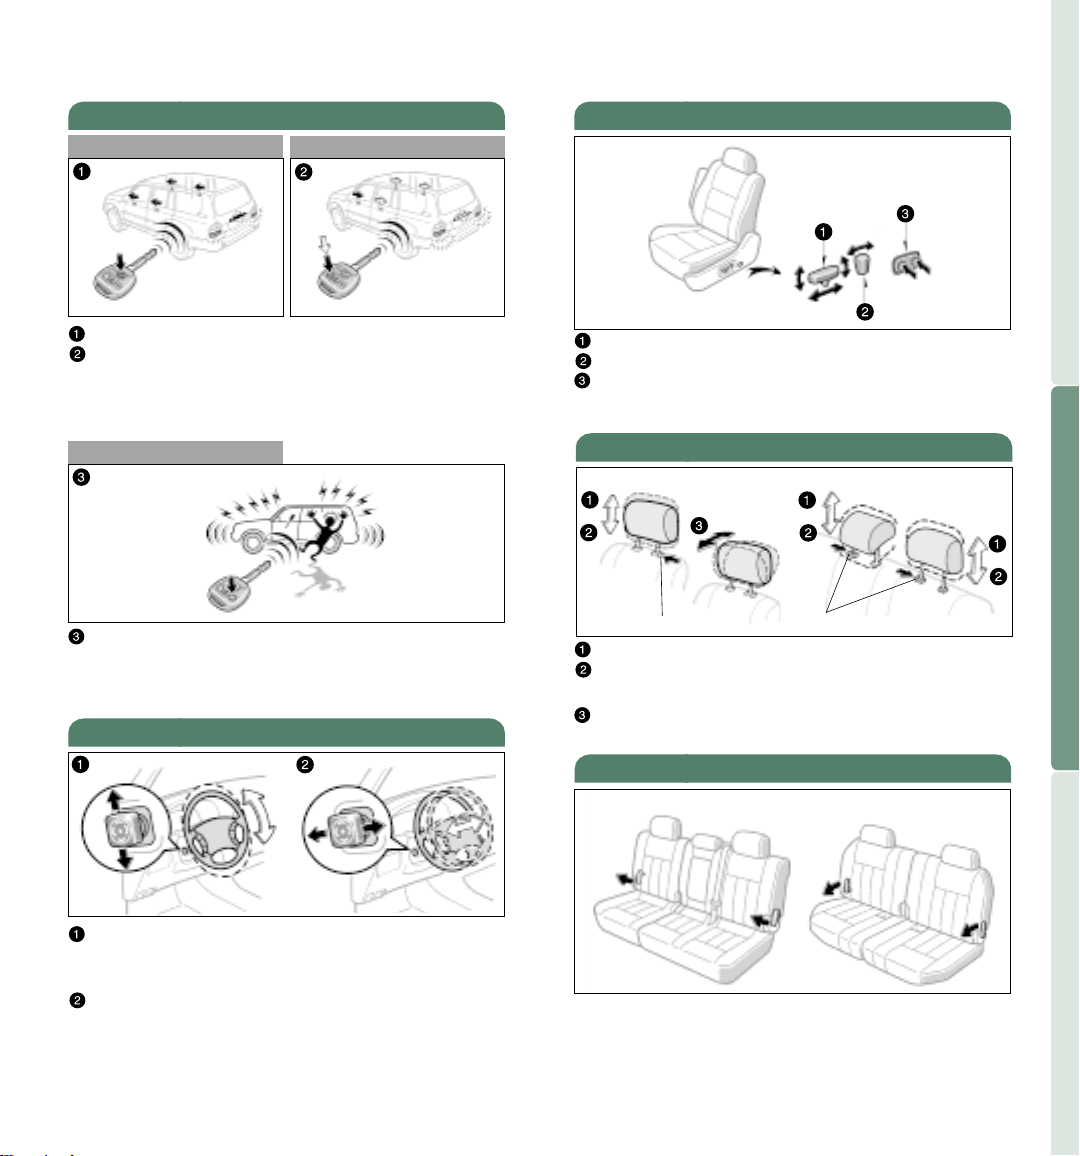
Keyless entry
Locking operation
To lock Push “LOCK.”
To unlock driver door Push “UNLOCK” once.
To unlock all the doors Push “UNLOCK” twice.
NOTE: After unlocking, if a door is not opened within
thirty (30) seconds, all doors will relock for safety.
Alarm operation
To activate alarm with remote Push and hold
“PANIC.”
Refer to the Owner’s Manual for more details.
Unlocking operation
Tilt and telescopic steering wheel
Seat adjustments-Front
OVERVIEW FEATURES/OPERATIONS
Position and cushion angle selector
Seatback angle selector
Lumbar support selector
Refer to the Owner’s Manual for more details.
Seats-Head restraints
Rear seatsFront seats
Lock release button Lock release buttons
To raise Pull up the head restraint.
To lower Push down the head restraint while
pressing the lock release button.
To adjust angle Move the top forward or
backward.
To change the steering wheel angle Push the
control switch upward or downward to set the
steering wheel to desired angle.
To change the steering wheel column length
Push the control switch to the right or left to set
the wheel at the desired position.
Note: Do not attempt to adjust while the vehicle
is in motion.
10
Seat adjustments-Rear
Second row seat Third row seat
SAFETY AND EMERGENCY FEATURES
To fold and/or tumble Pull the seatback angle lever.
Refer to the Owner’s Manual for more details.
11
Page 9
FEATURES/OPERATIONS
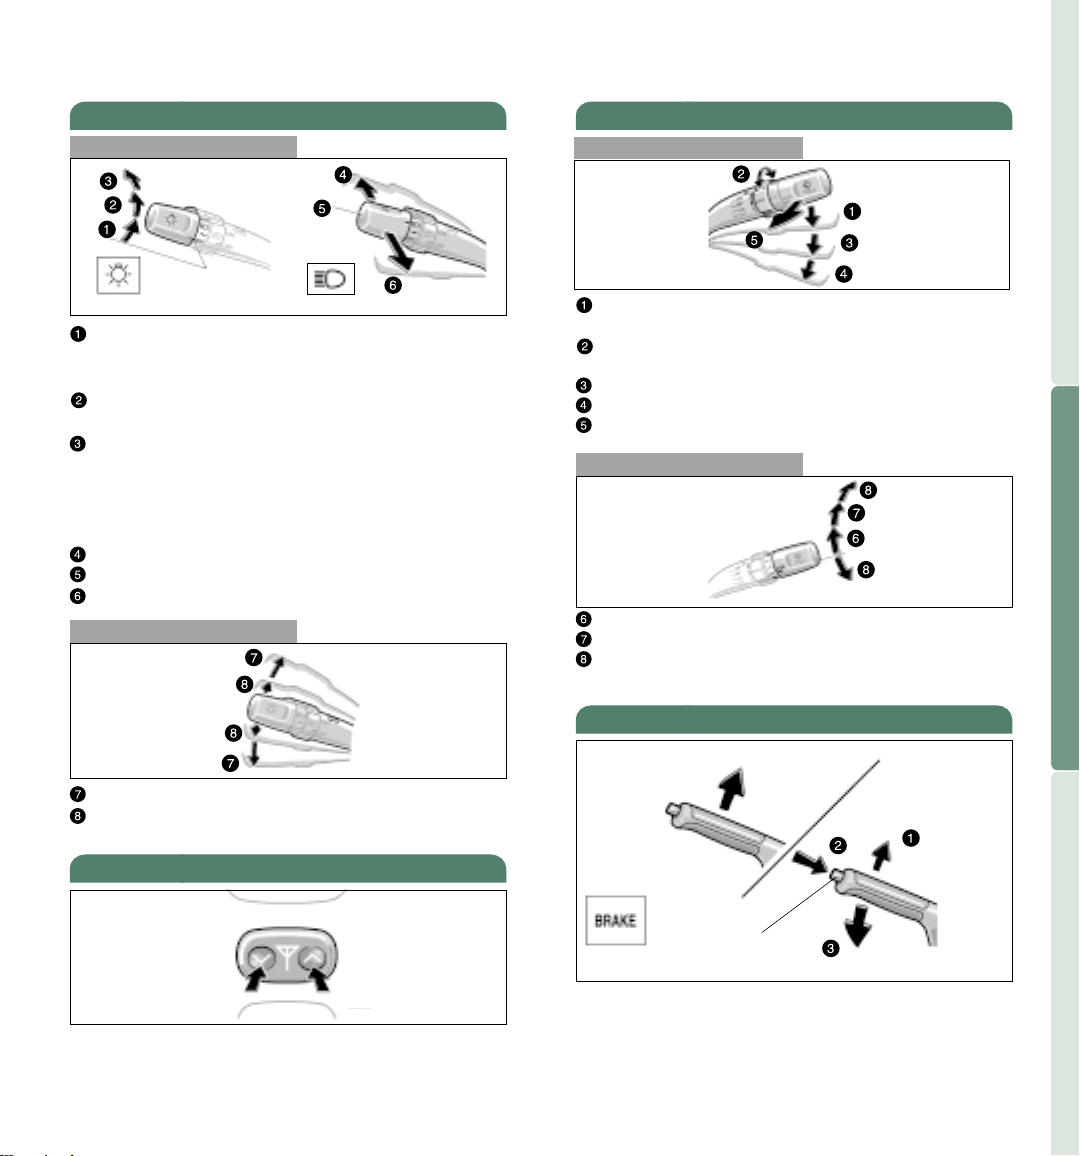
Lights & turn signals
Headlights
Indicator light
Parking, tail, license plate, side marker and
instrument panel lights Twist the lever knob to
position 1.
Headlights and all of the above Twist the lever
knob to position 2.
Headlights and/or all of the above (“AUTO”)
Twist the lever knob to position 3.
Daytime running light system
Automatically turns on the headlights at reduced
intensity.
High beams Push the lever forward.
Low beams
High beam flasher Pull the lever toward you.
Turn signals
Indicator light
Wiper & washer lever-Front/Rear
Front operation
Intermittent speed Push the lever down to
position 1.
Interval adjuster Twist the band to adjust the
intermittent speed.
Slow speed Push the lever down to position 3.
Fast speed Push the lever down to position 4.
Wash and wipe Pull the lever toward you.
Rear operation
Intermittent Twist the lever knob to position 6.
Normal speed Twist the lever knob to position 7.
Wash and wipe Twist the lever knob upward or
downward to position 8.
OVERVIEW FEATURES/OPERATIONS
Right or left turn Push the lever up or down.
Lane change Move the lever up or down to
position 8 and hold.
Antenna-Power
Down
To raise Push and hold “ .”
To lower Push and hold “ .”
See page 3 of this guide for switch location.
12
Up
>
>
Parking brake
Lock release
Indicator light
To set Pull the lever.
To release (1) Pull the lever up slightly, (2) press
the lock release button, and (3) lower.
button
13
SAFETY AND EMERGENCY FEATURES
Page 10
FEATURES/OPERATIONS
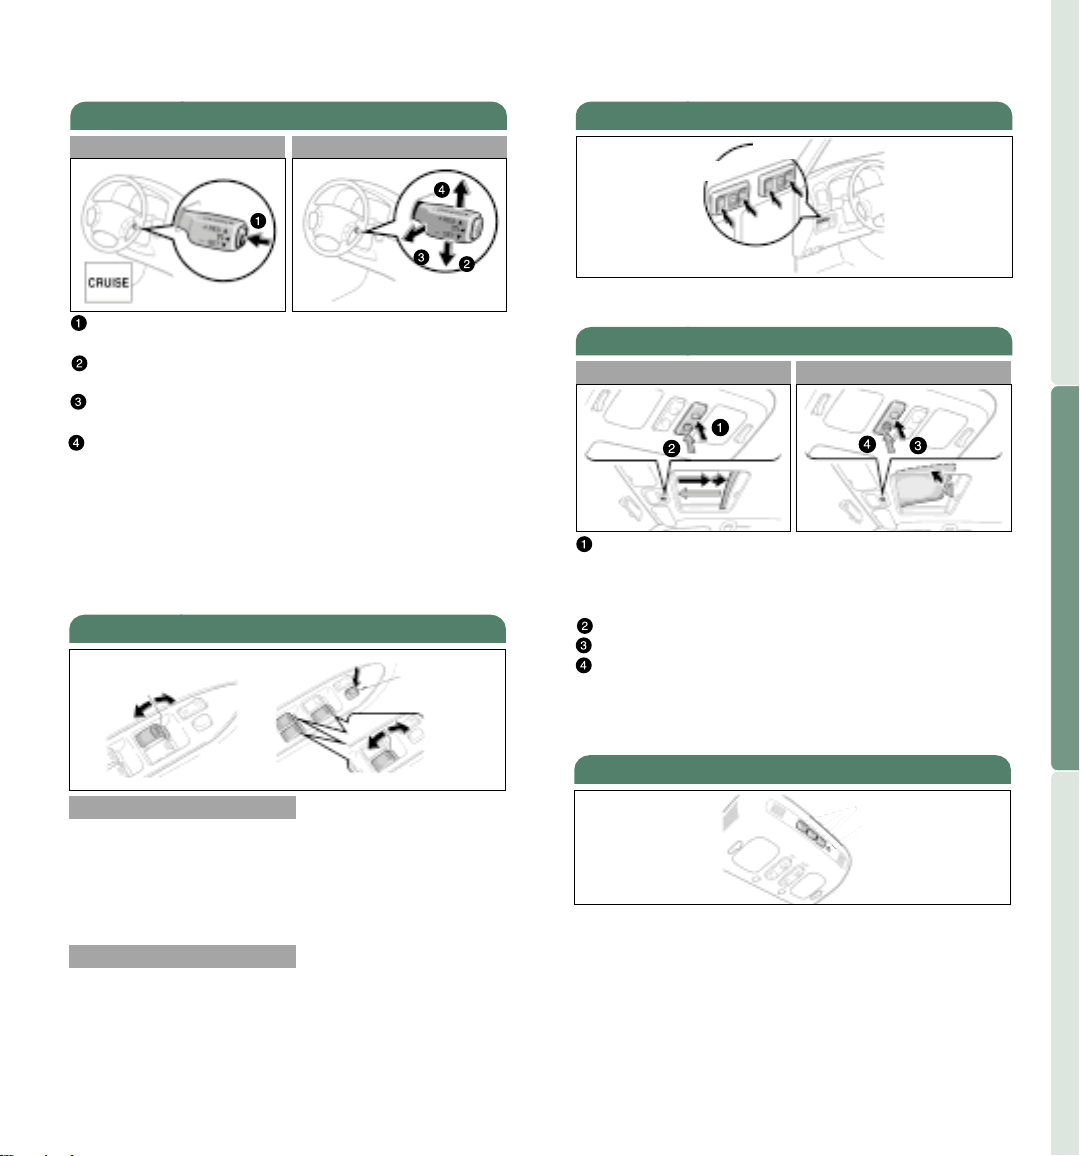
Cruise control
Turning system on/off Setting a speed
Indicator light
To turn the system “ON” or “OFF” Push the
button.
To set a speed Bring your vehicle to the desired
speed. Push the lever down toward “- SET.”
To cancel the set speed Pull the lever to “CANCEL”
or depress the brake pedal.
To resume set speed after cancel Push the lever
up toward “+ RES.” If vehicle speed falls below
25 mph, the set speed will not be resumed.
NOTE: To raise set speed, push up toward “+RES.” To
lower set speed, push down toward “-SET.”
Refer to the Owner’s Manual for more details.
Windows
Driver side
Window lock
switch
Windows-Power rear quarter
Right
Left
To open Push the right side of the switch.
To close Push the left side of the switch.
Moonroof
Sliding operation
To open Push and hold “ .” Moonroof will open
and stop just short of the fully open position
Toyota recommends this position for driving, as it
reduces wind throb. Push again to fully open.
To close Push and hold “ .”
To tilt up Push and hold “UP.”
To lower Push and hold the opposite side of “UP.”
NOTE: If battery is disconnected, the moonroof needs
to be reinitialized. Refer to the Owner’s Manual for
more details.
Tilting operation
>
>
Garage door opener (HomeLink®)*
OVERVIEW FEATURES/OPERATIONS
Window operation
To open or close Push down or pull up on the switch.
Automatic operation Push the switch completely
down or pull it completely up and release to fully
open or close. To stop window mid-way, lightly push
the switch in the opposite direction.
Window lock switch
Push the switch to deactivate the passenger windows.
14
Garage door openers manufactured under license
from HomeLink
garage doors, estate gates, security lighting, etc.
Refer to the Owner’s Manual for more details.
For programming assistance, contact the Toyota
Customer Experience Center at 1-800-331-4331, or
visit http://www.homelink.com
*HomeLink®is a registered trademark of Johnson Controls, Inc.
®
* can be programmed to operate
15
SAFETY AND EMERGENCY FEATURES
Page 11
FEATURES/OPERATIONS
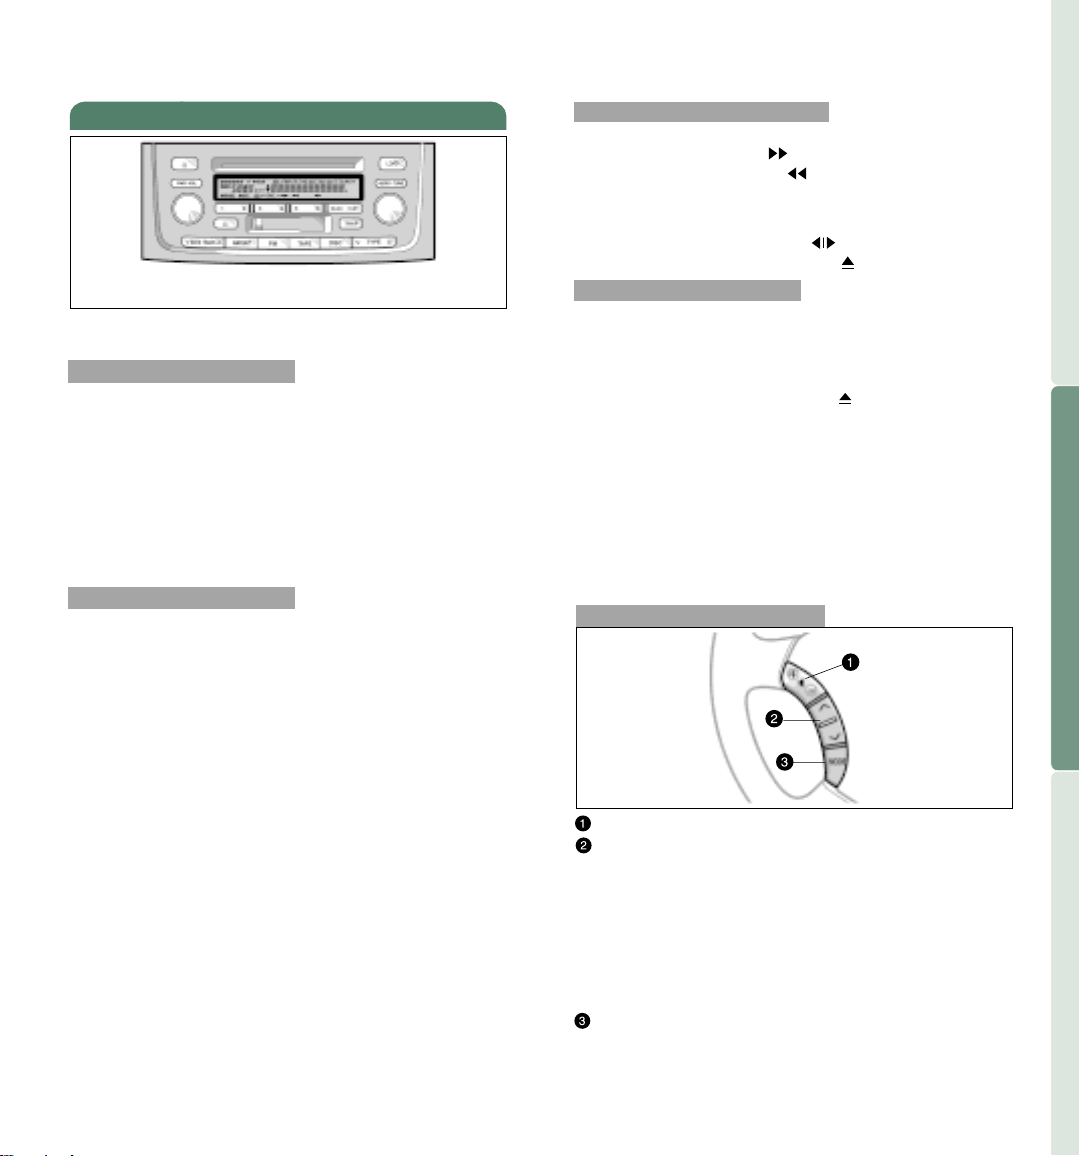
Audio
*Functions for buttons 1-6 are indicated above each
button on LCD.
For vehicle equipped with Navigation system, refer
to the Navigation System Owner’s Manual.
BASIC OPERATION
To turn on the audio system Push “PWR.VOL,”
“AM·SAT,” “FM,” “TAPE,” “DISC” or “LOAD.”
To turn off the system Push “PWR.VOL.”
To adjust the volume Turn “PWR.VOL.”
To adjust tone and balance Push the “TUNE.AUDIO
CONT” knob. The mode changes with each push in
succession from Bass, Midrange, Treble, Fade,
Balance. Turn the knob right or left to adjust each
mode.
RADIO
To select a station or XM satellite radio channel*
Push either side of “SEEK TRACK.”
To scan stations or XM satellite radio channel* Push
“SCAN.” Push and hold to scan preset stations. Push
again to hold selection.
To select the band or XM satellite radio channel*
Push “AM·SAT,” or “FM.”
-To preset a station or XM satellite radio channel*
Tune in the desired station and press a preset button
(1-6) until you hear a beep.
-To select a preset station or XM satellite radio
channel* Push desired preset button (1-6).
-To select a XM satellite radio channel category*
Push “TYPE” button.
RDS (Radio Data System-FM only) or XM satellite
radio*
-Push TYPE “ ” or “ ” to view current program
genre. Push again within 6 seconds to select new
genre.
-Push “SEEK/TRACK” or “SCAN” to find same genre
programs.
-Push “TEXT” to receive information transmitted
from radio stations.
>
>
16
CASSETTE TAPE PLAYER
To play Insert a cassette tape.
To fast forward Push “ .”
To rewind Push button “ .”
To stop a tape while it is fast forwarding or
rewinding, push the same button or “TAPE.”
To select a direction Push “ .”
To eject a cassette tape Push “ .”
CD PLAYER
To play Insert a compact disc.
To select a track Push “SEEK TRACK.”
To scan tracks on a disc Push “SCAN.” Push again to
hold selection.
To eject a compact disc Push “ .”
To view CD text Push “TEXT” to display disc
information.
CD Changer
-To load one disc Push “LOAD” and insert 1 disc.
-To load multiple discs Push and hold “LOAD” until
you hear a beep. Insert one disc.
Note: Wait until the green indicator illuminates to
install next disc.
Steering wheel switches
Volume control switch
>
“ ” switch
>
-In radio mode Push to select a preset station or
XM satellite radio channel*, push and hold to seek
the next strong station or XM satellite radio
channel*.
-In TAPE mode Push to fast forward or rewind.
-In CD mode Push to skip up or down to the next
or previous track.
“MODE” switch Push to select an audio mode.
Push and hold to turn the audio system “OFF.”
Refer to the Owner’s Manual for more details.
*If installed
17
OVERVIEW FEATURES/OPERATIONS
SAFETY AND EMERGENCY FEATURES
Page 12
FEATURES/OPERATIONS
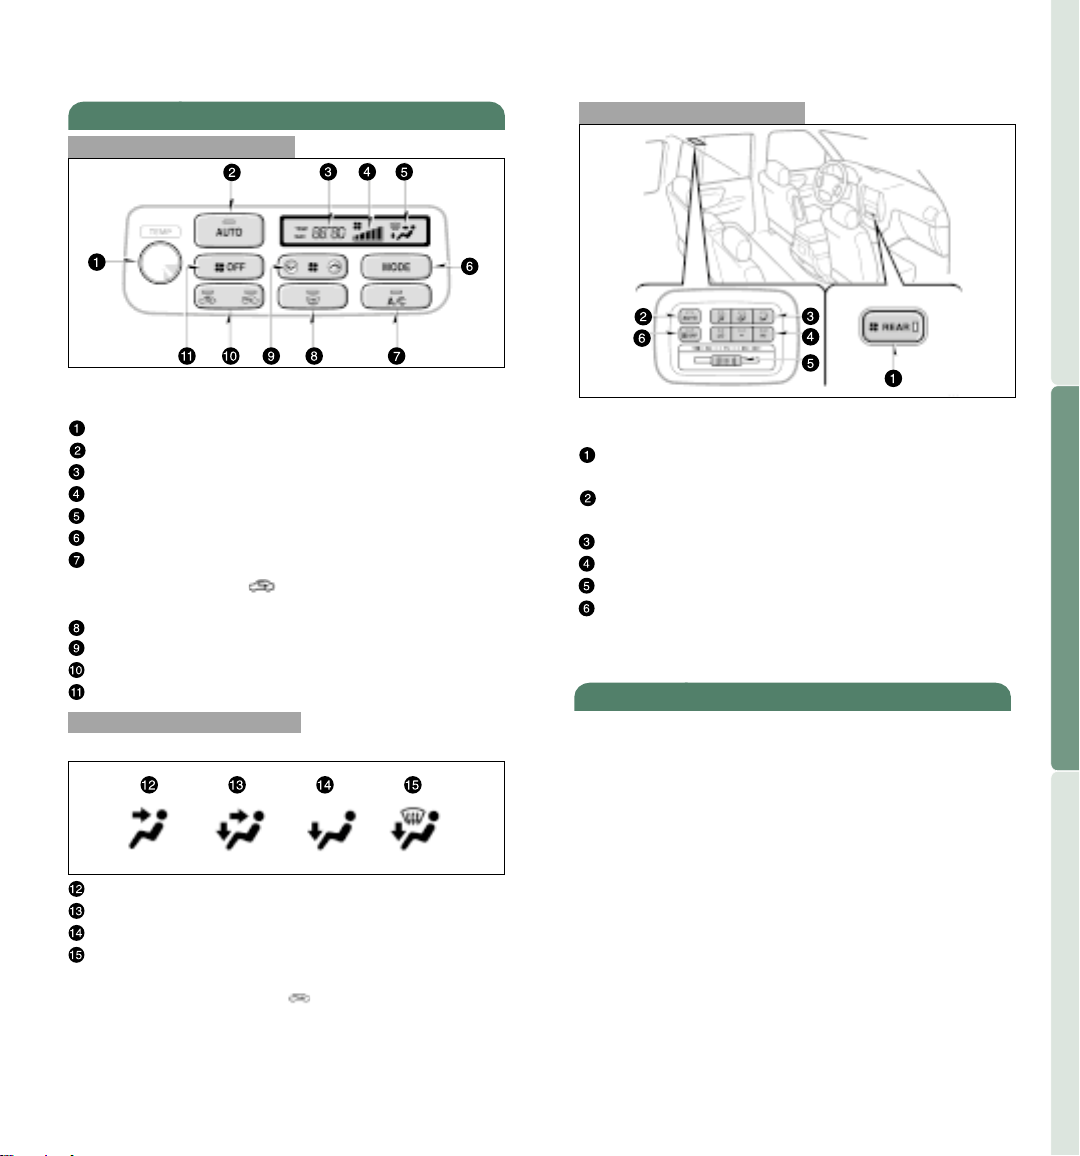
Air conditioning/Heating
Front
For vehicle equipped with Navigation system, refer
to the Navigation System Owner’s Manual.
Temperature selector
“AUTO” switch
Temperature display
Fan speed display
Air flow display
“MODE” button Air flow selector.
“A/C” switch Air conditioning system on/off
switch. Use with “ ” for best cooling
performance.
Windshield air flow button
Fan speed selector
Air intake selector
“OFF” switch Air conditioning off switch.
To select air flow vents
Push “MODE” to select one of the following:
Instrument panel
Floor and panel
Floor
Floor and windshield
1
Rear
OVERVIEW FEATURES/OPERATIONS
For vehicle equipped with Navigation system, refer
to the “Navigation System Owner’s Manual.”
“REAR” switch Rear air conditioning system
on/off switch.
“AUTO” switch Push to turn automatic air
conditioning on/off.
Air flow selector
Fan speed selector
Temperature selector
“OFF” switch Rear air conditioning system
on/off switch.
Refer to the Owner’s Manual for more details.
Engine immobilizer
This is a theft deterrent system. The engine will
start only when the electronic code in the key’s
transponder chip corresponds to the registered ID
code for the vehicle. Please note that key
replacement can be expensive. Refer to the Owner’s
Manual for more details.
SAFETY AND EMERGENCY FEATURES
1
Use fresh air mode (“ ” indicator light
“ON”) to reduce window fogging.
18
19
19
Page 13
FEATURES/OPERATIONS
SAFETY AND
EMERGENCY FEATURES
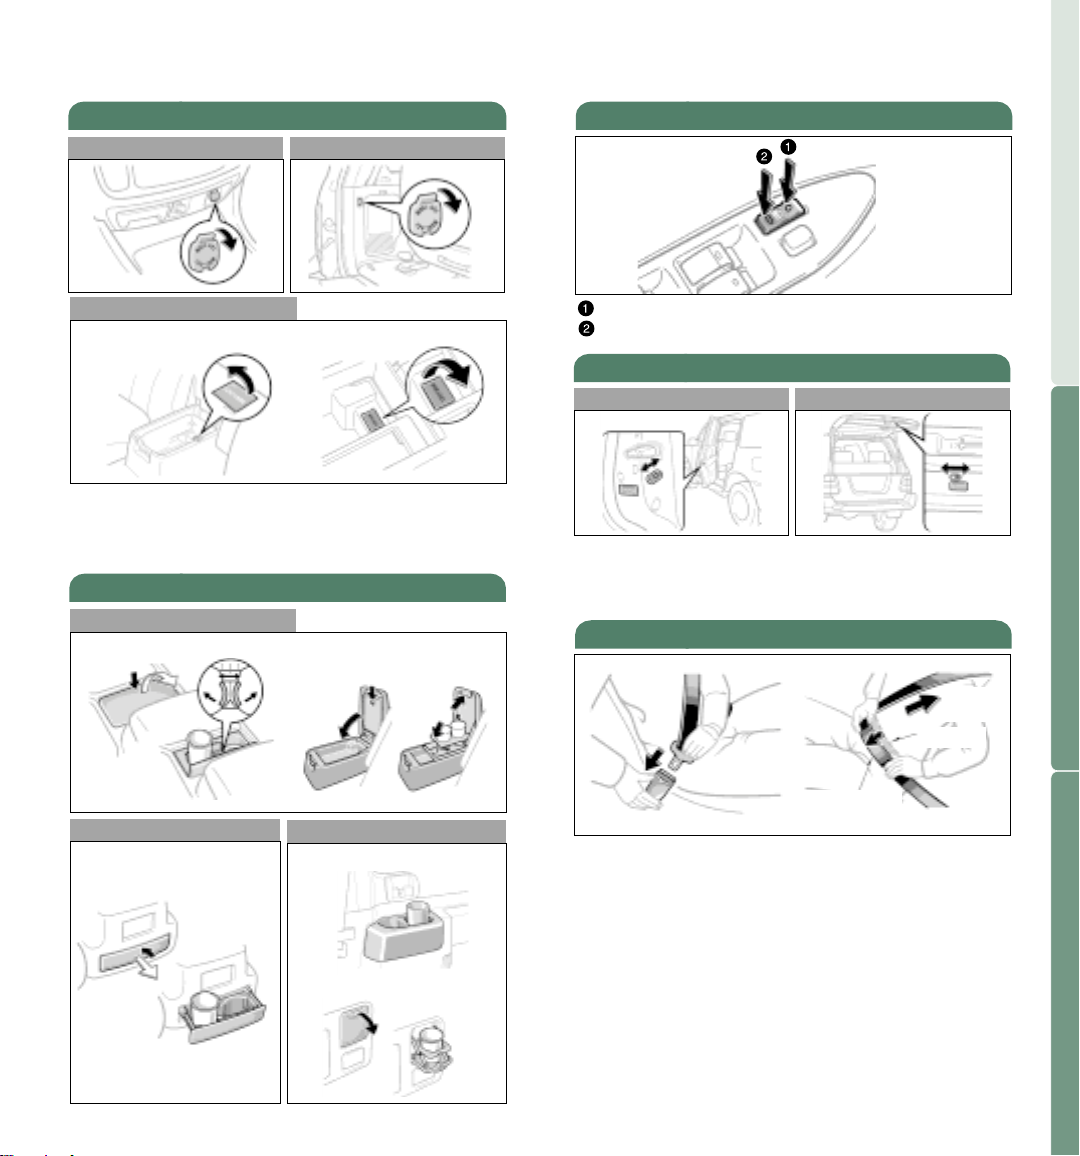
Power outlets
Instrument panel (12V) Luggage area (12V)
Rear console box (12V)
Without navigation system With navigation system
Designed for car accessories. Key must be in the
“ACC” or “ON” position to be used.
Refer to the Owner’s Manual for more details.
Cup holders
Front seats
Front of console box Center console box
Door locks
To lock Push down on the front of the switch.
To unlock Push down on the back of the switch.
Doors-Child safety locks
Rear-door Back-door
To lock the inside handle Move the lever to
“LOCK,” allowing the door to be opened only from
the outside.
Seat belts
Take up
slack
Too high
OVERVIEW FEATURES/OPERATIONS
Second row seats
Rear console box
Third row seats
Right-hand side
Left-hand side
20
Keep as low on
hips as possible
If belt is fully extended, then retracted even
slightly, it cannot be re-extended beyond that point,
unless fully retracted again. This feature is used to
help hold child restraint systems securely.
To find more information about seat belts, and how
to install a child restraint system, refer to the
Owner’s Manual.
21
SAFETY AND EMERGENCY FEATURES
Page 14
SAFETY AND EMERGENCY FEATURES
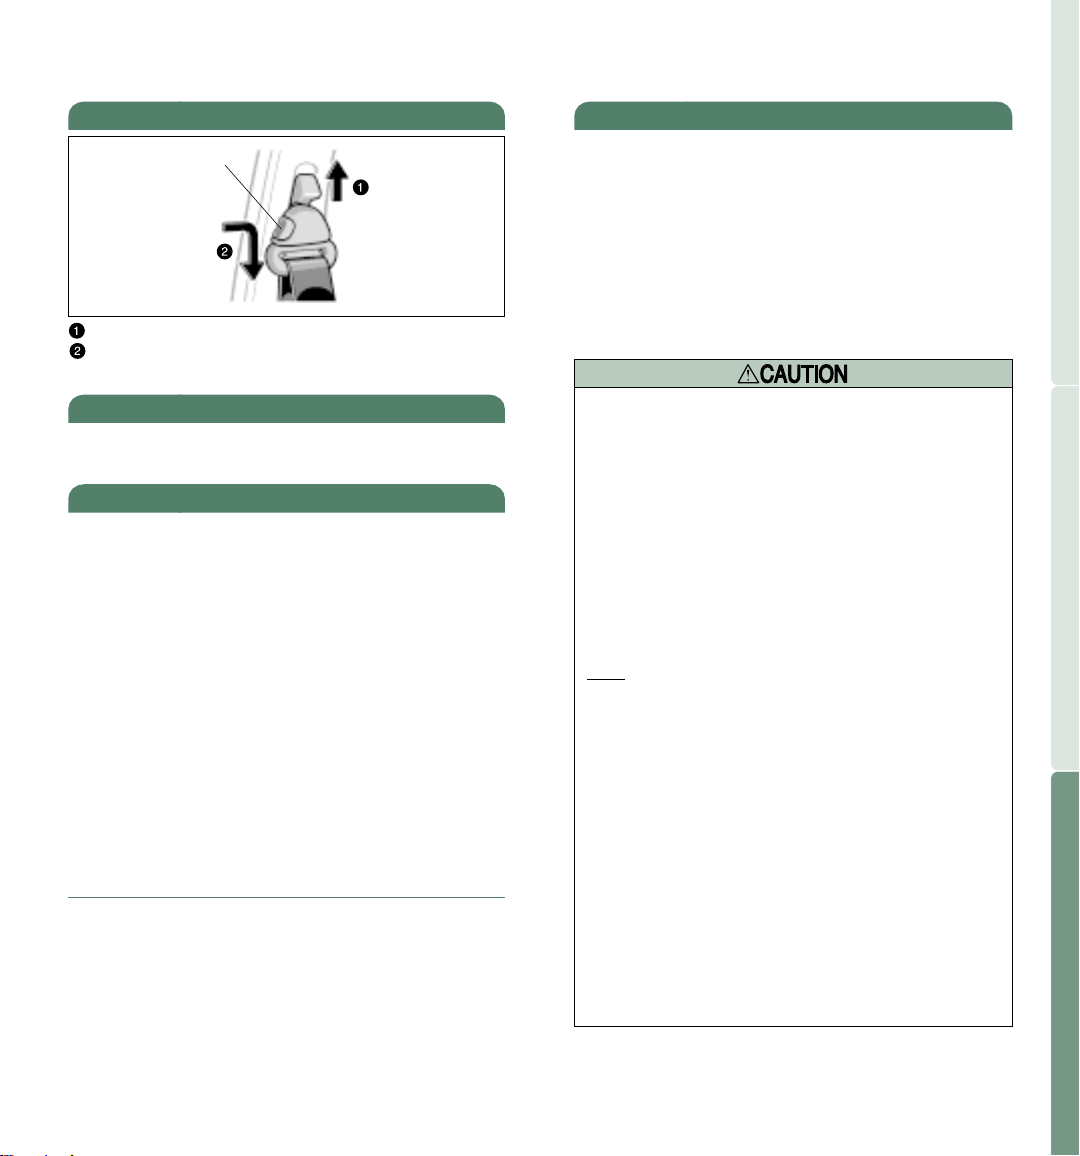
Seat belts-Shoulder belt anchor
Lock release
button
To raise Slide the anchor upward.
To lower Squeeze the lock release button and
slide the anchor downward.
ATRAC (Active Traction Control)*
Helps control spinning of the wheels, which may
occur when accelerating on slippery roads.
VSC1 (Vehicle Stability Control)*
Helps provide comprehensive control of the Antilock Brakes, Brake-Assist
control and other systems. This system helps
maintain control of the vehicle under adverse
conditions.
*Refer to the Owner’s Manual for more details.
1
Vehicle Stability Control (VSC) is an electronic system designed
to help the driver maintain vehicle control under adverse
conditions. It is not a substitute for safe driving practices.
Factors including speed, road conditions and driver steering
input can all affect whether VSC will be effective in preventing
loss of control.
2
Brake-Assist is designed to help the driver take full advantage of
the benefits of ABS (Anti-lock Brake System). It is not a
substitute for safe driving practices. Braking effectiveness also
depends on proper brake-system maintenance and tire and road
conditions.
2
, Traction Control, engine
Airbag-Supplemental Restraint System
The Airbag Supplemental Restraint System (SRS)
front, side* and side curtain* airbags are designed to
help provide further protection for the driver and
outboard passenger in addition to the primary safety
protection provided by the seat belts.
Please read the following caution, and refer to the
Owner’s Manual for more details.
*If installed
•The driver and front passenger airbag Supplemental Restraint
System (SRS) is designed only as a supplement to the primary
protection of the seat belt systems of the driver and front
passenger. The front seat occupants are particularly susceptible
to injury if they do not wear their seat belts; when sudden
braking or a collision occurs, they may be thrown forward. To
obtain maximum protection in an accident, the driver and all
passengers in the vehicle should always wear their seat belts
when driving because serious injuries or death can result to
unrestrained occupants. For instructions and precautions
concerning the seat belt system, see “Seat belts” in the
Owner’s Manual.
•Toyota strongly urges the use of a proper child restraint system
on the rear seat that conforms to the size of the child.
According to accident statistics, a child is safer when properly
restrained in the rear seat than on the front seat.
•Never
use a rear-facing child restraint system in the front seat.
The force of the rapid inflation of the passenger airbag can
cause severe injury or death to a child.
•Unless it is unavoidable, do not install a forward-facing child
restraint system on the front seat.
If you must install a forward-facing child restraint system on
the front seat, move the seat as far back as possible.
•Make sure you have complied with all installation instructions
provided by the child restraint manufacturer and the system is
properly secured.
•The SRS side and side curtain airbags (optional) are designed to
deploy in certain types of severe side impact collisions. In all
other collisions, the side impact and side curtain airbags will
not deploy. For instructions and precautions, see your Owner’s
Manual.
•Do not lean against the side doors when the vehicle is in use.
The side and side curtain airbags inflate with considerable
speed and force. Death or serious injury could result.
•Do not modify, cover or replace the surface of the front seats.
Such changes could disable the system or prevent the airbags
from activating correctly, resulting in death or serious injury.
OVERVIEW FEATURES/OPERATIONS
SAFETY AND EMERGENCY FEATURES
22
23
Page 15
SAFETY AND EMERGENCY FEATURES
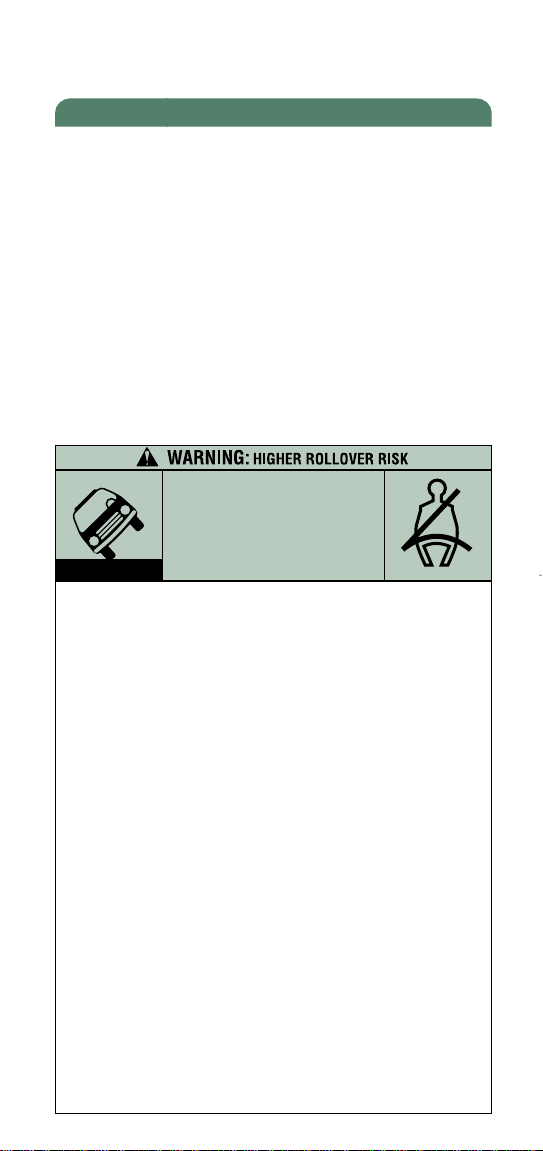
Rollover Information
This vehicle will handle and maneuver differently from an
ordinary passenger car because it is also designed for off-road
use. It has a higher ground clearance and higher center of
gravity than an ordinary passenger car. This vehicle design
feature causes this type of vehicle to be more likely to roll
over. Utility vehicles have a significantly higher rollover rate
than other types of vehicles.
An advantage of the higher ground clearance is a better view
of the road allowing you to anticipate problems. However, it
is not designed for cornering at the same speeds as ordinary
passenger cars any more than low-slung sports cars are
designed for off-road use. Therefore, sharp turns at excessive
speeds may cause rollover.
Failure to operate this vehicle correctly may result in loss of
control, accidents or vehicle rollover causing death or
serious injury. Be sure to read your Owner’s Manual for more
information on safe driving both on and off-road.
Avoid Abrupt Maneuvers
and Excessive Speed.
Always Buckle Up.
See Owner’s Manual
Always observe the following precautions to minimize the risk of serious personal injury or damage to your vehicle:
Always observe the following precautions to minimize
the risk of serious personal injury or damage to your
vehicle:
•In a rollover crash, an unbelted person is significantly
more likely to die than a person wearing a seat belt.
Therefore, the driver and all passengers should fasten
their seat belts whenever the vehicle is moving.
•Avoid sharp turns or abrupt maneuvers, if at all
possible. Failure to operate this vehicle correctly may
result in loss of control or vehicle rollover causing
death or serious injury.
•Loading cargo on the roof luggage carrier will make the
center of the vehicle gravity higher. Avoid high speeds,
sudden starts, sharp turns, sudden braking or abrupt
maneuvers; otherwise, it may result in a loss of ability
to operate this vehicle correctly.
•Always slow down in gusty crosswinds. Because of its
profile and higher center of gravity, your vehicle is
more sensitive to side winds than an ordinary
passenger car. Slowing down will allow you to have
better control.
•When driving off-road or in rugged terrain, do not drive
at excessive speeds, jump, make sharp turns, strike
objects, etc. This may cause loss of control or vehicle
rollover causing death or serious injury. You are also
risking expensive damage to your vehicle’s suspension
and chassis.
•Do not drive horizontally across steep slopes. Driving
straight up or straight down is preferred. Your vehicle
(or any similar off-road vehicle) can tip over sideways
much more easily than forward or backward.
For Further Information.
24
Page 16
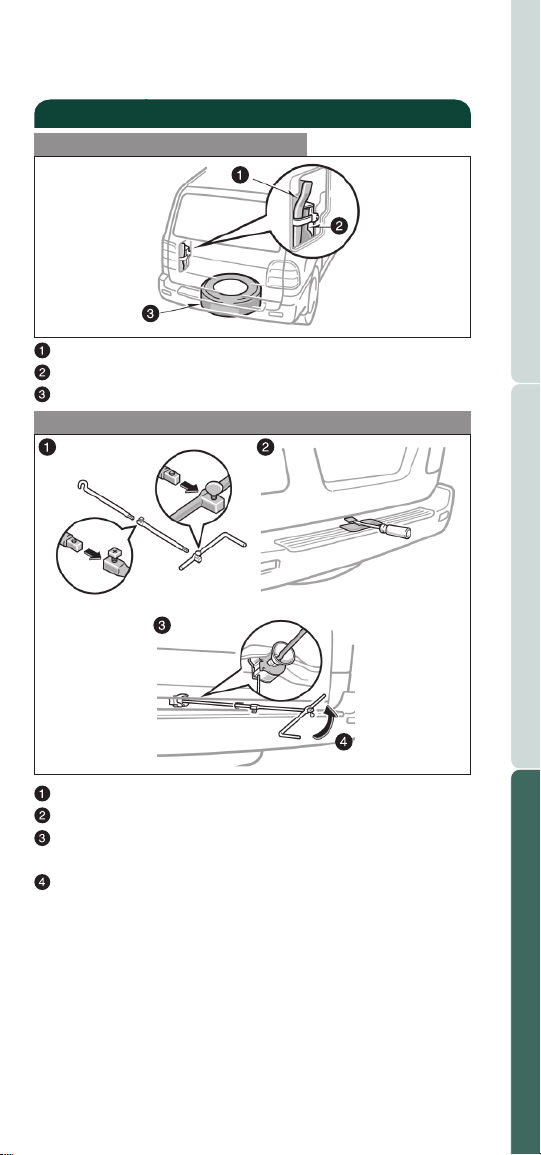
Spare tire & tools
Tool location
Tool bag
Jack
Spare tire
Removing the spare tire
OVERVIEW FEATURES/OPERATIONS
Assemble the jack handle.
Remove the access hole cover with a screwdriver.
Insert the jack handle end through the opening in
the bumper, and into the lowering screw.
Turn the jack handle counterclockwise.
Refer to the
Owner’s Manual for jack positioning and
tire changing procedures.
25
SAFETY AND EMERGENCY FEATURES
Page 17
 Loading...