

Page 1
WWW.MANUALS.WS
WWW.MANUALS.WS
Owner’s
Warranty
Information
Page 2

WWW.MANUALS.WS
WWW.MANUALS.WS
1
Tab le of Contents
Introduction
Satisfaction Down the Road 2
Transportation Assistance 3
If You Need Assistance 4
Warranty Coverages at a Glance 6
Your Warranties in Detail
General Warranty Provisions 7
New Vehicle Limited Warranty 9
Federal Emission Control Warranty 14
California Emission Control Warranty 20
Tire Limited Warranty 26
Your Responsibilities
Operation and Maintenance 27
Obtaining Warranty Service 29
Page 3

WWW.MANUALS.WS
WWW.MANUALS.WS
tToyota, our top priority is always our customers. We know
your Toyota is an important part of your life and something you
depend on every day. That’s why we’re dedicated to building
products of the highest quality and reliability.
Our excellent warranty coverage is evidence that we stand behind the
quality of our vehicles. We’re confident
— as you should be — that your
Toyota will provide you with many years of enjoyable driving.
To further demonstrate our commitment to our customers’ satisfaction,
occasionally we may establish a special policy adjustment to pay for specific repairs that are no longer covered by warranty. When we establish
such a policy adjustment, we mail details to all applicable owners we
have on record. That’s why it’s important to send in the card at the back
of this booklet if you change your address or if you’ve purchased this
vehicle from a previous owner.
To provide you with added protection against unexpected service costs,
we offer Toyota Extra Care vehicle service agreements and Toyota Auto
Care pre-paid maintenance programs. Both offer plans to meet a wide
variety of needs. Your dealership can help you select the plan that’s best
for you.
Our goal is for every Toyota customer to enjoy outstanding quality,
dependability and peace of mind throughout their ownership experience. We want you to be a satisfied member of the Toyota family for
many miles to come.
This booklet describes the terms of Toyota warranty coverage
as well as general owner responsibilities. A separate publication
found in your glove box, the Scheduled Maintenance Guide,
describes your vehicle’s maintenance requirements. Be sure to
review this publication carefully, since proper maintenance is
required to ensure that warranty coverage remains intact.
All information in this booklet is the latest available at the time of publication and, with the exception of the emission control warranties, is
subject to change without notice.
A
Introduction
2
Satisfaction Down the Road
Page 4

WWW.MANUALS.WS
WWW.MANUALS.WS
e realize that your confidence in the quality and reliability
of our products was a key factor in your decision to buy a
Toyota. We also know how disruptive the loss of transportation
can be to your daily routine. That’s why we’re pleased to offer you the
benefits of our Transportation Assistance Policy.
Under this policy, you are eligible for transportation assistance if your
Toyota must be kept overnight for warranty-covered repairs. The policy
applies when your vehicle must be kept overnight for any of the following reasons:
•
The warranty repairs will take longer than one day to complete.
•
The warrantable condition requires extensive diagnosis.
•
The parts needed for the warranty repairs are not readily available
and your vehicle is inoperative or unsafe to drive.
The policy does not apply when warranty repairs can be completed
in one day but the vehicle must be kept overnight due to dealer or
owner scheduling conflicts.
The Transportation Assistance Policy applies for the duration of the New
Vehicle Limited Warranty. The policy applies to all 2003 model-year
Toyotas sold and serviced by authorized Toyota dealerships in the
mainland United States and Alaska.
For further details, please consult your Toyota dealer.
W
Introduction
3
Transportation Assistance
Page 5

WWW.MANUALS.WS
WWW.MANUALS.WS
Both Toyota and your Toyota dealer are dedicated to serving your
automotive needs. Your complete satisfaction is our first priority. Should
you have a problem or concern — either during or after the warranty
period — please take the following steps to ensure the quickest possible
response:
Step 1
Discuss the situation with a dealership manager, such as the service
manager or customer relations manager. In most cases, a satisfactory
solution can be reached at this step.
Step 2
If the dealership does not address your concern to your satisfaction,
call the Toyota Customer Assistance Center at (800)331–4331. If you
are hearing- or speech-impaired, call (800)443-4999 (TDD).
Please have the following information ready when you call:
•
Your Toyota’s vehicle identification number (located on the
driver’s side corner of the dashboard, under the window)
•
Current mileage on your vehicle
•
Name of your Toyota dealership
AToyota customer relations representative will assist you in
working with the dealership to find a satisfactory solution.
Step 3
If your concern has still not been resolved to your satisfaction, Toyota
offers additional assistance through the Dispute Settlement Program,
a dispute resolution program administered by the National Center for
Dispute Settlement. The purpose of the Dispute Settlement Program
is to resolve disputes through arbitration — a process by which two
parties authorize an independent third party to hear and resolve a dispute. The program is informal and free of charge. To request that your
If You Need Assistance
Introduction
4
Page 6

WWW.MANUALS.WS
WWW.MANUALS.WS
case be reviewed through the program, complete the customer claim
form in the Owner's Warranty Rights Notification booklet (found in your
glove box) and mail it to:
National Center for Dispute Settlement
P.O. Box 561109
Dallas, TX 75356-1109
If you would like to request a customer claim form, call the Toyota
Customer Assistance Center at (800)331-4331. When you call, please
have your vehicle identification number, the current mileage on your
Toyota and the names of your selling and servicing dealerships.
Important: You must use the Dispute Settlement Program before seeking
remedies through a court action pursuant to the Magnuson-Moss
Warranty Act. You may also be required to use the Dispute Settlement
Program before seeking remedies under the “Lemon Laws” of your state.
Please check the appropriate page of the Owner’s Warranty Rights
Notification booklet for the requirements applicable to your state.
This information about the Dispute Settlement Program is correct
as of the date of printing. However, the program may be changed
without notice. For the most current information about the Dispute
Settlement Program, call the Toyota Customer Assistance Center at
(800)331-4331.
Introduction
5
If You Need Assistance
Page 7
WWW.MANUALS.WS
WWW.MANUALS.WS
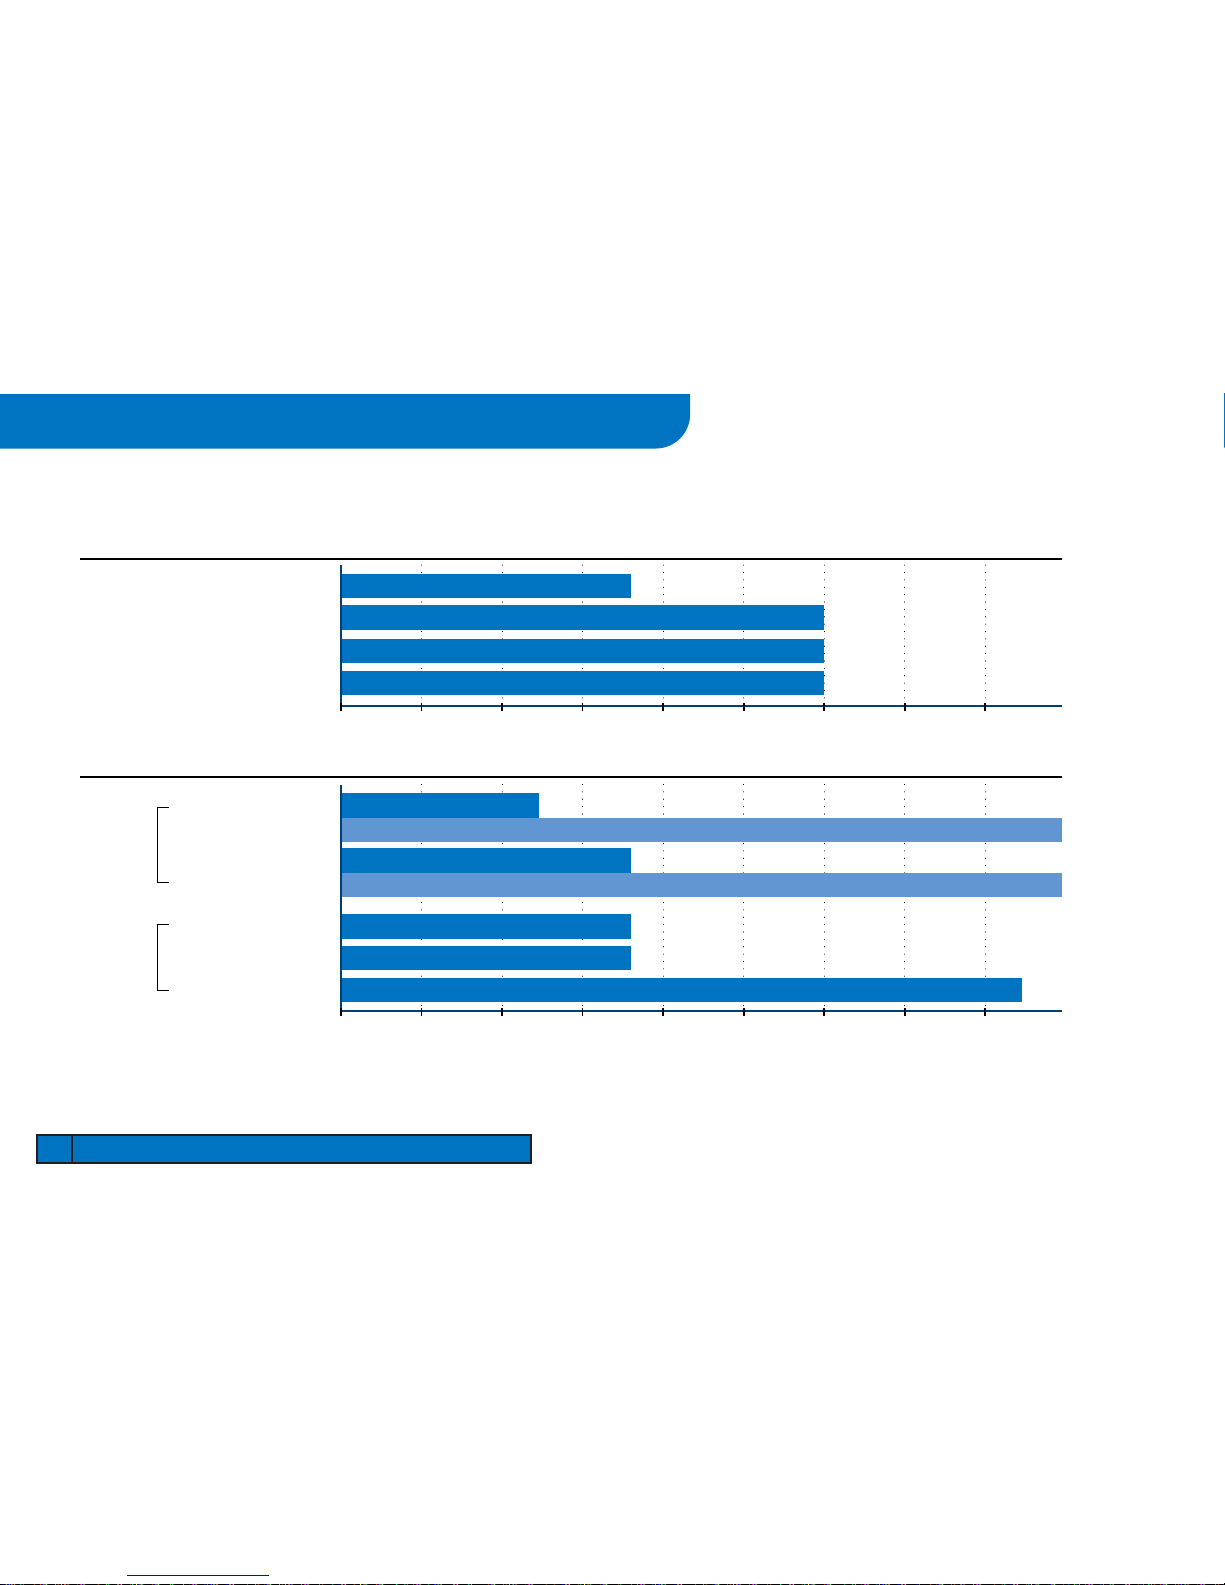
10 months
months
20 30 40 50 60 70 80
10 20 30 40 50 60 70 80
36 months / 36,000 miles
60 months / 60,000 miles
60 months / 60,000 miles
60 months / Unlimited miles
Basic
Powertrain
Restraint Systems
Corrosion Perforation
New Vehicle Limited Warranty
Emission Control Warranty
24 months / 24,000 miles
1
Specific components may have longer coverage under terms of the Powertrain Warranty.
36 months / 36,000 miles
1
96 months / 80,000 miles
96 months / 80,000 miles
36 months / 50,000 miles
36 months / 50,000 miles
1
84 months / 70,000 miles
Performance
Specific Components
Defect
Specific Components
Performance
Short-Term Defect
Long-Term Defect
FederalCalifornia
2,3
2
Also applies to Massachusetts and Vermont vehicles equipped with a California Certified Emission Control System.
Vehicles covered by this warranty are also covered by the Federal Emission Control Warranty.
3
For 4-cylinder Camry models certified as partial zero-emission vehicles (PZEV),
if any, coverage is 15 years or 150,000 miles, whichever occurs first.
Introduction
6
Warranty Coverages at a Glance
Page 8

WWW.MANUALS.WS
WWW.MANUALS.WS
Who Is the Warrantor
The warrantor for these limited warranties is Toyota Motor Sales, U.S.A.,
Inc. (“Toyota”), 19001 South Western Avenue, Torrance, California
90509-2991, a California corporation.
Which Vehicles Are Covered
These warranties apply to all 2003 model-year vehicles registered and
normally operated in the United States, U.S. territories and Canada.
Warranty coverage is automatically transferred at no cost to subsequent
vehicle owners.
Multiple Warranty Conditions
This booklet contains warranty terms and conditions that may vary
depending on the part covered. A warranty for specific parts or systems,
such as the Powertrain Warranty or Emission Performance Warranty, is
governed by the coverage set forth in that warranty as well as the
General Warranty Provisions.
When Warranty Begins
The warranty period begins on the vehicle’s in-service date, which is the
first date the vehicle is either delivered to an ultimate purchaser, leased,
or used as a company car or demonstrator.
Repairs Made at No Charge
Repairs and adjustments covered by these warranties are made at no
charge forparts and labor.
Parts Replacement
Any needed parts replacement will be made using new or remanufactured parts. The decision whether a part should be repaired or replaced
will be made by the servicing Toyota dealership and/or Toyota. Parts
scheduled to be replaced as required maintenance are warranted until
their first replacement only.
Your Warranties in Detail
7
General Warranty Provisions
Page 9

WWW.MANUALS.WS
WWW.MANUALS.WS
Limitations
The performance of necessary repairs and adjustments is the exclusive
remedy under these warranties or any implied warranties. Toyota does
not authorize any person to create foritany other obligation or liability
in connection with this vehicle.
Any implied warranty of merchantability or fitness for a particular
purpose is limited to the duration of these written warranties.
Some states do not allow restrictions on how long an implied warranty
lasts, so this limitation may not apply to you.
Your Rights Under State Law
These warranties give you specific legal rights. You may also have other
rights that vary from state to state.
Your Warranties in Detail
8
General Warranty Provisions
Page 10

WWW.MANUALS.WS
WWW.MANUALS.WS
Basic Warranty
This warranty covers repairs and adjustments needed to correct defects in
materials or workmanship of any part supplied by Toyota, subject to the
exceptions indicated under “What Is Not Covered” on pages 11–12.
Coverage is for 36 months or 36,000 miles, whichever occurs first, with
the exception of wheel alignment and wheel balancing, which are covered for 12 months or 20,000 miles, whichever occurs first.
Powertrain Warranty
This warranty covers repairs needed to correct defects in materials or
workmanship of any component listed in the next column and supplied
by Toyota, subject to the exceptions indicated under “What Is Not
Covered” on pages 11–12.
Coverage is for 60 months or 60,000 miles, whichever occurs first.
Engine
Cylinder block and head and all internal parts, intake manifold, timing
gears and gaskets, timing chain/belt and cover, flywheel, valve covers,
oil pan, oil pump, engine mounts, turbocharger housing and all internal
parts, supercharger housing and all internal parts, engine control computer, water pump, fuel pump, seals and gaskets.
Transmission and Transaxle
Case and all internal parts, torque converter, clutch cover, transmission
mounts, transfer case and all internal parts, engine control computer,
seals and gaskets.
Front-Wheel-Drive System
Final drive housing and all internal parts, axle shafts, drive shafts,
constant velocity joints, front hub and bearings, seals and gaskets.
Rear-Wheel-Drive System
Axle housing and all internal parts, propeller shafts, U-joints, axle
shafts, drive shafts, bearings, supports, seals and gaskets.
WHAT IS COVERED AND HOW LONG
Your Warranties in Detail
9
New Vehicle Limited Warranty
Page 11

WWW.MANUALS.WS
WWW.MANUALS.WS
Corrosion Perforation Warranty
This warranty covers repair or replacement of any original body panel
that develops perforation from corrosion (rust-through), subject to the
exceptions indicated under “What Is Not Covered” on pages 11–12.
Coverage is for 60 months, regardless of mileage.
For information on how to protect yourvehicle from corrosion, see the
section entitled “Corrosion Prevention and Appearance Care” in the
Owner’s Manual.
Restraint Systems Warranty
This warranty covers repairs needed to correct defects in materials or
workmanship of any seatbelt or airbag system supplied by Toyota,
subject to the exceptions indicated under “What Is Not Covered” on
pages 11–12.
Coverage is for 60 months or 60,000 miles, whichever occurs first.
For vehicles sold and registered in the state of Kansas, the warranty for
seatbelts and related components is 10 years, regardless of mileage.
Towing
When your vehicle is inoperable due to failure of a warranted part,
towing service to the nearest authorized Toyota dealership is covered.
Your Warranties in Detail
10
New Vehicle Limited Warranty
Page 12

WWW.MANUALS.WS
WWW.MANUALS.WS
This warranty does not cover damage or failures resulting directly or
indirectly from any of the following:
•
Fire, accidents or theft
•
Abuse or negligence
•
Misuse — for example, racing or overloading
•
Improper repairs
•
Alteration or tampering, including installation of non-Genuine
Toyota Accessories
•
Lack of or improper maintenance, including use of fluids other
than those specified in the Owner’s Manual
•
Installation of non-Genuine Toyota Parts
•
Airborne chemicals, tree sap, road debris (including stone chips),
rail dust, salt, hail, floods, wind storms, lightning and other
environmental conditions
•
Water contamination
This warranty also does not cover the following:
Tires
Tires are covered by a separate warranty provided by the tire manufacturer. See page 26.
Normal Wear and Tear
Noise, vibration, cosmetic conditions and other deterioration caused by
normal wear and tear.
Maintenance Expense
Normal maintenance services such as:
•
Engine tune-ups
•
Replacement of fluids and filters
•
Lubrication
•
Cleaning and polishing
•
Replacement of spark plugs and fuses
•
Replacement of worn wiper blades, brake pads/linings and clutch linings
WHAT IS NOT COVERED
Your Warranties in Detail
11
New Vehicle Limited Warranty
Maintenance Expense
Normal maintenance services such as:
•
Engine tune-ups
•
Replacement of fluids and filters
•
Lubrication
•
Cleaning and polishing
•
Replacement of spark plugs and fuses
•
Replacement of worn wiper blades, brake pads/linings and clutch linings
Noise, vibration, cosmetic conditions and other deterioration caused by
normal wear and tear.
Normal Wear and Tear
Tires are covered by a separate warranty provided by the tire manufacturer. See page 26.
Page 13

WWW.MANUALS.WS
WWW.MANUALS.WS
Vehicles With Altered Odometer
Failure of a vehicle on which the odometer has been altered so that
actual vehicle mileage cannot be readily determined.
Salvage or Total-Loss Vehicles
Any vehicle that has ever been issued a “salvage” title or similar title
under any state’s law; or has ever been declared a “total loss” or equivalent by a financial institution or insurer, such as by payment for a claim in
lieu of repairs because the cost of repairs exceeded the cash value of the
vehicle. This exclusion does not apply to the emission control warranties.
Incidental Damages
Incidental or consequential damages associated with a vehicle failure.
Such damages include but are not limited to inconvenience; the cost of
transportation, telephone calls and lodging; the loss of personal or commercial property; and the loss of pay or revenue.
Disclaimer of Extra Expenses and Damages
The performance of necessary repairs and adjustments is the exclusive remedy under this warranty or any implied warranty. Toyota
does not authorize any person to create foritany other obligation
or liability in connection with this vehicle. Toyota shall not be liable
forincidental or consequential damages resulting from breach of
this written warranty or any implied warranty. Any implied warranty of merchantability or fitness fora particular purpose is limited
to the duration of this written warranty, except in states where this
limitation is not allowed.
Your Warranties in Detail
12
New Vehicle Limited Warranty
Page 14

WWW.MANUALS.WS
WWW.MANUALS.WS
If a dispute arises regarding your warranty coverage, please follow the
steps described under “If You Need Assistance” on pages 4–5. Please
note that you must use the Dispute Settlement Program before seeking
remedies through a court action pursuant to the Magnuson-Moss
Warranty Act. You may also be required to use the Dispute Settlement
Program before seeking remedies under the “Lemon Laws” of your state.
Please check the appropriate page of the Owner’s Warranty Rights
Notification booklet (located in your glove box) for the requirements
applicable to your state.
Your Warranties in Detail
13
New Vehicle Limited Warranty
DISPUTE RESOLUTION
Page 15

WWW.MANUALS.WS
WWW.MANUALS.WS
Emission Defect Warranty
Toyota warrants that your vehicle:
•
Was designed, built and equipped to conform at the time of sale with
applicable federal emissions standards.
•
Is free from defects in materials and workmanship that may cause the
vehicle to fail to meet these standards.
Federal regulations require that this warranty be in effect for two years
or 24,000 miles from the vehicle’s in-service date, whichever occurs
first. However, under the terms of the Basic Warranty, Toyota provides
coverage of three years or 36,000 miles, whichever occurs first. Specific components may have longer coverage under the terms of the
Powertrain Warranty. Additionally, components marked “8/80” in the
parts list on pages 15–16 have coverage of eight years or 80,000 miles,
whichever occurs first.
Emission Performance Warranty
Some states and localities have established vehicle inspection and maintenance (I/M) programs to encourage proper vehicle maintenance. If an
EPA-approved I/M program is in force in your area, you are eligible for
Emission Performance Warranty coverage.
Under the terms of the Emission Performance Warranty and federal
regulations, Toyota will make all necessary repairs if both of the
following occur:
•
Your vehicle fails to meet applicable emissions standards as
determined by an EPA-approved emissions test.
•
This failure results or will result in some penalty to you — such
as a fine or denial of the right to use your vehicle
— under local,
state or federal law.
This warranty is in effect for two years or 24,000 miles from the vehicle’s
in-service date, whichever occurs first. Additionally, components marked
“8/80” in the parts list on pages 15–16 have coverage of eight years or
80,000 miles, whichever occurs first.
WHAT IS COVERED AND HOW LONG
Your Warranties in Detail
14
Federal Emission Control Warranty
Page 16

WWW.MANUALS.WS
WWW.MANUALS.WS
These warranty obligations do not apply to failures or non-compliance
caused by:
•
The use of replacement parts not certified in accordance with
aftermarket parts certification regulations.
•
The use of replacement parts not equivalent in quality or design
to original equipment parts.
Provisions under the “What Is Not Covered” section of the New Vehicle
Limited Warranty also apply to this warranty.
Air/Fuel Metering System
•
Air/fuel ratio feedback control system
•
Cold-start enrichment system
•
Deceleration control system
•
Electronic fuel injection system components
—Airflow sensor
— Engine control module (8/80)
—Throttle body
—Other components
Air Induction System
•
Intake manifold and intake air surge tank
Catalyst System
•
Catalytic converter and protector (8/80)
•
Constricted fuel filler neck
•
Exhaust manifold
•
Exhaust pipe (manifold to catalyst and/or catalyst to catalyst)
WHAT IS NOT COVERED WARRANTY PARTS LIST
8/80 = Covered for eight years or 80,000 miles, whichever occurs first.
Your Warranties in Detail
15
Federal Emission Control Warranty
Page 17

WWW.MANUALS.WS
WWW.MANUALS.WS
*
Evaporative Control System
•
Charcoal canister
•
Diaphragm valve
•
Fuel filler cap
•
Fuel tank
•
Vapor liquid separator
Exhaust Gas Recirculation (EGR) System
•
EGR gas temperature sensor
•
EGR valve
•
Associated parts
Ignition System
•
Distributor and internal parts
•
Ignition coil and ignitor
•
Ignition wires
•
Spark plugs*
Positive Crankcase Ventilation (PCV) System
•
Oil filler cap
•
PCV valve or orifice
Other Parts Used in Above Systems
•
Data link connector (8/80)
•
Hoses, clamps, fittings, tubing and mounting hardware
•
Malfunction indicator light and bulb (8/80)
•
Pulleys, belts and idlers
•
Sealing gaskets and devices
•
Sensors, switches and valves
Warranted until first required maintenance under terms of the
California Emission Control Warranty.
8/80 = Covered for eight years or 80,000 miles, whichever occurs first.
Your Warranties in Detail
16
Federal Emission Control Warranty
Page 18

WWW.MANUALS.WS
WWW.MANUALS.WS
You are responsible for performance of the required maintenance indicated in the Owner’s Manual and the Scheduled Maintenance Guide.
Toyota will not deny a warranty claim solely because you do not have
records to show that you maintained your vehicle. However, any failure
or noncompliance caused by lack of maintenance is not covered by this
warranty.
When maintenance and repairs are paid for by you, these services
may be performed by you or by any automotive service provider you
choose. Toyota will not deny a warranty claim simply because you
used a service provider other than a Toyota dealership for maintenance and repairs. However, any failure or non-compliance caused by
improper maintenance or repairs is not covered by this warranty.
To ensure optimum performance and maintain the quality built into
your vehicle’s emission control systems, Toyota recommends the use of
Genuine Toyota Parts when servicing or repairing the systems.
Warranty coverage is not dependentupon the use of any particular
brand of replacement parts and you may elect to use non–Genuine
Toyota Parts for maintenance and repairs. However, use of replacement parts that are not equivalent in quality to Genuine Toyota
Parts may impair the effectiveness of the emission control systems.
If you use replacement parts that have maintenance or replacement
schedules different from those of Genuine Toyota Parts, you must follow
the maintenance and replacement schedules for the parts you are using.
In addition, you should ensure that such parts are warranted by their
manufacturers to be equivalent to Genuine Toyota Parts.
MAINTENANCE REPLACEMENT PARTS
Your Warranties in Detail
17
Federal Emission Control Warranty
Page 19

WWW.MANUALS.WS
WWW.MANUALS.WS
If your vehicle fails an EPA-approved emissions test, you may make a
claim under the Emission Performance Warranty. To do so, take your
vehicle to an authorized Toyota dealership and present a copy of the
emissions test report. Also, take your maintenance records in case they
are needed.
If your claim qualifies for coverage, the dealership will repair your vehicle within 30 days (unless a shorter period is required by law). If your
claim is denied, Toyota will notify you in writing of the reason within
the same period. If we fail to do so, we will repair your vehicle free of
charge. The only exceptions allowed are when you request or agree to a
delay, or a delay is caused by factors beyond the control of Toyota or the
dealership.
For information on how to obtain service under the Emission Defect
Warranty, see page 29, “Obtaining Warranty Service.”
If you have questions or concerns about your vehicle’s federal emission
warranty coverage, please follow the steps described under “If You Need
Assistance” on pages 4–5. In the case of the Emission Performance
Warranty, you may also request information from or report complaints to:
U.S. Environmental Protection Agency
Vehicle Programs & Compliance Division (6405J)
Attn: Warranty Complaints
401 M Street SW
Washington, D.C. 20460
Vehicles equipped with a California Certified Emission Control System
that are registered and operated in California or any state that
adopts California emission warranty provisions are also covered by
the California Emission Control Warranty (see page 20). Currently,
Massachusetts and Vermont are the only other states to which the
California Emission Control Warranty applies.
IF YOUR VEHICLE FAILS AN EMISSIONS TEST IF YOU HAVE QUESTIONS
Your Warranties in Detail
18
Federal Emission Control Warranty
Page 20

WWW.MANUALS.WS
WWW.MANUALS.WS
We (the dealership) want you to know that at the time your new Toyota
vehicle is being delivered:
1) On the basis of written notification furnished by Toyota, we have
knowledge that the vehicle is covered by an EPA Certificate of
Conformity.
2) We have visually inspected those emission control devices or portions
thereof that are visible without removing or adjusting any components or systems, emissions-related or otherwise. On the basis of this
inspection, there are no apparent deficiencies in the installation of
emission control devices by Toyota. (For purposes of this certificate,
“emission control devices” is limited to devices installed on a vehicle
forthe sole or primary purpose of controlling emissions and which
were not in general use before 1968.)
3) We have performed all emission control system preparations required
by Toyota prior to the sale of the vehicle as set forth in Toyota’s current pre-delivery service manual.
4) Except as may be provided in Paragraph 5, if this vehicle fails an
EPA-approved emissions test within three months or 4,000 miles
(whichever comes first) of delivery to the ultimate purchaser, and the
vehicle has been maintained and used in accordance with the written instructions for proper maintenance and use, Toyota will remedy
the non-conformity free of charge under the terms of the Emission
Performance Warranty.
5) If vehicle was used as a company car or demonstrator, check box and
complete the following:
□
The vehicle with which this statement is delivered was placed
into service as a company car or demonstrator prior to delivery.
The Emission Performance Warranty period commenced on the
date the vehicle was first placed into service, which was:
Month Day Year
Note: The dealership makes no representation or warranty that the
emission control system or any part thereof is without defect or that
the system will perform properly. The Emission Performance Warranty
referred to in Paragraph 4 and furnished with the vehicle is solely that
of the manufacturer.
This statement is required by section 207 of the Clean Air Act (42 U.S.C.
7541) and the EPA regulations issued thereunder.
Dealership Name
DEALER CERTIFICATE
Your Warranties in Detail
19
Federal Emission Control Warranty
Page 21

WWW.MANUALS.WS
WWW.MANUALS.WS
The California Air Resources Board (CARB) and Toyota are pleased to
explain the emission control system warranty for your 2003 vehicle. In
California, new motor vehicles must be designed, built and equipped to
meet the state’s stringent anti-smog standards. CARB regulations require
that Toyota must warrant the emission control system on your vehicle for
the time periods indicated on this page, provided there has been no
abuse, neglect or improper maintenance of your vehicle.
Your emission control system may include parts such as the fuel injection
system, ignition system, catalytic converter and engine computer. Also
included may be hoses, belts, connectors and other emissions-related
assemblies.
Where a warrantable condition exists, Toyota will repair your vehicle at
no cost to you, including diagnosis, parts and labor.
1) For three years or 50,000 miles, whichever occurs first:
*
•
If your vehicle fails a smog-check test, all necessary repairs and
adjustments will be made by Toyota to ensure that your vehicle
passes the test. This is your Emission Control System PERFORMANCE
WARRANTY.
•
If any emissions-related part on your vehicle is defective, the part
will be repaired or replaced by Toyota. This is your SHORT-TERM
Emission Control System DEFECT WARRANTY. Covered parts are listed
on pages 15–16. Specific components may have longer coverage
under the terms of the Powertrain Warranty.
2) For seven years or 70,000 miles, whichever occurs first:
*
•
If an emissions-related part listed on pages 22—23 is defective,
the part will be repaired or replaced by Toyota. This is your
LONG-TERM Emission Control System DEFECT WARRANTY.
YOUR WARRANTY RIGHTS
AND OBLIGATIONS
MANUFACTURER’S WARRANTY COVERAGE
Your Warranties in Detail
20
California Emission Control Warranty
*For 4-cylinder Camry models certified as partial zero-emission vehicles (PZEV),
if any, coverage is 15 years or 150,000 miles, whichever occurs first.
Page 22

WWW.MANUALS.WS
WWW.MANUALS.WS
You are responsible for performance of the required maintenance indicated in the Owner’s Manual and the Scheduled Maintenance Guide.
Toyota recommends that you retain all receipts covering maintenance on
your vehicle, but Toyota cannot deny warranty coverage solely for the
lack of receipts or your failure to ensure the performance of all scheduled
maintenance.
You are responsible for presenting your vehicle to a Toyota dealership as
soon as a problem exists. The warranty repairs should be completed in a
reasonable amount of time, not to exceed 30 days.
You should also be aware that Toyota may deny you warranty coverage if
your vehicle or a part has failed due to abuse, neglect, improper maintenance or unapproved modifications.
If you have any questions regarding your warranty rights and responsibilities, you should contact the Toyota Customer Assistance Center at
(800)331-4331 or the California Air Resources Board, Mobile Source
Control Division, at 9528 Telstar Avenue, P.O. Box 8001, El Monte, CA
91734-8001.
These warranty obligations do not apply to failures or noncompliance
caused by:
•
The use of replacement parts not certified in accordance with
aftermarket parts certification regulations.
•
The use of replacement parts not equivalent in quality or design to
original equipment parts.
Provisions under the “What Is Not Covered” section of the New Vehicle
Limited Warranty also apply to this warranty.
OWNER’S WARRANTY RESPONSIBILITIES WHAT IS NOT COVERED
Your Warranties in Detail
21
California Emission Control Warranty
Page 23

WWW.MANUALS.WS
WWW.MANUALS.WS
The parts listed here are covered for seven years or 70,000 miles from
the vehicle’s in-service date, whichever occurs first.
Air/Fuel Metering System
•
Air-fuel ratio sensor on Highlander
•
Engine control computer (engine control module)
•
Fuel pump on Sienna
•
Mass air flow sensor on Tacoma equipped with 2RZ-FE and 3RZ-FE
•
Throttle body
Air Induction System
•
Intake manifold and intake air surge tank
•
Intake manifold gasket on MR2 Spyder
Catalyst System
•
Catalytic converter (warm-up three-way catalyst)
•
Exhaust center pipe on Avalon, Corolla Matrix 4WD, Highlander
equipped with 1MZ-FE, Tacoma and Tundra equipped with 5VZ-FE
•
Exhaust front pipe on Avalon, Camry, Camry Solara, Celica, Corolla,
Corolla Matrix 2WD, ECHO, Highlander equipped with 1MZ-FE, Land
Cruiser, MR2 Spyder, Sequoia, Sienna, Tacoma, Tundra and 4Runner
•
Exhaust manifold on Avalon, Camry, Camry Solara, Highlander, Land
Cruiser, MR2 Spyder, RAV4, Sequoia, Sienna, Tundra equipped with
2UZ-FE and 4Runner
•
Exhaust manifold gasket on Land Cruiser, Sequoia, Tundra equipped
with 2UZ-FE and 4Runner
•
Right exhaust manifold gasket on Sienna and on Avalon, Camry,
Camry Solara and Highlander models equipped with 1MZ-FE
Your Warranties in Detail
22
California Emission Control Warranty
PARTS LIST: LONG-TERM EMISSION
DEFECT WARRANTY
Page 24

WWW.MANUALS.WS
WWW.MANUALS.WS
Evaporative Control System
•
Charcoal canister on Highlander, Land Cruiser and 4Runner
•
Fuel tank
Ignition System
•
Knock sensor on Land Cruiser, MR2 Spyder, Sequoia, Tacoma
equipped with 5VZ-FE, Tundra and 4Runner
You are responsible for performance of the required maintenance indicated in the Owner’s Manual and the Scheduled Maintenance Guide.
Toyota will not deny a warranty claim solely because you do not have
records to show that you maintained your vehicle. However, any failure
or noncompliance caused by lack of maintenance is not covered by this
warranty.
When maintenance and repairs are paid for by you, these services
may be performed by you or by any automotive service provider you
choose. Toyota will not deny a warranty claim simply because you
used a service provider other than a Toyota dealership for maintenance and repairs. However, any failure or non-compliance caused by
improper maintenance or repairs is not covered by this warranty.
MAINTENANCE
Your Warranties in Detail
23
California Emission Control Warranty
Page 25

WWW.MANUALS.WS
WWW.MANUALS.WS
To ensure optimum performance and maintain the quality built into
your vehicle’s emission control systems, Toyota recommends the use of
Genuine Toyota Parts when servicing or repairing the systems.
Warranty coverage is not dependentupon the use of any particular
brand of replacement parts and you may elect to use non-Genuine
Toyota Parts for maintenance and repairs. However, use of replace–
ment parts that are not equivalent in quality to Genuine Toyota
Parts may impair the effectiveness of the emission control systems.
If you use replacement parts that have maintenance or replacement
schedules different from those of Genuine Toyota Parts, you must follow
the maintenance and replacement schedules for the parts you are using.
In addition, you should ensure that such parts are warranted by their
manufacturers to be equivalent to Genuine Toyota Parts.
If your vehicle fails a smog-check test, you may make a claim under the
Emission Performance Warranty. To do so, take your vehicle to an authorized Toyota dealership and present a copy of the smog-check test
report. Also, take your maintenance records in case they are needed.
If your claim qualifies for coverage, the dealership will repair your vehicle within 30 days (unless a shorter period is required by law). If your
claim is denied, Toyota will notify you in writing of the reason within
the same period. If we fail to do so, we will repair your vehicle free of
charge. The only exceptions allowed are when you request or agree to
a delay, or a delay is caused by factors beyond the control of Toyota or
the dealership.
For information on how to obtain service under the Emission Defect
Warranty, see page 29, “Obtaining Warranty Service.”
REPLACEMENT PARTS IF YOUR VEHICLE FAILS A SMOG-CHECK TEST
Your Warranties in Detail
24
California Emission Control Warranty
Page 26

WWW.MANUALS.WS
WWW.MANUALS.WS
If a Toyota dealership is unable to complete repairs on your vehicle
within 30 days, you may have the repairs made under Toyota’s
provisions for emergency warranty repairs. See page 29 for details.
If you have questions or concerns about your vehicle’s California emission warranty coverage, please follow the steps described under “If You
Need Assistance” on pages 4–5. You may also request information from
or report complaints to:
California Air Resources Board
Mobile Source Control Division
9528 Telstar Avenue
P.O. Box 8001
El Monte, CA 91734-8001
(800)242-4450
Vehicles equipped with a California Certified Emission Control System
that are registered and operated in California or any state that
adopts California emission warranty provisions are covered by this
warranty. Currently, Massachusetts and Vermont are the only other
states to which this warranty applies. Vehicles covered by this
warranty are also covered by the Federal Emission Control Warranty
(see page 14).
REPAIR DELAYS IF YOU HAVE QUESTIONS
Your Warranties in Detail
25
California Emission Control Warranty
Page 27

WWW.MANUALS.WS
WWW.MANUALS.WS
OBTAINING WARRANTY SERVICE ORIGINAL EQUIPMENT TIRE MANUFACTURERS
The tires that come as original equipment on your vehicle are warranted
by their manufacturer and not Toyota. A separate warranty statement for
the tires is in your glove box.
To obtain service for a tire defect, take the tire to an authorized dealer
of the tire manufacturer. (Refer to your local phone directory for dealer
locations.) Your Toyota dealer may also be able to assist you in obtaining
warranty service from the manufacturer.
For additional warranty information or service assistance, contact the
tire manufacturer directly.
Your Warranties in Detail
26
Tire Limited Warranty
Bridgestone/Firestone
One Bridgestone Park
Nashville, TN 37214
(800)847-3272
Continental General Tire
1800 Continental Blvd.
Charlotte, NC 28273
(800)847-3349
Goodyear Dunlop Tires
North America, Ltd.
P.O. Box 1109
Buffalo, NY 14240
(800)548-4714
Goodyear Tire and Rubber Co.
1144 East Market Street
Akron, OH 44316
(800)321-2136
Michelin/BFGoodrich
P.O. Box 19001
Greenville, SC 29602
(800)847-3435
Toyo Tire (U.S.A.) Corporation
6261 Katella Ave., Ste. 2B
Cypress, CA 90630
(800)442-8696
Yokohama Tire Corporation
601 South Acacia Avenue
Fullerton, CA 92831
(800)722-9888
Page 28

WWW.MANUALS.WS
WWW.MANUALS.WS
You are responsible for ensuring that your Toyota is operated and maintained according to the instructions in the Owner’s Manual and the
Scheduled Maintenance Guide.
You should keep detailed records of vehicle maintenance, since under
some circumstances they may be required for warranty coverage. These
records should include date of service, mileage at time of service and a
description of service performed and/or parts installed. For your convenience, a maintenance log is included in the Scheduled Maintenance
Guide. If you sell your vehicle, you should give your maintenance records
to the newowner.
Toyota will not deny a warranty claim solely because you do not have
records to show that you maintained your vehicle. However, damage or
failures caused by lack of proper maintenance are not covered under
warranty.
You may have maintenance performed on your vehicle by any qualified
person or facility. However, Toyota recommends having maintenance
performed by an authorized Toyota dealership.
Toyota dealership technicians are specially trained to maintain and repair
Toyota vehicles. They stay current on the latest service information
through Toyota technical bulletins, service publications and training
courses. Many are also certified through the Toyota Certification
Program, which involves a series of rigorous written examinations. Feel
free to ask any Toyota dealership to show you its technicians’ credentials.
You can be confident you’re getting the best possible service for your
vehicle when you take it to a Toyota dealership. Plus, a Toyota dealership will always use Genuine Toyota Parts designed specifically for your
vehicle.
GENERAL INFORMATION WHERE TO GO FOR MAINTENANCE
Your Responsibilities
27
Operation and Maintenance
Page 29

WWW.MANUALS.WS
WWW.MANUALS.WS
Warranty coverage is not dependent upon the use of any particular
brand of replacement parts. However, Toyota recommends using only
Genuine Toyota Parts when you need to replace a part on your vehicle.
Like all Toyota products, Genuine Toyota Parts are built to the highest
standards of quality, durability and performance. They are also designed
to fit your vehicle’s exact specifications.
Your Toyota dealership maintains an extensive inventory of Genuine
Toyota Parts to meet your vehicle service needs. And because it is linked
electronically to Toyota’s Parts Distribution Centers, the dealership has
quickaccess to any parts it may not have in stock.
Genuine Toyota Parts are covered by their own warranty (see your dealer
fordetails) or the remainder of any applicable New Vehicle Limited
Warranty, whichever is longer. Non–Genuine Toyota Parts, or any
damage or failures resulting from their use, are not covered by
any Toyota warranty.
REPLACEMENT PARTS
Your Responsibilities
28
Operation and Maintenance
Page 30

WWW.MANUALS.WS
WWW.MANUALS.WS
In the United States, U.S. Territories
and Canada
To obtain warranty service in the United States, U.S. territories or Canada,
take your vehicle to an authorized Toyota dealership. If your vehicle
cannot be driven, contact your nearest Toyota dealership for towing
assistance. You do not have to pay for towing to the nearest Toyota dealership if your vehicle is inoperable due to failure of a warranted part.
Outside the United States, U.S. Territories
and Canada
If you are using your vehicle outside the United States, U.S. territories
and Canada and need warranty service, contact a local Toyota dealership. Please note, however, that your vehicle may not be repaired free
of charge because the local Toyota distributor may have no obligation to
provide warranty service for your vehicle, and/or your vehicle may not
comply with local regulatory or environmental requirements.
If your vehicle is inoperable or unsafe to drive and there is no Toyota
dealership reasonably available to make repairs, you may perform the
repairs yourself or have them performed by another automotive service
provider. Toyota will reimburse you for any of the repairs that are covered by warranty. To receive reimbursement, present to an authorized
Toyota dealership your paid repair invoices and any parts that were
removed from the vehicle. You will be reimbursed for warranted parts
at the manufacturer’s suggested retail price and warranted labor at a
geographically appropriate hourly rate multiplied by Toyota’s recommended time allowance for the repair.
If your vehicle requires emergency repair, Toyota assumes no liability
forsubsequent failures caused by improper repairs or the use of nonGenuine Toyota Parts unless you have the vehicle properly repaired in a
timely manner. To ensure that warranty coverage remains intact, have
your vehicle inspected by an authorized Toyota dealership as soon as
possible after an emergency repair.
Obtaining Warranty Service
Your Responsibilities
29
BY GEOGRAPHIC REGION EMERGENCY REPAIRS
Page 31

WWW.MANUALS.WS
WWW.MANUALS.WS
Notes
30
Page 32

WWW.MANUALS.WS
WWW.MANUALS.WS
Notes
31
Page 33

WWW.MANUALS.WS
WWW.MANUALS.WS
Notes
32
Page 34
WWW.MANUALS.WS
WWW.MANUALS.WS
Page 35
WWW.MANUALS.WS
WWW.MANUALS.WS
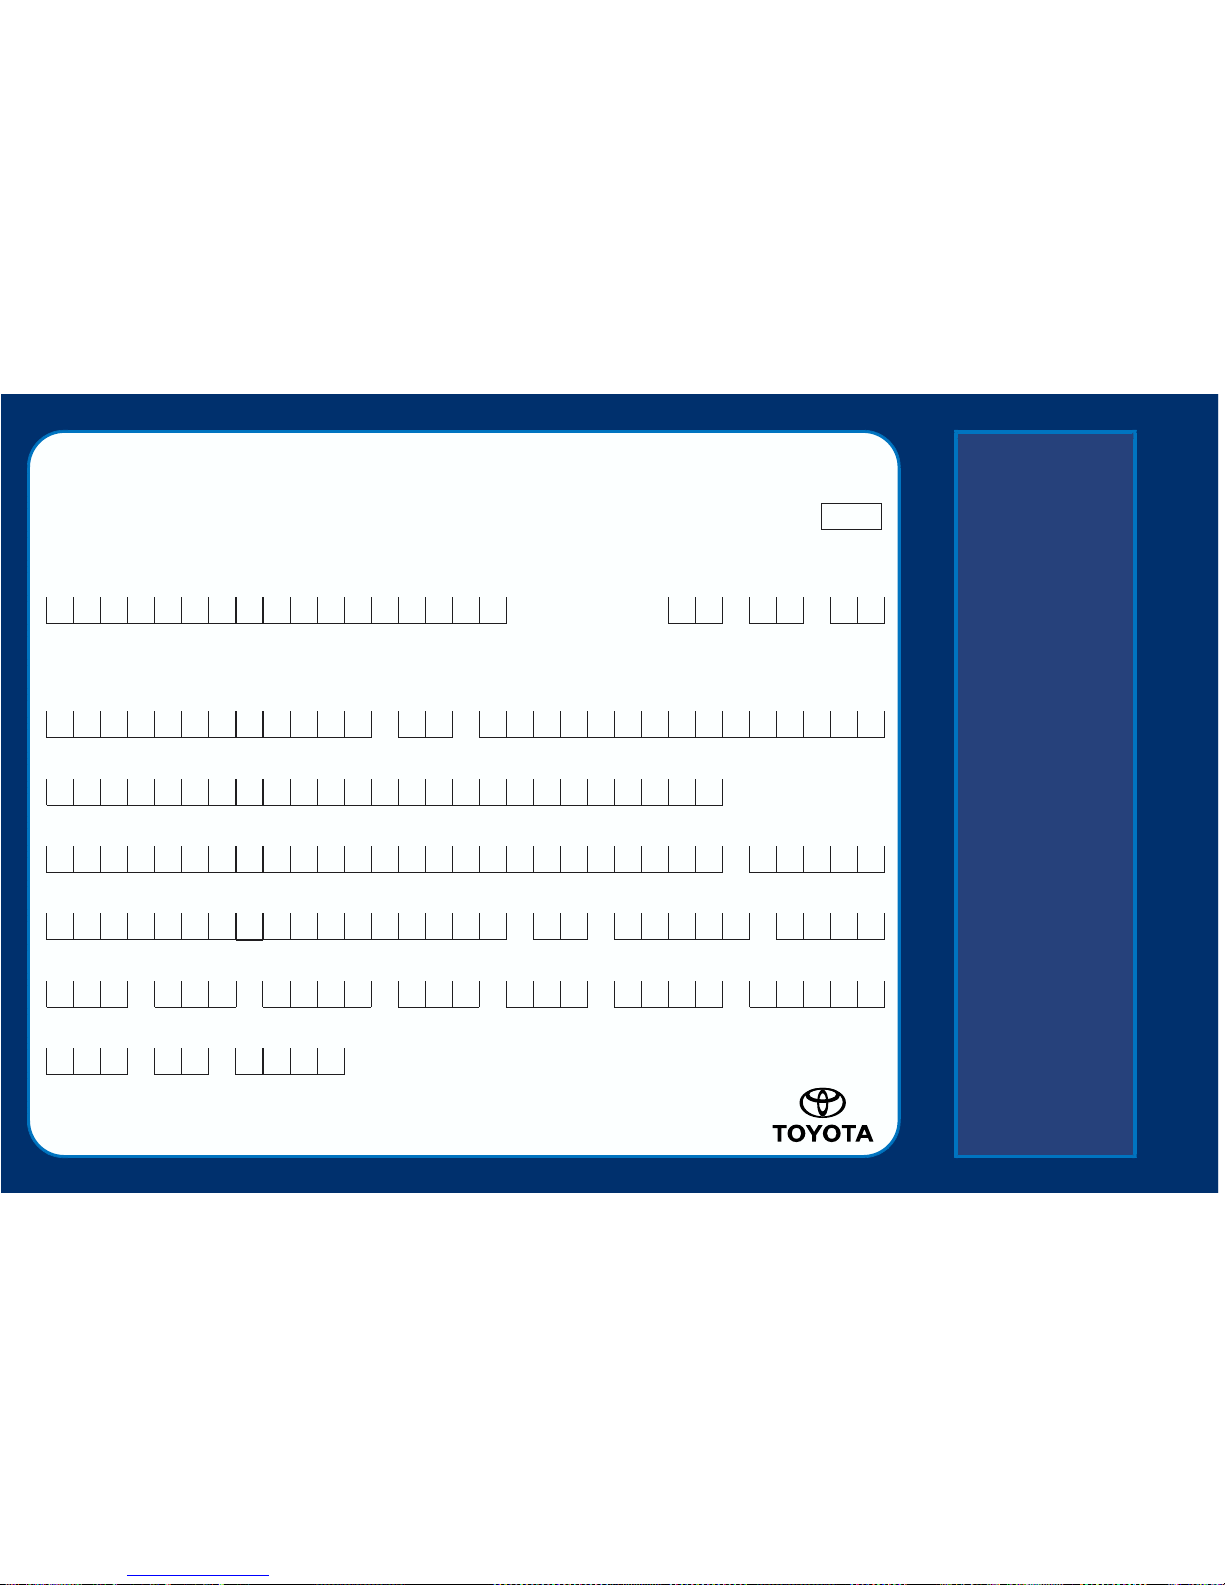
Check one: ■■ Same owner, name and/or address has changed ■■ New owner, purchased vehicle used
■■ Same owner, additional driver who should receive product/safety updates
■■ Mr. ■■ Mrs. ■■ Ms. ■■ Miss ■■ Dr.
Owner Information Change Form
EVV
First name M.I. Last name
Company name
Street address or P.O. Box Apt. or suite number
City State Zip code
Home phone number Work phone number Extension
Vehicle Identification Number (required to process change)
Mo. Day Year
–
–– ––
––
//
Check here if
address below
is for company
■■
This information is obtained solely for the use of Toyota Motor Sales, U.S.A., Inc.
Toyota occasionally sends special promotional offers to registered owners. Check here if you prefer not to receive these offers.
■■
/
Effective date of
this information
Social Security Number
(optional; for Toyota customer reference only)
If your name
or address has
changed or you
purchased your
Toyota as a used
vehicle, please
complete and
mail the attached
card, even if your
warranty coverage
has expired. This
will enable Toyota
to contact you
with important
product or safety
updates concern-
ing your vehicle.
If the card is no
longer attached,
please call the
Toyota Customer
Assistance Center at
(800) 331-4331.
Page 36

WWW.MANUALS.WS
WWW.MANUALS.WS
’03 Corolla U (L/O 0201)
1
2003 MY COROLLA_U (OM12744U)
OPERATION OF INSTRUM ENTS AND
CONTROLS
Overview of instruments and controls
Instrument panel overview 2. . . . . . . . . . . . . . . . . . . . . . . . . . . . . . . . . . . . .
Instrument cluster overview 4. . . . . . . . . . . . . . . . . . . . . . . . . . . . . . . . . . . .
Indicator symbols on the instrument panelel 6. . . . . . . . . . . . . . . . . . . . .
SECTION 1–
1
Page 37
WWW.MANUALS.WS
WWW.MANUALS.WS
’03 Corolla U (L/O 0201)
2
2003 MY COROLLA_U (OM12744U)
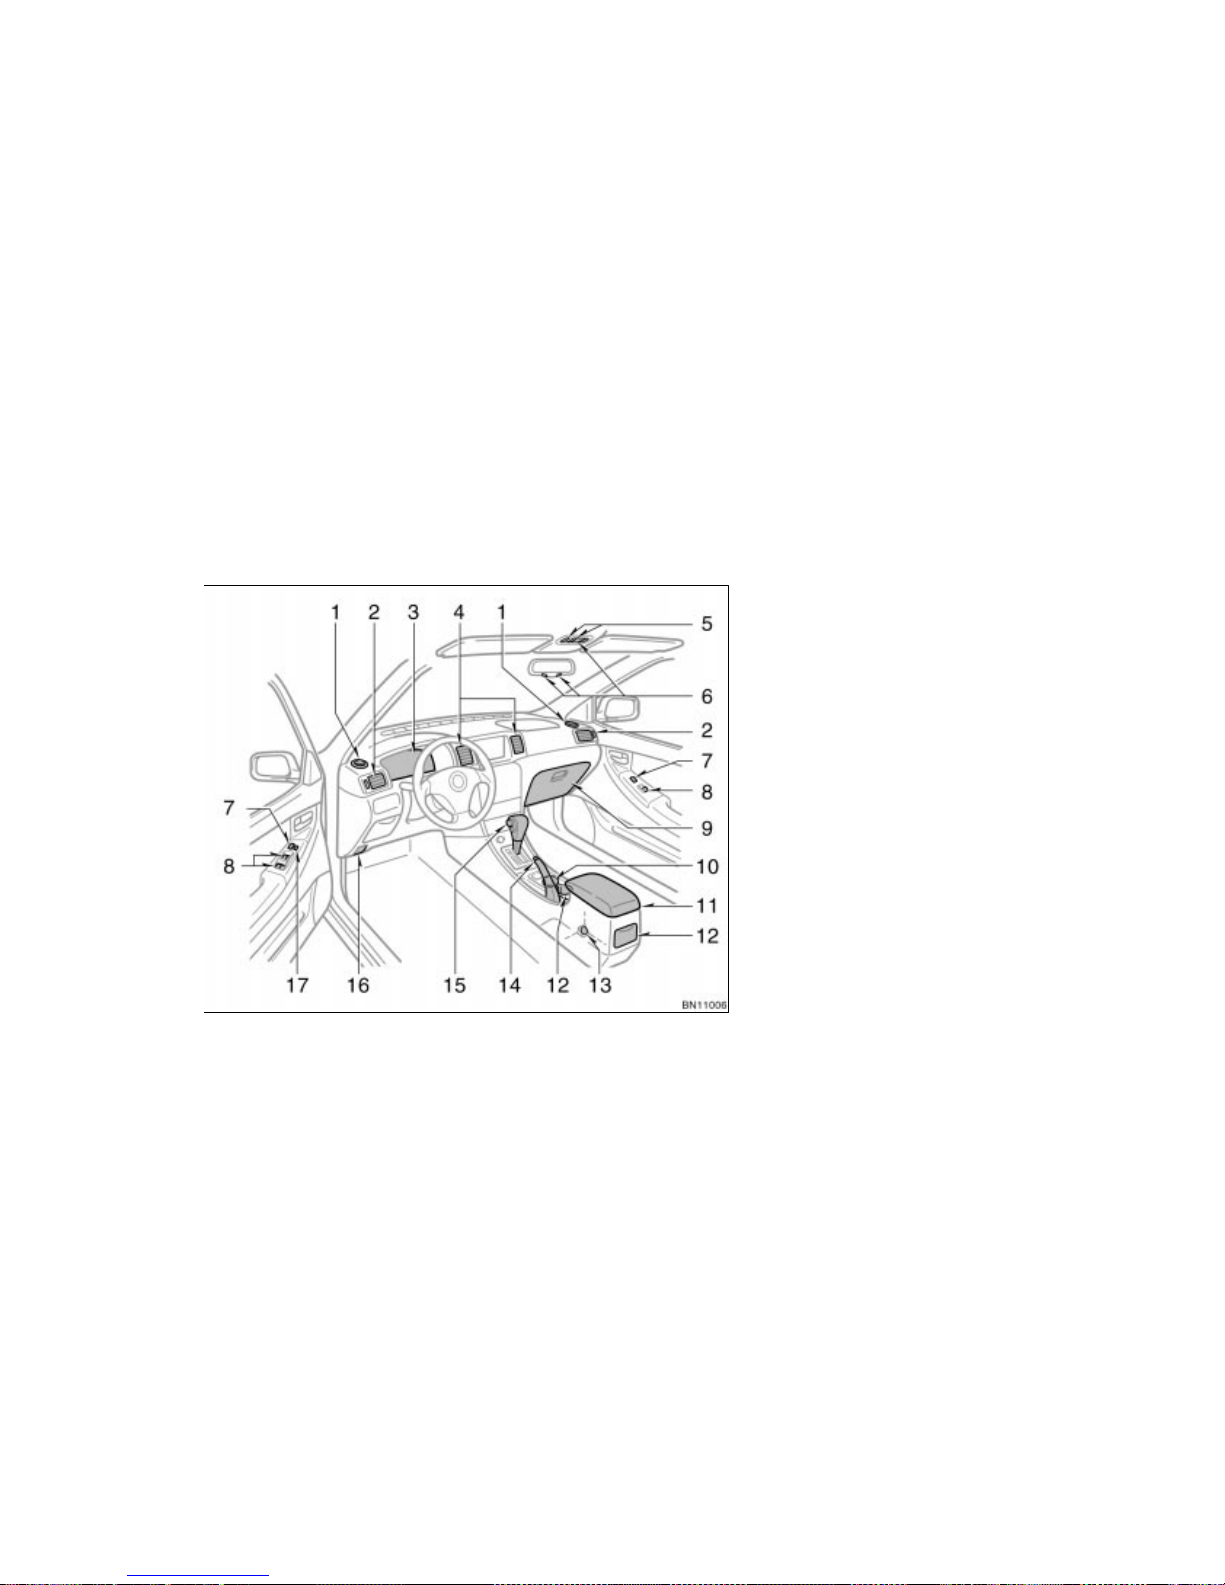
1. Side defros ter outlets
2. Side vents
3. Instr ument cluster
4. Center vents
5. Electr ic moon roof switches
6. Personal li ghts
7. Power door lock swit ches
8. Power window swit ches
9. Glove box
10. Portable a shtray
11. Rear console box
12. Cup holders
13. Power outlet
14. Parking b rake lever
15. Automatic transmission s elector lever
or manual transmi ssion gear shift lev er
16. Hood lock rel ease lever
17. Window lock switch
Instrument panel overview
Page 38
WWW.MANUALS.WS
WWW.MANUALS.WS
’03 Corolla U (L/O 0201)
3
2003 MY COROLLA_U (OM12744U)
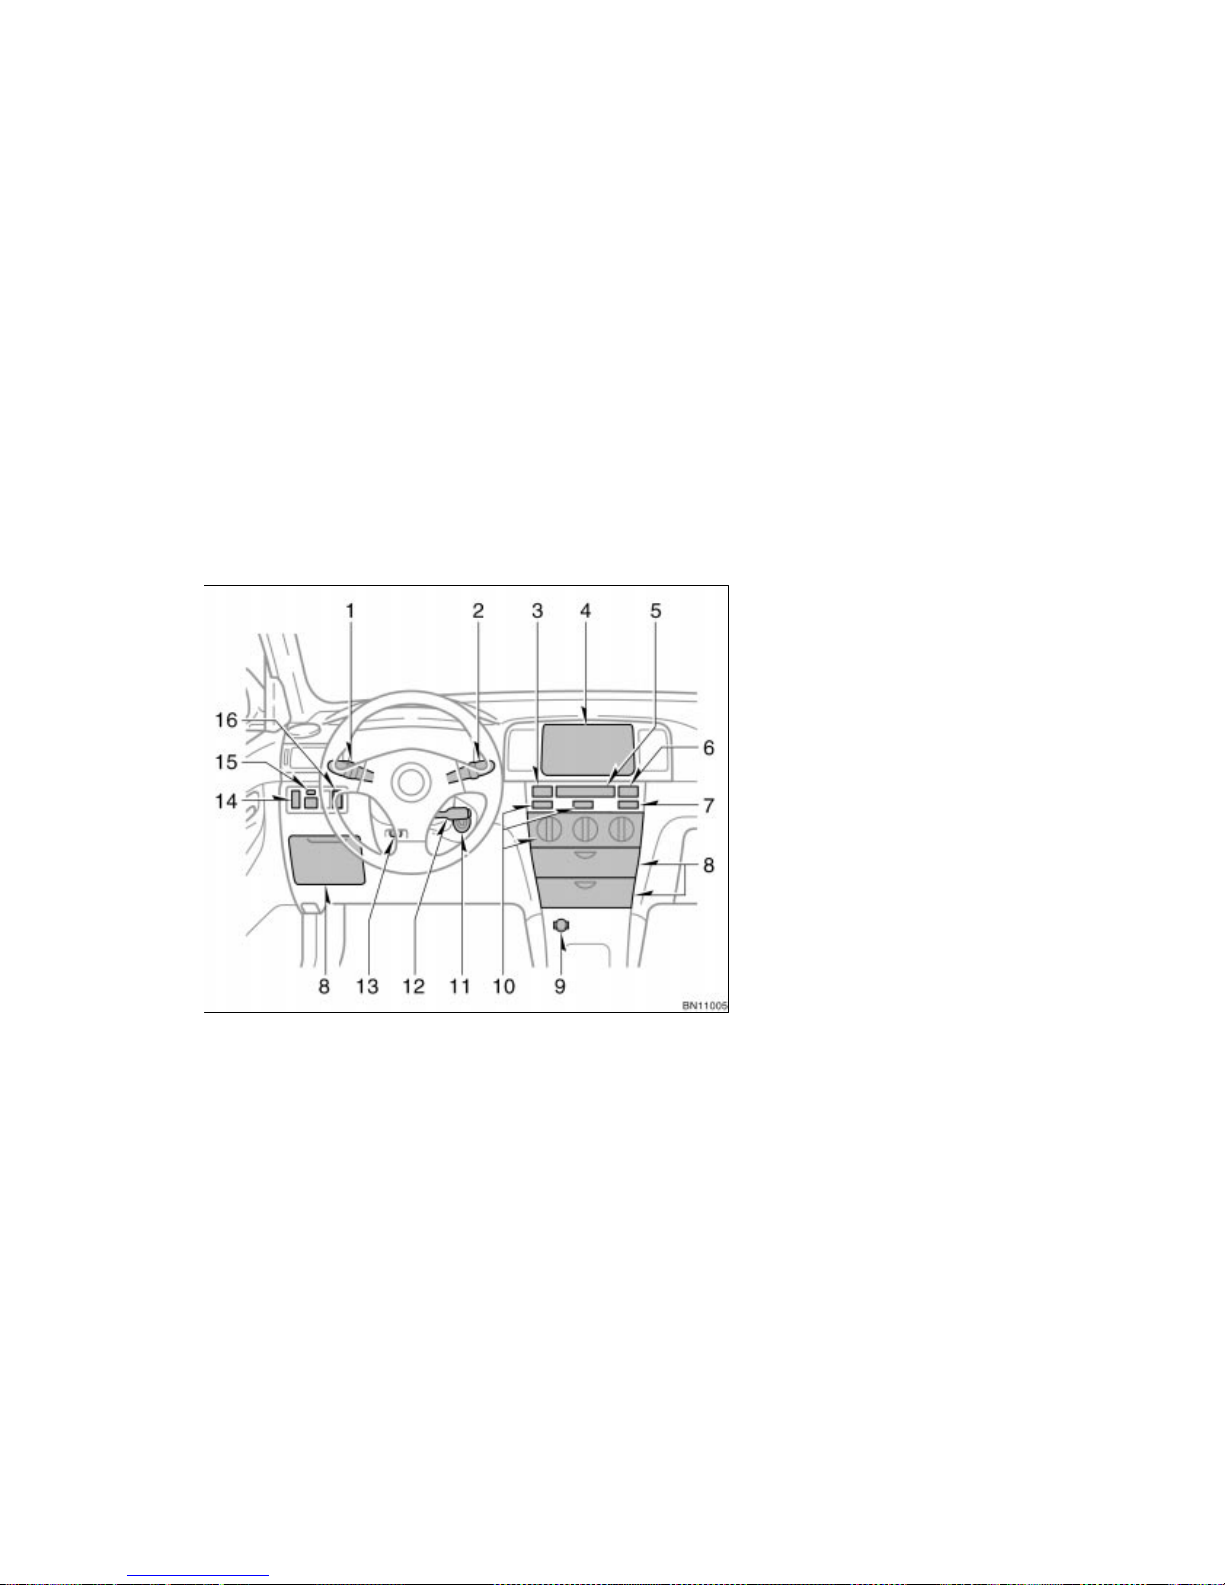
1. Headlight and tur n signal switch and
front fog light swit ch
2. Wiper and washer s witches
3. Emergency fl asher switch
4. Car audio
5. Clock
6. Front pass enger’s seat belt remi nder
light
7. Rear window defogger swi tch
8. Auxiliary boxes
9. Power outlet or cigarette lighter
10. Air conditi oning controls
11. Ignition switc h
12. Cruise c ontrol switch
13. Tilt steeri ng l ock release lever
14. Interi or/instrument panel light control
dial
15. Power rear view mirr or control swit ches
16. Toyota vehicle intr usion protection
system indicator light
Page 39
WWW.MANUALS.WS
WWW.MANUALS.WS
’03 Corolla U (L/O 0201)
4
2003 MY COROLLA_U (OM12744U)
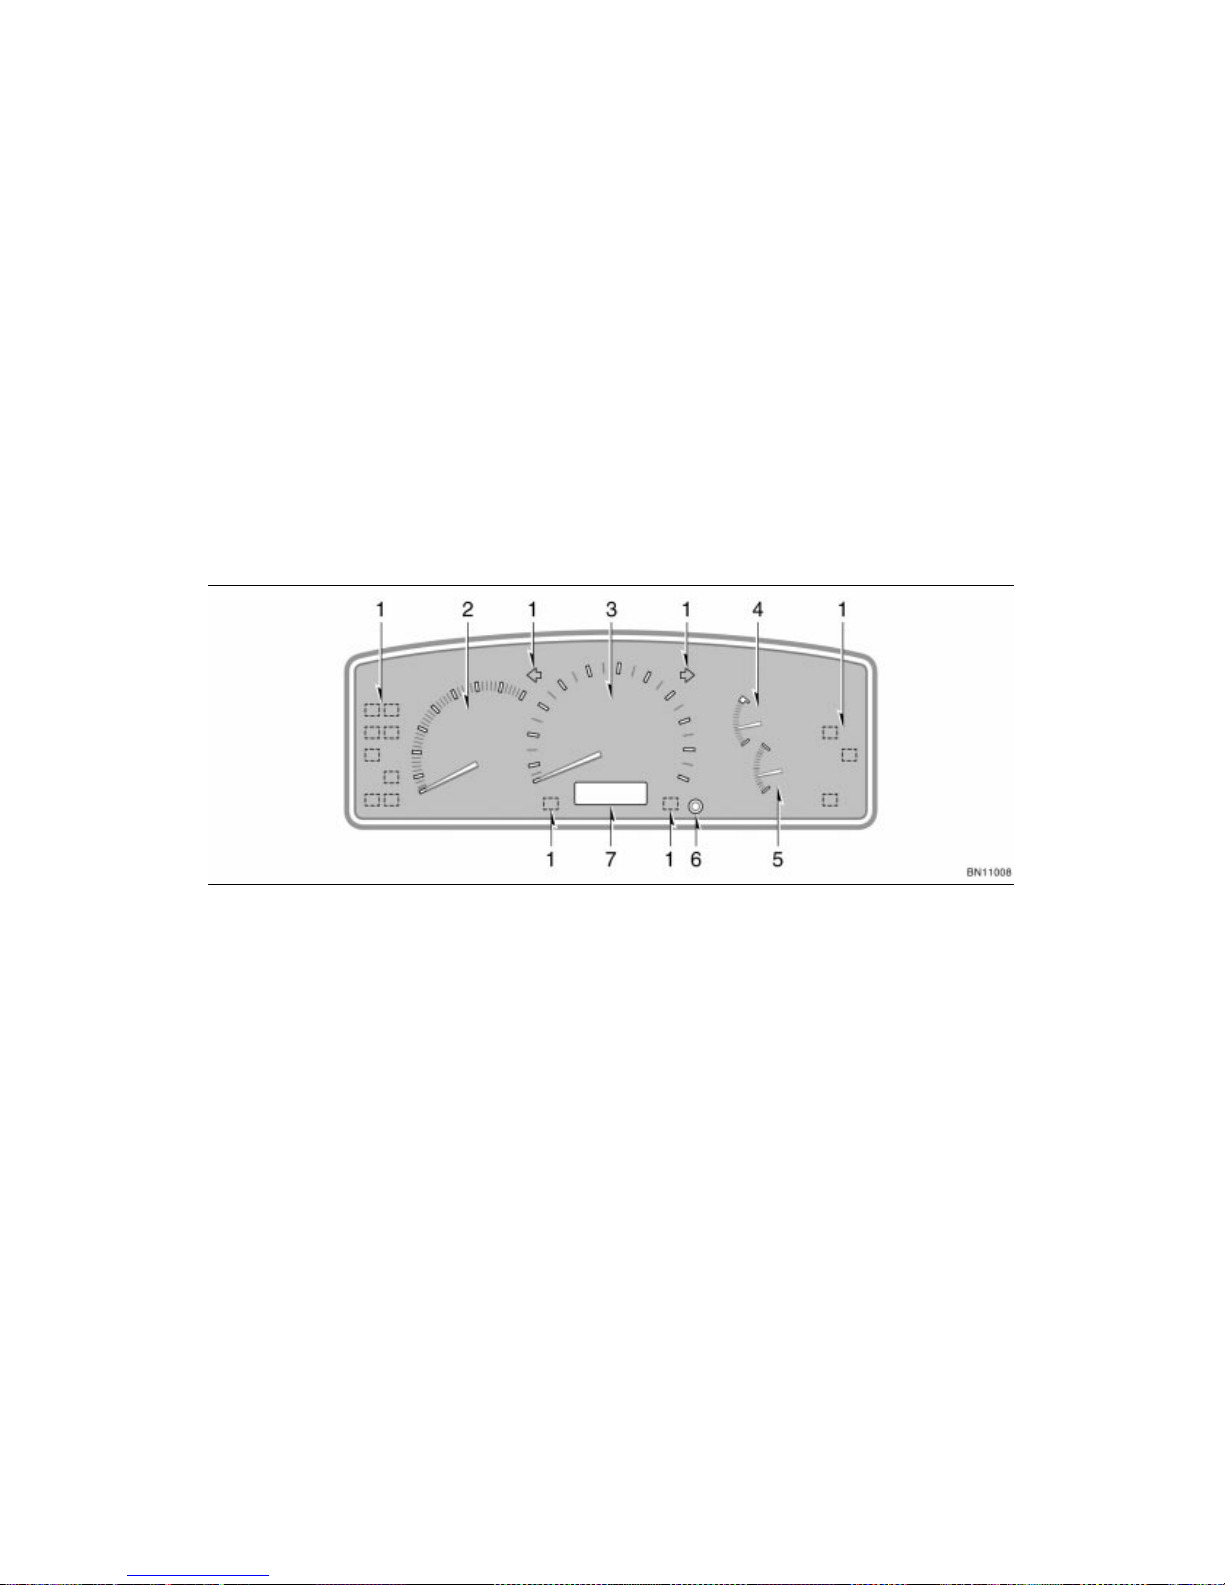
1. Servic e reminder indic ators and
indicator l ights
2. Tachometer
3. Speedometer
4. Engine coolant t emperature gauge
5. Fuel gauge
6. Trip m eter res et knob
7. Odometer, two trip meters and outs ide
temperature d isplay
Instrument cluster overview
Ty pe A
Page 40
WWW.MANUALS.WS
WWW.MANUALS.WS
’03 Corolla U (L/O 0201)
5
2003 MY COROLLA_U (OM12744U)
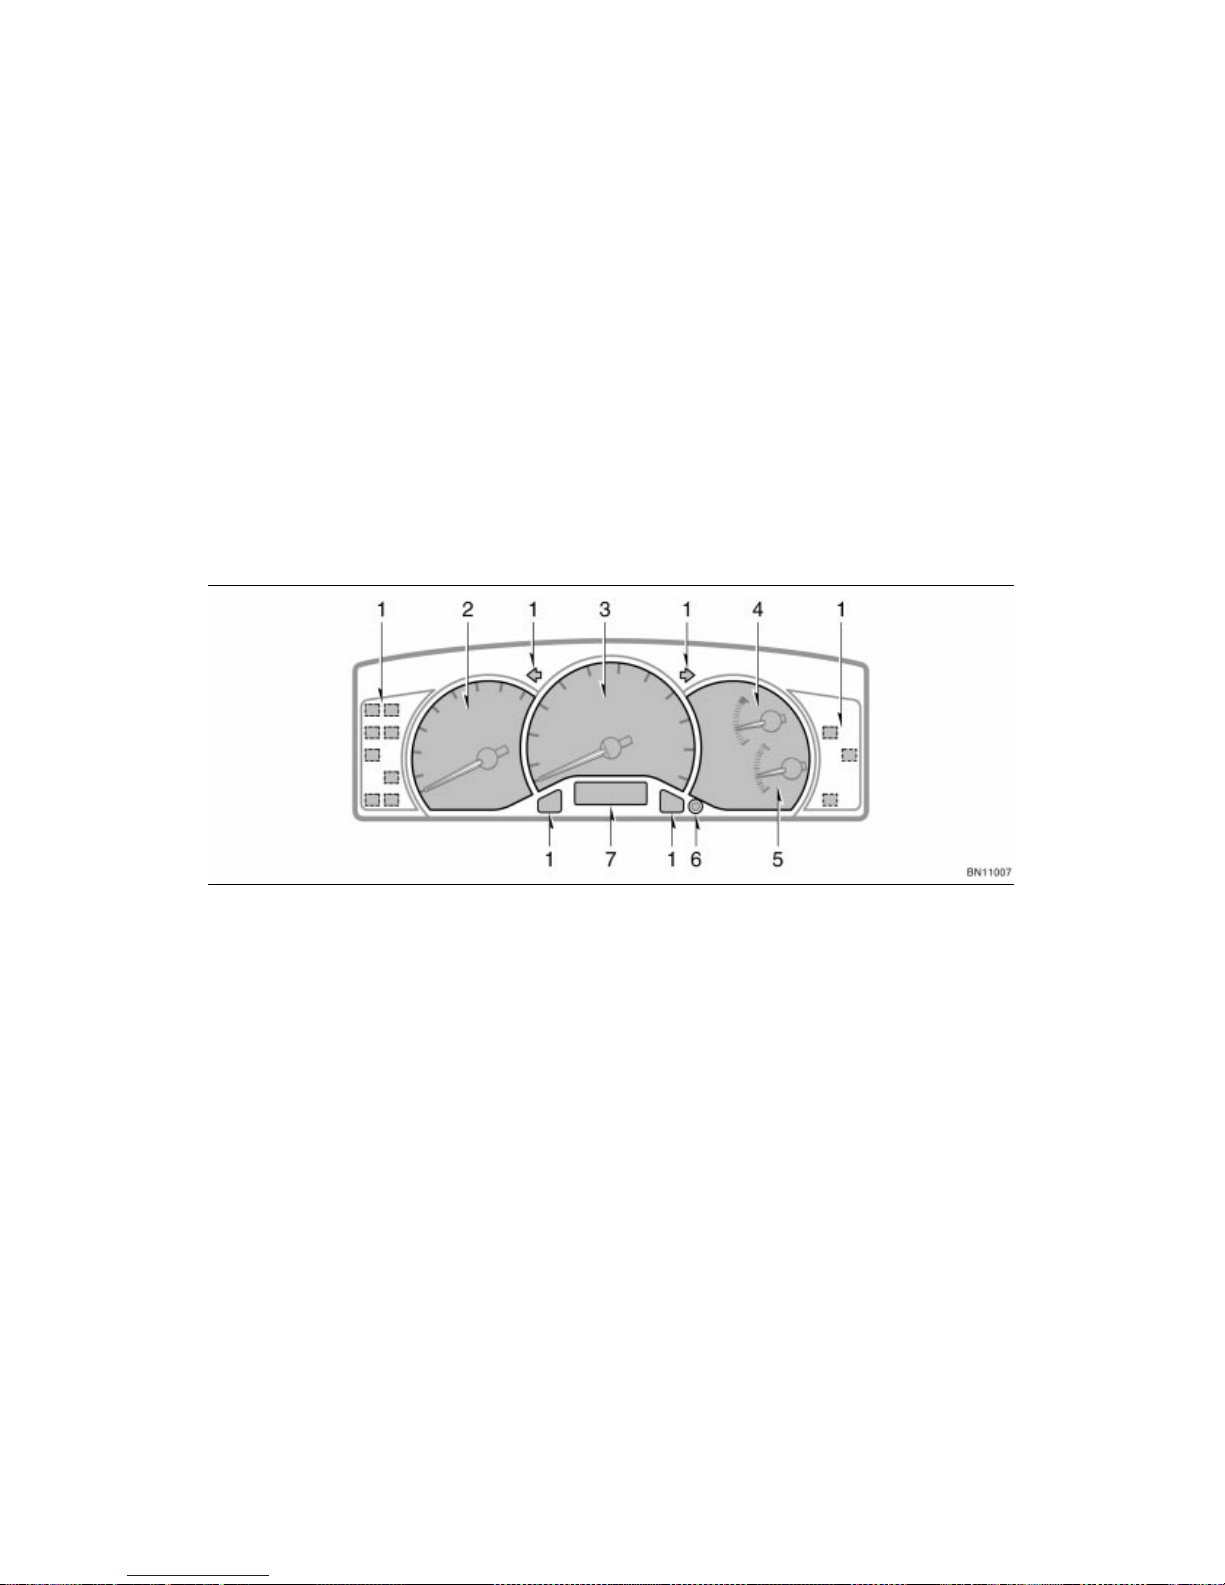
1. Servic e reminder indic ators and
indicator l ights
2. Tachometer
3. Speedometer
4. Engine coolant t emperature gauge
5. Fuel gauge
6. Trip m eter res et knob
7. Odometer, two trip meters and outs ide
temperature d isplay
Ty pe B
Page 41
WWW.MANUALS.WS
WWW.MANUALS.WS
’03 Corolla U (L/O 0201)
6
2003 MY COROLLA_U (OM12744U)
or
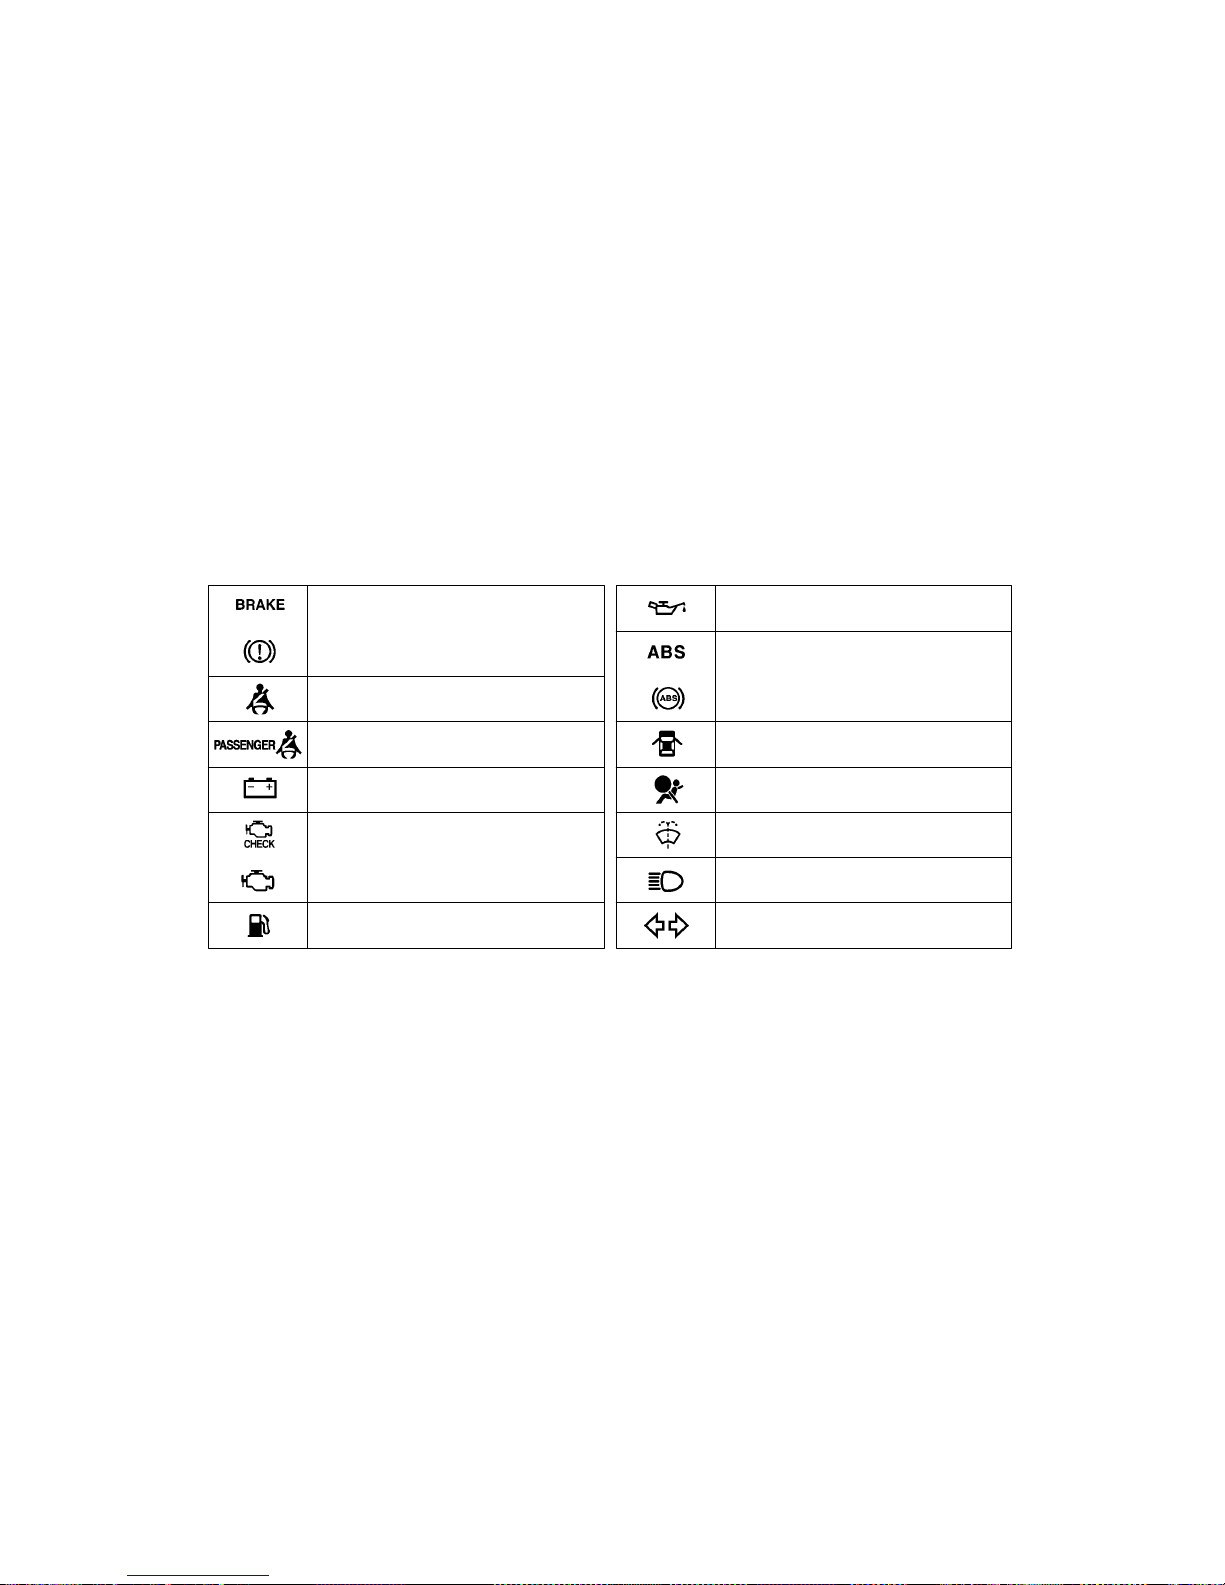
Brake system warning light
∗
1
Driver’s seat belt reminder light
∗
1
Discharge warning light
∗
1
Low fuel level warning light
∗
1
or
Low engine oil pressure warning light
∗
1
Anti–lock brake system warning light
∗
1
Open door warning light
∗
1
SRS warning light
∗
1
Low windshield washer fluid level warning
light
∗
1
Turn signal indicator lights
Headlight high beam indicator light
Front passenger’s seat belt reminder light
∗
1
Malfunction indicator lamp
∗
1
or
Indicator symbols on the instrument panel
Page 42
WWW.MANUALS.WS
WWW.MANUALS.WS
’03 Corolla U (L/O 0201)
7
2003 MY COROLLA_U (OM12744U)
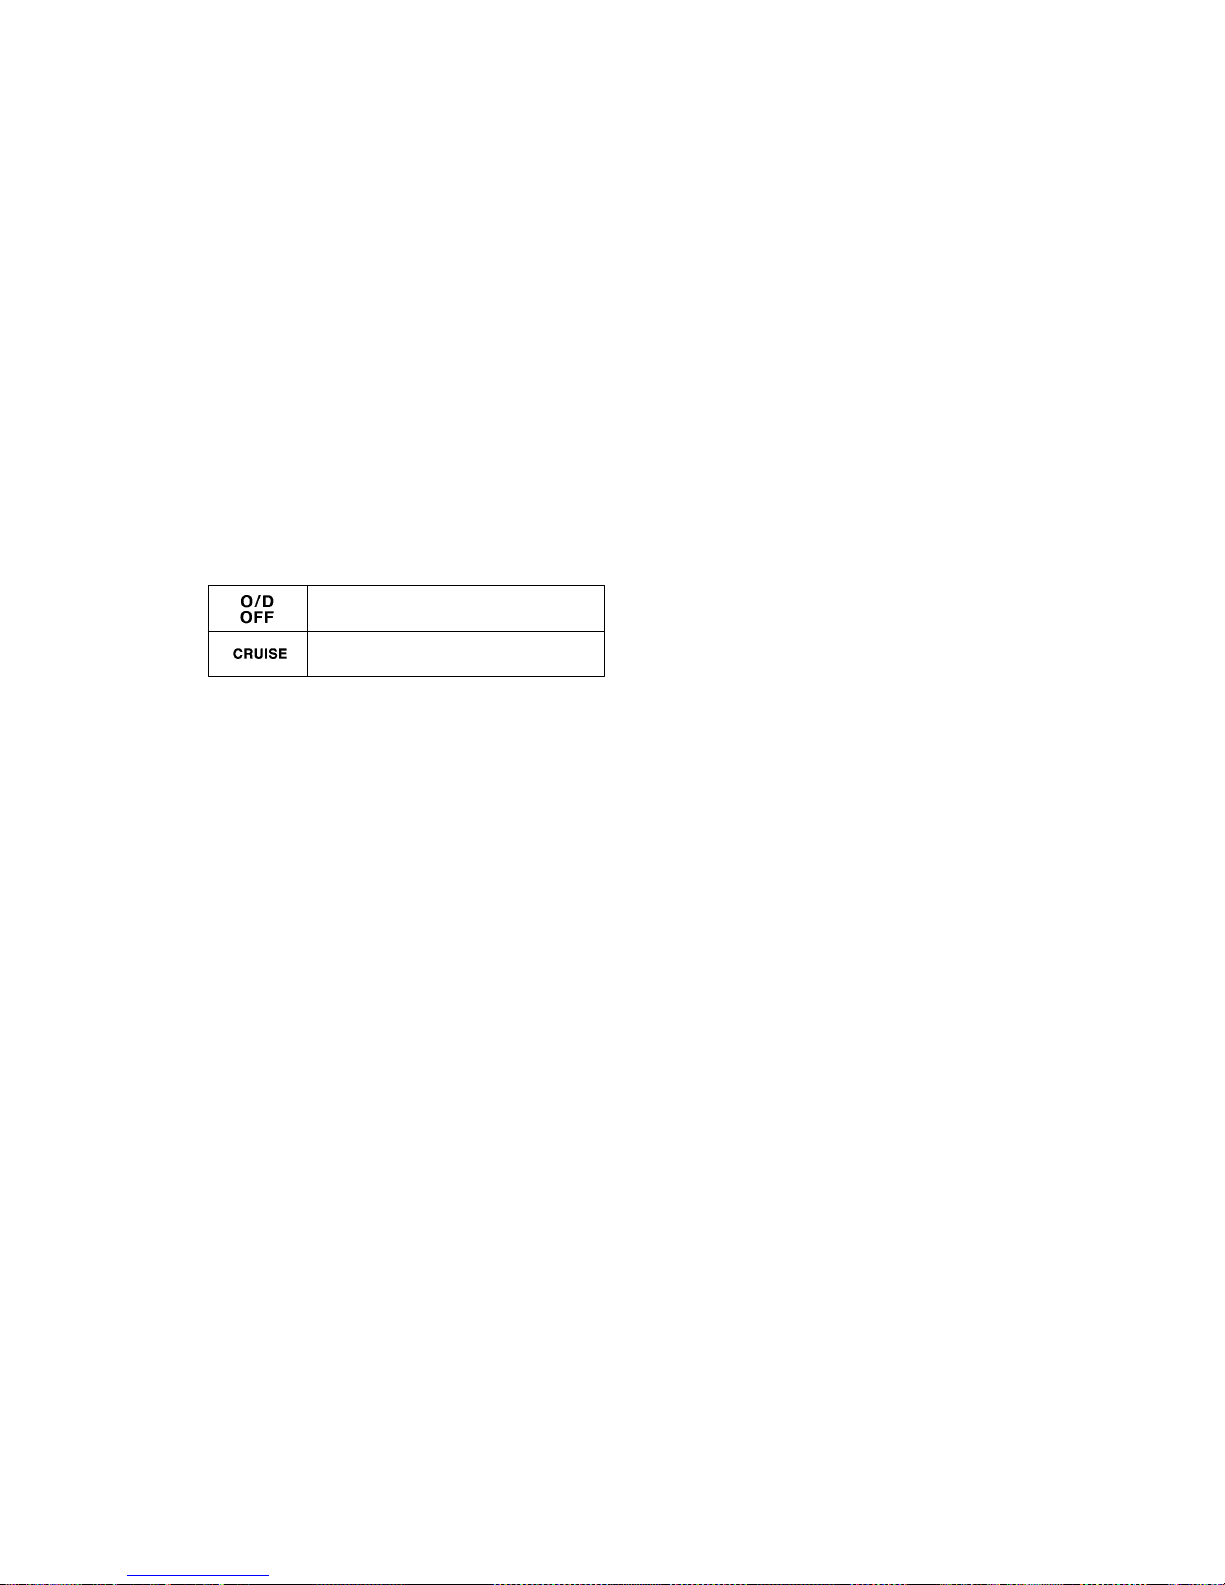
Overdrive–off indicator light
Cruise control indicator light
∗
2
∗
1
: For details, see “Service reminder indicators and warning
buzzers ” on page 85 in Section 1–5.
∗
2
: If this light flashes, see “Cruise control” on page 99 in Sec-
tion 1–6.
Page 43

WWW.MANUALS.WS
WWW.MANUALS.WS
’03 Corolla U (L/O 0201)
8
2003 MY COROLLA_U (OM12744U)
Page 44

WWW.MANUALS.WS
WWW.MANUALS.WS
’03 Corolla U (L/O 0201)
9
2003 MY COROLLA_U (OM12744U)
OPERATION OF INSTRUM ENTS AND
CONTROLS
Keys and Doors
Keys 10. . . . . . . . . . . . . . . . . . . . . . . . . . . . . . . . . . . . . . . . . . . . . . . . . . . . . . .
Side doors 10. . . . . . . . . . . . . . . . . . . . . . . . . . . . . . . . . . . . . . . . . . . . . . . . . .
Power windows 17. . . . . . . . . . . . . . . . . . . . . . . . . . . . . . . . . . . . . . . . . . . . . .
Trunk lid 18. . . . . . . . . . . . . . . . . . . . . . . . . . . . . . . . . . . . . . . . . . . . . . . . . . . .
Toyota vehicle intrusion protection system (TVIP) 20. . . . . . . . . . . . . . .
Hood 22. . . . . . . . . . . . . . . . . . . . . . . . . . . . . . . . . . . . . . . . . . . . . . . . . . . . . . .
Fuel tank cap 23. . . . . . . . . . . . . . . . . . . . . . . . . . . . . . . . . . . . . . . . . . . . . . .
Electric moon roof 25. . . . . . . . . . . . . . . . . . . . . . . . . . . . . . . . . . . . . . . . . . .
SECTION 1–
2
Page 45
WWW.MANUALS.WS
WWW.MANUALS.WS
’03 Corolla U (L/O 0201)
10
2003 MY COROLLA_U (OM12744U)
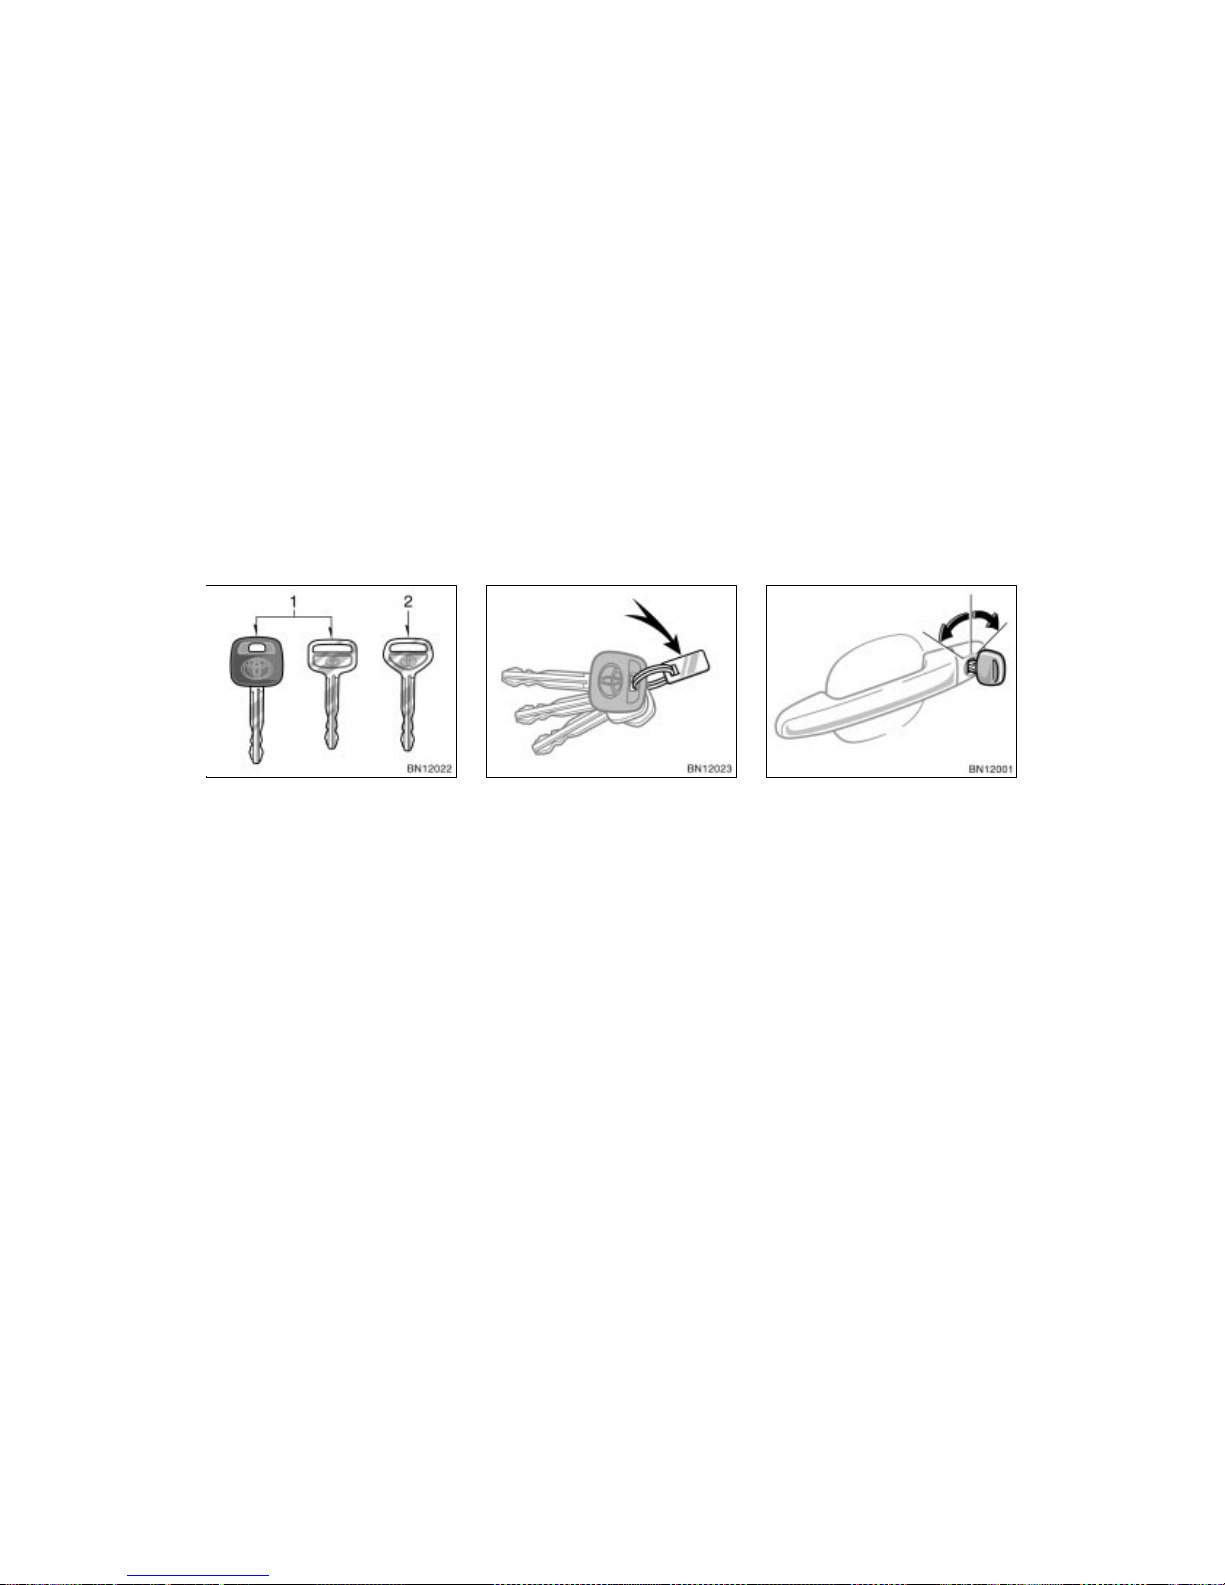
Your vehicle is supplied with two kinds
of keys.
1. Master key—This key works in every
lock.
2. Sub key—This key will not work in the
trunk.
To protect items locked in the trunk when
using valet parking, leave the sub key
with the attendant.
Since all the doors and trunk lid can be
locked without a key, you should always
carry a spare master key in case you
accidentally lock your keys inside the vehicle.
KEY NUMBER PLATE
Your key number is shown on the plate.
Keep the plate in a safe place such as
your wallet, not in the vehicle.
If you should lose your keys or if you
need additional keys, duplicates can be
made by a Toyota dealer using the key
number.
We recommend writing down the key number and storing it in a safe place.
LOCKING AND UNLOCKING WITH KEY
Insert the key into the keyhole and turn
it.
To lock: Turn the key forward.
To unlock: Turn the key backward.
Vehicles with power door lock system—
All the doors lock and unlock simulta-
neously with either front door. In the driver’s door lock, turning the key once will
unlock the driver’s door and twice in succession will unlock all the doors simultaneously.
Keys Side doors—
Page 46
WWW.MANUALS.WS
WWW.MANUALS.WS
’03 Corolla U (L/O 0201)
11
2003 MY COROLLA_U (OM12744U)
When the interior light dial is in the
DOOR position, and all doors are unlocked simultaneously using either the key
or the wireless remote control transmitter,
the interior light will come on and remain
on for about 15 seconds before fading
out. (For further information, see “Interior/
instrument panel light control” on page 77
in Section 1–4.)
LOCKING AND UNLOCKING WITH
INSIDE LOCK KNOB
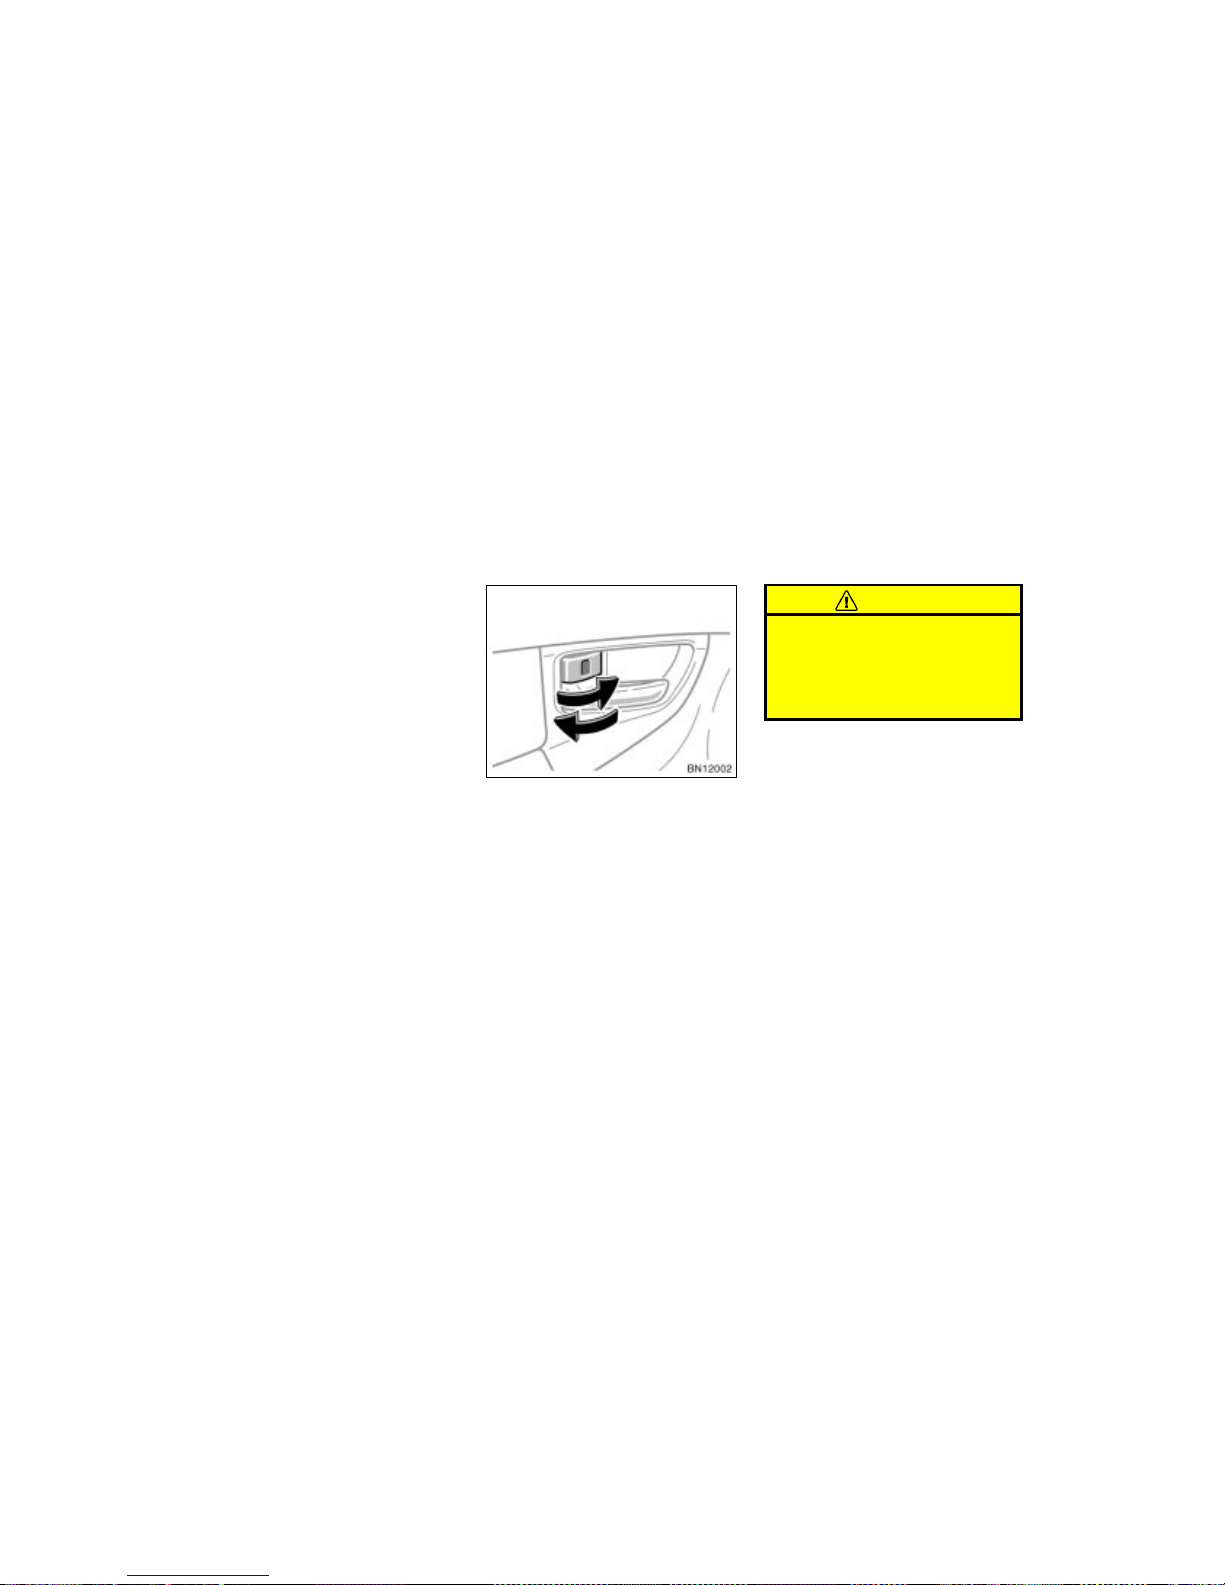
Move the lock knob.
To lock: Push the knob forward.
To unlock: Pull the knob backward.
The front doors can be opened by pulling
the inside handle even if the lock knobs
are in the locked position.
CAUTION
Do not pull the inside handle of the
front doors while driving. The doors
will open and an accident may occur.
Toyota strongly recommends that all
children be placed in the rear seat of
the vehicle.
Closing the door with the lock knob in the
lock position will also lock the door. Be
careful not to lock your keys in the vehicle.
Vehicles with power door lock system—
Doors cannot be locked when either front
door is open and the key is in the ignition.
Page 47
WWW.MANUALS.WS
WWW.MANUALS.WS
’03 Corolla U (L/O 0201)
12
2003 MY COROLLA_U (OM12744U)
Driver’s side
Passenger’s side
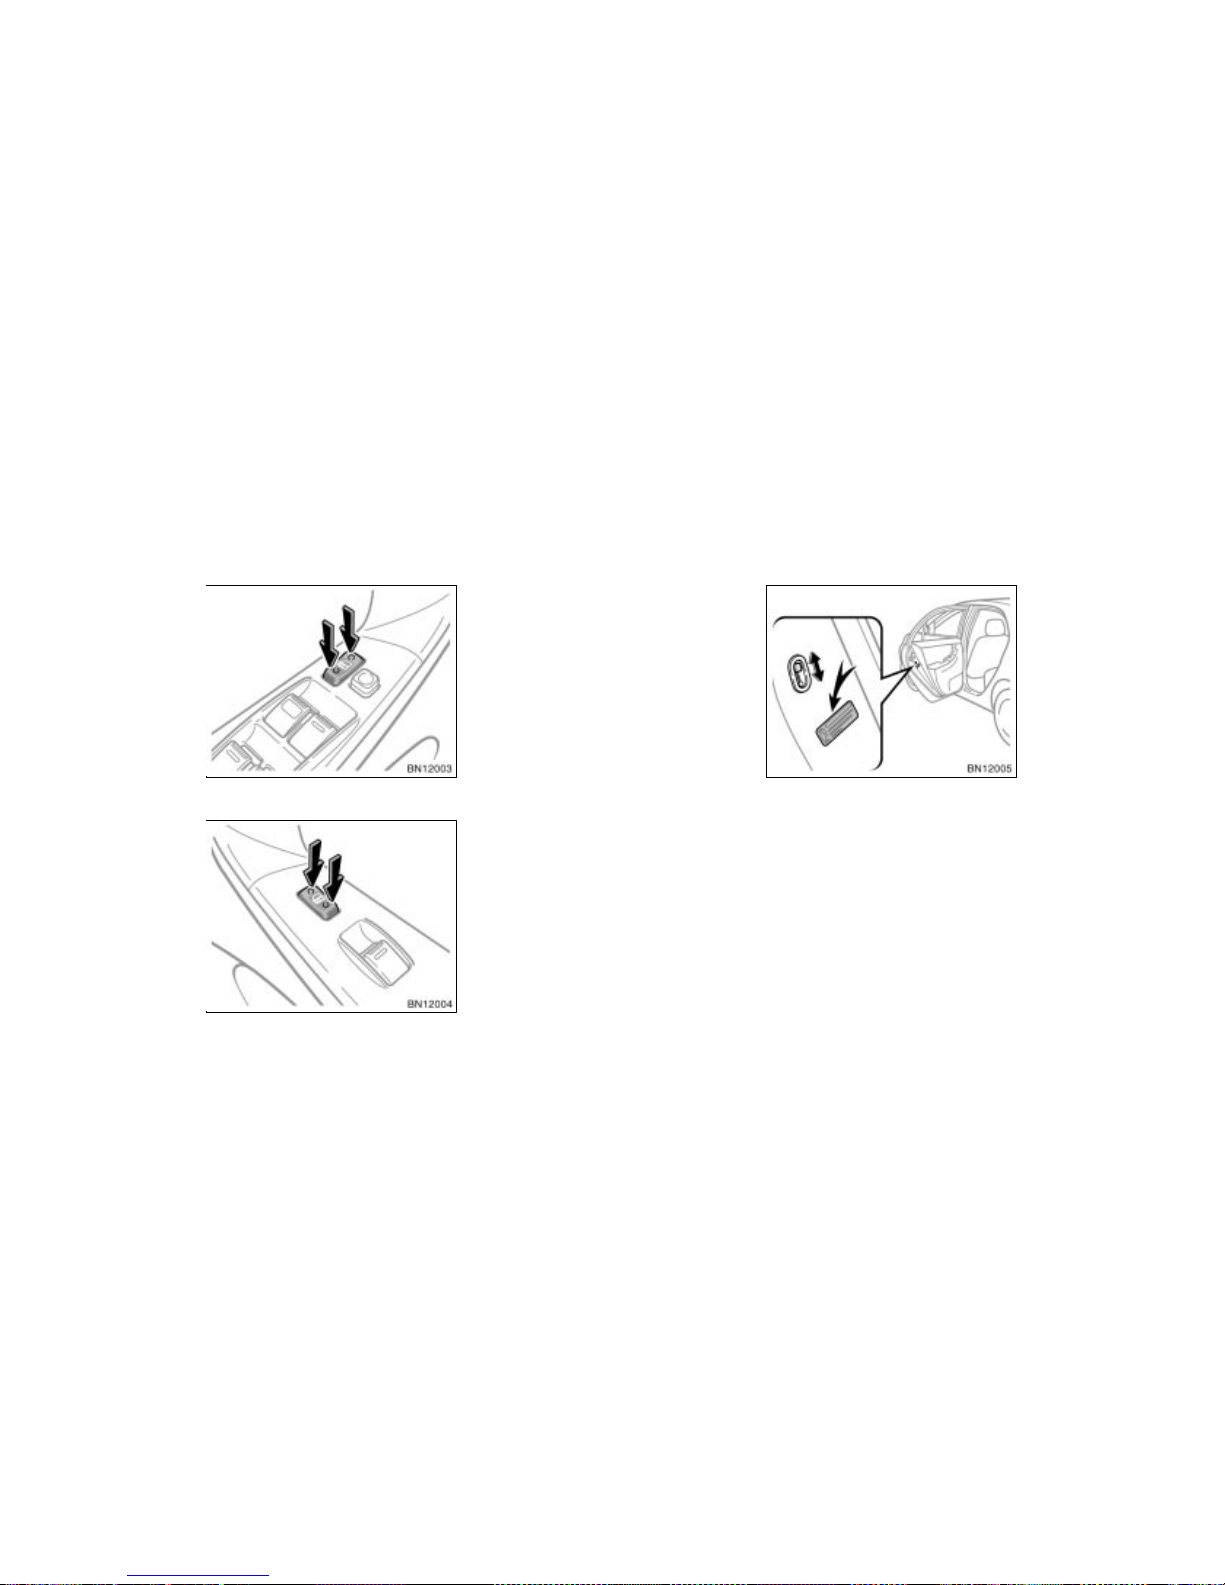
LOCKING AND UNLOCKING WITH
POWER DOOR LOCK SWITCH
Push the switch.
To lock: Push the switch down on the
front side.
To unlock: Push the switch down on the
rear side.
Operating the switch simultaneously locks
or unlocks all the doors.
If you do either of the following, no door
can be unlocked with the power door lock
switch.
Lock all the doors with the key or wire-
less remote control transmitter when all
the doors are closed.
Open the driver’s door or front passen-
ger’s door and move the inside lock
knobs of both front doors to the lock
position, then close the front doors.
The power door lock switch can be reset
in the following ways.
Turn the ignition key to “ON”.
Unlock all the doors with the key or
wireless remote control transmitter.
Unlock the driver’s door or front pas-
senger’s door with the inside lock
knob, and then unlock all the doors
with the power door lock switch.
REAR DOOR CHILD–PROTECTORS
Move the lock lever to the “LOCK”
position as shown on the label.
This feature allows you to lock a rear
door so it can be opened from the outside
only, not from inside. We recommend using this feature whenever small children
are in the vehicle.
Page 48
WWW.MANUALS.WS
WWW.MANUALS.WS
’03 Corolla U (L/O 0201)
13
2003 MY COROLLA_U (OM12744U)
CAUTION
Before driving, be sure that the doors
are closed and locked, especially
when small children are in the vehicle. Along with the proper use of
seat belts, locking the doors helps
prevent the driver and passengers
from being thrown out from the vehicle during an accident. It also helps
prevent the doors from being opened
unintentionally.
Locking operation
Unlocking operation
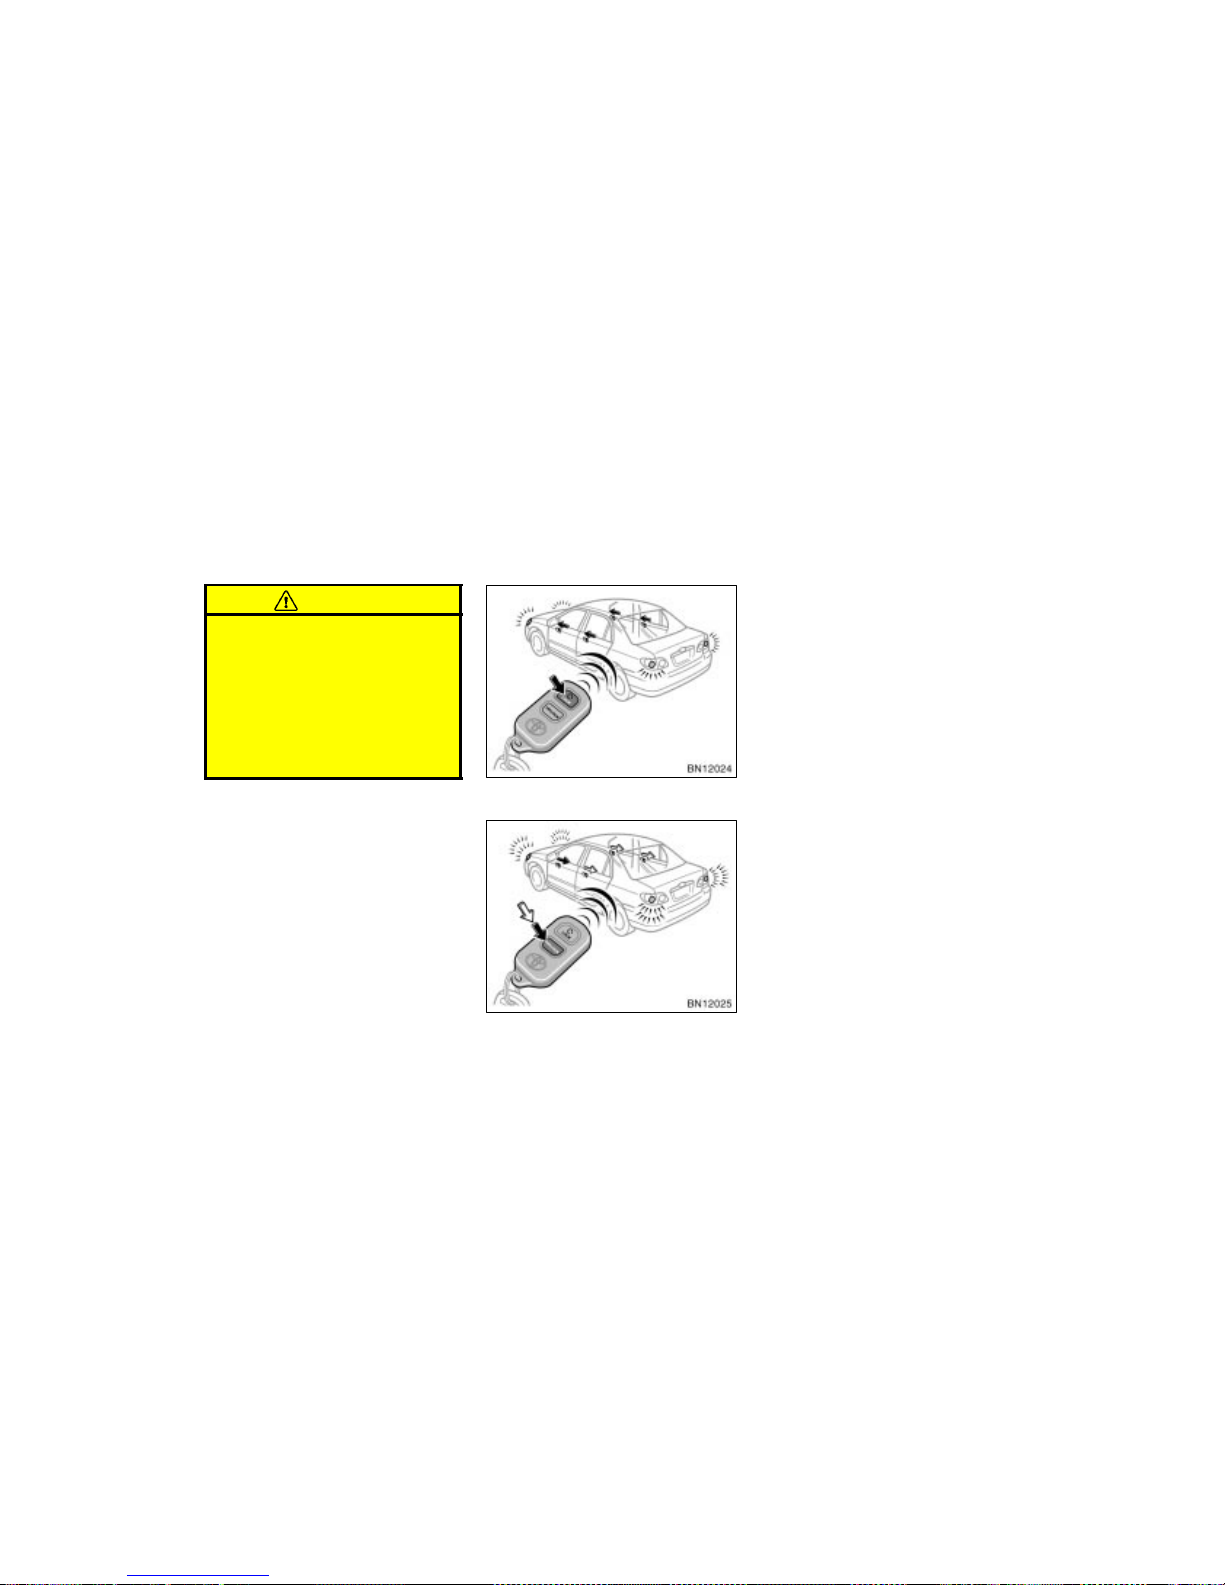
The wireless remote control system is
designed to lock or unlock all the
doors or activate the “PANIC” mode
from a distance within approximately 1
m (3 ft.) of the vehicle.
LOCKING AND UNLOCKING THE
DOORS
To lock and unlock all the doors, push
the switches of the transmitter slowly
and securely.
To lock: Push the “LOCK” switch. All the
doors are locked simultaneously. At this
time the turn signal lights will flash once.
Check to see that the doors are securely
locked.
If any door is not securely closed, locking
cannot be performed by the “LOCK”
switch.
To unlock: Push the “UNLOCK” switch
once to unlock the driver’s door alone.
Pushing the switch twice within 3 seconds
unlocks all the doors simultaneously. Each
time the “UNLOCK” switch is pushed, the
turn signal lights will flash twice.
—Wireless remote control
Page 49
WWW.MANUALS.WS
WWW.MANUALS.WS
’03 Corolla U (L/O 0201)
14
2003 MY COROLLA_U (OM12744U)
When the “UNLOCK” switch is pressed,
the interior light comes on. The light remains on for about 15 seconds u nless any
door is opened and closed. (For further
information, see “Interior/instrument panel
light control” on page 77 in Section 1–4.)
You have 30 s econds to open a door a fter
using the wireless remote unlock feature.
If a door is not opened by then, all the
doors will be automatically locked again.
If the “LOCK” or “UNLOCK” switch is kept
pressed in, the locking or unlocking operation is not repeated. Release the button
and then push again.
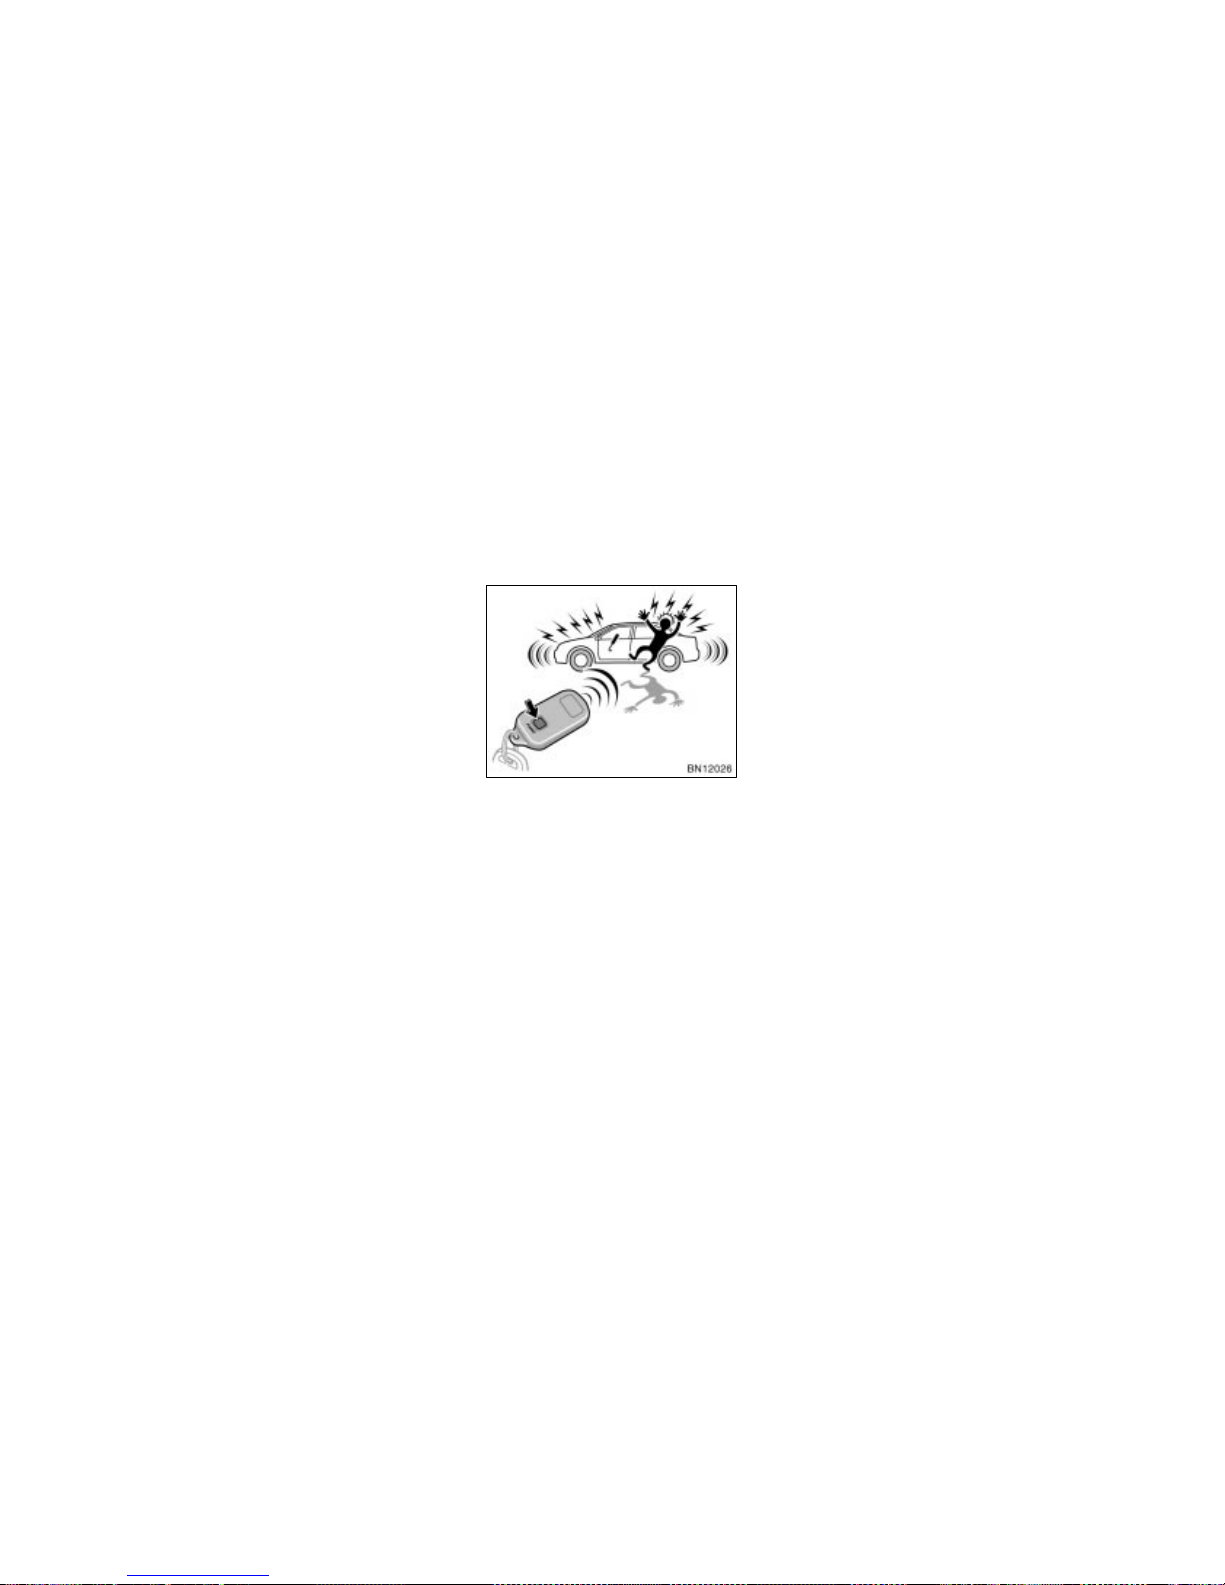
“PANIC” SWITCH
Pushing the “PANIC” switch blows the
horn intermittently and flashes the
headlights, tail lights, turn signal lights
and interior light.
The “PANIC” switch is used to deter vehicle theft when you witness anyone attempting to break into or damage your
vehicle.
The alarm will last for one minute. To stop
the alarm midway, push any switch on the
transmitter or turn the ignition key from
the “LOCK” to “ON” position.
The “PANIC” mode does not work when
the ignition key is in the “ON” position.
WIRELESS REMOTE CONTROL
TRANSMITTER
The wireless remote control transmitter is
an electronic component. Observe the following instructions in order not to cause
damage to the transmitter.
Do not leave the transmitter on places
where the temperature becomes high
such as on the dashboard.
Do not disassemble it.
Avoid knocking it hard against other
objects or dropping it.
Avoid putting it in water.
You can use up to 4 wireless remote control transmitters for the same vehicle.
Contact your Toyota dealer for detailed
information.
If the wireless remote control transmitter
does not actuate the doors or alarm, or
operate from a normal distance:
Check for closeness to a radio trans-
mitter such as a radio station or an
airport which can interfere with normal
operation of the transmitter.
The battery may have been consumed.
Check the battery in the transmitter. To
replace the battery, see “REPLACING
TRANSMITTER BATTERY”.
Page 50
WWW.MANUALS.WS
WWW.MANUALS.WS
’03 Corolla U (L/O 0201)
15
2003 MY COROLLA_U (OM12744U)
If you lose your transmitter, contact your
Toyota dealer as soon as possible to
avoid the possibility of theft, or an accident. (See “If you lose your wireless remote control transmitter” on page 186 in
Section 4.)
MODEL/FCC ID: GQ43VT27R
CAN: 1470 104 105A
MADE IN U.S.A.
This complies with Part 15 of the FCC
rules. Operation is subject to the following two conditions:
(1) This device may not cause harmful
interference, and (2) this device must
accept any interference received, including interference that may cause undesired operation.
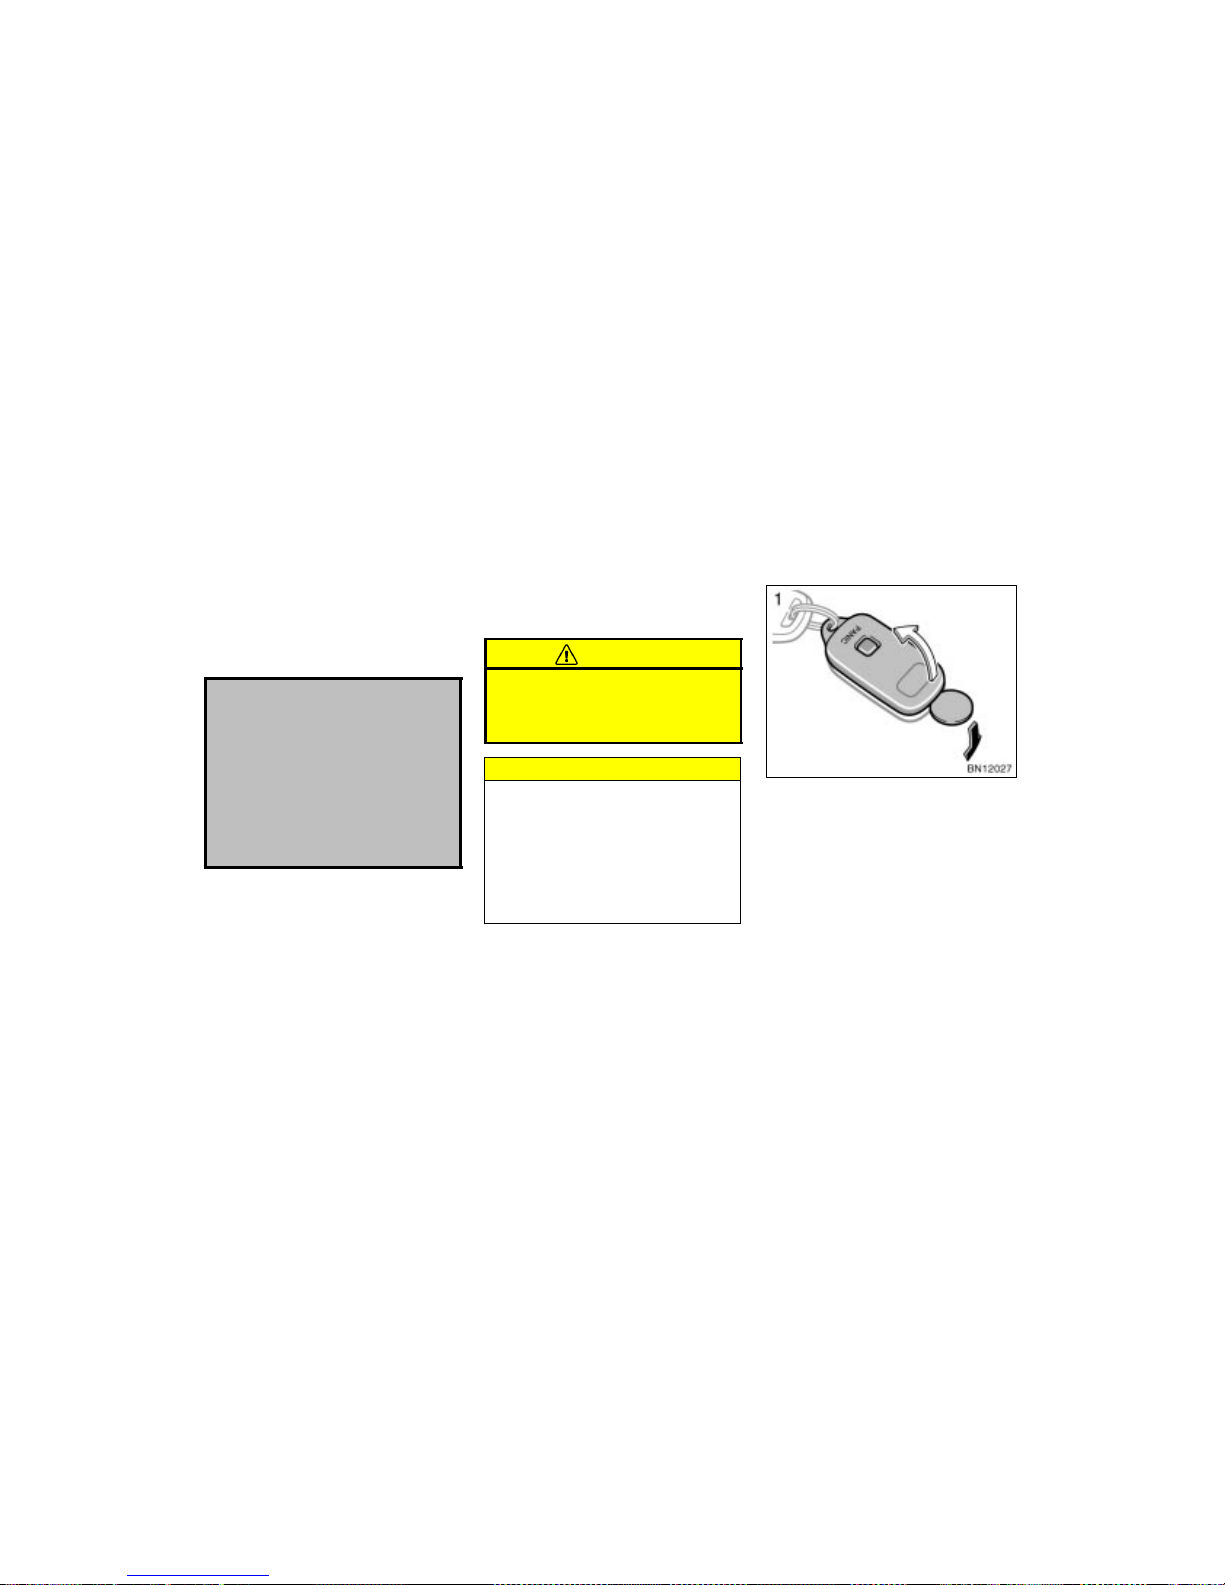
REPLACING TRANSMITTER BATTERY
For replacement, use a CR2032 lithium
battery or equivalent.
CAUTION
Special care should be taken that
small children do not swallow the removed transmitter battery or components.
NOTICE
When replacing the transmitter battery, be caref ul not to lose the components.
Replace only with the same or
equivalent type recommended by a
Toyota dealer.
Dispose of used batteries according
to the local laws.
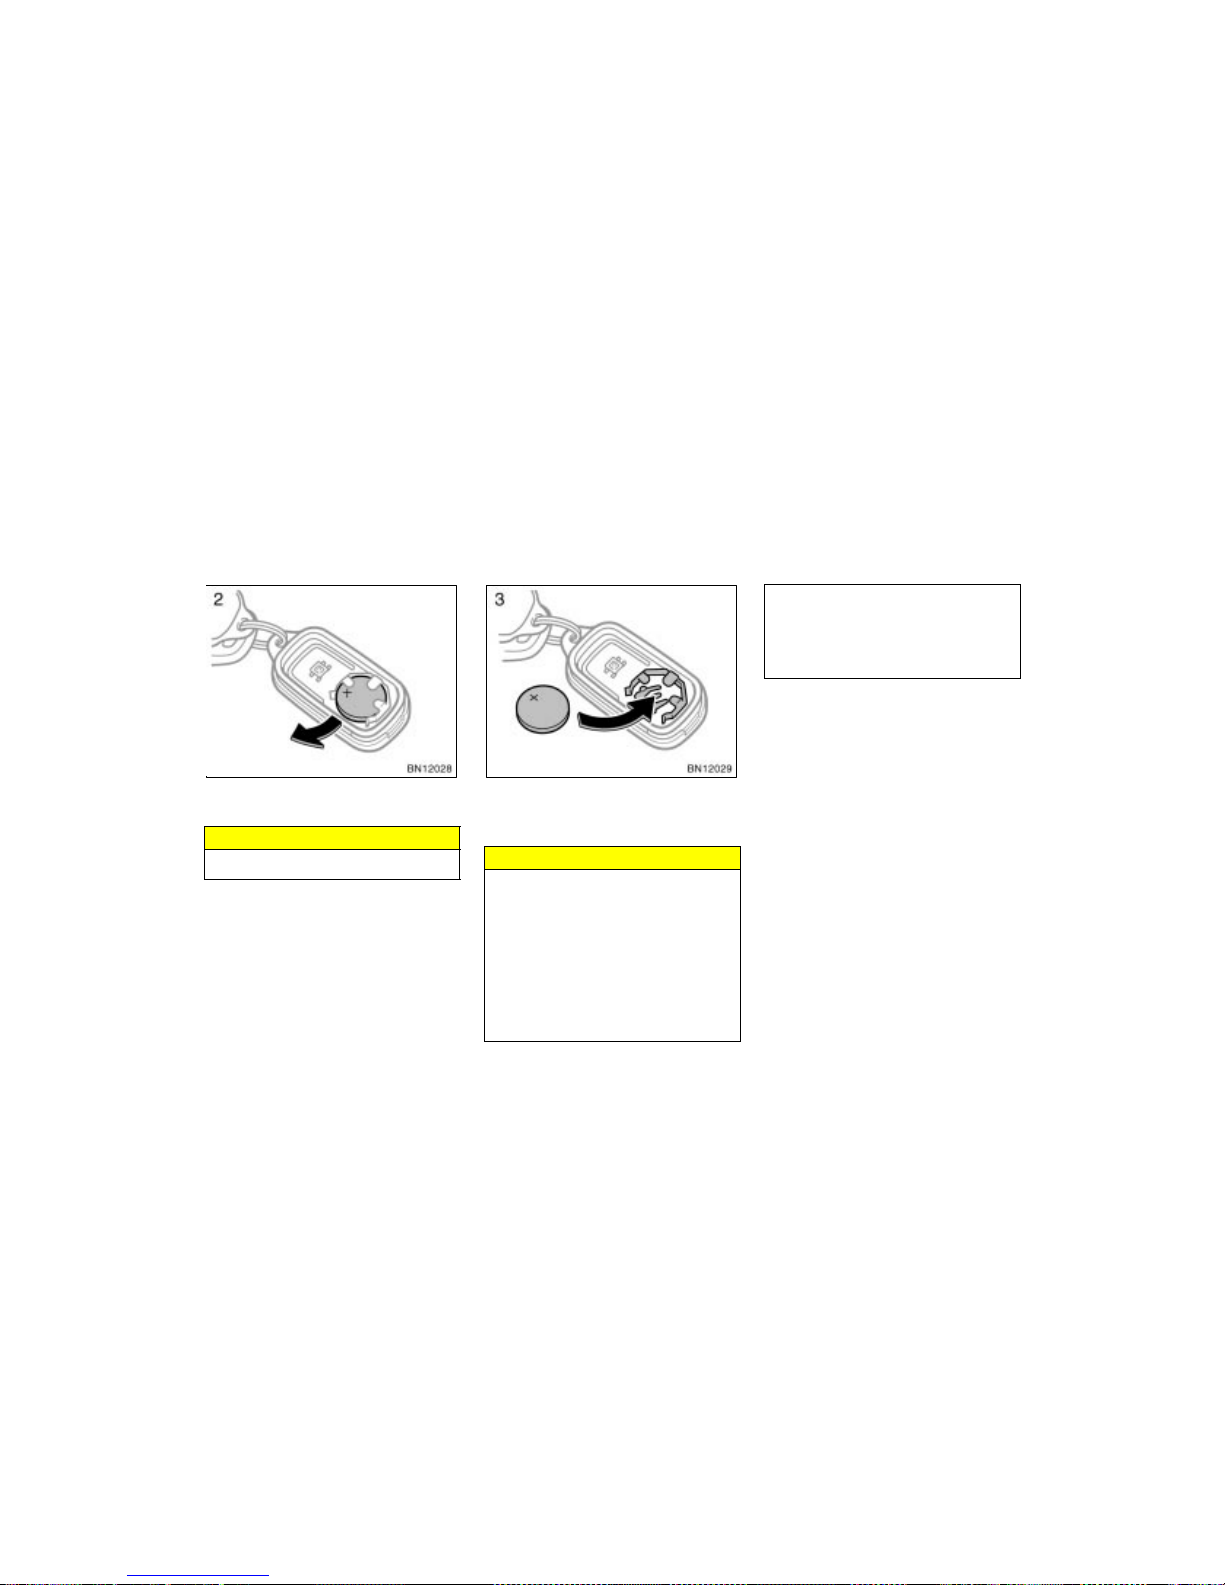
Replace the transmitter battery by the following procedures:
1. Using a coin or equivalent, open the
transmitter case.
Page 51
WWW.MANUALS.WS
WWW.MANUALS.WS
’03 Corolla U (L/O 0201)
16
2003 MY COROLLA_U (OM12744U)
2. Remove the discharged transmitter battery.
NOTICE
Do not bend the terminals.
3. Put a new transmitter battery with pos itive (+) side up.
Close the transmitter case securely.
NOTICE
Make sure the positive side and
negative side of the transmitter battery should be faced correctly.
Do not replace the battery with wet
hands. Water may cause unexpected
rust.
Do not touch or move any components inside of the transmitter, or
it may interfere with proper operation.
Be careful not to bend the electrode
of the transmitter battery insertion
and that dust or oils do not adhere
to the transmitter case.
Close the transmitter case securely.
After replacing battery, check that the
transmitter operates properly. If the transmitter still does not operate properly, contact your Toyota dealer.
Page 52
WWW.MANUALS.WS
WWW.MANUALS.WS
’03 Corolla U (L/O 0201)
17
2003 MY COROLLA_U (OM12744U)
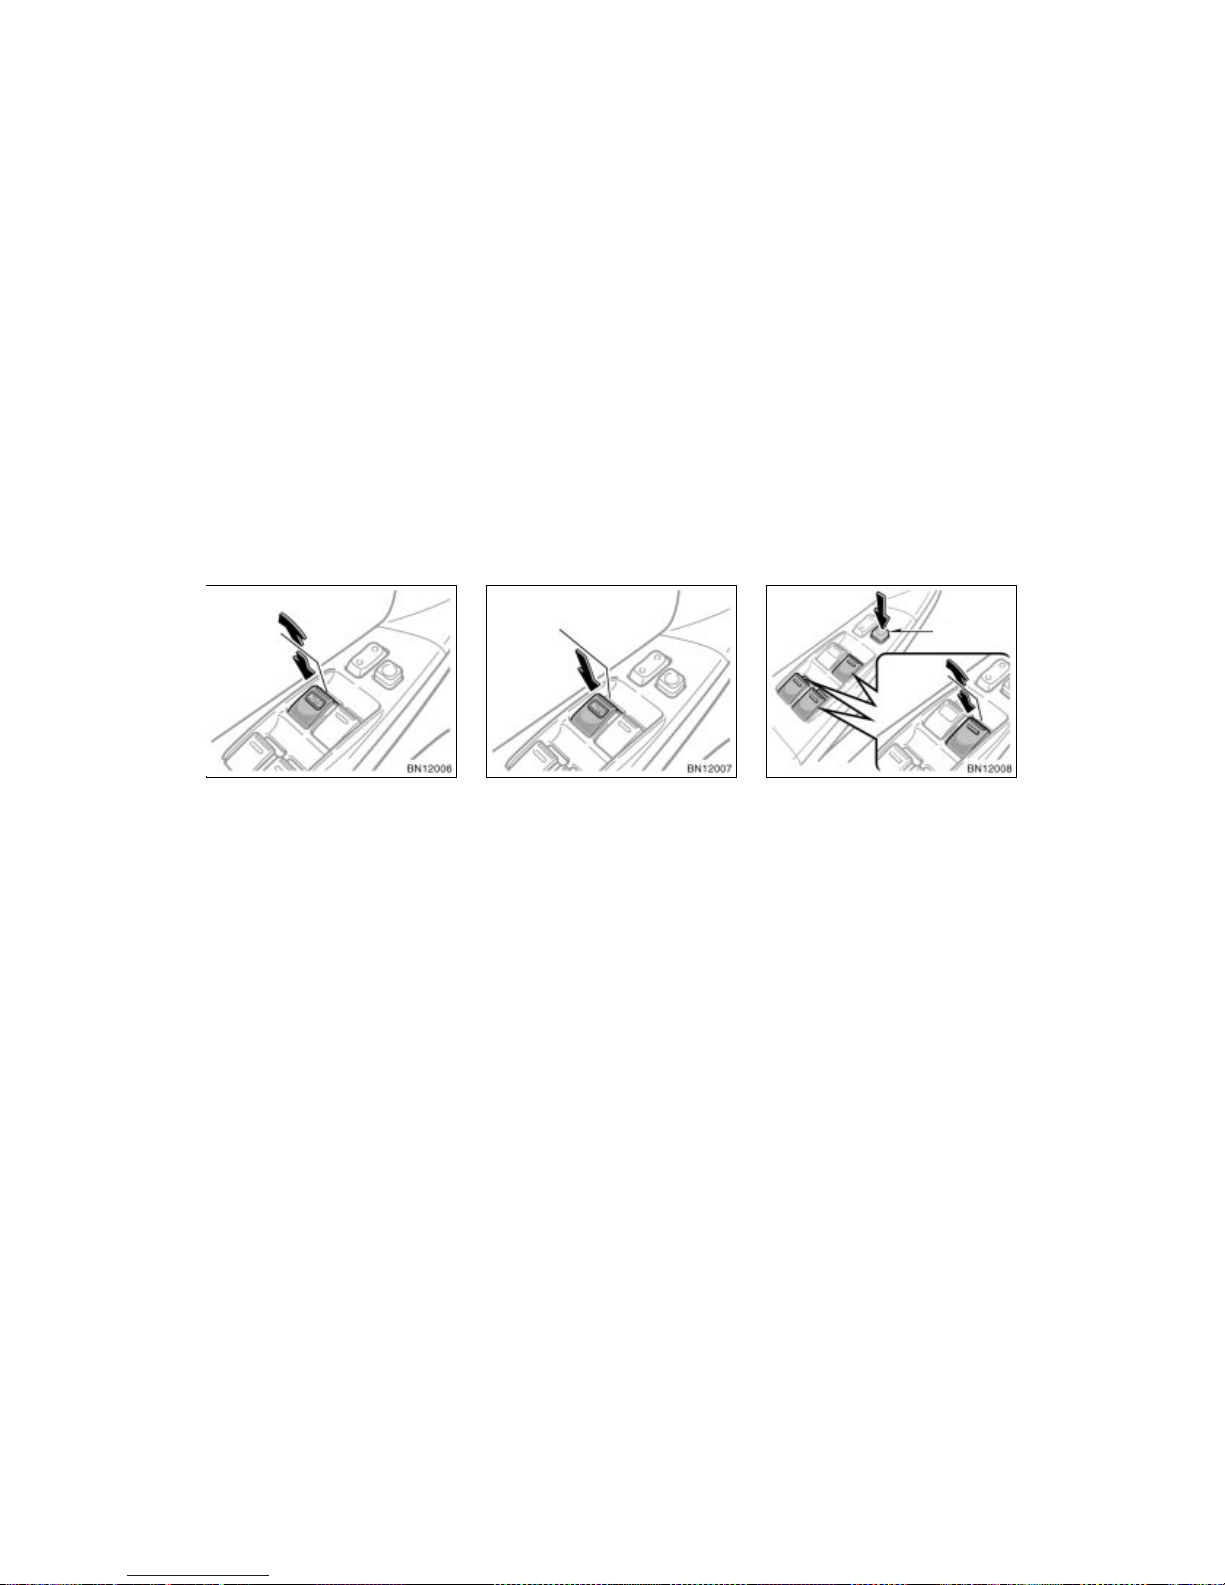
The windows can be operated with the
switch on each door.
The power windows work when the igniti on
switch is in the “ON” position.
OPERATING THE DRIVER’S WINDOW
Use the switch on the driver’s door.
Normal operation: The window moves as
long as you hold the switch.
To open: Lightly push down the switch.
To close: Pull up the switch.
Automatic operation (to open only):
Push the switch completely down and then
release it. The window will fully open. To
stop the window partway, lightly pull the
switch up and then release it.
Window lock
switch
OPERATING THE PASSENGERS’
WINDOWS
Use the switches on the passengers’
doors. The driver’s door also has
switches that control the passengers’
windows.
The window moves as long as you hold
the switch.
To open: Push down the switch.
To close: Pull up the switch.
If you push in the window lock switch on
the driver ’s door, the passengers’ windows
cannot be operated.
Power windows
Page 53
WWW.MANUALS.WS
WWW.MANUALS.WS
’03 Corolla U (L/O 0201)
18
2003 MY COROLLA_U (OM12744U)
CAUTION
To avoid serious personal injury, you
must do the following.
Always make sure the heads, hands
and other parts of the bodies of all
occupants are kept completely inside the vehicle before you close
the power windows. If someone’s
neck, head or hands get caught in
a closing window, it could result in
a serious injury. When anyone
closes the power windows, make
sure that he/she operates the windows safely.
When small children are in the ve-
hicle, never let them use the power
window switches without supervision. Use the window lock switch to
prevent them from making unexpected use of the switches.
Never leave small children alone in
the vehicle, especially with the ignition key still inserted. They could
use the power window switches and
get trapped in a window. Unattended children can be involved in
serious accidents.
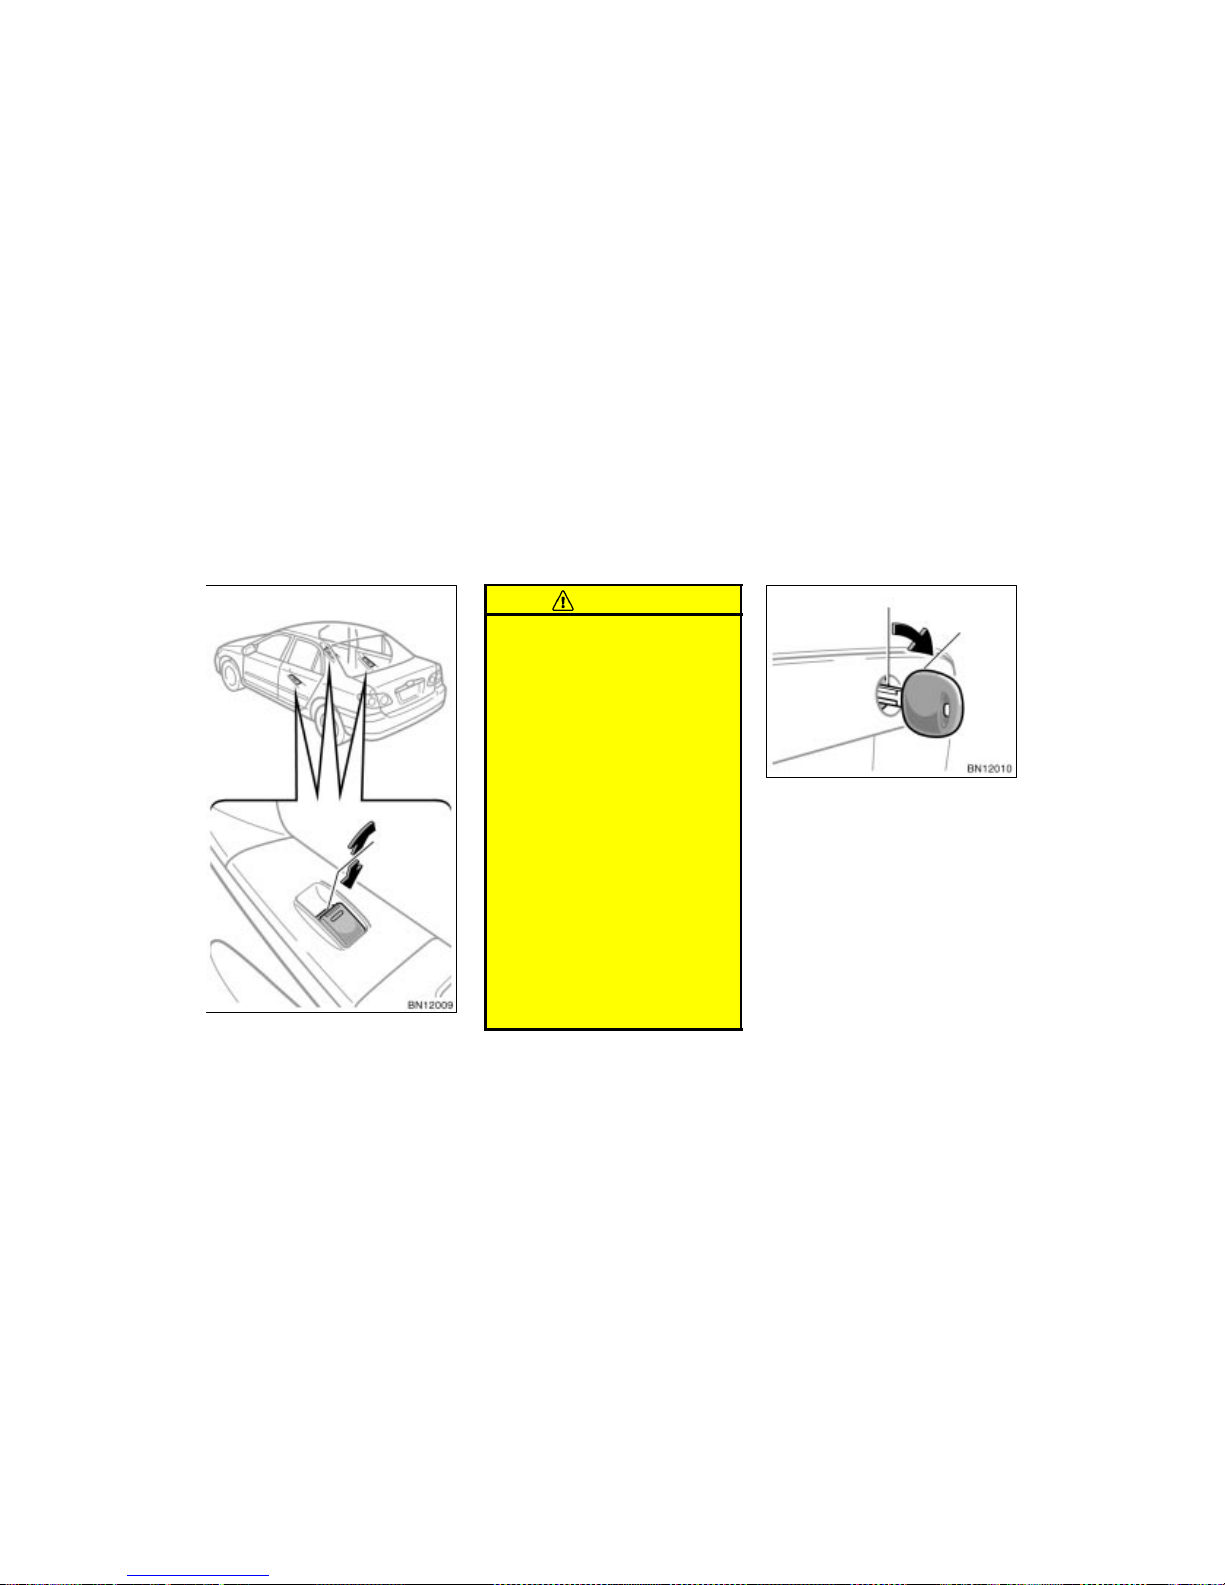
To open the trunk lid from the outside,
insert the master key and turn it clockwise.
See “Luggage stowage precautions” on
page 153 in Section 2 for precautions in
loading luggage.
To close the trunk lid, lower it and press
down on it. After closing the trunk lid, try
pulling it up to make sure it is securely
closed.
Trunk lid—
Page 54
WWW.MANUALS.WS
WWW.MANUALS.WS
’03 Corolla U (L/O 0201)
19
2003 MY COROLLA_U (OM12744U)
CAUTION
Keep the trunk lid closed while driving. This not only keeps the luggage
from being thrown out but also prevents exhaust gases from entering
the vehicle.
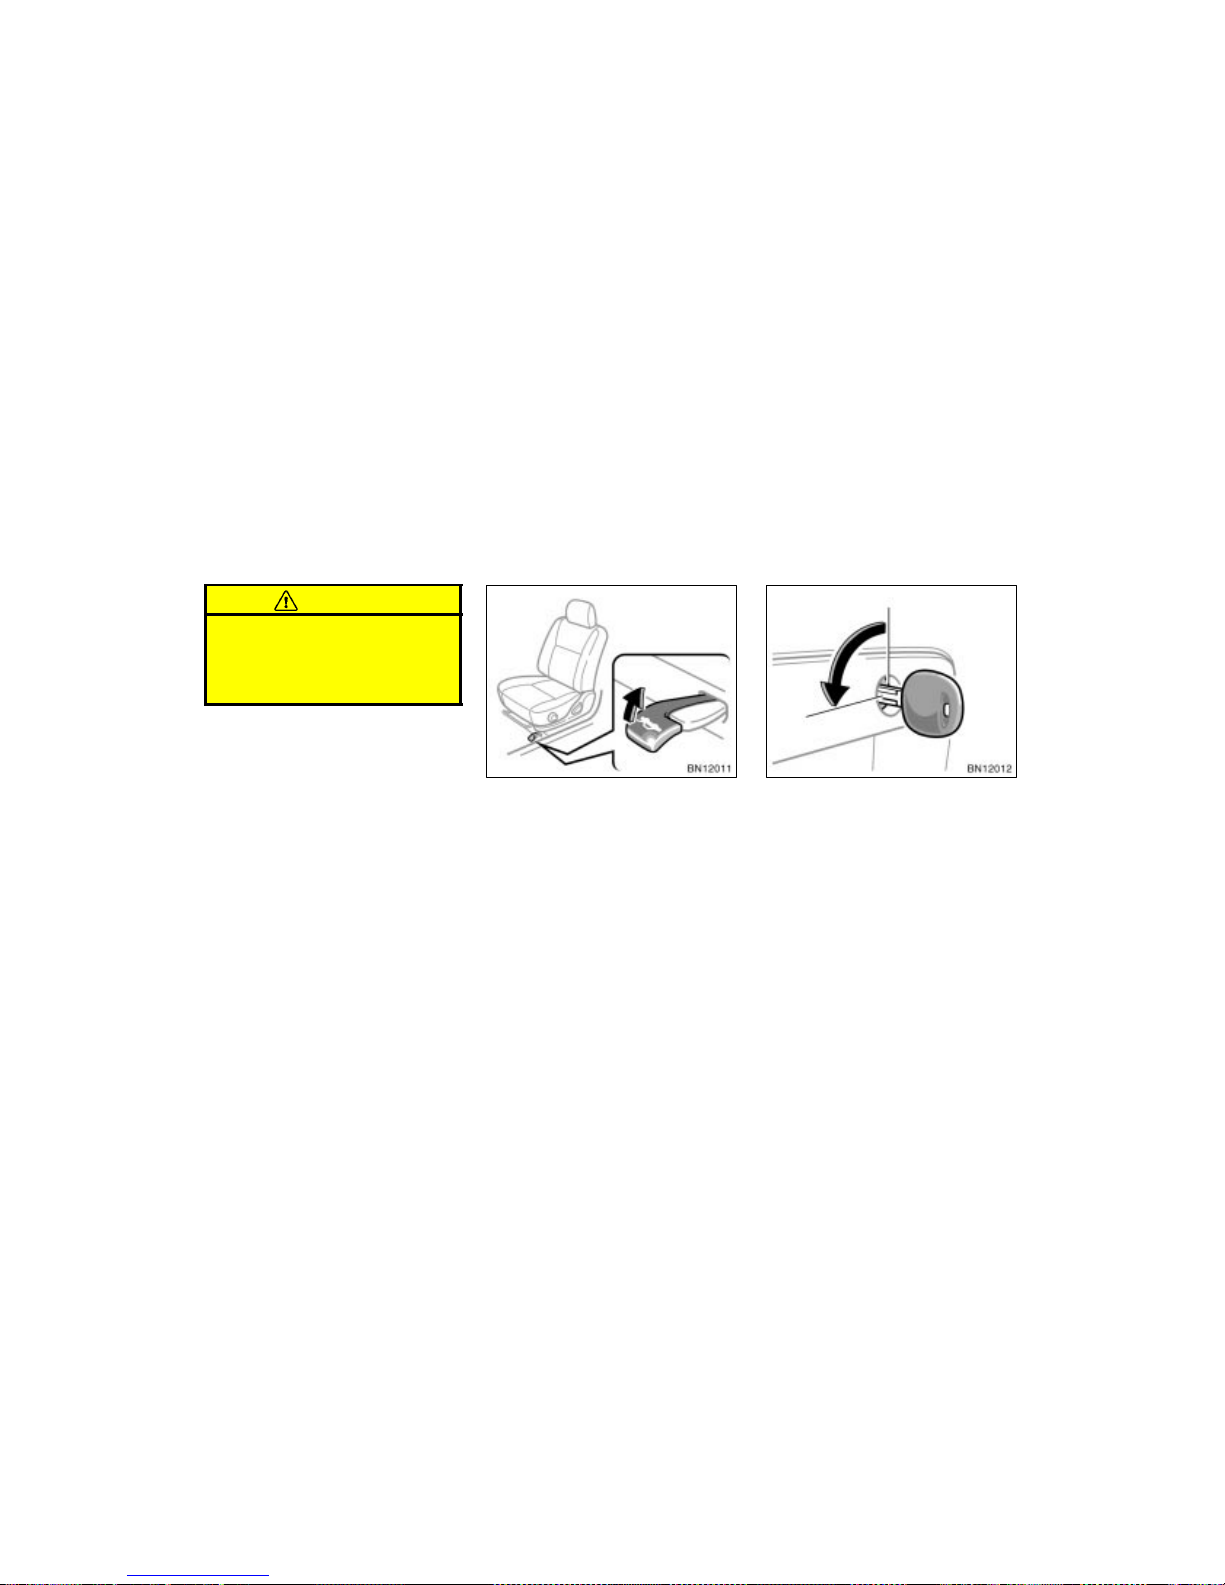
To open the trunk lid from the driver’s
seat, pull up on the lock release lever.
After closing the trunk lid, insert the
master key and turn it counterclockwise
to deactivate the lock release lever.
After closing the trunk lid, try pulling it up
to make sure it is securely locked.
—Lock release lever
—Lock release lever
cancelling system
Page 55
WWW.MANUALS.WS
WWW.MANUALS.WS
’03 Corolla U (L/O 0201)
20
2003 MY COROLLA_U (OM12744U)
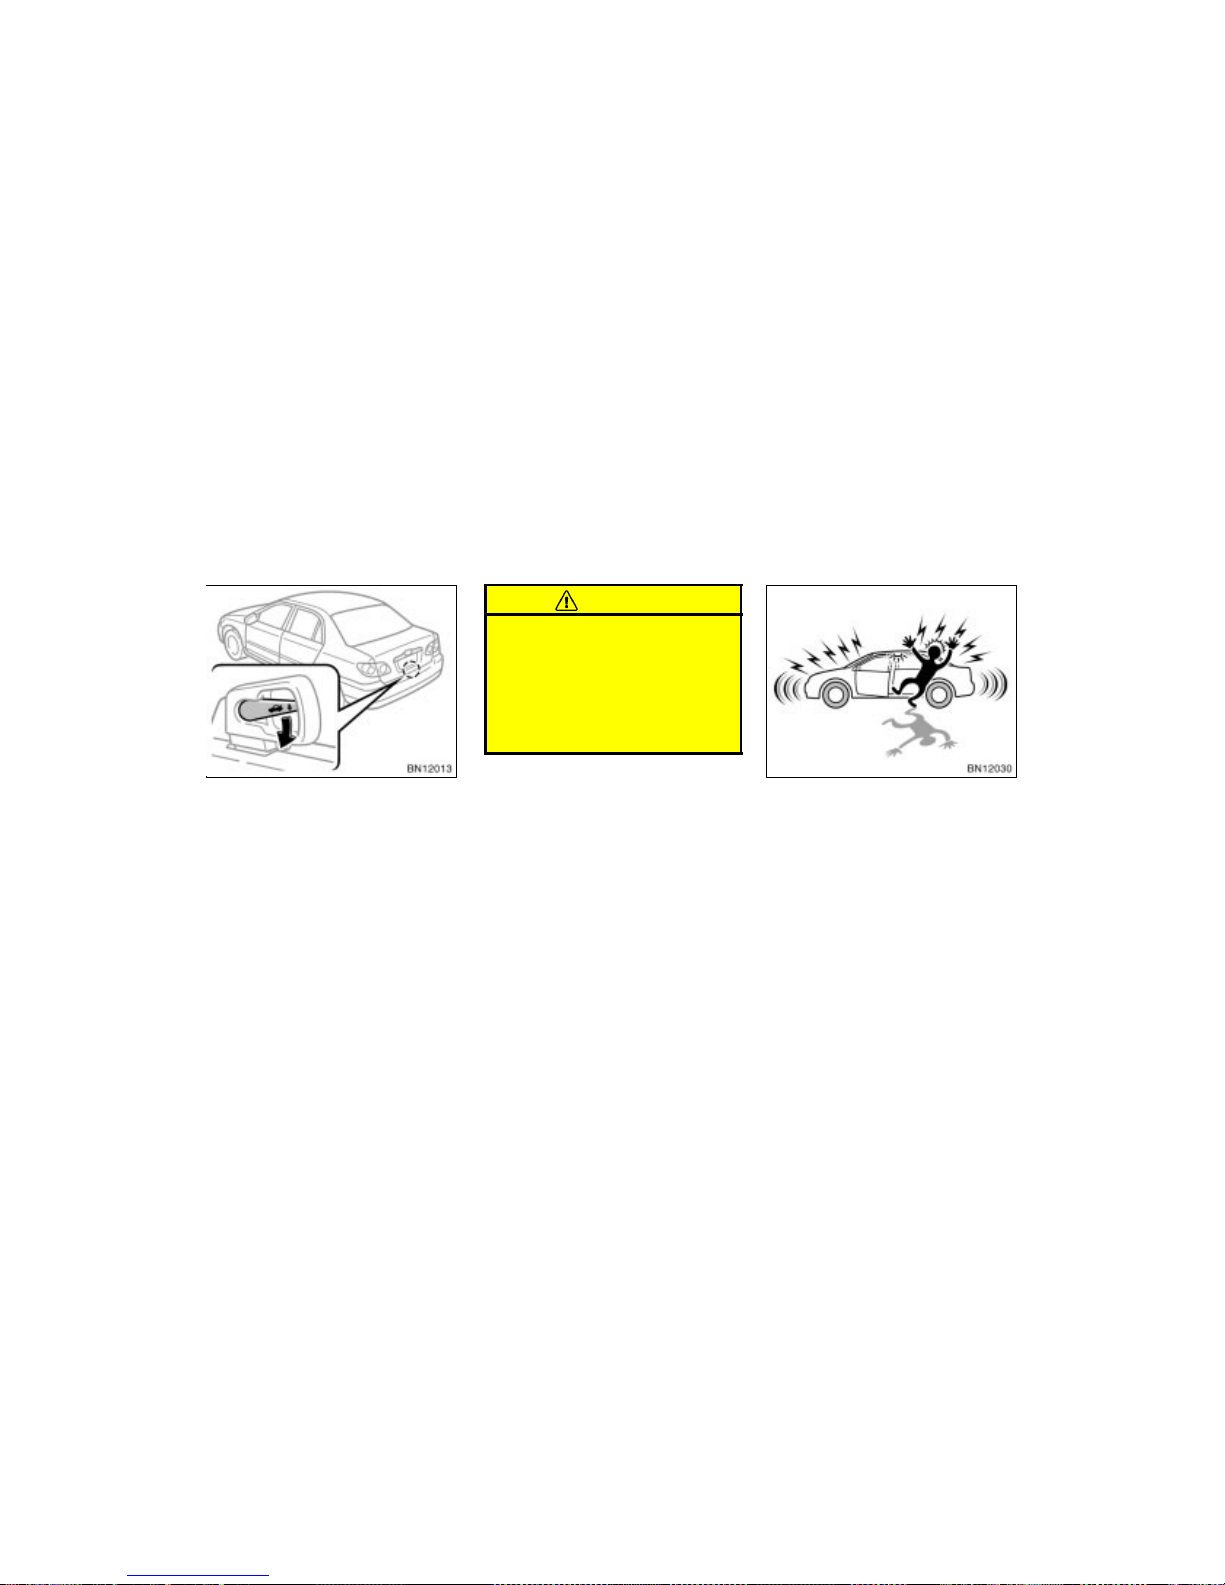
If a person is locked in the trunk, he
or she can pull down the phosphorescent handle on the inside of trunk lid
to open the trunk lid.
The phosphorescent (glow–in–the–dark)
handle will continue to glow for a time
after the trunk lid is closed. Exposing the
handle to stronger light will cause it to
glow longer.
CAUTION
Always lock the trunk lid and all
doors, and keep away the vehicle
keys out of children’s reaches.
Never leave children unattended in
the vehicle. Unsupervised children
may lock themselves in the vehicle
or trunk and suffer serious injuries
or death.
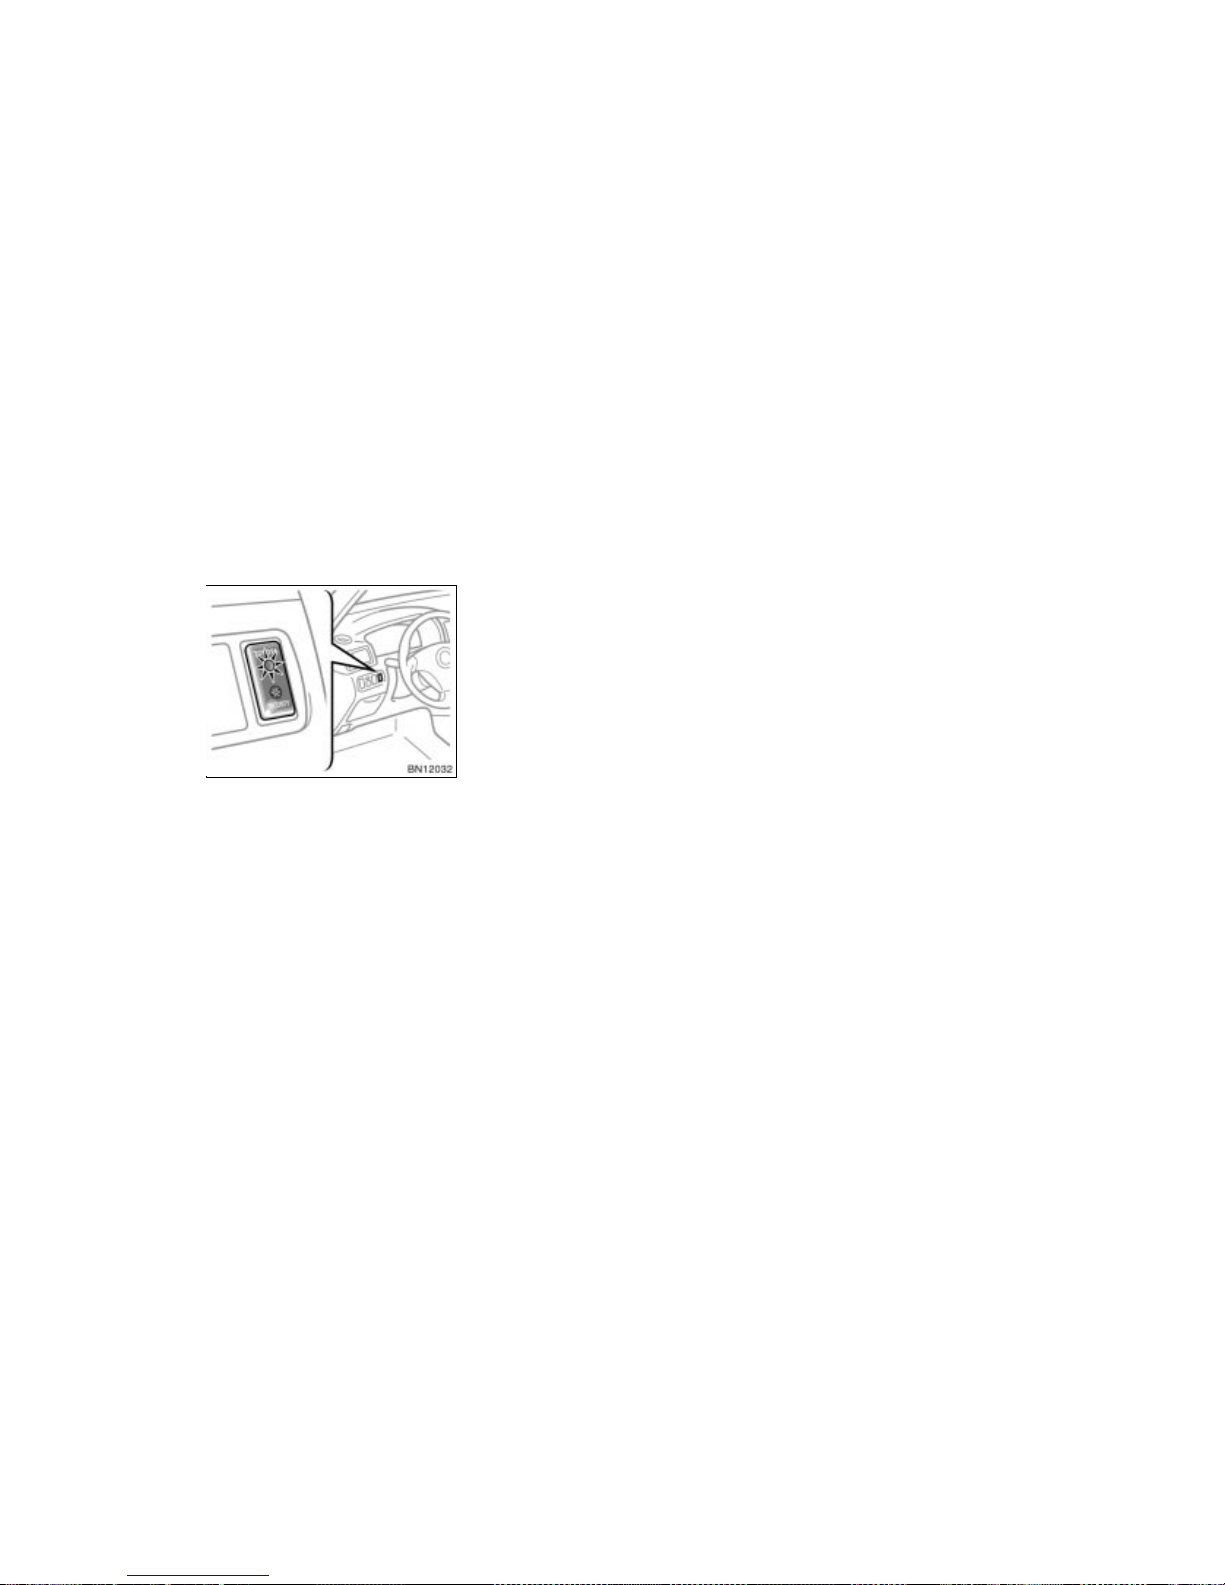
TVIP is a theft deterrent system. If
someone attempts to damage or break
into your vehicle, the system sounds
the alarm while flashing the lights.
—Internal trunk release handle
Toyota vehicle intrusion
protection system (TVIP)
Page 56
WWW.MANUALS.WS
WWW.MANUALS.WS
’03 Corolla U (L/O 0201)
21
2003 MY COROLLA_U (OM12744U)
SETTING THE SYSTEM
You can set the system as follows.
1. Remove the key from the ignition
switch.
2. Have all passengers get out of the
vehicle.
3. Close all the doors and trunk lid securely.
4. Lock all the doors with the key or wireless remote control transmitter. At this
time, the TVIP indicator light comes
on.
The system will be set in 30 seconds.
When the system is set, the indicator
light will start to flash.
5. Make sure that the indicator light
flashes. Then you may leave the vehicle.
Never leave anyone in the vehicle when
you set the system because unlocking
from the inside activates the alarm.
Activating the alarm
If the system detects a threat to the
vehicle, it sounds the alarm for one
minute while flashing headlights and
turn signal lights. Also, the interior
light turns on when the interior light
dial is in the DOOR position.
The system detects a threat under any of
the following conditions:
Either of the front doors is unlocked by
means other than the key or wireless
remote control transmitter.
If the key is not in the ignition switch,
all the doors will be automatically
locked again.
Any of the doors or trunk lid are forci-
bly opened.
The alarm will activate when the trunk
lid is opened with a key. Cancel the
system before opening the trunk lid.
The side windows are tapped or bro-
ken.
The battery terminal is disconnected
and then reconnected.
The ignition is hotwired.
After one minute, the alarm automatically
stops and the indicator light starts flashing
again.
Reactivating the alarm
Once set, until you cancel the system, the
system automatically resets the alarm after the alarm has stopped.
The alarm will activate again under the
same circumstances described in “Activating the alarm”.
Stopping the alarm
You can stop the alarm in either of the
following ways:
Unlock any of the doors with the key
or wireless remote control transmitter.
Place the ignition switch in the “ON”
position.
Page 57
WWW.MANUALS.WS
WWW.MANUALS.WS
’03 Corolla U (L/O 0201)
22
2003 MY COROLLA_U (OM12744U)
CANCELLING THE SYSTEM
You can cancel the system as described
in “Stopping the alarm”.
If you cancel the system by unlocking any
of the doors but no door is opened within
30 seconds, all the doors lock automatically and the system will be set again.
TESTING THE SYSTEM
You can check the system operation as
follows.
1. Open all the windows.
2. Set the system as described in
“SETTING THE SYSTEM”.
3. Unlock the driver’s door with the inside
lock knob. The system should activate
and the alarm should sound.
4. Stop the alarm as described in “Stopping the alarm”.
5. Repeat steps 2 to 4 for the other
doors. (For rear doors, unlock and then
open the doors as descri bed i n step 3.)
If the system does not work properly,
have it checked by your Toyota dealer.
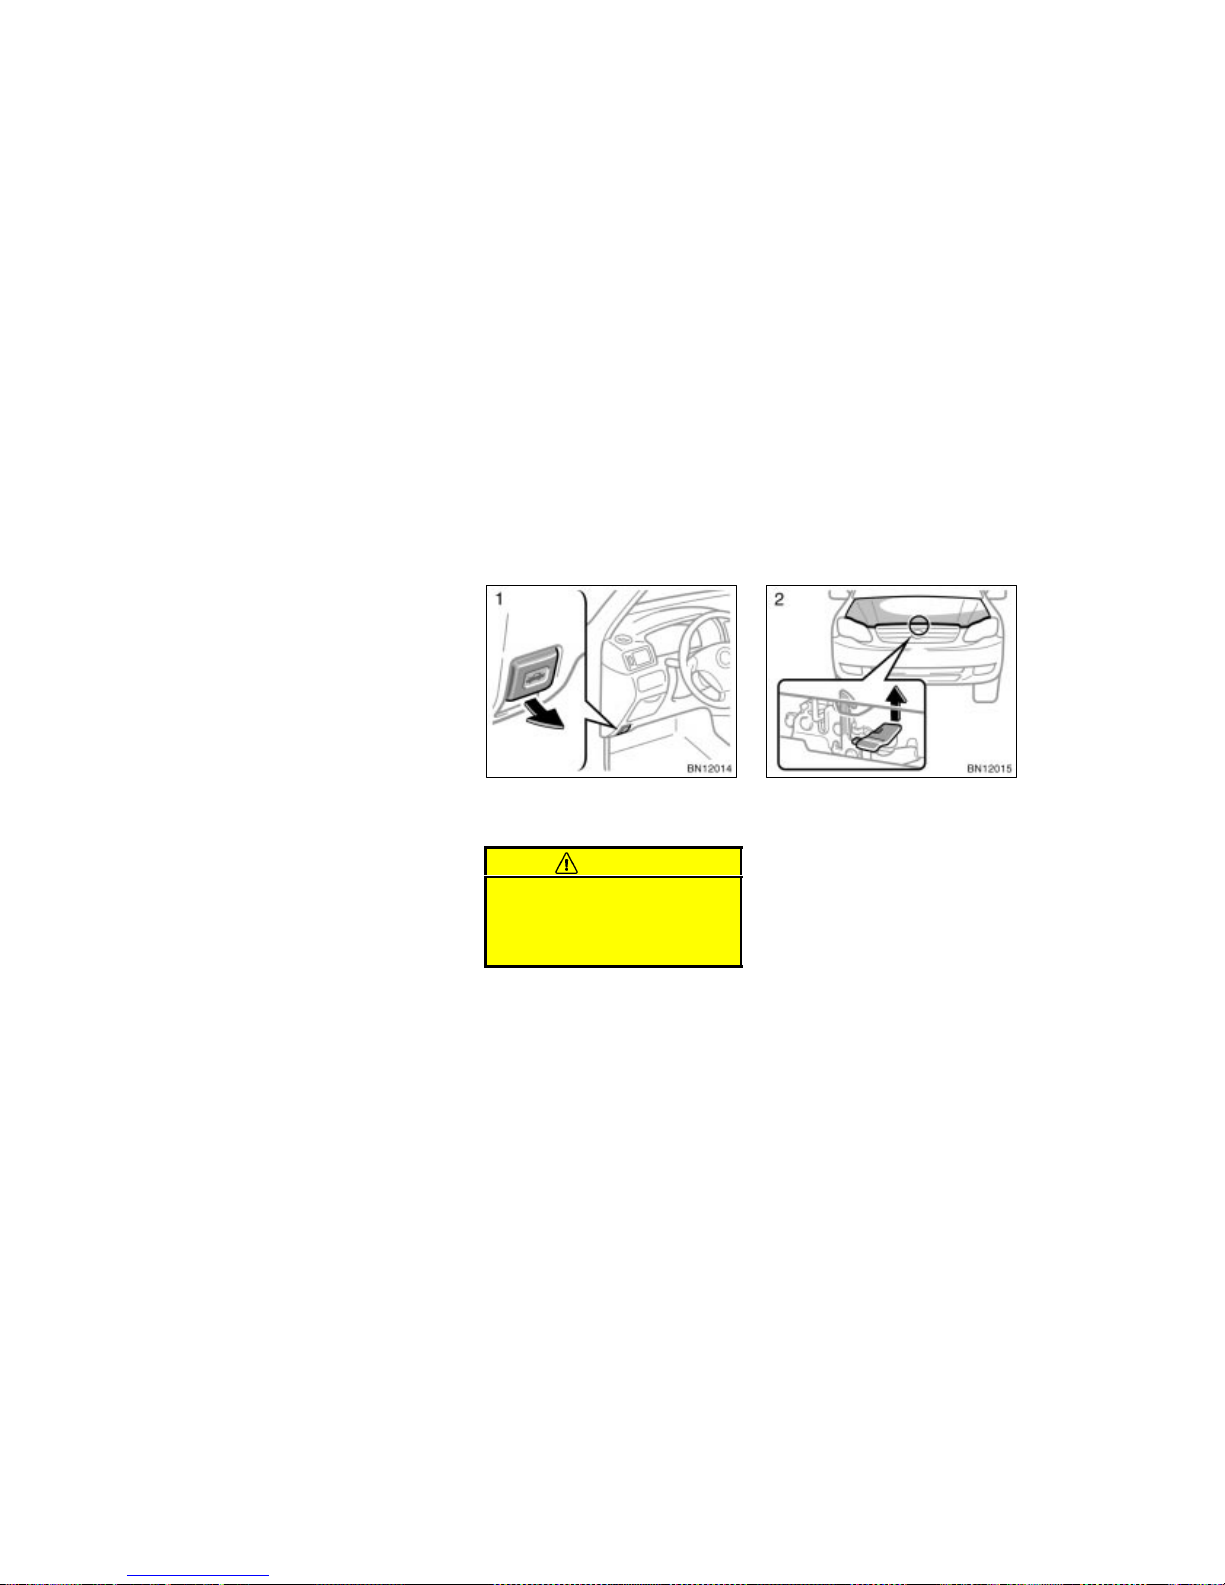
To open the hood:
1. Pull the hood lock release lever. The
hood will spring up slightly.
CAUTION
Before driving, be sure that the hood
is closed and securely locked. Otherwise, the hood may open unexpectedly while driving and an accident may
occur.
2. In front of the vehicle, pull up the
auxiliary catch lever and lift the
hood.
Hood
Page 58
WWW.MANUALS.WS
WWW.MANUALS.WS
’03 Corolla U (L/O 0201)
23
2003 MY COROLLA_U (OM12744U)
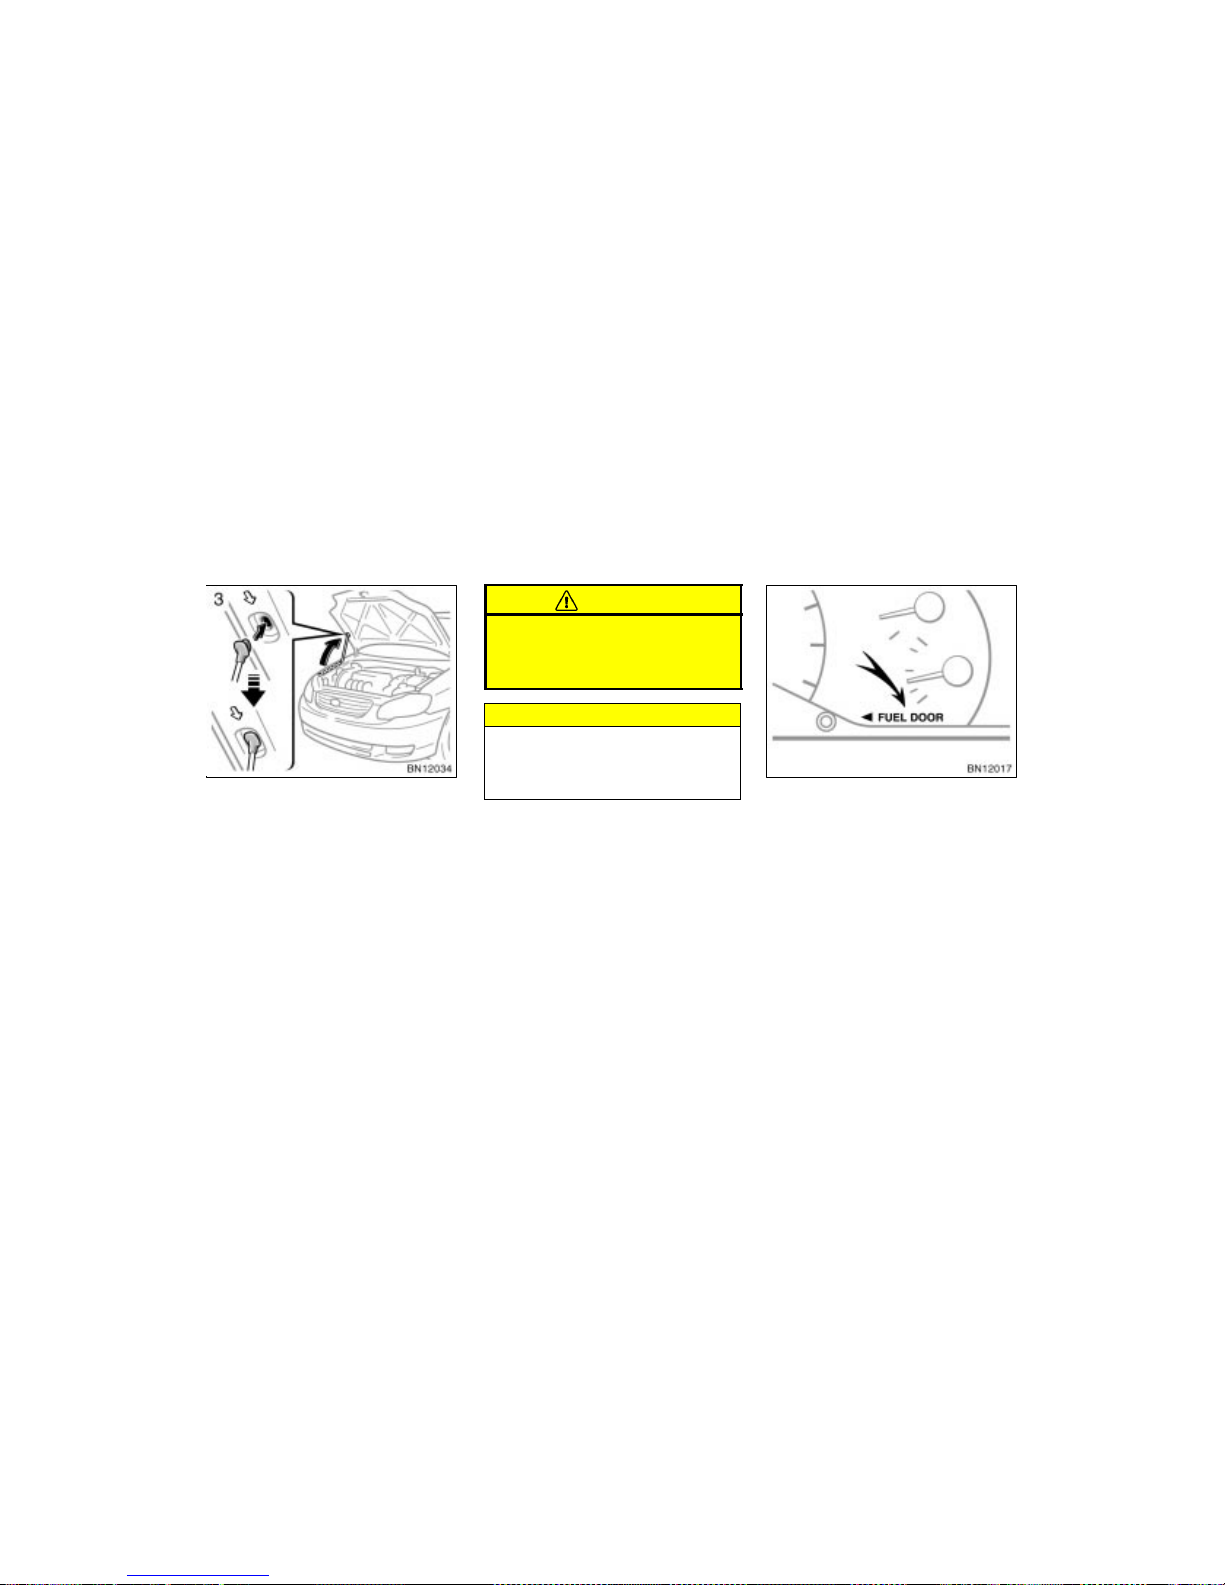
3. Hold the hood open by inserting the
support rod into the slot.
To insert the support rod into the slot,
move it straight up. If it is moved to the
side or toward the inside of the vehicle,
it may become detached.
Before closing the hood, check to see that
you have not forgotten any tools, rags,
etc. and return the support rod to its
clip—this prevents rattles. Then lower the
hood and make sure it locks into place.
If necessary, press down gently on the
front edge to lock it.
CAUTION
After inserting the support rod into
the slot, make sure the rod supports
the hood securely from falling down
on to your head or body.
NOTICE
Be sure to return the support rod to
its clip before closing the hood. Closing the hood with the support rod up
could cause the hood to bend.
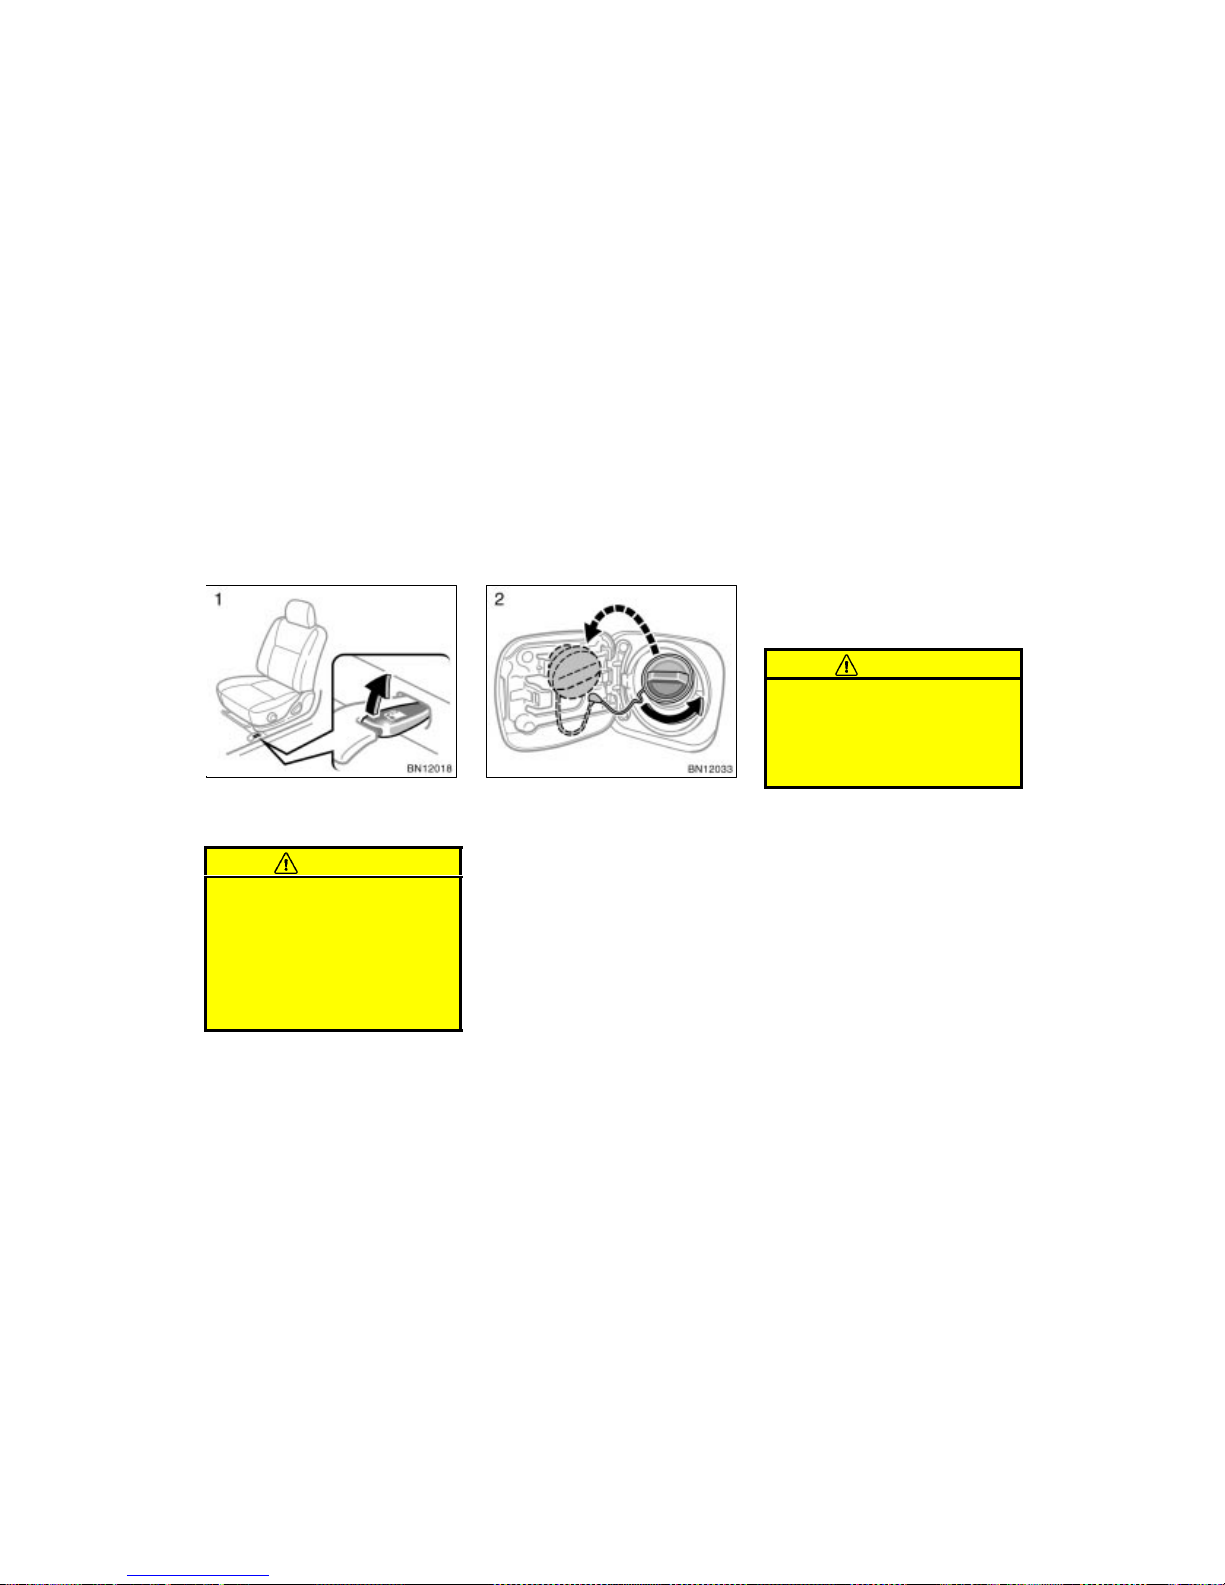
This indicates that the fuel filler door
is on the left side of your vehicle.
Fuel tank cap
Page 59
WWW.MANUALS.WS
WWW.MANUALS.WS
’03 Corolla U (L/O 0201)
24
2003 MY COROLLA_U (OM12744U)
1. To open the fuel filler door, pull the
lever up.
When refueling, turn off the engine.
CAUTION
Do not smoke, cause sparks or al-
low open flames when refueling.
The fumes are flammable.
When opening the cap, do not re-
move the cap quickly. In hot weather, fuel under pressure could cause
injury by spraying out of the filler
neck if the cap is suddenly removed.
2. To remove the fuel tank cap, turn
the cap slowly counterclockwise,
then pause slightly before removing
it. After removing the cap, hang it
on the cap hanger.
It is not unusual to hear a slight swoosh
when the cap is opened. When installing,
turn the cap clockwise till you hear a
click.
If the cap is not tightened securely, the
malfunction indicator lamp comes on.
Make sure the cap is tightened securely.
The indicator lamp goes off after driving
several times. If the indicator lamp does
not go off, contact your Toyota dealer as
soon as possible.
CAUTION
Make sure the cap is tightened se-
curely to prevent fuel spillage in
case of an accident.
Use only a genuine Toyota fuel tank
cap for replacement. It is designed
to regulate fuel tank pressure.
Page 60
WWW.MANUALS.WS
WWW.MANUALS.WS
’03 Corolla U (L/O 0201)
25
2003 MY COROLLA_U (OM12744U)
Sliding operation
Tilting operation
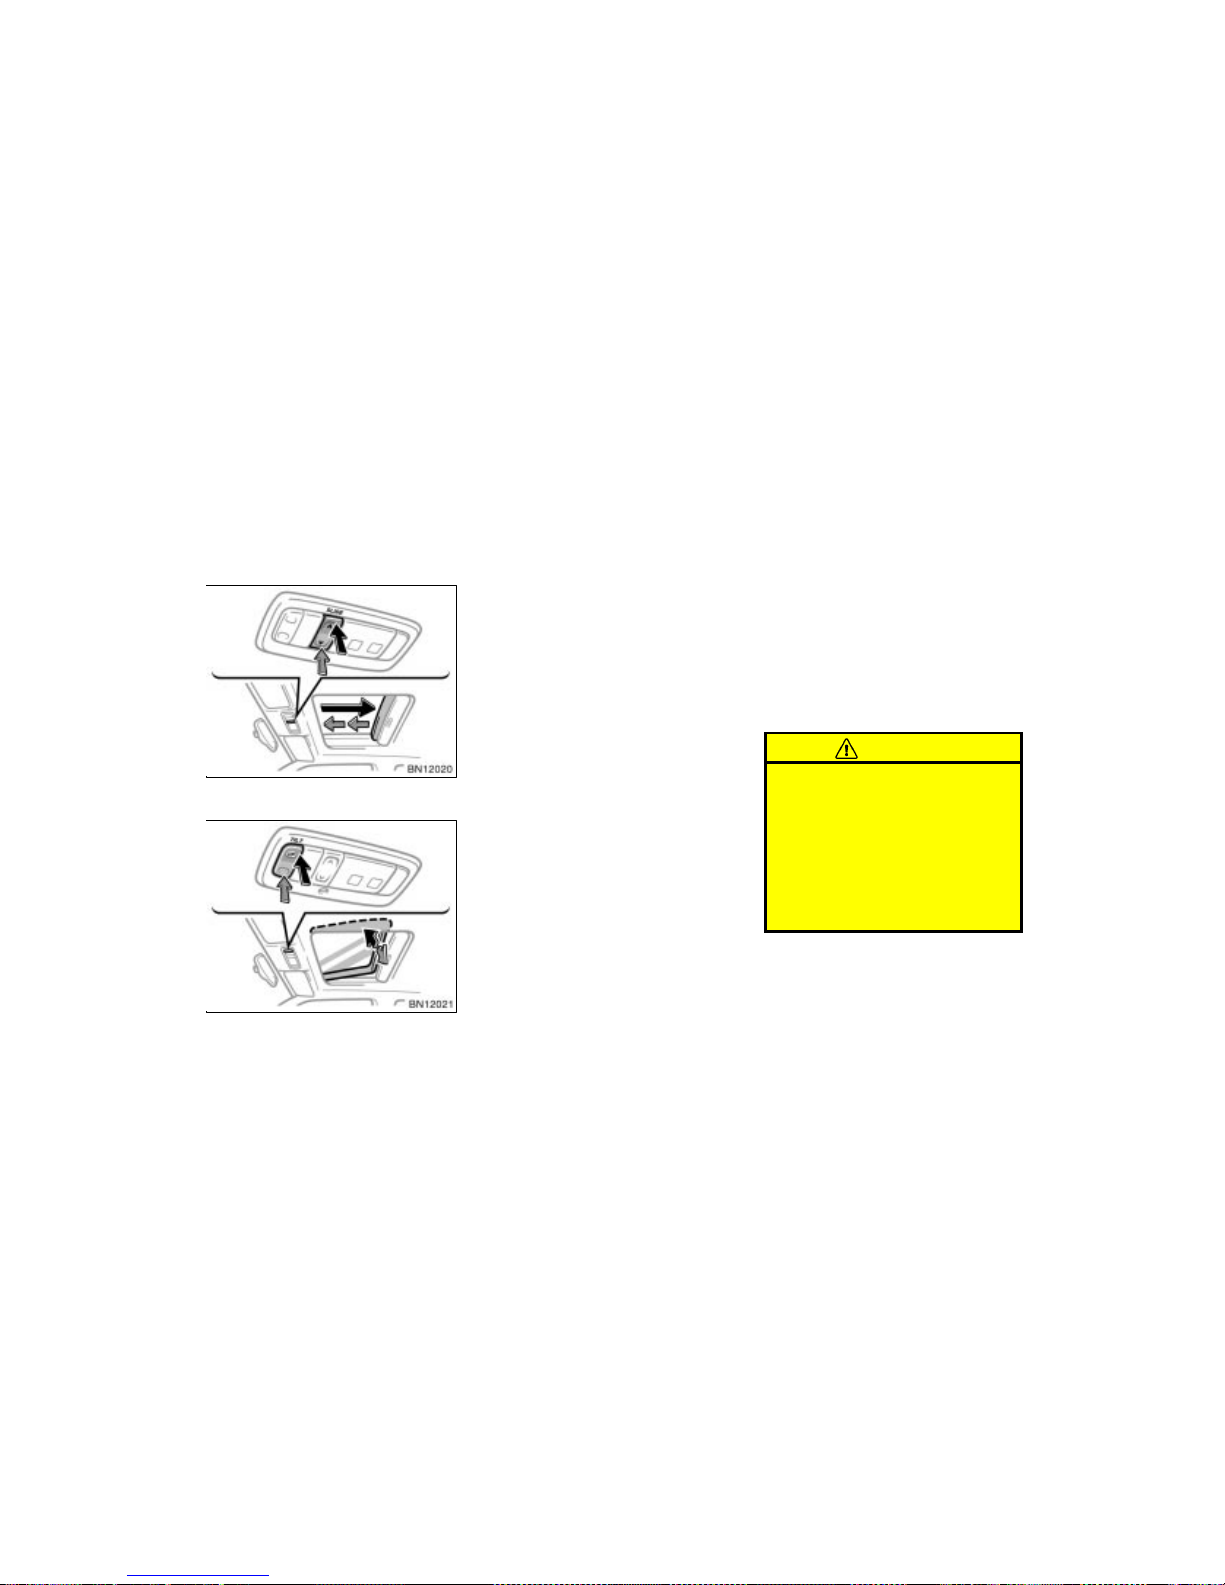
To operate the moon roof, use the
switches beside the personal light.
The moon roof works when the ignition
switch is in the “ON” position.
Sun shade operation—
The sun shade can be opened or closed
by hand.
Sliding operation—
To open: Push the switch on the rear
side.
The sun shade will be opened together
with the roof.
To close: Push the switch on the front
side.
As a precaution when closing, the roof
stops at the half closed position before
fully closing. Therefore, release the switch
and then push it again to close it completely.
Tilting operation—
To tilt up: Push the switch on the “UP”
side.
To lower: Pus h the switch on the opposite
side of the “UP” side.
You may stop the moon roof at any desired position. The roof will move while
the switch is being pushed and stop when
released.
CAUTION
To avoid serious personal injury, you
must do the following.
While the vehicle is moving, always
keep the heads, hands and other
parts of the bodies of all occupants
away from the roof opening. Otherwise, they could be seriously injured if the vehicle stops suddenly
or if the vehicle is involved in an
accident.
Electric moon roof
Page 61

WWW.MANUALS.WS
WWW.MANUALS.WS
’03 Corolla U (L/O 0201)
26
2003 MY COROLLA_U (OM12744U)
Always make sure nobody places
his/her head, hands and other parts
of the body in the roof opening before you close the roof. If someone’s neck, head or hands get
caught in the closing roof, it could
result in a serious injury. When
anyone closes the roof, first make
sure it is safe to do so.
Never leave small children alone in
the vehicle, especially with the ignition key still inserted. They could
use the moon roof switches and get
trapped in the roof opening. Unattended children can be involved in
serious accidents.
Never sit on top of the vehicle
around the roof opening.
Page 62

WWW.MANUALS.WS
WWW.MANUALS.WS
’03 Corolla U (L/O 0201)
27
2003 MY COROLLA_U (OM12744U)
OPERATION OF INSTRUM ENTS AND
CONTROLS
Seats, Seat belts, Steering wheel and Mirrors
Seats 28. . . . . . . . . . . . . . . . . . . . . . . . . . . . . . . . . . . . . . . . . . . . . . . . . . . . . .
Front seats 28. . . . . . . . . . . . . . . . . . . . . . . . . . . . . . . . . . . . . . . . . . . . . . . . .
Fold–down rear s eat 30. . . . . . . . . . . . . . . . . . . . . . . . . . . . . . . . . . . . . . . . .
Head restrai nts 31. . . . . . . . . . . . . . . . . . . . . . . . . . . . . . . . . . . . . . . . . . . . . .
Seat belts 32. . . . . . . . . . . . . . . . . . . . . . . . . . . . . . . . . . . . . . . . . . . . . . . . . . .
SRS driver airbag and front passenger airbag 40. . . . . . . . . . . . . . . . . . .
SRS side airbags 47. . . . . . . . . . . . . . . . . . . . . . . . . . . . . . . . . . . . . . . . . . . .
Child restraint 53. . . . . . . . . . . . . . . . . . . . . . . . . . . . . . . . . . . . . . . . . . . . . . .
Tilt steering wheel 68. . . . . . . . . . . . . . . . . . . . . . . . . . . . . . . . . . . . . . . . . . .
Outside rear view mirrors 69. . . . . . . . . . . . . . . . . . . . . . . . . . . . . . . . . . . . .
Anti–glare i nside rear view mirroror 70. . . . . . . . . . . . . . . . . . . . . . . . . . . .
Auto anti–glare inside rear view m irror 71. . . . . . . . . . . . . . . . . . . . . . . . .
Vanity mirrors 72. . . . . . . . . . . . . . . . . . . . . . . . . . . . . . . . . . . . . . . . . . . . . . .
SECTION 1–
3
Page 63
WWW.MANUALS.WS
WWW.MANUALS.WS
’03 Corolla U (L/O 0201)
28
2003 MY COROLLA_U (OM12744U)
While the vehicle is being driven, all vehicle occupants should have the seatback
upright, sit well back in the seat and properly wear the seat belts provided.
CAUTION
Do not drive the vehicle unless the
occupants are properly seated. Do
not allow sitting on top of a
folded–down seatback, or in the
luggage compartment or cargo area.
Persons not properly seated and/or
properly restrained by seat belts
can be severely injured in the event
of emergency braking or a collision.
During driving, do not allow pas-
sengers to stand up or move
around between seats. Severe injuries can occur in the event of emergency braking or a collision.
CAUTION
The SRS side airbags are installed in
the driver and front passenger seats.
Observe the following precautions.
Do not lean against the front door
when the vehicle is in use, since
the side airbag inflates with considerable speed and force. Otherwise,
you may be killed or seriously injured.
Do not use seat accessories which
cover the parts where the side airbags inflate. Such accessories may
prevent the side airbags from activating correctly, causing death or
serious injury.
Do not modify or replace the seats
or upholstery of the front seats
with the side airbags. Such changes
may disable the system or cause
the side airbags to inflate accidentally, resulting in death or serious
injury. Consult your Toyota dealer if
you insist on modifications of this
kind.
Adjust the driver’s seat so that the foot
pedals, steering wheel and instrument
panel controls are within easy reach of
the driver.
CAUTION
Adjustments should not be made
while the vehicle is moving, as the
seat may unexpectedly move and
cause the driver to lose control of
the vehicle.
When adjusting the seat, be careful
that the seat does not hi t a passenger or luggage.
After adjusting the seat position,
try sliding it forward and backward
to make sure it is locked in position.
After adjusting the seatback, push
back your body to make sure it is
locked in position.
Do not put objects under the seats.
Otherwise, the objects may interfere
with the seat–lock mechanism or
unexpectedly push up the seat position adjusting lever and the seat
may suddenly move, causing the
driver to lose control of the vehicle.
Seats
Front seats—
—Front seat precautions
(on vehicles with SRS side airbags) —Seat adjustment precau tio ns
Page 64
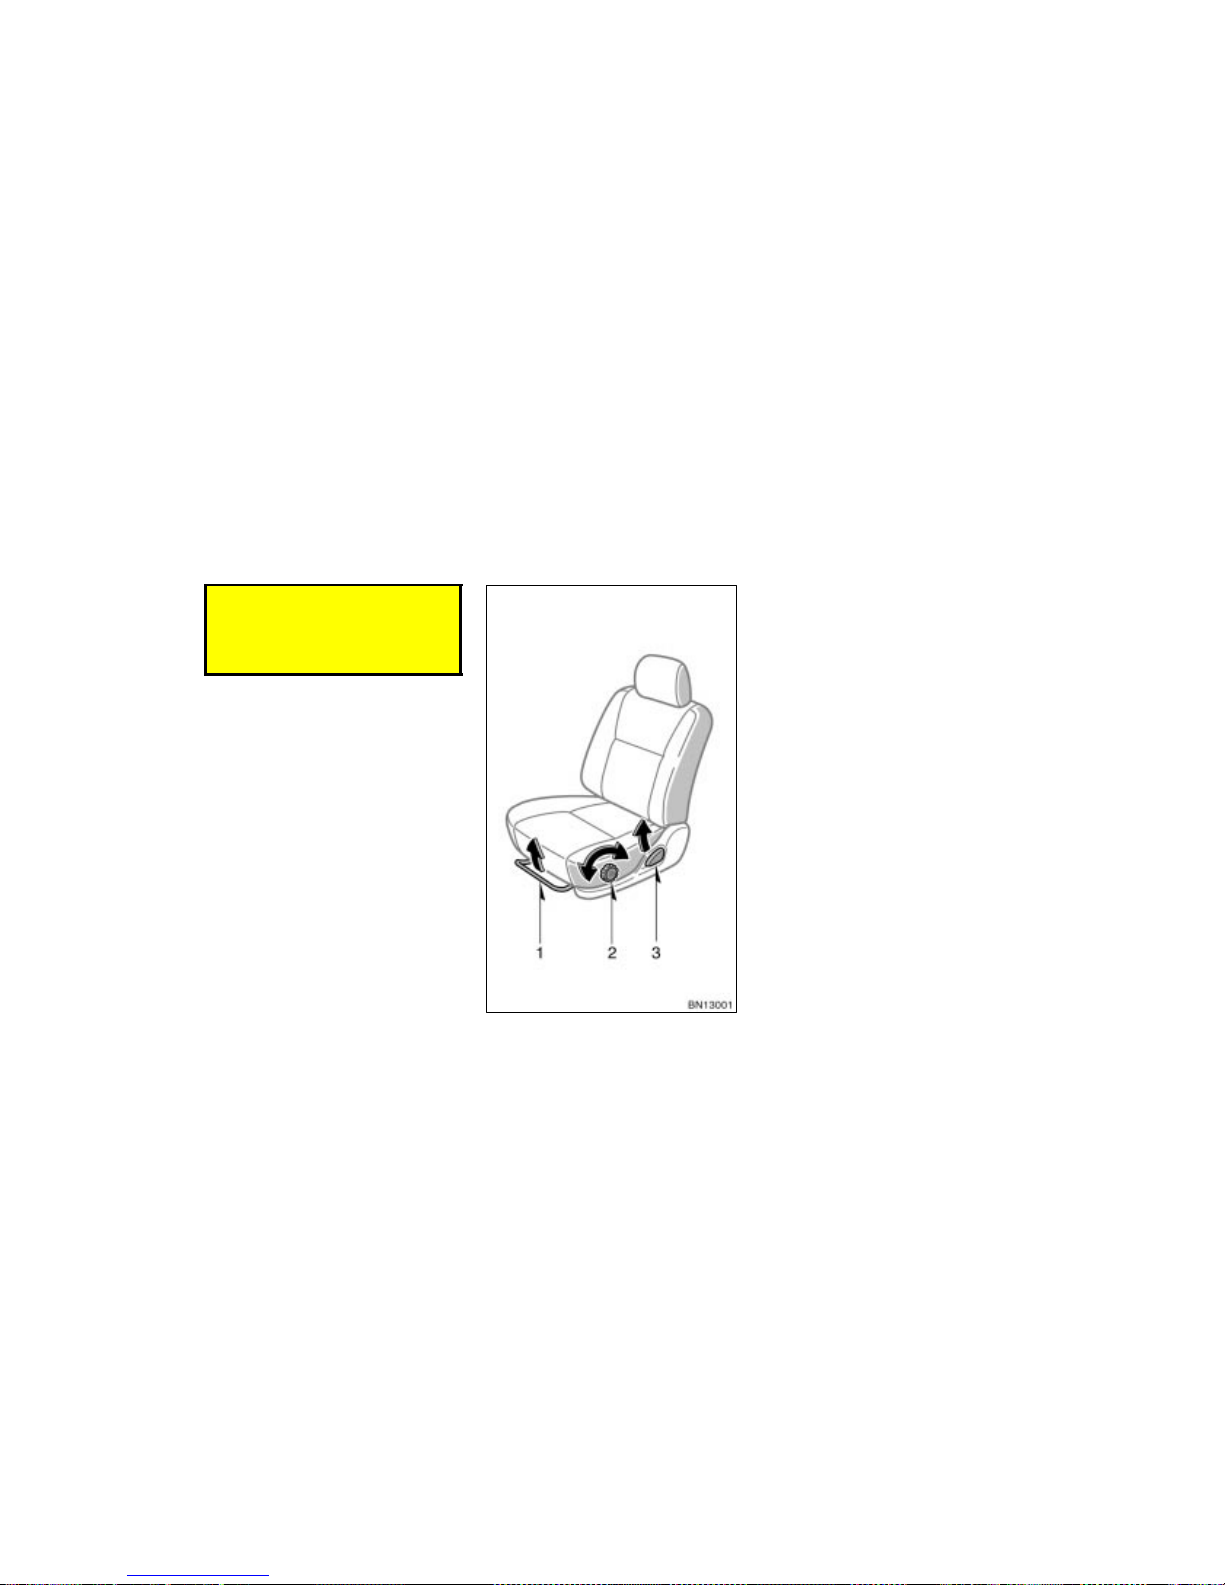
WWW.MANUALS.WS
WWW.MANUALS.WS
’03 Corolla U (L/O 0201)
29
2003 MY COROLLA_U (OM12744U)
While adjusting the seat, do not put
your hands under the seat or near
the moving parts. Otherwise, you
may catch and injure your hands or
fingers.
1. SEAT POSITION ADJUSTING LEVER
Hold the center of the lever and pull it
up. Then slide the seat to the desired
position with slight body pressure and
release the lever.
2. SEAT HEIGHT ADJUSTING KNOB
Turn the knob either way.
3. SEATBACK ANGLE ADJUSTING
LEVER
Lean forward and pull the lever up.
Then lean back to the desired angle
and release the lever.
—Adjusting front seats
Page 65
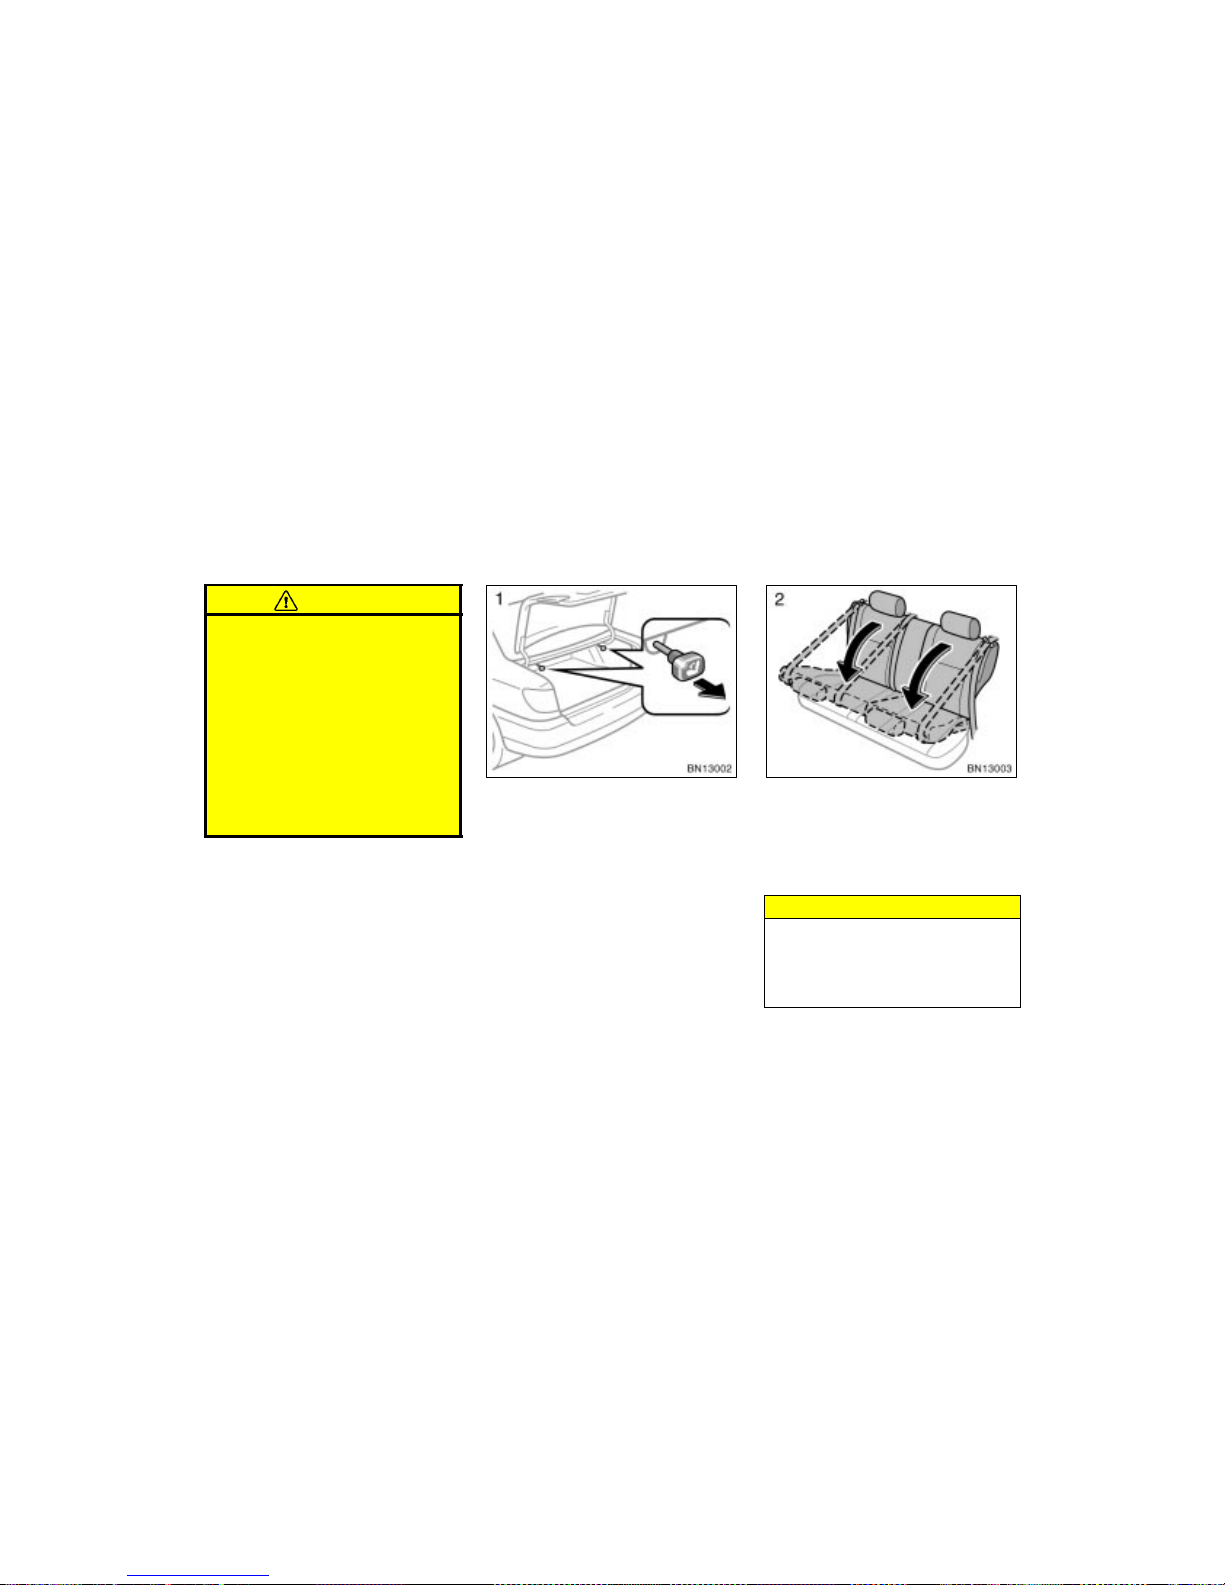
WWW.MANUALS.WS
WWW.MANUALS.WS
’03 Corolla U (L/O 0201)
30
2003 MY COROLLA_U (OM12744U)
CAUTION
To reduce the risk of sliding under
the lap belt during a collision, avoid
reclining the seatback any more than
needed. The seat belts provide maximum protection in a frontal or rear
collision when the driver and the passenger are sitting up straight and
well back in the seats. If you are
reclined, the lap belt may slide past
your hips and apply restraint forces
directly to the abdomen. In the event
of a frontal collision, the more the
seat is reclined, the greater the risk
of personal injury.
FOLDING DOWN REAR SEAT
1. To unlock the seatback, pull the lever in the trunk.
2. Fold down the seatback.
Each seatback can be folded separately.
This will enlarge the trunk as far as the
seatbacks. See “Luggage stowage precautions” on page 153 in Section 2 for precautions in loading luggage.
NOTICE
Make sure the luggage loaded in the
enlarged trunk will not damage the
webbing of the rear center seat belt
when the right seatback is folded
down.
Fold–down rear seat
Page 66
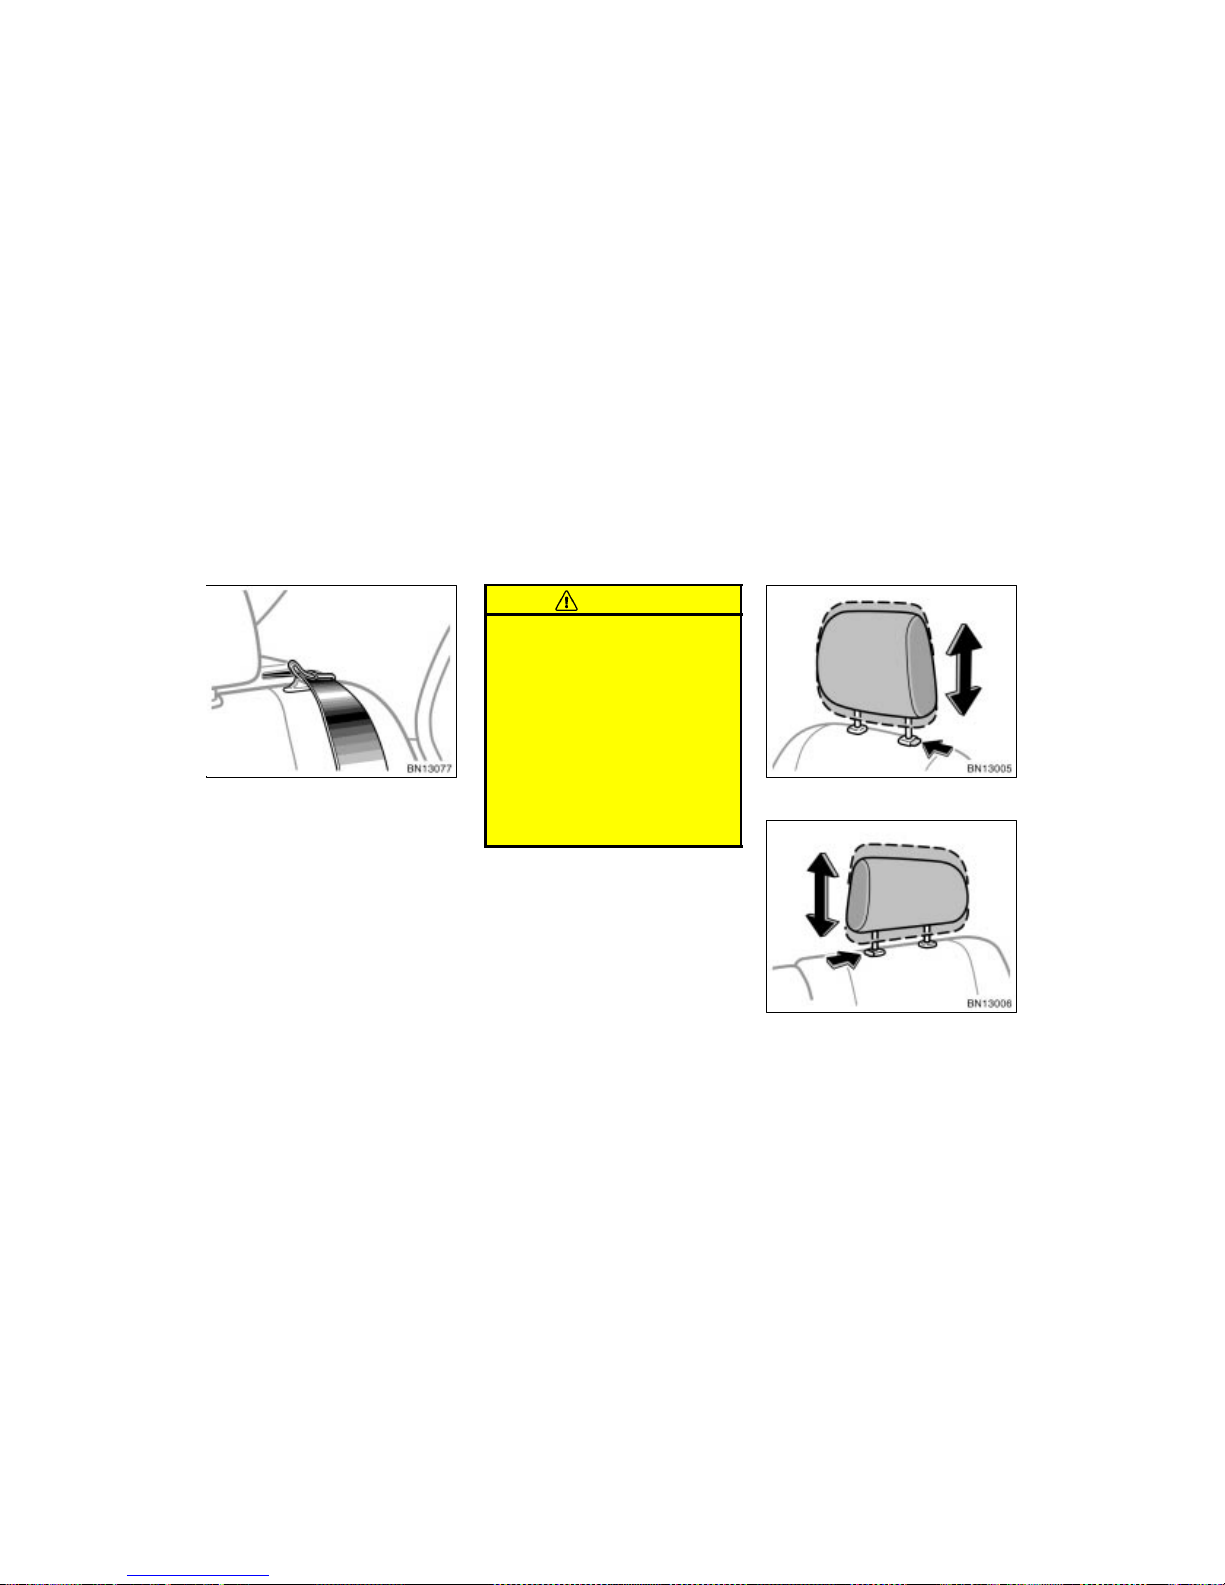
WWW.MANUALS.WS
WWW.MANUALS.WS
’03 Corolla U (L/O 0201)
31
2003 MY COROLLA_U (OM12744U)
BEFORE RETURNING REAR SEAT
Make sure the shoulder belt pass
through the guide when returning the
seatback up.
CAUTION
When returning the seatback to the
upright position, observe the following precautions in order to prevent
personal injury in a collision or sudden stop:
Make sure the seatback is securely
locked by pushing for ward and rearward on the top of the seatback.
Failure to do so will prevent the
seat belt from operating properly.
Make sure the seat belts are not
twisted or caught in the seatback
and are arranged in the proper
position and are ready to use.
Front
Rear
Head restraints
Page 67
WWW.MANUALS.WS
WWW.MANUALS.WS
’03 Corolla U (L/O 0201)
32
2003 MY COROLLA_U (OM12744U)
For your safety and comfort, adjust the
head restraint before driving.
To raise: Pull it up.
To lower: Push it down while pressing the
lock release button.
The head restraint is most effective when
it is close to your head. Therefore, using
a cushion on the seatback is not recommended.
CAUTION
Adjust the center of the head re-
straint so that it is closest to the
top of your ears.
After adjusting the head restraint,
make sure it is locked in position.
Do not drive with the head re-
straints removed.
Toyota strongly urges that the driver and
passengers in the vehicle be properly restrained at all times with the seat belts
provided. Failure to do so could increase
the chance of injury and/or the severity of
injury in accidents.
Child. Use a child restraint system appropriate for the child until the child becomes large enough to properly wear the
vehicle’s seat belts. See “Child restraint”
on page 53 for details.
If a child is too large for a child restraint
system, the child should sit in the rear
seat and must be restrained using the
vehicle’s seat belt. According to accident
statistics, the child is safer when properly
restrained in the rear seat than in the
front seat.
If a child must sit in the front seat, the
seat belts should be worn properly. If an
accident oc curs and the seat belts are not
worn properly, the force of the rapid inflation of the airbag may cause death or
serious injury to the child.
Do not allow the child to stand up or
kneel on either rear or front seats. An
unrestrained child could suffer serious injury o r death during emergenc y brak ing or
a collision. Also, do not let the child sit
on your lap. It does not provide sufficient
restraint.
Pregnant woman. Toyota recommends the
use of a seat belt. Ask your doctor for
specific recommendations. The lap belt
should be worn securely and as low as
possible over the hips and not on the
waist.
Injured person. Toyota recommends the
use of a seat belt. Depending on the injury, first check with your doctor for specific
recommendations.
CAUTION
Persons should ride in their seats
properly wearing their seat belts
whenever the vehicle is moving.
Otherwise, they are much more likely
to suffer serious bodily injury or
death in the event of sudden braking
or a collision.
Seat belts—
—Seat belt precautions
Page 68
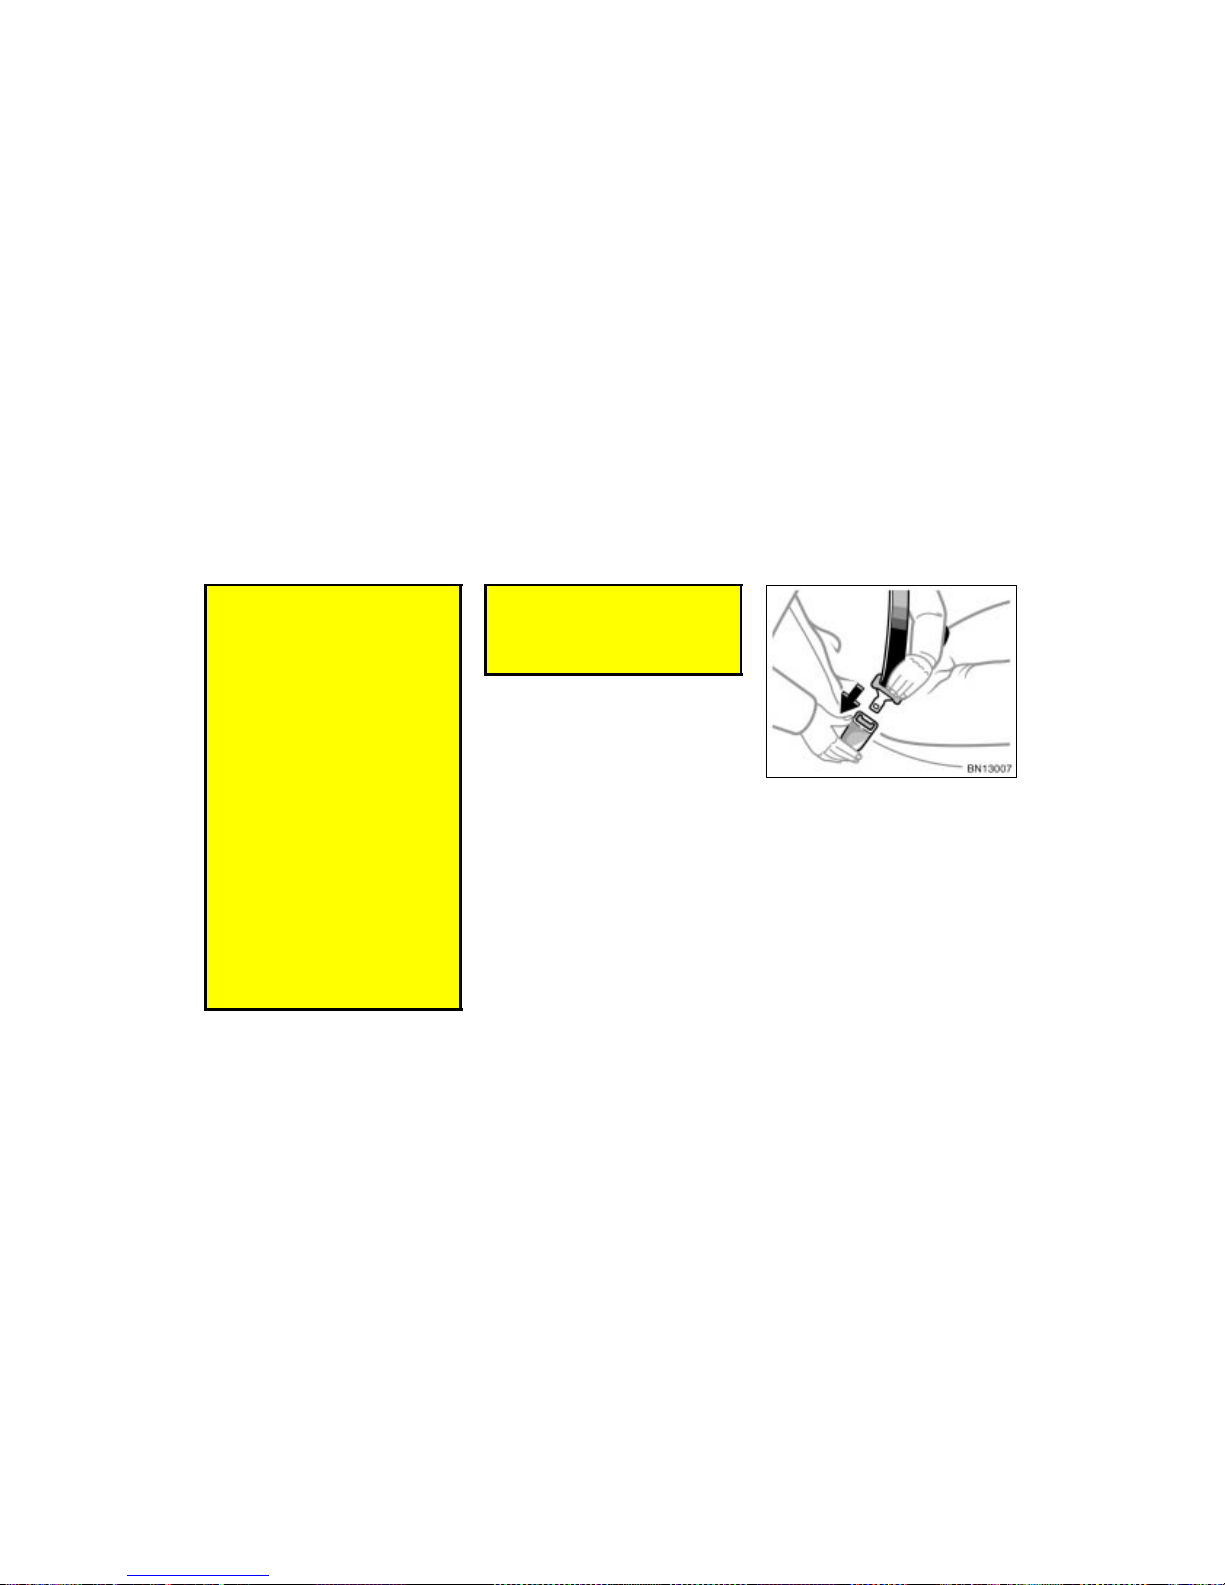
WWW.MANUALS.WS
WWW.MANUALS.WS
’03 Corolla U (L/O 0201)
33
2003 MY COROLLA_U (OM12744U)
When using the seat belts, observe
the following:
Use the belt for only one person at
a time. Do not use a single belt for
two or more people—even children.
Avoid reclining the seatbacks too
much. The seat belts provide maximum protection when the seatbacks
are in the upright position. (Refer
to the seat adjustment instructions.)
Be careful not to damage the belt
webbing or hardware. Take care that
they do not get caught or pinched
in the seat or doors.
Inspect the belt system periodically.
Check for cuts, fraying, and loose
parts. Damaged parts should be replaced. Do not disassemble or
modify the system.
Keep the belts clean and dry. If
they need cleaning, u se a mild soap
solution or lukewarm water. Never
use bleach, dye, or abrasive cleaners—they may severely weaken the
belts. (See “Cleaning the interior”
on page 191 in Section 5.)
Replace the belt assembly (includ-
ing bolts) if it has been used in a
severe impact. The entire assembly
should be replaced even if damage
is not obvious.
Adjust the seat as needed (front seats
only) and sit up straight and well back
in the seat. To fasten your belt, pull it
out of the retractor and insert the tab
into the buckle.
You will hear a click when the tab locks
into the buckle.
The seat belt length automatically adjusts
to your size and the seat position.
The retractor will lock the belt during a
sudden stop or on impact. It also may
lock if you lean forward too quickly. A
slow, easy motion will allow the belt to
extend, and you can move around freely.
—Front and rear seat belts
Page 69
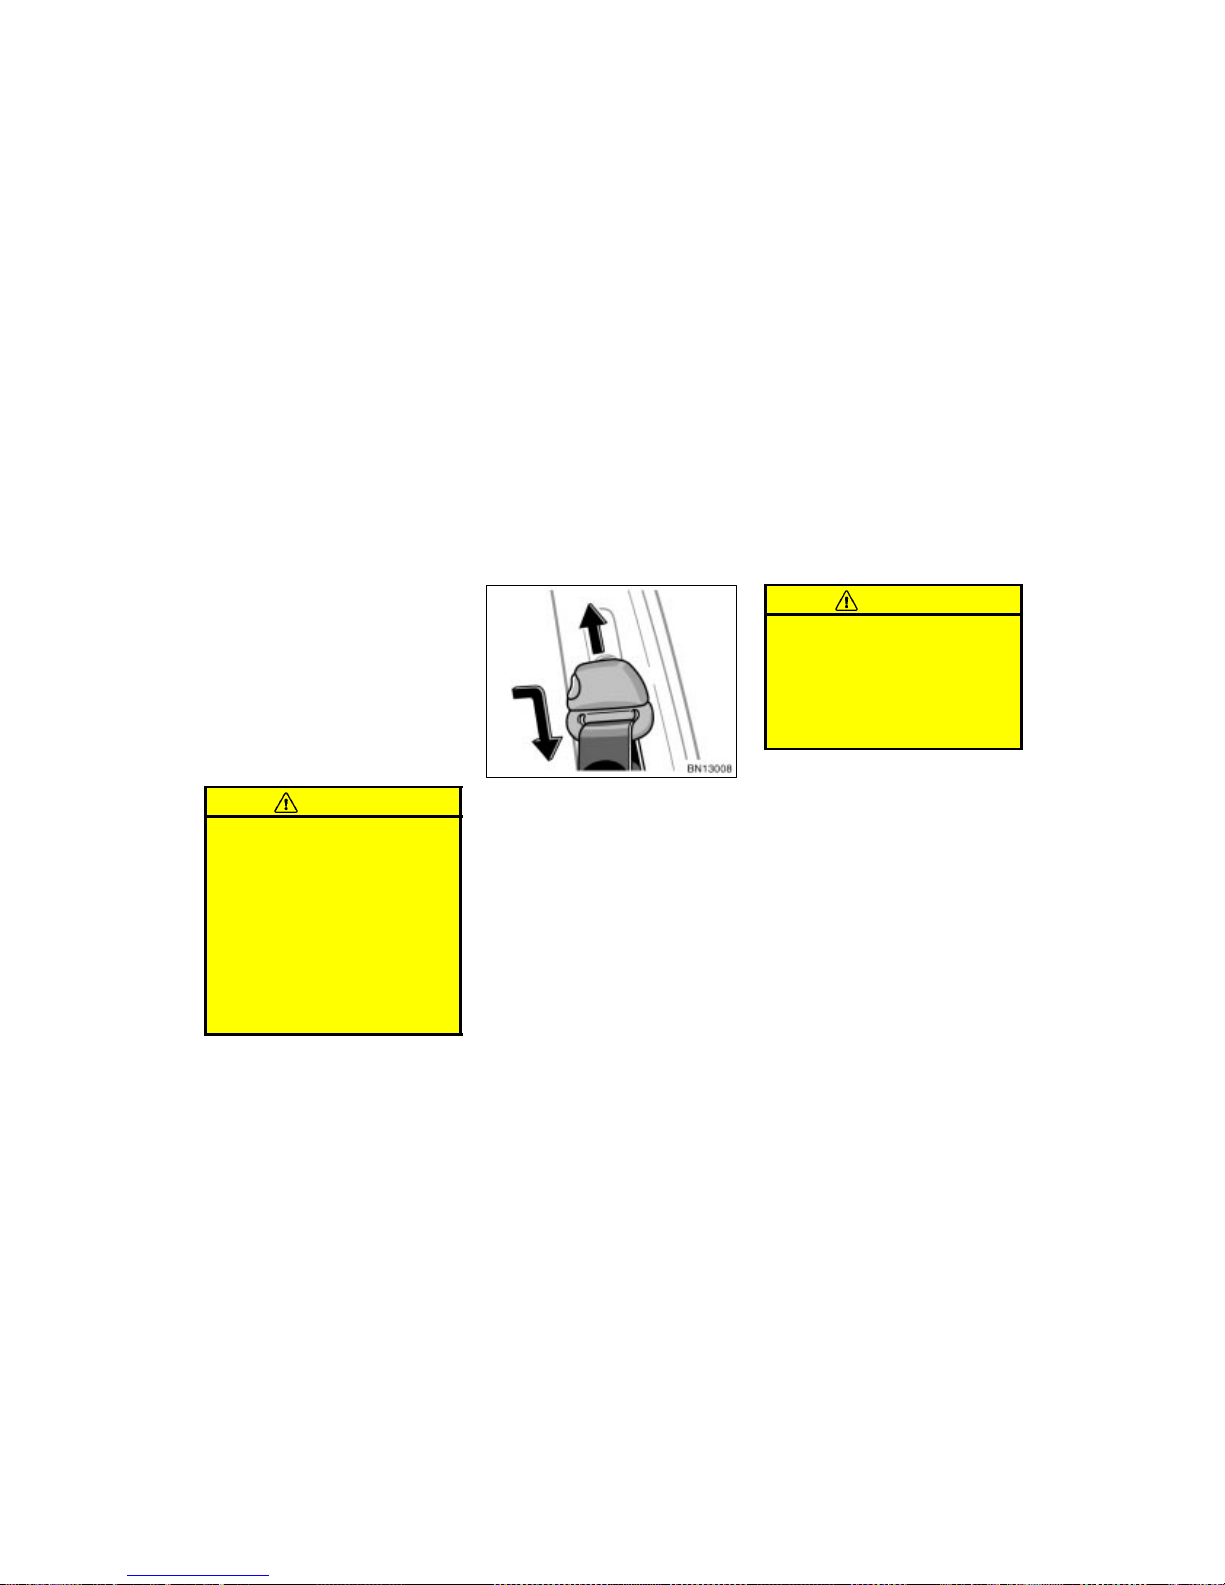
WWW.MANUALS.WS
WWW.MANUALS.WS
’03 Corolla U (L/O 0201)
34
2003 MY COROLLA_U (OM12744U)
If the seat belt cannot be pulled out of the
retractor, firmly pull the belt and release
it. You will then be able to smoothly pull
the belt out of the retractor.
When a passenger’s shoulder belt is completely extended and is then retracted
even slightly, the belt is locked in that
position and c annot be extended. Thi s feature is used to hold the child restraint
system securely. (For details, see “Child
restraint” on page 53 in this section.) To
free the belt again, fully retract the belt
and then pull the belt out once more.
CAUTION
After inserting the tab, make sure
that the tab and buckle are locked,
and the belt is not twisted.
Do not insert coins, clips, etc. in
the buckle as this may prevent you
from properly latching the tab and
buckle.
If the seat belt does not function
normally, immediately contact your
Toyota dealer. Do not use the seat
until the seat belt is fixed. It cannot
protect an adult occupant or your
child from injury.
Seat belts with an adjustable shoulder
anchor—
Adjust the shoulder anchor position to
your size.
To raise: Slide the anchor up.
To lower: Push in the lock release button
and slide the anchor down.
After adjustment make sure the anchor is
locked in position.
CAUTION
Always make sure the shoulder belt
is positioned across the center of
your shoulder. The belt should be
kept away from your neck, but not
falling off your shoulder. Failure to
do so could reduce the amount of
protection in an accident and cause
serious injuries in a collision.
Page 70
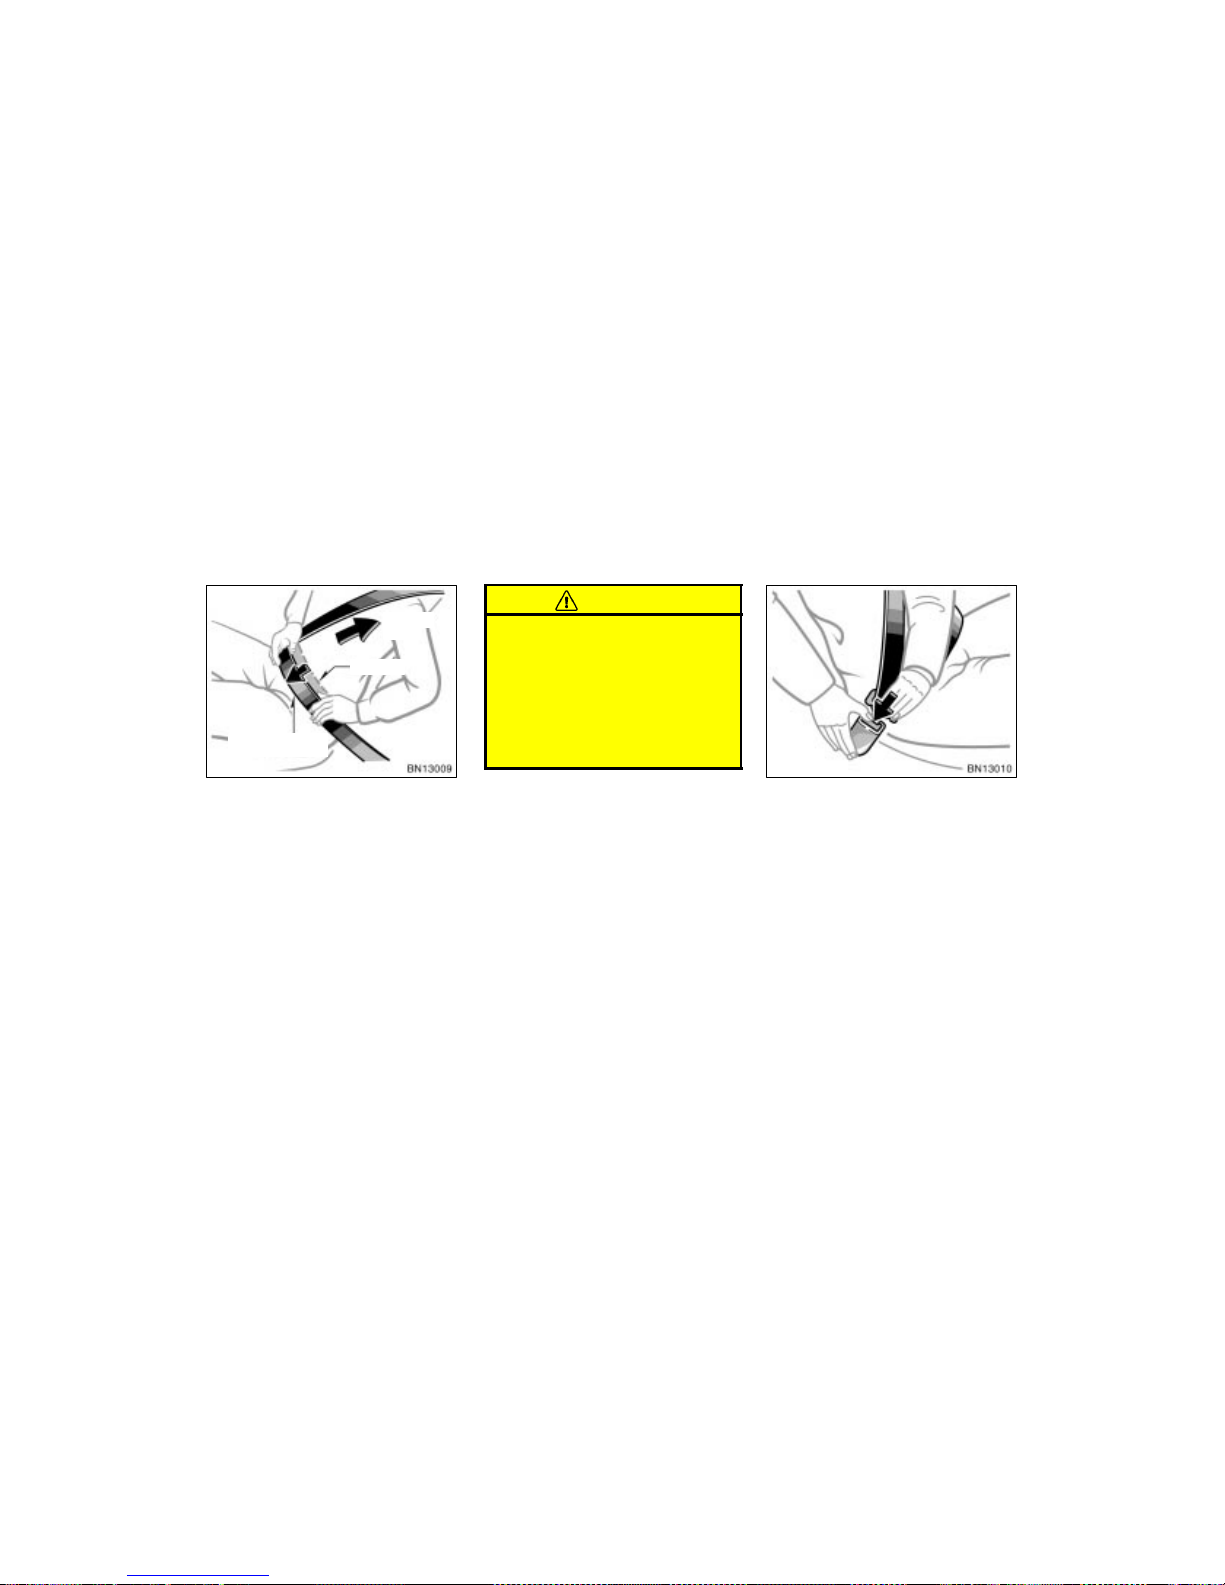
WWW.MANUALS.WS
WWW.MANUALS.WS
’03 Corolla U (L/O 0201)
35
2003 MY COROLLA_U (OM12744U)
Ta ke u p
slack
To o h i g h
Keep as low on
hips as possible
Adjust the position of the lap and
shoulder belts.
Position the lap belt as low as possible
on your hips—not on your waist, then adjust it to a snug fit by pulling the shoulder
portion upward through the latch plate.
CAUTION
Both high–positioned lap belts and
loose–fitting belts could cause serious injuries due to sliding under
the lap belt during a collision or
other unintended result. Keep the
lap belt positioned as low on hips
as possible.
For your safety, do not place the
shoulder belt under your arm.
To release the belt , p ress the buckle–release button and allow the belt to retract.
If the belt does not retract smoothly, pull
it out and check for kinks or twists. Then
make sure it remains untwisted as it retracts.
Page 71
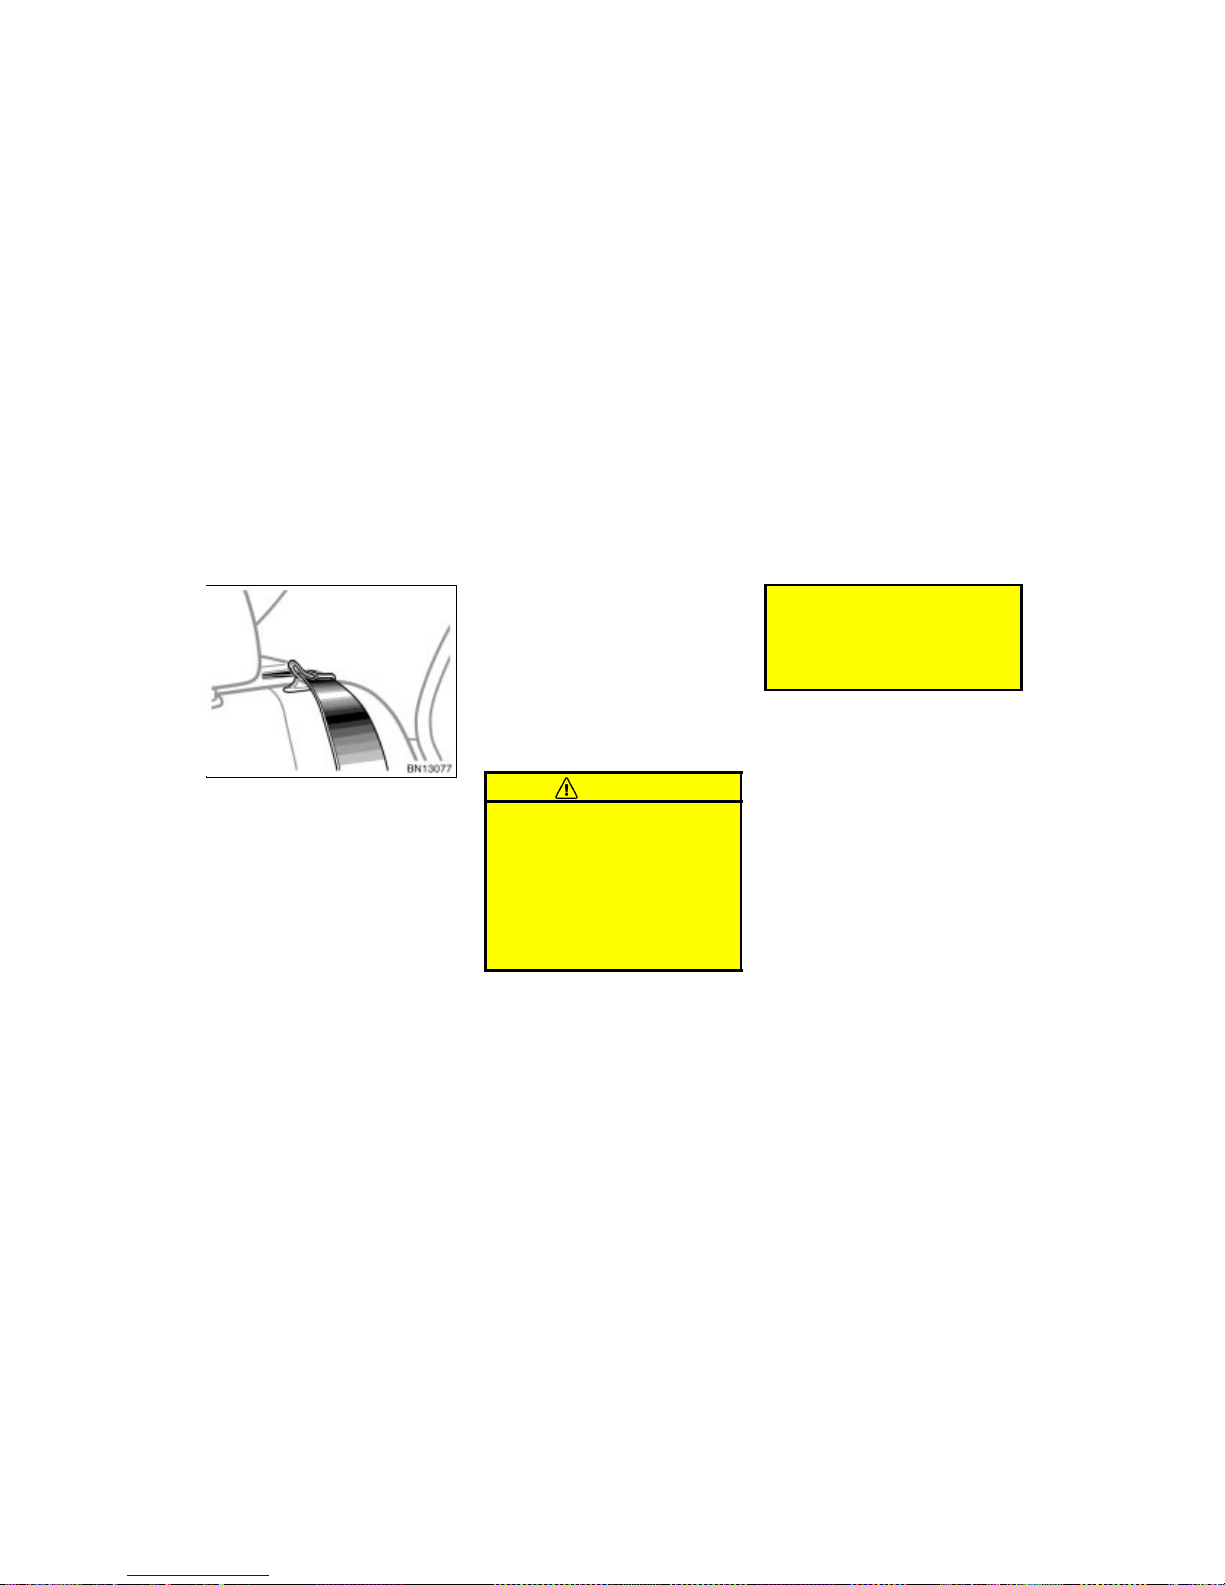
WWW.MANUALS.WS
WWW.MANUALS.WS
’03 Corolla U (L/O 0201)
36
2003 MY COROLLA_U (OM12744U)
Make sure the shoulder belt pass
through the guide when using the seat
belt for rear outside seat.
If your seat belts cannot be fastened securely because they are not long enough,
a personalized seat belt extender is available from your Toyota dealer free of
charge.
Please contact your local Toyota dealer so
that the dealer can order the proper required length for the extender. Bring the
heaviest coat you expect to wear for proper measurement and selection of length.
Additional ordering information is available
at your Toyota dealer.
CAUTION
When using the seat belt extender,
observe the following precautions.
Failure to follow these instructions
could reduce the effectiveness of the
seat belt restraint system in case of
vehicle accident, increasing the
chance of personal injury.
Never use the seat belt extender if
you can fasten the seat belt wit hout
it.
Remember that the extender pro-
vided for you may not be safe when
used on a different vehicle, for
another person, or at a different
seating position than the one originally intended.
—Seat belt extender
Page 72
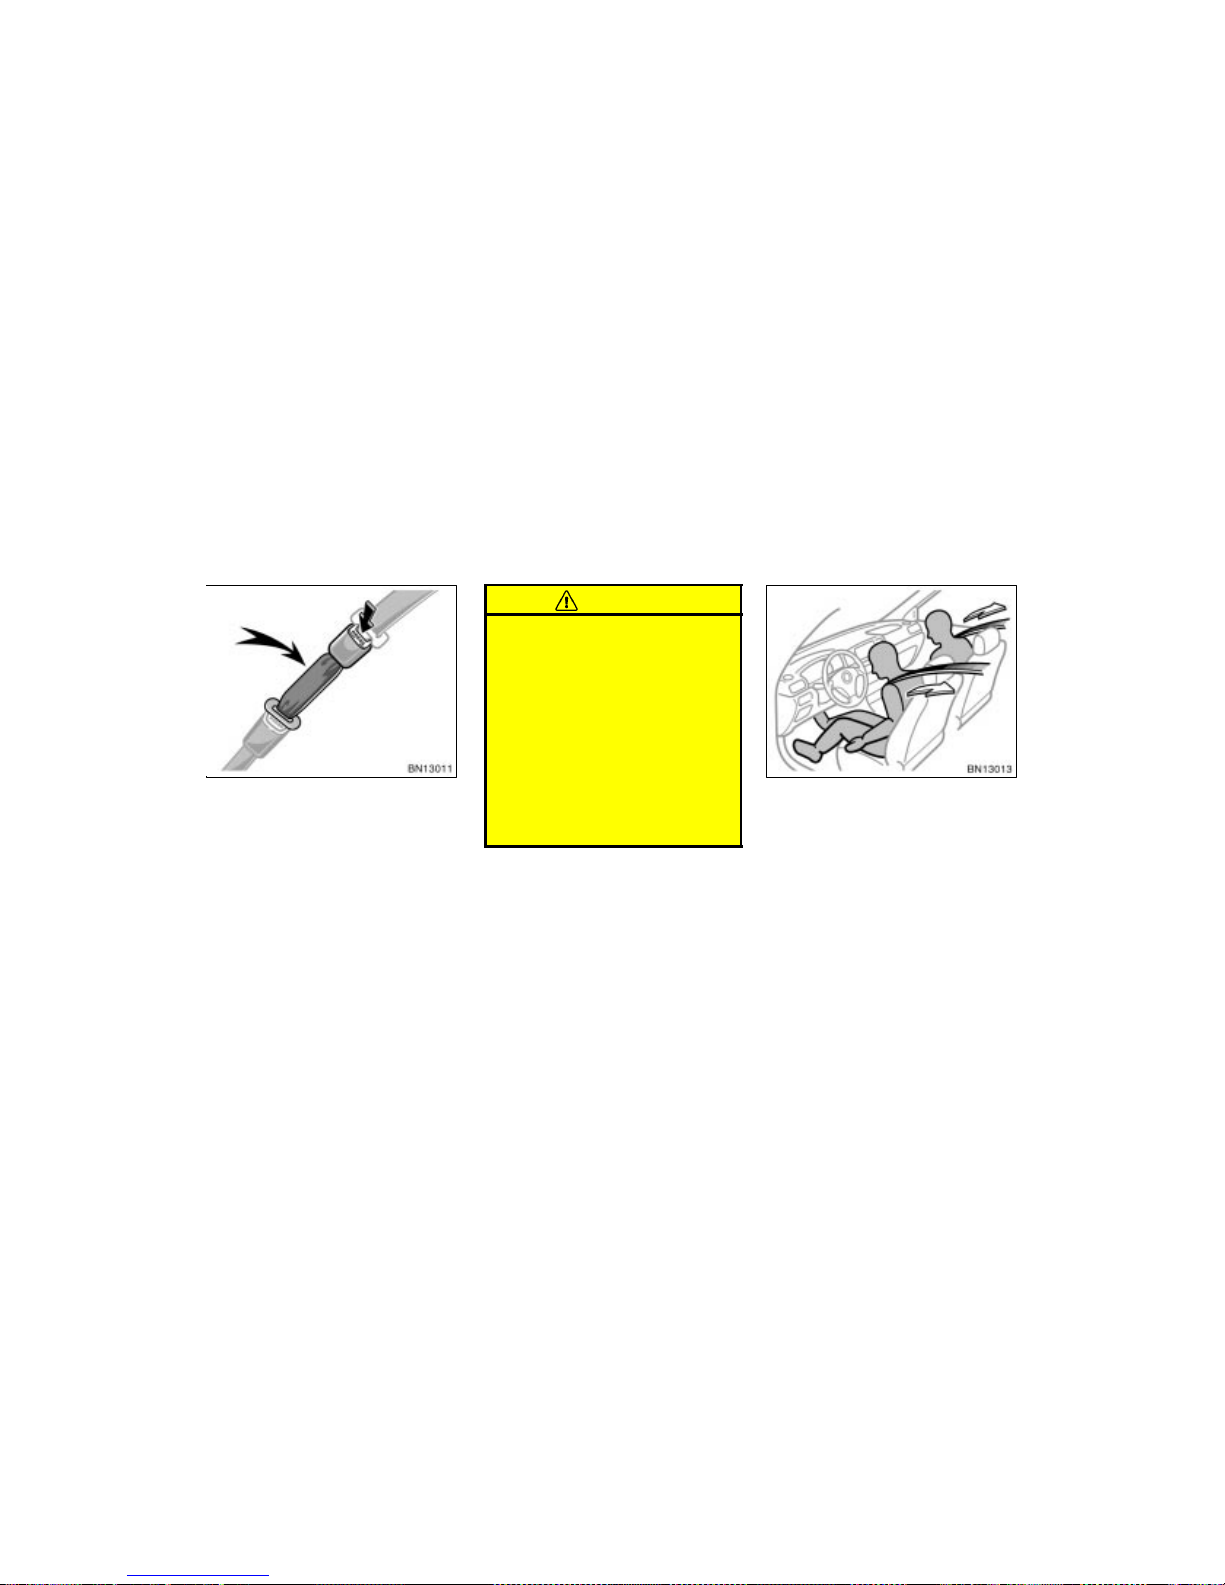
WWW.MANUALS.WS
WWW.MANUALS.WS
’03 Corolla U (L/O 0201)
37
2003 MY COROLLA_U (OM12744U)
To connect the extender to the seat
belt, insert the tab into the seat belt
buckle so that the “PRESS” signs on
the buckle–release buttons of the extender and the seat belt are both facing
outward as shown.
You will hear a click when the tab locks
into the buckle.
When releasing the seat belt, press on
the buckl e–release button on the extender,
not on the seat belt. This helps prevent
damage to the vehicle interior and extender itself.
When not in use, remove the extender
and store in the vehicle for future use.
CAUTION
After inserting the tab, make sure
that the tab and buckle are locked,
and the seat belt extender is not
twisted.
Do not insert coins, clips, etc. in
the buckle as this may prevent you
from properly latching the tab and
buckle.
If the seat belt does not function
normally, immediately contact your
Toyota dealer. Do not use the seat
until the seat belt is fixed. It cannot
protect an adult occupant or your
child from injury.
The driver and front passenger’s seat
belt pretensioners are designed to be
activated in response to a severe frontal impact.
When the airbag sensor detects the shock
of a severe frontal impact, the front seat
belts are quickly drawn back in by the
retractors so that the belts snugly restrain
the front seat occupants.
The front seat belt pretensioners are activated even with no passenger in the front
seat.
—Front seat belt
pretensioners
Page 73
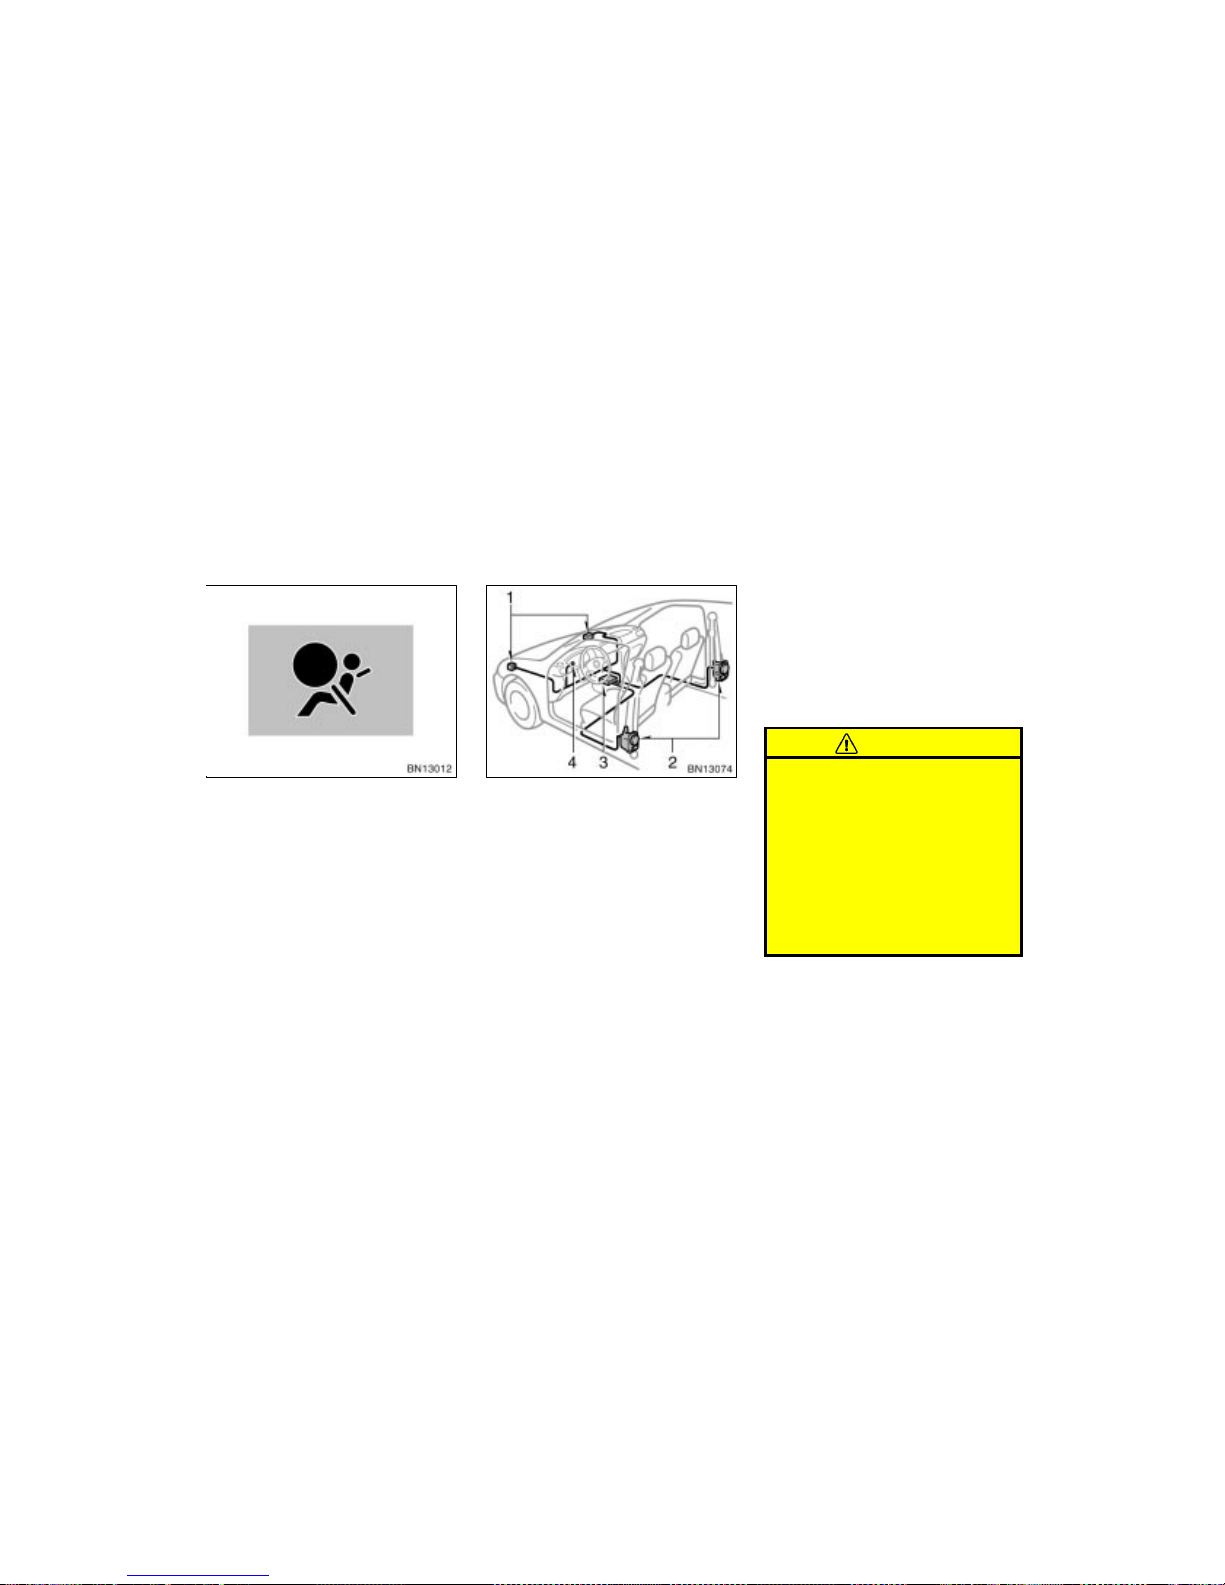
WWW.MANUALS.WS
WWW.MANUALS.WS
’03 Corolla U (L/O 0201)
38
2003 MY COROLLA_U (OM12744U)
This indicator comes on when the ignition key is turned to the “ON” position.
It goes off after about 6 seconds. This
means the front seat belt pretensioners
are operating properly.
This warning light system monitors the
airbag sensor assembly, front airbag sensors, side airbag sensors, driver’s seat
position sensor, driver’s seat belt buckle
switch, front seat belt pretensioner assemblies, inflators, warning light, interconnecting wiring and power sources. (For details,
see “Service reminder indicators and
warning buzzers” on page 85 in Section
1–5.)
The front seat belt pretensioner system
mainly consists of the following components and their locations are shown in the
illustration.
1. Front airbag sensors
2. Front seat belt pretensioner assemblies
3. Airbag sensor assembly
4. SRS warning light
The front seat belt pretensioners are controlled by the airbag sensor assembly. The
airbag sensor assembly consists of a safing sensor and airbag sensor.
When the front seat belt pretensioners are
activated, an operating noise may be
heard and a small amount of smoke–like
gas may be released. This gas is harmless and does not indicate that a fire is
occurring.
Once the front seat belt pretensioners
have been activated, the seat belt retractors remain locked.
CAUTION
Do not modify, remove, strike or open
the front seat belt pretensioner assemblies, airbag sensor or surrounding area or wiring. Doing so may
cause sudden operation of the front
seat belt pretensioners or disable the
system, which could result in death
or serious injury.
Failure to follow these instructions
can result in death or serious injuries. Consult your Toyota dealer
about any repairs and modifications.
Page 74
WWW.MANUALS.WS
WWW.MANUALS.WS
’03 Corolla U (L/O 0201)
39
2003 MY COROLLA_U (OM12744U)
NOTICE
Do not perform any of the following
changes without consulting your
Toyota dealer. Such changes can
interfere with proper operation of the
front seat belt pretensioners in some
cases.
Installation of electronic devices
such as a mobile two–way radio,
cassette tape player or compact
disc player
Repairs on or near the front seat
belt retractor assemblies
Modification of the suspension system
Modification of the front end structure
Attachment of a grille guard (bull
bar, kangaroo bar, etc.), snowplow,
winches or any other equipment to
the front end
Repairs made on or near the front
fenders, front end structure or console
This front seat belt pretensioner system
has a service reminder indicator to inform
the driver of operating problems. If any of
the following conditions occurs, this
indicates a malfunction of the airbags or
pretensioners. Contact your Toyota dealer
as soon as possible to service the
vehicle.
The light does not come on when the
ignition key is turned to the “ON” position, or the light remains on.
The light comes on or flashes while
driving.
If either front seat belt does not retract
or cannot be pulled out due to a malfunction or activation of the relevant
front seat belt pretensioner.
In the following cases, contac t your Toy ota
dealer as soon as possible:
The front of the vehicle (shaded in the
illustration) was involved in an acci dent
that was not severe enough to cause
the front seat belt pretensioners to operate.
Either front seat belt pretensioner as-
sembly or surrounding area is
scratched, cracked, or otherwise damaged.
Page 75
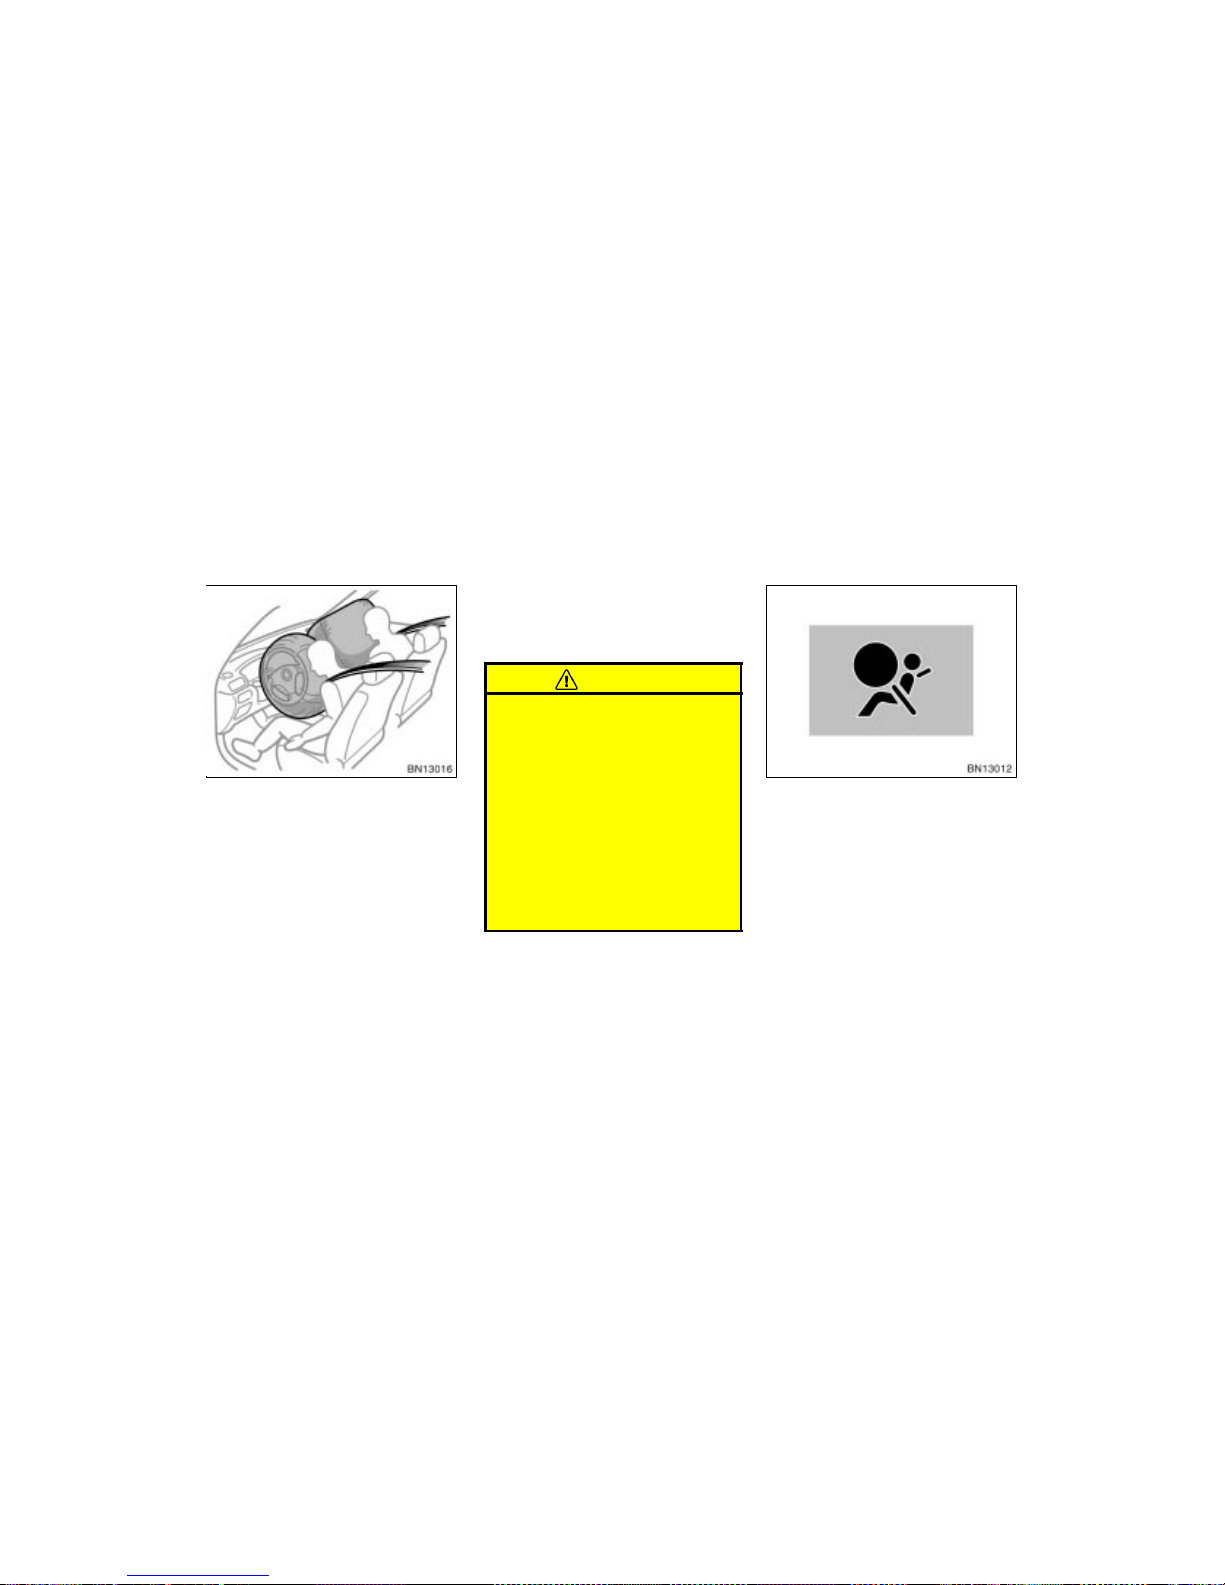
WWW.MANUALS.WS
WWW.MANUALS.WS
’03 Corolla U (L/O 0201)
40
2003 MY COROLLA_U (OM12744U)
The SRS (Supplemental Restraint System) front airbags are designed to provide further protection for the driver
and front passenger in addition to the
primary safety protection provided by
the seat belts.
In response to a severe frontal impact,
the SRS front airbags work together with
the seat belts to help reduce injury by
inflating. The SRS front airbags help to
reduce injuries mainly to the driver’s or
front pass enger’s head or chest caused by
directly hitting the steering wheel or dashboard. The front passenger airbag is activated even with no passenger in the front
seat.
Be sure to wear your seat belt properly.
Your vehicle is equipped with a crash
sensing and diagnostic module, which will
record the use of the seat belt restraint
system by the driver and front passenger
when the SRS airbags are inflated.
CAUTION
The driver or front passenger who is
too close to the steering wheel or
dashboard during airbag deployment
can be killed or seriously injured.
Toyota strongly recommends that:
The driver sit as far back as pos-
sible from the steering wheel while
still maintaining control of the vehicle.
The front passenger sit as far back
as possible from the dashboard.
All vehicle occupants be properly
restrained using the available seat
belts.
This indicator comes on when the ignition key is turned to the “ON” position.
It goes off after about 6 seconds. This
means the SRS front airbags are operating properly.
This warning light system monitors the
airbag sensor assembly, front airbag sensors, side airbag sensors, driver’s seat
position sensor, driver’s seat belt buckle
switch, front seat belt pretensioner assemblies, inflators, warning light, interconnecting wiring and power sources. (For details,
see “Service reminder indicators and
warning buzzers” on page 85 in Section
1–5.)
SRS driver airbag and front
passenger airbag
Page 76
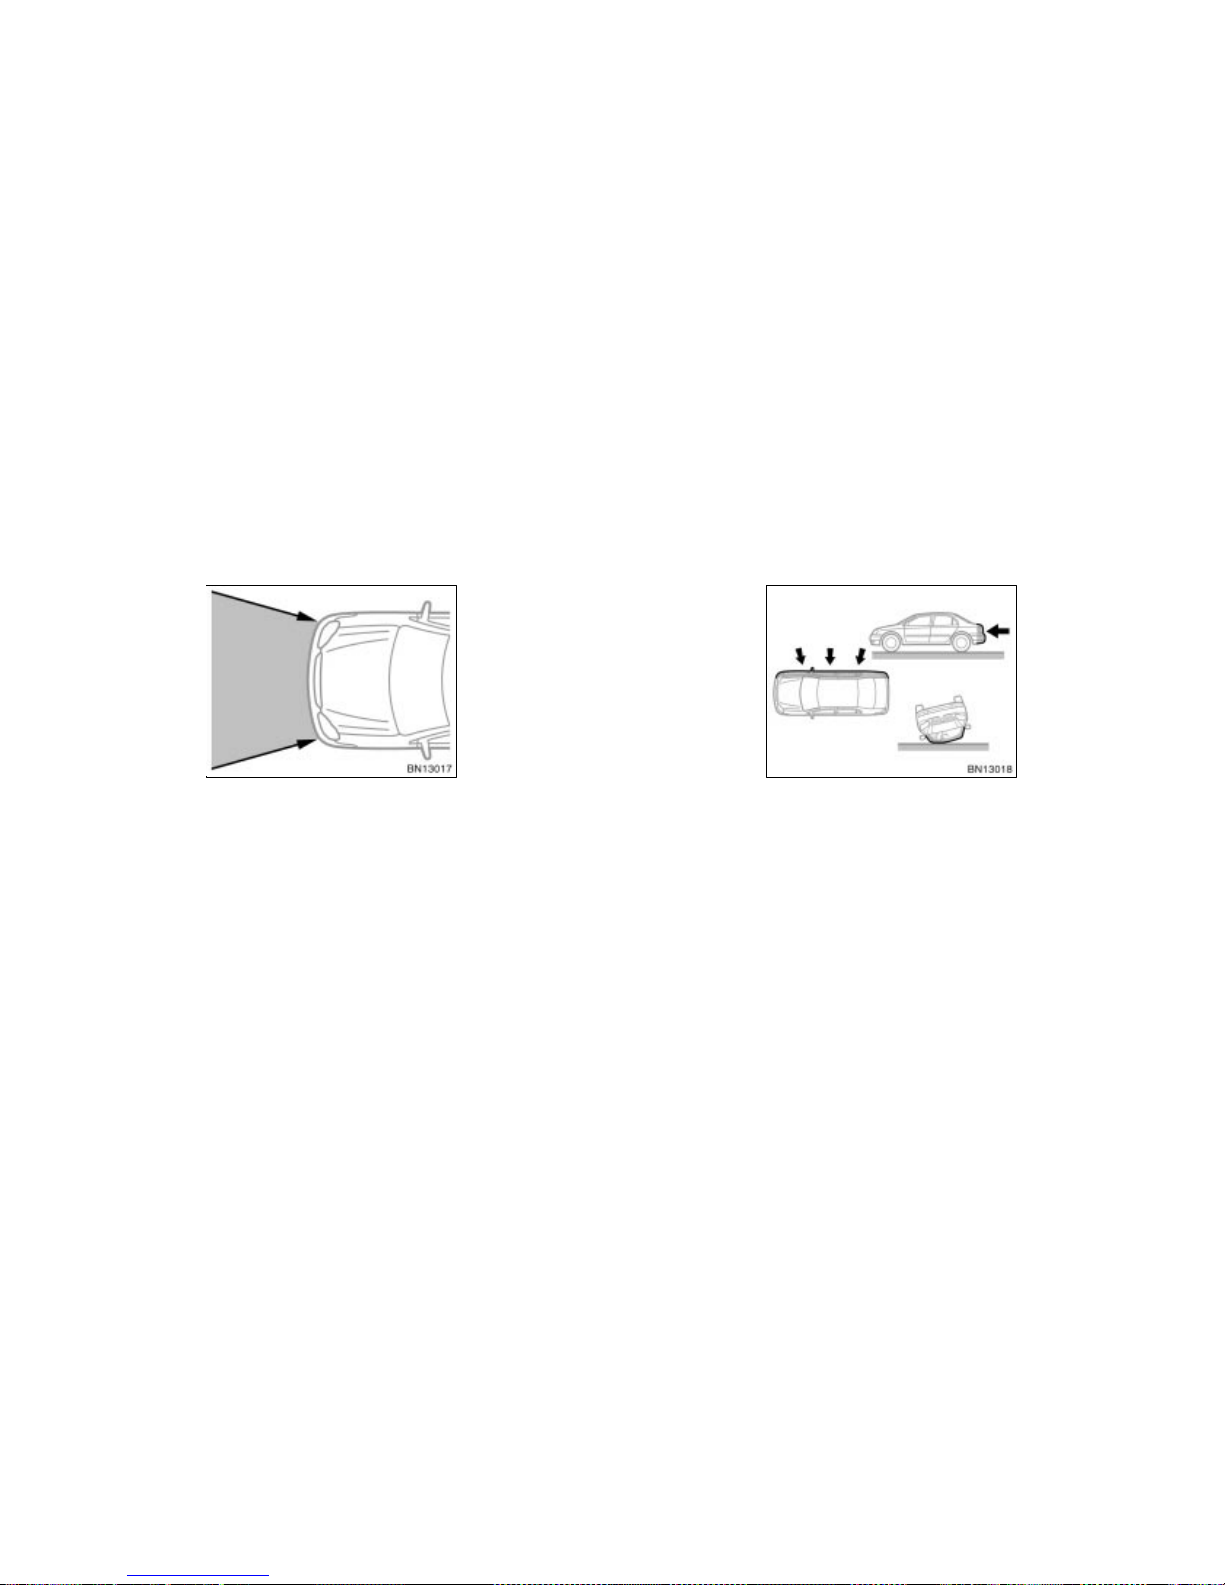
WWW.MANUALS.WS
WWW.MANUALS.WS
’03 Corolla U (L/O 0201)
41
2003 MY COROLLA_U (OM12744U)
The SRS front airbag system is designed to activate in response to a severe frontal impact within the shaded
area between the arrows in the illustration.
The SRS front airbags will deploy if the
severity of the impact is above the designed threshold level, comparable to an
approximate 25 km/h (15 mph) collision
when impacting s traight into a fixed barr ier
that does not move or deform.
If the severity of the impact is below the
above threshold level, the SRS front airbags may not deploy.
However, this threshold velocity will be
considerably higher if the vehicle strikes
an object, such as a parked vehicle or
sign pole, which can move or deform on
impact, or if it is involved in an underride
collision (e.g. a collision in which the nose
of the vehicle “underrides”, or goes under,
the bed of a truck, etc.).
For the safety of all occupants, always
wear your seat belts properly.
Collision from the rear
Collision from the side
Vehicle rollover
The SRS front airbags are not designed
to inflate if the vehicle is involved in a
side or rear collision, if it rolls over, or
if it is involved in a low–speed frontal
collision.
Page 77
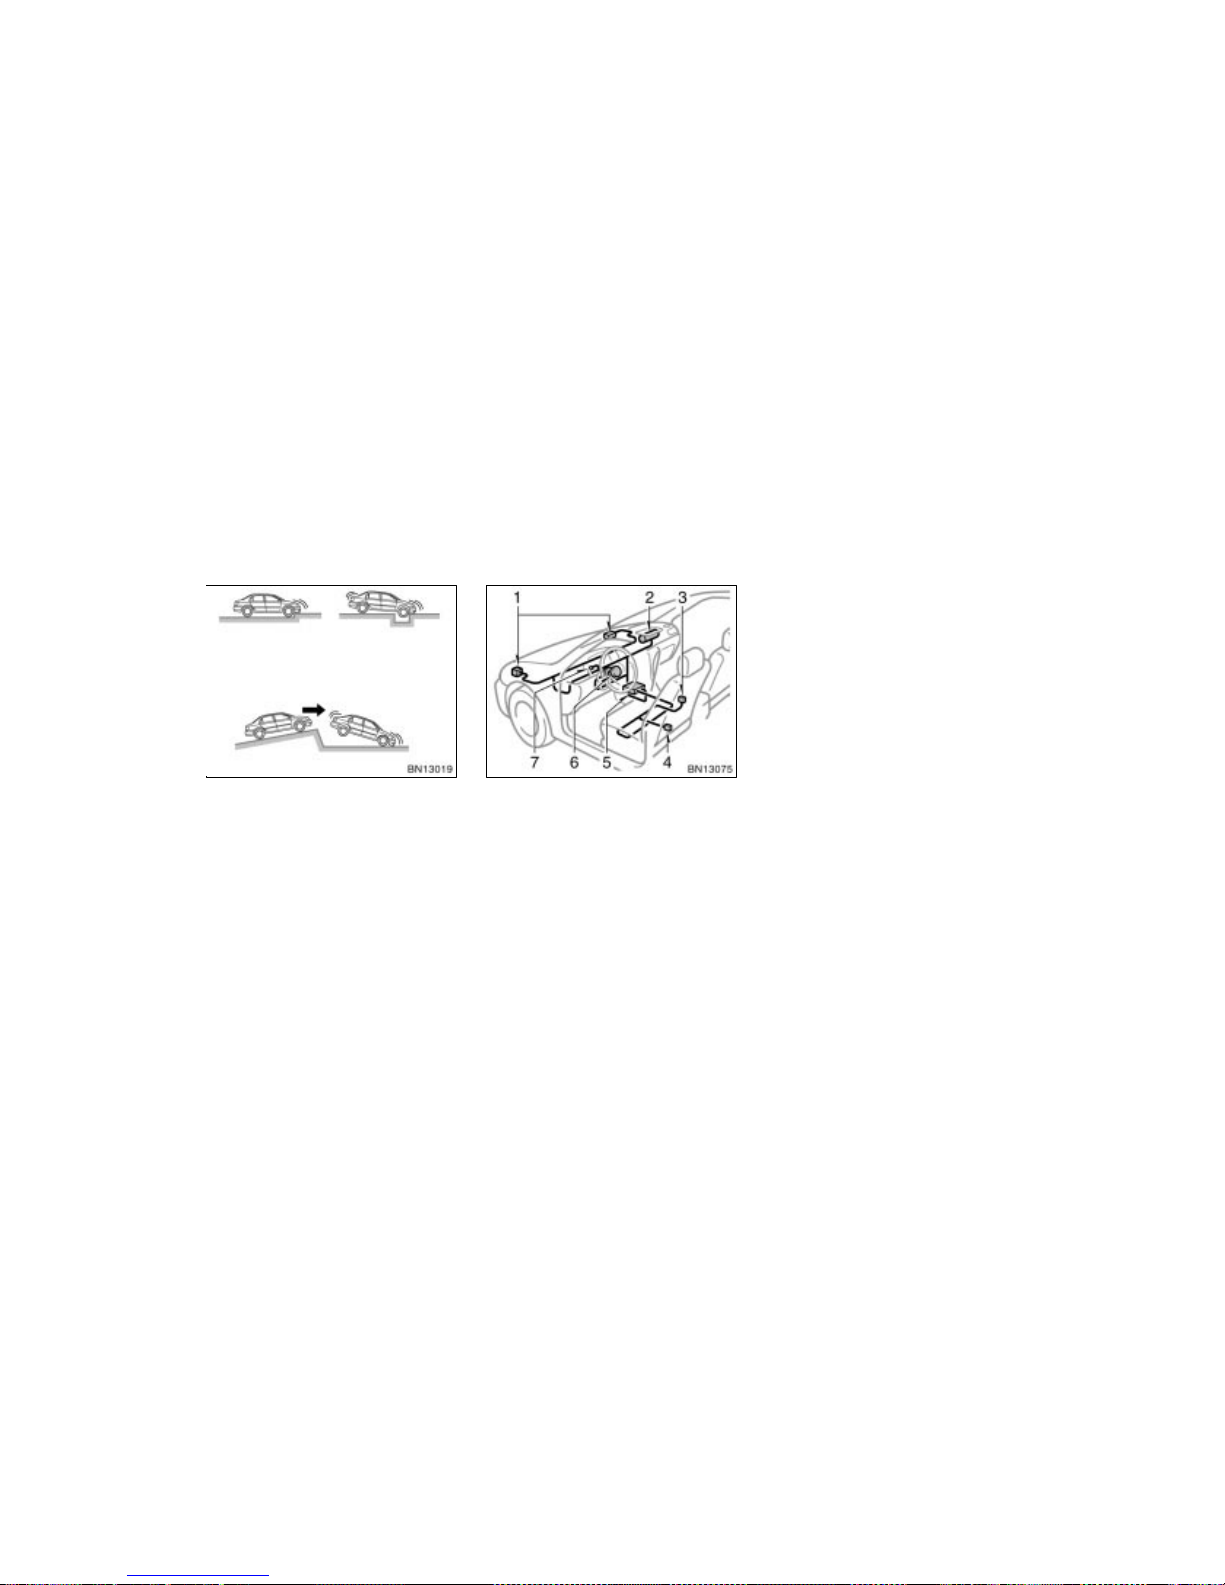
WWW.MANUALS.WS
WWW.MANUALS.WS
’03 Corolla U (L/O 0201)
42
2003 MY COROLLA_U (OM12744U)
Hitting a curb,
edge of pavement
or hard material
Falling into or
jumping over
a deep hole
Landing hard or vehicle falling
The SRS front airbags may deploy if a
serious impact occurs to the underside
of your vehicle. Some examples are
shown in the illustration.
The SRS airbag system consists mainly of
the following components, and their locations are shown in the illustration.
1. Front airbag sensors
2. Airbag module for front passenger
(airbag and inflator)
3. Driver’s seat belt buckle switch
4. Driver’s seat position sensor
5. Airbag sensor assembly
6. Airbag module for driver
(airbag and inflator)
7. SRS warning light
The airbag sensor assembly consists of a
safing sensor and airbag sensor.
In a severe frontal impact, the sensor detects deceleration and the system triggers
the airbag inflators. At this time a chemical reaction in the inflators quickly fills the
airbags with non–toxic gas t o help restr ain
the forward motion of the occupants.
When the airbags inflate, they produce a
fairly loud noise and release some smoke
and residue along with non–toxic gas. This
does not indicate a fire. This gas is normally harmless; however, for those who
have delicate skin, it may cause a minor
skin irritation. Be sure to wash off any
residue as soon as possible to prevent
any potential skin irritation.
Deployment of the airbags happens in a
fraction of a second, so the airbags must
inflate with considerable force. While the
system is designed to reduce serious injuries, it may also cause minor burns or
abrasions and swelling.
Parts of the ai rbag module (steering wheel
hub, dashboard) may be hot for several
minutes, but the airbags themselves will
not be hot. The airbags are designed to
inflate only once.
Page 78
WWW.MANUALS.WS
WWW.MANUALS.WS
’03 Corolla U (L/O 0201)
43
2003 MY COROLLA_U (OM12744U)
A crash severe enough to inflate the airbags may break the windshield as the
vehicle buckles. In vehicles with a passenger airbag the windshield may also be
damaged by absorbing some of the force
of the inflating airbag.
CAUTION
The SRS airbag system is designed
only as a supplement to the primary protection of the driver side and
front passenger side seat belt systems. The front seat occupants can
be killed or seriously injured by the
inflating airbags if they do not wear
the available seat belts properly.
During sudden braking just before
a collision, an unrestrained driver
or front passenger can move forward into direct contact with or
close proximity to the airbag which
may then deploy during the collision. To ensure maximum protection
in an accident, the driver and all
passengers in the vehicle must
wear their seat belts properly. Wearing a seat belt properly during an
accident reduces the chances of
death or serious injury or being
thrown out of the vehicle. For instructions and precautions concerning the seat belt system, see “Seat
belts” on page 32 in this section.
Improperly seated and/or restrained
infants and children can be killed
or seriously injured by the deploying front airbags. An infant or child
who is too small to use a seat belt
should be properly secured using a
child restraint system. Toyota
strongly recommends that all infants and children be placed in the
rear seat of the vehicle and properly restrained. The rear seat is the
safest for infants and children. For
instructions concerning the installation of a child restraint system, see
“Child restraint” on page 53 in this
section.
Page 79
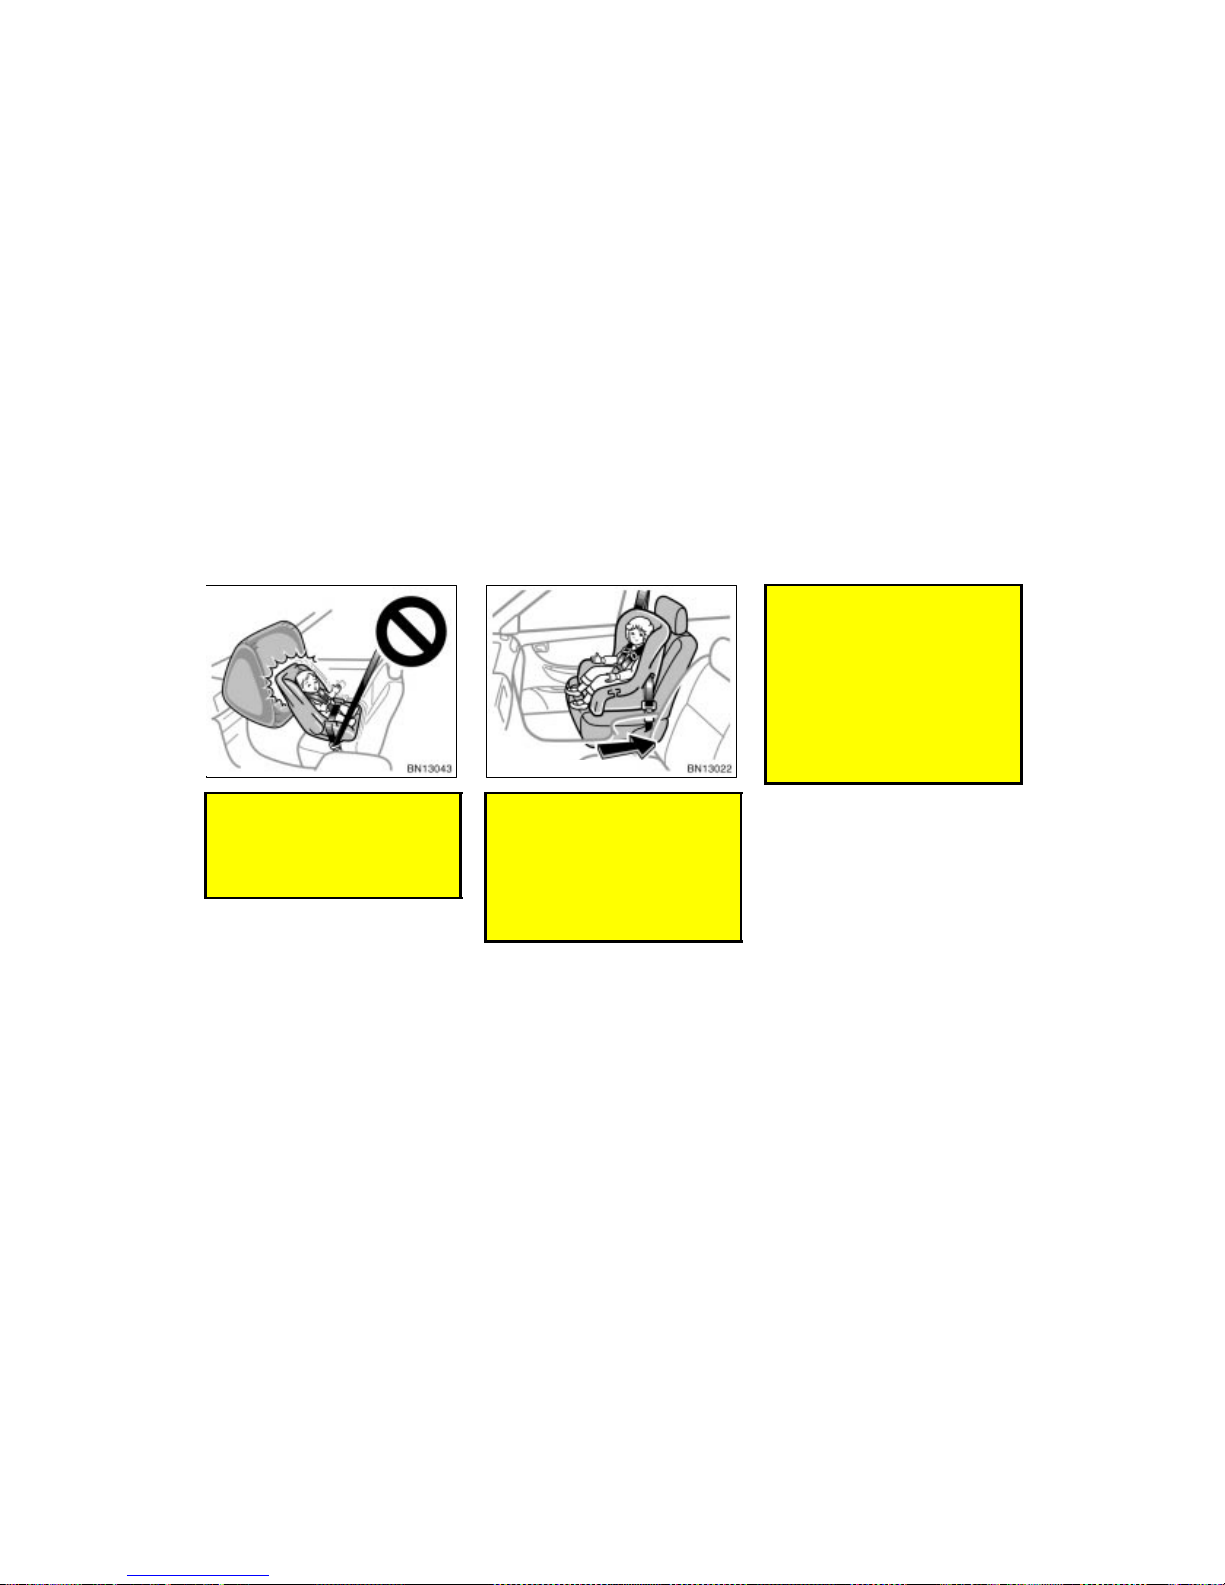
WWW.MANUALS.WS
WWW.MANUALS.WS
’03 Corolla U (L/O 0201)
44
2003 MY COROLLA_U (OM12744U)
Never install a rear–facing child re-
straint system on the front passenger seat because the force of the
rapid inflation of the front passenger airbag can cause death or serious injury to the child.
Move seat fully back
A for ward–facing child rest raint sys-
tem should be allowed to be
installed on the front passenger
seat only when it is unavoidable.
Always move the seat as far back
as possible, because the force of
the deploying front passenger airbag could cause death or serious
injury to the child.
On vehicles with side airbags, do
not allow the child to lean against
the front door or around the front
door even if the child is seated in
the child restraint system. It is dangerous if the side airbags inflate,
because the impact could cause
death or serious injury to the child.
For instructions concerning the
installation of a child restraint system, see “Child restraint” on page
53 in this section.
Page 80
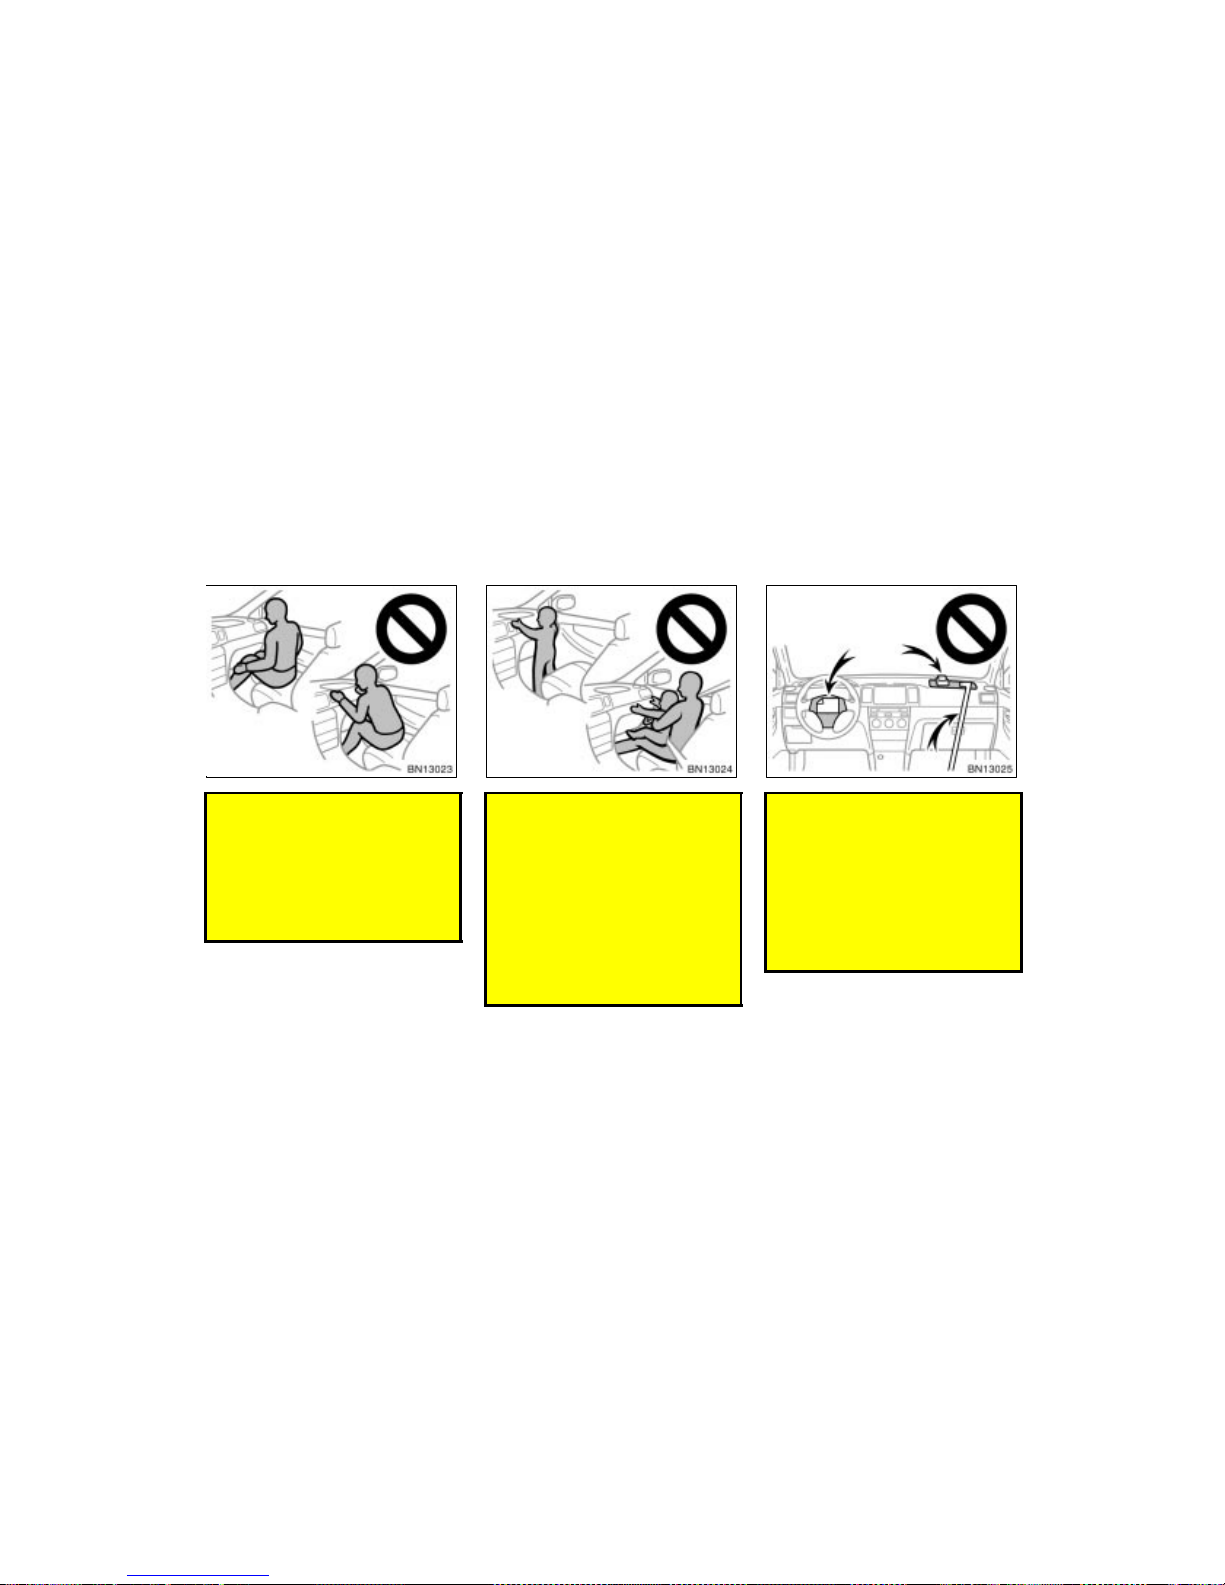
WWW.MANUALS.WS
WWW.MANUALS.WS
’03 Corolla U (L/O 0201)
45
2003 MY COROLLA_U (OM12744U)
Do not sit on the edge of the seat
or lean over the dashboard when
the vehicle is in use, since the
front airbags inflate with considerable speed and force. Otherwise,
you may be killed or seriously injured. Sit up straight and well back
in the seat, and always use your
seat belt properly.
Do not allow a child to stand up or
to kneel on the front passenger
seat, since the front airbag inflates
with considerable speed and force.
Otherwise, the child may be killed
or seriously injured.
Do not hold a child on your lap or
in your arms. Use a child restraint
system in the rear seat. F or instructions concerning the installation of
a child restraint system, see “Child
restraint” on page 53 in this section.
Do not put objects or your pets on
or in front of the dashboard or
steering wheel pad that houses the
front airbag system. They might restrict inflation or cause death or
serious injury as they are projected
rearward by the force of deploying
airbags. Likewise, the driver and
front passenger should not hold objects in their arms or on their
knees.
Page 81
WWW.MANUALS.WS
WWW.MANUALS.WS
’03 Corolla U (L/O 0201)
46
2003 MY COROLLA_U (OM12744U)
Do not modify or remove any wir-
ing. Do not modify, remove, strike
or open any components such as
the steering wheel pad, steering
wheel, column cover, front passenger airbag cover, front passenger
airbag or airbag sensor assembly.
Doing so may cause sudden SRS
front airbag inflation or disable the
system, which could result in death
or serious injury.
Failure to follow these instructions
can result in death or serious injury.
Consult your Toyota dealer about any
repairs and modifications.
NOTICE
Do not perform any of the following
changes without consulting your
Toyota dealer. Such changes can
interfere with proper operation of the
SRS front airbag system in some
cases.
Installation of electronic devices
such as a mobile two–way radio,
cassette tape player or compact
disc player
Modification of the suspension system
Modification of the front end structure
Attachment of a grille guard (bull
bar, kangaroo bar, etc.), snowplow,
winches or any other equipment to
the front end
Repairs made on or near the front
fenders, front end structure, console, steering column, steering
wheel or dashboard near the front
passenger airbag
This SRS front airbag system has a service reminder indicator to inform the driver
of operating problems. If either of the following conditions occurs, this indicates a
malfunction of the airbags. Contact your
Toyota dealer as soon as possible to service the vehicle.
The light does not come on when the
ignition key is turned to the “ON” position, or the light remains on.
The light comes on while driving.
Page 82
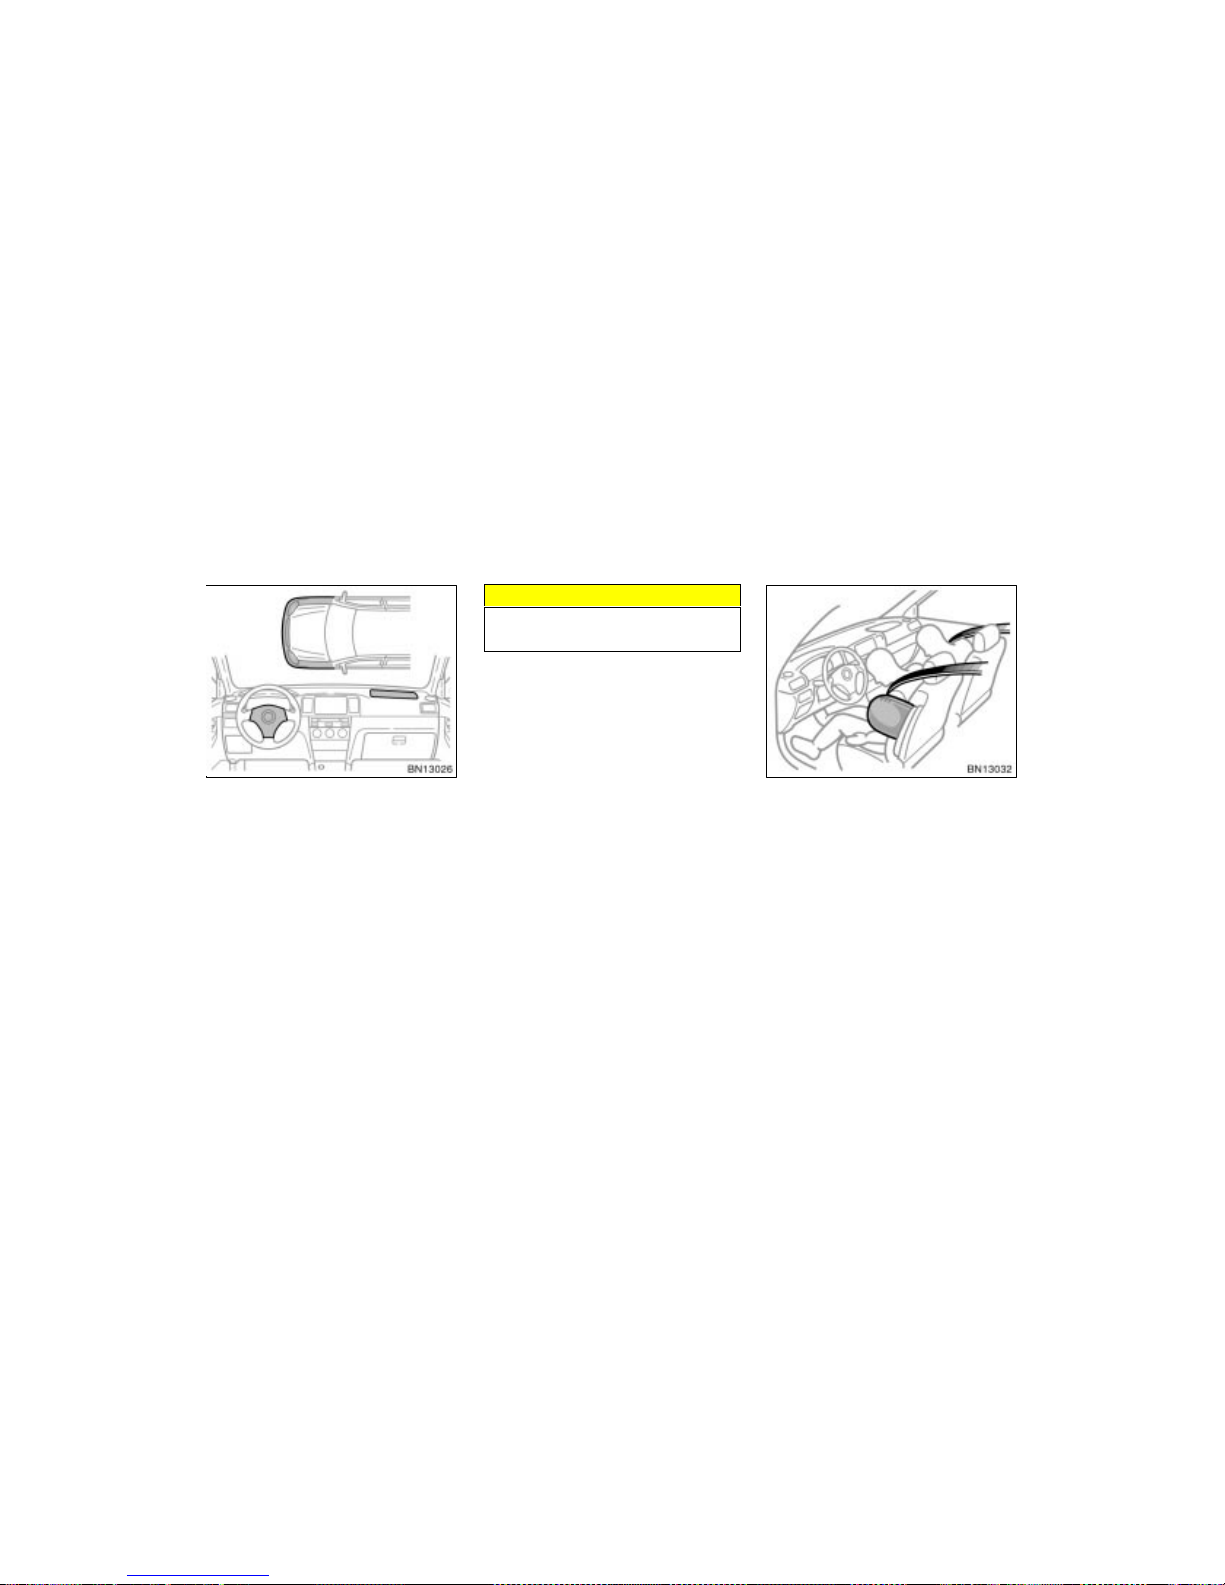
WWW.MANUALS.WS
WWW.MANUALS.WS
’03 Corolla U (L/O 0201)
47
2003 MY COROLLA_U (OM12744U)
In the following cases, contac t your Toy ota
dealer as soon as possible:
The SRS front airbags have been in-
flated.
The front of the vehicle (shaded in the
illustration) was involved in an acci dent
that was not severe enough to cause
the SRS front airbags to inflate.
The pad section of the steering wheel
or front passenger airbag cover
(shaded in the illustration) is scratc hed,
cracked, or otherwise damaged.
NOTICE
Do not disconnect the battery cables
before contacting your Toyota dealer.
The SRS (Supplemental Restraint System) side airbags are designed to provide further protection for the driver
and front passenger in addition to the
primary safety protection provided by
the seat belts.
In response to a severe side impact, the
SRS side airbags work together with the
seat belts to help reduce injury by inflating. The SRS side airbags help to reduce
injuries mainly to the driver’s or front passenger’s chest. The SRS side airbag on
the passenger seat is activated even with
no passenger in the front seat.
Be sure to wear your seat belt properly.
SRS side airbags
Page 83
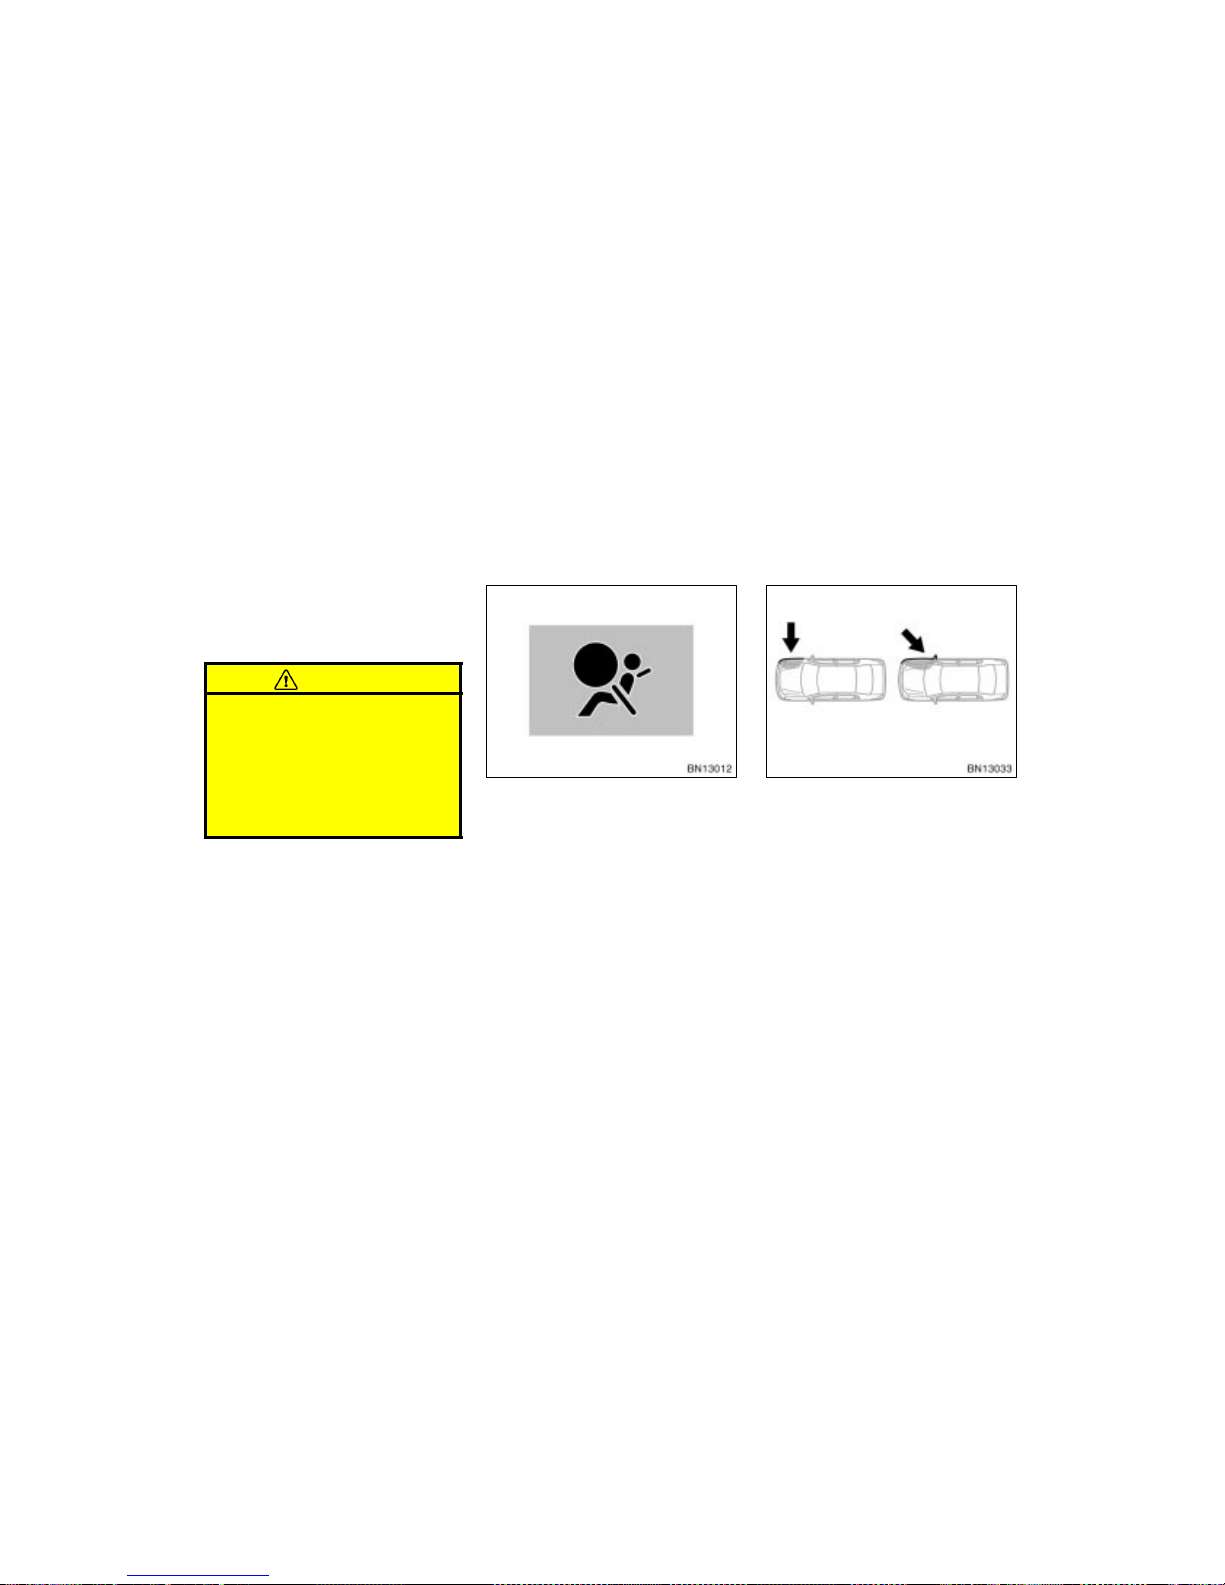
WWW.MANUALS.WS
WWW.MANUALS.WS
’03 Corolla U (L/O 0201)
48
2003 MY COROLLA_U (OM12744U)
Your vehicle is equipped with a crash
sensing and diagnostic module, which will
record the use of the seat belt restraint
system by the driver and front passenger
when the SRS side airbags are inflated.
CAUTION
SRS side airbags inflate with considerable force. To avoid potential death
or serious injury when they inflate,
the driver and front passenger must:
Wear their seat belts properly.
Remain properly seated with their
back upr ight and against the seat at
all times.
This indicator comes on when the ignition key is turned to the “ON” position.
It goes off after about 6 seconds. This
means the SRS side airbags are operating properly.
This warning light system monitors the
airbag sensor assembly, front airbag sensors, side airbag sensors, driver’s seat
position sensor, driver’s seat belt buckle
switch, front seat belt pretensioner assemblies, inflators, warning light, interconnecting wiring and power sources. (For details,
see “Service reminder indicators and
warning buzzers” on page 85 in Section
1–5.)
The SRS side airbag system may not
activate if the vehicle is subjected to a
collision from the side at certain
angles, or a collision to the side of the
vehicle body other than the passenger
compartment as shown in the illustration.
The SRS side airbags are designed to
inflate when the passenger compartment
area suffers a severe impact from the
side.
For the safety of all occupants, always
wear your seat belts properly.
Page 84
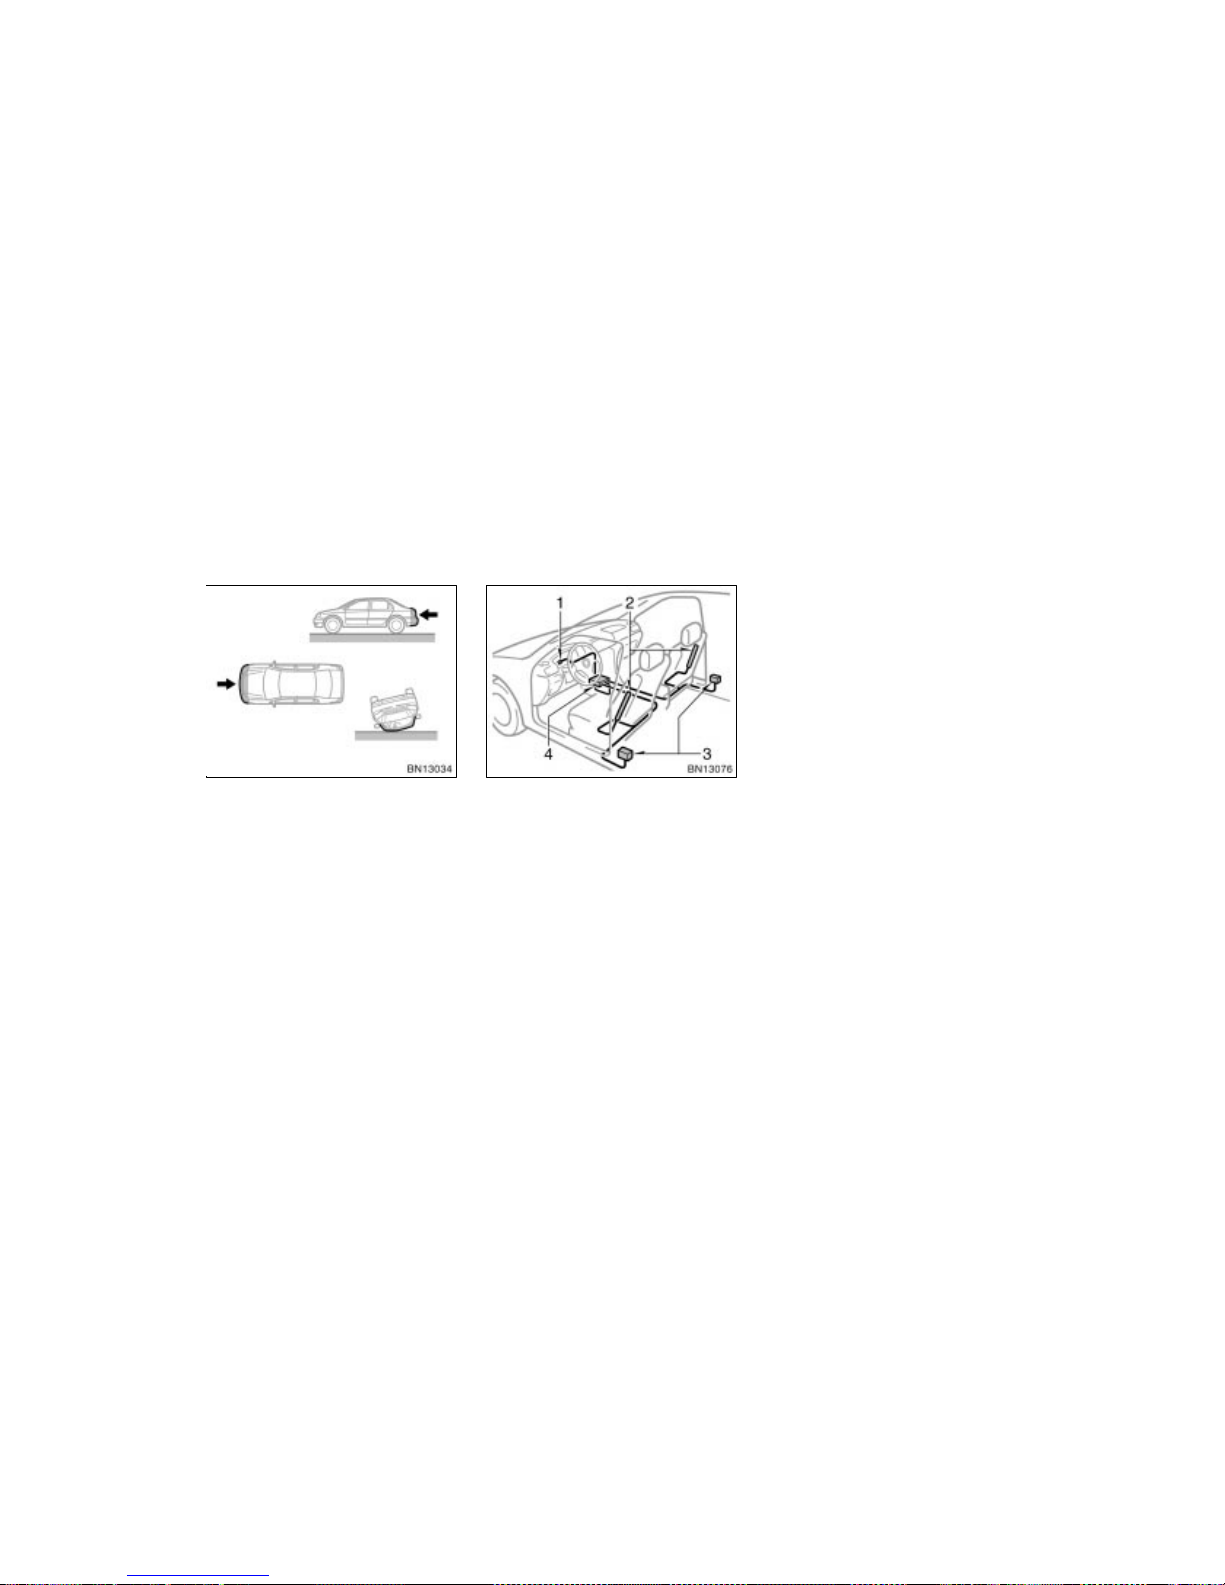
WWW.MANUALS.WS
WWW.MANUALS.WS
’03 Corolla U (L/O 0201)
49
2003 MY COROLLA_U (OM12744U)
Collision from the rear
Collision from the front
Vehicle rollover
The SRS side airbags are not designed
to inflate if the vehicle is involved in a
front or rear collision, if it rolls over,
or if it is involved in a low–speed side
collision.
The SRS side airbag system consists
mainly of the following components, and
their locations are shown in the illustration.
1. SRS warning light
2. Side airbag modules
(airbag and inflator)
3. Side airbag sensors
4. Airbag sensor assembly
The SRS side airbag system is controlled
by the airbag sensor assembly. The airbag
sensor assembly consists of a safing sensor and airbag sensor.
In a severe side impact, the side airbag
sensor triggers the side airbag inflators.
At this time a chemical reaction in the
inflators quickly fills the airbags with non–
toxic gas to help restrain the lateral motion of the occupants.
When the airbags inflate, they produce a
fairly loud noise and release some smoke
and residue along with non–toxic gas. This
does not indicate a fire. This gas is normally harmless; however, for those who
have delicate skin, it may cause a minor
skin irritation. Be sure to wash off any
residue as soon as possible to prevent
any potential skin irritation.
Deployment of the airbags happens in a
fraction of a second, so the airbags must
inflate with considerable force. While the
system is designed to reduce serious injuries, it may also cause minor burns or
abrasions and swelling.
Front seats may be hot for several minutes, but the airbags themselves will not
be hot. The airbags are designed to inf late
only once.
Page 85
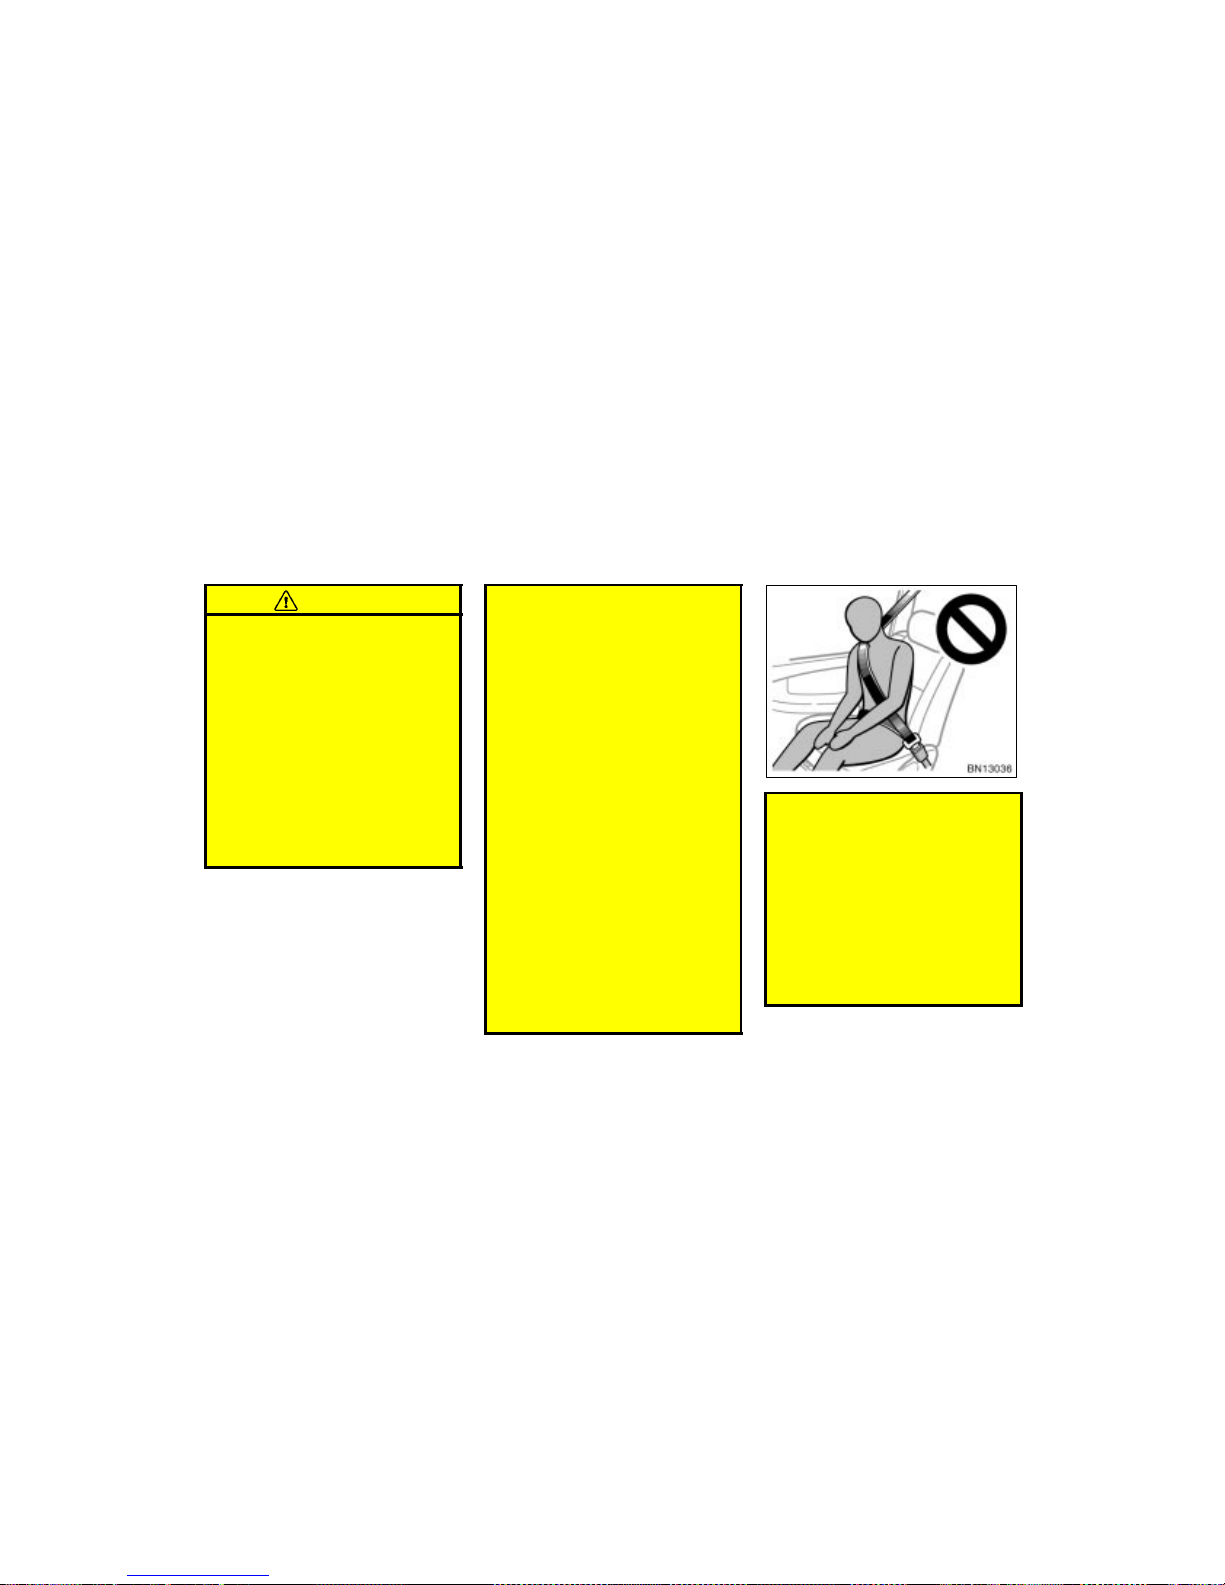
WWW.MANUALS.WS
WWW.MANUALS.WS
’03 Corolla U (L/O 0201)
50
2003 MY COROLLA_U (OM12744U)
CAUTION
The SRS side airbag system is de-
signed only as a supplement to the
primary protection of the driver
side and front passenger side seat
belt systems. To ensure maximum
protection in an accident, the driver
and all passengers in the vehicle
must wear their seat belts properly.
Wearing a seat belt properly during
an accident reduces the chances of
death or serious injury or being
thrown out of the vehicle. For
instructions and precautions concerning the seat belt system, see
“Seat belts” on page 32 in this section.
Improperly seated and/or restrained
infants and children can be killed
or seriously injured by the deploying airbags. An infant or child who
is too small to use a seat belt
should be properly secured using a
child restraint system. Toyota
strongly recommends that all infants and children be placed in the
rear seat of the vehicle and properly restrained. The rear seat is the
safest for infants and children. For
instructions concerning the installation of a child restraint system, see
“Child restraint” on page 53 in this
section.
Do not allow a child to lean his/her
head or any part of his/her body
against the front door or the area
of the seat from which the side airbag deploys even if he/she is
seated in the child restraint system.
It is dangerous if the side airbag
inflates, and the impact could cause
death or serious injury to the child.
For instructions concerning the
installation of a child restraint system, see “Child restraint” on page
53 in this section.
Do not lean against the front door
when the vehicle is in use, since
the side airbag inflates with considerable speed and force. Otherwise,
you may be killed or be seriously
injured. Spacial care should be taken especially when you have a
small child in the vehicle.
Sit up straight and well back in the
seat, distr ibuting your weight evenly
in the seat. Do not apply excessive
weight to the outer side of the front
seats on vehicles with side airbags.
Page 86
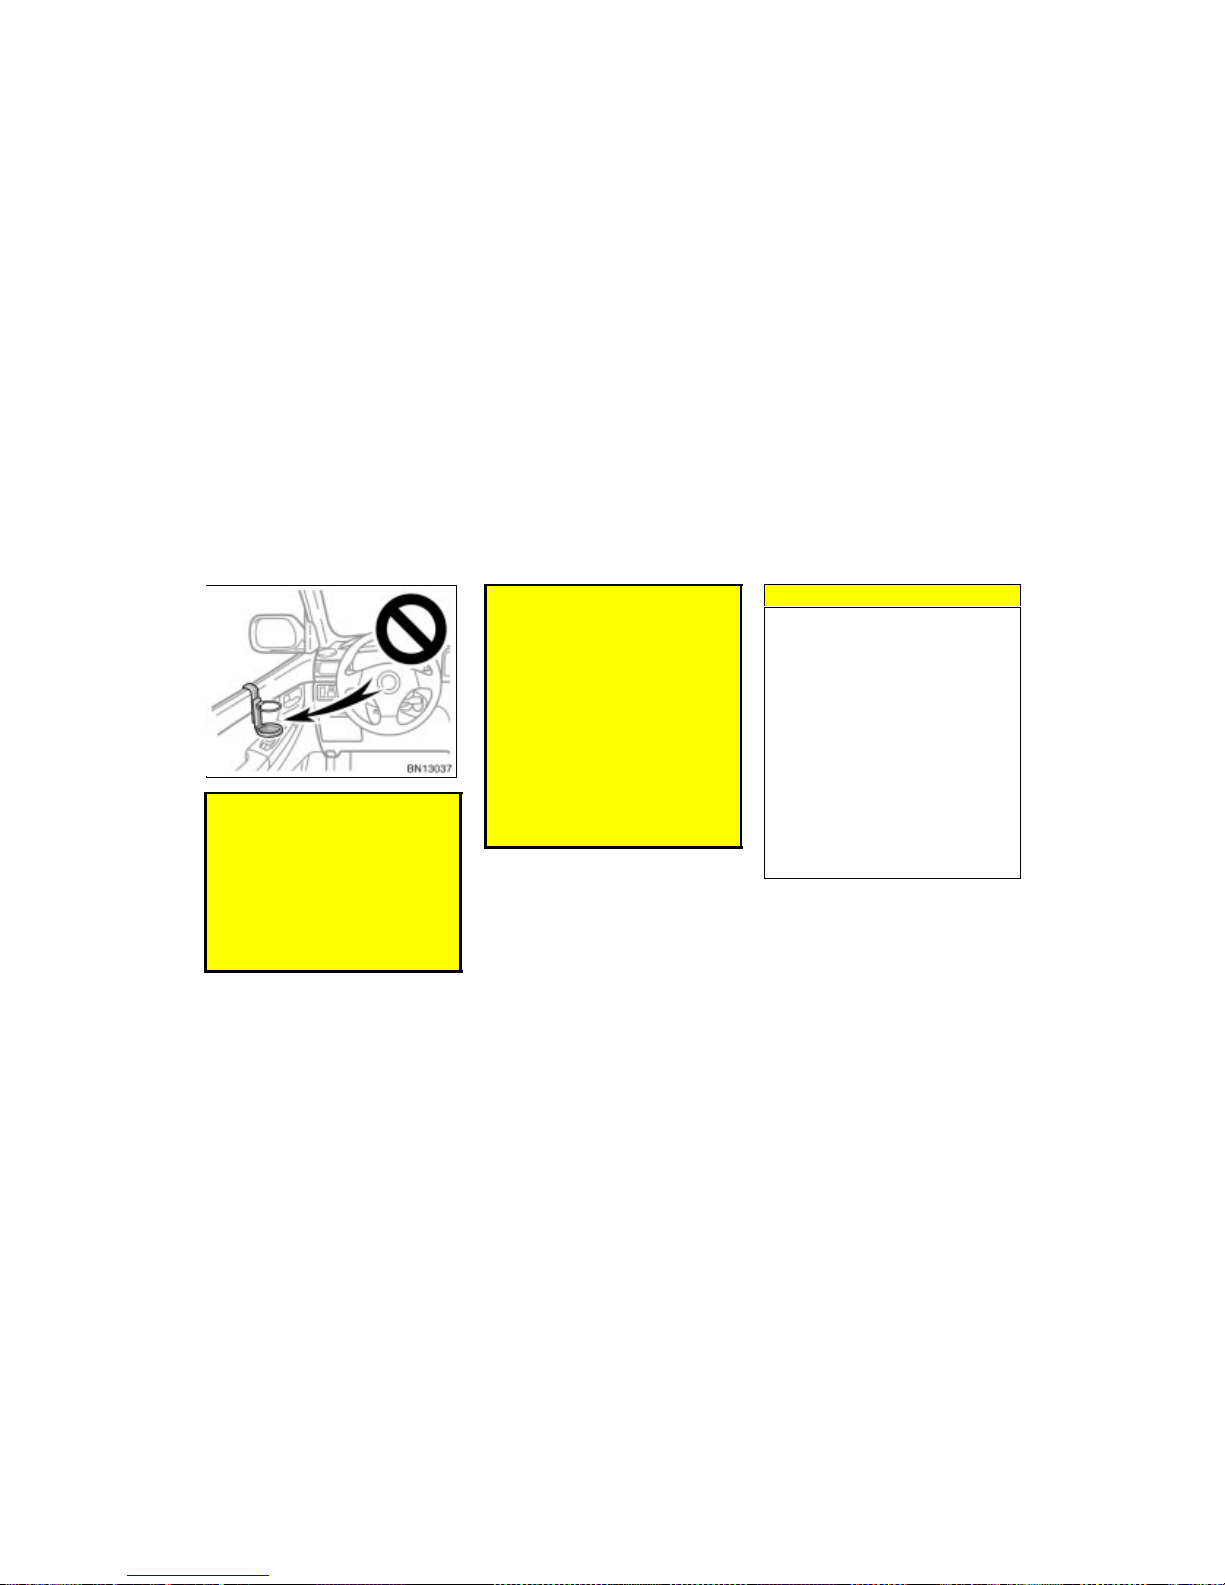
WWW.MANUALS.WS
WWW.MANUALS.WS
’03 Corolla U (L/O 0201)
51
2003 MY COROLLA_U (OM12744U)
Do not attach a cup holder or any
other device or object on or around
the door. When the side airbag inflates, the cup holder or any other
device or object will be thrown with
great force or the side airbag may
not activate correctly, resulting in
death or serious injury. Likewise,
the driver and front passenger
should not hold objects in their
arms or on their knees.
Do not use seat accessories which
cover the parts where the side airbags inflate. Such accessories may
prevent the side airbags from activating correctly, causing death or
serious injury.
Do not modify or replace the seats
or upholstery of front seats with
side airbags. Such changes may
disable the system or cause the
side airbags to inflate accidentally,
resulting in death or serious injury.
Failure to follow these instructions
can result in death or serious injury.
Consult your Toyota dealer about any
repairs and modifications.
NOTICE
Do not perform any of the following
changes without consulting your
Toyota dealer. Such changes can
interfere with proper operation of the
SRS side airbag system in some
cases.
Installation of electronic devices
such as a mobile two–way radio,
cassette tape player or compact
disc player
Modification of the suspension system
Modification of the side structure of
the passenger compartment
Repairs made on or near the console or front seat
Page 87
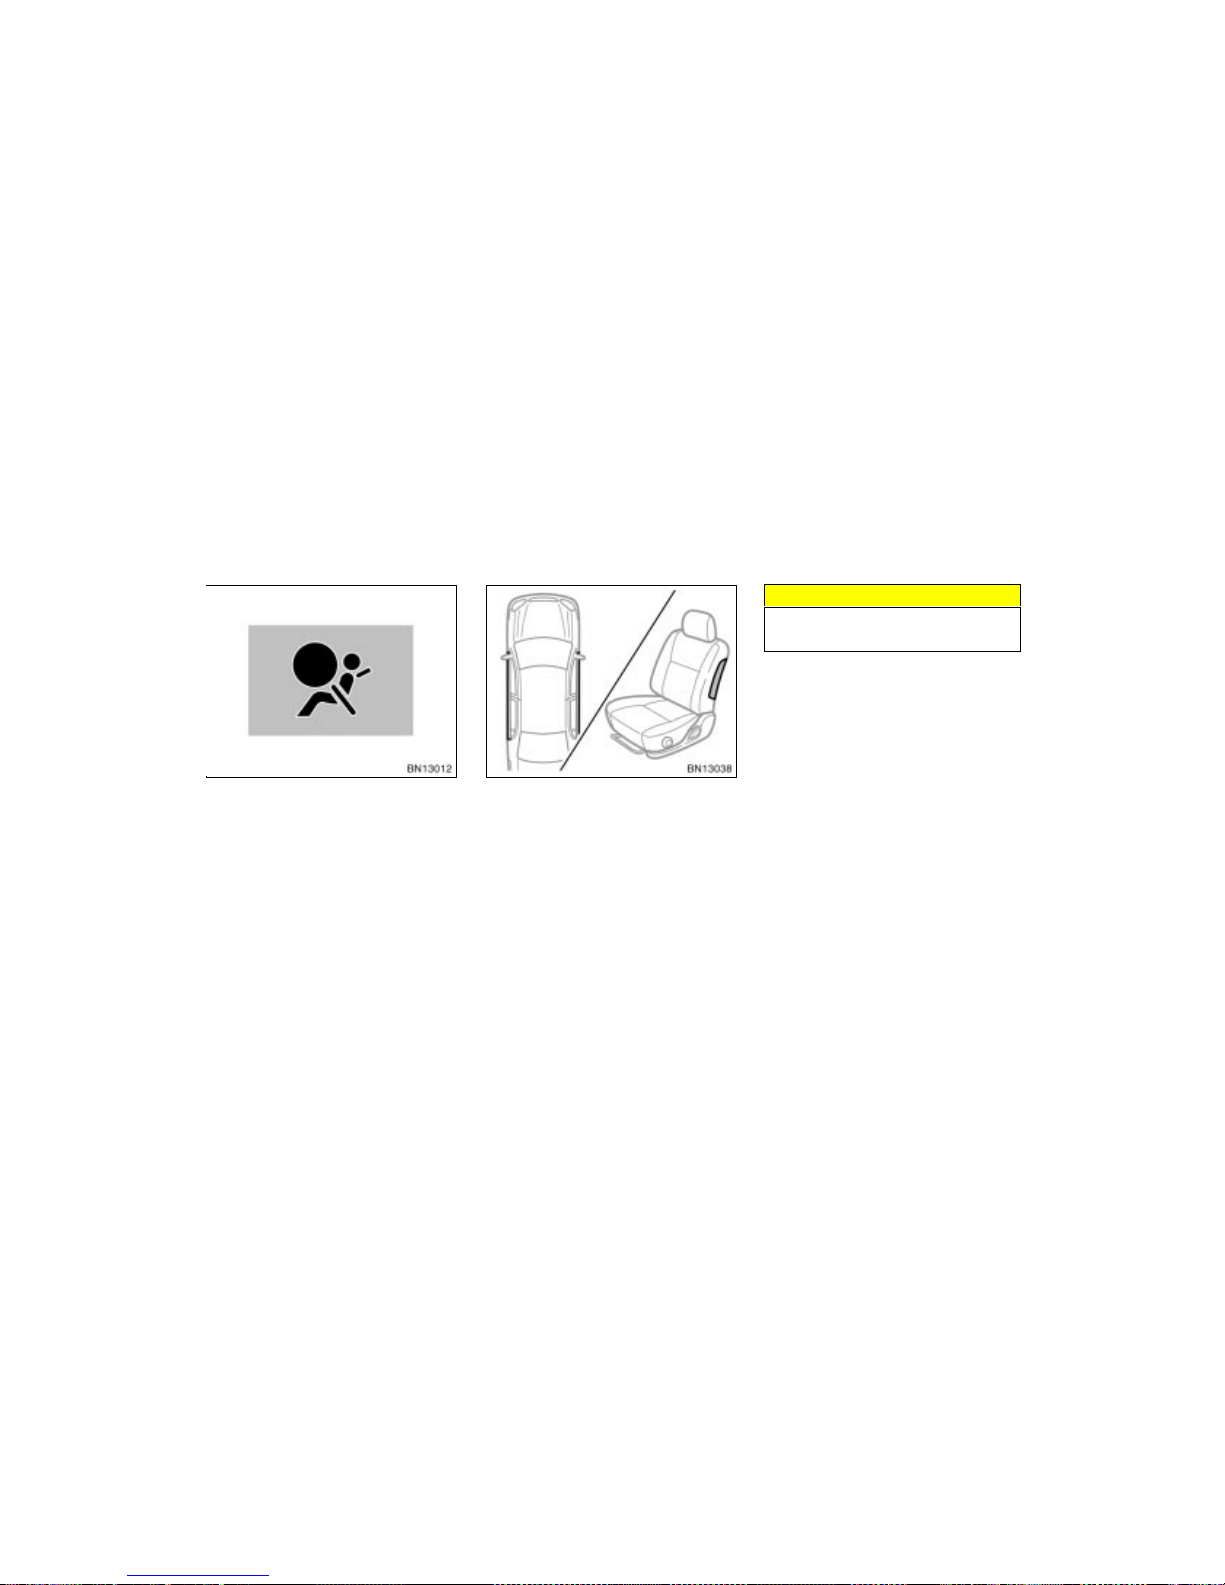
WWW.MANUALS.WS
WWW.MANUALS.WS
’03 Corolla U (L/O 0201)
52
2003 MY COROLLA_U (OM12744U)
This SRS side airbag system has a
service reminder indicator to inform the
driver of operating problems. If either of
the following conditions occurs, this
indicates a malfunction of the airbags.
Contact your Toyota dealer as soon as
possible to service the vehicle.
The light does not come on when the
ignition key is turned to the “ON” position, or the light remains on.
The light comes on or flashes while
driving.
In the following cases, contac t your Toy ota
dealer as soon as possible:
The SRS side airbags have been in-
flated.
The porti on of the doors (s haded in the
illustration) was involved in an acci dent
that was not severe enough to cause
the SRS side airbags to inflate.
The surface of the seats with the side
airbag (shaded in the illustration) is
scratched, cracked, or otherwise damaged.
NOTICE
Do not disconnect the battery cables
before contacting your Toyota dealer.
Page 88
WWW.MANUALS.WS
WWW.MANUALS.WS
’03 Corolla U (L/O 0201)
53
2003 MY COROLLA_U (OM12744U)
Toyota strongly urges the use of child
restraint systems for children small
enough to use them.
The laws of all 50 states in the U.S.A.
and Canada now require the use of a
child restraint system.
Your vehicle conforms to SAE J1819.
If a child is too large for a child restraint
system, the child should sit in the rear
seat and must be restrained using the
vehicle’s seat belt. See “Seat belts” on
page 32 for details.
CAUTION
For effective protection in automo-
bile accidents and sudden stops, a
child must be properly restrained,
using a seat belt or child restraint
system depending on the age and
size of the child. Holding a child in
your arms is not a substitute for a
child restraint system. In an accident, the child can be crushed
against the windshield, or between
you and the vehicle’s interior.
Toyota strongly urges use of a
proper child restraint system which
conforms to the size of the child,
installed on the rear seat. According to accident statistics, the child
is safer when properly restrained in
the rear seat than in the front seat.
Never install a rear–facing child re-
straint system on the front seat. In
the event of an accident, the force
of the rapid inflation of the airbag
can cause death or serious injury if
a rear–facing child restraint system
is installed on the front seat.
Unless it is unavoidable, do not
install a forward–facing child restraint system on the front seat.
A for ward–facing child rest raint sys-
tem should be allowed to be
installed on the front passenger
seat only when it is unavoidable.
Always move the seat as far back
as possible, because the force of
the deploying front passenger airbag could cause death or serious
injury to the child.
On vehicles with side airbags, do
not allow the child to lean against
the front door or around the front
door even if the child is seated in
the child restraint system. It is dangerous if the side airbags inflate,
because the impact could cause
death or serious injury to the child.
Make sure that you have complied
with all installation instructions provided by the child restraint
manufacturer and t hat the system is
properly secured.
Child restraint—
—Child restraint precautions
Page 89
WWW.MANUALS.WS
WWW.MANUALS.WS
’03 Corolla U (L/O 0201)
54
2003 MY COROLLA_U (OM12744U)
A child restraint system for a small
child or baby must itself be properly
restrained on the seat with the lap portion of the lap/shoulder belt. You must
carefully consult the manufacturer’s
instructions which accompany the child
restraint system.
To provide proper restraint, use a child
restraint system following the manufacturer’s instructions about the appropriate age
and size of the child for the child restraint
system.
Install the child restraint system correctly
following the instructions provided by its
manufacturer. General directions are also
provided under the following illustrations.
The child restraint system should be
installed on the rear seat. According to
accident statistics, the child is safer when
properly restrained in the rear seat than
in the front seat.
CAUTION
Never install a rear–facing child re-
straint system on the front seat. In
the event of an accident, the force
of the rapid inflation of the airbag
can cause death or serious injury if
a rear–facing child restraint system
is installed on the front seat.
Unless it is unavoidable, do not
install a forward–facing child restraint system on the front seat.
A for ward–facing child rest raint sys-
tem should be allowed to be
installed on the front passenger
seat only when it is unavoidable.
Always move the seat as far back
as possible, because the force of
the deploying front passenger airbag could cause death or serious
injury to the child.
On vehicles with side airbags, do
not allow the child to lean against
the front door or around the front
door even if the child is seated in
the child restraint system. It is dangerous if the side airbags inflate,
because the impact could cause
death or serious injury to the child.
After installing the child restraint
system, make sure it is secured in
place following the manufacturer’s
instructions. If it is not restrained
securely, it may cause death or serious injury to the child in the
event of a sudden stop or accident.
When not using the child restraint system,
keep it secured with the seat belt or place
it in the trunk or somewhere other than
the passenger compartment. This will prevent it from injuring passengers in the
event of a sudden stop or accident.
—Child restraint system
Page 90
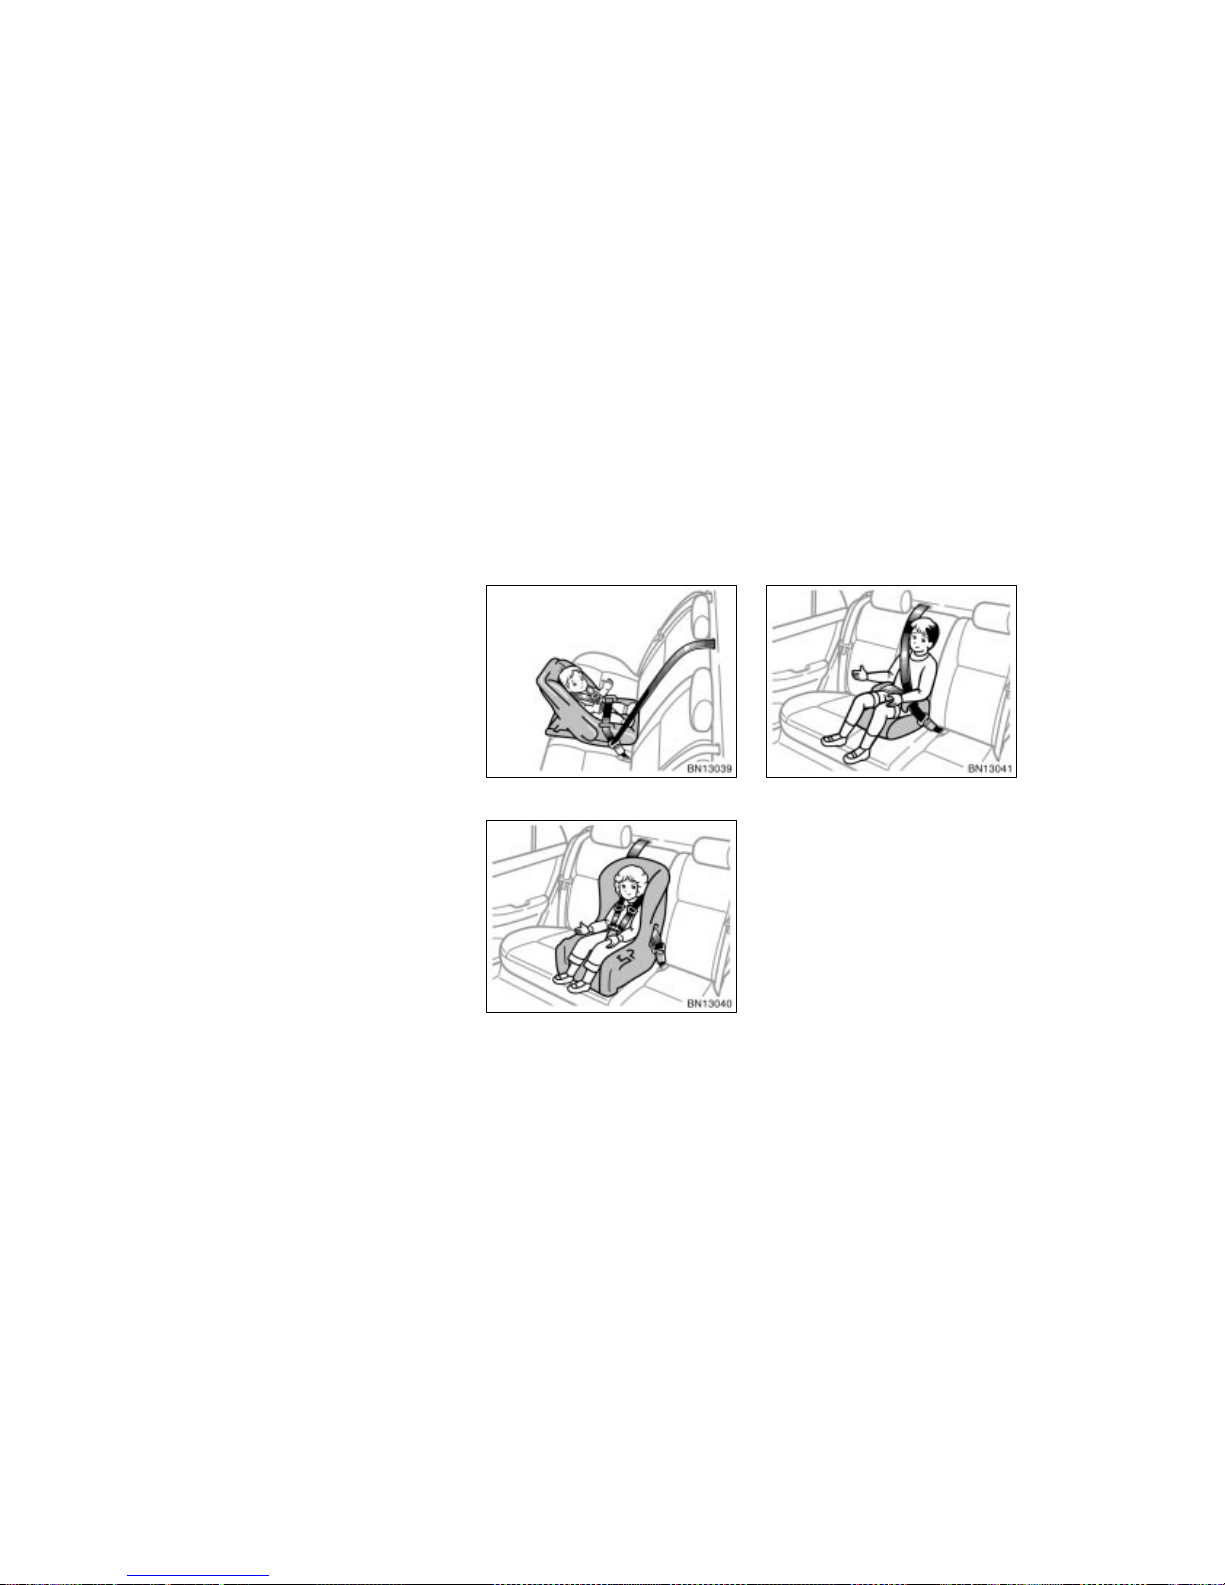
WWW.MANUALS.WS
WWW.MANUALS.WS
’03 Corolla U (L/O 0201)
55
2003 MY COROLLA_U (OM12744U)
Child restraint systems are classified into
the following 3 types depending on the
child’s age and size.
(A) Infant seat
(B) Convertible seat
(C) Boos ter seat
Install the child restraint system following
the instructions provided by its manufacturer.
Your vehicle has anchor brackets for securing the top strap of a child restraint
system.
For instructions about how to use the anchor bracket, see “—Using a top strap” on
page 65 in this section.
The child restraint lower anchorages approved for your vehicle may also be used.
See “—Installation with child restraint lower anchorages” o n p age 67 in this section.
(A) Infant seat
(B) Convertible seat
(C) Booster seat
—Types of child restraint
system
Page 91
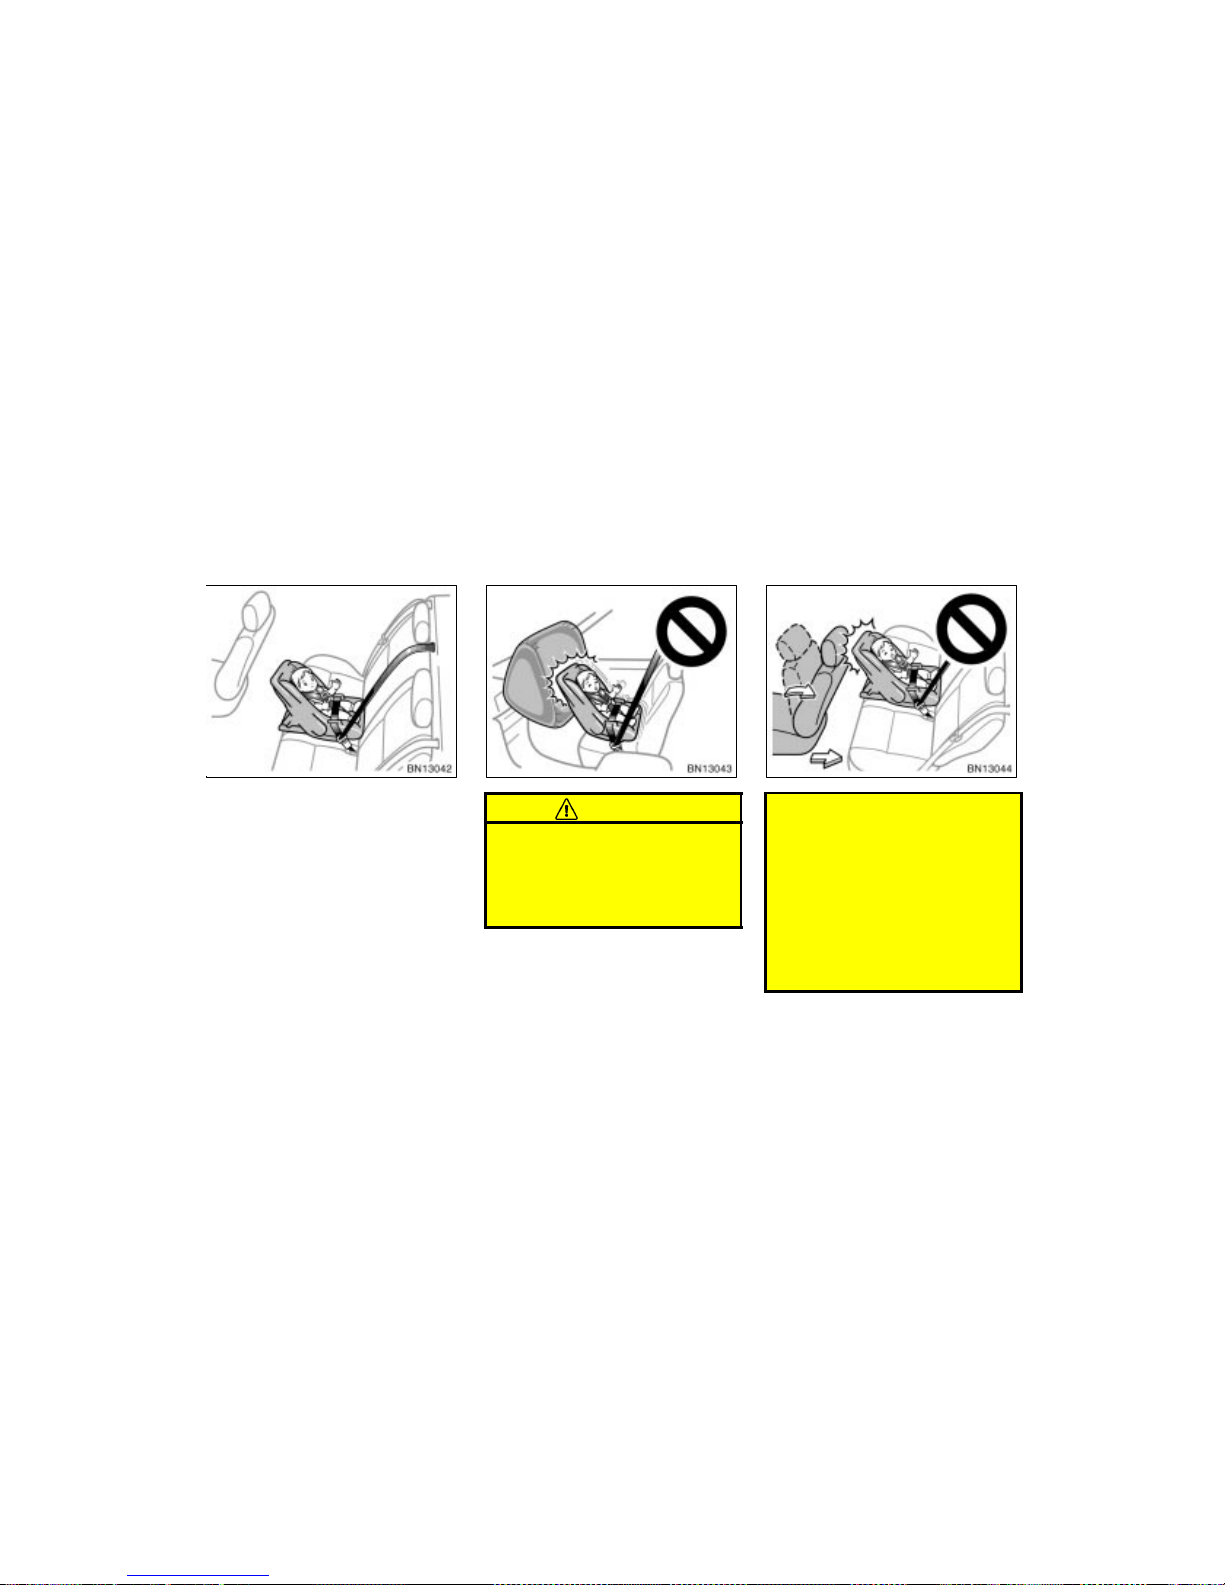
WWW.MANUALS.WS
WWW.MANUALS.WS
’03 Corolla U (L/O 0201)
56
2003 MY COROLLA_U (OM12744U)
(A) I NFANT SEAT INSTALLATION
An infant seat is used in rear–facing
position only.
CAUTION
Never install a rear–facing child re-
straint system on the front passenger seat because the force of the
rapid inflation of the front passenger airbag can cause death or serious injury to the child.
Do not install a child restraint sys-
tem on the rear seat if it interferes
with the lock mechanism of the
front seats. This can cause death or
serious injury to a child and front
passenger in case of a sudden
braking or collision.
If the driver’s seat position does
not allow sufficient space for safe
installation, install the child restraint system on the rear right
seat.
—Installation with 3–point
type seat belt
Page 92
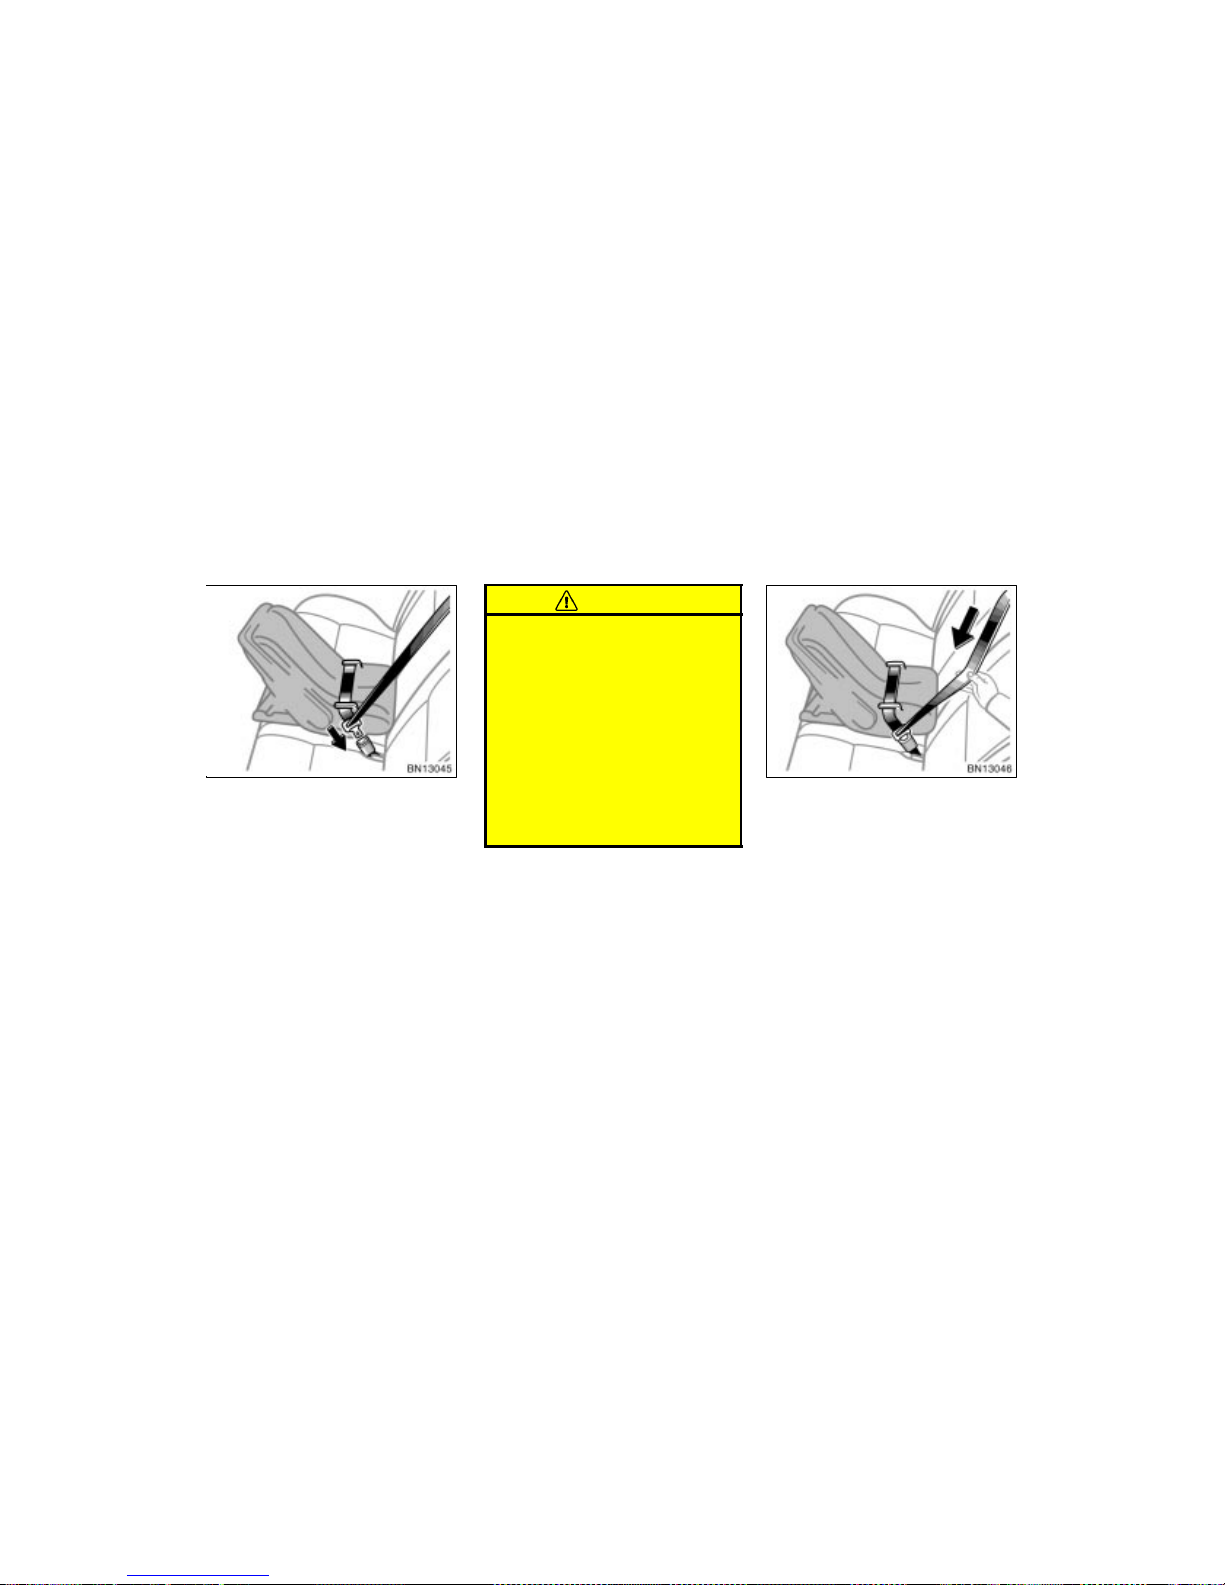
WWW.MANUALS.WS
WWW.MANUALS.WS
’03 Corolla U (L/O 0201)
57
2003 MY COROLLA_U (OM12744U)
1. Run the lap and shoulder belt through
or around the infant seat following the
instructions provided by its manufacturer and insert the tab into the buckle
taking care not to twist the belt. Keep
the lap portion of the belt tight.
CAUTION
After inserting the tab, make sure
that the tab and buckle are locked,
and the lap and shoulder portions
of the belt are not twisted.
Do not insert coins, clips, etc. in
the buckle as this may prevent you
from properly latching the tab and
buckle.
If the seat belt does not function
normally, it cannot protect your
child from injury. Contact your
Toyota dealer immediately. Do not
use the child restraint system until
the seat belt is fixed.
2. Fully extend the shoulder belt to put it
in the lock mode. When the belt is
then retracted even slightly, it cannot
be extended.
To hold the infant seat securely, make
sure the belt is in the lock mode before
letting the belt retract.
Page 93
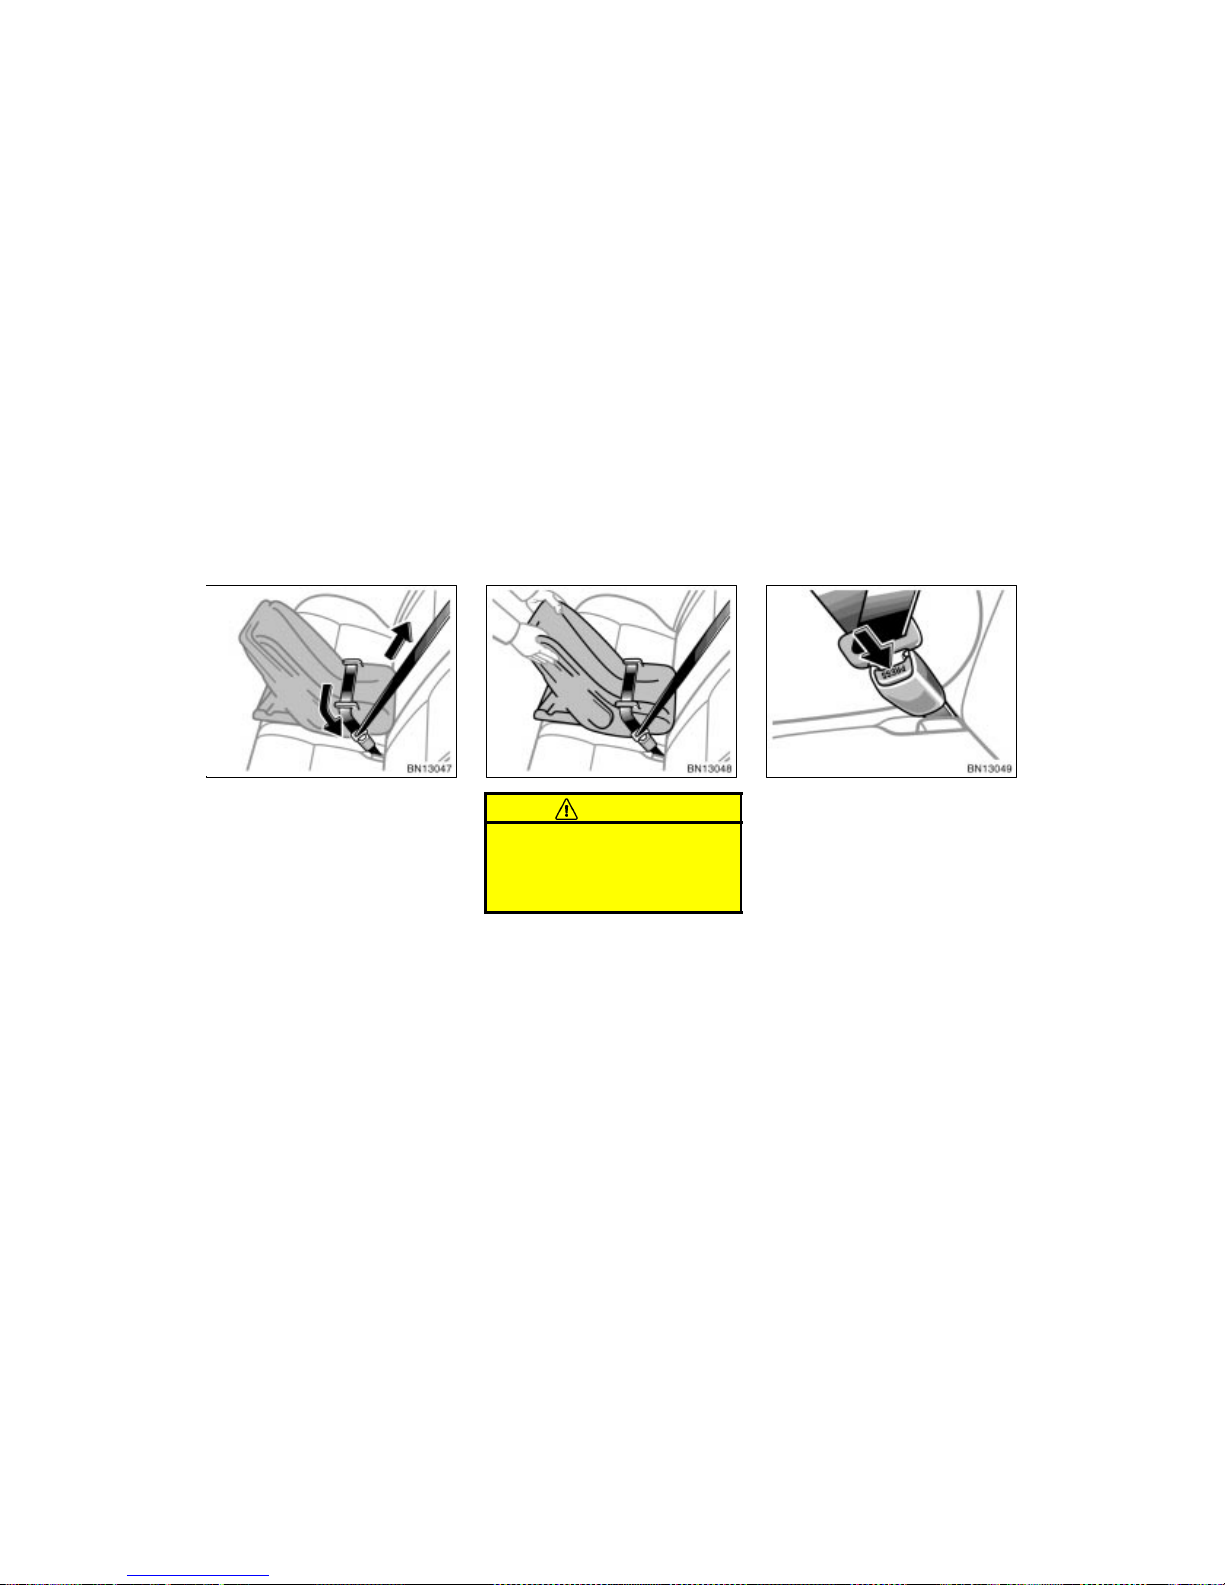
WWW.MANUALS.WS
WWW.MANUALS.WS
’03 Corolla U (L/O 0201)
58
2003 MY COROLLA_U (OM12744U)
3. While pressing the infant seat firmly
against the seat cushion and seatback,
let the shoulder belt retract as far as
it will go to hold the infant seat securely.
CAUTION
Push and pull the child restraint system in different directions to make
sure it is secure. Follow all the
installation instructions provided by
its manufacturer.
4. To remove the infant seat, press the
buckle–release button and allow the
belt to retract completely. The belt will
move freely again and be ready to
work for an adult or older child passenger.
Page 94
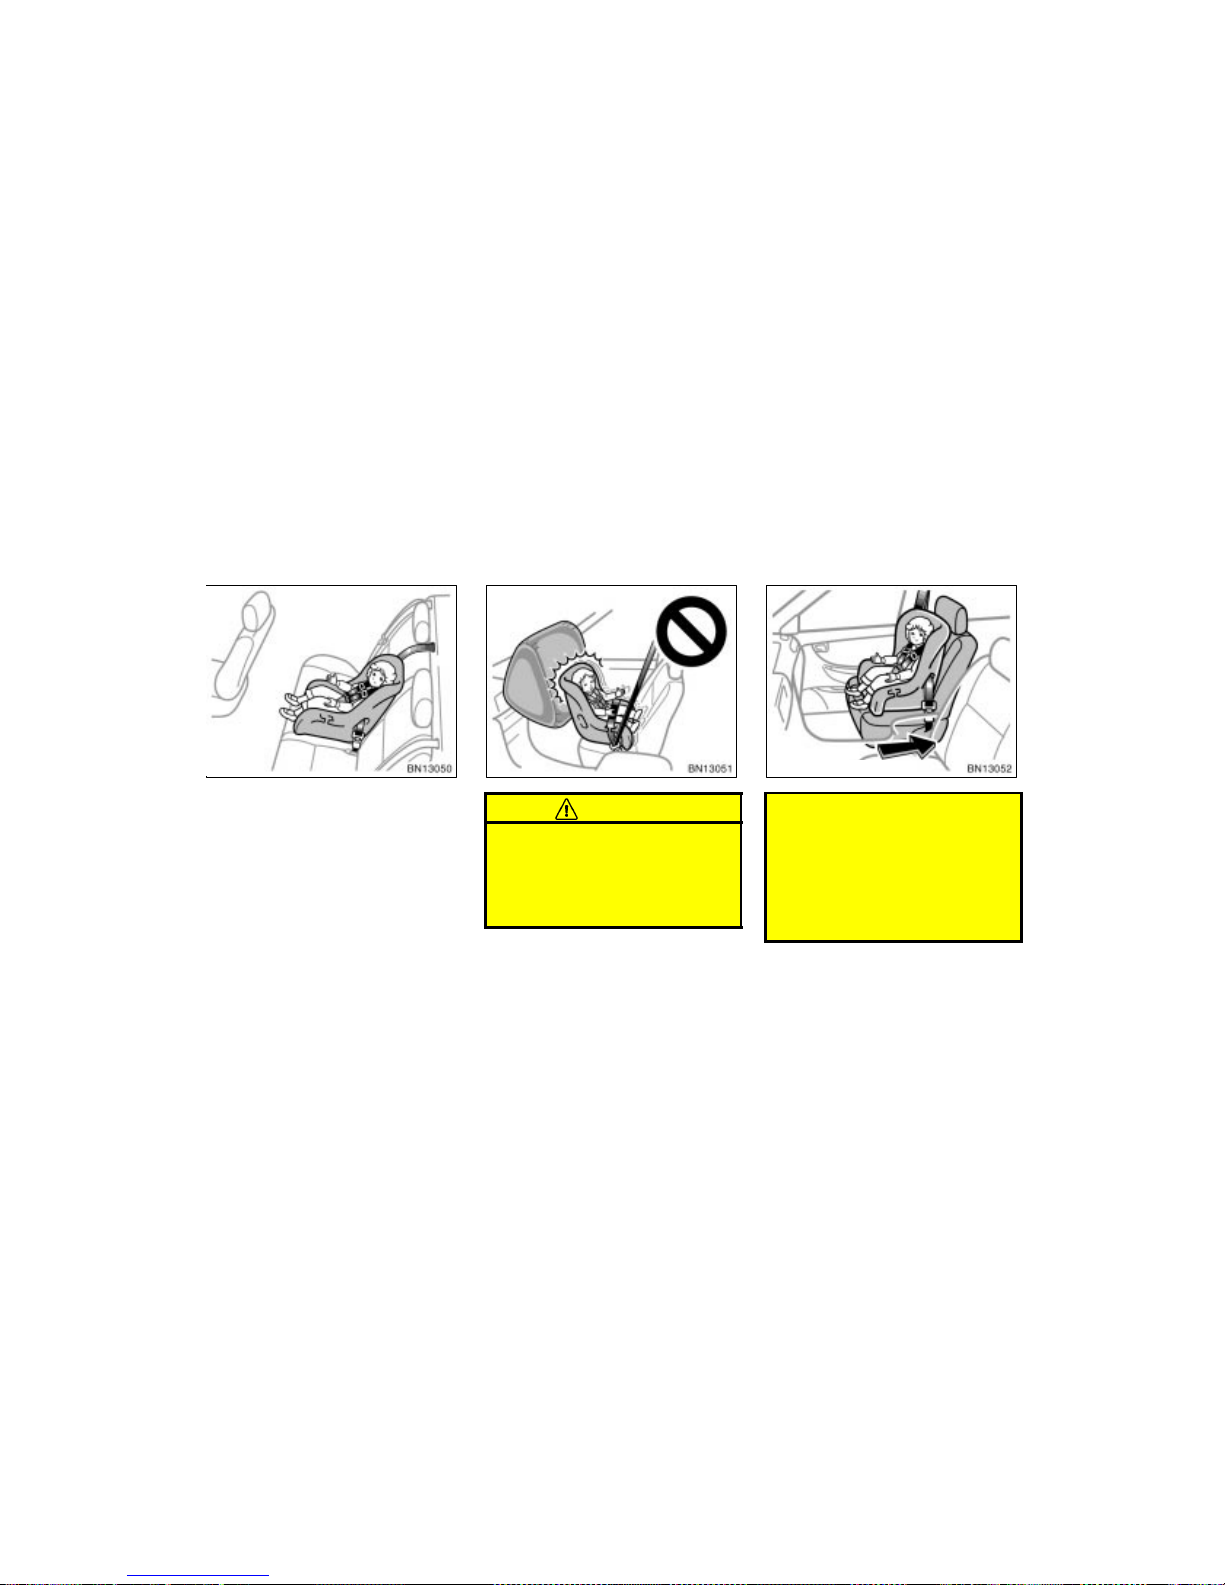
WWW.MANUALS.WS
WWW.MANUALS.WS
’03 Corolla U (L/O 0201)
59
2003 MY COROLLA_U (OM12744U)
(B) CONVERTI BLE SEAT INSTALLATION
A convertible seat is used in forward–
facing or rear–facing position depending on the child’s age and size. When
installing, follow the manufacturer’s instructions about the applicable child’s
age and size as well as directions for
installing the child restraint system.
CAUTION
Never install a rear–facing child re-
straint system on the front passenger seat because the force of the
rapid inflation of the front passenger airbag can cause death or serious injury to the child.
Move seat fully back
A for ward–facing child rest raint sys-
tem should be allowed to be
installed on the front passenger
seat only when it is unavoidable.
Always move the seat as far back
as possible, because the force of
the deploying front passenger airbag could cause death or serious
injury to the child.
Page 95
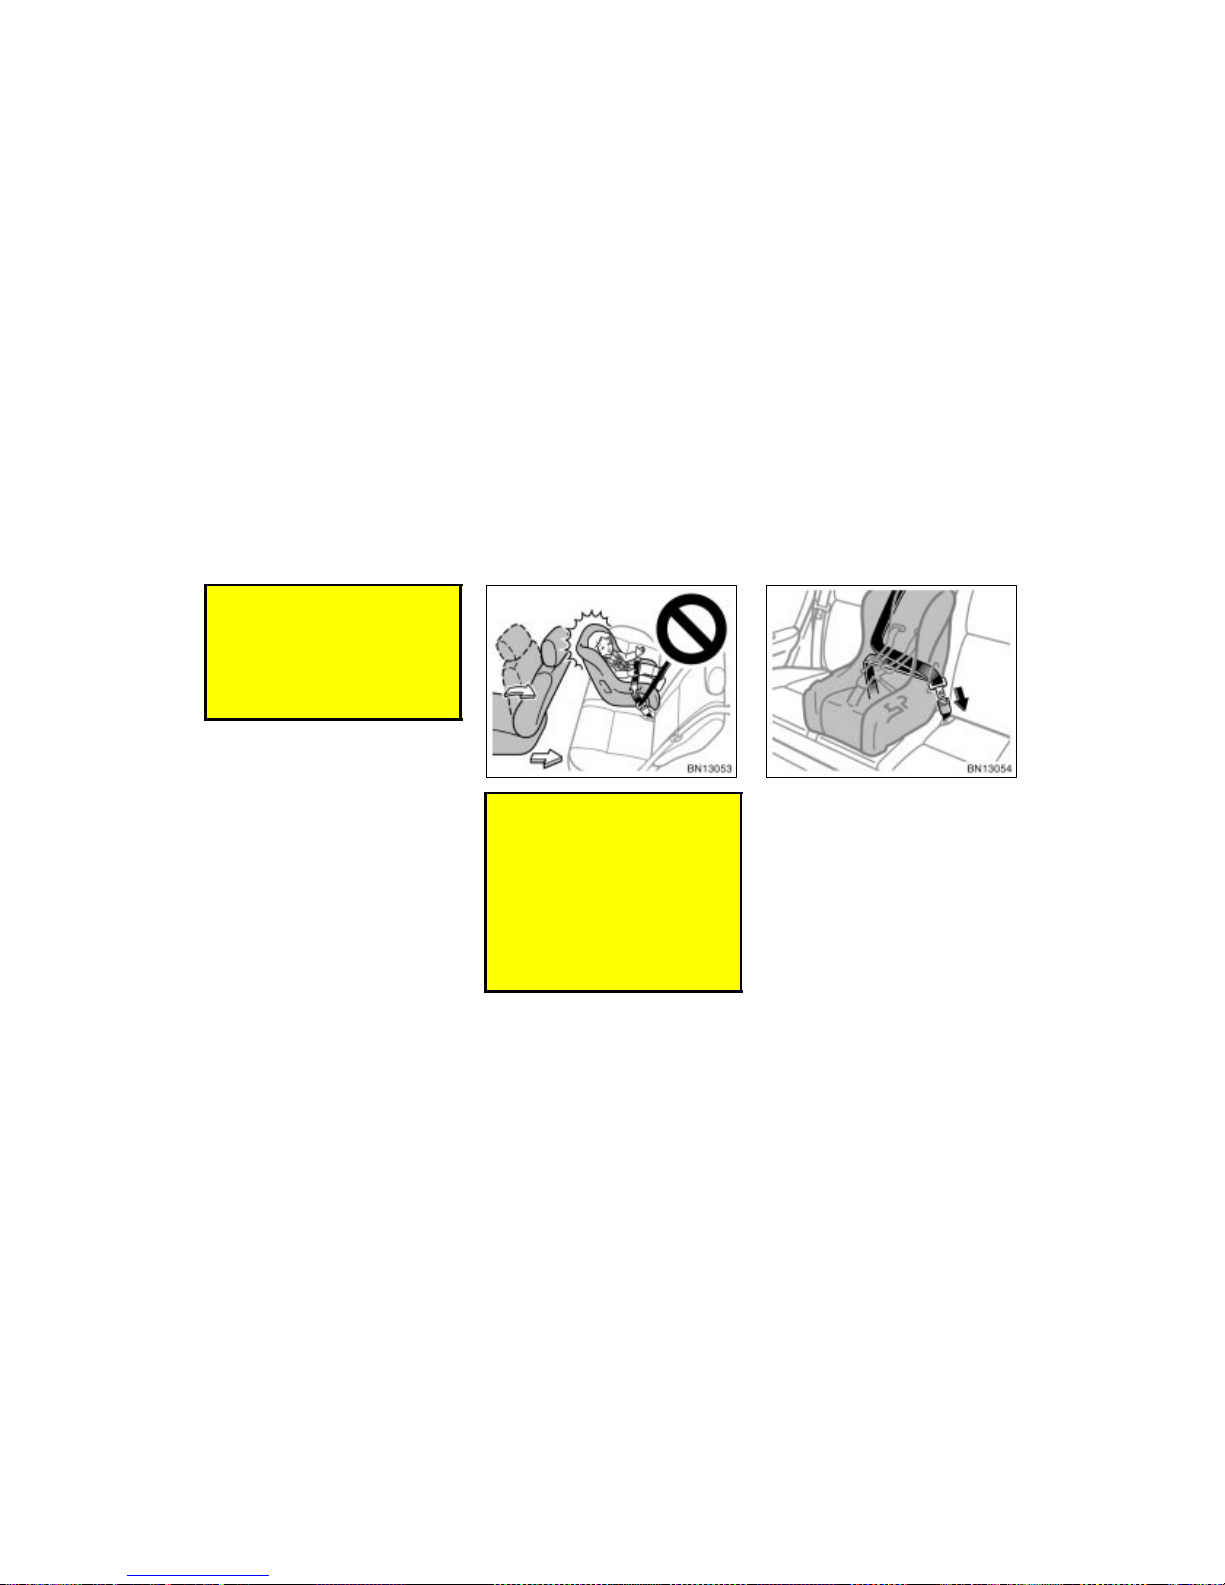
WWW.MANUALS.WS
WWW.MANUALS.WS
’03 Corolla U (L/O 0201)
60
2003 MY COROLLA_U (OM12744U)
On vehicles with side airbags, do
not allow the child to lean against
the front door or around the front
door even if the child is seated in
the child restraint system. It is dangerous if the side airbags inflate,
because the impact could cause
death or serious injury to the child.
Do not install a child restraint sys-
tem on the rear seat if it interferes
with the lock mechanism of the
front seats. This can cause death or
serious injury to a child and front
passenger in case of a sudden
braking or collision.
If the driver’s seat position does
not allow sufficient space for safe
installation, install the child restraint system on the rear right
seat.
1. Run the lap and shoulder belt through
or around the convertible seat following
the instructions provided by its
manufacturer and insert the tab into
the buckle taking care not to twist the
belt. Keep the lap portion of the belt
tight.
Page 96
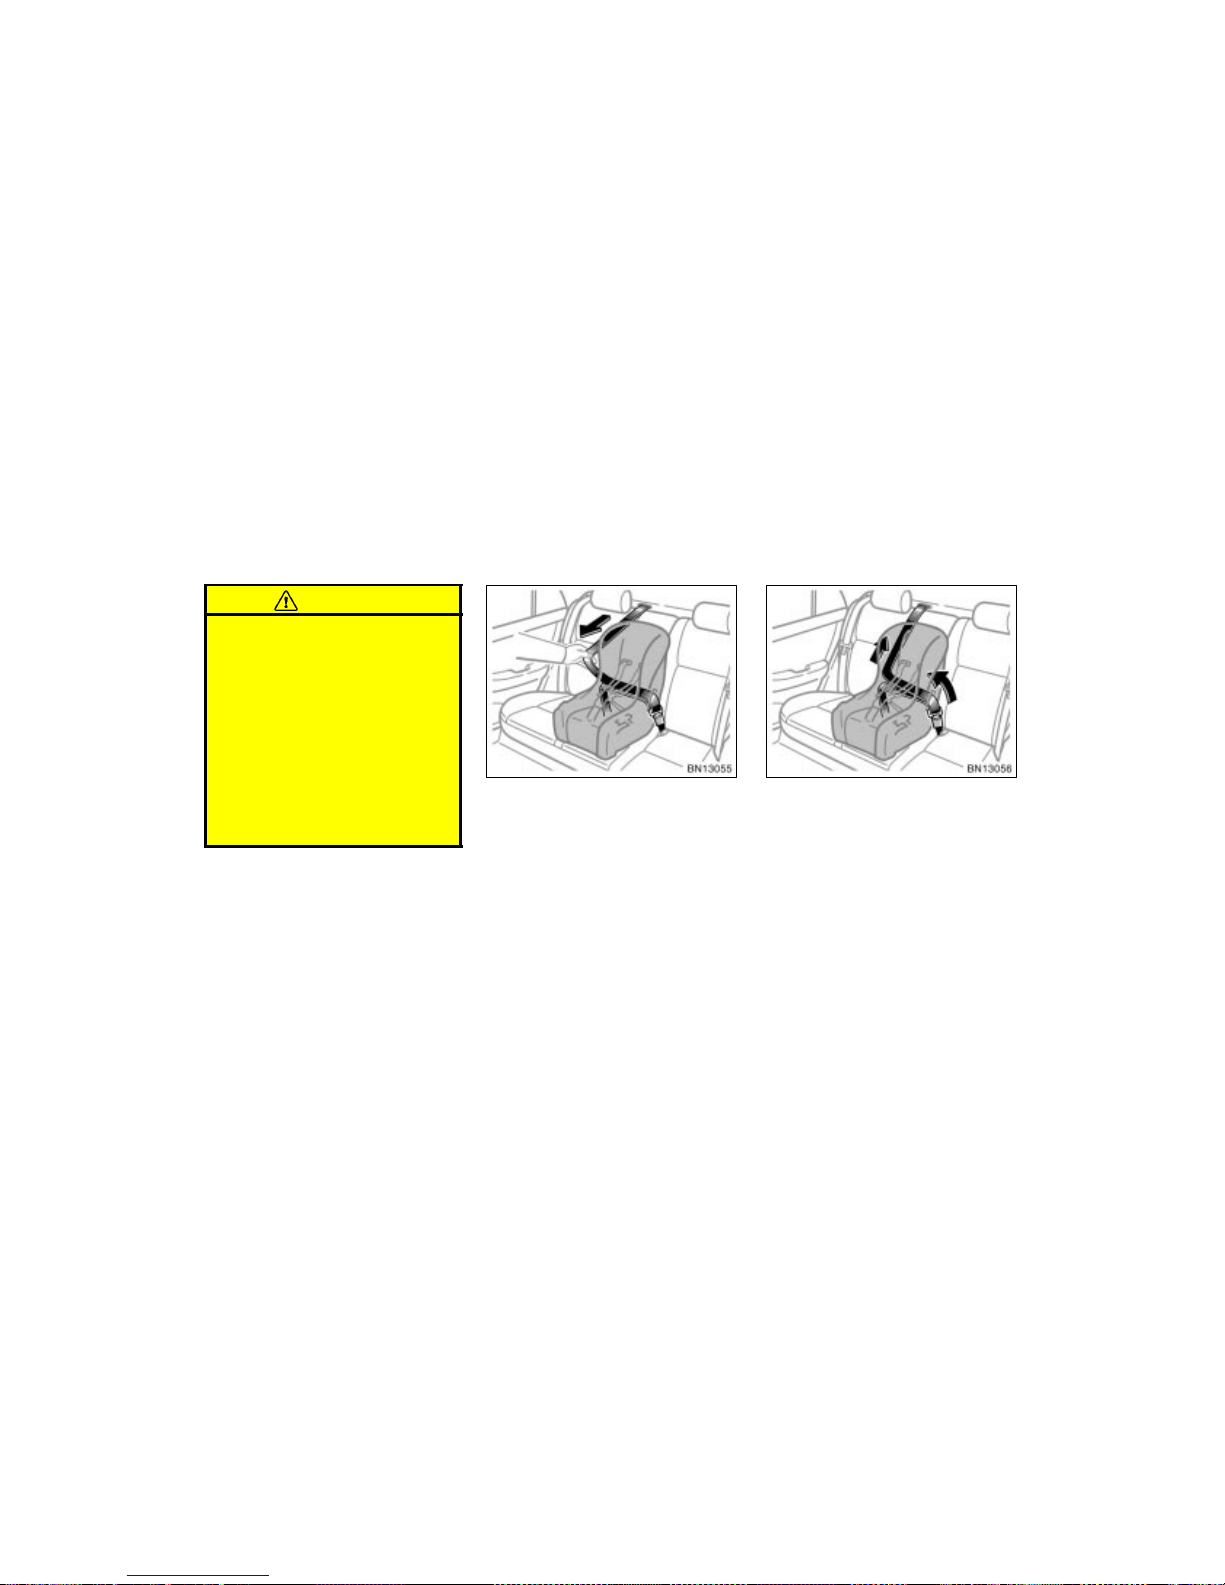
WWW.MANUALS.WS
WWW.MANUALS.WS
’03 Corolla U (L/O 0201)
61
2003 MY COROLLA_U (OM12744U)
CAUTION
After inserting the tab, make sure
that the tab and buckle are locked,
and the lap and shoulder portions
of the belt are not twisted.
Do not insert coins, clips, etc. in
the buckle as this may prevent you
from properly latching the tab and
buckle.
If the seat belt does not function
normally, it cannot protect your
child from injury. Contact your
Toyota dealer immediately. Do not
use the child restraint system until
the seat belt is fixed.
2. Fully extend the shoulder belt to put it
in the lock mode. When the belt is
then retracted even slightly, it cannot
be extended.
To hold the convertible seat securely,
make sure the belt is in the lock mode
before letting the belt retract.
3. While pressing the convertible seat
firmly against the seat cushion and
seatback, let the shoulder belt retract
as far as it will go to hold the convertible seat securely.
Page 97
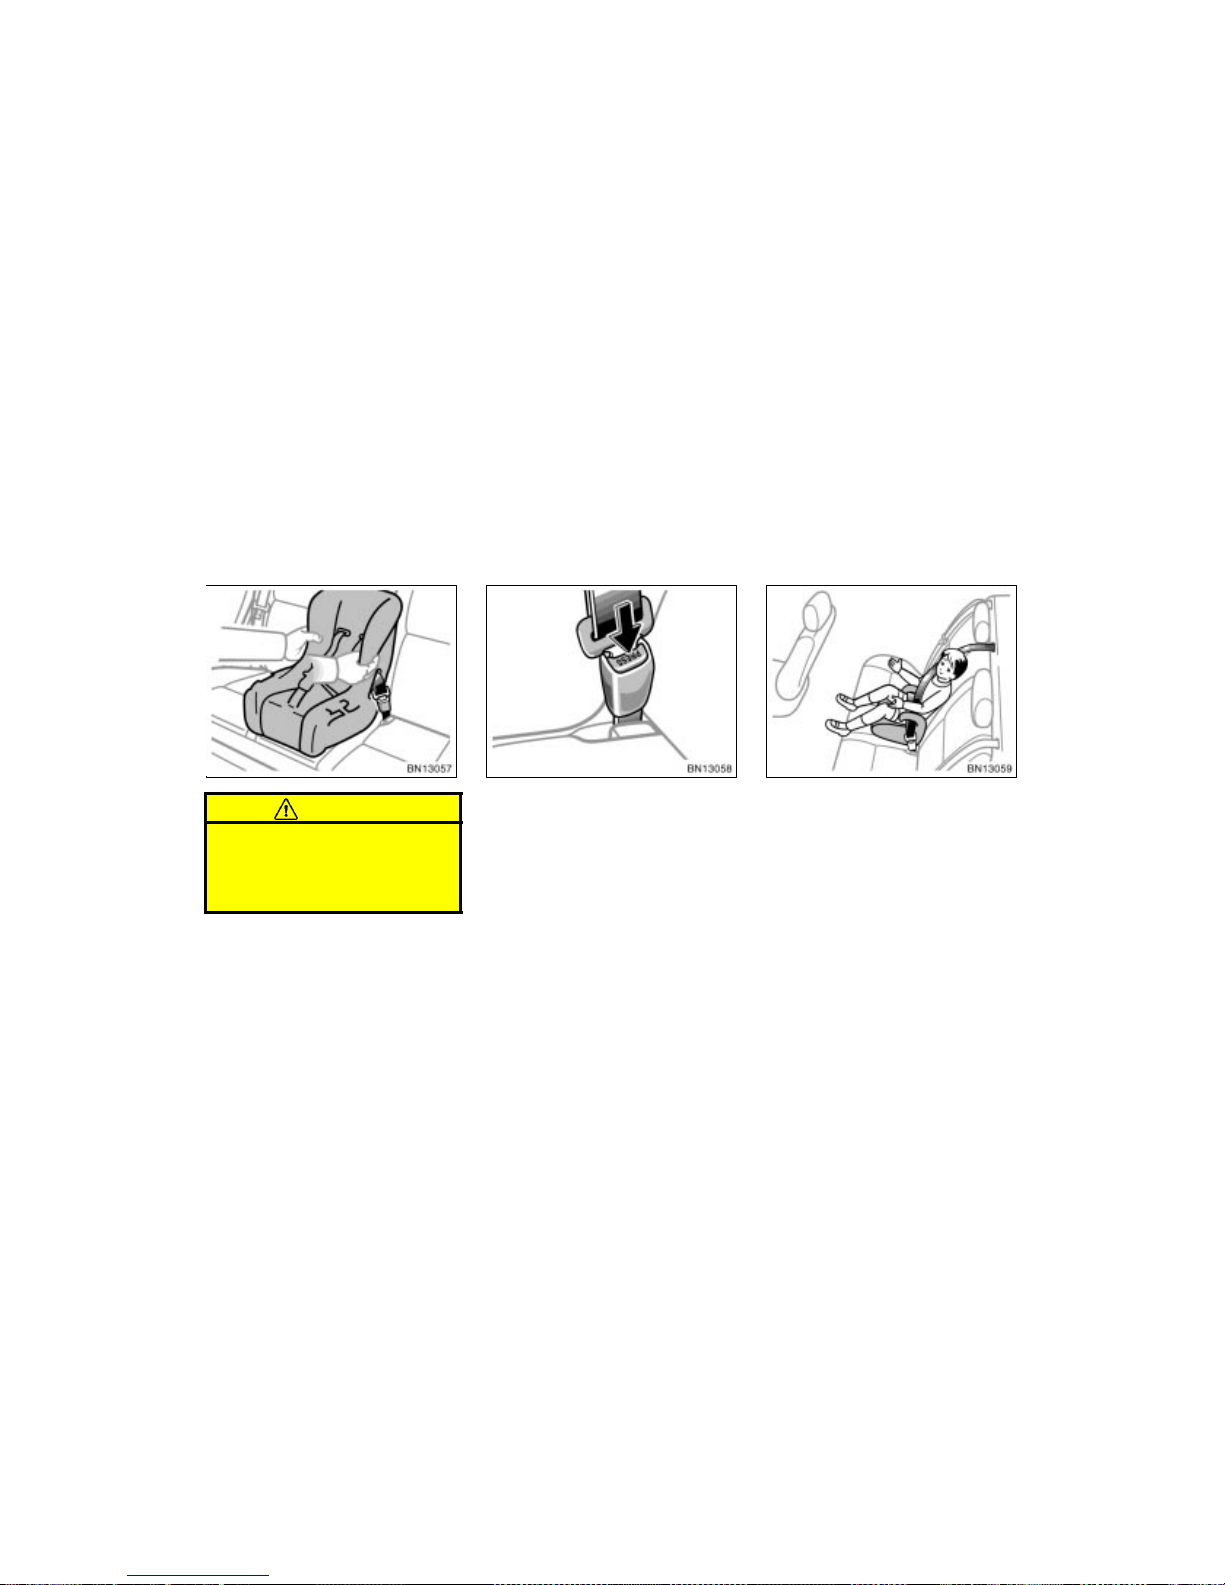
WWW.MANUALS.WS
WWW.MANUALS.WS
’03 Corolla U (L/O 0201)
62
2003 MY COROLLA_U (OM12744U)
CAUTION
Push and pull the child restraint system in different directions to make
sure it is secure. Follow all the
installation instructions provided by
its manufacturer.
4. To remove the convertible seat, press
the buckle–release button and allow the
belt to retract completely. The belt will
move freely again and be ready to
work for an adult or older child passenger.
(C) BOOSTER SEAT INSTALLATION
A booster seat is used in forward–fac-
ing position only.
Page 98
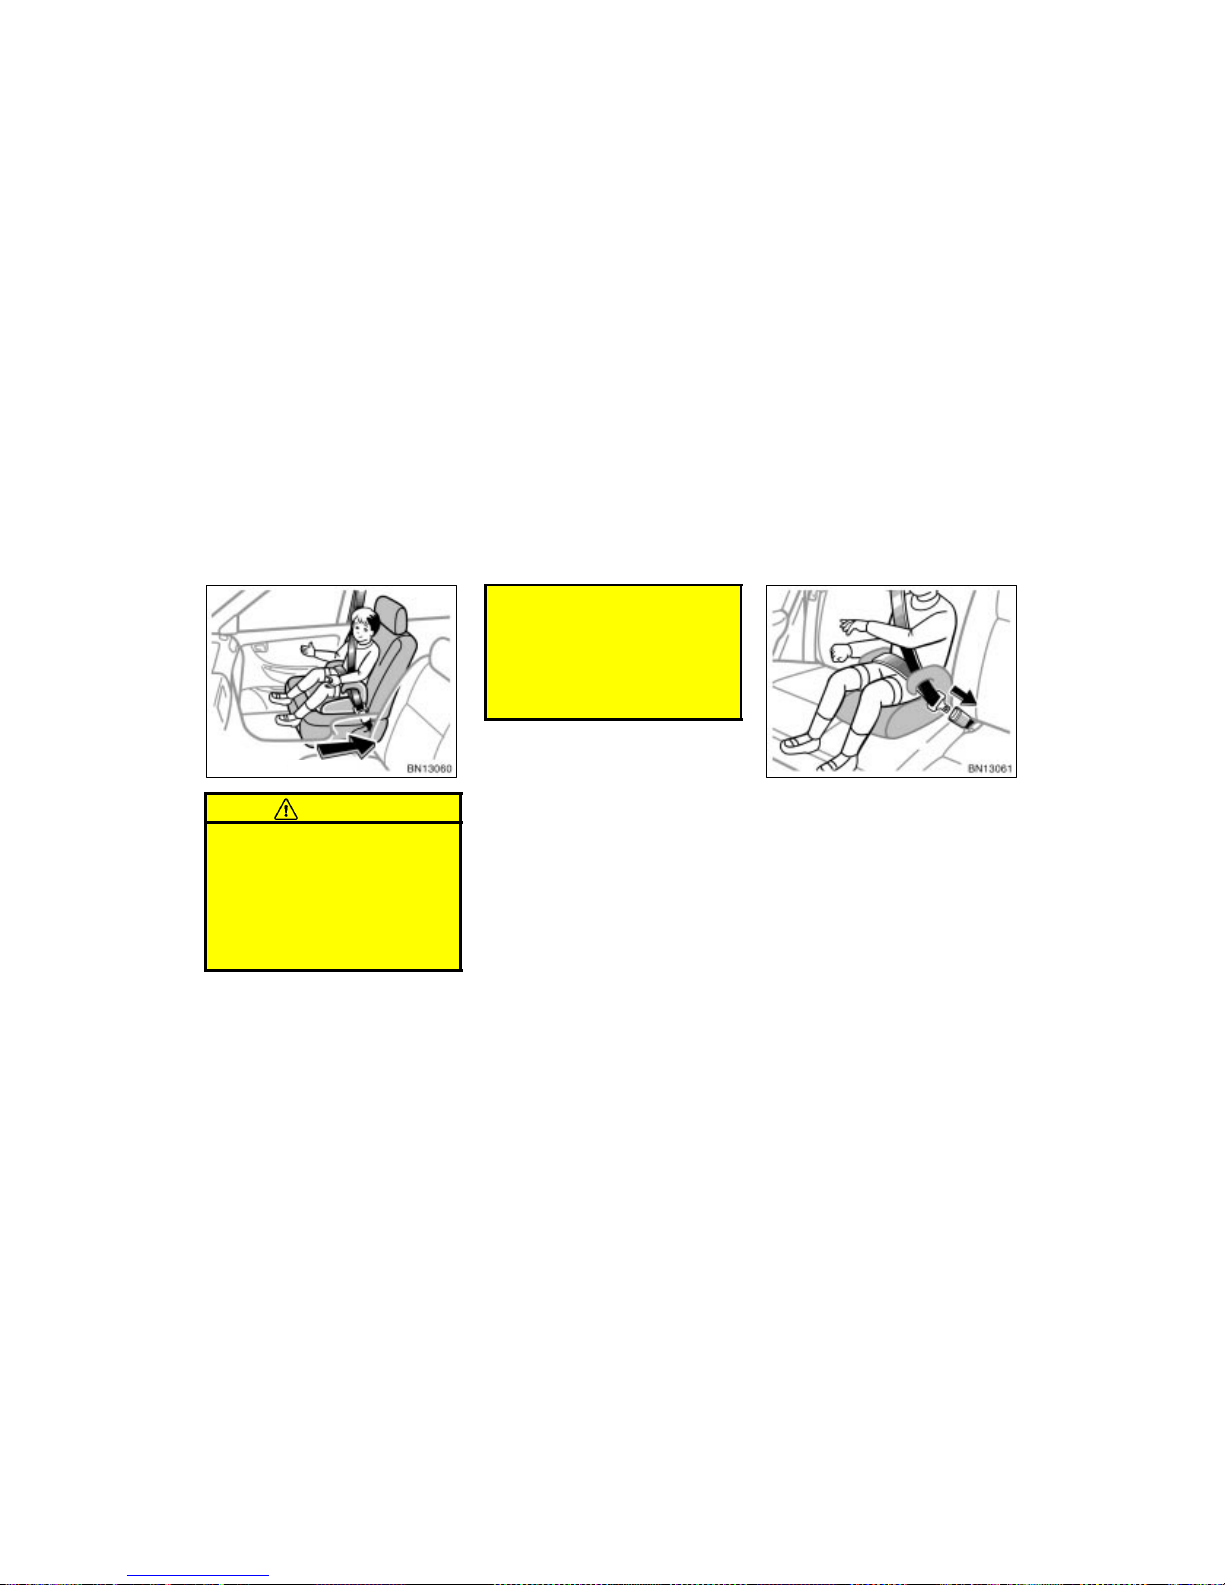
WWW.MANUALS.WS
WWW.MANUALS.WS
’03 Corolla U (L/O 0201)
63
2003 MY COROLLA_U (OM12744U)
Move seat fully back
CAUTION
A for ward–facing child rest raint sys-
tem should be allowed to be
installed on the front passenger
seat only when it is unavoidable.
Always move the seat as far back
as possible, because the force of
the deploying front passenger airbag could cause death or serious
injury to the child.
On vehicles with side airbags, do
not allow the child to lean against
the front door or around the front
door even if the child is seated in
the child restraint system. It is dangerous if the side airbags inflate,
because the impact could cause
death or serious injury to the child.
1. Sit the child on a booster seat. Run
the lap and shoulder belt through or
around the booster seat and child following the instructions provided by its
manufacturer and insert the tab into
the buckle taking care not to twist the
belt.
Make sure the shoulder belt is correctly
across the child’s shoulder and that the
lap belt is positioned as low as possible
on child’s hips. See “Seat belts” on page
32 for details.
Page 99
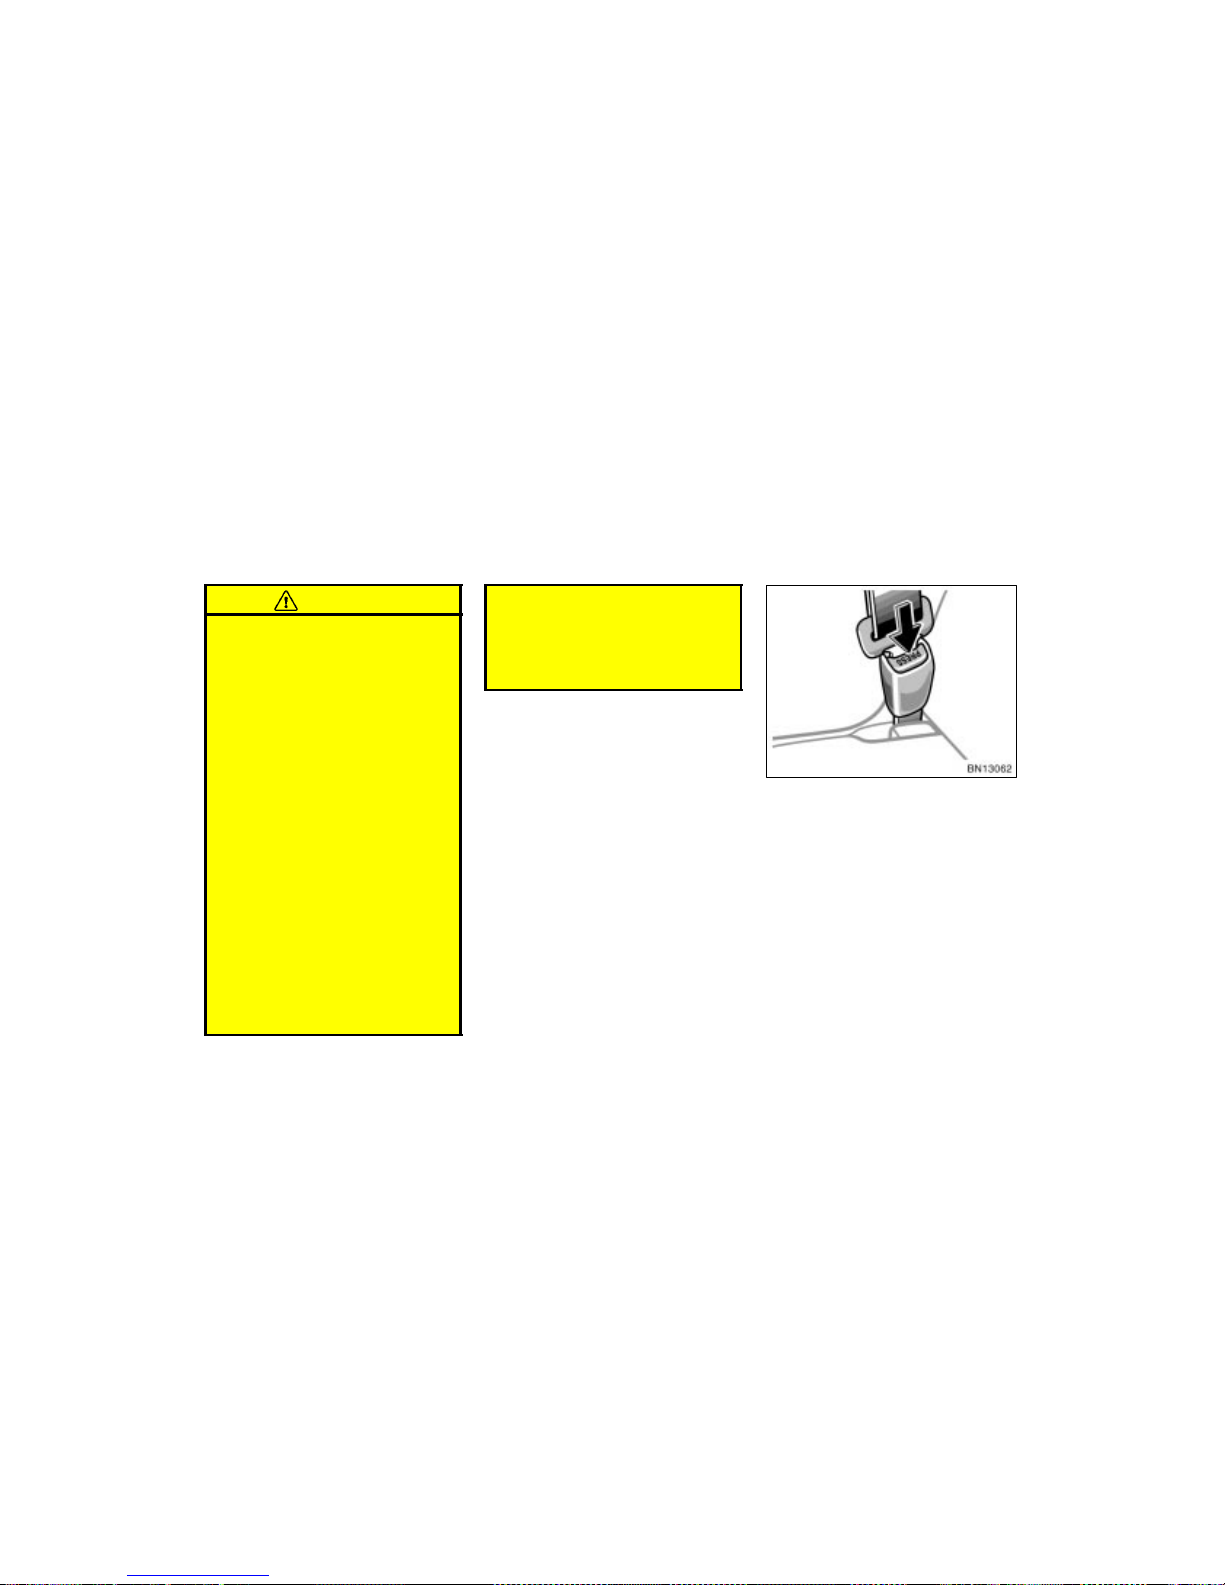
WWW.MANUALS.WS
WWW.MANUALS.WS
’03 Corolla U (L/O 0201)
64
2003 MY COROLLA_U (OM12744U)
CAUTION
Always make sure the shoulder belt
is positioned across the center of
child’s shoulder. The belt should be
kept away from child’s neck, but
not falling off child’s shoulder. Failure to do so could reduce the
amount of protection in an accident
and cause serious injuries in a collision.
Both high–positioned lap belts and
loose–fitting belts could cause serious injuries due to sliding under
the lap belt during a collision or
other unintended result. Keep the
lap belt positioned as low on a
child’s hips as possible.
For child’s safety, do not place the
shoulder belt under child’s arm.
After inserting the tab, make sure
that the tab and buckle are locked,
and the lap and shoulder portions
of the belt are not twisted.
Do not insert coins, clips, etc. in
the buckle as this may prevent your
child from properly latching the tab
and buckle.
If the seat belt does not function
normally, it cannot protect your
child from injury. Contact your
Toyota dealer immediately. Do not
use the child restraint system until
the seat belt is fixed.
2. To remove the booster seat, press the
buckle–release button and allow the
belt to retract.
Page 100
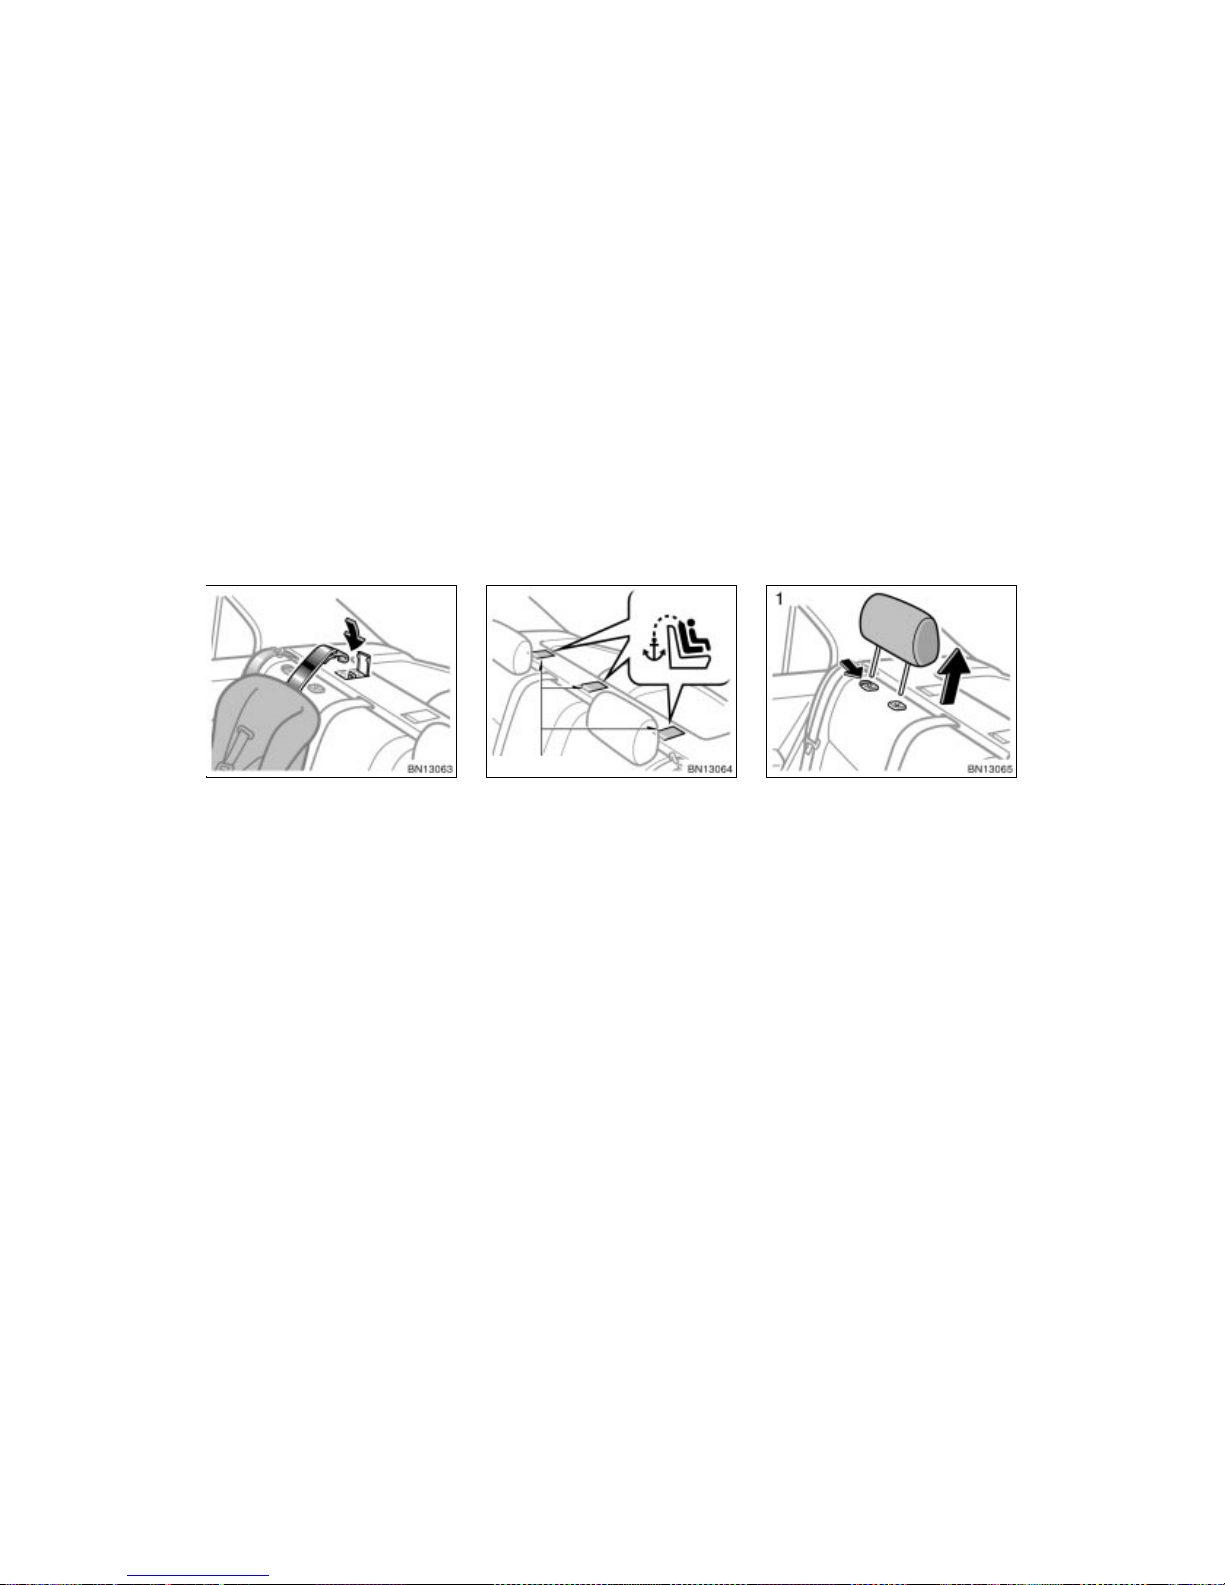
WWW.MANUALS.WS
WWW.MANUALS.WS
’03 Corolla U (L/O 0201)
65
2003 MY COROLLA_U (OM12744U)
Follow the procedure below for a child
restraint system that requires the use
of a top strap.
Anchor brackets
Symbol
Use the anchor bracket on the package
tray behind the rear seat to attach the top
strap.
Anchor brackets are installed for each
rear seating position.
This symbol indicates the location of the
anchor brackets.
TO USE THE ANCHOR BRACKET:
1. Outside anchor brackets only—
Remove the head restraint.
—Using a top strap
 Loading...