

Town Food Service RM-55P-R Installation Manual
72 Beadel Street Brooklyn, NY 11222
718/ 388-5650 outside New York State 800/ 221-5032
www.townfood.com
facsimile 718/ 388-5860
Automatic Gas Rice Cooker Owner’s Manual
RM-55N-R (NATURAL GAS) | RM-55P-R (PROPANE GAS) NSF AND ETL CERTIFIED
RM-50N-R (NATURAL GAS) | RM-50P-R (PROPANE GAS) NOT CERTIFIED
SECTION 1 INSTALLATION INSTRUCTIONS
FOR COMMERCIAL USE ONLY
Warning
Improper installation, adjustment, alteration, service or maintenance can cause property damage,
injury or death.
Read the installation, operating and maintenance instructions thoroughly before installing or servicing
this equipment.
For Your Safety
Do not store or use gasoline or other flammable vapors and liquids in the vicinity of this or any
other appliance.
Important
Contact your local gas supplier if you smell gas near this equipment.
Do not DiscarD instructions. this manual must remain with the unit for future reference.
this emergency information must be prominently DisplayeD.
© Town Food Service Equipment Company, Inc. No part of this booklet or it ’s illustrations may be copied or reproduced without
written authorization from Town Food Service Equipment Co., Inc.
REVISED MAY, 2012

Congratulations on your purchase of your RiceMaster Automatic Gas Rice Cooker.
With proper installation, care and use, it should provide years of reliable service.
IMPORTANT NOTE
The RM-50N-R or RM-50-P-R is not NSF or ETL certified. However, it’s functionality and most of the
specifications are identical to the RM-55N-R and RM55P-R. Most RM-50N-R and RM-50-P-R parts are
interchangeable with RM-55N-R and RM-55P-R. Except for listings and certification, information in this
manual for the RM-50N-R and RM-50-P-R is the same as the RM-55N-R and RM-55-P-R.
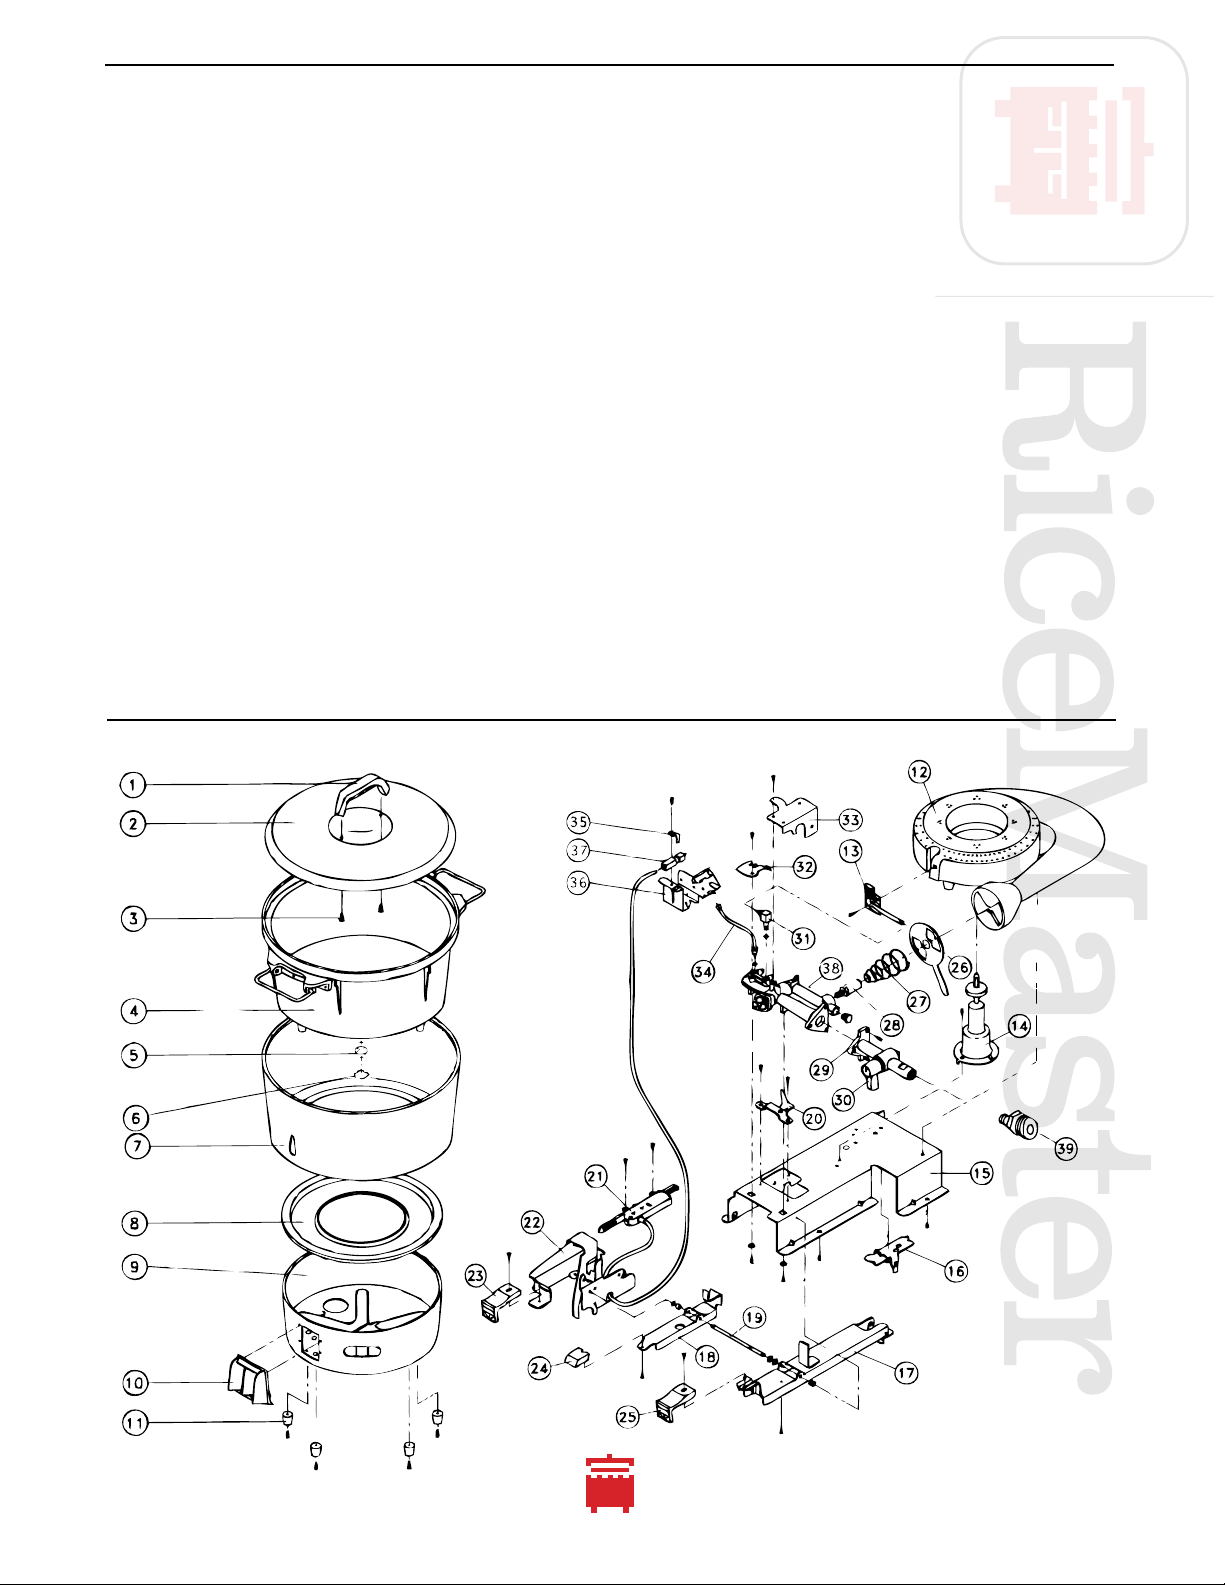
PARTS IDENTIFICATION
____________________________________________________________________________________________
BURNER ASSEMBLY
1
1 shut off stem
2 burner base cover
3 pilot/warmer
4 main burner
5 data plate
6 no.1 start button/ignition lever
7 no.2 main burner/cook button
8 main gas valve knob
9 pilot ignition button-red
lid
2
5
3
6
rice pot
4
8
7
9
pressure regulator
outer jacket
jacket window
2
Town Food Service Equipment Company, Inc. 718/388-5650 outside New York State 800/221-5032

RM-55N-R RM-55P-R RM-50N-R RM-50P-R
INSTALLATION INSTRUCTIONS
____________________________________________________________________________________________
1) The gas supply line must be of adequate size to ensure maximum efficiency of the unit.
2) The installation must conform with the National Fuel Gas Code, ANSI Z223.1, Natural Gas
Installation Code, CAN/CGA-B149.1 or the Propane Installation Code, CAN/CGA-B149.2,
as applicable including:
a) The appliance and it’s individual shut-off valve must be disconnected from the gas supply
piping system during any pressure testing of that system at test pressure in excess of
(3.45 kPa).
b) The appliance must be isolated from the gas supply piping system by closing it’s individual
manual valve during any pressure testing of the gas supply piping system at test pressures
1
equal or less than
⁄2 psig (3.45 kPa).
3) Local regulations governing gas appliance installations must be complied with.
4) Equipment should be in an area with adequate ventilation.
1
⁄2 psig
5) Minimum spacing of 6” to combustible construction is required along back
6”
and side walls. Clearance for noncombustible construction are the same as
combustible clearances. For use only on noncombustible surfaces.
6”
6) Materials such as wood, compressed paper and plant fibers that will ignite and burn, must not
be exposed near the unit. Local safety codes should be complied with in respect to fire
hazard avoidance.
7) Use of the supplied pressure regulator is mandatory.
Note that the use of 2 regulators may cause
insufficient gas flow. Consult with installer but always comply with above codes.
8) Keep the appliance area free and clear from combustible materials, gasoline and other flammable
vapors and liquids.
9) Locate this appliance in a well ventilated area. Do not block or cover the opening between the
shroud and pot. Do not obstruct flow of combustion and ventilation air.
10) The unit must be installed with adequate clearance for servicing and proper operation.
11) If the unit is connected to a flexible gas line, the installation must be made with a connector that
complies with the Standard Connectors for Movable Gas Appliances, ANSIZ21.69 or Connectors
for Movable Gas Appliances, CAN/CGA-06.16, and a Quick Disconnect device that complies with
the standard for Quick Disconnect Devices for Use with Gas Fuel ANSIZ21.41, or Quick Disconnect
Devices for use with Gas Fuel, CAN1-6.9, and adequate means must be provided to limit the
movement of the appliance without depending on connector and the Quick Disconnect device or it’s
associated piping to limit movement of the appliance.
12) Before connecting gas check that gas valve is turned OFF (gas valve handle in the vertical position).
13) Check for leaks using soapy water or other suitable leak detector. Rinse off the soapy water
after testing. Do not use open flame for testing.
3
Town Food Service Equipment Company, Inc. 718/388-5650 outside New York State 800/221-5032

LIGHTING AND SHUT DOWN INSTRUCTIONS
________________________________________________________________________
Always follow these lighting and shut down instructions when lighting rice cooker. A 5 minute complete
shutoff period is required before lighting or relighting pilot. Check for gas leaks before relighting unit.
Use soapy water or other suitable leak detector. Rinse off the soapy water after testing.
Notice to Installer—the following must be performed to insure proper operation
1) Remove pot, outer jacket, and base cover.
2) Turn gas valve to ON position as shown in figure 2 below.
3) Gently push on the #2 COOK button. It should stop half way down and not engage.
This is a safety feature feature that does not allow accidental start of the main burner unless the pilot
button has already been pushed.
4) Push the left button marked #1 START down until the unit clicks, then release it. This is the ignition lever
and should light the pilot. The red button labeled WARM button controls the pilot and is hidden by
the #1 START button when off. Pushing the #1 START button also engages the WARM button and
exposes it. It will stay down until pushed up to extinguish the pilot. If the pilot has not lit, repeat until
the pilot lights.
5) If pilot fails to remain lit, refer to TROUBLE SHOOTING on page 14.
6) Replace the pot, outer jacket, and base cover in their proper order. With the pilot lit, push the
#2 COOK button down to its position without water in the pot. The unit should shut off within 3
to 4 minutes. If it fails to shut off, push the #2 COOK button up to the OFF position and see
TROUBLE SHOOTING on page 14. If it shuts off normally, add a gallon of water and wait for the
click indicating that the sensor has reset. With the pilot lit, press the #2 COOK button again. The rice
cooker should boil the pot dry and then shut off. If it fails to shut off normally, press the #2 COOK
button up to it’s OFF position and refer to the TROUBLE SHOOTING section on page 14 for
additional causes and remedies.
WARNING
When igniting the pilot, position the jacket window directly over #1 START and #2 COOK buttons.
Use caution when igniting pilot and maintain a safe distance from jacket window (figure 3).
SHUT DOWN
When removing the pot, make sure to push the red WARM button up until it clicks and is hidden by the #1
START button—it is then in the OFF position. A 5 minute complete shut off period is required before
lighting or relighting pilot.
figure 1
start button
START
1
main
burner button
COOK
2
figure 2
pilot/warmer button
WARM
Town Food Service Equipment Company, Inc. 718/388-5650 outside New York State 800/221-5032
off position
on position
figure 3
jacket window
4
SPECIFICATIONS, DIMENSIONS, AND GAS INPUT INFORMATION
________________________________________________________________________
RM-50/55N-R RM-50/55P-R
type of gas natural propane
BTU 34,600 27,300
gas connection
3
⁄4” NPT
3
⁄4” NPT
liquid capacity 24 qts. 24 qts.
unit size 22” (depth) x 17” (height) 22” (depth) x 17” (height)
net weight 43 lbs. 43 lbs.
carton size 21” x 21” x 18” 21” x 21” x 18”
master carton 1 unit (4.4 cu. ft.) 1 unit (4.4 cu. ft.)
shipping weight 46 lbs. 46 lbs.
color RM-50N: red base, RM-50P: red base
RM-55N: gray base RM-55P: gray base
capacity raw rice:18 lbs. (55 6 oz. cups*) raw rice:18 lbs. (55 6 oz. cups*)
cooked rice: 43 lbs. (110 6 oz. cups*) cooked rice: 43 lbs. (110 6 oz. cups*)
*Asian standard measurement of 6 oz., opposed to an 8oz. cup
PARTS LIST
________________________________________________________________________
for parts breakdown, see page 6
5
5
Town Food Service Equipment Company, Inc. 718/388-5650 outside New York State 800/221-5032
 Loading...