

Town Food Service RM-50N, RM-55N, RM-50P, RM-55P User Manual
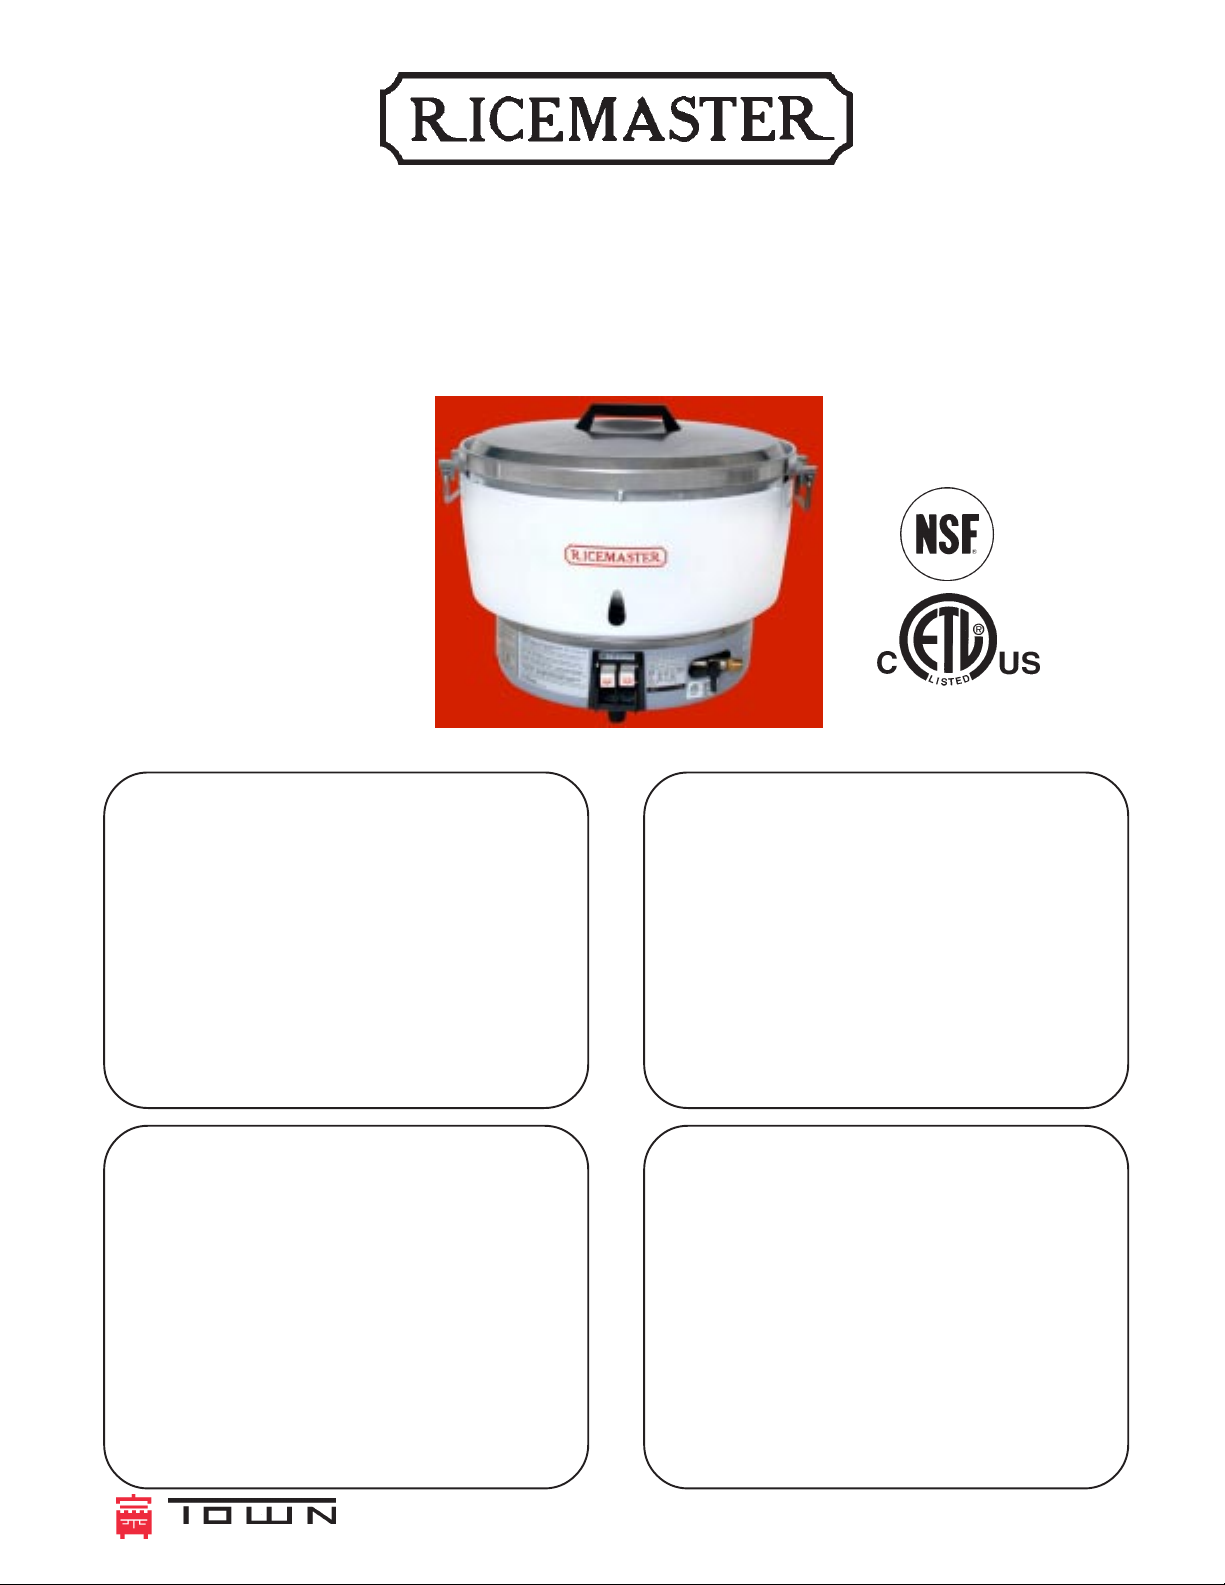
non-certified: RM-50N Natural gas/RM-50P Propane gas
NSF & ETL listed: RM-55N Natural gas/RM-55P Propane gas
Automatic Gas Rice Cooker
Owner’s Manual
Section I: Installation Instructions
FOR YOUR SAFETY
Do not store or use gasoline or other
flammable vapors and liquids in the
vicinity of this or any other appliance.
TO THE PURCHASER
Contact your local gas supplier and
ask instructions in the event the user
smells gas. This information should
be posted in a prominent location.
WARNING
Improper installation, adjustment,
alteration, service or maintenance can
cause property damage, injury or
death. Read the Installation, Operating and Maintenance Instructions
thoroughly before installing or servicing this equipment.
THE INSTALLER MUST
LEAVE THIS MANUAL
WITH THE UNIT AFTER
INSTALLATION.
THE CONSUMER IS TO
RETAIN THIS MANUAL
FOR FUTURE REFERENCE.
FOOD SERVICE EQ. CO., INC. • 72 BEADEL ST. • BKLYN • NY • 11222
Congratulations on your purchase of your Ricemaster Automatic Gas Rice Cooker. With
proper installation, care and use it should provide years of reliable service.
IMPORTANT NOTE: The RM-50 is not NSF or ETL listed. However, its function and specifications are identical to the RM-55. RM-55 parts are interchangeable with RM-50. Except for
listings and certification, information in this manual for the RM-55 is the same as the RM-50.
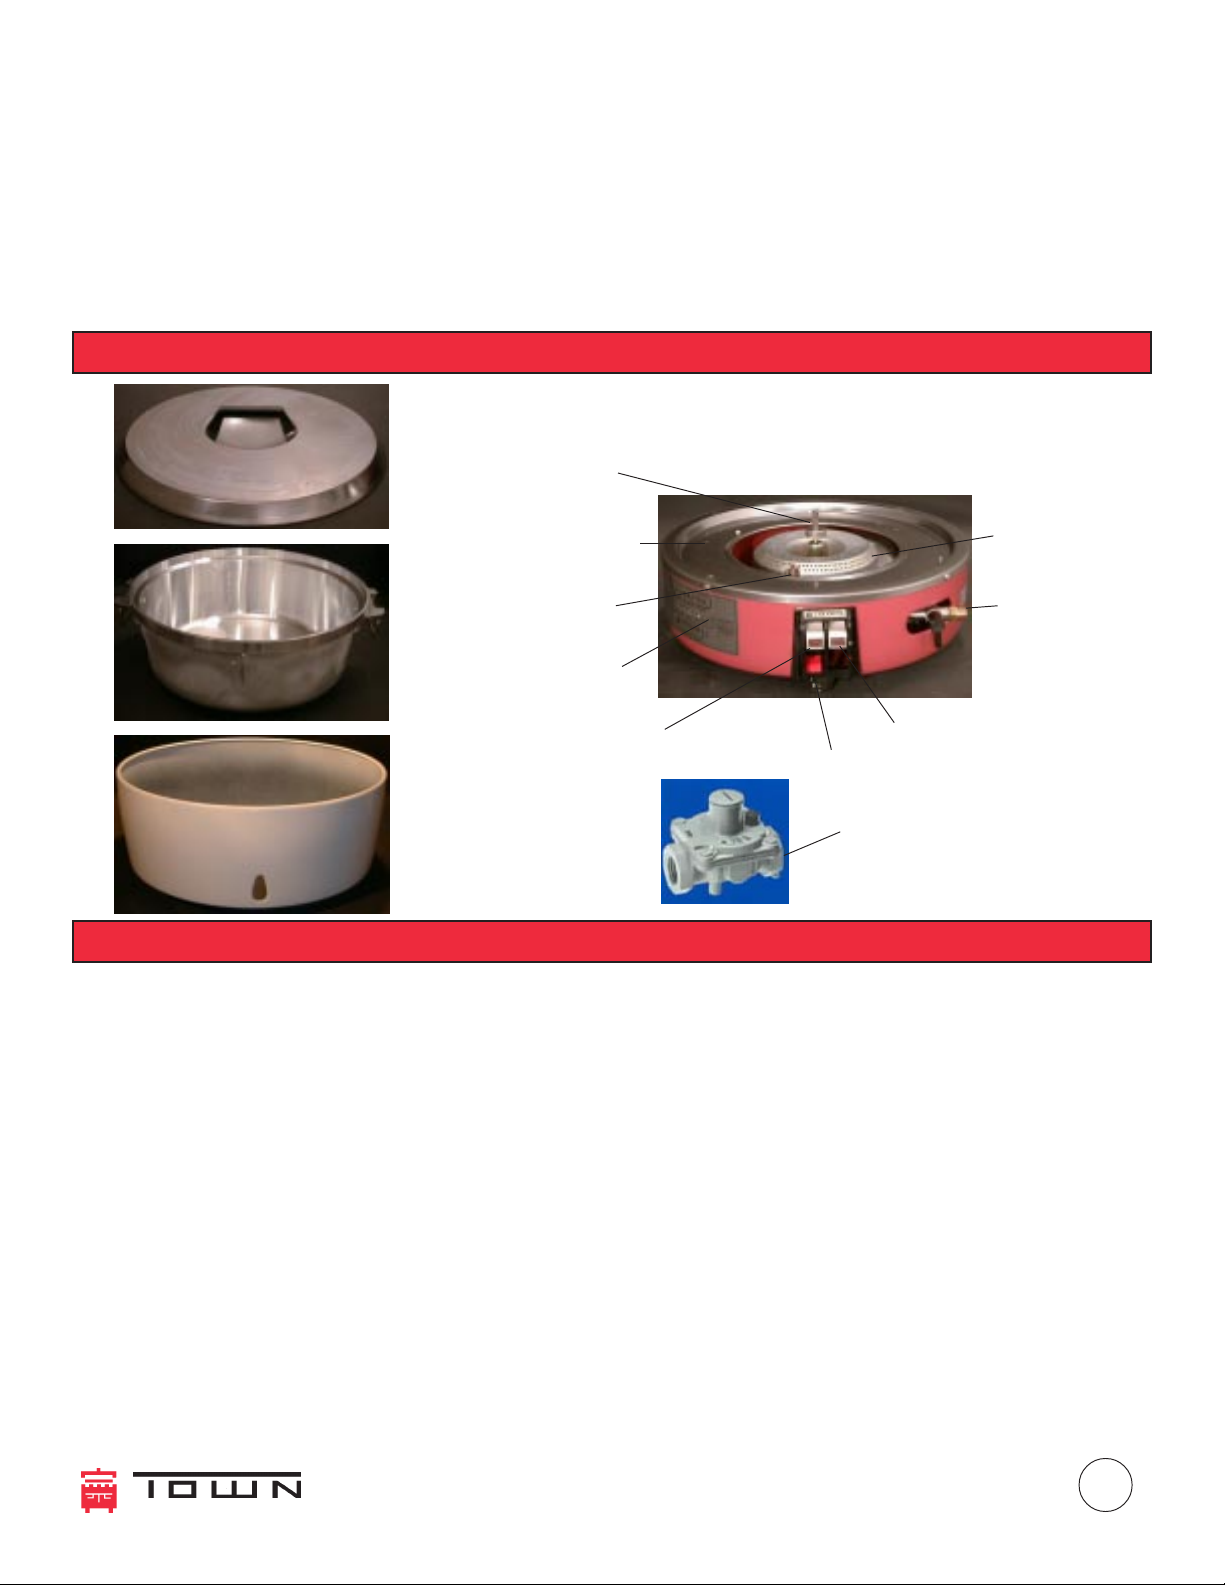
COMPONENT IDENTIFICATION
BURNER ASSEMBLYBURNER ASSEMBLY
BURNER ASSEMBLY
Shut Off
Stem
Lid
Burner Base
Cover
BURNER ASSEMBLYBURNER ASSEMBLY
Main Burner
Pilot/
warmer
Data plate
Rice Pot
#1 Start Button & Ignition Lever
Keep Warm Button-red
Pressure Regulator
RM-55 only
Outer Jacket
SPECIFICATIONS
Specifications: RM-55N RM-55P
Type of gas Natural Propane
Btu 34,600 27,300
Gas Connection 3/8” NPT 3/8” NPT
Liquid Capacity 24 qts. 24 qts.
Unit Size 17"h x 19"d x 23" 17"h x 19"d x 23"
Net Weight 44 lbs. 44 lbs.
Carton Size 21" x 21" x 17" 21" x 21" x 17"
Master Carton 1 unit (4.4 cu. ft.) 1 unit (4.4 cu. ft.)
Shipping Weight 50 lbs. 50 lbs.
Color white jacket/gray base white jacket/gray base
RM-50N RM-50P
Color white jacket/red base white jacket/red base
Main Gas Valve
#2 Main Burner/Cook Button
Capacity:
Raw Rice 17 lbs. (55 - 6 oz. cups)
Cooked Rice 270 servings @ 3 oz. each
FOOD SERVICE EQ. CO., INC. • 72 BEADEL ST. • BKLYN • NY • 11222
2

INSTALLATION INSTRUCTIONS
INSTALLATION:
1. The gas supply line must be of adequate size to insure maximum efficiency of the unit.
2. The installation must conform with the National Fuel Gas Code, ANSI Z223.1, Natural Gas Installation
Code, CAN/CGA-B149.1 or the Propane Installation Code, CAN/CGA-B149.2, as applicable, including:
a. The appliance and its individual shutoff valve must be disconnected from the gas supply piping system
during any pressure testing of that system at test pressures in excess of 1/2 NPT(3.45 kPa).
b.The appliance must be isolated from the gas supply piping system by closing its individual manual valve
during any pressure testing of the gas supply piping system at test pressures equal or less than 1/2 psig
(3.45 kPa).
3. Local regulations governing gas appliance installations must be complied with.
4. Equipment should be in an area with adequate ventilation
5. Minimum spacing of 6" to combustible construction is required along
back and side walls. Clearances for noncombustible construction are the
same as combustible clearances. For use only on noncombustible floors.
6. Materials such as wood, compressed paper and plant fibers that will ignite and burn, Must Not Be Exposed
Near this unit. Local safety codes should be complied with in respect to fire hazard avoidance.
7. Use of the supplied pressure regulator is mandatory ( provided with RM-55 only). Note: use of two
regulators may cause insufficient gas flow. Consult with your installer but always comply with above
codes.
8. Keep the appliance area free and clear from combustible materials, gasoline and other flammable vapors
and liquids.
9. Locate this appliance in a well ventilated place. Do Not Block or Cover the opening between the shroud
and pot. DO NOT OBSTRUCT FLOW OF COMBUSTION AND VENTILATION AIR.
10. This equipment must be installed with adequate clearance for servicing and proper operation.
12. This unit should be operated only with drip pan in place.
13. If the unit is connected to a flexible gas line, the installation shall be made with a connector that complies
with the Standard for Connectors for Movable Gas Appliances, ANSI Z 21.69 or Connectors For Movable
Gas Appliances, CAN/CGA-06.16, and a Quick Disconnect device that complies with the standard for
Quick-Disconnect Devices for Use with Gas Fuel ANSI Z21.41, or Quick Disconnect Devices for use with
Gas Fuel, CAN1-6.9, and adequate means must be provided to limit the movement of the appliance
without depending on connector and the quick-disconnect device or its associated piping to limit the
appliance movement.
14. Before connecting gas check that gas valve on the appliance is turned “off” (gas valve knob in vertical
position.)
15. Check for leaks using soapy water or other suitable leak detector. Rinse off the soapy water after testing.
DO NOT USE OPEN FLAME FOR TESTING.
(718)388-5650 except NY fax: (718)388-5860 townfood.com
3
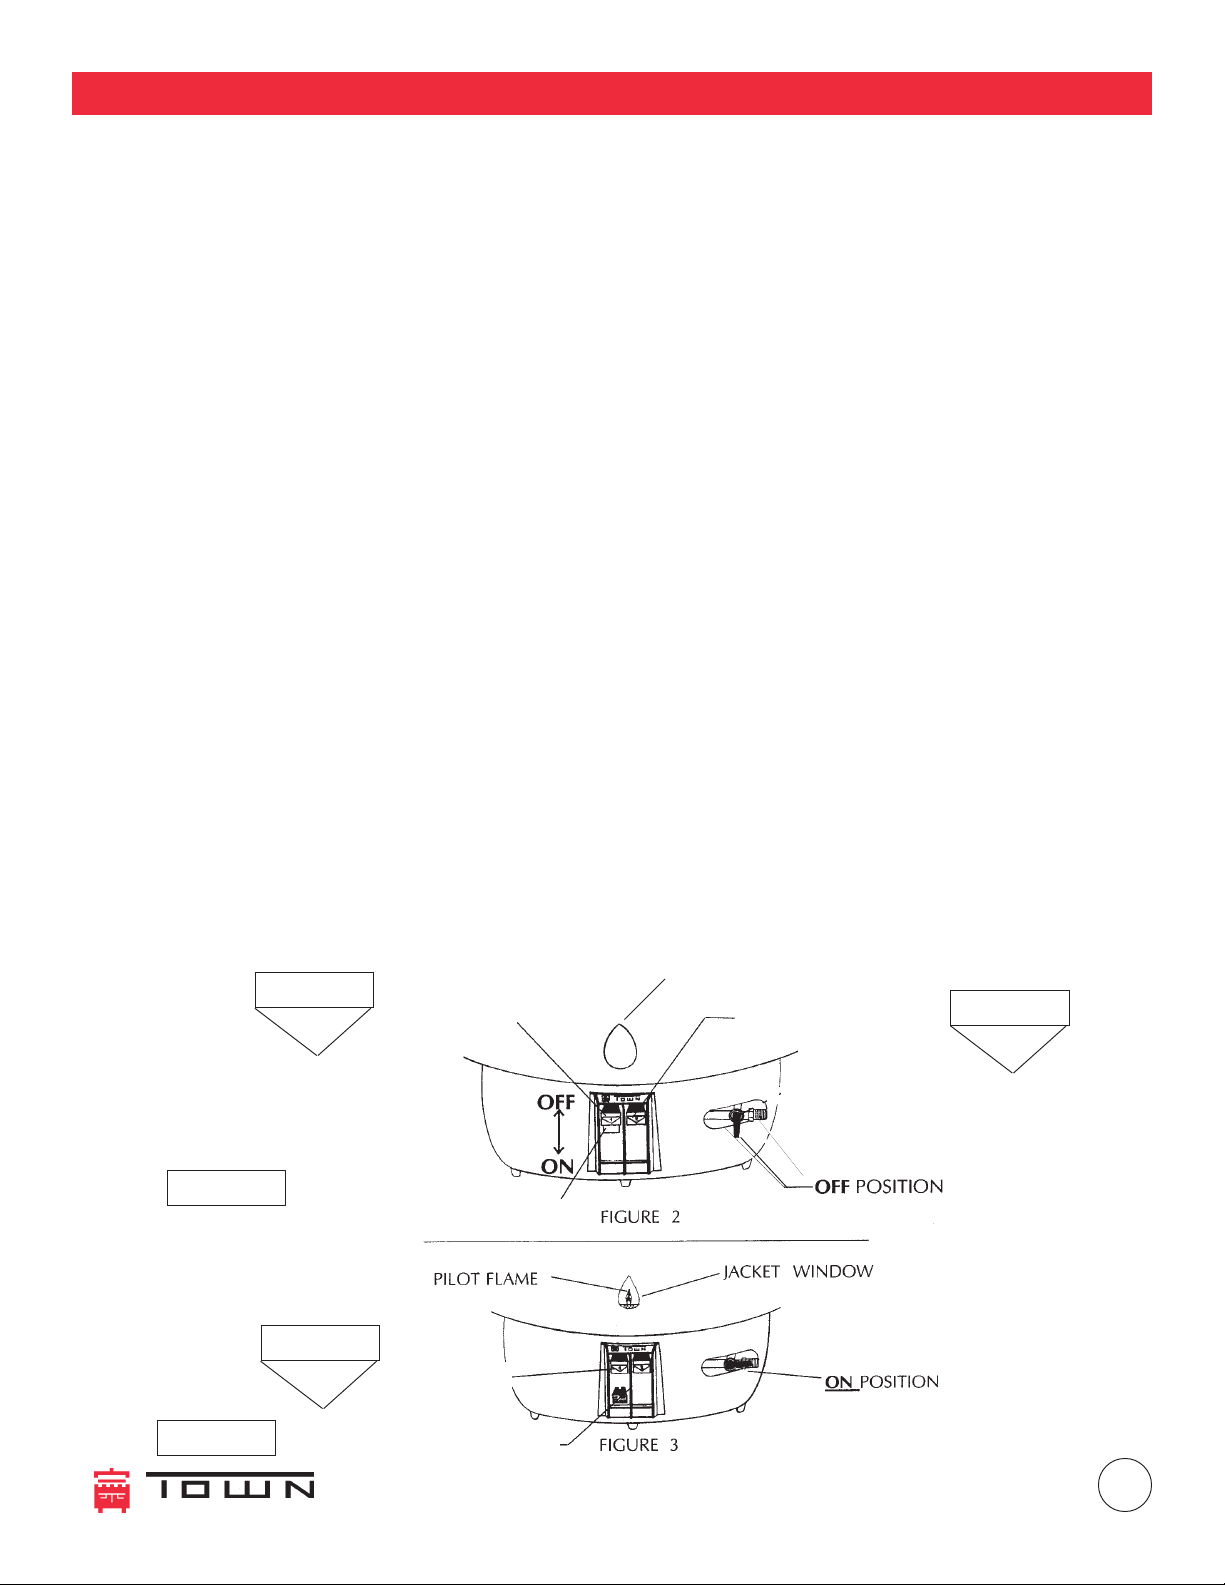
LIGHTING AND SHUT DOWN INSTRUCTIONSLIGHTING AND SHUT DOWN INSTRUCTIONS
LIGHTING AND SHUT DOWN INSTRUCTIONS
LIGHTING AND SHUT DOWN INSTRUCTIONSLIGHTING AND SHUT DOWN INSTRUCTIONS
Always follow these lighting and shutdown instructions when lighting your rice cooker. A five minute
complete shutoff period is required before lighting or relighting pilot. Check for gas leaks before relighting unit. Use soapy water or other suitable leak detector. Rinse off the soapy water after testing.
Notice to Installer: The following must be performed to insure proper operation.
1. Remove Pot, Outer Jacket, and Drip Tray.
2. Open the manual valve to the unit.
3. Gently push on the #2 COOK button. It should stop half way down and not engage. This is a safety
feature that does not allow accidental start of the main burner unless the pilot button has already been
pushed.
4. Push the left button marked #1 START down until you hear a click, then release it. This is the ignition
lever and the pilot should light. The red button marked WARM controls the pilot and is hidden by the
START button when off. Pushing the START button also depresses the WARM button, exposing it. It
will stay down until pushed up to extinguish the pilot. If the pilot has not lit, repeat until pilot lights.
5. If pilot fails to remain lit, see Trouble Shooting.
6. Replace the Pot, Outer Jacket, and Drip Tray in their proper order. With the pilot lit, push the COOK
button down to its on position without water in the pot. The rice cooker should shut off within 3 to
four minutes. If it fails to shut off push the COOK button up to its off position and see Trouble Shoot-
ing. But if it shuts off normally, add a gallon of water and, with the pilot lit, again press the COOK
button. The rice cooker should boil the pot dry and then shut off. If it fails to shut off normally, push
the COOK button up to its off position and see Trouble Shooting.
SHUT DOWN: When removing the pot, make sure to push up the red button WARM until it clicks and
is hidden by the START button. It is then in the “OFF” position. A five minute complete shutoff
period is required before lighting or relighting pilot.
WARNING: *When igniting the pilot, position the Jacket Window directly over START and COOK
buttons. Do not be too close to the viewing hole when igniting.
Jacket Window
Main Burner Button
COOKCOOK
COOK
COOKCOOK
22
2
22
WARMWARM
WARM
WARMWARM
STARTSTART
START
STARTSTART
11
1
11
Pilot/Warmer Button (red)
STARTSTART
START
STARTSTART
Start Button
WARMWARM
WARM
WARMWARM
11
1
11
Pilot/Warmer Button (red)
Start Button
FOOD SERVICE EQ. CO., INC. • 72 BEADEL ST. • BKLYN • NY • 11222
4
OPTIONAL REAR CONNECTION KIT
RM-55N RC Kit for Natural Gas
RM-55P RC Kit for Propane Gas
This kit allows the rice cooker to be
connected from the rear; It is
optional and is not furnished with
the rice cooker unless ordered.
Each kit includes:
1-3/4” pressure regulator
1-3/4” x 1/2” bushing
1-3/8” x 1/2” galvanized coupling
1-1/2” galvanized street elbow
1-1/2” x 10” galvanized pipe nipple
1- pipe nipple bracket with two (2)
screws
If using this kit, use only one
pressure regulator.
RM-55 REAR CONNECTION KIT INSTALLATION INSTRUCTIONS
Before installing the connection kit, install the provided pressure regulator:
a. Locate gas supply for the rice cooker. Installation must comply with the National codes so there
should be a shut off valve on the gas supply line to the rice cooker.
b. Install the supplied pressure regulator after the gas supply valve. An arrow on the body of the
pressure regulator indicates the direction of the gas flow. The arrow must be pointing in the direction to
the rice cooker. The rice cooker will not operate if the regulator is improperly installed.
c. Install the 3/4” x 1/2” bushing supplied into the pressure regulator outlet.
d. Install the supply side of the quick disconnect hose (provided by others) to the regulator per the
manufacturer’s instructions.
With the pressure regulator and the hose installed, install the rear connection kit. Be sure to use
approved materials on the pipe threads to prevent gas leaks.
1. Install 3/8” x 1/2” galvanized coupling onto the rice cooker inlet while using a wrench to secure the
unit’s gas manifold.
2. Install 1/2” galvanized street elbow onto the coupling.
3. Install pipe nipple bracket with two (2) screws provided. Holes for the screws are provided.
4. Install 1/2” x 10” galvanized pipe nipple.
5. Install 3/4” pressure regulator. Connect one end to the pipe nipple and the other end to the Quick
Disconnect.
6. Install the Quick Disconnect hose nipple per the manufacturer’s instructions.
7. Check your installation for leaks with an approved leak detector.
When appropriate, light the rice cooker and check for proper operation.
(718)388-5650 (800) 221-5032 except NY fax: (718)388-5860 townfood.com
5
 Loading...