

Page 1

!
The TowGo® Trailer Backup Navigation Aid™
USER’S GUIDE
™
Page 2

!
April!1,!2019
The!wordmarks!“TowGo”!and!“Tell!your!trailer!where!to!go”!are!registered!trademarks!of!TowGo,!LLC.!
!
“Bluetooth”!and!“Android”!are!trademarks!of!their!respective!owners!
Page 3

!
!
TABLE OF CONTENTS
1. Notices................................................................................................................................1
2. THANK YOU! ......................................................................................................................5
3. ABOUT YOUR TRAILER HITCH SENSOR...........................................................................5
4. ABOUT YOUR STEERING WHEEL SENSOR ...................................................................... 6
5. BEFORE YOU GET STARTED .............................................................................................6
INSTALLATION
6. INSTALL THE TRAILER HITCH SENSOR ............................................................................7
7. CRITICAL INFORMATION FOR PROPER INSTALLATION AND OPERATION!!! .............. 8
8. MEASURE THE DISTANCE FROM THE SENSOR TO THE HITCH BALL ..........................8
9. INSTALL THE HITCH RECEIVER T-BRACKET ....................................................................9
10. MEASURE THE DISTANCE FROM THE CORD ATTACHMENT POINT TO THE HITCH BALL................................ 10
11. MEASURE AND ASSEMBLE THE STRETCH CORD ......................................................... 11
12. CONNECTING THE TRAILER HITCH SENSOR POWER CABLE ....................................12
13. POWERING THE TRAILER HITCH SENSOR ....................................................................12
14. ATTACHING THE STEERING WHEEL SENSOR ..............................................................12
THE TOWGO APP
15. GETTING STARTED WITH THE TOWGO APP.................................................................13
16. GETTING AROUND THE APP .......................................................................................... 13
17. CONNECTING AND CONFIGURING YOUR SENSORS.................................................. 14
18. CONNECT TO YOUR TRAILER HITCH SENSOR .............................................................14
19. CONNECT TO YOUR STEERING WHEEL SENSOR ........................................................ 15
20. CONFIGURE YOUR STEERING WHEEL SENSOR ...........................................................16
21. CONFIGURE YOUR TRAILER HITCH SENSOR ................................................................ 17
OPERATION
22. INITIALIZATION ...............................................................................................................19
23. DISPLAY GUIDANCE FEATURES ..................................................................................... 20
24. TURNING – THE RED AND DARK BLUE CURVED LINES ..............................................21
25. BACKING STRAIGHT – THE WHITE AND LIGHT BLUE LINES ......................................23
26. THE FLASH AND BEEP ...................................................................................................23
27. ADVANCED MANEUVERS .............................................................................................. 24
28. VERY IMPORTANT INFORMATION REGARDING YOUR HITCH SENSOR AND STRETCH CORD ..25
29. TROUBLESHOOTING ......................................................................................................26
30. GUARANTEE AND RETURN POLICY ..............................................................................28
Page 4

!
!
! STEERING!WHEEL!SENSOR:! ! FCC!ID:!!!2AOGL1! ! IC:!2359971!
!"#$% &'(#)'% )*+,-#'$% .#/"% 011% 23&% 41% 52/#*3% '6,*$75'% -#+#/$% $'/% 8*5/"% 8*5% 9'3'52-% ,*,7-2/#*3%
:73)*3/5*--'&% '6,*$75';<% !"#$%&'(#)'% +7$/%3*/% ='%)*--*)2/'&% *5% *,'52/#39% #3% )*3>73)/#*3%.#/"% 23?%*/"'5%
23/'332%*5%/523$+#//'5<!
! TRAILER!HITCH!SENSOR:! ! ! FCC!ID:!!!2AOGL2! ! IC:!2359972!
!"#$%&'(#)'%)*+,-#'$%.#/"%011%23&%41%52/#*3%'6,*$75'%-#+#/$%$'/%8*5/"%8*5%23%73)*3/5*--'&%'3(#5*3+'3/<%
!"'%&'(#)'%$"*7-&%='%#3$/2--'&%23&%*,'52/'&% .#/"%2%+#3#+7+%&#$/23)'%*8%@A)+%='/.''3%/"'%52/*5%23&%
?*75% =*&?<% !"#$% &'(#)'% +7$/% 3*/% ='% )*--*)2/'&% *5% *,'52/#39% #3% )*3>73)/#*3% .#/"% 23?% */"'5% 23/'332% *5%
/523$+#//'5<%
STEERING!WHEEL!&!TRAILER!HITCH!SENSOR:!
USA!
%B!"#$%&'(#)'%)*+,-#'$%.#/"%C25/%DE%*8%/"'%011%F7-'$<%%G,'52/#*3%#$%$7=>')/%/*%/"'%8*--*.#39%/.*%)*3&#/#*3$H%
:D;% /"#$% &'(#)'% +2?% 3*/% )27$'% "25+87-% #3/'58'5'3)'I% 23&% :@;% /"#$% &'(#)'% +7$/% 2))',/% 23?% #3/'58'5'3)'%
5')'#('&I%#3)-7'%#3/'58'5'3)'%/"2/%+2?%)27$'%73&'$#5'&%*,'52/#*3<J!
!
B1"239'$% *5% +*#)2/#*3$% 3*/% '6,5'$$-?% 2,,5*('&% =?% TowGo,! LLC! )*7-&% (*#&% /"'% 7$'5K$% 27/"*5#/?% /*%
*,'52/'%/"'%'L7#,+'3/<J!
!
“!"#$%'L7#,+'3/%"2$%=''3%/'$/'&%23&%8*73&%/*%)*+,-?%.#/"%/"'%-#+#/$%8*5%2%1-2$$%M% #/2-%&'(#)'I%,75$723/%
/*%C25/%DE%*8%/"'%011%F7-'$<%%!"'$'%-#+#/$%25'%&'$#93'&%/*%,5*(#&'%5'2$*32=-'%,5*/')/#*3%292#3$/%"25+87-%
#3/'58'5'3)'%#3%2% 5'$#&'3/#2-%#3$/2--2/#*3<%!"#$%'L7#,+'3/%9'3'52/'$I% 7$'$%23&%)23%52/'%52&#*%85'L7'3)?%
'3'59?%23&I%#8%3*/%#3$/2--'&%23&%7$'&%#3%2))*5&23)'%.#/"%/"'%#3$/57)/#*3$I%+2?%)27$'%"25+87-%#3/'58'5'3)'%
/*%52&#*%)*++73#)2/#*3$<%%N*.'('5I%/"'5'%#$%3*%972523/''%/"2/%#3/'58'5'3)'%.#--%3*/%*))75%#3%2%,25/#)7-25%
#3$/2--2/#*3<%%48% /" #$%'L7#,+'3/%&*'$%)27$'%"25+87-%#3/'58'5'3)'%/*%52&#*%*5%/'-'(#$#*3%5')',/#*3I%."#)"%)23%
='% &'/'5+#3'&% =?% /753#39% /"'% 'L7#,+'3/% *88% 23&% *3I% /"'% 7$'5% #$% '3)*7529'&% /*% /5?% /*% )*55')/% /"'%
#3/'58'5'3)'%=?%*3'%*8%/"'%8*--*.#39%+'2$75'$H%
OO% F'*5#'3/%*5%5'-*)2/'%/"'%5')'#(#39%23/'332<%
OO% 43)5'2$'%/"'%$',252/#*3%='/.''3%/"'%'L7#,+'3/%23&%5')'#('5<%
OO% 1*33')/%/"'%'L7#,+'3/%#3/*%23%*7/-'/%*3%2%)#5)7#/%X'5'3/%85*+%/"2/%/*%."#)"%/"'%5')'#('5%#$%
)*33')/'&<%
OO% 1*3$7-/%/"'%&'2-'5%*5%23%'6,'5#'3)'&%52&#*P!Q%/')"3#)#23%8*5%"'-,<J%
B!"#$%'L7#,+'3/%"2$%=''3%/'$/'&%23&%8*73&%/*%)*+,-?%.#/"%/"'%-#+#/$%8*5%2%1-2$$%R% #/2-%&'(#)'I%,75$723/%
/*%C25/%DE%*8%/"'%011%F7-'$<%%!"'$'%-#+#/$%25'%&'$#93'&%/*%,5*(#&'%5'2$*32=-'%,5*/')/#*3%292#3$/%"25+87-%
#3/'58'5'3)'% ."'3% /"'% 'L7#,+'3/% #$%*,'52/'&% #3%2% )*++'5)#2-%'3(#5*3+'3/<% %!"#$% 'L7#,+'3/% 9'3'52/'$I%
7$'$% 23&% )23% 52/'% 52&#*% 85'L7'3)?% '3'59?% 23&I% #8% 3*/% #3$/2--'&% 23&% 7$'&% #3% 2))*5&23)'% .#/"% /"'%
#3$/57)/#*3% +2372-I% +2?% )27$'% "25+87-% #3/'58'5'3)'% /*% 52&#*% )*++73#)2/#*3$<% % G,'52/#*3% *8% /"#$%
'L7#,+'3/% #3% 2% 5'$#&'3/#2-% 25'2% #$% -#S'-?% /*% )27$'% "25+87-% #3/'58'5'3)'% #3% ."#)"% )2$'% /"'% 7$'5% .#--% ='%
5'L7#5'&%/*%)*55')/%/"'%#3/'58'5'3)'%2/%"#$%*.3%'6,'3$'<J!%
Canada!
This device complies with Industry Canada licence-exempt RSS standard(s). Operation is subject to the
following two conditions: (1) this device may not cause interference, and (2) this device must accept
any interference, including interference that may cause undesired operation of the device.
Le présent appareil est conforme aux CNR d'Industrie Canada applicables aux appareils radio exempts
de licence. L'exploitation est autorisée aux deux conditions suivantes : (1) l'appareil ne doit pas produire
de brouillage, et (2) l'appareil doit accepter tout brouillage radioélectrique subi, même si le brouillage
est susceptible d'en compromettre le fonctionnement.!
1
Page 5

!
TowGo Mobile App Terms of Use and Privacy Policy
( For the most up to date Terms of Use, go to https://www.towgo.com/terms/ )
1. Introduction
The TowGo mobile application is operated by TowGo, LLC (“Company” or “We”). Please read these terms of use
(“Terms”).
By purchasing, downloading, registering with, accessing, and/or using the TowGo steering wheel sensor, trailer hitch
sensor, and/or mobile application (the “App”), you indicate your agreement to these Terms. If you do not agree, please do
not use the App or the content/services provided therefrom (the “Services”). We reserve the right to modify these Terms,
including the Privacy Policy, at any time and without prior notice by displaying updated Terms on the Company web page
(https://www.towgo.com/terms/). Any such changes or modifications shall become effective immediately upon posting on
that web page page. Your continued use of the App after updated Terms are displayed will constitute your acceptance of
the revised Terms.
If you breach these Terms, We reserve the right in our sole discretion to restrict, suspend, or terminate your access to the
App with or without notice to you.
2. Scope of License
The license granted to you for use of the App, including Services and content therefrom, is a limited, personal, nonexclusive, non-transferable license (without the right to sublicense) to access and make use of the App on a mobile device
that you own or control, in both cases for personal and noncommercial use only. You may not copy (except as expressly
permitted by this license), decompile, reverse engineer, disassemble, attempt to derive the source code of, modify, or
create derivative works of the App or any updates thereon or parts thereof (except as and only to the extent that the
foregoing restriction is prohibited by applicable law or to the extent as may be permitted by the licensing terms governing
use of any open sourced components included with the App).
3. Safety
You agree that your use of the App and operation of a vehicle and/or other devices/machinery is at your own risk, and it is
your responsibility to maintain such health, liability, hazard, personal injury, medical, life, and other insurance policies as
required by law and/or as you deem reasonably necessary for any injuries that you may incur while using the
App/Services. You also agree not to use the App to violate any applicable law, rule, or regulation (including, but not
limited to, motor vehicle, traffic, and trespass laws). You also agree not to encourage or enable any other individual to
violate any applicable law, rule, or regulation.
Any and all Services provided by the App are made available for informational purposes only and are not intended to be
relied upon in situations where erroneous, inaccurate, time-delayed or incomplete guidance and/or data may lead to
death, personal injury, property or environmental damage. You agree that the results you receive from the App/Services
may vary from actual road or terrain conditions due to factors that can affect the accuracy of the guidance/data, such as,
but not limited to, weather, road and traffic conditions, criminal mischief, and geopolitical events. For your safety, always
pay attention to your surroundings and observe current road conditions and signage.
4. Intellectual Property
You acknowledge that by using the App, you do not obtain any rights, title, or interest in or related to the App, including,
but not limited to, content contained in the App, trademarks, service marks, software, copyrightable works, illustrations,
images, etc., whether tangible or intangible (“Content”). Unless otherwise noted, all Content is the exclusive property of
Company or other appropriate author/owner, and is protected by applicable intellectual property laws. Such Content may
not be copied, reproduced, republished, uploaded, posted, transmitted, distributed, or exploited in any way, without prior
written permission from the Content owner.
The wordmarks “TowGo®” and “Tell your trailer where to go®” and other names, trademarks, service marks, etc. are
owned by TowGo, LLC (“Company Marks”). You may not use Company Marks in any manner or in connection with any
manner that may cause confusion as to the source of any product or service, that implies Company’s endorsement,
sponsorship, relationship with, etc. of any product or service where none exists, or that disparages or discredits Company.
You must not remove, obscure, or alter any copyright notices, trademarks, services marks, or any other proprietary rights
or legal notices, documents or hyperlinks that may appear in or be provided through the App/Services.
5. Inappropriate Use
You hereby expressly agree that you will not use the App:
• For any unlawful purpose, including posting, storing, sending, or otherwise transmitting information, property,
data, or material that is libelous, obscene, threatening, harassing or defamatory, or which may infringe the intellectual
property rights of any person or which encourages in any way conduct that would be unlawful or inappropriate.
• Use any automated means to access the App or collect any information from the App, including without limitation,
the harvesting or collecting of email addresses, lists of users, user contact information, user location data, or other user
information.
2
Page 6

!
• To use the App in any manner which could damage, disable, overburden, or impair the App, or interfere with any
other party’s use of the Services/the App.
• To transmit or otherwise make available through the App any computer code, file, program, or other element, that
would interrupt, destroy, interfere with, or otherwise cause any other effect that may be reasonably considered
undesirable, harmful, or negative (including, but not limited to, any virus, worm, or harmful malware of any kind).
• To circumvent or attempt to circumvent the App security or any attempt (whether or not successful) to control
access to the App and/or related goods or services.
• Without the legally required notices for radio transmissions and interference.
You hereby expressly agree that you will remove the steer sensor from the steering wheel and the trailer hitch sensor from
the trailer except when guiding a trailer while backing up.
6. Indemnification
You agree to defend, indemnify and hold Company, its officers, directors, shareholders, successors in interest,
employees, agents, subsidiaries, and affiliates harmless from and against any and all claims, damages, costs and
expenses, including attorneys’ fees, arising from or relating to your use of the App or the Services as well as any content
provided therefrom, your violation of this Agreement, or your violation of any rights of another.
7. Disclaimers; Limitation of Liability; Cap on Liability
THE APP IS AVAILABLE “AS IS” AND “AS AVAILABLE.” TO THE MAXIMUM EXTENT PERMITTED UNDER LAW, WE
DISCLAIM ALL EXPRESS OR IMPLIED WARRANTIES, INCLUDING ANY WARRANTY OF MERCHANTABILITY OR
FITNESS FOR A PARTICULAR PURPOSE (EVEN IF THAT PURPOSE HAS BEEN DISCLOSED), NONINFRINGEMENT OF THIRD PARTY RIGHTS, AND ANY WARRANTY THAT OUR APP, SITE OR SERVICES (1) WILL
BE UNINTERRUPTED, FREE FROM ERRORS, OR FREE FROM VIRUSES, WORMS, “TROJAN HORSES” OR OTHER
MALICIOUS CODE OR HARMFUL FEATURES OR (2) WILL MEET YOUR REQUIREMENTS OR BE ACCURATE,
COMPLETE, TIMELY, RELIABLE, OR NON-INFRINGING. COMPANY RESERVES THE RIGHT TO CORRECT ANY
ERRORS IN THE APP OR SERVICES. IF YOU RELY ON OUR APP, SITE OR SERVICES, YOU DO SO ENTIRELY AT
YOUR OWN RISK.
IN NO EVENT WILL COMPANY OR ITS MEMBERS, OFFICERS, DIRECTORS, EMPLOYEES, REPRESENTATIVES,
OR AGENTS BE LIABLE TO YOU OR ANY THIRD PARTY FOR ANY DAMAGES RELATING TO OR ARISING OUT OF
THE USE OF, OR THE INABILITY TO USE, THE APP OR THE SITE, INCLUDING WITHOUT LIMITATION, DIRECT OR
INDIRECT, SPECIAL, INCIDENTAL, OR CONSEQUENTIAL DAMAGES, LOSSES OR EXPENSES ARISING IN
CONNECTION WITH THIS APP OR SITE OR USE THEREOF OR INABILITY TO USE BY ANY PARTY, OR IN
CONNECTION WITH ANY FAILURE OF PERFORMANCE, ERROR, OMISSION, INTERRUPTION, DEFECT, DELAY IN
OPERATION OR TRANSMISSION, COMPUTER VIRUS OR LINE OR SYSTEM FAILURE, EVEN IF COMPANY, OR
REPRESENTATIVES THEREOF, ARE ADVISED OF THE POSSIBILITY OF SUCH DAMAGES, LOSSES OR
EXPENSES.
NOTWITHSTANDING THE FOREGOING, IN NO EVENT WILL COMPANY’S AGGREGATE LIABILITY TO YOU FOR
ANY CAUSE, AND REGARDLESS OF THE FORM OF ACTION, EXCEED THE AMOUNT PAID BY YOU TO COMPANY
FOR PRODUCTS PURCHASED USING THE APP IN THE TWELVE (12) MONTH PERIOD IMMEDIATELY PRECEDING
THE OCCURRENCE THAT GAVE RISE TO SUCH CLAIM.
8. Advertisers or Partners; Third Party Links
Your correspondence or business dealings with, or participation in promotions of, advertisers, or partners found on or
through the App, including payment and delivery of related goods or services, and any other terms, conditions, warranties
or representations associated with such dealings, are solely between you and such advertiser or partner. We shall not be
responsible or liable for any loss or damage of any sort incurred as the result of any such dealings or as the result of the
presence of such advertisers or partners on the App.
We may provide, or third parties may provide, links to other websites or resources that are beyond our control. We makes
no representations as to the quality, suitability, functionality, or legality of any websites to which links may be provided,
and you hereby waive any claim you might have against us with respect to such websites. WE ARE NOT RESPONSIBLE
FOR THE CONTENT ON THE INTERNET OR WORLD WIDE WEB PAGES THAT ARE CONTAINED OUTSIDE OF THE
APP.
9. Privacy Policy
We respect your privacy and are committed to protecting it through our compliance with this policy (the “Privacy Policy”).
Access to the App, the TowGo website, and/or use of the Services offered are subject to this Privacy policy. By accessing,
registering with, or using the App, the TowGo website, and/or the Services offered therefrom, you are deemed to have
accepted this Privacy Policy. In particular, you are deemed to have consented to our collection, use, and disclosure of
your personal information in the manner prescribed in this Privacy Policy and for the purposes set out in herein. We
reserve the right to amend this Privacy Policy from time to time. If you disagree with any part of this Privacy Policy, you
must immediately discontinue your access to the App and your use of the Services.
3
Page 7

!
As part of the normal operation of our Services, We may, from time to time, collect, use and, in some cases, disclose
information about you to third parties. Accordingly, We have developed this Privacy Policy in order for you to understand
how We may collect, use, communicate and disclose and make use of your personal information when you use the
Services on the App:
• Before or at the time of collecting personal information, We will endeavor to identify the purposes for which
information is being collected.
• We will collect and use of personal information solely with the objective of fulfilling those purposes specified by us
and for other compatible purposes, unless We obtain the consent of the individual concerned or as required by law.
• We will only retain personal information as long as necessary for the fulfillment of those purposes.
• We will protect personal information by reasonable security safeguards against loss or theft, as well as
unauthorized access, disclosure, copying, use or modification.
When you download, access, and use the App, it may use technology to automatically collect:
Usage Details. When you access and use the App, We may automatically collect certain details of your access to and
use of the App, including vehicle parameters (e.g., make, model, steering ratio, wheelbase, trailer length), logs, and other
communication data and the resources that you access and use on or through the App.
Device Information. We may collect information about your mobile device and internet connection, including the device’s
unique device identifier, IP address, operating system, browser type, mobile network information, and the device’s
telephone number.
Stored Information and Files. The App also may access metadata and other information associated with other files
stored on your device. This may include, for example, photographs to be displayed within the App and address book
information.
Location Information. This App does not collect real-time information about the location of your device.
Unfortunately, the transmission of information via the internet and mobile platforms is not completely secure. Although we
do our best to protect your personal information, we cannot guarantee the security of your personal information
transmitted through our App. Any transmission of personal information is at your own risk. We are not responsible for
circumvention of any privacy settings or security measures we provide.
10. Governing Law
All matters relating to your access to and use of the App shall be governed by the laws of the State of New Hampshire,
without regard to its conflict of laws provisions.
11. Contact Information
To ask questions or comment about these Terms of Use, contact us via e-mail at: [email protected]
12. General/Miscellaneous
These Terms constitute the entire agreement between you and Company with respect to the subject matter contained
herein and govern your use of the App, superseding any prior agreements between you and Company. Some Services
may be subject to additional posted conditions and your use of those Services is subject to those conditions, which are
incorporated into these Terms by reference. In the event of an inconsistency between these Terms and any additional
posted conditions, the provisions of the additional conditions shall control. You also may be subject to additional terms
and conditions that may apply when you use affiliate services, third-party content or third-party software. The failure of
Company to exercise or enforce any right or provision of the Terms shall not constitute a waiver of such right or provision.
If any provision of the Terms is found by a court of competent jurisdiction to be invalid, the parties nevertheless agree that
the court should endeavor to give effect to the parties’ intentions as reflected in the provision, and all other provisions of
the Terms remain in full force and effect. You agree that, regardless of any statute or law to the contrary, any claim or
cause of action arising out of or related to use of the App or the Terms must be filed within one (1) year after such claim or
cause of action arose or be forever barred. The section titles in these Terms are for convenience only. You may not
transfer any rights or obligations you may have under this Agreement without the prior written consent of Company. This
Agreement, or any right or obligation hereunder, is freely transferable by Company.
February 1, 2019
4
Page 8

!
THANK YOU FOR YOUR PURCHASE!
Thank you for purchasing the TowGo® Trailer Backup Navigation Aid.™ We are very happy to
have you as one of our customers and we hope that our product will provide you with years of
enjoyment. This guide will help you become familiar with the Steering Wheel Sensor and the
Trailer Hitch Sensor that came with your product. After installation, please refer to the
operating sections of this guide.
ABOUT YOUR TRAILER HITCH SENSOR
1 Main Housing
2 Swing Arm
3 LED Status Indicator (rear side)
4 Stretch Cord Attachment Clip
5 Flat-four Cable
6 Flat-four Cable Plug
5
Page 9

!
ABOUT YOUR STEERING WHEEL SENSOR
1 Steering Wheel Attachment Straps
2 LED Status Indicator
3 Power/Initialize Button
4 Strap Engagement Hooks (rear side)
5 USB Battery Charging Port (inner top side – USB charging cable included in kit)
6 Cosmetic Skirt
BEFORE YOU GET STARTED
Charge your Steering Wheel Sensor:
Locate the USB charging cable that came with your purchase (or one of your own). On the
inner top side of your Steer Sensor, you will see a USB charging input port. Plug the mini-USB
end of the cord into the charging port; plug the other end into a powered USB plug. (Note:
the supplied USB cord can only be used for charging.) Allow at least two (2) hours for
charging.
6
Page 10
!
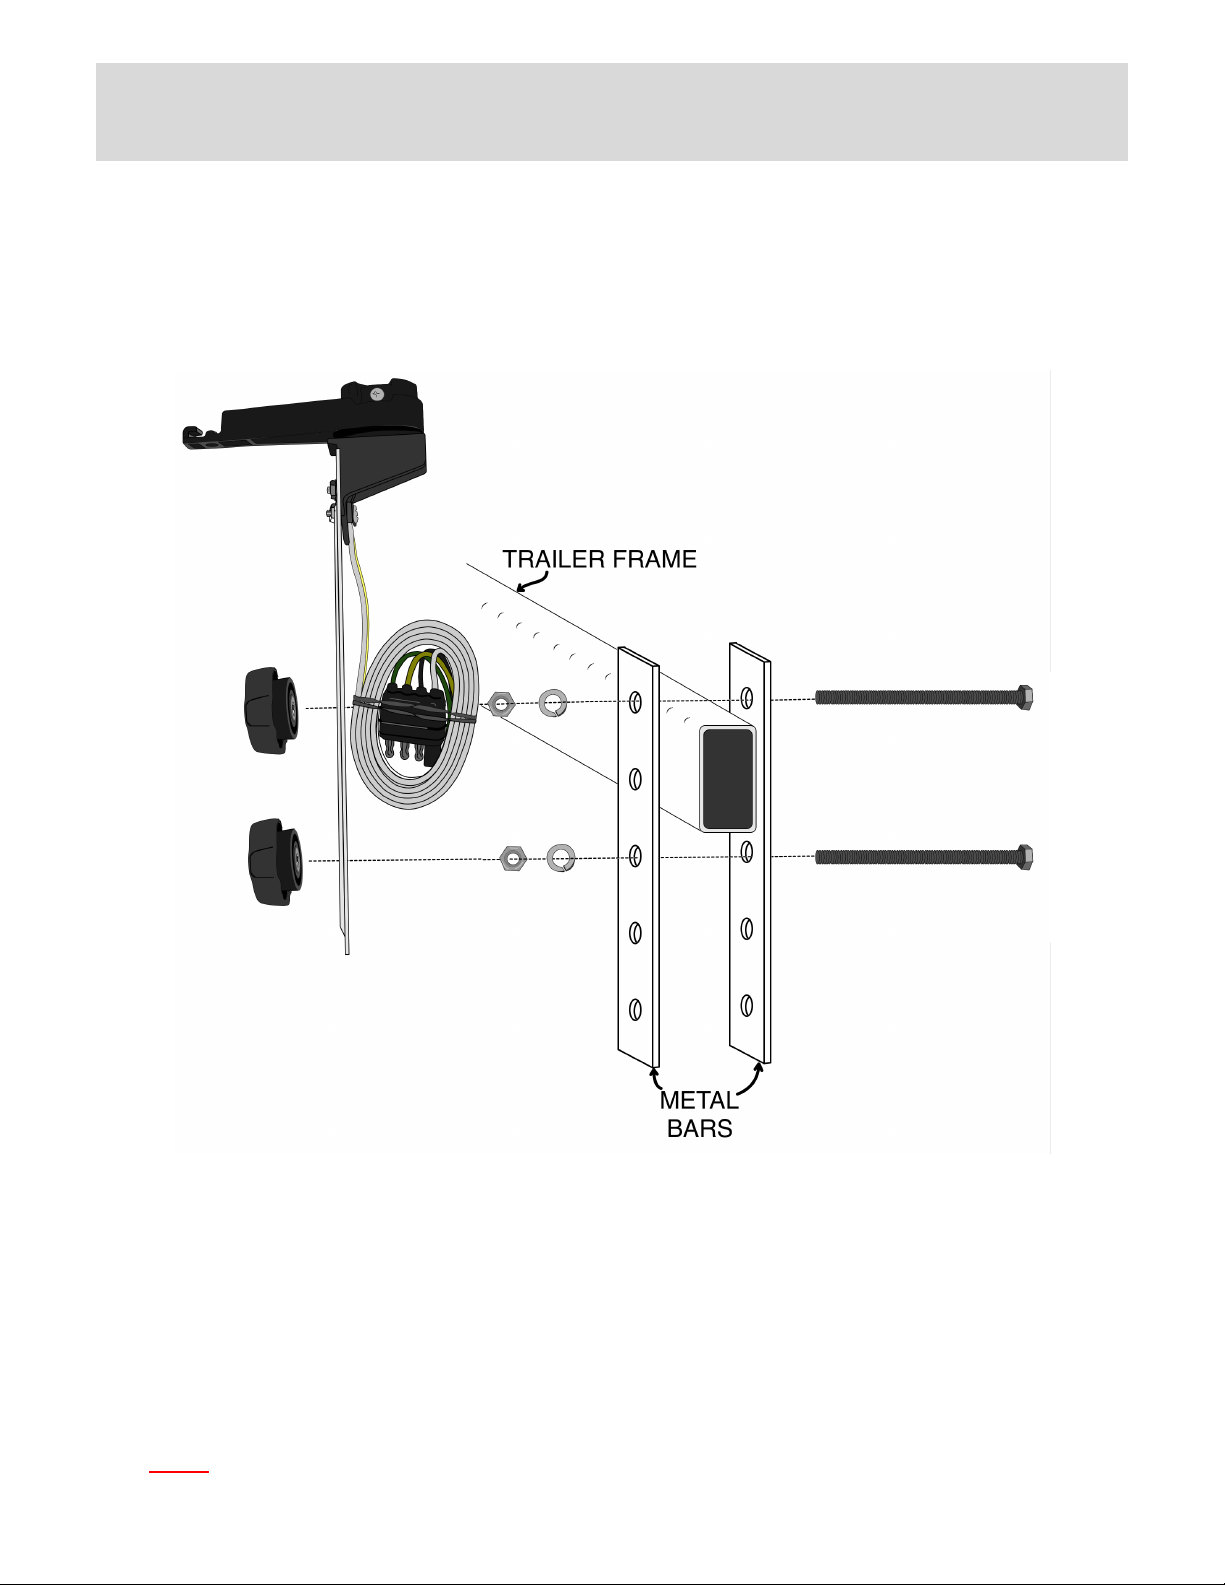
INSTALL THE TRAILER HITCH SENSOR
The$Trailer$Sensor$should$be$attached$to$the$frame$of$the$trailer$just$behind$the$hitch$ball$coupler$using$
two$bolts$(5/16”$–$18$thread).$These$two$bolts$must$be$attached$to$your$trailer$such$that$(1)$one$bolt$is$
directly$above$the$other,$(2)$the$bolts$are$both$pointing$in$the$same$direction,$and$(3)$the$bolts$have$a$
vertical$spacing$between$1”$and$4½“.$Be$sure$to$install$the$two$bolts$securely$so$that$they$cannot$come$
loose$and$fall$off$the$trailer.$Install$the$Trailer$Sensor$such$that$it$is$as$close$or$closer$to$the$hitch$ball$
than$the$TLBracket.$The$sensor$does$not$have$to$be$centered$on$the$trailer.$
$
ATTENTION4–4You4must4purchase4the4following4parts4to4install4your4Trailer4Backup4Navigation4Aid:4
•$2$Bolts$(5/16–18)$having$a$langth$suitable$for$your$trailer$frame$with$nuts$and$lock$washers$
•$2$Clamping$Knobs$(with$5/16$–$18$female$insert)$
•$Any$other$mounting$hardware$(e.g.,$metal$bars)$needed$to$secure$the$bolts$to$your$trailer.$For$
mounting$ideas,$please$visit$https://www.towgo.com/install$
$
Note:$ the$ trailer$ sensor$housing$ should$be$ above$ the$ tongue$ such$ that$ the$ tongue$ wi ll $ provide$ some$
protection$from$kicked$up$road$debris.$Position$the$trailer$sensor$assembly$close$to$the$coupler,$but$not$
so$close$that$the$coupler$latch$lever$can$collide$with$and$damage$the$sensor$arm.$
$
YOU4MUST4ADHERE4TO4THE4CRITICAL4INSTALLATION4INFORMATION4ON4THE4FOLLOWING4PAGE:!
7
Page 11
!
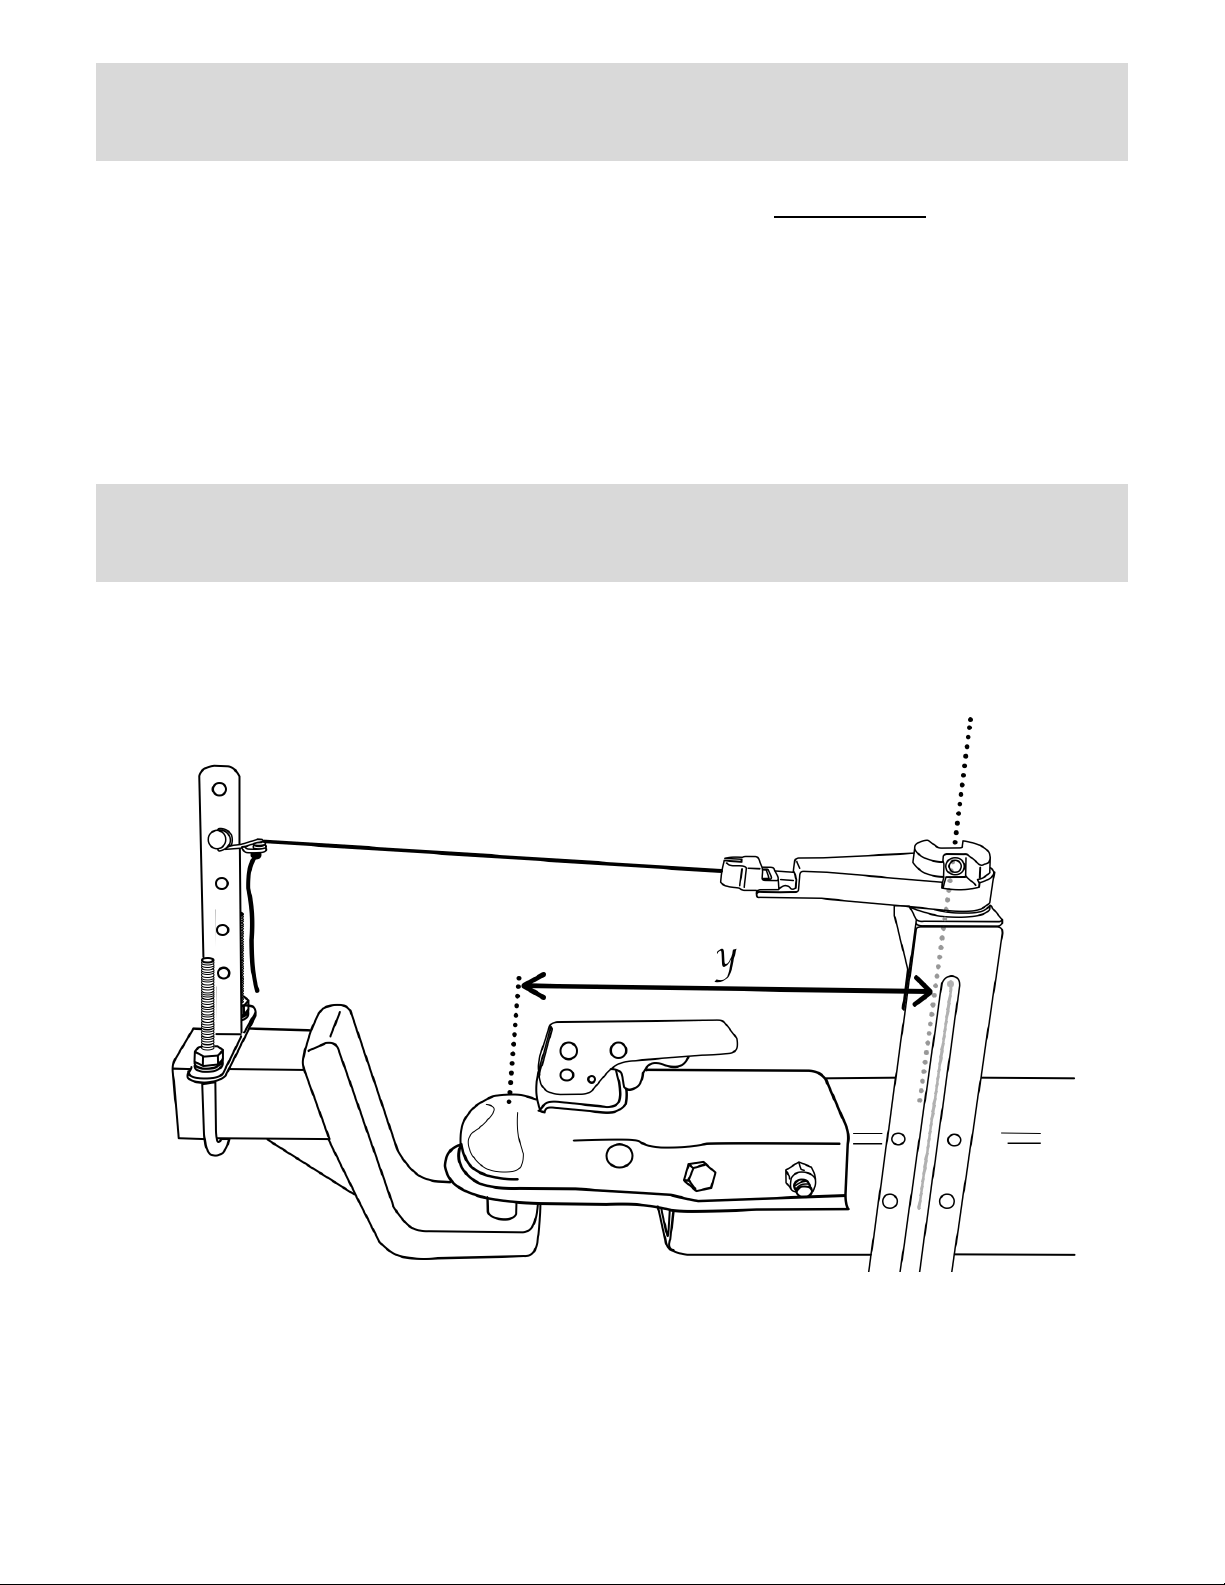
CRITICAL INFORMATION FOR PROPER INSTALLATION AND OPERATION!!!
7
When$installed,$the$bottom$of$the$circular$portion$of$the$swing$arm$must%not% touch$the$sensor$housing.$
This$is$to$ensure$that$it$can$rotate$freely$and$that$it$will$not$suffer$stresses$that$could$break$the$internal$
mechanism.$ Be$ sure$ that$ the$ mounting$ bolts$ for$ the$ trailer$ hitch$ sensor$ assembly$ are$ installed$ one$
directly$above$the$other.$Also$be$sure$that$the$installed$stretch$cord$is$level$–$it$must$not$pull$up$or$down$
on$the$swing$arm.$
$
Failure$ to$ follow$ these$ instructions$ will$ void$ the$ warranty.$ No$ returns$ will$ be$ accepted$ if$ these$
instructions$are$not$followed.$
$
$
MEASURE THE DISTANCE FROM THE SENSOR TO THE HITCH BALL
$
Once$you$ h ave$ mounted$your$Trailer$Sensor$Assembly$to$the$ trailer,$measure$the$distance$(y)$from$ the$
center$of$the$housing$to$the$centerline$of$the$hitch$ball:$
$
$
$
Measure$using$millimeters$or$inches$(if$inches,$measure$to$the$nearest$1/16$of$an$inch).$The$accuracy$of$
the$overall$system$is$affected$by$how$precisely$you$make$this$measurement.$
$
$
8
Page 12
!
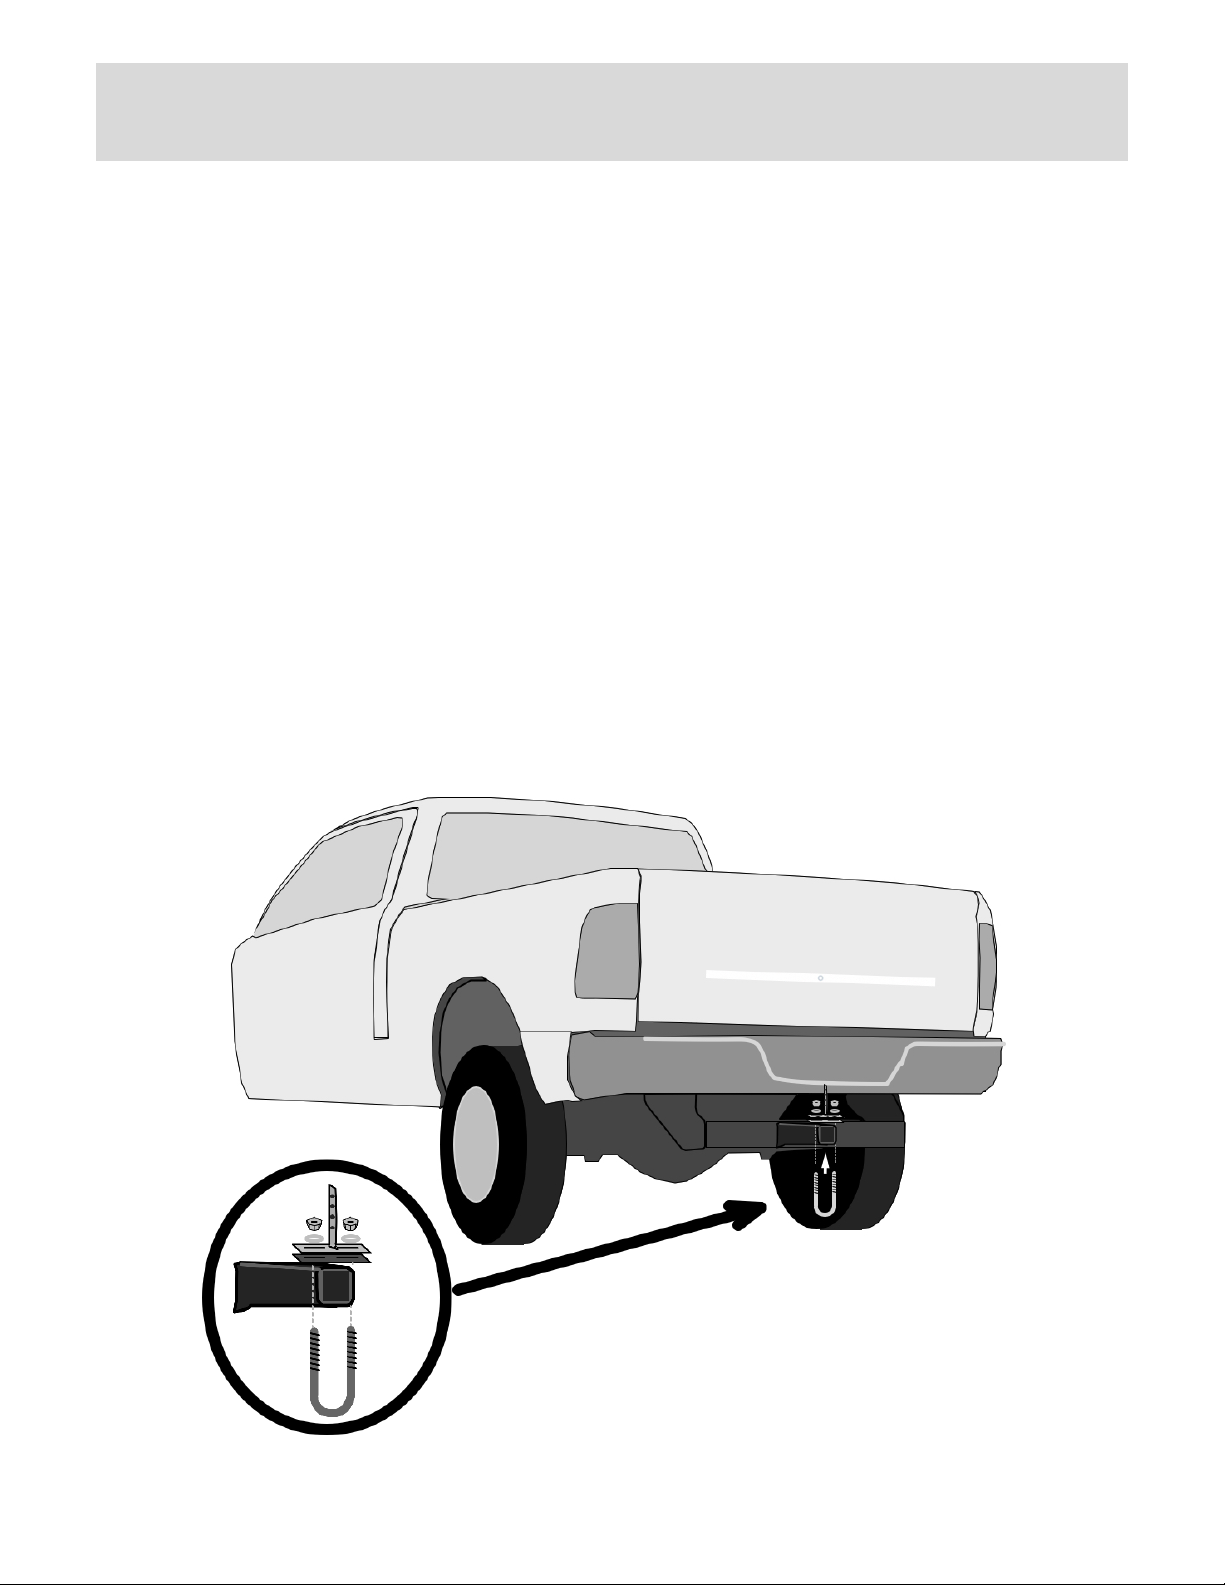
INSTALL THE HITCH RECEIVER T-BRACKET
!"#$%&'(" $)#(#&*#+$!,-+.(/#'$&0$.''.("#1$'2$'"#$"&'("$+#(#&*#+$30&45$.$6,728'9$:4$.11&'&24$'2$;23+$!2<=2$
-+.(/#'>$;23$?30'$@3+(".0#$'"#$A2882<&45$@.+'0$&4$2+1#+$'2$&40'.88$;23+$!+.&8#+$-.(/3@$B.*&5.'&24$C&1D$
$
E$6,728'$F?.G&?3?$'"+#.1$0&H#$2A$IJEKLM$
E$6,728'$N8.'#$F';@&(.88;$&4(831#1$<&'"$6,728'0M$
O$P2(/,Q.0"#+0$
O$B3'0$
$
:40'.88$'"#$7+.(/#'D$
EM R8&1#$'"#$U"bolt$3@$24'2$'"#$"&'("$+#(#&*#+$A+2?$7#82<9$
OM N8.(#$'"#$U"bolt'Plate$12<4$24'2$'"#$#410$2A$'"#$6,728'9$
SM N8.(#$'"#$!2<=2$Bracket$12<4$24'2$'"#$#410$2A$'"#$6,728'9$T#4'#+$&'$8#A','2,+&5"'9$$
UM N8.(#$.$Lock"Washer$24'2$72'"$6,728'$#4109$
IM !3+4$.$Nut$24'2$72'"$6,728'$#410$.41$'&5" '#4$&4 '2$@8 .(#9$
$
9
Page 13
!
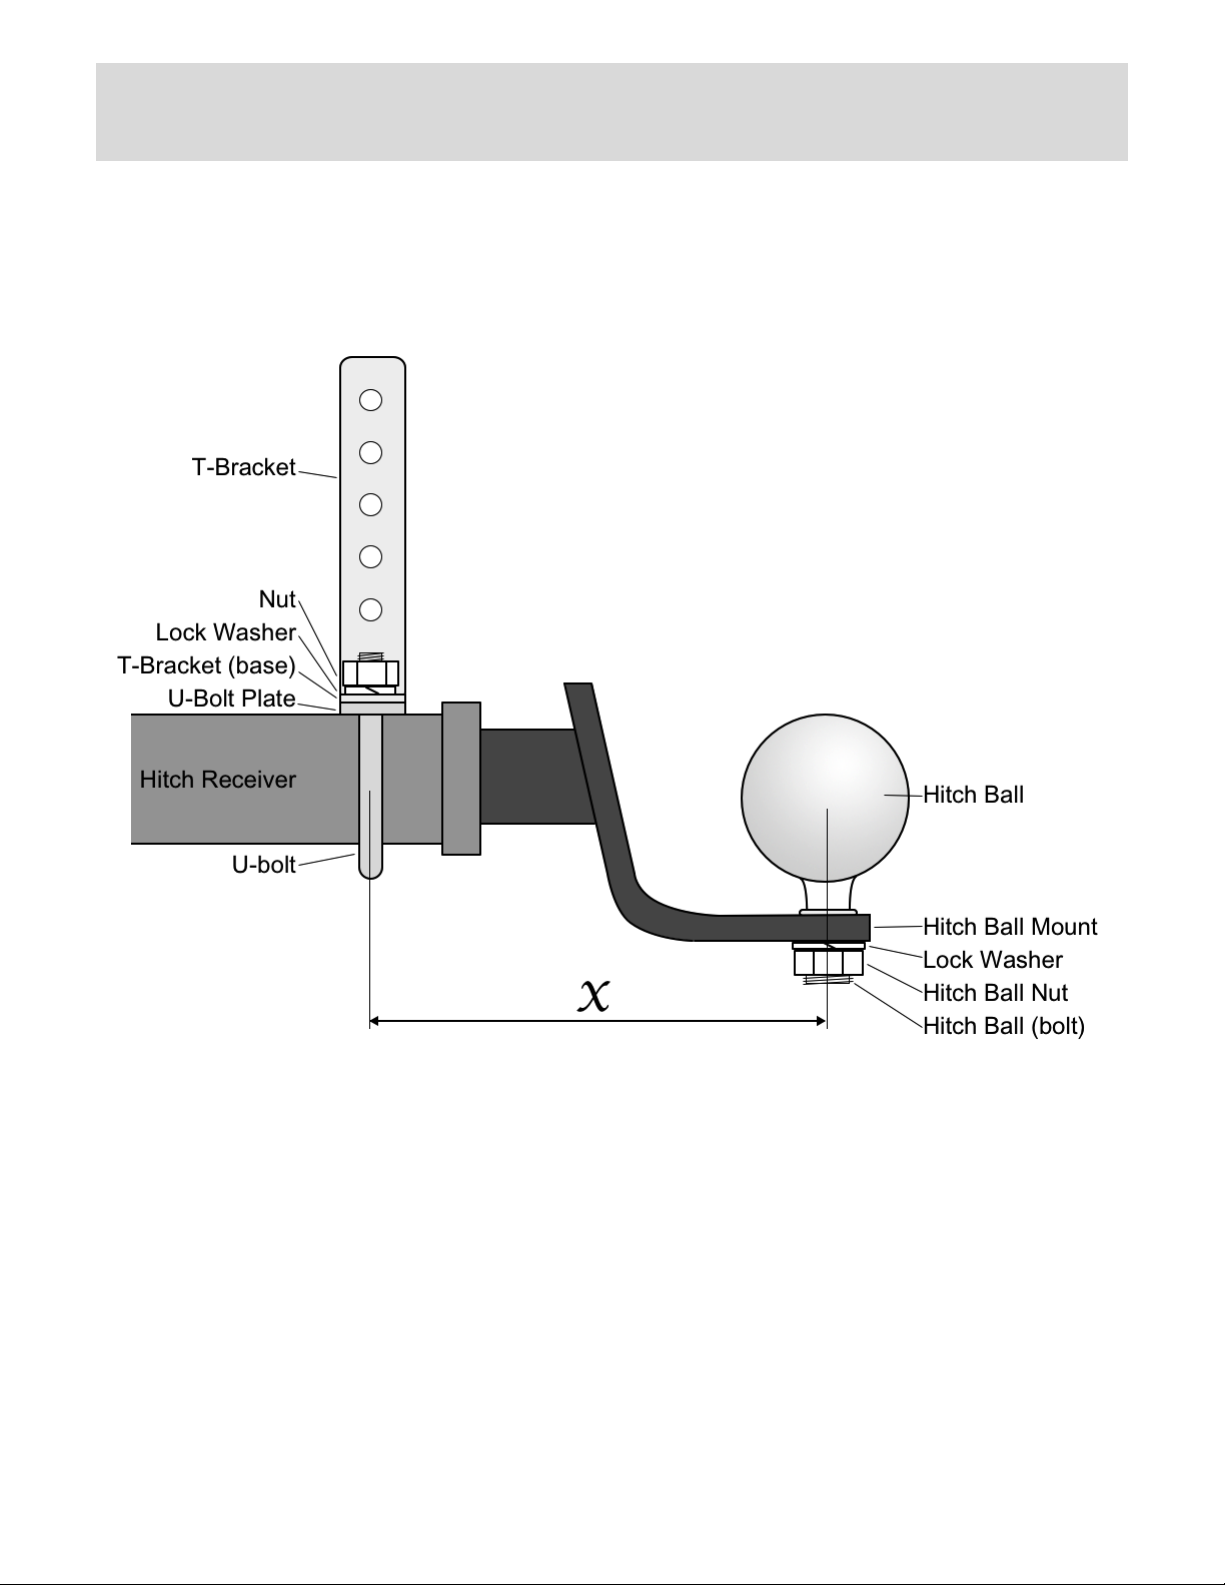
MEASURE THE DISTANCE FROM THE CORD ATTACHMENT POINT TO THE HITCH BALL
The$Hitch$Receiver$Bracket$should$already$be$attached$to$the$hitch$receiver$using$a$ULbolt.$$
$
Measure$the$di stance$(x)$from$the$centerline$of$the$ULbolt$to$ the$centerline$of$ the$hitch$ball$as$shown$in$
the$following$drawing:$
$
$
$
$
Measure$using$millimeters$or$inches$(if$inches,$measure$to$the$nearest$1/16$of$an$inch).$The$accuracy$of$
the$overall$system$is$affected$by$how$precisely$you$make$this$measurement.$
$
Note:$the$hitch$receiver$on$some$vehicles$is$located$below$the$vehicle’s$rear$bumper.$In$such$instances,$
the$bracket$ can$ be$ installed$on$the$portion$of$ the$ hitch$ball$mount$(where$it$ is$ inserted$ in to$ the$hitch$
receiver).$$
$
10
Page 14
!
MEASURE AND ASSEMBLE THE STRETCH CORD
The$Stretch$ Cord$ must$be$measured$and$ assembled$ according$to$your$ particular$ installation$to$ensure$
proper$ tension$ on$ your$cord$ at$all$ times.$Failing$ to$follow$ these$ instructions$ will$ damage$ your$ Trailer$
Hitch$Sensor,$prevent$proper$operation,$and$void$your$warranty.$$
$
$
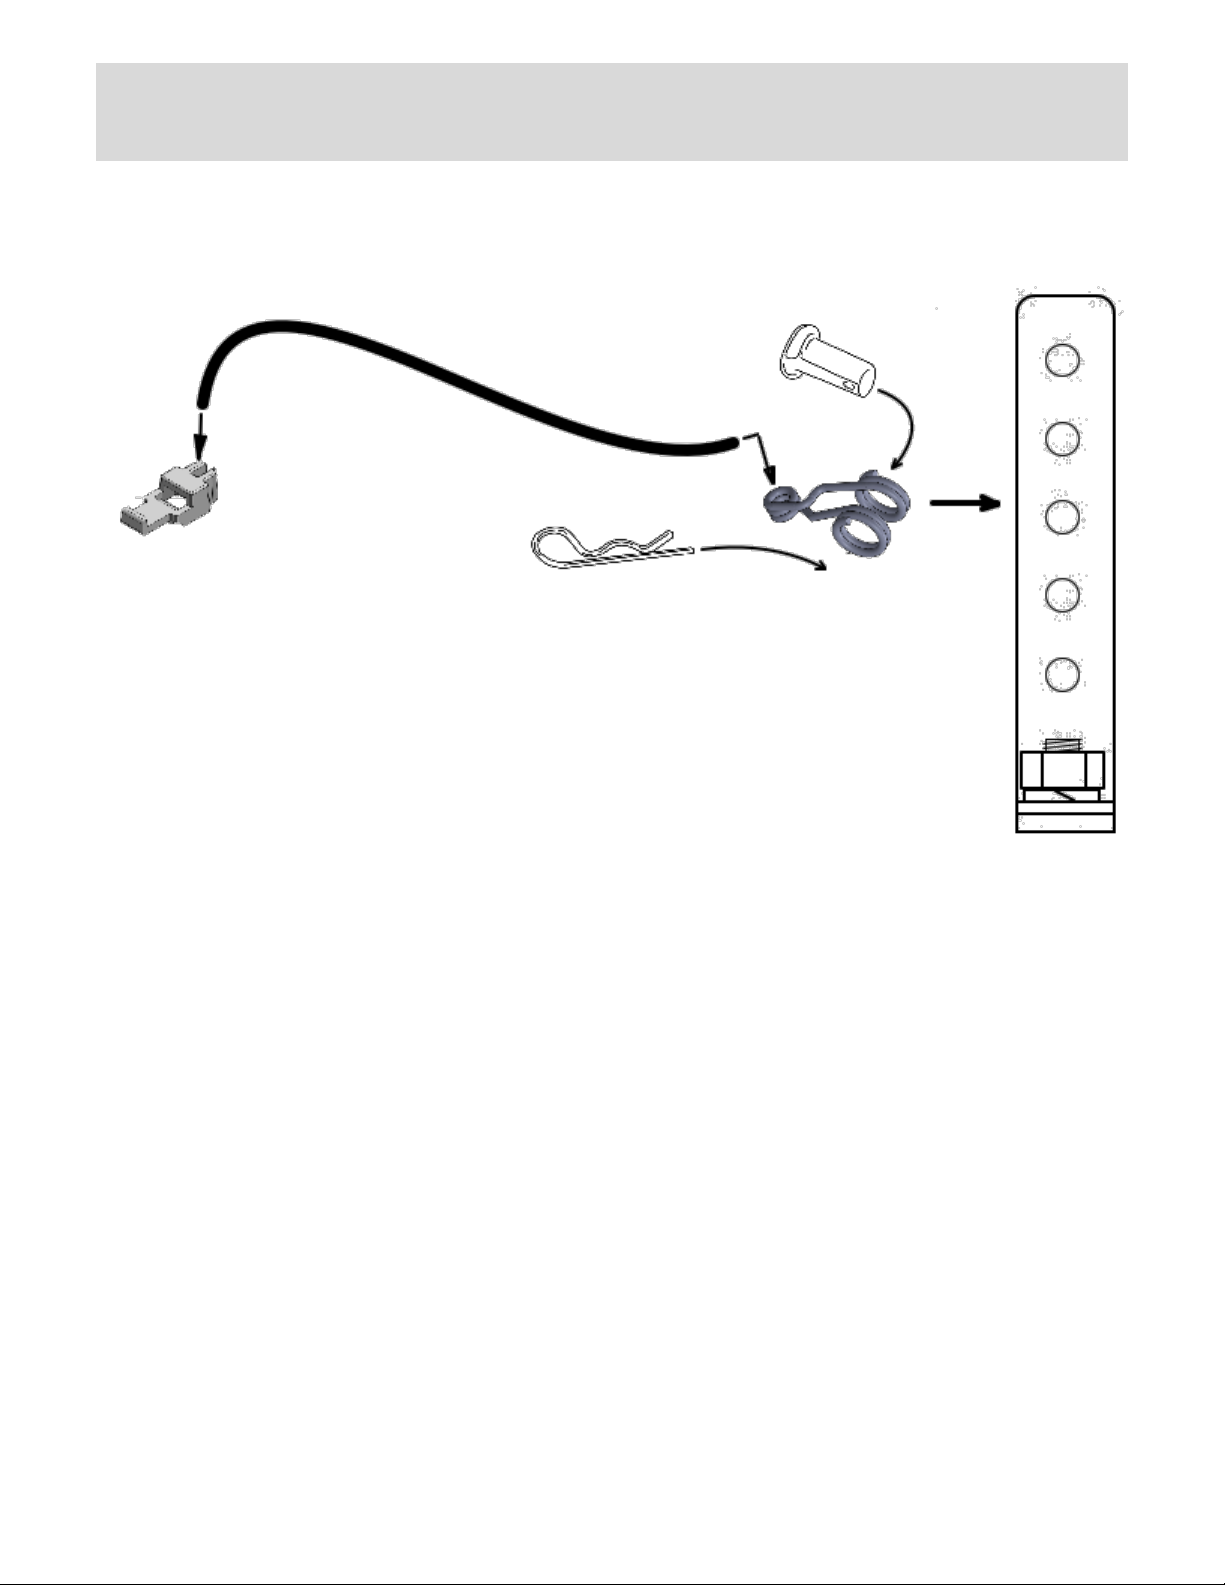
1) Insert$ the$ Stretch$ Cord$ into$ the$ hole$ in$the$slot$in$the$Stretch$Cord$Attachment$Clip$(Cord$Clip).$
Insert$it$from$above$as$shown$in$the$left$side$of$the$picture,$above.$
2) Tie$a$single$knot$near$the$end$of$the$cord$on$the$bottom$side$of$the$Cord$Clip$to$prevent$it$being$
pulled$back$through.$
3) Insert$the$free$end$of$ th e$Stretch$Cord$through$the$small$coil$of$the$Cord$Pin,$BUT$DO$NOT$TIE$a$
knot.$Slide$the$Cord$Pin$down$the$cord$towards$the$Cord$Clip.!
4) The$length$of$the$Stretch$Cord$is$measured$from$knot$to$ kno t.$After$you$input$the$measurements$
taken$ above$ for$x$and$ y,$calculate$the$ length$ for$the$ cord$ by$adding$ x$ and$y$ and$ together$and$
dividing$that$result$by$two.$With$the$cord$straight$but$without$tension$in$it,$tie$the$second$knot$at$
this$calculated$distance$from$the$first$knot.$!
5) Slide$the$Cord$Pin$back$down$the$cord$until$i t$stop s$at$th e$second$knot.!
6) Clip$the$Cord$Pin$onto$the$Hitch$ Receiver$Bracket$and$secure$using$the$Anchor$clevis$pin$and$the$
Anchor$ Clip$ cotter$ pin,$ as$ follows:$ Choose$ a$ hole$ on$ the$ Hitch$ Receiver$ Bracket$ that$ puts$ the$
stretch$cord$in$its$most$level$position.$Position$the$two$large$loops$of$the$Cord$Pin$on$either$side$
of$the$hole$in$the$Bracket$and$insert$the$Anchor$clevis$pin$through$the$loops$and$hole.$Secure$the$
Anchor$with$the$Anchor$Clip$cotter$pin.$(The$Anchor$Cli p$fits$tightly$into$the$Anchor$–$if$necessary,$
pinch$the$loops$of$the$Cord$Pin$together$against$the$Bracket,$insert$the$tip$of$the$Anchor$Clip$into$
one$end$of$the$hole$in$the$Anchor,$use$the$Anchor$Clip$to$rotate$the$Anchor$by$180$degrees,$and$
then$push$the$Anchor$Clip$the$rest$of$the$way$through$the$hole$in$the$Anchor.)$$
7) Hook$the$Cord$Clip$into$the$tip$of$the$Swing$Arm$(it$inserts$from$above).$
11
Page 15

!
CONNECTING THE TRAILER HITCH SENSOR POWER CABLE
The$ trailer$ sensor$ gets$ its$ power$ through$ a$ standard$ flat3four$ trailer$ connector.$ If$ your$ trailer$ uses$ a$
different$type$of$connector$and$your$vehicle$has$both$a$socket$for$your$trailer’s$connector$and$a$flat3four$
socket,$plug$in$both$your$vehicle$and$your$trailer$and$you$should$be$good$to$go.$If$not,$read$on…$
$
If$your$trailer$uses$a$flat3four$connector$and$your$vehicle$has$a$flat3four$socket,$you$will$need$to $purchase$
a$flat3four$‘Y’$adaptor.$This$is$an$adaptor$with$one$trailer$connector$and$two$vehicle$connectors.$Plug$the$
one$ trailer$ connector$ into$ your$ vehicle$ and$ then$ plug$ your$ trailer$ into$ one$ of$ the$ adaptor’s$ vehicle$
connectors$and$your$TowGo$sensor$into$the$other.$You$should$now$be$good$to$go.$If$not,$keep$reading…$
$
If$neither$ of$ the$above$two$solutions$ apply$ to$your$setup,$ you$ will$ need$to$add$ a$ flat3four$vehicle$end$
socket.$This$ can$ be$done$ either$ by$purchasing$an$ adaptor$ that$fits$your$ vehicle$ and$that$ provides$ two$
different$types$of$sockets$ (one$ to$ fit$ your$ trailer’s$connector$ an d$ a$flat3four$ connector)$or$ by$replacing$
the$connector$on$your$vehicle$ with$ a$ connector$ that$ inclu des$ a$second$ (f lat3four)$ socket.$Alternatively,$
you$can$splice$on$a$flat3four$connector$to$the$wiring$for$ your$ existing$ connector.$ If$ you$ do$ not$ want$to$
modify$your$vehicles$wiring$by$adding$a$flat3four$socket$(perhaps,$because$it$is$a$rented$vehicle),$you$can$
splice$ a$ flat3four$ vehicle3end$ connector$ onto$ your$trailer.$ Check$with$ your$auto$ parts$ dealer$ or$ trailer$
parts$dealer$for$these$and$similar$solutions.$$Also$check$for$other$options$online$at:$
https://www.towgo.com/wiring0
$
POWERING THE TRAILER HITCH SENSOR
$
Your$TowGo$sensor$gets$its$power$when$power$is$supplied$ to$your$trailer.$Turn$on$power$to$your$trailer$
by$turning$on$your$headlights.$This$will$provide$power$to$the$running$lights$on$your$trail er$ and$ to$ your$
sensor.$Your$trailer$sensor$has$a$small$LED$light$on$its$side$that$will$light$up$or$blink$when$the$sensor$has$
power.$$If$the$LED$is$not$lit,$your$sensor$does$not$have$power$(see$page$26$for$troubleshooting$tips).$
$
INSTALLING THE STEERING WHEEL SENSOR
$
Steer$your$vehicle$straight$and$ then$attach$ the$
Steering$Wheel$Sensor$to$the$ inside$ top$ of$ your$
steering$ wheel.$ Hold$ the$ sensor$ against$ the$
inside$curve$ of$ the$steering$wheel$with$ the$ LED$
Status$ Indicator$ facing$ you.$ Wrap$ the$ two$
Attachment$Straps$around$to$the$backside$of$the$
steering$ wheel$ and$ hook$ them$ onto$ the$ Strap$
Engagement$Hooks.$Once$attached,$it$should$not$
be$easy$to$move.$Power3up$the$sensor$by$briefly$
pressing$the$Power/Initialize$Button.$
0
0
0
12
Page 16
!
GETTING STARTED WITH THE TOWGO APP
DOWNLOADING YOUR APP
You must be connected to the internet in order to download the APP.
Do this step BEFORE you go out somewhere remote.
Download and install the TowGo App onto your phone or tablet by following instructions at:
https://www.towgo.com/downloads
Launch the App. When it finishes starting up, read through the Terms of Use, check the box
at the bottom of the Terms of Use and confirm your acceptance. You will now see the
navigation screen with the virtual trailer.
Periodically, start your App while connected to the internet in order for your
device to detect if there is new software available.
GETTING AROUND THE APP
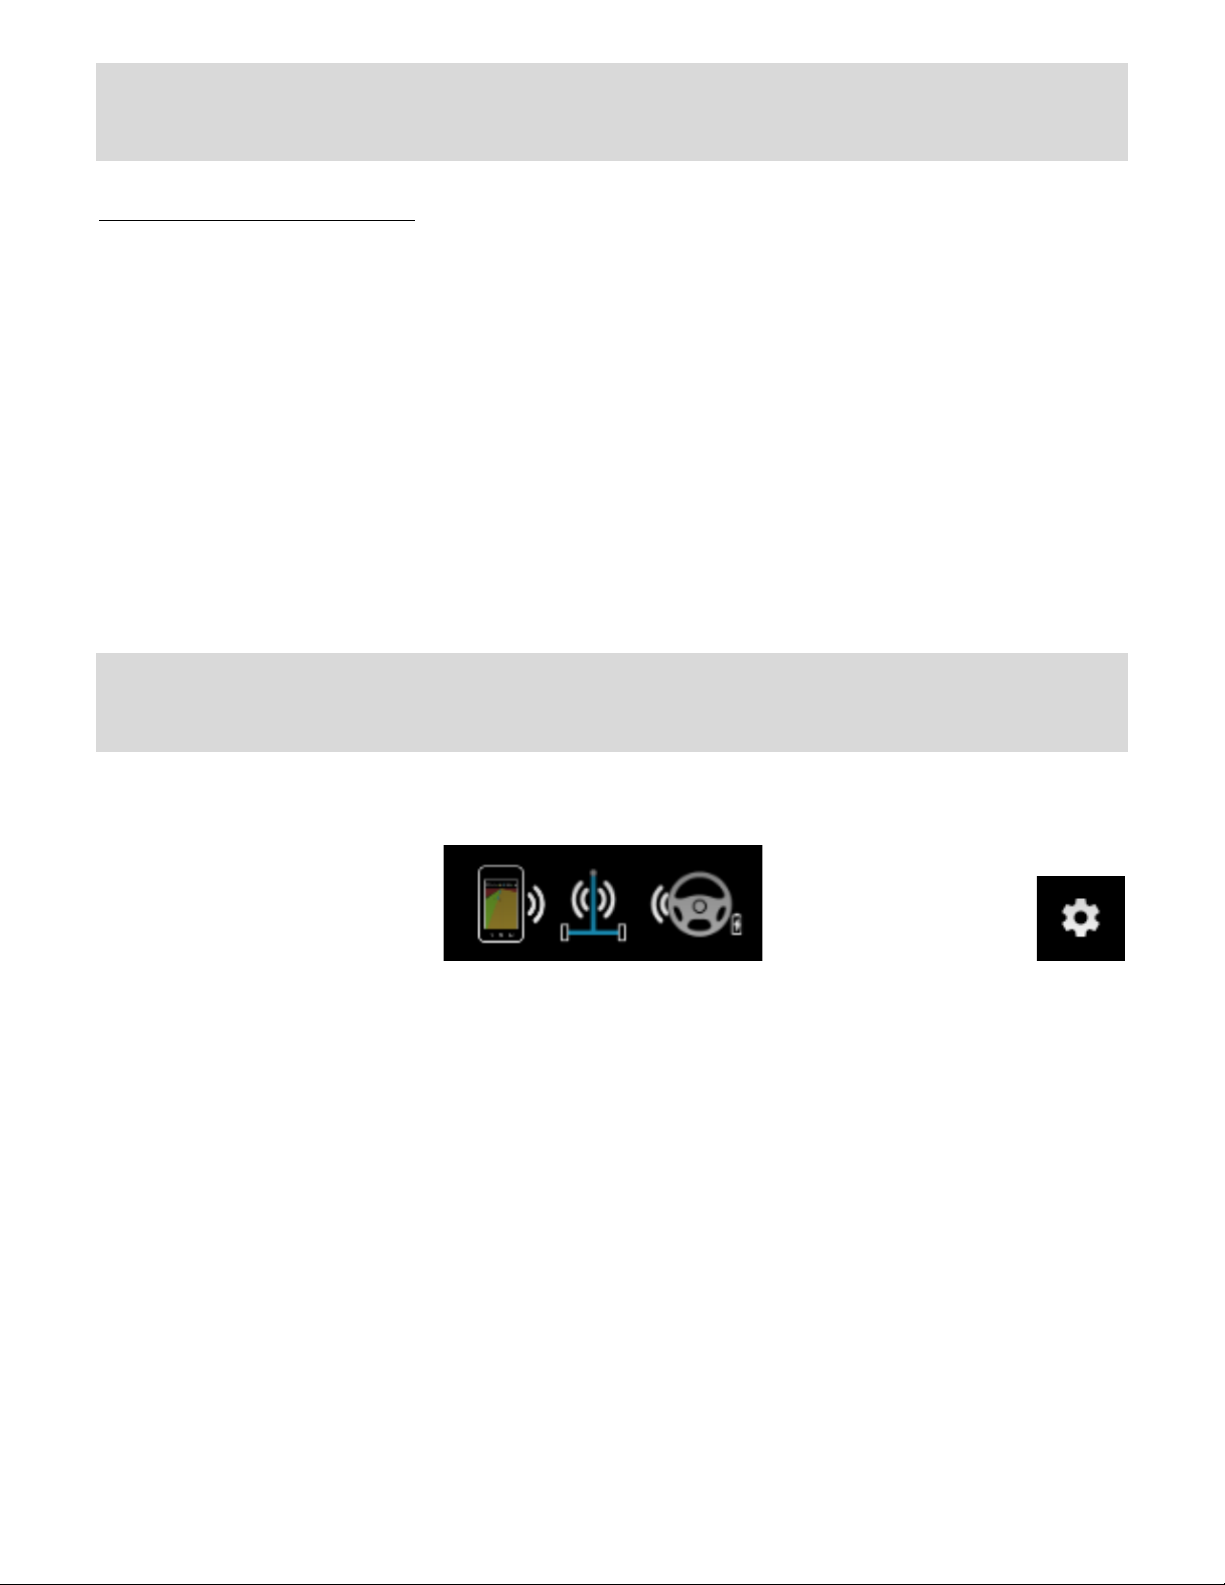
Along the top center of the screen, you will see three device icons.
!
! ! !
• Touching the display device icon on the left will bring you to the main display; bars on its
right show the signal strength going to the hitch sensor.
• Touching the trailer sensor icon in the middle will bring you to the trailer sensor connection
screen (if disconnected) and to the trailer sensor setup screen (if connected); bars on its left
show the signal strength going to the display device and bars on its right show the signal
strength going to the steering sensor. Touching the icon again returns you to the main
display.
• Touching the steering sensor icon on the right will bring you to the steering sensor
connection screen (if disconnected) and to the steering sensor setup screen (if connected);
bars on its left show the signal strength going to the trailer sensor. To its bottom right is a
battery charge indicator showing charge level (or a lightening bolt if charging). Touching the
icon again returns you to the main display.
• These and other functions are also available by touching the gear icon on the far right.
13
Page 17
!
CONNECTING AND CONFIGURING YOUR SENSORS
When connecting to your sensors or entering configuration data, be sure the sensors are
powered up. Each sensor has a light on it to let you know it has power. Please refer to the
troubleshooting section in the back of this guide if you think your sensor is without power.
The trailer hitch sensor must be powered up and connected to configure the steering wheel
sensor. Please follow the following sequence to connect and configure your sensors.
CONNECT TO YOUR TRAILER HITCH SENSOR
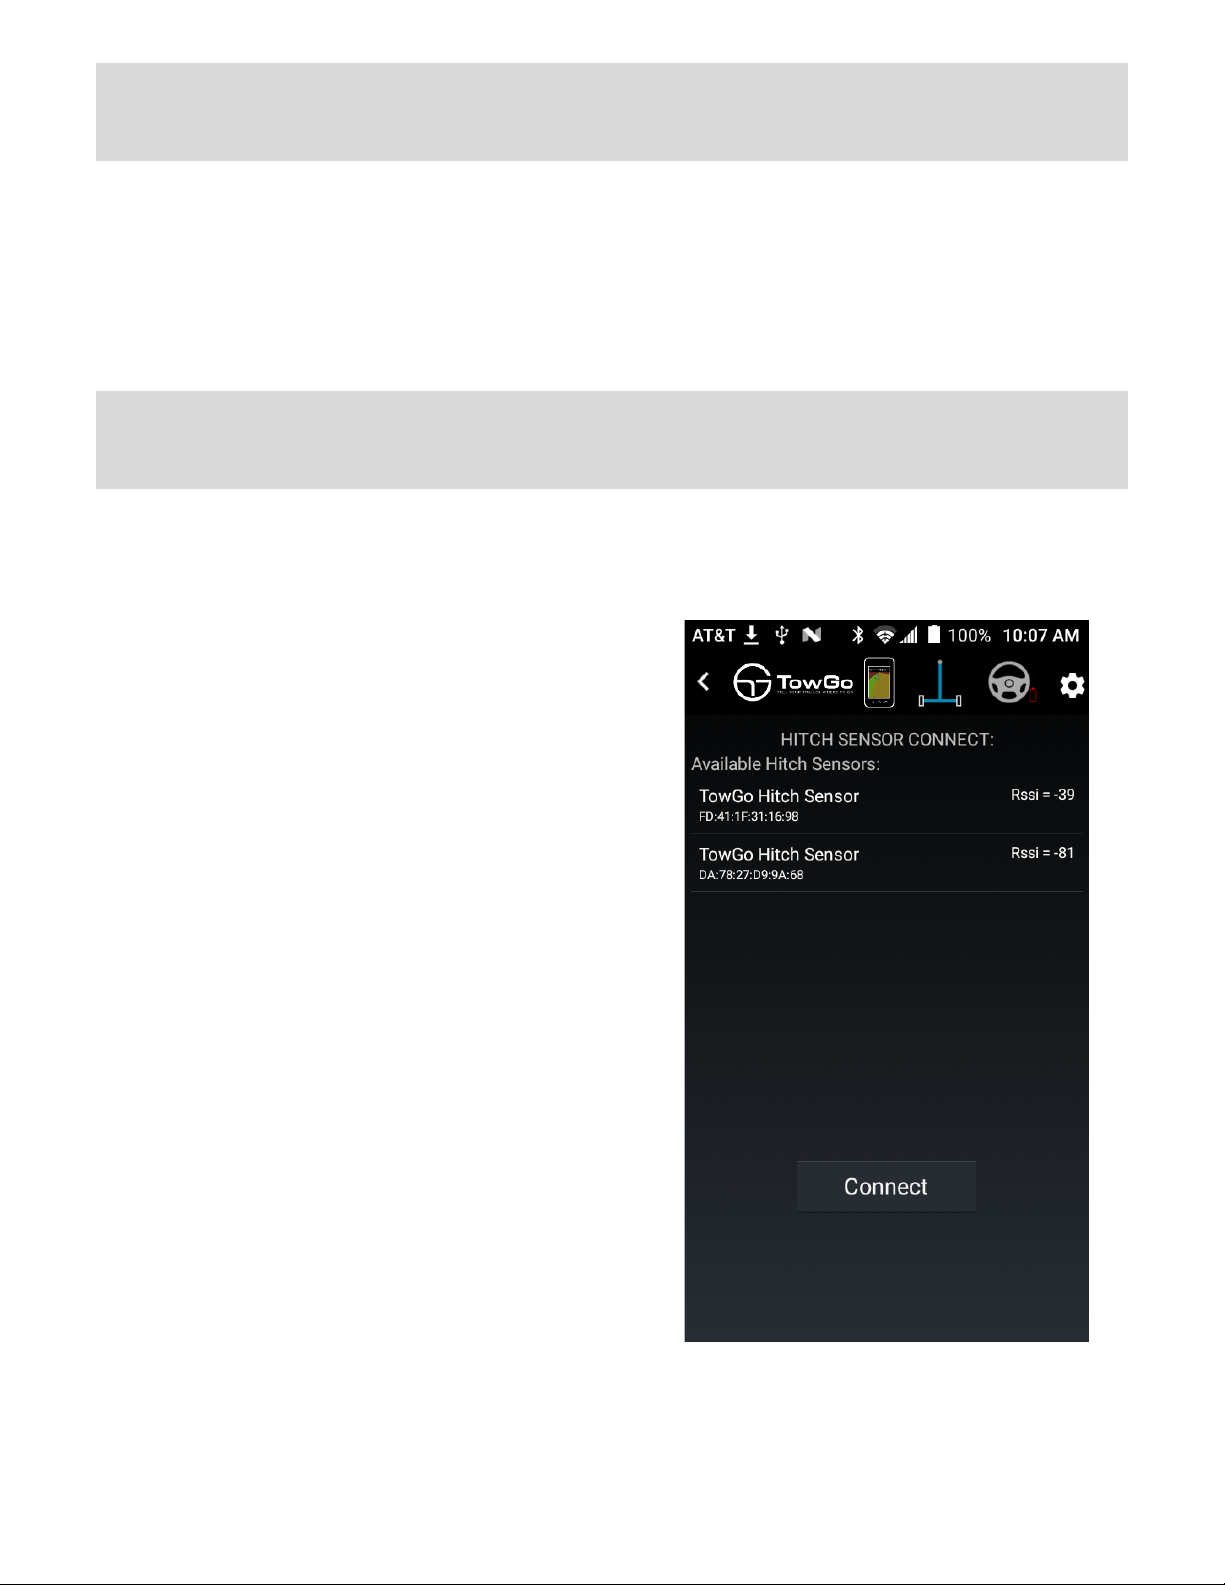
Power up your trailer hitch sensor. On your App, tap the gear icon (top right) or the trailer
icon (top center). The App will automatically attempt to reconnect to the last connected
trailer, if available.
If a trailer is not connected, you will see a
list of available trailers. Choose your trailer
and touch the 'Connect' button. If the list is
long, you may need to scroll to find your
trailer.
Hint: to help identify your trailer, press on
the brake or operate the turn signal to
highlight it in the list.
If you do not see your trailer in the list,
verify that your trailer’s hitch sensor has
power by checking that its light is on. If it’s
not, be sure your headlights are on (the
sensor gets its power along with the
trailer's lights). Next, check that the hitch
sensor wire is plugged in.
Once connected, signal strength bars will
appear beside the trailer icon.
Next, before you configure your trailer
hitch sensor, connect to your Steering
Wheel Sensor…
14
Page 18
!
CONNECT TO YOUR STEERING WHEEL SENSOR
If your steer sensor is not listed, check that
it is on by briefly pressing its power button
located on the bottom. If the light on the
front of the sensor is not lit, your steering
wheel sensor may need to be charged.
Remove the sensor from the steering wheel
and locate the charging port on top. Use a
mini USB cable to charge the steer sensor.
(Note: the one supplied with your TowGo
system can only be used for charging.)
Once connected, signal strength bars will
appear beside the steering wheel icon.
You can now configure your steering wheel
sensor.
To power off your steer sensor, press and
hold in its button until the light goes off.
Briefly press the button on the steering
wheel sensor to power on. The light will be
red. Your steer sensor will reconnect to your
hitch sensor if both are powered up. The
light will turn green when they reconnect.
In the App, tap the gear icon (top right) or
the steering wheel icon (top center).
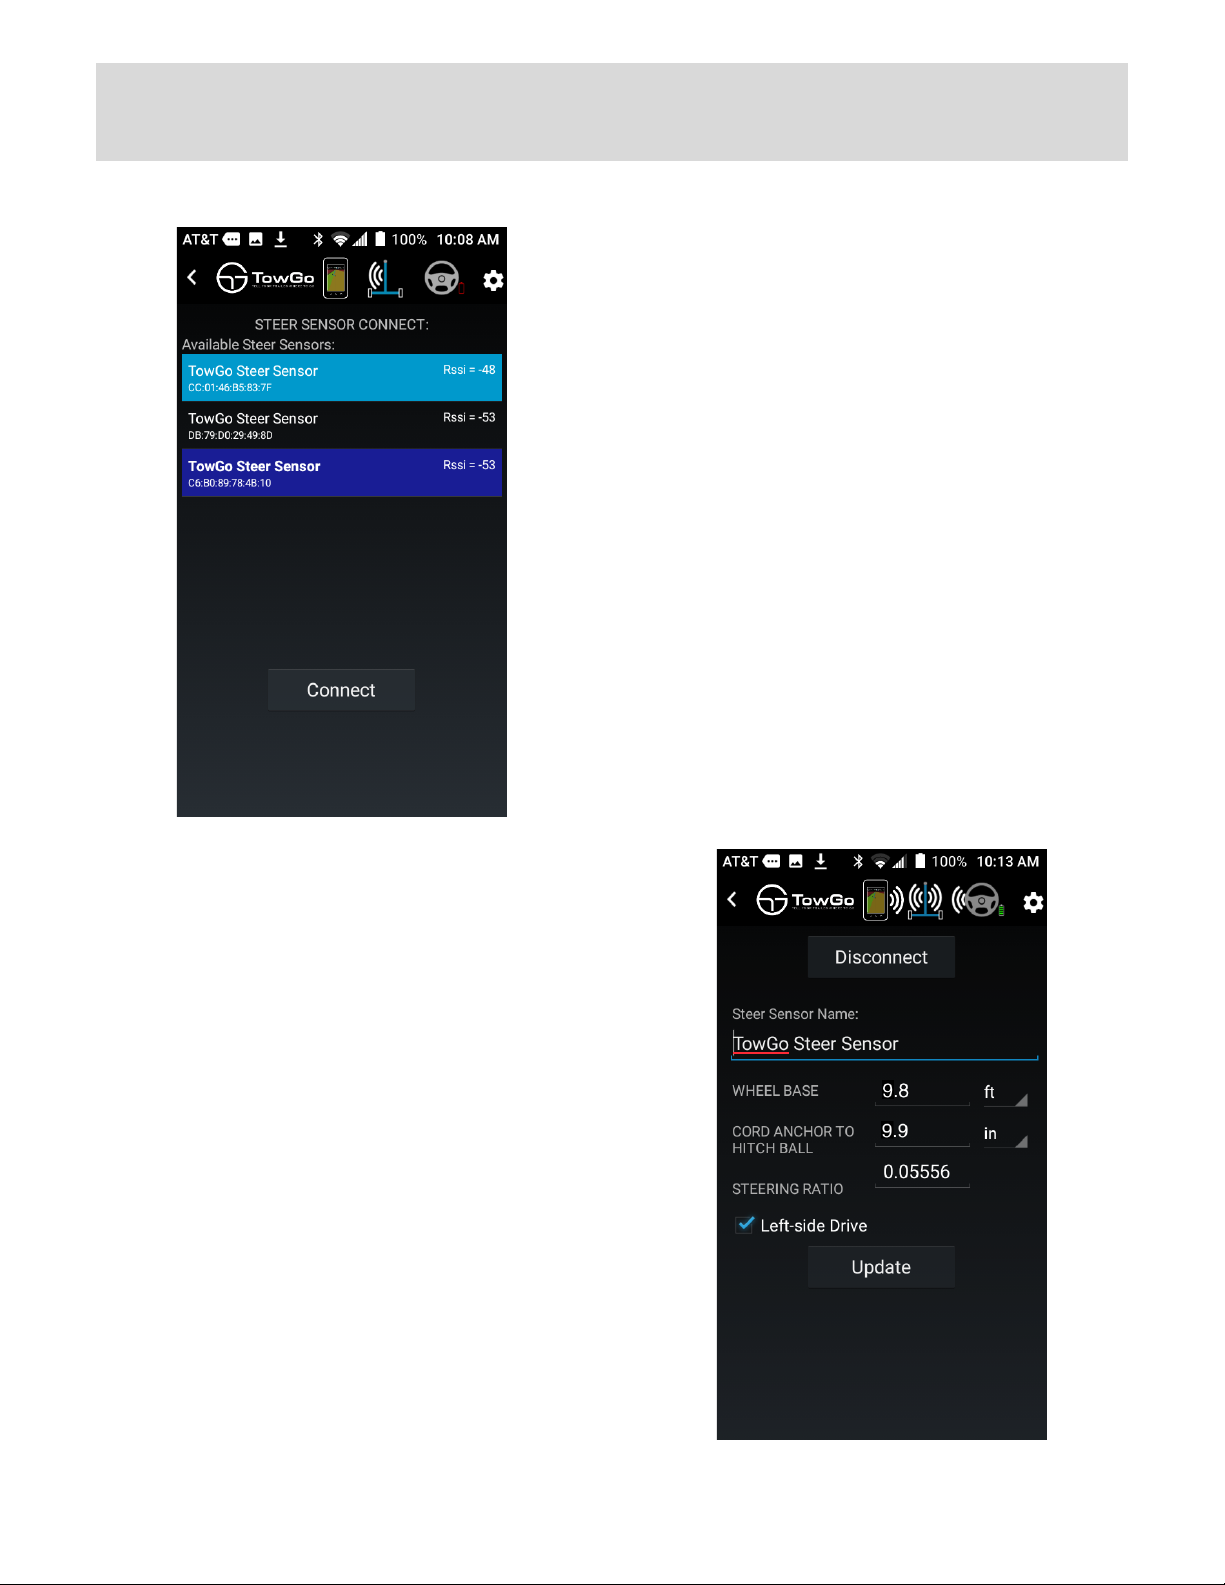
If a steering wheel sensor is not already
connected, you will see a list of available
steer sensors. Choose your steer sensor and
touch the 'Connect' button.
If the list is long, you may need to scroll to
find yours.
Hint: To help identify your steer sensor,
briefly press its power button to highlight it
in the list.
15
Page 19

!
CONFIGURE YOUR STEERING WHEEL SENSOR
Three values need to be entered on your App's 'Steering Wheel Sensor Configuration' screen
to set up your Steer Sensor for operation.!
!
It is very important to be as accurate as possible with these particular measurements for the
best performance of your TowGo system. You can use feet, inches, meters, or centimeters.
The first value is the wheel base of your towing vehicle. The wheel base can be found in the
vehicle's owner’s manual or the manufacturer’s web site. If you cannot find the wheel base
from either of these (or other) sources, you can measure the wheel base with a measuring
tape; measure from the center of your front tire to the center of your back tire.
The second length is between the stretch cord mounting bracket and the hitch ball. Measure
from the center of the hitch ball to the center of the bracket. Make sure this measurement is
parallel to the ground.
The third value is the steering ratio of your vehicle. This is the ratio of how much the front
tires turn when you turn your steering wheel. A typical value is around 20:1 (or 0.05). The
steering ratio for your vehicle can be found in its owner’s manual or on the manufacturer’s
web site. If you cannot find the steering ratio from either of these (or other) sources, it is
possible to measure the steering ratio with a protractor. Drive straight forward, put the
vehicle in park, and then make sure your tire is parallel to the line of travel. Next, rotate the
steering wheel a quarter turn (90°) from where it was, drive a short distance more, put the
vehicle in park, and measure the angle of the front tire to the vehicle’s line of straight travel
(i.e., measured to where it was when driving straight). Divide this measured angle by 90 – this
is your steering ratio.
On your App, access the 'Steering Wheel Sensor Configuration' screen.
Enter the values for WHEEL BASE, CORD ANCHOR TO HITCH BALL and STEERING RATIO.
Be sure to select the units of measure that you used to measure in the pull down to the right
of the length value. ***Steering ratio has no units of measure.
If you move the steering wheel sensor to different tow vehicle, you must re-measure and
reenter all of these values.
16
Page 20
!
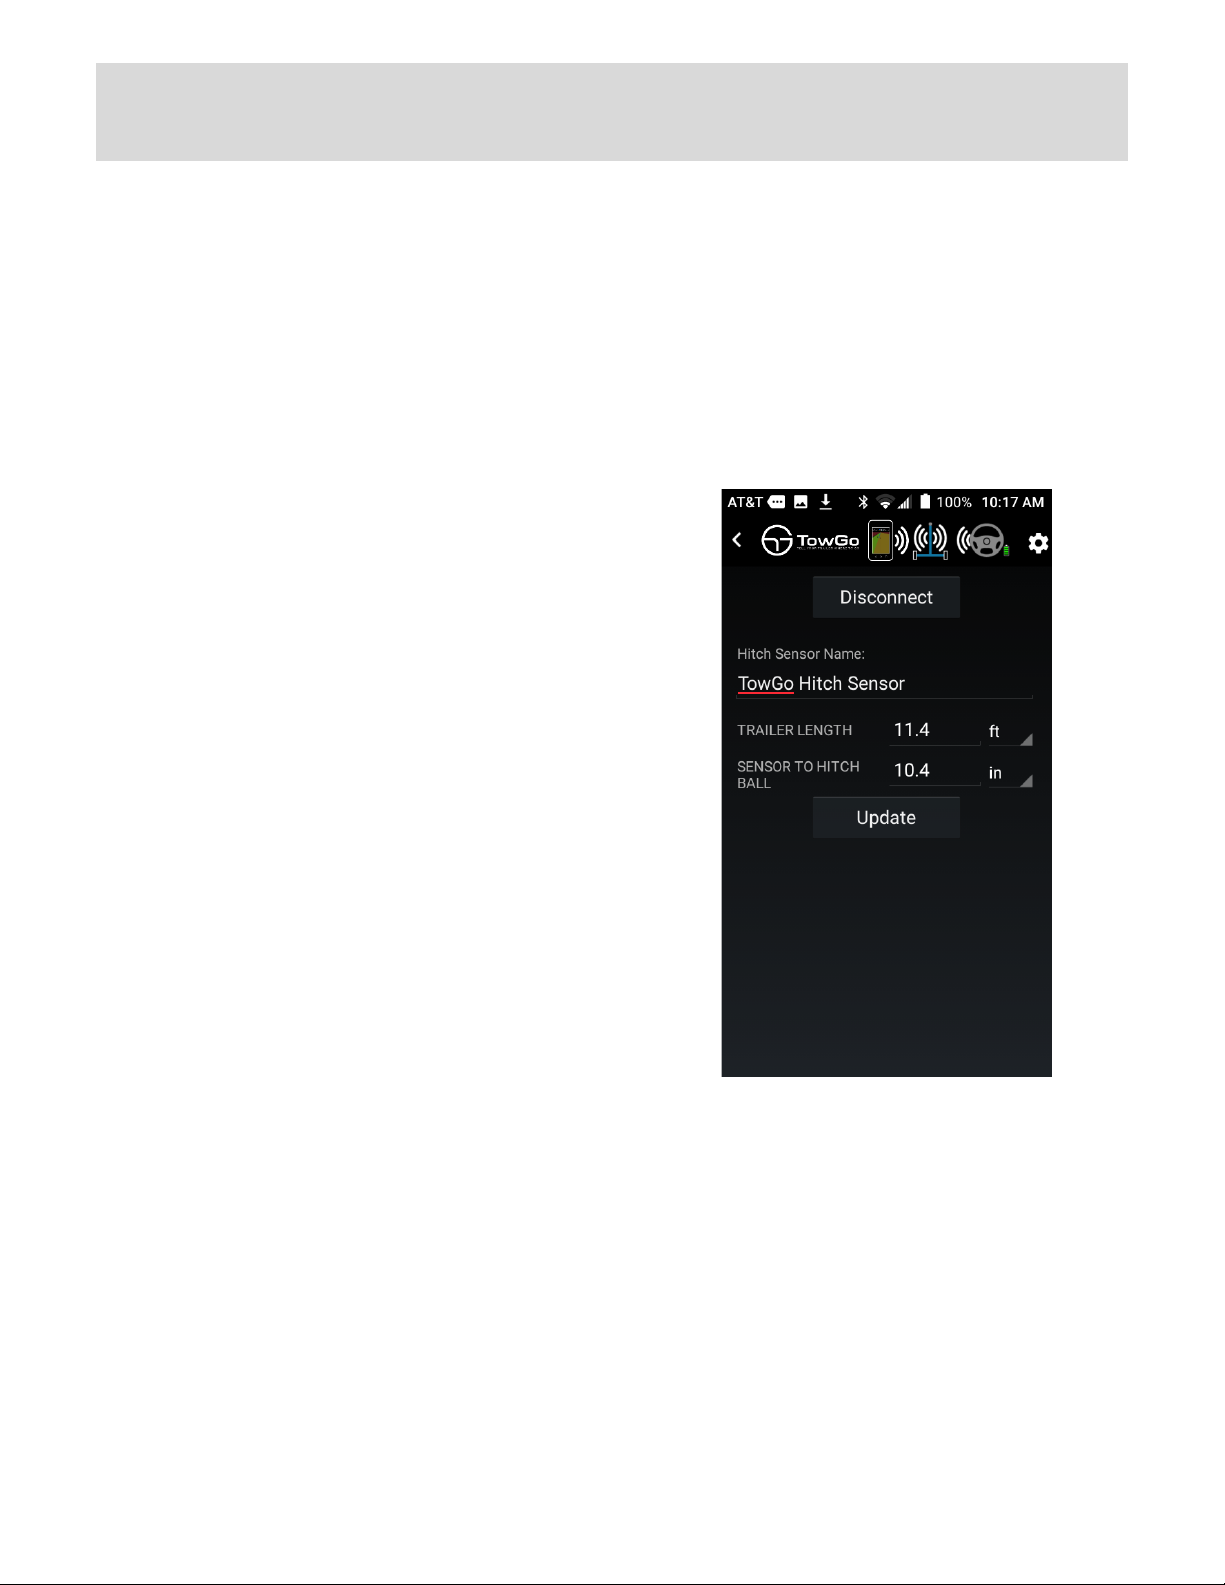
CONFIGURE YOUR TRAILER HITCH SENSOR
Two lengths need to be measured and
entered into your App's 'Hitch Sensor
Configuration' screen before your TowGo
System can be used. !
!
It is very important to be as accurate as
possible with these particular
measurements for the best performance of
your TowGo system. You can use feet,
inches, meters, or centimeters.
The first measurement is the length of your
trailer from the center of your hitch ball
straight back to the center of your axle.
For two axles, measure to a point that is
halfway between the two axles.
For three axles, measure to the center of
the middle axle.
The second length is between your hitch
sensor and your hitch ball. The trailer
should be coupled to your tow vehicle
when doing this. Measure from the center
of the hitch ball to a point directly below
the center of rotation of the hitch sensor
Make sure this measurement is taken
parallel to the ground.
See the video titled “How to Measure
the Stretch Cord:” showing how to take
this measurement at:
https://www.towgo.com/videos/
On your App, access the 'Hitch Sensor
Configuration Screen'.
Enter the lengths for TRAILER LENGTH and
SENSOR TO HITCH BALL.
Be sure to select the units of measure that
you used to measure in the pull down to
the right of the length value.
Please note: If you move the location of the
sensor or if you move the sensor to another
trailer, you must re-measure and reenter
both of these distances…
17
Page 21

!
OPERATION
BACKING UP WITH THE TowGo APP
18
Page 22

!
INITIALIZATION
Always start out by initializing the system.
To initialize the system, make sure your TowGo App is connected to both sensors and (1)
drive forward in a straight line, (2) stop when your truck is steered straight ahead and your
truck and trailer are in a straight line. Then without changing the position of the steering
wheel, (3) press and release the button on your Steering Wheel Sensor (this will initialize both
sensors).
Initialization allows the Steer Sensor to learn the position of the steering wheel that
corresponds to steering straight. The Hitch Sensor also learns the trailer position that
corresponds to the trailer being aligned with your truck. System initialization lets your Steer
Sensor compensate if it is not attached exactly to the top of your steering wheel. Likewise,
you can mount your Hitch Sensor off center on the trailer tongue and the system will be able
to compensate and correctly compute the angle at the hitch.
You must reinitialize the system if the Steer Sensor gets shifted or otherwise moved from its
position on the steering wheel during a backing maneuver.
With the system initialized, you can start backing your trailer with the TowGo App. The
TowGo system is a static one which means it works even when your truck is completely
stopped. If you are ever unsure of how much your vehicle or trailer are turning, you can just
stop backing, review your App and adjust until you are happy with where you want to go.
19
Page 23
!
DISPLAY GUIDANCE FEATURES
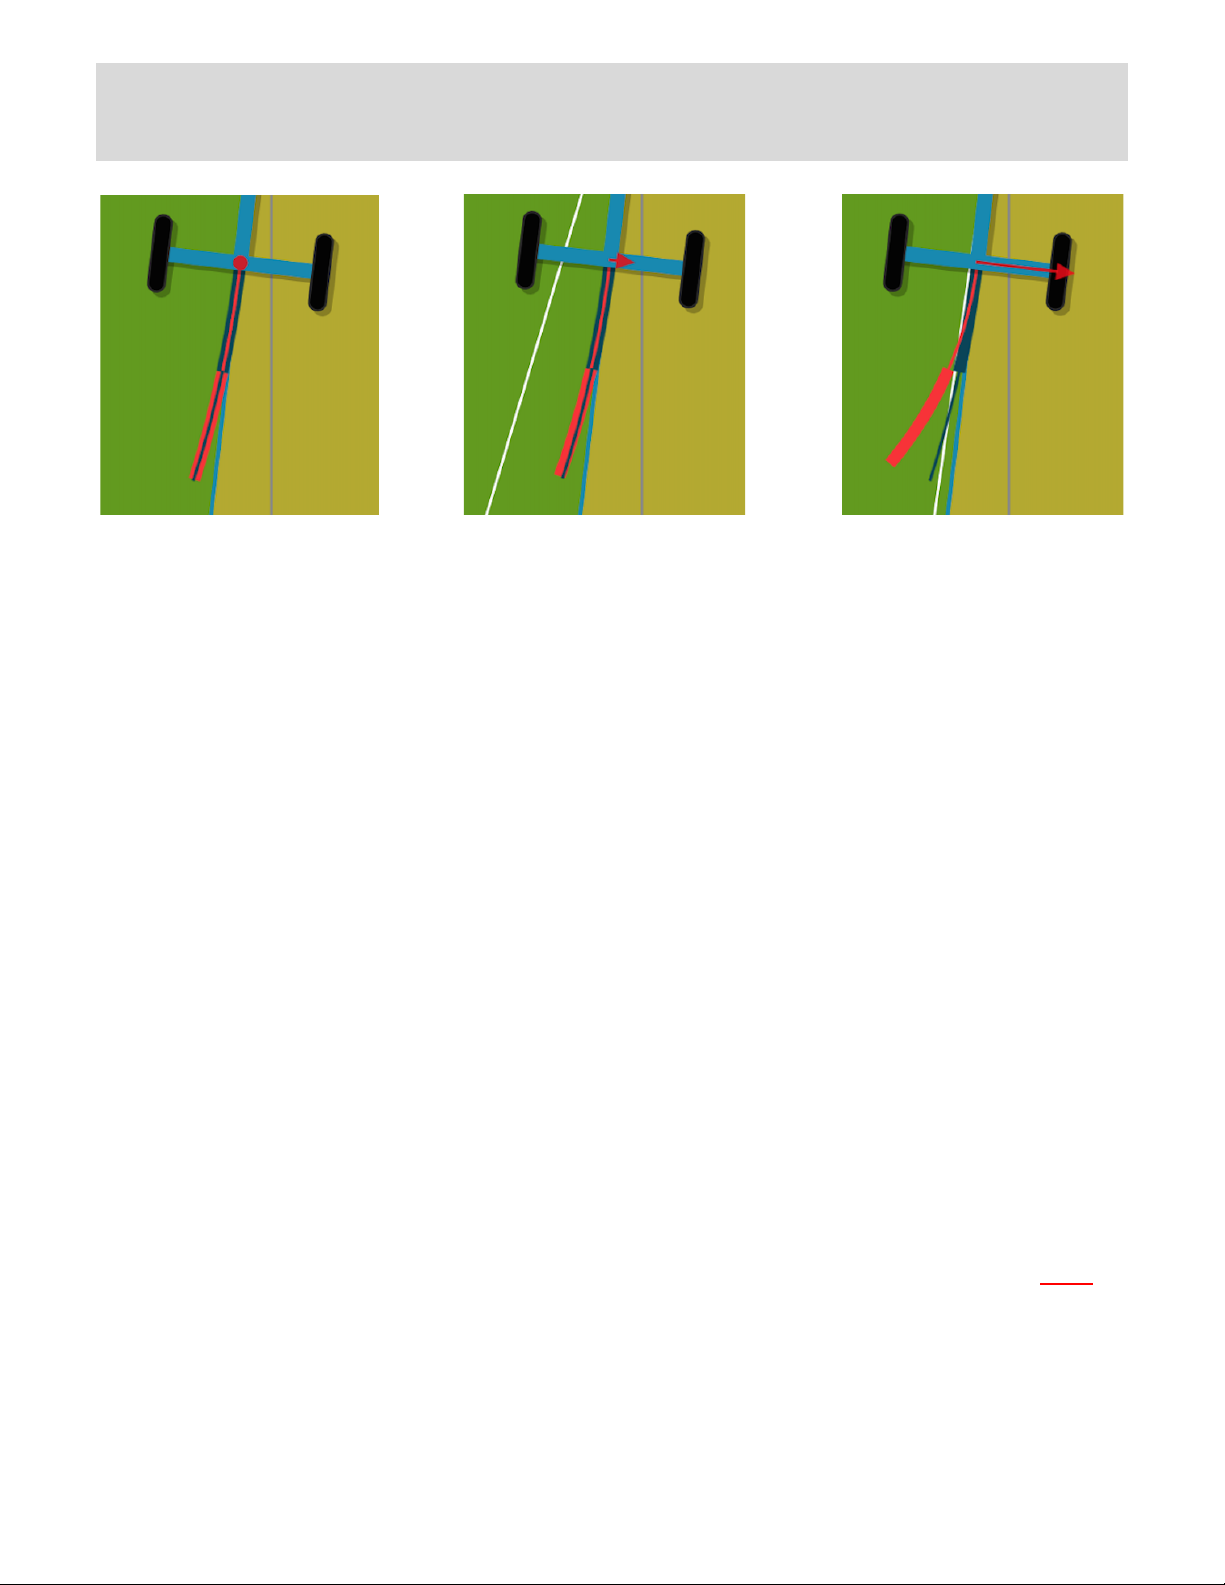
Red Dot Smaller red arrow Larger red arrow
Path constant – no adjustment Gradual path adjustment Immediate path adjustment
RED CURVED VEHICLE LINE: indicates the truck’s path that changes as you turn the
steering wheel – this red curved vehicle line is hidden by default (touch the gear icon
for a menu to toggle this feature on or off)
DARK BLUE CURVED TRAILER LINE: indicates the trailer's path that changes as the
angle at your trailer hitch changes
RED PATH CORRECTION ARROW: shows whether the trailer’s path will become more
straight or more curved and if it will be changing towards the driver’s side or the
passenger’s side – the smaller the arrow, the more gradual the change and the larger
the arrow, the more immediate the change
RED DOT: when the trailer’s path is not changing, instead of the Red Path Correction Arrow,
you will see a Red Dot
WHITE ALIGNMENT LINE: indicates the direction in which the truck and trailer will be
traveling when they become aligned – this white curved alignment line is hidden by
default (touch the gear icon for a menu to toggle this feature on or off)
LIGHT BLUE STRAIGHT TRAILER LINE: a simple straight line extension of the on-screen
trailer to help you better see the current trailer position and angle
ATTENTION: ALWAYS BE AWARE OF YOUR SURROUNDINGS. CONTINUOUSLY WATCH
FOR PEOPLE, ANIMALS AND ANY OTHER OBSTACLES. THE TOWGO BACKUP TRAILER
SYSTEM IS ONLY AN AID TO HELP YOU BACK UP YOUR TRAILER – IT IS NOT A
COLLISION DETECTION OR AVOIDANCE SYSTEM!
20
Page 24

!
TURNING – THE RED AND DARK BLUE CURVED LINES
Step 1: Get into position to backup through a curve
Turn the steering wheel so that the Red Path Correction Arrow is pointing towards the side
that you want the trailer to go.
The size of the Red Arrow and the gap between the red and blue lines determines how
quickly your trailer will get into position.
• To get into position gradually, turn your steering wheel to position the red line close
to the blue line – the Red Arrow will be small.
• To get into position more immediately, turn your steering wheel to position the red
curve farther from the blue line – the Red Arrow will be large.
Slowly start backing up until your truck and trailer are both on the curved path and then
stop your truck. Because your trailer will be a bit farther around the curve, this will cause an
angle to form between the truck and trailer. You do not need to achieve an exact match
between the arc of your truck-trailer and the arc of the curve. This step is just to get the
trailer turned as close as you can in the direction of the curve.
Step 2: Backup through the curve
Steer your truck to turn at the same rate as your trailer by turning your steering wheel so the
red and blue lines are on top of each other. Notice that the Red Path Correction Arrow turns
into a Red Dot. The arc of your truck-trailer will now pretty much stay the same as you
backup.
If your estimate of the arc of your truck-trailer were to exactly match the arc of the curve, you
could hold this steering position and simply backup around the curve. It is unlikely that you
will estimate the path that precisely and, even if you did, the shape of the road will probably
change a bit as you go around the curve. Don’t worry – you can adjust your steering to be
more precise as you go.
Step 3: Verify your direction
Slowly backup. Keep an eye on your trailer using your sideview mirrors if necessary (or your
rearview camera, if you have one). Keep your trailer’s tires running parallel to the edge of your
path (e.g., the curb) as you proceed through the curve. If the trailer angle is set just right, the
wheels of the trailer will track parallel to the edge of the path.
21
Page 25

!
Step 4: Adjust your path
If your trailer starts to get too close or too far from the edge of the path, you must adjust
your steering to get back on your intended path. Stop your truck so you can examine the
TowGo App.
First, turn the steering wheel so that the Red Path Correction Arrow points back towards the
intended path.
Second, adjust how gradually you will correct your path. More gradual corrections are usually
best unless something about your path requires otherwise. The TowGo App lets you know
how quickly the path will be corrected; the smaller the Red Arrow (and the closer together the
red and blue curved lines), the more gradual the correction.
Slowly back up. As the trailer returns to your intended path, stop your truck once again.
Now that your trailer angle is better matched to the curve of your path, turn your steering
wheel so that the red and blue curved lines again are on top of each other and the Red Path
Correction Arrow again becomes a Red Dot.
Go back to 'Step 3 – Verify your direction'
Now that you have some basics, you can...
Tell Your Trailer Where To Go®
22
Page 26

!
BACKING STRAIGHT – THE WHITE AND LIGHT BLUE STRAIGHT LINES
The White Line is an additional indicator to help straighten after a turn and while backing up
straight. The White Line shows you how much the trailer will turn while you line up your truck
with your trailer.
When you steer your truck to become aligned with the trailer (when the truck is turning faster
than the trailer), you will see a White Line appear on the display. The White Line shows the
direction your trailer will be in when you reach alignment. (Precisely speaking, if the White
Line and the Light Blue Trailer Line are angled apart by some number of degrees, the trailer
will turn that number of degrees while you are backing up to become aligned.)
If the White Line is far from the Light Blue Trailer Line (corresponding to a gradual path
change with the red and blue curved lines close together), as your truck and trailer get lined
up, your trailer will turn by the difference between the White Line and the Light Blue Trailer
Line.
If the White Line is very close to the Light Blue Trailer Line (corresponding to a more
immediate path change where the red and blue curved lines are far apart), your trailer will not
turn much as your truck and trailer become aligned. Be aware that after alignment is reached,
such sharper steering can result in overshooting the aligned position.
THE FLASH AND BEEP
As your truck and trailer reach alignment, the TowGo App will Flash and Beep.
Especially when you are new to the system, immediately stop your truck when the Flash and
Beep occurs. Stopping allows you plenty of time to assess your position and decide on your
next steering. If you were turning sharply to achieve alignment, stopping allows you to
straighten your steering without overshooting your aligned position.
Not stopping can lead to an opposite side jackknife unless you make a very quick steering
adjustment.
23
Page 27

!
ADVANCED MANEUVERS
Backing Straight Without Stopping:
Drive directly away from your destination until (1) you are steering straight ahead, (2) your
truck and trailer are in a straight line, and (3) your intended destination is directly behind you.
Without moving the wheel, initialize your system. Now, place your hand on the top center of
the steering wheel. While keeping aware of your surroundings, rotate the wheel slightly
counter-clockwise (so your hand is at about 9 o’clock) and very slowly start backing up.
When the trailer just begins to turn (the system should give you your first flash and beep),
Immediately stop. The Red Dot should now be a Red Arrow that is pointing to the right (if
not, verify your input values and start over).
Without changing the grip of your hand on the steering wheel, turn the wheel clockwise until
you see a red arrow that is pointing to the left. Note the position of your hand; it will typically
be somewhere between 1 o’clock and 4 o’clock. Also make a mental note of the left-right
mirrored position of your hand; if your hand is at 2 o’clock, its mirrored position is 10 o’clock;
if your hand is at 4 o’clock, its mirrored position is 8 o’clock. You are now ready to backup to
your destination.
CONTINUOUSLY WATCH YOUR SURROUNDINGS FOR PEOPLE, ANIMALS AND ANY
OTHER OBSTACLES! Do not watch your TowGo App. (While you are new to the system, at
the flash & beep, come to an immediate dead stop, adjust your steering, then go as follows…)
Keeping your hand gripped in the same place on the steering wheel, very slowly start backing
up. The moment you hear the beep and/or notice the flash, instantly reverse the wheel so that
your hand is at it’s mirrored position (your hand must travel through the 12 o’clock position –
not through 6 o’clock). Keep going slowly until you again hear the beep and/or notice the
flash and instantly reverse the wheel so that your hand is back at its previous position. Slowly
continue until you reach your destination. Of course, if something doesn’t seem right,
STOP IMMEDIATELY. But, this technique will usually get you just where you want to go.
Aligning Truck and Trailer Gradually:
An advanced maneuver to avoid overshooting the aligned position when turning is to
continuously adjust your steering straighter as you approach alignment. Notice that if the
White Line is enabled and very close to the Light Blue Trailer Line, turning the steering wheel
even more does not move the White Line more (it is already about as close to the Light Blue
Trailer Line as it can get). Accordingly, if the White Line is so close to the Light Blue Trailer
Line, you may find that you can turn the wheel a bit less without disturbing the White Line. As
you back into an aligned position, continuously ease off the steering as much as you can
without disturbing the White Line. Your steering will then become straight just as your truck
and trailer become aligned.
24
Page 28
!
VERY IMPORTANT INFORMATION REGARDING YOUR HITCH SENSOR AND STRETCH CORD
Always7remem ber7 to7install7the7Stretch7Cord7before7using7your7TowGo®7Trailer7Backup7Navigation7
Aid.$ The$ Trailer$ Backup$ Navigation$ Aid$ will$ not$ work$ without$ a$ properly$ measured,$ knotted$ and$
installed$Stretch$ Cord.$ Make7sure7the7Trailer7 Sensor7 Assembly7is7securely7attached7 to7 your7 trailer7
before7you7attach7the7Stretch7Cord.$
$
The7Stretch7Cord7must7be7properly7sized.$It$must$be$tight$when$the$trailer$is$turned$sharply$to$either$
side,$but$not$so$tight$that$the$tension$damages$the$hitch$sensor$or$breaks$the$Stretch$Cord$when$the$
trailer$ is$ straight$ back.$ The$ cord$ length$ calculation$ explained$ above$ is$ necessary$ for$ setting$ this$
length.$
$
The7 Stretch7 Cord7must7 be7 properly7 installed.$ The$Stretch$ Cord$must% be% horizontal$when$ installed$
and,$on$the$Trailer$Hitch$Sensor,$the$bottom$edge$of$the$Swing$Arm$must$ n ot$ rub$on$(or$in$any$way$
touch)$ the$ Main$ Housing.$ Failure$ to$ do$ this$ will$ cause$ the$ system$ to$ malfunction$ and$ will$ cause$
mechanical$failure.$$
7
Always7remove7the7Trailer7Sensor7Assembly7from7your7 trailer7 when7 not7 backing.$ We$ do$ not$ want$
your$sensor$to$be$stolen$when$parked.$We$also$do$not$want$your$sensor$damaged$or$destroyed$while$
driving.$ To$reduce$ the$ chance$ of$ accidental$ damage,$ before7you7uncouple7your7trailer7from7your7
vehicle,$ first$ unclip7 the7 Stretch7 Cord7 and7 then7 remove7 the7 Trailer7 Sensor7 Assembly7 from7 your7
trailer!7
$
Remember7 to7 unclip7 the7 Stretch7 Cord7 before7 removing7 the7 Trailer7 Sensor7 Assembly7 from7 your7
trailer!$Do$not$even$loosen$the$Trailer$Sensor$Assembly$with$the$cord$attached.$If7the7Trailer7Sensor7
Assembly7becomes7loose7while7the7Stretch7 C ord7is7attached,7your7sensor7may7become7damaged7or7
the7Trailer7Sensor7 Assembly7 could7 become7 a7projectile7and7cause7injury!7Make7 sure7 the7 sensor7 is7
tightly7secured!$
$
When$ connecting$ and$ disconnection$the$ Stretch$ Cord$to$or$ from$ the$Swing$Arm,$ be$ careful$to$not$
apply$upward$or$downward$pressure$to$the$Swing$Arm.$BE7GENTLE!$
$
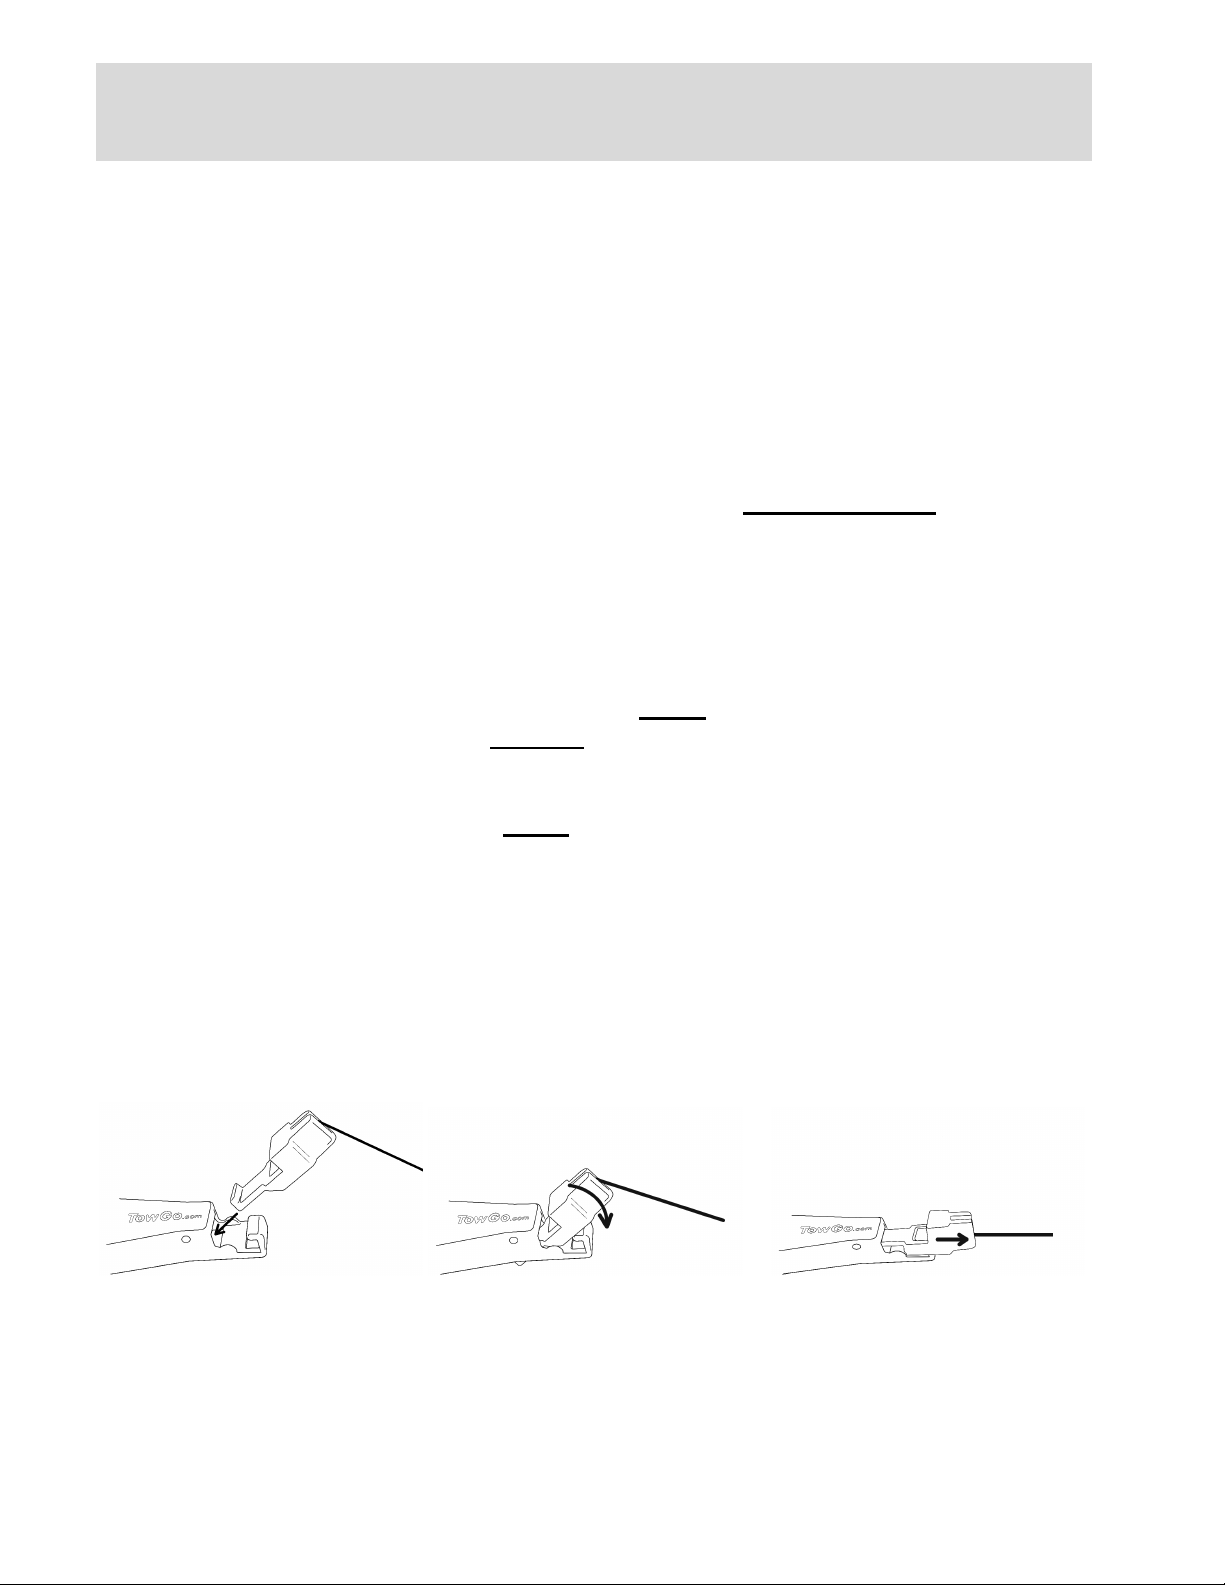
To$attach$the$Stretch$Cord$to$the$Swing$Arm:$
$ $$$$$ $
$ Insert$the$Stretch$ Rotate$the$Stretch$ Allow$the$tension$
$ Cord$Attachment$Clip$ Cord$Attachment$Clip$ of$the$Stretch$Cord$to$
$ into$the$Swing$Arm$ to$horizontal$ lock$the$Clip$in$place$
$
$
To$detach$the$Stretch$Cord,$reverse$the$above$sequence.$
25
Page 29

!
TROUBLESHOOTING
!"#$%&#'()#*%+#,))-*.#$%&(#,)*,%(#-*#+/)#0-,+#%"#'1'-0'20)#,)*,%(,3#"%00%4#+/),)#,+)5,6#
#
Hitch&Sensor:&&
78#9)(-"$#+/'+#$%&#'()#0%%:-*.#'+#+/)#/-+;/#,)*,%(#0-,+#'*<#*%+#+/)#,+))(#,)*,%(#0-,+=#
>8#?/);:#+/)#@AB#%*#+/)#/-+;/#,)*,%(=#
C#!"#+/)#LED&is& off3#+/)#5(%20)D#-,#0-:)0$# '#0';:#%"#5%4)(=#E':)#,&()#$%&(#1)/-;0)F,#0-./+,# '()#%*#G#
5%4)(#;%D),#"(%D#+/)#1)/-;0)#4/)*#-+,#0-./+,#'()#%*=#H%&#;'*#1)(-"$#+/-,#2$#;/);:-*.#+/'+#+/)#
(&**-*.#0-./+,#%*#+/)#+('-0)(#'()#0-+#G#-"#+/)$#'()#*%+6#
! D':)#,&()#'00#+('-0)(#()0'+)<#"&,),#-*#$%&(#1)/-;0)#'()#.%%<I#
! 1)(-"$#+/'+#'00#;'20),#'()#5(%5)(0$#;%**);+)<#'*<#5%4)()<I#
! D':)#,&()#'00#;%**);+%(#;%*+';+,#'()#;0)'*I#'*<#
! ;/);:#'*$#'<'5+%(#;'20),#%(#'<'5+%(#50&.,#"%(#"'&0+,=#
" If#your#vehicle#has#both#a#flat2four#socket#and#a#different#socket#for#your#trail er,# be#sure#
the#fla t2four# socket#has#power# when#the#other#socket#is#in#use#(if#not,#contact#your#auto#
dealer).#
" Make# sure# your# vehicle# does#not# have# voltage#protection# circuits#that# cut# off# power# if#
your#trailer#has#a#wiring#problem.#Some#modern#vehicles#wi ll # not#recognize#trailers#with#
low#power#LED#lighting;#this#may#be#remedied#by#adding#load#resistors#–#check#with#your#
auto#dealer#to#see#if#this#applies#to#your#vehicle.##
C#!"#+/)#LED&is&blinking&red3#+/)#/-+;/#,)*,%(#-,#4'-+-*.#"%(#'#;%**);+-%*# '*<# ,/%&0<# 2)# 1-,-20)# -*#
+/)#'1'-0'20)#/-+;/#,)*,%(,#0-,+=#?%*+-*&)#4-+/#,+)5#J=#
C# !"#+/)#LED& is& blinking& green& and& then& red#K-)=#@AB#;$;0),#%""L.())*L()<83# +/)# /-+;/# ,)*,%(# -,#
;%**);+)<# +%# '# ,+))(# ,)*,%(# %*0$3# '*<# ,/%&0<# 2)# 1-,-20)# -*# +/)# '1'-0'2 0)# /-+;/# ,)*,%(,# 0-,+=#
?%*+-*&)#4-+/#,+)5#J=#
C#!"#+/)#LED&is&solid&green#K4-+/#*%#20-*:-*.8#+/)#/-+;/#,)*,%(#-,#;%**);+)<#K1-'#M0&)+%%+/8#+%#2%+/#
'#<-,50'$#<)1-;)#'*<#+%#'#,+))(#,)*,%(=#
C# !"#+/)#LED& is& blinking& red& and& then& green# K-)=# @AB# .%),# %""L()<L.())*83# +/)# /-+;/# ,)*,%(# -,#
;%**);+)<#K1-'#M0&)+%%+/8#+%#'#<-,50'$#<)1-;)=##
J8#9)(-"$#+/'+#+/)#M0&)+%%+/#-,#+&(*)<#%*#-*#+/)#'55=#N%#-*+%#+/)#,)++-*.,#"%(#$%&(#<-,50'$#<)1-;)#'*<#
,4-+;/#%*#M0&)+%%+/=#!"#M0&)+%%+/#-,#'0()'<$#%*3#+($#,4-+;/-*.#-+#%""#'*<#+/)*#2';:#%*=#
O8#9)(-"$#+/'+#$%&(#'55#-,#(&**-*.#5(%5)(0$=#P/&+#%""#+/)#'55#'*<#(),+'(+#-+=#
Q8#9)(-"$#+/'+#$%&(#<-,50'$#<)1-;)#-,#(&**-*.#5(%5)(0$=#P/&+#%""#+/)#<-,50'$#<)1-;)#'*<#(),+'(+#-+=#
R8# ?$;0)# 5%4)(#%*# +/)# S-+;/# P)*,%(# 2$#+&(*-*.# %""# +/)#1)/-;0)F,# 0-./+,# %(# 2$# &*50&..-*.#+/)# ,)*,%(#
K;/);:#+/'+#+/)#@AB#.%),#%""83#+/)*#5%4)(#-+#2';:#%*=#
T8#E':)#,&()# +/)# /-+;/# ,)*,%(# -,# 4-+/-*#('*.)#KD'U-D&D#OV#"))+8#%"#$%&(# 5/%*)# %(# +'20)+# '*<#+/'+#
+/)()#-,#*%+#%&+,-<)#('<-%#-*+)(")()*;)=##
#
*& If& you&think& you&should& be& connected&but& you&are¬&seeing&the&connection&on&your&
display&device/app,&check&if&some&other&nearby&display&device/app&has&connected&to&your&
hitch&sensor.& The&list&of& available& hitch&sensors& will& not&be&displayed& if& a&hitch& sensor& is&
already&connected& —&you&will&only&see&the&configuration&screen&for&the&connected&hitch&
sensor.& &
#
26
Page 30

!
Steer Sensor:
1) Verify that you are looking at the steer sensor list and not the hitch sensor list.
2) Check the LED on the steer sensor.
• If the LED is off, the problem is likely a lack of power.
Click the button on the bottom of the steer sensor. If the LED does not light up, charge
the steer sensor using the USB port inside the top of the steer sensor (it must be detached
from the steering wheel for charging). You can use a USB port in your car to charge if you
have one. You can buy a USB port that plugs into your cigarette lighter at most auto parts
stores.
• If the LED is green, the steer sensor is already connected (via Bluetooth) to a hitch
sensor. Check for any near by hitch sensor that may have connected to your steer sensor.
• If the LED is red, the steer sensor is awaiting a connection and should be visible in
the available steer sensors list.
3) Cycle the power on the Steer Sensor by holding the button in until the LED goes off
(about 6 seconds), then click the button to power it back on.
4) The LED should go on.
5) Make sure the steer sensor is within range (maximum 40 feet) of the hitch sensor and
that there is not outside radio interference.
27
Page 31

!
GUARANTEE AND RETURN POLICY
The TowGo® Trailer Backup Navigation Aid™ (the "Backup Aid") comes with a 30-day money back
guarantee. You may return the Backup Aid to TowGo, LLC ("TowGo") for any reason within 30
days of the date of delivery following the original retail purchase (the "Cancellation Period") for a
full refund of your purchase price (less shipping costs). To make a return, you must inform us of
your decision within the Cancellation Period by contacting TowGo customer support (see:
https://towgo.com/com) and clearly stating your desire to make the return. Although it will not
affect your right to a refund, please provide details on where and when you purchased the Backup
Aid and your reason for returning the Backup Aid. TowGo customer service will then provide you
with a Return Materials Authorization ("RMA") that must be included with your return shipment to
TowGo so TowGo can identify your shipment.
To receive a refund, you must return the Backup Aid with the RMA within the 14 days following the
day on which you notify TowGo customer support that you desire to return the Backup Aid. If the
Backup Aid is faulty or not generally as described, TowGo will either (i) replace the Backup Aid, or
(ii) refund the price you paid for the Backup Aid plus original delivery cost up to the value of our
ground delivery option. Otherwise, TowGo will refund the price you paid for the Backup Aid less all
original delivery costs. You are responsible for all costs associated with returning the Backup Aid to
us. Units returned for a refund must be in as-new condition. Any refund for a returned Backup Aid
that is not in as-new condition will be assessed the greater of (i) a 15% restocking fee or (ii) any
reduction in the value of the Backup Aid, as determined in our sole discretion, caused by your
handling of the Backup Aid in a way which goes beyond what is necessary to establish their nature,
characteristics and functioning (e.g., beyond what would normally be permitted in a brick-andmortar store). Any assessments will be deducted from the refunded amount.
We will process the refund due to you as soon as possible and, in any case, within 30 days from the
date of receipt by TowGo of the returned Backup Aid. The TowGo Trailer Backup Navigation Aid is
not eligible for a refund after the 30-day period.
This guarantee is only applicable to new units bought directly from TowGo. Refurbished or nonstandard products are not covered. If you purchase a Backup Aid and return it, any subsequent
purchase of a Backup Aid will not be eligible for the guarantee.
Any product returned without an RMA may, at the discretion of TowGo, be sent C.O.D. back to
the customer at the customer’s expense for shipping and handling, or TowGo may instead accept
the return and assess a 15% restocking fee at our discretion. Likewise, any product returned to an
address other than that given along with the RMA may be rejected and returned to sender at the
customer’s expense or assessed a 15% restocking fee. Any product that is not returned in the
original packaging will be assessed a 15% restocking fee plus the replacement price for anything
that is missing.
TowGo is not responsible for merchandise lost, damaged, or stolen during return shipping. We
recommend that you use a carrier that provides shipment tracking and that you insure your return
against loss or damage. Whether or not you choose to both use a carrier that offers tracking or
insure or declare the full value of the product, you will nonetheless be responsible for any loss or
damage to the product during shipping.
28
Page 32

!
Copyright 2019 © TowGo, LLC
 Loading...