

Page 1
INSTRUCTION MANUAL
®
Tower
Hobbies®
guarantees
this kit to be
free from defects
in both material and
workmanship at the
WARR ANTY
date of purchase. This
warranty does not cover any
component parts damaged by
use or modication. In no case shall
Tower Hobbies’ liability exceed the
original cost of the purchased kit. Further,
Tower Hobbies reserves the right to change
or modify this warranty without notice.
In that Tower Hobbies has no control over the nal
assembly or material used for nal assembly, no
liability shall be assumed nor accepted for any damage
resulting from the use by the user of the nal user-assembled
product. By the act of using the user-assembled product, the
user accepts all resulting liability.
If the buyer is not prepared to accept the liability associated with the
use of this product, the buyer is advised to return this kit immediately in
new and unused condition to the place of purchase.
To make a warranty claim send the defective part or item to Hobby Services at
the address below:
Hobby Services • 3002 N. Apollo Dr. Suite 1 • Champaign IL 61822 • USA
Include a letter stating your name, return shipping address, as much contact information as
possible (daytime telephone number, fax number, e-mail address), a detailed description of
the problem and a photocopy of the purchase receipt. Upon receipt of the package the problem
will be evaluated as quickly as possible.
WINGSPAN
43.2 in [1097mm]
38.0– 42.3 oz [1077– 1199g]
LENGTH
33.8 in [ 859 mm ]
WING AREA
318.0 in2 [20.51 dm2]
WEIGHT
READ THROUGH THIS MANUAL
BEFORE STARTING CONSTRUCTION.
IT CONTAINS IMPORTANT INSTRUCTIONS
AND WARNINGS CONCERNING THE
ASSEMBLY AND USE OF THIS MODEL.
WING LOADING
17.2 – 19.2 oz/ ft2 [52.5–58.6 g/dm2]
MOTOR
RimFire .10 35-30-1250 kV
3S 11.1V 2200 mAh – 3200 mAh LiPo
40A ESC
RADIO
4 – 5 channels, 4 servos
TOWER HOBBIES
Champaign, Illinois
(217) 398-8970 ext. 6
airsupport@hobbico.com
®
®
© 2018 Tower Hobbies .
A subsidiary of Hobbico, Inc.
TOWA2200 EP ARF / TOWA2202 EP RxR
Page 2

TABLE OF CONTENTS
INTRODUCTION . . . . . . . . . . . . . . . . . . . . . . . . . . . . . . . . 2
ADDITIONAL ITEMS REQUIRED . . . . . . . . . . . . . . . . . . . 2
Radio/Servos . . . . . . . . . . . . . . . . . . . . . . . . . . . . . . . . 2
Brushless Electric Motor . . . . . . . . . . . . . . . . . . . . . . . 2
LiPo Battery Charger . . . . . . . . . . . . . . . . . . . . . . . . . . 2
Adhesives, Hardware & Other Accessories . . . . . . . . . 2
ELECTRIC MOTOR SAFETY PRECAUTIONS. . . . . . . . . 3
LITHIUM BATTERY WARNING. . . . . . . . . . . . . . . . . . . . . 3
KIT CONTENTS. . . . . . . . . . . . . . . . . . . . . . . . . . . . . . . . . 4
PREPARATION . . . . . . . . . . . . . . . . . . . . . . . . . . . . . . . . . 4
ASSEMBLE THE WING. . . . . . . . . . . . . . . . . . . . . . . . . . . 5
Join the Wing Halves . . . . . . . . . . . . . . . . . . . . . . . . . . 5
Hook Up the Ailerons. . . . . . . . . . . . . . . . . . . . . . . . . . 6
Mount the Landing Gear . . . . . . . . . . . . . . . . . . . . . . . 7
INTRODUCTION
Thank you for purchasing the Tower Hobbies Cherokee EP.
This Cherokee is intended for electric power only, so the
structure has been lightened accordingly to make it a nice
little scale yer. Tricycle landing gear is the icing on the cake
for easy ground handling, takeoffs, and landings.
NOTE: This instruction manual illustrates all the steps
necessary to assemble the ARF (almost ready-to- y) edition
of the Cherokee EP. However, the Rx-R (receiver-ready)
edition requires less assembly, so if assembling the Rx-R,
simply skim through the manual and perform only steps
that apply.
ASSEMBLE THE FUSELAGE . . . . . . . . . . . . . . . . . . . . . . 8
Join the Vertical & Horizontal Stabilizer. . . . . . . . . . . . 8
Mount the Nose Gear . . . . . . . . . . . . . . . . . . . . . . . . . 9
Mount the Motor & ESC. . . . . . . . . . . . . . . . . . . . . . . . 9
Mount the Cowl . . . . . . . . . . . . . . . . . . . . . . . . . . . . . 10
Hook Up the Elevator and Rudder. . . . . . . . . . . . . . . 11
FINAL ASSEMBLY. . . . . . . . . . . . . . . . . . . . . . . . . . . . . . 13
Install the Receiver. . . . . . . . . . . . . . . . . . . . . . . . . . . 13
Set the Control Throws . . . . . . . . . . . . . . . . . . . . . . . 13
Arm the ESC . . . . . . . . . . . . . . . . . . . . . . . . . . . . . . . 13
Set the Fail Safe and the Motor Brake. . . . . . . . . . . . 14
Check the C.G. . . . . . . . . . . . . . . . . . . . . . . . . . . . . . 14
Balance the Model Laterally . . . . . . . . . . . . . . . . . . . 15
FLYING. . . . . . . . . . . . . . . . . . . . . . . . . . . . . . . . . . . . . . . 16
❍ LiPo 30C 3S 11.1V 2200 Star (ONXP2263)
❍ LiPo 30C 3S 11.1V 3200 Star (ONXP1953)
❍ Programmable ESC 40A BL 2S-6S (GPMM2140)
❍ APC 9x6E Thin Electric Propeller (APCQ4118)
LiPo Battery Charger
To charge a 3S 3200mAh LiPo at 1C a charger capable of
at least 40 watts is required (3S x 4.2V/cell = 12.6V x 3.2A =
40 watts). The Triton EQ (GPMM3155) is more than enough
charger with 50W output using AC and 63W output using DC.
Adhesives, Hardware & Other Accessories
For the latest technical updates or manual revisions, nd the
Tower Hobbies Cherokee EP page on the Tower Hobbies
website. If there is new technical information or changes
to this model a “tech notice” box will appear on the page.
ADDITIONAL ITEMS REQUIRED
Radio/Servos
A 4-channel radio is required to y the Cherokee. The Tactic
TTX660 is recommended because of its simple, exible
computer programming and multiple model memory. The
servo mounts in the Cherokee are sized for Tactic TSX10 micro
servos, but the mounts may be enlarged for other servos.
❍ Tactic TTX660 6-channel programmable radio
(TACJ2660)
❍ Tactic TR625 6-channel receiver (TACL0625)
❍ (4) Tactic TSX10 micro digital, high-torque, metal gear,
ball bearing servos (TACM0210)
Brushless Electric Motor
The Cherokee ies on a RimFire .10 with a 3S 2200mAh–
3200mAh LiPo and a 9 x 6E propeller (APCQ4118) and 40A
ESC (GPMM2140):
❍ Great Planes RimFire .10 35-30-1250 Outrunner
Brushless (GPMG4595)
Other than common hobby tools, here is a list of items
required:
❍ 30-Minute epoxy (GPMR6043)
❍ Epoxy brushes (GPMR8060)
❍ Mixing cups (GPMR8056)
❍ Mixing sticks (GPMR8055)
❍ Threadlocker thread locking cement (GPMR6060)
❍ Thin CA (GPMR6001)
❍ Medium CA (GPMR6007)
❍ CA applicator tips (HCAR3780)
❍ CA accelerator (GPMR6035)
A covering iron with a cover sock will probably be required
for tightening and re-bonding to the model any covering
that may have loosened between the time the covering was
applied and the time the model was removed from the box.
The 21st Century iron is preferred because of its long cord,
contoured shoe, and precisely adjustable temperature range:
❍ Coverite 21st Century Sealing Iron (COVR2700)
❍ Coverite 21st Century Cover Sock (COVR2702)
Great Planes Product Support
3002 N Apollo Drive, Suite 1 Ph: (217) 398-8970, ext. 6
Champaign, IL 61822 Fax: (217) 398-7721
E-mail: airsupport@greatplanes.com
2
Page 3
ELECTRIC MOTOR
SAFETY PRECAUTIONS
WARNING! A spinning propeller has the potential to cause
serious and permanent injury.
WARNING! Once the motor batteries are connected, the
propeller can start spinning at any time. Make sure the Fail
Safe is set on your radio to prevent the motor from starting
if the signal is lost.
WARNING! Stand clear of the propeller when handling
the aircraft. Make sure the aircraft is held securely until the
battery has been disconnected.
ALWAYS remove the propeller if the motor batteries will be
connected while working on your plane.
ALWAYS remove the motor batteries from the plane
when charging.
ALWAYS switch on the transmitter rst, then the receiver.
ALWAYS unplug the motor batteries rst before switching
off the receiver then transmitter.
NEVER touch the motor during or right after operation. The
motor gets HOT!
NEVER switch off the transmitter with the motor batteries
plugged in.
NEVER reach through the arc of the propeller when plugging
the battery into the ESC.
LITHIUM BATTERY WARNING!
This product recommends the use of a lithium polymer
(LiPo) battery. Improper handling of a LiPo battery
could result in FIRE! A lithium battery re has the
potential to ignite surrounding areas and may cause property
damage or cause personal injury.
For safe LiPo handling, follow ALL of these guidelines:
MOST IMPORTANT! Never leave the battery or charger
unattended during charging or discharging.
WARNING: Read the entire instruction sheet included with
your batteries. Failure to follow the instructions could cause
permanent damage to the battery and its surroundings and
cause bodily harm!
ALWAYS follow the charging instructions included with your
charger for charging LiPo batteries. LiPo batteries can cause
serious damage or re if misused.
ALWAYS use a LiPo-approved charger.
ALWAYS set the charger’s output volts to match the
battery volts.
ALWAYS charge a LiPo battery in a reproof location.
ALWAYS balance charge the battery pack.
ALWAYS store and transport LiPo batteries in a reproof
container away from combustible materials.
ALWAYS KEEP OUT OF THE REACH OF CHILDREN.
ALWAYS keep LiPo batteries out of the reach of animals. A
punctured battery may cause a re.
ALWAYS disconnect the battery and unplug the charger
after the charge is complete.
ALWAYS keep a supply of sand accessible when charging
a LiPo battery. Dumping sand on the battery will assist in
extinguishing a LiPo chemical re.
ALWAYS remove the batteries from the plane after a crash.
Set them aside in a safe location for at least 20 minutes. If
the batteries are damaged in the crash, they could catch
re. If the battery starts to swell, quickly move the battery to
a safe location, preferably outside away from combustible
material. Place it in a bucket, covering the battery with sand.
NEVER use water to try and put out a LiPo re.
NEVER charge or use a battery that is deformed, bent,
crushed or has any type of visible damage.
NEVER use a NiCd/NiMH peak charger to charge a
LiPo battery.
NEVER charge in excess of 4.20V per cell unless the battery
is rated for a higher voltage.
NEVER charge at currents greater than 1C unless the batter y
is rated for a higher charge rate.
NEVER trickle-charge a LiPo battery.
NEVER allow the battery temperature to exceed 140 degrees
F (60 degrees C).
NEVER disassemble or modify the battery pack wiring in
any way or puncture the cells, as this may result in a re.
NEVER discharge below 2.7V per cell. It is recommended
to not discharge below 3.7V per cell.
NEVER charge the battery or set the charger on combustible
materials.
NEVER charge the battery inside a vehicle or in a location
that could be damaged in the event of a LiPo re.
NEVER put a LiPo battery in the pocket of any clothing.
NEVER charge the batteries in the plane. Disconnect the
batteries and remove them from the plane immediately
after landing.
NEVER allow the battery to short circuit by touching exposed
wires together. This may cause a re.
NEVER operate or store batteries below 40˚F or above
110 ˚ F (4- 43 ˚C)
3
Page 4
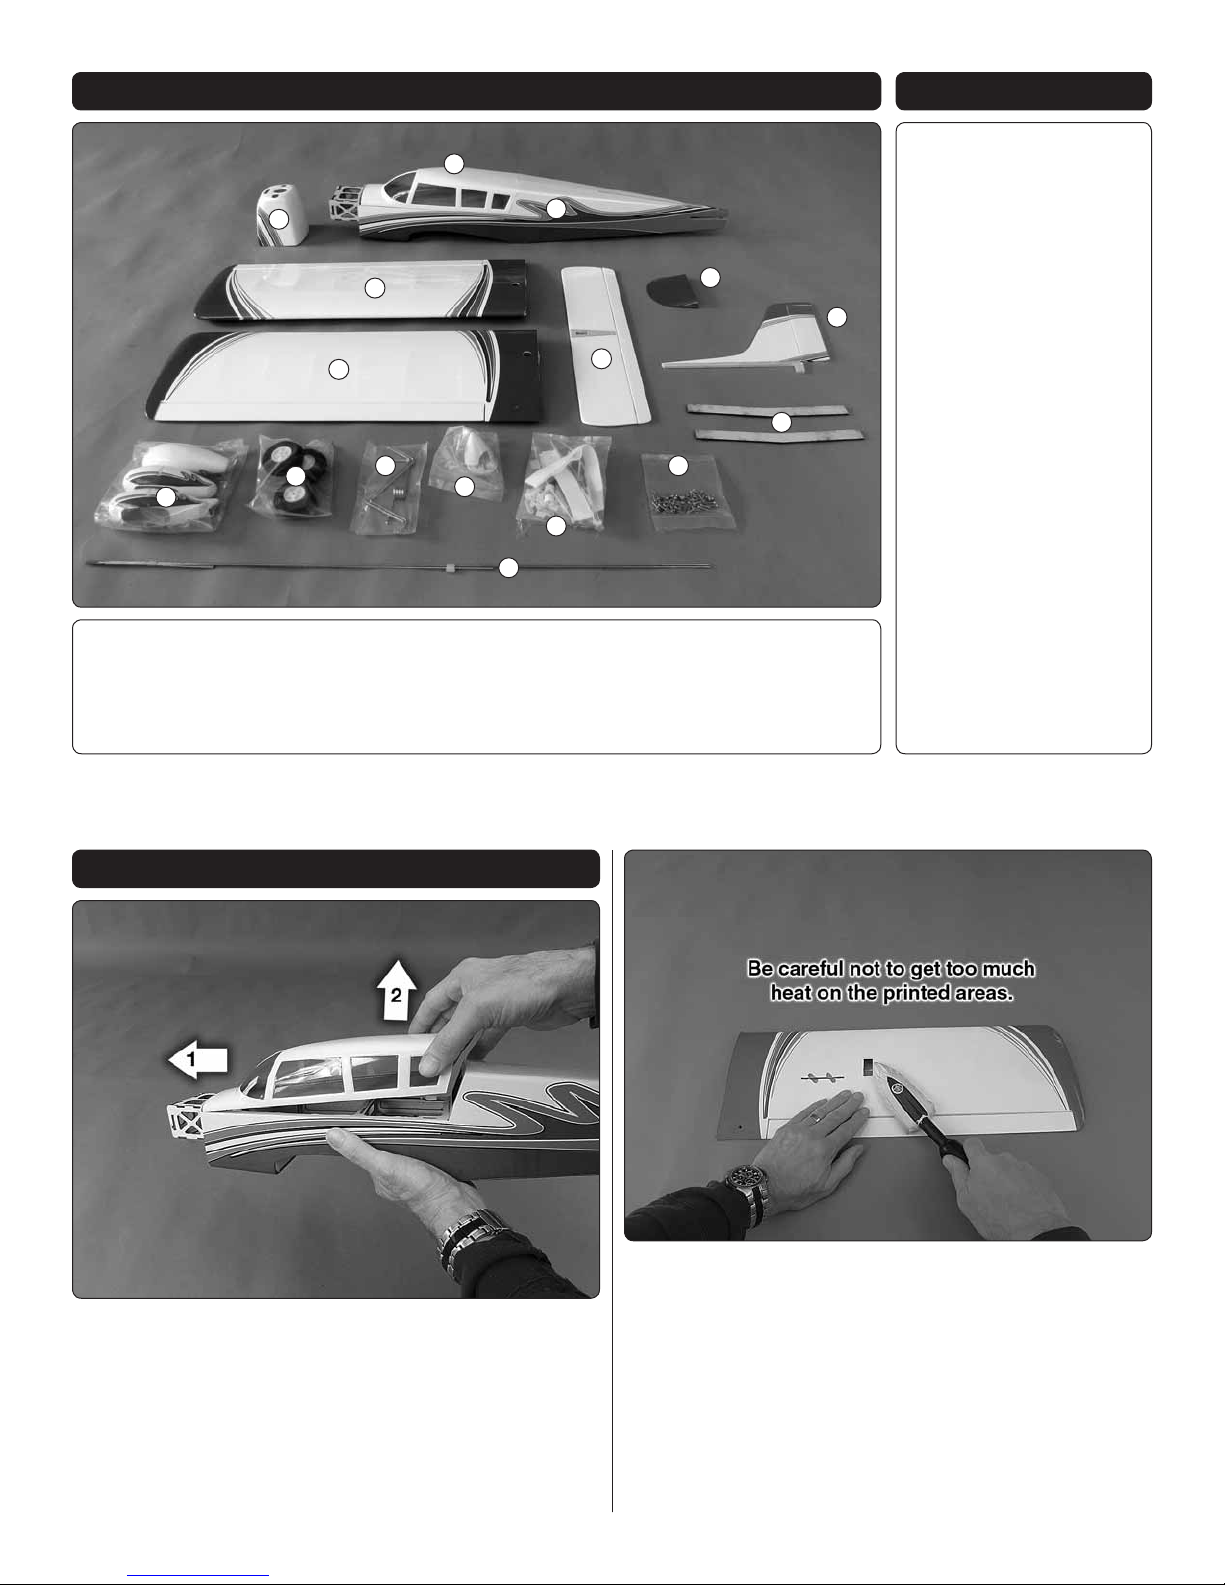
KIT CONTENTS SPARE PARTS
TOWA4100 Wing Set
2
1
4
5
3
7
8
6
9
TOWA4101 Fuselage
TOWA4102 Tail Surfaces Set
TOWA4103 Cowl
TOWA4104 Hatch
TOWA4105 Landing Gear Set
TOWA4106 Wheel Pants Set
TOWA4107 Decals
GPMA4045 1-3/4" White
Spinner
10
1. Cowl
2. Canopy Hatch
3. Fuselage
4. Right Wing
11
12
5. Left Wing
6. Horizontal Stabilizer
7. Wing Fairing
8. Vertical Stabilizer
PREPARATION
13
14
16
9. Wing Joiners
10. Wheel Pants
11. Wheels
12. Landing Gear Wires
15
13. Spinner
14. Plastic Hardware
15. Metal Hardware
16. Pushrods
1. The canopy hatch is removed by pushing the hatch
❏
forward to disengage the magnets and tabs, then lifting the
back of the hatch upward and pulling the canopy back and out.
2. Use a covering iron with a protective cover sock to
❏
remove any wrinkles or areas of loose covering that may have
developed after the covering was originally applied. Start
with low or medium heat to nd the setting that works best
(approximately 300º F measured on the surface of the cover
sock). Gradually increase the heat as necessary to get the
covering to tighten. Too much heat may cause seams and
edges to pull away or damage the color graphics printed onto
the covering. As you proceed, push down on the iron over
sheeted areas to bond the covering to the wood underneath.
4
Page 5
3. Test the security of all the control surfaces and the
❏
hinges by pulling to make sure they remain secure. Add a
few drops of thin CA to any hinges that aren’t secure.
4. Stack two or three paper
❏
towel squares on top of each
other and cut them into small
squares. During various
stages of assembly these
squares may be dampened
with denatured alcohol for
epoxy and other kinds of
cleanup.
3. Tape the ends of the servo strings that are inside the
❏
wings to the outside of the wings. Test- t the wing halves
together with the wing joiner and the alignment pin. Make
any adjustments necessary for a good t.
NOTE: Even though you may be using 30-minute epoxy,
some brands of epoxy harden faster than others and time
seems to y when working time is limited, so make sure you
have everything you need to glue the wing halves together
and work ef ciently so you don’t run out of working time
before the epoxy begins to harden.
4. Mix approximately 1/4 oz. of 30-minute epoxy. Working
❏
quickly, pour some epoxy into the spar cavities in both wings
and distribute with a wire or small dowel.
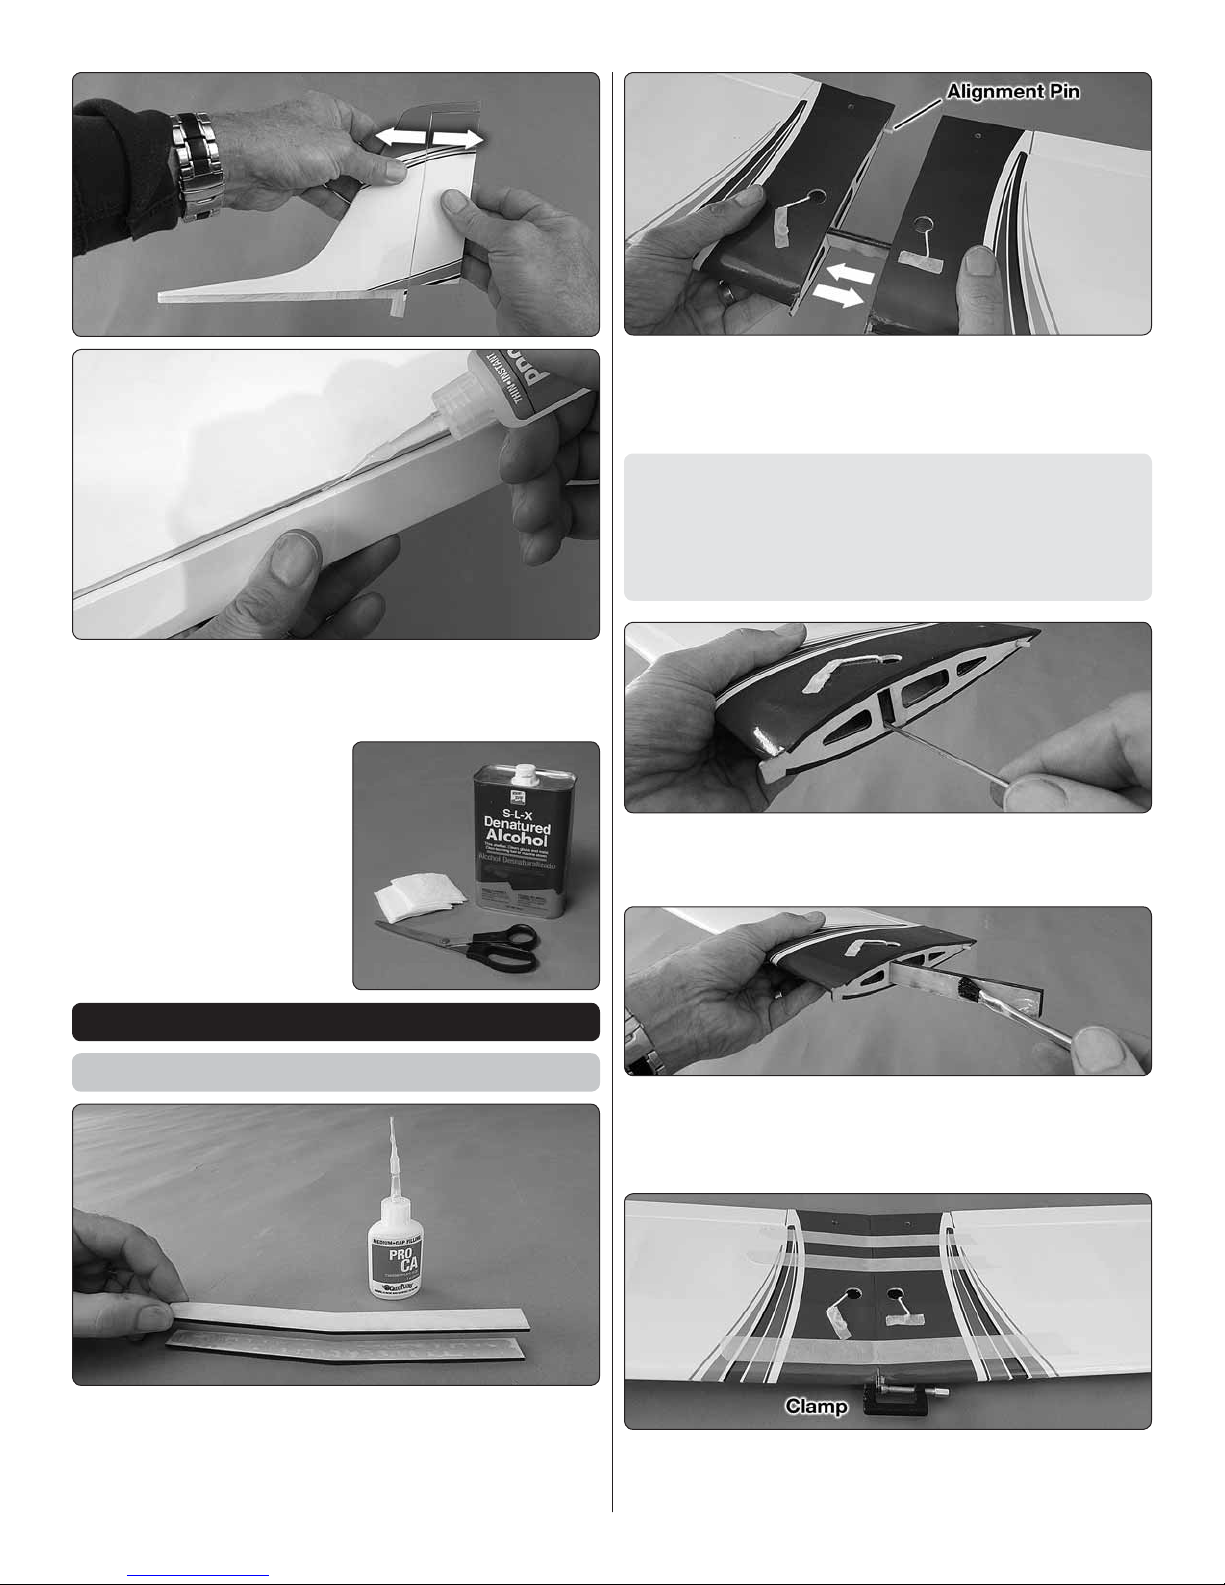
ASSEMBLE THE WING
Join the Wing Halves
1. Use medium CA or epoxy to glue together the two
❏
pieces of the plywood wing joiner.
2. Glue the nylon alignment pin (visible in the following
❏
image) halfway into one of the wing halves.
5. Coat one end of the joiner and insert it into one of the
❏
wing halves. Coat the protruding sides of the joiner and both
root ribs of each wing half. Then, join them together and wipe
away excess epoxy as it squeezes out.
6. Clamp the front of the wing together at the tab and apply
❏
strips of masking tape to tightly pull the wings together. Use
the paper towel squares dampened with denatured alcohol
5
Page 6

to wipe away excess epoxy as you proceed. Allow the epoxy
Aileron servo arm
7/16" [11mm]
#48 (.076")
Pushrod Wire
Servo Arm
1/16"
to fully harden before removing the clamps and tape.
7. After the epoxy has hardened, remove the clamps
❏
and carefully peel off the tape. Any residual tape adhesive
may be cleaned with naptha (lighter uid) and areas of the
covering that may have lifted from removing the tape may
be retightened with your covering iron.
Hook Up the Ailerons
1. The servo openings are sized for the recommended
❏
servos (Tactic TSX10 servos). If using larger servos, enlarge
the openings as necessary.
Refer to this image while mounting the aileron servos
and hooking up the ailerons.
4. Drill 1/16" [1.6mm] holes for the servo mounting screws
❏
and mount the servo in the wing with the mounting hardware
that came with it.
2. Attach a 6" [150mm] servo extension to each
❏
aileron servo. Secure the connections using tape or a
product designed specifically for this purpose.
Install the left aileron servo rst…
5. The single-arm servo arms with Tactic TSX10 servos
❏
were used. Use a #48 (.076") drill to enlarge the hole in
the servo arm that is closest to 7/16" [11mm] out from the
center—this will provide about the correct high-rate aileron
throw with the transmitter end points set to 100%.
6. Align the aileron horn with the hinge gap as shown. Then,
❏
drill 1/16" [1.6mm] holes into (but not all the way through) the
aileron and mount the horn with M2 x 8 Phillips wood screws.
7. Remove the M2 x 8 horn mounting screws from the
❏
aileron. Add a few drops of thin CA to each screw hole, allow
to harden, and then re-mount the horn with the screws.
3. Use the string in the wing to pull the aileron servo
❏
extension through and t the servo into the wing.
8. Thread a clevis fteen full turns onto a 6" [150mm]
❏
pushrod. Center the aileron and the servo arm, mark, bend
6
Page 7

and cut the pushrod. Then, hook up the aileron with a
90-degree pushrod connector on the servo arm as shown.
9. Hook up the aileron servo in the right wing the same way.
❏
Mount the Landing Gear
1. Fit the landing straps into the wing. Then, use the holes
❏
in the straps as a guide to drill 1/16" [1.6mm] holes into the
landing gear rails for the mounting screws.
2. Enlarge the holes in all the landing gear straps with a
❏
3/32" [2.4mm] drill.
5. Fasten the gear to the pant with a strap and a M2.5 x
❏
10 washer-head Phillips wood screw. Use the other hole in
the strap as a guide to drill the hole for the second screw.
6. Fasten the other side of the strap to the pant with
❏
another M2.5 x 10 screw.
7. Remove the strap and the gear from the pant. Lightly
❏
wet the threads of two M3 set screws with threadlocker
and thread them each into a wheel collar with a 1.5mm hex
driver wrench.
3. Fit one of the main landing gear wires into one of the
❏
wheel pants—be certain the end of the wire engages the
plywood disc inside the pant. Hold a nylon landing gear
strap into position, and then mark one of the holes in the
strap onto the pant.
4. Drill a 1/16" [1.6mm] hole through the pant at the mark.
❏
8. Install the landing gear wire back into the pant with a
❏
wheel and a wheel collar on both sides of the wheel. Fasten
the gear with the strap and screws. Then, tighten the collars
to the gear with the wheel centered in the pant. Make sure
the wheel rotates smoothly. A small amount of oil on the
axle is recommended.
7
Page 8

9. Mount the landing gear to the wing with two straps
1" [ 25 mm ]
❏
and four more M2.5 x 10 washer-head Phillips wood screws.
10. Prepare the other landing gear and mount to the other
❏
wing in the same way.
ASSEMBLE THE FUSELAGE
Join the Vertical & Horizontal Stabilizer
3. If necessary, adjust the slot for the stab in the fuselage
❏
to get the stab horizontally aligned with the wing. Usually
though, all that will be required is a small amount of weight
on the high side of the stab.
4. Remove the stab and n from the fuselage. Make
❏
sure you have your paper towel squares and denatured
alcohol handy.
5. Mix up a batch of 30-minute epoxy. Apply epoxy to all
❏
joining areas of the stab, n and fuselage. Fit the stab and
n into position. 1/16" [1.6mm] balsa strips are handy for
quickly wiping away most of the excess epoxy—follow with
paper towel squares dampened with denatured alcohol. If
any weight was required to level the stab, don’t forget to
reposition the weight and double-check the alignment until
the epoxy has fully hardened.
1. Cut the 10-24 x 2" [50mm] wing bolts to a length of 1"
❏
[25mm]. Mount the wing to the fuselage with the bolts.
2. Test t horizontal stabilizer (stab) and vertical stabilizer
❏
( n) to the fuselage. View the model from behind to check
that the stab is parallel with the wing and the n is vertical.
6. While the wing is mounted to the fuselage, use a hobby
❏
knife to trim any dimples from the bottom of the wing fairing
followed with sandpaper where the fairing contacts the
bottom of the wing.
7. Use medium CA to glue the wing fairing into position.
❏
8
Page 9

8. After the epoxy gluing the stab and n to the fuselage
L-bend
1/4" [6 mm]
❏
has hardened, remove the wing.
Mount the Nose Gear
Mount the Motor & ESC
1. Mount the motor to the motor mount box with four M3
❏
x 10 Phillips machine-thread screws, M3 lock washers and
at washers with a touch of threadlocker on the threads.
1. Mount the nose wheel pant and nose wheel to the nose
❏
gear the same way as the main gear wheel and pant. Fasten
the nose gear mount and steering arm as shown.
2. Cut the threaded end off a 17-3/4" [450mm] pushrod so
❏
you have a non-threaded pushrod that is 10-1/2" [265mm] in
length. Make a 1/4" [6mm] “L” bend in one end of the pushrod
and install it into the pushrod guide tube for the nose steering.
3. Slide the nose steering pushrod into the guide tube in
❏
the fuselage. Attach the pushrod to the steering arm and
mount the nose gear to the fuselage with four M3 x 12 Phillips
machine-thread screws, M3 lock washers and at washers
and a dab of threadlocker on the threads.
2. Use double-sided foam mounting tape or adhesive-
❏
backed hook and loop material and the included small zip
ties to mount the ESC to the bottom of the motor mount
box. Note how the three wires from the ESC to the motor
are guided in and back out the side of the motor mount box
providing an easy path away from the cowl. On top, another
zip tie was used to hang the wires from the top of the motor
mount box keeping them away from the end of the motor shaft.
9
Page 10

3 . Do not install the propeller. Power up the ESC and
❏
use the transmitter to run the motor to make sure it turns
counter-clockwise when viewed from the front. If the motor
turns the wrong direction, disconnect the battery, and switch
any two of the three motor wires with each other. Then, retest.
Mount the Cowl
1. Mark on the cowl where to cut out for the nose gear wire.
❏
5. Tape two strips to each side of the fuselage where
❏
shown – note that the front edge of each strip aligns with
the front of the fuselage.
6. Use a 1/4" propeller reamer to enlarge the hole in the
❏
spinner back plate to t the propeller shaft on the motor.
7. Install the cowl and the spinner back plate. Position the
❏
cowl so the back plate will be 1/16" [1.6mm] from the cowl
and the propeller shaft will rotate without contacting the cowl.
2. Use a rotary tool with a cutting bit or a hobby knife
❏
to carefully cut the cowl until it goes on far enough for the
base of the propeller adapter to protrude from the cowl
approximately 1/16" [1.6 mm].
3. Draw a line on
❏
a piece of paper 1/8"
[3.2mm] from one
edge.
4. Cut four strips
❏
from the paper.
8. Using the lines on the paper strips as a guide, use a
❏
T-pin to mark the screw hole locations onto the cowl.
9. Remove the cowl. Drill 3/32" [2.4mm] holes at the marks
❏
using a piece of balsa or similar to support the inside of the
cowl at each hole as you drill.
10
Page 11

10. Reposition and align the cowl. Drill 1/16" [1.6mm]
❏
holes into the fuselage through each screw hole in the cowl.
Hook Up the Elevator and Rudder
1. Cut one of the 27" [680mm] pushrods to a length of
❏
18-1/2" [470mm] and the other to 17-1/2" [445mm] by cutting
off the unthreaded end. Thread a nylon clevis about fteen
full turns onto each pushrod and connect each one to a
control horn as shown.
11. Mount the cowl with four M2.5 x 10 washer-head Phillips
❏
wood screws. Carefully trim the spinner cone as necessary
to accommodate the propeller. Then, temporarily mount the
propeller and spinner. A sandpaper disk is also supplied to
place between the back plate and the propeller to keep the
back plate from turning when tightening the propeller nut.
12. Remove the propeller.
❏
2. Slide the longer pushrod into the elevator guide tube
❏
in the fuselage. Position the horn so the clevis holes will
be centered over the hinge line. Drill 1/16" [1.6mm] holes
through the elevator and mount the horn to the elevator
with two M2 x 12 Phillips machine-thread screws and the
back plate on top of the elevator.
11
Page 12

3. Mount the rudder horn the same way.
Elevator servo arm
11/32" [9 mm]
#48 (.076")
Rudder
Pushrod
#48 (.076")
Connector for
Nose Steering
Pushrod
1/16" [1.6 mm]
Rudder/nose
steering
servo arm
7/16 "
[11mm]
11/ 32 "
[9 mm]
Screw-Lock
Connector
M3 Set Screw
Nylon Retainer
❏
4. Use a #48 (.076") drill to enlarge the hole in the servo
❏
arm that is nearest to 11/32" [ 9mm ] out from the center—
this will provide the correct high-rate elevator throw with the
transmitter end points set to 100%.
7. Drill 1/16" [1.6mm] holes in the servo tray for the elevator
❏
servo and mount the servo with the mounting hardware that
came with it.
5. Fit the servo arm on the elevator servo and set the
❏
servo in the servo tray in the fuselage. With the servo arm
and elevator centered, mark the elevator pushrod where it
crosses the hole in the arm.
6. Make an “L” bend in the pushrod at the mark – this can
❏
be done with the pushrod installed, but will be easier if the
pushrod is removed (unthreading the clevis, reinstalling the
pushrod and threading the clevis back on will be required).
Connect the pushrod to the servo arm with a 90-degree
pushrod connector and cut off the excess wire.
8. Using the diagrams above, connect the rudder servo to
❏
the nose steering pushrod and the rudder pushrod the same
way. A screw-lock pushrod connector with a nylon retainer
and an M3 set screw is used to connect the nose steering
pushrod to the servo arm.
12
Page 13

9. Remove the propeller before powering up the
These are the recommended control surface throws:
ELEVATOR
HIGH RATE
AILERONS
RUDDER
LOW RATE
1/4"
[6.5 mm ]
18.0°
Up
3/8"
[10mm]
18.0°
Up
1/8"
[3 mm ]
9.0°
Up
5/ 32"
[5 mm]
7.5°
Up
1/4"
[6.5 mm ]
18.0°
Down
3/8"
[10mm]
18.0°
Down
1/8"
[3 mm ]
9.0°
Down
5/ 32"
[5 mm]
7.5°
Down
5/8"
[16 mm]
22.5°
Up
7/16"
[11 mm]
15.5°
Up
5/8"
[16 mm]
22.5°
Down
7/16"
[11 mm]
15.5°
Down
❏
radio. Connect the servos to your receiver, power up the radio,
center the servos and adjust the clevises on the pushrods
so the elevator and rudder are centered.
10. If you haven’t yet done so, place a silicone retainer
❏
over the clevises on the rudder and elevator pushrods.
FINAL ASSEMBLY
Install the Receiver
Refer to this image for the next two steps.
1. A receiver with end-pin-type servo plugs may be
❏
mounted on top of the servo tray, but receivers with toppin receptacles (as shown) will have to be mounted on the
back end of the battery tray. Use foam mounting tape or
hook-and-loop strips to mount the receiver.
2. Connect the ESC and servos to the receiver. The signal
❏
lead from the ESC may require a 6" [150mm] servo extension.
When mounting the wing for ying, the aileron servos may
be connected to the aileron channel in the receiver with a
Y-harness, or each servo may be connected to separate
channels if they are mixed through programming in the
transmitter (as shown in the previous image).
Set the Control Throws
CAUTION: Always remove the propeller while operating
the radio for any reason.
NOTE: Most Tactic and Futaba transmitters require that the
throttle channel be set to reverse. Other brand transmitters
will vary. Be sure to con rm the correct operation of the
throttle channel WITHOUT THE PROPELLER INSTALLED
before continuing past this step.
2. If necessary, adjust the throws with the programming
❏
in your transmitter and/or adjusting where the pushrods
connect to the servo arms and/or control horns.
3. Now would also be a good time to set your Fail Safe. Set
❏
Fail Safe on the throttle channel so that, in the event of loss
of signal, the motor cuts off. With the propeller removed, test
your Fail Safe by advancing the throttle slightly (just enough
to make the motor turn) and turning off the transmitter. If the
Fail Safe is correctly set the motor will stop.
Arm the ESC
Before the motor will rotate, the ESC must be armed rst:
1. To arm the ESC, move the throttle stick to the lowest
position, turn the transmitter on, and wait for the initiation
tones followed by a single beep. Note: The ESC will autocalibrate the low throttle stick position when powered on.
Be sure that throttle stick is at its lowest point when you
plug the ight battery in (or at the highest point for setting
the brake function- see below).
2. Move the throttle stick to full throttle and the ESC will
con rm this position with a double beep.
3. Lower the throttle again and the ESC will con rm this
lowest position with a sequence of four beeps. THE ESC
IS NOW ARMED. Advancing the throttle stick will cause
the motor to rotate. The propeller should not be installed
on the motor until you are ready for ight and you have
con rmed the Fail Safe is operating correctly!
1. Measure and set the control throws according to the
❏
measurements provided here:
13
Page 14

Set the Fail Safe and the Motor Brake
FAIL SAFE: While you have your radio operational and without
the propeller mounted, now would also be a good time to set
and check the Fail Safe function of your transmitter. Refer to
the instructions that came with your radio control system to set
Fail Safe on the throttle channel so that, in the event of signal
loss, the motor will stop. To test the Fail Safe, with the propeller
removed and the radio control system turned on, advance the
throttle slightly (just enough to make the motor turn) and turn
off the transmitter. If the Fail Safe is set correctly, the motor will
stop when the transmitter is turned off.
MOTOR BRAKE: While you still have your radio system
powered up and without the propeller mounted, check
the motor brake.
Advance the throttle stick to run the motor, and then move
the throttle stick down to stop the motor.
coast gradually to a stop (not stop abruptly). If the motor does
stop abruptly, the brake is turned on. Turn off the brake function
by following the procedure below:
A. Disconnect the battery from the ESC so it will not
receive power.
B.
With the transmitter turned on, advance the throttle stick
to full throttle.
C.
Connect the battery to the ESC to power the motor. Listen
for the series of beeps. There will be three single beeps
separated by pauses (for brake OFF), then a series of
three double beeps separated by pauses (for brake ON).
To turn the brake ON, lower the throttle during the series
of double beeps. If you wish to turn the brake OFF, lower
the throttle during the three single beeps. Now the brake
is set to the desired function and you may disconnect the
battery and turn off the transmitter.
WARNING! Do not proceed with the installation
of the propeller if your Fail Safe is not functioning
as expected. Even with a properly set Fail Safe,
the propeller/motor should always be considered “armed”
and can be a potential source of injury WHENEVER the
propeller is installed on the motor and the ight battery
is connected to the ESC. ALWAYS be alert for anything
that could come in contact with the propeller (especially
yourself) should it unexpectedly start to rotate.
Also, be sure the Cherokee is ALWAYS secured to your
bench during setup or on a ight stand prior to your ight
when the propeller is installed and the ight battery is
connected to the ESC. Do not allow the Cherokee to be
able to roll if the motor were to start unexpectedly. Safe
practices at your work bench and at your ying site will
ensure an enjoyable experience with the Cherokee EP.
The motor should
1. Cut a 6" [150mm] strip of the rougher, “hook” side of
❏
the adhesive-back hook-and-loop material. Peel off the
protective backing, apply medium CA to the strip and apply
the strip to the battery tray where shown.
2. Apply a strip of the softer, “loop” side of the adhesive-
❏
back hook-and-loop material to the battery. (Only a small
strip of hook-and-loop is required on the battery as a strap
will also be used to hold the battery in place.)
Check the C.G.
Since the battery location determines the C.G., the procedure
of determining where to mount the battery and checking the
C.G. are done simultaneously.
3. Place the battery in the middle of the battery tray.
❏
NOTE: The battery should not be connected to the ESC
when checking C.G.
4.
Install the prop and spinner in preparation for balancing
❏
the model. DO NOT connect the battery to the ESC at this time.
14
Page 15

1-1/2"
2-5/8"
38 mm
67mm
2-3/16"
56mm
The recommended C.G. is 2-3/16" [56mm] back from
the leading edge of the wing. The recommended C.G.
range is from 1-1/2"— 2-5/8" [ 38mm — 67mm].
5. Set a Great Planes C.G. machine to 2-3/16" [56mm],
❏
or mark the recommended, starting C.G. location on the top
of the wing where shown in the diagram.
6. Install the canopy hatch. At this point the model should
❏
be completely ready to y with the wing, propeller and spinner.
Test the C.G. by placing the model on the C.G. machine, or
lift at the lines you marked indicating the recommended,
starting C.G. Shift the battery forward or aft to get the model
to balance.
7. Once the location of the battery has been determined,
❏
make a mental note of this location, or mark the inside of
the fuselage or the battery tray to position the battery here
for the proper C.G. when ying the model.
through and under the battery tray and cut the strap to the
correct length to secure the battery.
9. Double-check the C.G. and, if necessar y, reposition the
❏
battery and adjust any marks you may have made, noting
the battery’s location for the desired C.G.
Balance the Model Laterally
1. Lift the Piper several times by the propeller shaft and
❏
the tail to see if one wing drops.
2. If one wing drops consistently, add weight to the
❏
opposite tip by sticking it to the outside or strategically
concealing it inside the balsa tip. An airplane that has
been laterally balanced will track better in ight and
maintain its heading better during maneuvers when the
plane is climbing.
MOTOR/BATTERY/PROPELLER INFORMATION
WARNING: Never have the flight battery
connected to the ESC without the transmitter
turned on – after each ight (or any time after
running the motor) always disconnect the battery before
turning off the transmitter. And when ready to y (or
whenever running the motor for any reason), always turn
on the transmitter rst before connecting the motor battery.
Also make certain your Fail Safe is programmed correctly so
in the event the receiver loses signal (or, if you inadvertently
turn off the transmitter before disconnecting the battery or
vice-versa) the motor will not turn. Follow the instructions
that came with your radio control system to check and
set the Fail Safe.
The recommended RimFire .10 is rated for 30A constant
current and 35A surge current, so it is desirable to load (prop)
the motor to operate within that limit.
For starters, an APC 9 x 6E (on a 3S LiPo) draws about
24A static, but averages a little less than 15A with “normal”
throttle use. This is a suitable propeller choice and ies the
Cherokee well—it can be zoomed around or cruise at lower
throttle for more scale-appearing ight and extended air time.
We’ve also own the Cherokee with a 10 x 5.5MR (MultiRotor). The current draw is only slightly higher, so this is
also a suitable propeller choice.
With every propeller, ight time depends greatly on how you
use the throttle.
8. Make a battery strap by overlapping 3" [75mm] of the
❏
included hook-and-loop strap material. Insert the strap
15
Page 16

In any case, use a ight
timer initially set to a
conservative time (5
minutes for example).
When the timer sounds,
land. Resting (unloaded)
voltage should not be
below 3.75V/cell measured
with a volt meter after you
land. When you charge the
battery note how much
capacity it took to recharge (indicating how much was used
for the ight). Strive to use no more than 80% of the battery’s
capacity. Adjust your timer according to the voltage and
capacity used for the ight.
You can also use the worksheet below to determine optimum
ight times based on your ying style and battery capacity.
CAUTION: Never run the motor on the ground for more
than a few seconds. Otherwise, you may overload the
motor, battery or ESC.
FLYING
The Piper Cherokee doesn’t have any particular ight
characteristics that you need to be made aware of ahead
of time. It’s an honest yer with no peculiar tendencies.
Using low rates on rudder to dampen the nose steering
sensitivity for takeoff is advised – especially if taking off
from a paved runway.
Have a ball! But always stay in control
and y in a safe manner.
GOOD LUCK AND GREAT FLYING!
A
BCDEFG
FORMULAS
Flight Time
(.10ths )
Recharge
Capacity
1
2
3
4
5
6
7
8
9
10
© 2018 Tower Hobbies .® A subsidiary of Hobbico, Inc.
B / A D x .8 E / C
mAh/minute
Battery
Capacity
Target Capacity
to Use in Flight
Recommended
Flight Time
B/1000 / (A/60)
Avg. In-Flight
Current
TOWA2200/2202
 Loading...