

Page 1
Stainless Steel
One-Touch Pressure Cooker
Safety and Instruction Manual
PLEASE READ CAREFULLY
T90103
*Subject to registering Your Extended Guarantee online at www.towerhouswares.co.uk.
Page 2

2
Register Your Extended Guarantee online at www.towerhouswares.co.uk.
CONTENTS:
Please read this Manual carefully BEFORE
using the Pressure Cooker for your own
safety. The Tower Pressure Cooker has
been designed to cook food under pressure
in accordance with the instructions in this
Manual.
Thank you for purchasing this Tower Pressure
Cooker from the Tower Pressure Cooker range.
It has been designed to provide many years of
trouble-free cooking. There are many benets to
using a Tower pressure cooker:
• A wide range of food can be cooked in
your pressure cooker, including vegetarian,
vegan and a wide range of ethnic dishes.
• Foods retain more nutrients, vitamins and
minerals and are more tasty.
• Saves energy as cooking is done in just
one container on one heat source.
• Saves time when cooking – cooking can
be up to 70% faster.
• Less washing up is required as only one
cooking pot is used and the pressure
cooker lid eliminates splashes and boil
overs.
The Tower Pressure Cooker enables you to
produce a wide variety of meals, side dishes
and deserts, including:
• Soups and pâté’s
• Steamed vegetables
• Whole chickens and joints of meat
• Stews and casseroles
• Pasta dishes
• Beans, rice and pulses
• Steamed puddings
Contents:
1. Specications
1.1 Components and accessories
1.2 Technical Information
1.3 Suitable hob types for cooking
1.4 Spare part information
2. ImportantSafetyInformation
2.1 Safety features
2.2 User safety
2.3 Safety during use
2.4 Foods and safe quantities
3. UsingyourTowerPressureCooker
3.1 Before cooking
3.2 During cooking
3.3 At the end of cooking
3.4 How to use the steamer
4. CookingTimesandRecipes
4.1 Cooking times for different types of food
4.2 Simple recipe examples
5. StorageandMaintenance
5.1 How to look after your Tower Pressure
Cooker
5.2 Changing key parts
6. TroubleShooting
7. WarrantyInformation
8. CustomerServiceInformation
Page 3
Safety and Instruction Manual
3
Helpline: +44 (0) 844 984 0055
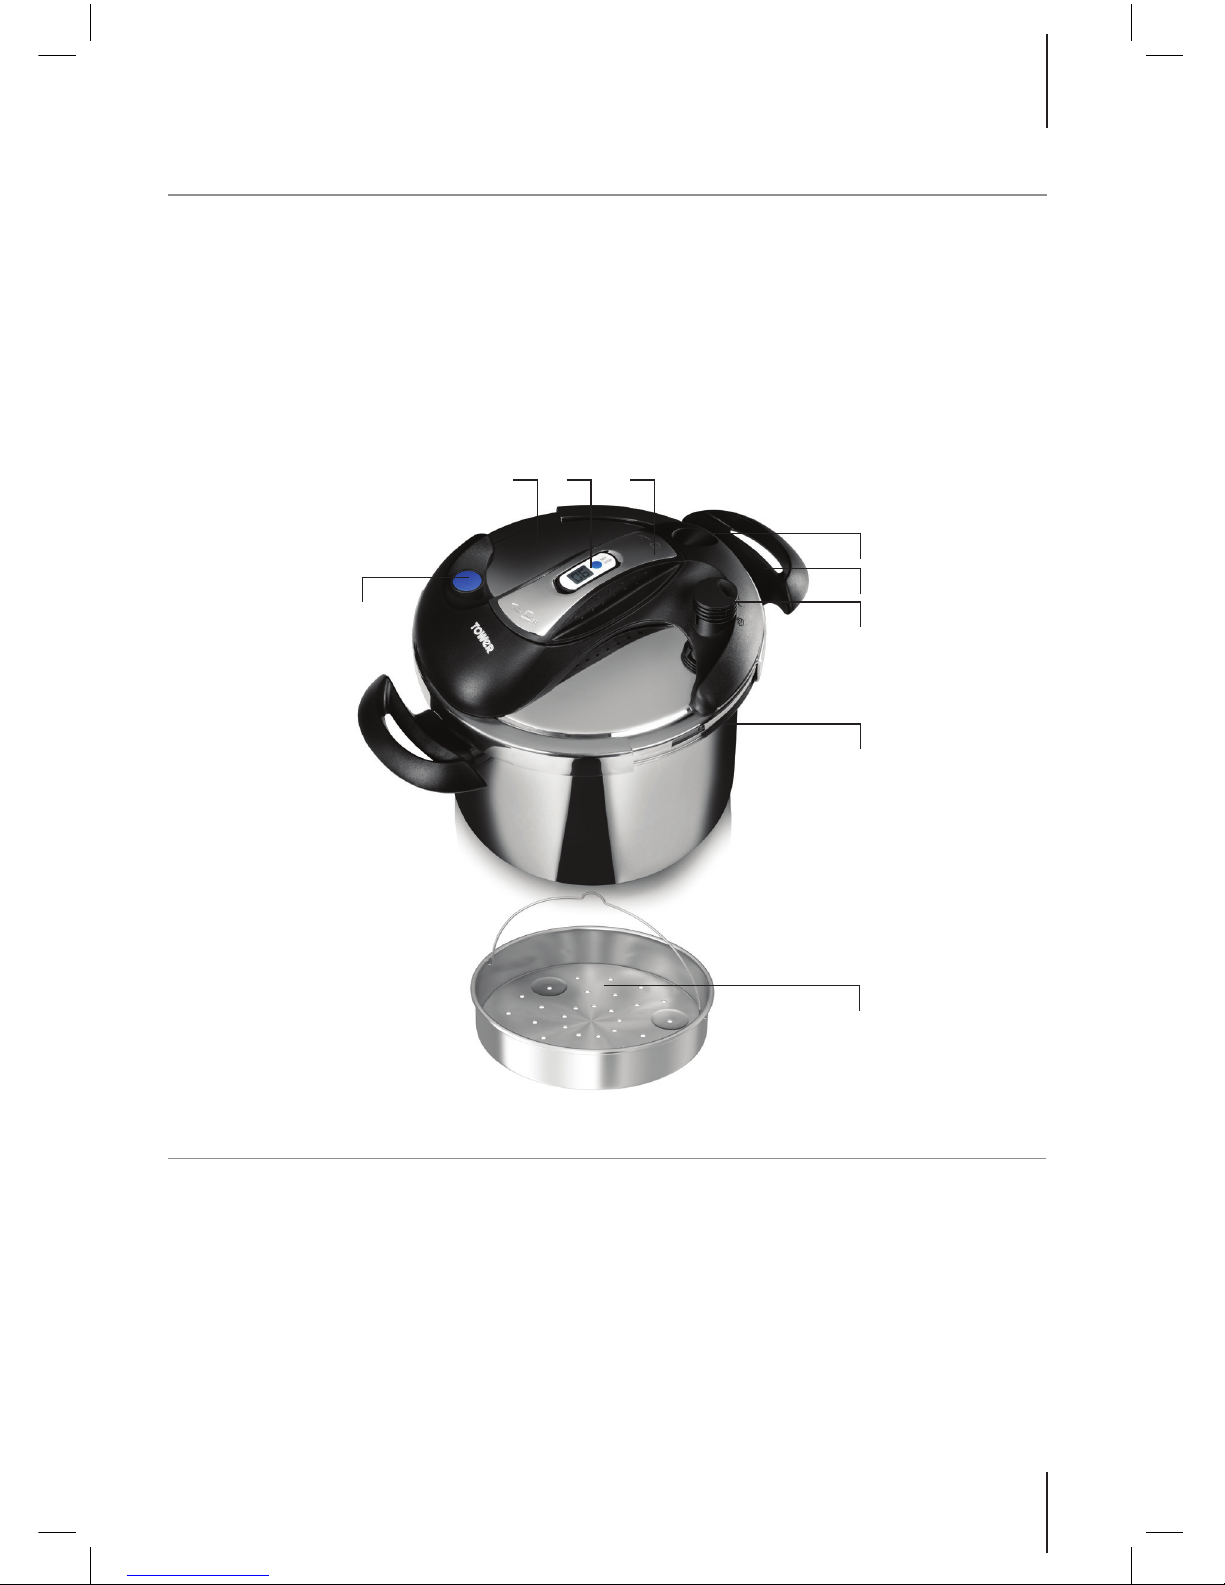
1.1 Components
This box contains:
Pressure Cooker
Steamer Basket
Steamer Stand
Timer
2 Spare Type AG13 Batteries
Instruction Manual
Structureofyourpressurecooker:
1. Pressure Cooker Lid
2. Timer
3. Lock/Unlock Handle
4. Safety Valve
5. Handles
6. Pressure Limiting Valve
7. Safety Window
8. Steamer Basket
9. Pressure Indicator
1 SPECIFICATIONS:
1. 2. 3.
6.
7.
5.
4.
9.
8.
Page 4

4
Register Your Extended Guarantee online at www.towerhouswares.co.uk.
SPECIFICATIONSContinued
1.3 SuitableCookingHobs
• The Tower Pressure Cooker can be used
on all types of hob, including gas, electric
and induction, with a power rating of less
than 2kW.
• When using an electrical and/or induction
hob, ensure that the hob has a diameter
as close as possible to that of the cooker.
NEVER use a hob that is too large for the
pan base.
• When using a gas hob, always ensure that
the ames DO NOT encroach upon the
sides of the cooker but remain beneath it.
• DO NOT place or attempt to heat the
pressure cooker in a heated oven.
1.4 SparePartsInformation
• Your Tower Pressure Cooker is covered
by a standard manufacturer’s guarantee
of One Year. This can be upgraded to a
10-year Guarantee by registering your
purchase on the Tower website (See
Section 7).
• Should you encounter problems or require
a replacement part, please consult the
list below and then contact The Tower
Customer Service Department on:
+44 (0) 844 984 0055.
Any necessary spare parts may be
ordered from the Tower website.
CODE DESCRIPTION
TS1006 22cm Sealing Ring Grey
TS2002 Pressure Limiting Valve Black
TS2006 Safety Valve Red
TS3001 Digital Timer
TS3002
Indicator Kit One Touch
Blue
1.2 TechnicalSpecication
Model No: T90103
Diameter: 22cm
Capacity: 6 Litre
Working Pressure: 80kPa (Approx 11.6psi) ± 10%
Safety Pressure: Not exceeding 180kPa (Approx 26psi)
Material: Stainless steel 18/8 body and lid
Aluminium and steel encapsulated base
Suitable for hob types: Induction/Gas/Electric/Ceramic/Halogen
Featuring: Unique twist lock/open system
Inner minimum and maximum marking
60mins timer/alarm
Your warranty becomes void should you decide
to use non Tower spare parts. Spare parts can be
purchased from www.towerhousewares.co.uk
Page 5

Safety and Instruction Manual
5
Helpline: +44 (0) 844 984 0055
P
r
e
s
s
u
r
e
I
n
d
i
c
a
t
o
r
P
r
e
s
s
u
r
e
I
n
d
i
c
a
t
o
r
Please read these notes carefully
BEFORE using your Tower
Pressure Cooker
2.1SafetyFeatures
2.1.1 Pressure Limiting Valve and
Pressure Indicator
• Once the pressure has built up
to its working level, the pressure
limiting valve will release any
excess steam. Once the
pressure cooker has reached its
working pressure, the pressure
indicator will rise to show one
line.
• Should the pressure indicator
rise to show a second red line,
the pressure is incorrect and
action needs to be taken. The
pressure cooker should be
taken off the heat and allowed
to cool. When the pressure
indicator has dropped, the
pressure has been completely
reduced. The pressure limiting
valve should then be removed,
the cover can then be opened
and the pressure cooker
checked to ensure that it has
been set up correctly.
2.1.2 Safety Valve
• This will rise when the operating
pressure reaches 4kPa –
beware of any escaping steam
as this can scald.
2.1.3 Sealing Ring/Safety Window
• When the pressure limiting
valve and the safety valve
have not been activated, the
sealing ring will be squeezed
out through the safety window.
In this eventuality, action needs
to be taken. The pressure
cooker should be taken off
the heat and allowed to cool.
When the pressure indicator
has dropped, the pressure has
been completely reduced. The
pressure limiting valve should
then be removed, the Cover
can then be opened and the
pressure cooker checked to
ensure that it has been set up
correctly.
2.1.4 Lock/Unlock Handle
• In order to open or close
the cover, the lock/unlock
handle needs to be twisted 90
degrees.
2IMPORTANTSAFETYINFORMATION
O
p
e
n
a
n
d
C
l
o
s
e
O
p
e
n
a
n
d
C
l
o
s
e
Page 6

6
Register Your Extended Guarantee online at www.towerhouswares.co.uk.
2.2UserSafety
• The pressure cooker heats food
under pressure.
• When the pressure cooker is at
its operating pressure, the liquid
boils at 120°C
• When the food is at boiling
temperature, and when the
pressure is decreasing rapidly,
steam and boiling liquid can
escape from the pressure
cooker.
• To avoid injury, ensure that
the pressure cooker is closed
correctly and securely before
use. Do NOT start to heat the
pressure cooker until the lid
has been correctly and securely
closed.
• DO NOT leave the pressure
cooker unattended.
• DO NOT allow children to use
the pressure cooker
• DO NOT obstruct the pressure
limiting valve – it must be clear
at all times.
• Finally, take care to position
the pressure cooker so that
tthe pressure limiting valve and
safety windows are not in close
proximity to other people or
yourself so as to prevent injury
from escaping steam.
2.3Safetyduringuse
• Always check the pressure
limiting valve before use – hold
the cover up to the light and look
through the valve to ensure that it
is clear from any food, dirt, scale
etc.
2.4Foodsandsafequantities
• The amount of food and liquid
placed into the pressure cooker
must NOT exceed
2
⁄3
of the
volume of the pressure cooker.
This is to allow room for any
expansion, bubbling etc which
could block the steam release
valves. The amount of liquid
(water, soup etc) must NOT
be less than 200ml in order
to avoid the risk of boiling dry.
When cooking soup, rice or
dried vegetables that expand
during cooking, do not ll more
than ¼ full.
• NEVER use your Tower OneTouch Pressure Cooker with
oil. Some manufacturers may
advise using small amounts of
oil and some recipes may call
for a similar amount of oil to be
added. However, food must NOT
be cooked directly in oil, i.e. for
cooking food such as chips.
Page 7

Safety and Instruction Manual
7
Helpline: +44 (0) 844 984 0055
• DO NOT pressure cook foods
such as stewed fruit, apple
sauce, cranberries, rhubarb,
pearl barley, oatmeal, other
cereals, split peas, soup mixes
containing dried vegetables,
noodles, macaroni or spaghetti.
These foods tend to foam, froth
and splutter and may block the
pressure limiting valve.
• If you are cooking foods that
have skins, always pierce the
skins before cooking. Do NOT
pierce the skins immediately after
cooking as the food could still be
pressurised and may spray hot
liquid that can cause injury.
• When cooking foods such as
porridge or soup, allow your
Tower Pressure Cooker to
cool once the cooling time has
elapsed, then shake the pressure
cooker gently before opening
to release any air bubbles. This
will reduce the risk of bursting
once the lid is open and prevent
possible injury.
• When cooking soft food, such
as rice, allow to cool, then shake
the Pressure Cooker gently
before opening to avoid hot food
spraying out as the pressure is
released.
• In the unlikely event the
appliance develops a fault,
stop using it immediately and
seek advice from the service
department:
+44 (0) 844 984 0055
Page 8

8
Register Your Extended Guarantee online at www.towerhouswares.co.uk.
3 USING YOUR PRESSURE COOKER
R
a
p
i
d
C
o
o
l
i
n
g
For the rst time of use, clean the pressure
cooker, ll with about 400ml of water and
heat for 30 minutes. Allow to cool and then
empty the heated water. Your pressure cooker
is now ready for use.
3.1BeforeCooking&SettheTimer
Open the lid – Twist the unlock handle in order
to separate the cover from the bowl.
Check the Valves – Before each use, check that
the pressure limiting valve, safety valve and safety
window are not blocked and that the sealing ring
is in place.
Add the Ingredients – place your selected
ingredients in the bowl. Always use liquid in your
pressure cooker. To avoid damage, DO NOT heat
the pressure cooker when it is empty or dry.
As explained in Section 2.4, when cooking
foods that will foam or froth, such as rice,
dried vegetables or stewed fruit, do NOT ll
the pressure cooker bowl to more than ¼ of its
capacity in order to allow the food to expand
without blocking the pressure limiting valve.
Similarly, if you are cooking foods that do not
expand, e.g. meat and vegetables, DO NOT
ll above 2/3 of the capacity of the bowl.
Close the Cover – Fit the cover and twist the
locking handle to lock the cover to the bowl.
Cooking Pressure – The Tower Pressure Cooker
has one operating pressure, namely 80kPa (See
Cooking Times and Recipes, Section 4)
Select the cooking time using the digital
timer – Your Tower One-Touch Pressure Cooker
incorporates a digital timer that enables you
to set the precise cooking time. This feature is
unique to the Tower One-Touch Pressure Cooker.
Once you have set the time, the timer may be
removed from the cover knob and may be taken
around the house with you. When the cooking
time has nished, an alarm sounds, alerting you
to return and remove the pressure cooker from
the heat.
Heating – Turn the hob to its highest setting in
order to get the pressure cooker as quickly as
possible to its required cooking pressure.
NOTE: Some steam will escape from the
safety valve after the pressure cooker has
been heating. This is normal and will cease
once the safety valve has risen.
Setting The Timer – Press the blue button on
the timer. The number “00” will be displayed.
Then press the button the required number of
times – i.e. if you need 10 minutes, press the
button 10 times.
The digital clock will then start counting down
and, when it reaches “00” the alarm will sound.
To stop the alarm, press the blue button. After a
few seconds, the numbers will disappear
If you wish to stop the time counting down,
press and hold down the blue button for a few
seconds; the numbers “00” will be displayed and
then the screen will go clear.
If you wish to leave the kitchen while the cooking
is in progress, the timer can be removed from the
cover knob and taken with you. The timer and
the alarm will continue to work in the same way.
Upon return to the pressure cooker, the timer can
be replaced in its slot.
3.2DuringCooking
3.2.1 Cooking Pressure
Once the required cooking pressure (80kPa) has
been reached, the pressure limiting valve will
rise and steam will escape continuously from it
(emitting a hissing sound as it does so). At this
point, the heat should be turned down to the
lowest possible level that maintains the pressure
limiting valve in its raised position.
3.2.2 Cooking Time
The cooking time begins directly the heat is
turned down, once the pressure limiting valve
rises and the pressure cooker begins to hiss.
Once the cooking time has nished, the hob
C
h
e
c
k
V
a
l
v
e
s
O
p
e
n
a
n
d
C
l
o
s
e
MAX
MIN
MAX
MIN
L
e
v
e
l
s
Page 9

Safety and Instruction Manual
9
Helpline: +44 (0) 844 984 0055
should be turned off and the pressure cooker
allowed to cool.
3.2.3 Caution
DO NOT leave the pressure cooker unattended
during cooking.
DO NOT touch the metal surfaces of the
pressure cooker during cooking as they will be
very hot. Always use oven gloves and hold the
pressure cooker by both handles, keeping the
pressure cooker level.
The timer is NOT waterproof – please keep it
away from any contact with water.
The timer is not a toy – keep it away from
children and pets.
3.3OnceCookingHasFinished
Do NOT attempt to open your pressure cooker
until it has cooled and the pressure has been
released.
3.3.1 Natural Cooling – The Preferred Method
Using oven gloves and gripping the handles,
carefully move the pressure cooker on to a level,
heat-resistant surface and leave it to stand until
the pressure has reduced and the safety valve
has lowered.
3.3.2 Rapid Cooling
If it is necessary to cool the pressure cooker
more rapidly, place it in a sink and run cold water
over it until the safety valve has lowered
DO NOT allow water to enter the pressure
cooker through the safety valve or through the
pressure limiting valve.
REMOVE the timer from the cover when using
the rapid cooling methods as the timer is NOT
waterproof.
3.3.3 Opening The Pressure Cooker
Once the safety valve has lowered, the pressure
limiting valve can be removed. When all of the
steam has escaped and the valve rod has been
released, the lid can be opened. If the safety
valve rod has not dropped, it means that there is
still some pressure in the pressure cooker.
To ensure your safety, the cover cannot be
opened until the indicating valve rod has
dropped. DO NOT force the pressure cooker
open.
Under these circumstances, the safety valve may
be pressed down, using a needle or a cocktail
stick to enable the remaining steam to escape.
The pressure limiting valve should always be
removed before opening the cover.
Use oven gloves to open the cover to avoid the
risk of injury.
If soft foods, such as rice, are being cooked,
shake the pressure cooker gently to relieve the
pressure before opening. Similarly with foods
such as soup, shake gently to disperse any
bubbles as they could burst and spray hot liquid,
causing injury.
Next, twist the lock/unlock handle to open the
lid.
3.4HowtoUsetheSteamer
Some recipes, such as Christmas pudding,
require pre-steaming before being brought to
cooking temperature. Pre-steaming can be
carried out in a closed pressure cooker, over a
medium heat.
Once steaming begins, the heat should be
turned down as low as possible in order to
reduce the amount of steam that escapes and
the amount of water that is consumed. Once
pre-steaming is complete, check that there is
still sufcient water remaining to complete the
cooking stage.
The cover should be locked into position and the
heat turned up to bring the pressure cooker up
to cooking pressure.
The basket is used to prevent the food from
coming into contact with the liquid while, at the
same time, allowing the steam to circulate freely
in and around the food.
The basket may be lined with aluminium foil when
cooking foods such as rice or pasta. However, in
order to prevent the rice or pasta from blocking
the safety vents, the basket should be covered
with greaseproof paper, which must be tied
down securely around the sides of the basket.
Page 10

10
Register Your Extended Guarantee online at www.towerhouswares.co.uk.
4.1CookingTimes
The cooking time starts from the moment that the heat is turned down after the pressure limiting valve
rises and your pressure cooker starts to hiss; it nishes when you remove your pressure cooker from the
heat.
4.1.1VegetableCookingTimes
Vegetable VegetableCooking time
(mins)
Cooking time
(mins)
Artichoke (large whole,
without leaves)
9 - 11
Artichoke (medium whole,
without leaves)
6 - 8
Artichoke (small whole,
without leaves)
4 - 5
Artichoke (hearts) 2 - 3
Asparagus (ne, whole) 1 - 1½
Asparagus (thick, whole) 1 - 2
Aubergine (5 mm slices) 3
Aubergine (10 mm chunks) 3
Beans (green, whole - fresh
or frozen)
2 - 3
Beets (5 mm slices) 5 - 6
Beans (yellow, whole - fresh
or frozen)
2 - 3
Broccoli (orets) 2
Broccoli (stalks) 5 - 6
Broccoli (stalks, 5 mm slices) 3 - 4
Brussels sprouts (whole) 4
Cabbage (red or green, in
quarters)
3 - 4
Cabbage (red or green, 5
mm slices)
1
Carrots (5 mm slices) 1
Carrots (25 mm chunks) 4
Cauliower (orets) 2 - 3
Celery (25 mm chunks) 3
Corn (kernels) 1
Corn on the cob 3
Endive (thickly cut) 1 - 2
Green beans (whole - fresh
or frozen)
2 - 3
Kale (coarsely chopped) 2
Leeks (white part) 2 - 4
Mixed vegetables (frozen) 2 - 3
Okra (small pods) 2 - 3
Onions (medium whole) 2 - 3
4.COOKINGTIMESANDRECIPES
Page 11

Safety and Instruction Manual
11
Helpline: +44 (0) 844 984 0055
Vegetable VegetableCooking time
(mins)
Cooking time
(mins)
Parsnips (5 mm slices) 1
Parsnips (25 mm slices) 2 - 4
Peas (in the pod) 1
Peas (green) 1
Potatoes (cut into 25 mm
cubes)
5 - 7
Potatoes (new, whole small) 5 - 7
Potatoes (whole large) 10 - 12
Pumpkin (50 mm slices) 3 - 4
Red beet (5 mm slices) 4
Red beet (large, whole) 20
Red beet (small, whole) 12
Spinach (fresh) 1
Spinach (frozen) 4
Squash (acorn, halved) 7
Squash (butternut, 25 mm
slices)
4
Sweet potato (40 mm slices) 5
Swede (25 mm slices) 7
Swiss chard 2
Tomatoes (in quarters) 2
Tomatoes (whole) 3
Turnip (small, in quarters) 3
Turnip (40 mm slices) 3
Yellow beans (whole - fresh
or frozen)
2 - 3
Zucchini (5 mm slices) 2
Page 12

12
Register Your Extended Guarantee online at www.towerhouswares.co.uk.
Meat MeatWater
quantity
Water
quantity
Cooking
time (mins)
Cooking
time (mins)
4.1.2MeatCookingTimes
Beef, corned (3 to 4
inches thick)
950ml 45
Beef, ank steak 250ml 35
Beef, liver; sliced 300ml 5
Beef, pot roast blade,
chuck, or rump
300ml 30 - 40
Beef, round steak
(Swiss) (12mm thick)
300ml 20 - 25
Beef, short ribs 300ml 35 - 40
Beef Stew (25mm
cubes)
700ml 15 - 20
Chicken, fried (1100 to
1400g)
300ml 12
Chicken, fricassee
(1400 to 1800g)
500ml 15 - 20
Chicken, stewed;(18002500g)
500ml 25 - 30
Pheasant 300ml 15 - 20
Ham, uncooked shank
(1300-2250g)
625ml 35 - 45
Ham, uncooked picnic
or shoulder
625ml 35 - 45
Ham, uncooked slices
(25mm thick)
175ml 5 - 6
Pork chops 250ml 9
Pork shanks 625ml 35
Pork shoulder 375ml 35 - 40
Pork spareribs 250ml 15
Lamb shoulder (1300
to 2500g)
750ml 30 - 40
Lamb steak (25mm
thick)
175ml 9
Lamb stew (25mm
cubes)
500ml 10
Mutton (1300 to 1500g) 625ml 45
Oxtail 500ml 45
Rabbit 250ml 12 - 15
Veal shank 625ml 40 - 45
Veal steak (25mm thick) 250ml 12 - 15
Veal Stew (25mm
cubes)
500ml 10
Venison, pot roast (75 to
100mm thick)
300ml 30 - 40
Page 13

Safety and Instruction Manual
13
Helpline: +44 (0) 844 984 0055
These cooking times and quantities are for
guidance only. Please make sure that all
food is cooked thoroughly before serving.
Grains
(1 cup/250ml)
TypeWater
quantity
Cut of
Fish
Cooking
time (mins)
Cooking
time (mins)
4.1.3RiceandGrainCookingTimes 4.1.3MeatCookingTimes
Barley (pearl) 950 ml 15 - 20
Barley (pot) 750 ml 20
Couscous 500 ml 2 - 3
Oats (quick cooking) 400 ml 6
Rice (basmati) 350 ml 5 - 7
Rice (brown) 350 ml 12 - 15
Rice (white) 350 ml 5 - 6
Rice (wild) 750 ml 22 - 25
Spelt berries 750 ml 15
Wheat berries 750 ml 30
White – Bass,
Bream, Brill, Cod,
Coley, Haddock,
Halibut (454g)
Plaice,
Rock Salmon,
Sole, Turbot,
Skate Wings,
Whiting
Steaks and
Fillets
Whole Fish
4-5
6-8 per
450g
Oily – Herring,
Mackerel, Mullet,
Trout
Salmon
Fillets
Whole Fish
(Depending
upon size)
Steaks, cut
-
lets or pieces
Small whole
(Salmon
Trout)
4-5
7-8
5-6
6-9 per
450g
Crab 8-10
Lobster,
Prawns, Shrimps
10-11
3
Page 14

14
Register Your Extended Guarantee online at www.towerhouswares.co.uk.
Beef Stew
4.2SampleRecipes FoodAllergies
Important Note: Some of these recipes
may contain nuts and/or other allergens.
Please be careful when making any of our
sample recipes that you are NOT allergic
to any of the ingredients. For more
information on allergies, please visit the
Food Standards Agency’s website at:
www.food.gov.uk
Ingredients
Serves: 8
• 1 tablespoon olive oil
• 1 small onion, diced
• 1kg beef stewing meat, cubed
• 225ml beef stock
• 225ml water
• 5 carrots, peeled and diced
• 1 dessert-spoon salt, or to taste
• 8 medium baking potatoes, peeled and
diced
• 1 dessert-spoon cornour
Method
1. Heat the oil in the bottom of the pressure
cooker over medium high heat. Add the
onion and beef, and cook until browned
on the outside.
2. Stir in the stock, water, carrots and salt,
close the lid, and secure the pressure
limiting valve. Heat until you start to hear
sizzling, then reduce the heat to medium,
and set your timer for 20 minutes.
3. Meanwhile, place the potatoes in a
saucepan with enough water to cover.
Bring to the boil, and cook until tender,
about 10 minutes. Drain. This whole
process should take about the same
amount of time as the rest of the stew.
4. When the 20 minutes are up, release the
pressure from the cooker according to the
manufacturer’s instructions.
5. Remove the lid, and place the pot over
medium heat. Bring to the boil. Stir the
cornour into a small amount of cold water
until dissolved. Stir this into the stew, and
cook for a few minutes. Add the potatoes
to the stew, or place them in serving
dishes, and ladle the stew over them.
PREP
TIME
15
minutes
COOK
TIME
20
minutes
READY
IN
35
minutes
Page 15

Safety and Instruction Manual
15
Helpline: +44 (0) 844 984 0055
Leek and Hazelnut Risotto
Ingredients
Serves: 4
• 850ml hot meat or vegetable stock
• 2 baby carrots
• 2 to 3 small leeks
• 1 knob of butter
• 1 rosemary sprig
• 225ml dry white wine
• 400g Carnaroli, Arborio or
Vialone Nano rice
• 1 teaspoon salt (or less if the stock is
already salty)
• 1 handful of hazelnuts, roughly chopped
with a grinder
• 1 knob of butter
• Grated Parmesan cheese, to serve
absorbed, and then pour the rest of the
wine over the rice. Let the wine evaporate
again. Add the salt and the boiling stock to
the rice, stir and close the pressure cooker
straight away.
4. Put the pressure cooker to the highest
heat level and bring it to pressure.
Depending on the model, you can turn
off the cooker when it gets to pressure or
lower the heat. Calculate about 4 minutes
from when the pressure cooker comes to
pressure.
5. While the rice is cooking, toast the
hazelnuts in a dry frying pan on medium
heat for a few minutes until they are
golden, stirring constantly.
6. After 4 minutes in the pressure cooker,
remove it from the heat, relieve the
pressure by letting the steam escape. Pay
attention while doing this because some
liquid can come out of the valve.
7. Open the pressure cooker, stir the risotto
and check to see if it needs more salt.
Add the other knob of butter and stir,
letting it cream the risotto before serving.
Serve the risotto with a generous sprinkling
of Parmesan cheese and the toasted nuts.
Method
1. In a medium sized pot, bring the stock
to the boil. Peel the carrots and cut them
into little cubes. Cut the leeks in half
lengthways, wash them under running
water, get rid of the dark green part and
then cut them into little (2mm) pieces.
2. Put the pressure cooker on medium heat
and melt 1 knob of butter. Brown the
leeks, carrots and the rosemary sprig.
Pour half of the white wine and let it
simmer. (Keep the other half for later to
pour over the rice.)
3. When the wine has evaporated, add
the rice, mixing it so that the butter is
PREP
TIME
10
minutes
COOK
TIME
15
minutes
READY
IN
25
minutes
Page 16

16
Register Your Extended Guarantee online at www.towerhouswares.co.uk.
Ingredients
Serves: 4-6
• Butter 100g, plus a little extra
• Golden caster sugar 100g
• Eggs 2
• Vanilla extract 1 tsp
• Self-raising our 100g
• Cocoa powder 1 tbsp
• Grated dark chocolate 2 tbsp
Method
1. Butter a 1.2 litre pudding basin. Cream the
butter with the sugar until light and uffy.
Beat the eggs in a separate bowl and add
gradually. Add the vanilla extract and mix
in.
2. Meanwhile, heat at least 5cm water in your
pressure cooker with a steamer insert or
an improvised steamer rack in place.
3. Sift the our and cocoa into the mixture.
Gently fold, adding the chocolate. Add a
tablespoon of water until the mixture is
soft enough to drop from the spoon.
4. Pour the mixture into your prepared basin,
lling only three-quarters to allow room to
rise.
5. Take a double square of greaseproof
paper, large enough to hang over the rim
of the basin by a few centimetres, and
fold a pleat into it. Butter the underside
and secure the paper with a long piece of
string under the rim. Loop the string over
the basin and tie on the opposite side to
make a handle.
6. Put the basin into the steamer, cover the
pressure cooker without clamping the
cover closed and steam for 15 minutes.
This is essential to allow the sponge to
rise.
7. Now clamp on the cover. Bring up to full
pressure, turn the heat down to medium
and cook for 25 minutes.
8. Turn off the heat and vent immediately.
Remove the basin using the handle. Run
a knife around the inside of the basin and
turn out on to a plate. Serve with double
cream or crème fraîche.
PREP
TIME
15
minutes
COOK
TIME
20
minutes
READY
IN
35
minutes
Chocolate Pudding
Page 17

Safety and Instruction Manual
17
Helpline: +44 (0) 844 984 0055
5Cleaning,StorageandMaintenance
5.1LookingafteryourPressureCooker
Your Tower Pressure Cooker is designed to
give you many years of trouble free cooking,
if properly cared for.
After every use, the pressure cooker should be
carefully cleaned and dried before putting away.
Please ensure that all the parts are put away
clean, dry and in a safe place ready for your next
cooking session.
For the best results and in order to keep your
stainless steel pressure condition in top condition,
the stainless steel surface can be polished using a
soft clean cloth and stainless steel cleaner to bring
the true shine back and to ensure that it is ready
for its next use.
Do not wash any part of the product in a
dishwasher. We recommend careful hand washing
only in order to prolong the lifespan of the product.
To avoid damaging the surface of the pressure
cooker, do not use implements or cleaning
materials made from metals, hard materials
or abrasives.
DO NOT store food inside the Pressure Cooker
when not in use.
To avoid damage to the seal, DO NOT store your
pressure cooker with the cover tted in place;
instead, place the cover upside down, with the
seal uppermost and store the pressure cooker in a
cool, dry place away from direct sunlight.
5.2MaintainingtheSeal
After use, remove the seal from the cover and
check for any damage. If the seal is damaged
or has gone out of shape, it must be replaced
immediately. We recommend that the seal be
replaced every one or two years, depending upon
the amount of use. Do NOT use substitute parts
otherwise your Guarantee will be invalidated.
Wash the seal in hot water and detergent to
remove any debris from both the seal and the
groove in which it sits.
Dry the seal and replace it in the cover.
5.3MaintainingtheSafetyValveandPressure
LimitingValve
If the pressure limiting valve has become blocked
during the cooking process, the safety will
automatically work. Ensure the cooker is then
turned off immediately. Then open the cover and
clear the valve by rinsing it in water.
5.4Safetyopen-preventingvalve
switch clockwise safety valve with spanner,
dismantle and clean. If the pressure cooker has
not been used for a period of time, always check
the safety lock before use.
While in operation, NEVER remove the pressure
limiting valve, do not put any weight on it or use
anything else, other than the pressure limiting
valve supplied.
In order to ensure safety, NEVER use any other
sealing ring, other than the sealing ring supplied.
Do not lift the pressure limiting valve to lower the
pressure when cooking.
Whilst cooking, AVOID knocking the pressure
cooker as the contents are under pressure and
will damage the cooker. Should you experience
any problems, please take your pressure cooker
to the nearest service agent, or a suitably qualied
person.
5.5ChangingthebatteryintheTimer
Remove the new batteries from the packaging.
The side with battery model number on is the front
of the battery. Using a small coin, open the bottom
of the timer by turning the coin anti-clockwise.
Remove the old battery and carefully insert the
new battery, making sure that the front side is up.
Replace the lid and using the coin tighten it into
position. Press the blue button on the timer to
check if it is now working – you should see the
numbers “00”. Insert the timer into the slot in the
cover knob.
C
l
e
a
n
i
n
g
t
h
e
s
e
a
l
C
l
e
a
n
i
n
g
v
a
l
v
e
s
S
a
f
e
t
y
o
p
e
n
-
p
r
e
v
e
n
t
i
n
g
v
a
l
v
e
Page 18

18
Register Your Extended Guarantee online at www.towerhouswares.co.uk.
6TROUBLESHOOTING
If your Pressure Cooker is not performing as
it should, remove it from the hob using oven
gloves, place it in the sink and then run cold
water over it to cool the appliance and to
reduce the pressure.
The table below details common problems and
how to solve them.
Steam escapes from under
the cover
The seal is dirty
The seal is old or
damaged
Clean the seal, the rim of the Bowl and
the rim of the cover
Replace the seal
Steam and liquid suddenly
escape from the safety valve
The safety function of
the cover lock button
is operating. The
pressure limiting valve
is blocked
Turn off the hob and move the pressure
cooker to a level, heat-resistant surface.
Allow the pressure cooker to cool and the
pressure to reduce. Open the cover and
clean the pressure limiting valve
Steam and liquid suddenly
escape from the safety
window
The safety function
of the safety window
is operating. The
pressure limiting valve
and safety valve are
blocked
The safety valve is
faulty or damaged
Turn off the hob and move the pressure
cooker to a level, heat-resistant surface.
Allow the pressure cooker to cool and
the pressure to reduce. Open the cover
and clean the pressure limiting valve and
safety valve
Replace the safety valve
Problem Cause Solution
DISPOSALOFTHEUNIT
Please visit www.recycle-more.co.uk or www.recyclenow.co.uk
for access to information about the recycling of non electrical items.
Please arrange to take this appliance to your local Civic Amenity
site for recycling, once it has reached the end of its life.
Page 19

Safety and Instruction Manual
19
Helpline: +44 (0) 844 984 0055
7 WARRANTY
This product is guaranteed for 12 months from
the date of original purchase.
If any defect arises due to faulty materials of
workmanship, the faulty products must be
returned to the place of purchase.
Refund or replacement is at the discretion of
the retailer.
The Following Conditions Apply:
• The product must be returned to the
retailer with proof of purchase.
• The product must be installed and
used in accordance with the instructions
contained in this instruction guide.
• It must be used only for domestic
purposes.
• It does not cover wear and tear, damage,
misuse or consumable parts.
• RKW has limited liability for incidental
or consequential loss or damage.
This guarantee is valid in the UK and Eire Only.
The standard one year guarantee is only
extended to the maximum available for each
particular product upon registration of the
product within 28 days of purchase. If you
do not register the product with us
within the 28 day period, your product is
guaranteed for 1 year only.
To validate your extended warranty, please
visit www.towerhousewares.co.uk and register
with us online. Alternatively, call our customer
registration line on +(44) (0) 844 984 0055.
Please note that length of extended warranty
oered is dependent on product type and
that each qualifying product needs to be
registered individually in order to extend its
warranty past the standard 1 year.
Wehopethatyouwill
enjoyyourTowerPressure
Cookerformanyyears.
Asathankyoufor
purchasingoneofour
fantasticproducts,
wearegivingyou10years
peaceofmind.
To receive your 10 year
guarantee, simply register
your appliance
online by visiting
www.towerhousewares.co.uk
Page 20

thank you!
We hope you enjoy your appliance for
many years. As a thank you for purchasing
one of our fantastic products, we are giving
you an extra 9 years peace of mind.
*To receive your extra 9 years guarantee,
register your appliance online by visiting:
www.towerhousewares.co.uk
Should you have a problem with your
appliance, or need any spare parts,
please call our Service Department on:
+44 (0) 844 984 0055
great british design, innovation and excellence since 1912
0415.V1
Your warranty becomes void should you decide
to use non Tower spare parts. Spare parts can be
purchased from www.towerhousewares.co.uk
 Loading...