

Page 1
Safety and Instruction Manual
PLEASE READ CAREFULLY
*Subject to registering Your Extended Guarantee online at www.towerhousewares.co.uk.
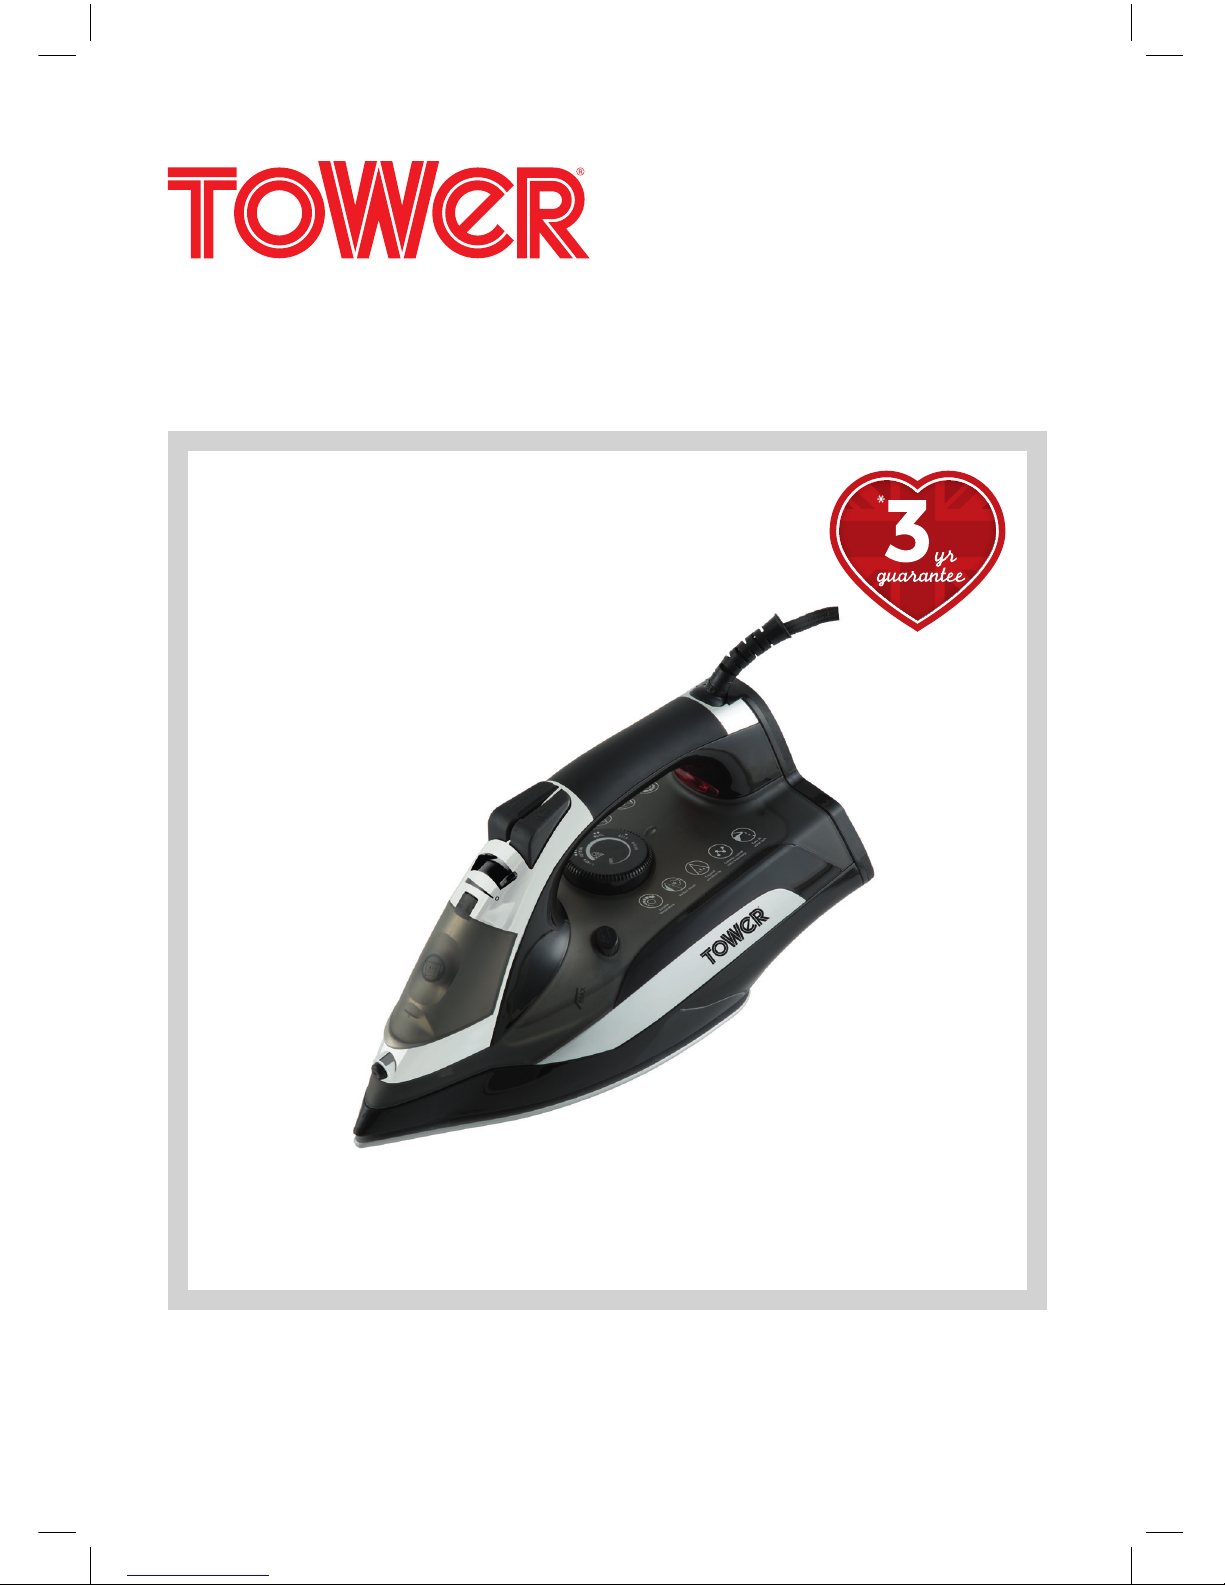
3000W
CeraGlide Turbo Iron
T22001
Page 2
2
Register online at www.towerhousewares.co.uk for your FREE extended guarantee.
1912 Midland Metal Spinners was founded by
George Cadman, who was then 65 years old, as
a metal holloware manufacturing company, in St.
Mark’s Street, Wolverhampton. They later moved
into the Tower and Fort Works in Pelham Street,
which ultimately gave rise to the famous Tower
brand name.
1937 Tower exhibited some of their latest holloware
designs at the British Industries Fair. As you can
see from the original poster, their stand No. A410
must have been a great sight as it promoted their
“Beautiful, inexpensive, untarnishable Plate, at
prices all can afford to pay”.
1961 Tower became one of the largest
manufacturers of aluminium holloware, electric
kettles, tea pots and other household articles with
over 1,000 employees.
1974 Russell Hobbs took ownership of the
expanding Tower brand.
30% Faster Ironing
The Tower Ceraglide Turbo Steam Iron will help
you tackle the ironing with its anti-drip feature and
variable temperature control. 3000W Turbo power
combined with advanced Ceraglide technology
means 30% faster ironing.
A vertical steam function lets you remove wrinkles
from hanging clothes, curtains, and more. With a
tapered precision tip to remove every crease, the
CeraGlide Turbo Iron is quick and efcient.
Page 3

Safety and Instruction Manual
3
Helpline: +44 (0) 333 220 6066
CONTENTS:
Please read this Manual carefully BEFORE
using the appliance for your own safety.
Thank you for purchasing this Tower CeraGlide
Turbo Iron the Tower range of products.
It has been designed to provide many years of
trouble-free ironing. There are many benets to
using a Tower CeraGlide Turbo Iron:
• Powerful 150g Steam Boost
• Ceraglide ceramic technology
• Variable temperature control
• Tapered Precision tip
• Vertical Steam function
• Anti-scale lter with self-clean feature
Contents:
1. Specications
Components and structure
Technical information
2. ImportantSafetyInformation
3. UsingyourTowerAppliance
4. Cleaning&Care
5. Recycling
6. WiringSafety
7. WarrantyInformation
8. Troubleshooting
9. YourReceipt
SeebackpageforCustomerService
Information
Page 4
4
Register online at www.towerhousewares.co.uk for your FREE extended guarantee.
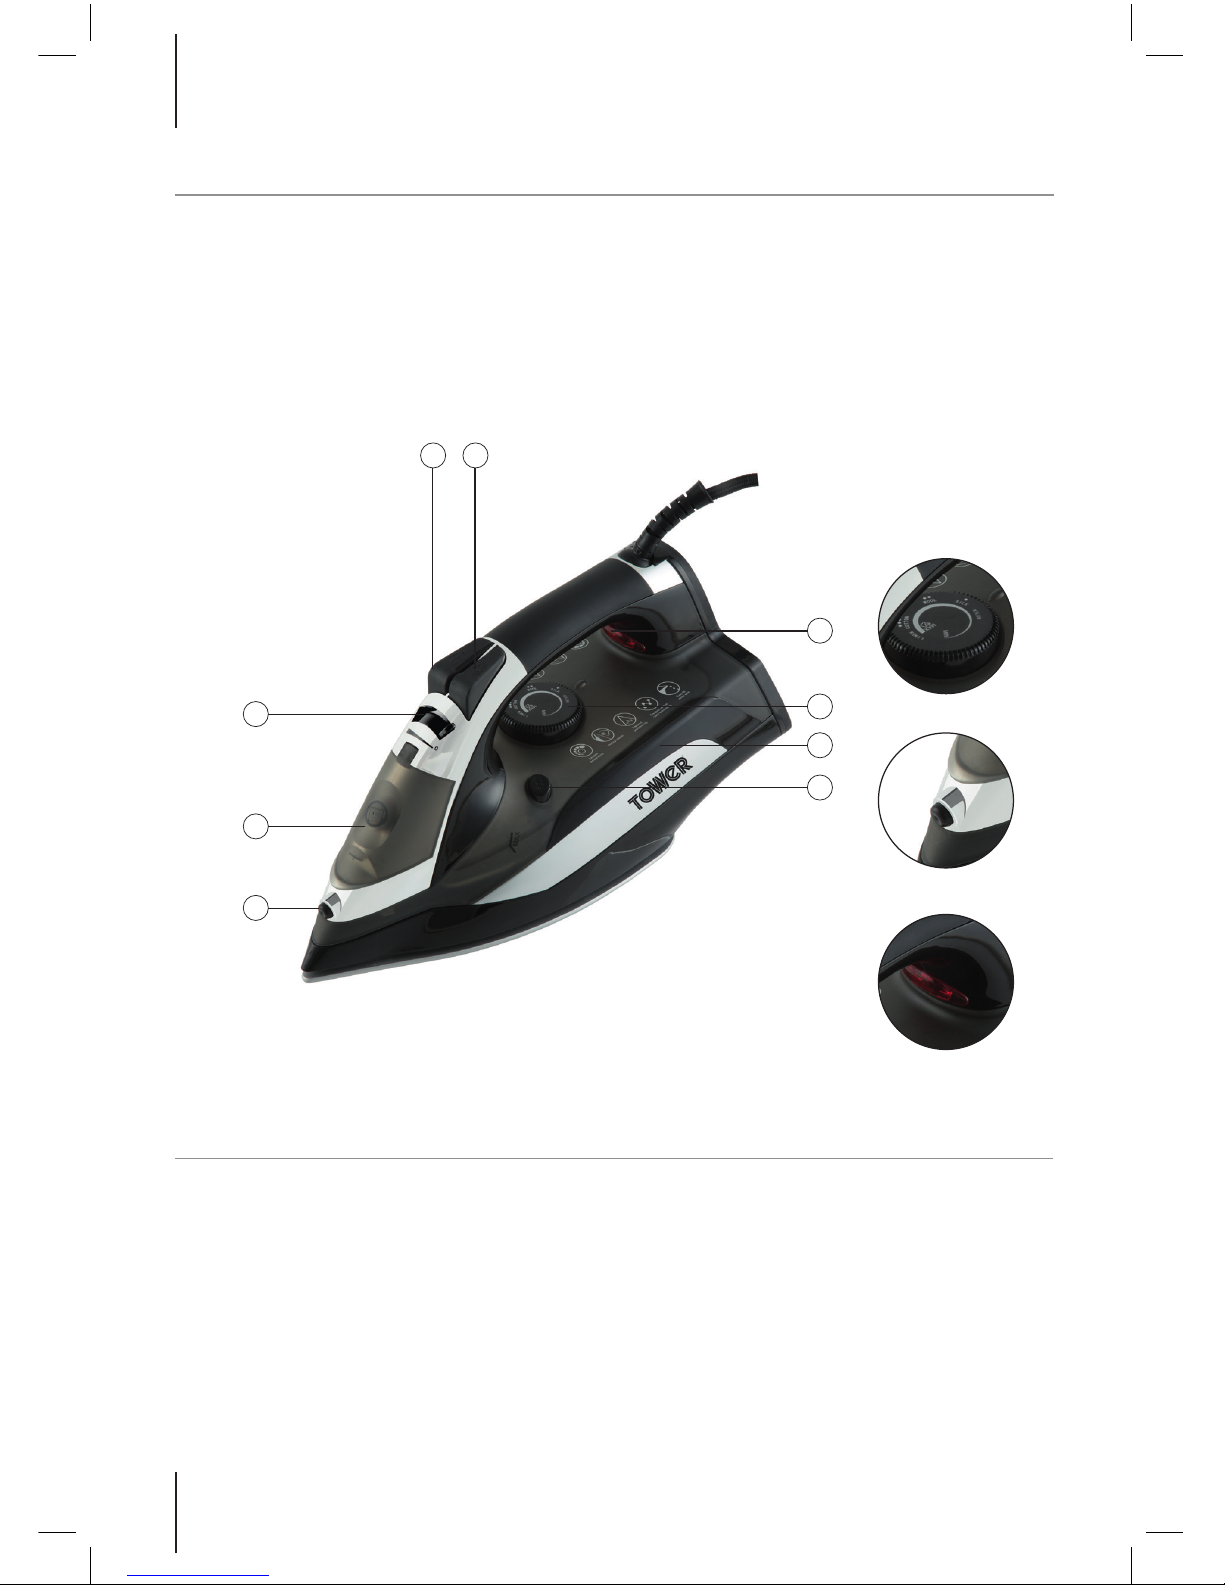
Components
This box contains:
Steam Iron
Measuring Jug
Instruction Manual
Structureofyourappliance:
1. Spray nozzle
2. Water Filling Opening
3. Steam Control Switch
4. Spray Button
5. Burst of Steam
6. Power Indicator Light
7. Temperature Control
8. Water Tank
9. Self Clean Button
1 SPECIFICATIONS:
T
e
m
p
e
r
a
t
u
r
e
C
o
n
t
r
o
l
S
p
r
a
y
N
o
z
z
l
e
P
o
w
e
r
I
n
d
i
c
a
t
o
r
L
i
g
h
t
4 5
6
7
8
9
1
3
2
Page 5

Safety and Instruction Manual
5
Helpline: +44 (0) 333 220 6066
Technical Data
Description: CeraGlide Turbo Iron
Model: T22001
Rated Voltage: 220-240V ~50/60Hz
Power Consumption: 3000 Watts
Documentation
We declare that this product conforms to the following product legislation in accordance with the
following directive(s):
2004/108/EC Electromagnetic Compatibility Directive.
2006/95/EC Low Voltage Directive.
2011/65/EU Restriction of Hazardous Substances Directive.
RKW Quality Assurance, United Kingdom.
Guarantee
The spares and accessories are guaranteed for
1 year from date of purchase.
The main body and housing are guaranteed
for the extended free warranty subject to
registration.
If any defect arises due to faulty materials of
workmanship, the faulty products must be
returned to the place of purchase.
Refund or replacement is at the discretion of
the retailer.
Should you encounter problems or require
a replacement part, contact The Tower
Customer Service Department on:
+44 (0) 333 220 6066.
Any necessary spare parts may be ordered
from the Tower website.
Your warranty becomes void should you decide
to use non Tower spare parts. Spare parts can
be purchased from www.towerhousewares.
co.uk
Page 6

6
Register online at www.towerhousewares.co.uk for your FREE extended guarantee.
Please read these notes carefully BEFORE using your Tower appliance
• Check that the voltage of the
main circuit corresponds with
the rating of the appliance
before operating.
• Please ensure that the
appliance is used on a stable,
level, and heat resistant surface.
• Do not immerse cords, plugs
or any part of the appliance in
water or any other liquid.
• Do not leave the appliance
unattended while it is operating.
• Close supervision is necessary
when any appliance is used by
or near children or pets.
• This appliance can be used
by children aged from 8 years
and above and persons with
reduced physical, sensory or
mental capabilities or lack of
experience and knowledge
if they have been given
supervision or instruction
concerning use of the appliance
in a safe way and understand
the hazards involved.
• Children shall not play with the
appliance.
• Cleaning and user maintenance
shall not be made by children
without supervision.
• Switch off at the wall socket
then remove the plug from
the socket when not in use or
before cleaning.
• If the supply cord or appliance
is damaged, stop using the
appliance immediately and seek
advice from the manufacturer or
its service agent or
a similarly qualied person.
• Do not let the cord hang over
the edge of a table or counter
or let it come into contact with
any hot surfaces.
• The use of accessory
attachments is not
recommended by the appliance
manufacturer, apart from those
supplied with this product.
• Do not pull the plug out by the
cord as this may damage the
plug and/or the cable.
• Do not use this product for
anything other than its intended
use.
• This appliance is for household
use only.
• Do not carry the appliance by
the power cord.
2 IMPORTANT SAFETY INFORMATION
Page 7

Safety and Instruction Manual
7
Helpline: +44 (0) 333 220 6066
• Do not use the appliance
outdoors.
• The iron should always be
turned to “min” before plugging
or unplugging from the mains
outlet. Never pull the cord to
disconnect from the mains:
instead, grasp plug and pull to
disconnect.
• Always disconnect the iron from
the electrical outlet when lling
with water or emptying and
when not in use.
• Do not leave the iron
unattended when connected
to the mains or on an ironing
board.
• WARNING: Burns can occur
from touching hot metal parts,
hot water or steam, use caution
when you turn a steam iron
upside down-there may be hot
water in the reservoir.
• Only use normal tap water or
distilled water in this product.
Do not use perfumed water.
• Never direct steam toward
people, pets or electrical
systems.
• Never obstruct the steam holes.
• CAUTION: When not in use,
your iron should never be
placed at and/or left on an
ironing board.
• Do not place the iron on an
unprotected surface.
• Do not plug the iron into a
power outlet whilst other
appliances are plugged in, as
this could cause the electrics to
overload.
• In the unlikely event the
appliance develops a fault,
stop using it immediately and
seek advice from the service
department:
+44 (0) 333 220 6066
Page 8

8
Register online at www.towerhousewares.co.uk for your FREE extended guarantee.
3 USING YOUR APPLIANCE
Fillingwithwater
1. Remove the mains plug from the wall
socket before lling (or emptying) the iron
with water. Set the temperature dial to
‘MIN’.
2. Place the iron on the heel rest and tilt
forward at an approximately 45° angle.
3. Pour water into the Water Filling Opening,
to the max position of the water tank.
4. Do not put vinegar, starch, chemically, descaled water or de-scaling agents in the
water reservoir.
Settingthetemperature
1. Stand the iron on its end.
2. Set the temperature control to the correct
ironing temperature.
3. Insert the mains plug into the wall socket.
4. After the temperature light rst has gone
out and has come on again, you may start
ironing.
5. The temperature light will come on from
time to time during ironing.
6. If you set the temperature control to
a lower setting after ironing at a high
temperature, please allow time for the iron
to cool. This is to prevent scorching on
your garment.
SprayFunction
Press the spray button at any time to spray
water on clothes, as often as required.
Note: Ensure that there is enough water in the
tank to use the spray function. During rst use,
you may have to pump the spray button several
times to start the spraying function.
DryIroning
1. Set the steam control switch to 0.
2. As per the washing label instructions on
the item of clothing, select the required
temperature and begin ironing.
SteamIroning
1. Ensure that there is enough water in the
water tank.
2. Set the required temperature. Water may
leak from the sole plate if too low of a
temperature has been selected.
3. Once the required temperature has been
reached the power indicator light will turn
off.
4. Increase the steam output by pulling the
Steam Button backwards and decrease
the output by pushing the Steam Button
forward.
Usingthesteamjet
This function provides an extra amount of
steam to remove stubborn creases.
1. Turn the temperature control to the
position “MAX”.
2. The indicator light turns off when the
required temperature is reached.
3. Press the steam jet button once.
4. Wait a few seconds before pressing the
steam jet button again.
5. When there are stubborn creases usually
all creases can be removed within three
operations of the steam jet.
Page 9

Safety and Instruction Manual
9
Helpline: +44 (0) 333 220 6066
VerticalSteam
The Iron is tted with a vertical steam function.
This enables you to remove creases from
hanging clothes, wall hangings or curtains.
Hold the Iron vertically and direct it towards the
fabric and press the stream burst button.
Warning: Ensure that the steam is not directed
towards yourself or other people. The ejected
steam is hot and therefore hazardous.
Anti-Calcfunction
A special resin lter inside the water reservoir
softens hard water and prevents scale build-up
in the plate.
The resin lter is permanent and does not need
replacing. However if you live in a particularly
hard water area, we recommend using bottled
or distilled water.
Warning: never pour vinegar or other liquid
cleaners for eliminating calcium into water tank.
Anti-dripfunction
With a bimetal assembled inside the iron,
which closes the steam when the iron soleplate
becomes very low, so water leakage will never
happen with this features.
Automaticsafetyshut-off
1. The iron has an electronic safety device
which switches off the heating element
automatically if the iron is left motionless.
2. The iron will shut off after 30 seconds in
a horizontal position or 8 minutes in a
vertical position.
3. Pick up the iron or move it lightly to heat it
up again. The indicator light will come on.
When the indicator light is off, the iron is
ready for use.
4. To prevent water dripping from the
soleplate in the horizontal resting position,
set the steam control dial to position 0 or
stand the iron on its end if the appliance is
left unattended for a while.
Ironingtips
• Always check rst whether a label with
ironing instructions is attached to the
article.
• The iron heats up quicker than it cools
down, therefore, you should start
ironing the articles requiring the lowest
temperature such as those made of
synthetic bres.
• If the fabric consists of various kinds
of bres, you must always select the
lowest ironing temperature to iron the
composition of those bres.
• Silk and other fabrics that are likely to
become shiny should be ironed on the
inner side.
• Velvet and other textures that rapidly
become shiny should be ironed in one
direction with light pressure applied.
Always keep the iron moving at any given
moment.
• Pure woollen fabrics (100% wool) may be
ironed with the iron set a steam position.
Preferably set steam button to the
maximum position and use a dry cloth as
a mat.
Note: when ironing woollen fabrics, shining of
the fabric may occur. So it is suggested that
you should turn the article inside out and iron
the reverse side.
Page 10

10
Register online at www.towerhousewares.co.uk for your FREE extended guarantee.
IMPORTANT
Read all garment labels when ironing and
ensure the manufacturers ironing guidelines are
followed. The manufacturers ironing guidelines
are often shown by symbols similar to the
below:
Note: if the article to be ironed consists of
various different fabrics, always select the
temperature required by the most delicate
fabric.
Page 11

Safety and Instruction Manual
11
Helpline: +44 (0) 333 220 6066
5 RECYCLING
DISPOSAL OF THE UNIT
Appliances bearing the symbol shown here may not be disposed of in domestic rubbish.
You are required to dispose of old electrical and electronic appliances like this separately.
Please visit www.recycle-more.co.uk or www.recyclenow.co.uk for access to information about
the recycling of electrical items.
Please visit www.weeeireland.ie for access to information about the recycling of
electrical items purchased in Ireland.
The WEEE directive, introduced in August 2006, states that all electrical items must be
recycled, rather than taken to landll.
Please arrange to take this appliance to your local Civic Amenity site for recycling,
once it has reached the end of its life.
4CLEANING&CARE
Self-cleaning:
1. Set the temperature control to the
maximum position, press the self-clean
button for about 1 minute, steam will be
emitted to clean the steam chamber. Use
this function once every two weeks or so.
After ironing:
1. Disconnect power supply and empty the
water left in water tank. Reconnect the
power supply and disconnect after indicator
light goes off, this dries the soleplate.
2. Let the iron completely cool down, then
wipe akes and any other deposits on the
soleplate with a damp cloth or a nonabrasive (liquid) cleaner. Clean the upper
part of iron with a damp cloth. Always
store the emptied iron horizontally on a
stable surface with a cloth protecting the
soleplate.
3. When not in use, store the appliance in a
safe, dry place, out of reach of children.
IMPORTANT!
Do not use the appliance if damp. Ensure the
appliance is completely clean and dry before
storing.
Storage
Unplug power cord from the power outlet and
clean as instructed.
Store on a at, dry level surface out of reach of
children.
Page 12

12
Register online at www.towerhousewares.co.uk for your FREE extended guarantee.
6 WIRING SAFETY FOR UK USE ONLY
IMPORTANT
As the colours in the
mains lead of this
appliance may not
correspond with the
coloured markings
identifying the terminals
in your plug, please
proceed as follows:
The wires in the mains lead are coloured in
accordance with the following code:
Blue neutral [N] Brown live [L]
Green/Yellow [EARTH]
Plug Fitting Details (Where Applicable).
The wire coloured blue is the neutral and must be
connected to the terminal marked [N] or coloured
black.
The wire coloured brown is the live wire and
must be connected to the terminal marked [L] or
coloured red.
The wire coloured green/yellow must be
connected to the terminal marked with the letter
[E] or marked
.
On no account must either the brown or the blue
wire be connected to the [EARTH] terminal
.
Always ensure that the cord grip is fastened
correctly.
The plug must be tted with a fuse of the same
rating already tted and conforming to BS 1362
and be ASTA approved.
If in doubt consult a qualied electrician who will
be pleased to do this for you.
Non-Rewireable Mains Plug
If your appliance is supplied with a non-
rewireable plug tted to the mains lead and
should the fuse need replacing, you must use an
ASTA approved one (conforming to BS 1362 of
the same rating).
If in doubt, consult a qualied electrician who will
be pleased to do this for you.
The specially designed lid release button helps
you to open the lid of the fryer easily and safely.
Push the button for the fryer lid to automatically
open. This keeps your hands safely out of the
way as steam to escape from the Deep Fat Fryer.
To remove the lid altogether, lift the lid to the
vertical position and pull upwards.
WARNING:
This Appliance MUST be Earthed
FUSE
Page 13

Safety and Instruction Manual
13
Helpline: +44 (0) 333 220 6066
7 WARRANTY
This product is guaranteed for 12 months from
the date of original purchase.
If any defect arises due to faulty materials of
workmanship, the faulty products must be
returned to the place of purchase.
Refund or replacement is at the discretion of
the retailer.
The Following Conditions Apply:
• The product must be returned to the
retailer with proof of purchase.
• The product must be installed and
used in accordance with the instructions
contained in this instruction guide.
• It must be used only for domestic
purposes.
• It does not cover wear and tear, damage,
misuse or consumable parts.
• Tower has limited liability for incidental
or consequential loss or damage.
This guarantee is valid in the UK and Eire Only.
The standard one year guarantee is only
extended to the maximum available for each
particular product upon registration of the
product within 28 days of purchase. If you
do not register the product with us
within the 28 day period, your product is
guaranteed for 1 year only.
To validate your extended warranty, please
visit www.towerhousewares.co.uk and register
with us online. Alternatively, call our customer
registration line on +44 (0) 333 220 6066.
Please note that length of extended warranty
offered is dependent on product type and
that each qualifying product needs to be
registered individually in order to extend its
warranty past the standard 1 year.
Extended warranty is only valid with proof of
purchase.
Wehopethatyouwillenjoy
yourTowerCeraGlide
Turbo Iron Iron
formanyyears.
Asathankyoufor
purchasingoneofour
fantasticproducts,
wearegivingyou3years
peaceofmind.
To receive your 3 year
guarantee, simply register
your appliance
online by visiting
www.towerhousewares.co.uk
Page 14

14
Register online at www.towerhousewares.co.uk for your FREE extended guarantee.
8TROUBLESHOOTING&FAQ’S
Problem Possible Reasons Solution
Not enough heat or
too much heat
The temperature dial may not have
been rotated correctly, or it may
have been set to the incorrect
position. The iron is unplugged.
Set the temperature dial to the
correct position and check if the iron
is plugged in.
No steam or leakage.
The temperature dial has been set
to MIN
Set the temperature dial to the
required position.
No burst of steam or
no vertical steam
The vertical steam function has
been used too often within in a
short period. The iron is not hot
enough.
Continue ironing in horizontal
position and wait a while before
using the vertical steam function
again.
Leaking water from
Soleplate
The temperature dial is not set in
steam range.
Set the temperature dial as per
steam range.
The heat is still not enough.
Open Steam Button only after the
indicator light goes off.
The water is over than max position Pour out the remaining water
Little Steam
Check if the Steam Button is in
proper location.
Set the steam button to the proper
location.
Steam hole is blocked.
Clean the steam hole with distilled
water.
There is too little water in the water
tank
Fill the tank with water
No Spraying
There is not enough pressure or air
inside
Press the spray nozzle by hand, and
push the spray button several times
continuously.
Page 15

Safety and Instruction Manual
15
Helpline: +44 (0) 333 220 6066
9 YOUR RECEIPT
Afx your store receipt to this page for safe
keeping.
Page 16

thank you!
We hope you enjoy your appliance for
many years. As a thank you for purchasing
one of our fantastic products, we are giving
you an extra 2 years peace of mind.
*To receive your extra 2 years guarantee,
register your appliance online by visiting:
www.towerhousewares.co.uk
Should you have a problem with your
appliance, or need any spare parts,
please call our Service Department on:
+44 (0) 333 220 6066
great british design, innovation and excellence since 1912
1015.V1
Your warranty becomes void should you decide
to use non Tower spare parts. Spare parts can be
purchased from www.towerhousewares.co.uk
 Loading...