

Page 1
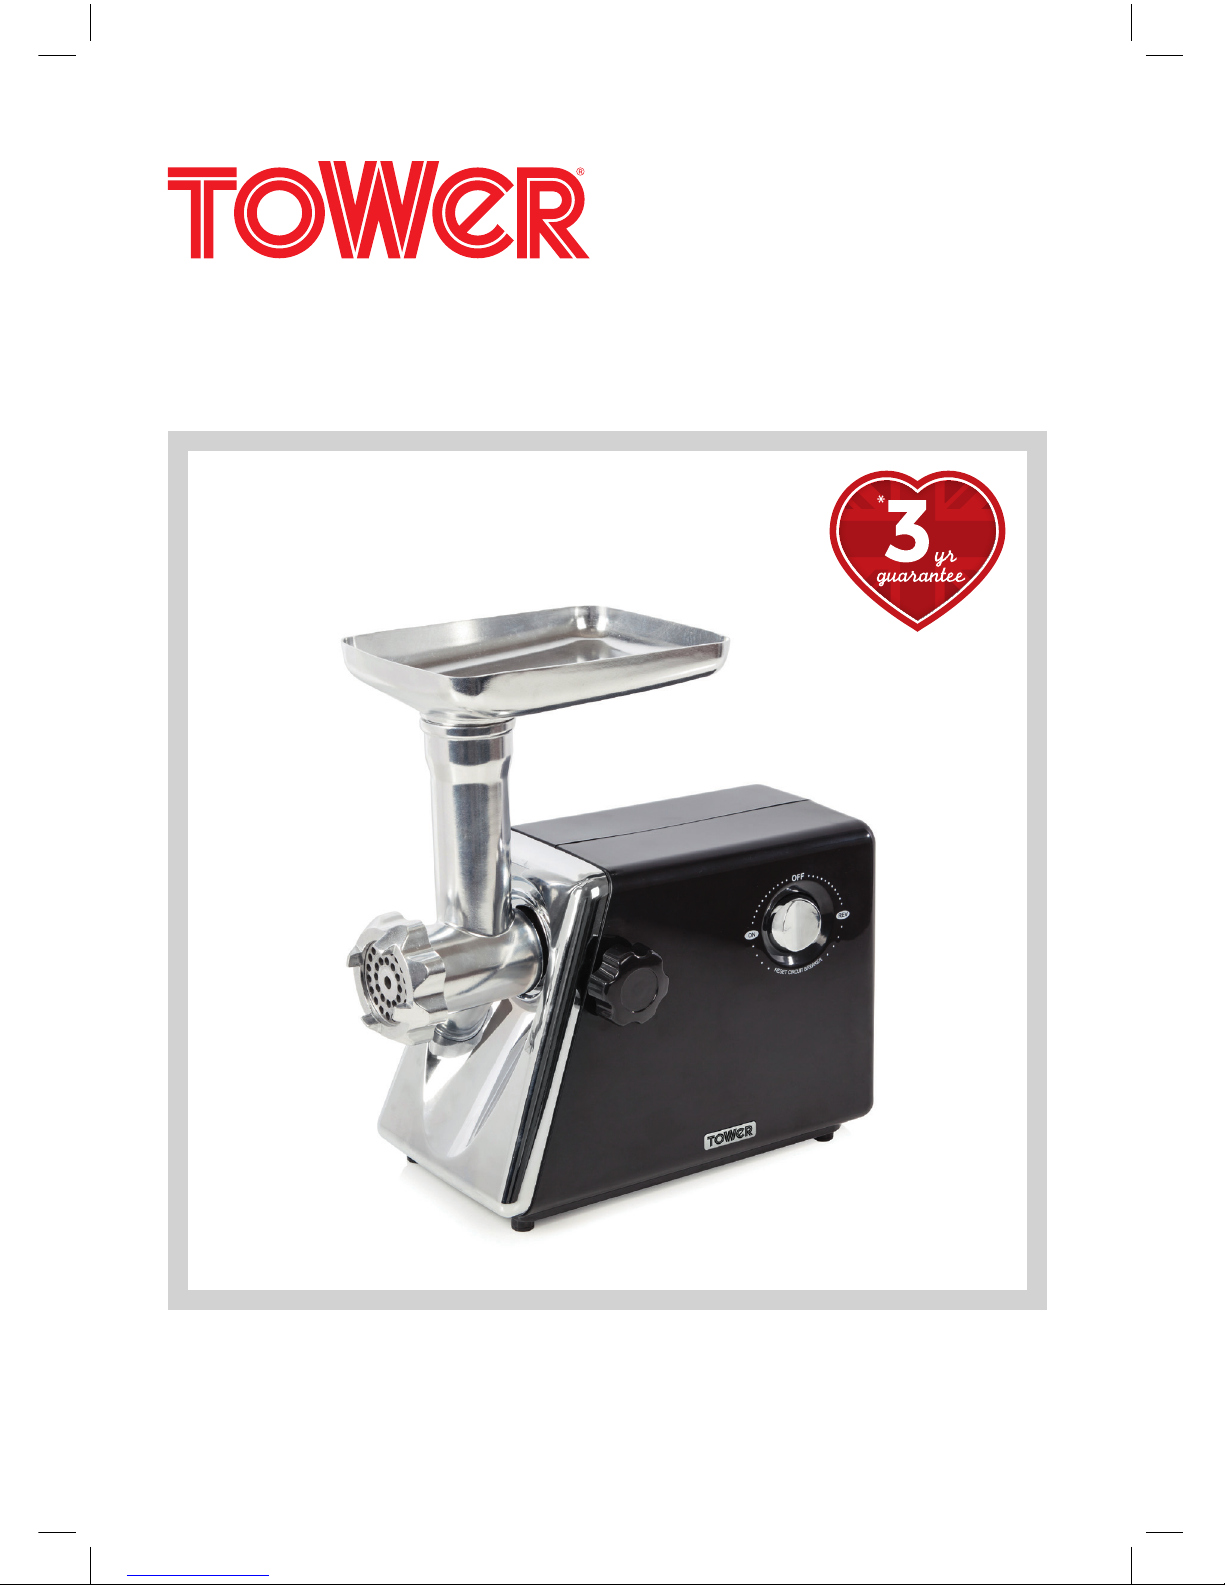
500W
Meat Grinder
Safety and Instruction Manual
PLEASE READ CAREFULLY
T19005
*Subject to registering Your Extended Guarantee online at www.towerhousewares.co.uk.
Page 2
2
Register online at www.towerhousewares.co.uk for your FREE extended guarantee.
1912 Midland Metal Spinners was founded by
George Cadman, who was then 65 years old, as
a metal holloware manufacturing company, in St.
Mark’s Street, Wolverhampton. They later moved
into the Tower and Fort Works in Pelham Street,
which ultimately gave rise to the famous Tower
brand name.
1937 Tower exhibited some of their latest holloware
designs at the British Industries Fair. As you can
see from the original poster, their stand No. A410
must have been a great sight as it promoted their
“Beautiful, inexpensive, untarnishable Plate, at
prices all can afford to pay”.
1961 Tower became one of the largest
manufacturers of aluminium holloware, electric
kettles, tea pots and other household articles with
over 1,000 employees.
1974 Russell Hobbs took ownership of the
expanding Tower brand.
Healthier, Easier & Cheaper
Grinding meat has never been easier thanks to this
heavy duty, durable kitchen-top appliance. A large
meat lling pan is on hand to take all the meat you
can squeeze in to it and a quiet motor means you
won’t disturb others when you’re mincing.
Have your meat any way you like it - ne, medium
and coarse - the choice is yours! There’s even a
handy sausage stufng attachment and a food
pusher included to ensure that this appliance can
take on all mincing eventualities. Grinding your
own meat is a huge upgrade in both avour and
quality. It’s healthier, safer, cheaper and with the
Tower Meat Grinder, easy too!
Page 3

Safety and Instruction Manual
3
Helpline: +44 (0) 844 984 0055
CONTENTS:
Please read this Manual carefully BEFORE
using the Meat Grinder for your own safety.
Thank you for purchasing this Tower Meat
Grinder from the Tower range of products.
It has been designed to provide many years
of trouble-free use. There are many benets to
using a Tower Meat Grinder:
• The Tower Meat Grinder has a power
and efcient motor making grinding meat
simple.
• The motor is quiet with a low noise level
meaning grinding in your kitchen isn’t a
disturbance.
• Stainless steel blades and an aluminium
hopper plate for a great quality appliance.
• Reverse function to stop any jams.
• The Tower Meat Grinder comes with
attachments to make sausages, Kubbe,
and to grind meat.
• With three sizes of cutting blades so your
meat can be ne, medium or coarse.
Contents:
1. Specications
Components and structure
Technical information
2. ImportantSafetyInformation
3. UsingyourTowerAppliance
4. TroubleShooting&Faq’s
5. Cleaning&Care
5. Recycling
7. WiringSafety
8. WarrantyInformation
9. YourReceipt
SeebackpageforCustomerService
Information
Page 4
4
Register online at www.towerhousewares.co.uk for your FREE extended guarantee.
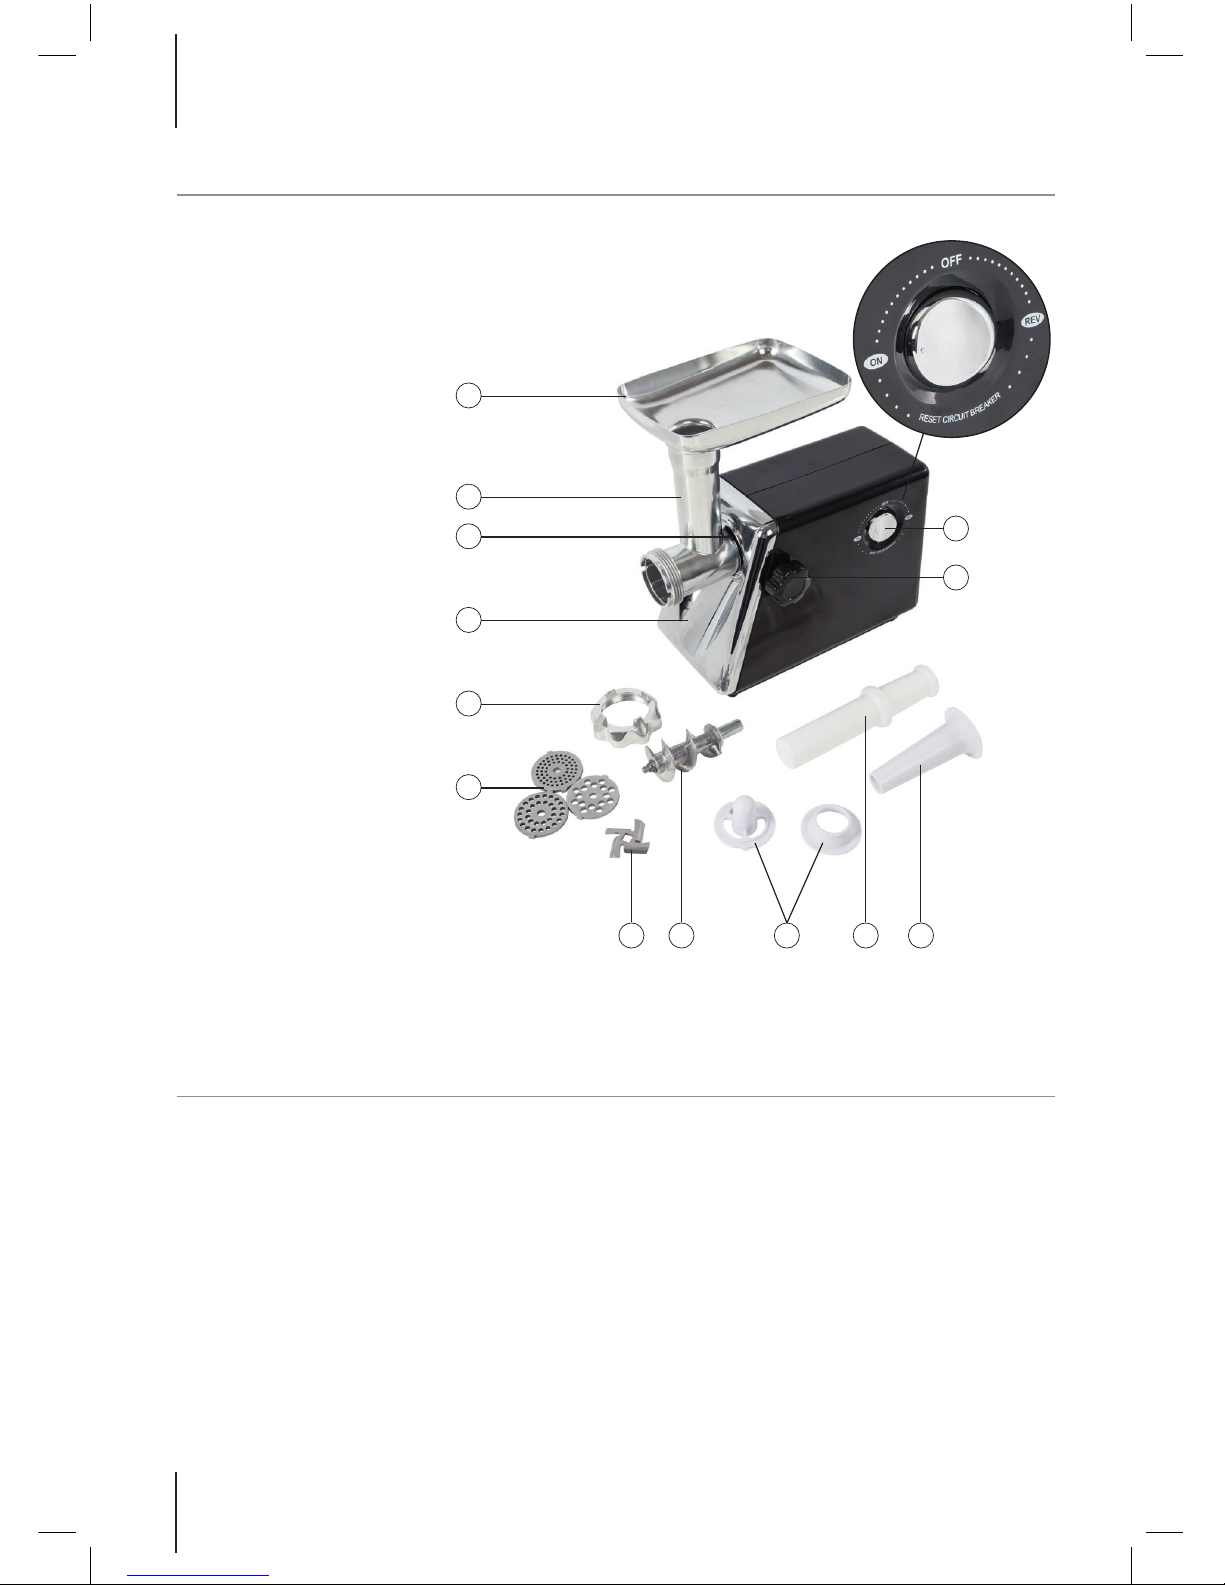
Components
This box contains:
Instruction Manual
Meat Grinder
Hopper Plate
Horn
Fixing Ring
Cutting Plate
(ne, medium & large)
Cutting Blade
Worm
Kubbe Attachments
Food Pusher
Sausage Stufng
Attachment
Structureofyourappliance:
1. Hopper Plate
2. Horn
3. Head Inlet
4. Body
5. Fixing Ring
6. Cutting Plate
(ne, medium & large)
7. Cutting Blade
8. Worm
9. Kubbe Attachments
10. Food Pusher
11. Sausage Stufng
Attachment
12. Fastening Screw
13. On/Off/Reverse Switch
1SPECIFICATIONS:
1
2
12
13
3
4
5
6
7 8 9 10 11
Page 5

Safety and Instruction Manual
5
Helpline: +44 (0) 844 984 0055
Technical Data
Description: Meat Grinder
Model: T19005
Rated Voltage: 220V -240V ~ 50/60Hz
Power Consumption: 250 Watts (Max. locked motor wattage approx. 500W)
Documentation
We declare that this product conforms to the following product legislation in accordance with the
following directive(s):
2004/108/EC Electromagnetic Compatibility Directive.
2006/95/EC Low Voltage Directive.
2011/65/EU Restriction of Hazardous Substances Directive.
1935/2004/EC Materials & Articles in Contact With Food (LFGB section 30 & 31).
2009/125/EC Eco-Design of Energy Related Products
RKW Quality Assurance, United Kingdom.
Guarantee
The spares and accessories are guaranteed for
1 year from date of purchase.
The main body and housing are guaranteed
for the extended free warranty subject to
registration.
If any defect arises due to faulty materials of
workmanship, the faulty products must be
returned to the place of purchase.
Refund or replacement is at the discretion of
the retailer.
Should you encounter problems or require
a replacement part, contact The Tower
Customer Service Department on:
+44 (0) 844 984 0055.
Any necessary spare parts may be ordered
from the Tower website.
Your warranty becomes void should you decide
to use non Tower spare parts. Spare parts can
be purchased from www.towerhousewares.
co.uk
Page 6

6
Register online at www.towerhousewares.co.uk for your FREE extended guarantee.
Please read these notes carefully BEFORE using your Tower appliance
• Check that the voltage of the
main circuit corresponds with
the rating of the appliance
before operating.
• If the supply cord or appliance
is damaged, stop using the
appliance immediately and seek
advice from the manufacturer,
its service agent or a similarly
qualied person.
• Do not let the cord hang over
the edge of a table or counter
or let it come into contact with
any hot surfaces.
• Do not carry the appliance by
the power cord.
• Do not use any extension cord
with this appliance.
• Do not pull the plug out by the
cord as this may damage the
plug and/or the cable.
• Switch off at the wall socket
then remove the plug from
the socket when not in use or
before cleaning.
• Switch off and unplug before
tting or removing tools/
attachments, after use and
before cleaning.
• Close supervision is necessary
when any appliance is used by
or near children.
• Children should not play with
the appliance.
• This appliance can be used
by children aged from 8 years
and above and persons with
reduced physical, sensory or
mental capabilities or lack of
experience and knowledge
if they have been given
supervision or instruction
concerning use of the appliance
in a safe way and understand
the hazards involved.
• Cleaning and user maintenance
should not be undertaken by
children without supervision.
• Take care when any appliance
is used near pets.
• Do not use this product for
anything other than its intended
use.
• This appliance is for household
use only.
• Please ensure that the
appliance is used on a stable,
level, and heat resistant surface.
2IMPORTANTSAFETYINFORMATION
Page 7

Safety and Instruction Manual
7
Helpline: +44 (0) 844 984 0055
• Do not immerse cords, plugs
or any part of the appliance in
water or any other liquid.
• Do not use the appliance
outdoors.
• CAUTION: Never push
products into the meat grinder
by hand. Always use the
included food pusher.DO NOT
run the meat grinder for more
than ten continuous minutes
without allowing a ten minute
interval for the motor to cool.
• Do not grind ginger or other
foods with hard bre.
• Do not grind hard foods such
as bones or nuts.
• When using the Kubbe
attachment, do not x the
cutting blade or plate.
• When moving the appliance,
carry the body with both hands.
Do not carry the appliance by
the hopper plate or horn.
• Warning: The cutting blade is
sharp, handle with care.
• Never place your ngers near
the food chute while the grinder
is in operation
• Ensure the appliance is not
placed close to the edge of the
work surface.
• Do not leave unattended during
use.
• In the unlikely event the
appliance develops a fault,
stop using it immediately and
seek advice from the service
department:
+44 (0) 844 984 0055
Page 8

8
Register online at www.towerhousewares.co.uk for your FREE extended guarantee.
3USINGYOURAPPLIANCE
Beforerstuse:
Ensure that the voltage indicated on the rating
label corresponds to the mains voltage in your
home.
Wash all parts (except the main body of the
appliance) in warm, soapy water and dry.
Before plugging in the appliance, make sure the
on/off switch is in the off position.
Assembly:
1. Take the horn and insert it into the head
inlet, slanted slightly downwards. Take the
fastening screw and screw it into the side of
the motor housing. Hold onto the horn and
turn the screw clockwise to fasten it into
place. (see Fig 1)
2. Fit the worm into the horn, with the shorter
end facing out. The longer end will set into
the motor housing loosely. (see Fig 2)
3. Place the cutting blade onto the end of
the worm, with the blades facing inwards
towards the inside of the horn. (see Fig 2)
NOTE: If the cutting blade is not t properly, the
meat will not grind.
4. Place the desired cutting plate on top of the
cutting blade. It will position onto the slots
either side on the horn. This will then hold
the worm in place. (see Fig 3)
5. Screw the xing ring tightly into place on
top of the cutting blade. Ensure not to over
tighten. (see Fig 4)
6. Place the hopper plate on to the horn and
t it into position. (see Fig 5)
7. Place the unit on a steady, dry surface.
NOTE: Ensure the air passages at the bottom
and side of the motor housing are not blocked at
any time.
Fig 1. Fig 5.
Fig 2.
Fig 3.
Fig 4.
Page 9

Safety and Instruction Manual
9
Helpline: +44 (0) 844 984 0055
MincingMeat:
1. Cut the meat into small enough chunks/
pieces to ensure it ts easily into the hopper
opening.
Note: It is recommended to use sinew free,
boneless and fatless meat, approximately sized
as: 20mm; 20mm and 60 mm.
2. Plug the unit in. Move the ON/OFF/REV
switch to the ON position.
3. Feed the produce into the hopper plate,
using the food pusher only.
4. When nished, switch the appliance off and
unplug it from the power supply.
ReverseFunction:
If jamming occurs switch the grinder off at the
plug. Move ON/OFF/REV switch to the REV
position, and turn the grinder back on.
This will reverse the ow of the product.
The worm will begin rotating in the opposite
direction, thus empting the horn of the grinder.
Disassembling:
1. Make sure the motor has come to a
complete stop.
2. Disconnect the plug from the power source.
3. Disassemble in the reverse order of
assembly.
4. Tip: To remove the cutting plate easily, place
a screwdriver between the cutting plate and
the horn, to lift it up and away.
5. Unscrew the fastening screw to remove the
horn.
MakingSausagewithyourMeatGrinder:
1. Untangle and place your casings into
groups.
2. Take each casing and wash both the inside
and outside, to get rid of any debris. Place
in lukewarm water.
3. Grind meat to your desired consistency.
4. Mix your seasoning in with the ground
meat.
5. Fit the worm into the horn. Place the
sausage stufng attachment on top and use
the xing ring to t everything into place.
(See below image for assembly).
6. Open one end of your casing using your
ngers and slip it over the end of the
sausage stufng attachment.
7. Slide the whole casing onto the sausage
stufng attachment, leaving around 2” of
casing overhanging the end.
8. Once in place, turn the Meat Grinder on,
and use the meat pusher to work the
sausage meat through the grinder and into
the casing.
9. Fill the sausage casing, guiding it with your
hands.
Page 10

10
Register online at www.towerhousewares.co.uk for your FREE extended guarantee.
10. To make sausage links, switch the Meat
Grinder off after you have lled the casing
with the length of one sausage. Tie a
knot at the end of the 2” of casing that is
overhanging.
11. Turn the Meat Grinder back and ll the
casing until it is approximately 2” from being
full.
12. Slide the sausage and casing off the
sausage attachment and tie a knot at
the open end of the casing. Link the
sausage by twisting the casing at intervals
(depending on the size you want each
sausage to be).
Note: The above instructions refer to natural
casings. Articial casings do not require cleaning
or soaking before use.
Recipes
SimplePork,AppleandCaramelisedOnion
SausagePatties
Making your own sausages allows you to
experiment with avours, control exactly what
goes in, and lets you season to your taste. To
make linked sausages follow the method noted
in the ‘Making Sausages with your Meat Grinder’
section. If you want to try something different
sausage patties taste just as good, and are even
quicker to make.
Ingredients
500g pork mince
1 red onion, peeled and nely chopped
1 tbsp. brown sugar
1 tbsp. balsamic vinegar
4 cloves of garlic, peeled and minced
2 small apples, grated
Handful parsley and oregano
1 tbsp. mustard powder
1 tbsp. seeded mustard
1 tsp. salt
Method
1. Place a large bowl in the fridge and allow it
to cool. This ensures the fat in the sausages
does not melt.
2. Put nely diced red onion in a hot, welloiled pan and cook on a low heat, until
golden. After around 15 minutes, add sugar,
balsamic vinegar and a pinch of salt. Cook
until the onions are sticky and thick. Set
aside and allow to cool.
3. Once the onions are cool, put them into
the large cooled bowl. Add all of the
ingredients. Lightly mix everything together.
Be careful to avoid over mixing.
4. Prepare the grinder by using a ne cutting
plate, securing into place with the xing
ring.
5. Place a large bowl underneath the horn of
the grinder to catch the meat.
6. Place the meat mixture on the hopper plate
and turn the grinder on.
7. Keep feeding the mixture into the grinder,
using the food pusher attachment.
8. Once nished, shape the meat into patties
and pan fry immediately, until cooked.
Alternatively, refrigerate the raw meat for up
to 24 hours before cooking, or freeze.
Page 11

Safety and Instruction Manual
11
Helpline: +44 (0) 844 984 0055
NoFryFalafel
A popular middle-eastern food, falafel is often
served deep fried. However, the vegetarian dish
is a tasty, healthy option when baked.
Time: 45 mins with up to 24 hr soak for
chickpeas.
Ingredients
Falafel
1 ¾ cups dried chickpeas
2 garlic cloves
1 small onion, quartered
1 tbsp. cumin
1 cup chopped parsley
Pinch of cayenne, or extra to taste
1 ½ tsp. salt, plus more to taste
½ tsp. black pepper, plus more to taste
½ tsp. baking soda
Dash of lemon juice
TahiniSauce
½ cup tahini (sesame seed paste)
4 tbsp. olive oil
1 tbsp. lemon juice
Method
1. Place chickpeas in a large bowl and cover
with water by 3-4 inches. Soak for anytime
between 12 – 24 hours, or until they have
tripled in size and come apart easily in
hand.
2. Check as they soak to ensure they have
enough water.
3. Heat oven to 190°C/375°F (fan 170°C / gas
mark 5).
4. Drain chickpeas and add to a medium sized
bowl with the chopped onion and garlic
cloves.
5. Assemble the grinder using the ne cutting
plate. Place a large bowl to catch the
mixture under the horn of the grinder.
6. Add the mixture into the grinder, turn it
on, and use the food pusher to guide the
mixture through.
7. Once the mixture is nely ground add the
cumin, cayenne, parsley, 1 tsp of salt,
pepper, baking soda and a dash of lemon
juice into the bowl.
8. Stir together until well mixed.
9. Taste and adjust seasoning if necessary.
10. Spread 2 tbsp. of oil on a large rimmed
baking sheet.
11. Roll the chickpea mixture into large balls –
roughly 1 – 1 ½ inches each.
12. This should make around 18 – 20 balls.
Place them onto the pan and brush the
tops lightly with oil.
13. Bake until golden brown, for 10 – 15
minutes on each side.
MethodforTahiniSauce
1. Whisk tahini, lemon juice and oil in a bowl,
adding ½ cup of warm water slowly, until
smooth.
2. Drizzle over the baked falafel. Serve alone
with salad, or in a pitta.
Page 12

12
Register online at www.towerhousewares.co.uk for your FREE extended guarantee.
DeepFriedKubbe
Kubbe is a traditional Lebanese dish made primarily of lamb and bulgur wheat and then deep fried. They
taste great with Tahini Sauce, as per the method listed in the No Fry Falafel recipe
Ingredients
Kubbe
½ cup bulgur wheat
14 ounces of lamb
½ onion, roughly chopped
2 pinches of all-spice seasoning
½ tsp. cumin
1 tbsp. Greek yoghurt
Sunower or peanut oil to fry
Stufng
1 tbsp. olive oil
1 small onion nely chopped
2 tbsp. pine nuts
1 clove garlic, crushed
Pinch of cayenne
Pinch of all spice-seasoning
2 pinches of cinnamon
4 ½ ounces of lamb
Salt and pepper to season
Method
3. Rinse bulgur wheat three times, before
transferring to a bowl. Pour ½ a cup of
boiling water on top, and then cover and
leave whilst preparing the stufng.
4. For the stufng, nely grind 4 ½ ounces
of lamb using the ne cutting plate on the
grinder. Set to one side.
5. Heat olive oil in a pan and slowly cook the
onions until soft. This should take around 8
minutes.
6. Add the pine nuts to the pan and stir over
a medium-high heat for a minute before
adding the garlic, spices and nely ground
lamb to stir fry until the lamb has browned.
7. Season, turn off the heat and place to one
side.
8. Drain the bulgur wheat thoroughly.
9. For the Kubbe, grind the 14 ounces of lamb
using the ne cutting plate, into a bowl.
Feed the meat through 2 or 3 times.
10. Stir in the onion, all-spice seasoning and
cumin together with the meat, before
grinding the mixture again.
11. Mix into the bulgur, using your hands as if
kneading dough.
12. Add a tbsp. of Greek yoghurt, stir and
season generously before placing to one
side.
13. Now both the Kubbe and stufng are ready,
remove the cutting plate and cutting blade
from the grinder. Replace with the Kubbe
attachments – rst the pusher and then the
shaper. Fit the protrusions at the sides of
the attachments into the slots on the horn.
Screw the xing ring on to hold all in place.
Page 13

Safety and Instruction Manual
13
Helpline: +44 (0) 844 984 0055
14. Take the Kubbe mixture and feed it slowly
into the grinder using the food pusher, to
form small cylinders of meat. This creates
the outer casing for the stufng.
15. Once done, insert the stufng into the
Kubbe mixture tubes and squeeze the ends
together, to create a lemon shape.
16. Place on to a plate, and continue until all
the mixture is used.
17. Chill for 20 minutes.
18. When it is time to cook the Kubbe, heat 1-2
inches of sunower or peanut oil in a deep
frying pan.
19. Once the oil is sizzling, add half of the
prepared Kubbe and fry for 7-10 minutes,
or until they are deep brown all over.
20. Drain on paper towels and then place them
in the oven to stay warm as the next batch
is fried.
Check this chart for
basic imperial to metric
conversions of weights.
Metric Imperial US cups
250ml 8 oz 1 cup
180ml 6 oz 3/4 cup
150ml 5 oz 2/3 cup
120ml 4 oz 1/2 cup
75ml 2 1/2 oz 1/3 cup
60ml 2 oz 1/4 cup
30ml 1 oz 1/8 cup
15ml 1/2 oz 1 tablespoon
Imperial Metric
1/2 oz 15g
1 oz 30g
2 oz 60g
3 oz 90g
4 oz 110g
5 oz 140g
6 oz 170g
7 oz 200g
8 oz 225g
9 oz 255g
10 oz 280g
11 oz 310g
12 oz 340g
13 oz 370g
14 oz 400g
15 oz 425g
1 lb 450g
FoodAllergies
Important Note:
Some of these
recipes may contain
nuts and/or other
allergens.
Please be careful
when making any of
our sample recipes
that you are NOT
allergic to any of
the ingredients. For
more information on
allergies, please visit
the Food Standards
Agency’s website at:
www.food.gov.uk
Page 14

14
Register online at www.towerhousewares.co.uk for your FREE extended guarantee.
Tips:
It’s important to keep the meat you are grinding
cold. Keep it well chilled until right before
you’re ready to grind. Keep the meat grinder
accessories in the freezer for at least an hour
before use.
Trim your meat well to make sure bits of sinew
don’t get caught around the blade.
If after grinding you nd you have not used
enough spice, spread the ground meat out in a
thin layer and sprinkle the added seasoning over
it. Mix it in gently using your hands.
Use fresh spices and herbs to ensure that your
sausages have a strong fresh avour.
If you’re making burgers, try not to overwork the
meat too much or pack it together too tightly
when forming the patties. It’s important to have a
bit of separation for a moist burger.
Add a small amount of olive oil onto the end of
your sausage stufng attachment to ease the
process of slipping the casing on.
Try grinding pieces of stale bread to help remove
any food residue left in the Meat Grinder after
use. Turn the meat grinder on as you slip the
casing onto the sausage stufng attachment, to
push some air into the casing.
If you want to link sausages as you stuff them,
keep string on hand and switch the grinder off
after each length of sausage has been stuffed,
then tie with string to create a link.
You can add small amounts of water to your
ground meat when stufng sausage to help
ease the meat through the sausage stufng
attachment.
Grind your meat twice for best results.
Handle the meat you are grinding lightly to avoid
it ‘compacting’.
Page 15

Safety and Instruction Manual
15
Helpline: +44 (0) 844 984 0055
4TROUBLESHOOTING&FAQ’S
Questions Answers
Can I operate the
grinder empty?
No. Running the grinder dry could damage the head.
Are any of the parts
and accessories
dishwasher safe?
No. We recommend cleaning all the accessories in warm soapy water so as not
to damage the nish.
Where can I buy
sausage casings?
You can purchase natural casings from your local butcher, or look online on
sausage making websites for a variety of natural and synthetic casings.
How can I clean
excess meat out of the
grinder?
Feed chunks of stale bread or toast through the grinder. This helps to clear the
last pieces of ground meat out.
What do I do if my
grinder gets jammed?
If your grinder is jammed, or if the motor slows or stops you need to switch it to
the reverse position. To do this, switch the grinder off.
Move ON/OFF/REV switch to the REV position, and turn the grinder back on.
This will reverse the ow of the product. The worm will begin rotating in the
opposite direction, thus empting the horn of the grinder.
Can I add food to
my grinder before
switching it on?
No. The grinder must always be switched on before adding any food.
Meat does not ow
through the grinder.
Make sure the grinder head is properly assembled.
What are the sizes of
the cutting blades?
Fine: 3mm
Medium: 5mm
Coarse: 7 mm
Meat is not feeding
through correctly
Check that the cutting blade is assembled correctly. Ensure the meat is boneless
and sinewless.
Check that the food pipe is full of meat. Air pockets inside can result in an
inconsistent nished product.
Check the extruder ring and screw assembly are correctly in place.
If you continue to have problems, run the meat through the grinder suing the
coarse cutting blade rst, and then use the medium or ne blade afterwards.
White meat is more difcult to grind that red meat (red meats mince easier).
Ensure any white meat is diced into small portions before grinding.
What is the best way
to clean the cutting
blades?
Wash them in warm soapy water. Never store them wet. If they are not being
used immediately after washing, wipe them with mineral oil.
Always inspect the blades regularly to ensure that all the holes are clear of
bones, bits of gristle or over foreign materials. Clean the holes with wire as often
as possible.
How long can I operate
the grinder for?
Do not operate the grinder for more than 30 minutes at any one time. After 30
minutes of continuous use, allow a few minutes to rest before using again.
Page 16

16
Register online at www.towerhousewares.co.uk for your FREE extended guarantee.
6RECYCLING
DISPOSAL OF THE UNIT
Appliances bearing the symbol shown here may not be disposed of in domestic rubbish.
You are required to dispose of old electrical and electronic appliances like this separately.
Please visit www.recycle-more.co.uk or www.recyclenow.co.uk for access to information
about the recycling of electrical items.
Please visit www.weeeireland.ie for access to information about the recycling of
electrical items purchased in Ireland.
The WEEE directive, introduced in August 2006, states that all electrical items must be recycled,
rather than taken to landll.
Please arrange to take this appliance to your local Civic Amenity site for recycling,
once it has reached the end of its life.
5CLEANING&CARE
Remove all traces of meat and food produce.
Wash each part of the appliance (except the
main body) in warm, soapy water.
Do not immerse the main body of the appliance
in water. Instead, wipe it down with a damp
cloth.
Do not use any caustic liquids or thinners to
clean the appliance, as it may crack and cause
the unit to discolour.
Ensure any meat is fully cleaned out of the
grinder.
Wipe all of the included stainless steel cutting
parts with a small amount of vegetable oil.
IMPORTANT!
Allow to dry fully after cleaning before using
again.
Do not use the appliance if damp. Ensure the
appliance is completely clean and dry before
storing.
Storage
Unplug power cord from the power outlet and
clean as above.
Allow the appliance to dry fully.
Store on a at, dry level surface out of reach of
children.
Page 17

Safety and Instruction Manual
17
Helpline: +44 (0) 844 984 0055
7WIRINGSAFETYFORUKUSEONLY
IMPORTANT
As the colours in the
mains lead of this
appliance may not
correspond with the
coloured markings
identifying the terminals
in your plug, please
proceed as follows:
The wires in the mains lead are coloured in
accordance with the following code:
Blue neutral [N] Brown live [L]
Plug Fitting Details (Where Applicable).
The wire coloured blue is the neutral and must be
connected to the terminal marked [N] or coloured
black.
The wire coloured brown is the live wire and
must be connected to the terminal marked [L] or
coloured red.
On no account must either the brown or the blue
wire be connected to the [EARTH] terminal
.
Always ensure that the cord grip is fastened
correctly.
The plug must be tted with a fuse of the same
rating already tted and conforming to BS 1362
and be ASTA approved.
If in doubt consult a qualied electrician who will
be pleased to do this for you.
Non-Rewireable Mains Plug
If your appliance is supplied with a nonrewireable plug tted to the mains lead and
should the fuse need replacing, you must use an
ASTA approved one (conforming to BS 1362 of
the same rating).
If in doubt, consult a qualied electrician who will
be pleased to do this for you.
If you need to remove the plug - disconnect it
from the mains - and then cut it off the mains
lead and immediately dispose of its safely. Never
attempt to reuse the plug or insert it into a socket
outlet as there is a danger of an electric shock.
WARNING:
This appliance is double insulated.
Do not connect any wire to the earth terminal.
Page 18

18
Register online at www.towerhousewares.co.uk for your FREE extended guarantee.
8WARRANTY
This product is guaranteed for 12 months from
the date of original purchase.
If any defect arises due to faulty materials of
workmanship, the faulty products must be
returned to the place of purchase.
Refund or replacement is at the discretion of
the retailer.
The Following Conditions Apply:
• The product must be returned to the
retailer with proof of purchase.
• The product must be installed and
used in accordance with the instructions
contained in this instruction guide.
• It must be used only for domestic
purposes.
• It does not cover wear and tear, damage,
misuse or consumable parts.
• Tower has limited liability for incidental
or consequential loss or damage.
This guarantee is valid in the UK and Eire Only.
The standard one year guarantee is only
extended to the maximum available for each
particular product upon registration of the
product within 28 days of purchase. If you
do not register the product with us
within the 28 day period, your product is
guaranteed for 1 year only.
To validate your extended warranty, please
visit www.towerhousewares.co.uk and register
with us online. Alternatively, call our customer
registration line on +(44) (0) 844 984 0055.
Please note that length of extended warranty
oered is dependent on product type and
that each qualifying product needs to be
registered individually in order to extend its
warranty past the standard 1 year.
Extended warranty is only valid with proof of
purchase.
Wehopethatyouwillenjoy
yourTowerMeatGrinder
formanyyears.
Asathankyoufor
purchasingoneofour
fantasticproducts,
wearegivingyou3years
peaceofmind.
To receive your 3 year
guarantee, simply register
your appliance
online by visiting
www.towerhousewares.co.uk
Page 19

Safety and Instruction Manual
19
Helpline: +44 (0) 844 984 0055
9 YOUR RECEIPT
Afx your store receipt to this page for safe
keeping.
Page 20

thank you!
We hope you enjoy your appliance for
many years. As a thank you for purchasing
one of our fantastic products, we are giving
you an extra 2 years peace of mind.
*To receive your extra 2 years guarantee,
register your appliance online by visiting:
www.towerhousewares.co.uk
Should you have a problem with your
appliance, or need any spare parts,
please call our Service Department on:
+44 (0) 844 984 0055
great british design, innovation and excellence since 1912
0615.V1
Your warranty becomes void should you decide
to use non Tower spare parts. Spare parts can be
purchased from www.towerhousewares.co.uk
 Loading...