

Page 1
Safety and Instruction Manual
PLEASE READ CAREFULLY
T19001
Food
Dehydrator
Page 2

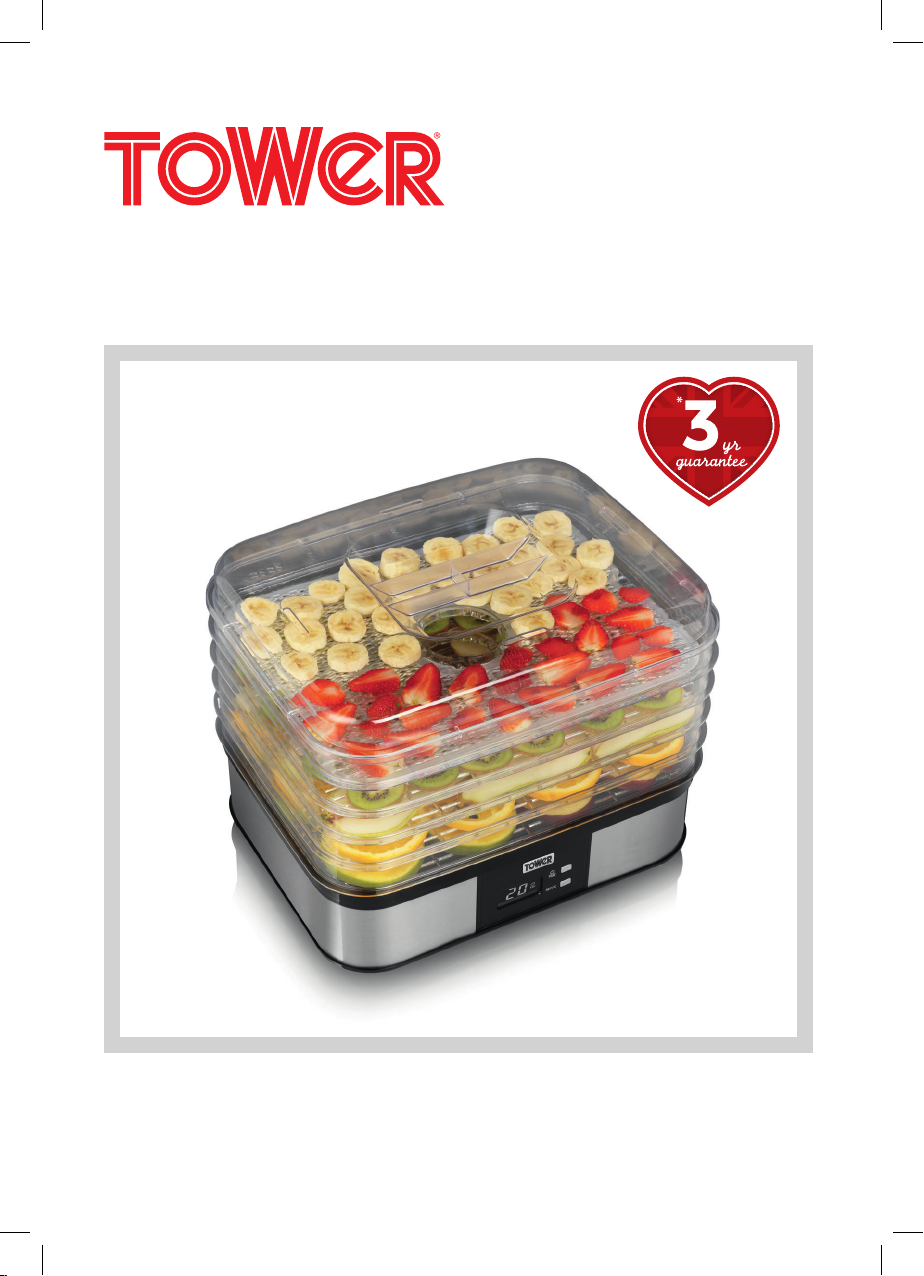
T19001 Food Dehydrator
www.towerhousewares.co.uk
TECHNICAL DATA
Description: Food Dehydrator
Model: T19001
Rated Voltage: 220V-240V ~ 50/60Hz
Power Consumption: 250 Watts
DOCUMENTATION
We declare that this product conforms to the following product
legislation in accordance with the following directive(s):
2004/108/EC Electromagnetic Compatibility Directive.
2006/95/EC Low Voltage Directive.
2011/65/EU Restriction of Hazardous Substances Directive.
1935/2004/EC Materials & Articles in Contact With Food
(LFGB section 30 & 31).
RKW Quality Assurance, United Kingdom.
WARRANTY
This product is guaranteed for 12 months from the date of original
purchase. If any defect arises due to faulty materials of workmanship,
the faulty products must be returned to the place of purchase. Refund or
replacement is at the discretion of the retailer.
The Following Conditions Apply:
• The product must be returned to the retailer with proof of purchase.
• The product must be installed and used in accordance with the
instructions contained in this instruction guide.
• It must be used only for domestic purposes.
• It does not cover wear and tear, damage, misuse or consumable parts.
• RKW has limited liability for incidental or consequential loss or damage.
• This guarantee is valid in the UK and Eire Only.
An extended warranty is available for this appliance.
See back page for details.
2
Page 3
Safety and Instruction Manual
Helpline: +44 (0) 844 984 0055
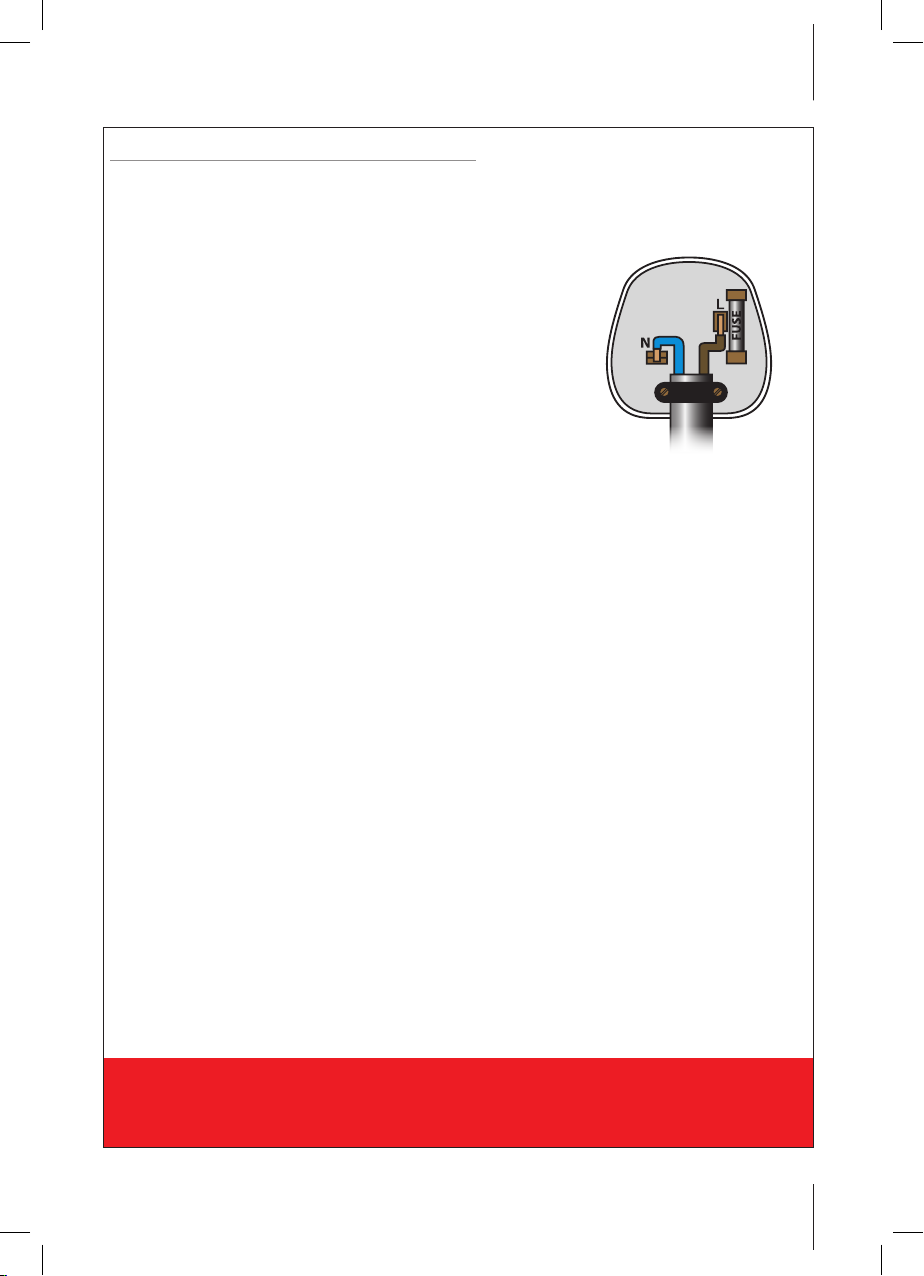
IMPORTANT! WIRING SAFETY
(For UK Use Only) As the colours in the mains lead of this appliance
may not correspond with the coloured markings identifying the
terminals in your plug, please proceed as follows:
The wires in the mains lead are coloured in
accordance with the following code:
Blue [N] Neutral
Brown [L] Live
Plug Fitting Details (where applicable)
The wire coloured blue is the neutral and must
be connected to the terminal marked [N] or coloured black. The wire
coloured brown is the live wire and must be connected to the terminal
marked [L] or coloured red.
Always ensure that the cord grip is fastened correctly.
The plug must be fitted with a fuse of the same rating already fitted and
conforming to BS 1362 and be ASTA approved. If in doubt consult a
qualified electrician who will be pleased to do this for you.
Non-rewireable Mains Plug
If your appliance is supplied with a non-rewireable plug fitted to the
mains lead and should the fuse need replacing, you must use an ASTA
approved one (conforming to BS 1362 of the same rating).
If in doubt, consult a qualified electrician who will be pleased to do this
for you.
If you need to remove the plug - disconnect it from the mains - and
then cut it off the mains lead and immediately dispose of it safely.
Never attempt to reuse the plug or insert it into a socket outlet as there
is a danger of an electric shock.
WARNING:
This appliance is double insulated.
Do Not connect any wire to the earth terminal.
3
Page 4

T19001 Food Dehydrator
www.towerhousewares.co.uk
PRODUCT SAFETY INFORMATION
• Check that the voltage of the main circuit corresponds with the rating
of the appliance before operating.
• Please ensure that the appliance is used on a stable, level, and heat
resistant surface.
• Do not immerse cords, plugs or any part of the appliance in water or
any other liquid.
• Do not leave the appliance unattended while it is operating.
• Close supervision is necessary when any appliance is used by or near
children or pets.
• This appliance can be used by children aged from 8 years and above
and persons with reduced physical, sensory or mental capabilities or
lack of experience and knowledge if they have been given supervision
or instruction concerning use of the appliance in a safe way and
understand the hazards involved.
• Children shall not play with the appliance.
• Cleaning and user maintenance shall not be made by children without
supervision.
• Switch off at the wall socket then remove the plug from the socket
when not in use or before cleaning.
• If the supply cord or appliance is damaged, stop using the appliance
immediately and seek advice from the manufacturer or its service
agent or a similarly qualified person.
• Do not let the cord hang over the edge of a table or counter or let it
come into contact with any hot surfaces.
• The use of accessory attachments is not recommended by the
appliance manufacturer, apart from those supplied with this product.
• Do not pull the plug out by the cord as this may damage the plug
and/or the cable.
• Do not use this product for anything other than its intended use.
• This appliance is for household use only.
• Do not carry the appliance by the power cord.
• Do not use the appliance outdoors.
• Never position the unit close to or on hot surfaces or open flames.
• Do not spill liquid onto the base unit. If this happens switch off and
unplug from the mains, mop up the liquid and seek advice from a
qualified technician.
4
Page 5

Safety and Instruction Manual
Helpline: +44 (0) 844 984 0055
• High temperatures are present during operation. Only touch the
handles on the unit.
• This appliance is Not intended for commercial use.
• Do not site the product under cupboards or near hanging fabric.
• This appliance can produce steam as part of the cooking process.
Avoid contact with steam escaping from the appliance.
• The appliance is not intended to be operated by means of an external
timer or separate remote control system.
• Extreme caution must be used when moving an appliance that
produces hot oil or other hot liquids from the cooking process.
• In the unlikely event the appliance develops a fault, stop using it
immediately and seek advice from the service department:
+44 (0) 844 984 0055
DISPOSAL OF THE UNIT
Appliances bearing the symbol shown here may not be disposed
of in domestic rubbish. You are required to dispose of old
electrical and electronic appliances like this separately.
Please visit www.recycle-more.co.uk or www.recyclenow.co.uk
for access to information about the recycling of electrical items.
Please visit www.weeeireland.ie for access to information about
the recycling of electrical items purchased in Ireland.
The WEEE directive, introduced in August 2006, states that
all electrical items must be recycled, rather than taken to landfill.
Please arrange to take this appliance to your local Civic Amenity
site for recycling, once it has reached the end of its life.
5
Page 6

T19001 Food Dehydrator
www.towerhousewares.co.uk
WHAT’S IN THE BOX
Instruction Manual
1.
Drying Rack
1. Lid
2. Dehydrating Trays x 5
3. Dehydrator Base Unit
4. Control Panel
4.
2.
3.
BEFORE YOUR FIRST USE:
1. Remove your appliance from the packaging.
2. Before using the unit for the first time, carefully clean the
unit and cover.
3. Do not use any aggressive detergents, brushes with metal or nylon
bristles or sharp objects such as knives or spatulas for cleaning
the appliance. Wipe with a sponge or cloth dampened in warm water.
4. Your appliance is now ready for normal use.
5. Dispose of the packaging in a responsible manner.
WARNING:
DO NOT immerse the unit in water.
6
Page 7

Safety and Instruction Manual
Helpline: +44 (0) 844 984 0055
USING YOUR APPLIANCE:
Connecting the Unit
• Connect the appliance to the electrical supply. Make sure that the plug
is connected properly. The red power indicator light will illuminate.
Operating the Appliance
1. The LCD displays
twinkling and displays
00
then press /Time then into time setting,LCD
00
hr
,press /Time button to set the working
time as you require, each press adds 1 hour. Press and hold to fast
forward,the Time setting range from 0-36 hours.,The appliance will
start to work 3 seconds after you have selected the time.
2. The working,Default temperature is 55
(remaining time) and
0
C
55
(working temperature).
o
C. The LCD show
13
hr
3. You could adjust the temperature as you required while the
appliance is working. Press SET/
LCD display current temperature
o
C into to temperature interface.
0
C
55
press SET/oC button again
to set temperature as you require. Each press, increases the
temperature by 5
o
4. Press and hold SET/oC to fast forward,the working temperature.
The setting range is 40oC - 70oC. The appliance will start to work
3 seconds after you have selected the temperature.
0
C
5. The LCD will return back working interface,
55
and
13
hr
6. The appliance will go into standby mode once the timer reaches
7. To stop the appliance when it is in the middle of a cycle,
press the /Time for 2 seconds, the appliance will enter standby
mode and display
00
00
7
Page 8

T19001 Food Dehydrator
www.towerhousewares.co.uk
Selecting Food to Dehydrate:
1. Fruits
Most fruits can be prepared and stored, but their durations of
preparation are varied, and you may refer to the reference table for
details. When selecting the fruit, you should select the ripe ones
because they contain a large amount of natural sugar while the
unripe ones may taste bitter after they are baked.
2. Vegetables
Vegetables selected should be fresh, tender, and free from
deterioration or spoilage.
3. Meat/poultry/seafood
The food should be fresh, however, the food that has just been taken
out of refrigerator must not be selected, otherwise a great deal of
water, when the food baked, may be produced and flow into the
main machine. After the preparation of dried meat is completed, it
should be sealed and refrigerated.
Fruit
1. Before putting fruit into the tray, you should wash them clean and
remove water on their surface.
2. The bad or deteriorated part of the fruit should be removed.
3. Fine fruits like grapes may be put into the tray as a whole for baking.
4. For bigger fruits, you had better cut them into parts between
6-13mm
5. Light-coloured fruits like apples, pears, peaches, etc. will turn into
darker colour during baking storage. If you want to reduce the
change of colour, you may handle it in one of the following ways:
A) Using pineapple or lemon juice Soak the sliced apple, pineapple,
peach or other fruit into the lemon juice directly. Take it out after two
minutes. Wipe it with paper or cloth and then put it into the tray for
baking.
B) Using syrup for heating treatment. Put the sliced fruit into the
syrup. Boil it and then soak it in the syrup for 35 minutes (do not
stir). Remove the fruit and clean the fruit with fresh water. Wipe it
with paper or cloth and then put it into the tray for baking.
8
Page 9

Safety and Instruction Manual
Helpline: +44 (0) 844 984 0055
Vegetables
1. Before putting the vegetable into the tray, you should wash the
vegetable clean and remove water on its surface.
2. Generally speaking, you had better cut the vegetable into slices
6mm thick. Other vegetables can be handled as following:
A) Soak the vegetable in boiling water for 1-2 minutes. Take out and
wash it with freezing water. Remove water on the vegetable and then
put it into the tray.
B) Boil some water and then put the vegetable on the steamer
or steaming for some time. Take it out and wash it with freezing
water. Remove water on the vegetable and then put it into the tray
(otherwise the excessive water will flow into the main machine to
cause changer).
Meat /poultry/seafood
1. Remove the fat meat and then cut the rest of the meat into slices.
Which are about 3-6mm thick. You make cut squares on the sliced
meat loaves so that they become more tasty and refreshing after
they are dried.
2. If the meat slices are comparatively thick, they should be salted for
a long time so as to make them saturated with the flavour, and the
thinner ones need shorter time of salting.
3. It will take around 6-8 hours for the food to be salted in refrigerator.
Food storage
1. You may store the food only after the tray has cooled down, The
food should be stored in clean dry and sealed containers, such as
glass tanks, food preservation bags to be used in refrigerator etc. If
you use a plastic bag to store the food, the air must be pumped out.
When you use other containers to store the food, you should try to
fill the container as much as possible and compact it so as to reduce
the amount of air, thus preventing the food from getting damp.
2. Indicate the food name and date of storage.
3. Except for meat/poultry. Other food can be stored and put in a dry
and cool place. Food that will not be consumed immediately should
be put in refrigerator. If put in a sunlit or hot place, the food will
deteriorate easily.
4. Meat or chicken should be stored in refrigerator.
5. You had better check the food stored about once a month to prevent
the food from getting damp.
9
Page 10

T19001 Food Dehydrator
www.towerhousewares.co.uk
Reference table of food baking temperature
Type of food
Drying
temperature
o
C
Green leafy
Vegetables
45~50 55~70 55~60
Fruit drying time reference table
Fruit Processing
requirements
Peeled, pith
Apple
Banana
Plum
Grapes
Lemon
Mango
Orange
Kiwi
Pear
Pineapple
and cut into
6mm thick
sheet
Peeled,cut into
3mm sheet
After one
minute into
boiled water
then half open
blisters
1~2 into boiled
water
Cut into 6mm
thick sheet
Peeled cut
into 6mm thick
sheet
Cut into 6mm
sheet
Peeled cut
into 6mm thick
sheet
Peeled, pith
and cut into
6mm thick
sheet
Peeled cut
into 6mm thick
sheet
Bread Vegetable Fruit Peanut
55~65 40
Drying time Hr Effect
5~15 Becomes soft, curved
10~36 Brittle
5~25 Becomes soft, curved
10~36 Become soft
5~25 Brittle
15~24 Becomes soft, curved
5~15 Becomes soft, curved
10~25 Becomes soft, curved
8~24 Becomes soft, curved
10~21 Becomes soft, curved
10
Page 11

Safety and Instruction Manual
Helpline: +44 (0) 844 984 0055
Storage
To store your appliance:
1. Unplug power cord from the power outlet.
2. Allow the appliance to fully cool.
3. Clean the appliance and dehydration trays.
4. Store on a flat, dry level surface.
NOTE:
Do not immerse any part of the appliance in water or any other liquid.
Do not use abrasives to clean the appliance.
Store as instructed above.
11
Page 12

T19001
Food
Dehydrator
thank you!
We hope you enjoy your appliance for
many years. As a thank you for purchasing
one of our fantastic products, we are giving
you an extra 2 years peace of mind.
*To receive your extra 2 years guarantee,
register your appliance online by visiting:
www.towerhousewares.co.uk
Should you have a problem with your
appliance, or need any spare parts,
please call our Service Department on:
+44 (0) 844 984 0055
great british design, innovation and excellence since 1912
Designed, developed and distributed throughout the UK by RKW LTD.
 Loading...