

Page 1
Safety and Instruction Manual
PLEASE READ CAREFULLY
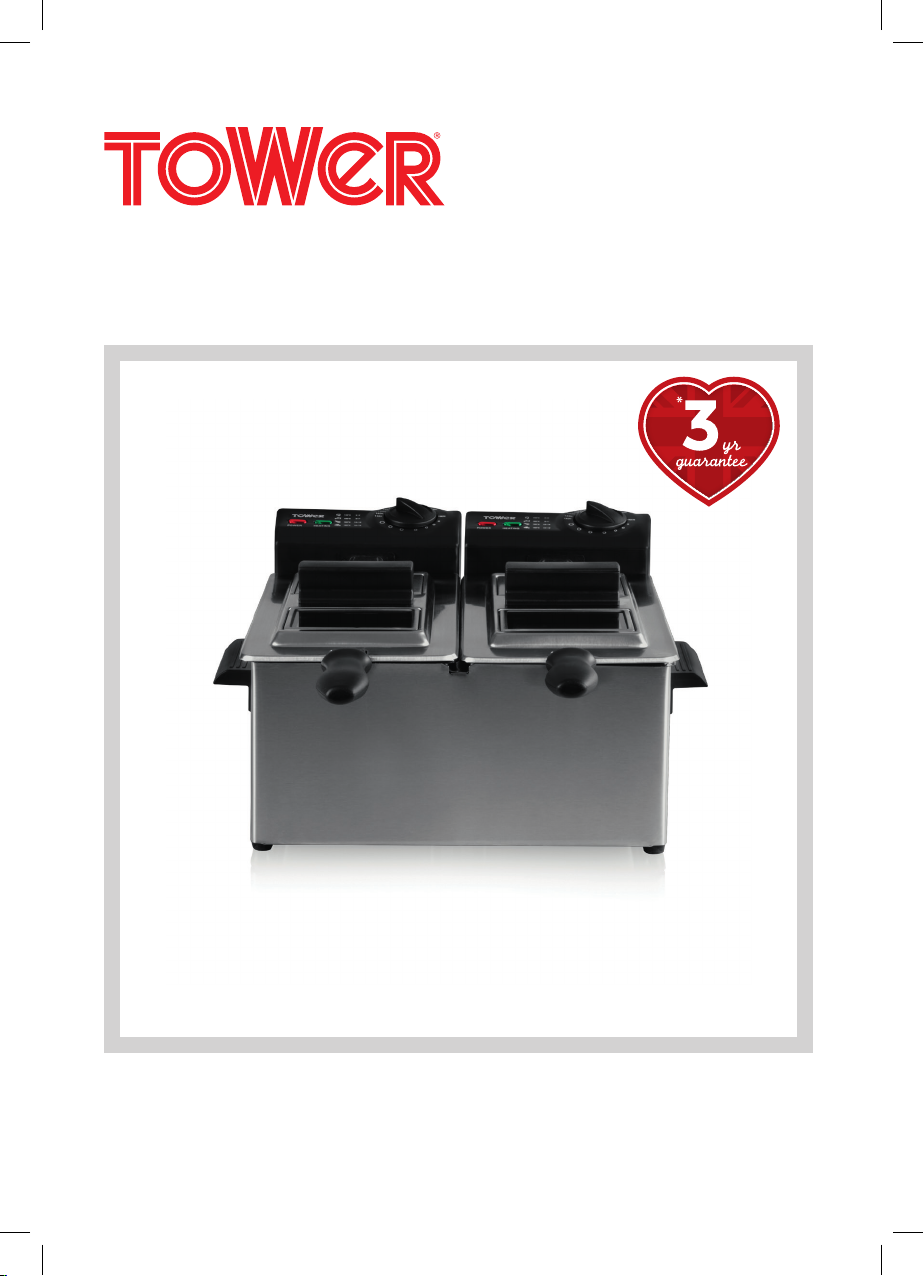
T17007
6 Litre
Dual Deep Fryer
*Subject to registering Your Extended Guarantee online at www.towerhousewares.co.uk.
Page 2
Register online at www.towerhousewares.co.uk for your FREE extended guarantee.
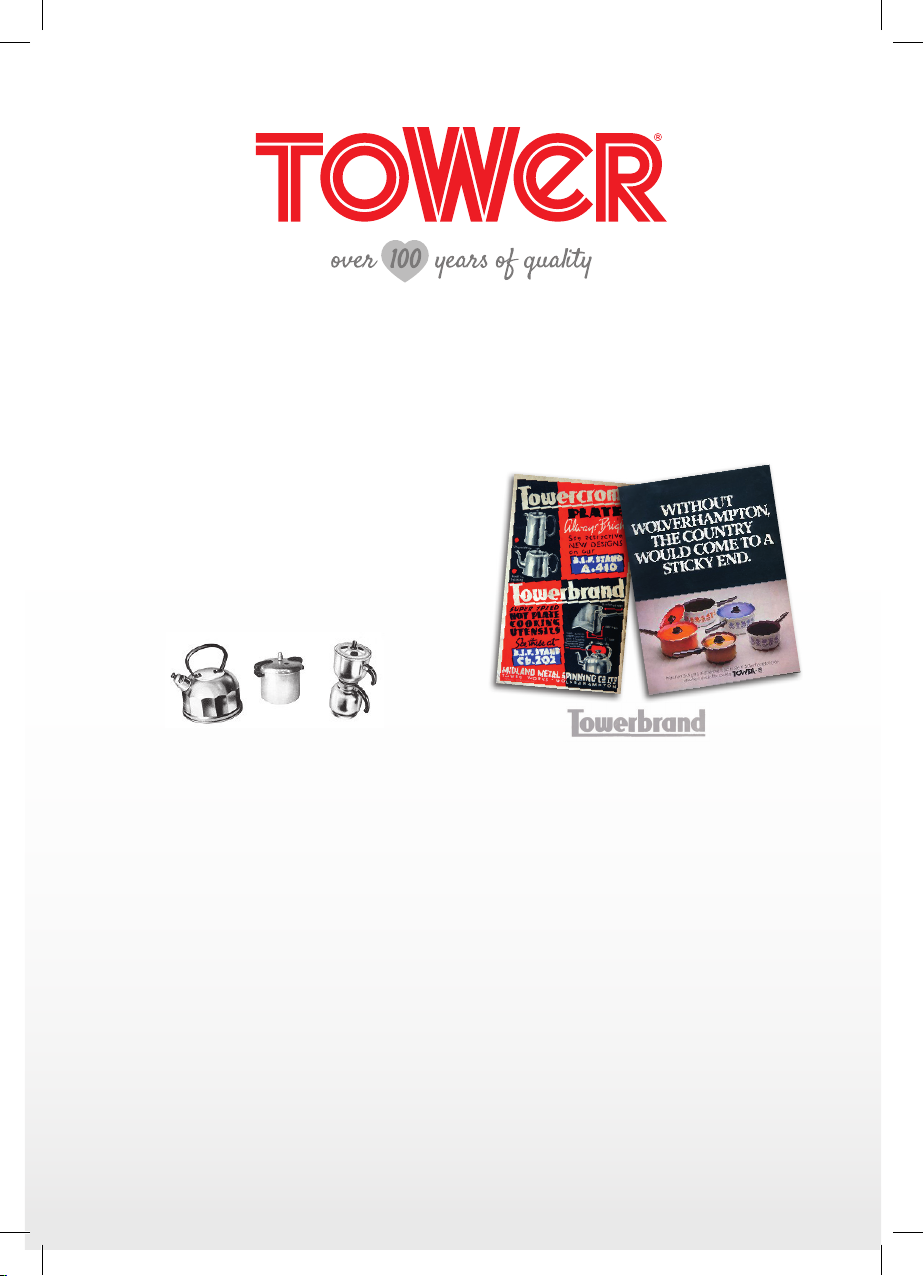
1912 Midland Metal Spinners was founded by
George Cadman, who was then 65 years old, as
a metal holloware manufacturing company, in St.
Mark’s Street, Wolverhampton. They later moved
into the Tower and Fort Works in Pelham Street,
which ultimately gave rise to the famous Tower
brand name.
1937 Tower exhibited some of their latest holloware
designs at the British Industries Fair. As you can
see from the original poster, their stand No. A410
must have been a great sight as it promoted their
“Beautiful, inexpensive, untarnishable Plate, at
prices all can afford to pay”.
A Traditional Taste
With the Tower Dual Deep Fryer, you can bring the
taste everyone loves right into your own kitchen.
Unlike water-based cooking (boiling, steaming,
etc.), when you fry food, you are using dry heat.
Frying uses a means of heat transfer that mixes
both conduction and convection. An age old
cooking tradition, experts believe that frying
originated from the Middle East. With foods such
as Falafel cooking to perfection when fried, this is
no surprise. Home cooked fried chips will transport
you back to a nostalgic time of full flavours and
delicious crispy food.
1961 Tower became one of the largest
manufacturers of aluminium holloware, electric
kettles, tea pots and other household articles with
over 1,000 employees.
1974 Russell Hobbs took ownership of the
expanding Tower brand.
The Tower Dual Deep Fryer brings traditional frying
into the 21st century. With a ‘Ready’ indicator
light that lets you know when your oil has reached
the right temperature, you’re destined to get the
perfect taste from your food.
2
Page 3

Safety and Instruction Manual
Helpline: +44 (0) 333 220 6066
CONTENTS:
Please read this Manual carefully BEFORE
using the Dual Deep Fryer for your own safety.
Thank you for purchasing this Tower Dual Deep
Fryer from the Tower range of products.
It has been designed to provide many years of
trouble-free cooking. There are many benets to
using a Tower Dual Deep Fryer:
• Thermostatically controlled frying ensures
that your food is never under or over
cooked.
• 2 x 3L oil tanks with independent power
supplies and controls.
• Removable immersed stainless steel
heating elements.
• Dishwasher safe lids, baskets and oil
tanks.
• Variable temperature controls up to 190°C.
• Odour lters to absorb smells and steam.
Contents:
1. Specications
Components and structure
Technical information
2. ImportantSafetyInformation
3. UsingyourTowerAppliance
4. Recipes
5. TroubleShooting&Faq’s
6. Cleaning&Care
7. Recycling
8. WiringSafety
9. WarrantyInformation
10. YourReceipt
SeebackpageforCustomerService
Information.
3
Page 4
Register online at www.towerhousewares.co.uk for your FREE extended guarantee.
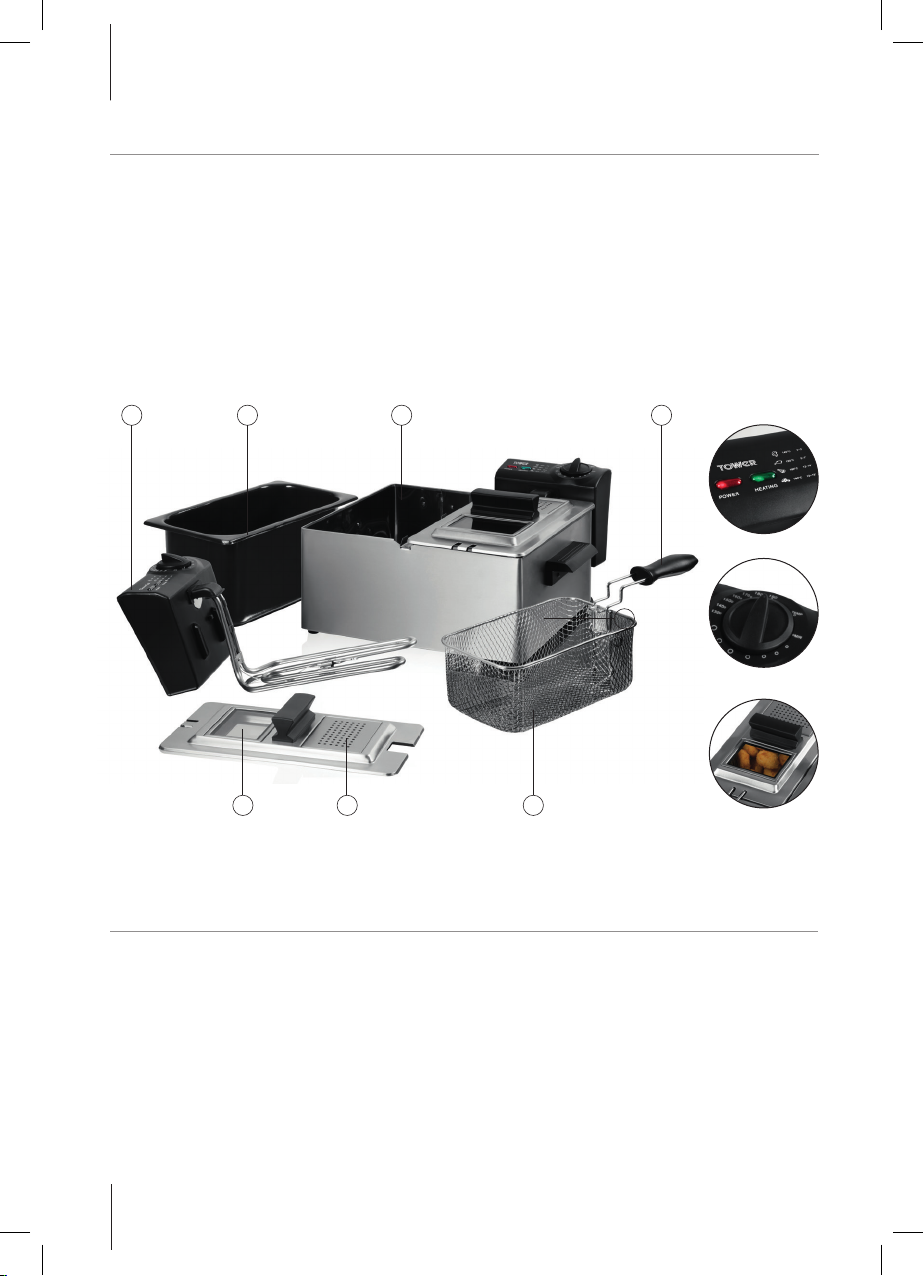
1SPECIFICATIONS:
Components
This box contains:
Dual Deep Fryer
2 x Fryer Lids
2 x Frying Baskets
2 x Basket Handles
21 3 4
2 x Removable Oil Pots
Heating Elements & Controls
Instruction Manual
3
r
o
t
L
a
i
g
c
i
d
n
I
p
m
e
T
e
i
V
h
t
s
r
u
e
t
a
C
r
o
e
w
n
t
r
o
l
W
g
i
n
n
i
d
o
w
567
Structureofyourappliance:
1. Heating Elements & Controls
2. Removable Oil Pot
3. Deep Fryer Base
4. Basket Handle
4
5. Frying Basket
6. Removable Lid
7. Viewing Window
Page 5

Safety and Instruction Manual
Helpline: +44 (0) 333 220 6066
Technical Data
Description: 6 Litre Dual Deep Fryer
Model: T17007
Rated Voltage: 230V
Frequency: ~50Hz
Power Consumption: 2 x 1800W
Documentation
We declare that this product conforms to the following product legislation in accordance with the
following directive(s):
2004/108/EC Electromagnetic Compatibility Directive.
2006/95/EC Low Voltage Directive.
2011/65/EU Restriction of Hazardous Substances Directive.
1935/2004/EC Materials & Articles in Contact With Food (LFGB section 30 & 31).
2009/125/EC Eco-Design of Energy Related Products
RKW Quality Assurance, United Kingdom.
Guarantee
Spares and accessories are guaranteed for
1 year from date of purchase.
The main body and non-removable oil pot are
guaranteed for the extended free warranty
subject to registration.
If any defect arises due to faulty materials of
workmanship, the faulty products must be
returned to the place of purchase.
Refund or replacement is at the discretion of
the retailer.
Should you encounter problems or require
a replacement part, contact The Tower
Customer Service Department on:
+44 (0) 333 220 6066.
Any necessary spare parts may be ordered
from the Tower website.
Your warranty becomes void should you decide
to use non Tower spare parts. Spare parts can
be purchased from www.towerhousewares.
co.uk
5
Page 6

Register online at www.towerhousewares.co.uk for your FREE extended guarantee.
2IMPORTANTSAFETYINFORMATION
Please read these notes carefully BEFORE using your Tower appliance
• Check that the voltage of the
main circuit corresponds with
the rating of the appliance
before operating.
• If the supply cord or appliance
is damaged, stop using the
appliance immediately and seek
advice from the manufacturer,
its service agent or a similarly
qualied person.
• WARNING: Do not let the cord
hang over the edge of a table
or counter, serious burns may
result from the deep fat fryer
being pulled off the counter
where it may be grabbed by
children or become entangled
with the user.
• Do not carry the appliance by
the power cord.
• Switch off and unplug before
tting or removing tools/
attachments, after use and
before cleaning.
• Close supervision is necessary
when any appliance is used by
or near children.
• Children should not play with
the appliance.
• This appliance can be used
by children aged from 8 years
and above and persons with
reduced physical, sensory or
mental capabilities or lack of
experience and knowledge
if they have been given
supervision or instruction
concerning use of the appliance
in a safe way and understand
the hazards involved.
• Do not use any extension cord
with this appliance.
• Do not pull the plug out by the
cord as this may damage the
plug and/or the cable.
• Switch off at the wall socket
then remove the plug from
the socket when not in use or
before cleaning.
• Cleaning and user maintenance
should not be undertaken by
children without supervision.
• Take care when any appliance
is used near pets.
• Do not use this product for
anything other than its intended
use.
• This appliance is for household
use only.
6
Page 7

Safety and Instruction Manual
Helpline: +44 (0) 333 220 6066
• Ensure that all parts are
completely dry before lling the
appliance with oil or liquid fat.
• The fryer may on be used with
frying oil or liquid frying fat. It is
not suitable for use with solid
fats.
• Never switch the appliance on
unless it is lled with oil.
• Do not overll the appliance
with oil.
• Do not use the appliance
underneath a wall mounted
cupboard.
• Always dry food before frying
e.g. Chips which are too wet
can cause the hot oil to froth
excessively.
• After use, set the thermostat
to the lowest setting (turn the
thermostat fully anti clockwise).
• This product should not be
used with timers or remote
devices as to do so would be a
potential re hazard.
• DO NOT use an extension
lead or plug adaptor with this
appliance.
• Extreme caution must be used
when moving an appliance
containing hot foods, water or
other hot liquids.
• In the unlikely event the
appliance develops a fault,
stop using it immediately and
seek advice from the service
department:
+44 (0) 333 220 6066
• Switch off at the wall socket
then unplug and allow to cool.
• Caution: Do not touch the hot
surfaces or the steam that may
be produced whilst cooking as
these may burn/ scald.
7
Page 8

Register online at www.towerhousewares.co.uk for your FREE extended guarantee.
3USINGYOURAPPLIANCE
Note: Assemble the frying basket handles and
ensure they are secure correctly before use.
1. Fit each element and control panel into
place. The elements slot into place in the oil
tanks and are exposed in the oil.
2. Fill the oil tanks to the appropriate level.
The oil tanks are clearly marked with the
Minimum and Maximum oil levels; do not
attempt to fry with less than the minimum
level as this could cause damage and
overheating to the unit.
3. Do not over ll the oil tanks as this could
cause the oil to spill when the food is
placed in the tank to cook.
4. Turn the temperature controls to the ‘Min’
position and plug into the mains power
supply socket and switch on the socket.
5. Caution: Do not plug both elements into the
same power socket using a plug adaptor.
6. Turn the temperature controls clockwise to
the required temperature and the red power
light and green ready light will illuminate.
This indicates that the unit is now on and
heating the oil.
7. Allow the oil to reach the required
temperature before placing any food in
the oil. This is indicated by the ready light,
which will go out when the oil has reached
the required temperature.
TemperatureControlDials:
Each fryer functions independently. There is a
temperature dial on each control panel, allowing
you to cook two different foods at once, at
different temperatures. Each fryer has power and
heating indicator lights, so you know when each
has reached the correct temperature.
The temperature control dials allow the
temperature to be set to the type of food that
you are cooking. The temperature ranges that
can be achieved are 130°C to 190°C for perfect
results every time.
Note: Never use the temperature control dial to
switch the appliance off. Always switch off at the
wall socket and unplug.
Removablehandles:
To assemble the frying basket handles, squeeze
the metal rods of the handles together and
position each end within the slots of the holder
in the basket. With these in place, work the rods
into the vertical grips to secure the handle in
place.
Simply reverse this procedure to remove this
handle for cleaning and storage.
Viewingwindows:
PowerandReadylights:
The red power indicators will stay on during use.
The green ready light will cycle on and off as
the thermostat cycles to maintain the correct
temperature.
8
Coat the inner face of the viewing windows
with oil to prevent condensation forming and to
enable cooking process to be checked.
Page 9

Safety and Instruction Manual
Helpline: +44 (0) 333 220 6066
CookingwithyourDualDeepFryer:
Note: The power light will remain on when in use.
1. Before frying, make sure you pat dry any
wet or frozen foods.
2. Place the food in the frying basket. Do not
overload the basket as this will substantially
lower the oil temperature.
3. Once the oil has reached the correct
temperature and the ready light has turned
off, slowly lower the fry basket into the oil.
4. The lid can be placed on the fryer during
use except when cooking high moisture
foods such as chips and frozen foods.
When the liquid has boiled off place the lid
down.
5. When the food is ready, remove the lid (if
it has been used) using the handle, lift the
basket up slowly out of the oil.
6. After the excess oil has drained, place the
food on a paper towel lined baking sheet to
allow any remaining oil to drain away.
7. If you are frying more than one load in
each basket, ensure the oil re-heats to the
required temperature.
Referencemenu:
The frying time given in the chart is only for
reference. Always check food is thoroughly
cooked before eating.
Food type Temp
(°C)
Weight
(G)
Time
(minutes)
Whole shrimp 130 200 3-5
Mushrooms 150 300 4-6
Fillets 150 300 5-7
Crumbed
chicken
170 250 12-14
Fish cakes 170 300 3-5
Onions 190 350 2-4
French fries 190 400 8-10
Potato chips 190 400 3-6
TIPS:
• Certain vegetables, such as potatoes
will not require a coating as they form a
natural skin around themselves. However,
most meat and sh will require a batter or
breading.
• Gently lower food into the oil.
• Don’t overll the fryer. It’s better to fry in
batches.
• Take into account the type of food you
are cooking when selecting a frying
temperature. Generally, pre-cooked food
will require a higher temperature and less
cooking time than raw food.
• CAUTION: Certain foods may begin to turn
golden brown before they are fully cooked.
• Always check the food is fully cooked
before serving.
9
Page 10

Register online at www.towerhousewares.co.uk for your FREE extended guarantee.
Oil:
• Always start with clean oil. To keep your oil
clean, strain out any food remnants after
use, and replace the oil completely after
8 - 10 uses.
• Suitable oils to use in your fryer include
vegetable, sunower, sesame, groundnut,
corn, soy, hazelnut and rapeseed.
• Peanut oil, safower oil, sunower oil and
canola oil are the best choices as they have
‘high smoke points’. This means they don’t
break down at deep frying temperatures.
• If you use the same oil for frying repeatedly,
the temperature at which the smoke point
occurs is lowered. This happens less in
rapeseed and sunower oils.
• Avoid using olive oil, butter or margarine in
your fryer as they are unsuitable for cooking
at such high temperatures.
• Different oils have different tastes to them.
• Canola oil tastes fairly neutral, hazelnut oil
has a distinctive taste, light sesame oil has
a nutty avour which is especially good for
frying, and rapeseed oil is a popular choice
with a light and delicate taste. Peanut oil
doesn’t absorb or transfer avours, making
it good for cooking – however, its smoking
point is lower than that of corn or safower
oil.
• Almond, avocado and cottonseed oil are
also great to fry with, although they are
harder to nd and more expensive.
• Rapeseed oil is also a healthy choice as
it has less unhealthy saturated fat than all
other cooking oils, along with being a rich
source in vitamin E.
• Change the oil in your fryer after every 8 –
10 uses. When you do change the oil, never
pour it down the drain. Dispose of it safely
according to the guidelines of your local
council.
• Do not attempt to empty or change the oil
when the machine or oil is still hot. Allow to
cool completely before cleaning or moving.
When the oil is cool, remove the oil tank
and tip and pour to empty.
10
Page 11

Safety and Instruction Manual
Helpline: +44 (0) 333 220 6066
4 RECIPES
A Quick Easy Batter for
Deep Frying
Ingredients
• 140g our
• 1 tsp. baking powder
• ½ tsp. salt
• 1 egg
• 1 cup milk
• 55ml vegetable oil
Method
1. Mix the dry ingredients (our, baking
powder and salt) together in a bowl using
a fork.
2. 2. Beat the egg, milk and oil together in a
separate bowl.
3. 3. Stir the beaten ingredients into the our
mixture until well blended.
4. 4. Prepare the food you are frying. Ensure
frozen foods are entirely thawed. Dry food
completely before dipping into the batter.
5. 5. Dip your prepared food into batter and
coat.
Beer Batter
Ingredients
• 90g our
• 1 tsp. salt
• 1 egg
• ½ tsp. baking powder
• 100ml beer
• 1 tbsp. vegetable oil
Method
1. Mix the dry ingredients (our, baking
powder and salt) together in a bowl using
a fork.
2. Beat the egg, beer and oil together in a
separate bowl.
3. Stir the beaten ingredients into the our
mixture until well blended.
4. The batter should be smooth and
moderately thick.
5. Prepare the food you are frying. Ensure
frozen foods are entirely thawed. Dry food
completely before dipping into the batter.
6. 6. Fry using the reference table on page 9
to guide you.
Suggested foods: Slices of zucchini, chicken
pieces (partially cooked), shrimp, sh
6. Dip your prepared food into batter and
coat.
7. Fry using the reference table on page 9 to
guide you.
Suggested foods: Slices of onion for onion
rings, sh, shrimp
11
Page 12

Register online at www.towerhousewares.co.uk for your FREE extended guarantee.
Homemade Fries Beer Battered Onion
Rings
Ingredients
• 4 large potatoes
• Salt to season
• Frying oil, as needed
Method
1. Peel and wash the potatoes and cut them
into thin chips.
2. Pat dry on a tea towel.
3. Heat your fryer oil to 140°C.
4. Put a batch of chips into the frying basket
and fry for ve minutes.
5. Remove from the oil whilst still uncoloured
and drain on kitchen paper.
6. Reheat the fryer to 190°C and fry the chips
again for around 3 minutes until golden
and crispy.
7. Remove from the oil again and drain on
kitchen paper before seasoning with salt
and serving.
Ingredients
• 2 large onions
• Beer batter (see beer batter recipe)
• 70g our
• Frying oil, as needed
Method
1. Peel and slice the onions horizontally into
½ inch thick rings.
2. Heat the fryer to 190°C.
3. Coat each onion ring in our and dip into
the batter.
4. Shake off any access batter and place in
the frying basket.
5. Fry for around 3 minutes, ipping them
once using tongs.
6. When the onion rings are evenly browned
remove from the oil and drain on kitchen
paper.
7. Season and serve.
12
Page 13

Safety and Instruction Manual
Helpline: +44 (0) 333 220 6066
Sweet Potato Fries
Ingredients
• 3 tbsp. corn our
• 6 sweet potatoes
• 1 tsp. garlic powder
• Frying oil, as needed
Method
1. Peel and cut the sweet potatoes into ½
inch strips.
2. Wash with cold water until all of the starch
has been washed off the sweet potatoes.
3. Strain the fries and remove any excess
water.
4. Add the corn our, garlic powder and any
other seasonings to a large plastic food
bag.
5. In batches, add the fries to the bag and
shake to combine.
6. Remove the fries from the bag and dust off
any excess seasoning.
7. Heat oil in the fryer to 175°C.
8. Fry for around 5 minutes until golden
brown and crisp.
9. Remove from the oil and drain on kitchen
paper.
Metric Imperial US cups
250ml 8 oz 1 cup
180ml 6 oz 3/4 cup
150ml 5 oz 2/3 cup
120ml 4 oz 1/2 cup
75ml 2 1/2 oz 1/3 cup
60ml 2 oz 1/4 cup
30ml 1 oz 1/8 cup
15ml 1/2 oz 1 tablespoon
Imperial Metric
1/2 oz 15g
1 oz 30g
2 oz 60g
3 oz 90g
4 oz 110g
5 oz 140g
6 oz 170g
7 oz 200g
8 oz 225g
9 oz 255g
10 oz 280g
11 oz 310g
12 oz 340g
13 oz 370g
14 oz 400g
15 oz 425g
1 lb 450g
Check this chart for
basic imperial to metric
conversions of weights.
FoodAllergies
Important Note:
Some of these
recipes may contain
nuts and/or other
allergens.
Please be careful
when making any of
our sample recipes
that you are NOT
allergic to any of
the ingredients. For
more information on
allergies, please visit
the Food Standards
Agency’s website at:
www.food.gov.uk
10. Season and serve.
13
Page 14

Register online at www.towerhousewares.co.uk for your FREE extended guarantee.
5CLEANING&CARE
Remove plug from the mains socket, and allow
the appliance to cool down before cleaning.
Do not immerse the appliance in water and make
sure no water enters the appliance.
Clean the base unit by wiping it with a damp
cloth. A little detergent can be added if the
appliance is heavily soiled.
Do not use scouring pads, steel wool or any form
of strong solvents or abrasive cleaning agents
to clean the appliance, as they may damage the
outside surfaces of the appliance.
Clean all accessories in warm soapy water, do
not use any scouring pads, steel wool or any
strong solvents or abrasive cleaning agents when
cleaning accessories.
Make sure that the appliance is cleaned after
every use.
IMPORTANT!
Allow to dry fully after cleaning before using
again.
Do not use the appliance if damp. Ensure the
appliance is completely clean and dry before
storing.
Storage
Unplug power cord from the power outlet and
clean as instructed.
Allow the appliance to dry fully.
Store on a at, dry level surface out of reach of
children.
6RECYCLING
DISPOSAL OF THE UNIT
Appliances bearing the symbol shown here may not be disposed of in domestic rubbish.
You are required to dispose of old electrical and electronic appliances like this separately.
Please visit www.recycle-more.co.uk or www.recyclenow.co.uk for access to information about
the recycling of electrical items.
Please visit www.weeeireland.ie for access to information about the recycling of
electrical items purchased in Ireland.
The WEEE directive, introduced in August 2006, states that all electrical items must be
recycled, rather than taken to landll.
Please arrange to take this appliance to your local Civic Amenity site for recycling,
once it has reached the end of its life.
14
Page 15

Safety and Instruction Manual
Helpline: +44 (0) 333 220 6066
7WIRINGSAFETYFORUKUSEONLY
FUSE
IMPORTANT
As the colours in the
mains lead of this
appliance may not
correspond with the
coloured markings
identifying the terminals
in your plug, please
proceed as follows:
The wires in the mains lead are coloured in
accordance with the following code:
Blue neutral [N] Brown live [L]
Green/Yellow [EARTH]
Plug Fitting Details (Where Applicable).
The wire coloured blue is the neutral and must be
connected to the terminal marked [N] or coloured
black.
The wire coloured brown is the live wire and
must be connected to the terminal marked [L] or
coloured red.
The wire coloured green/yellow must be
connected to the terminal marked with the letter
[E] or marked
On no account must either the brown or the blue
wire be connected to the [EARTH] terminal
Always ensure that the cord grip is fastened
correctly.
The plug must be tted with a fuse of the same
rating already tted and conforming to BS 1362
and be ASTA approved.
If in doubt consult a qualied electrician who will
be pleased to do this for you.
.
.
Non-Rewireable Mains Plug
If your appliance is supplied with a non-
rewireable plug tted to the mains lead and
should the fuse need replacing, you must use an
ASTA approved one (conforming to BS 1362 of
the same rating).
If in doubt, consult a qualied electrician who will
be pleased to do this for you.
If you need to remove the plug - disconnect it
from the mains - and then cut it off the mains
lead and immediately dispose of its safely. Never
attempt to reuse the plug or insert it into a socket
outlet as there is a danger of an electric shock.
WARNING:
This Appliance MUST be Earthed
15
Page 16

Register online at www.towerhousewares.co.uk for your FREE extended guarantee.
8WARRANTY
Wehopethatyouwillenjoy
yourTowerDeepFatFryer
formanyyears.
Asathankyoufor
purchasingoneofour
fantasticproducts,
wearegivingyou3years
peaceofmind.
This product is guaranteed for 12 months from
the date of original purchase.
If any defect arises due to faulty materials of
workmanship, the faulty products must be
returned to the place of purchase.
Refund or replacement is at the discretion of
the retailer.
The Following Conditions Apply:
• The product must be returned to the
retailer with proof of purchase.
• The product must be installed and
used in accordance with the instructions
contained in this instruction guide.
• It must be used only for domestic
purposes.
• It does not cover wear and tear, damage,
misuse or consumable parts.
• Tower has limited liability for incidental
or consequential loss or damage.
This guarantee is valid in the UK and Eire Only.
The standard one year guarantee is only
To receive your 3 year
guarantee, simply register
your appliance
online by visiting
www.towerhousewares.co.uk
16
extended to the maximum available for each
particular product upon registration of the
product within 28 days of purchase. If you
do not register the product with us
within the 28 day period, your product is
guaranteed for 1 year only.
To validate your extended warranty, please
visit www.towerhousewares.co.uk and register
with us online. Alternatively, call our customer
registration line on +44 (0) 333 220 6066.
Please note that length of extended warranty
offered is dependent on product type and
that each qualifying product needs to be
registered individually in order to extend its
warranty past the standard 1 year.
Extended warranty is only valid with proof of
purchase.
Page 17

Safety and Instruction Manual
Helpline: +44 (0) 333 220 6066
9TROUBLESHOOTING&FAQ’S
Questions Answers
Allow the oil to fully cool. Make sure the Fryer is unplugged. Remove the lid
How do I change the
oil in the Fryer?
How often shall I
change the oil?
Why does my Fryer
smell bad?
The oil is overowing.
Can I deep fry frozen
foods?
and pour the oil out into a suitable container. After this, you can clean and
rell the bowl.
When you change the oil in your fryer, never pour it down the drain. Dis
pose of it safely according to the guidelines of your local council.
Change the oil in your fryer after every 8 – 10 uses.
Change the oil sooner if it very dark and thick, has an unpleasant smell and
froths or begins to smoke at a temperature less than 170°C
Your oil may have gone bad. Replace is with fresh oil.
You may not be using the correct oil. Ensure you are using an oil safe for
frying at high temperatures
Check and see if the Fryer is lled above the maximum level.
Ensure you are drying all your food before placing it into the fryer.
Make sure the basket is not being overloaded.
You can deep fry frozen foods, just remember to shake off any excess ice
beforehand so that no liquid is going into the fryer.
-
9 YOUR RECEIPT
Afx your store receipt to this page for safe
keeping.
17
Page 18

thank you!
We hope you enjoy your appliance for
many years. As a thank you for purchasing
one of our fantastic products, we are giving
you an extra 2 years peace of mind.
*To receive your extra 2 years guarantee,
register your appliance online by visiting:
www.towerhousewares.co.uk
Should you have a problem with your
appliance, or need any spare parts,
please call our Service Department on:
+44 (0) 333 220 6066
Your warranty becomes void should you decide
to use non Tower spare parts. Spare parts can be
purchased from www.towerhousewares.co.uk
great british design, innovation and excellence since 1912
0116.V2
 Loading...