

Page 1
Safety and Instruction Manual
PLEASE READ CAREFULLY
*Subject to registering Your Extended Guarantee online at www.towerhousewares.co.uk.
Digital Rotisserie Multi Air Fryer
T17004
Page 2
2
Register online at www.towerhousewares.co.uk for your FREE extended guarantee.
1912 Midland Metal Spinners was founded by
George Cadman, who was then 65 years old, as
a metal holloware manufacturing company, in St.
Mark’s Street, Wolverhampton. They later moved
into the Tower and Fort Works in Pelham Street,
which ultimately gave rise to the famous Tower
brand name.
1937 Tower exhibited some of their latest holloware
designs at the British Industries Fair. As you can
see from the original poster, their stand No. A410
must have been a great sight as it promoted their
“Beautiful, inexpensive, untarnishable Plate, at
prices all can afford to pay”.
1961 Tower became one of the largest
manufacturers of aluminium holloware, electric
kettles, tea pots and other household articles with
over 1,000 employees.
1974 Russell Hobbs took ownership of the
expanding Tower brand.
A Healthy Alternative
Want to cook healthily using less oil? Tower’s
handy Air Fryer uses revolutionary air blast
technology requiring little or no oil to fry, roast, grill
or bake. A digital timer helps you to stay in control.
Air frying allows you to enjoy the taste of deep fried
food, but at only 10% fat, it really is the healthiest
alternative. All you need to do is lightly coat the
food in oil and the hot air will fry it for you. Air frying
uses hot circulating air to cook food that’s crispy
on the outside and moist inside at higher speeds.
Page 3

Safety and Instruction Manual
3
Helpline: +44 (0) 333 220 6066
CONTENTS:
Please read this Manual carefully BEFORE
using the Low Fat Air Fryer for your own
safety.
Thank you for purchasing this Tower Air Fryer
from the Tower range of products.
It has been designed to provide many years of
trouble-free cooking. There are many benets to
using a Tower Air Fryer:
• Create delicious deep-fried style food
using just one spoonful of oil.
• Up to 80% less fat with the same great
taste.
• Six cooking modes including: Roast, Fries,
Stir-Fry, Grill & BBQ.
• 360° food rotating system with triple
cooking power for faster, healthier and
more economical cooking.
• Temperature control up to 230°C.
• Programmable times: up to 60 minutes.
Contents:
1. Specications
Components and structure
Technical information
2. ImportantSafetyInformation
3. UsingyourTowerAppliance
4. Cleaning&Care
5. Recycling
6. WiringSafety
7. WarrantyInformation
8. Troubleshooting
9. YourReceipt
SeebackpageforCustomerService
Information
Page 4
4
Register online at www.towerhousewares.co.uk for your FREE extended guarantee.
Components
This box contains:
Steel Rack
Rotisserie Basket
Rotisserie Forks & Spit
Tongs
Recipe Book
Instruction Manual
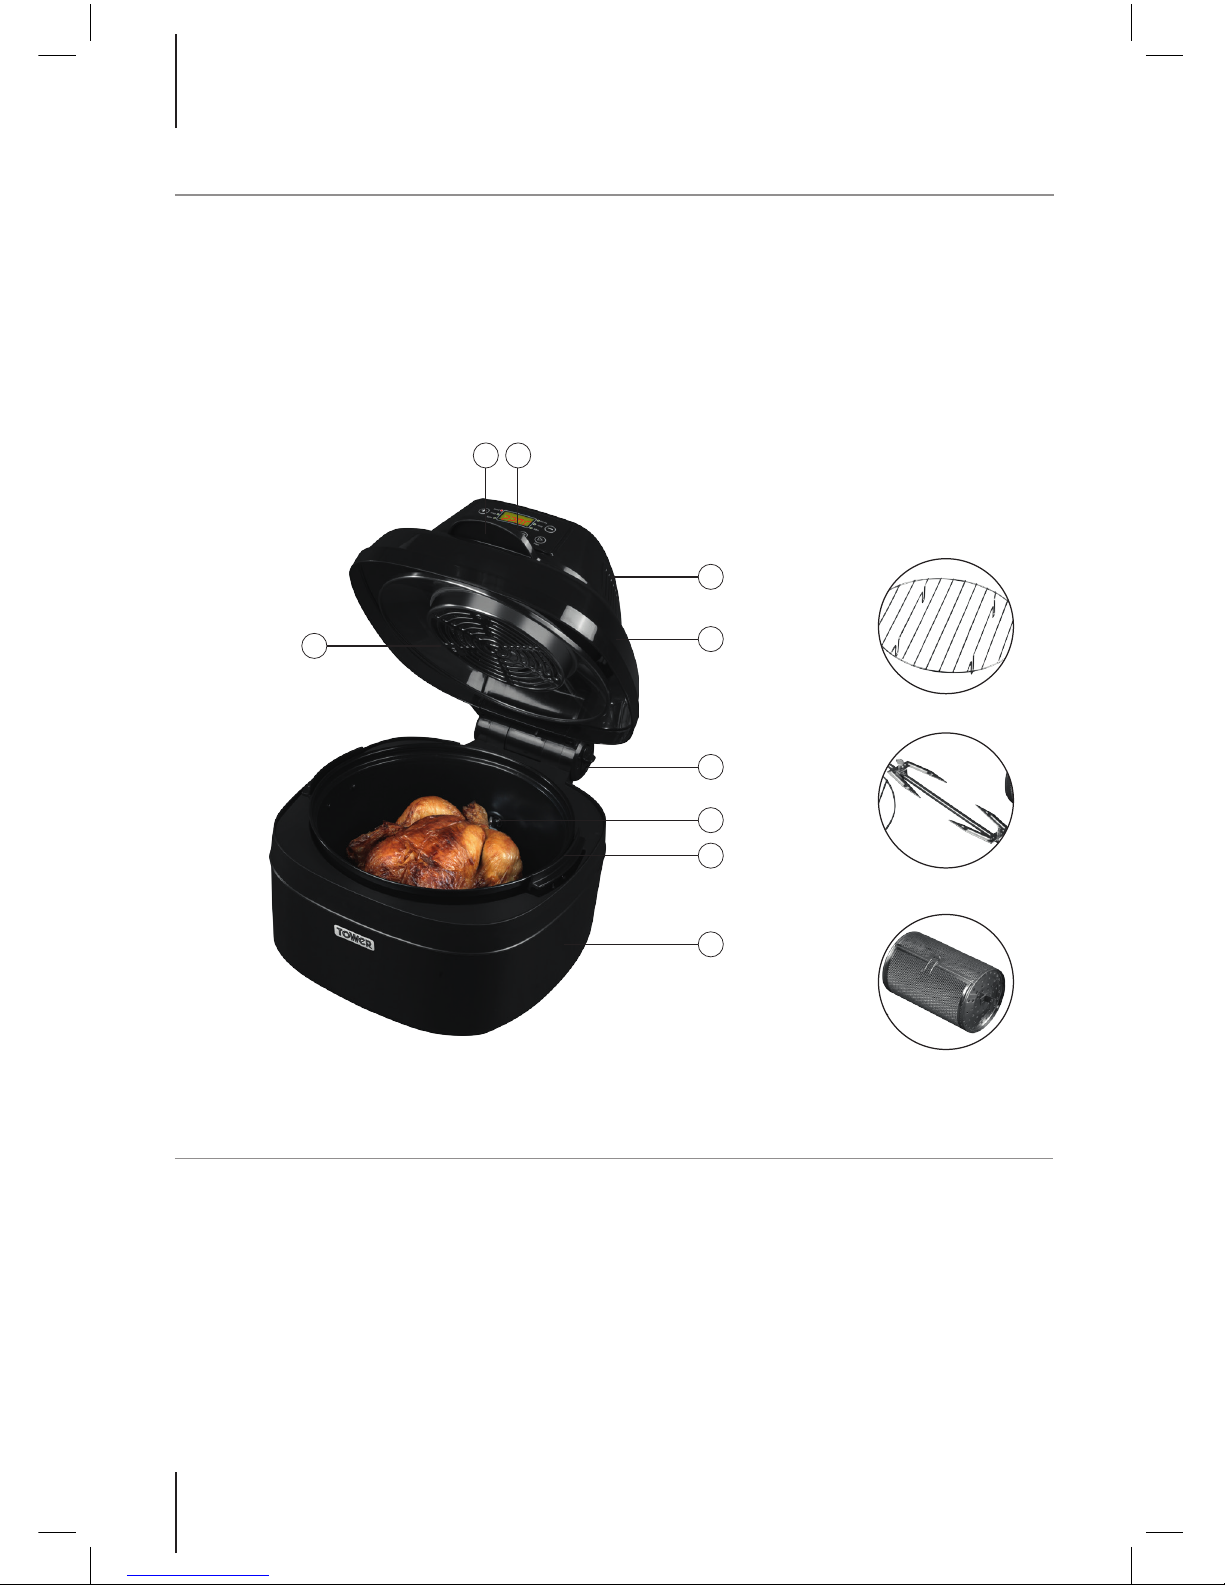
Structureofyourappliance:
1. Heating Fan
2. Lid Handle
3. Control Panel
4. Heat emission hole / Louvre
5. Transparent Cover
6. Lid Release
7. Spit Hole
8. Stainless Steel Bowl
9. Base
10. Steel Rack
11. Rotisserie Forks & Spit
12. Rotisserie Basket
1SPECIFICATIONS:
1
0
.
S
t
e
a
k
R
a
c
k
1
1
.
R
o
t
i
s
s
e
r
i
e
F
o
r
k
&
S
p
i
t
1
2
.
R
o
t
i
s
s
e
r
i
e
B
a
s
k
e
t
2 3
4
5
6
7
8
9
1
Page 5

Safety and Instruction Manual
5
Helpline: +44 (0) 333 220 6066
Technical Data
Description: Digital Rotisserie Multi Air Fryer
Model: T17004
Rated Voltage: 220-240V ~50/60Hz
Power Consumption: 1000 Watts
Documentation
We declare that this product conforms to the following product legislation in accordance with the
following directive(s):
2004/108/EC Electromagnetic Compatibility Directive.
2006/95/EC Low Voltage Directive.
2011/65/EU Restriction of Hazardous Substances Directive.
1935/2004/EC Materials & Articles in Contact With Food (LFGB section 30 & 31).
RKW Quality Assurance, United Kingdom.
Guarantee
The spares and accessories are guaranteed for
1 year from date of purchase.
The main body and housing are guaranteed
for the extended free warranty subject to
registration.
If any defect arises due to faulty materials of
workmanship, the faulty products must be
returned to the place of purchase.
Refund or replacement is at the discretion of
the retailer.
Should you encounter problems or require
a replacement part, contact The Tower
Customer Service Department on:
+44 (0) 333 220 6066.
Any necessary spare parts may be ordered
from the Tower website.
Your warranty becomes void should you decide
to use non Tower spare parts. Spare parts can
be purchased from www.towerhousewares.
co.uk
Page 6

6
Register online at www.towerhousewares.co.uk for your FREE extended guarantee.
Please read these notes carefully BEFORE using your Tower appliance
• Check that the voltage of the
main circuit corresponds with
the rating of the appliance
before operating.
• If the supply cord or appliance
is damaged, stop using the
appliance immediately and seek
advice from the manufacturer,
its service agent or a similarly
qualied person.
• WARNING: Do not let the cord
hang over the edge of a table
or counter, serious burns may
result from the Air Fryer being
pulled off the counter where it
may be grabbed by children
or become entangled with the
us er.
• Do not carry the appliance by
the power cord.
• Do not use any extension cord
with this appliance.
• Do not pull the plug out by the
cord as this may damage the
plug and/or the cable.
• Switch off at the wall socket
then remove the plug from
the socket when not in use or
before cleaning.
• Switch off and unplug before
tting or removing tools/
attachments, after use and
before cleaning.
• Close supervision is necessary
when any appliance is used by
or near children.
• Children should not play with
the appliance.
• This appliance can be used
by children aged from 8 years
and above and persons with
reduced physical, sensory or
mental capabilities or lack of
experience and knowledge
if they have been given
supervision or instruction
concerning use of the appliance
in a safe way and understand
the hazards involved.
• Cleaning and user maintenance
should not be undertaken by
children without supervision.
• Take care when any appliance
is used near pets.
• Do not use this product for
anything other than its intended
use.
• This appliance is for household
use only.
2IMPORTANTSAFETYINFORMATION
Page 7

Safety and Instruction Manual
7
Helpline: +44 (0) 333 220 6066
• This appliance includes a
heating function.
• Please ensure that the
appliance is used on a stable,
level, and heat resistant surface.
• Do not immerse cords, plugs
or any part of the appliance in
water or any other liquid.
• Do not use the appliance
outdoors.
• Do not place the Air Fryer on
or near combustible materials
such as a tablecloth or curtain.
• Do not place the Air Fryer
against a wall or against other
appliances. Leave at least 10cm
free space on the back and
sides and 10cm free space
above the appliance.
• Allow the Air Fryer cool down
for approx. 30 minutes before
you handle or clean it.
• Make sure the food prepared in
the Air Fryer comes out goldenyellow instead of dark brown.
Remove burnt remnants.
• During hot air frying, hot steam
is released through the air outlet
openings. Keep your hands and
face at a safe distance from the
steam and from the air outlet
openings.
• Hot steam and air may escape
when you remove the pan from
the Air Fryer.
• Any baking trays or oven
dishes used in the Air Fryer
will become hot. Always use
oven gloves when handling or
removing anything from the Air
fryer.
• WARNING: Do not ll the Air
Fryer pan with oil as this may
cause a re hazard.
• Do not place anything on top of
the Air Fryer.
• Ensure that food is completely
dry before adding any oil to it
and/or putting it in the Air Fryer.
• In the unlikely event the
appliance develops a fault,
stop using it immediately and
seek advice from the service
department:
+44 (0) 333 220 6066
Page 8

8
Register online at www.towerhousewares.co.uk for your FREE extended guarantee.
3USINGYOURAPPLIANCE
ControlPanel
1. Temperature/Time adjustment buttons
2. Food Roller - Start/Stop rotation function
3. Temp Timer - Set your desired cooking
temperature and time
4. ON/OFF - On/Off the appliance
5. Menu - Cooking mode selection
6. Start - Start the menu
Note: For more information see later part of
instructions
Above is the correct method of opening or
closing the cooking lid:
Warning: Before opening the lid the cooking
process must be stopped. Please press down
the xed switch (as illustrated above) to unlock
the lid.
Note: Be careful to avoid scalding from hot
steam escaping.
Whenusingtheaccessories
• When handing any of the heated
accessories, ensure you use the tongs
provided. For extra protection, wear oven
gloves.
• Pay attention to the temperature of the
inner pot.
• Use both hands when carrying to avoid
accident.
Spit
The spit has a hinged end and a more uted
end.
The hinged end ts into place on a hook in the
front inner of the steel bowl.
The more uted end goes into the recess in
steel bowl.
To use the chicken fork attachment, slide them
on to each end of the spit, with the forks facing
inwards towards the chicken. Use the screws
included to hold them into place.
Usingtheappliance
1. Depending on what is required t the
rotisserie basket or steel rack into the inner
bowl before adding food.
2. Try to keep the food 15 – 20mm away
from the outer edge of the bowl, to allow
for maximum hot air circulation.
3. If the rotisserie basket is required, please
put the food inside prior to tting it into the
inner bowl.
4. Close the lid and check that no food
touches the top of the lid.
5. Plug in the appliance, making sure it is sat
on a level, steady dry surface.
6. Press the on/off key and a beep will
sound. Then press the menu button and
select the desired function. To move
through the different options, keep
pressing the menu key.
1
2 3 4 5 6
1
Page 9

Safety and Instruction Manual
9
Helpline: +44 (0) 333 220 6066
7. Once you have reached the desired
function, the set temperature will be
ashing on the screen.
8. To change the temperature press the + or
– keys, on either side of the LED screen.
Long press the + or – keys to move up
and down in increments of 10
o
C. Short
press to move in increments of 1oC.
9. Once the correct temperature has been
reached press the Temp/Timer button.
The time in minutes will appear ashing on
the screen. Use the same + and – keys to
change the time in increments of 1 minute.
Long pressing will change the temperature
quicker.
10. When the correct time and temperature
have been chosen, press start.
11. At any point during cooking, the lid can be
lifted to check on the food. Once lifted, the
cooking will pause. When the lid is placed
back down, cooking will resume.
12. When the food has nished cooking the
appliance will beep multiple times, and the
inner light will go out.
13. The fan will remain on for a few seconds.
14. Lift the lid and carefully extract the food
using the tongs provided.
15. If the appliance is switched on but has not
been used, it will switch off automatically
after 1 minute.
Warning: When the lid has been opened,
cooking will pause. There is a safety catch
located on the side of the lid hinge. This stops
the lid from closing its self once opened.
To close the lid, with one hand on the lid handle,
pull the safety catch down until you hear a click.
Lower the lid gently back into place.
Note: Do not use the lid safety catch without
holding on to the lid, as it snaps shut very
quickly.
Functions:
There are a variety of pre-set food functions on
the control panel.
• Roast: This pre-set is perfect for roasting
meats or vegetables.
• Fries: This function cooks chips without
the need of preheating.
• Bake: This function is great for
omelettes.
• Stir-Fry: Use the rotisserie basket for an
even cook on rotation.
• Grill: Great for cooking steaks.
• BBQ: Use your Chicken forks & spindle
for Kebabs & BBQ Chicken
See the table below for the pre-set temperature
and times for each cooking function.
Menu Temperature oC Time
minutes
Roast 220 25
French Fries
(non -preheat)
230 20
Bake 180 15
Stir-fry 200 10
Grill 190 15
BBQ 200 12
Page 10

10
Register online at www.towerhousewares.co.uk for your FREE extended guarantee.
Cooking Guidelines:
NOTE: These times are approximate. Times
can vary depending on the size, thickness and
quantity of the recipe. Adjusting the temperature
will also change the cooking times.
Menu Time
Minutes
Temperature
o
C
Thin frozen fries 9 – 16 200
Thin frozen fries 9 – 16 200
Homemade fries
(8 x 8mm)
10 – 16 200
Homemade
potato wedges
18 – 22 180
Homemade
potato cubes
12 – 18 200
Rosti 15 – 18 180
Potato gratin 15 – 18 200
Steak 8 – 12 180
Pork chops 10 – 15 180
Hamburger 7 – 14 180
Sausage roll 13 – 15 200
Menu Time
Minutes
Temperature
o
C
Drumsticks 18 – 22 180
Chicken breast 10 – 15 180
Chicken 25 220
Spring rolls 8 – 10 200
Frozen chicken
nuggets
6 – 10 200
Frozen sh ngers 6 – 20 200
Frozen breaded
cheese snacks
8 – 10 180
Stuffed vegetables 10 160
Cake 20 – 25 160
Quiche 20 – 22 180
Mufns 15 – 18 200
Sweet snacks 20 160
Page 11

Safety and Instruction Manual
11
Helpline: +44 (0) 333 220 6066
5RECYCLING
DISPOSAL OF THE UNIT
Appliances bearing the symbol shown here may not be disposed of in domestic rubbish.
You are required to dispose of old electrical and electronic appliances like this separately.
Please visit www.recycle-more.co.uk or www.recyclenow.co.uk for access to information about
the recycling of electrical items.
Please visit www.weeeireland.ie for access to information about the recycling of
electrical items purchased in Ireland.
The WEEE directive, introduced in August 2006, states that all electrical items must be
recycled, rather than taken to landll.
Please arrange to take this appliance to your local Civic Amenity site for recycling,
once it has reached the end of its life.
4CLEANING&CARE
Remove plug from the mains socket, and allow
the appliance to cool down before cleaning.
Do not immerse the lid unit of the appliance
in water and make sure no water enters the
appliance.
Clean the base unit by wiping it with a damp
cloth. A little detergent can be added if the
appliance is heavily soiled.
Do not use scouring pads, steel wool or any form
of strong solvents or abrasive cleaning agents
to clean the appliance, as they may damage the
outside surfaces of the appliance.
Clean all accessories in warm soapy water, do
not use any scouring pads, steel wool or any
strong solvents or abrasive cleaning agents when
cleaning accessories.
Make sure that the appliance is cleaned after
every use.
IMPORTANT!
Allow to dry fully after cleaning before using
again.
Do not use the appliance if damp. Ensure the
appliance is completely clean and dry before
storing.
Storage
Unplug power cord from the power outlet and
clean as instructed.
Allow the appliance to dry fully.
Store on a at, dry level surface out of reach of
children.
Page 12

12
Register online at www.towerhousewares.co.uk for your FREE extended guarantee.
6WIRINGSAFETYFORUKUSEONLY
IMPORTANT
As the colours in the
mains lead of this
appliance may not
correspond with the
coloured markings
identifying the terminals
in your plug, please
proceed as follows:
The wires in the mains lead are coloured in
accordance with the following code:
Blue neutral [N] Brown live [L]
Green/Yellow [EARTH]
Plug Fitting Details (Where Applicable).
The wire coloured blue is the neutral and must be
connected to the terminal marked [N] or coloured
black.
The wire coloured brown is the live wire and
must be connected to the terminal marked [L] or
coloured red.
The wire coloured green/yellow must be
connected to the terminal marked with the letter
[E] or marked
.
On no account must either the brown or the blue
wire be connected to the [EARTH] terminal
.
Always ensure that the cord grip is fastened
correctly.
The plug must be tted with a fuse of the same
rating already tted and conforming to BS 1362
and be ASTA approved.
If in doubt consult a qualied electrician who will
be pleased to do this for you.
Non-Rewireable Mains Plug
If your appliance is supplied with a nonrewireable plug tted to the mains lead and
should the fuse need replacing, you must use an
ASTA approved one (conforming to BS 1362 of
the same rating).
If in doubt, consult a qualied electrician who will
be pleased to do this for you.
The specially designed lid release button helps
you to open the lid of the fryer easily and safely.
Push the button for the fryer lid to automatically
open. This keeps your hands safely out of the
way as steam to escape from the Deep Fat Fryer.
To remove the lid altogether, lift the lid to the
vertical position and pull upwards.
WARNING:
This Appliance MUST be Earthed
FUSE
Page 13

Safety and Instruction Manual
13
Helpline: +44 (0) 333 220 6066
7WARRANTY
This product is guaranteed for 12 months from
the date of original purchase.
If any defect arises due to faulty materials of
workmanship, the faulty products must be
returned to the place of purchase.
Refund or replacement is at the discretion of
the retailer.
The Following Conditions Apply:
• The product must be returned to the
retailer with proof of purchase.
• The product must be installed and
used in accordance with the instructions
contained in this instruction guide.
• It must be used only for domestic
purposes.
• It does not cover wear and tear, damage,
misuse or consumable parts.
• Tower has limited liability for incidental
or consequential loss or damage.
This guarantee is valid in the UK and Eire Only.
The standard one year guarantee is only
extended to the maximum available for each
particular product upon registration of the
product within 28 days of purchase. If you
do not register the product with us
within the 28 day period, your product is
guaranteed for 1 year only.
To validate your extended warranty, please
visit www.towerhousewares.co.uk and register
with us online. Alternatively, call our customer
registration line on +(44) (0) 333 220 6066.
Please note that length of extended warranty
offered is dependent on product type and
that each qualifying product needs to be
registered individually in order to extend its
warranty past the standard 1 year.
Extended warranty is only valid with proof of
purchase.
Wehopethatyouwillenjoy
yourTowerDigitalAirFryer
formanyyears.
Asathankyoufor
purchasingoneofour
fantasticproducts,
wearegivingyou3years
peaceofmind.
To receive your 3 year
guarantee, simply register
your appliance
online by visiting
www.towerhousewares.co.uk
Page 14

14
Register online at www.towerhousewares.co.uk for your FREE extended guarantee.
8TROUBLESHOOTING&FAQ’S
Questions Answers
How long should I
leave the Air Fryer to
cool before storing it?
We recommend leaving the Air Fryer for 30-45 minutes to cool before
storing.
My homemade
fries are not crispy
enough.
Ensure that the fries are completely dry before adding oil to them and
putting them in the Air Fryer.
Try cutting the potatoes into thinner, smaller fries and adding slightly more
oil for a crispier result.
My food has not
cooked uniformly.
The food may not be cut uniformly. Make sure everything is cut to the same
shape and size for good, even cooking.
How much cooking
oil do I need to use?
Frozen part fried foods require no added oils.
You only need to add ½ - 1 tbsp. of oil for other foods.
What is the capacity
of the Air Fryer?
The Air Fryer is 8 litres in capacity.
White smoke is
coming out of the Air
Fryer.
This is normal if you are preparing greasy ingredients, because a large
amount of oil leaks into the pan. This does not affect the appliance or the
end result.
Page 15

Safety and Instruction Manual
15
Helpline: +44 (0) 333 220 6066
9 YOUR RECEIPT
Afx your store receipt to this page for safe
keeping.
Page 16

thank you!
We hope you enjoy your appliance for
many years. As a thank you for purchasing
one of our fantastic products, we are giving
you an extra 2 years peace of mind.
*To receive your extra 2 years guarantee,
register your appliance online by visiting:
www.towerhousewares.co.uk
Should you have a problem with your
appliance, or need any spare parts,
please call our Service Department on:
+44 (0) 333 220 6066
great british design, innovation and excellence since 1912
0915.V2
Your warranty becomes void should you decide
to use non Tower spare parts. Spare parts can be
purchased from www.towerhousewares.co.uk
 Loading...