

Page 1

T16012
6L Digital Multi-Pot Pressure Cooker
Safety and Instruction Manual With Recipes
PLEASE READ CAREFULLY
*Subject to registering Your Extended Guarantee online at www.towerhousewares.co.uk.
Page 2

1912 Midland Metal Spinners
was founded by George
Cadman, who was then
65 years old, as a metal
holloware manufacturing
company, in St. Mark’s Street,
Wolverhampton. They later
moved into the Tower and
Fort Works in Pelham Street,
which ultimately gave rise
to the famous Tower brand
name.
1937 Tower exhibited some
of their latest holloware
designs at the British
Industries Fair. As you can
see from the original poster,
their stand No. A410 must
have been a great sight as
it promoted their “Beautiful,
inexpensive, untarnishable
Plate, at prices all can afford
to pay”.
1961 Tower became one of
the largest manufacturers of
aluminium holloware, electric
kettles, tea pots and other
household articles with over
1,000 employees.
1974 Russell Hobbs took
ownership of the expanding
Tower brand.
The 6 Litre Digital MultiPot Pressure Cooker with
intelligent touchscreen
control is the ultimate in
cooking inspiration.
With 16+ cooking functions,
an automatic 24 hour keep
warm function and delay
timer, the Digital Multi-Pot
Pressure Cooker provides you
with your own customised
cooking experience. It’s easy
and efcient, locking in more
vitamins and nutrients in your
food. Perfect for creating
delicious homemade meals
with ease, the one pot
functionality means less
cleaning up, and more
avoursome meals.
2
Page 3

Contents:
Please read this Manual carefully BEFORE using the Digital
Multi-Pot Pressure Cooker for your own safety.
Thank you for purchasing this Tower 6 Litre Digital Multi-Pot
Pressure Cooker from the Tower range of products.
It has been designed to provide many years of trouble-free
cooking. There are many benets to using a Tower Multi-Pot
Pressure Cooker:
There are many benets to using a Tower Blender:
• Unique twist lock lid
• 24 hour keep warm function
• LED display with touchscreen
• 6L cooking pot
• Digital timer
1. Specications
Components and
structure
2. Technical data
3. Important Safety
Information
4. Using your Appliance
5. Weights & Measures
6. Troubleshooting
7. Cleaning & Care
8. Recycling
9. Wiring Safety
10. Warranty Information
11. Your Receipt
12. Recipes
Stuffed peppers
Feta Cheese
Porridge
ApricotJam
Paella
Mulled Wine
Pork Pilaf
Poached Pears
Beef Kebabs
Pumpkin Soup
Chocolate Fondue
Beef Goulash
Vanilla yoghurt
Turkey Brawn
See back page for
Customer Service
Information.
3
Page 4
1 - Specications:
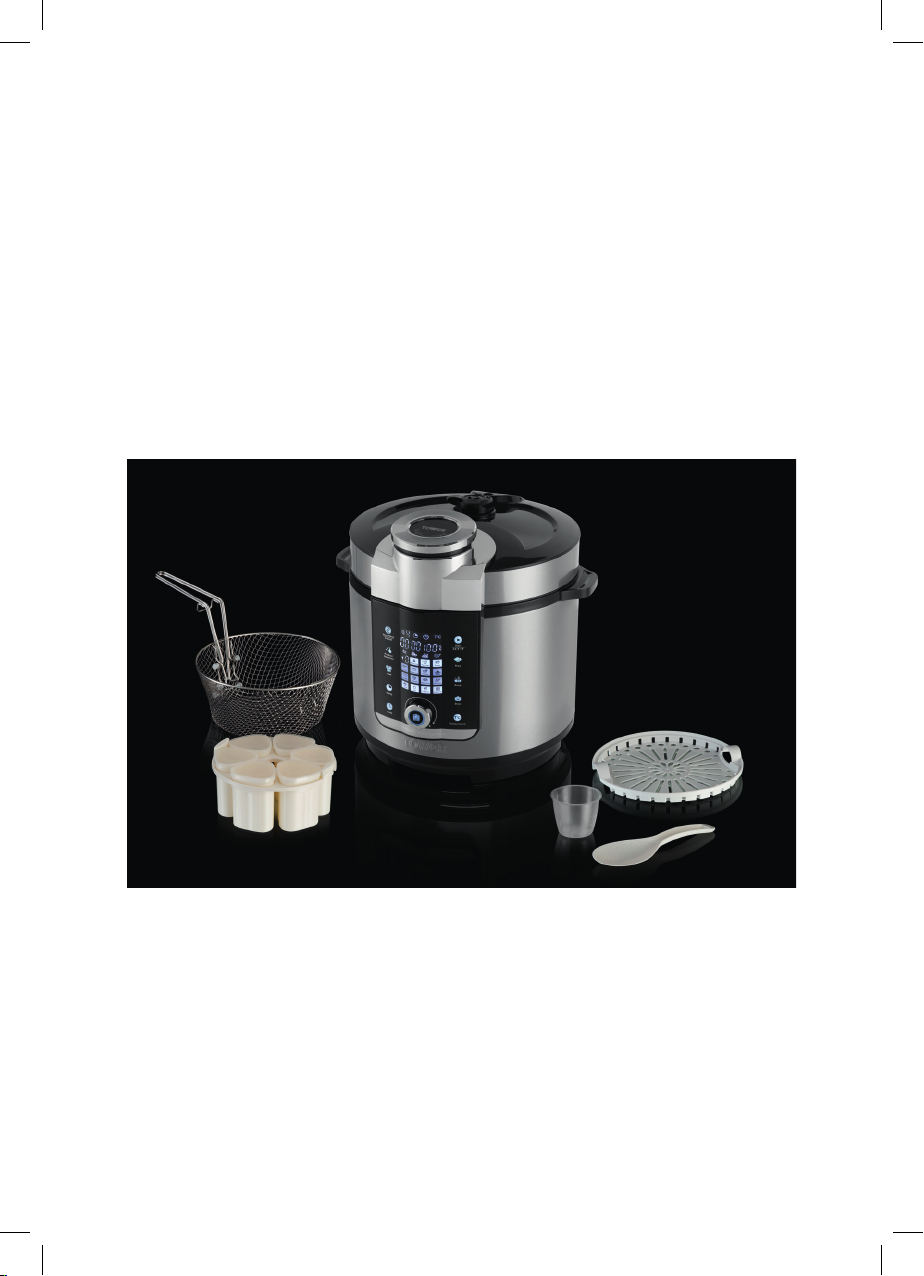
What’s in the box:
Digital Multi-Pot Pressure
Cooker
Steam tray
Measuring cup
Spatula/Ladle
Yoghurt pots
Frying basket
4
Page 5

2 - Technical Data:
Description: 6L Digital Multi-Pot Pressure Cooker
Model: T16012
Rated Voltage: 220-240V
Frequency: ~50/60Hz
Power Consumption: 900-1000W
Documentation
We declare that this product conforms to the following product legislation in
accordance with the following directive(s):
2014/108/EU Electromagnetic Compatibility Directive.
2014/95/EU Low Voltage Directive.
2011/65/EU Restriction of Hazardous Substances Directive.
1935/2004/EC Materials & Articles in Contact With Food
(LFGB section 30 & 31).
2009/125/EC Eco-Design of Energy Related Products.
RKW Quality Assurance, United Kingdom.
Guarantee:
All accessories are covered
by the warranty.
The main body and housing
are guaranteed for the
extended free warranty
subject to registration.
If any defect arises due
to faulty materials of
workmanship, the faulty
products must be returned
to the place of purchase.
Refund or replacement is at
the discretion of the retailer.
Should you encounter problems or require a
replacement part, contact The Tower Customer Service
Department on: +44 (0) 333 220 6066.
Any necessary spare parts may be ordered from the
Tower website.
Your warranty becomes void should you decide to use
non Tower spare parts. Spare parts can be purchased
from www.towerhousewares.co.uk
5
Page 6

3 - Important Safety Information:
Please read these notes carefully BEFORE using your
Tower appliance
• This appliance cooks under
pressure. Improper use may
result in scalding injury.
Make certain unit is properly
closed before operating. See
Operating Instructions before
beginning.
• Do not open the pressure
cooker until the unit has cooled
and internal pressure has been
released. Any pressure in the
cooker can be hazardous.
• Do not attempt to use the
safety lock override pin whilst
the cooker is under pressure.
• Steam may also release from
steam release hole located at
the back of the lid.
• Always check the pressure
release devices for clogging
before use, rinse the steam
valve under warm water to
release any debris obstructing
the vent. Always check inside
the lid, underneath the steam
vent for any unwanted food
clogging.
• Do not touch hot surfaces. Use
handles and pot holders.
• Do not place the pressure
cooker in a heated oven.
• Extreme caution must be used
when moving a pressure cooker
containing hot liquids.
• Do not use this pressure cooker
for pressure frying with oil.
• Never ll the unit over 4⁄5
full when cooking; however,
when cooking foods that
expand such as dried fruits,
or vegetables, the unit must
never be over 2⁄5 full. 2⁄5 full
means the food, as well as all
other ingredients and liquids
combined.
• Do not cook foods such
as apple sauce, beans,
cranberries, pearl barley,
oatmeal or other cereals,
white rice, split peas, noodles,
macaroni, rhubarb, or
spaghetti.
• Check that the voltage of the
main circuit corresponds with
the rating of the appliance
before operating.
• If the supply cord or appliance
is damaged, stop using
the appliance immediately
and seek advice from the
manufacturer, its service agent
or a similarly qualied person.
6
Page 7

• Do not let the cord hang over
the edge of a table or counter
or let it come into contact with
any hot surfaces.
• Do not carry the appliance by
the power cord.
• Do not use any extension cord
with this appliance.
• Do not pull the plug out by the
cord as this may damage the
plug and/or the cable.
• Switch off at the wall socket
then remove the plug from
the socket when not in use or
before cleaning.
or mental capabilities or
lack of experience and
knowledge if they have
been given supervision or
instruction concerning use of
the appliance in a safe way
and understand the hazards
involved.
• Cleaning and user maintenance
should not be undertaken by
children without supervision.
• Take care when any appliance
is used near pets.
• Do not use this product
for anything other than its
intended use.
• Switch off and unplug before
tting or removing tools/
attachments, after use and
before cleaning.
• Close supervision is necessary
when any appliance is used by
or near children.
• Children should not play with
the appliance.
• This appliance can be used
by children aged from 8 years
and above and persons with
reduced physical, sensory
• This appliance is for household
use only.
• Do not use the appliance
outdoors.In the unlikely event
the appliance develops a fault,
stop using it immediately and
seek advice from the service
department:
+44 (0) 333 220 6066
7
Page 8
4 - Using Your Appliance
Before rst use
Before use, always check the steam release valve, pressure indicator valve and sealing ring are
in good condition and clear from any food, dirt, scale etc.
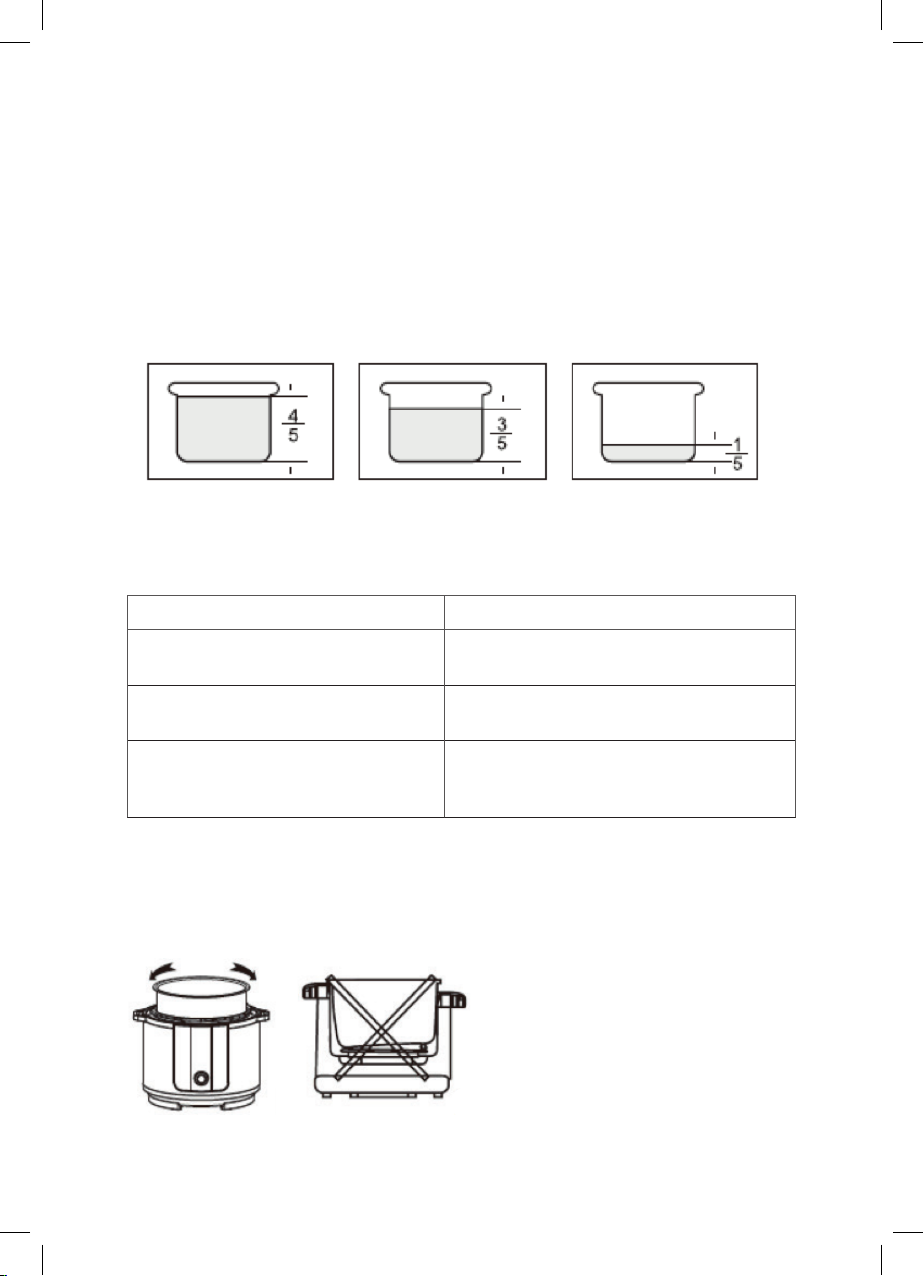
Filling the Multi-Pot Pressure Cooker
The total amount of food and liquid should not exceed 4/5 of the height of the pan.
Speed Settings
Fill Level Types of Food
Do not exceed 4/5 volume Meat and vegetables which do not ex-
pand of foam when cooked
Do not exceed 3/5 volume Dried vegetables, soups, stews etc. which
need room to expand
Do not exceed 1/5 volume Rice, cereals, pearl barley, oatmeal or oth-
er cereals and pulses that expand quite a
lot when cooked
Note: the above is only a general guide. Always check recipes for any exceptions to these rules.
Assembly
Always ensure the inner pot is securely in place on top of the heating plate. Rotate the inner
pot after placing it inside the Multi-Pot Pressure Cooker to check that it is correctly in position.
8
Page 9
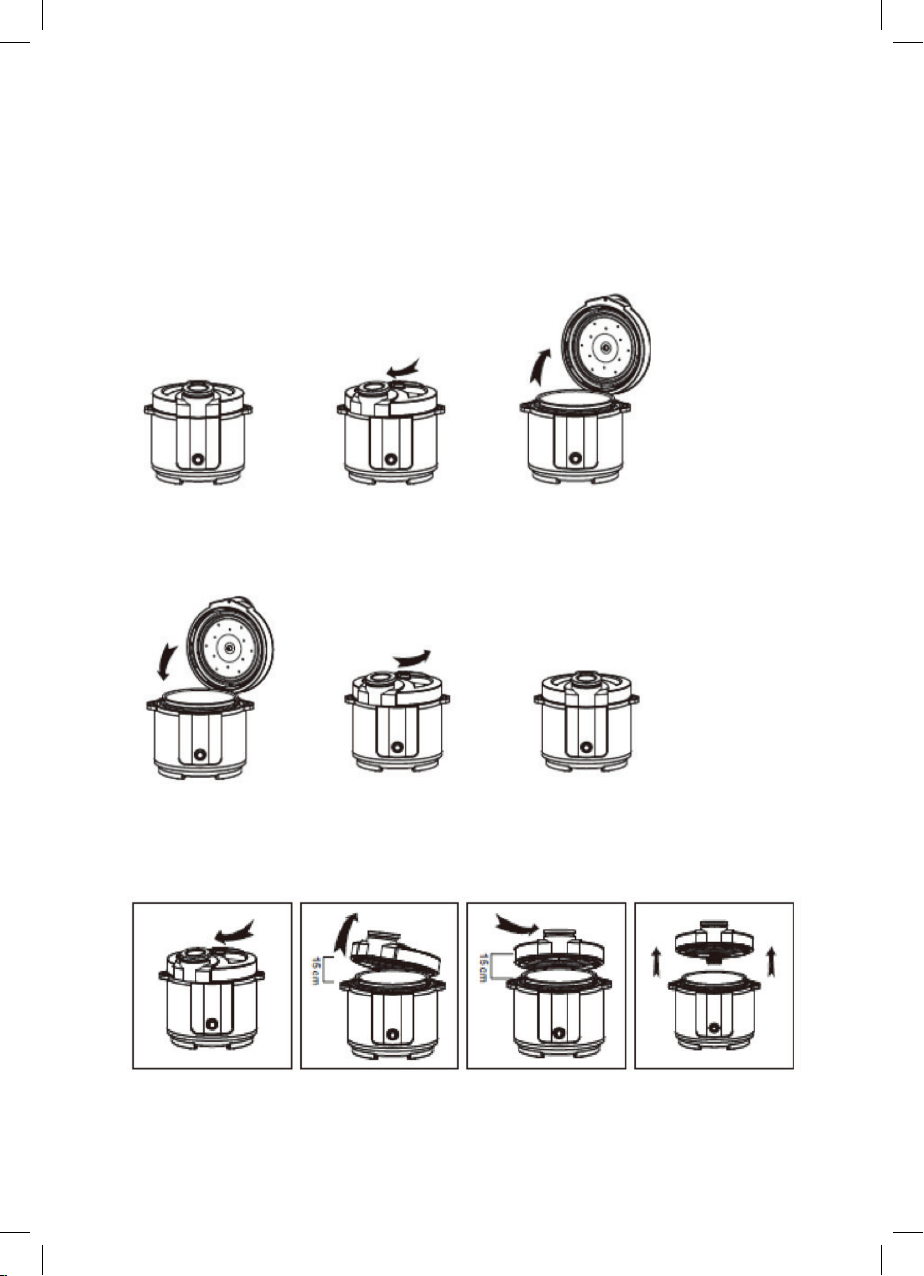
Opening & Closing the Multi-Pot Pressure Cooker
To open the lid
Rotate the handle on the lid clockwise to unlock and pull the lid up to open.
To close the lid
Close the Multi-Pot Pressure Cooker lid and turn the handle counter clockwise to lock in place.
Dismantling the lid
Lift the lid and turn it counter-clockwise to rotate it up and away from the Multi-Pot Pressure
Cooker.
9
Page 10
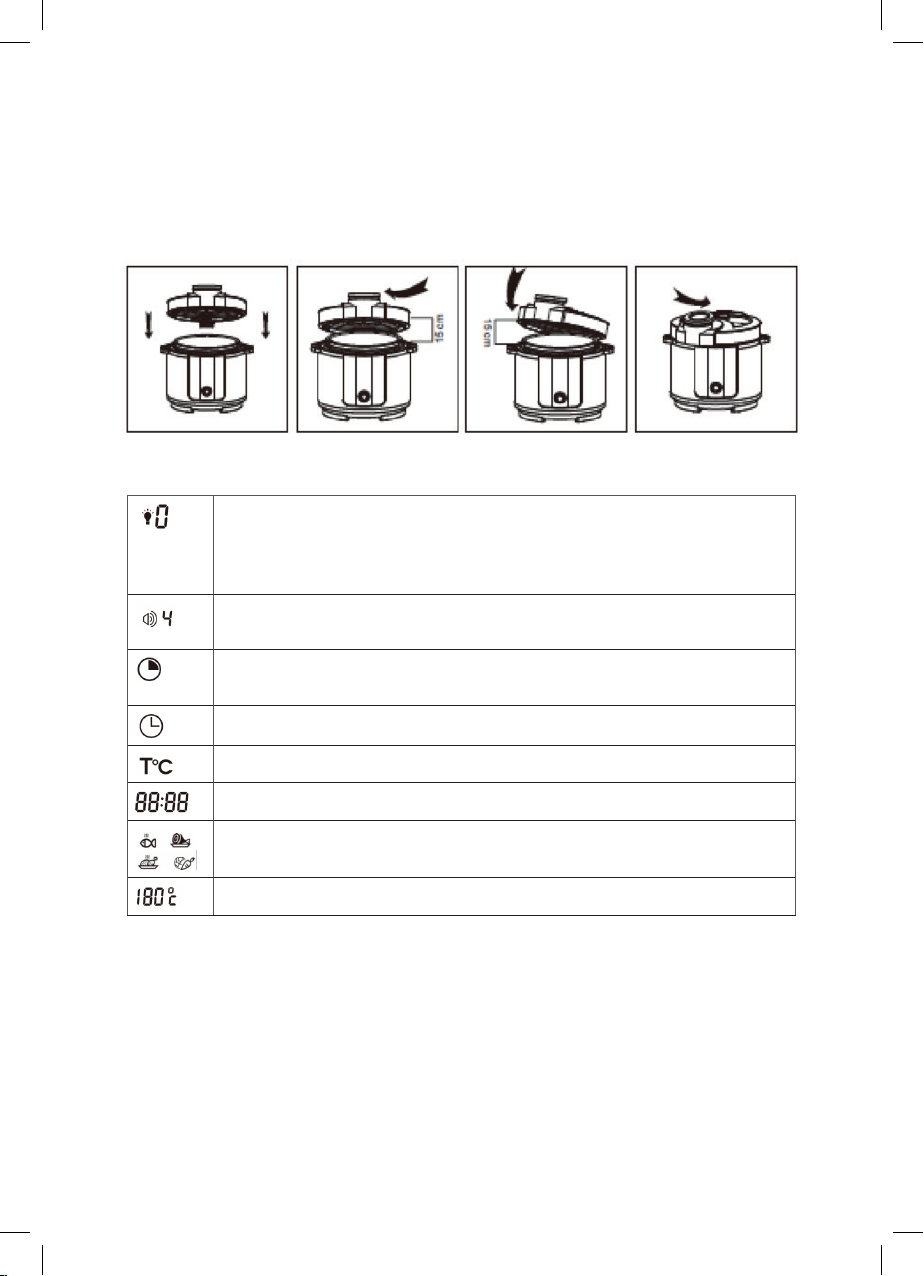
Installing the lid
Before use, always check the steam release valve, pressure indicator valve and sealing ring are
in good condition and clear from any food, dirt, scale etc.
Display
When the Multi-Pot Pressure Cooker is rst switched on the display
will show ‘0’. If the Multi-Pot Pressure Cooker remains inactive for 30
seconds after switching on, the lights will turn off and the display will
show ‘F’, to indicate that it is in standby.
Press the time/temp button. The display will show a speaker icon.
Adjust the volume from 1 to 4.
This icon indicates that the Delay function has been selected. The
display will show a countdown.
Icon indicates that the time is being adjusted.
Icon indicates that the temperature is being adjusted.
The pre-set time and countdown will be displayed when cooking.
Indicates the chosen food type: Fish/Meat/Poultry/Vegetables
For Steam, Stew and Fry functions.
Icon indicates the temperature.
10
Page 11
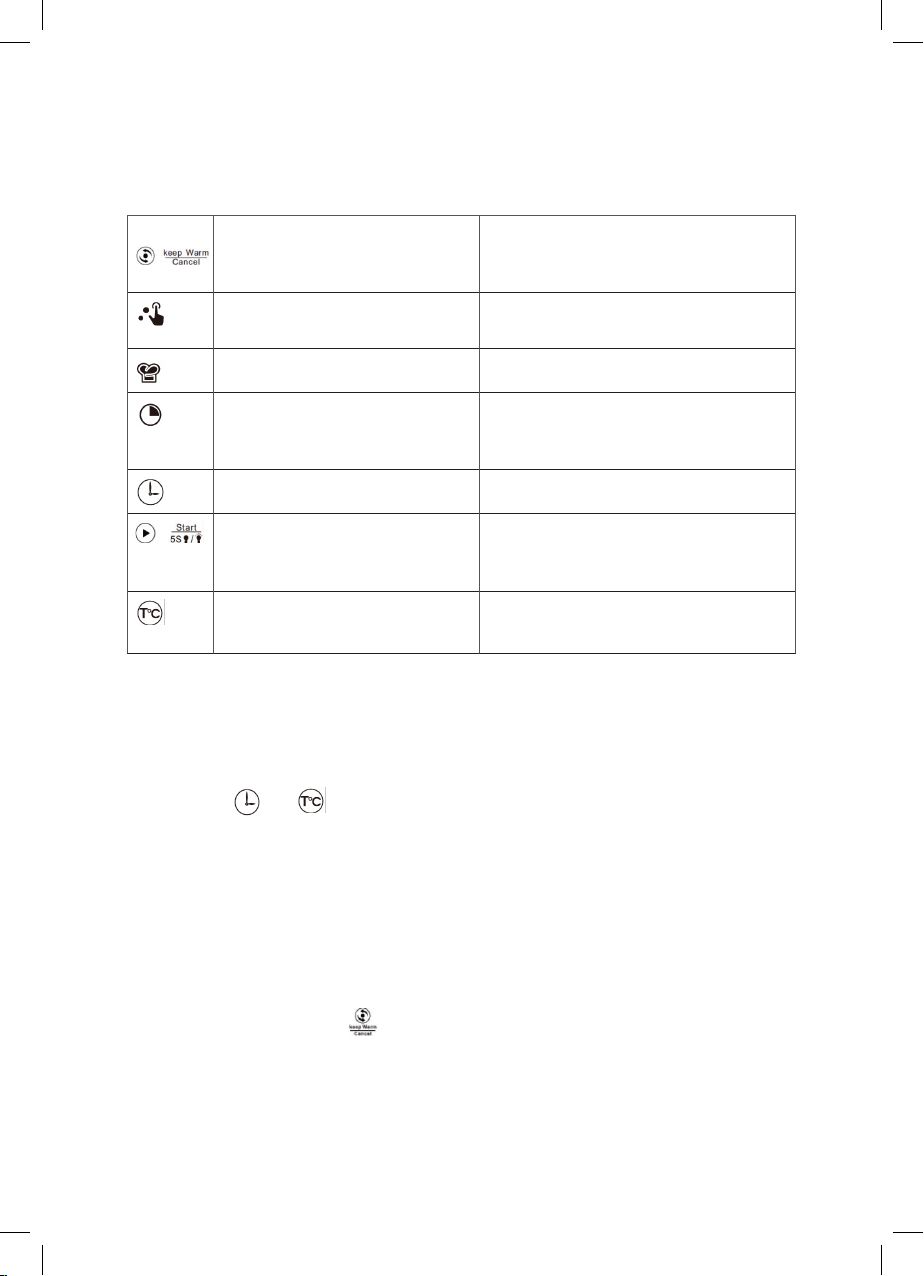
Control Panel
Keep Warm/Cancel Keep Warm/Cancel button.
The keep warm temperature is set at
70°C.
Product Selection/Food Type Available on Steam, Stew and Fry
functions.
Chef To sauté/brown.
Delay After selecting a cooking function,
press the delay button to delay the
start time.
Time Press to adjust the time.
Start/restart Press to start.
Press and hold for 10 seconds to
restart the multi-cooker.
Temperature Press to adjust the temperature
Standby
The multi-cooker will enter standby mode when it is not in use. The lights will turn off and the
display will show ‘F’.
Press and hold the start button for ve seconds to exit standby mode.
Volume Control
1. Press the
and buttons simultaneously to enter volume control mode.
2. The display will show the current volume.
3. Use the control dial to adjust from 0 to 4.
4. Press Start to conrm.
Chef
The Chef function is for sautéing or browning.
1. Press the Chef button on the control panel, and then the Time button.
2. Adjust the time using the control dial and then press Start.
Cancel
To cancel a selection press the
cancel button.
11
Page 12

Time
You can adjust the cooking time on all cooking programs. The
icon on the display will be
lit up.
1. To set the cooking time, select a cooking program.
2. Press the Time button and use the control dial to adjust the hours.
3. Press the Time button again to highlight the minutes, and use the control dial to adjust.
4. Press Start to begin cooking.
Temperature
You can adjust the temperature on cooking programs where the icon on the display is lit up.
1. After selecting a cooking program, press the Temperature button.
2. Use the control dial to adjust the temperature and then press start to begin cooking.
Keep Warm
The Keep warm function is used to maintain the temperature of the food for a maximum of
24 hours.
The multi-cooker will automatically enter the Keep Warm function when each cooking program
has nished, except the Fry, Wine and Yoghurt programs.
The Keep Warm indicator
will show on the display when the multi-cooker is in keep warm
mode.
Warming up a meal
If you want to warm up a cooked meal, press the Keep Warm button.
Do not select a cooking program. The food will begin warming up.
To cancel, press the Keep Warm button again.
Delay
Use the delay function to delay the start time of the cooking process.
The delay function can be pre-set up to 24 hours in advance.
Setting the delay time:
1. Use the control dial to the select the cooking program. If you wish to use the Chef program,
press the Chef button.
2. Press the Delay button and set the delay starting time using the control dial. You can adjust
in increments of 5 minutes.
3. Press the start button to begin.
4. The delay time will countdown on the display.
5. When the delay function countdown has nished, the cooking process will begin.
Adjusting the delay time
You can adjust the delay time after setting it.
Press the time button and set the time using the control dial.
Note: The delay setting is not available for fry or omelette programs.
Cooking time is not included in the delay time.
Do not keep ingredients in the multi-cooker for more than 12 hours, some produce may spoil.
12
Page 13
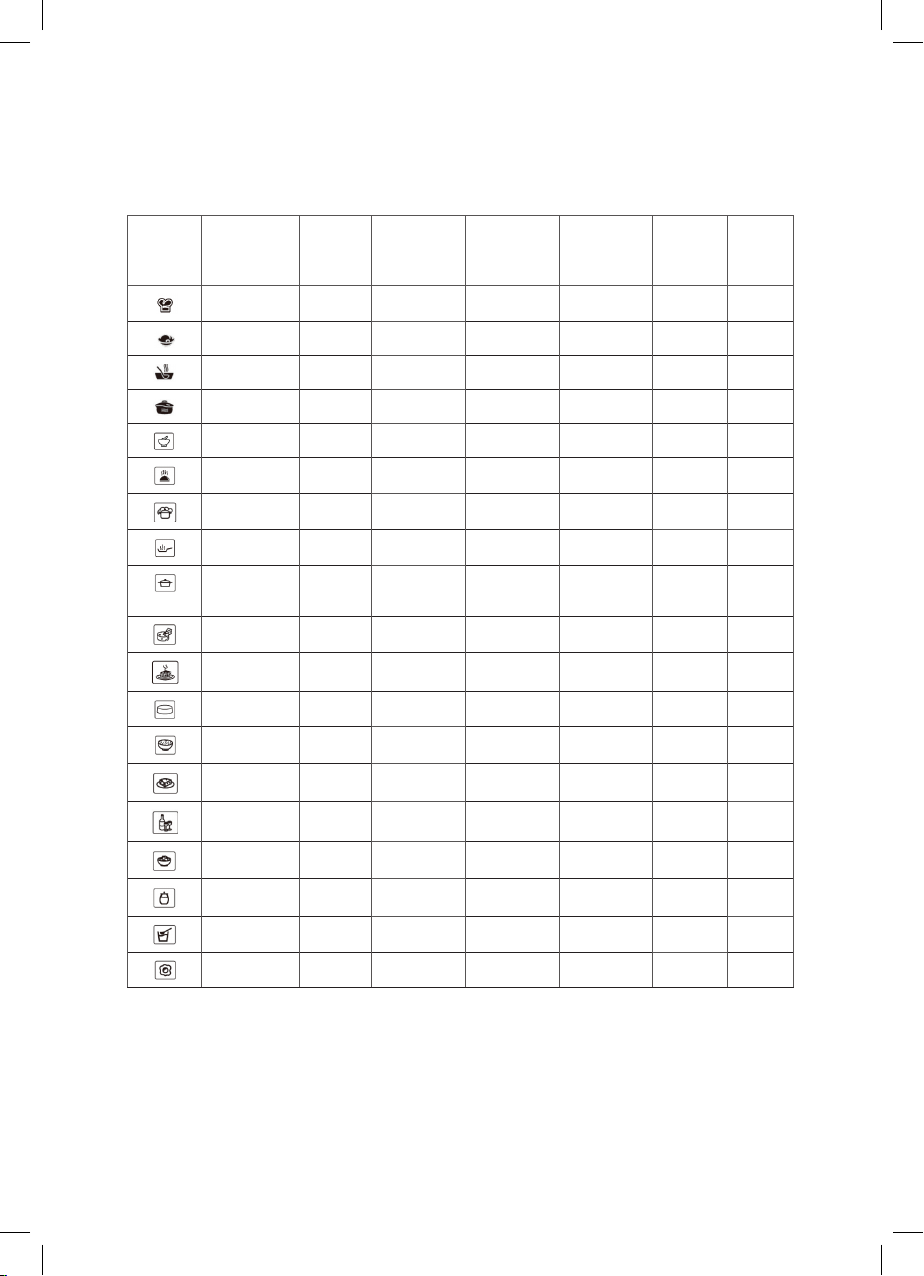
Cooking Functions
Icon Program Default
Chef N/A
Rice N/A
Soup N/A
Stew N/A
Porridge N/A
Multi-cook 30°
Steam N/A
Fry 170°C
Slow Stew/
Cook
Cheese 100°C
Cake 140
Temp
95°C
Adjustable
Temp
✗
✗
✗
✗
✗
✓
✗
✓
✗
✓
✓
Default
Cooking
time
2 minutes
10 minutes
25 minutes
35 minutes
10 minutes
10 minutes
10 minutes
45 minutes
2 hours
15 minutes
40 minutes
Adjustable
time
✓ ✓ ✓
✓ ✓ ✓
✓ ✓ ✓
✓ ✓ ✓
✓ ✓ ✓
✓ ✓ ✓
✓ ✓ ✓
✓ ✗ ✗
✓ ✓ ✓
✓ ✓ ✓
✓ ✓ ✓
Delay Keep
Warm
Crispy 160°C
Cereals N/A
Gelatine N/A
Wine 40°C
Pilaf N/A
Jam 100°C
Yoghurt 40°C
Omelette 140°C
✓
✓
✗
✗
✗
✗
✗
✗
1 hour
35 minutes
45 minutes
8 hours
15 minutes
10 minutes
5 hours
10 minutes
✓ ✓ ✓
✓ ✓ ✓
✓ ✓ ✓
✓ ✓ ✗
✓ ✓ ✓
✓ ✓ ✓
✓ ✓ ✗
✓ ✗ ✓
13
Page 14
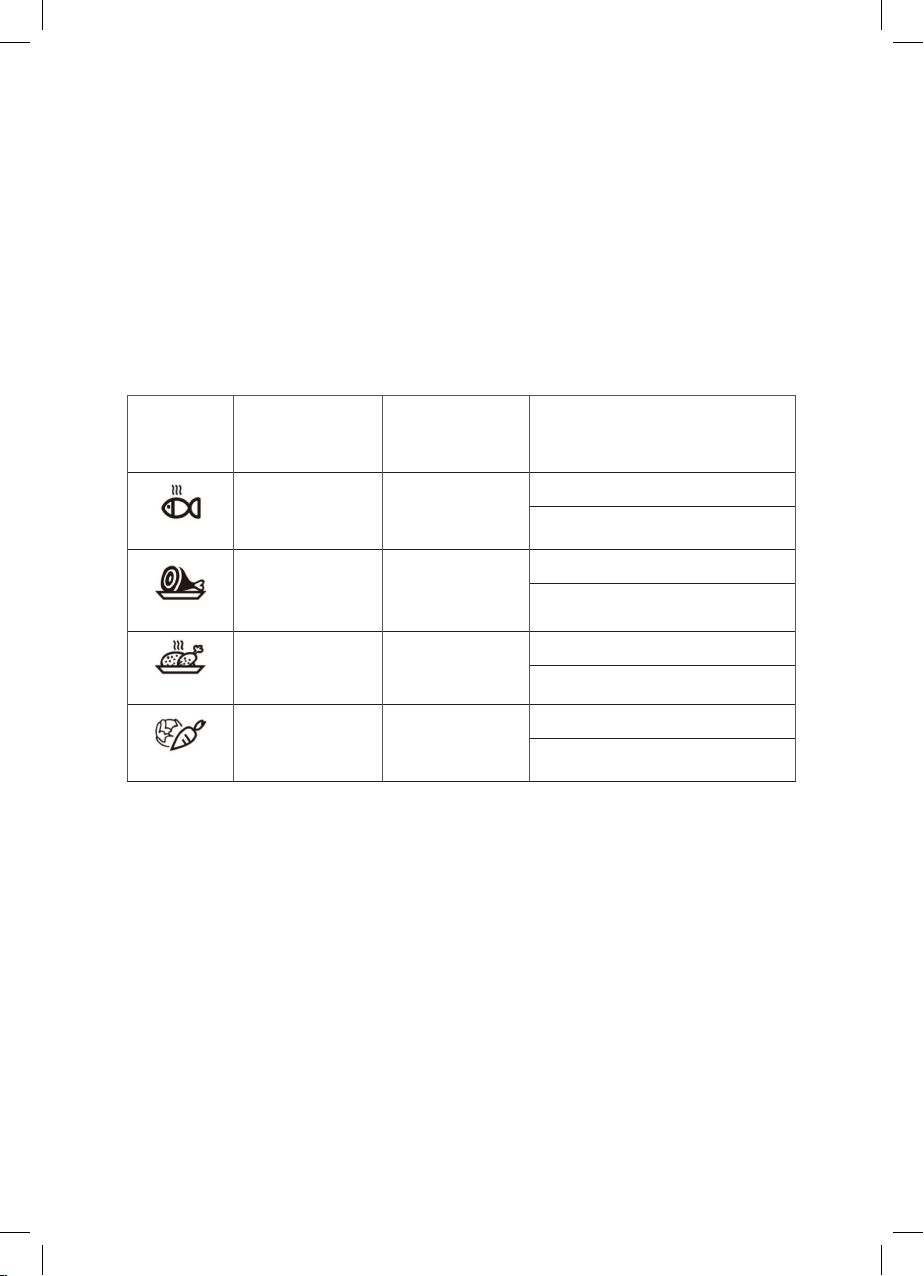
Product Selection
Product Selection allows you to select the specic food type when using the Steam, Stew or
Fry cooking programs.
Selecting a food type
1. Turn the Multi-Pot Pressure Cooker on.
2. Use the control dial to select Steam, Stew or Fry.
3. Press the Product Selection button to select Fish, Meat, Poultry or Vegetables.
4. Press Start to begin the cooking program.
Food type Steam Stew Fry
10 minutes 15 minutes 35 minutes
Fish
Meat
Poultry
Vegetables
170°C
20 minutes 30 minutes 25 minutes
170°C
15 minutes 25 minutes 25 minutes
170°C
5 minutes 10 minutes 20 minutes
170°C
14
Page 15
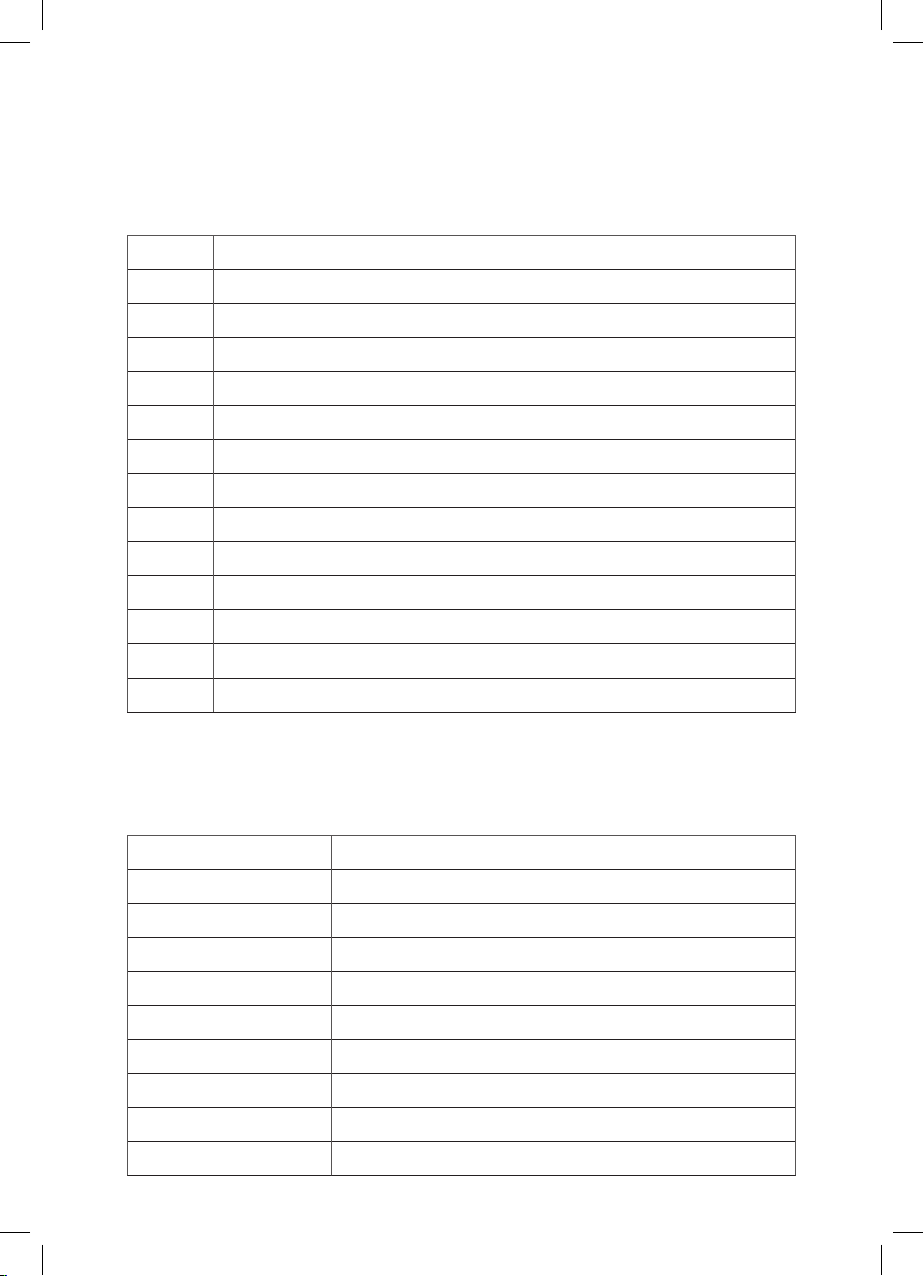
Temperature
Recommended temperatures for different cooking processes.
Temp Cooking Process
35-40 Dough proving, yoghurt, vinegar cooking
55-60 Green or herbal tea brewing, warming baby food
65-70 Warm up food.
75-80 White tea brewing, mulled wine
85-90 Cottage cheese cooking, red tea brewing, slow cooking
95-100 Porridge, jam
105-110 Sterilization, gelatine, aspic cooking
115-120 Shank, sugar syrup
125-130 Casserole, stewing
135-140 Frying pre-cooked foods, smoking
145-150 Vegetables, sh or meat cooked in foil
155 Vegetable and sh frying
160-180 Meat and poultry frying
Note: this is a guideline only.
Cooking in Multi-Cooker and Pressure Cooker modes
Fill the inner pot with your ingredients and liquid, ensure that you do not exceed the max ll line,
and follow the recommended guidelines from the ‘lling your Multi-Pot Pressure Cooker’ section.
Multi Cooker Pressure Cooker
Fry Soup
Omelette Stew
Cake Porridge
Slow Stew/Cook Steam
Jam Rice
Yoghurt Pilaf
Multi-cook Cereals
Wine Gelatine
Cheese Crispy
15
Page 16

Multi-Cooker mode
1. Add your ingredients to the multi-cooker pot.
2. Check that the sealing ring is set correctly on the lid. Close the lid.
Note: When using the fry function, leave the lid off.
3. Leave the steam release valve open when cooking without pressure.
4. Turn the control dial until the required cooking function is shown on the display.
5. Press the pre-set button to see the function cooking time on the display.
6. When the multi-cooker reaches the optimum temperature, the cooking time will begin
counting down on the display.
7. The multi-cooker will beep to indicate when the cooking time is over and automatically
enter keep warm mode (excluding Fry, Wine and Yoghurt functions).
8. When you are ready, unplug the multi-cooker and remove the lid.
Pressure Cooking
1. Add your ingredients to the multi-cooker pot.
2. Check that the sealing ring is set correctly on the lid. Close the lid.
3. Close the steam release valve.
4. Turn the control dial until the required cooking function is shown on the display.
5. Press start to run the function.
6. You can also press the product selection button to select the food type. Conrm by pressing
the start button.
7. When the multi-cooker reaches the optimum temperature, the cooking time will begin
counting down on the display.
8. The multi-cooker will beep to indicate when the cooking time is over and automatically
enter keep warm mode.
9. When you are ready, unplug the multi-cooker.
10. Open the steam release valve to allow hot steam to escape and the pressure to lower.
11. Caution: Always open the steam release valve from the side, not from above. The escaping
steam can scald.
12. When there is no more escaping steam and the oat valve has sunk to the lowest position,
open the lid.
Caution: Never open the lid by force. Steam is extremely hot.
Steam Release Valve
Pressure cooking:
When pressure cooking, you must ensure the steam release valve
is closed.
Turn the steam release valve so that the
sealed symbol is aligned
with the ▲ arrow on the lid. This allows the pressure to build during
cooking.
Cooking without pressure:
To cook without pressure, turn the steam release valve so that
the
steam symbol is aligned with the arrow on the lid. This
allows the steam to release during cooking.
16
Page 17

Releasing steam:
When you are releasing steam after cooking, always turn the steam release valve from the
side. Do not reach over the steam release valve or hold your hand over the vents on the steam
release valve.
Always move your hands away from the steam release valve after turning.
The escaping steam will be extremely hot and can scald.
Pressure Indicator Valve:
When the cooking time has nished, the pressure indicator valve will rise.
Water Catch Pot:
There is a water catch pot located on the back of the multi-cooker. Ensure you empty it when
it is full.
17
Page 18

5 - Weights & Measures
Check these charts for basic imperial to metric conversions
of weights.
Metric Imperial US cups
250ml 8 oz 1 cup
180ml 6 oz 3/4 cup
150ml 5 oz 2/3 cup
120ml 4 oz 1/2 cup
75ml 2 1/2 oz 1/3 cup
60ml 2 oz 1/4 cup
30ml 1 oz 1/8 cup
15ml 1/2 oz 1 tablespoon
Imperial Metric
1/2 oz 15g
1 oz 30g
2 oz 60g
3 oz 90g
4 oz 110g
5 oz 140g
6 oz 170g
7 oz 200g
8 oz 225g
9 oz 255g
10 oz 280g
11 oz 310g
12 oz 340g
13 oz 370g
14 oz 400g
15 oz 425g
1 lb 450g
Food Allergies
Important Note: Some of the recipes contained in this document may contain nuts and/
or other allergens. Please be careful when making any of our sample recipes that you ARE
NOT allergic to any of the ingredients. For more information on allergies, please visit the
Food Standards Agency’s website at: www.food.gov.uk
18
Page 19

6 - Troubleshooting
Error Code Fault
E1 Cut Circuit
E2 Short Circuit
E3 Over-heat
E4 Signal switch failure.
19
Page 20

7 - Cleaning & Care
1. Remove plug from the mains socket, and allow the appliance to cool down before cleaning.
2. Do not immerse the base unit of the appliance in water and make sure no water enters
the appliance.
3. Clean the base unit by wiping it with a damp cloth. A little detergent can be added if the
appliance is heavily soiled.
4. Do not use scouring pads, steel wool or any form of strong solvents or abrasive cleaning
agents to clean the appliance, as they may damage the outside surfaces of the appliance.
5. Clean all accessories in warm soapy water, do not use any scouring pads, steel wool or any
strong solvents or abrasive cleaning agents when cleaning accessories.
6. After every use please remove, empty, clean and replace the water catch pot.
Cleaning the lid:
Remove the inner lid plate and rinse thoroughly.
Remove the sealing ring and rinse it thoroughly with water.
Wipe dry and t back in place.
IMPORTANT!
Allow to dry fully after cleaning before using again.
Do not use the appliance if damp. Ensure the appliance is completely clean and dry before
storing.
Storage
To store your appliance:
Unplug power cord from the power outlet and clean as above.
Allow the appliance to dry fully.
Store on a at, dry level surface out of reach of children.
8 - Recycling
DISPOSAL OF THE UNIT
Appliances bearing the symbol shown here may not be disposed of in domestic rubbish.
You are required to dispose of old electrical and electronic appliances like this separately.
Please visit www.recycle-more.co.uk or www.recyclenow.co.uk for access to information
about the recycling of electrical items.
Please visit www.weeeireland.ie for access to information about the recycling of
electrical items purchased in Ireland.
The WEEE directive, introduced in August 2006, states that all electrical items must be
recycled, rather than taken to landll.
Please arrange to take this appliance to your local Civic Amenity site for
recycling, once it has reached the end of its life.
20
Page 21

9 - Wiring Safety for UK Use Only
FUSE
IMPORTANT
As the colours in the
mains lead of this
appliance may not
correspond with the
coloured markings
identifying the terminals
in your plug, please
proceed as follows:
The wires in the mains lead are coloured in
accordance with the following code:
Blue neutral [N] Brown live [L]
Green/Yellow [EARTH]
Plug Fitting Details (Where Applicable).
The wire coloured blue is the neutral and
must be connected to the terminal marked
[N] or coloured black.
The wire coloured brown is the live wire and
must be connected to the terminal marked
[L] or coloured red.
The wire coloured green/yellow must be
connected to the terminal marked with the
letter [E] or marked
.
The plug must be tted with a fuse of the
same rating already tted and conforming to
BS 1362 and be ASTA approved.
If in doubt consult a qualied electrician who
will be pleased to do this for you.
Non-Rewireable Mains Plug
If your appliance is supplied with a non-
rewireable plug tted to the mains lead and
should the fuse need replacing, you must
use an ASTA approved one (conforming to
BS 1362 of the same rating).
If in doubt, consult a qualied electrician
who will be pleased to do this for you.
If you need to remove the plug - disconnect
it from the mains - and then cut it off the
mains lead and immediately dispose of it
safely. Never attempt to reuse the plug or
insert it into a socket outlet as there is a
danger of an electric shock.
On no account must either the brown or
the blue wire be connected to the [EARTH]
terminal
Always ensure that the cord grip is fastened
correctly.
.
WARNING:
This appliance MUST be earthed
21
Page 22

10 - Warranty
We hope that you will enjoy
your Digital Multi-Pot
Pressure Cooker for
many years.
As a thank you for purchasing
one of our fantastic products,
we are giving you 3 years
peace of mind.
To receive your 3 year
guarantee, simply register your
appliance online by visiting
www.towerhousewares.co.uk
This product is guaranteed for 12 months from
the date of original purchase.
If any defect arises due to faulty materials of
workmanship, the faulty products must be
returned to the place of purchase.
Refund or replacement is at the discretion of the
retailer.
The Following Conditions Apply:
• The product must be returned to the
retailer with proof of purchase.
• The product must be installed and
used in accordance with the instructions
contained in this instruction guide.
• It must be used only for domestic
purposes.
• It does not cover wear and tear, damage,
misuse or consumable parts.
• Tower has limited liability for incidental
or consequential loss or damage.
This guarantee is valid in the UK and Eire Only.
The standard one year guarantee is only
extended to the maximum available for each
particular product upon registration of the
product within 28 days of purchase. If you
do not register the product with us within the
28 day period, your product is guaranteed for 1
year only.
To validate your extended warranty, please
visit www.towerhousewares.co.uk and register
with us online. Alternatively, call our customer
registration line on +44 (0) 333 220 6066.
Please note that length of extended warranty
offered is dependent on product type and that
each qualifying product needs to be registered
individually in order to extend its warranty past
the standard 1 year.
Extended warranty is only valid with proof of
purchase.
22
Page 23

11 - Your Receipt
Afx your store receipt to
this page for safe keeping.
23
Page 24

NOTES
24
Page 25

NOTES
25
Page 26

NOTES
26
Page 27

Recipes
Recipes for use with the T16012 Digital Multi-Pot Pressure Cooker.
For more great recipes and inspiration from the
Tower Kitchen, visit
www.towerhousewares.co.uk/blog
27
Page 28

Porridge
Ingredients
1 litre milk
150g oats
50g butter
1 tsp cinnamon
Sugar
Salt
Method
1. Place oats into the cooking pot and add the butter, salt, sugar,
cinnamon and milk. Stir well.
2. Close the lid and close the steam release valve.
3. Select the porridge function and set for 5 minutes. Press start.
4. When cooking is nished, release the steam.
5. Serve with a topping of fruits, jam, honey or chocolate.
28
Page 29

29
Page 30

Feta Cheese
Ingredients
3L milk
600ml ker
20g salt
Method
1. Pour milk and ker into the cooking pot and stir well.
2. Close the lid and open the steam release valve.
3. Select the yoghurt function and set the timer to 8 hours.
4. Press start and cook until the end of the function.
5. Remove the lid and add salt to the pot. Stir well.
6. Close the lid and close the steam release valve.
7. Select steam function and set the food type as vegetables.
8. Adjust the time to 30 minutes.
9. Press start.
10. When the cooking function has ended, release the steam.
11. Strain the mixture to remove the whey.
12. Put the mixture in a bowl and cover. Place a heavy item on top,
and refrigerate for 12 hours.
30
Page 31

31
Page 32

Seafood Paella
Ingredients
100g salmon llet
100g cod llet
100g shelled mussels (halves)
100g prawns
300g arborio rice, rinsed
2 garlic clove, crushed
100g peas
400ml chicken stock
Handful of parsley, roughly
chopped
1 lemon, cut into wedges
½ tsp paprika
Salt and pepper
Method
1. Dice the sh and peel the prawns.
2. Place the sh and prawns into the cooking pot, with the rice,
garlic, salt and spices.
3. Cover with the stock.
4. Close the lid and close the steam release valve.
5. Select the cereal function and set the timer to 15 minutes. Press
start.
6. When cooking has nished, release the steam.
7. Serve with sprinkled chopped parsley and a wedge of lemon.
32
Page 33

33
Page 34

Stuffed pepper
Ingredients
500g bell pepper
250g ground beef
200g rice, boiled
100g chopped onion
1.5L water
Method
1. Put the ground beef in a large bowl and add the rice, onions,
salt, pepper. Stir to combine.
2. Cut the tops off of the bell peppers and stuff with the mixture.
3. Pour the water into the cooking pot, and place the steamer tray
on top. Sit the peppers on the steamer tray.
4. Close the lid and close the steam release valve.
5. Select the steam function and set the food type to meat.
6. Set the timer to 20 minutes and press start.
7. When cooking has nished, release the steam.
34
Page 35

35
Page 36

Apricot Jam
Ingredients
1 kg apricot
400g sugar
50ml lemon juice
Method
1. Rinse, dry and stone the apricots.
2. Chop roughly and blend in a blender or food processor until
smooth.
3. Add the lemon juice and sugar and mix together.
4. Pour mixture into the cooking pot.
5. Close the lid and open the steam release valve.
6. Select the Jam function and set the timer for 1 hour.
7. Press start. Cook until the end of the function, stirring occasionally.
8. Decant into air tight jars and refrigerate.
36
Page 37

37
Page 38

Mulled Wine
Ingredients
700ml dry red wine
100g sugar
10g raisins
10g ginger
10g orange peel
1 orange, quartered
2 cinnamon sticks
1 dried bay leaf
10g cardamom
10g cloves
Method
1. Place all ingredients into the cooking pot and pour in the wine.
2. Close the lid and leave the steam release valve open.
3. Set the wine function for 30 minutes and press start.
4. When cooking is nished, leave the mulled wine in the cooking
pot for 30 more minutes on the keep warm function.
38
Page 39

39
Page 40

Pork Pilaf
Ingredients
500g pork llet, diced
300g rice
250g onion, chopped
250g carrot, chopped
50g garlic, crushed
50ml olive oil
500ml water
Method
1. Pour olive oil into the cooking pot.
2. Select fry and set the timer to 30 minutes. Press start.
3. When the multi cooker has heated up, add the diced pork and
fry for twenty minutes, stirring frequently.
4. Add the onions and carrots and fry for the remaining 10 minutes.
5. When the cooking function has completed, add the rice, salt and
spices, and the water.
6. Close the lid and close the steam release valve.
7. Select the Pilaf function for 30 minutes and press start.
8. When the cooking function has nished, release the steam.
40
Page 41

41
Page 42

Beef Kebab
Ingredients
300g beef llet, cut into strips
1 garlic clove, grated
10g ginger, grated
50ml olive oil
50ml soy sauce
20ml lemon juice
Method
1. Marinate the beef strips in soy sauce, olive oil, ginger and lemon
juice for 20 minutes.
2. Place the beef strips on wooden skewers.
3. Pour some olive oil into the cooking pot.
4. Select the fry function for 20 minutes and press start.
5. When the Multi-cooker has heated up, place the skewers into
the cooking pot.
6. Leave the lid off of the Multi-cooker and turn the skewers
frequently.
7. Serve with pitta bread.
42
Page 43

43
Page 44

Poached Pears
Ingredients
6 pears
100g caster sugar
1 vanilla pod
1 fresh thyme sprig
1 cinnamon stick, halved
750ml red wine
Method
1. Halve the vanilla pod sideways and scrape out the black seeds.
2. Peel the pears, keeping them whole with the stalks intact.
3. Place the pears into the cooking pot, and pour in the wine. Add
the vanilla, cinnamon, sugar and thyme.
4. Close the lid and leave the steam release valve open.
5. Select the Slow Cooker function and set the timer to two hours.
6. Press start to begin cooking.
7. Serve the pears with the cooled syrup.
44
Page 45

45
Page 46

Pumpkin Soup
Ingredients
600g pumpkin, diced
100g carrot, sliced
200g potato, diced
500ml cream
1L chicken or vegetable stock
Salt and pepper
Handful of pumpkin seeds
Method
1. Add all ingredients (except the pumpkin seeds) to the cooking
pot and stir well.
2. Close the lid and close the stream release valve.
3. Select the soup function and set the timer to 25 minutes.
4. Press start.
5. When cooking has nished, release the steam.
6. Pour the soup into a bowl and mix with a blender until smooth.
7. Serve with a swirl of cream, and sprinkle the pumpkin seeds
on top.
46
Page 47

47
Page 48

Chocolate Fondue
Ingredients
500g dark chocolate
500ml cream
100ml coffee liqueur
Method
1. Break chocolate into pieces and put into the cooking pot. Add
the liqueur and cream.
2. Select the Multi-cooker function and set the timer to 15 minutes,
at 90°C.
3. Press start. Cook with the lid off, stirring constantly.
4. Pour into a bowl and serve with your favourite fruit on skewers.
48
Page 49

49
Page 50

Goulash
Ingredients
800g beef llet, diced
500g potato, chopped
200g onion, diced
1 garlic clove, crushed
100g tomato paste
150ml water
70ml olive oil
1 tbsp. paprika
2 bay leaves
1 red pepper, de-seeded and
thinly sliced
1 green pepper, de-seeded and
thinly sliced
150ml soured cream
2 tbsp. at leaf parsley,
chopped
salt and pepper to season
Method
1. Place the meat and onions into the cooking pot, and pour in the
water and oil. Add the tomato paste, peppers, bay leaves, salt,
pepper, paprika and garlic.
2. Stir well. Place the steamer into the cooking pot and put the
potatoes on to it. Sprinkle the potatoes with salt.
3. Close the lid and close the steam release valve.
4. Select the stew function, and food type meat for 30 minutes.
5. Press start.
6. When the cooking function ends, released the steam.
7. Mix the steamed potatoes in with the goulash and stir in soured
cream.
8. Serve sprinkled with parsley.
50
Page 51

51
Page 52

Carrot Cake
Ingredients
40g our
20g butter
peel of 1 lemon
juice of 1 lemon
180g carrot, grated
2 eggs
50g sugar
50g walnuts, chopped
Method
1. Separate the egg whites from the yolks.
2. Beat the yolks and sugar in a bowl until smooth.
3. With a mixer, whisk the egg whites until thick.
4. Add the carrot, our, walnuts, lemon peel, and lemon juice with
the yolks and sugar.
5. Stir well and add the whisked egg whites.
6. Grease the cooking pot with butter and pour the cake batter
into the pot.
7. Close the lid and leave the steam release valve open.
8. Select the Cake/Bake function and set the timer for 40 minutes.
9. Press start to begin cooking.
10. When cooking has nished, remove the cake and place on a
cooling rack.
11. Top with buttercream frosting and walnuts.
52
Page 53

53
Page 54

Crispy Rice
Ingredients
160g rice
20g butter
160g water
Method
1. Add the butter to the cooking pot and select the fry function
for 5 minutes.
2. Once the butter has melted, add the water and rice to the pot
and select the crispy function.
3. Set the timer to 60 minutes and close the lid. Open the steam
release valve.
4. Once the cooking time has nished, remove the rice and serve
with a sweet sauce, such as coconut sugar sauce.
54
Page 55

55
Page 56

Yoghurt
Ingredients
700ml milk
150ml cream
150ml ker (or any yoghurt
starter)
1 tbsp. vanilla extract
Method
1. Mix all ingredients together and pour into the cooking pot.
2. Close the lid and leave the steam release valve open.
3. Select the Yoghurt function and set the timer to 8 hours.
4. Press start.
5. When the yoghurt is cooked, stir and then pour into glass
containers.
6. Store in the refrigerator.
56
Page 57

57
Page 58

Brawn Turkey
Ingredients
700g turkey llet, diced
30g gelatine
20g dried sweet pepper
10g chopped garlic
2 bay leaves
900ml water
Salt and pepper
Method
1. Dissolve the gelatine in 100ml of water.
2. Put the turkey into the cooking pot and add the remaining 800ml
of water.
3. Add garlic, bay leaves, salt and pepper, and stir well.
4. Close the lid and close the steam release valve.
5. Select the gelatine function and set the timer to 20 minutes.
6. Press start.
7. After 20 minutes, release the steam.
8. Open the lid and remove the bay leaves.
9. Add the gelatine to the pot and stir well.
10. Pour the mixture into medium sized bowls.
11. Place in the refrigerator and keep for 5-6 hours until the gelatine
sets.
58
Page 59

59
Page 60

thank you!
We hope you enjoy your appliance for
many years. As a thank you for purchasing
one of our fantastic products, we are
giving you an extra 2 years peace of mind.
*To receive your extra 2 years guarantee,
register your appliance online by visiting:
www.towerhousewares.co.uk
Should you have a problem with your
appliance, or need any spare parts,
please call our Service Department on:
+44 (0) 333 220 6066
Your warranty becomes void should you decide
to use non Tower spare parts. Spare parts can be
purchased from www.towerhousewares.co.uk
great british design, innovation and excellence since 1912
0616.V1
 Loading...