

Page 1
5 Litre
Digital Multi Cooker
Safety and Instruction Manual
PLEASE READ CAREFULLY
T16007
Page 2
T16007 Digital Multi Cooker
2
www.towerhousewares.co.uk
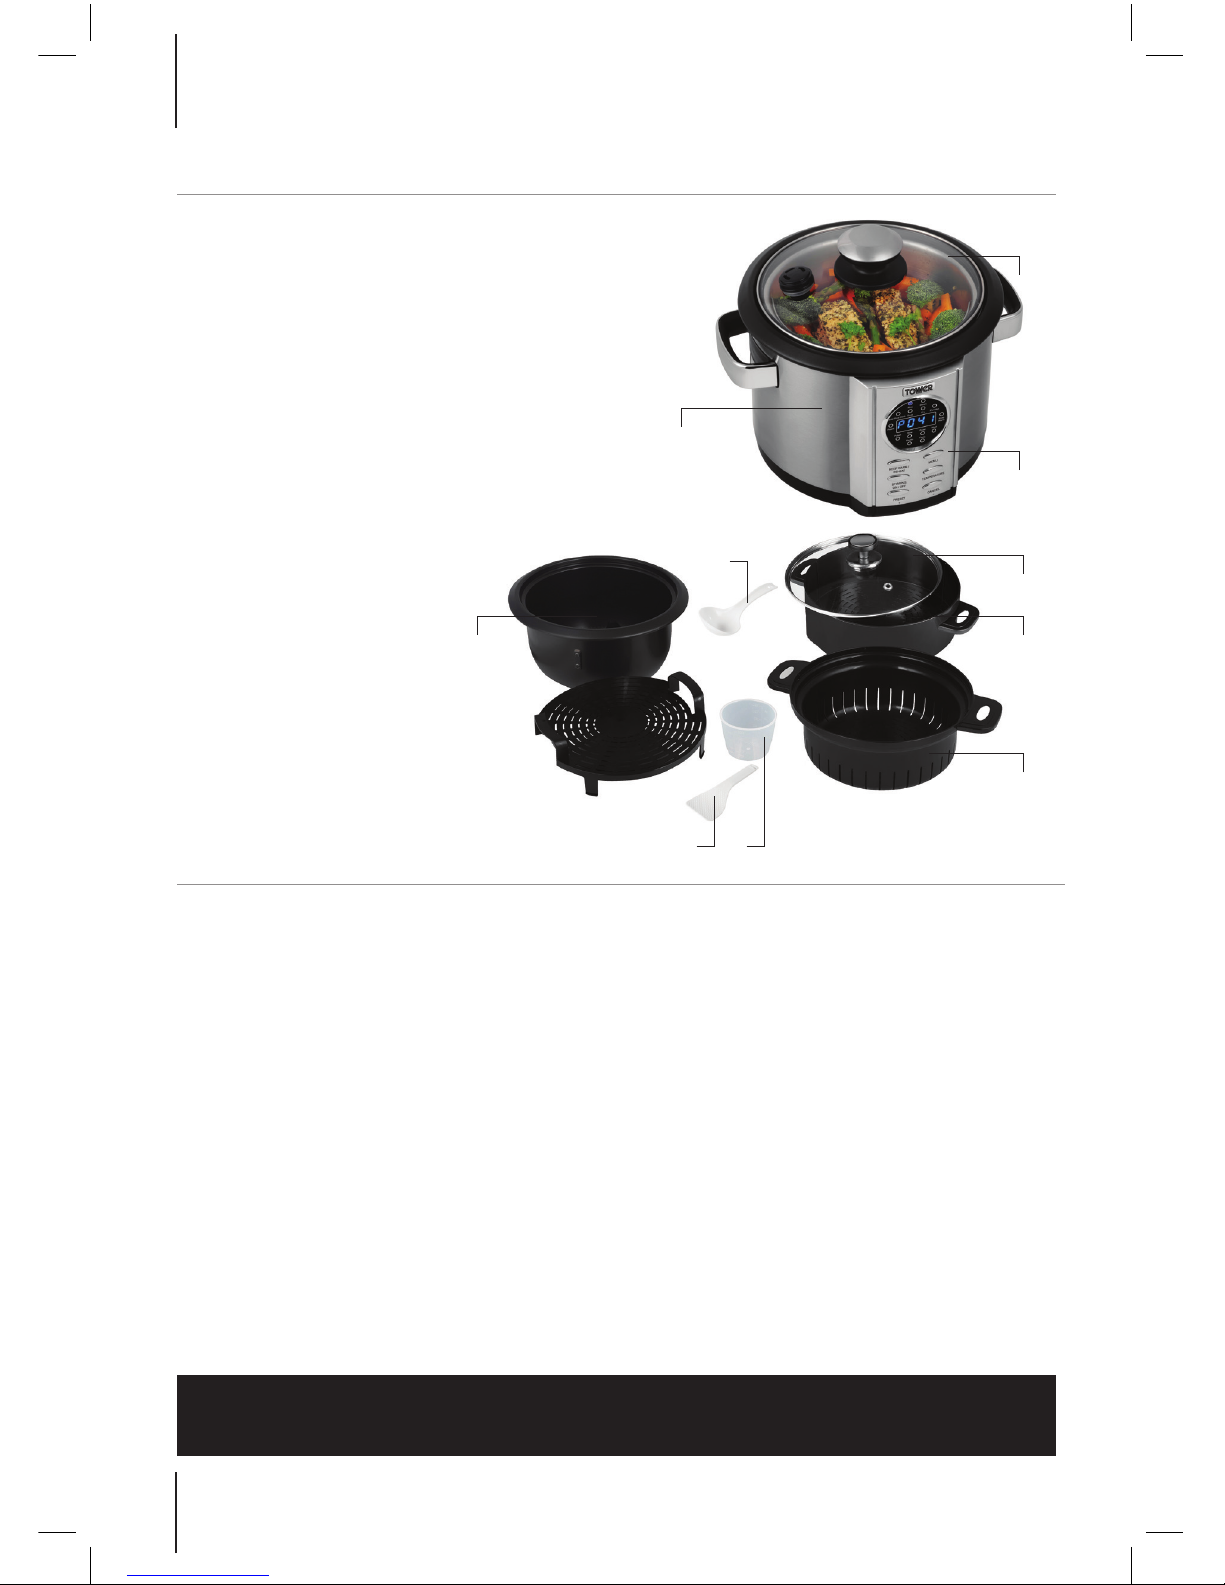
WHAT’S IN THE BOX
Instruction Manual
2 x Glass lid handles
Stirrer
1. Digital Multi Cooker
2. Glass lid with large vent
3. Control panel.
4. Glass lid with small vent
5. Steam pot
6. Steam tray
7. Measuring cup
8. Rice spoon
9. Steam rack
10. Cooking pot
11. Ladle
BEFORE YOUR FIRST USE
1. Before using the unit for the first time, carefully clean the unit and all items that
will come into contact with food.
2. Glass lid handle assembly.
3. Place the small washer on to the screw, and slide through the bottom of the lid.
4. Place the large decorative washer on the top of the lid over the screw.
5. Place the handle on top of the washer and from below the lid using a Philips
screwdriver tighten the screw in to the handle.
6. Do not use any aggressive detergents, brushes with metal or nylon
bristles or sharp objects such as knives or spatulas for cleaning
the appliance and accessories, use a sponge or cloth dampened in warm water
to avoid damage.
7. Dispose of packaging in a responsible manner.
8. It’s a good idea to keep the outer box for storage purposes.
WARNING:
DO NOT immerse the unit in water.
3.
2.
10.
1.
11.
8. 7.
6.
5.
4.
Page 3

Safety and Instruction Manual
3
Helpline: +44 (0) 844 984 0055
CONTENTS: CONTENTS:
2 What’s in the box & before your first use
4 Product safety information
6 Using your appliance & functionality
7 Getting started
10 Recipes for your digital multi cooker
11 Seasoned rice
12 Steamed salmon fillets
13 Slow cooker chilli
14 Tomato basil soup
15 Asian shrimp stir-fry
16 Creamy apple, cinnamon and sultana porridge
17 Easy peasy lentils
18 Winter warmer beef stew
19 Roasted chicken with paprika & thyme
20 Ginger-soy glaze chicken wings
21 Plain risotto
22 Pasta with pesto sauce
23 Program guide
24 Care and cleaning
25 Technical data, documentation & warranty
26 Important! wiring safety
27 Your receipt & disposal of the unit
Page
Page 4

T16007 Digital Multi Cooker
4
www.towerhousewares.co.uk
PRODUCT SAFETY INFORMATION
• Check that the voltage of the main circuit corresponds with the rating of the
appliance before operating.
• Please ensure that the appliance is used on a stable, level, and heat
resistant surface.
• Do not immerse cords, plugs or any part of the appliance in water or any
other liquid.
• Do not leave the appliance unattended while it is operating.
• Close supervision is necessary when any appliance is used by or near
children or pets.
• This appliance can be used by children aged from 8 years and above and
persons with reduced physical, sensory or mental capabilities or lack of
experience and knowledge if they have been given supervision or instruction
concerning use of the appliance in a safe way and understand the hazards
involved.
• Children shall not play with the appliance.
• Cleaning and user maintenance shall not be made by children without
supervision.
• Switch off at the wall socket then remove the plug from the socket when not
in use or before cleaning.
• If the supply cord or appliance is damaged, stop using the appliance
immediately and seek advice from the manufacturer or its service agent or
a similarly qualified person.
• Do not let the cord hang over the edge of a table or counter or let it come
into contact with any hot surfaces.
• The use of accessory attachments is not recommended by the appliance
manufacturer, apart from those supplied with this product.
• Do not pull the plug out by the cord as this may damage the plug and/or the
cable.
• Do not use this product for anything other than its intended use.
• This appliance is for household use only.
• Do not carry the appliance by the power cord.
• Do not use the appliance outdoors.
Page 5

Safety and Instruction Manual
5
Helpline: +44 (0) 844 984 0055
• Never position the unit close to or on hot surfaces or open flames.
• Do not spill liquid onto the digital controls. If this happens switch off and
unplug from the mains, mop up the liquid.
• High temperatures are present during operation. Only touch the handles
on the unit.
• This appliance is Not intended for commercial use.
• Do not site the product under cupboards or near hanging fabric.
• Avoid contact with steam escaping from the lid vents.
• The cover can become extremely hot during operation therefore use oven
gloves where possible when removing the cover to avoid burns.
• This product should not be used with timers or remote devices as to do so
would be a potential fire hazard.
• Do not use an extension lead with this appliance.
• Do not disassemble the product yourself
• In the unlikely event the appliance develops a fault, stop using it immediately
and seek advice from the service department:
+44 (0) 844 984 0055
Page 6

T16007 Digital Multi Cooker
6
www.towerhousewares.co.uk
USING YOUR APPLIANCE
Functionality
Connect power lead to the cooking pot, and switch on at the wall.
Continually press the menu button on the control panel to select the required
cooking process. This will display the cooking time for this function, if you wish
to increase or decrease this time, you can do this by pressing the pre-set or
cancel button on the control panel to change the cooking time by a minute at a
time.
After 5 seconds the chosen cooking process will start.
If the function you are using has the adjust temperature feature (listed in the
programme guide on page 23) you can now adjust the temperature to what you
require by pressing the temperature button on the control panel.
Also if you require your food to be stirred during cooking, place the supplied
stirrer inside the cooking pot and lock into place by placing the stirrer onto the
metal rod in the base of the cooking pot and twist, to remove the stirrer twist and
remove. Once the cooking function has started press the stirring button straight
away to start this process, then press it again to stop this.
To stop cooking at anytime press the cancel button, this will place the cooker
into the stand-by mode.
To pre-set your cooking time only on the following functions, soup, risotto,
porridge and rice, before you have chosen your cooking function, press the
pre-set button to increase by 10mins or press your cancel button to decrease by
10mins, then choose your required cooking function, both the pre-set light and
the chosen function light will illuminate, once the pre-set time has expired your
chosen cooking function will proceed.
After your cooking process has finished the cooker will automatically go into the
keep warm function, apart from the steam & pasta functions, the cooker will stay
at between 65-70
o
C, if it goes over 70oC it will stop heating, if it falls below
65
o
C it will start to heat back up to 70oC.
Page 7

Safety and Instruction Manual
7
Helpline: +44 (0) 844 984 0055
GETTING STARTED
How to use your Multi cooker for Rice
Measure out your required amount of rice using the measuring cups provided,
then wash your rice under cold water. Place washed rice into the cooking pot
and place the required amount of water into the cooking pot, following the
measuring guide inside the cooking pot, place the small vent glass cooking lid
on top. If you are using the Pre-set function, press the pre-set button first and set
your pre-set time before starting the Rice function. Now press your menu button
to choose the rice function, after 5 seconds the cooking function will start, once
the cycle expires the keep warm function will automatically start, you can press
cancel at any time to stop this and go to standby mode.
How to use your Multi cooker to Steam
Firstly add water to the cooking pot to the minimum water fill level, this may
vary depending on the amount of food that you are steaming. Using your
steam bowl (5) place the produce that will need the most intense steaming i.e.:
potatoes in this receptacle, then add the next tier, the steam tray (6) and place
your vegetables into this, finally place the steam rack (9) on top and place your
salmon fillets on top of this. Now place the small vent glass cooking lid on top.
By pressing the menu button, select the steam function, after 5 seconds this
will start the steaming process. If steaming chicken place the meat on the lower
level of the steam tier, this will prevent juices running into the vegetables.
How to use your Multi cooker to Sauté/Slow Cook
Firstly place stirrer inside the cooking pot and fix into place, put your desired
produce into the cooking pot, along with a stock if slow cooking. Place the small
vent glass lid on the cooking pot. Press menu button until you reach the Sauté/
Slow cook function then in 5 secs this will proceed, if you require the stirrer to
be used in this process press the stirrer button at anytime once the function has
started. If you are using diced meat in your recipe, please brown & seal the meat
prior to placing it with rest of the ingredients.
Page 8

T16007 Digital Multi Cooker
8
www.towerhousewares.co.uk
How to use you Multi cooker to make Soup
Using the cooking pot, place the produce inside with the stirrer in place, once
again fry off and seal any meat firstly, then add the rest of your ingredients place
the large vent glass lid on to the cooking pot and start the soup function by
pressing the menu button continually until you reach the soup function.
How to use your Multi cooker to Fry
This function can be used for shallow frying, use this function to fry onions,
vegetables, stir fry and browning and sealing meats. Place the stirrer, if required
into the cooking pot, add a small amount of oil inside the cooking pot and
add produce, place the small vent glass cooking lid on top and proceed with
pressing the menu button on the control panel until you reach the fry function,
after 5 seconds this will then start the cooking time, adjust time if needed.
How to use your multi cooker to make Porridge
Firstly place the stirrer into the cooking pot, then add the oats and water to
the cooking pot, place the small vent glass lid on to the cooking pot. Press the
menu button until you reach the porridge function and the cooking process will
automatically start after 5 seconds.
How to use your multi cooker to cook Pulses
Firstly rinse lentils/beans etc. in water, place 100g of lentils etc. into the cooking
pot, add 500ml of water. Place small vent glass lid on to the cooking pot. Press
the menu button until you reach the pulses function, then after 5 seconds this
cooking process will start. Once complete the lentils etc. will have softened and
should be firm to the bite. Drain, rinse then use.
How to use your multi cooker to make Stews
Follow the guidelines as you would for Sauté/Slow cook, remembering to fry
your meat before adding the rest of the recipe.
Page 9

Safety and Instruction Manual
9
Helpline: +44 (0) 844 984 0055
How to use your multi cooker to Roast
Firstly place a small amount of oil inside the cooking pot, add your preferred
meat, season, and cover with large vent glass lid. Press the menu button and
select the roast function, after 5 seconds the cooking procedure will start, adjust
the time or temperature as needed.
How to use your multi cooker on the Meat function
Place stirrer inside the cooking pot, then add a small amount of oil, this will help
to seal and brown the meat. Place the meat inside and cover with large vent
glass lid, once function has completed, test before serving.
How to use your multi cooker for Risotto
Place the stirrer inside, as this has a automatic stirring function included, place
your ingredients into the cooking pot. Place small vent glass lid on to the
cooking pot and commence with the cooking function.
How to use your multi cooker for Pasta making
Place the stirrer inside, add your desired amount of pasta and water into the
cooking pot, place the small vent glass lid onto the top and using the menu
button go to the pasta function. After 5 seconds this will automatically start, once
the function completes your pasta is ready to serve.
Page 10

T16007 Digital Multi Cooker
10
www.towerhousewares.co.uk
Program Guide
All recipes are for guideline purposes only and the photography shown is for
illustration purposes only.
Cooking
time
(Minutes)
Adjustable
time
(minutes)
Adjustable
temperature
(oc)
Preset
Auto
Rotate
Auto
Keep
warm
Fry 35 5 - 99 40 -170 no no yes
Stew 70 10 - 99 40 -170 no no yes
Meat/
Chicken
50 5 - 99 40 -170 no no yes
Bean
tendon
45 5 - 99 40 -170 no no yes
Saute/
Slow cook
70 5 - 990 40 -170 no no yes
Roast 40 5 - 99 no no no yes
Steam 30 5 - 99 no no no yes
Soup 60 5 - 99 no yes no yes
Risotto 50 5 - 99 no yes yes yes
Porridge 45 5 - 99 no yes no yes
Rice 45 5 - 99 no yes no yes
Steam/
Pasta
35 5 - 99 no no no no
Reheat 9 no no no no yes
Page 11

Safety and Instruction Manual
11
Helpline: +44 (0) 844 984 0055
Recipes for your Digital
Multi Cooker
From steaming and roasting, to fry and
slow cook - the Tower Digital Multicooker will help revolutionise your
kitchen.
With an incredibly wide array of
functions, you can create delicious
dishes including pasta, stew, soup and
even porridge - all from this one handy
machine.
And with a large 5 litre capacity,
whatever you make you have enough
room to feed the whole family.
The glass viewing lid allows you to easily
keep an eye on your food as it cooks, so
you won’t need to open it up and offset
the temperature.
As well as this the multi-cooker also
includes a 24 hour pre-set timer ( only
on certain functions ) and a 24 hour keep
warm function, perfect for those with a
busy lifestyle that need their kitchen to
t around them.
We have created 10 recipes for you to
get started, so don’t be afraid and dive
on in and experiment!
Please use the table below should you
need to do any conversions or weights
or volumes.
When measuring liquid, cooking measurements are
quite straightforward.
Check this
chart for basic
imperial to metric
conversions of
weights.
Metric Imperial US cups
250ml 8 floz 1 cup
180ml 6 fl oz 3/4 cup
150ml 5 floz 2/3 cup
120ml 4 floz 1/2 cup
75ml 2 1/2 floz 1/3 cup
60ml 2 floz 1/4 cup
30ml 1 floz 1/8 cup
15ml 1/2 floz 1 tablespoon
Imperial Metric
1/2 oz 15g
1 oz 30g
2 oz 60g
3 oz 90g
4 oz 110g
5 oz 140g
6 oz 170g
7 oz 200g
8 oz 225g
9 oz 255g
10 oz 280g
11 oz 310g
12 oz 340g
13 oz 370g
14 oz 400g
15 oz 425g
1 lb 450g
Page 12

T16007 Digital Multi Cooker
12
www.towerhousewares.co.uk
Steamed Salmon Fillets
What you need
2 salmon llets
2 tsp (10 ml) ground ginger
3 tbsp (45 ml) low-sodium soy sauce
1 garlic clove, minced
2 tsp (10 ml) dark brown sugar
1
⁄2 tsp (2.5 ml) chilli akes
1 green onion or shallot, sliced
Salt and pepper, to taste
How you do it
1. Mix ginger, soy sauce, garlic, dark brown sugar, and chilli akes.
2. Rub sh llets with mixture and place in refrigerator to marinate for
approximately 30 minutes.
3. Lift cover and add steamer basket with salmon llets.
4. Cook for 8–10 minutes or until salmon akes easily with a fork.
Serve salmon over rice and sprinkle with sliced green onion.
5. Remember that you can adjust the cooking time to your requirements.
Cooking
Time
10 mins
SERVES
2
SEE
STEAM
SECTION
PAGE
7
Page 13

Safety and Instruction Manual
13
Helpline: +44 (0) 844 984 0055
Slow Cooker Chilli
What you need
1kg lean minced beef
2 cloves garlic, minced
1 large green pepper, cubed
1 large onion, chopped
1 jalapeño pepper, minced
720ml beef stock
2 packs chilli seasoning
2 cans kidney beans, drained
2 cans diced tomatoes
6 oz. tomato paste
Grated Cheddar cheese
Sliced jalapeños
Sour cream, to taste
How you do it
1. Crumble the minced beef into large pan.
2. Over medium high heat, brown minced beef and Drain the fat.
3. Add garlic, green pepper, onion and jalapeño to meat mixture and cook
until onion is softened.
4. Place meat and onion mixture into the digital multi cooker.
5. Add remaining ingredients. Stir to combine.
6. Cover and cook on HIGH for 4 hours or LOW for 8 hours.
7. Serve with grated Cheddar cheese, sliced jalapeños and sour cream,
8. Remember that you can adjust the cooking time to your requirements.
Cooking
Time
8 hours
max
SERVES
12
SEE
SLOW COOK
SECTION
PAGE
7
Page 14

T16007 Digital Multi Cooker
14
www.towerhousewares.co.uk
Tomato Basil Soup
What you need
2 tbsp olive oil
1 medium onion, chopped
4 garlic cloves, minced
2 large tomatoes, chopped
2 cans chopped tomatoes
120ml cup chicken broth
60ml tomato puree
30g fresh basil, coarsely chopped
3 tbsp sugar
1 tsp salt
1
⁄2 tsp crushed red pepper
1
⁄2 tsp cracked black pepper
120ml cup heavy cream
How you do it
1. Heat the olive oil, onion and garlic in a frying pan.
2. Cook 2 minutes; stir in tomatoes and cook an additional 2 minutes.
3. Transfer the above into the cooking pot.
4. Add chopped tomatoes, chicken stock, tomato paste, basil, sugar, salt,
red pepper and black pepper to the cooking pot.
5. Cover and select the soup function.
6. Once the soup is cooked, add cream to taste.
7. Stir in heavy cream before serving.
8. Remember that you can adjust the cooking time to your requirements.
Cooking
Time
1.5 hours
SERVES
6
SEE
SOUP
SECTION
PAGE
8
Page 15

Safety and Instruction Manual
15
Helpline: +44 (0) 844 984 0055
Asian Shrimp Stir-Fry
What you need
2 tbsp olive oil
100g sliced carrots
300g of orets of broccoli
150g coarsely chopped onion
150g chopped red bell pepper
150g chopped green bell pepper
900g large shrimp (shelled, peeled
and de-veined)
200g chopped cabbage
2 tbsp honey
240ml teriyaki marinade/sauce
How you do it
1. Choose the fry function.
2. Heat olive oil in cooking pot until you see a light smoke.
3. Add carrots, onion and both coloured peppers.
4. Cook for approximately 10 minutes with lid on, or until carrots begin to
soften slightly.
5. Add shrimp, cabbage, teriyaki sauce, and honey. Replace lid.
6. Cook for an additional 10 minutes, or until shrimp are opaque.
7. Serve and enjoy!
8. Remember that you can adjust the cooking time to your requirements.
Cooking
Time
10-20
mins
SERVES
8
SEE
FRY
SECTION
PAGE
8
Page 16

T16007 Digital Multi Cooker
16
www.towerhousewares.co.uk
Creamy Apple, Cinnamon
and Sultana Porridge
What you need
1 litre water
8 dessert spoon dark brown soft sugar
4 tsp ground cinnamon
8 tbsp maple syrup
200g uncooked porridge oats
Handful sultanas
3 apple - peeled, cored and diced
How you do it
1. Choose the Porridge function.
2. Add
porridge oats, water, brown sugar, cinnamon and syrup.
3. After about 40 minutes add the apple and sultanas to nish.
4. Serve and enjoy!
5. Remember that you can adjust the cooking time to your requirements.
Cooking
Time
45 mins
SERVES
8
SEE
PORRIDGE
SECTION
PAGE
8
Page 17

Safety and Instruction Manual
17
Helpline: +44 (0) 844 984 0055
Easy Peasy Lentils
What you need
100g lentils
500ml water
How you do it
1. Rinse the lentils in cold water.
2. Place the lentils into the cooking pot.
3. Add the water.
4. Choose the pulses function.
5. Once the cooking cycle is complete the lentils will have softened and
should be rm to the bite.
6. Drain, rinse and use.
7. The lentils can now be used for a range of dishes, such as curries & salads.
8. Remember that you can adjust the cooking time to your requirements.
It is best that you do not add these cooked lentils to soups and stews as this
will over cook them. Instead
add the lentils uncooked at the
beginning when cooking stews
and soups.
Lentils are a great substitute
for beans.
Cooking
Time
45 mins
SERVES
4
SEE
PULSES
SECTION
PAGE
8
Page 18

T16007 Digital Multi Cooker
18
www.towerhousewares.co.uk
Winter Warmer Beef Stew
What you need
60g plain our
1 tsp salt
1
⁄2 tsp black pepper
1.3kg beef stew cubes
2 tbsp vegetable oil
1 can peeled chopped tomatoes
410ml. beef stock
170ml red wine
2 packets onion soup mix
1 tsp dried basil
8 small potatoes
1 bag (450g) carrots, peeled and cut
into 2 inch pieces
230g. sliced mushrooms
1 large onion, cut into eighths
How you do it
1. In a large bowl, combine our, salt and pepper; add beef.
2. Toss to coat.
3. In a large frying pan over medium-high heat, heat oil.
4. Add half of the beef. Cook until browned on all sides. Repeat with
remaining beef.
5. Place browned beef in the cooking pot.
6. Choose the stew function.
7. Stir in tomatoes, beef stock, wine, onion soup mix and basil until well
blended.
8. Add potatoes, carrots, onion and mushrooms.
9. Cover and cook until the cycle is complete.
10. Remember that you can
adjust the cooking time to
your requirement.
Cooking
Time
70 mins
SERVES
10
SEE
STEW
SECTION
PAGE
8
Page 19

Safety and Instruction Manual
19
Helpline: +44 (0) 844 984 0055
Roasted Chicken with
Paprika & Thyme
What you need
1
⁄2 tsp paprika
1
⁄2 tsp onion powder
1
⁄2 tsp dried thyme leaves
1
⁄2 tsp salt
1
⁄2 tsp cracked black pepper
1 large onion, cut in eighths
1
⁄2 lemon, cut in half
Small whole chicken
How you do it
1. Mix paprika, onion powder, thyme, salt and pepper in a small bowl; set
aside.
2. Place
3
⁄4 of the onion on bottom of cooking pot.
3. Rinse chicken and pat dry.
4. Add remaining onion and lemon to chicken cavity.
5. Sprinkle all sides with seasoning mixture.
6. Place chicken on top of onions in cooking pot.
7. Cover and select the roast function.
8. The chicken is done when meat temperature registers 165°F in the breast
or 175°F-180°F in the thickest part of the thigh.
9. Remember that you can adjust the cooking time to your requirements.
Please ensure that the chicken
is cooked thoroughly before
serving.
Cooking
Time
40 mins
SERVES
4
SEE
ROAST
SECTION
PAGE
9
Page 20

T16007 Digital Multi Cooker
20
www.towerhousewares.co.uk
Ginger-Soy Glaze
Chicken Wings
What you need
10 chicken wings,
1 tbsp vegetable oil
1
⁄2 tbsp salt
1
⁄2 tsp freshly ground black pepper
85g honey
1 tbsp soy sauce
1 large garlic cloves, crushed
1” piece of ginger, peeled, sliced
How you do it
1. Bring all ingredients (except the chicken) and 1⁄4 cup water to a boil in
a small saucepan, stirring to dissolve honey.
2. Reduce heat to low; simmer, stirring occasionally, until reduced to
1
⁄4 cup.
3. Strain into a medium bowl. Let sit for 15 minutes to thicken slightly.
4. Select the meat function.
5. Place all ingredients in a large bowl and toss to coat.
6. Place the coated chicken wings into the cooking pot.
7. Once the cooking cycle is complete, check that the chicken is thoroughly
cooked. 175°F-180°F in the thickest part of the wing.
8. Remember that you can adjust the cooking time to your requirements.
Cooking
Time
50 mins
SERVES
2
SEE
MEAT
SECTION
PAGE
9
Page 21

Safety and Instruction Manual
21
Helpline: +44 (0) 844 984 0055
Plain Risotto
What you need
3 tbsp unsalted butter
1 medium onion, nely chopped
2 cloves garlic, minced
400g Arborio rice
900ml chicken stock
225ml dry white wine
1 tsp salt
1 tsp cracked black pepper
1 package (10-ounce) fresh spinach,
stemmed and
coarsely chopped
25g chopped fresh basil
115g freshly grated Parmesan cheese
How you do it
1. In a large frying pan put in the unsalted butter, onion, garlic, and fry until
soft.
2. Select the risotto function.
3. Place the rest of the ingredients (apart from the spinach, basil and
parmesan) into the cooking pot.
4. Pour in chicken stock, wine, salt and pepper.
5. 15 minutes before the cooking cycle is complete, Stir in spinach, basil
and Parmesan cheese. Cook 15 minutes longer until spinach is wilted and
cheese is melted.
6. Check that the rice has a rm texture.
Remember that you can adjust
the cooking time to your
requirements.
Cooking
Time
50 mins
SERVES
6
SEE
RISOTTO
SECTION
PAGE
9
Page 22

T16007 Digital Multi Cooker
22
www.towerhousewares.co.uk
Pasta with Pesto Sauce
What you need
1 package (12 oz.) pasta
Traditional Basil Pesto
Cherry tomatoes
Balsamic Vinegar
Parmesan cheese
1 litre water
How you do it
1. Select the pasta function.
2. Add the pasta and water to the cooking pot.
3. Once the cooking cycle is complete, check that the pasta is cooked to
your taste.
4. Drain and toss with pesto sauce of your choice.
5. Serve with a baby leaf salad with gorgeous cherry tomatoes and drizzle
with balsamic vinegar.
6. Sprinkle with parmesan cheese to taste.
Cooking
Time
50 mins
SERVES
4
SEE
PASTA
SECTION
PAGE
9
Page 23

Safety and Instruction Manual
23
Helpline: +44 (0) 844 984 0055
Seasoned Rice
What you need
800g regular or converted white rice, uncooked
1 tbsp dried minced onion
Stock (can be beef or chicken)*
Water*
120g cup butter or margarine, melted
* Split the liquids required between the water and stock depending on how much rice is
required (following the measuring guide inside the cooking pot)
How you do it
1. Measure and wash your required amount of rice using the measuring cup
provided.
2. Place washed rice into the cooking pot and pour the required amount of
water following the measuring guide inside the cooking pot .
3. Place all ingredients in cooking pot. Stir to mix.
4. Follow the rice cooking instructions on page 7.
5. Cover and cook for 45 mins.
6. Remember that you can adjust the cooking time to your requirements.
Cooking
Time
45 mins
SERVES
4
SEE
RICE
SECTION
PAGE
7
Page 24

T16007 Digital Multi Cooker
24
www.towerhousewares.co.uk
CARE AND CLEANING
Remove plug from the mains socket, and allow the appliance to cool down
before cleaning.
Do not immerse the base unit of the appliance in water and make sure no water
enters the appliance.
Clean the base unit by wiping it with a damp cloth. A little detergent can be
added if the appliance is heavily soiled.
Do not use scouring pads, steel wool or any form of strong solvents or abrasive
cleaning agents to clean the appliance, as they may damage the outside
surfaces of the appliance.
Clean all accessories in warm soapy water, do not use any scouring pads,
steel wool or any strong solvents or abrasive cleaning agents when cleaning
accessories.
IMPORTANT! Allow to dry fully after cleaning before using again.
Do not use the appliance if damp. Ensure the appliance is completely
clean and dry before storing.
Storage
To store your appliance:
1. Unplug power cord from the power outlet and clean as above.
2. Allow the appliance to dry fully.
3. Store on a flat, dry level surface out of reach of children.
Page 25

Safety and Instruction Manual
25
Helpline: +44 (0) 844 984 0055
TECHNICAL DATA
Description: Digital Multi Cooker
Model: T16007
Rated Voltage: 220-240V ~50/60Hz
Input power: 700W
DOCUMENTATION
We declare that this product conforms to the following product
legislation in accordance with the following directive(s):
2004/108/EC Electromagnetic Compatibility Directive.
2006/95/EC Low Voltage Directive.
2011/65/EU Restriction of Hazardous Substances Directive.
1935/2004/EC Materials & Articles in Contact With Food
(LFGB section 30 & 31).
RKW Quality Assurance, United Kingdom.
WARRANTY
This product is guaranteed for 12 months from the date of original purchase.
If any defect arises due to faulty materials of workmanship, the faulty products
must be returned to the place of purchase. Refund or replacement is at the
discretion of the retailer.
The Following Conditions Apply:
• The product must be returned to the retailer with proof of purchase.
• The product must be installed and used in accordance with the instructions
contained in this instruction guide.
• It must be used only for domestic purposes.
• It does not cover wear and tear, damage, misuse or consumable parts.
• RKW has limited liability for incidental or consequential loss or damage.
• This guarantee is valid in the UK and Eire Only.
An extended warranty is available for this appliance.
See back page for details.
Page 26

T16007 Digital Multi Cooker
26
www.towerhousewares.co.uk
WARNING:
This Appliance MUST be Earthed
IMPORTANT! WIRING SAFETY
(For UK Use Only) As the colours in the mains lead of this appliance may not
correspond with the coloured markings identifying the terminals in your plug,
please proceed as follows:
The wires in the mains lead are coloured in
accordance with the following code:
Blue [N] Neutral
Brown [L] Live
Green/Yellow [E] Earth
Plug Fitting Details (where applicable)
The wire coloured blue is the neutral and must be connected to the terminal
marked [N] or coloured black. The wire coloured brown is the live wire and
must be connected to the terminal marked [L] or coloured red. The wire
coloured green/yellow must be connected to the terminal marked with the letter
[E] or
. On no account must either the brown or the blue wire be connected
to the [E] terminal .
Always ensure that the cord grip is fastened correctly.
The plug must be fitted with a fuse of the same rating already fitted and
conforming to BS 1362 and be ASTA approved. If in doubt consult a qualified
electrician who will be pleased to do this for you.
Non-rewireable Mains Plug
If your appliance is supplied with a non-rewireable plug fitted to the mains lead
and should the fuse need replacing, you must use an ASTA approved one
(conforming to BS 1362 of the same rating).
If in doubt, consult a qualified electrician who will be pleased to do this for you.
If you need to remove the plug - disconnect it from the mains - and then cut it
off the mains lead and immediately dispose of it safely. Never attempt to reuse
the plug or insert it into a socket outlet as there is a danger of an electric shock.
FUSE
Page 27

Safety and Instruction Manual
27
Helpline: +44 (0) 844 984 0055
DISPOSAL OF THE UNIT
Appliances bearing the symbol shown here may not be disposed of in
domestic rubbish. You are required to dispose of old electrical and electronic
appliances like this separately.
Please visit www.recycle-more.co.uk or www.recyclenow.co.uk
for access to information about the recycling of electrical items.
Please visit www.weeeireland.ie for access to information about
the recycling of electrical items purchased in Ireland.
The WEEE directive, introduced in August 2006, states that
all electrical items must be recycled, rather than taken to landfill.
Please arrange to take this appliance to your local Civic Amenity
site for recycling, once it has reached the end of its life.
YOUR RECEIPT
Affix your store receipt to this page.
Page 28

www.towerhousewares.co.uk
thank you!
We hope you enjoy your appliance for
many years. As a thank you for purchasing
one of our fantastic products, we are giving
you an extra 2 years peace of mind.
*To receive your extra 2 years guarantee,
register your appliance online by visiting:
www.towerhousewares.co.uk
Should you have a problem with your
appliance, or need any spare parts,
please call our Service Department on:
+44 (0) 844 984 0055
great british design, innovation and excellence since 1912
0215.V3
 Loading...