

Page 1

T14028
INDOOR/OUTDOOR BARBECUE & GRILL
SAFETY AND INSTRUCTION MANUAL
PLEASE READ CAREFULLY
*Subject to registering your Extended Guarantee online at www.towerhousewares.co.uk.
Page 2
2
GREAT BRITISH DESIGN, INNOVATION
AND EXCELLENCE SINCE 1912
Since the turn of the 20th century, Tower has been designing,
developing and manufacturing housewares and small
appliances used by millions of households throughout the
UK and beyond. During the 1960s, the rise in popularity
of pressure cooking saw Tower become the UK’s largest
producer of pressure cookers, right through into the late
1980s. In recent years the Tower brand has been reborn with
an exciting and varied range of housewares and electrical
appliances that have quickly reinstated the brand’s richly
deserved status as a household name.
Visit
www.towerhousewares.co.uk
for more fantastic products.
Page 3

3
Contents:
Thank you for purchasing this appliance from the
Tower range.
Please read this manual carefully BEFORE using the
appliance for your own safety.
It has been designed to provide many years of
trouble-free use.
There are many benefits to using a Tower Indoor/
Outdoor BBQ Grill:
• Easy to clean due to non-stick coating.
• Power On indicator and adjustable thermostat to
allow for effective and precise grilling.
• Sturdily built to ensure stability across a variety of
flooring surfaces. The grill is ideal for both indoor
and outdoor events.
• Easy to operate.
1. Specifications
Components and
structure
2. Technical Data
3. Important Safety
Information
4. Before First Use
5. Using your Appliance
6. Troubleshooting
7. Recycling
8. Cleaning & Care
9. Wiring Safety
10. Warranty Information
11. Your Receipt
See back page for Customer
Service Information.
Page 4
4
This box contains:
Instruction Manual
BBQ Unit
Windshield and 2 trays
4 Iron tube with coating 67cm stand legs
Frame
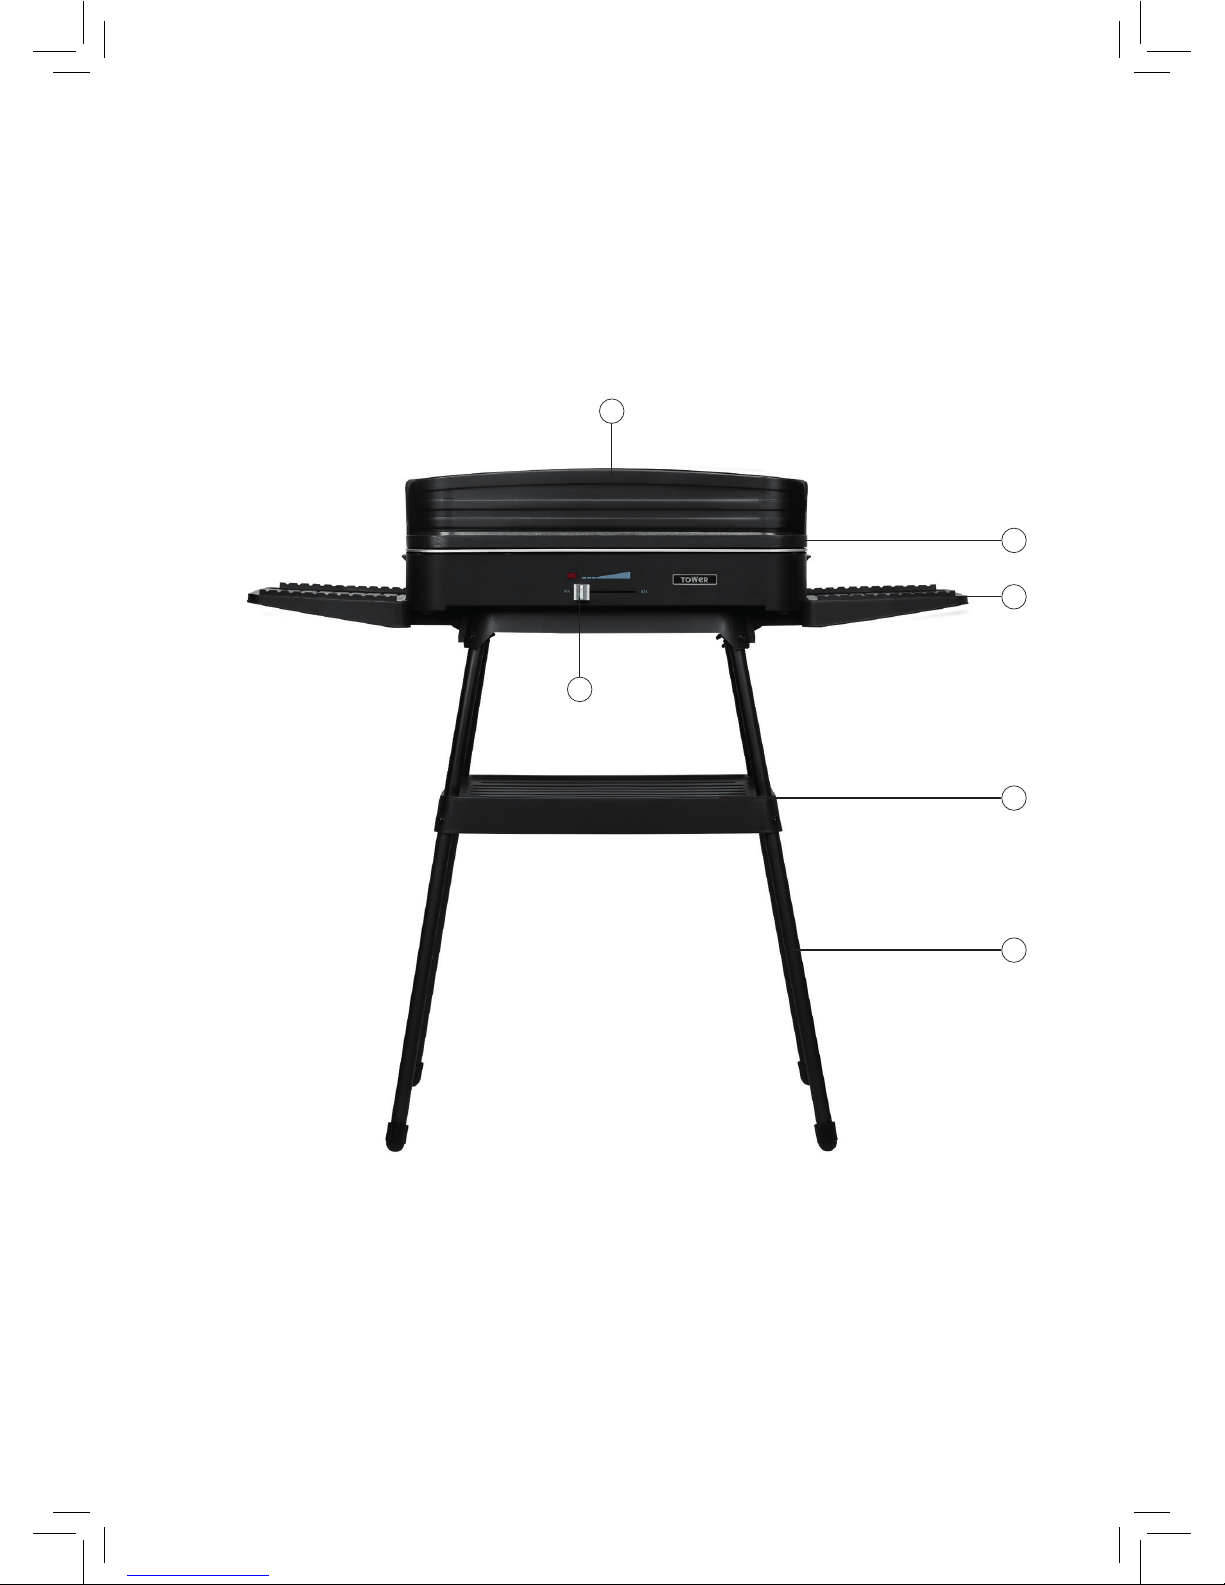
1. Windshield
2. Grill
3. Side Trays
4. Lower Tray
5. Frame
6. Heat control slider
1 - Specifications:
Structure of your appliance:
2
3
4
5
1
6
Page 5

5
Description: Indoor/Outdoor Barbecue & Grill
Model: T14028
Rated Voltage: 230V
Frequency: 50Hz
Power Consumption: 2200W
IPX4 Class 1
Documentation
We declare that this product conforms to the following product legislation in
accordance with the following directive(s):
2014/30/EU Electromagnetic Compatibility Directive.
2014/35/EU Low Voltage Directive.
2011/65/EU Restriction of Hazardous Substances Directive.
1935/2004/EC Materials & Articles in Contact With Food
(LFGB section 30 & 31).
RK Wholesale LTD Quality Assurance, United Kingdom.
2 - Technical Data:
Should you encounter problems or require a replacement part, contact the Tower
Customer Support Team: +44 (0) 333 220 6066.
Some spare parts may be ordered from the Tower website.
Your warranty becomes void should you decide to use non Tower spare parts.
Spare parts can be purchased from www.towerhousewares.co.uk
Guarantee for spare parts:
The spares and accessories are guaranteed for 1 year from date of purchase.
The main body and housing are guaranteed for the extended free warranty subject
to registration.
If any defect arises due to faulty materials of workmanship, the faulty products must
be returned to the place of purchase within 12 months from the date of purchase.
Refund or replacement is at the discretion of the retailer.
Page 6

6
• Check that the voltage
of the main circuit
corresponds with the rating
of the appliance before
operating.
• If the supply cord or
appliance is damaged,
stop using the appliance
immediately and
seek advice from the
manufacturer, its service
agent or a similarly qualified
person.
• WARNING! DO NOT let the
cord hang over the edge of
a table or counter, serious
burns may result from the
BBQ being pulled over.
• DO NOT carry the appliance
by the power cord.
• DO NOT use any extension
cord with this appliance.
• DO NOT pull the plug out
by the cord as this may
damage the plug and/or the
cable.
• Switch off at the wall socket
then remove the plug from
the socket when not in use
or before cleaning.
• Switch off and unplug
before fitting or removing
tools/attachments, after use
and before cleaning.
• Close supervision is
necessary when any
appliance is used by or near
children.
• Children should not play
with the appliance.
• This appliance can be
used by children aged
from 8 years and above
and persons with reduced
physical, sensory or mental
capabilities or lack of
experience and knowledge
if they have been given
supervision or instruction
concerning use of the
appliance in a safe way and
understand the hazards
involved.
• Cleaning and user
maintenance should not
be undertaken by children
without supervision.
• Take care when any
appliance is used near pets.
• DO NOT use this product
for anything other than its
intended use.
Please read these notes carefully BEFORE using your
Tower appliance
3 - Important Safety Information:
Page 7

7
• This appliance is for
household use only.
• This appliance includes a
heating function.
• Please ensure that the
appliance is used on a
stable, level, and heat
resistant surface.
• DO NOT immerse cords,
plugs or any part of the
appliance in water or any
other liquid.
• DO NOT place the BBQ
on or near combustible
materials such as a
tablecloth or curtain.
• DO NOT place the BBQ
against a wall or against
other appliances. Leave at
least 10cm free space on
the back and sides and
10cm free space above the
appliance.
• Allow the BBQ to cool down
for approx 60 minutes before
you handle or clean it.
• Remove burnt remnants.
• Any baking trays or oven
dishes used on the BBQ will
become hot. Always use
oven gloves when handling
or removing anything from
the BBQ.
• WARNING! This appliance
operates at high
temperatures, which may
cause burns. DO NOT touch
the hot surfaces of the
appliance (pan, air outlet,
etc.)
• DO NOT move the
appliance when it is full of
hot food.
• DO NOT immerse the
appliance in water.
• In the unlikely event the
appliance develops a fault,
stop using it immediately
and seek advice from the
Customer Support Team:
+44 (0) 333 220 6066
Page 8

8
• Read all of the instructions and retain them for future use.
• Remove all packaging material and any stickers.
• Wash removable parts and/or accessories as instructed in the Care and Cleaning
section.
• Wipe the Grill plates with a damp cloth or sponge to remove any dust. Wipe dry
with a soft cloth or paper towels.
• Select a dry, level location where the Grill will be used, leaving enough space
between the back of the BBQ and wall to allow heat to flow without damage
to walls.
• Lightly grease the Grill plate before the first use with some cooking oil.
• Before you insert the plug into an earth-connected wall socket, check if the
mains voltage complies with the information indicated on the type plate for the
appliance.
• Dispose of the packaging in a responsible manner.
Note: When your BBQ is heated for the first time, it may emit a slight amount
of smoke or odour. This is normal with many heating appliances due to small
amounts of manufacturing oil or dust particles that may have settled in transit.
This does not affect the safety of your appliance.
Ensure adequate ventilation, or heat the device up for the first time outdoors.
Before you barbecue for the first time, let the BBQ heat up and cool off twice
with an empty grill.
Assembling the BBQ:
1. Place the Grill tray on a dry, level surface.
2. Place the Grill plate onto the Grill tray so that both drains in the Grill plate and
the Grill tray are vertically aligned.
3. Make sure that the Grill plate has locked onto the Grill tray.
4. If the Grill plate is correctly in place you can now use the BBQ.
If you would like to use the BBQ outdoors, you should also mount the wind-screen
onto it.
• Place the side ends of the windscreen on the left or right side of the Grill tray.
• From above, push the back wall of the windscreen into the two windscreen
brackets on the back wall of the Grill tray.
• The windscreen is mounted and you can now use the BBQ Grill.
You can also use this BBQ Grill on a stand. A frame including a shelf (e.g. for
utensils) is included in the product contents.
Mount the frame as follows:
1. From below, insert one of the support legs through one of the openings at the
corners of the shelf.
2. Push the support leg up until the holes in the shelf and support leg are
vertically aligned.
4 - Before First Use
5 - Using Your Appliance
Page 9

9
3. Insert a screw through the hole from the front.
4. Secure the screw by screwing a wingnut onto it.
5. Mount the three other support legs in exactly the same way.
6. Place the support frame on the four support legs from above so that the
support legs run into the guide bars and the holes in the support legs and the
guide bars are vertically aligned
7. Insert a screw through the hole from the front.
8. Secure the screw by screwing a wingnut onto it.
9. Follow exactly the same steps for the three other corners.
10. Place the BBQ Grill on the support frame.
11. Make sure that the BBQ Grill locks into the support frame.
12. The frame has now been mounted and you can now use the BBQ Grill on a
stand.
Note: You can also use this BBQ Grill on a stand. A frame including a shelf (e.g. for
utensils) is included in the product contents.
Preparing And Using Your Barbecue:
Note: Slide the thermostat control to the “MIN” setting before you plug into a
suitable mains socket.
1. Place the BBQ Grill on a level, stable, fireproof base in a suitable location.
2. Connect the BBQ Grill to a suitable mains socket.
3. Slide the thermostat control to the “MAX” setting. The BBQ Grill will now
automatically heat up.
4. As soon as the selected temperature setting is reached, the red indicator light
will go out. The heating process will automatically end.
5. As soon as the selected temperature setting has reduced, the red indicator
light will illuminate and the heating process will then resume until the BBQ
Grill returns to the selected temperature. For best results, let the BBQ Grill heat
up for 10 to 15 minutes.
6. Place the food you would like barbecue on the grill plate.
7. To reduce the barbecuing temperature, slide the thermostat control to the left,
e.g. when barbecuing delicate foods such as fish or mushrooms.
8. Slide the thermostat control to the “MIN” setting to stop barbecuing.
9. Take the food off of the grill plate.
10. To switch the BBQ Grill off, first pull the mains plug out of the socket.
11. Always let the BBQ Grill cool off completely.
Note: Do not use any fuels such as charcoal in the BBQ Grill.
Note: Heat the BBQ Grill up for approx. 10 – 15 minutes before placing food on
the grill plate. This will help you achieve best cooking results.
Page 10

10
Barbecuing Tips:
You can prepare your barbecue meals without using additional fat or fuels like
wood or charcoal with the BBQ Grill. Please observe the following notes:
• Cook sensitive food (e.g. fish or mushrooms) on low heat.
• To keep barbecued food warm, turn the thermostat control to low heat.
• For juicy meat, do not poke holes in the meat with a fork; otherwise it will dry
out.
• Ideally, you should use barbecue tongs to turn your food.
• From time to time, turn your food for best results.
• Season the food while it is being prepared.
• Please ensure all foods are cooked thoroughly and are piping hot throughout
before consuming them.
6 - Troubleshooting
Problem Possible cause Solution
The BBQ Grill does
not heat up.
The BBQ Grill is not connected to
the power supply.
Insert the mains plug in a
socket with earthing contact.
The BBQ Grill
switches off on its
own.
The selected temperature setting
has been reached. The thermostat
will automatically switch off.
The thermostat will
automatically switch back on
once the selected temperature
setting is under-run.
Slide the thermostat control to
a higher temperature setting.
Page 11

11
7 - Recycling
DISPOSAL OF THE UNIT
Appliances bearing the symbol shown here may not be disposed of in domestic
rubbish. You are required to dispose of old electrical and electronic appliances like
this separately.
Please visit www.recycle-more.co.uk or www.recyclenow.co.uk for access to
information about the recycling of electrical items.
Please visit www.weeeireland.ie for access to information about the recycling of
electrical items purchased in Ireland.
The WEEE directive, introduced in August 2006, states that all electrical items must
be recycled, rather than taken to landfill.
Please arrange to take this appliance to your local Civic Amenity site
for recycling, once it has reached the end of its life.
Page 12

12
• Let the BBQ Grill cool off completely.
• Take the grill plate out of the grill tray, then wipe off the outside of the grill tray
with a damp cloth and suitable detergent.
• Wipe the heating coil off with a dry cloth.
• Empty the fat drip tray.
• Clean the grill plate, the fat drip tray and the windscreen with water and
detergent.
• Then let all parts dry completely.
WARNING! RISK OF ELECTRIC SHOCK.
Contact with electrical contacts could result in an electric shock.
• Pull the mains plug out of the socket contact before cleaning.
WARNING! RISK OF SHORT CIRCUIT!
• Water that has penetrated the housing may cause a short circuit.
• Make sure that no liquids penetrate the housing.
• Never submerge the BBQ Grill in water or other liquids.
WARNING! RISK OF DAMAGE.
• If you clean the BBQ Grill, grill tray, fat drip tray, wind- screen and other parts
improperly, you could damage the BBQ Grill and its accessories.
• Do not attempt to clean the BBQ Grill in a dish- washer.
• Never attempt to clean the BBQ Grill by immersing it in liquids and do not use
a steam cleaner to clean it.
• Do not use any aggressive cleaners such as alkaline, chlorine-based cleaners
and sharp or metallic cleaning utensils such as knives, hard scrapers or similar.
• Pull the mains plug out of the socket before cleaning.
•
STORAGE
• Store the BBQ Grill in an assembled state to protect the heating coil from
damage.
• Always store the BBQ Grill in a dry location.
8 - Cleaning & Care
Page 13

13
WARNING:
This appliance MUST be earthed
9 - Wiring Safety for UK Use Only
IMPORTANT
As the colours in the
mains lead of this
appliance may not
correspond with the
coloured markings
identifying the
terminals in your plug,
please proceed as
follows:
The wires in the mains lead are coloured
in accordance with the following code:
Blue neutral [N] Brown live
[L] Green/Yellow [EARTH]
Plug Fitting Details (Where Applicable).
The wire coloured blue is the neutral
and must be connected to the terminal
marked [N] or coloured black.
The wire coloured brown is the live wire
and must be connected to the terminal
marked [L] or coloured red.
The wire coloured green/yellow must be
connected to the terminal marked with
the letter [E] or marked
.
On no account must either the brown
or the blue wire be connected to the
[EARTH] terminal
.
Always ensure that the cord grip is
fastened correctly.
The plug must be fitted with a fuse
of the same rating already fitted and
conforming to BS 1362 and be ASTA
approved.
If in doubt consult a qualified electrician
who will be pleased to do this for you.
Non-Rewireable Mains Plug
If your appliance is supplied with a nonrewireable plug fitted to the mains lead
and should the fuse need replacing,
you must use an ASTA approved one
(conforming to BS 1362 of the same
rating).
If in doubt, consult a qualified
electrician who will be pleased to do
this for you.
If you need to remove the plug disconnect it from the mains - then cut
it off of the mains lead and immediately
dispose of it in a safe manner. Never
attempt to reuse the plug or insert it
into a socket outlet as there is a danger
of an electric shock.
FUSE
Page 14

14
This product is guaranteed for 12 months
from the date of original purchase.
If any defect arises due to faulty materials
of workmanship, the faulty products must
be returned to the place of purchase.
Refund or replacement is at the discretion
of the retailer.
The Following Conditions Apply:
• The product must be returned to the
retailer with proof of purchase or a
receipt.
• The product must be installed and
used in accordance with the
instructions contained in this
instruction guide.
• It must be used only for domestic
purposes.
• It does not cover wear and tear,
damage, misuse or consumable parts.
• Tower has limited liability for incidental
or consequential loss or damage.
This guarantee is valid in the UK and Eire
only.
The standard one year guarantee is only
extended to the maximum available for
each particular product upon registration
of the product within 28 days of purchase.
If you do not register the product with us
within the 28 day period, your product is
guaranteed for 1 year only.
To validate your extended warranty, please
visit www.towerhousewares.co.uk and
register with us online. Alternatively, call
our customer registration line on
+44 (0) 333 220 6066.
Please note that length of extended
warranty offered is dependent on product
type and that each qualifying product
needs to be registered individually in order
to extend its warranty past the standard
1 year.
Extended warranty is only valid with proof
of purchase or receipt.
As a thank you for purchasing
one of our fantastic products,
we are offering you an extra
2 years peace of mind in
addition to your 1 year
guarantee.
To receive your extra 2 year
guarantee, register your
appliance online within 28
days of purchase by visiting
www.towerhousewares.co.uk
10 - Warranty
Page 15

15
Ax your store receipt to this page for safe keeping.
11 - Your Receipt
Page 16

16
NOTES
Page 17

17
NOTES
Page 18

thank you!
We hope you enjoy your appliance for many years. As a thank you for
purchasing one of our fantastic products, we are offering you an extra
2 years peace of mind.
*To receive your extra 2 years guarantee, register your appliance online
within 28 days of purchase by visiting:
www.towerhousewares.co.uk
Should you have a problem with your appliance, or need any spare parts,
please call our Customer Support Team:
+44 (0) 333 220 6066
0218.V2
Your warranty becomes void should you
decide to use non Tower spare parts.
Spare parts can be purchased from
www.towerhousewares.co.uk
 Loading...