

Page 1

Page 2

Our m odel ki ts are su bject t o const ant qua lity ch ecks th rough out the p roduc tion pr ocess , and we si ncere ly
hop e that yo u are com plete ly sati sfied w ith the c onten ts of you r kit. Ho wever, w e would a sk you to c heck al l
the p arts be fore yo u start c onstr uctio n, refe rring t o the Par ts List , as we can not exc hange c ompon ents wh ich
you h ave alr eady mo difie d. If you f ind any p art is no t accep table f or any re ason, w e will re adily c orrec t or
exc hange i t once we h ave exa mined t he faul ty comp onent . Just se nd the of fendi ng part t o our Mod el
Dep artme nt. Ple ase be su re to inc lude th e enclo sed com plain t fo
rm, d uly com plete d. We are c onsta ntly
wor king on i mprov ing our m odels , and for t his rea son we mu st rese rve the r ight to c hange t he kit co ntent s
in te rms of sh ape or di mensi ons of pa rts, te chnol ogy, mat erial s and fit tings , witho ut prio r notif icati on.
Ple ase und ersta nd that w e canno t enter tain cl aims ag ainst u s if the ki t conte nts do no t agree i n every
res pect wi th the in struc tions a nd the il lustr ation s.
Rad io-co ntrol led mod els, an d espec ially m odel ai rcraf t, are by n o means p layth ings in t he usua l sens e of th e
ter m. Buil ding an d opera ting th em safe ly requ ires a ce rtain l
eve l of tech nical c ompet ence an d manua l skill ,
tog ether w ith dis cipli ne and a re spons ible at titud e at the fl ying fi eld. Er rors an d carel essne ss in bui ldin g and
fly ing the m odel ca n resul t in seri ous per sonal i njury a nd dama ge to pro perty. S ince we , as manu factu rers,
hav e no cont rol ove r the con struc tion, m ainte nance a nd oper ation o f our pro ducts , we are ob liged t o take
thi s oppor tunit y to poin t out the se haza rds and t o empha sise yo ur pers onal re spons ibili ty.
Spe cificati ons
Ste ps of ass embly
Cho ose a flyin g field
Cen ter of gr avity
Saf ety
1.F usela ge 1pc
2.W ing 1pc
3.E levat or 1pc
4.R udder 1pc
5.E quipmen t canop y 1pc
6.R ight wi ng fence 1p c
7.L eft win g fence 1 pc
8.S pinner 1p c
9.F usela ge foam b lock 1p c
10. Left pa rt of lan ding gear 1 pc
11.R ig ht p ar t of l an di ng g ea r 1p c
12. Pull- pull fish ing line 1p c
13. Vector s ystem 1 pc
14. Motor m ount 1p c
15. Aileron s ervo cont rol horn 1p c
16. GWS HD 80 40 1pc
17. Screw ( ST1.4 *6 ) 14pc s
18. Adjus tor 2pc s
19. O ring 2p cs
20. Spinner c onnec ting part 1 pc
21. Aileron p ush rod 2pc s
22. Wing br acings #1 2 pc s
23. Eleva tor push ro d 1pc
24. Washe rs 2 pc s
25. Vector s yst
em pu sh rod 2p cs
26. Eleva tor braci ngs 2pc s
27. Wing br acings #2 2 pc s
1. Ma tched w ith vecto r rotat in g sy st em o n ru dd er w hi ch i nc re as es t he f le xi bi li ty o n ru dd er c on trol.
2. Go od wind-r esistan ce and stab ility, e as y fo r co nt ro l.
3. EP O foam co nstru ction tha t is beau fiful , crash -resistan t and eas y for mai ntena nce makes v ery
rob ust air frame.
4. A thou ghtfu l equipme nt cabin de sign, all e lectr onic equi pments ca n be i ns ta ll ed a nd s af el y
sec ured insi de.
5. Si mple desi gn, 85% p re-asse mbled and s uper conv enient as sembl y process k eeps yo u far
awa y from th e co
mpl icate d traditi onal as sembly proc ess of in door 3D pla ne and long t ime
wai ting.
6. Pr ofess ional air frame con figurat ion and s pecial ai rfoil d esign mak es it a great l ightw eight 3D
air plane for a w ide fli ght spe ed range.
7. No m atter y ou’re p rofessi onal 3D fly er or just st ar ti ng o ut i n 3D , we b el ie ve S ba ch 34 2 is a
goo d choice.
Battery
3S 400mAh
20C Li-Po
Mot or
AT22 06V2
KV 15 00
ESC
10A
Wit h BEC
8
NO GRAVI TY Spe cific at io n
33.1 in (840 m m)
37.8 in (960 m m)
0.6 1 lb-0. 65 lb (27 5g-295g )
Alway s be car ef ul of pr opeller w he n plugging in t he lipo bat te r y an d
the lip o batter y is i ns ta ll ed !!!!
NO GRAVITY
NO G RAV I TY
Page 3

Steps of ASSEMBLY
1.In st al l le ft and ri gh t la nding g ea r in to c orres po nd ing slo ts o n fu se lage, t he n fi x
with g lu e.
2.In se rt w in g into co rr es pondi ng s lo ts o n fusel ag e, t hen use g lu e to f ix . Make
sure t he w in g wi thout i ns ta lled co nt ro l ho rn pass t hr ou gh fuse la ge f ir st, and
ensu re t he w in g is perp en di cular t o fu se la ge. A=B.
3.In st al l ai leron s er vo c ontro l ho rn i nt o corre sp on ding sl ot o n ai le ron, th en
fix wi th g lu e.
4.In se rt s ta biliz er i nt o the slo t of r ea r fu selag e an d fi x wi th gl ue . Ma ke s ure
C=D.
NO GRAVITY
Page 4
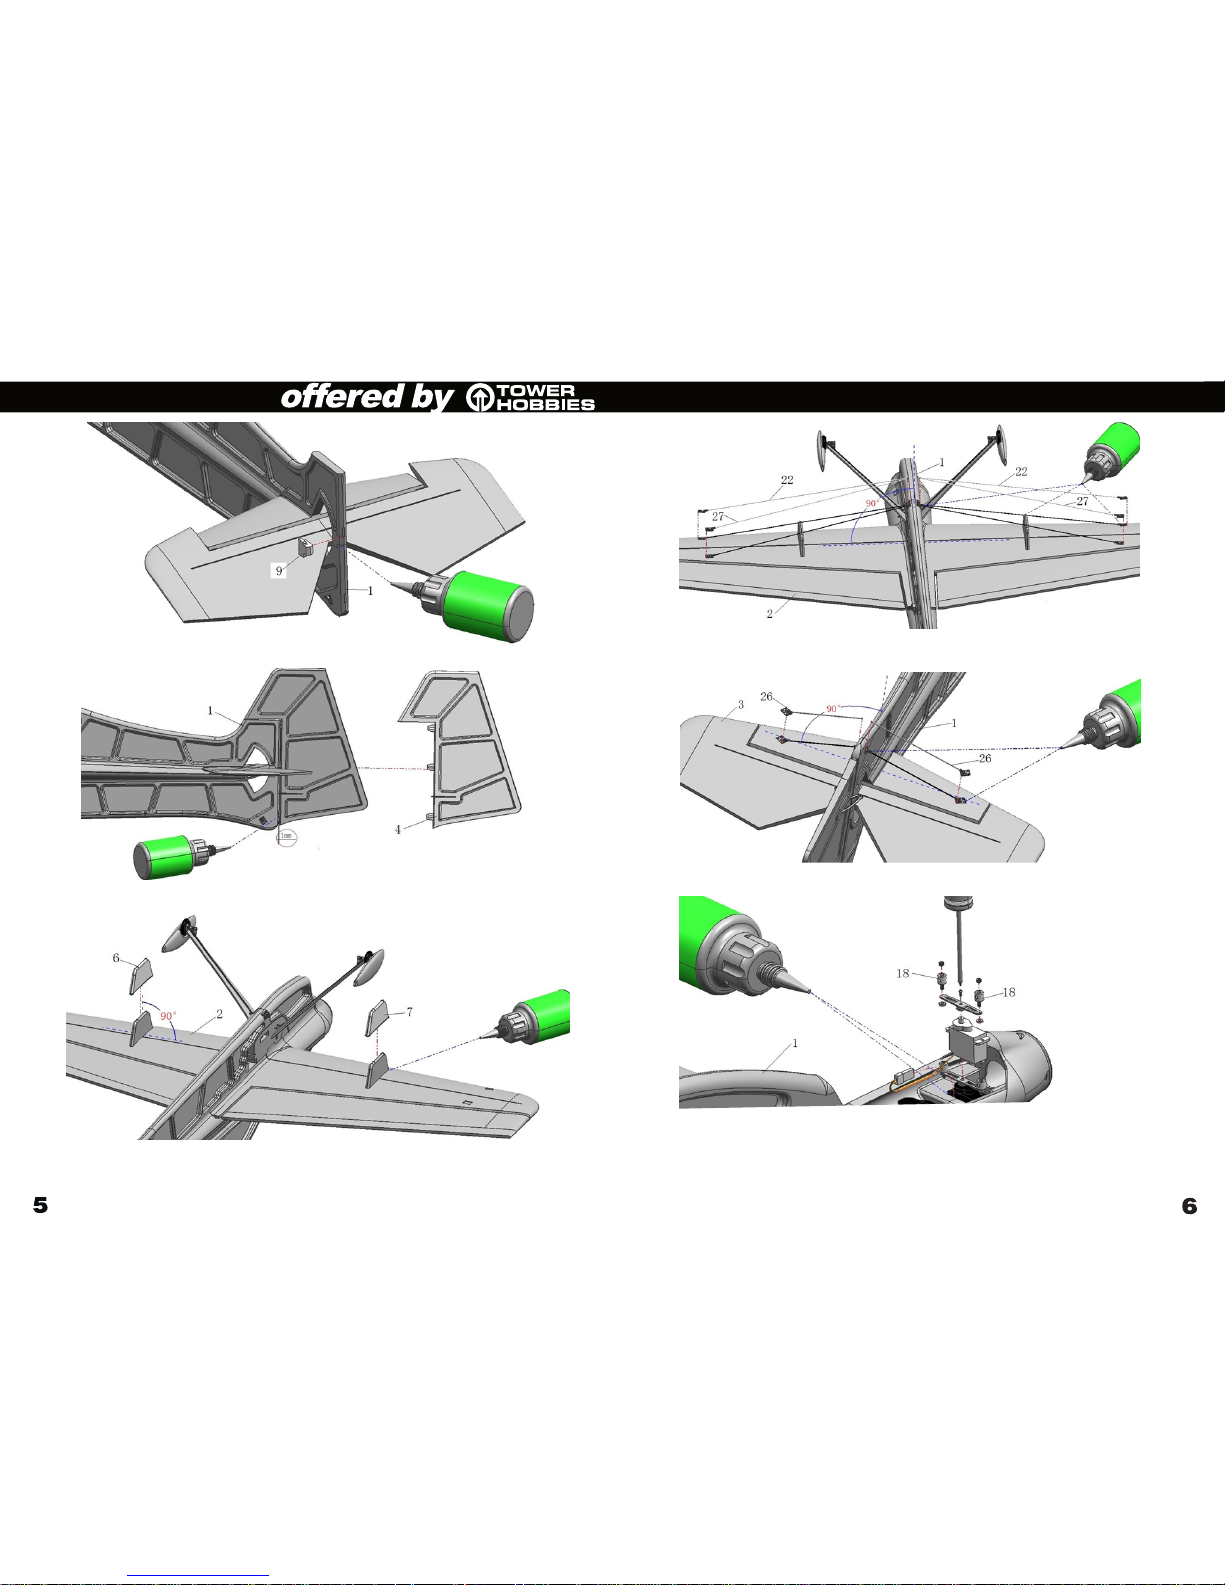
5.I nstal l fusel age foa m block i nto slo t that sh own in ab ove pic ture, t hen fix w ith glu e.
6.A ttach r udder o nto the r ear fus elage a ccord ing to th eir cor respo nding c uttin gs
and f ix with g lue. Ma ke sure t he rudd er is on th e same le vel as fu selag e.
7.I nsert l eft and r ight wi ng fenc es into s lots on w ing, ma ke sure t he y’ re p er pe nd ic ul ar
to wi ng, the n fix wit h gl ue .
8.I nstal l wing br acing r od 1 and 2 on c orres pondi ng places o n wi ng a nd f us el ag e,
aft er make s ure win g and fus elage i s perpe ndicu lar to ea ch othe r, fix the b racin gs
wit h glue.
9.I nstal l eleva tor bra cings a s pictu re show n. Make s ure fus elage a nd elev ator is
per pendi cular t o each ot her, the n fix the b racin gs with g lue.
9.1 .Plac e adjus tors in to hole s on serv o arm, an d fix the m with nu ts both u pside
and d ownsi de. Bef or a dd in g gl ue o n jo in ts b et we en s er vo a rm a nd n ut s,
mak e su re a dj us to rs a re i n fu nc ti on .
9.2 .Pass t he serv o wires t hroug h the ser vo hous e as pict ure sho wn.
9.3 .Fix th e assem bled se rvo arm o nto ser vo with s crew.
9.4 .Put th is serv o which w ill be us ed for ve ctor sy stem in to the se rv o ho us e, t he n
fix w it h gl ue .
NO GRAVITY
Page 5

10. 1.Pas s ailer on serv o wires t hroug h corre spond ing ser vo hous e.
10. 2.Fix s ervo ar m on serv o with sc rew.
10. 3.Pla ce aile ron ser vo into c orrep sondi ng serv o house , then fi x with gl ue.
11.1 .P as s el ev at or s er vo w ir es t hr ough corr espondi ng s er vo h ou se .
11.2 .F ix s er vo a rm o n se rv o wi th s cr ew.
11.3 .P la ce e le va to r se rv o in to c or repsondin g servo h ouse, t he n fi x wi th g lu e.
12. 1.Pas s rudde r servo w ires th rough c orres pondi ng serv o house .
12. 2.Fix s ervo ar m on serv o with sc rew.
12. 3.Pla ce rudd er serv o into co rreps ondin g servo h ouse, t hen fix w ith glu e.
13. Insta ll the ai leron p ushro d, one en d conne cted to a ilero n contr ol horn , anoth er
end c onnec ted to se rvo arm . You ca n ad ju st t he l en gt h of p us hr od w it h clips on
the t wo e nd s.
NO GRAVITY
Page 6

14. 1.Rem ove one c lip fro m the ele vator p ushro d, then p ass the p ushro d throu gh the
pus hr od g ui di ng t ub e.
14. 2.Put o n the rem oved cl ip on pus hrod.
14. 3.Ins tall th e eleva tor pus hrod, o ne end co nnect ed to con trol ho rn, ano ther en d
con ne ct ed t o se rv o ar m. You c an a dj us t th e le ng th o f pu sh ro d wi th c lips on the
two e nd s.
15. 1.Thr ead the p ull-p ull fis hing li ne thro ugh the r udder s ervo ho le, the n fix it wi th glue .
15. 2.Adj ust the p ull-p ull lin e to a prop er leng th, and p ass ano ther en d of fish ing lin e
thr ou gh t he s er vo a rm , th en f ix i t wi th s cr ew a nd w as he r as p ic ture show n.
16. Ve ctor sy stem in stall ation
16. 1 . In st al l th e mo to r on v ec tor syste m, then f ix i t wi th s cr ew s.
16. 2.Con nect th e vecto r styst em p us hr od w it h Z be nd t o th e co rr es po nd in g
hol es.
16. 3.Ins tall ve ctor sy stem on m ot or m ou nt w it h sc re ws . And p as s th e
pus hr od w ir e th ro ug h th e ho le o n ad ju st or, t he n ad ju st t he w ir e length
wit h sc re w on a dj us to r.
NO GRAVITY
Page 7

11
12
17. I f you don ’t need t he vect or syst em , pl ea se r ea d fo ll ow in g in st al la ti on s te ps .
17. 1. Skip s tep 9 on ho w to inst all vec tor sys tem ser vo .
17. 2 . Pa ss E SC t hr ou gh t he m id dle part of m otor mo unt.
17. 3 . In st al l mo to r on m ot or m ount with s crews .
17. 4.Fix m otor mo unt on fi xing mo unt of fu se la ge w it h sc re ws .
18. I nstal l 8040 pr opell er on mot or with O r ings.
19. 1 . In se rt s pi nn er c on ne cting par t into mi ddle ho le of pro pelle r. (no need
to dr op g lu e)
19. 2 . An ot he r en d co nn ec t to s pinner, th en fix wi th glue .
20. P lace re ceive r and bat tery in to equi pment c abin, t hen fix w ith vel cro.
21. Cover t he equi pment c anopy.
NO GRAVITY
Page 8

1413
Choose a Flying Field
In or der to ha ve the mo st succ ess and t o prote ct your p ro pe rt y an d ai rc ra ft , it i s ve ry
imp ortan t to sele ct a plac e to fly tha t is very o pe n. C on su lt l oc al l aw s an d or di na nc es b ef or e
cho osing a l ocati on to fly yo ur airc raft.
The s ite sho uld:
• Hav e a minim um of 200 m of clea r space i n all dir ectio ns.
• Sta y clear o f pedes trian s.
• Sta y free of t rees, b ui ld in gs , ca rs , po we r li ne s or a ny th in g th at c ou ld e ntangle you r aircr aft or
int erfer e with yo ur line o f sight .
Pla n on flyin g in an are a that gi ves you m ore spa ce than y ou thin k you nee d, espe ciall y with fir st
flig hts.
The c enter o f gravi ty (CG) s ho ul d be a t a po si ti on o f 60 mm -7 0m m aw ay f ro m le ad in g ed ge ,
ple ase ref er to abo ve pict ure.
Saf ety is th e First C om ma nd me nt w he n fl yi ng a ny m od el a ir cr af t.
Thi rd part y insur ance sh ould be c onsid ered a ba sic ess entia l. If you j oin a mod el club s uitab le
cov er will u suall y be avai lable thr ou gh t he o rg an is at io n. I t is y ou r pe rs on al r es po ns ibility t o
ens ure tha t your in suran ce is ade quate . Make it y our job t o keep yo ur mode ls and yo ur radi o
con trol sy stem in p erfec t order a t all tim es. Che ck the co rr ec t ch ar gi ng p ro ce du re f or t he
bat terie s you are u sing. M ake use o f all sen sible s afety s ystem s and pre cauti ons whi ch are
adv ised fo r your sy stem. An e xcell ent sou rce of pr actic al acce ssori es is our m ain cat alogu e,
as ou r produ cts are d esign ed and ma nufac tured e xclus ively b y pract ising m odell ers for o ther
pra ctisi ng mode llers .
Alw ays fly w ith a res ponsi ble att itude . You ma y th in k th at f ly in g lo w ov er o th er p eople’s h ea ds
is pr oof of yo ur pilo ting sk ill; ot hers kn ow bett er. The re al e xp er t do es n ot n ee d to p ro ve
him self in s uch chi ldish w ays. Le t other p ilots k now tha t this is w hat you t hink to o.
Alw ays fly i n such a wa y that yo u do not en dange r yours elf or ot hers. B ear in mi nd that e ven the
bes t RC syst em in the w orld is s ubjec t to outs ide int erfer ence. N o matte r ho w ma ny y ea rs o f
acc ident -free f lying y ou have u nder yo ur belt , you hav e no idea w hat wil l happen in t he n ex t mi nu te .
We ho pe y ou h av e ma ny h ou rs o f pl ea su re b ui lding and f lying y our new m odel.
Wing
Fuse la ge
Stab il iz er
Verti ca l fi n
Land in g ge ar s et
Equi pm en t ca nopy
NO GRAVITY
Page 9

15
16
Spin ne r
Vecto r sy st em
Moto r mo un t
Push ro d se t
Brac in gs
O ring
Othe r ac ce ss ory pac k
NO GRAVITY
Page 10

Moto r:22 06 K v1 500
Serv o: 8 g mi cr o servo
ESC :1 0A mp
Bat tery3 S 400mA h 20C Li- Po
17
18
NO GRAVITY
Page 11

NO GRAVITY
Page 12

NO GRAVITY
 Loading...