

Page 1
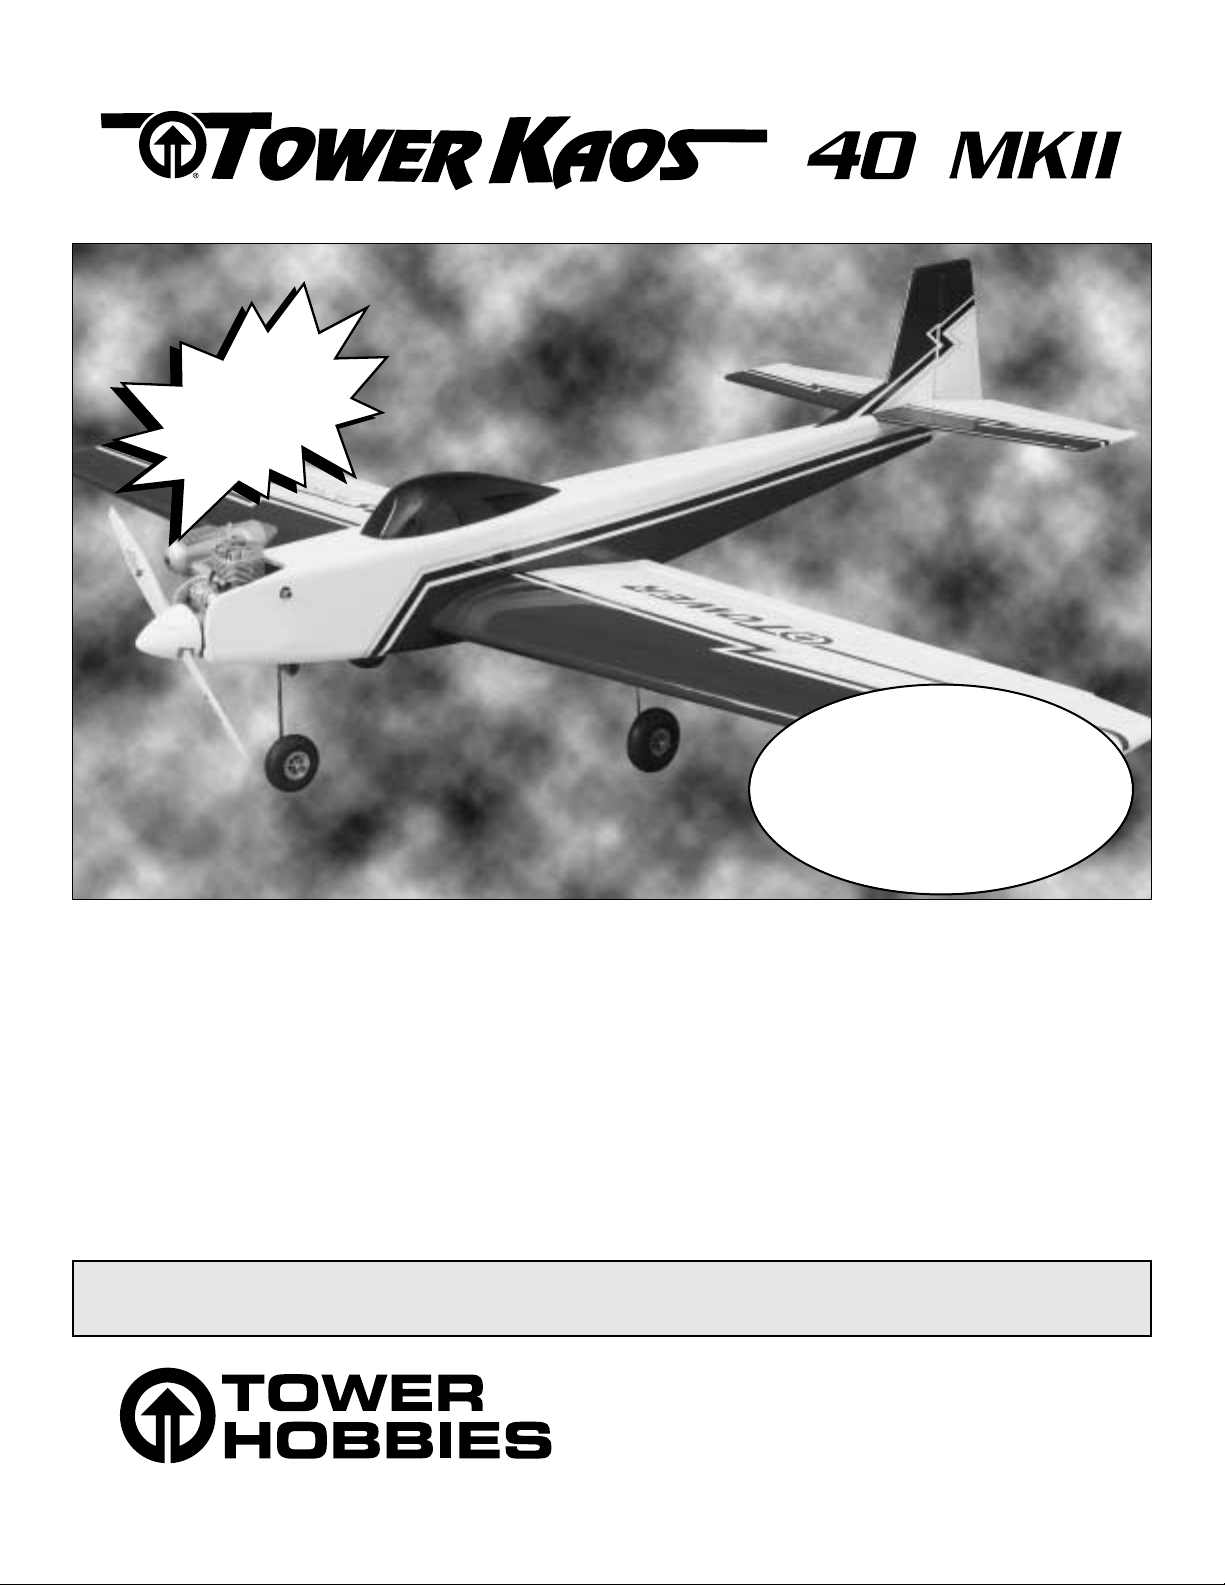
ARF
Wingspan: 55.5 in [1,415mm]
Wing Area: 585 sq in [38dm2]
Weight: 5 - 6 lbs [2,270 - 2,720g]
Length: 48.5 in [1,232mm]
Wing Loading: 19.5 - 24 oz/sq ft [59 - 73g/dm
Engine: .40 - .46 cu in [6.5 - 7.5cc] two-stroke
.48 - .70 cu in [8.0 - 11.5cc] four-stroke
Radio: 4-channel, four servos
WARRANTY
Tower Hobbies®guarantees this kit to be free from defects in both material and workmanship at the date of purchase. This
warranty does not cover any component parts damaged by use or modification. In no case shall Tower Hobbies’ liability
exceed the original cost of the purchased kit. Further, Tower Hobbies reserves the right to change or modify this warranty
without notice.
2
]
In that Tower Hobbies has no control over the final assembly or material used for final assembly, no liability shall be assumed
nor accepted for any damage resulting from the use by the user of the final user-assembled product. By the act of using the
user-assembled product, the user accepts all resulting liability.
If the buyer is not prepared to accept the liability associated with the use of this product, the buyer is advised to return this
kit immediately in new and unused condition to the place of purchase.
READ THROUGH THIS MANUAL COMPLETELY BEFORE STARTING CONSTRUCTION. IT CONTAINS IMPORTANT
INSTRUCTIONS AND WARNINGS CONCERNING THE ASSEMBLY AND USE OF THIS MODEL.
®
Tower Hobbies
P.O. Box 9078
®
Champaign, IL 61826
(800) 637-6050
www.towerhobbies.com
© Copyright 2003 V 1.0 TOWZ1150 for TOWA2052
Page 2
TABLE OF CONTENTS
INTRODUCTION .............................................................2
SAFETY PRECAUTIONS ....................................................2
ADDITIONAL ITEMS REQUIRED .....................................3
Hardware & Accessories..............................................3
Optional Supplies & Tools ...........................................3
IMPORTANT BUILDING NOTES ......................................3
KIT INSPECTION ..............................................................3
ORDERING REPLACEMENT PARTS...................................3
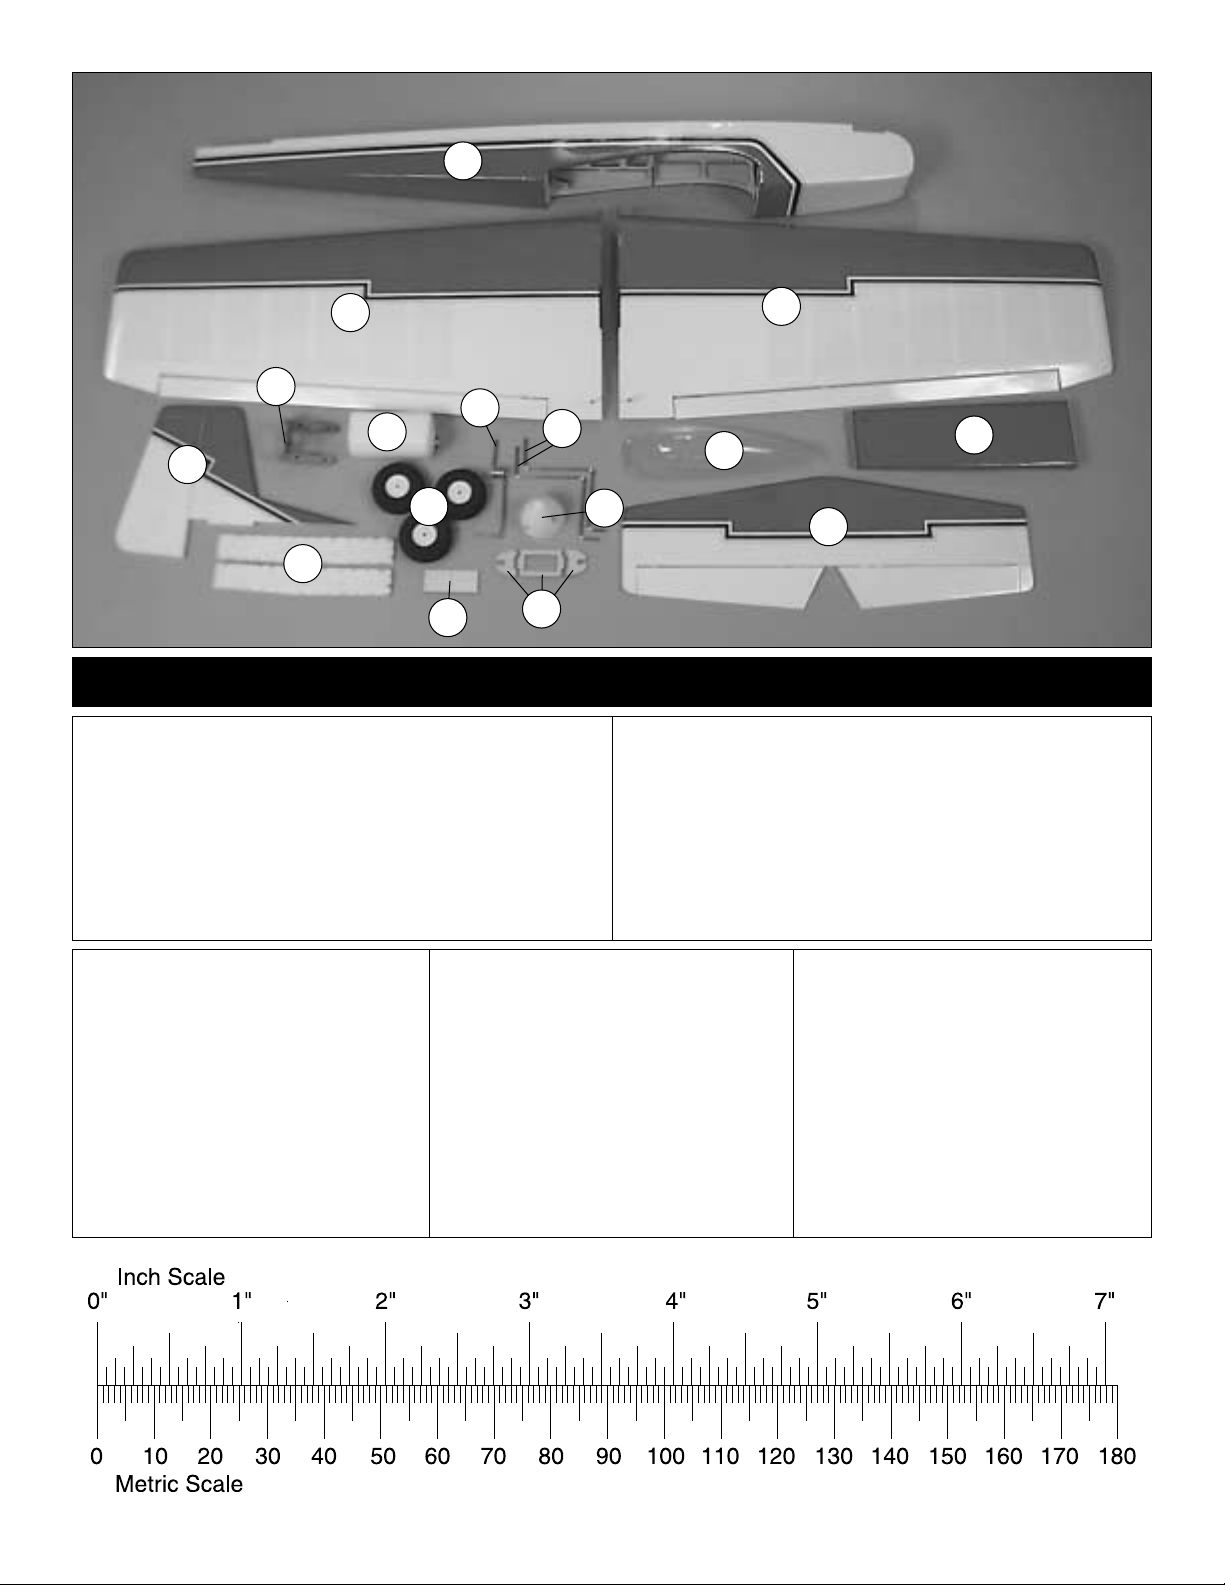
PARTS LIST .......................................................................4
INCH/METRIC RULER ......................................................4
PREPARATIONS ................................................................5
BUILD THE WING ............................................................5
Install the Ailerons.......................................................5
Join the Wings.............................................................6
Install the Main Landing Gear .....................................8
Install the Aileron Servo ..............................................9
ASSEMBLE THE FUSELAGE..............................................10
Mount the Stab & Fin ................................................10
Install the Nose Gear.................................................12
Install the Fuel Tank & Engine ...................................14
Install the Radio & Servos..........................................15
GET THE MODEL READY TO FLY ...................................19
Check the Control Directions ....................................19
Set the Control Throws ..............................................19
Balance the Model (C.G.)..........................................19
Balance the Model Laterally......................................20
PREFLIGHT .....................................................................20
Identify Your Model ...................................................20
Charge the Batteries ..................................................20
Balance the Propellers ...............................................21
Ground Check...........................................................21
Range Check .............................................................21
ENGINE SAFETY PRECAUTIONS ....................................21
AMA SAFETY CODE (excerpt) ........................................21
CHECK LIST ....................................................................22
FLYING ...........................................................................22
Takeoff.......................................................................23
Flight.........................................................................23
Landing .....................................................................23
PROTECT YOUR MODEL, YOURSELF &
OTHERS...FOLLOW THESE IMPORTANT
SAFETY PRECAUTIONS
1. Your Tower Kaos .40 ARF should not be considered a toy,
but rather a sophisticated, working model that functions very
much like a full-size airplane. Because of its performance
capabilities, the Kaos, if not assembled and operated
correctly, could possibly cause injury to you or spectators
and damage to property.
2. You must assemble the model according to the
instructions. Do not alter or modify the model, as doing so
may result in an unsafe or unflyable model. In a few cases the
instructions may differ slightly from the photos. In those
instances the written instructions should be considered as
correct.
3. You must take time to build straight, true and strong.
4. You must use an R/C radio system that is in first-class
condition, and a correctly sized engine and components (fuel
tank, wheels, etc.) throughout the building process.
5. You must correctly install all R/C and other components so
that the model operates correctly on the ground and in the
6. You must check the operation of the model before every
flight to insure that all equipment is operating and that the
model has remained structurally sound. Be sure to check
clevises or other connectors often and replace them if they
show any signs of wear or fatigue.
7. If you are not already an experienced R/C pilot, you should
fly the model only with the help of a competent, experienced
R/C pilot.
We, as the kit manufacturer, provide you with a top
quality, thoroughly tested kit and instructions, but
ultimately the quality and flyability of your finished model
depends on how you build it; therefore, we cannot in any
way guarantee the performance of your completed model,
and no representations are expressed or implied as to the
performance or safety of your completed model.
air.
INTRODUCTION
Congratulations and thank you for purchasing the Tower Kaos
.40 ARF. You’ve made the right choice getting this updated
version of a classic, all-time favorite of modelers around the
world. The Tower Kaos is a stable, forgiving airplane with the
capability of performing many popular aerobatics. We hope
you enjoy the airplane as much as we have enjoyed bringing
it to you!
Remember: Take your time and follow the instructions to
end up with a well-built model that is straight and true.
If you have not flown this type of model before, we
recommend that you get the assistance of an experienced
pilot in your R/C club for your first flights. If you’re not a
member of a club, your local hobby shop has information
about clubs in your area whose membership includes
experienced pilots.
In addition to joining an R/C club, we strongly recommend
you join the AMA (Academy of Model Aeronautics). AMA
2
Page 3
membership is required to fly at AMA sanctioned clubs.
There are over 2,500 AMA chartered clubs across the
Among other benefits, the AMA provides insurance to its
members who fly at sanctioned sites and events. Additionally,
training programs and instructors are available at AMA club
sites to help you get started the right way. Contact the AMA
at the address or toll-free phone number below:
Academy of Model Aeronautics
5151 East Memorial Drive
Muncie, IN 47302-9252
Tele. (800) 435-9262
Fax (765) 741-0057
Or via the Internet at:
http://www.modelaircraft.org
country.
❍
CG Machine™(GPMR2400)
❍
Robart Super Stand II (ROBQ1402)
IMPORTANT BUILDING NOTES
• When you see the term test fit in the instructions, it
means that you should first position the part on the assembly
without using any glue, then slightly modify or custom fit the
part as necessary for the best fit.
• Whenever the term glue is written you should rely
upon your experience to decide what type of glue to use.
When a specific type of adhesive works best for that step, the
instructions will make a recommendation.
• Whenever just epoxy is specified you may use either
30-minute (or 45-minute) epoxy or 6-minute epoxy. When
30-minute epoxy is specified it is highly recommended that
you use only 30-minute (or 45-minute) epoxy, because you
will need the working time and/or the additional strength.
ADDITIONAL ITEMS REQUIRED
In addition to common household tools and hobby tools, this
is the “short list” of the most important items required to
build the Tower Hobbies Kaos .40. Tower Hobbies Build-it
CA and Epoxy glue are recommended.
HARDWARE & ACCESSORIES
❍
Four-channel radio with four standard servos.
❍
The recommended engine size range for the Tower Kaos
.40 is .40 - .46 cu in [6.5 - 7.5cc] two-stroke or .48 - .70
cu in [8 - 11.5] four-stroke.
❍
6" [150mm] servo extension (HCAM2701 for Futaba®)
❍
1/4" [6mm] R/C foam rubber (HCAQ1000)
❍
3' [900mm] standard silicone fuel tubing (GPMQ4131)
❍
2 oz. Tower Hobbies Build-it Thin CA (TOWR3800)
❍
2 oz. Tower Hobbies Build-it Medium CA+ (TOWR3801)
❍
Tower Hobbies Build-it 30-minute epoxy (TOWR3811)
❍
Drill bits: 1/16" [1.6mm], 5/64 [2mm], 3/32" [2.5mm],
5/32" [4mm]
❍
T-pins (HCAR5100)
❍
#1 Hobby knife (TOWR1010)
❍
#11 blades (5-pack, TOWR1015)
OPTIONAL SUPPLIES & TOOLS
• Photos and sketches are placed before the step they
refer to. Frequently you can study photos in following steps
to get another view of the same parts.
KIT INSPECTION
™
Before starting to build, take an inventory of this kit to make
sure it is complete, and inspect the parts to make sure they
are of acceptable quality. If any parts are missing or are not
of acceptable quality, or if you need assistance with
assembly, contact Order Assistance. When reporting
or missing parts, use the part names exactly as they
in the “Ordering Replacement Parts” section on this
Order Assistance:
Telephone: (800) 637-6050
Fax: (217) 398-7721
E-mail: [email protected]
ORDERING REPLACEMENT PARTS
Replacement parts are available from Tower Hobbies for your
Tower Kaos .40 ARF. Our order assistance representatives are
ready to answer or place your order. Call us at (800)
637-6050.
defective
are written
page.
❍
Stick-on segmented lead weights (GPMQ4485)
❍
Top Flite®MonoKote®trim seal iron (TOPR2200)
❍
Top Flite MonoKote heat gun (TOPR2000)
❍
2 oz. Tower Hobbies spray CA activator (TOWR3804)
❍
Masking tape (TOPR8018)
❍
Threadlocker™thread-locking cement (GPMR6060)
❍
Denatured alcohol (for epoxy clean up)
❍
AccuThrow™Deflection Gauge (GPMR2405)
Replacement Parts
Wing Set - TOWA6010
Fuselage Set - TOWA6011
Tail Set - TOWA6012
Landing Gear Set - TOWA6013
Canopy - TOWA6014
3
Page 4
1
5
4
7
1 Fuselage
2 Left Wing Panel w/Aileron
3 Right Wing Panel W/Aileron
4 Fin/Rudder
5 Engine Mount
6 Fuel Tank
7 Wing Joiners (2 pcs.)
8 Wheels 2-1/2" (3)
2
3
12
6
8
13
11
14
16
15
9
10
PARTS LIST
9 Wing Bolt Block
10 Aileron Servo Tray (3 pcs.)
11 Spinner
12 Nose Landing Gear
13 Main landing Gear
14 Canopy
15 Stabilizer/Elevator
16 Belly Pan
Parts Not Photographed
(15) Hinge material disks
(6) Nylon clevises
(6) Silicone clevis keepers
(1) Nylon nose gear bearing
(3) Control horns
(3) Control horn plates
(4) Nylon landing gear straps
(2) Nylon aileron torque rod links
(4) Nylon pushrod keepers
(2) 4 x 40mm Phillips head machine
(4) 4 x 25mm Phillips head machine
(6) 4 x 15mm Phillips head machine
To convert inches to millimeters, multiply inches by 25.4 (25.4mm = 1")
screws
screws
screws
(10) 4mm Wheel collars
(4) 4mm Nuts
(2) Screw-lock connector
(2) Motor mount straps
(6) 2 x 15mm Phillips head machine
(12) 2 x 10mm Servo mounting screws with
washer head
(8) 4mm Lock washer
(8) 4mm Flat washer
(2) Nuts for screw-lock connector
(2) 4mm Flat washer (large)
(1) 3 x 10mm Phillips head machine
(12) 3 x 5mm Phillips head machine
screws
screws
screws
4
(6) 4mm Blind nuts (pre-installed in the
firewall and wing bolt mounting plate)
(3) 560mm Plastic pushrod tubes (pre-
installed in fuselage)
(2) 356mm Plastic pushrod tube
(3) 2 x 680mm Pushrod wire, threaded
one end
(1) 2 x 400mm Pushrod wire, threaded
one end
(1) 405mm Wire pushrod with Z-bend on
one end
(2) 2 x 155mm Pushrod, threaded one end
Page 5
PREPARATIONS
❍
1. If you have not done so already, remove the major parts
of the kit from the box and inspect for damage. If any parts are
damaged or missing, contact Order Assistance at the
telephone number listed in the “Kit Inspection” section on
page 3.
❍
2. Remove the tape and separate the ailerons from the
wing and the elevators from the stab. Use a covering iron with
a covering sock on high heat to tighten the covering if
necessary. Apply pressure over sheeted areas to thoroughly
bond the covering to the wood.
BUILD THE WING
INSTALL THE AILERONS
Do the right wing first so your work matches the photos the
first time through. You can do one wing at a time, or work
on them together.
❍ ❍
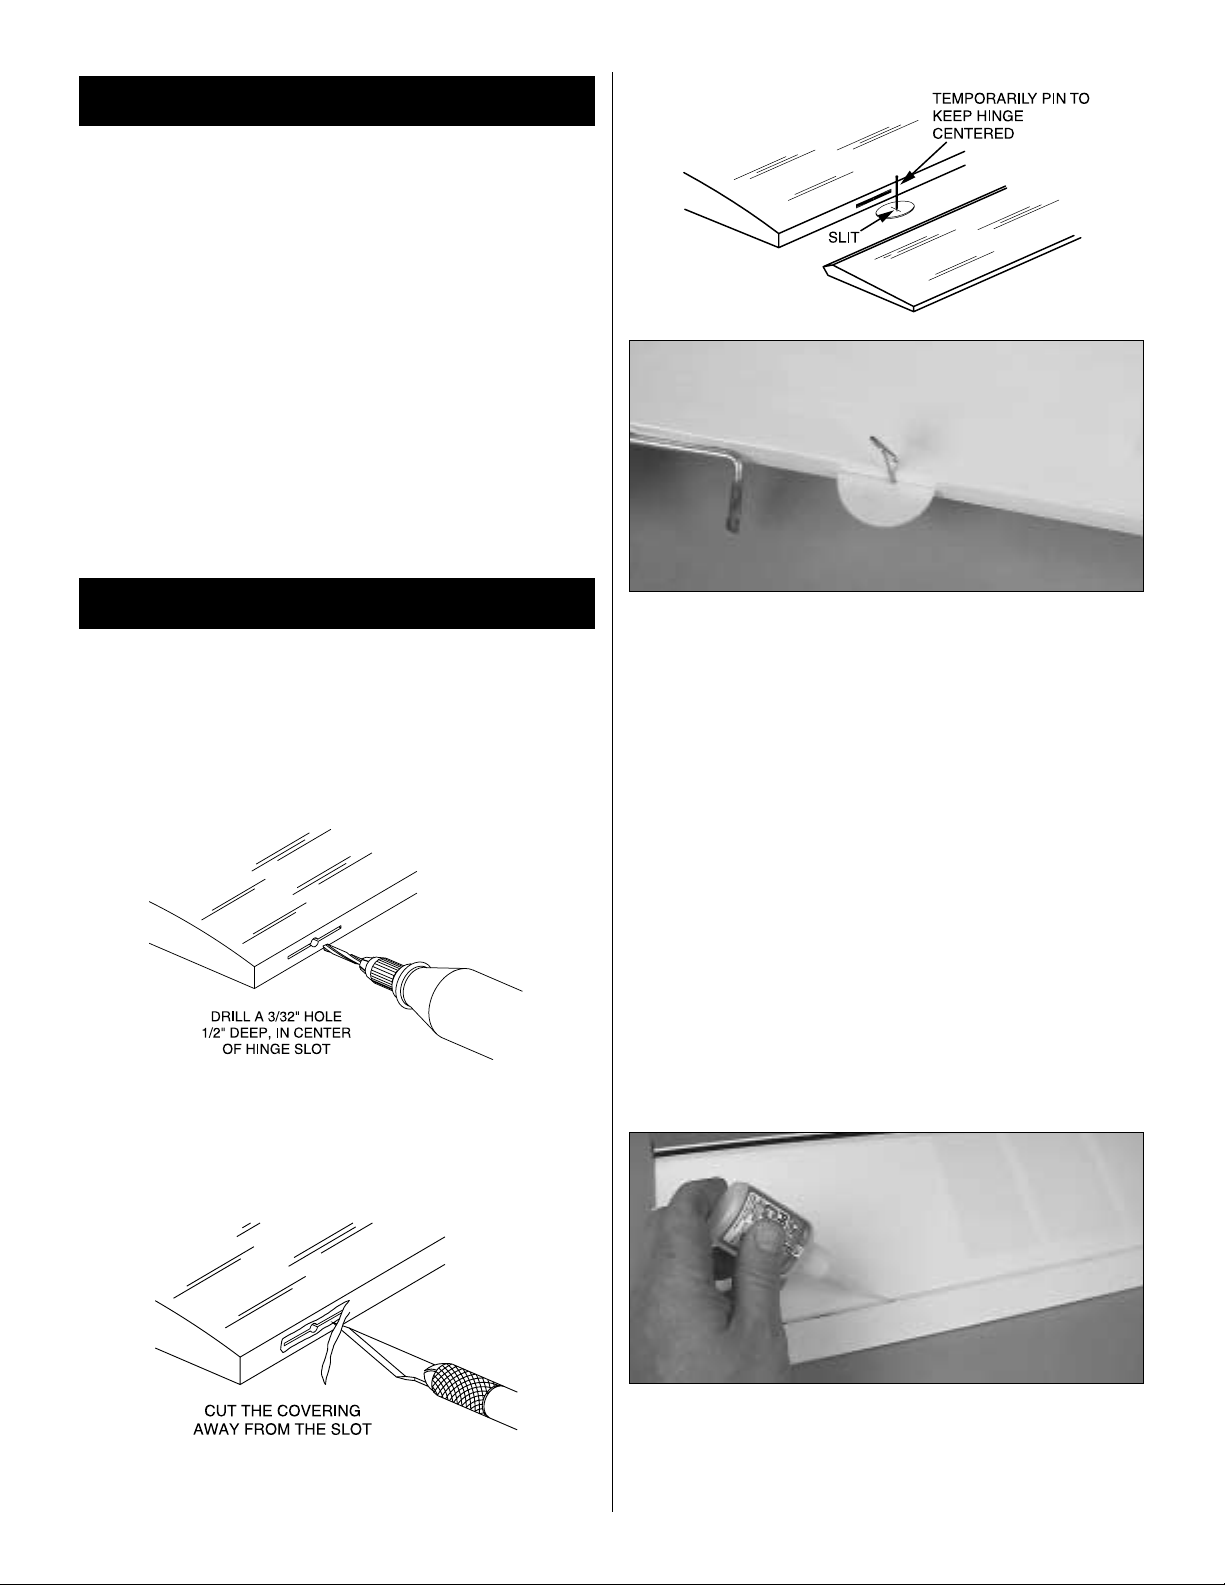
1. Drill a 3/32" [2.4mm] hole, 1/2" [13mm] deep in the
center of each hinge slot to allow the CA to “wick” in. Followup with a #11 blade to clean out the slots. Hint: If you have
one, use a high-speed rotary tool to drill the holes.
❍ ❍
3. Locate four of the circular hinge material disks. Look
closely at the disk and you will see a slit cut through the
center of the disk. This slit will aid in wicking the glue into the
hinge. It is important that the slit in the disk runs
to the control surface. Insert a pin through the middle of each
hinge disk, just off of the slit. Test fit the ailerons to the wing
with the hinges installed.
❍ ❍
4. Remove the aileron from the wing. Work some
6-minute epoxy into the hole for the aileron torque rod
located at the inboard end of the aileron. Working quickly,
install the aileron with the hinges in place back onto the
wing. Clean any excess epoxy away from the hole with
rubbing alcohol.
❍ ❍
5. Remove the pins you have inserted into the hinges.
Adjust the aileron so there is a small gap between the LE of
the aileron and the wing. The gap should be small, just
enough to see light through or to slip a piece of paper
through.
perpendicular
❍ ❍
2. Use a sharp #11 blade to cut a strip of covering from
the hinge slots.
❍ ❍
6. Apply six drops of thin CA to the top and bottom of
each hinge. Do not use CA accelerator. After the CA has fully
hardened test the hinges by pulling on the aileron.
❍
7. Repeat steps 1-6 for the left wing panel.
5
Page 6
JOIN THE WINGS
❍
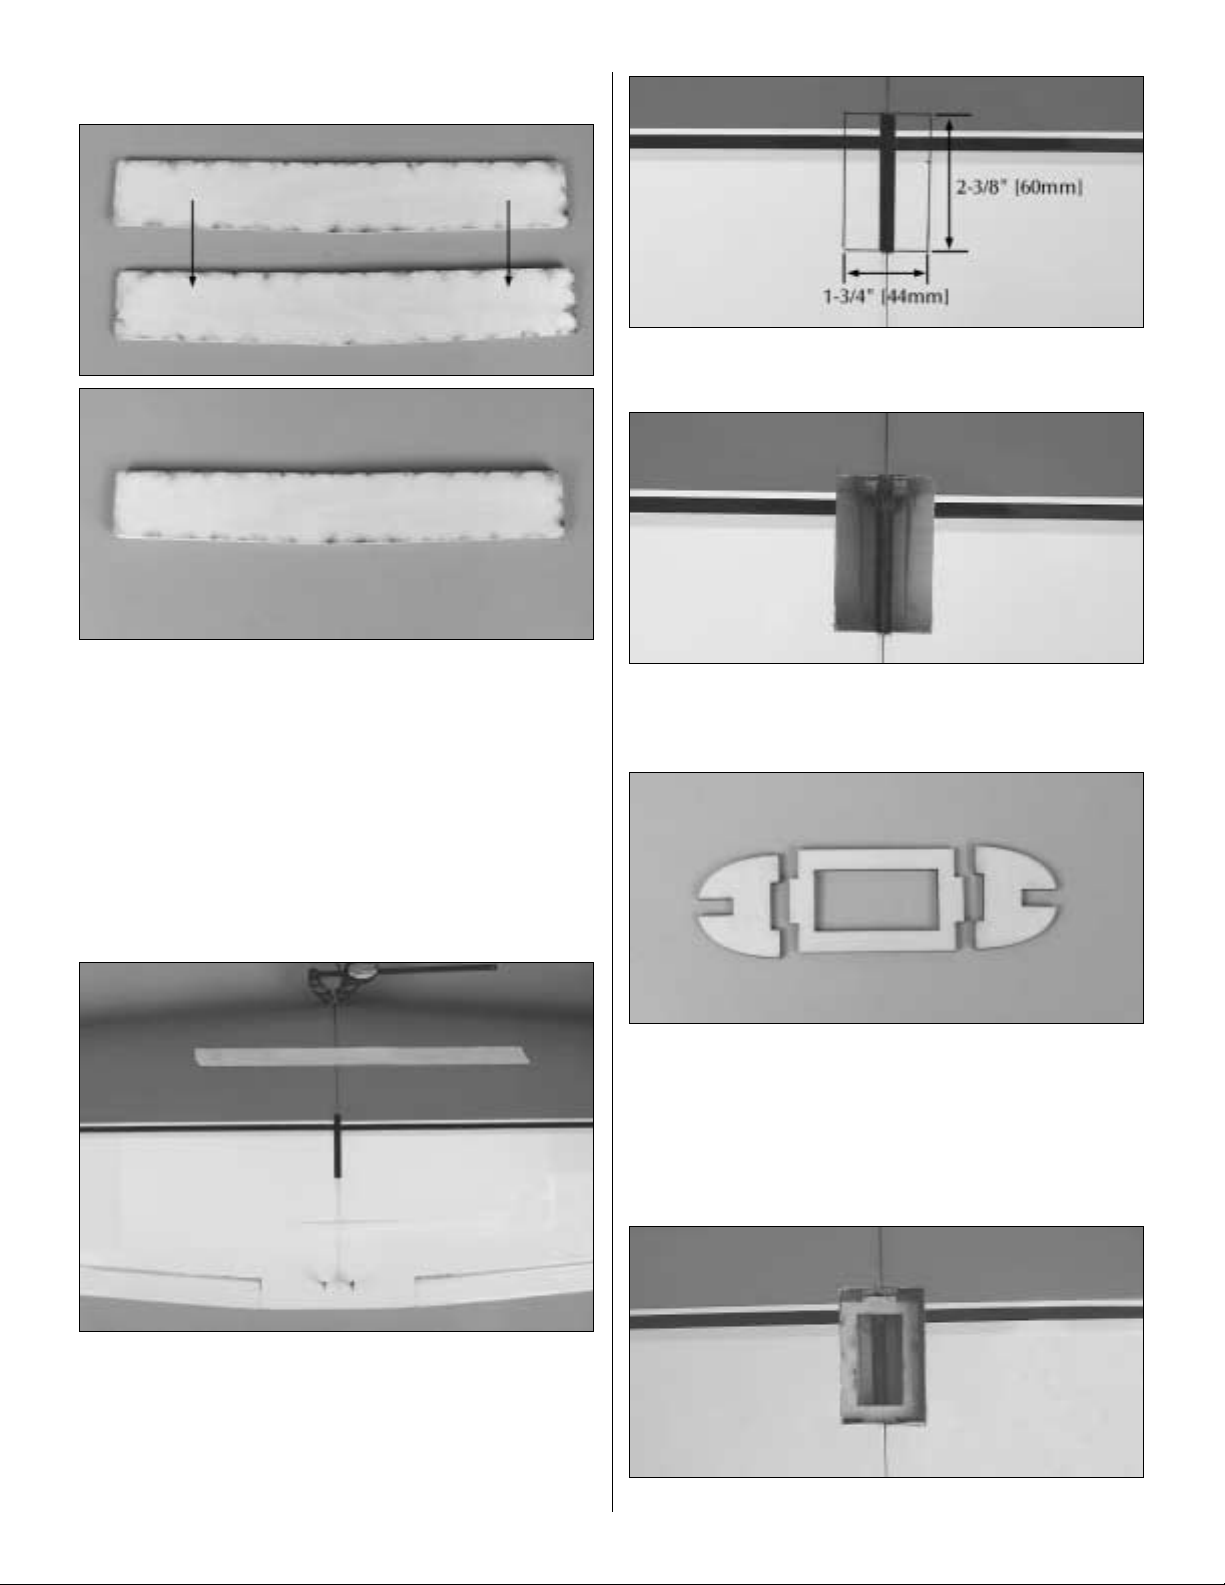
1. Locate the two plywood wing joiners. Using 6-minute
epoxy, glue the joiners together.
❍
2. Test fit the wing joiner into the wing joiner pocket in
each wing half. Sand the joiner as needed until it fits easily
into the pockets. There should be enough room in the pocket
to allow the glue to contact the entire joiner surface when
inserted into the pocket.
❍ 4. Using a felt-tip pen, mark a box 1-3/4" x 2-3/8" [44 x
❍
5. Cut through the sheeting on the lines you have drawn
with a hobby knife. Remove the sheeting.
60mm].
❍
3. Once you are satisfied with the fit, apply a liberal
amount of 30-minute epoxy into each wing joiner pocket, on
both sides of the wing joiner and the root ribs of both wing
halves. Clamp the leading edge of the wing and use masking
tape to hold the wing together until the epoxy has cured. Be
certain the leading and trailing edges of both wing halves
accurately align.
❍
6. Locate the die-cut plywood servo tray and servo tray
sides. Test fit the servo tray sides into the wing cavity. The
notch in the bottom of the servo tray sides will fit over the root
rib of the wings. Sand the notch as needed to get a good fit.
When you are satisfied with the fit, glue the servo tray and
sides together.
❍
7. Glue the servo tray into the wing with 6-minute epoxy.
6
Page 7
❍
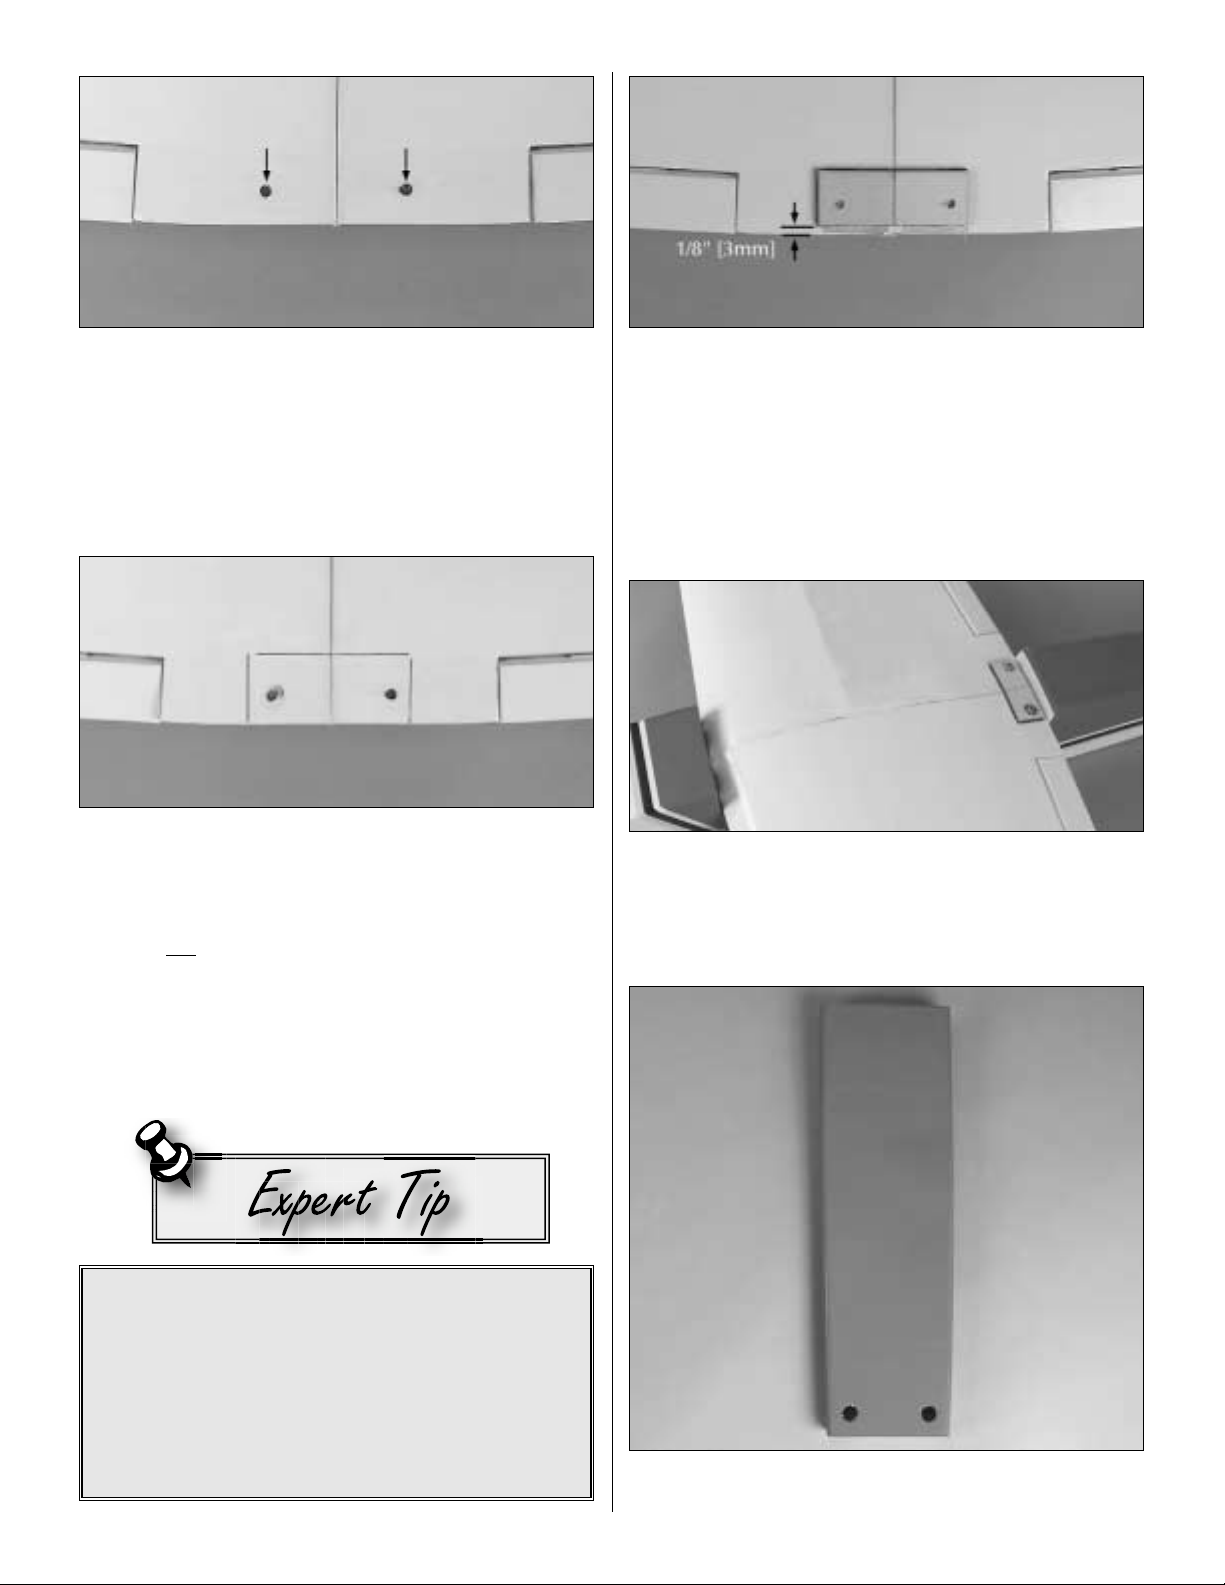
8. Locate the two holes under the covering at the trailing
edge of the wing. Cut the covering away on both the top and
the bottom of the wing.
❍
9. Locate the plywood wing bolt plate. Position it on the
bottom of the wing over the wing bolt holes. Using a felt tip
marker, trace around the wing bolt plate. Using your
knife with a sharp blade, cut the covering away, being careful
not to cut into the surface of the wing skin. Cutting into the
wing skin will weaken the structure. The following tip is an
alternative method for safely cutting the covering.
modeling
❍
10. Glue the plywood wing bolt plate onto the bottom of
the wing over the area where you removed the covering.
gluing it in position, be sure that the plate is set back 1/8"
[3mm] from the trailing edge of the wing. Once the glue has
cured use a 5/32" [4mm] drill bit to drill through the wing bolt
holes from the top of the wing through the wing bolt plates.
❍
11. Temporarily bolt the wing to the fuselage with two 4 x
40mm bolts and two 4mm washers.
When
How to cut covering from balsa.
To avoid cutting into the balsa, use a soldering iron instead
of a hobby knife to cut the covering from the stab. The tip of
the soldering iron doesn’t have to be sharp, but a fine tip
does work best. Allow the iron to heat fully. Use a
straightedge to guide the soldering iron at a rate that will just
melt the covering and not burn into the wood. The hotter the
soldering iron, the faster it must travel to melt a fine cut. Peel
off the covering.
❍
12. Locate the wing belly pan. Cut the covering away from
the holes at the rear of the belly pan.
7
Page 8
❍
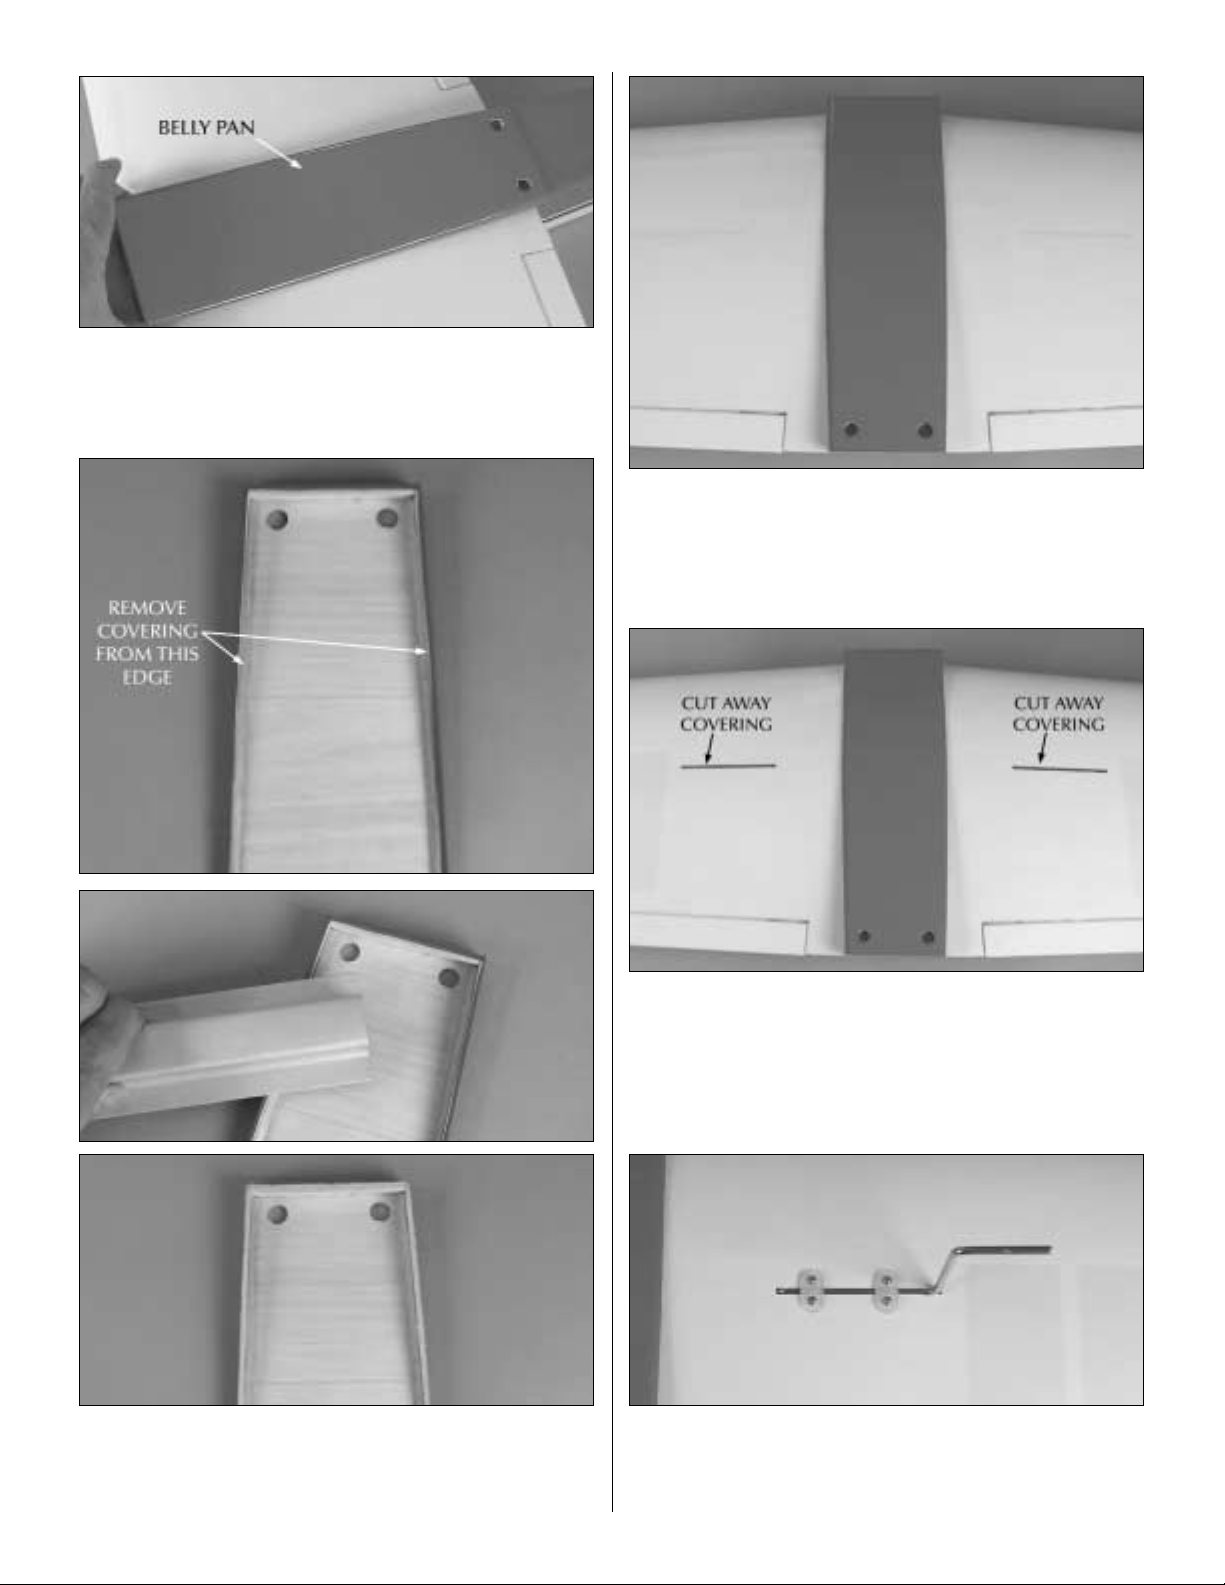
13. Place the belly pan in position on the wing, aligning it
with the fuselage. Trace the outline of the belly pan onto the
wing with a felt-tip marker.
❍
15. Glue the belly pan in place on the wing, making sure
it is aligned with the fuselage. Once the glue has cured,
remove the wing from the fuselage.
INSTALL THE MAIN LANDING GEAR
❍
14. Remove the covering from the edge of the inside of the
belly pan. This is most easily done by carefully sanding the
edge with a sanding block. Be careful to only sand it as much
as needed to remove the covering.
❍
1. Cut the covering away from the landing gear blocks on
both wing panels.
❍
2. Insert the landing gear wires into the holes in the
landing gear blocks. (The short end of the wire is the end that
is inserted into the landing gear block). Do this for both
❍
3. Locate two nylon landing gear straps and four 2 x 10mm
sheet metal screws. Locate the nylon landing gear straps over
the landing gear wire. Mark the location for the holes, then
drill a 1/16" [1.6mm] hole into the landing gear blocks. Install
8
wings.
Page 9
the nylon landing gear straps with two sheet metal screws.
Follow this procedure for the remaining landing gear wire.
❍
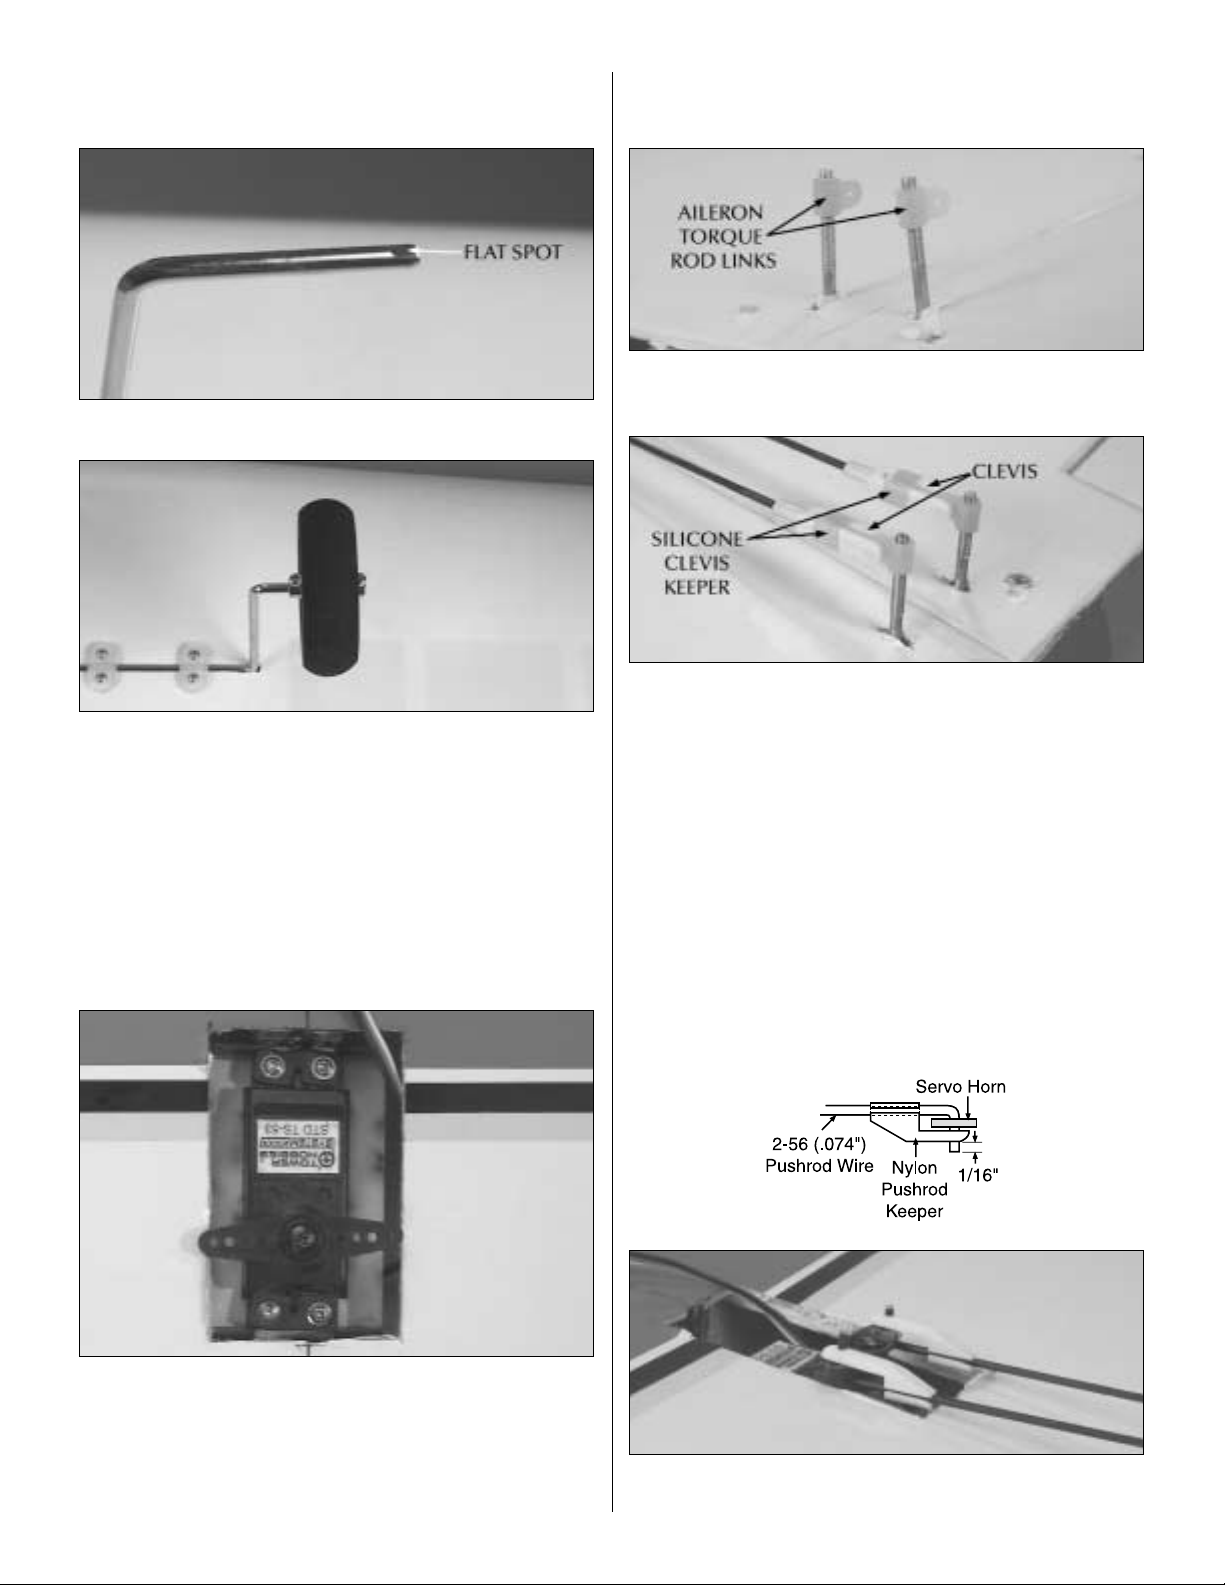
4. File a flat spot on the end of the landing gear wire.
allow the glue to cure. Permanently install the servo using the
screws provided with the servos.
❍
2. Locate two nylon aileron torque rod links. Thread them
onto the aileron torque rods approximately 20 full turns.
❍
5. Locate two 4mm wheel collars, two 3 x 5mm set screws
and one foam wheel. Install one wheel collar and set screw
onto the landing gear wire followed by the wheel and another
wheel collar and set screw. Tighten the wheel collar set
screws onto the landing gear wire, making sure the set screw
on the outer wheel collar is tightened against the flat spot you
filed on the wire. Be sure to use a small amount of
threadlocker on the set screws. Do the same for the other
landing gear. Apply a drop of oil on the wheels.
INSTALL THE AILERON SERVO
❍
3. Locate the two 6" [152mm] aileron pushrod wires.
Install a nylon clevis onto the threaded end of the wire
approximately 20 turns. Then, slide a silicone clevis keeper
onto the wire. Install the clevis onto the nylon torque rod link
and lock it in place by sliding the silicone clevis keeper over
the clevis.
❍
4. Be sure the aileron servo is centered. Enlarge the first
hole in the servo arm with a Hobbico Servo Horn Drill
(HCAR0698) (or a #48 or 5/64" [2mm] drill bit). Center the
aileron and align the wire pushrod with the hole in the end of
the servo arm. Using a marker, mark the location where the
wire aligns with the hole in the servo arm. On that mark make
a 90° bend. From the bend measure an additional 3/16"
[4.8mm] and then cut off the excess pushrod wire.
❍
1. Install your servo into the servo compartment following
the instructions included with your particular brand of servo.
Install the servo arm in the orientation shown. Drill 1/16"
[1.6mm] pilot holes for the servo screws. Remove the servo.
Then, install and remove a servo screw into each of the holes.
Put a couple of drops of thin CA into each of the holes and
❍
5. Install the wire into the hole in the servo arm using a
nylon pushrod keeper as shown in the sketch.
9
Page 10
ASSEMBLE THE FUSELAGE
MOUNT THE STAB & FIN
in place with a couple of T-pins. Measure from the wing tip to
the stab, adjusting the stab until the distance is equal. Once
the stab is positioned properly use a felt-tip marker to mark
the outline of the fuselage on the bottom of the stab.
❍
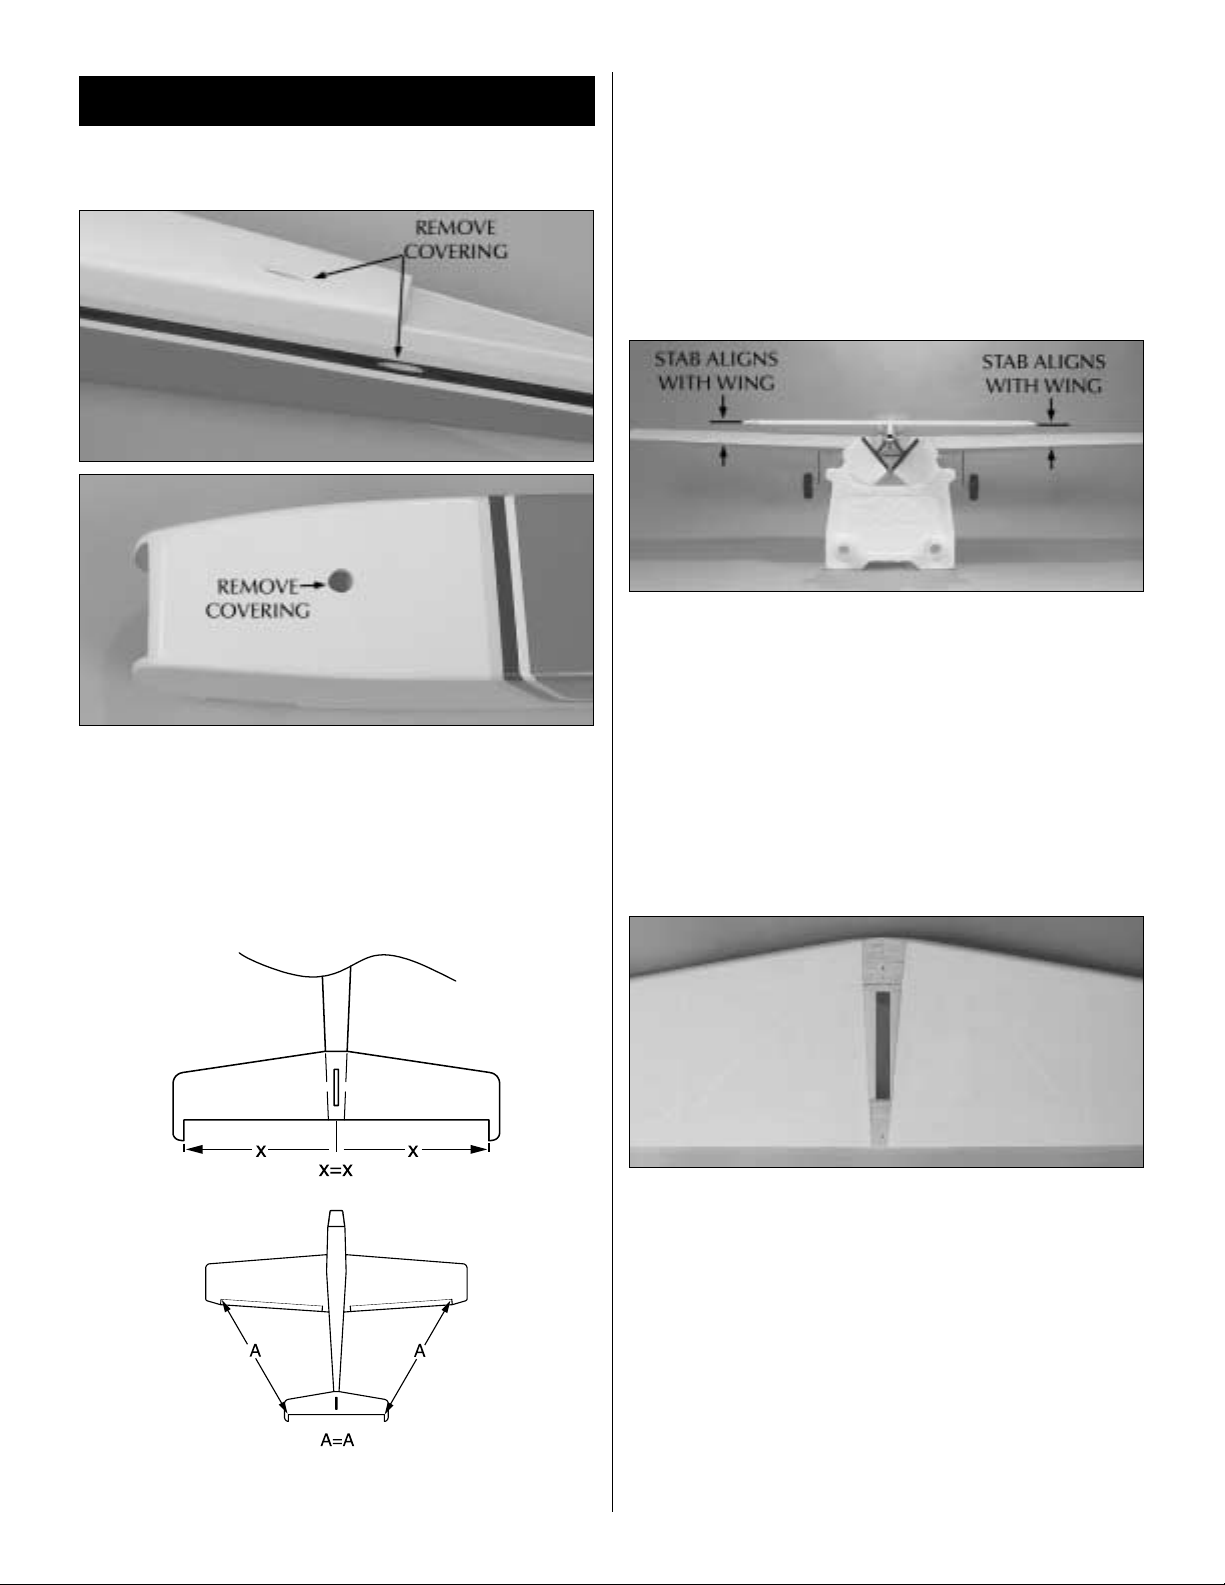
4. Stand five to ten feet [2m] behind the model and view
the stab and wing. If the stab and wing align with each other,
proceed to the next step. If the stab and wing do not align,
remove the stab and sand the high side of the fuselage until
the stab aligns with the wing.
❍
1. Locate the fuselage. Cut the covering away from the
pushrod exits at the rear of the fuselage. There is one located
on the left and right side of the fuselage and one on the top
of the fuselage. Cut away the covering to expose the hole in
the bottom, front of the fuselage.
❍
2. Bolt the wing to the fuselage. Place the model in a
building stand (such as a Robart Super Stand II, ROBQ1402).
❍
5. Carefully cut the covering from the bottom of the stab
inside the marks you made on the bottom of the stab. Use the
same technique for cutting the covering as you used for
the wing.
❍
3. Fit the stab onto the fuselage. Center the trailing edge by
taking accurate measurements as shown. Temporarily hold it
❍
6. Glue the stab to the fuselage with 6-minute epoxy. Be
sure to check the alignment of the stab before the glue cures.
Clean any excess epoxy with rubbing alcohol and a paper
10
towel.
Page 11
❍
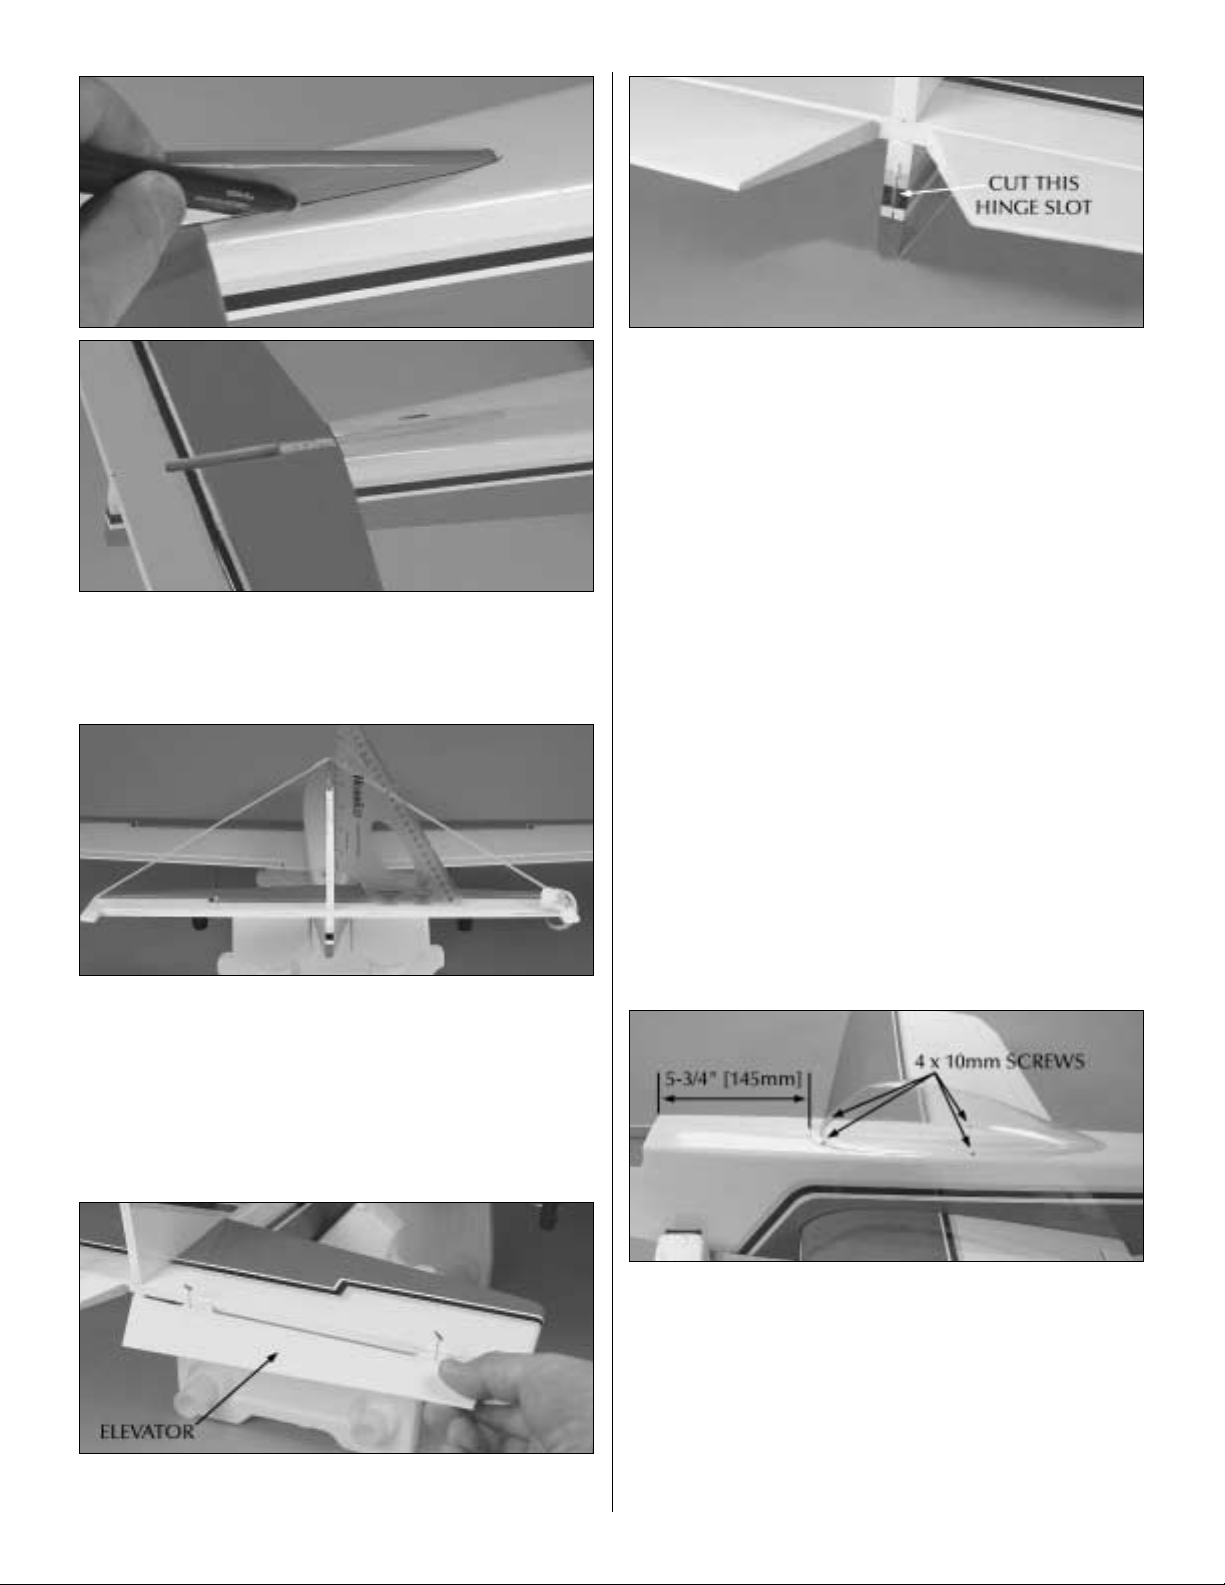
7. Cut the covering away from the fuselage as shown.
❍
10. Look closely at the trailing edge of the rudder. You will
find three pre-cut hinge slots. Look at the fin and you will see
that there are two pre-cut hinge slots in the fin. Position the
rudder against the fin, aligning the hinge slots. The lower
hinge on the rudder does not have a matching slot on the
bottom of the fuselage. Mark the location for the hinge slot on
the bottom of the fuselage. Using a hobby knife, cut a hinge
slot where you have marked.
❍
11. Permanently install the rudder to the fin and fuselage
using the same technique used for installing the ailerons and
elevators.
❍
8. Test fit the fin into the slot in the stab. Make adjustments
as needed to get a good fit. Once you are satisfied with the fit,
glue the fin to the stab with 6-minute epoxy. Use a triangle to
make sure the fin is perpendicular to the stab. Hold the fin in
place with masking tape until the glue has cured.
❍
9. Permanently install the elevators to the stab using the
same technique used for installing the aileron hinges.
❍
12. Center the canopy on the top of the fuselage 5-3/4"
[145mm] back from the engine compartment. Drill two 1/16"
[1.6mm] holes on the flange of the canopy on both sides of
the canopy. The location of the holes is not crucial but should
be positioned towards the front and rear of the canopy flange.
Drill through the canopy flange and the fuselage. Remove the
canopy, apply a couple of drops of thin CA into each of the
four holes and allow it to cure. Once the glue has cured,
install the canopy in place with four 2 x 10mm screws with
the washer head.
11
Page 12
INSTALL THE NOSE GEAR
❍
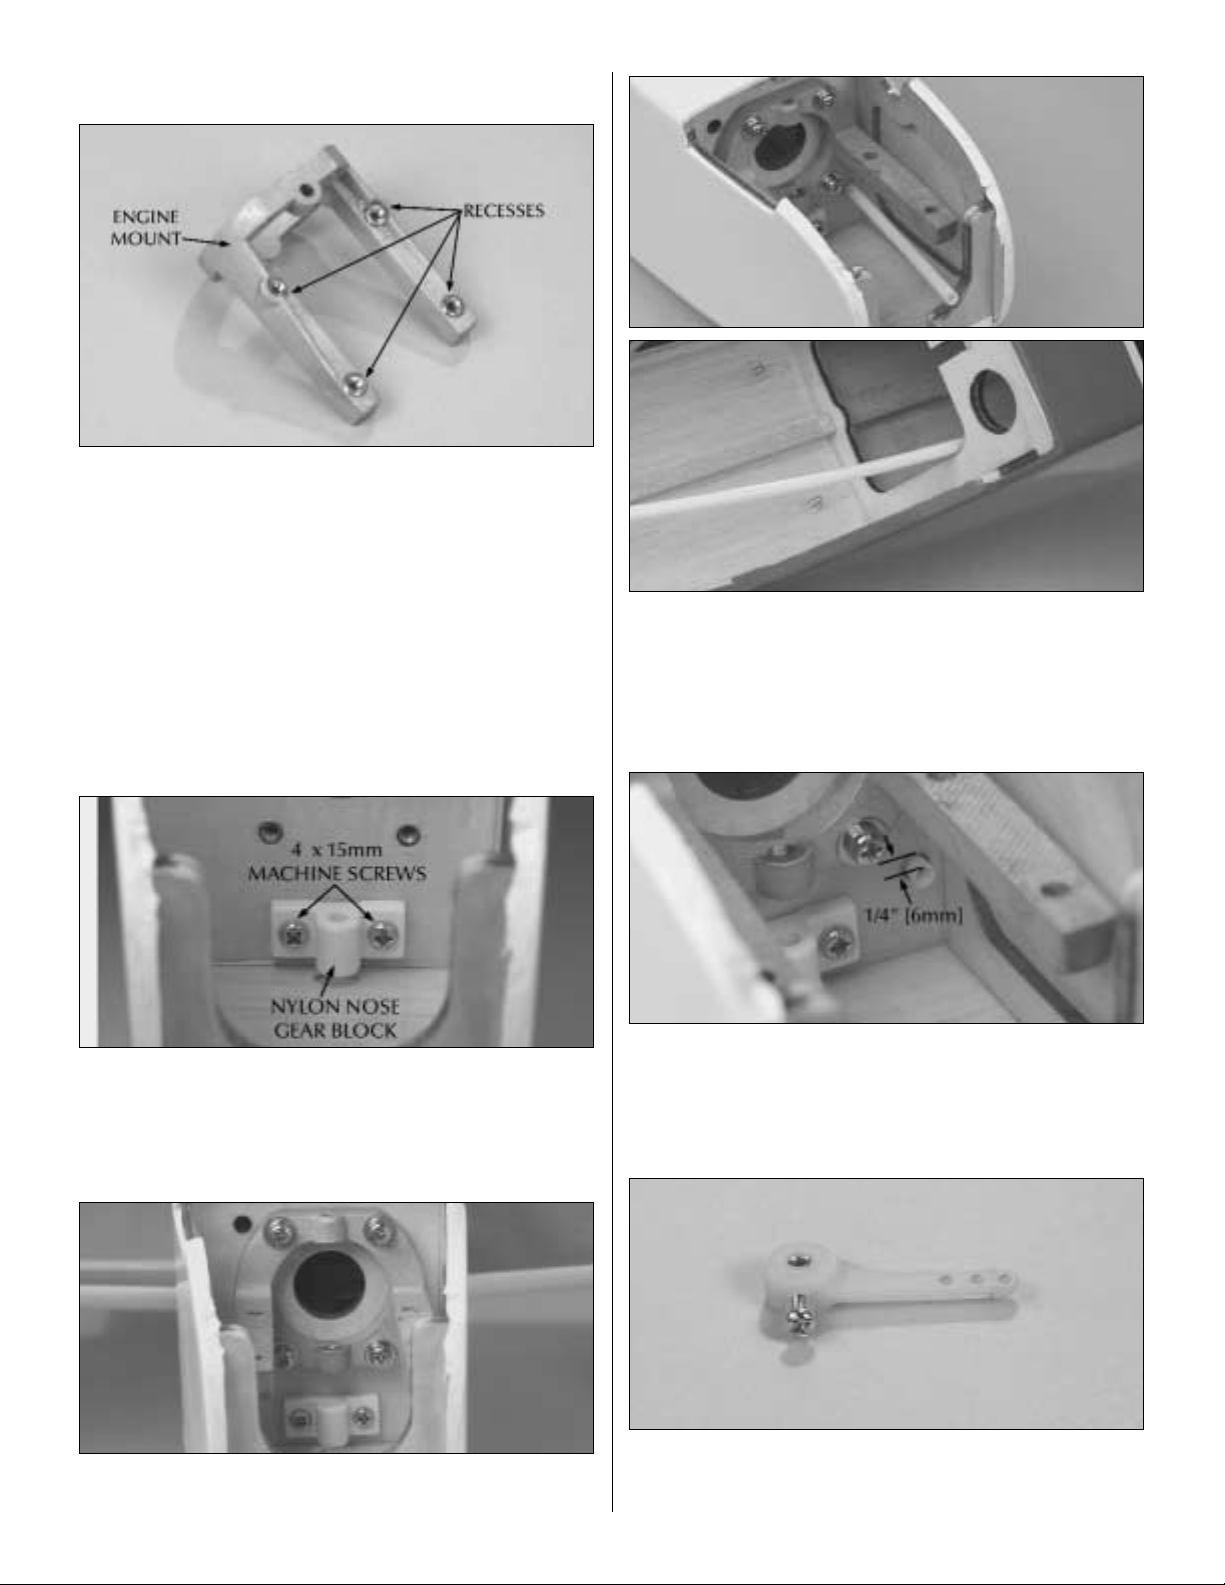
1. Locate the aluminum engine mount. Turn the mount
over and take notice of the recesses on the bottom of both
rails. Locate four 4mm nuts. Test fit the nuts into the recesses
in the bottom of the landing gear rails. Once the nuts are
properly seated in the rails, carefully apply a small drop of
medium CA glue onto the edge of the nuts. Do not apply too
much glue; this could cause glue to wick into the threads of
the nuts. Allow the glue to cure or apply some CA accelerator
to the glue to speed the curing process.
❍
4. Locate one of the two 14" [356mm] white nylon pushrod
tubes. Roughen one end of the tube with 220-grit sandpaper.
Insert the un-sanded end of the tube into the hole in the
bottom left side of the firewall. Feed the tube through the
fuselage so that it exits inside of the forward fuselage former.
❍
2. Locate the nylon nose gear block. Install it onto the
firewall using two 4 x 15mm machine screws.
❍
3. Install the engine mount to the firewall with four 4 x
15mm machine screws, 4mm lock washers and 4mm flat
washers.
❍
5. Apply a small amount of 6-minute epoxy to the end of
the white nylon tube. Position the tube so that it extends
beyond the firewall approximately 1/4" [6mm]. Allow the
epoxy to cure.
❍
6. Install a 4mm wheel collar into the nylon steering arm.
Once the wheel collar is in position install a 3 x 10mm
screw into the arm and wheel collar.
12
machine
Page 13
❍
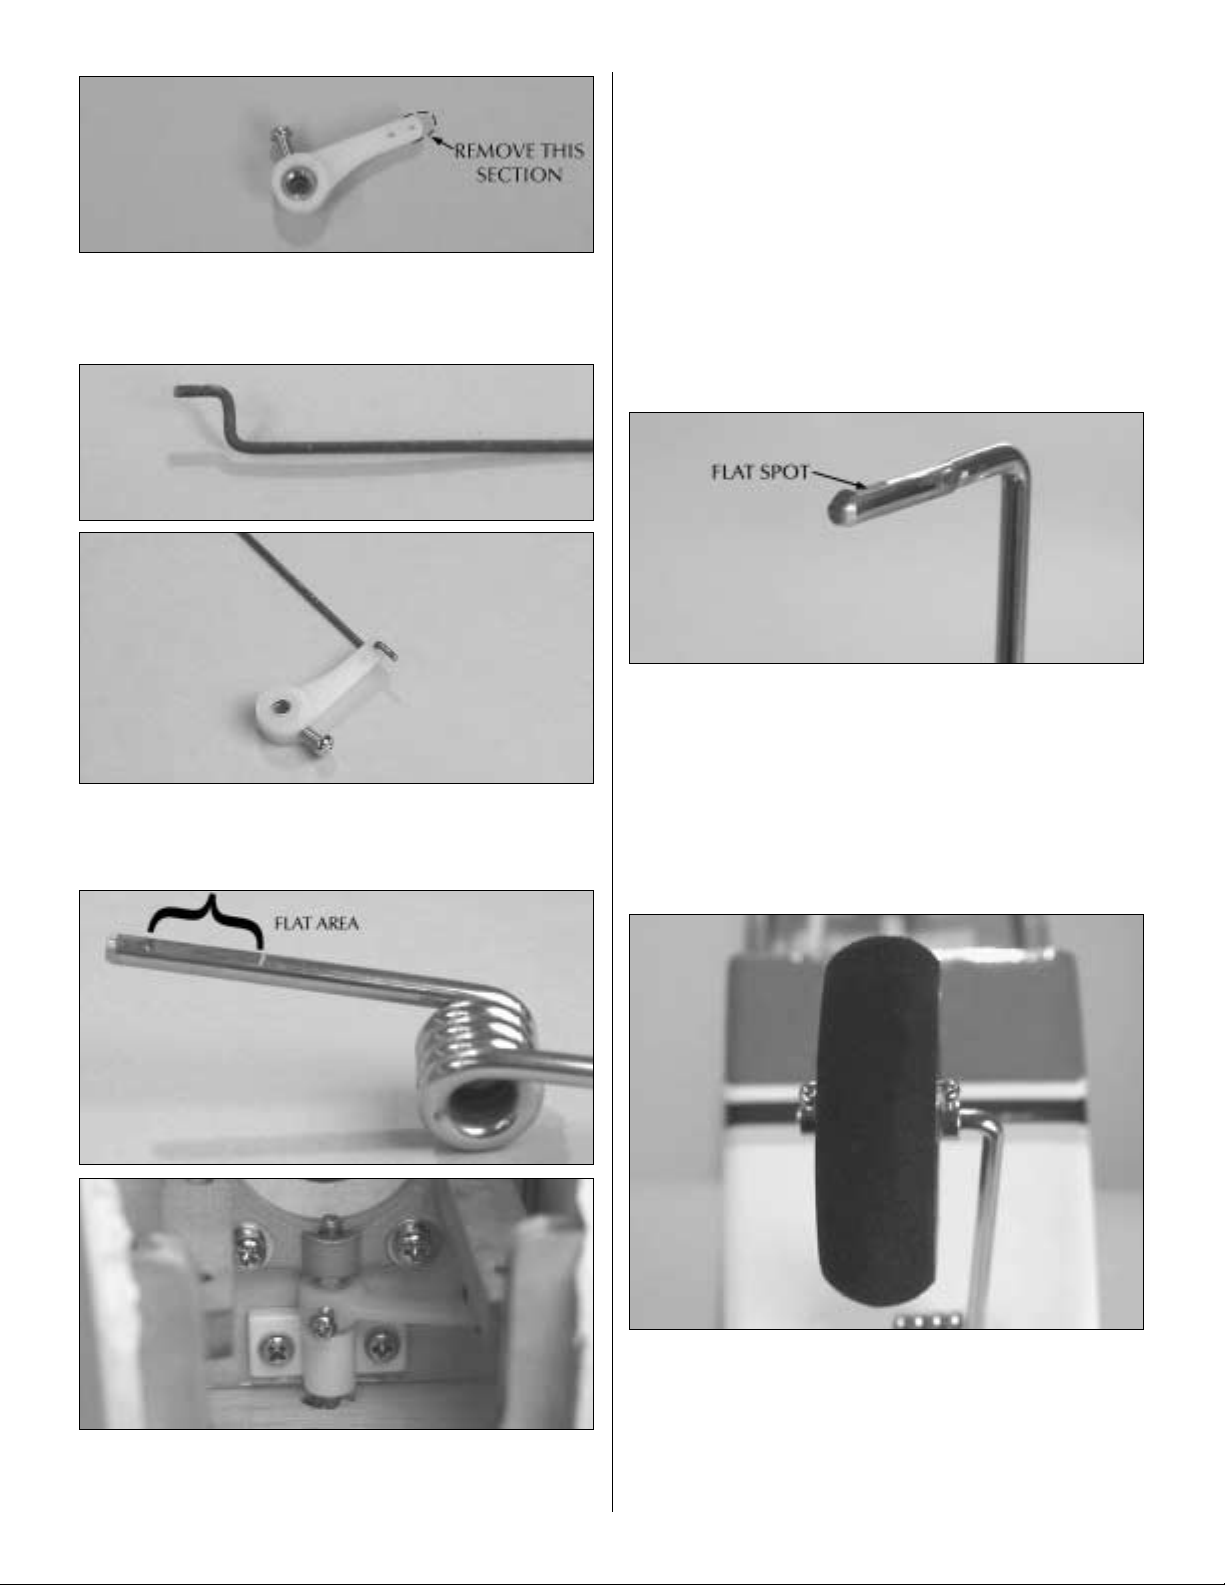
7. The nylon steering arm has three holes. Cut the end hole
from the steering arm. Using a small sanding block, round the
end of the arm after cutting off the outermost hole.
steering arm and into the bottom of the engine mount. Apply
a drop of threadlocker to the set screw. Then, tighten the set
screw in the steering arm onto the flat spot on the landing
gear wire.
❍
8. Locate the 1.5mm wire with the Z-bend on one end of
the wire. Insert it into the outermost hole of the steering arm
as shown.
❍
10. File a flat spot onto the end of the metal nose gear wire.
❍
9. Locate the wire nose gear. Notice that there is a flat spot
on one side of the wire. Insert the wire through the bottom of
the fuselage, through the nylon nose gear bearing, the nylon
❍
11. Locate two 4mm wheel collars and two 3 x 5mm set
screws. Install the screws into the wheel collars. Slide a wheel
collar and set screw onto the nose gear wire, followed by the
foam nose wheel and another wheel collar and set screw.
Tighten the set screw in the outer wheel collar onto the flat
spot you filed on the end of the wire. Center the nose wheel
and then tighten the set screw on the remaining wheel collar.
13
Page 14
INSTALL THE FUEL TANK & ENGINE
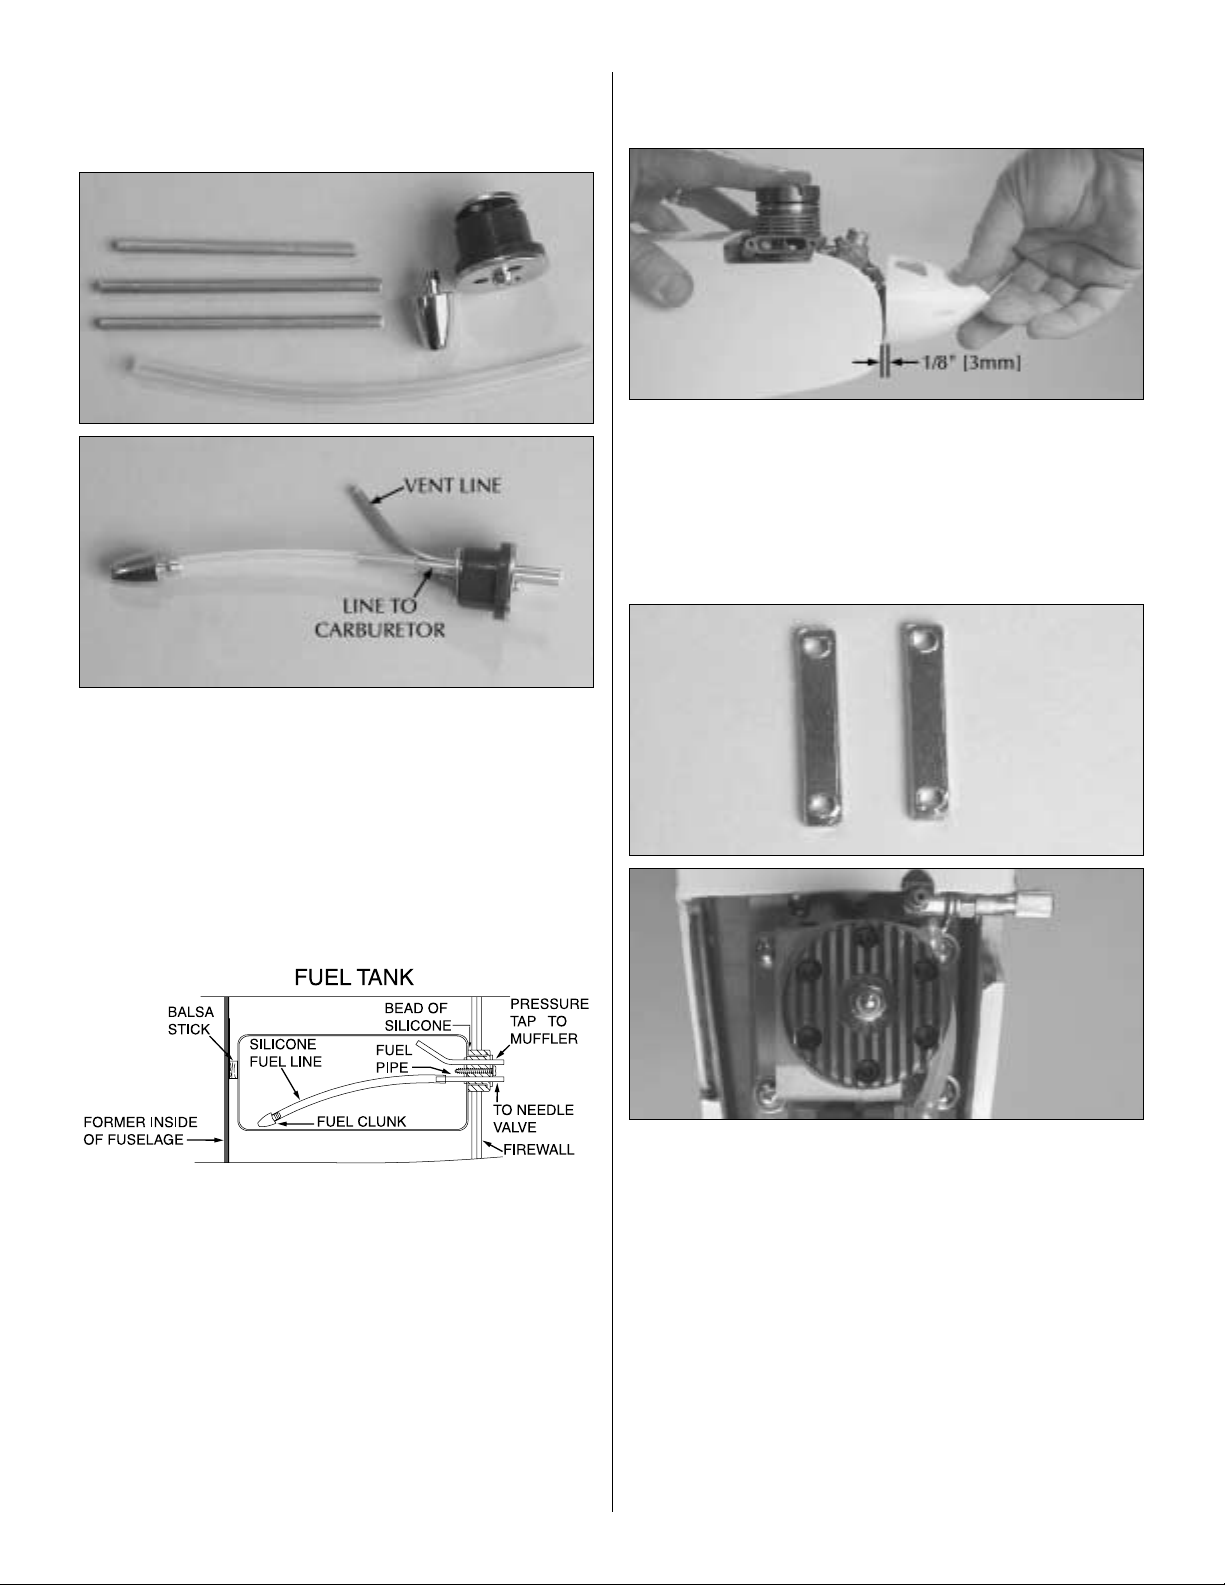
❍ 1. Locate the fuel tank. Remove the parts from inside of the
tank.
engine compartment. Make the necessary adjustments as
needed to allow your engine to fit.
❍
6. Locate the plastic spinner. Remove the nut and washer
from the engine crankshaft and slide the spinner onto the
crankshaft. Place the engine on the engine mount, positioning
it so that there is a least 1/8" [3mm] clearance between the
back of the spinner and the sides of the fuselage. Remove the
spinner.
❍
2. Assemble the components. Included in the fuel tank
parts are three aluminum tubes. If you will be fueling your
plane with a third line rather than filling the tank through the
carburetor line, you will need to use the third aluminum tube.
If not, assemble the tank as shown with a vent line and
carburetor line. Once assembled, use a fine tip marker and
mark the front of the fuel tank so you can identify which is the
vent line and which is the carburetor line.
❍
3. Insert the fuel tank into the fuselage. Hold the tank in
place either by using silicone glue around the front of the tank
or insert a small balsa stick (not supplied) behind the tank and
glue the stick to the former.
❍
4. Install fuel tubing on the aluminum lines, long enough
to reach the carburetor inlet and the pressure tap on the
muffler.
❍
5. Test fit your engine onto the engine mount. Depending
on your particular brand of engine and whether it has a
remote needle valve you may need to make additional cutouts or enlarge the cut-outs that are already made in the
❍
7. Locate the two engine mounting straps. Install them on
the engine and engine mount by inserting a 4 x 25mm
machine screw, 4mm lock washer and a 4mm flat washer
through the holes in the end of the strap. Attach the strap to
the engine mount. Be careful not to push too hard on the nuts
you glued in the bottom of the engine mount earlier. Doing so
could cause the nuts to fall out of the mount, requiring you to
remove the engine mount to replace the nuts.
❍
8. Locate the remaining 14" [356mm] white pushrod tube.
Roughen one end of the tube with 220-grit sandpaper. Insert
the un-sanded end of the tube into the hole in the top right
side of the firewall. Apply a small amount of 6-minute epoxy
to the end of the white nylon tube. Position the tube so that it
extends beyond the firewall approximately 1/4" [6mm]. Allow
the epoxy to cure.
14
Page 15
❍
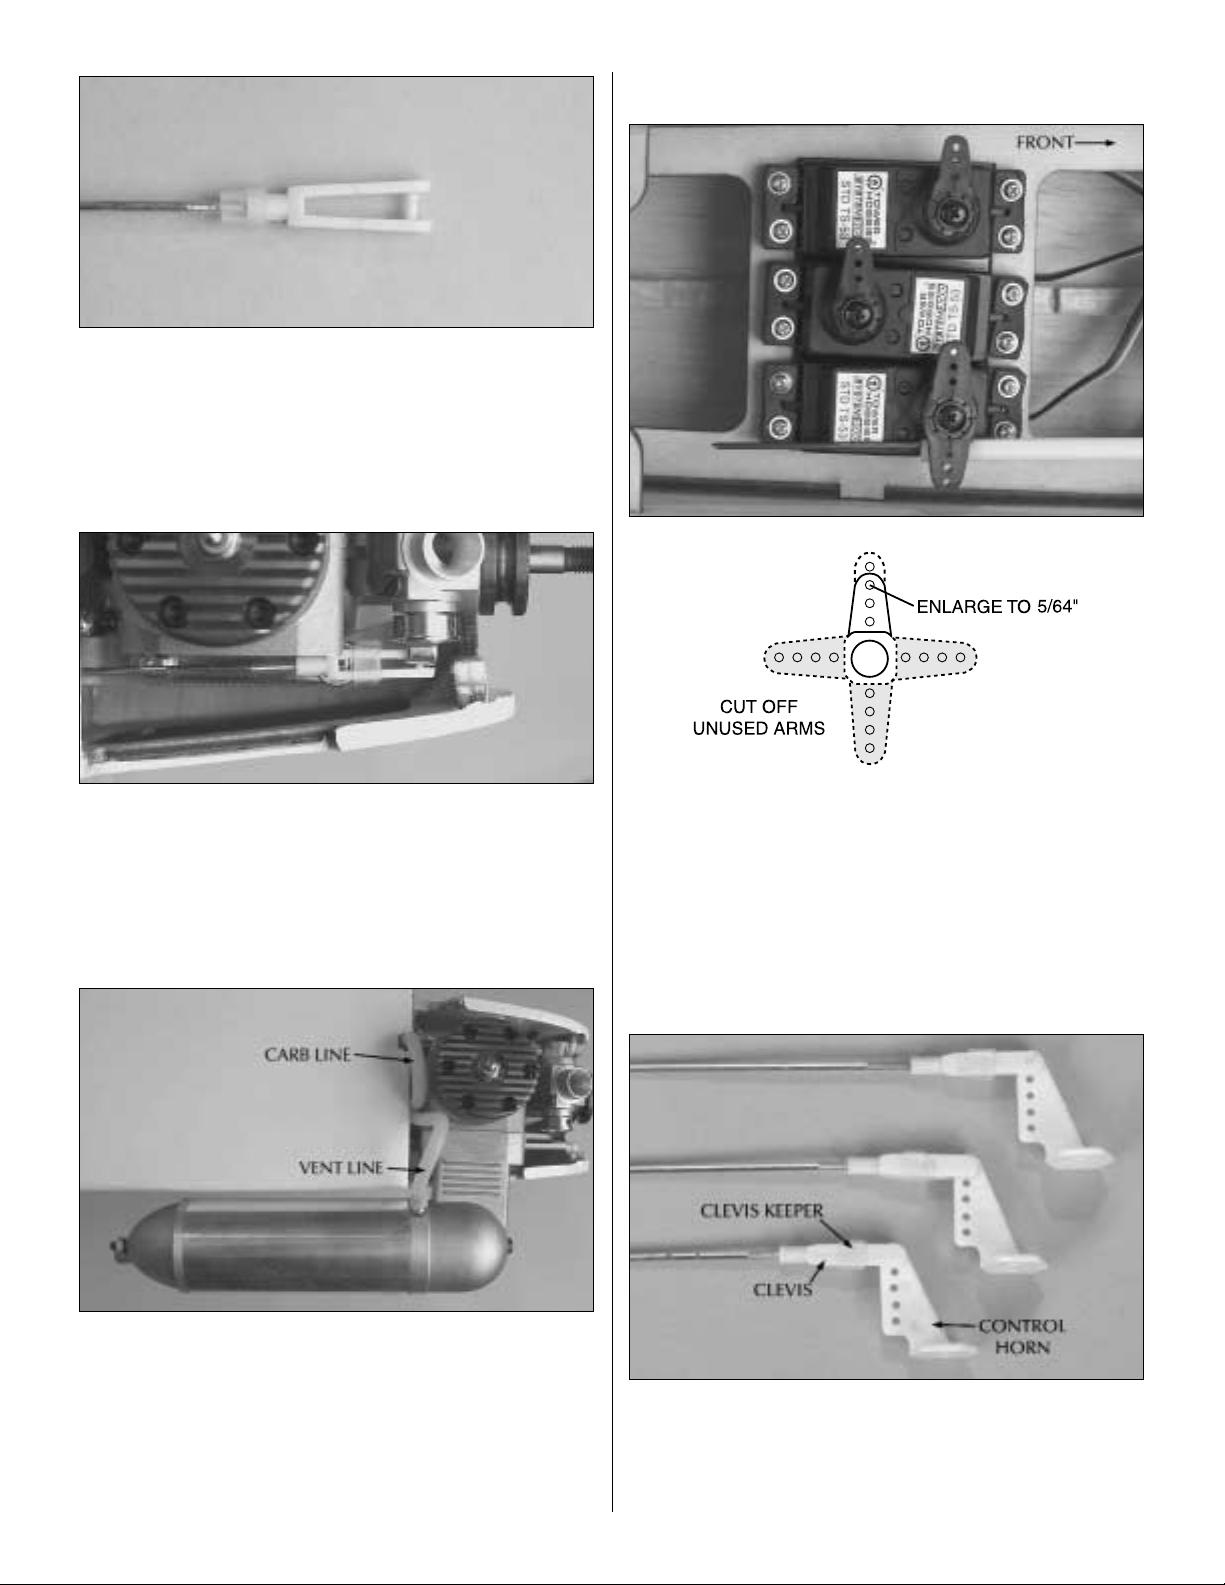
9. Locate the .074 x 16" [406mm] pushrod, threaded on
one end. Thread a nylon clevis onto the threaded portion of
the rod approximately 20 full turns. Install a silicone clevis
keeper onto the bottom of the clevis.
INSTALL THE RADIO & SERVOS
❍
10. Slide the end of the wire into the tube. Attach the clevis
to the throttle arm on the carburetor. Slide the clevis keeper
over the clevis.
❍
11. Install the muffler. Attach the fuel lines to the
carburetor and the muffler pressure tap.
❍
1. Install your servos into the servo bay using the hardware
and instructions that came with the servos. Install the servos
in the direction shown. You will only need to use a servo arm
that has three holes in the arm. If your servo arms have more
than 3 holes, cut off the excess holes and shape the end of the
arm to a round finish with a sanding block or high-speed
rotary tool. Cut off the unused arms. Set them aside as you
will be using some of them later.
❍
12. Install the appropriate propeller for your engine and
the spinner onto the engine crankshaft.
❍
2. Locate the three 2 x 680mm wire pushrods, threaded on
one end. Thread a nylon clevis onto the threaded portion of
the rod approximately 16 to 20 full turns. Install a silicone
clevis keeper onto the bottom of the clevis. Install the clevis
into the nylon control horn. Once it is securely in place slide
15
Page 16
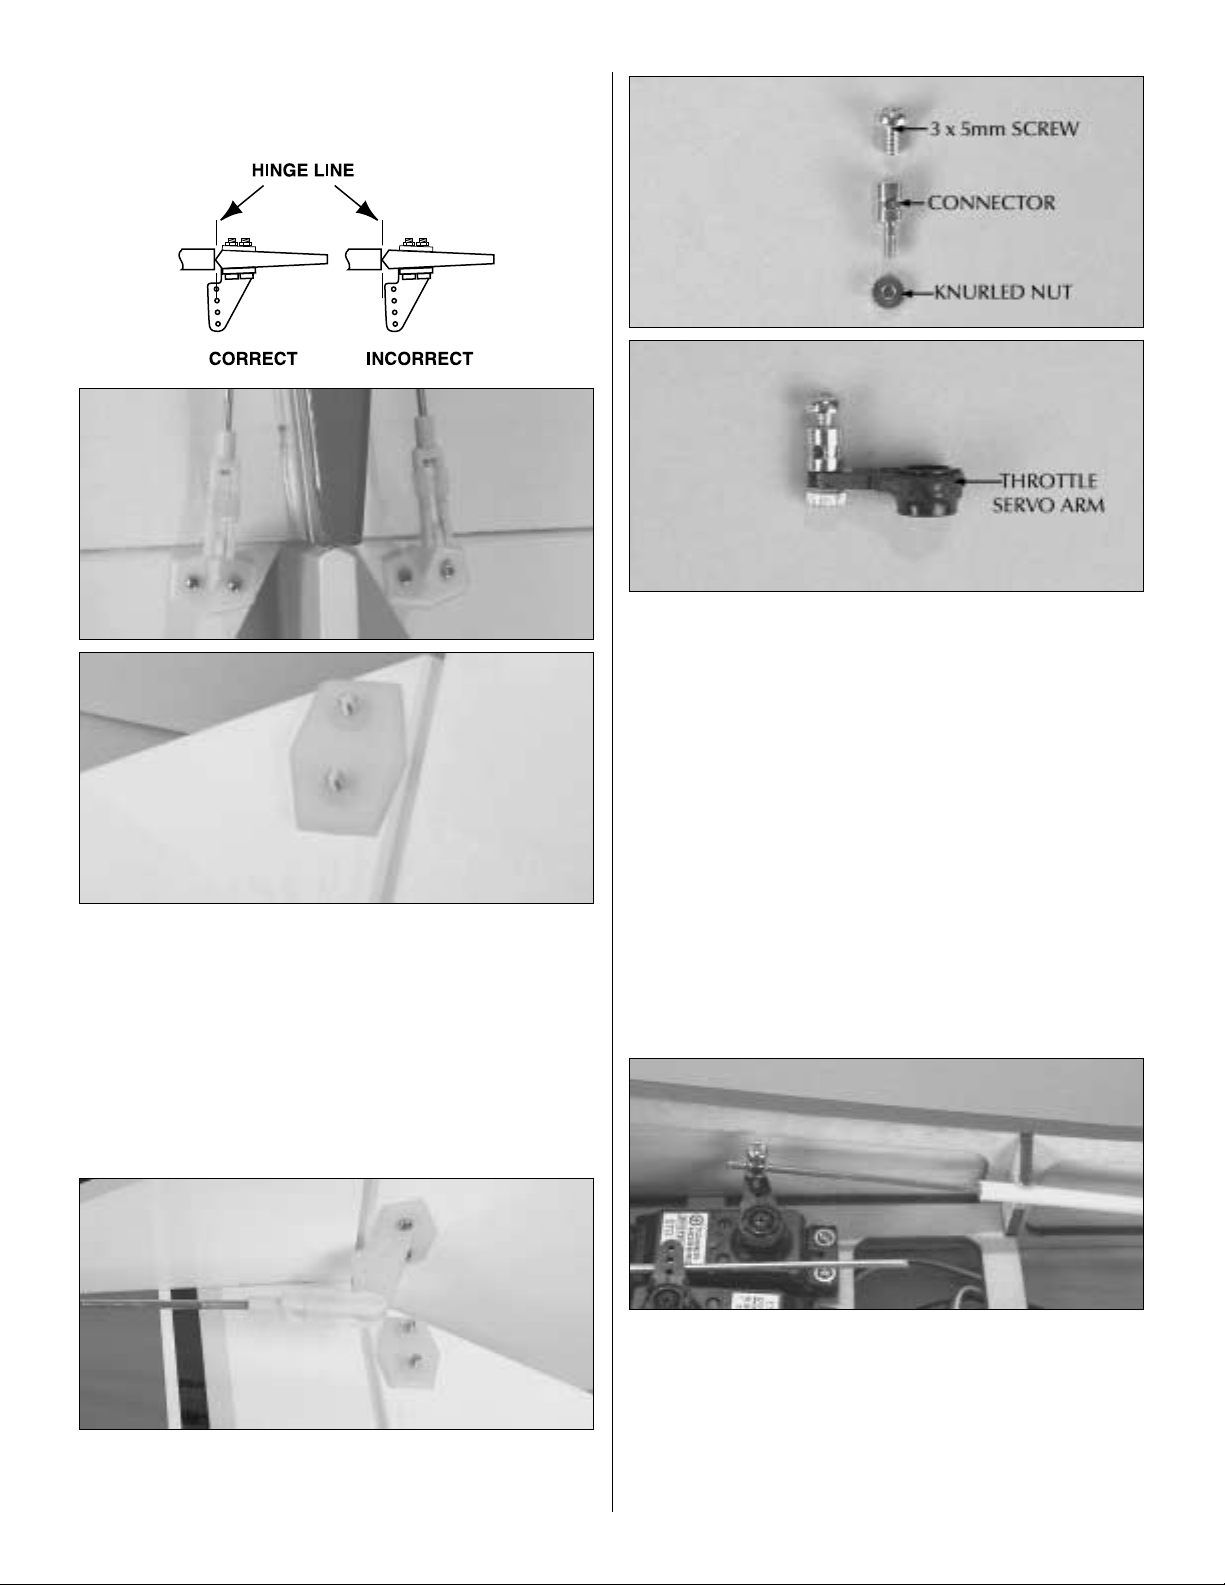
the silicone clevis keeper over the clevis. Repeat this for all
three pushrods.
❍
5. Locate the three components of the screw-lock
connector: the 3 x 5mm set screw, connector and the knurled
nut. Remove the servo arm from your throttle servo. Drill the
outermost hole of the servo arm with a 5/64" [2mm] drill bit.
Install the connector by inserting the threaded pin into the
servo arm. IMPORTANT! Place a drop of Threadlocker onto
the threads. Install the knurled nut onto the threads but do not
tighten it against the servo arm. It is necessary for the
to be able to rotate in the servo arm hole. If you do not use
the thread-locking compound, the nut will come off resulting
in the loss of the throttle control.
connector
❍
3. Insert the end of the pushrod wire into the hole on the
left side of the fuselage. Position the control horn on the
elevator half. Once the control horn is properly positioned,
use a fine-tip marker to mark the hole locations. Drill a 3/32"
[2.4mm] hole through the marks you made on the elevator,
drilling all the way through the elevator. Install the control
horn to the elevator by inserting a 2 x 15mm machine screw
through each of the holes in the control horn and threading
them into the control horn plate on the top of the elevator.
Repeat this procedure for the other elevator.
❍
4. Insert the remaining pushrod into the hole on the top of
the fuselage. Mount the control horn to the rudder following
the same procedure used for the elevator.
❍
6. You may find it necessary to shorten the length of the
white nylon tube that the throttle pushrod is in. Cut it so that
it extends just beyond the former that supports the servo tray.
Make a mark on the former at the point where the white nylon
tube contacts it. At that point cut a small notch in the former
for the tube to rest in. Sand the tube with 220-grit sandpaper
where the tube contacts the notch you made in the former.
Glue the tube into the notch with 6-minute epoxy.
16
Page 17
❍
7. Cut a notch in the former behind the fuel tank for the
nose gear steering pushrod tube. Sand the tube with 220-grit
sandpaper where the tube rests in the notch you made.
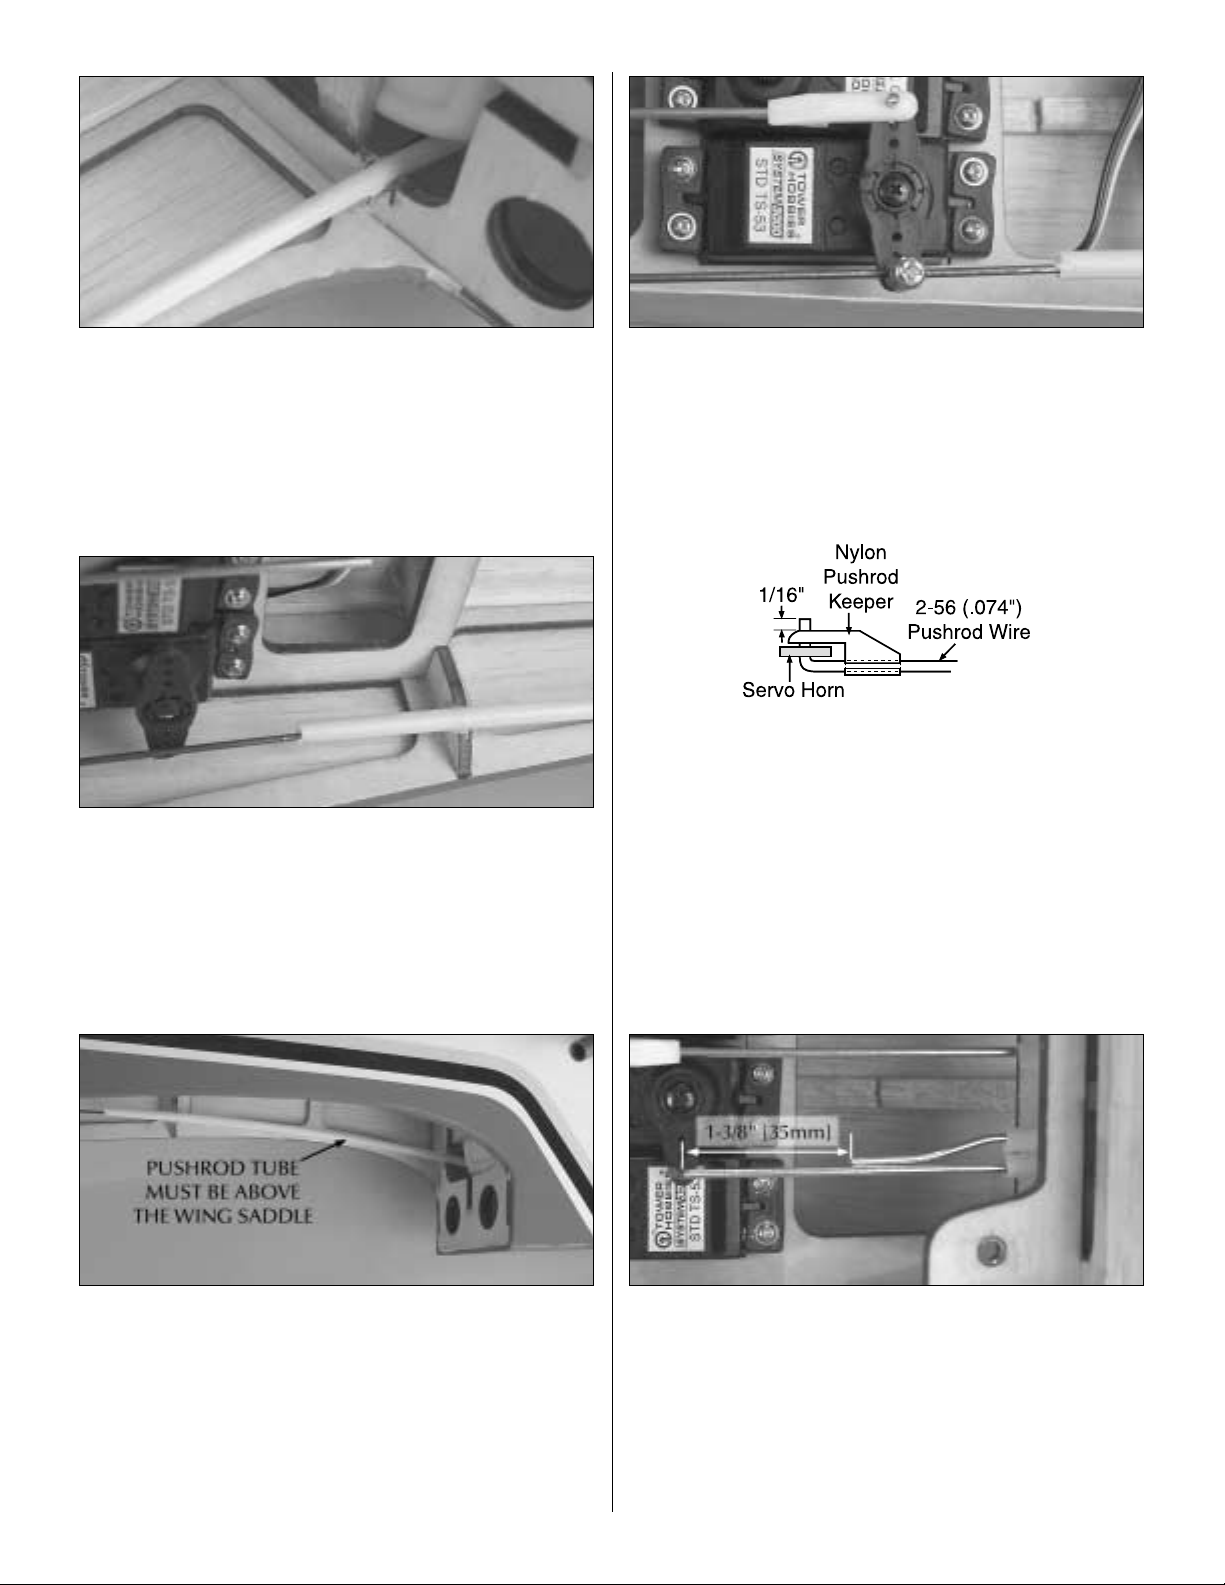
❍
8. Cut a notch in the former that supports the servo tray for
the nose gear steering pushrod tube.
❍ 10. Insert the throttle pushrod into the screw-lock
Center the servo and then tighten the set screw against the
pushrod wire.
❍
11. Center the rudder. Place the rudder pushrod over the
outermost hole in the servo arm. Using a fine-point marker,
make a mark on the pushrod where it crosses over the hole in
the servo arm. Bend the pushrod 90 degrees on the mark. Cut
the pushrod so that it extends 3/8" [9.5mm] above the bend.
Drill the outermost hole of the servo arm with a 5/64" [2mm]
drill bit. Insert the pushrod into the outermost hole in the
servo arm and retain it with a nylon pushrod keeper.
connector.
❍
9. Looking at the left side of the inside of the fuselage, you
will see that the nose gear steering pushrod tube is slightly
lower than the wing saddle. If left like this it could interfere
with the wing. Glue the pushrod into the notches you made
in the two formers with 6-minute epoxy. When gluing the
tubes in place, press on the tube so that it is inside the
fuselage. Hold the tube while the glue cures or place a balsa
stick across the wing saddle. Tape the stick onto both sides of
the fuselage to hold the tube in place.
❍
12. Center the elevator servo. Drill the outermost hole of
the servo arm with a 5/64" [2mm] drill bit. Center the elevator
half that is attached to the pushrod that is in-line with the
servo arm. Using a fine-point marker, make a mark on the
pushrod where it crosses over the hole in the servo arm. Bend
the pushrod 90 degrees on the mark. Cut the pushrod so that
it extends 3/8" [9.5mm] above the bend. Center the remaining
half of the elevator. Bend the pushrod as shown. Then, cut the
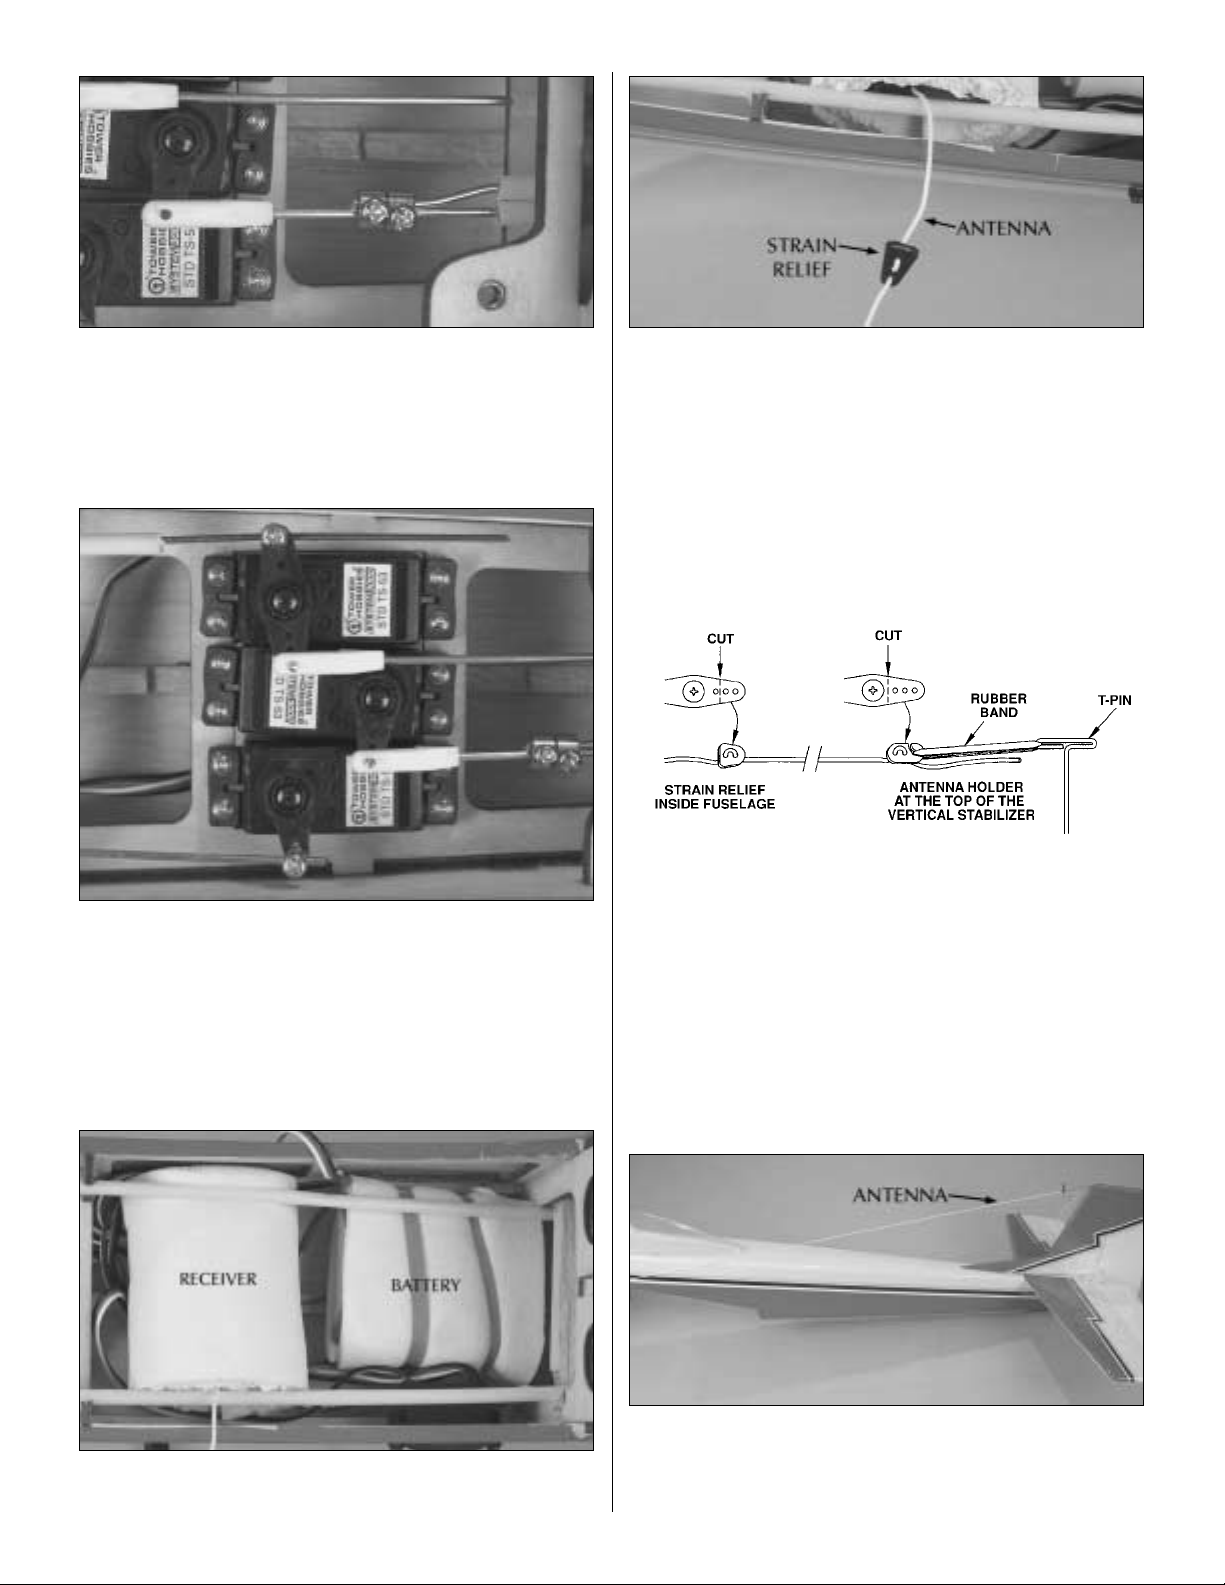
pushrod 1-3/8" [35mm] from the bend in the other pushrod.
17
Page 18
❍
13. Locate two 4mm wheel collars and two 3 x 5mm set
screws. Slide them over both of the elevator pushrods. Center
both halves of the elevator. Then, tighten the set screws.
Install the wire pushrod into the servo arm, retain the pushrod
with a nylon pushrod connector and then install the servo
arm onto the servo.
This completes the servo installation. Your final servo
installation should match the photograph.
❍
16. Locate one of the discarded servo arms you cut off
earlier. You are going to use it as a strain relief for your
antenna. Route the antenna through the arm as
❍
17. Drill a 1/16" [1.6mm] hole in the side of the fuselage.
Insert the antenna through the hole, pulling it out of the
fuselage. The plastic servo arm should be pulled against the
inside of the fuselage.
shown.
receiver
❍
14. Plug the servo leads into the receiver and install the
battery switch and charge jack following the instructions
provided with your radio system. Be sure to install the switch
on the fuselage side opposite the muffler to prevent fuel from
getting into the switch.
❍
15. Wrap the battery and receiver in 1/4" [6.4mm] thick
foam rubber. Place them into the fuselage as shown.
❍
18. Following the illustration at step 17, use another servo
arm on the end of the receiver wire. Insert a T-pin into the top
of the vertical fin. Attach a rubber band to the antenna and
the T-pin.
18
Page 19
❍
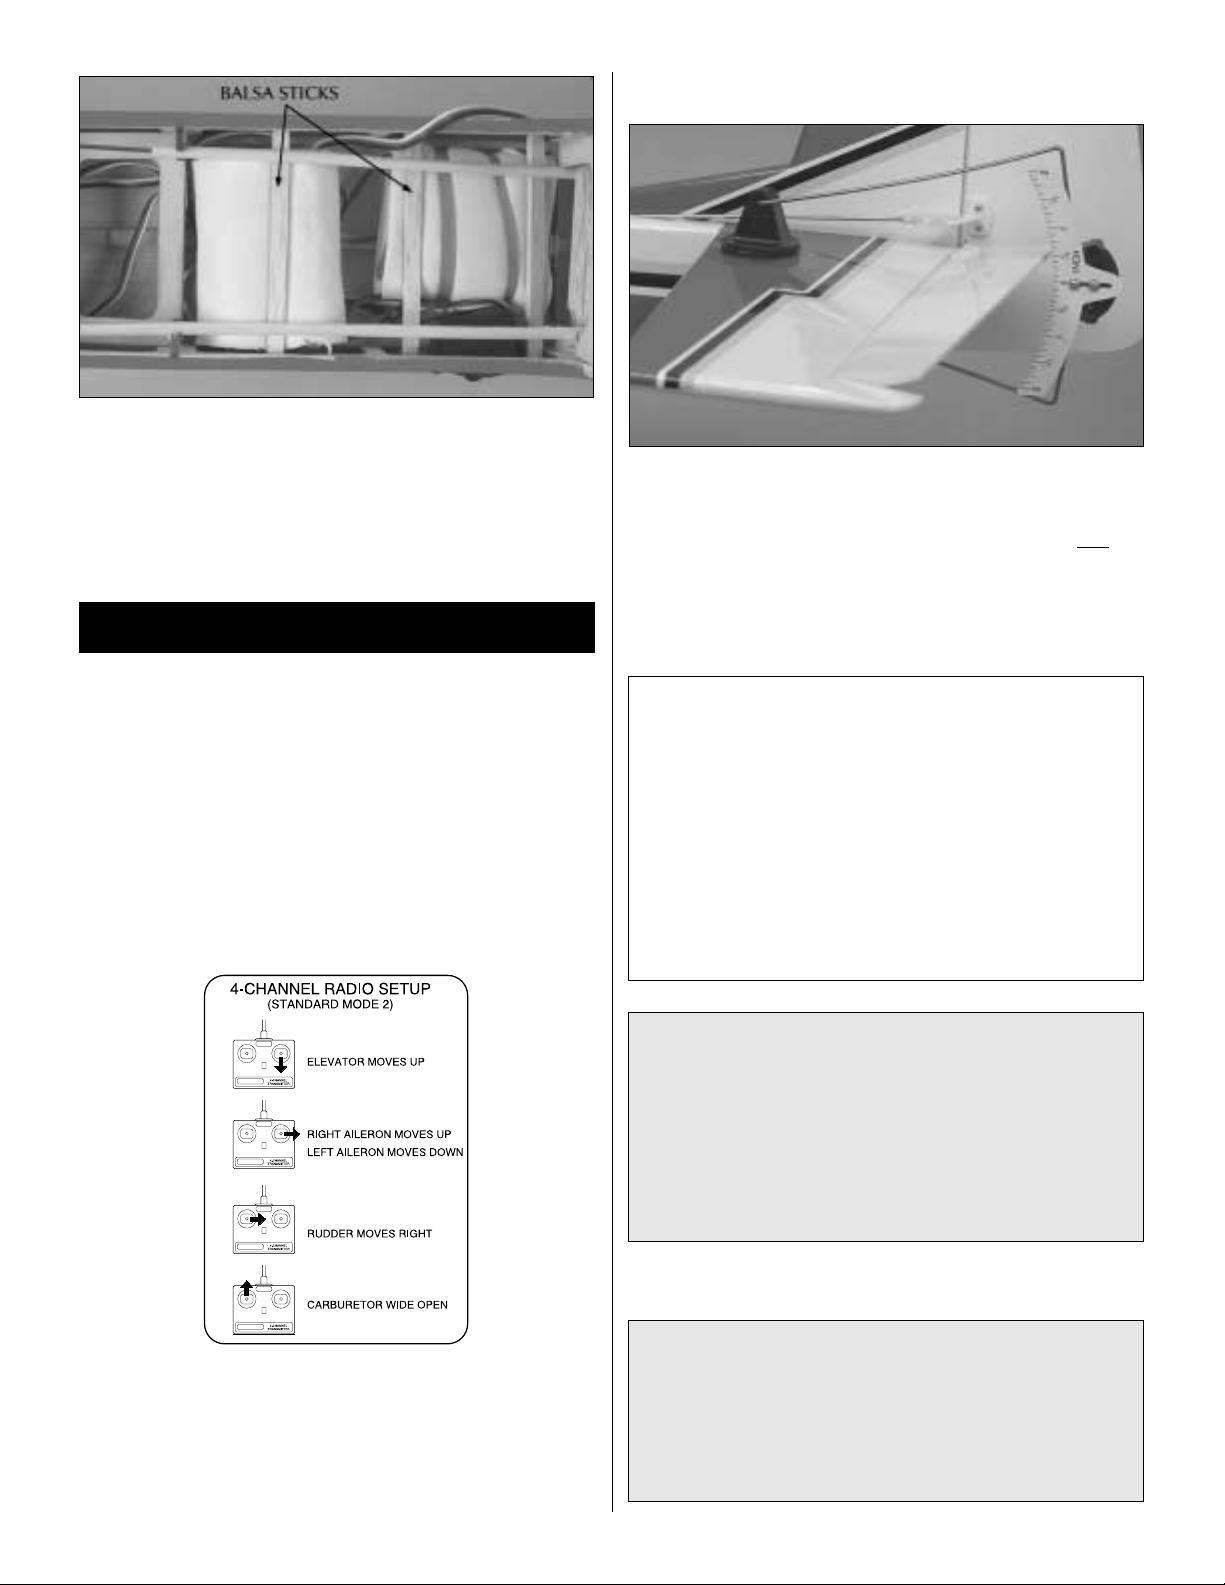
19. Be sure all servo lines are plugged into the receiver.
Permanently secure the receiver and battery into the fuselage
holding them in place by gluing a couple of balsa sticks (not
supplied) into the fuselage.
SET THE CONTROL THROWS
Use a Great Planes AccuThrow (or a ruler) to accurately
measure and set the control throw of each control surface as
indicated in the chart that follows. If your radio does not have
dual rates, we recommend setting the throws at the low rate
setting.
GET THE MODEL READY TO FLY
CHECK THE CONTROL DIRECTIONS
❍
1. Turn on the transmitter and receiver and center the trims.
If necessary, remove the servo arms from the servos and
reposition them so they are centered. Reinstall the screws that
hold on the servo arms.
❍
2. With the transmitter and receiver still on, check all the
control surfaces to see if they are centered. If necessary, adjust
the clevises on the pushrods to center the control surfaces.
Note: The throws are measured at the widest part of the
elevators, rudder and ailerons.
These are the recommended control surface throws:
High Rate Low Rate
ELEVATOR: 5/8" [16mm] up 3/8" [10mm] up
5/8" [16mm] down 3/8" [10mm] down
RUDDER: 1" [25mm] left 1/2" [13mm] left
1" [25mm] right 1/2" [13mm] right
AILERONS: 3/8" [10mm] up 1/4" [6mm] up
3/8" [10mm] down 1/4" [6mm] down
IMPORTANT:The Kaos.40 has been extensively flown and
tested to arrive at the throws at which it flies best. Flying
your model at these throws will provide you with the
greatest chance for successful first flights. If, after you have
become accustomed to the way the Kaos.40 flies, you
would like to change the throws to suit your taste, that is
fine. However, too much control throw could make the
model difficult to control, so remember, “more is not
always better.”
❍
3. Make certain that the control surfaces and the carburetor
respond in the correct direction as shown in the diagram. If
any of the controls respond in the wrong direction, use the
servo reversing in the transmitter to reverse the servos
connected to those controls. Be certain the control surfaces
have remained centered. Adjust if necessary.
BALANCE THE MODEL (C.G.)
More than any other factor, the C.G. (balance point) can
have the greatest effect on how a model flies, and may
determine whether or not your first flight will be
successful. If you value this model and wish to enjoy it for
many flights, DO NOT OVERLOOK THIS IMPORTANT
PROCEDURE. A model that is not properly balanced will
be unstable and possibly unflyable.
19
Page 20
At this stage the model should be in ready-to-fly condition
with all of the systems in place including the engine, landing
gear, covering, and the radio system.
❍
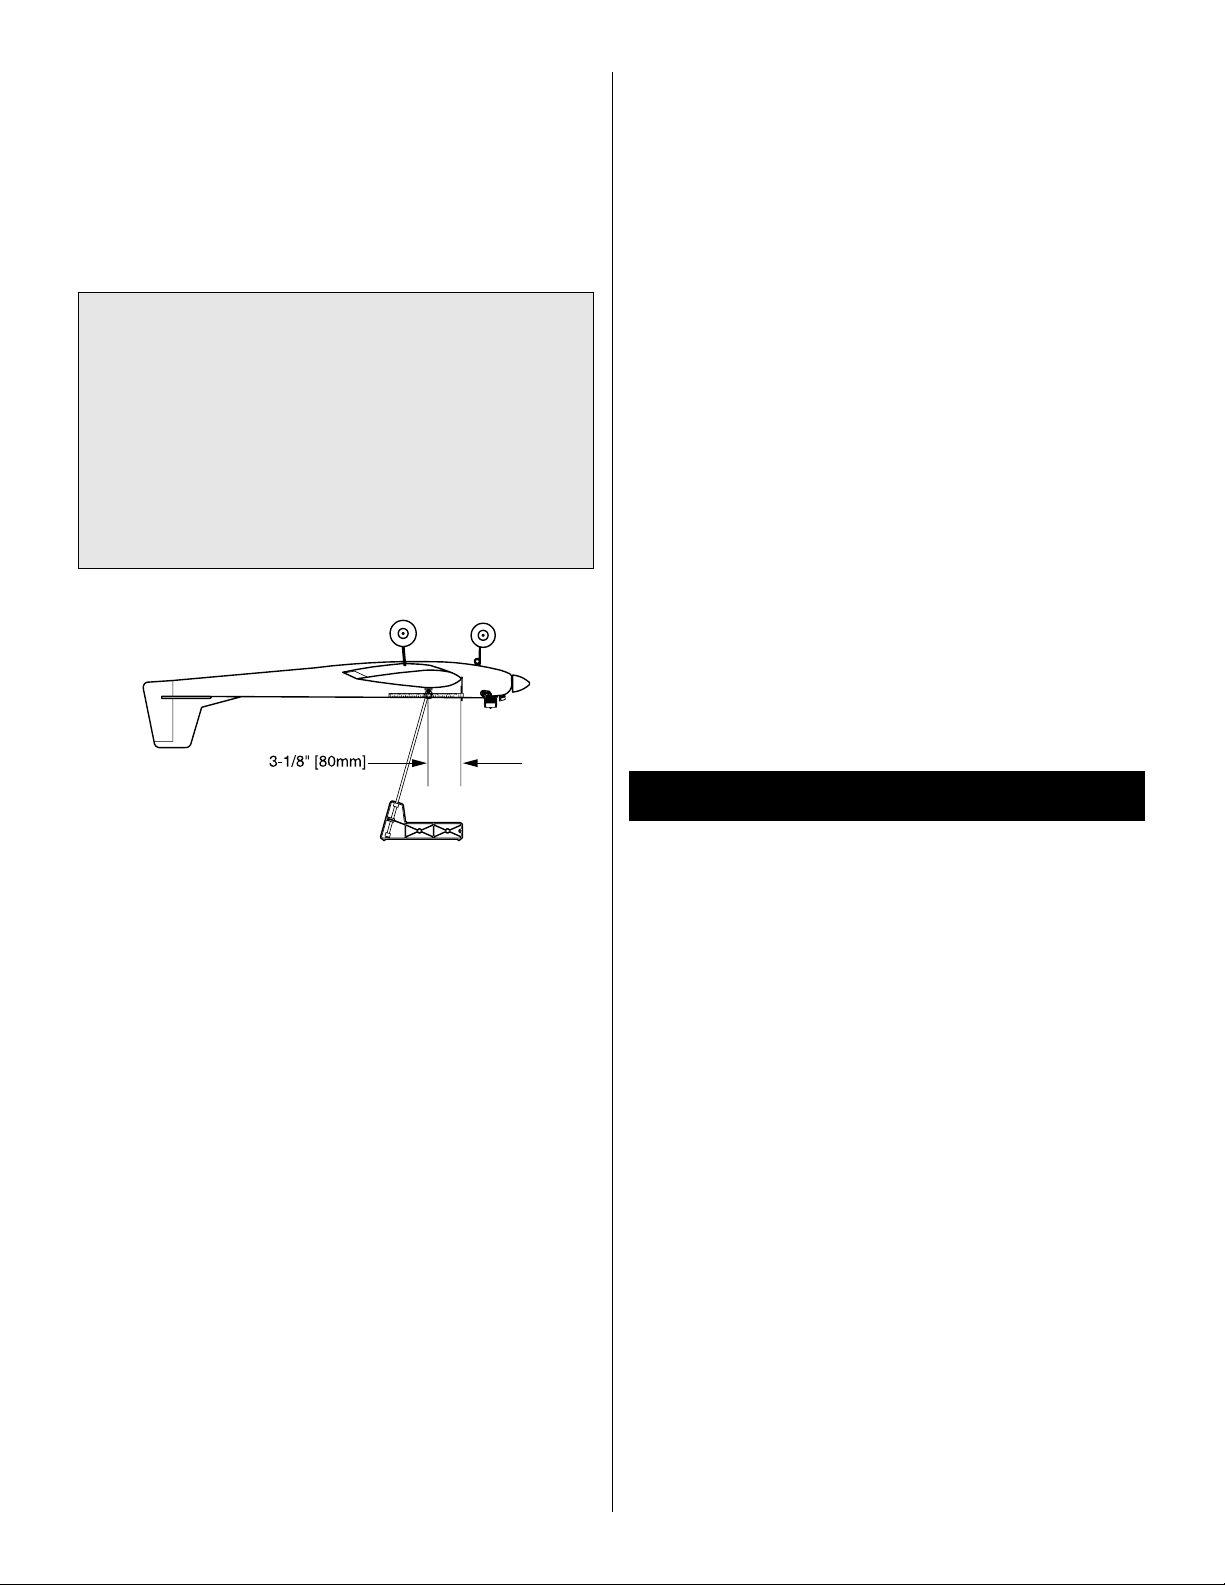
1. Use a felt-tip pen or 1/8" [3mm]-wide tape to accurately
mark the C.G. on the top of the wing on both sides of the
fuselage. The C.G. is located 3-1/8" [80mm] back from the
leading edge of the wing, where it meets the fuselage.
This is where your model should balance for the first
flights. Later, you may wish to experiment by shifting the
C.G. up to 1/8" [3mm] forward or 7/8" [22mm] back to
change the flying characteristics. Moving the C.G. forward
may improve the smoothness and stability, but the model
may then require more speed for takeoff and make it more
difficult to slow for landing. Moving the C.G. aft makes the
model more maneuverable, but could also cause it to
become too difficult to control. In any case, start at the
recommended balance point and do not at any time
balance the model outside the specified range.
❍
4. IMPORTANT: If you found it necessary to add any
weight, recheck the C.G. after the weight has been installed.
BALANCE THE MODEL LATERALLY
❍
1. With the wing level, have an assistant help you lift the
model by the engine propeller shaft and the bottom of the
fuse under the TE of the fin. Do this several times.
❍
2. If one wing always drops when you lift the model, it
means that side is heavy. Balance the airplane by adding
weight to the other wing tip. An airplane that has been
laterally balanced will track better in loops and other
maneuvers.
❍
2. With the wing attached to the fuselage, all parts of the
model installed (ready-to-fly) and an empty fuel tank, place
the model upside-down on a Great Planes CG Machine, or lift
it upside-down at the balance point you marked.
❍
3. If the tail drops, the model is “tail heavy” and weight
must be added to the nose to balance. If the nose drops, the
model is “nose heavy” and weight must be added to the tail
to balance. If additional weight is required, nose weight may
be easily added by using a “spinner weight” (GPMQ4645 for
the 1 oz. weight, or GPMQ4646 for the 2 oz. weight). If
spinner weight is not practical or is not enough, use Great
Planes (GPMQ4485) “stick-on” lead. A good place to add
stick-on nose weight is to the firewall (don’t attach weight to
the cowl–it is not intended to support weight). Begin by
placing incrementally increasing amounts of weight on the
fuse over the firewall until the model balances. Once you
have determined the amount of weight required, it can be
permanently attached. If required, tail weight may be added
by cutting open the bottom of the fuse and gluing it
permanently inside.
Note: Do not rely upon the adhesive on the back of the lead
weight to permanently hold it in place. Over time, fuel and
exhaust residue may soften the adhesive and cause the
weight to fall off. Use #2 sheet metal screws, RTV silicone or
epoxy to permanently hold the weight in place.
PREFLIGHT
IDENTIFY YOUR MODEL
No matter if you fly at an AMA sanctioned R/C club site or if
you fly somewhere on your own, you should always have
your name, address, telephone number and AMA number on
or inside your model. It is required at all AMA R/C club flying
sites and AMA sanctioned flying events. Fill out the
tag on page 23 and place it on or inside your model.
CHARGE THE BATTERIES
Follow the battery charging instructions that came with your
radio control system to charge the batteries. You should
always charge your transmitter and receiver batteries the
night before you go flying, and at other times as
recommended by the radio manufacturer.
Note: Checking the condition of your receiver battery pack is
highly recommended. All battery packs, whether it’s a trusty
pack you’ve just taken out of another model, or a new battery
pack you just purchased, should be cycled, noting the
discharge capacity. Oftentimes, a weak battery pack can be
identified (and a valuable model saved!) by comparing its
actual capacity to its rated capacity. Refer to the instructions
and recommendations that come with your cycler. If you
don’t own a battery cycler, perhaps you can have a friend
cycle your pack and note the capacity for you.
20
identification
Page 21
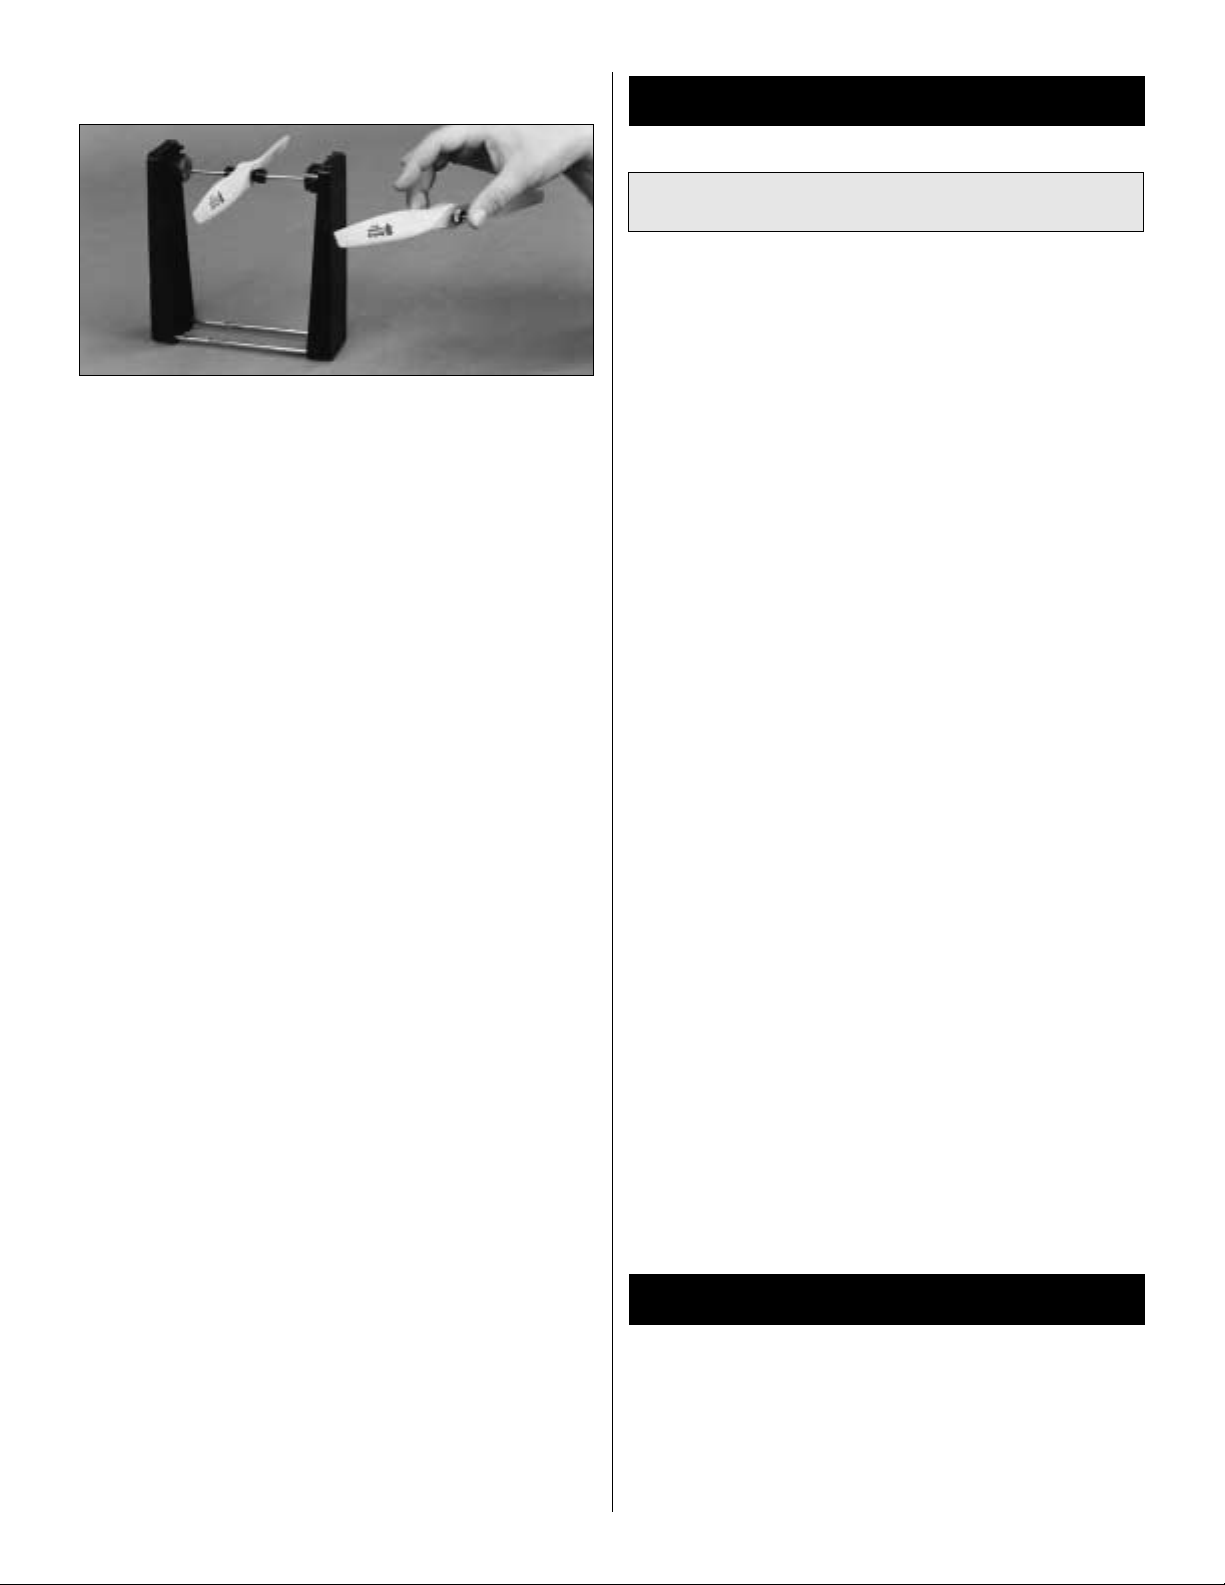
BALANCE THE PROPELLERS
Carefully balance your propeller and spare propellers before
you fly. An unbalanced prop can be the single most
significant cause of vibration that can damage your model.
Not only will engine mounting screws and bolts loosen,
possibly with disastrous effect, but vibration may also
damage your radio receiver and battery. Vibration can also
cause your fuel to foam, which will, in turn, cause your
engine to run hot or quit.
We use a Top Flite Precision Magnetic Prop Balancer
(TOPQ5700) in the workshop and keep a Great Planes
Fingertip Prop Balancer (GPMQ5000) in our flight box.
ENGINE SAFETY PRECAUTIONS
Failure to follow these safety precautions may result in
severe injury to yourself and others.
Keep all engine fuel in a safe place, away from high heat,
sparks or flames, as fuel is very flammable. Do not smoke
near the engine or fuel; and remember that engine exhaust
gives off a great deal of deadly carbon monoxide. Therefore,
do not run the engine in a closed room or garage.
Get help from an experienced pilot when learning to operate
engines.
Use safety glasses when starting or running engines.
Do not run the engine in an area of loose gravel or sand; the
propeller may throw such material in your face or eyes.
Keep your face and body as well as all spectators away from
™
the plane of rotation of the propeller as you start and run
the engine.
GROUND CHECK
If the engine is new, follow the engine manufacturer’s
instructions to break-in the engine. After break-in, confirm
that the engine idles reliably, transitions smoothly and rapidly
to full power and maintains full power–indefinitely. After you
run the engine on the model, inspect the model closely to
make sure all screws remained tight, the hinges are secure,
the prop is secure and all pushrods and connectors are
secure.
RANGE CHECK
Ground check the operational range of your radio before the
first flight of the day. With the transmitter antenna collapsed
and the receiver and transmitter on, you should be able to
walk at least 100 feet [30m] away from the model and still
have control. Have an assistant stand by your model and,
while you work the controls, tell you what the control
surfaces are doing. Repeat this test with the engine running
at various speeds with an assistant holding the model, using
hand signals to show you what is happening. If the control
surfaces do not respond correctly, do not fly! Find and
correct the problem first. Look for loose servo connections or
broken wires, corroded wires on old servo connectors, poor
solder joints in your battery pack or a defective cell, or a
damaged receiver crystal from a previous crash.
Keep these items away from the prop: loose clothing, shirt
sleeves, ties, scarfs, long hair or loose objects such as pencils
or screwdrivers that may fall out of shirt or jacket pockets into
the prop.
Use a “chicken stick” or electric starter to start the engine. Do
not use your fingers to flip the propeller. Make certain the
glow plug clip or connector is secure so that it will not pop
off or otherwise get into the running propeller.
Make all engine adjustments from behind the rotating
propeller.
The engine gets hot! Do not touch it during or right after
operation. Make sure fuel lines are in good condition so fuel
will not leak onto a hot engine, causing a fire.
To stop a glow engine, cut off the fuel supply by closing off
the fuel line or following the engine manufacturer’s
recommendations. Do not use hands, fingers or any other
body part to try to stop the engine. To stop a gasoline
powered engine an on/off switch should be connected to the
engine coil. Do not throw anything into the propeller of a
running engine.
AMA SAFETY CODE (excerpt)
Read and abide by the following Academy of Model
Aeronautics Official Safety Code:
GENERAL
1. I will not fly my model aircraft in sanctioned events, air
shows, or model flying demonstrations until it has been
21
Page 22
proven to be airworthy by having been previously
successfully flight tested.
2. I will not fly my model aircraft higher than approximately
400 feet within 3 miles of an airport without notifying the
airport operator. I will give right of way to, and avoid flying
in the proximity of full-scale aircraft. Where necessary an
observer shall be used to supervise flying to avoid having
models fly in the proximity of full-scale aircraft.
3. Where established, I will abide by the safety rules for the
flying site I use, and I will not willfully and deliberately fly my
models in a careless, reckless and/or dangerous manner.
7. I will not fly my model unless it is identified with my name
and address or AMA number, on or in the model.
9. I will not operate models with pyrotechnics (any device
that explodes, burns, or propels a projectile of any kind).
RADIO CONTROL
1. I will have completed a successful radio equipment
check before the first flight of a new or repaired model.
2. I will not fly my model aircraft in the presence of
spectators until I become a qualified flier, unless assisted by
an experienced helper.
3. I will perform my initial turn after takeoff away from the pit
or spectator areas, and I will not thereafter fly over pit or
spectator areas, unless beyond my control.
4. I will operate my model using only radio control
frequencies currently allowed by the Federal Communications
Commission.
ground
CHECK LIST
❍
4. Extend your receiver antenna and make sure it has a
strain relief inside the fuselage to keep tension off the
solder joint inside the receiver.
❍
5. Balance your model laterally as explained in the
instructions.
❍
6. Use thread-locking compound to secure critical
fasteners such as the set screws that hold the wheel
axles to the struts, screws that hold the carburetor
(if applicable), screw-lock pushrod connectors, etc.
❍ 7. Add a drop of oil to the axles so the wheels will turn
❍
8. Make sure all hinges are securely glued in place.
❍
9. Reinforce holes for wood screws with thin CA where
appropriate (servo mounting screws, cowl mounting
screws, etc.).
❍ 10. Confirm that all controls operate in the correct
and the throws are set up according to the manual.
❍
11. Make sure there are silicone retainers on all the
clevises and that all servo arms are secured to the
servos with the screws included with your radio.
❍ 12. Secure connections between servo wires and Y-
or servo extensions, and the connection between
your battery pack and the on/off switch with vinyl
tape, heat shrink tubing or special clips suitable for
that purpose.
❍
13. Make sure any servo extension cords you may have
used do not interfere with other systems (servo arms,
pushrods, etc.).
❍
14. Secure the pressure tap (if used) to the muffler with
high temp RTV silicone, thread-locking compound or
J.B. Weld.
❍
15. Make sure the fuel lines are connected and are
not kinked.
❍
16. Balance your propeller (and spare propellers).
❍
17. Tighten the propeller nut and spinner.
❍ 18. Place your name, address, AMA number and
number on or inside your model.
❍
19. Cycle your receiver battery pack (if necessary) and
make sure it is fully charged.
❍
20. If you wish to photograph your model, do so before
your first flight.
direction
connectors
telephone
❍ 21. Range check your radio when you get to the flying
arm
freely.
field.
During the last few moments of preparation your mind
may be elsewhere anticipating the excitement of the first
flight. Because of this, you may be more likely to overlook
certain checks and procedures that should be performed
before the model is flown. To help avoid this, a check list
is provided to make sure these important areas are not
overlooked. Many are covered in the instruction manual,
so where appropriate, refer to the manual for complete
instructions. Be sure to check the items off as they are
completed (that’s why it’s called a check list!).
❍
1. Fuelproof all areas exposed to fuel or exhaust
residue.
❍
2. Check the C.G. according to the measurements
provided in the manual.
❍
3. Be certain the battery and receiver are securely
mounted in the fuse. Simply stuffing them into place
with foam rubber is not sufficient.
FLYING
The Kaos .40 is a great-flying model that flies smoothly and
predictably. The Kaos .40 does not, however, possess the selfrecovery characteristics of a primary R/C trainer and should
be flown only by experienced R/C pilots.
22
Page 23
CAUTION (THIS APPLIES TO ALL R/C AIRPLANES): If,
while flying, you notice any unusual sounds, such as a
low-pitched “buzz,” this may indicate control surface
flutter. Because flutter can quickly destroy components of
your airplane, any time you detect flutter you must
immediately cut the throttle and land the airplane! Check
all servo grommets for deterioration (this may indicate
which surface fluttered), and make sure all pushrod
linkages are secure and free of play. If the control surface
fluttered once, it probably will flutter again under similar
circumstances unless you can eliminate the free-play or
flexing in the linkages. Here are some things which can
cause flutter: Excessive hinge gap; Not mounting control
horns solidly; Poor fit of clevis pin in horn; Side-play of
pushrod in guide tube caused by tight bends; Poor fit of
Z-bend in servo arm; Insufficient glue used when gluing in
the elevator joiner wire; Excessive play or backlash in
servo gears; and Insecure servo mounting.
level, but use this first flight to become familiar with your
model before landing.
LANDING
To initiate a landing approach, lower the throttle while on the
downwind leg. Allow the nose of the model to pitch
downward to gradually bleed off altitude. Continue to lose
altitude, but maintain airspeed by keeping the nose down as
you turn onto the crosswind leg. Make your final turn toward
the runway (into the wind) keeping the nose down to
maintain airspeed and control. Level the attitude when the
model reaches the runway threshold, modulating the throttle
as necessary to maintain your glide path and airspeed. If you
are going to overshoot, smoothly advance the throttle (always
ready on the right rudder to counteract torque) and climb out
to make another attempt. When you’re ready to make your
landing flare and the model is a foot or so off the deck,
smoothly increase up elevator until it gently touches down.
TAKEOFF
Before you get ready to takeoff, see how the model handles
on the ground by doing a few practice runs at low speeds on
the runway. If necessary, adjust the nose wheel so the model
will roll straight down the runway. If you need to calm your
nerves before the maiden flight, shut the engine down and
bring the model back into the pits. Top off the fuel, then
check all fasteners and control linkages for peace of mind.
Remember to takeoff into the wind. When you’re ready, point
the model straight down the runway and then gradually
advance the throttle. Gain as much speed as your runway
and flying site will practically allow before gently applying
up elevator, lifting the model into the air. At this moment it is
likely that you will need to apply more right rudder to
counteract engine torque. Be smooth on the elevator stick,
allowing the model to establish a gentle climb to a safe
altitude before turning into the traffic pattern.
FLIGHT
For reassurance and to keep an eye on other traffic, it is a
good idea to have an assistant on the flight line with you. Tell
him to remind you to throttle back once the plane gets to a
comfortable altitude. While full throttle is usually desirable
for takeoff, most models fly more smoothly at reduced
speeds.
One final note about flying your model. Have a goal or flight
plan in mind for every flight. This can be learning a new
maneuver(s), improving a maneuver(s) you already know, or
learning how the model behaves in certain conditions (such
as on high or low rates). This is not necessarily to improve
your skills (though it is never a bad idea!), but more
importantly so you do not surprise yourself by impulsively
attempting a maneuver and suddenly finding that you’ve run
out of time, altitude or airspeed. Every maneuver should be
deliberate, not impulsive. For example, if you’re going to do
a loop, check your altitude, mind the wind direction
(anticipating rudder corrections that will be required to
maintain heading), remember to throttle back at the top, and
make certain you are on the desired rates (high/low rates). A
flight plan greatly reduces the chances of crashing your
model just because of poor planning and impulsive moves.
Remember to think.
Have a ball! But always stay in control and fly in a safe
manner.
GOOD LUCK AND GREAT FLYING!
Take it easy with the Kaos for the first few flights, gradually
getting acquainted with it as you gain confidence. Adjust the
trims to maintain straight and level flight. After flying around
for a while, and while still at a safe altitude with plenty of
fuel, practice slow flight and execute practice landing
approaches by reducing the throttle to see how the model
handles at slower speeds. Add power to see how she climbs
as well. Continue to fly around, executing various maneuvers
and making mental notes (or having your assistant write them
down) of what trim or C.G. changes may be required to fine
tune the model so it flies the way you like. Mind your fuel
23
Page 24
BUILDING NOTES
Kit Purchased Date: ___________________________
Where Purchased: ____________________________
Date Construction Started: _____________________
FLIGHT LOG
Date Construction Finished: ____________________
Finished Weight:______________________________
Date of First Flight:____________________________
 Loading...