

Page 1
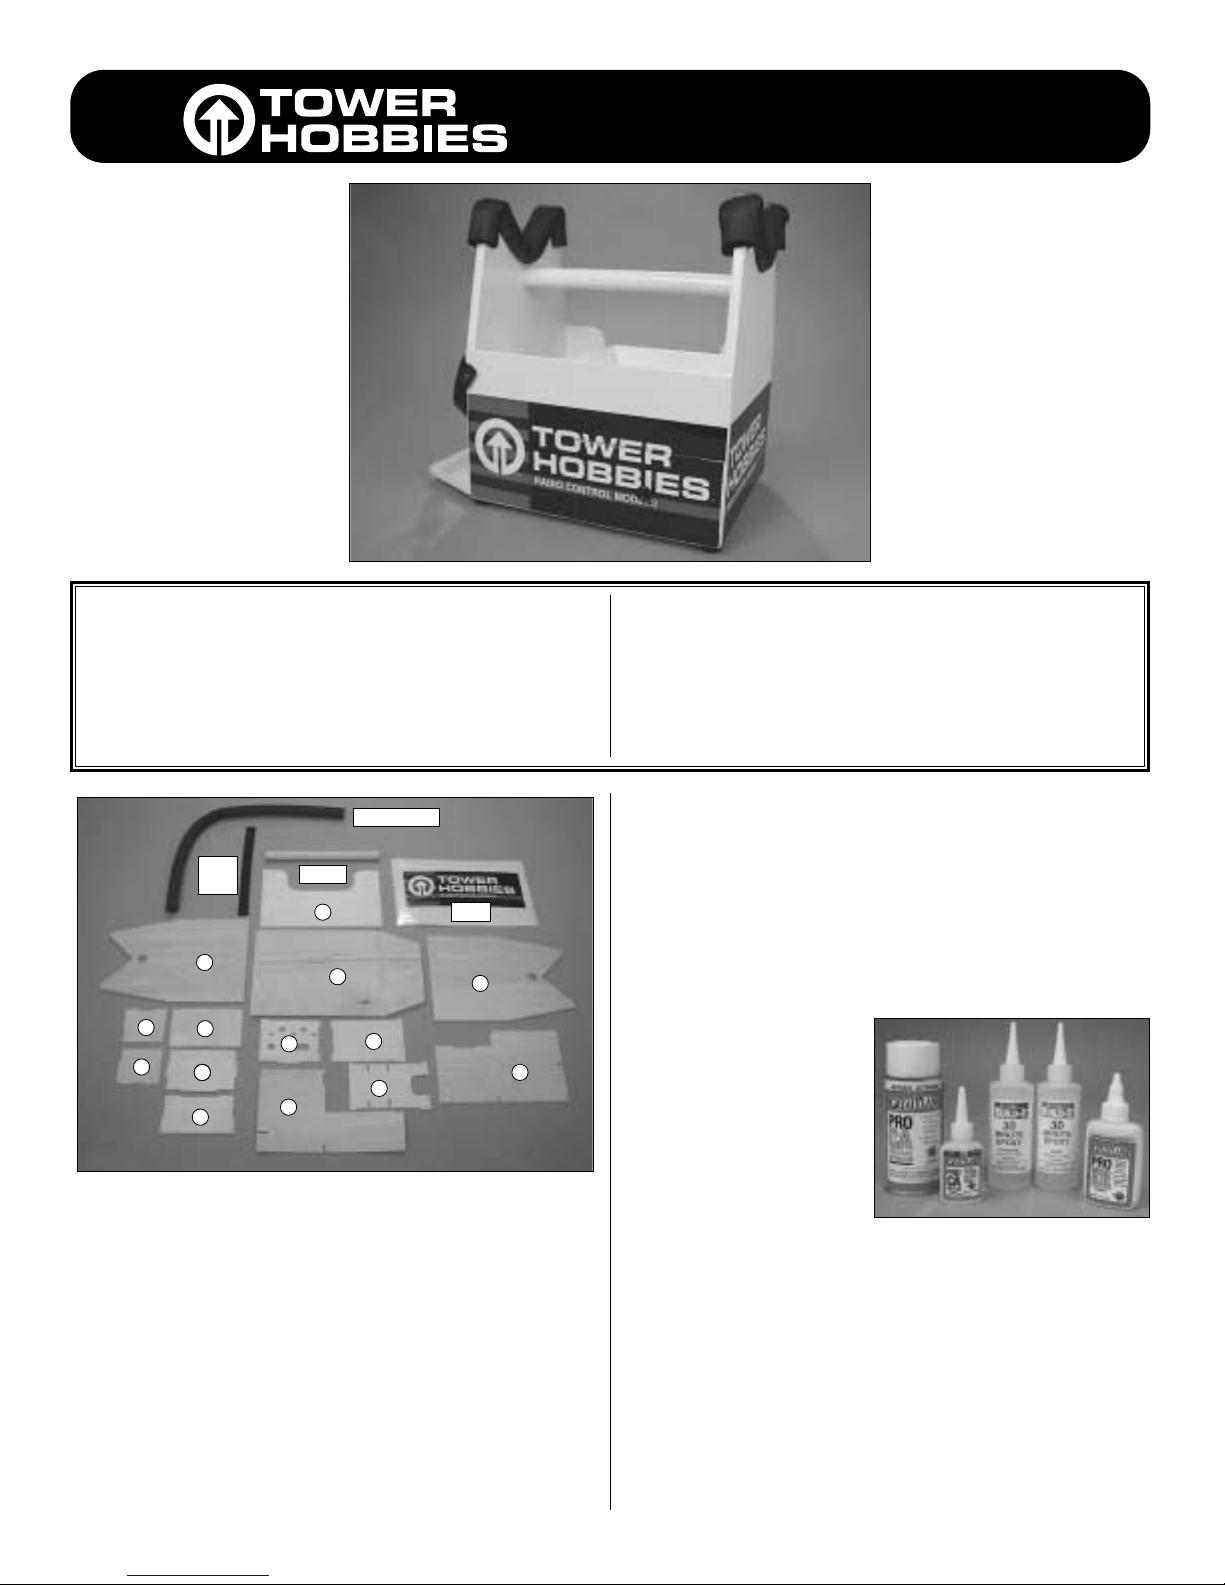
Parts List
Hardware (not pictured)
Tools and Items Needed for Assembly:
❍ Medium and Fine Sandpaper.
❍ Hobby Knife & #11 Blade (TOWR1010).
❍ Hobbico
®
Builders Triangle (HCAR0480).
❍ Drill with 1/8" [3mm] and 3/32" [2.4mm] drill bits.
❍ Fuelproof paint or finishing resin.
Choice of Adhesives:
We assembled our Easy Tote
field box using Thick Great
Planes®Pro™CA glue
(GPMR6015). You may use
this product or 30-Minute
Tower Hobbies BUILD-IT
™
Epoxy (TOWR3811), or
Great Planes Pro Wood Glue
(GPMR6160). Please note that if you are using epoxy or wood
glue you will need to tape the pieces into place with the proper alignment and wait for the glue to dry.
Specification & Description Changes:
All pictures, descriptions and specifications found in this
instruction manual are subject to change without notice.
Tower Hobbies maintains no responsibility for inadvertent
errors in this manual.
Rubber Feet (4)
3x12mm Wood
Screws (4)
Drawer Knob (1)
2.6x10mm Wood
Screws (2)
3mm Washers (5)
3x10mm Wood
Screw (1)
Part A (1)
Part B (1)
Part C (1)
Part D (1)
Part E (1)
Part F (2)
Part G (1)
Part H (1)
Part I (1)
Part J (2)
Part L (1)
Part M (1)
Wood Handle (1)
Decals (3)
Cradle Padding
Material (1)
Hook & Loop
Material (2)
EASY TOTE
A COMPACT, EASY TO ASSEMBLE FLIGHT BOX
Congratulations. You have made a wise choice in selecting
the Tower Easy Tote for your field box.
We have engineered this kit to be simple to assemble and
provide enough space to hold everything you need to go flying without being overly bulky.
The parts practically hold themselves together without glue, so
you can “dry fit” all the parts to make sure you have everything
in the proper place. Please note that the parts will only fit
together one way, eliminating the chance of error.
When properly assembled and fuel proofed, your Easy Tote
should provide many years of flight line service.
™
®
®
Cradle Padding
Hook
&
Loop
F
J
M
J
GG
I
L
C
E
Handle
H
Decal
G
A
B
F
D
Page 2

❍ 1. Start by locating Parts A, B, and C. Assemble them as
shown in the above photograph. Use a flat surface or a
Hobbico Builders Triangle (HCAR0480) to keep the parts
square. Glue parts A and C to part B.
❍ 2. Part D is the back of the shelf assembly. Align the tabs
and use a flat surface to hold everything straight while you
glue the shelf assembly into place as shown above.
❍ 3. Part E is the front of the shelf assembly. Again align the
tabs and use a flat surface to firmly hold the assembly in place
on part E as you glue the completed shelf assembly together.
Note the overhang as shown in the above photograph.
❍ 4. Glue both “F” uprights to, part G, the base of the box.
Use a Hobbico Builders Triangle (HCAR0480) to keep the
uprights 90-degrees to the base of the box, part G.
❍ 5. Test fit the shelf assembly into the base/upright assembly.
If everything in your shelf assembly was flat and straight, the
assembly should fit perfectly inside, if not use sandpaper to
make small alterations in the shelf assembly until it fits properly. Note that the overhang of part E fits flush against the outside of the base (part G) and one of the uprights (part F).
When you are completely satisfied with the fit and alignment,
glue the shelf assembly into place.
❍ 6. Part H is the backside of the Easy Tote. Test fit this part
into place; if everything is correct glue it into place as shown
in the above photograph.
Assembly Instructions
Page 3

❍ 7. Insert the wooden handle into the holes in the two
uprights (part F) as shown in the photograph above. Keep the
handle ends flush with the outside of the uprights as shown.
When satisfied with the fit, glue the handle in place at this time.
❍ 8. Locate parts I, L, M, and two J parts in order to assem-
ble the drawer. Assemble the I, L, and J parts as shown in the
photograph above. Do not add part M until you have completed the assembly of all the other parts of the drawer as
described in the following step.
❍ 9. Test fit the front of the drawer, part M, to the assembly. It
is important that the top of this part aligns with the top of the
two part J's as shown in the photograph. Also be sure to align
part M with the left side of the drawer side (part J). This alignment creates an overhang of part M on the right and bottom
of drawer as indicated in the above photograph. When satisfied with the position and alignment glue part M securely into
place.
❍ 10. Slide the drawer assembly into place and notice how
the overhang on the right and bottom matches up with the
bottom and side of the Easy Tote.
We strongly suggest that you fuelproof your new field box. You
may finish your Easy Tote using a number of methods. You can
paint it in your favorite color. Making sure you use a paint that
is fuelproof such as Top Flite®LustreKote™. Apply a number of
coats of paint until you are happy with the finish. If you prefer
the natural finish of wood, you can also use a quality finishing
resin such as Pro Epoxy Finishing Resin (GPMR6049) which
sands easily and will provide a nice finish.
When you are done with the finish continue with the final
steps to complete your Easy Tote.
❍ 11. Locate the four rubber “feet”, four 3x12mm wood screws
and four 3mm flat washers. Drill a 3/32" [2.4mm] hole at each
corner of the bottom of the base. Place a flat washer on each of
the 3x12mm wood screws then insert it into the rubber feet.
Screw them into place as shown in the above photograph.
Finishing Your Tower Hobbies Easy Tote
Page 4

❍ 12. Your Easy Tote Kit includes three colorful Tower
Hobbies decals. If you decide to utilize these, apply them
now. With the drawer installed, place the entire decal on the
front of the box as shown. Using a sharp hobby knife make a
cut around the edge of the drawer as shown in the photograph. When satisfied with your trim scheme, drill a 1/8"
[3mm] hole in the center of the front of the drawer as indicated in the above photograph.
❍ 13. Place a 3x10mm screw and a 3mm flat washer through
the hole in the front of the drawer from the inside. While
holding the head of the screw on the inside of the drawer,
place the drawer handle onto the screw.
❍ 14. Your kit is supplied with hook and loop material to hold
your fuel container in place. Locate this material and two
2.6x10mm screws. At the locations shown in the photograph
drill two 3/32" [2.4mm] holes. Secure the hook and loop
material with the two screws.
❍ 15. Also included with your kit is cradle padding material
to be used as shown in the photograph above. This material
will protect your airplane during normal use. Glue this in
place as shown. We used thick CA, but the other adhesives
(wood glue or epoxy) you may have chosen to assemble your
kit will work also, just remember, you will have to tape it into
place until the glue sets or dries.
This completes the assembly of your new flight box. Enjoy it
for many years to come.
Defective/Damaged Merchandise:
If this product is received damaged or defective in parts or
craftsmanship, please call the Tower Hobbies Order
Assistance line at 1-800-637-6050. Please save all packing
material and paperwork.
Entire Contents © Copyright 2002TOWZ1264 for TOWP1500
 Loading...