

TOWA SX-590II Operating Manual

Model SX-590II
OPERATING MANUAL


NOTICE
The information and specifications in this manual are subject to change without notice.
While every precaution has been taken to make this manual accurate, the Manufacturer shall not be
liable for any errors or omissions, nor for any damages resulting from the use of the information
herein.
This manual may not be copied or transmitted by any means, in whole or in part, without prior
written consent from the Manufacturer.
All rights reserved.
FEDERAL COMMUNICATIONS COMMISION NOTICE
This equipment has been tested and found to comply with the limits for a Class A digital device,
pursuant to section J in Part 15 of the FCC Rules. These limits are designed to provide reasonable
protection against harmful interference when the equipment is operated in a commercial
environment.
This equipment generates, uses, and can radiate radio frequency energy and, if not installed and
used in accordance with the instructions, may cause destructive interference of radio
communications. Operation of this equipment in a residential area is likely to cause interference, in
which case the user will be required to correct the problem at his own expense.

INTRODUCTION
We very much appreciate your purchase of this cash register. The cash register is equipped with
function keys which allow you to program and use various functions and with numeric keys for
entering numbers.
This Manual explains the methods for programming and entering transactions with this cash register
and it describes precautions and accessory items necessary to use it. This manual also shows
examples of the receipts that will be printed out for each case described.
Before using the cash register, please read this manual so that you understand its operation.

1
CONTENTS
1. GETTING TO KNOW THE CASH REGISTER.......................................................................................3
1). GENERAL SPECIFICATIONS ................................................................................................. 3
2). PRECAUTIONS ....................................................................................................................... 3
3). EXTERNAL VIEW.................................................................................................................... 4
4). CONTROL LOCK .................................................................................................................... 5
5). DISPLAY .................................................................................................................................. 6
6). PRINTER ................................................................................................................................. 7
7). KEYBOARD.............................................................................................................................8
2.SETTING UP ........................................................................................................................................11
1). INITIALIZATION .................................................................................................................... 11
(1) SYSTEM CLEAR ............................................................................................................... 11
(2) HALF CLEAR .................................................................................................................... 12
2). INSTALLING THE PAPER ROLLS........................................................................................ 13
3. QUICK START......................................................................................................................................15
4. REGISTRATION...................................................................................................................................16
1). EXAMPLE OF REGISTRATION AND RECEIPT ................................................................... 16
1-1. SINGLE ITEM CASH SALE.............................................................................................. 16
1-2. DEPARTMENT OF HIGH AMOUNT LOCK-OUT.............................................................. 16
1-3. MULTIPLE SALE AND CHANGE ..................................................................................... 17
1-4. CHANGE CALCULATION AFTER TRANSACTION ......................................................... 17
1-5.
MULTIPLELICATION AND REPEAT ENTRY
........................................................................... 18
1-6. COVER KEY..................................................................................................................... 18
1-7. PLU KEY .......................................................................................................................... 19
1-8. PRICE ENTRY OF PLU.................................................................................................... 19
1-9. ENTRY PRICE OF PLU AND INPUT BY PLU KEY.......................................................... 20
1-10.
DEPARTMENT/PLU SALES BY READING BARCODE.
.......................................................... 20
1-11. DISCOUNT ..................................................................................................................... 21
1-12. DISCOUNT RATE........................................................................................................... 22
1-13. PLUS PERCENTAGE RATE........................................................................................... 23
1-14. SALE ON CHARGE WITH #/NS KEY AND ERROR CORRECTION WITH EC KEY
......................... 23
1-15. TENDERING WITH TEND$5.00 - TEND$50.00KEY .....................................................24
1-16. TRANSACTION WITH CHKS KEY ............................................................................... 24
1-17. TRANSACTION WITH CARD1 CARD2 CARD3 CARD4 KEYS ................................. 25
1-18. REGISTRATION WITH SHFT1 SHFT2 KEYS.............................................................. 25
1-19. RETURN ITEM SALE..................................................................................................... 26
1-20. BOTTLE RETURNING ...................................................................................................26
1-21. VOID............................................................................................................................... 26
1-22. RECEIVED-ON-ACCOUNT AND PAID OUT.................................................................. 27
1-23. REGISTRATION WITH NTX TX1 TX2 AND TX3 KEYS ..............................................28
1-24. REGISTRATION WITH TXEX ........................................................................................ 29
1-25. VARIOUS CASES OF RECEIPT ISSUE ........................................................................ 29
2). TRANSACTION HOLD KEY ................................................................................................. 31
3). FOOD STAMP ....................................................................................................................... 32
4). AGE VERIFICATION ............................................................................................................. 33
5). QUANTITY/ FRACTION FUNCTION..................................................................................... 33
5. VARIOUS FUNCTIONS........................................................................................................................34
1). INVENTORY CONTROL........................................................................................................ 34
2). PLU MENU SHIFT FUNCTION.............................................................................................. 34

2
3). TRAINING MODE .................................................................................................................. 35
6. X/Z REPORT ........................................................................................................................................36
1). READ AND RESET THE SALES INFORMATION ................................................................ 36
2). EXPLANATION OF KEY FUNCTIONS.................................................................................. 39
(1) FUNCTION KEYS .............................................................................................................. 39
(2) PRESET SHEET FOR X/Z REPORTS ............................................................................... 40
3). HOW TO CHOOSE REPORTS.............................................................................................. 41
4). IN REPORT MENU ................................................................................................................ 42
4-1. SALES REPORT .............................................................................................................. 42
4-2. INVENTORY REPORT ..................................................................................................... 43
4-3. REPORT TABLE NO......................................................................................................... 44
4-4. TRAINING REPORT......................................................................................................... 44
5). SALES REPORT BY MACRO KEY ...................................................................................... 45
6). CHOOSING REPORT OF SPECIFIC PLU/DEPARTMENT (EX. FROM XX PLU TO YY PLU).
.................................................................................................................................................... 46
7). CASH DECLERATION ..........................................................................................................48
8). ISSUING RE-ORDERS LIST ................................................................................................. 50
9). SAMPLE REPORT ................................................................................................................ 51
7. INTERFACE PORTS............................................................................................................................56
8. TROUBLESHOOTING .........................................................................................................................59
9. MAINTENANCE ...................................................................................................................................60
1. GETTING TO KNOW THE CASH REGISTER
3
1. GETTING TO KNOW THE CASH REGISTER
This chapter describes the specifications, precautions, part names of this cash register and
functions.
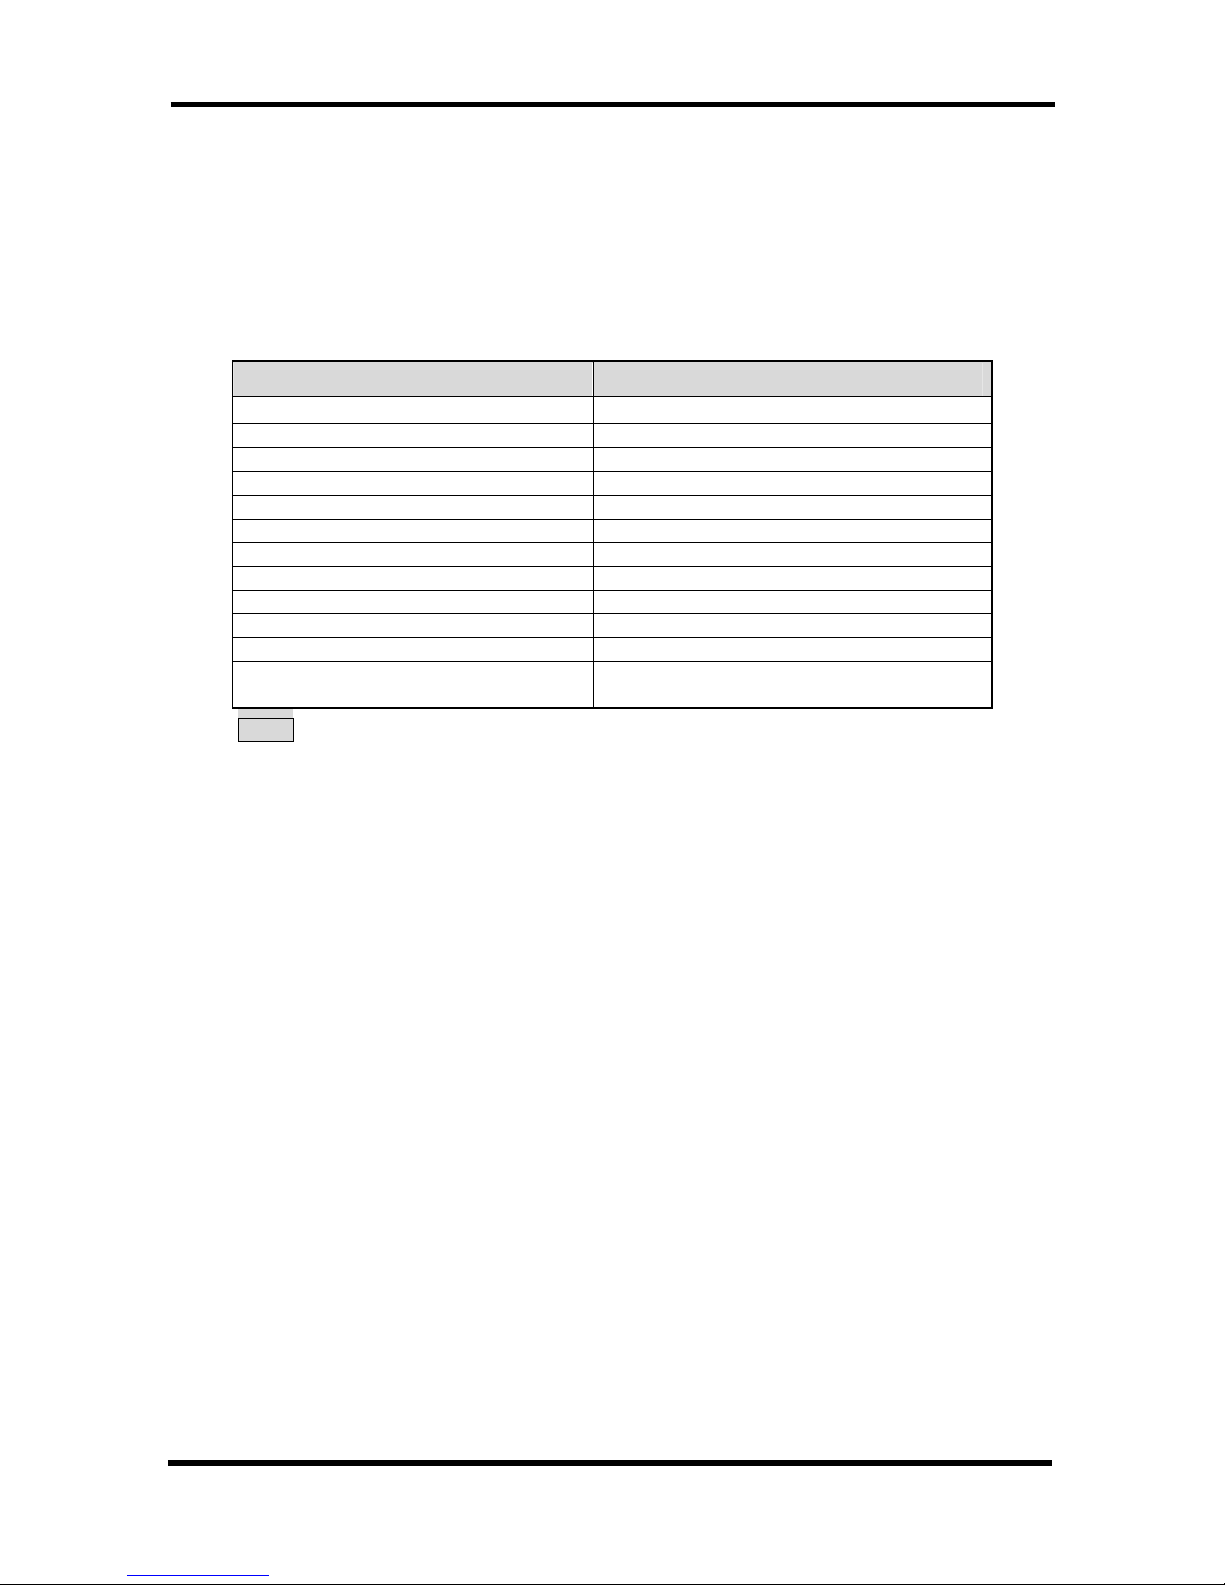
1). GENERAL SPECIFICATIONS
Item Description
Power source
AC100~117VAC,220~240VAC±10%
Power consumption 40W
Operating environment temperature
0°C to 40°C ( 32°F to 104°F )
Storage memory SD RAM
Memory back-up time Approx. 700 hours
Printer 2 station thermal printer
Printing speed Approx. 14 lines per sec.
Paper roll width 57.5mm
Max. Diameter of paper roll 70mm
Dimensions(Body) 350mm (W) x 429mm (D) x 188mm (H)
Dimensions(Drawer No.26) 410mm (W) x 415mm (D) x 114mm (H)
Weight Body(except Drawer) : 6.9 Kg
Drawer (No.26) : 6.2 Kg
NOTE: THE DRAWER IS SEPARABLE.
2). PRECAUTIONS
Please note the following items before using the cash register.
z Avoid using the cash register in the following conditions:
Exposed to direct sunlight or water
Hot or humid environments
Near equipment that generates strong electromagnetic fields
Anywhere there may be sudden changes in temperature
z Do not touch the cash register if your hands are wet.
z If the register malfunctions, do not attempt to repair the cash register by yourself.
z Plug your cash register into any standard wall outlet.
Other electrical devices on the same circuit may damage the cash register.
z The outlet must be located near the unit and easily accessible.
1. GETTING TO KNOW THE CASH REGSTER
4
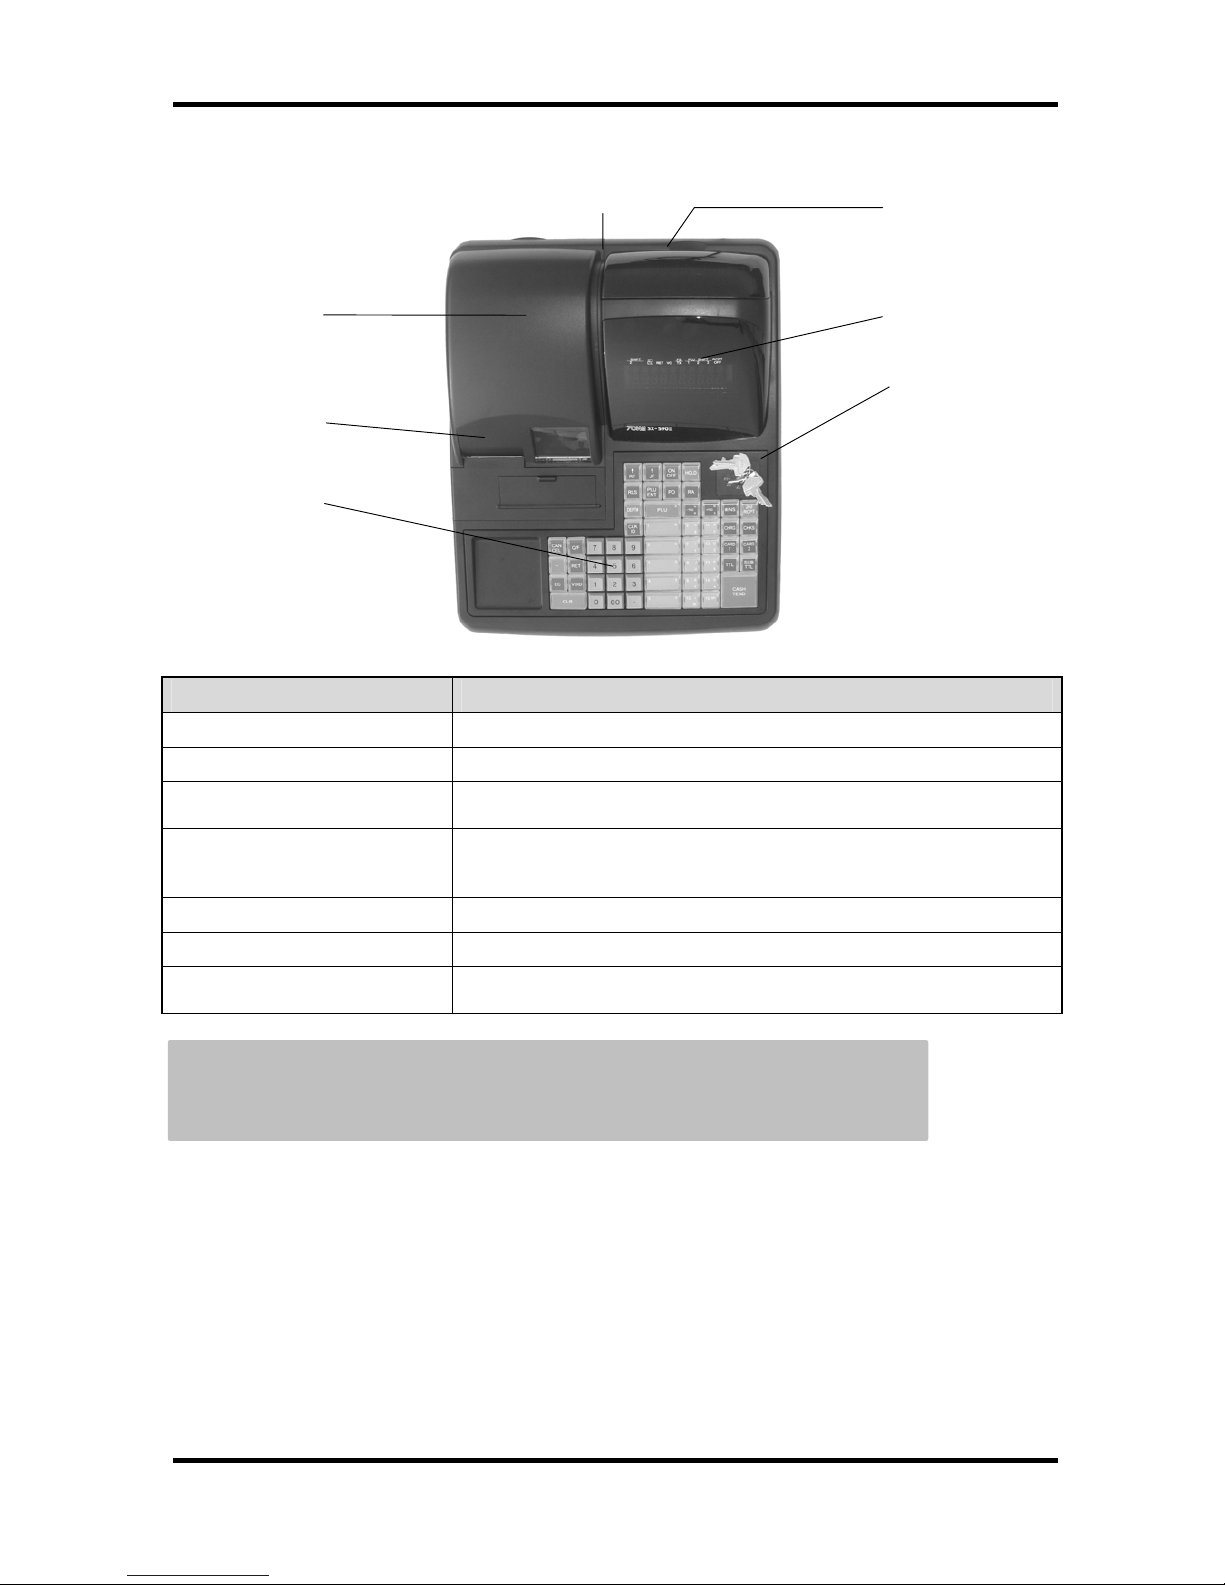
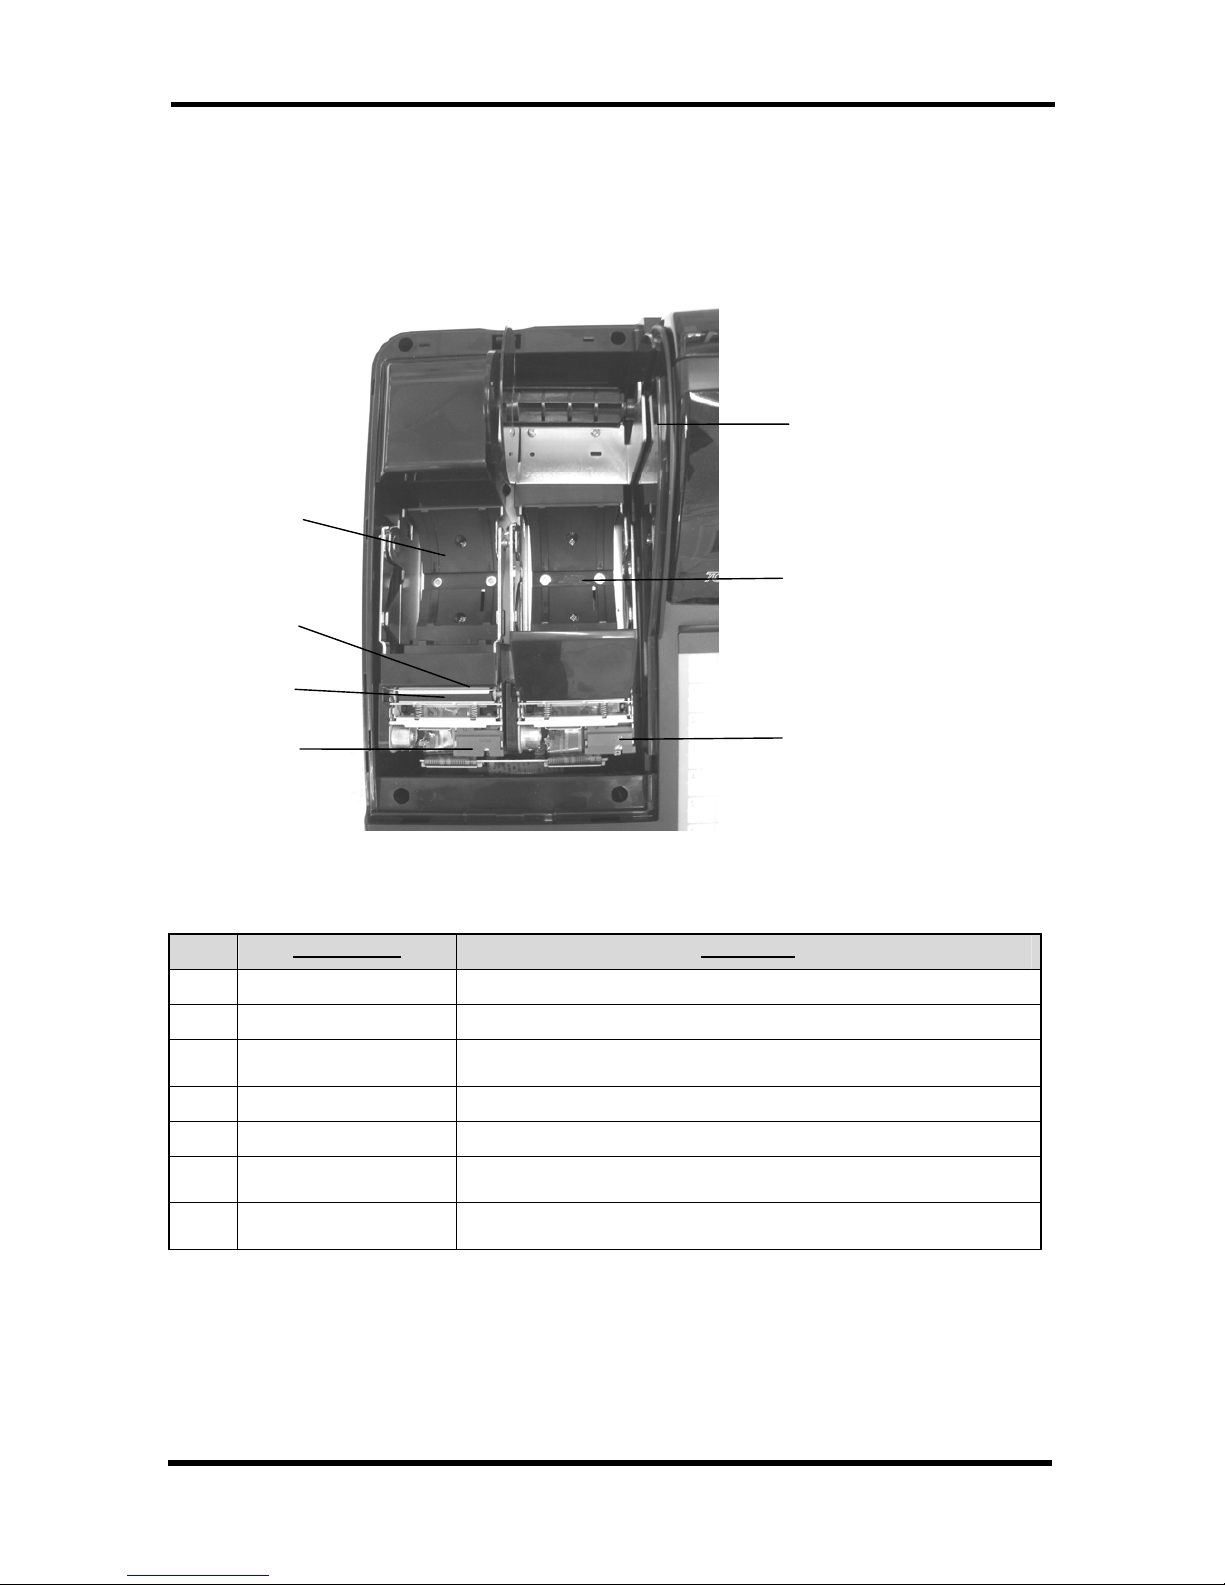
3). EXTERNAL VIEW
Part name Functions
1. Printer cover Protecting the printer.
2. Receipt dispenser This is where the receipt comes out.
3. Input/Output connectors
(Rear side )
Ready for connection with peripheral devices such as PC,
scanners, etc.
4. Customer display Shows the customer the article name, the amount and the
transaction name in two-line fluorescent display unit. Upper line: 14
segments 10 digits. Lower line: Numeric 10 digits
5. Operator display The same display as the customer display.
6. Control lock The control lock allows you to change the cash register mode.
7. Keyboard The water-proof 173-position for flat keyboard.
56-position for raised keyboard.
* Drawer Unit :The drawer can be sited far from the ECR.
Caution : Do not connect Input / Output Connectors to Telephones.
1
2
7
4
5
6
3
1. GETTING TO KNOW THE CASH REGISTER
5
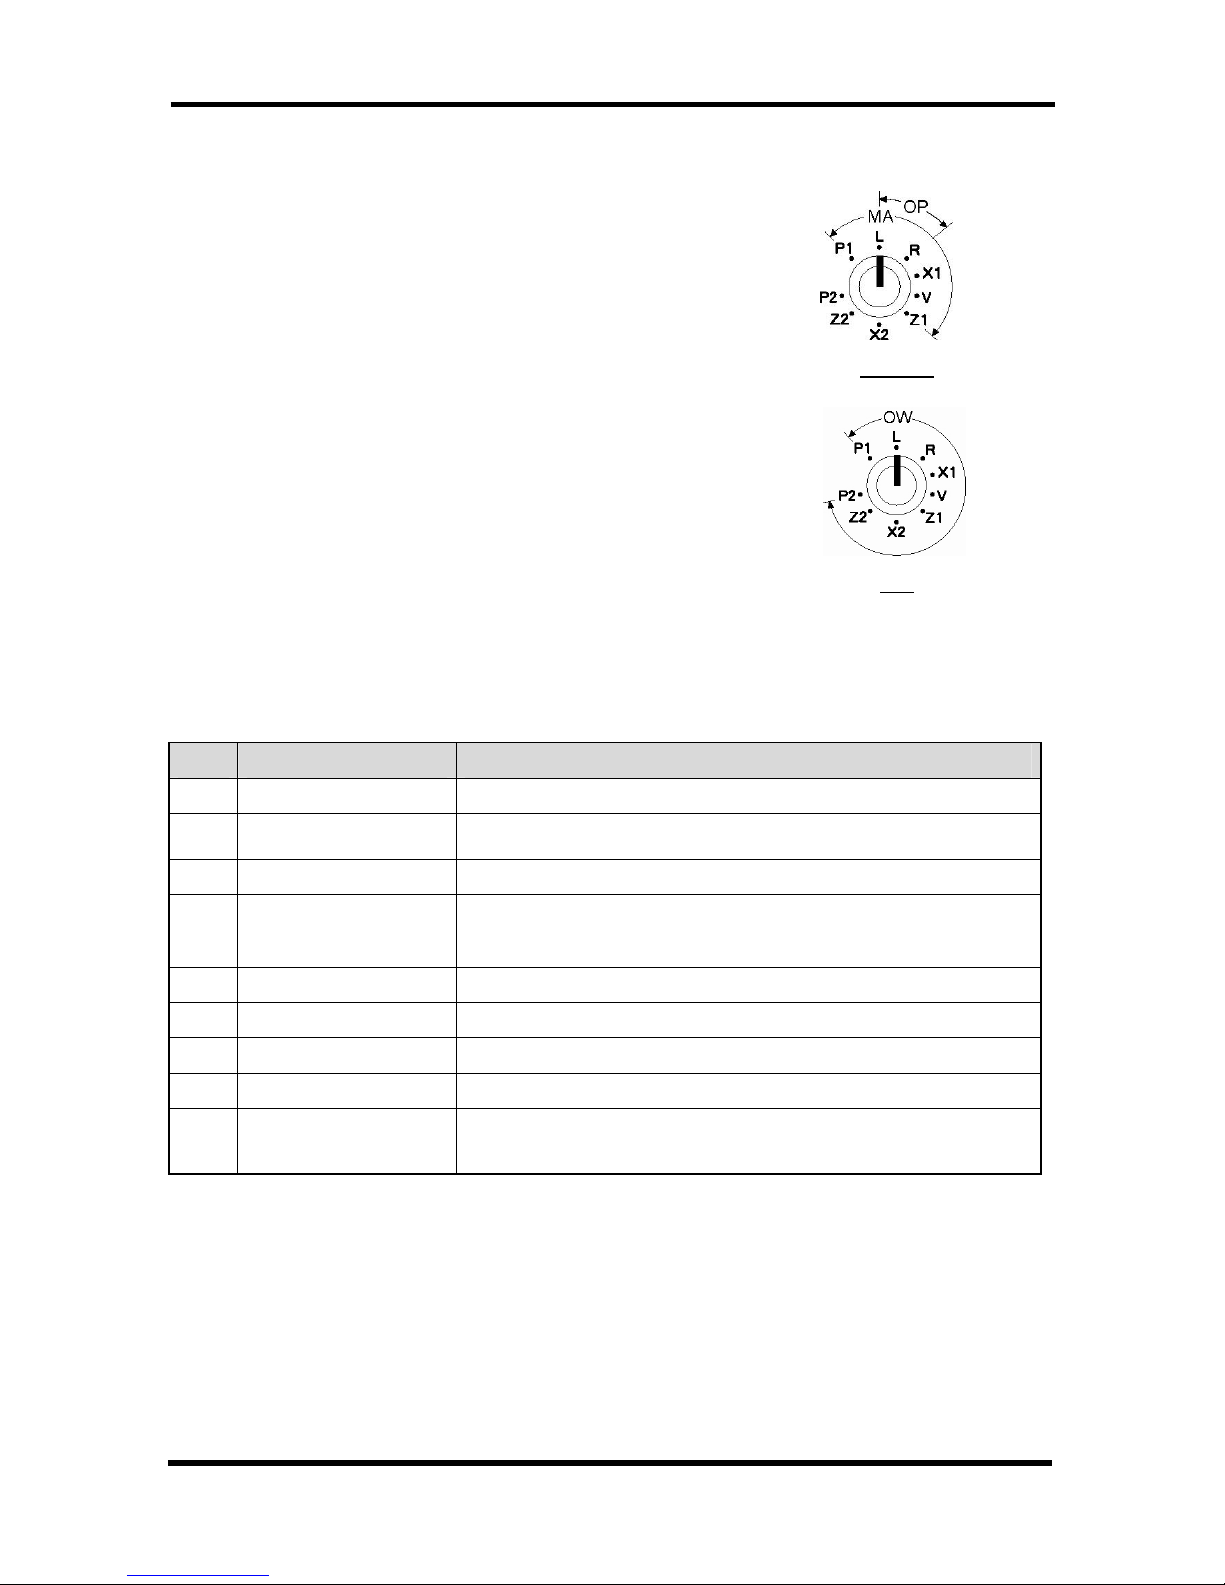
4). CONTROL LOCK
The control lock allows you to change the cash register mode .
Your register is equipped with nine modes. The cash register
is always in of these nine modes.
To change mode, use the owner’s key (marked with [OW]),
manager’s key(marked with [MA]) and the operator’s key
(marked with [OP]) which come with this cash register. OP / MA
Insert the owner’s key, manager’s key or the operator’s key
into the control lock and turn it to any position.
The [OW] key can select any mode. The [MA] key can select
the “P1”, “L”, “R”, “X1”, “V”, and “Z1”positions.
The [OP] key can select the “L” or “R” positions.
OW: Key for Owner can access all key positions. OW
MA : Key for Manager can access "P1", "L", "R", " X1", "V" and "Z1" positions.
OP : Key for Operator can access "L" and "R" positions.
The following table shows the modes the cash register is equipped with.
Mode Functions
P1 Program 1 mode Used to program "Date", Department, PLU, Tax etc.
L
Lock mode
Used to lock the cash register. This position disables all
operations.
R Register mode Used to process sales transaction
X1
(T)
Read mode
Used to read and print the Sales Reports.
Used for training the operator.
V Void mode Used to void the registration.
Z1 Reset mode Used to reset and print the Sales Reports
X2 Periodical read mode Used to print periodicals information report.
Z2 Periodical reset mode Used to read and reset the periodical sales information.
P2
Program 2 mode
Used to program "SYSTEM FLAG", "KEY LAYOUT",
"TRANSACTION NAME" etc. System mode is accessible from the
P2 mode.
1. GETTING TO KNOW THE CASH REGSTER
6
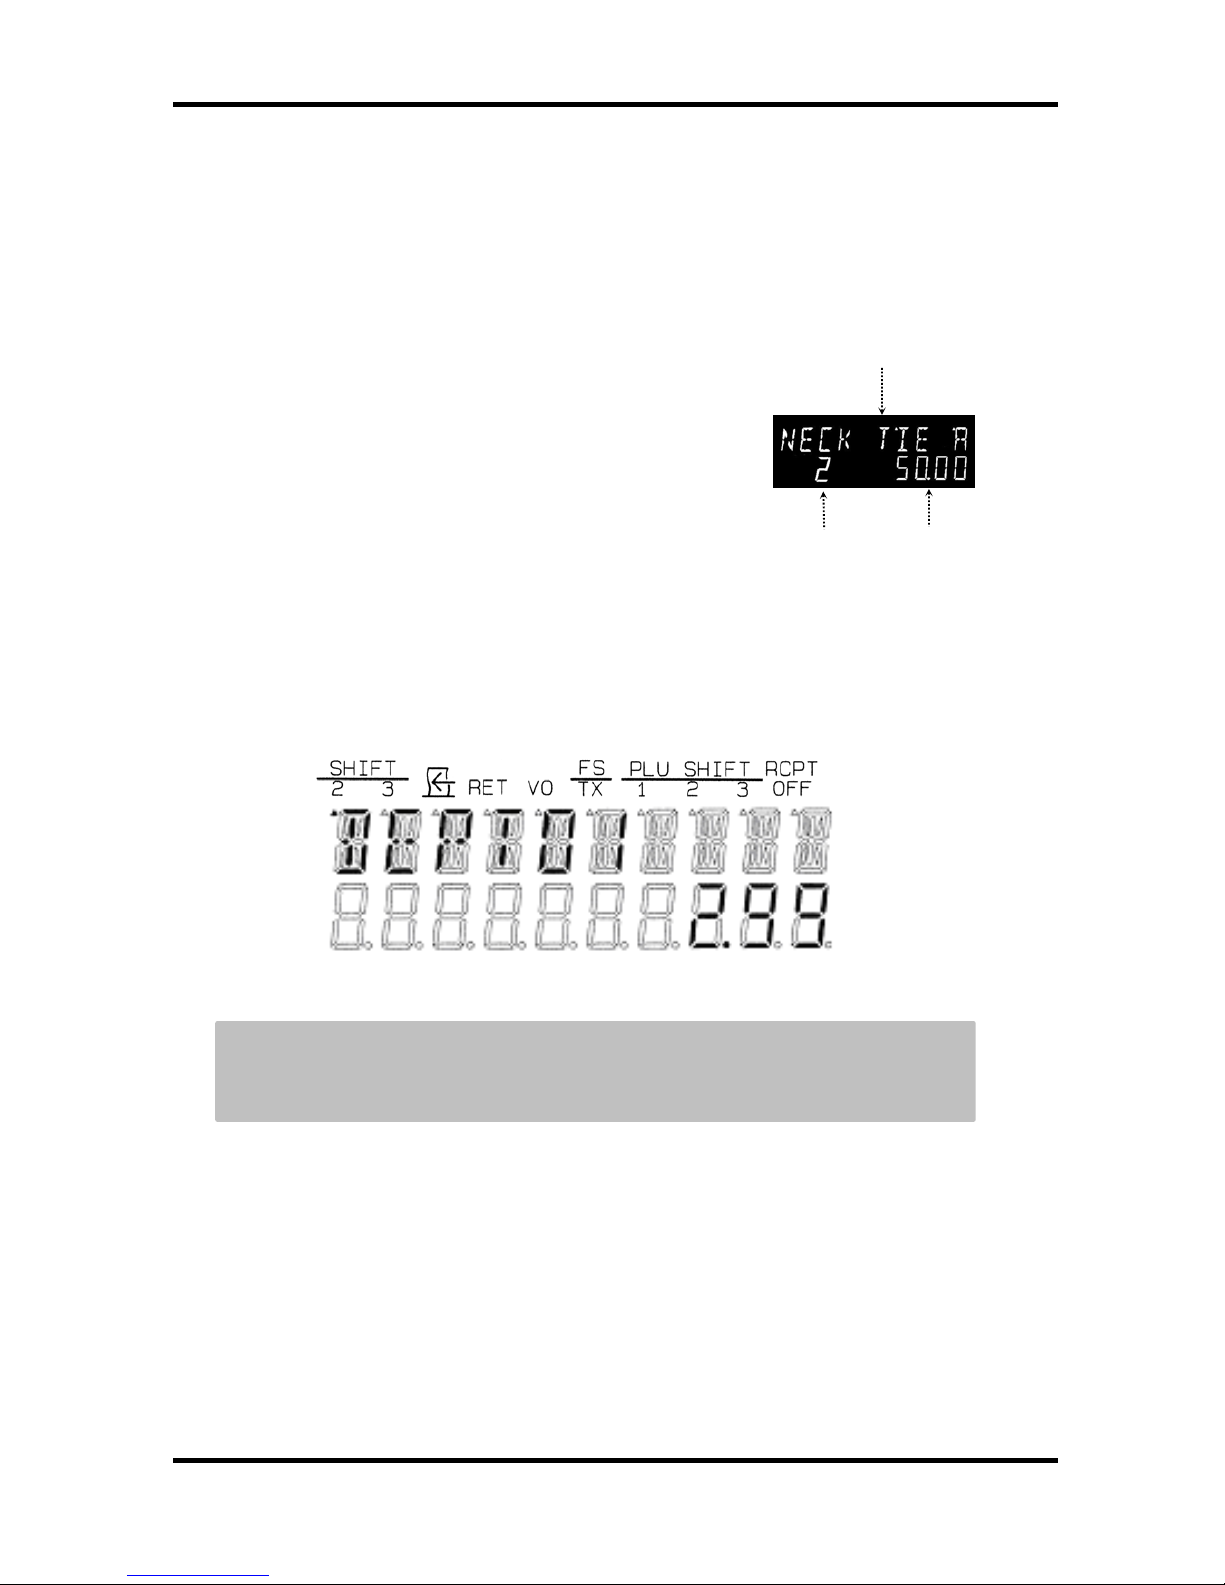
5). DISPLAY
Operator & Customer Display
Your cash register provides 2 x two-line displays for operator and customer.
* UPPER LINE: 14 Segments, 10 Digits Fluorescent tube.
Displays name of commodity or transaction.
* LOWER LINE: 7 Segment 10 Digits Fluorescent tube.
Displays Unit Price during operation, and
total amount when transaction is completed.
Example of display at "R" mode
.
Note: To set up the customer display, pull up and rotate the unit for the best
angle.
NAME OF COMMODITY OR
TRANSACTION
REPEAT
A
MOUNT
1. GETTING TO KNOW THE CASH REGISTER
7
6). PRINTER
The figure below shows the printer without the cover.
Part Names Functions
1
Journal Hold the journal roll.
2
Receipt Hold the receipt roll.
3
Print-head unit Prints the characters and graphic logos on the receipt and
journal roll.
4
Take-up spool Used to take up the journal roll.
5
Paper exit The paper exits here.
6
Arms release button
(Receipt)
Release the receipt arms.
7
Arms release button
(Journal)
Release the journal arms.
2
7
6
4
1
5
3
1. GETTING TO KNOW THE CASH REGSTER
8
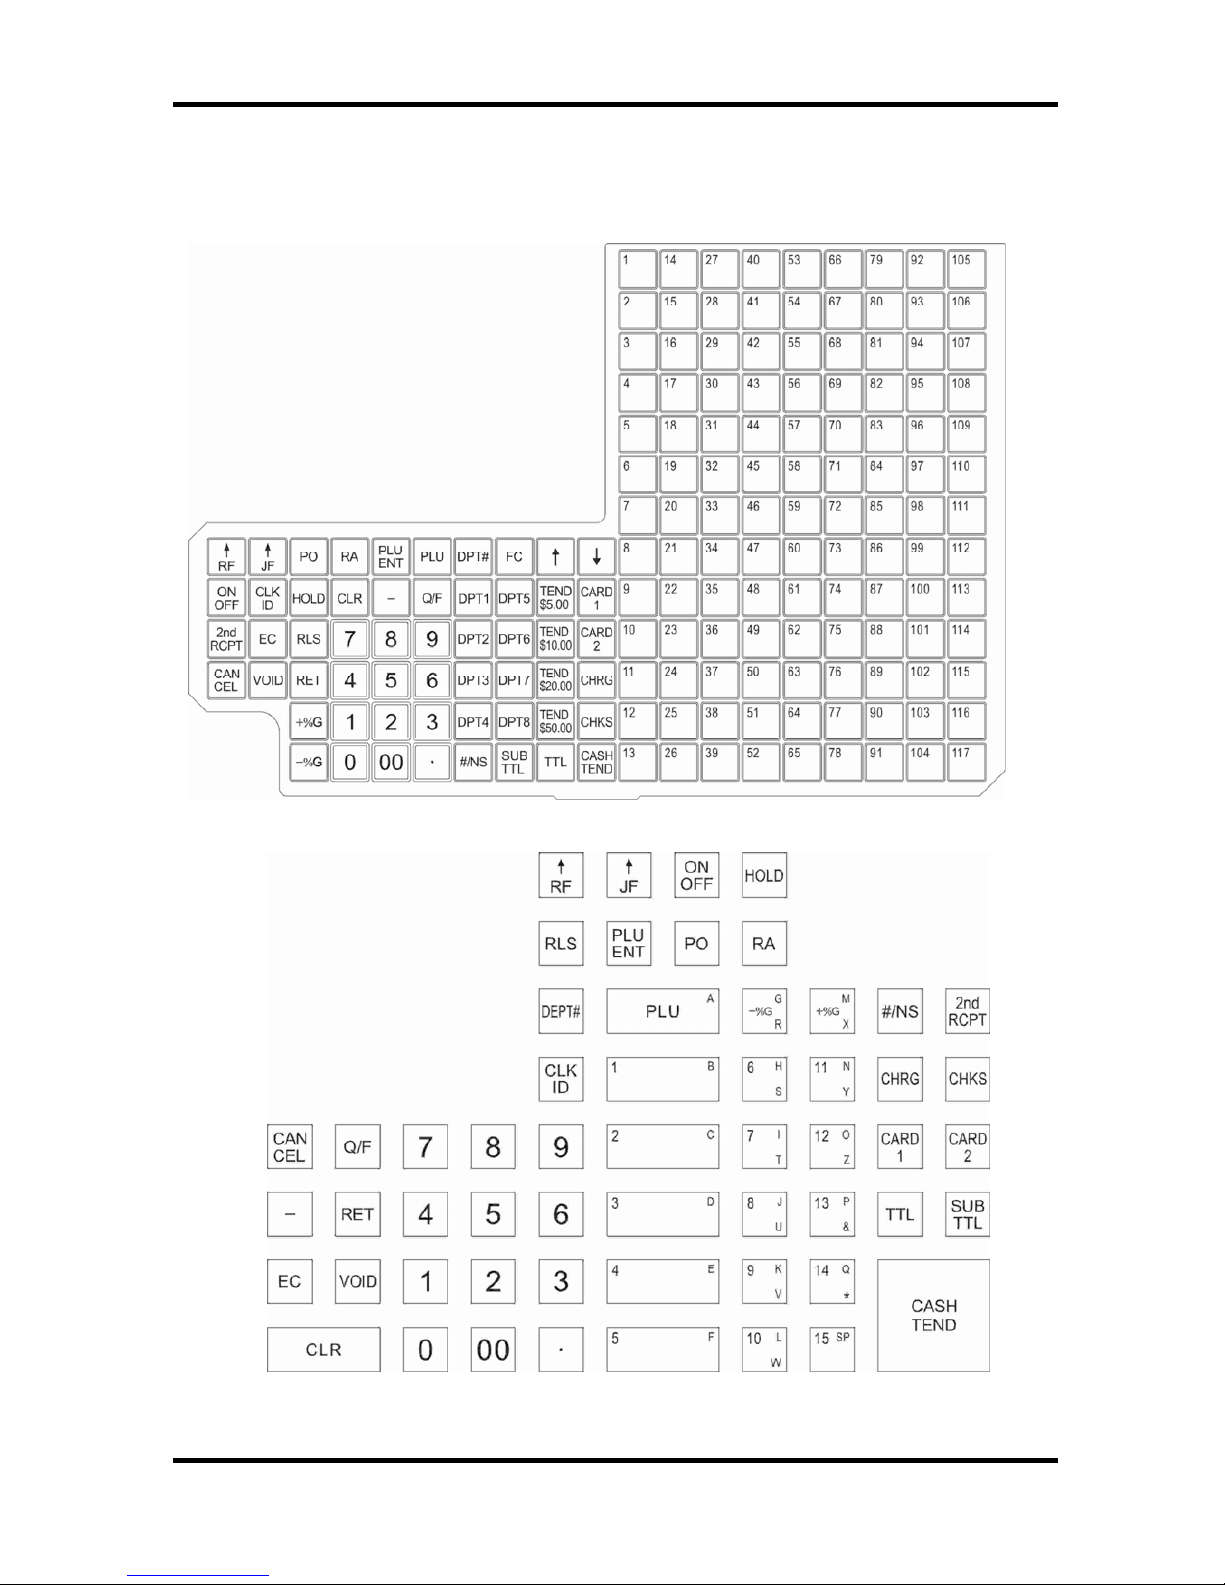
7). KEYBOARD
Flat Keyboard Standard Layout and Functions
* 154 key positions including FEED keys.
* All the keys except FEED keys can be laid out at Customer’s option.

1. GETTING TO KNOW THE CASH REGISTER
9
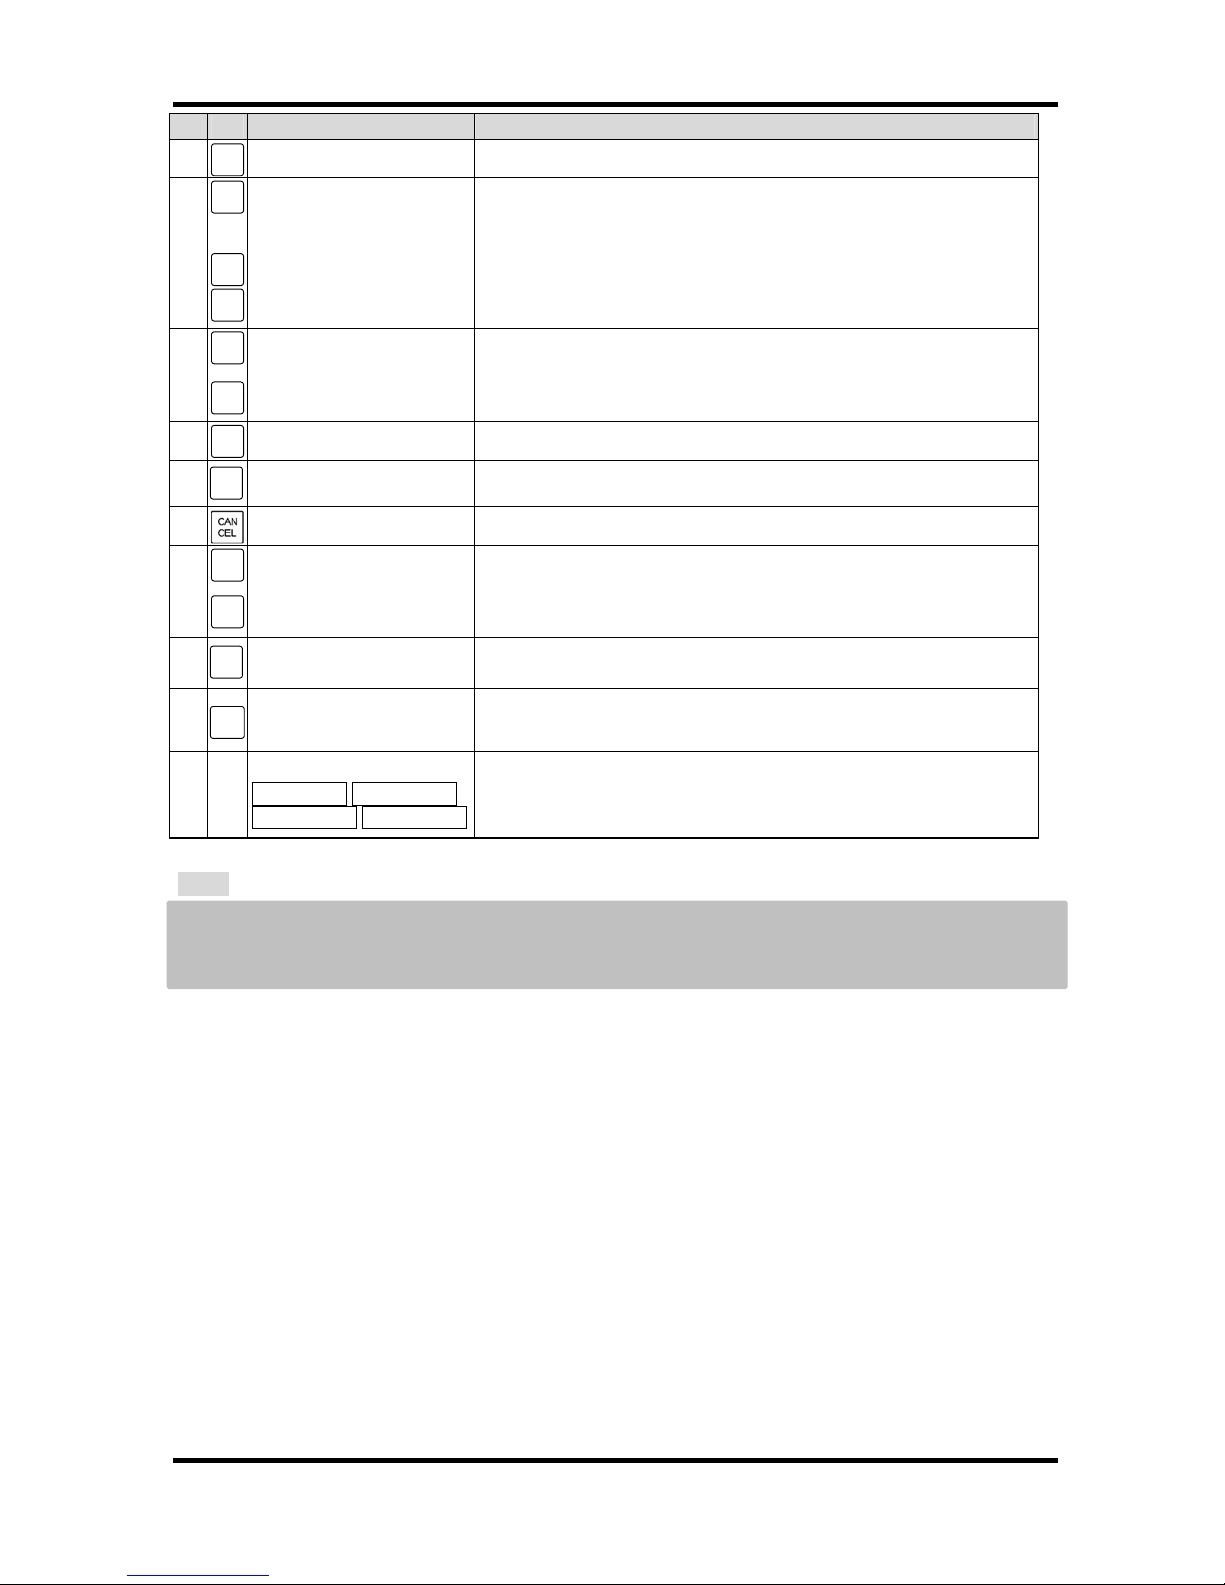
* Flat Keyboard Functions
No.
Key
Name Functions
1
Receipt feed key Used to feed the receipt paper.
2
Journal feed key Used to feed the journal paper.
Used to move the cursor upward in registration.
3
Arrow keys
Used to move the cursor downward in registration.
4 Foreign currency key
Used to convert the amount from the local currency to the one
in the foreign currency.
Q/F key
Used to multiply quantity of a PLU/DEPT
Used for Q/F function( See 36 page)
5
**Multiplication is carried out by quantity (integer: 4 digits, decimal: 2 digits) x unit price in
8 digits. Its result is Max. 9 digits.
6 Total key Used to display calculated amount including tax.
7
Received on account
key
Used to record received money on account.
8 Paid out key Used to record amount paid out from the drawer.
9 Return key Used to refund an item
11
Hold key
Used to keep sales data temporarily in the memory for the
registration of next waiting customer.
12 Second receipt key Used to issue a duplicate receipt.
13 Void key
Used to void an item you entered or transaction which was
done.
14 Error correction key Used to clear the last item entered.
15
Non-add /
Non sales key
Used to register code number.
Used to open the drawer without registration.
16 Clear key Used to clear a numeric entry or an error.
17 Minus key
Used to subtract a specific amount from an item or sub-total.
Used to register bottle returning.
18 Minus percent key Used to subtract a percentage rate to an item/sub-total amount.
19 Plus percent key Use to add a percentage rate to an item /sub-total amount.
20
Cash tendered
key
Used to finalize a transaction by cash
Used to calculate amount of change and cash received.
21 Charge tendered key Used to finalize a transaction by charge.
22 Checks tendered key
Used to finalize a transaction by checks.
Used to calculate amount received or paid by checks.
23
.
:
.
Card 1 - 2 keys
Used to finalize a transaction by credit cards.
Maximum 4 kinds of cards keys are available.
24
Subtotal key
Used to display a sub-total without tax during transaction..
Used for percent calculation of [+%G] and [-%G] after sub-total.
Used to display time or commercial message.
25 Entry release key
Used to release single item preset price of department.
Also used to release high amount lock out.
FC
TTL
RA
PO
2nd
RCPT
V
OID
EC
#/NS C
LR
-
%G
+%G
CASH
CHRG
CHKS
RLS
RF
JF
Q/
F
-
CARD
1
CARD
2
SUB
TTL
RET
HOLD
1. GETTING TO KNOW THE CASH REGSTER
10
No.
Key
Name Functions
26 Clerk ID key By the input ID number, a clerk can be selected.
27
:
:
Numeric keys Used to enter numbers.
28
:
:
Department key
1 - 8
Used to enter department sales.
Max. Department is 199.
29
:
:
Department # key Used to input the department number manually.
30
Receipt ON / OFF
key
This key allows you to turn off the receipt printing to save paper.
31
Cancel key Used to cancel the current transaction.
32
:
Price look up keys
(1 –117)
Used to enter PLS sales.
Max PLU is 3,000 for FK
MAX PLU is 10,000 for RK
.
33
PLU # KEY Used to input PLU number manually
34
PLU ENTRY KEY Used to release preset price of PLU
35
Tender keys
TEND 5.00,TEND 10.00
TEND 20.00 TEND 50.00
Used to enter fixed tender amount,5.00,10.00,20.00 and 50.00
Note:
The keys indicated in this list shows the ones available on the default key board only. You can
change location of any keys except the RF/JF keys with any available keys (See the manual for
Program 2 position. Key code table)
CLK
ID
0 9 00
DPT#
ON
OFF
1
117
DPT1
DPT8
PLU
PLU
ENT

2. SETTING UP
11
2.SETTING UP
1). INITIALIZATION
(1) SYSTEM CLEAR
CONTROL LOCK KEY : P2 position
These steps will clear all of the setting you have programmed and erase all sales information in
the register. Both programming and sales data will be lost by this operation.
This operation should also be performed after adding memory board and repairing the main logic
circuitry.
SYSTEM CLEAR OPERATION:
1) Set the power switch located on the right rear corner of the lower cabinet to the OFF position
(O side of the switch).
2) Set the control lock to the "P2" position.
3) Press and hold both RF and JF buttons located on the Keyboard.
4) Set the power switch to the ON position ("I" side of the switch).
5) Then, the front display will show the following.
6) When the above message displays, press the key t or the key.
7) The system initialization starts and the following message is displayed.
8) When the initialization ends, the display will show the following message.
9) Press the key at the lower right corner.
10) Display the message “PROGRAM2”.
S Y S C L R ?
C L E A R I N G
8
P R S A K E Y
P R O G R A M 2

2. SETTING UP
12
(2) HALF CLEAR
CONTROL LOCK KEY : "PROGRAM 1" or "PROGRAM 2 "
Due to incorrect operation of the cash register or during programming, it is possible at some
point for the cash register to become stacking loop. Using the following procedure to reset the
machine.
1) Control lock key to "PROGRAM 1" or "PROGRAM 2" position.
2) Set the power switch to the OFF position.
3) Wait for more than 5 seconds before setting the power switch back to the ON position.
The following display will be displayed.
The memory in the current transaction will be lost, however, you will not lose any of the
program and the previously registered sales data.
4) The first display of “PROGRAM1” or “PROGRAM2” is displayed.
P L S W A I T
P R O G R A M 2

2. SETTING UP
13
2). INSTALLING THE PAPER ROLLS
Your cash register features a thermal printer which uses two rolls of 58mm standard thermal paper;
one roll (left side) is for the customer receipt and the other roll (right side) is for the journal record. If a
customer receipt is not required, a paper saving option is available by pressing the [ON/OFF] key on
the keyboard.
Paper Roll
Before installing the paper roll, be sure to do the following to avoid causing a paper jam:
Fig.1
Removing and installing the paper roll for the receipt
1. Open the printer cover.
2. Press the arms release button (left) to raise the printer arms.
(See Fig. 2).
3. Remove the roll.
.
4. Drop the new paper roll into the receipt location,
and put the paper end to this side.
5. Press the printer arms (See Fig. 3).
6. Close the printer cover.
* Orient the paper roll so that it rotates in a
counterclockwise direction, as shown in Fig. 1.
NOTE:
As thermal paper is used, it has right and wrong
side to print. Install the paper roll correctly.
Fig.2
Fig.3
2. SETTING UP
14
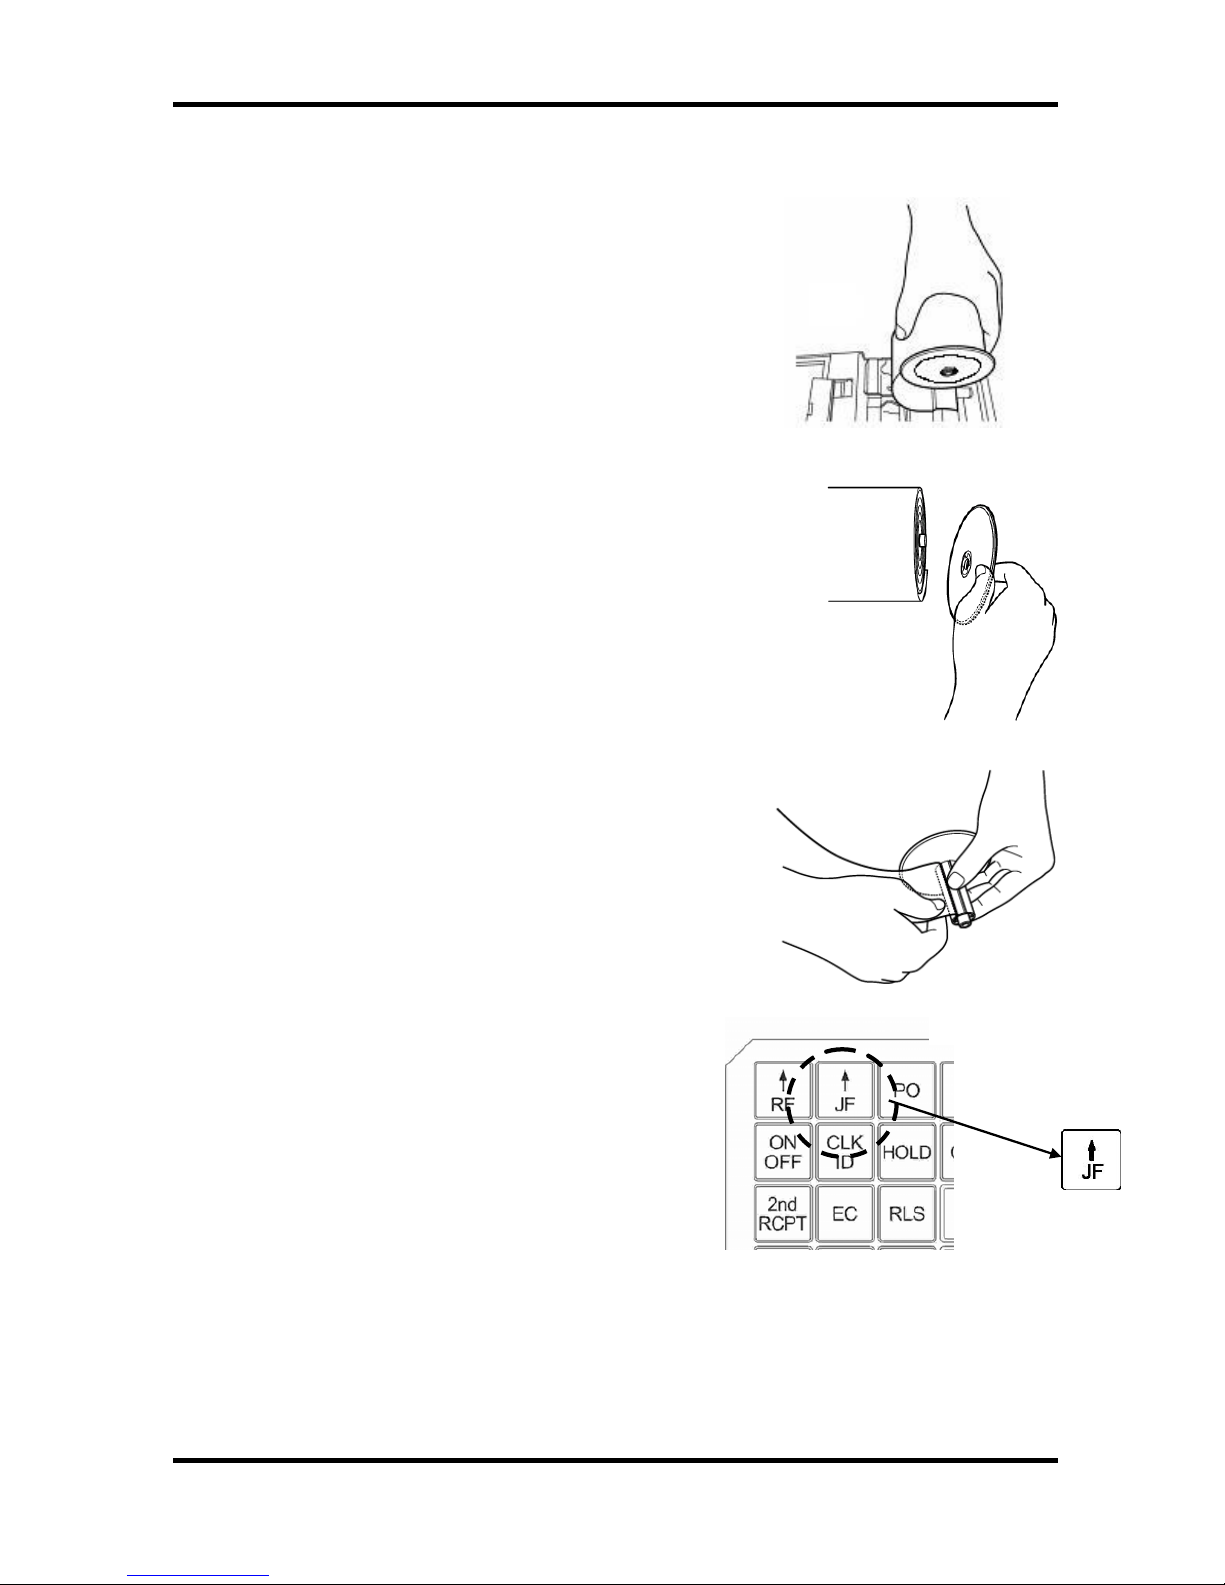
Removing and installing the paper roll for the journal
1. Make sure the Control Lock is in the “R”(Register)
position.
2. Open the printer cover.
3. Press the arms release button (right) to raise the
printer arms.
4. Remove the take-up spool and paper roll from the support
(See Fig. 4).
5. Take away the right side of reel from the take-up spool.
(See Fig.5)
6. Make a small fold on the end of new roll paper and feed it around
tabs on the take-up spool (See Fig.6)
5. Turn the take-up spool to fasten the paper.
6. Clip the right side of reel onto the take-up spool.
7. Place the take-up spool on the right position.
8. Press the J feed key (See Fig. 7).
9. Close the printer cover.
Fig.6
Fig.4
Fig.5
Fig.7

3.QUICK START
15
3. QUICK START
Before proceeding with Quick Start, the cash register must be initialized.
1. Insert the manager program key (MA) in the control lock and turn to the “P1” program
position”.
2 (1) Move the cursor to [ 1 DATE ], key and press the key.
(2) To set the DATE, enter as year-month-day format.
Example : For 14
th
September 2010
DATE : [ 20100914 ] key
(3) To set the current time, use military time.
Example : To set 10:15 AM
TIME : [ 1015 ] key , key
*Reminder: To convert to military time, add the number 12 to every hour after 12:00
noon. For example, to set 1:15 PM [ 1315 ]
3. To set a tax rate
Example : If tax rate is 5%,
(1) Move the cursor to [ 10 TAX ] , [ 10 ] key and press the key
(2)TAX1 : [ 5 0 0 0 0 ] key, key
4. Departments can be programmed for the price, tax status and description all in one step.
In order to get start quickly, we mention programming a price and tax status only.
Complete setup is explained by the “P1 Manual, Department Programming” section.
(1) Move the cursor to [ 2 DEPARTMENT ] [ 2 ] key and press
key
(2) To program Department 1 as taxable and a price of $6.00:
Price : key [ 6 0 0 ] key
Taxable Flag : [ 1 ] key
(3) To move Department 2, price setting page
key key key
(4) To program Department 2 as non-taxable and a price of $7.00:
Price : [ 7 0 0 ] key key
If no pre-set price is desired, skip entering the price.

4. REGISTRATION
16
Commercial
Message
Number of
Items
Single Item
Preset Price
Time, Day
of Week
And Name
of Cashier
Consecutive
Number
Date
4. REGISTRATION
1). EXAMPLE OF REGISTRATION AND RECEIPT
Some of keys in the examples may need to be programmed on the keyboard.
1-1. SINGLE ITEM CASH SALE
z Single item cash sale function
allows you to finish transaction
without pressing the [CASH TEND]
key.
EXAMPLE
STEP KEY OPERATION
1)
z Assume the single item function and
unit price is programmed for DEPT 1
(GADGETS)
Entered sales price has priority to register over single item preset price.
“SINGLE ITEM (PRICE PRESET)” mode is released in the following cases:
1) The single item function can be ineffective by pressing the key before a
registration.
2) When multiple sales items are registered before the item which is programmed single
item cash sale.
** Commercial message, time, name of cashier, machine number, consecutive number, and date on
the receipt sample are omitted from here.**
1-2. DEPARTMENT OF HIGH AMOUNT LOCK-OUT
EXAMPLE
In case high amount lock out(HALO) is programmed to $10.00 at Department 7 (SOCKS)
STEP KEY OPERATION
RECEIPT
1)
z The register will sound a continuous alarm
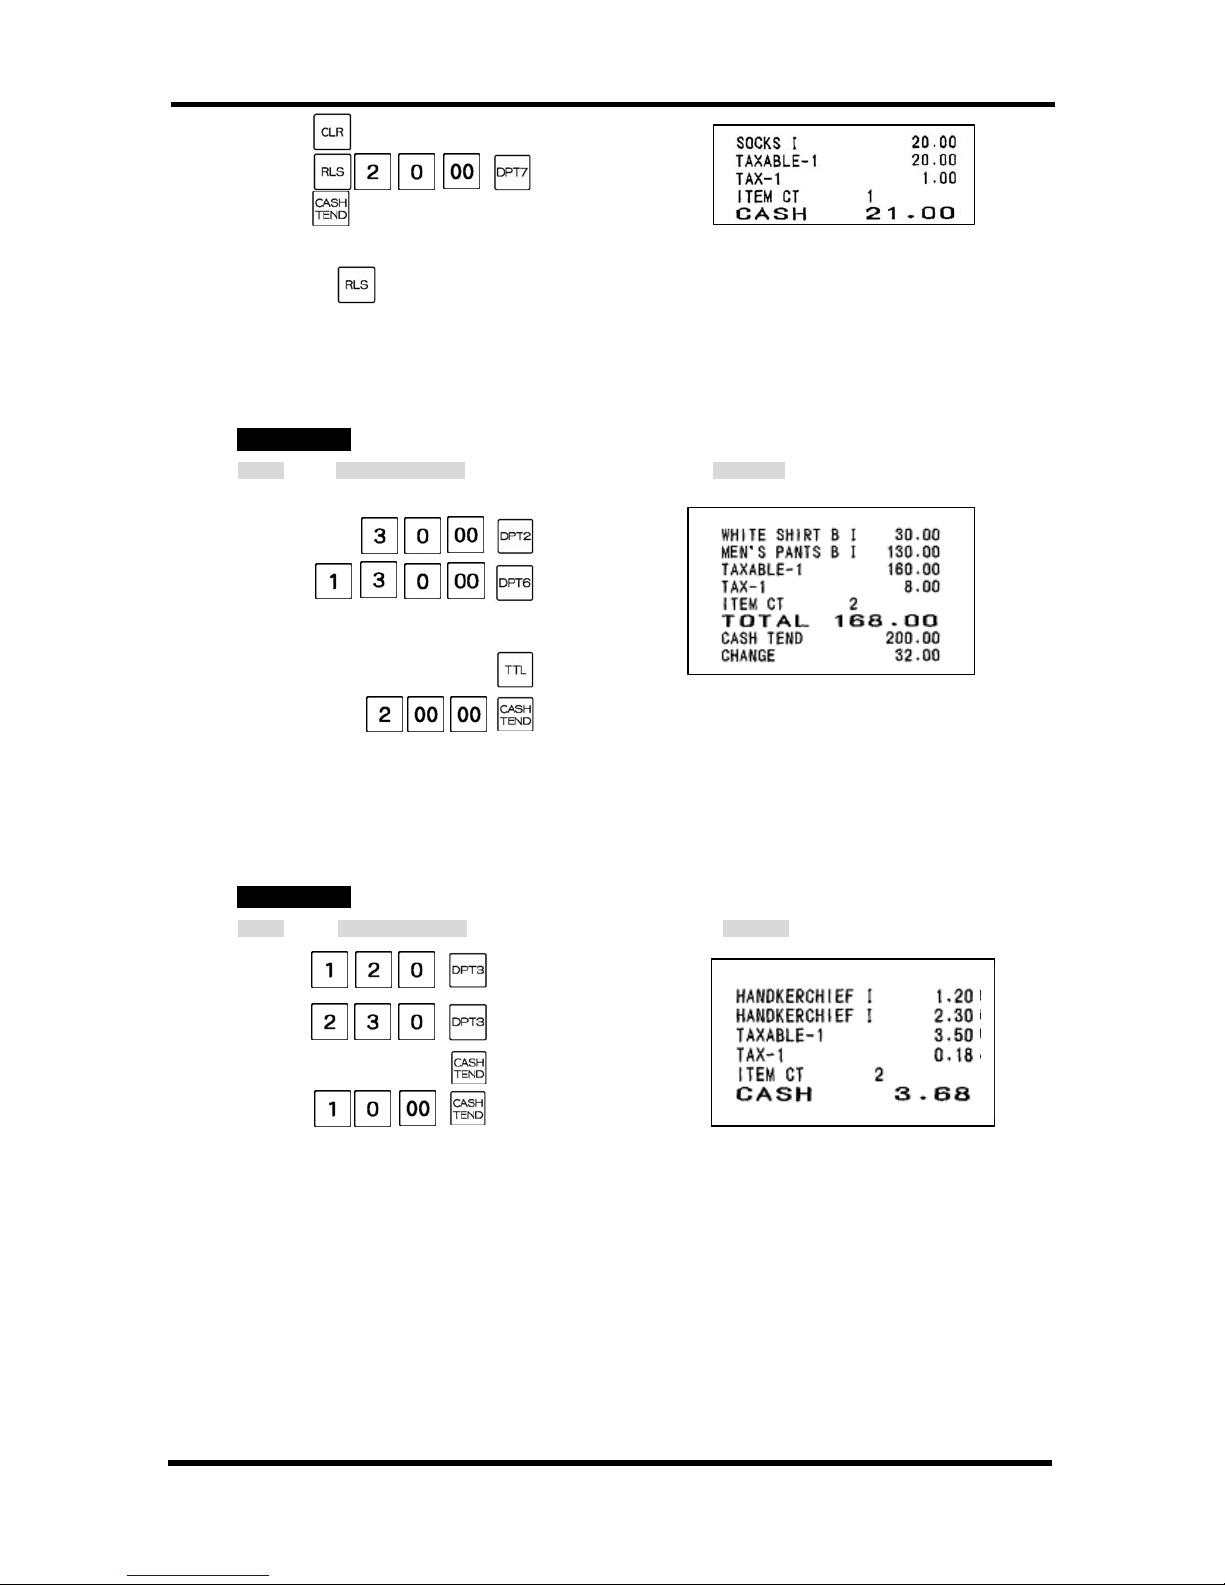
4. REGISTRATION
17
2)
3)
4)
z If the key is pressed before registration, “HIGH AMOUNT LOCK-OUT” mode is
released and registration up to 8 digit number is possible
.
1-3. MULTIPLE SALE AND CHANGE
EXAMPLE
STEP KEY OPERATION RECEIPT
1) (White shirt B)
(Men’s pants B)
2)
3)
4)
z If the tendered amount is short, an error may occur ( Tender key flag 1 #4=1)
1-4. CHANGE CALCULATION AFTER TRANSACTION
EXAMPLE
STEP KEY OPERATION
RECEIPT
1) (Handkerchief)
2)
3)
4)
z In this case the transaction is finalized without the cash tendered operation. By the
operation of the cash tendered after the finalization, the change amount can be displayed
though it will not be printed on the receipt. In this sample case, 6.32 will be displayed as
change amount at the displays.
 Loading...