

TOUGH-WORKS TLGS625 Instruction Manual

TLGS625
2" X 28" BELT AND 6" WHEEL
BENCH GRINDER SANDER
IMPORTANT:
For your own safety, read and follow all of the Safety
Guidelines and Operating Instructions before operating
this product.
INSTRUCTION
MANUAL

TLGS625
TABLE OF CONTENTS
TABLE OF CONTENTS ...............................................................................................
SPECIFICATIONS ......................................................................................................
SAFETY GUIDELINES ................................................................................................
ELECTRICAL SAFETY .................................................................................................
PACKAGE CONTENTS ..............................................................................................
KEY PARTS DIAGRAN
ASSEMBLY INSTRUCTIONS........................................................................................
OPERATION .................................................................................................................
MAINTENANCE ............................................................................................................
TROUBLESHOOTING GUIDE .....................................................................................
EXPLONED VIEW .........................................................................................................
PARTS LIST ..................................................................................................................
WARRANTY ..................................................................................................................
..................................................................................................
2
2
4
6
7
8
10
12
15
17
18
19
20
2
TABLE OF CONTENTS
SPECIFICATIONS
Motor 120V, 60Hz , 2.5A
Speed (no load) 3450RPM
Belt size 2" x 28"
Wheel size
6"x3/4"x1/2"

3
BD4603
TLGS625
GENERAL SAFETY GUIDELINES
BEFORE USING THIS POWER
TOOL
• Operate in a safe work environment. Keep
your work area clean, well lit and free of
distractions.
• Keep anyone not wearing the appropriate s
afety equipment away from the work area.
• Store tools properly in a safe and dry location.
Keep tools out of the reach of children.
• Do not install or use in the presence of flam mable gases, dust or liquids.
• Always wear impact safety goggles that
provide front and side protection for the eyes.
Wear a full-face shield if your work creates
metal filings or wood chips. (Eye protection
equipment should comply with ANSI Z87.1
standards.)
• Wear gloves that provide protection based on
the work materials or to reduce the effects of
tool vibration.
• Non-skid footwear is recommended to main-
SAFETY GUIDELINES
tain footing and balance in the work environment.
• Wear the appropriate rated dust mask or
respirator.
• Do not operate any tool when tired or under
the influence of drugs, alcohol or medications.
• Avoid wearing clothes or jewelry that can b ecome entangled with the moving parts of a
tool. Keep long hair covered or bound.
• Do not overreach when operating the tool.
Proper footing and balance enables better
control in unexpected situations.
• Securely hold the material using both hands.
Applying the material to the grinder with only
one hand can result in a loss of control.
• Never use a tool with a cracked or worn gri nding wheel. Change the grinding wheel
before using.
• Replace cracked wheel immediately. Use only
flanges supplied with the grinder.
• Clean dust and debris from beneath the gri nding wheels frequently.
• Do not start the tool if the grinding wheel is in
contact with the workpiece.
• Always ensure the safety guards are attached
correctly and do not operate the bench grinder
without the guards attached. Adjust the dista nce between the wheel and the tool rest to
maintain a 1/16 in. or less separation as the
diameter of the wheel decreases with use.
• Use an appropriate dust respirator when working
for an extended period of time. This will help
prevent breathing in the fine dust created while
grinding.
• Do not grind on the sides of grinding wheels
unless they are specifically designed for that
purpose.
• Before using the tool on the workpiece, run the
tool at the highest speed, without a load, for at
least 30 seconds in a safe position. Stop im mediately if there is any vibration or wobbling
that could indicate poor installation or a poorly
balanced grinding wheel. Check the tool to
determine the cause.
• Do not allow the motor to overload or overheat.
Take breaks to rest the tool.
• Do not subject the grinding wheel to any lateral
pressure as it may damage the tool or cause
it to kickback.
ADDITIONAL SPECIFIC SAFETY
RULES
1. Only use a grinding wheel with the correct arbor
size and shape that matches the grinder’s
spindle.
2. Ensure the grinding wheel has a clean edge.
Check the grinding wheel for wear or chipping
and replace if necessary.
3. Never install more than one grinding wheel at
a time unless the tool and wheels are design ed for that purpose.
4. A large amount of sparks will be created when
working with a grinding wheel. Hold the tool
so that sparks fly away from you and other
persons or flammable materials. Have a fully
charged fire extinguisher present.in the event
of a fire.
5. Do not subject the grinding wheel to any
lateral pressure as it may damage the
tool or cause it to kickback.

TLGS625
4
6. Disconnect tool from power source before
cleaning, servicing, changing parts/accessor ies or when not in use.
7. Protect yourself against electric shocks when
working on electrical equipment. Avoid body
contact with grounded surfaces. There is an
increased chance of electrical shock if your
body is grounded.
8. Do not expose tool to rain or water entering a
power tool will increase the risk of electric shock.
9. Do not disconnect the power cord in place of
using the ON/OFF switch on the tool. This will
prevent an accidental startup when the power
cord is plugged into the power supply.
10. Do not alter any parts of the tool or accessories.
All parts and accessories are designed with
built-in safety features that may be compro mised if altered.
11. Make certain the power source conforms to
requirements of your equipment.
12. Do not allow the tool to run without load for an
extended period of time, as this will shorten
its life.
13. Do not cover the air vents. Proper cooling of
the motor is necessary to ensure normal life
of normal life of the tool.
14. Avoid unintentional starting. Ensure the switch
is off when connecting to the power source.
15. In the event of a power failure, turn off the
machine as soon as the power is interrupted.
interrupted. The possibility of accidental injury
could occur if the power returns and the unit is
not switched off.
16. Disconnect the power source before installing
or servicing the tool.
17. After making adjustments, make sure that any
adjustment devices are securely tightened.
18. Remove adjusting keys and wrenches before
turning the tool on. A wrench or a key that is left
attached to a rotating part of the tool increases
the risk of personal injury.
19. Never force the tool. Excessive pressure could
break the tool, resulting in damage to your
workpiece or serious personal injury. If your tool
runs smoothly under no load, but does not run
smoothly under load, then excessive pressure
is being used.
20. Do not touch an operating motor. Motors can
operate at high temperatures.
21. Only use accessories that are specifically
designed for use with the tool. Ensure the
accessory is tightly installed.
22. Only use an accessory that exceeds the No
Load Speed rating.
23. Do not touch an operating motor. Motors can
operate at high temperatures and can cause
a burn injury.
24. Insert the power cord plug directly to the power
supply whenever possible. Use extension cords
or surge protectors only when the tool's power
cord cannot reach a power supply from the work
area.
25. Do not operate this tool if the power cord is fr ayed or damaged as an electric shock may
occur, resulting in personal injury or property
damage.
26. Inspect the tool's power cord for cracks, fraying
or other faults in the insulation or plug before
each use.
27. Discontinue use if a power cord feels more than
comfortably warm while operating the tool.
28. Keep all connections dry and off the ground to
reduce the risk of electric shock. Do not touch
plug with wet hands.
29. Do not allow people, mobile equipment or ve hicles to pass over unprotected power cords.
30. This tool vibrates during use. Repeated or long term exposure to vibration may cause tempo rary or permanent physical injury, particularly
to the hands, arms and shoulders.
SAFETY GUIDELINES
5
BD4603
TLGS625
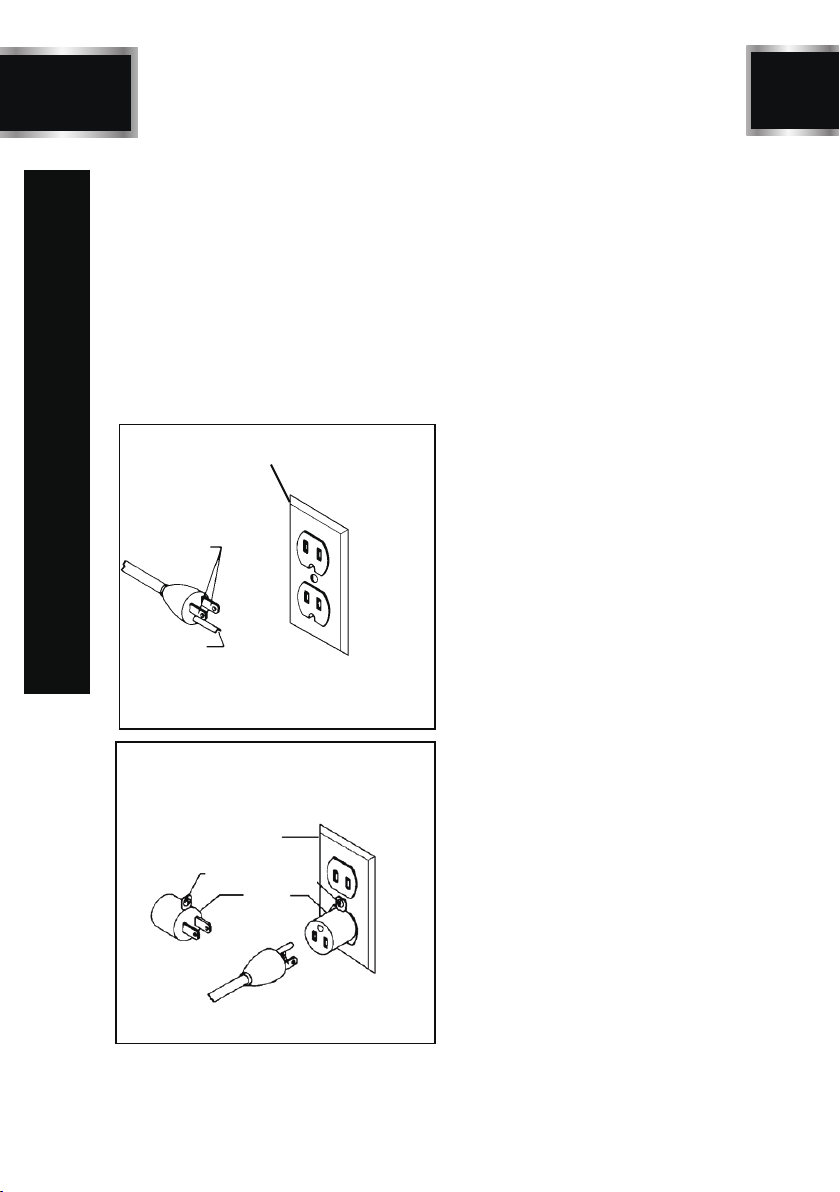
A separate electrical circuit should be used for your
machines. This circuit should
wire and should be protected with a 20-A time-lag
fuse. If an extension cord is used, use only 3-wire
extension cords which have 3-pronged grounding
type plugs and matching receptacle which will
accept the machine’s plug. Before connecting the
machine to the power line, make sure the switch
is in the "OFF" position and be sure that the ele ctric current is of the same characteristics as
indicated on the machine. All line connections
should make good contact. Running
will damage the machine.
GROUNDED
OUTLET BOX
CURRENT
CARRYING
PRONGS
not be less than #12
on low voltage
ELECTRICAL SAFETY
GROUNDING BLADE
IS LONGEST OF THE 3 BLADES
Figure. 1
GROUNDED OUTLET BOX
GROUNDING
MEANS
ADAPTER
Figure. 2
MOTOR SPECIFICATIONS
Your machine is wired for 120 V, 60Hz
alternating current. Before connecting the
machine to the
power source, make sure
the switch is in the "OFF" position.
GROUNDING INSTRUCTIONS
All grounded, cord-connected machines: In the
event of a malfunction or breakdown,grounding
provides a path of least resistance for electric
current to reduce the risk of electric shock. This
machine is equipped with an electric cord having
an equipment grounding conductor and a grounding plug.
DANGER!
DO NOT EXPOSE THE MACHINE TO RAIN OR
OPERATE THE MACHINE IN
THIS MACHINE MUST BE GROUNDED
WHILE IN USE TO PROTECT THE
FROM ELECTRIC SHOCK.
The plug must be plugged into a matching outlet
that is properly installed and grounded in accordance with all local codes and ordinances.
Do not modify the plug provided–if it will not fit
the outlet, have the proper outlet installed by a
qualified electrician.
Improper connection of the equipment-grounding
conductor can result in risk of electric shock. The
conductor with insulation having an outer surface
that is green with or without yellow stripes is the
equipment-grounding conductor. If repair or replacement of the electric cord or plug is necessary,
do not connect the equipment-grounding conductor to a live terminal.
Check with a qualified electrician or service personnel if the grounding instructions are not completely understood, or if in doubt as to whether the
machine is properly grounded.
Use only 3-wire extension cords that have 3-pronged
grounding type plugs and matching 3-conductor
receptacles that accept the machine’s plug, as shown
in Fig. A.Repair or replace damaged or worn cord
immediately.
!
DAMP LOCATIONS.
OPERATOR

MINIMUM GAUGE FOR CORD SETS
Use proper extension cords. Make sure your extension
cord is in good condition and is a 3-wire extension
cord which has a 3-pronged grounding type plug
and matching receptacle which will accept the machine’s plug. When using an extension cord, be
sure to use one heavy enough to carry the current
of the machine. An undersized cord will cause a
drop in line voltage, resulting in loss of power and
overheating. The table shows the correct gauge
to use depending on the cord length. If in doubt,
use the next heavier gauge. The smaller the gauge
number, the heavier the cord.
Ampere rating of
the tool
(120V circuit only)
More
Not more
than
than
Total length of cord
Minimum Gauge for the
extension cord (AWG)
TLGS625
6
!
WARNING!
In all cases,make certain the receptacle in question is properly grounded.
If you are not sure,have a electrician check the
receptacle.
ELECTRICAL SAFETY
 Loading...