

Toughsty WIFI29 User Manual
WIFI29
User Guide
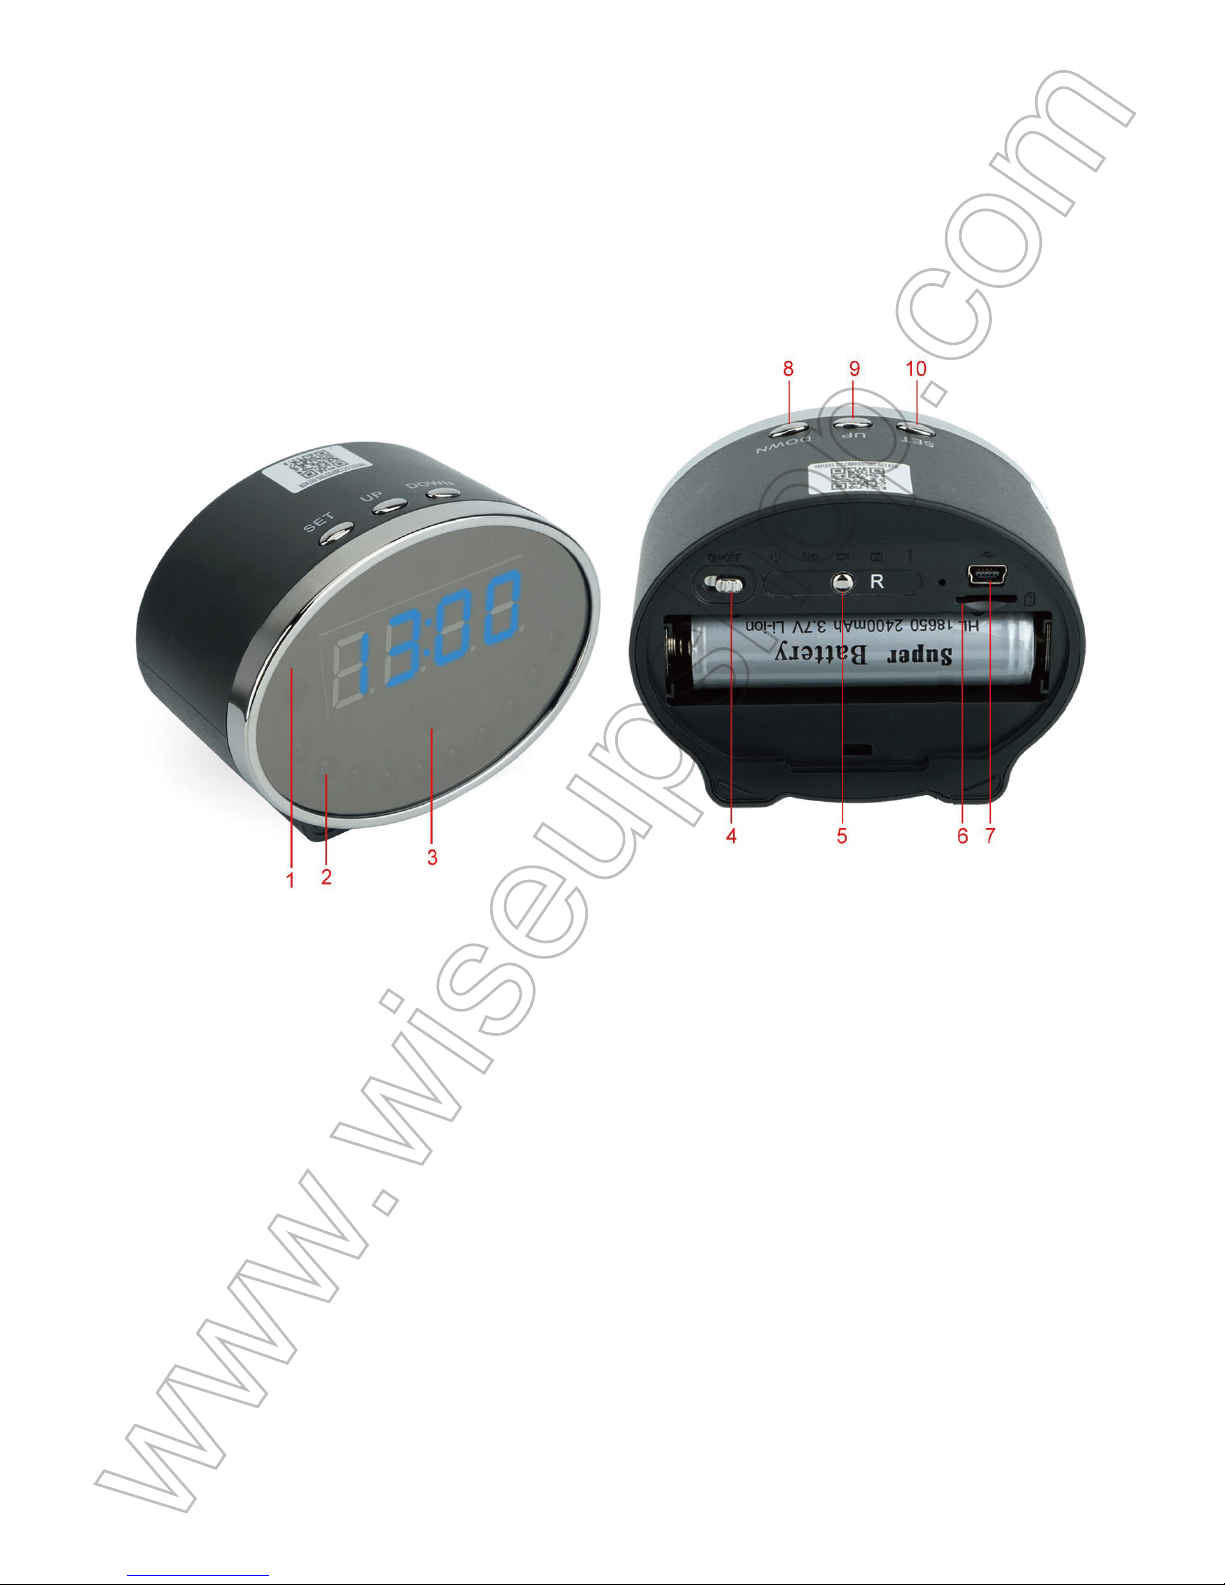
I. Product Overview
1. WIFI Indicator Light
2. IR LEDs
3. Camera Lens
4. Power Switch
5. Reset Button
6. Micro SD Card Slot
7. USB Port
8. Down Button
9. Up Button
10. Set Button
II. What’s in the Box
-1× WIFI Camera Alarm Clock
-1× USB Cable
-1× AC110-240V to DC5V Power Adapter
-1× 8GB Micro SD Card (fitted into the Micro SD card slot already)
III. Before You Start
3.1. Get Clock Part Ready
3.1.1. Open back cover, put the backup battery in place and plug it into an outlet AC
power using the power adapter included, time display will be lit brightly.
3.1.2. Press the Set Button once and the hour will start flashing, then use the Up or Down
Button to adjust the current hour.
3.1.3. Press the Set Button once again to save the hour setting and the minute will start
flashing, then use the Up or Down Button to adjust the current minute.
3.1.4. Press the Set Button to save the minute setting.
3.2. Get WIFI Camera Part Ready
3.2.1. Make sure the Micro SD card has been formatted already and is securely fitted into
the camera’s SD card slot, or it will not work. We recommend you use SDHC Class 10
Micro SD cards.
3.2.2. Power on the WIFI camera by sliding the Power Switch to the ON position. Wait
about 1-3 minutes and the blue indicator light will keep flashing slowly, which means the
camera’s WIFI signal is ready.
3.2.3. If you need the camera to work 24/7 days, connect it to an outlet AC power supply
using the USB cable and power adapter included.
3.2.4. For Android, iPhone and iPad users, please scan the QR code to download the
“BVCAM” APP on your mobile devices.

IV. Network Setup
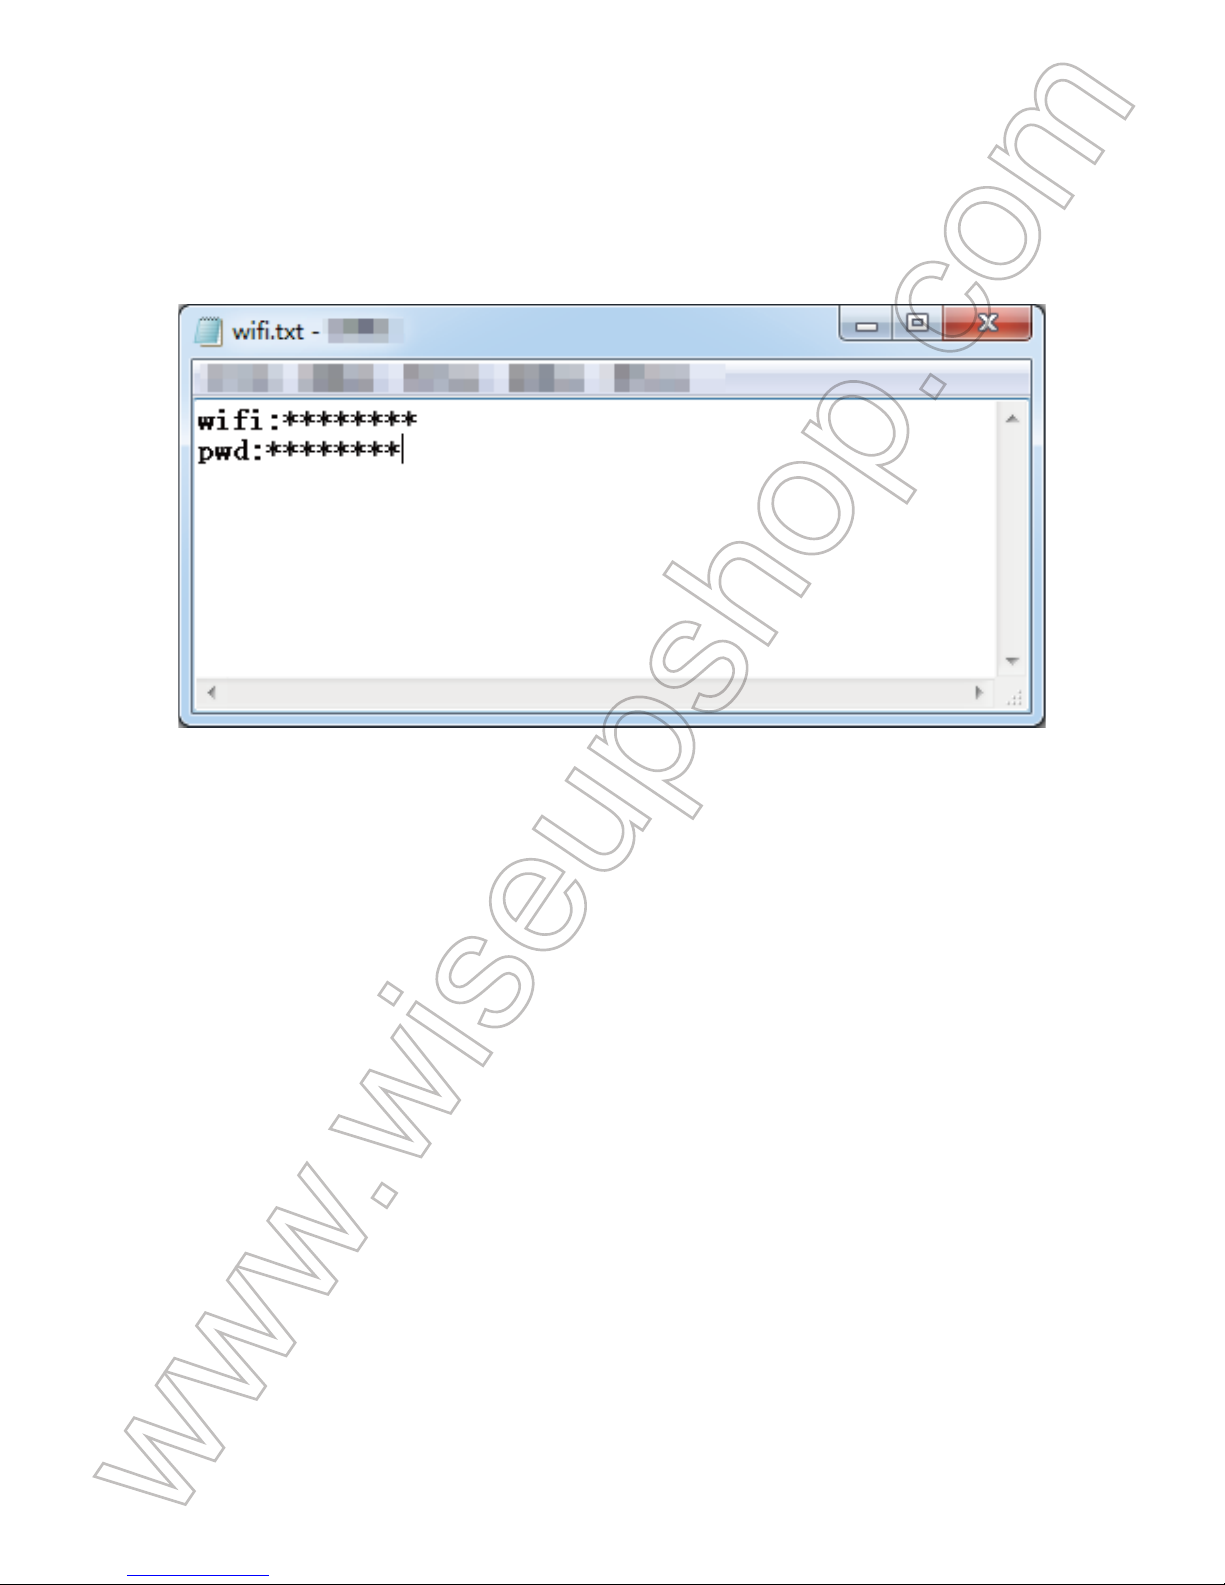
4.1. Option One: Quick Configuration Using a Micro SD Card
4.1.1. Format the Micro SD card on your PC computer. Then create a file named “wifi.txt” in
the Micro SD card. Open it and input your WIFI network SSID and password as follows:
4.1.2. Save this file. Unplug the Micro SD card off your PC computer and insert it into your
camera when it is powered off.
4.1.3. Slide the Power Switch to the ON position. The camera will connect to your WIFI
network in 15-30 seconds.
4.1.4. When the WIFI indicator light stays illuminated, it means the WIFI configuration is
complete. At this point, connect your mobile device to another WIFI network, or turn off
your WIFI function and use your mobile network instead.
4.1.5. Launch the “BVCAM” APP, tap “+”, “Add the new online Device”, then input the
camera’s UID, which is a combination of numbers and letters specific to your camera and
type in the default password “8888”. Or you can scan the QR code which sticks on the top
of the clock camera. At last, click “OK” or “√” to add the camera. If the camera shows
online, it means you can view live or recorded video remotely as long as you have access
to the Internet.
4.2. Option Two: Through “BVCAM” APP
LAN (P2P) Mode Setup
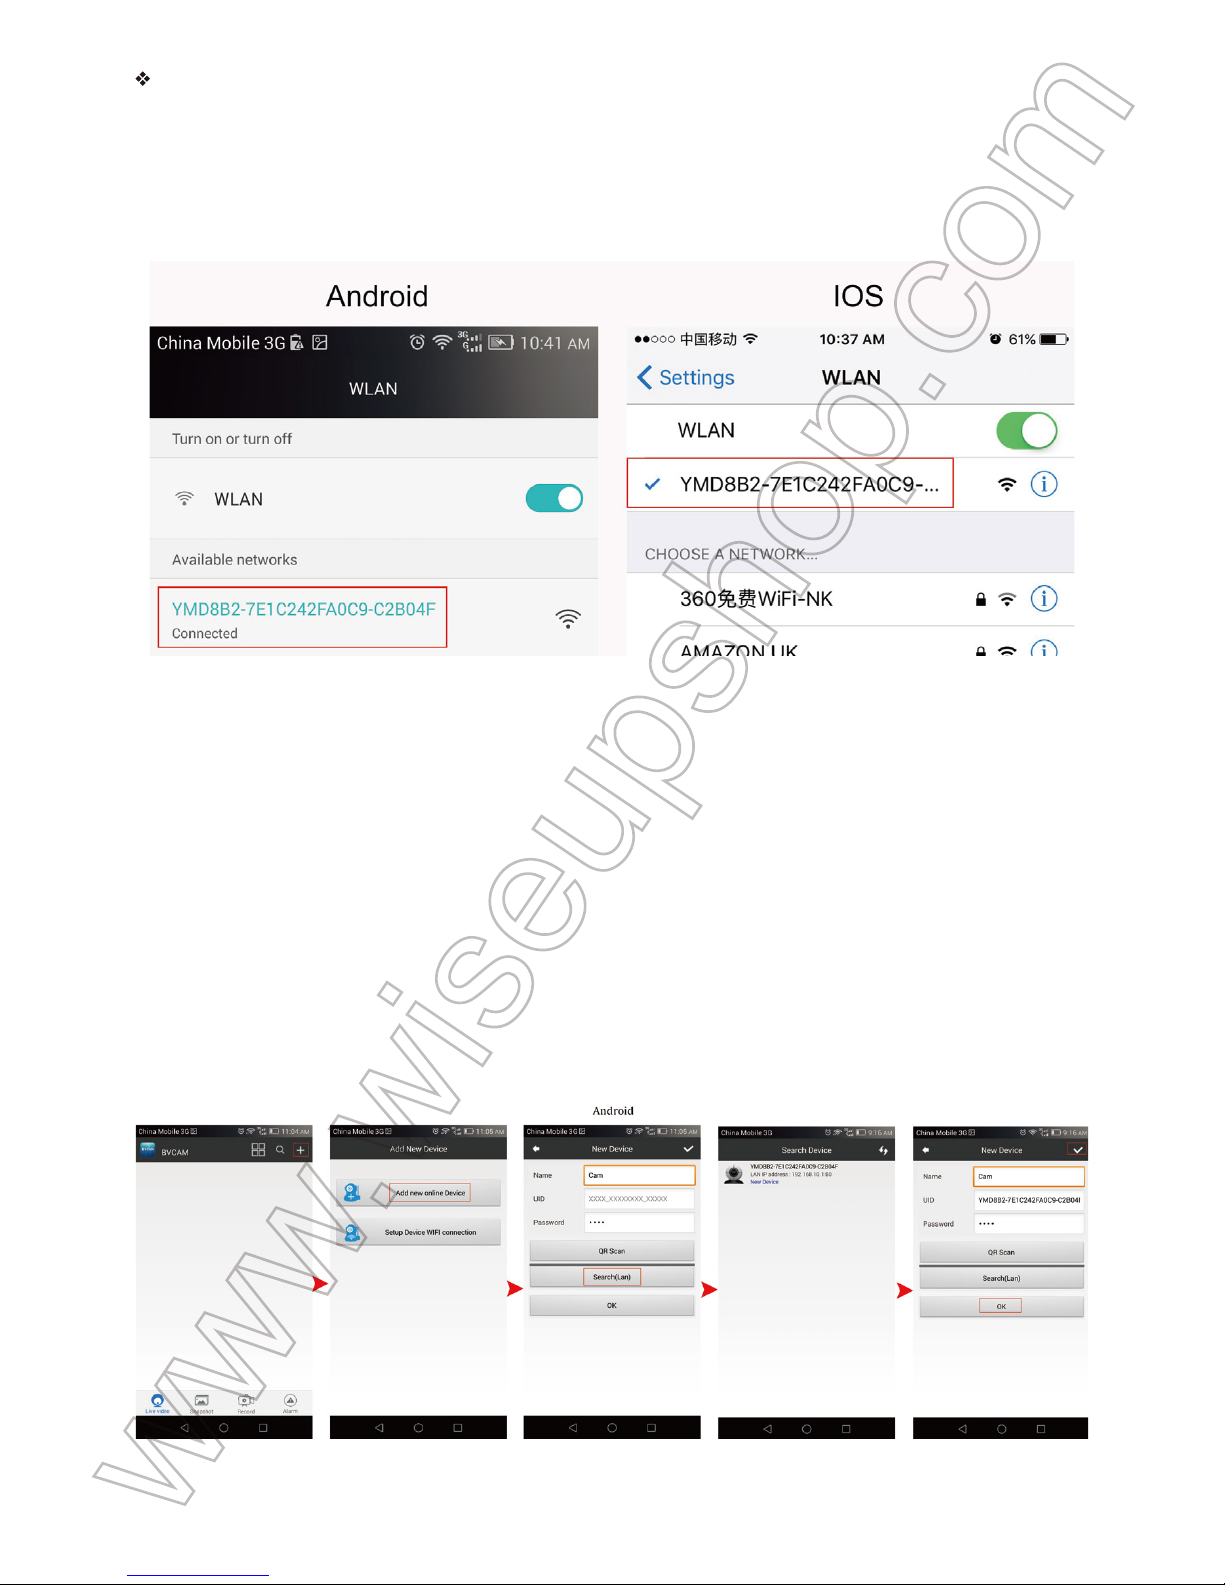
4.2.1. Go to the WLAN Setting page on your phone or mobile device, connect to the
camera’s WIFI signal named “YM*****”. Wait for the WIFI to be connected and your phone

status bar will appear WIFI symbol as below:
[Note]:
If the camera’s WIFI signal cannot be found after a long time, please see Q1 on the FAQ
page at the end of this user guide for detailed solutions.
4.2.2. Run the “BVCAM” APP.
4.2.3. Add the camera to the “BVCAM” APP as below:
For Android: Tap +> Tap Add the new online Device> Search for the camera > Tap the
camera icon > Tap OK or √.
For IOS: Tap +> Tap Add new online Camera> Search for the camera > Tap the camera
icon > Tap OK.
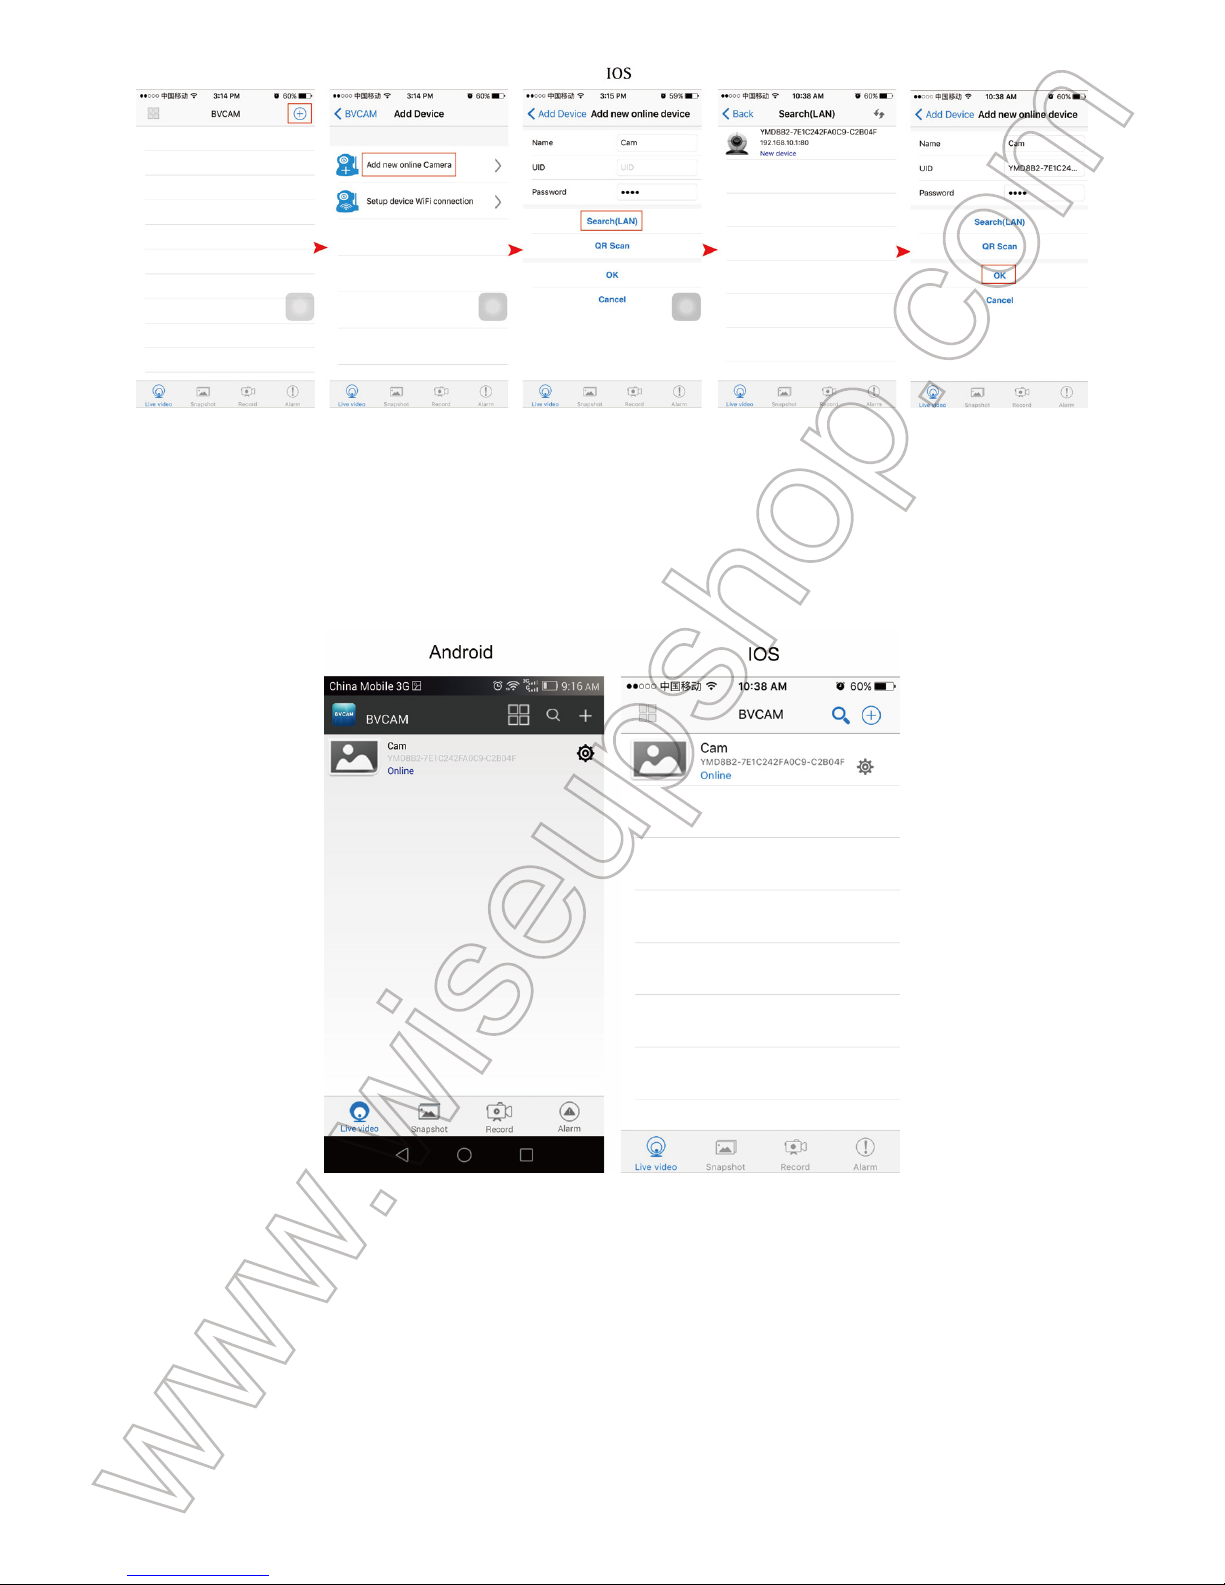
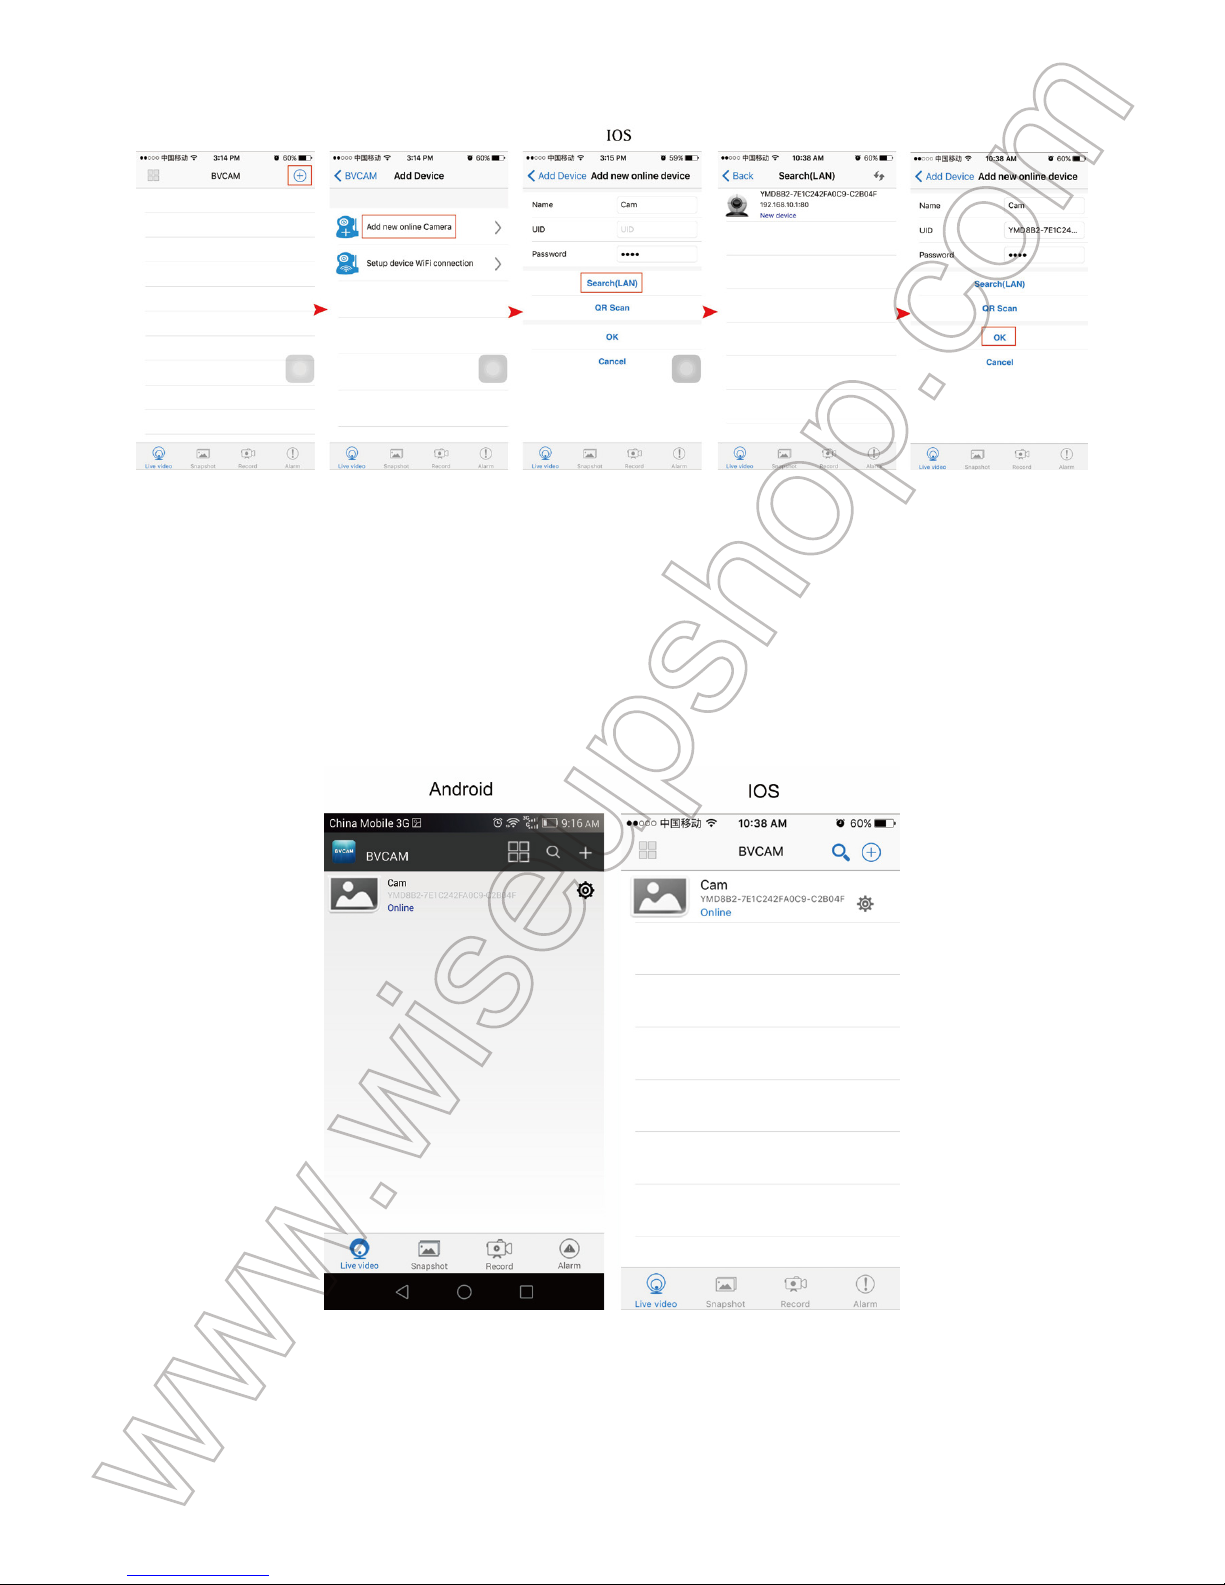
4.2.4. If it shows the camera is “Online” on the “Live video” page, it means the camera’s
P2P (LAN) setup is successful. You can check or record video in the P2P (LAN) mode.
[Note]:
In this P2P (LAN) mode, you can only view video locally, within 15 meters (49 feet) open
range.
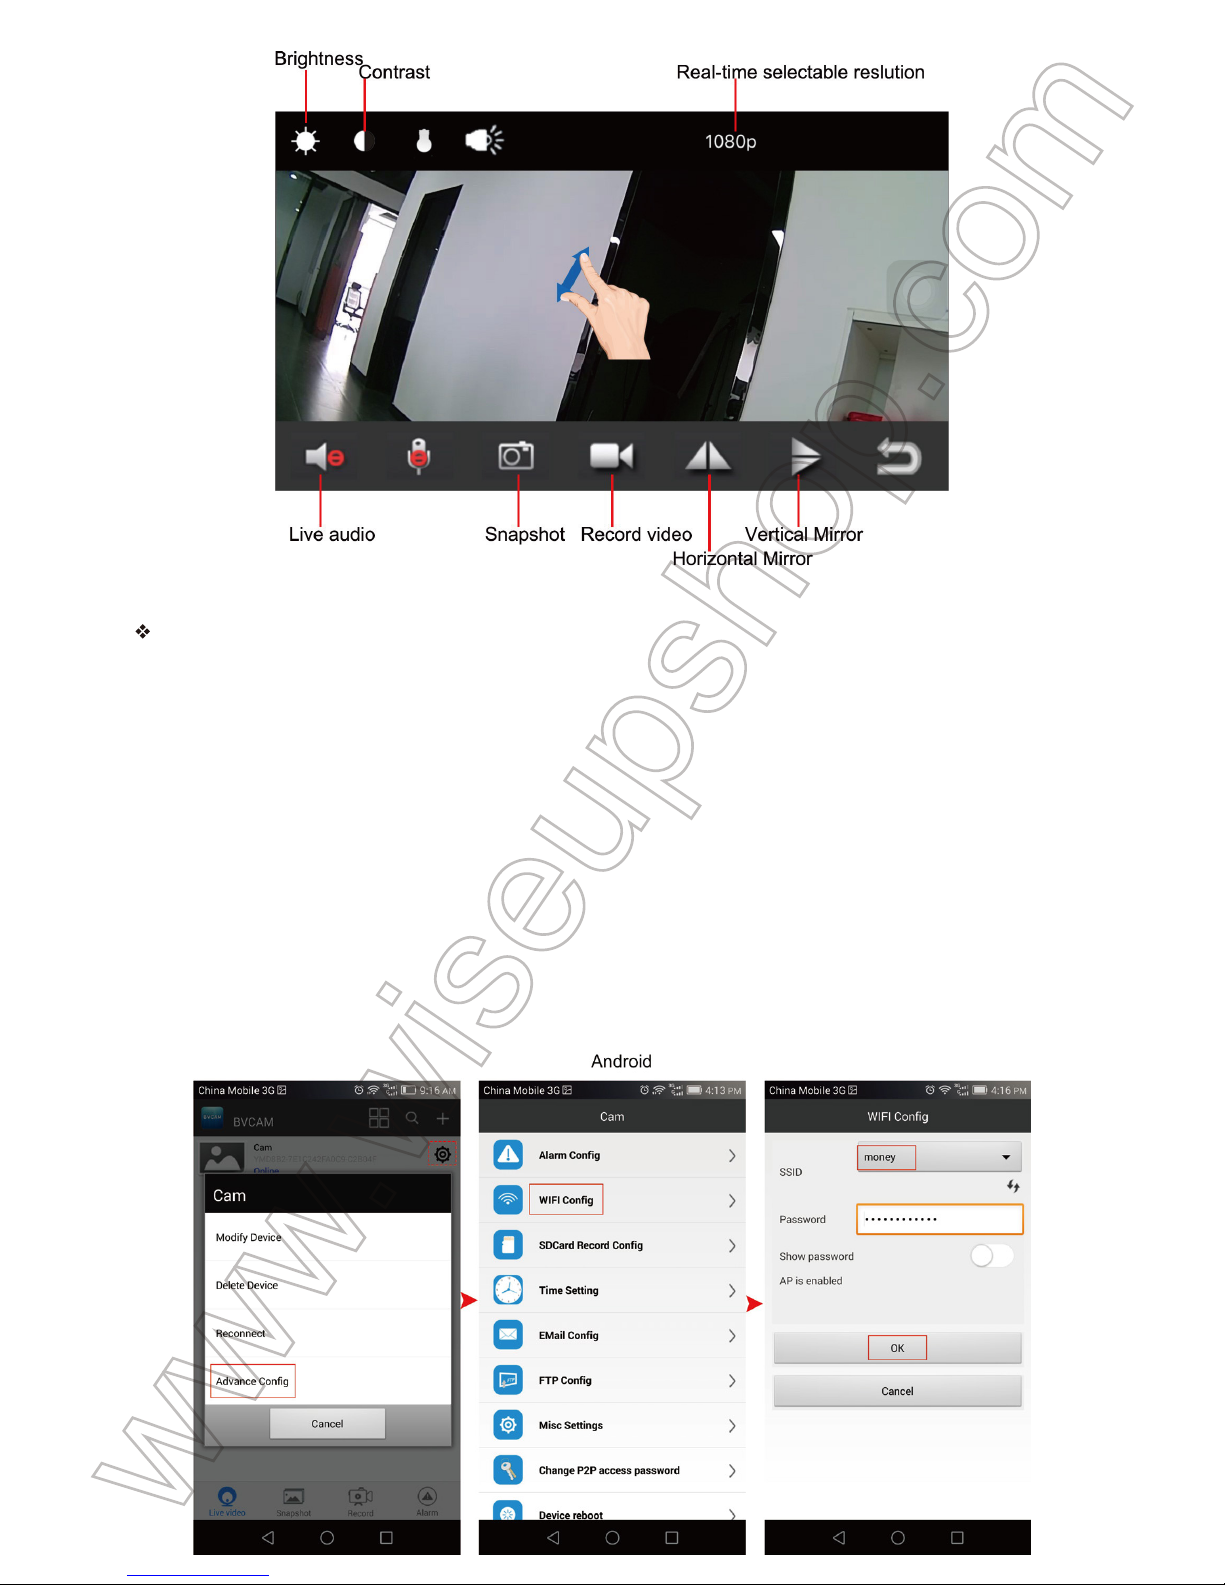
4.2.5. On the live video screen, you can gently put your index finger and thumb on the
screen then slide in and outward directions on a specific area to zoom in and out.

Remote View Setup (WAN Mode)
4.2.6. Follow the steps below to set up WAN mode or remote view function:
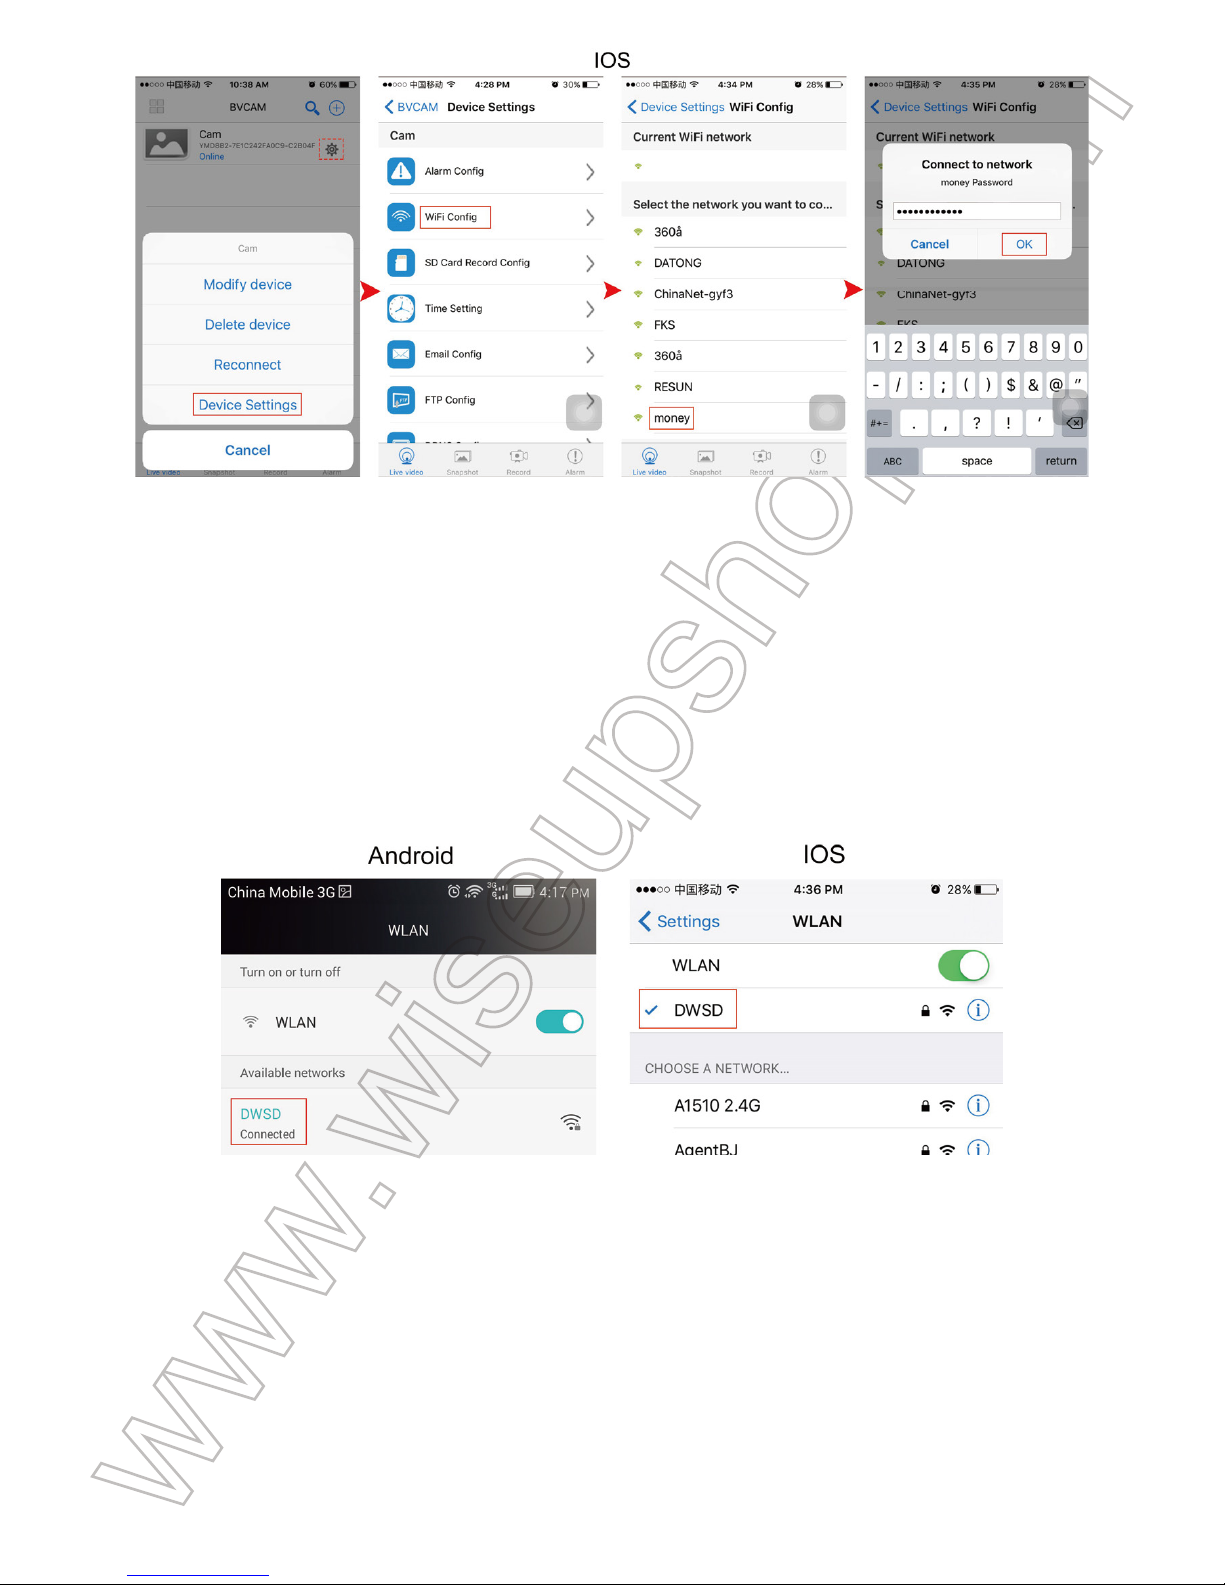
Step 1: Launch the “BVCAM” APP. Tap the setting icon on the “Live video” page and then
choose "Advance Config" or “Device Settings”.
Step 2: Go to “WIFI Config” page, select a desired WIFI hotspot to enroll the camera in.
Step 3: Tap “OK” to complete the remote view setup and the camera will reboot automatically.
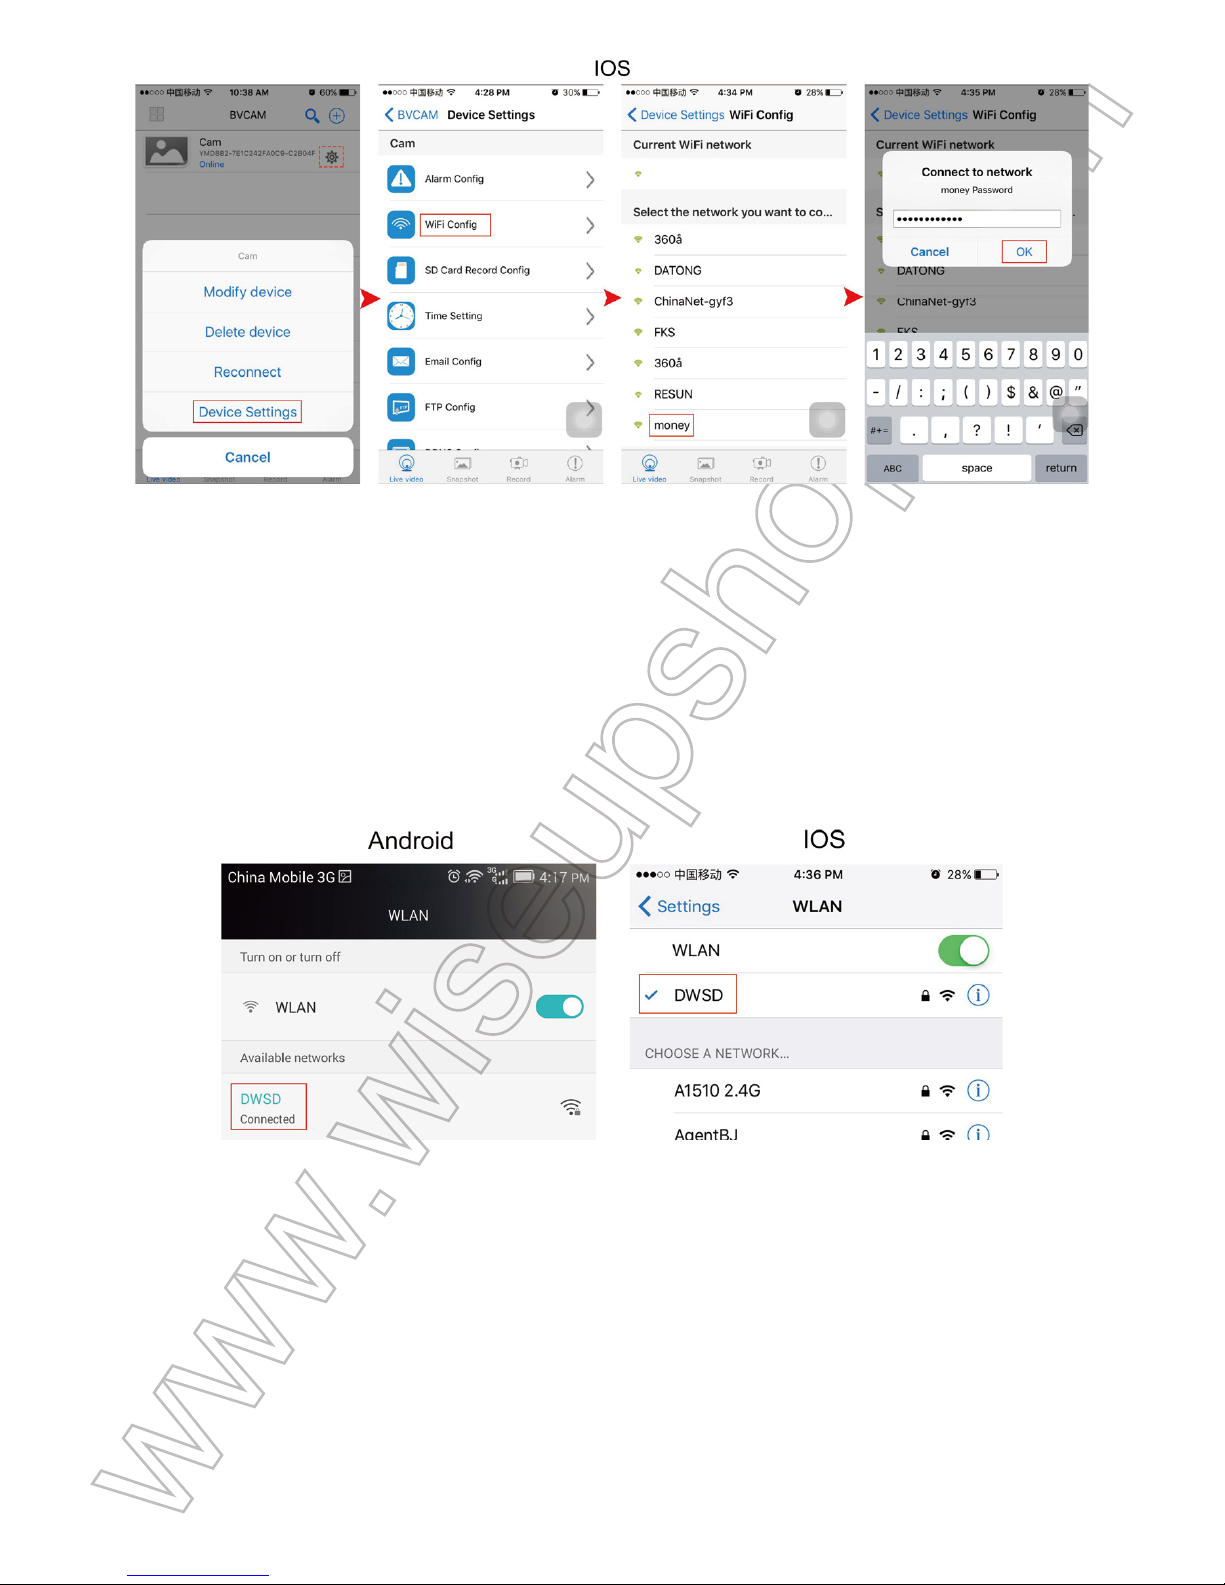
How to check if remote view function works?
1. Exit the “BVCAM” APP.
2. Back to the WIFI or WLAN setting page on your phone or mobile device, exit your
phone or mobile device from the current WIFI network, enroll your phone or mobile device
in another WIFI hotspot, or you can turn off the WIFI or WLAN function, enable your
mobile network data instead.
3. Launch the “BVCAM” APP again. If the camera is “Online” on the “Live video” page, it
means the remote view setup is successful and the camera has entered into WAN mode. The
WIFI indicator light will be solid blue. You can go ahead to view live video or recorded video
remotely.
[Note]:
If the camera shows “Device Offline”, that means the remote view setup failed and you
need to reset the camera (See VIII) and set up all over again.
V. Motion Detection Recording Setup
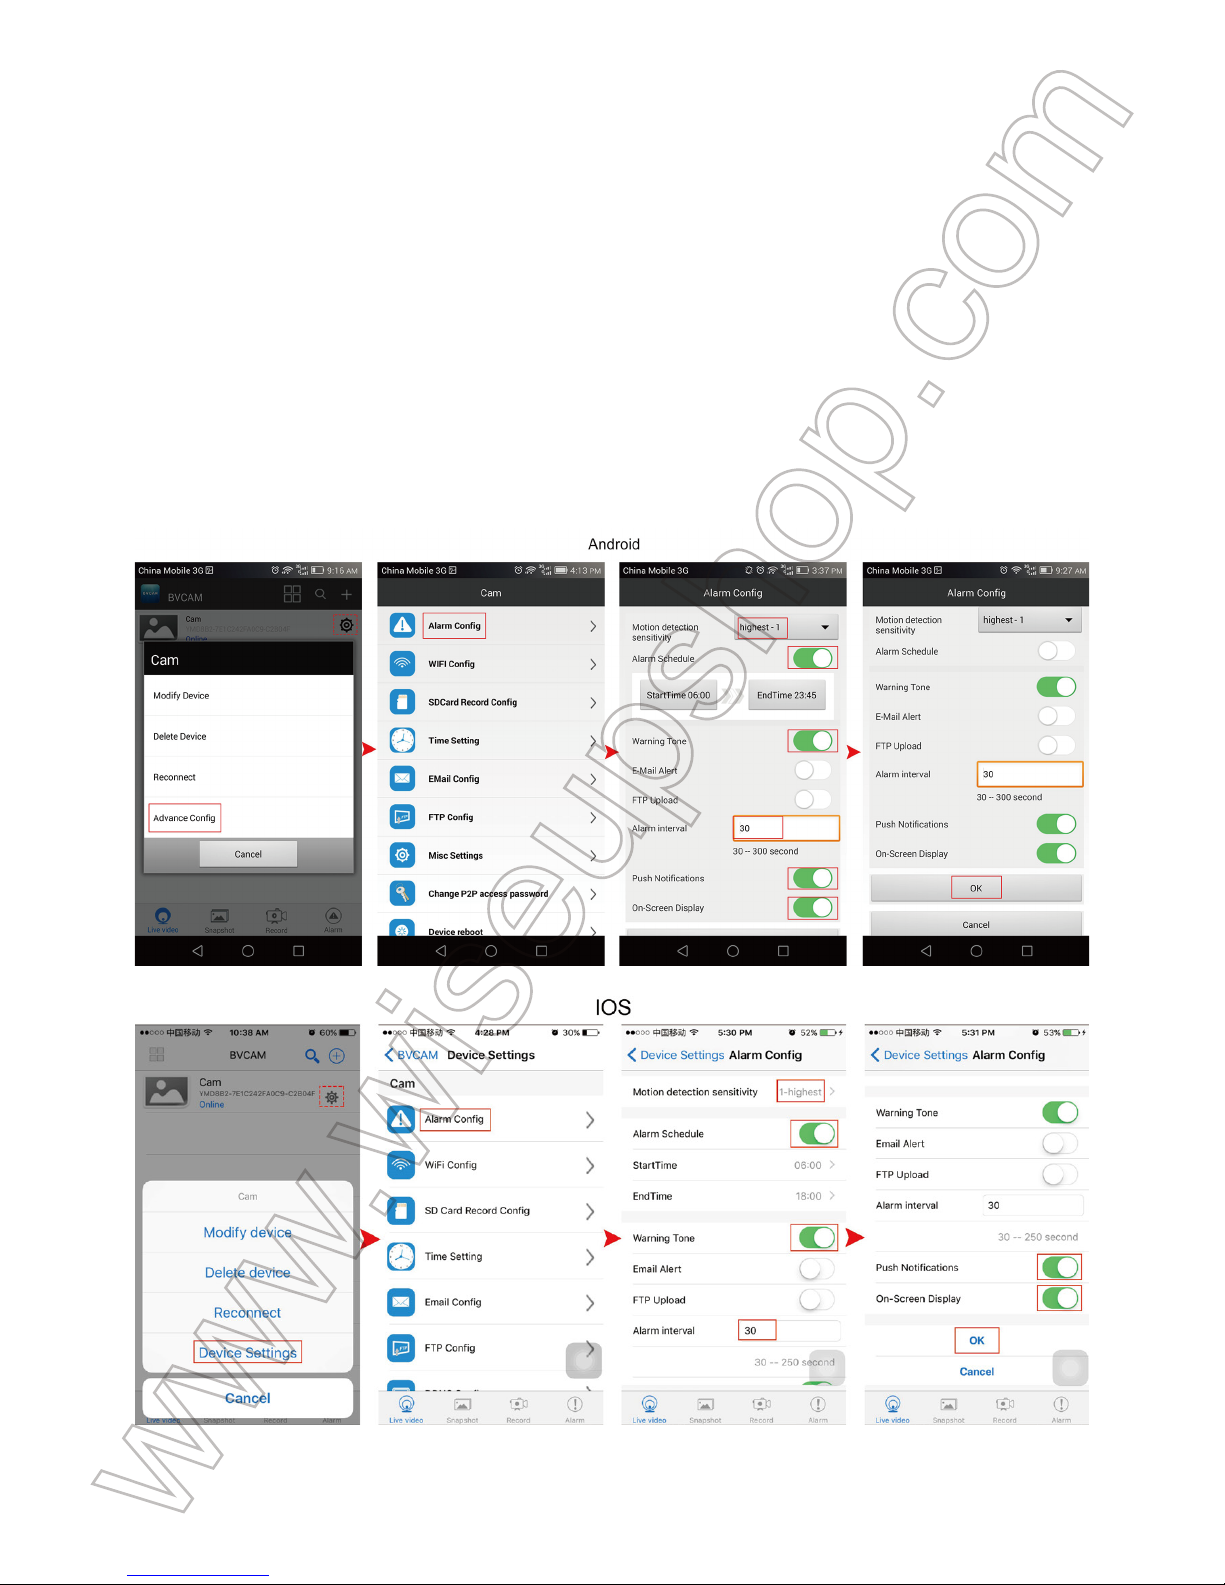
>> Please make sure that the camera is added to the APP in LAN or WAN mode before
you start.
5.1. Launch the “BVCAM” APP.
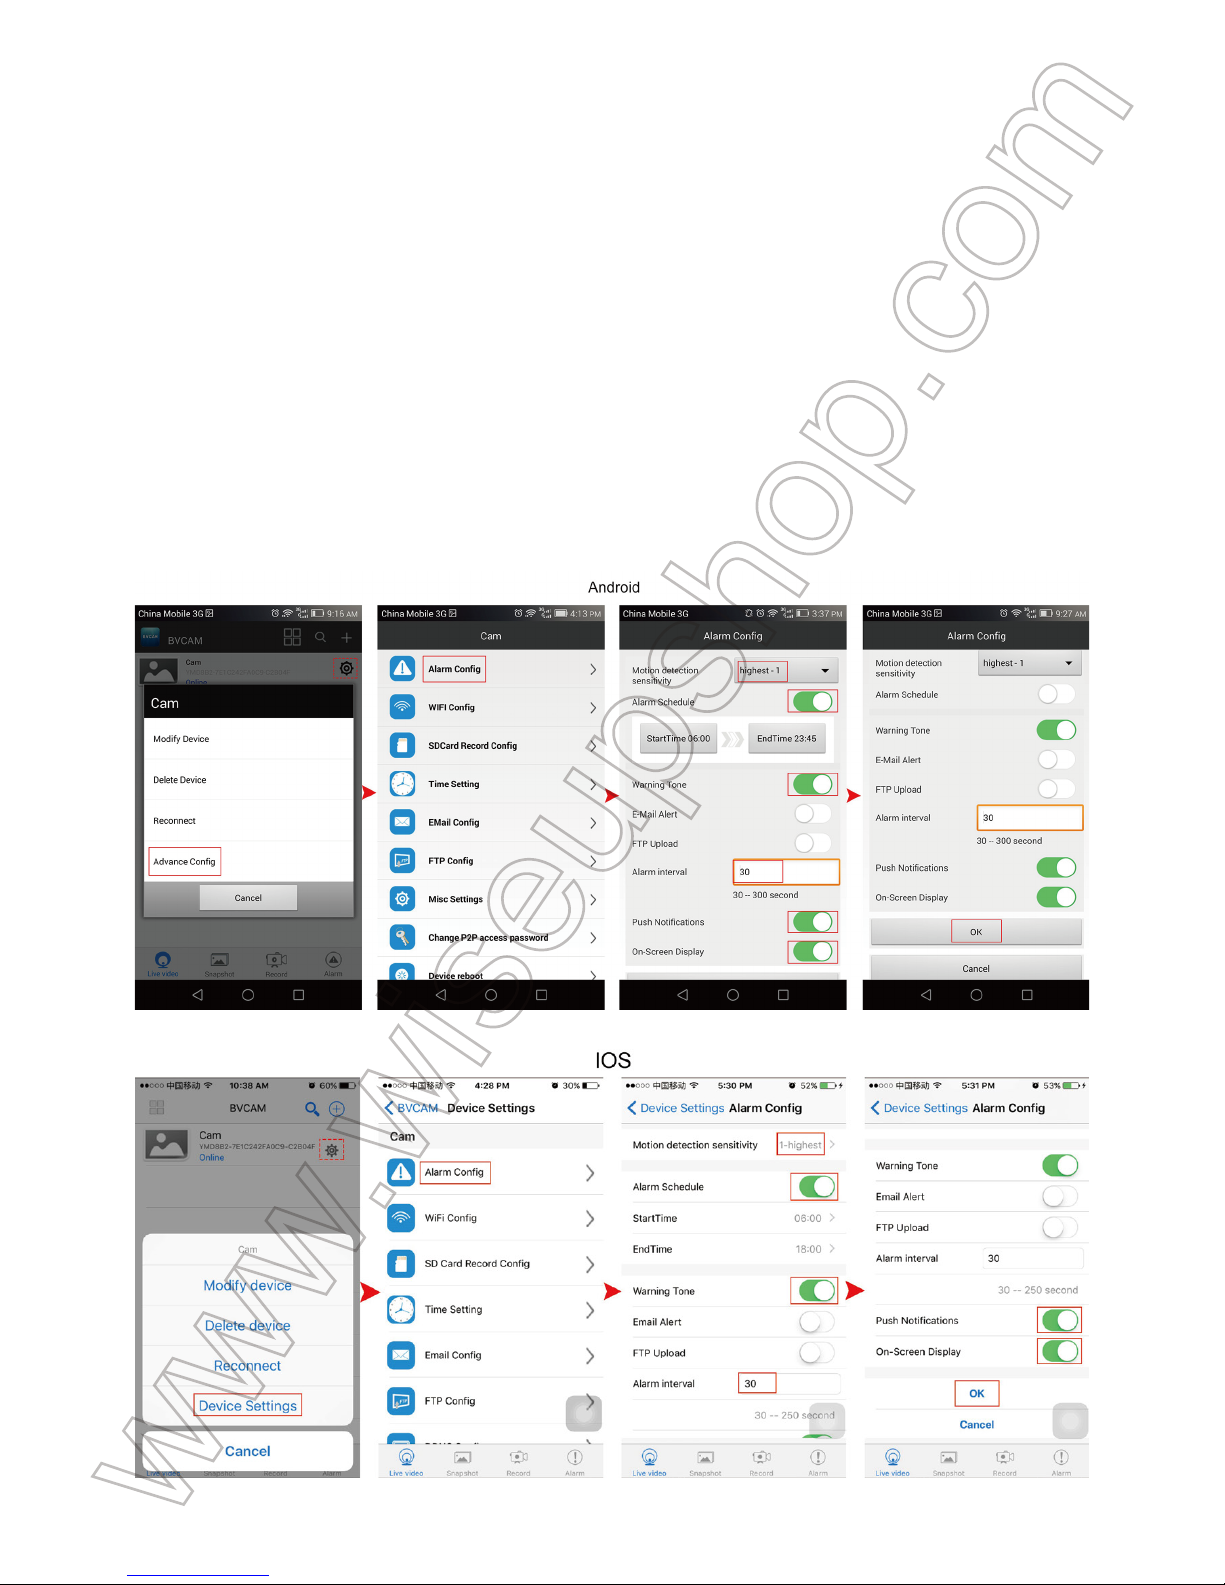
5.2. Set up motion detection photograph
Step1: Tap the setting icon on the “Live video” page then choose "Advance Config" or “Device
Settings”.
Step 2: Go to “Alarm Config” page, there, choose your desired sensitivity level and set an
alarm schedule.
Step 3: Tap “OK” to complete the setting.
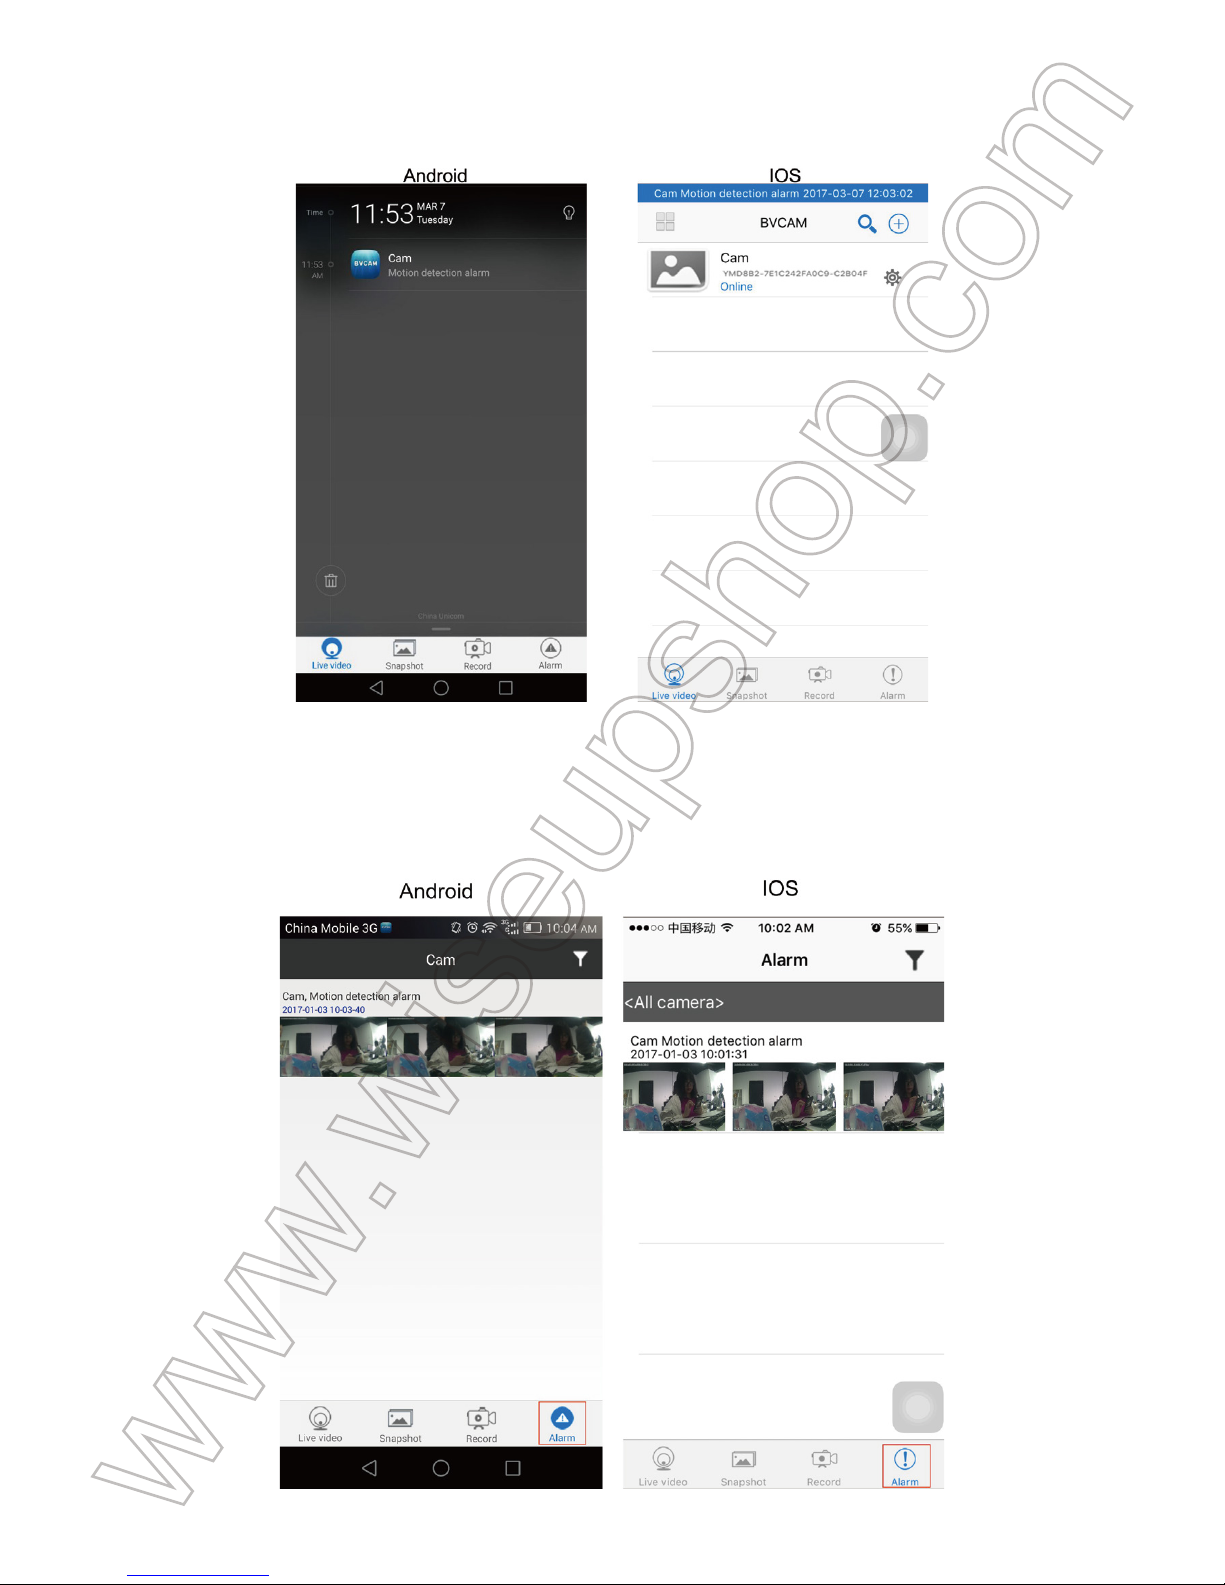
Step 4: When a movement is detected, the camera will push a warning message to your
phone and will take a screenshot of the live video page automatically.
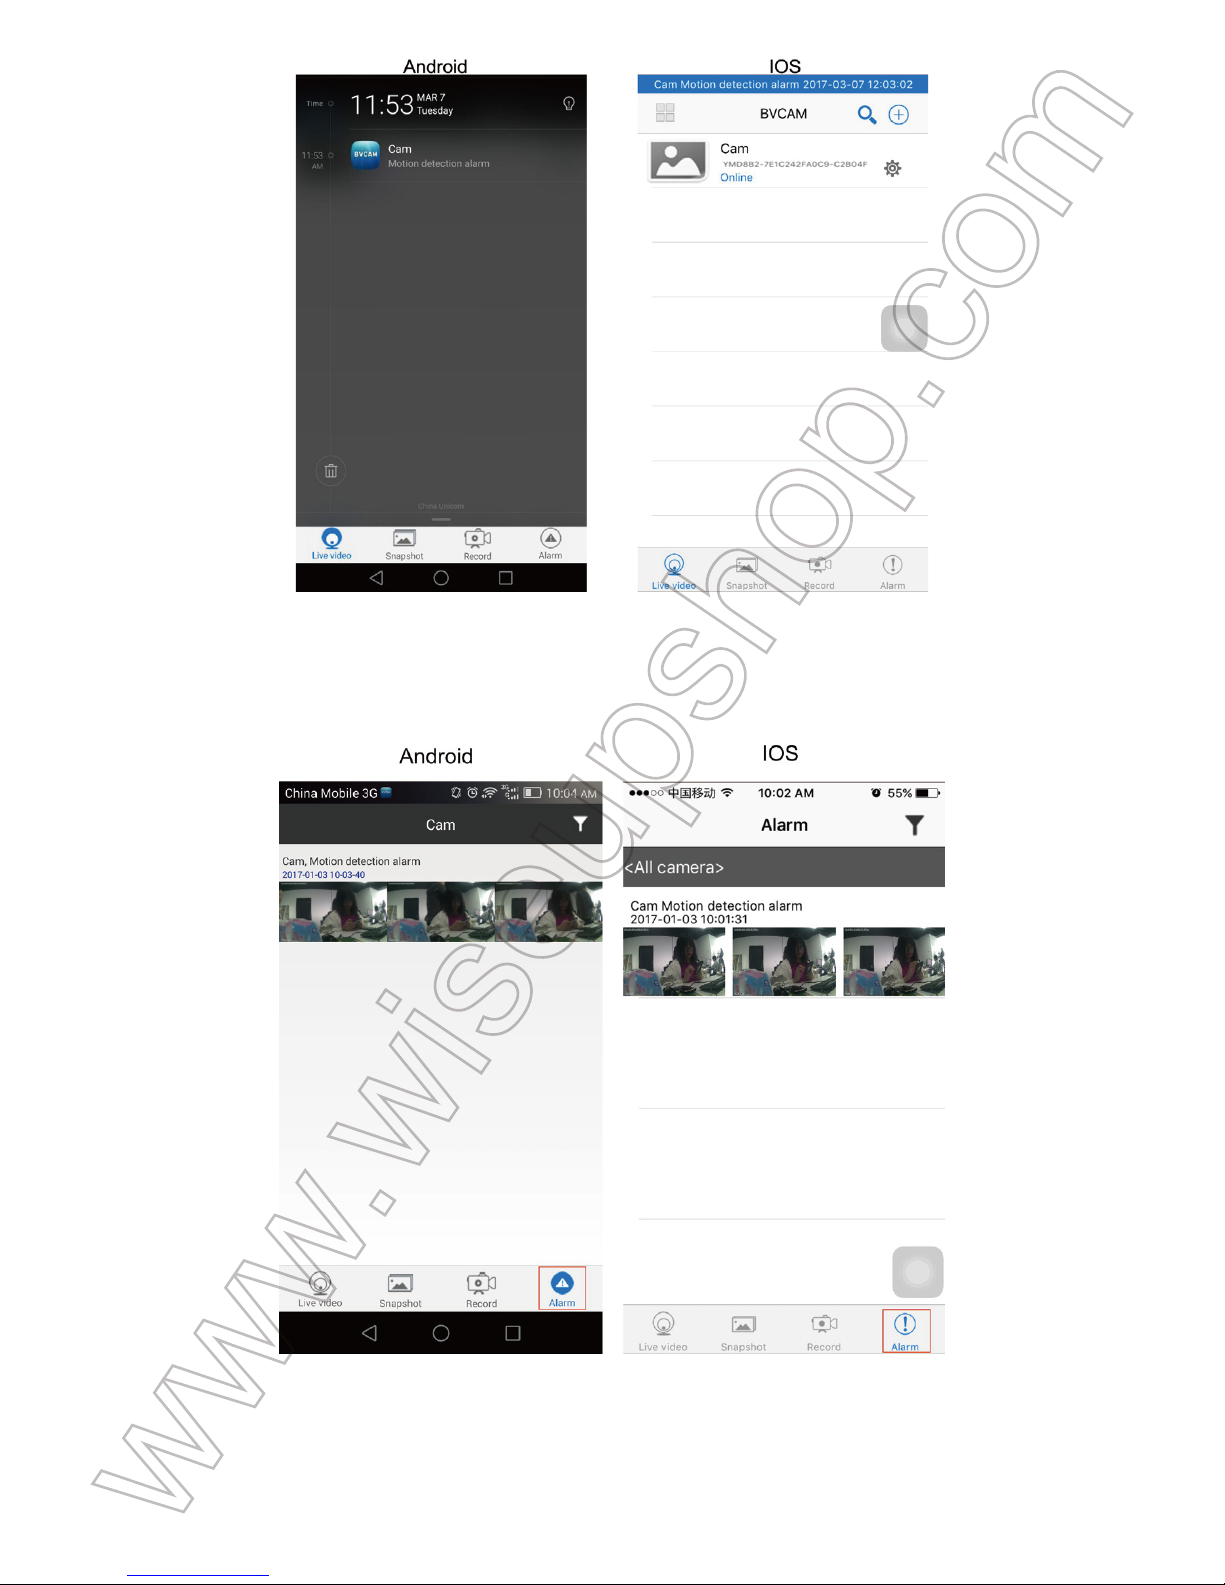
Step 5: You can go back to the “Live video” page and tap “Alarm” at the bottom of the screen
to check out the photos.
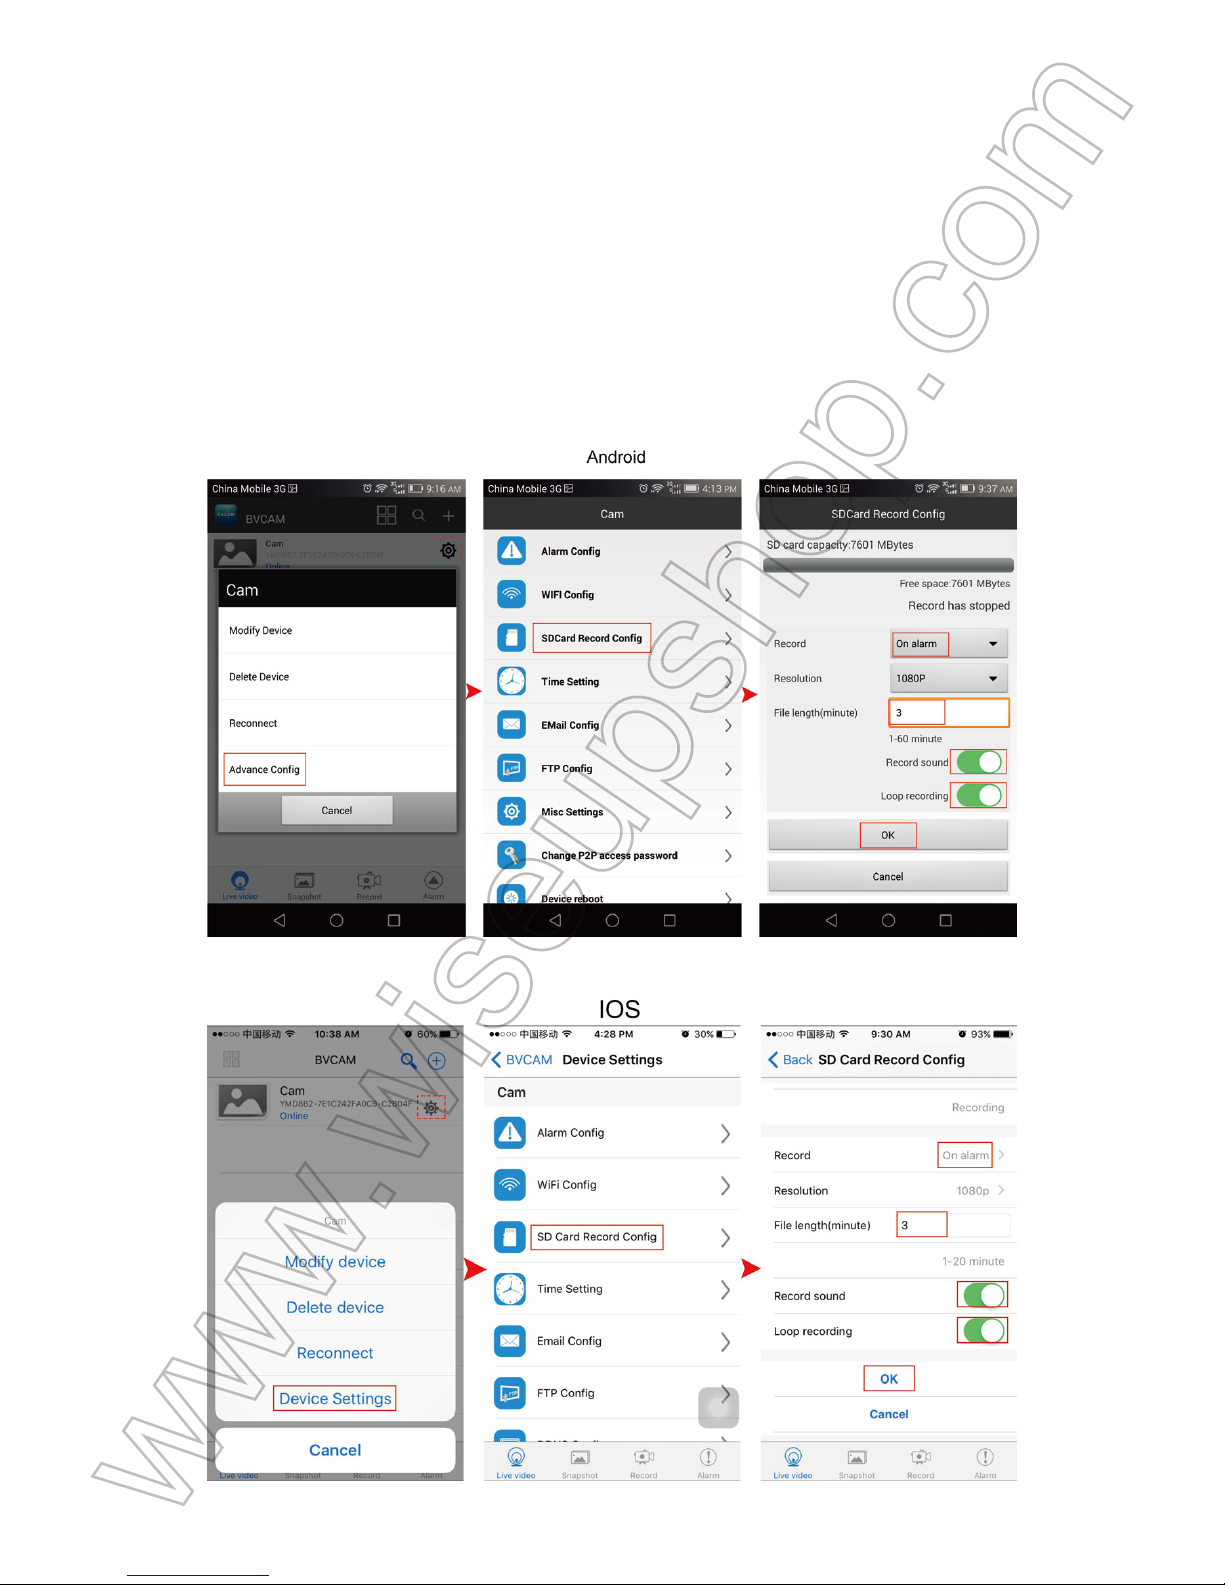
5.3. Set up SD card recording based on motion detection
Step 1: Tap the setting icon on the “Live video” page then choose "Advance Config" or “Device
Settings”.
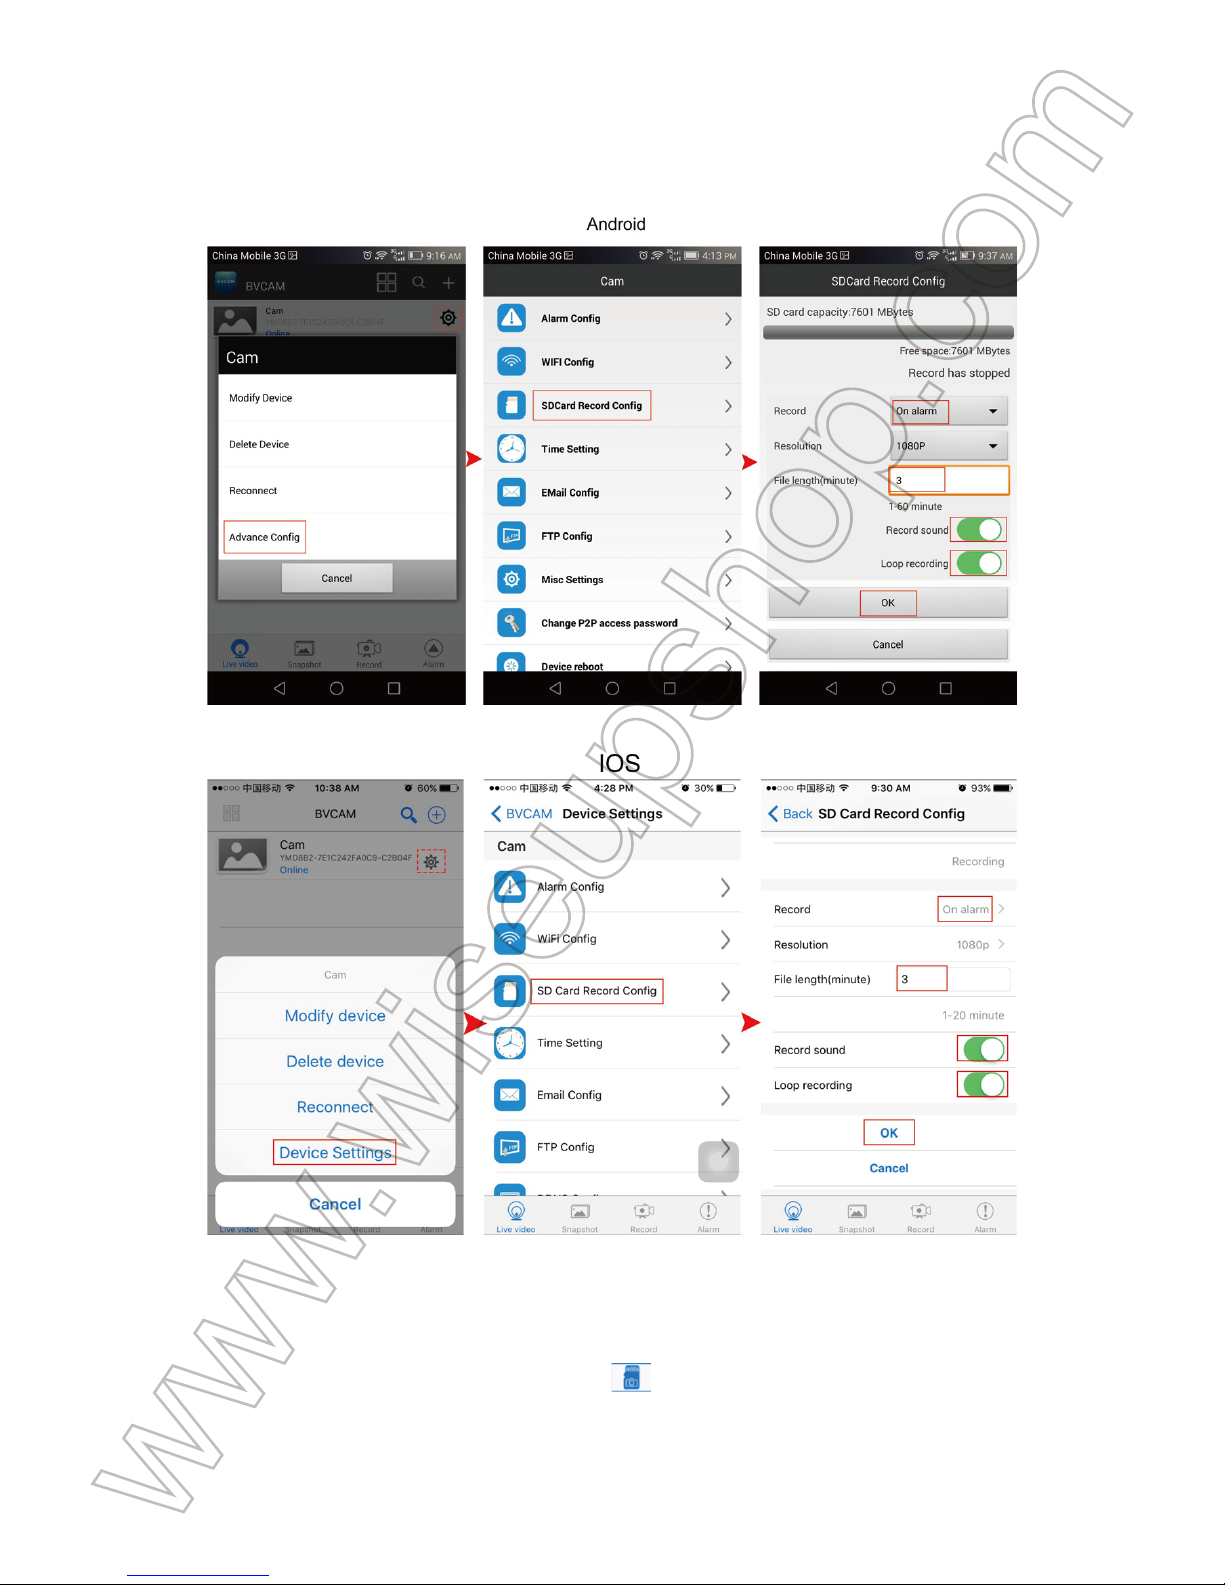
Step 2: Go to “SDCard Record Config” page, choose “On alarm”, then set the video
resolution and file length as you like.
Step 3: Tap “OK” to complete the Motion Detection Video Recording setting.
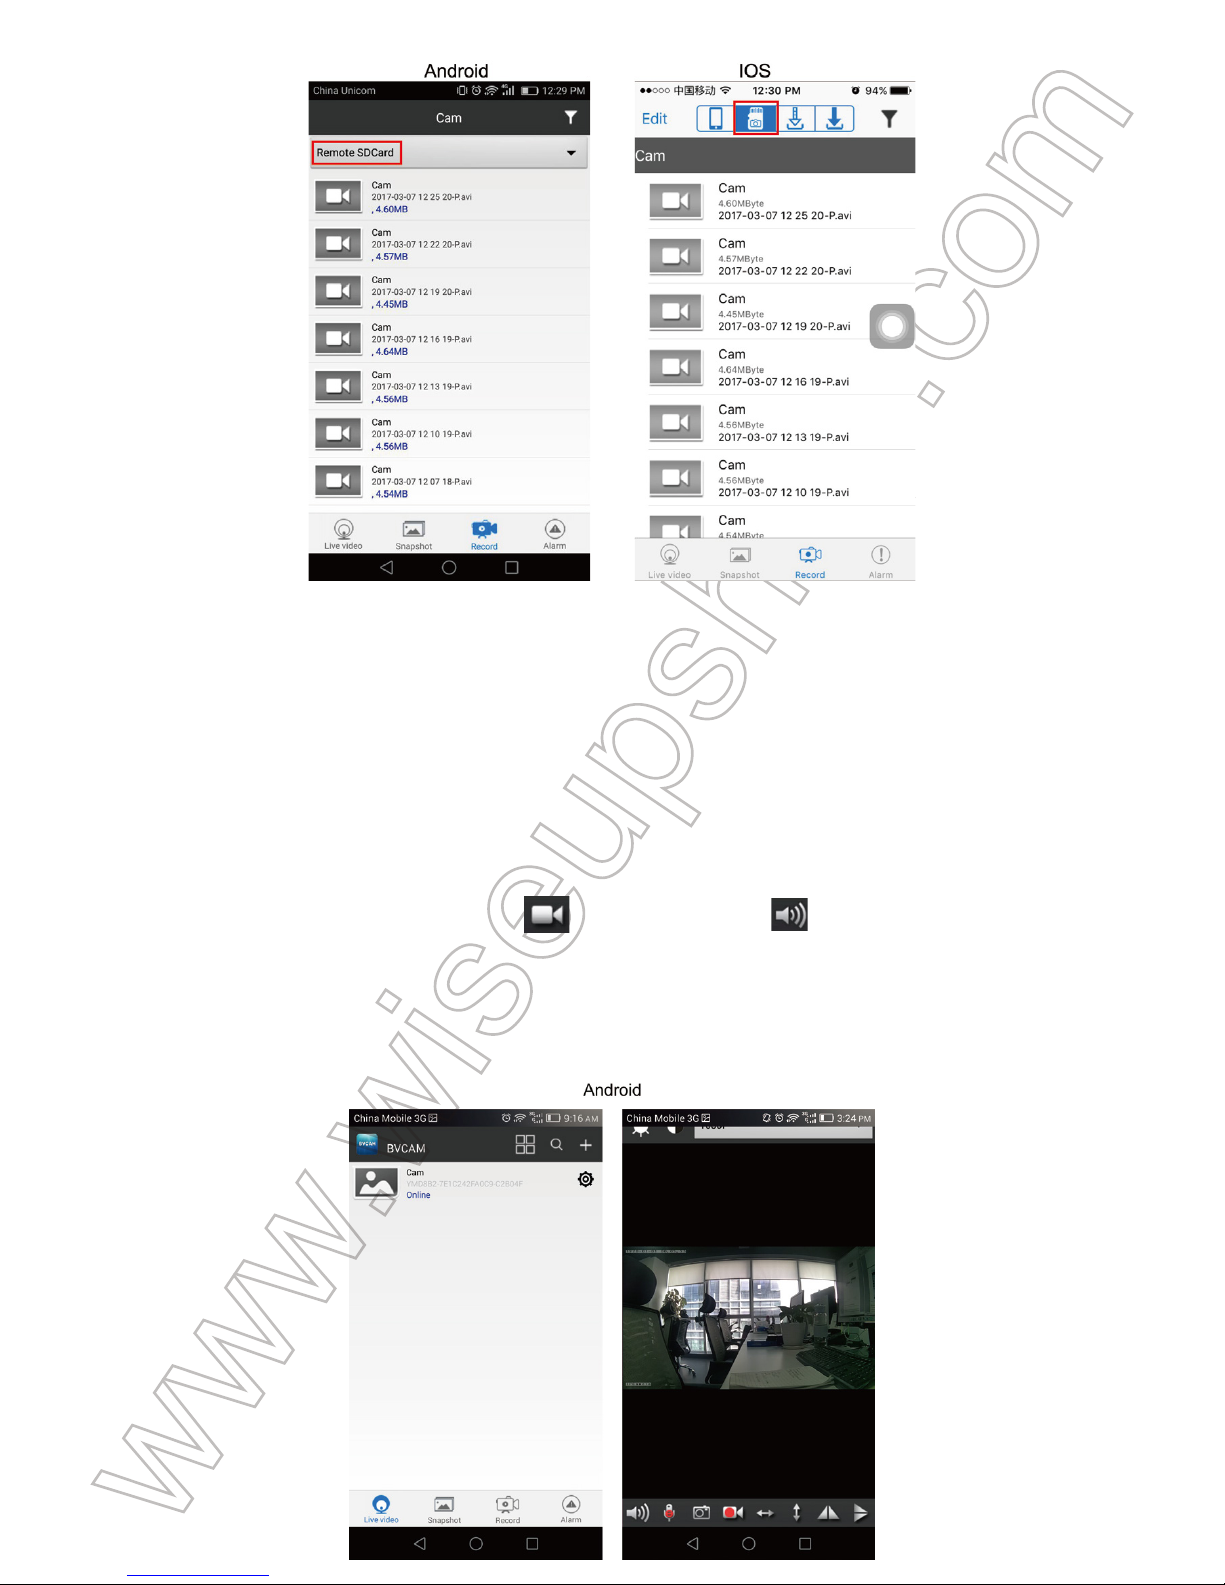
Step 4: When a movement is detected, the camera will record a video to the Micro SD card
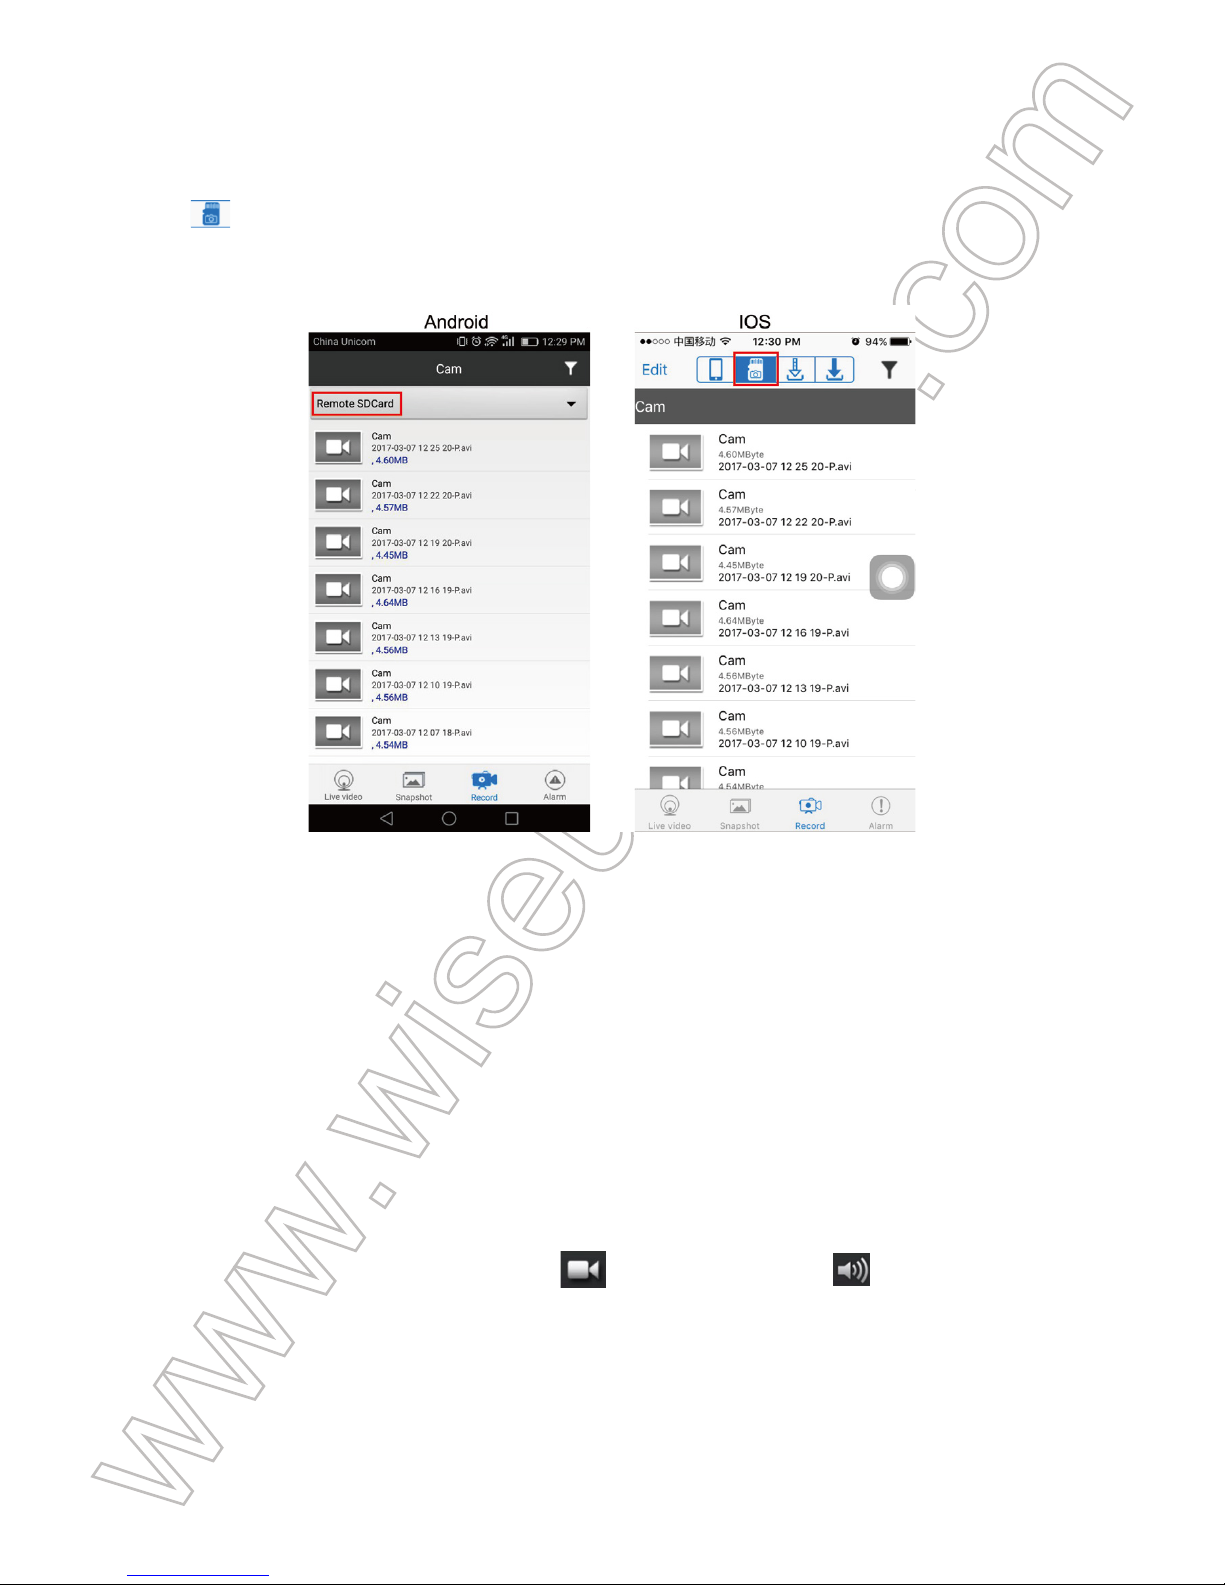
automatically. You can go back to the “Live video” page, tap “Record” at the bottom of the
screen and then tap "Remote SD Card" or to check out the video files. Or you can
download these video files to your phone.
[Note]: Video Resolution: 1280×720P, 640x480, 320x240 Video Format: AVI
VI. Recording Video to Smartphone or Tablet PC
>> Please make sure that the camera is added to the APP in LAN or WAN before you start.
6.1. Launch the “BVCAM” APP. Tap the camera icon to get into the live video screen.
6.2. Tap the video recording button and audio button to start or stop recording
video.
For Android users, the video files will be saved on your mobile device's flash memory. For
IOS users, the video files will be only found in the APP “BVCAM”.
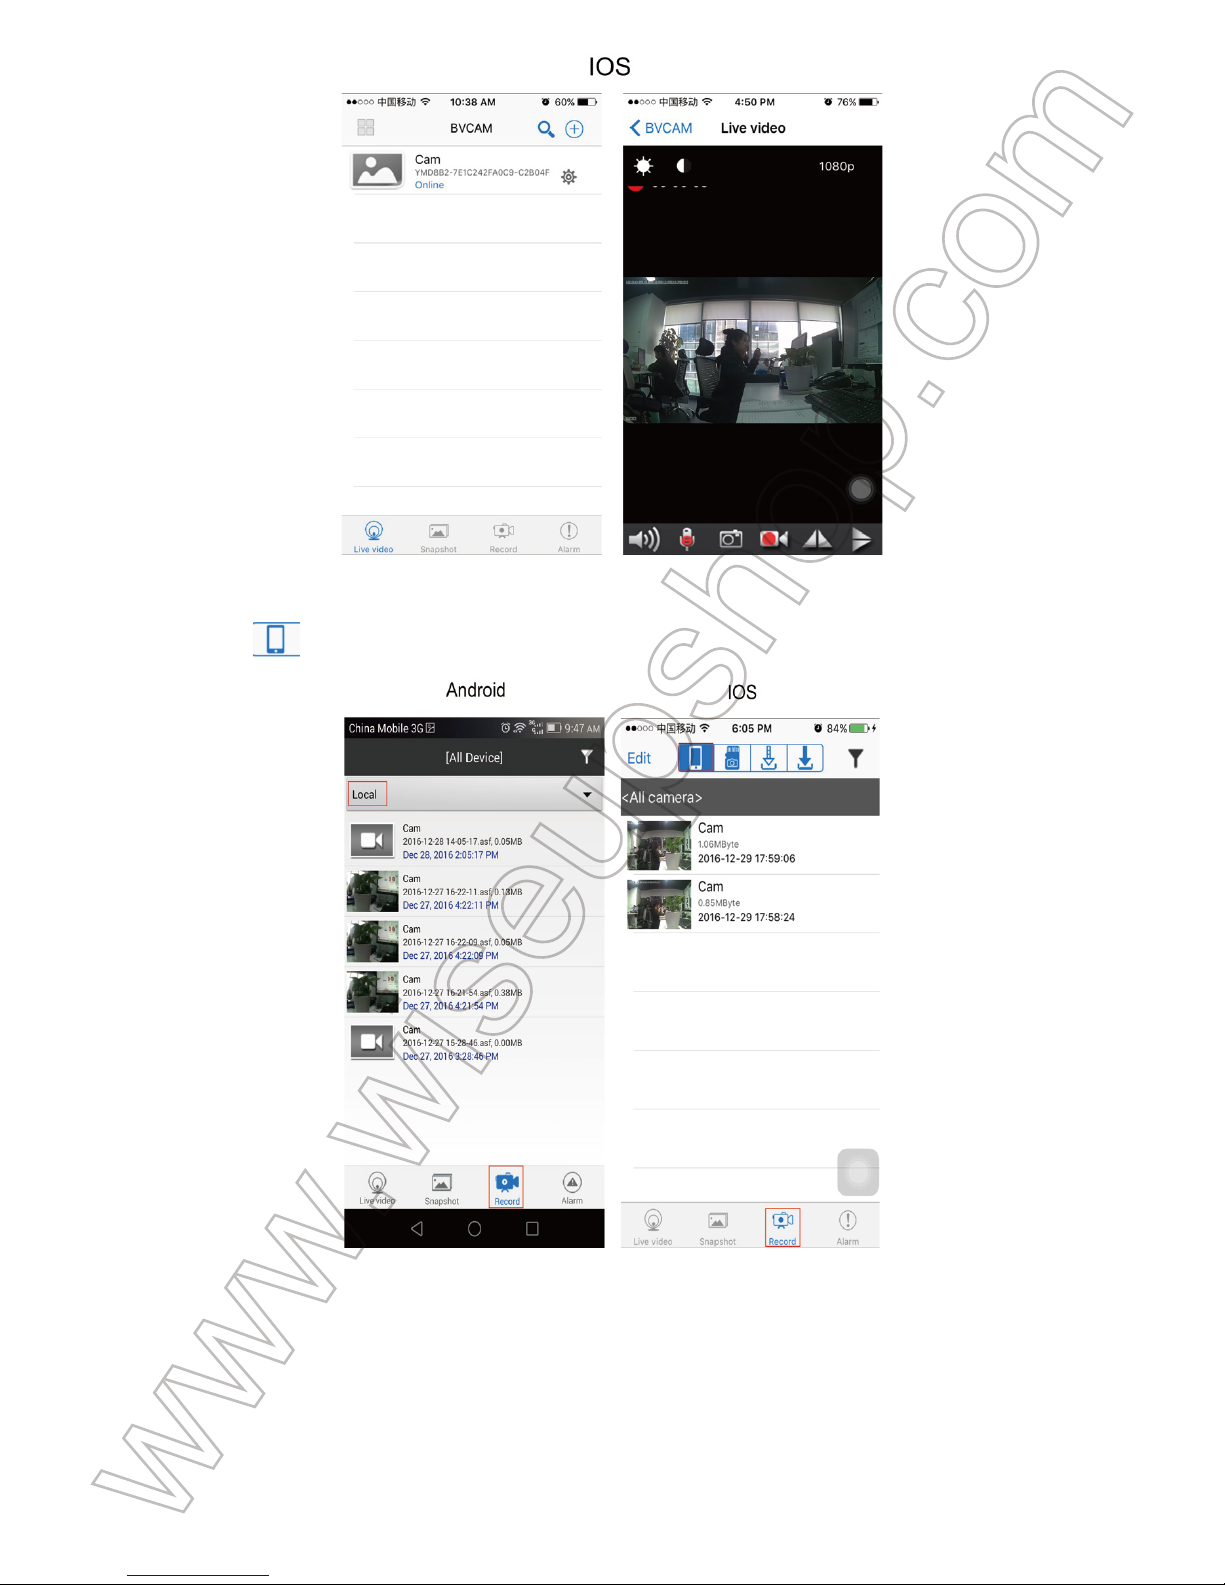
6.3. Go back to the “Live video” page, tap “Record” at the bottom of the screen and then tap
"Local" or to check out the video files.
VII. Recording Video to Local Micro SD Card
>> Please make sure that the camera is added to the APP in LAN or WAN before you
start.
7.1. Launch the “BVCAM”APP.
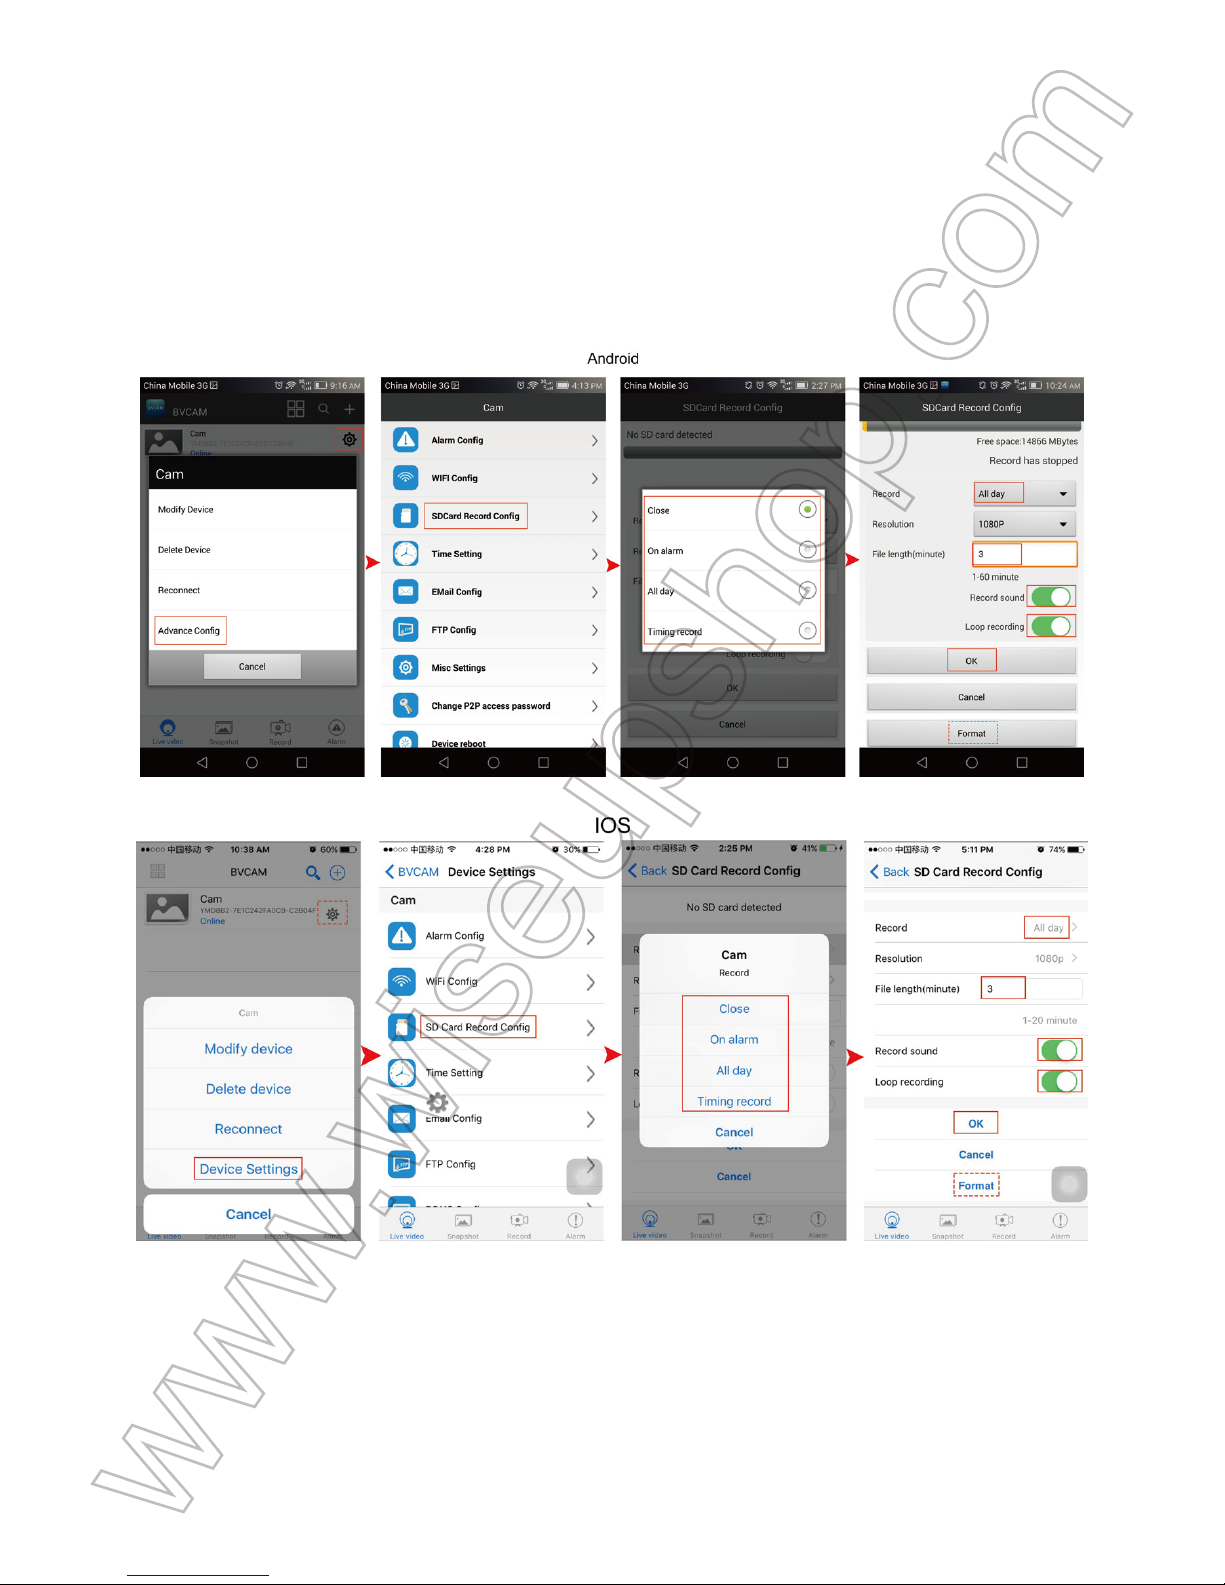
7.2. Tap the setting icon on the “Live video” page then select "Advance Config" or “Device
Settings”.
7.3. Go to “SD Card Record Config” page, then choose a desired recording mode and file
length.
7.4. Tap “OK” to complete the SD card recording setting and the camera will record video
to the Micro SD card continuously.
7.5. The video files will be saved in the Micro SD card of this camera. You can check out
the video files by following chapter 5.2.4.
VIII. Resetting
If for any reason the camera stops working or isn’t working properly, you can reset the
camera to restore it back to factory default settings.
Operation: When the camera is powered on, hold down the Reset Button for 3 seconds to
reset all settings to factory default. The camera will reboot automatically with default settings
in 3 minutes.
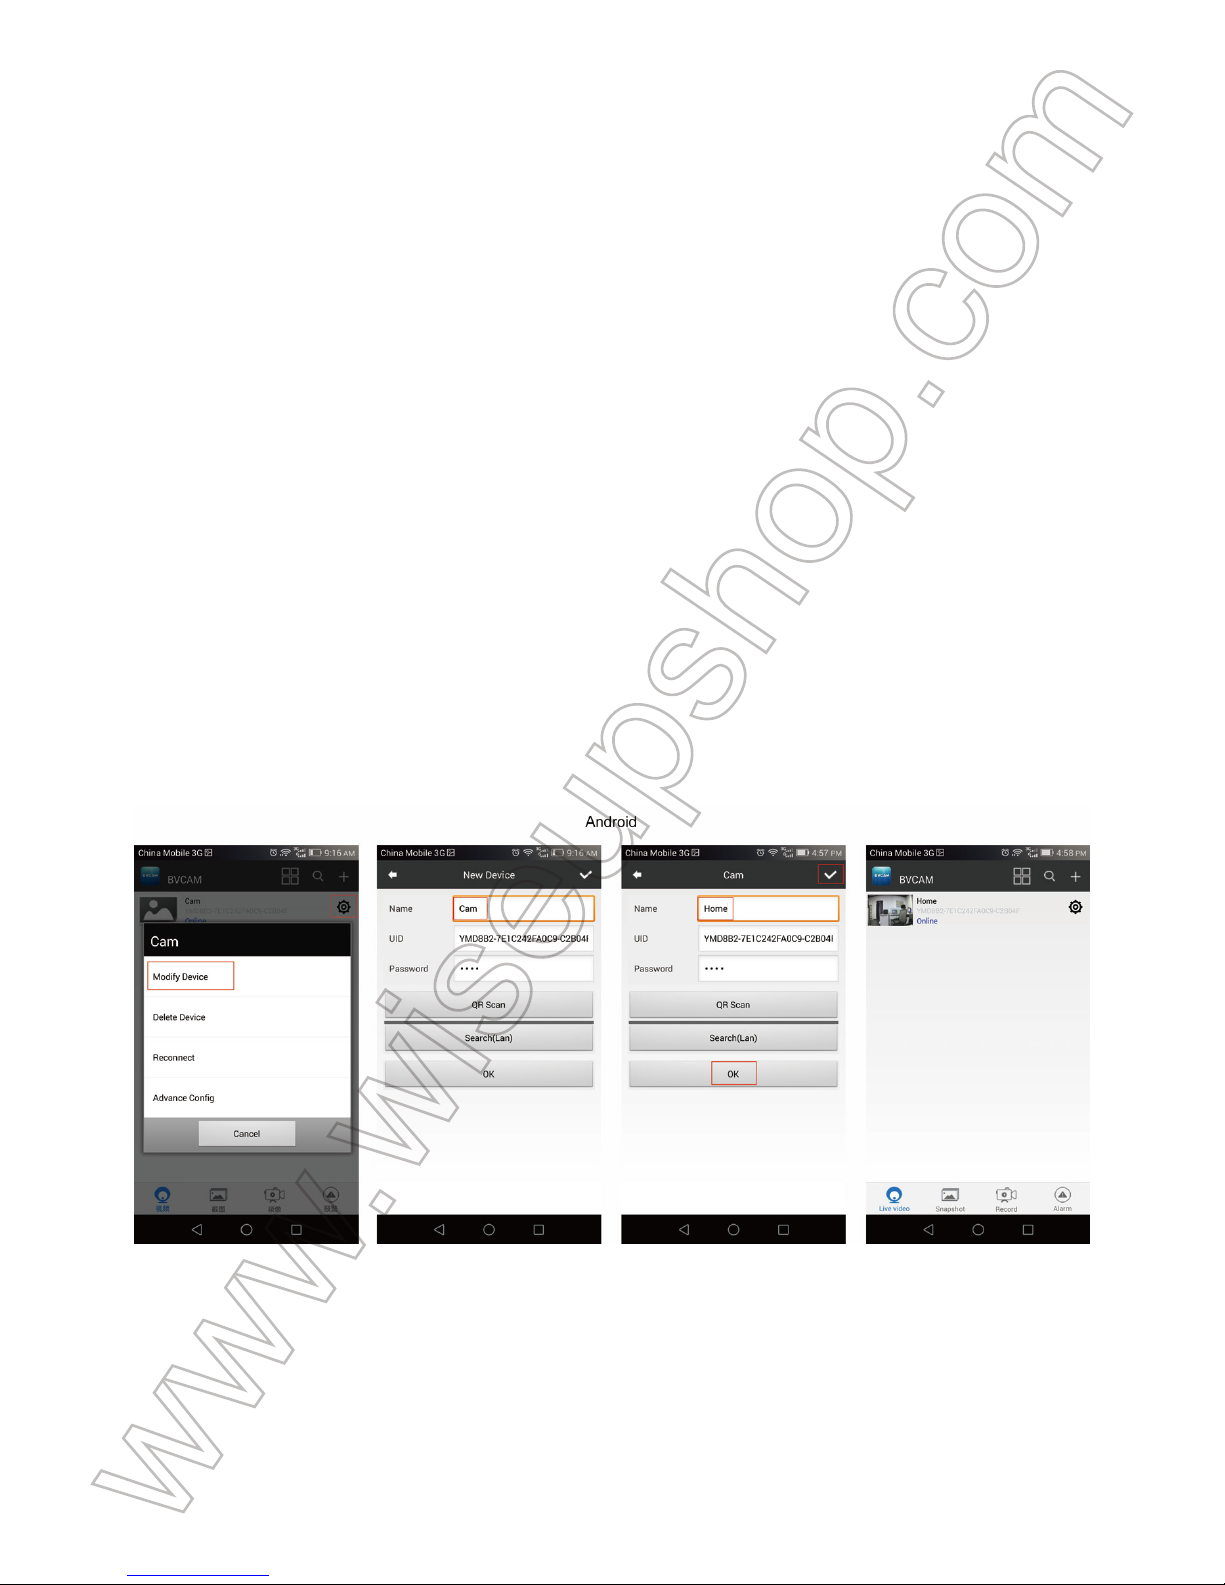
IX. Renaming Camera & Changing Password
>> Please confirm that the camera is added to the APP, and it is online in the P2P (LAN)
mode before you start.
9.1. Launch the APP “BVCAM”.
9.2. Rename the camera as below:
Step1: Tap the setting icon on the “Live video” page then choose “Modify Device” in the popup
window.
Step 2: Clear the default name and type in your desirable name like home, office, bedroom,
etc.
Step 3: Tap “OK” or “√” to confirm the change.
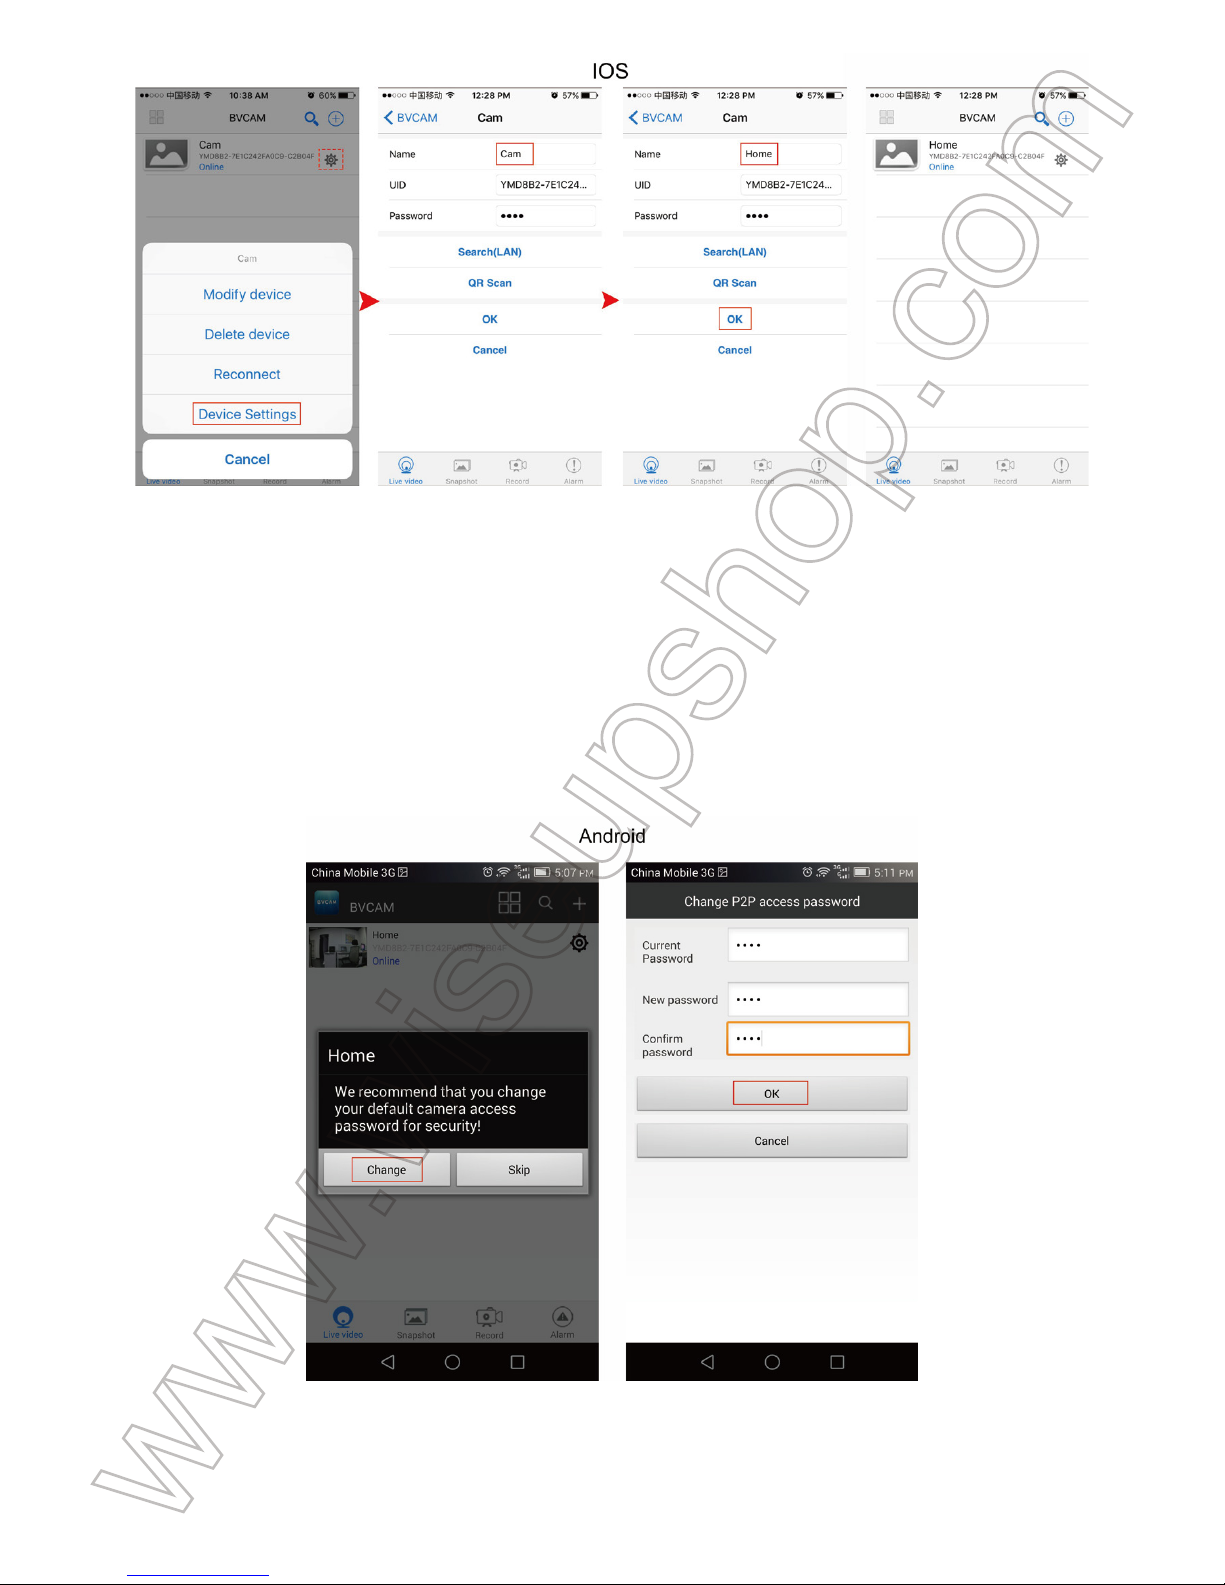
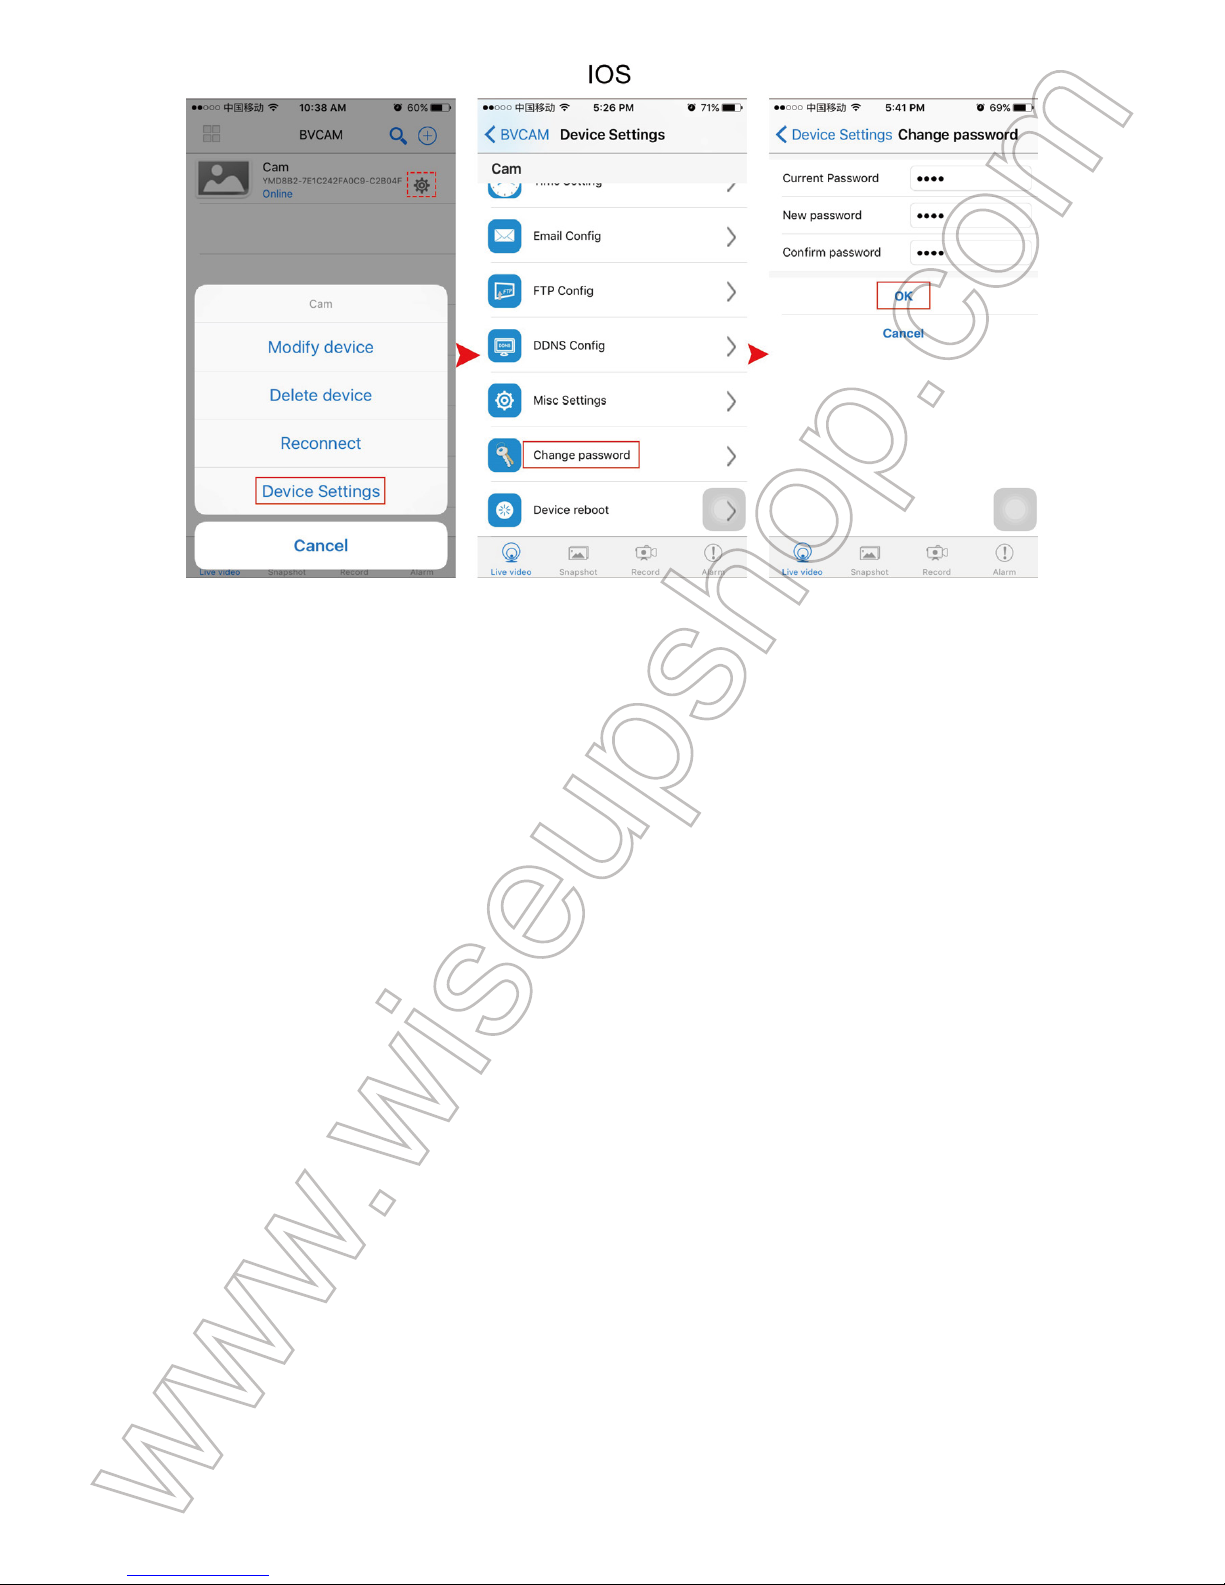
9.3. Change the password as below:
Option One
Step 1: Tap the camera icon on the “Live video” page, and tap “Change” in the popup window.
Step 2: Enter the new password and confirm it, then tap “OK” to save the change.
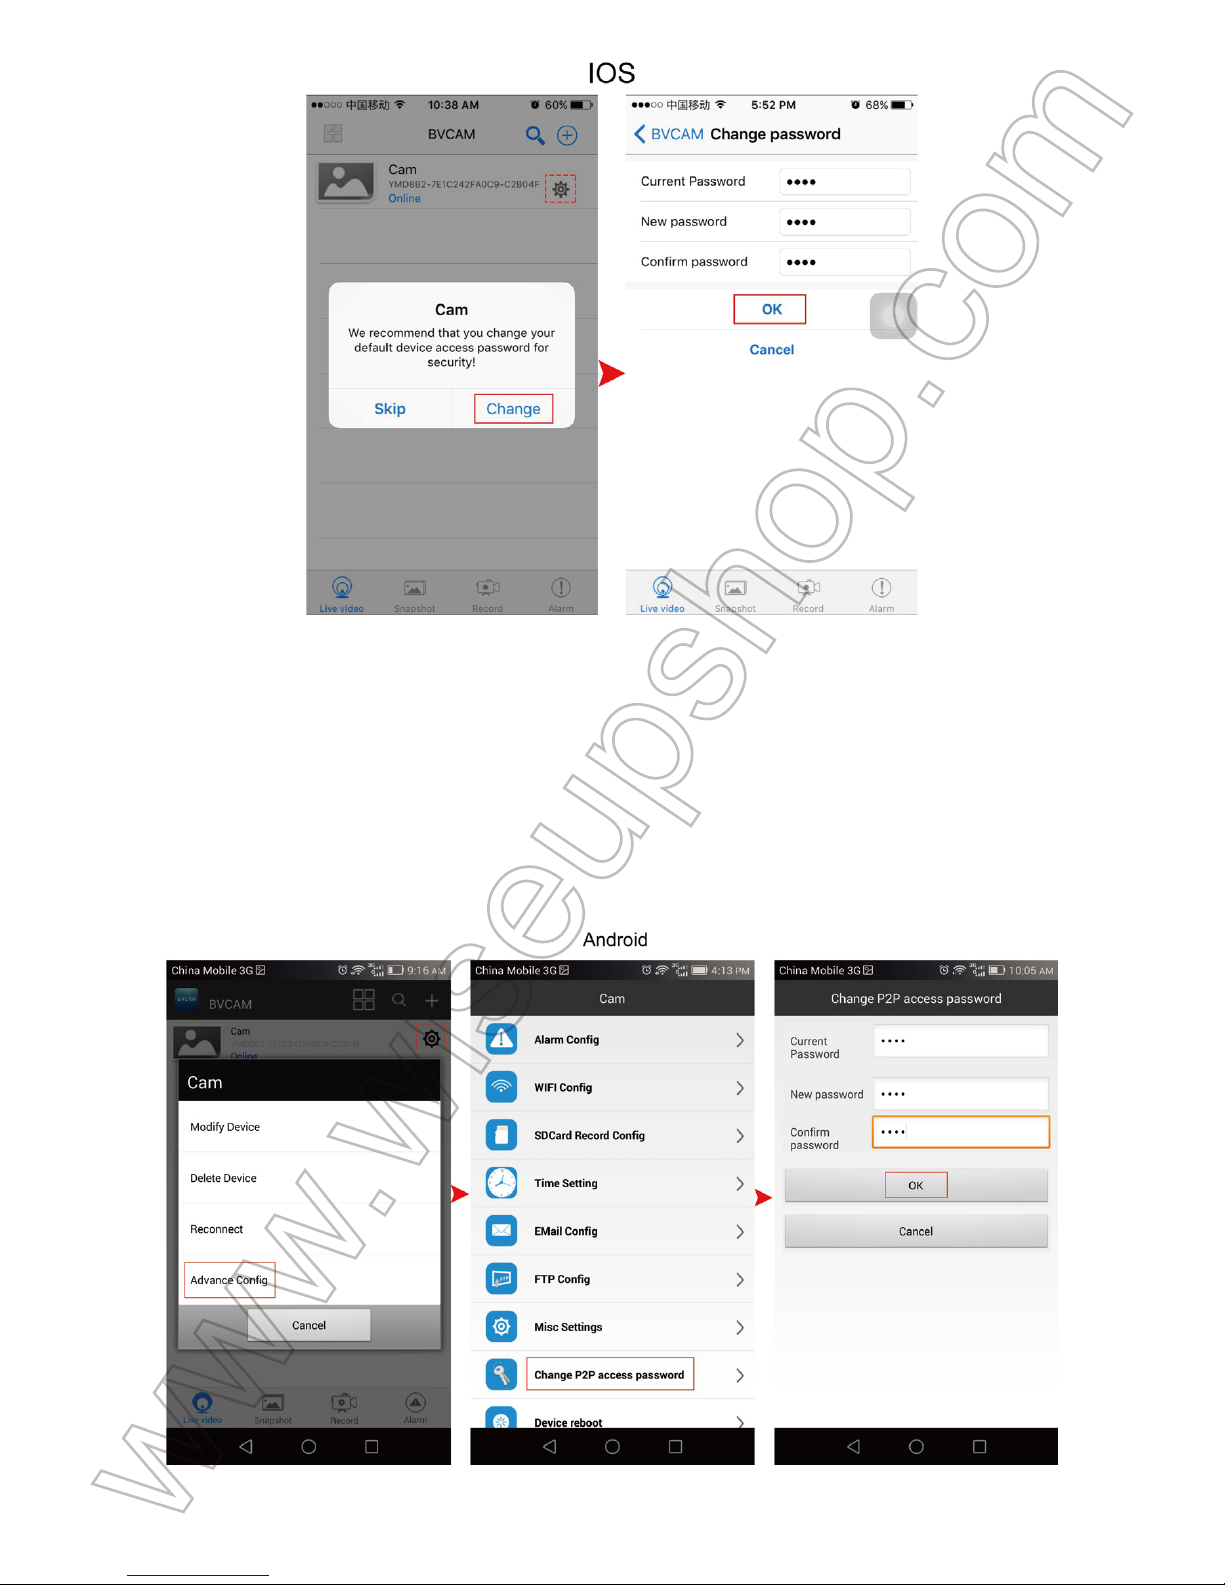
Option Two
Step 1: Tap the settings icon on the “Live video” page, tap "Advance Config" or “Device
Settings”, then go to "Change P2P access password" or “Change password” page.
Step 2: Enter the default password “8888” at first, then enter a new password and confirm it,
tap “OK” to save the change.
Frequently Asked Questions
Q1: Why can’t I find the camera’s WIFI signal on my smartphone or tablet PC?
A1: There are 4 solutions to this problem:
1. Take out the backup battery, plug the camera into an outlet power supply by using the
USB cable provided. Wait 2 minutes for the WIFI signal SSID to appear.
2. Reset the camera (See VIII), then wait for the WIFI signal SSID to show up.
3. Keep your phone or mobile device within the camera’s WIFI hotspot range, refreshing
the WIFI signal page. It may take up to 2 minutes for the hotspot to become recognizable
on your phone or mobile device's WIFI setting page.
4. Shut off your phone or mobile device’s WIFI function for a while, then turn it on to
search again.
Q2: The camera does not record any video to the Micro SD card?
A2: Please power off the camera, take out the Micro SD card and format it, then insert it
to the SD card slot again, power on the camera again.
Q3: Why does the WAN mode setup fail?
A3: Please make sure your network is in a good condition. Plus, the WIFI network the
camera is configured with can’t be the same with one you connect your phone to.

Q4: What can I do if I forget the Login password?
A4: Please reset the camera. (See VIII)
Q5: The APP cannot find the camera’s UID after choosing “Search (LAN)”?
A5: Ensure your phone or mobile device is still connecting to the camera’s WIFI signal.
Ensure your camera is powered by the outlet power supply or the backup battery is fully
charged. Note that we don’t recommend you plug the camera into your PC computer for
charging. Your camera will not work properly that way.
Q6: Why live video screen shows up black and a searching circle spins in center but
nothing ever displays?
A6: a. If your camera is connected to a slow WIFI network, wait 10-30 seconds for live
video to re-appear.
b. On the live video page, please select a lower resolution to play.
Q7: Live video is not smooth and clear?
A7: Select suitable resolution according to the real time network environment
Q8: How many mobile devices can connect to the camera at the same time?
A8: No limit.
Q9: There is only 1 user, but the camera shows 2 or more users?
A9: a. If you login in very often, the last login record is still in. If you check it every 2-5 minutes,
the camera will show surely the exact numbers of users;
b. For your safety and privacy, please change camera's password for the fi¬rst time use.
Q10: How many cameras are supported on the mobile application?
A10: No limit.
Q11: Is there any PC client software I can use on my computer?
A11: Please click the PC client software download link and download the zip file on your PC:
http://www.wiseupshop.com/download?name=wifi29&Submit=++++++++

Q12: The camera is not holding my WIFI settings and continues to show that the
camera is offline?
A12: Make sure the camera is inside the range of good WIFI signal. Or if you are using
the backup battery, check if the power adapter is connected properly for long time use.
Q13: Will the camera still work if the power goes out?
A13: If the camera is in P2P (LAN) mode, the camera can still work and record video as
long as the backup battery provides power for the camera to run. If the camera is in WAN
mode, it will not work until power is restored and the Internet access is available.
Q14: How to add the camera to more devices?
A14: Make sure that camera is in WAN mode already. Then launch the “BVCAM” APP on
your other Android phone or tablet PC, tap “+” icon, input the camera UID (a unique
combination of numbers and letters specific to your camera) or the OR code that sticks on the
top of the clock. Finally, tap “OK” to add the camera to the APP.
Q15: What can I do if my PC computer is unable to read the SD card directly from the
device?
A15: Remove the SD card from the camera, then use a card reader to read it on your PC.
Make sure the camera is powered off before removing the Micro SD card.
Q16: Why is time display not stable, always blinking?
A16: If you are using the backup battery, please recharge it. If not, check it the power adapter
is connected properly.
Q17: What media player software should I use to play back the video files on my
computer?
A17: Click the link: http://www.videolan.org/vlc/index.html to download and install VLC player
to play back video files on your PC or Mac computer.

WIFI29
Benutzerhandbuch
I. Produktübersicht
1. WIFI Indikator Licht
2. IR-LEDs
3. Kameraobjektiv
4. Netzschalter
5. Reset-Taste
6. Mikro-Sd-Einbauschlitz
7. USB-Anschluss
8. Abwärtstaste
9. Auf Knopf
10. Set-Taste
II. Was ist in der Box
-1 × WIFI Kamera Wecker
-1 × USB-Kabel
-1 × AC110-240V zum DC5V Netzteil
-1 × 8GB Micro SD Card (bereits in den Micro SD Kartensteckplatz eingebaut)
III. Bevor du anfängst
3.1. Holen Sie sich Uhr Teil bereit
3.1.1. Öffnen Sie die rückseitige Abdeckung, legen Sie die Reservebatterie ein und stecken
Sie sie in eine Steckdose. Stromversorgung mit dem mitgelieferten Netzteil, die Zeitanzeige
leuchtet hell.
3.1.2. Drücken Sie einmal die Set-Taste und die Stunde beginnt zu blinken, dann verwenden
Sie die Auf- oder Ab-Taste, um die aktuelle Stunde einzustellen.
3.1.3. Drücken Sie erneut die Set-Taste, um die Stunden-Einstellung zu speichern, und
die Minute beginnt zu blinken. Verwenden Sie dann die Auf- oder Ab-Taste, um die
aktuelle Minute einzustellen.
3.1.4. Drücken Sie die Set-Taste, um die Minuteneinstellung zu speichern.
3.2 Holen Sie sich WIFI Kamera Teil bereit
3.2.1. Vergewissern Sie sich, dass die Micro SD-Karte bereits formatiert ist und sicher in
den SD-Kartensteckplatz der Kamera eingepasst ist, oder es funktioniert nicht. Wir
empfehlen Ihnen, SDHC Class 10 Micro SD Karten zu verwenden.
3.2.2. Schalten Sie die WIFI-Kamera ein, indem Sie den Netzschalter auf ON schieben.
Warten Sie ca. 1-3 Minuten und die blaue Kontrollleuchte blinkt langsam, was bedeutet,
dass das WIFI-Signal der Kamera bereit ist.
3.2.3. Wenn Sie die Kamera benötigen, um 24/7 Tage zu arbeiten, schließen Sie es an
eine Steckdose Netzteil mit dem USB-Kabel und Netzteil inbegriffen.
3.2.4. Für Android-, iPhone- und iPad-Benutzer scannen Sie bitte den QR-Code, um die
"BVCAM" APP auf Ihren mobilen Geräten herunterzuladen.
IV. Netzwerkeinrichtung
4.1. Option Eins: Schnelle Konfiguration mit einer Micro SD Karte
4.1.1. Formatieren Sie die Micro SD Karte auf Ihrem PC Computer. Dann erstellen Sie eine
Datei namens "wifi.txt" in der Micro SD Karte. Öffnen Sie es und geben Sie Ihr WIFI-Netzwerk
SSID und Passwort wie folgt ein:
4.1.2. Diese Datei speichern Ziehen Sie die Micro SD-Karte aus dem PC-Computer und
stecken Sie sie in die Kamera, wenn sie ausgeschaltet ist.
4.1.3. Schieben Sie den Netzschalter auf ON. Die Kamera wird in 15-30 Sekunden mit
Ihrem WIFI-Netzwerk verbunden.
4.1.4. Wenn die WIFI-Kontrollleuchte leuchtet, bedeutet dies, dass die
WIFI-Konfiguration abgeschlossen ist. An dieser Stelle verbinden Sie Ihr Mobilgerät mit
einem anderen WIFI-Netzwerk oder schalten Sie Ihre WIFI-Funktion aus und verwenden
Sie stattdessen Ihr Mobilfunknetz.
4.1.5. Starten Sie die "BVCAM" APP, tippen Sie auf "+", "Add the new online Device" und
geben Sie dann die UID der Kamera ein, die eine Kombination aus Zahlen und Buchstaben
für Ihre Kamera ist und geben Sie das Standardpasswort "8888" ein. Oder Sie können den
QR-Code scannen, der an der Oberseite der Uhrkamera haftet. Endlich klicken Sie auf "OK"
oder "√", um die Kamera hinzuzufügen. Wenn die Kamera online zeigt, bedeutet das, dass du
live oder aufgezeichnetes Video remote ansehen kannst, solange du Zugang zum Internet
hast.
4.2. Option Zwei: Durch "BVCAM" APP
LAN (P2P) Modus Setup
4.2.1. Gehen Sie auf die WLAN-Einstellungsseite auf Ihrem Telefon oder Mobilgerät, verbinden
Sie das WIFI-Signal der Kamera mit dem Namen "YM *****". Warten Sie, bis das WIFI
angeschlossen ist und Ihre Telefonstatusleiste erscheint als WIFI-Symbol wie folgt:
[Hinweis]:
Wenn das WIFI-Signal der Kamera nach langer Zeit nicht gefunden werden kann,
siehe Q1 auf der FAQ-Seite am Ende dieser Bedienungsanleitung für detaillierte Lösungen.
4.2.2. Führen Sie die "BVCAM" APP.
4.2.3. Füge die Kamera zum "BVCAM" APP wie folgt hinzu:
Für Android: Tippen Sie auf +> Tippen Sie auf Neues Online-Gerät hinzufügen> Suche nach
der Kamera> Tippen Sie auf das Kamerasymbol> Tippen Sie auf OK oder √.
Für IOS: Tippen Sie auf +> Tippen Sie auf Neue Online-Kamera hinzufügen> Suche nach
der Kamera> Tippen Sie auf das Kamerasymbol> Tippen Sie auf OK.
4.2.4. Wenn es zeigt, dass die Kamera auf der Seite "Live Video" auf "Online" steht,
bedeutet dies, dass das P2P (LAN) Setup der Kamera erfolgreich ist. Sie können Videos
im P2P (LAN) -Modus überprüfen oder aufnehmen.
[Hinweis]: In diesem P2P (LAN) -Modus können Sie das Video nur lokal innerhalb von 15
Metern (49 Fuß) öffnen.
4.2.5. Auf dem Live-Video-Bildschirm können Sie sanft Ihren Zeigefinger und Daumen
auf den Bildschirm und dann nach innen und nach außen Richtungen auf einem
bestimmten Bereich zu vergrößern und verkleinern.
Remote View Setup (WAN-Modus)
4.2.6. Gehen Sie folgendermaßen vor, um den WAN-Modus oder die Remote-View-Funktion
einzurichten:
Schritt 1: Starten Sie die "BVCAM" APP. Tippen Sie auf die Einstellung "Live Video" und
wählen Sie dann "Advance Config" oder "Device Settings".
Schritt 2: Gehe auf "WIFI Config" -Seite, wähle einen gewünschten WIFI-Hotspot aus, um
die Kamera einzuschreiben.
Schritt 3: Tippen Sie auf "OK", um das Setup der Fernbedienung abzuschließen, und die
Kamera wird automatisch neu gestartet.
Wie kann man überprüfen, ob die Remote View Funktion funktioniert?
1. Beenden Sie die "BVCAM" APP.
2. Zurück zur WIFI- oder WLAN-Einstellungsseite auf Ihrem Telefon oder Mobilgerät
verlassen Sie Ihr Telefon oder Mobilgerät aus dem aktuellen WIFI-Netzwerk, registrieren Sie
Ihr Telefon oder Mobilgerät in einem anderen WIFI-Hotspot oder Sie können die WIFI- oder
WLAN-Funktion deaktivieren , Aktivieren Sie stattdessen Ihre mobilen Netzwerkdaten.
3. Starten Sie den "BVCAM" APP erneut. Wenn die Kamera auf der Seite "Live-Video" auf
"Online" steht, bedeutet dies, dass das Remote-View-Setup erfolgreich ist und die Kamera in
den WAN-Modus gelangt ist. Die WIFI-Kontrollleuchte ist hellblau. Sie können vorwärts
gehen, um Live-Video oder Videoaufnahme remote zu sehen.
[Hinweis]:
Wenn die Kamera "Device Offline" anzeigt, bedeutet das, dass das Remote View Setup
fehlgeschlagen ist und Sie müssen die Kamera zurücksetzen (siehe VIII) und wieder einrichten.
V. Bewegungserkennung Aufnahme Setup
>> Bitte stellen Sie sicher, dass die Kamera der APP im LAN- oder WAN-Modus hinzugefügt
wird, bevor Sie beginnen.
5.1. Starten Sie die "BVCAM" APP.
5.2. Richten Sie die Bewegungserkennung ein
Schritt 1: Tippen Sie auf das Einstellungssymbol auf der Seite "Live Video" und wählen
Sie dann "Advance Config" oder "Device Settings".
Schritt 2: Gehen Sie auf "Alarm Config" Seite, dort wählen Sie Ihre gewünschte Empfindlichkeit
Ebene und legen Sie einen Alarm Zeitplan.
Schritt 3: Tippen Sie auf "OK", um die Einstellung abzuschließen.
Schritt 4: Wenn eine Bewegung erkannt wird, drückt die Kamera eine Warnmeldung an
Ihr Telefon und nimmt einen Screenshot der Live-Videoseite automatisch auf.
Schritt 5: Sie können zurück zur Seite "Live-Video" gehen und auf "Alarm" am unteren
Rand des Bildschirms tippen, um die Fotos auszuprobieren.
5.3. Setzen Sie die SD-Kartenaufzeichnung auf der Grundlage der Bewegungserkennung
ein.
Schritt 1: Tippen Sie auf die Einstellung "Live Video" und wählen Sie dann "Advance
Config" oder "Device Settings".
Schritt 2: Gehen Sie auf "SDCard Record Config" -Seite, wählen Sie "On Alarm", dann
stellen Sie die Videoauflösung und Dateilänge, wie Sie möchten.
Schritt 3: Tippen Sie auf "OK", um die Motion Detection Video Recording-Einstellung
abzuschließen.
Schritt 4: Wenn eine Bewegung erkannt wird, nimmt die Kamera automatisch ein Video auf
die Micro SD-Karte auf. Sie können auf die Seite "Live Video" zurückkehren, tippen Sie auf
"Record" am unteren Rand des Bildschirms und tippen Sie dann auf "Remote SD Card"
oder um die Videodateien auszuprobieren. Oder Sie können diese Video-Dateien auf
Ihr Handy herunterladen.
[Anmerkung]:
Videoauflösung: 1280 × 720P, 640x480, 320x240 Videoformat: AVI
VI. Aufnehmen von Video auf Smartphone oder Tablet PC
>> Bitte stellen Sie sicher, dass die Kamera der APP in LAN oder WAN hinzugefügt wird,
bevor Sie beginnen.
6.1. Starten Sie die "BVCAM" APP. Tippen Sie auf das Kamerasymbol, um in den
Live-Videobildschirm zu gelangen.
6.2. Tippen Sie auf die Aufnahmetaste und die Audio-Taste , um die Aufnahme
zu starten oder zu stoppen.
Für Android-Benutzer werden die Videodateien auf dem Flash-Speicher Ihres Mobilgeräts
gespeichert. Für IOS-Benutzer werden die Videodateien nur im APP "BVCAM" gefunden.
 Loading...