

Toughsty P3000 User Manual

P3000
User Guide
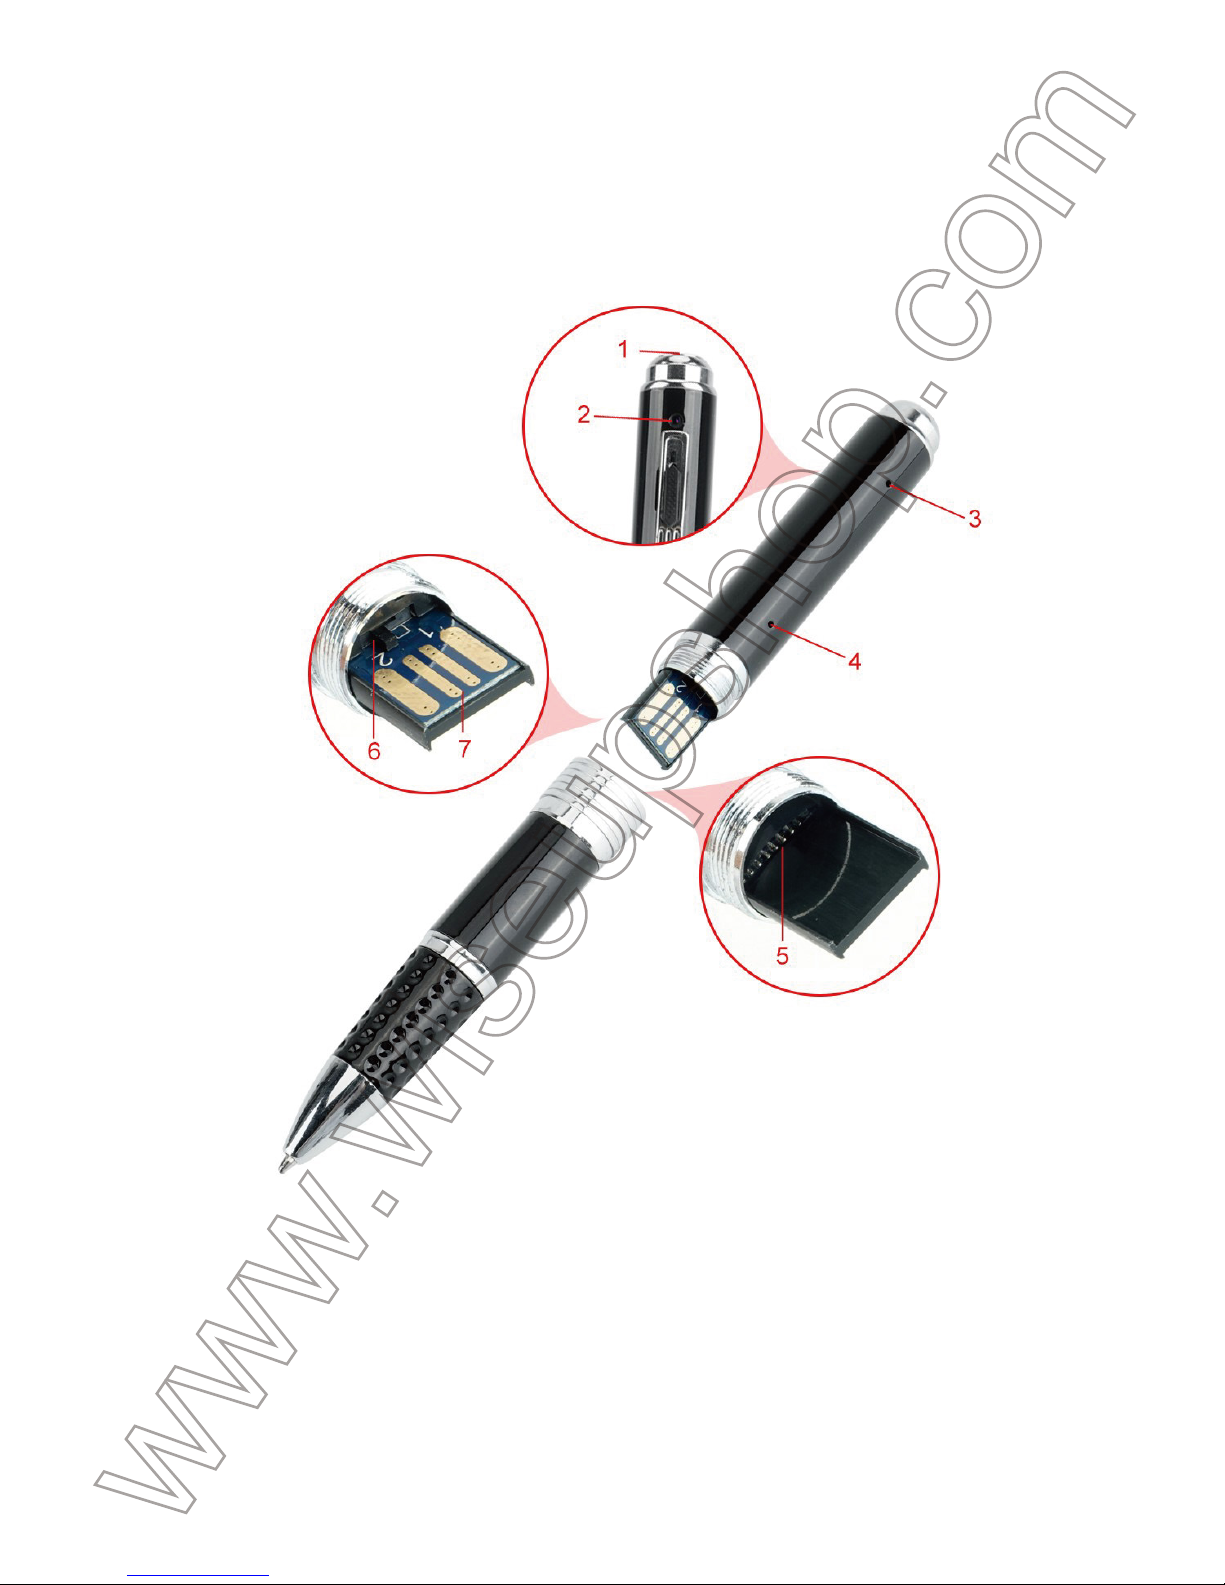
I. Product Overview
1. Power Button
2. Camera Lens
3. Blue/Yellow Indicator Light
4. Reset Button
5. Micro SD Card Slot
6. Mode Switch
7. USB Port

II. What’s in the Box
-1× Pen Camera
-1× USB Cable
-1× AC110-230V to DC 5V Charging Adapter
-1× 8GB Micro SD Card (fitted into the Micro SD card slot already)
III. Operation
>> Please make sure your pen camera is fully recharged before using.
>> Please make sure the Micro SD card (4GB-32GB) has been formatted
already and is securely fitted into the camera’s SD card slot, or it will not work. A
SDHC Class 10 Micro SD card is recommended.
[Note]:
If no Micro SD card is fitted into the camera, the camera will shut down
automatically. Both blue and yellow indicator lights will be illuminated for 2 seconds and
flash 10 times, then turn off.
3.1. POWER ON/OFF & VIDEO RECORDING
3.1.1. Slide the Mode Switch to the position 2, then press the Power Button for
2 seconds to power on the camera. Both blue and yellow indicator lights will be
illuminated for 3 seconds, then the yellow indicator light will turn off while the
blue one will flash 3 times and then turn off. The camera will start video recording
automatically.
3.1.2. Press the Power Button once to stop recording video. The yellow indicator
light will stay illuminated, indicating the camera has entered into standby mode.
3.1.3. Press the Power Button once again to resume video recording. The blue
indicator light will flash twice and then turn off.
3.1.4. In standby mode, power off the camera by pressing the Power Button for
2 seconds. Both blue and yellow indicator lights will flash once and then turn off.
[Note]:
1). Video clips will be generated and saved every 10 minutes automatically.
2). This pen camera can record video for 1 hour continuously on a full charge.
3). Video Resolution: 1920x1080P Video Format: AVI
4). If the battery is low, the camera will save all video files and shut down automatically.
You can see both blue and yellow indicator lights flash once and then turn off.
5). The camera will shut down automatically if it is in standby mode without any operation
more than 3 minutes. Both blue and yellow indicator lights will flash once and then turn
off.
3.2. AUDIO RECORDING & CAMERA/STILL PHOTOGRAPHY
3.2.1. Slide the Mode Switch to the position 1, then press the Power Button for
2 seconds to power on the camera. Both blue and yellow indicator lights will be
illuminated for 3 seconds, then the blue indicator light will turn off while the
yellow one will flash 3 times and then turn off. The camera will start audio
recording automatically.
3.2.2. Press the Power Button once to stop recording audio. The yellow indicator
light will stay illuminated, indicating the camera has entered into standby mode.
3.2.3. Press the Power Button for 2 seconds to resume audio recording. The
yellow indicator light will flash twice and then turn off.
3.2.4. Press the Power Button once in standby mode to take a photo. The blue
indicator light will flash once and then turn off, then the yellow indicator light will
stay illuminated, indicating the camera is back to standby mode.
[Note]:
1). An audio file will be generated and saved every 5 minutes automatically.
2). Audio format: WAV
3). The camera cannot be powered off when the Mode Switch at the position 1, you need
to slide the Mode Switch to the position 2 to power off the camera. (See 3.1.4)
IV. Video/Image Files Uploads
4.1. Option 1: Direct Connection
4.1.1. Power off the camera and unscrew the pen to reveal a USB connection.
4.1.2. Plug the pen directly into a proper PC computer USB port.
4.1.3. The pen camera will be recognized as a removable disk drive.
4.1.4. All the files can be accessed in the drive.
4.2. Option 2: Using a Card Reader

4.2.1. Power off the camera, unscrew the pen to reveal a USB connection,
remove the Micro SD card from the Micro SD card slot, and then insert it into a
card reader.
4.2.2. Insert the card reader into a proper PC computer USB port.
4.2.3. The Micro SD card will be recognized as a removable disk drive.
4.2.4. All the files can be accessed in the drive.
V. Setting Time/Date Stamp
5.1. Power off the camera, unscrew the pen to reveal a USB connection and
plug the pen directly into a proper PC computer USB port.
5.2. Removable disk drive folder appears.
5.3. Click on the drive in the root directory and inside the root directory, open the
txt file named “time.txt”. If you can’t find it, then you could create a txt file named
“time.txt”.
5.4. Write the current date and time in the “time.txt” file with the correct format:
YYYY-MM-DD HH:MM:SS Y (For example: 2016-04-12 14:24:32). Save this file.
5.5. Restart the camera and the system will upgrade the program automatically.
VI. Charging
6.1. Power off the camera, unscrew the pen to reveal a USB connection and
plug the pen into a proper PC computer USB port directly.
6.2. The yellow indicator light will keep flashing during the charging process.
6.3. It will take 2 hours to obtain a full charge.
6.4. The yellow indicator light will stay illuminated when the battery is fully
recharged.
VII. Resetting
If, for any reason, the camera stops responding or isn’t working properly, a quick
reset will restore it back to normal operation.
Operation: When the camera is powered on, use a pin to press the Reset
Button once, the camera will shut down automatically. Then you can restart the
camera to the factory default settings.
P3000
Benutzerhandbuch
I. Produktübersicht
1. Netzschalter
2. Kameraobjektiv
3. Blaue / gelbe Anzeigelampe
4. Reset-Taste
5. Mikro-Sd-Einbauschlitz
6. Modusschalter
7. USB-Anschluss

II. Was ist in der Box
-1 × Stift-Kamera
-1 × USB-Kabel
-1 × AC110-230V zu DC 5V aufladenadapter
-1 × 8GB Micro SD-Karte (in den Micro SD-Kartensteckplatz bereits eingebaut)
III. Betrieb
>> Stellen Sie bitte sicher, dass Ihre Stiftkamera vollständig aufgeladen wird,
bevor Sie verwenden.
>> Bitte stellen Sie sicher, dass die Micro SD-Karte (4GB-32GB) bereits
formatiert wurde und sicher in den SD-Kartenslot der Kamera eingesetzt ist,
oder es funktioniert nicht. Eine SDHC Klasse 10 Micro SD-Karte wird
empfohlen.
[Hinweis]:
Wenn keine Micro SD-Karte in die Kamera eingelegt ist, wird die Kamera
automatisch heruntergefahren. Beide blauen und gelben Kontrollleuchten leuchten für 2
Sekunden und blinken 10 mal, dann ausschalten.
3.1. EINSCHALTEN / AUSSCHALTEN & VIDEOAUFNAHME
3.1.1. Schieben Sie den Modus-Schalter auf Position 2, und drücken Sie die Ein/ Aus-Taste für 2 Sekunden, um die Kamera einzuschalten. Beide blauen und
gelben Kontrollleuchten leuchten für 3 Sekunden, dann die gelbe Anzeigelampe
schaltet sich aus, während die blaue blitzt 3mal und schaltet dann aus. Die
Kamera startet die Videoaufnahme automatisch.
3.1.2. Drücken Sie einmal die Ein- / Austaste, um die Aufnahme zu beenden. Die
gelbe Kontrollleuchte leuchtet auf und zeigt an, dass die Kamera in den
Standby-Modus versetzt wurde.
3.1.3. Drücken Sie die Power-Taste erneut, um die Videoaufnahme
wiederaufzunehmen. Die blaue Kontrollleuchte blinkt zweimal und schaltet sich
dann aus.
3.1.4. Schalten Sie im Standby-Modus die Kamera aus, indem Sie den
Netzschalter 2 Sekunden lang drücken. Die blaue und gelbe Kontrollleuchte
blinkt einmal und schaltet sich dann aus.

[Hinweis]:
1). Videoclips werden alle 10 Minuten automatisch generiert und gespeichert.
2). Diese Stiftkamera kann Video für 1 Stunde ununterbrochen auf einer vollen Aufladung
aufzeichnen.
3). Video-Auflösung: 1920x1080P Video-Format: AVI
4). Wenn die Batterie leer ist, speichert die Kamera alle Videodateien und schaltet sich
automatisch ab. Sie sehen, dass die blauen und gelben Kontrollleuchten einmal
aufleuchten und dann ausschalten.
5). Die Kamera schaltet sich automatisch ab, wenn sie sich im Standby-Modus befindet,
ohne dass der Betrieb länger als 3 Minuten ist. Die blaue und gelbe Kontrollleuchte blinkt
einmal und schaltet sich dann aus.
3.2. AUDIOAUFNAHME & KAMERA / FOTOGRAFIE
3.2.1. Schieben Sie den Modus-Schalter auf Position 1, und drücken Sie die Ein/ Aus-Taste für 2 Sekunden, um die Kamera einzuschalten. Beide blauen und
gelben Kontrollleuchten leuchten für 3 Sekunden, dann schaltet sich die blaue
Kontrolllampe aus, während der gelbe Blitz dreimal aufleuchtet und dann
ausschaltet. Die Kamera wird automatisch gestartet.
3.2.2. Drücken Sie einmal die Ein- / Austaste, um die Aufnahme zu stoppen. Die
gelbe Kontrollleuchte leuchtet auf und zeigt an, dass die Kamera in den
Standby-Modus versetzt wurde.
3.2.3. Drücken Sie die Power-Taste für 2 Sekunden, um die Aufnahme
fortzusetzen. Die gelbe Kontrollleuchte blinkt zweimal und schaltet sich dann
aus.
3.2.4. Drücken Sie im Standby-Modus einmal die Power-Taste, um ein Foto
aufzunehmen. Die blaue Kontrollleuchte blinkt einmal und schaltet sich dann
aus, dann leuchtet die gelbe Kontrollleuchte auf und zeigt an, dass die Kamera
wieder in den Standby-Modus zurückkehrt.
[Hinweis]:
1). Eine Audiodatei wird automatisch alle 5 Minuten erstellt und gespeichert.
2). Audioformat: WAV
3). Die Kamera kann nicht ausgeschaltet werden, wenn der Modusschalter an der
Position 1 ist, müssen Sie den Modusschalter auf die Position 2 schieben, um die Kamera
auszuschalten. (Siehe 3.1.4)
IV. Video / Bilddateien Uploads
4.1. Option 1: Direktverbindung
4.1.1. Schalten Sie die Kamera aus und schrauben Sie den Stift ab, um eine
USB-Verbindung aufzudecken.
4.1.2. Schließen Sie den Stift direkt an einen geeigneten USB-Port des
PC-Computers an.
4.1.3. Die Stiftkamera wird als Wechseldatenträger erkannt.
4.1.4. Auf alle Dateien kann im Laufwerk zugegriffen werden.
4.2. Option 2: Verwenden eines Kartenlesers
4.2.1. Schalten Sie die Kamera aus, schrauben Sie den Stift ab, um eine
USB-Verbindung aufzudecken, entfernen Sie die Micro SD-Karte aus dem Micro
SD-Kartensteckplatz und legen Sie sie dann in einen Kartenleser ein.
4.2.2. Stecken Sie den Kartenleser in einen geeigneten USB-Anschluss des
PC-Computers.
4.2.3. Die Micro SD-Karte wird als Wechseldatenträger erkannt.
4.2.4. Auf alle Dateien kann im Laufwerk zugegriffen werden.
V. Einstellzeit / Datumsstempel
5.1. Schalten Sie die Kamera aus, schrauben Sie den Stift, um einen
USB-Anschluss zu entdecken, und stecken Sie den Stift direkt in einen geeigneten
PC-Computer-USB-Anschluss.
5.2. Wechseldatenträgerordner wird angezeigt.
5.3. Klicken Sie auf das Laufwerk im Stammverzeichnis und im
Stammverzeichnis, öffnen Sie die txt-Datei mit dem Namen "time.txt". Wenn Sie
es nicht finden, können Sie eine txt-Datei mit dem Namen "time.txt" erstellen.
5.4. Schreiben Sie das aktuelle Datum und die Uhrzeit in der Datei "time.txt" mit
dem richtigen Format:
JJJJ-MM-TT HH: MM: SS Y (Beispiel: 2016-04-12 14:24:32). Speichern Sie

diese Datei.
5.5. Starten Sie die Kamera neu und das System aktualisiert das Programm
automatisch.
VI. Aufladen
6.1. Schalten Sie die Kamera aus, schrauben Sie den Stift, um einen
USB-Anschluss zu entdecken und stecken Sie den Stift in einen richtigen
PC-Computer USB-Anschluss direkt.
6.2. Die gelbe Kontrollleuchte blinkt während des Ladevorgangs.
6.3. Es dauert 2 Stunden, um eine volle Ladung zu erhalten.
6.4. Die gelbe Kontrolllampe leuchtet, wenn der Akku vollständig aufgeladen ist.
VII. Rücksetzen
Wenn die Kamera aus irgendeinem Grund nicht mehr reagiert oder nicht
ordnungsgemäß arbeitet, wird sie durch einen schnellen Reset wieder in den
Normalbetrieb zurückversetzt.
Betrieb: Wenn die Kamera eingeschaltet ist, verwenden Sie einen Stift, um die
Reset-Taste einmal zu drücken, wird die Kamera automatisch heruntergefahren.
Anschließend können Sie die Kamera auf die werkseitigen Standardeinstellungen
zurücksetzen.
 Loading...