

Toughsty DVR-0031-1080P User Manual

DVR-0031-1080P
User Guide
I. Product Overview
1. Power Switch
2. USB Port
3. Micro SD Card Slot
4. Camera Lens
5. Blue Indicator Light
II. What’s in the Box
-1× Smoke Detector Camera
-1× USB Cable
-1× DC 5V Charging Adapter
-1× 2.4 GHz Remote Controller
-1× 3m USB Cable
-4× Double-Sided Adhesive Foam Pads
-1× 8GB Micro SD Card (fitted into the Micro SD card slot already)
III. Operation
>> Before using, make sure that the smoke detector camera is fully recharged.
>> Please make sure the Micro SD card (4GB-32GB, format it for the first usage) is
securely fitted into the camera’s SD card slot, or it will not work. A SDHC Class 10
Micro SD card is recommended. If the Micro SD card cannot be read, the camera
will not respond correctly to your operation.
3.1. POWER ON/OFF
3.1.1. Slide the power switch to the ON position. Power on the camera by pressing
the Power Button for 3 seconds. The blue indicator light will stay illuminated, indicat-
ing the camera has entered into standby mode automatically.
3.1.2. Power off the camera by pressing the Power Button for 3 seconds again. The
blue indicator light will turn off. Slide the power switch to the OFF position.
[Note]:
than 1 minute.
3.2. VIDEO RECORDING
3.2.1. Slide the power switch to the ON position. Power on the camera by pressing
the Power Button for 3 seconds. The blue indicator light will stay illuminated, indicat-
ing the camera has entered into standby mode automatically.
3.2.2. Press the Video Recording Button once to record video. The blue indicator
light will flash once and then turn off.
3.2.3. Press the Video Recording Button once again to stop recording video. The
blue indicator light will stay illuminated, indicating the camera is back to standby
mode.
[Notes]:
1). A video file will be generated and saved every 10 minutes automatically.
2). The smoke detector camera can record video continuously for 2.5 hours on a full charge.
3).Video Resolution: 1920×1080P Video Format: AVI
3.3. CAMERA/STILL PHOTOGRAPHY
3.3.1. Slide the power switch to the ON position. Power on the camera by pressing
the Power Button for 3 seconds. The blue indicator light will stay illuminated, indicat-
ing the camera has entered into standby mode automatically.
3.3.2. Press the Camera Button once to take a photo. The blue indicator light will
flash once and then stay illuminated, indicating the camera is back to standby mode.
6. Red Indicator Light
7. Power Button
8. Camera Button
9. Video Recording Button
10. Motion Detection Recording Button

III. Operation
>> Before using, make sure that the smoke detector camera is fully recharged.
>> Please make sure the Micro SD card (4GB-32GB, format it for the first usage) is
securely fitted into the camera’s SD card slot, or it will not work. A SDHC Class 10
Micro SD card is recommended. If the Micro SD card cannot be read, the camera
will not respond correctly to your operation.
3.1. POWER ON/OFF
3.1.1. Slide the power switch to the ON position. Power on the camera by pressing
the Power Button for 3 seconds. The blue indicator light will stay illuminated, indicating the camera has entered into standby mode automatically.
3.1.2. Power off the camera by pressing the Power Button for 3 seconds again. The
blue indicator light will turn off. Slide the power switch to the OFF position.
[Note]:
The camera will shut down automatically if it is in standby mode without any operation more
than 1 minute.
3.2. VIDEO RECORDING
3.2.1. Slide the power switch to the ON position. Power on the camera by pressing
the Power Button for 3 seconds. The blue indicator light will stay illuminated, indicating the camera has entered into standby mode automatically.
3.2.2. Press the Video Recording Button once to record video. The blue indicator
light will flash once and then turn off.
3.2.3. Press the Video Recording Button once again to stop recording video. The
blue indicator light will stay illuminated, indicating the camera is back to standby
mode.
[Notes]:
1). A video file will be generated and saved every 10 minutes automatically.
2). The smoke detector camera can record video continuously for 2.5 hours on a full charge.
3).Video Resolution: 1920×1080P Video Format: AVI
3.3. CAMERA/STILL PHOTOGRAPHY
3.3.1. Slide the power switch to the ON position. Power on the camera by pressing
the Power Button for 3 seconds. The blue indicator light will stay illuminated, indicating the camera has entered into standby mode automatically.
3.3.2. Press the Camera Button once to take a photo. The blue indicator light will
flash once and then stay illuminated, indicating the camera is back to standby mode.
3.4. MOTION DETECTION VIDEO RECORDING
3.4.1. Slide the power switch to the ON position. Power on the camera by pressing
the Power Button for 3 seconds. The blue indicator light will stay illuminated, indicat-
ing the camera has entered into standby mode automatically.
3.4.2. Press the Motion Detection Recording Button once to enter into motion detec-
tion recording mode. The blue indicator light will flash 3 times and then turn off.
3.4.3. When a movement is detected, the blue indicator light will flash once and the
camera will start recording video automatically.
3.4.4. Press the Motion Detection Recording Button once again to exit motion detec-
tion recording mode. The blue indicator light will stay illuminated, indicating the
camera is back to standby mode.
[Note]:
IV. Video/Image Files Uploads
4.1. Power off the camera, remove the Micro SD card and insert it into a card reader.
4.2. Insert the card reader into a PC computer.
4.3. The Micro SD card will be recognized as a removable disk drive.
4.4. All the files can be accessed in the “DCIM” folder.
V. Setting Time/Date Stamp
5.1. Power off the camera, remove the Micro SD card and insert it into a card reader.
5.2. Insert the card reader into a PC computer.
5.3. Removable disk drive folder appears.
5.4. Click on the drive in the root directory and inside the root directory, create a file
named “time.txt”.
5.5. Write the current date and time in the “time.txt” file with the correct format:
YYYY.MM.DD HH:MM:SS (For example: 2016.04.12 14:24:32). Save this file.
5.6. Restart the camera and the system will upgrade the program automatically.
VI. Charging
6.1. Connect the smoke detector camera to an outlet AC power socket by using the
USB cable and charging adapter provided.
6.2. The blue indicator light will be illuminated during the charging process.
6.3. It will take 5 hours to obtain a full charge.
6.4. The blue indicator light will not change even when the smoke detector camera
is fully recharged.

3.4. MOTION DETECTION VIDEO RECORDING
3.4.1. Slide the power switch to the ON position. Power on the camera by pressing
the Power Button for 3 seconds. The blue indicator light will stay illuminated, indicating the camera has entered into standby mode automatically.
3.4.2. Press the Motion Detection Recording Button once to enter into motion detection recording mode. The blue indicator light will flash 3 times and then turn off.
3.4.3. When a movement is detected, the blue indicator light will flash once and the
camera will start recording video automatically.
3.4.4. Press the Motion Detection Recording Button once again to exit motion detection recording mode. The blue indicator light will stay illuminated, indicating the
camera is back to standby mode.
[Note]:
A video file will be generated and saved every 3 minutes automatically.
IV. Video/Image Files Uploads
4.1. Power off the camera, remove the Micro SD card and insert it into a card reader.
4.2. Insert the card reader into a PC computer.
4.3. The Micro SD card will be recognized as a removable disk drive.
4.4. All the files can be accessed in the “DCIM” folder.
V. Setting Time/Date Stamp
5.1. Power off the camera, remove the Micro SD card and insert it into a card reader.
5.2. Insert the card reader into a PC computer.
5.3. Removable disk drive folder appears.
5.4. Click on the drive in the root directory and inside the root directory, create a file
named “time.txt”.
5.5. Write the current date and time in the “time.txt” file with the correct format:
YYYY.MM.DD HH:MM:SS (For example: 2016.04.12 14:24:32). Save this file.
5.6. Restart the camera and the system will upgrade the program automatically.
VI. Charging
6.1. Connect the smoke detector camera to an outlet AC power socket by using the
USB cable and charging adapter provided.
6.2. The blue indicator light will be illuminated during the charging process.
6.3. It will take 5 hours to obtain a full charge.
6.4. The blue indicator light will not change even when the smoke detector camera
is fully recharged.
[Note]: The smoke detector camera can be charged whether it is on or off.

[Note]: The smoke detector camera can be charged whether it is on or off.
DVR-0031-1080P
Benutzerhandbuch
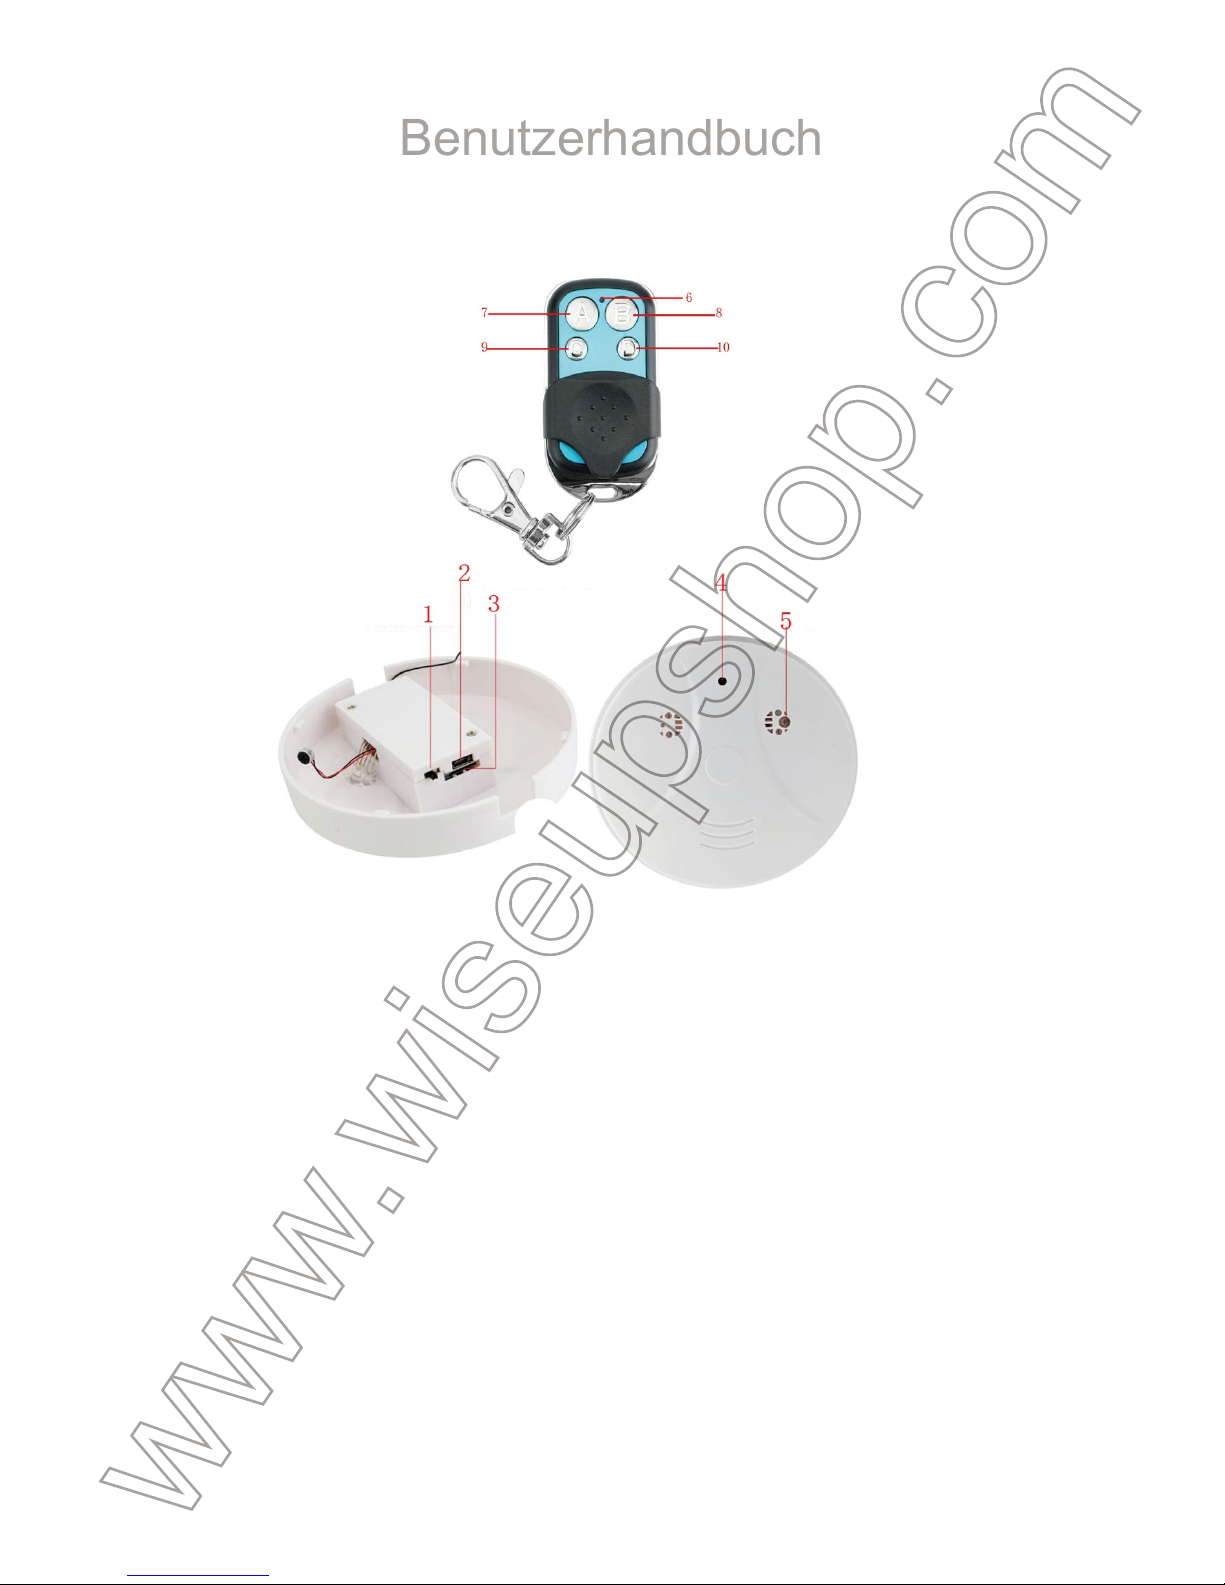
I. Produktübersicht
1. Netzschalter
2. USB-Anschluss
3. Micro-SD-Kartensteckplatz
4. Kamera-Objektiv
5. Blau-Anzeigelampe
II. Was ist in der Box
-1 × Rauchmelder-Kamera
-1 × USB-Kabel
-1 × DC 5V Ladeadapter
-1 × 2.4 GHz Fernbedienung
-1 × 3 m USB-Kabel
-4 × doppelseitig klebende Schaumstoffpolster
-1 × 8 GB Micro SD-Karte (in den Steckplatz Micro SD-Karte ausgestattet bereits)
III. Betrieb
>> Vor der Verwendung, stellen Sie sicher, dass der Rauchmelder-Kamera vollstän-
dig aufgeladen ist.
>> Bitte stellen Sie sicher, dass die Micro SD-Karte (4GB-32GB, formatieren Sie es
für die erste Nutzung) sicher in den SD-Kartensteckplatz der Kamera angebracht,
oder es wird nicht funktionieren. Eine SDHC Class 10 Micro-SD-Karte wird emp-
fohlen. Wenn die Micro SD-Karte kann nicht gelesen werden, wird die Kamera nicht
richtig an den Betrieb zu antworten.
3.1. EINSCHALTEN / AUSSCHALTEN
3.1.1. Schieben Sie den Netzschalter in die Position ON. Schalten Sie die Kamera
mit der Power-Taste 3 Sekunden lang drücken. Die blaue Anzeigelampe bleibt be-
leuchtet, was die Kamera hat sich automatisch in den Standby-Modus.
3.1.2. Schalten Sie die Kamera mit der Power-Taste erneut für 3 Sekunden drücken.
Die blaue Anzeigelampe erlischt. Schieben Sie den Netzschalter in die Position
OFF.
[Anmerkung]:
dus ohne Bedienung ist mehr als 1 Minute.
3.2. VIDEOAUFNAHME
3.2.1. Schieben Sie den Netzschalter in die Position ON. Schalten Sie die Kamera
mit der Power-Taste 3 Sekunden lang drücken. Die blaue Anzeigelampe bleibt be-
leuchtet, was die Kamera hat sich automatisch in den Standby-Modus.
3.2.2. Drücken Sie die Videoaufnahmetaste einmal auf Video aufnehmen. Die blaue
Anzeigelampe blinkt einmal und dann auszuschalten.
3.2.3. Drücken Sie die Videoaufnahmetaste erneut zu stoppen Videoaufzeichnung.
Die blaue Anzeigelampe bleibt beleuchtet, was die Kamera in den Standby-Modus
ist wieder da.
[Notizen]:
1). Eine Videodatei wird erzeugt und automatisch gespeichert, alle 10 Minuten werden.
2). Der Rauchmelder Kamera kann Video kontinuierlich für 2,5 Stunden bei voller Aufladung notieren.
3). Video-Auflösung: 1920 × 1080p Video Format: AVI
3.3. CAMERA / FOTOGRAFIE
3.3.1. Schieben Sie den Netzschalter in die Position ON. Schalten Sie die Kamera
mit der Power-Taste 3 Sekunden lang drücken. Die blaue Anzeigelampe bleibt be-
6. Red Indicator Light
7. Power Button
8. Kamerataste
9. Videoaufnahmetaste
10. Bewegungserkennung Aufnahmetaste

III. Betrieb
>> Vor der Verwendung, stellen Sie sicher, dass der Rauchmelder-Kamera vollständig aufgeladen ist.
>> Bitte stellen Sie sicher, dass die Micro SD-Karte (4GB-32GB, formatieren Sie es
für die erste Nutzung) sicher in den SD-Kartensteckplatz der Kamera angebracht,
oder es wird nicht funktionieren. Eine SDHC Class 10 Micro-SD-Karte wird empfohlen. Wenn die Micro SD-Karte kann nicht gelesen werden, wird die Kamera nicht
richtig an den Betrieb zu antworten.
3.1. EINSCHALTEN / AUSSCHALTEN
3.1.1. Schieben Sie den Netzschalter in die Position ON. Schalten Sie die Kamera
mit der Power-Taste 3 Sekunden lang drücken. Die blaue Anzeigelampe bleibt beleuchtet, was die Kamera hat sich automatisch in den Standby-Modus.
3.1.2. Schalten Sie die Kamera mit der Power-Taste erneut für 3 Sekunden drücken.
Die blaue Anzeigelampe erlischt. Schieben Sie den Netzschalter in die Position
OFF.
[Anmerkung]:
Die Kamera wird automatisch heruntergefahren wird, wenn es sich im Standby-Mo-
dus ohne Bedienung ist mehr als 1 Minute.
3.2. VIDEOAUFNAHME
3.2.1. Schieben Sie den Netzschalter in die Position ON. Schalten Sie die Kamera
mit der Power-Taste 3 Sekunden lang drücken. Die blaue Anzeigelampe bleibt beleuchtet, was die Kamera hat sich automatisch in den Standby-Modus.
3.2.2. Drücken Sie die Videoaufnahmetaste einmal auf Video aufnehmen. Die blaue
Anzeigelampe blinkt einmal und dann auszuschalten.
3.2.3. Drücken Sie die Videoaufnahmetaste erneut zu stoppen Videoaufzeichnung.
Die blaue Anzeigelampe bleibt beleuchtet, was die Kamera in den Standby-Modus
ist wieder da.
[Notizen]:
1). Eine Videodatei wird erzeugt und automatisch gespeichert, alle 10 Minuten werden.
2). Der Rauchmelder Kamera kann Video kontinuierlich für 2,5 Stunden bei voller Aufladung notieren.
3). Video-Auflösung: 1920 × 1080p Video Format: AVI
3.3. CAMERA / FOTOGRAFIE
3.3.1. Schieben Sie den Netzschalter in die Position ON. Schalten Sie die Kamera
mit der Power-Taste 3 Sekunden lang drücken. Die blaue Anzeigelampe bleibt be-
leuchtet, was die Kamera hat sich automatisch in den Standby-Modus.
3.3.2. Drücken Sie einmal auf die Schaltfläche Kamera ein Foto zu machen. Die
blaue Anzeigelampe blinkt einmal und dann beleuchtet bleiben, was auf die Kamera
in den Standby-Modus zurück.
3.4. BEWEGUNGS VIDEO-AUFNAHME
3.4.1. Schieben Sie den Netzschalter in die Position ON. Schalten Sie die Kamera
mit der Power-Taste 3 Sekunden lang drücken. Die blaue Anzeigelampe bleibt be-
leuchtet, was die Kamera hat sich automatisch in den Standby-Modus.
3.4.2. Drücken Sie die Motion-Detection-Aufnahmetaste einmal eingeben in die Be-
wegungserkennung Aufnahmemodus. Die blaue Anzeigelampe blinken 3 Mal und
dann auszuschalten.
3.4.3. Wenn eine Bewegung erkannt wird, wird die blaue Anzeigelampe einmal
blinken und die Kamera startet Video-Aufnahme automatisch. ??
3.4.4. Drücken Sie die Motion-Detection-Aufnahmetaste erneut zur Bewegung-
serkennung Modus zu verlassen. Die blaue Anzeigelampe bleibt beleuchtet, was die
Kamera in den Standby-Modus ist wieder da.
[Anmerkung]:
IV. Video / Bilddateien Uploads
4.1. Schalten Sie die Kamera aus, entfernen Sie die Micro SD-Karte und in einen
Kartenleser ein.
4.2. Setzen Sie den Kartenleser in einen PC-Computer.
4.3. Die SD-Micro-Karte wird als Wechsellaufwerk erkannt werden.
4.4. Alle Dateien können im Ordner "DCIM" zugegriffen werden.
V. Einstellung Zeit / Datumsstempel
5.1. Schalten Sie die Kamera aus, entfernen Sie die Micro SD-Karte und in einen
Kartenleser ein.
5.2. Setzen Sie den Kartenleser in einen PC-Computer.
5.3. Wechselplattenlaufwerk Ordner angezeigt wird.
5.4. Klicken Sie auf das Laufwerk im Stammverzeichnis und im Inneren des
Root-Verzeichnis eine Datei mit dem Namen "time.txt".
5.5. Schreiben Sie das aktuelle Datum und die Uhrzeit in der "time.txt" Datei mit dem
richtigen Format:
YYYY.MM.DD HH: MM: SS (Zum Beispiel: 2016.04.12 14.24.32). Speichern Sie

leuchtet, was die Kamera hat sich automatisch in den Standby-Modus.
3.3.2. Drücken Sie einmal auf die Schaltfläche Kamera ein Foto zu machen. Die
blaue Anzeigelampe blinkt einmal und dann beleuchtet bleiben, was auf die Kamera
in den Standby-Modus zurück.
3.4. BEWEGUNGS VIDEO-AUFNAHME
3.4.1. Schieben Sie den Netzschalter in die Position ON. Schalten Sie die Kamera
mit der Power-Taste 3 Sekunden lang drücken. Die blaue Anzeigelampe bleibt beleuchtet, was die Kamera hat sich automatisch in den Standby-Modus.
3.4.2. Drücken Sie die Motion-Detection-Aufnahmetaste einmal eingeben in die Bewegungserkennung Aufnahmemodus. Die blaue Anzeigelampe blinken 3 Mal und
dann auszuschalten.
3.4.3. Wenn eine Bewegung erkannt wird, wird die blaue Anzeigelampe einmal
blinken und die Kamera startet Video-Aufnahme automatisch. ??
3.4.4. Drücken Sie die Motion-Detection-Aufnahmetaste erneut zur Bewegungserkennung Modus zu verlassen. Die blaue Anzeigelampe bleibt beleuchtet, was die
Kamera in den Standby-Modus ist wieder da.
[Anmerkung]:
Eine Videodatei erzeugt und gespeichert werden automatisch alle 3 Minuten.
IV. Video / Bilddateien Uploads
4.1. Schalten Sie die Kamera aus, entfernen Sie die Micro SD-Karte und in einen
Kartenleser ein.
4.2. Setzen Sie den Kartenleser in einen PC-Computer.
4.3. Die SD-Micro-Karte wird als Wechsellaufwerk erkannt werden.
4.4. Alle Dateien können im Ordner "DCIM" zugegriffen werden.
V. Einstellung Zeit / Datumsstempel
5.1. Schalten Sie die Kamera aus, entfernen Sie die Micro SD-Karte und in einen
Kartenleser ein.
5.2. Setzen Sie den Kartenleser in einen PC-Computer.
5.3. Wechselplattenlaufwerk Ordner angezeigt wird.
5.4. Klicken Sie auf das Laufwerk im Stammverzeichnis und im Inneren des
Root-Verzeichnis eine Datei mit dem Namen "time.txt".
5.5. Schreiben Sie das aktuelle Datum und die Uhrzeit in der "time.txt" Datei mit dem
richtigen Format:
YYYY.MM.DD HH: MM: SS (Zum Beispiel: 2016.04.12 14.24.32). Speichern Sie
diese Datei.
5.6. Starten Sie die Kamera und das System wird das Programm automatisch aktu-
alisieren.
VI. Lade
6.1. Schließen Sie den Rauchmelder-Kamera an eine Steckdose an Steckdose mit
dem USB-Kabel und Ladeadapter zur Verfügung gestellt.
6.2. Die blaue Anzeige leuchtet während des Ladevorgangs beleuchtet werden.
6.3. Es dauert nur 5 Stunden in Anspruch nehmen, eine volle Ladung zu erhalten.
6.4. Die blaue Anzeige leuchtet nicht, selbst wenn der Rauchmelder-Kamera voll-
ständig aufgeladen ist.
[Anmerkung]:

diese Datei.
5.6. Starten Sie die Kamera und das System wird das Programm automatisch aktualisieren.
VI. Lade
6.1. Schließen Sie den Rauchmelder-Kamera an eine Steckdose an Steckdose mit
dem USB-Kabel und Ladeadapter zur Verfügung gestellt.
6.2. Die blaue Anzeige leuchtet während des Ladevorgangs beleuchtet werden.
6.3. Es dauert nur 5 Stunden in Anspruch nehmen, eine volle Ladung zu erhalten.
6.4. Die blaue Anzeige leuchtet nicht, selbst wenn der Rauchmelder-Kamera vollständig aufgeladen ist.
[Anmerkung]:
Der Rauchmelder Kamera geladen werden kann, ob sie ein- oder ausgeschaltet ist.
 Loading...