

TouchTunes Virtuo 700259-001, Virtuo 700259-002, Virtuo 700270-001 Installation And Setup Manual

Installation and Setup Guide

Disclaimer
Document Part Number: 900475-001 Rev 11 December 2014
TouchTunes and the TouchTunes logo are trademarks of TouchTunes Interactive Networks.
All other brand and product names are trademarks or registered trademarks of their respective
corporations.
The mention of any product does not constitute an endorsement by TouchTunes Interactive Networks.
This manual is furnished under a lease agreement and may only be copied or used within accordance
with the terms of such lease agreement. The content of this manual is furnished for informational use only ,
is subject to change without notice, and should not be construed as a commitment by TouchTunes
Interactive Networks. TouchTunes Interactive Networks assumes no responsibility or liability for any
errors or inaccuracies that may appear in this document.
Except as permitted by such lease agreement, no part of this publication may be reproduced, stored in
any retrieval system, or transmitted, in any form or by any means, electronic, mechanical, recording, or
otherwise, without prior written consent of TouchTunes Interactive Networks.
Changes are periodically made to the information herein; these changes will be incorporated into new
editions of this publication. TouchTunes may make improvements and/or changes in the products and/or
software programs described in this publication at any time.
If you have comments on this manual or the products it describes, address them to:
TouchTunes Interactive Networks
Attention: Publications
400 Sainte Croix Avenue, Suite 200 E
Montreal, Quebec, Canada H4N 3L4
Service Hotline: 1-847-353-1954
Fax: (847) 419-3304
TouchTunes may use or distribute whatever information you supply in any way it believes appropriate
without incurring any obligations to you.
Copyright © 2014 TouchTunes Interactive Networks. All rights reserved, including those to reproduce this
publication or parts thereof in any form without permission in writing from TouchTunes Interactive
Networks.

Contents
1 Welcome 7
Welcome . . . . . . . . . . . . . . . . . . . . . . . . . . . . . . . . . . . . . . . . . . . . . . . . . . . . . . . . . . . . . . . . . 8
About This Guide . . . . . . . . . . . . . . . . . . . . . . . . . . . . . . . . . . . . . . . . . . . . . . . . . . . . . . . . . . . 8
Disclaimer and Important Safety Information . . . . . . . . . . . . . . . . . . . . . . . . . . . . . . . . . . . . . . 8
Important Safety Instructions . . . . . . . . . . . . . . . . . . . . . . . . . . . . . . . . . . . . . . . . . . . . . . . 8
Contacting TouchTunes . . . . . . . . . . . . . . . . . . . . . . . . . . . . . . . . . . . . . . . . . . . . . . . . . . . . . . 10
2 Introducing Virtuo 11
Introducing Virtuo . . . . . . . . . . . . . . . . . . . . . . . . . . . . . . . . . . . . . . . . . . . . . . . . . . . . . . . . . . . 12
Virtuo Features Overview . . . . . . . . . . . . . . . . . . . . . . . . . . . . . . . . . . . . . . . . . . . . . . . . . . . . . 13
Exterior Features Overview . . . . . . . . . . . . . . . . . . . . . . . . . . . . . . . . . . . . . . . . . . . . . . . . . . . 15
Visual Components . . . . . . . . . . . . . . . . . . . . . . . . . . . . . . . . . . . . . . . . . . . . . . . . . . . . . . 16
Interior Features Overview . . . . . . . . . . . . . . . . . . . . . . . . . . . . . . . . . . . . . . . . . . . . . . . . . . . . 17
Computer . . . . . . . . . . . . . . . . . . . . . . . . . . . . . . . . . . . . . . . . . . . . . . . . . . . . . . . . . . . . . . 18
Virtuo Computer Panel Connections . . . . . . . . . . . . . . . . . . . . . . . . . . . . . . . . . . . . . . . . . 19
I/O Board . . . . . . . . . . . . . . . . . . . . . . . . . . . . . . . . . . . . . . . . . . . . . . . . . . . . . . . . . . . . . . 20
Amplifier . . . . . . . . . . . . . . . . . . . . . . . . . . . . . . . . . . . . . . . . . . . . . . . . . . . . . . . . . . . . . . . 21
Key Specifications . . . . . . . . . . . . . . . . . . . . . . . . . . . . . . . . . . . . . . . . . . . . . . . . . . . . . . . 21
Key Features . . . . . . . . . . . . . . . . . . . . . . . . . . . . . . . . . . . . . . . . . . . . . . . . . . . . . . . . . . . 21
Remote Control . . . . . . . . . . . . . . . . . . . . . . . . . . . . . . . . . . . . . . . . . . . . . . . . . . . . . . . . . . . . 22
Payment Means . . . . . . . . . . . . . . . . . . . . . . . . . . . . . . . . . . . . . . . . . . . . . . . . . . . . . . . . . . . . 23
Cable Routing and Intuitive Color Coding . . . . . . . . . . . . . . . . . . . . . . . . . . . . . . . . . . . . . . . . 24
Cable Management Hardware . . . . . . . . . . . . . . . . . . . . . . . . . . . . . . . . . . . . . . . . . . . . . . 25
User Interface - Play More! . . . . . . . . . . . . . . . . . . . . . . . . . . . . . . . . . . . . . . . . . . . . . . . . . . . 26
Touch Screen Monitor . . . . . . . . . . . . . . . . . . . . . . . . . . . . . . . . . . . . . . . . . . . . . . . . . . . . 27
Home Page . . . . . . . . . . . . . . . . . . . . . . . . . . . . . . . . . . . . . . . . . . . . . . . . . . . . . . . . . . . . 27
Local Favorites . . . . . . . . . . . . . . . . . . . . . . . . . . . . . . . . . . . . . . . . . . . . . . . . . . . . . . . . . 28
Content Sorting . . . . . . . . . . . . . . . . . . . . . . . . . . . . . . . . . . . . . . . . . . . . . . . . . . . . . . . . . 29
Artist Top Hits . . . . . . . . . . . . . . . . . . . . . . . . . . . . . . . . . . . . . . . . . . . . . . . . . . . . . . . . . . 29
Context Sensitive Help . . . . . . . . . . . . . . . . . . . . . . . . . . . . . . . . . . . . . . . . . . . . . . . . . . . 30
Scrubber . . . . . . . . . . . . . . . . . . . . . . . . . . . . . . . . . . . . . . . . . . . . . . . . . . . . . . . . . . . . . . 31
New Search Engine . . . . . . . . . . . . . . . . . . . . . . . . . . . . . . . . . . . . . . . . . . . . . . . . . . . . . . 32
Playlist Builder . . . . . . . . . . . . . . . . . . . . . . . . . . . . . . . . . . . . . . . . . . . . . . . . . . . . . . . . . . 33

4
Visible Play Queue . . . . . . . . . . . . . . . . . . . . . . . . . . . . . . . . . . . . . . . . . . . . . . . . . . . . . . .34
Two Screen Display . . . . . . . . . . . . . . . . . . . . . . . . . . . . . . . . . . . . . . . . . . . . . . . . . . . . . .35
Live Equalizer . . . . . . . . . . . . . . . . . . . . . . . . . . . . . . . . . . . . . . . . . . . . . . . . . . . . . . . . . . .35
Show Recommendations . . . . . . . . . . . . . . . . . . . . . . . . . . . . . . . . . . . . . . . . . . . . . . . . . .36
Custom Music Programming (CMP) . . . . . . . . . . . . . . . . . . . . . . . . . . . . . . . . . . . . . . . . . .37
New Boot Screen . . . . . . . . . . . . . . . . . . . . . . . . . . . . . . . . . . . . . . . . . . . . . . . . . . . . . . . .37
Expanded Language Support . . . . . . . . . . . . . . . . . . . . . . . . . . . . . . . . . . . . . . . . . . . . . . .38
Improved myTouchTunes Drawer . . . . . . . . . . . . . . . . . . . . . . . . . . . . . . . . . . . . . . . . . . . .39
HD Attract Video Loops . . . . . . . . . . . . . . . . . . . . . . . . . . . . . . . . . . . . . . . . . . . . . . . . . . .39
myTouchTunes Banners . . . . . . . . . . . . . . . . . . . . . . . . . . . . . . . . . . . . . . . . . . . . . . . . . . .40
Improved Sound using Bass Boost . . . . . . . . . . . . . . . . . . . . . . . . . . . . . . . . . . . . . . . . . . .41
Terms of Use Screen . . . . . . . . . . . . . . . . . . . . . . . . . . . . . . . . . . . . . . . . . . . . . . . . . . . . .41
Owner Profile Page . . . . . . . . . . . . . . . . . . . . . . . . . . . . . . . . . . . . . . . . . . . . . . . . . . . . . . .42
3 Pre-Installation 43
Unpacking and Checking Virtuo Components . . . . . . . . . . . . . . . . . . . . . . . . . . . . . . . . . . . . . .44
Setting Up a Broadband Connection . . . . . . . . . . . . . . . . . . . . . . . . . . . . . . . . . . . . . . . . . . . . .46
Preparing Tools for Installation . . . . . . . . . . . . . . . . . . . . . . . . . . . . . . . . . . . . . . . . . . . . . . . . .47
4 Installing Virtuo 49
Moving Virtuo to its Mounting Location . . . . . . . . . . . . . . . . . . . . . . . . . . . . . . . . . . . . . . . . . . .50
Wall-Mounting the Virtuo SmartJuke . . . . . . . . . . . . . . . . . . . . . . . . . . . . . . . . . . . . . . . . . . . . .51
Installing the Hard Drive . . . . . . . . . . . . . . . . . . . . . . . . . . . . . . . . . . . . . . . . . . . . . . . . . . . . . .55
Accessing the Cable Channel for Virtuo . . . . . . . . . . . . . . . . . . . . . . . . . . . . . . . . . . . . . . . . . .57
Connecting Virtuo to the Broadband Network (Internet) . . . . . . . . . . . . . . . . . . . . . . . . . . . . . .58
Setting up TouchTunes Wireless Broadband . . . . . . . . . . . . . . . . . . . . . . . . . . . . . . . . . . . . . .59
Connecting Audio Speakers to Virtuo . . . . . . . . . . . . . . . . . . . . . . . . . . . . . . . . . . . . . . . . . . . .60
Connecting Power to Virtuo . . . . . . . . . . . . . . . . . . . . . . . . . . . . . . . . . . . . . . . . . . . . . . . . . . . .61
Tightening the Wire Strain-Relief Bracket . . . . . . . . . . . . . . . . . . . . . . . . . . . . . . . . . . . . . . . . .62
Closing the Virtuo Case . . . . . . . . . . . . . . . . . . . . . . . . . . . . . . . . . . . . . . . . . . . . . . . . . . . . . . .63
Activating the Virtuo Screen . . . . . . . . . . . . . . . . . . . . . . . . . . . . . . . . . . . . . . . . . . . . . . . . . . .64
5 Activating Virtuo 65
Power on Virtuo . . . . . . . . . . . . . . . . . . . . . . . . . . . . . . . . . . . . . . . . . . . . . . . . . . . . . . . . . . . . .66
Configure Virtuo . . . . . . . . . . . . . . . . . . . . . . . . . . . . . . . . . . . . . . . . . . . . . . . . . . . . . . . . . . . .67
Perform an Auto-Adjust . . . . . . . . . . . . . . . . . . . . . . . . . . . . . . . . . . . . . . . . . . . . . . . . . . . .67
Calibrate the Touchscreen . . . . . . . . . . . . . . . . . . . . . . . . . . . . . . . . . . . . . . . . . . . . . . . . .68
Select the Configuration Settings . . . . . . . . . . . . . . . . . . . . . . . . . . . . . . . . . . . . . . . . . . . .68
Select the Languages . . . . . . . . . . . . . . . . . . . . . . . . . . . . . . . . . . . . . . . . . . . . . . . . . . . . .69
Choose the Virtuo Settings . . . . . . . . . . . . . . . . . . . . . . . . . . . . . . . . . . . . . . . . . . . . . . . . .70
Choose the Calling Window and Connection Type . . . . . . . . . . . . . . . . . . . . . . . . . . . . . . .71
Verify the Configuration . . . . . . . . . . . . . . . . . . . . . . . . . . . . . . . . . . . . . . . . . . . . . . . . . . .74
Update the Software . . . . . . . . . . . . . . . . . . . . . . . . . . . . . . . . . . . . . . . . . . . . . . . . . . . . . . . . .76
Installation Errors . . . . . . . . . . . . . . . . . . . . . . . . . . . . . . . . . . . . . . . . . . . . . . . . . . . . . . . . . . .78
Corruption in the ID Chip or Hard Drive . . . . . . . . . . . . . . . . . . . . . . . . . . . . . . . . . . . . . . .78
Serious System Error . . . . . . . . . . . . . . . . . . . . . . . . . . . . . . . . . . . . . . . . . . . . . . . . . . . . .78

6 Setting up your Virtuo 79
Activating the Operator Interface . . . . . . . . . . . . . . . . . . . . . . . . . . . . . . . . . . . . . . . . . . . . . . . .80
Setting Up the Remote Control . . . . . . . . . . . . . . . . . . . . . . . . . . . . . . . . . . . . . . . . . . . . . . . . .81
Setting the Remote Control ID . . . . . . . . . . . . . . . . . . . . . . . . . . . . . . . . . . . . . . . . . . . . . .82
Learning the Remote ID . . . . . . . . . . . . . . . . . . . . . . . . . . . . . . . . . . . . . . . . . . . . . . . . . . .83
Remote Key Assignments . . . . . . . . . . . . . . . . . . . . . . . . . . . . . . . . . . . . . . . . . . . . . . . . . .84
Relocating the Wireless Remote Receiver . . . . . . . . . . . . . . . . . . . . . . . . . . . . . . . . . . . . .85
Configuring the Bill Acceptors . . . . . . . . . . . . . . . . . . . . . . . . . . . . . . . . . . . . . . . . . . . . . . . . . .86
Testing the Payment Acceptors . . . . . . . . . . . . . . . . . . . . . . . . . . . . . . . . . . . . . . . . . . . . . . . .87
Testing the Bill and Coin Acceptors . . . . . . . . . . . . . . . . . . . . . . . . . . . . . . . . . . . . . . . . . .88
Testing the Credit Card Reader . . . . . . . . . . . . . . . . . . . . . . . . . . . . . . . . . . . . . . . . . . . . .89
Enabling Bass Boost . . . . . . . . . . . . . . . . . . . . . . . . . . . . . . . . . . . . . . . . . . . . . . . . . . . . . . . . .90
Connecting an External Audio Source . . . . . . . . . . . . . . . . . . . . . . . . . . . . . . . . . . . . . . . . . . .91
Requirements for Connecting to an External Audio Source . . . . . . . . . . . . . . . . . . . . . . . .91
Connecting a Microphone . . . . . . . . . . . . . . . . . . . . . . . . . . . . . . . . . . . . . . . . . . . . . . . . . . . . .93
Adjusting Touch Screen Brightness and Contrast . . . . . . . . . . . . . . . . . . . . . . . . . . . . . . . . . . .97
Re-applying Filters and Credit Rules . . . . . . . . . . . . . . . . . . . . . . . . . . . . . . . . . . . . . . . . . . . . .98
Setting the Lighting Colors . . . . . . . . . . . . . . . . . . . . . . . . . . . . . . . . . . . . . . . . . . . . . . . . . . . .98
Setting Local Favorites Options . . . . . . . . . . . . . . . . . . . . . . . . . . . . . . . . . . . . . . . . . . . . . . . .99
Setting Custom Music Programming (CMP) Levels . . . . . . . . . . . . . . . . . . . . . . . . . . . . . . . . .100
Changing Languages . . . . . . . . . . . . . . . . . . . . . . . . . . . . . . . . . . . . . . . . . . . . . . . . . . . . . . . .100
Do Not Apply Stickers to the Virtuo Touch Screen . . . . . . . . . . . . . . . . . . . . . . . . . . . . . . . . . .101
Adding Your Owner Profile . . . . . . . . . . . . . . . . . . . . . . . . . . . . . . . . . . . . . . . . . . . . . . . . . . . .102
5
7 Service and maintenance 103
Important Safety Instructions and Warranty Information . . . . . . . . . . . . . . . . . . . . . . . . . . . . . .104
About the Virtuo Maintenance Guide . . . . . . . . . . . . . . . . . . . . . . . . . . . . . . . . . . . . . . . . . . . .104
List of Available Virtuo FRU (Field-Replaceable Unit) Kits . . . . . . . . . . . . . . . . . . . . . . . . . . . .105
Replacing a Payment Acceptor . . . . . . . . . . . . . . . . . . . . . . . . . . . . . . . . . . . . . . . . . . . . . . . . .106
Replacing a Bill Acceptor . . . . . . . . . . . . . . . . . . . . . . . . . . . . . . . . . . . . . . . . . . . . . . . . . .106
8 Bridging Virtuo’s Internal Amplifier 109
About Amplifier Bridging . . . . . . . . . . . . . . . . . . . . . . . . . . . . . . . . . . . . . . . . . . . . . . . . . . . . . .109
Bridged Amplifier Configuration . . . . . . . . . . . . . . . . . . . . . . . . . . . . . . . . . . . . . . . . . . . . . . . . .110
How to Bridge the Amplifier . . . . . . . . . . . . . . . . . . . . . . . . . . . . . . . . . . . . . . . . . . . . . . . . . . . .111
Bridging Safety Considerations and Recommendations . . . . . . . . . . . . . . . . . . . . . . . . . . . . . .114
Troubleshooting Amplifier Bridging . . . . . . . . . . . . . . . . . . . . . . . . . . . . . . . . . . . . . . . . . . . . . .114
9 Connection Diagrams 115
USB Connection Requirements . . . . . . . . . . . . . . . . . . . . . . . . . . . . . . . . . . . . . . . . . . . . . . . .118

6

Welcome
1
This section introduces Virtuo, provides important safety information, and describes how to get customer support.
Topics
Welcome
About This Guide
Disclaimer and Important Safety Information
Contacting TouchTunes
Virtuo Installation and Setup Guide 900475-001 Rev 11

8
Welcome
Welcome
Welcome
Congratulations on your purchase of Virtuo, the world’s first SmartJuke. Virtuo’ s new design concept and appearance
introduces new features that will revamp the user experience as well as attract new users.
About This Guide
This guide is intended for Operators of TouchTunes digital jukeboxes and their technicians, and TouchTunes
technical support and field service personnel. It provides important information about the installation, setup, and
operation of your new Virtuo.
This manual refers to the following models:
• Virtuo 700259-001
• Virtuo 700259-002
• Virtuo 700270-001
Disclaimer and Important Safety Information
TouchTunes Interactive Networks is not responsible for any damage resulting from the improper installation or
connection of test kit components or any other external equipment to your kit. Nor is TouchTunes responsible for any
damage caused during shipment (except the shipment to the original purchaser) or any damage caused by:
• impacts, fluids, fire, flood, wind, earthquake, lightning or similar disaster
• unauthorized modifications, attachments or peripherals, improper use, environment, installation or electrical
supply
• improper maintenance
• any other misuse, abuse, or mishandling
IMPORTANT SAFETY INSTRUCTIONS
Familiarize yourself with this important safety information before proceeding with product installation.
• READ THESE INSTRUCTIONS.
• KEEP THESE INSTRUCTIONS.
• HEED ALL WARNINGS.
• FOLLOW ALL INSTRUCTIONS.
The Lightning Flash with arrow head symbol within an equilateral triangle is intended to alert the user
to the presence of un-insulated "dangerous voltage" within the product enclosure that may be of
sufficient magnitude to constitute a risk of shock to persons".
The exclamation point within an equilateral triangle is intended to alert the user to the presence of
important operating and maintenance (servicing) instructions in the literature accompanying the
product".
WARNING: Do not defeat the safety purpose of the polarized or grounding-type plug. A polarized plug
has two blades with one wider than the other. A grounding type plug has two blades and a third
grounding prong. The wide blade or the third prong are provided for your safety. If the provided plug
does not fit into your outlet, consult an electrician for replacement of the obsolete outlet.
Virtuo Installation and Setup Guide

Welcome
Disclaimer and Important Safety Information
WARNING: TO REDUCE THE RISK OF FIRE OR ELECTRIC SHOCK, DO NOT EXPOSE THIS
APP ARA TUS TO RAIN OR MOISTURE AND OBJECTS FILLED WITH LIQUIDS, SUCH AS VASES,
SHOULD NOT BE PLACED ON THIS APPARATUS
DO NOT USE THIS APPARATUS NEAR WATER.
WARNING: TO REDUCE THE RISK OF FIRE OR ELECTRIC SHOCK, THIS APPARATUS SHALL
BE CONNECTED TO A MAINS SOCKET OUTLET WITH A PROTECTIVE EARTHING
CONNECTION.
WARNING: The speaker output of this unit can exceed 10 Watts and could cause a shock injury.
Connection to speakers should be performed by a skilled person in compliance with local building
codes. Class 2 wiring is required for speaker cables. Use of external speakers outside the ratings
stated at the speaker jack may result in a shock injury or damage to the unit, or equivalent.
CAUTION: Do not use Virtuo immediately after transferring the unit from a cold place to a warm place
as condensation may have occurred on internal components. Wait for the unit to reach room
temperature before using it.
IMPORTANT: See product enclosure for safety-related markings.
TO COMPLETEL Y DISCONNECT THIS APPARATUS FROM THE AC MAINS, DISCONNECT THE
POWER SUPPLY CORD PLUG FROM THE AC RECEPTACLE
9
THE MAINS PLUG OF THE POWER SUPPLY CORD OR APPLIANCE COUPLER SHALL REMAIN
READIL Y ACCESSIBLE
No serviceable parts inside, please contact TouchTunes Customer Support for service.
Clean only with dry cloth.
Do not block any ventilation openings. Install in accordance with the manufacturers instructions.
Do not install near any heat sources such as radiators, heat registers, stoves, or other apparatus
(including amplifiers) that produce heat.
Protect the power cord from being walked on or pinched particularly at plugs, convenience
receptacles, and the point where they exit from the apparatus.
Only use attachments/accessories specified by the manufacturer.
Unplug this apparatus during lightning storms or when unused for long periods of time.
Refer all servicing to qualified service personnel. Servicing is required when the apparatus has been
damaged in any way, such as power-supply cord or plug is damaged, liquid has been spilled or
objects have fallen into the apparatus, the apparatus has been exposed to rain or moisture, does not
operate normally, or has been dropped.
Warning: To reduce the risk of fire or electric shock, do not expose this apparatus to rain or moisture.
To disconnect this apparatus unplug from the mains plug, access to the mains plug should be readily
accessible after the installation.
Virtuo Installation and Setup Guide

10
Welcome
Contacting TouchTunes
Contacting TouchTunes
If you need help with or have questions about this document, contact TouchTunes by:
• using the email links on the Contacts page on the TouchTunes Dashboard at
https://operator.touchtunes.com.
• calling the TouchTunes 24/7 Service Hotline at 847-353-1954.
To help us assist you more effectively with problem reports, the following information may be required when
contacting TouchTunes Support:
• SmartJuke ID.
• SmartJuke model.
• The serial number of any component you believe to be defective.
• The date/time of the problem.
• Actions performed immediately before the problem occurred.
• Any additional comments.
If you need assistance with this or any other TouchTunes product, please call or email technical support. We value
your comments.
Virtuo Installation and Setup Guide

Introducing Virtuo
2
This section introduces the exterior, interior and software features of your new TouchTunes Virtuo SmartJuke.
Topics
Introducing Virtuo
Virtuo Features Overview
Exterior Features Overview
Interior Features Overview
• Computer
• Virtuo Computer Panel Connections
• I/O Board
• Amplifier
Remote Control
Payment Means
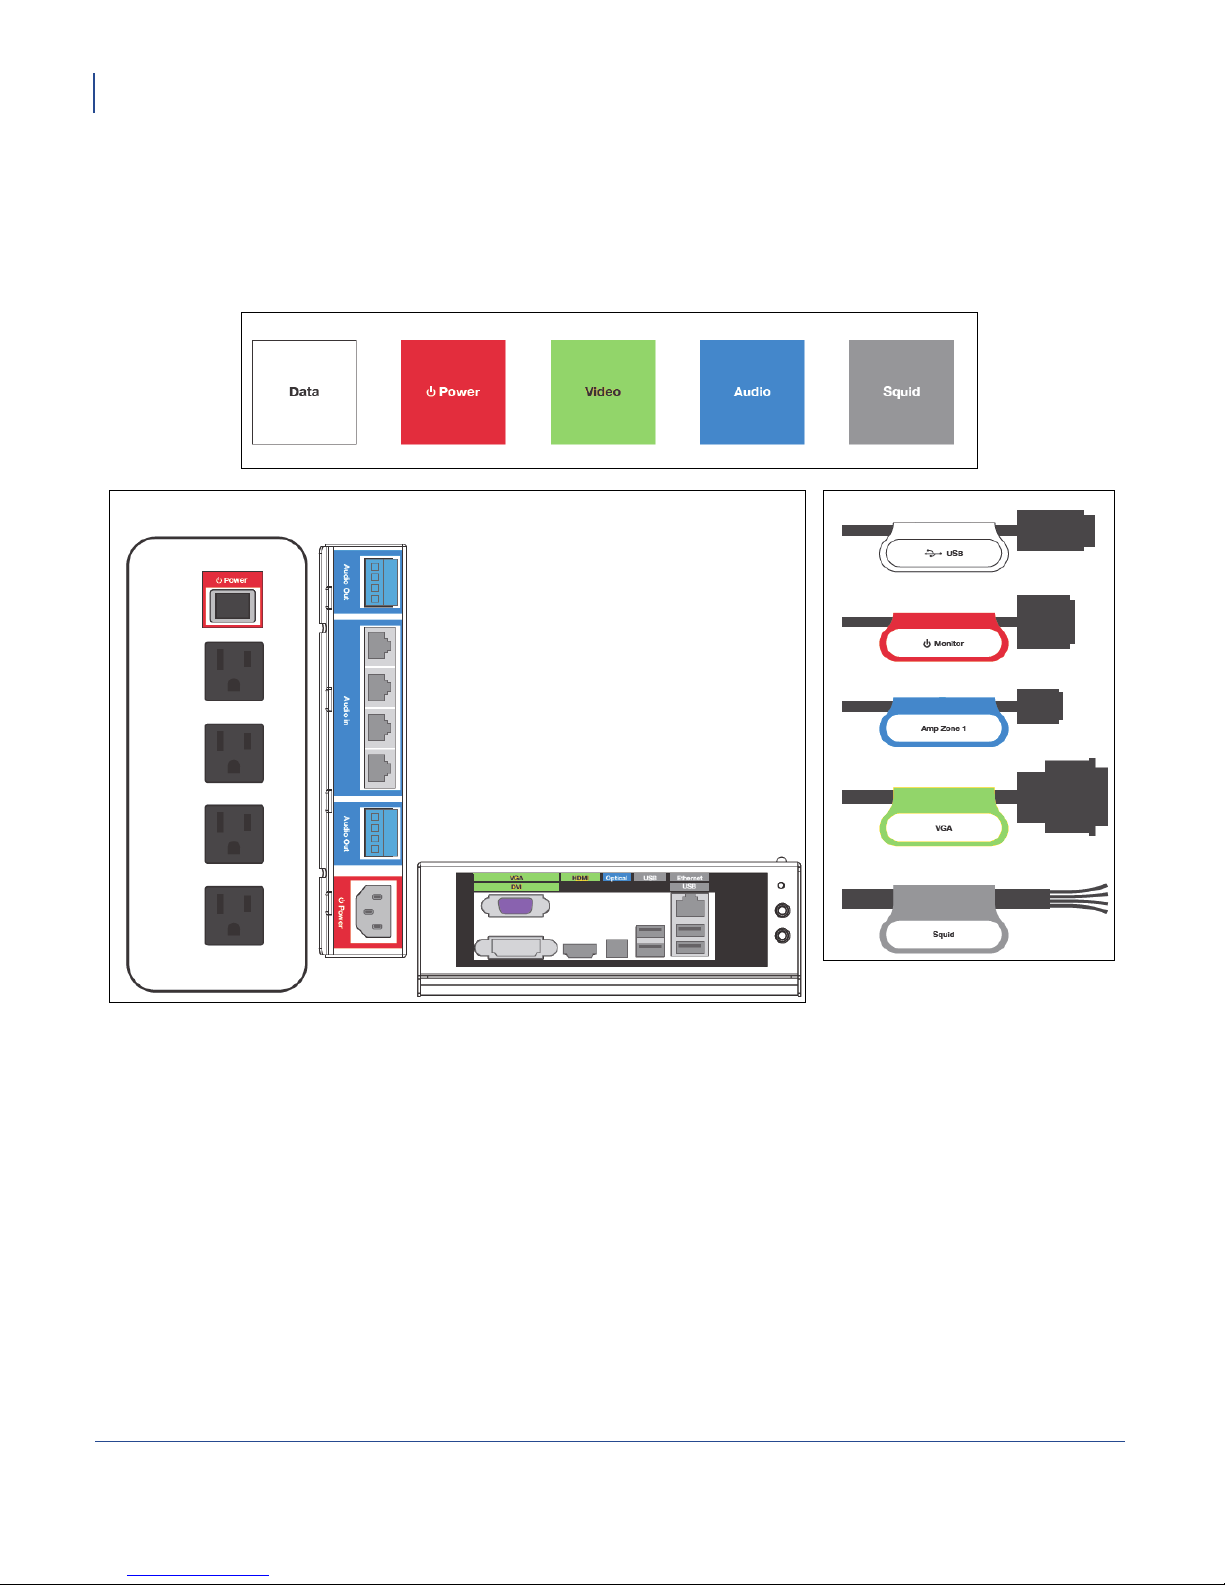
Cable Routing and Intuitive Color Coding
User Interface - Play More!
Virtuo Installation and Setup Guide 900475-001 Rev 11

12
Introducing Virtuo
Introducing Virtuo
Introducing Virtuo
TouchTunes introduces the world’s first SmartJuke—a revolutionary next-generation entertainment platform, with
new features designed to enhance the customer experience and attract new TouchTunes users.
The TouchTunes Virtuo,
more than just a jukebox.
Virtuo is a SmartJuke—a
multimedia entertainment
platform that enhances
patrons’ entertainment
experience
Virtuo Installation and Setup Guide

Introducing Virtuo
Virtuo Features Overview
Virtuo Features Overview
Display
High definition 26-inch wide screen with 16x9 aspect ratio provides more area to present rich content and enhance
the music search and selection experience for the consumer.
High Intensity LED Array
Separate from the user interface, the LED panel allows information to be displayed to an extended audience, even
when the unit is in pause mode.
Onboard Camera
A high definition still and video camera enables patrons to interact with mobile and web communities live from the
location.
Light Show
Multi-zone, 16-million color, high intensity light show offers high visibility in low light settings, and clearly identifies
Virtuo as an interactive device—a SmartJuke.
Crisp Internal Design
Virtuo’s internal design provides a cleaner and safer layout for maintenance, featuring:
• color-coded components and cabling
• new labeling
• tangle-free cabling
• serviceable parts
13
Amplification
A dual amplifier with integrated power supply provides world class audio for 2 independently controllable zones. A
third independently controllable zone can be used with external amplification.
Fan-less Design
Virtuo’s cooling system is an industrial design using passive cooling greatly reduces noise and makes it the “greenest”
out-of-home entertainment platform on the market.
More Powerful CPU and GPU
Virtuo’s 64-bit CPU and dedicated graphics accelerator provide greater than ever performance and superior graphics.
High Capacity Storage
With a high resilience 500-gigabyte hard drive, Virtuo allows for the local storage of more music and multimedia
content reduces the need for download and decreases response time when playing a song.
Bezel-less Front Panel
A modern and sleek industrial design conveying a single glass panel represents a distinctive and classy upgrade to
existing products, increasing the potential to reach up-scale locations.
Compatibility with Ovation Mounting Bracket
Virtuo can be mounted on the same wall bracket used by Ovation jukeboxes, allowing for a rapid swap and upgrade
process.
Virtuo Installation and Setup Guide

14
Introducing Virtuo
Virtuo Features Overview
TouchTunes Wireless Broadband
TouchTunes wireless broadband enables operators to connect their jukeboxes to the Internet with a wireless high
speed connection. This gives you:
• real-time customer access to the entire TouchTunes catalog through TuneCentral
• customer access to myTouchTunes from jukeboxes and access to personalized playlists
• faster data transfers and communications with the Operator Dashboard, including music downloads, settings
modifications and Network Diagnostic System (NDS)
• improved song recommendation quality
• expanded advertisement capabilities
• credit card reader functionality
Virtuo Installation and Setup Guide
Introducing Virtuo
Exterior Features Overview
Exterior Features Overview
Virtuo’s visual features make the statement that this is more than a jukebox, with attractive visual components that
invite and attract patrons to come and Play More!
FRONT LIGHTING
a continuous light that dims
upon user interaction;
customizable light color
15
TOUCH SCREEN,
LED ARRA Y P ANEL,
CAMERA
26” touch screen,
programmable LED
array, camera
BRAND BAR
PAYMENT
CURTAIN
HOUSING PANELS
black is standard;
customizable by
painting or decal
application
WALL WASH
a programmable
vertical light
BACKLIT PLAY
BUTTON
button functionality
is tied to on-screen
user interface
PAYMENT
AREA
blue lighting,
backlit payment
icons signal when it is time
for a transaction to take place
Virtuo Installation and Setup Guide

16
Introducing Virtuo
Exterior Features Overview
Visual Components
• RIM lights: 16-million color light show
• Reflective wall wash: 6 dimmable zones provide a colorful aura
• LED panel: 16-million color LED display area for displaying additional graphics
• Brand bar backlight: single-color LED light strip illuminating the TouchTunes logo
• Payment curtain: gradient lighting strip for illumination of the payment mechanisms
• Touch screen monitor: a bigger than ever (26-inch), 720p monitor for displaying and selecting titles
• Play button backlight: outer lighting ring illuminates a familiar “push to play” button
• Camera: allows for patron interaction with others live from the venue
Virtuo’s chassis is a cast aluminum cabinet with top, bottom, left and right injection-mold plastic panels that provide
a sleeve that covers the door frame.
Edge lighting for bill acceptors and credit card reader illuminates the acceptors to show where payment is made.
A dedicated Play button with the symbol commonly used for consumer audio/video electronics provides patrons a
familiar means of playing their songs, as well as giving them tactile feedback.
Virtuo Installation and Setup Guide

Interior Features Overview
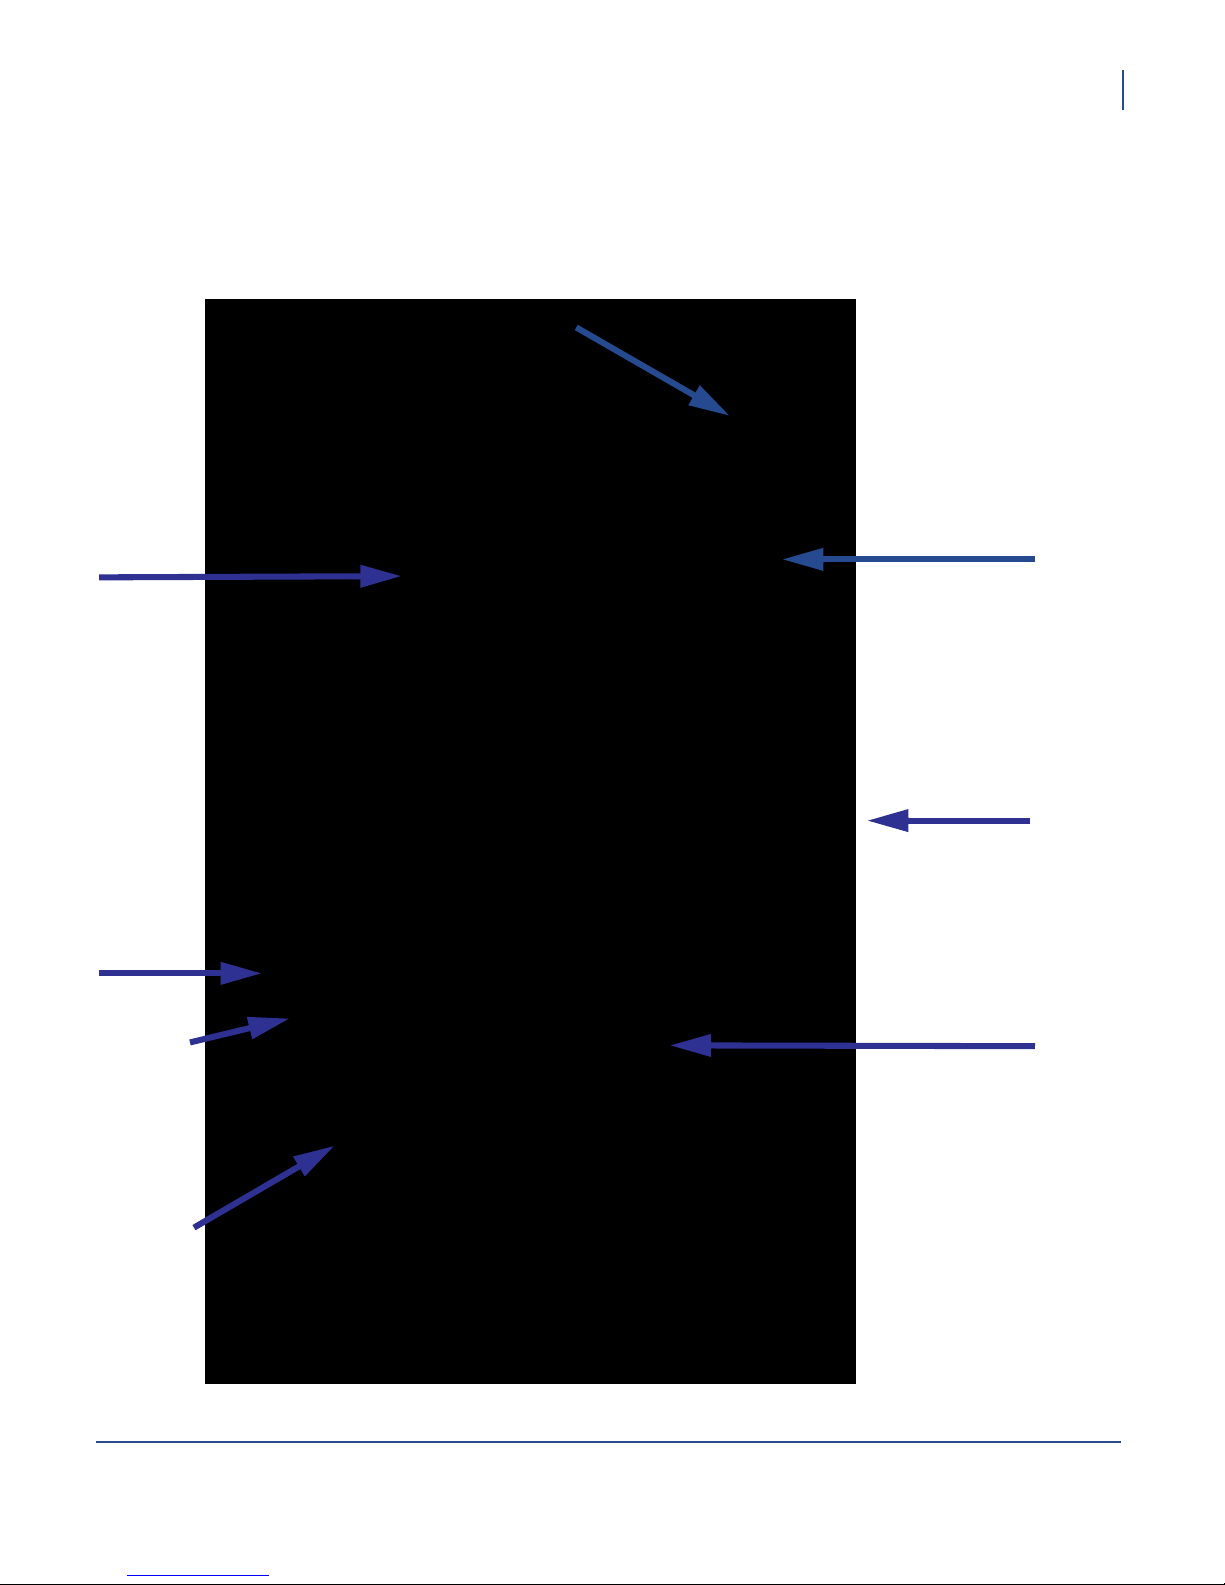
This figure illustrates the locations of Virtuo’s major internal components.
Introducing Virtuo
Interior Features Overview
17
1
4
2
5
7
6
8
3
Interior view: door and cabinet
1. LED panel
2. Touch screen
3. Payment acceptors
4. Power supply unit
5. Computer
6. I/O board
7. Power strip
8. Amplifier
Virtuo Installation and Setup Guide
18
Introducing Virtuo
Interior Features Overview
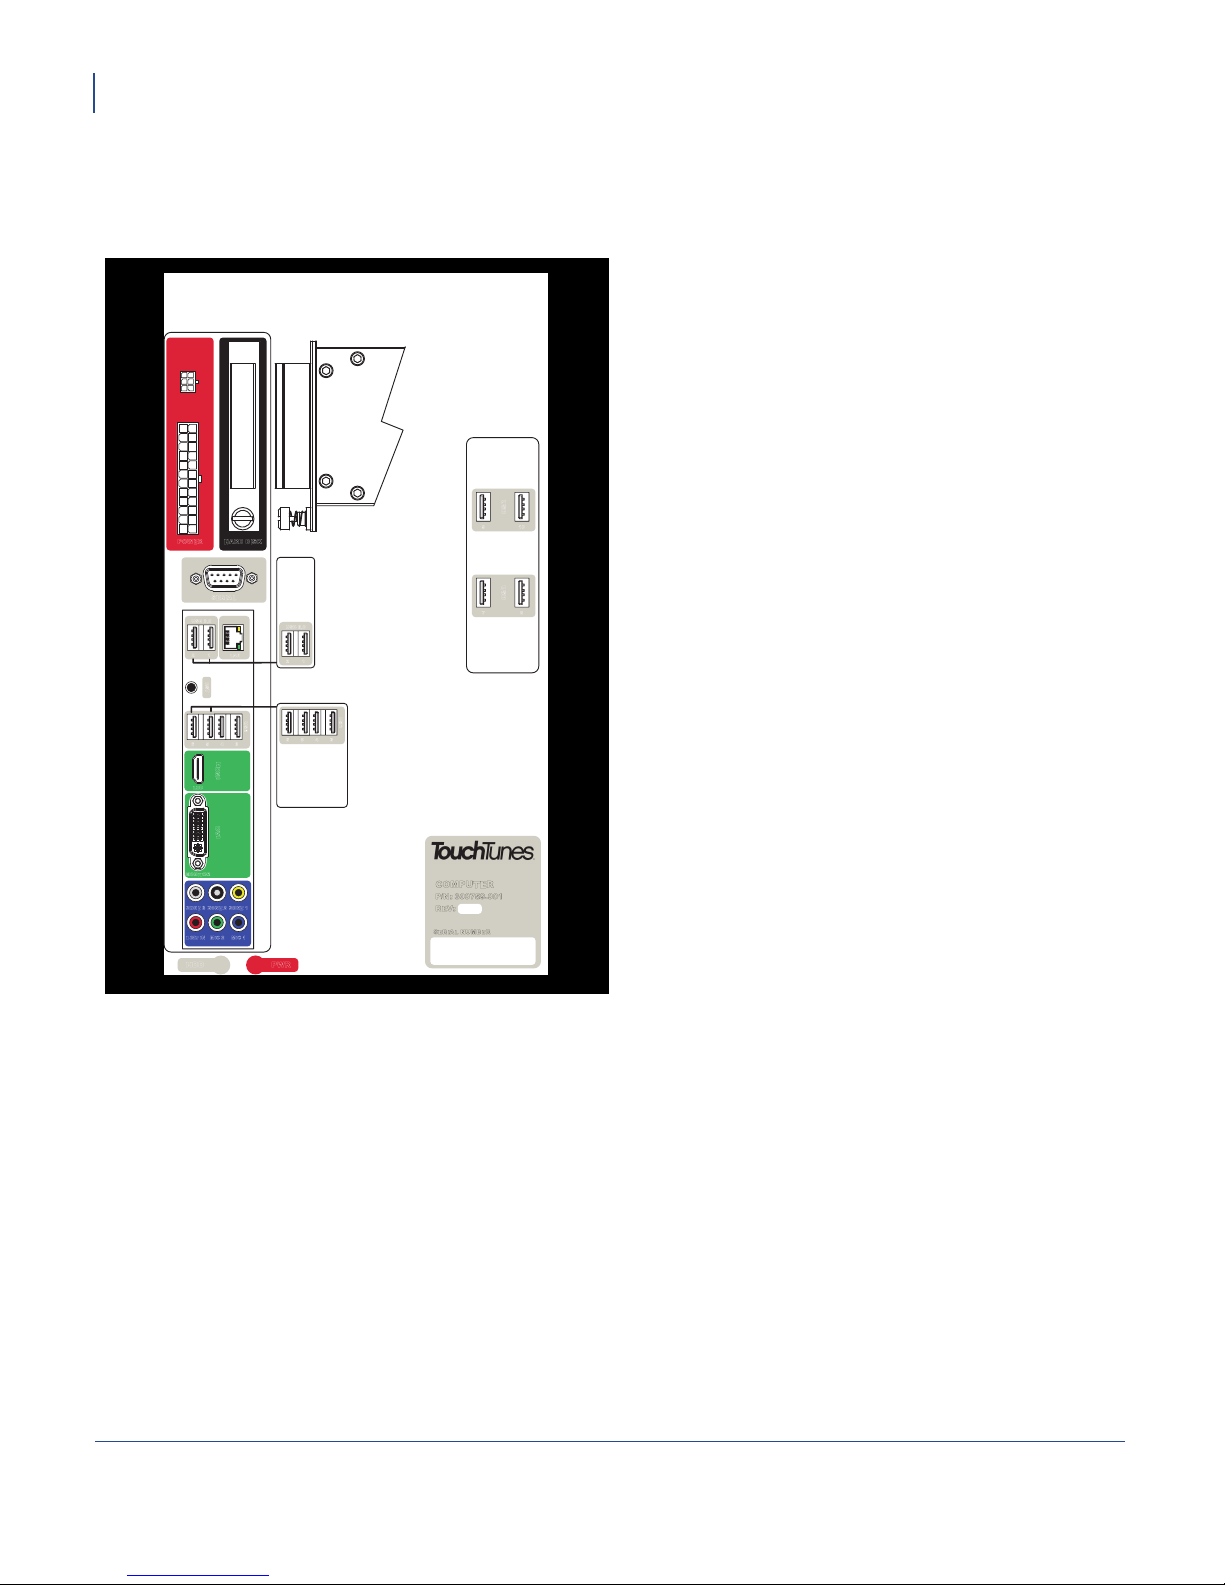
Computer
Computer
POWER HARD DISK
SERIAL
USB 3.0
2
1
LAN
L
OPTICA
RST
APPLICATIONS
FOR FUTURE
RESERVED
USB 3.0
2
1
USB
9 10
USB
7
PHOTOBOOTH
8
MODEM
The central computer in your Virtuo SmartJuke is a
specially designed computer mounted inside Virtuo
that runs the unit. Like a regular laptop or desktop
computer, the computer contains a hard drive and USB
connectors for attaching peripherals.
To conserve space, the computer has connectors on
its left and right panels. Two LEDs on the top panel
provide indications of power status and hard drive
activity.
See Virtuo Computer Panel Connections to identify the
components and connections on the computer for your
Virtuo SmartJuke.
6 5 4 3
HDMI
LED
DVI
ONITOR
M
3
ONE 2ZONE
M
IC 2
LINE IN MI
D
654
LED ARRAY
CARD READER
3
CAMERA
I/O BOARD
USB
COMPUT
ER
01
P/N: 300759-0
:
REV
SERIAL NUMBER
900698-001R00
USB
ONE 1Z
Z
C
1
PWRHD
Virtuo Installation and Setup Guide
Virtuo Computer Panel Connections
6 pin
power
connector
hard disk
drive
Introducing Virtuo
Interior Features Overview
19
24 pin
power
connector
RS232
port
USB 3.0
ports
Reset
button
USB
ports
HDMI
out
DVI
out
POWER HARD DISK
SERIAL
USB 3.0
2
1
LAN
L
OPTICA
RST
USB
6 5 4 3
HDMI
LED
DVI
APPLICATIONS
FOR FUTURE
RESERVED
USB 3.0
2
1
5
4
CAMERA
LED ARRAY
3
I/O BOARD
6
CARD READER
Ethernet
port
USB
USB
9 10
USB
7
PHOTOBOOTH
8
MODEM
USB ports
ONITOR
M
Audio
ports
LINE IN MI
ONE 1Z
3
Z
ONE 2ZONE
M
C
IC 2
1
D
PWRHD
Status LEDs
Yellow = hard drive activity
Green = power
COMPUT
P/N: 300759-0
REV
SERIAL NUMBER
ER
:
01
900698-001 R00
Virtuo Installation and Setup Guide
20
Introducing Virtuo
Interior Features Overview
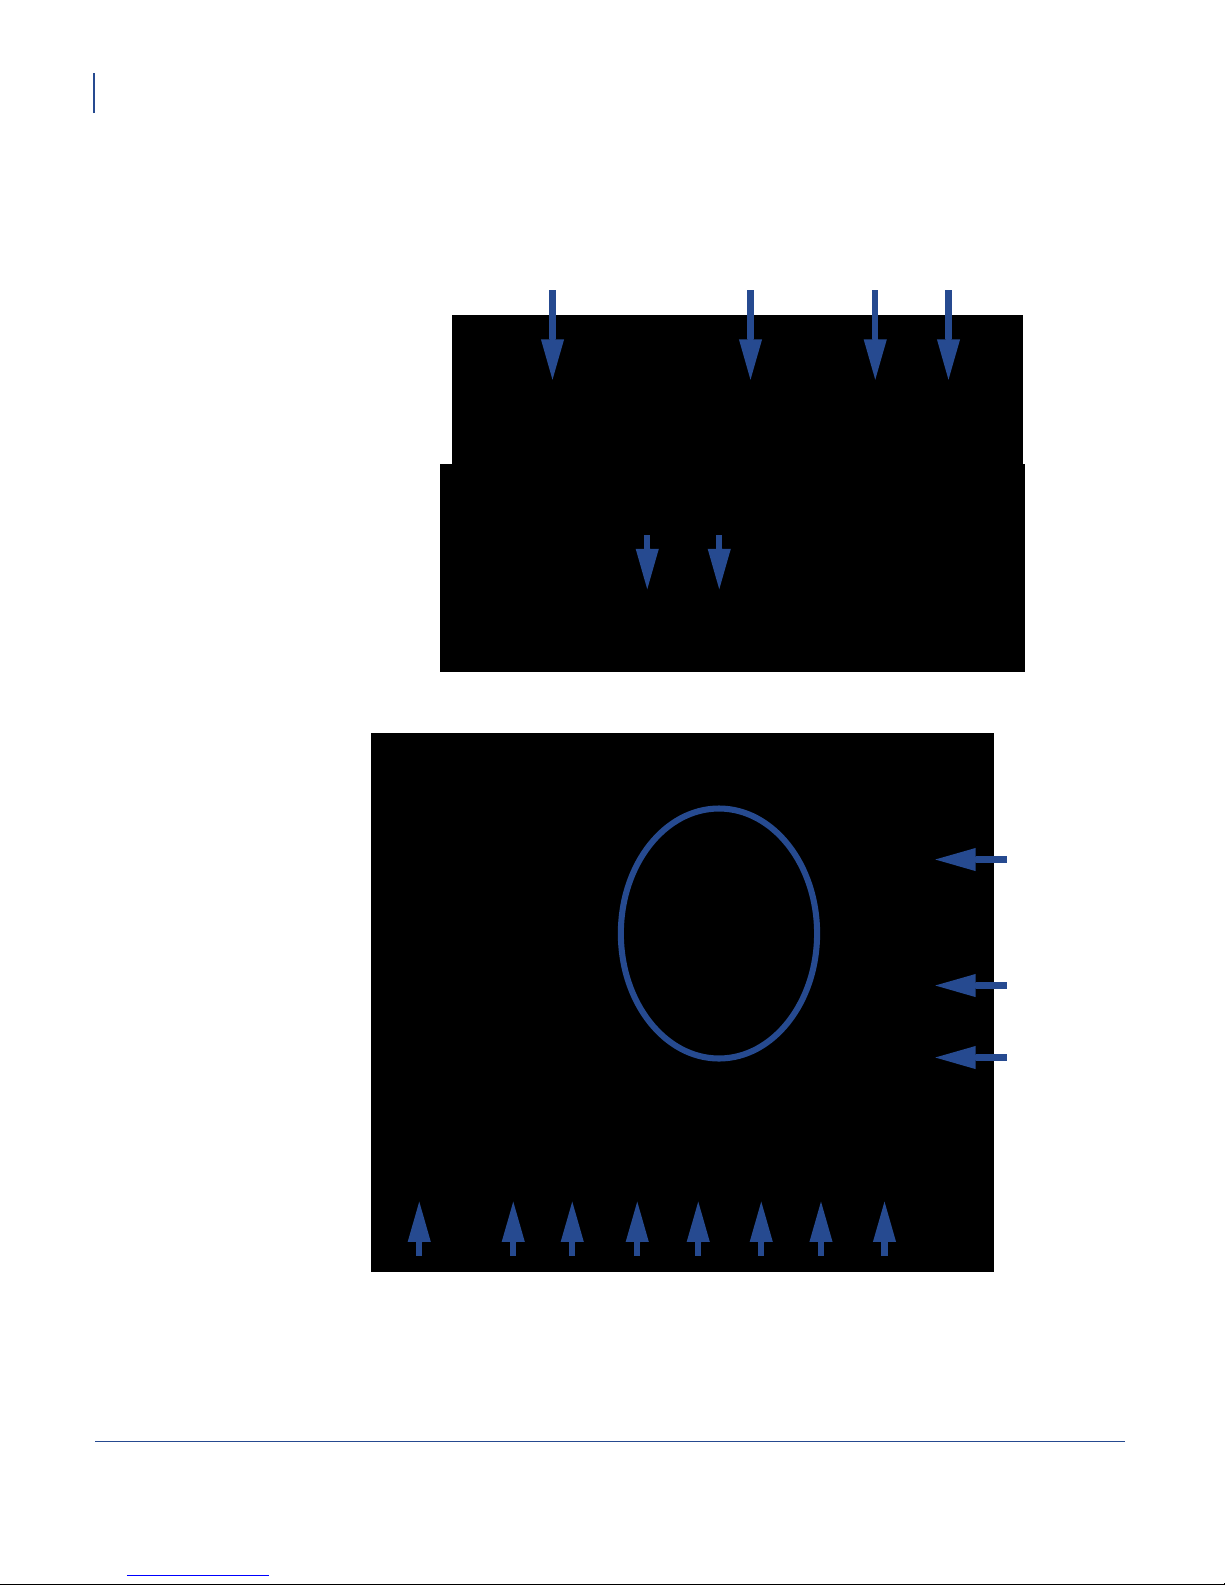
I/O Board
The I/O board is an interface between the SmartJuke computer and Virtuo’s other components, providing controls
and status indicators. Refer to the following figure to identify all components and connections on the I/O board for
your Virtuo.
ABCD
A Squid (main)
B Squid (auxiliary)
C Display DC power out
D DC power input
E USB port
F HDMI audio port
TOP PANEL
RIGHT-HAND PANEL
G Power button
H Volume up/down buttons
I Manager button
J Wired remote
K Zone 1 audio
L Zone 2 audio
M Zone 3 audio
N Aux input
O Mic 1 input
P Mic 2 input
Q DMX light show
R Status LEDS
S Diagnostics
Over temperature
Wired remote activity
Bill acceptor activity
Coin acceptor activity
24VDC switching power status
12VDC switching power status
24VDC power status
E
F
FRONT PANEL
S
G
H
I
J
KLMNOPQ
Virtuo Installation and Setup Guide

Introducing Virtuo
Interior Features Overview
Amplifier
Virtuo’s DA950-V amplifier is a specially-designed dual amplifier with integrated power supply and support for two
independently controllable audio zones.
21
AC power
inlet
* Each zone’s ports are wired together to allow daisy-chaining to optional additional amplifiers.
Dual Amplifier Connector Panel
Zone 1
out
Zone 1
in/out *
Zone 2
in/out *
Key Specifications
• 2 x 450W @ 1% THD+N, 20Hz – 20kHz, 4Ω, BTL
• 4x 120W @ 1% THD+N, 20Hz – 20kHz, 4Ω, SE (both channels driven)
• 121dBA dynamic range (BTL-mode)
• 117dBA dynamic range (SE-mode)
• THD+N = 0.002% @ 1W (8Ω,1kHz, SE-mode)
• THD+N = 0.002% @ 1W (8Ω,1kHz, BTL-mode)
• 86,4% total efficiency @ 250W, 8Ω
• CCIF Intermodulation distortion = 0.0009%, 10W, 4Ω, 18.5kHz/1kHz
• ±25V unregulated auxiliary power supply
• selectable mains 85-132VAC & 170-264VAC
Zone 2
out
Key Features
• fully integrated audio power solution
• rugged construction
• thermal protection
• over current protection
• sound optimized soft clipping
Virtuo Installation and Setup Guide

22
Introducing Virtuo
Remote Control
Remote Control
Virtuo’s wireless remote control is a single-frequency remote that
transmits a 433.92 MHz and has these features:
• improved range and reliability
• light weight and robust
• long battery life
• integrated flash memory ensures that remote does not lose its ID
when batteries drain
• membrane and plastic framing with greater resistance to liquids
The remote control is RF-based. This eliminates the need to point it
directly at the SmartJuke when using it. It has a range of up to 200 feet depending on the type of the obstructions
between it and the unit.
Virtuo also supports a wired remote control, which is available as an option.
Virtuo Installation and Setup Guide

Payment Means
The standard configuration for U.S. model Virtuos is:
• one credit card reader
• two ICT bill acceptors (600-note stacker).
Introducing Virtuo
Payment Means
23
Payment acceptors
NOTE Canadian Virtuos include one credit card reader, one coin acceptor and one bill acceptor.
Virtuo Installation and Setup Guide
24
Introducing Virtuo
Cable Routing and Intuitive Color Coding
Cable Routing and Intuitive Color Coding
T o eliminate needless cable tracing and the potential for connecting cables improperly , all V irtuo’s cables are labelled
at both ends and are color coded, as are all connection ports on the main components (computer, power supply unit,
I/O board, amplifier).
LEGEND
Port labelling
Color coding
Virtuo’s cable management features ensure that cables are properly supported and protected throughout their routing
from point A to point B, and that tangles (or cable spaghetti) are eliminated, making maintenance of the installation
easier and more efficient.
Virtuo Installation and Setup Guide
Cable labelling

Cable Management Hardware
Virtuo uses this cable management hardware:
Plastic Conduit
This tubing is used to contain multiple cables where they cross over the door hinge. This
helps prevent cable pinching and fatigue when the door is opened and closed. If a wire does
fail, it is easy to replace.
The conduits are secured at both ends with a tool-free clip to keep the wires from becoming
fatigued at the point of entry into the tubing.
Cable clips
Cable saddles or twist locks are used in any area where cable clips are located. Both clip
types provide easy cable routing during assembly and repair.
Introducing Virtuo
Cable Routing and Intuitive Color Coding
25
Hook and loop, one-wrap cable ties
These reusable hook and loop cable ties are easy to take on and off and require no tools.
Virtuo Installation and Setup Guide

26
Introducing Virtuo
User Interface - Play More!
User Interface - Play More!
Virtuo’s user interface represents a radical departure from GUIs previously employed by TouchTunes software or
that of its competitors, with an inviting layout that presents patrons with a more attractive, entertaining, and userfriendly experience that invites them to Play More!
Evolving from TouchTunes’ state of the art Jukebox Software architecture, the OpenStage software platform
comprises a user interface that includes these new features:
• Touch Screen Monitor • Live Equalizer
• Home Page • Show Recommendations
• Local Favorites • Custom Music Programming (CMP)
• Content Sorting • New Boot Screen
• Artist Top Hits • Expanded Language Support
• Context Sensitive Help • Improved myTouchTunes Drawer
• Scrubber • HD Attract Video Loops
• New Search Engine • myTouchTunes Banners
• Playlist Builder • Improved Sound using Bass Boost
• Visible Play Queue • Terms of Use Screen
• Two Screen Display • Owner Profile Page
Virtuo Installation and Setup Guide

Introducing Virtuo
User Interface - Play More!
Touch Screen Monitor
The touch screen is a 26-inch, high definition
screen with a 16x9 landscape display.
With a viewing space 60% larger than 19-inch
screens, the landscape orientation is ideal for
multiple users and increased social interaction,
and lends itself to immediate recognition of
content displayed on screen—both advertising
and entertainment content.
Ergonomically , the display provides an increased
relaxed sight range that supports minimal eye/
head movement to view content and minimal
arm/hand movement to physically interact with
content.
NOTE For patrons’ optimal viewing angle and relaxed sight range, ensure that you adhere to the
installation guidelines for wall-mounting Virtuo. See Moving Virtuo to its Mounting Location.
27
Home Page
OpenStage’s home page is a first point of contact that offers a simple set of choices to the consumer experience and
streamlines the navigation experience by offering specific paths that are contextual.
Virtuo Installation and Setup Guide

28
Introducing Virtuo
User Interface - Play More!
Local Favorites
Formerly called Staff Picks, Local Favorites is content defined by local users. This increases the independence and
ownership of the content for a location, and encourages customization and user involvement by local patrons. The
default view and sort order of Local Favorites is by artists, alphabetically . For how to change the order and view, see
Setting Local Favorites Options.
Virtuo Installation and Setup Guide
Content Sorting
Content sorting helps patrons browse content alphabetically, by popularity or by release date.
Introducing Virtuo
User Interface - Play More!
29
Artist Top Hits
Many users would rather pick a known hit from an artist and they may not always know the title of the song.
A top hit listing per artist provides reassurance at this level.
Virtuo Installation and Setup Guide

30
Introducing Virtuo
User Interface - Play More!
Context Sensitive Help
Customers can now use Help to help them navigate the Virtuo interface. When customers touch the Help button, help
bubbles appear that explain the functionality of the page they’re on.
Virtuo Installation and Setup Guide
 Loading...