

TouchTunes Photobooth Installation And Setup Manual
PRINTER
INSTALLATION AND SETUP GUIDE

Disclaimer
Document Part Number: 900757-001 Rev 00 April 2013
TouchTunes and the TouchTunes logo are trademarks of TouchTunes Interactive Networks.
All other brand and product names are trademarks or registered trademarks of their respective
corporations.
The mention of any product does not constitute an endorsement by TouchTunes Interactive Networks.
This manual is furnished under a lease agreement and may only be copied or used within accordance
with the terms of such lease agreement. The content of this manual is furnished for informational use only,
is subject to change without notice, and should not be construed as a commitment by TouchTunes
Interactive Networks. TouchTunes Interactive Networks assumes no responsibility or liability for any
errors or inaccuracies that may appear in this document.
Except as permitted by such lease agreement, no part of this publication may be reproduced, stored in
any retrieval system, or transmitted, in any form or by any means, electronic, mechanical, recording, or
otherwise, without prior written consent of TouchTunes Interactive Networks.
Changes are periodically made to the information herein; these changes will be incorporated into new
editions of this publication. TouchTunes may make improvements and/or changes in the products and/or
software programs described in this publication at any time.
If you have comments on this manual or the products it describes, address them to:
TouchTunes Interactive Networks
Attention: Publications
400 Sainte Croix Avenue, Suite 200 E
Montreal, Quebec, Canada H4N 3L4
Service Hotline: 1-847-353-1954
Fax: (847) 419-3304
TouchTunes may use or distribute whatever information you supply in any way it believes appropriate
without incurring any obligations to you.
Copyright © 2013 TouchTunes Interactive Networks. All rights reserved, including those to reproduce this
publication or parts thereof in any form without permission in writing from TouchTunes Interactive
Networks.

Contents
1 Welcome To TouchTunes
PhotoBooth 5
About TouchTunes PhotoBooth . . . . . . . . . . . . . . . . . . . . . . . . . . . . . . . . . . . . . . . . . . . . . . . . 5
PhotoBooth Service Requirements Reminder . . . . . . . . . . . . . . . . . . . . . . . . . . . . . . . . . . . . . 5
About This Guide . . . . . . . . . . . . . . . . . . . . . . . . . . . . . . . . . . . . . . . . . . . . . . . . . . . . . . . . . . . 5
Disclaimer and Safety Information . . . . . . . . . . . . . . . . . . . . . . . . . . . . . . . . . . . . . . . . . . . . . . 6
Contacting TouchTunes . . . . . . . . . . . . . . . . . . . . . . . . . . . . . . . . . . . . . . . . . . . . . . . . . . . . . . 7
2 Activating PhotoBooth 9
Ensuring Your Camera is Ready for PhotoBooth . . . . . . . . . . . . . . . . . . . . . . . . . . . . . . . . . . . 9
Enabling PhotoBooth and Adjusting Surcharges . . . . . . . . . . . . . . . . . . . . . . . . . . . . . . . . . . . 10
About PhotoBooth Surcharges . . . . . . . . . . . . . . . . . . . . . . . . . . . . . . . . . . . . . . . . . . . . . 10
Adjusting the Virtuo Camera’s White Balance . . . . . . . . . . . . . . . . . . . . . . . . . . . . . . . . . . . . . 12
3 PhotoBooth Printer Installation 15
Unpacking the PhotoBooth Printer . . . . . . . . . . . . . . . . . . . . . . . . . . . . . . . . . . . . . . . . . . . . . . 16
Installing the Ink Ribbon . . . . . . . . . . . . . . . . . . . . . . . . . . . . . . . . . . . . . . . . . . . . . . . . . . . . . . 16
Installing the Paper Roll . . . . . . . . . . . . . . . . . . . . . . . . . . . . . . . . . . . . . . . . . . . . . . . . . . . . . . 18
Connecting the PhotoBooth Printer to Virtuo . . . . . . . . . . . . . . . . . . . . . . . . . . . . . . . . . . . . . . 22
Testing the PhotoBooth Printer . . . . . . . . . . . . . . . . . . . . . . . . . . . . . . . . . . . . . . . . . . . . . . . . 24
4 Printer Maintenance 25
Ordering Replacement Ink Ribbons and Paper Rolls . . . . . . . . . . . . . . . . . . . . . . . . . . . . . . . 25
Changing the Ink Ribbon and Paper Roll . . . . . . . . . . . . . . . . . . . . . . . . . . . . . . . . . . . . . . . . . 27
Changing the Ink Ribbon . . . . . . . . . . . . . . . . . . . . . . . . . . . . . . . . . . . . . . . . . . . . . . . . . . 27
Changing the Paper Roll . . . . . . . . . . . . . . . . . . . . . . . . . . . . . . . . . . . . . . . . . . . . . . . . . . 31


Welcome To TouchTunes
PhotoBooth
About TouchTunes PhotoBooth
TouchTunes’ PhotoBooth is a new service that makes it easy for consumers to own the moment and remember it
forever. Fun, social and spontaneous, TouchTunes PhotoBooth encourages consumer interaction and draws
attention to the Virtuo SmartJuke with its luminous yellow LED light.
TouchTunes PhotoBooth’s high quality, wide-angle camera lens makes taking group photos a snap, even in low-light
settings like bars and restaurants. PhotoBooth presents a new non-music source of revenue and because it will not
interrupt Virtuo’s standard music mode, you now have simultaneous revenue streams available to you!
Setting up a PhotoBooth printer is simple, and the option to print is available automatically if a printer is connected to
Virtuo. The standalone PhotoBooth printer can be kept under a bar counter or in a separate office, where it will only
be accessible to location employees.
PhotoBooth Service Requirements Reminder
This guide was packaged with a one-page README document that explains what you will need to do, apart from
setting up a PhotoBooth printer, to provide your locations with the PhotoBooth service.
Ensure that you have read this README document before visiting your locations to install a PhotoBooth printer.
1
About This Guide
This guide is for Operators of TouchTunes Virtuo SmartJukes and their technicians, and TouchTunes technical
support and field service personnel. It provides important information about the installation, setup, and operation of
a TouchTunes PhotoBooth camera and printer.
TouchTunes PhotoBooth Installation and Setup Guide 900757-001 Rev 00
6
Welcome To TouchTunes PhotoBooth
Disclaimer and Safety Information
Disclaimer and Safety Information
TouchTunes Interactive Networks is not responsible for any damage resulting from the improper installation or
connection of PhotoBooth components or any other external equipment to your Virtuo, nor is TouchTunes
responsible for any damage caused during shipment (except the shipment to the original purchaser) or any damage
caused by:
• impacts, fluids, fire, flood, wind, earthquake, lightning or similar disaster
• unauthorized modifications, attachments or peripherals, improper use, environment, installation or electrical
supply
• improper maintenance
• any other misuse, abuse, or mishandling
Familiarize yourself with this important safety information before proceeding with product installation.
WARNING: This symbol alerts you to the presence of dangerous voltage within the product
enclosure that may be of sufficient magnitude to constitute a risk of electrical shock. Do not
open the PhotoBooth Printer except to replace the ink ribbon or paper roll. There are no
user-serviceable parts inside. Servicing must be performed by qualified personnel only.
CAUTION: Do not install the TouchTunes Printer near any heat sources, such as radiators,
heat registers, stoves, or other apparatus (including amplifiers) that produce heat.
To prevent risk of fire or electric shock, avoid overloading wall outlets, extension cords,
integral convenience receptacles.
Protect all power cords from being walked on or pinched, particularly at plugs, convenience
receptacles, and the point where they exit from the apparatus.
Do not let objects or liquids enter these products—as they may touch dangerous voltage
points or short-out parts that could result in a fire or electric shock.
Refer all service to qualified service personnel. Service is required when this equipment has
been damaged in any way, including but not limited to: power-supply cord or plug damage;
liquid has been spilled or objects have fallen into the equipment; the equipment has been
exposed to rain or moisture, or has been dropped.
TouchTunes PhotoBooth Installation and Setup Guide

Welcome To TouchTunes PhotoBooth
Contacting TouchTunes
Contacting TouchTunes
If you need help with or have questions about this document, contact TouchTunes by:
• using the email links on the Contacts page on the TouchTunes Dashboard at
https://operator.touchtunes.com.
• calling the TouchTunes 24/7 Service Hotline at 847-353-1954.
To help us assist you more effectively with problem reports, the following information may be required when
contacting TouchTunes Support:
• Virtuo SmartJuke ID.
• Virtuo SmartJuke model.
• The serial number of any component you believe to be defective.
• The date/time the problem occurred.
• Actions performed immediately before the problem occurred.
• Any additional comments or information that might help us identify the source of the problem.
If you need assistance with this or any other TouchTunes product, please call or email technical support. We value
your comments.
7
TouchTunes PhotoBooth Installation and Setup Guide 900757-001 Rev 00


Activating PhotoBooth
2
Topics
Ensuring Your Camera is Ready for PhotoBooth
Enabling PhotoBooth and Adjusting Surcharges
Adjusting the Virtuo Camera’s White Balance
Ensuring Your Camera is Ready for PhotoBooth
The most important aspect of optimizing the PhotoBooth experience for locations is ensuring Virtuo’s onboard
PhotoBooth camera is properly installed and calibrated.
Throughout April and May of 2012, as part of our In-Venue Virtuo Improvement Program, TouchTunes shipped a
PhotoBooth camera and/or a new PhotoBooth camera bracket to all operators with Virtuo SmartJukes.
Note: As part of the In-venue Virtuo Improvement Program, these parts were integrated into the production of all new
Virtuos. If you received a Virtuo directly from TouchTunes (and not a distributor) after April 2012, it is not necessary
to install the Virtuo Camera or replace the Virtuo Camera Bracket.
If you received a full PhotoBooth Camera kit for your Virtuo:
The instructions for installing your Virtuo camera, 900523-001 PhotoBooth Camera Kit Installation and
Alignment, were included with the PhotoBooth camera kit.
These instructions are also available on the Operator Dashboard at https://operator.touchtunes.com
If you only received a PhotoBooth Camera bracket for your Virtuo:
The instructions for replacing the original camera bracket and calibrating the camera, 900631-001 PhotoBooth
Camera Bracket Installation and Alignment, were included with the new PhotoBooth camera bracket.
These instructions are also available on the Operator Dashboard at https://operator.touchtunes.com
TouchTunes PhotoBooth Installation and Setup Guide 900757-001 Rev 00

10
Activating PhotoBooth
Enabling PhotoBooth and Adjusting Surcharges
Enabling PhotoBooth and Adjusting Surcharges
If you followed the instructions included with either the PhotoBooth camera kit or PhotoBooth camera bracket kit, your
PhotoBooth camera is already optimized. All that remains to offer your locations digital images using the PhotoBooth
service is to ensure you have turned PhotoBooth ON and you have added any surcharge you wish to charge for
digital images.
Note: Although the installation and alignment of the Virtuo camera or camera bracket were one-time requirements,
you should consider periodically adjusting the white balance levels of your Virtuo camera to match changing light
conditions in a location. See Adjusting the Virtuo Camera’s White Balance for the procedure.
About PhotoBooth Surcharges
As per the terms of your PhotoBooth Addendum with TouchTunes, there are minimum prices to patrons for the
PhotoBooth service. The PhotoBooth service automatically calculates the number of credits required to meet these
minimums.
• The base cost of a digital photo is $1.
• The base cost of a printed photo is $3.
• The base cost of additional printed photos is $2.
PhotoBooth Surcharges Example
The following example may be useful in helping you determine the most appropriate PhotoBooth surcharges.
If your Virtuo credit rules are 2 credits per dollar, then the cost of a single credit is 50 cents.
1. The default price for a digital image will be 2 credits, since that is the equivalent of $1 to the patron.
2. The default price for the first printed image (which includes a digital image) will be 6 credits, since that is the
equivalent of $3 to the patron.
3. The default price for additional printed images will be 4 credits, since that is the equivalent of $2 to the patron.
In this example, a patron would pay:
• $1 for a digital print
• $3 for a printed image (which includes a digital print)
• $5 for two printed images ($7 for three printed images, $9 for four printed images, etc..).
In all three cases, each credit you add as a surcharge for each of these options will increase that base price by 50
cents.
TouchTunes PhotoBooth Installation and Setup Guide
Activating PhotoBooth
Enabling PhotoBooth and Adjusting Surcharges
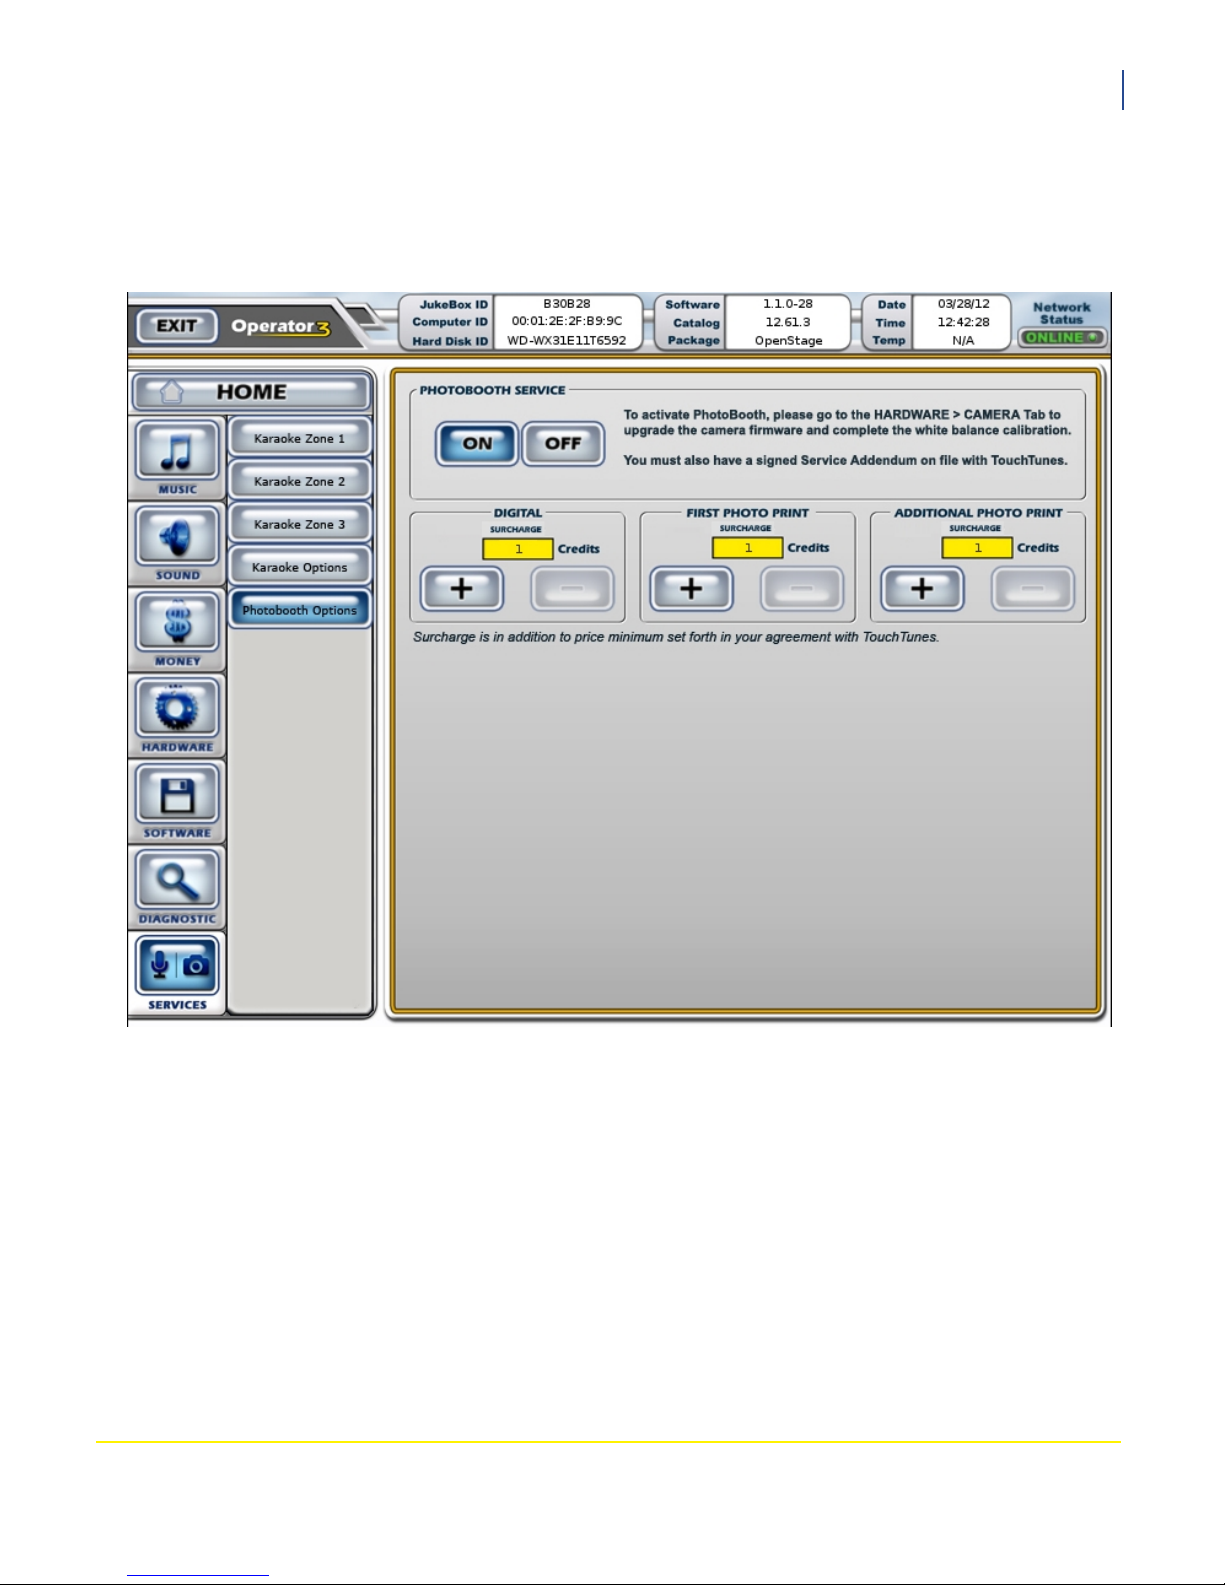
To Turn PhotoBooth ON and Set the PhotoBooth Surcharges:
1. Touch the Services > PhotoBooth Options button from Virtuo’s Operator Menu.
2. Turn the PhotoBooth service ON.
3. Use the + and - buttons to increase the surcharges for digital photos, the first printed image, and additional printed
images.
11
TouchTunes PhotoBooth Installation and Setup Guide 900757-001 Rev 00
 Loading...