

Page 1
1 of 12
About this guide
This guide explains how to install and activate the Ovation Digital
Jukebox. Ovation is different from conventional jukeboxes, both in the
way it operates and in the way it is installed. It is therefore strongly
recommended that you review this guide thoroughly before you begin.
For detailed information on planning your installation, refer to the Ovation
Operator’s Manual on the TouchTunes web site.
Service and support
For service and support issues, call the TouchTunes 24/7 Service Hotline
at 888-711-5853. You must provide the Jukebox ID number to obtain
service. This number can be found underneath the front of Ovation or
inside to the right of the fan.
Components
Ovation ships in several boxes. If any component appears to be damaged,
do not attempt to use or install the system. Notify TouchTunes or your
local distributor immediately.
Verify that you have received the following components:
Dimensions and weight
Important safety information
• Read all safety instructions before installing this product.
• Keep all instructions for future reference.
• Heed all warnings.
• Follow all instructions.
Ovation Jukebox
Quick Start Guide
September 2006
900169-001
Ovation
1 Ovation Digital Jukebox with power line installed
1 Ovation wall bracket
1 Parts kit containing:
1 Remote control (part #: 700031-001)
1 Remote control mounting bracket (part #: 400188-001)
2 AAA batteries
2 Keys (ilco #549)
1 Female RCA to DIN Adapter (part #: 300141-012)
1 Male RCA to DIN Adapter (part #: 300143-012)
2 Wall bracket screws
3 Terminal connectors (four-position Euroblock - part #:
1000000-001). Two for connecting external speakers
and one for connecting an optional microphone.
Hard drive (shipped separately)
Height Width Depth Weight
Crated 41” 32” 18” 142 lbs.
Uncrated 37 1/4” 27 1/4” 11 1/4” 125 lbs.
CAUTION: Ovation components are heavy and represent a
serious safety hazard if their mounting system should fail.
Therefore, installation should only be performed by an
experienced installer or licensed contractor that is familiar with
standard rigging, mounting, and hanging practices, as
recognized by a licensed engineer or governmental agency in
your area.
CAUTION: Ovation mounting components are ETL listed and
CSA approved only when used as specified in this guide. Any
other use or modification of the mounting components is
expressly prohibited, as this may present an unacceptable risk
of structural failure.
CAUTION: Do not install Ovation near any heat sources, such
as radiators, heat registers, stoves, or other apparatus
(including amplifiers) that produce heat.
CAUTION: Do not defeat the safety purposes of the groundingtype plug. A grounding-type plug has two blades and a third
grounding prong. The wider blade or the third grounding
prong are provided for your safety. If the provided plug does
not fit in your outlet, consult an electrician for replacement of
the obsolete outlet.
CAUTION: See product enclosure for safety related markings
and refer to the Ovation Operator’s Manual on the TouchTunes
web site for additional safety information.
CAUTION: Dispose of used batteries in accordance with the
regulations in your area. Do not incinerate.
CAUTION: The lights inside Ovation contain mercury. Disposal
of this material may be regulated in your area due to
environmental considerations. For disposal or recycling
information, please contact your local authorities or the
Electronic Industries Alliance at www.eiae.org.
CAUTION: Unplug this apparatus when unused for long
periods of time.
Page 2

2 of 12
FCC Notice
This equipment has been tested and found to comply with limits for a
Class A digital device, pursuant to Part 15 of the FCC rules. These limits
are designed to provide reasonable protection against harmful
interference in a commercial environment. This equipment generates,
uses, and can radiate radio frequency energy and, if not installed and used
in accordance with the instruction manual, may cause harmful
interference to radio communications. Operation of this equipment in a
residential area is likely to cause harmful interference in which case the
user will be required to correct the interference at his own expense.
Note: Unauthorized modification of the receiver or radio remote control
could void the user's authority to operate this equipment.
This product complies with the Canadian ICES-003 Class A specification.
Do not use this apparatus near water of moisture—Do not
use this product near a bathtub, washbowl, kitchen sink,
laundry tub, in a wet basement, near a swimming pool, or
anywhere else that water or moisture are present.
Clean only with a dry cloth—and as directed in this
document. Unplug this product from the wall outlet before
cleaning.
Do not block any ventilation opening. Install in accordance
with the manufacturer’s instructions—To ensure reliable
operation of the product and to protect it from overheating, put
the product in a position and location that will not interfere
with its proper ventilation. For example, do not place the
product on a bed, sofa, or similar surface that may block the
ventilation openings. Do not put it in a built-in system, such as
a bookcase or a cabinet that may keep air from flowing
through it ventilation openings.
Do not let objects or liquids enter the product—as they may
touch dangerous voltage points or short-out parts that could
result in a fire or electric shock.
Protect the power cord from being walked on or pinched,
particularly at plugs, convenience receptacles, and the point
where they exit from the apparatus.
Use only attachments and accessories specified by the
manufacturer.
Refer all services to qualified service personnel. Services is
required when the apparatus has been damaged in any way:
such as power-supply cord or plug is damaged; liquid has
been spilled or objects have fallen into the apparatus; the
apparatus has been exposed to rain or moisture, does not
operate normally, or has been dropped.
To disconnect this apparatus you must unplug it from the
wall outlet, therefore ensure during installation that the plug
will be accessible after installation to facilitate
disconnecting it from the wall outlet. or equivalent.
To prevent risk of fire or electric shock, avoid overloading
wall outlets, extension cords, integral convenience
receptacles.
Page 3
3 of 12
Important concepts
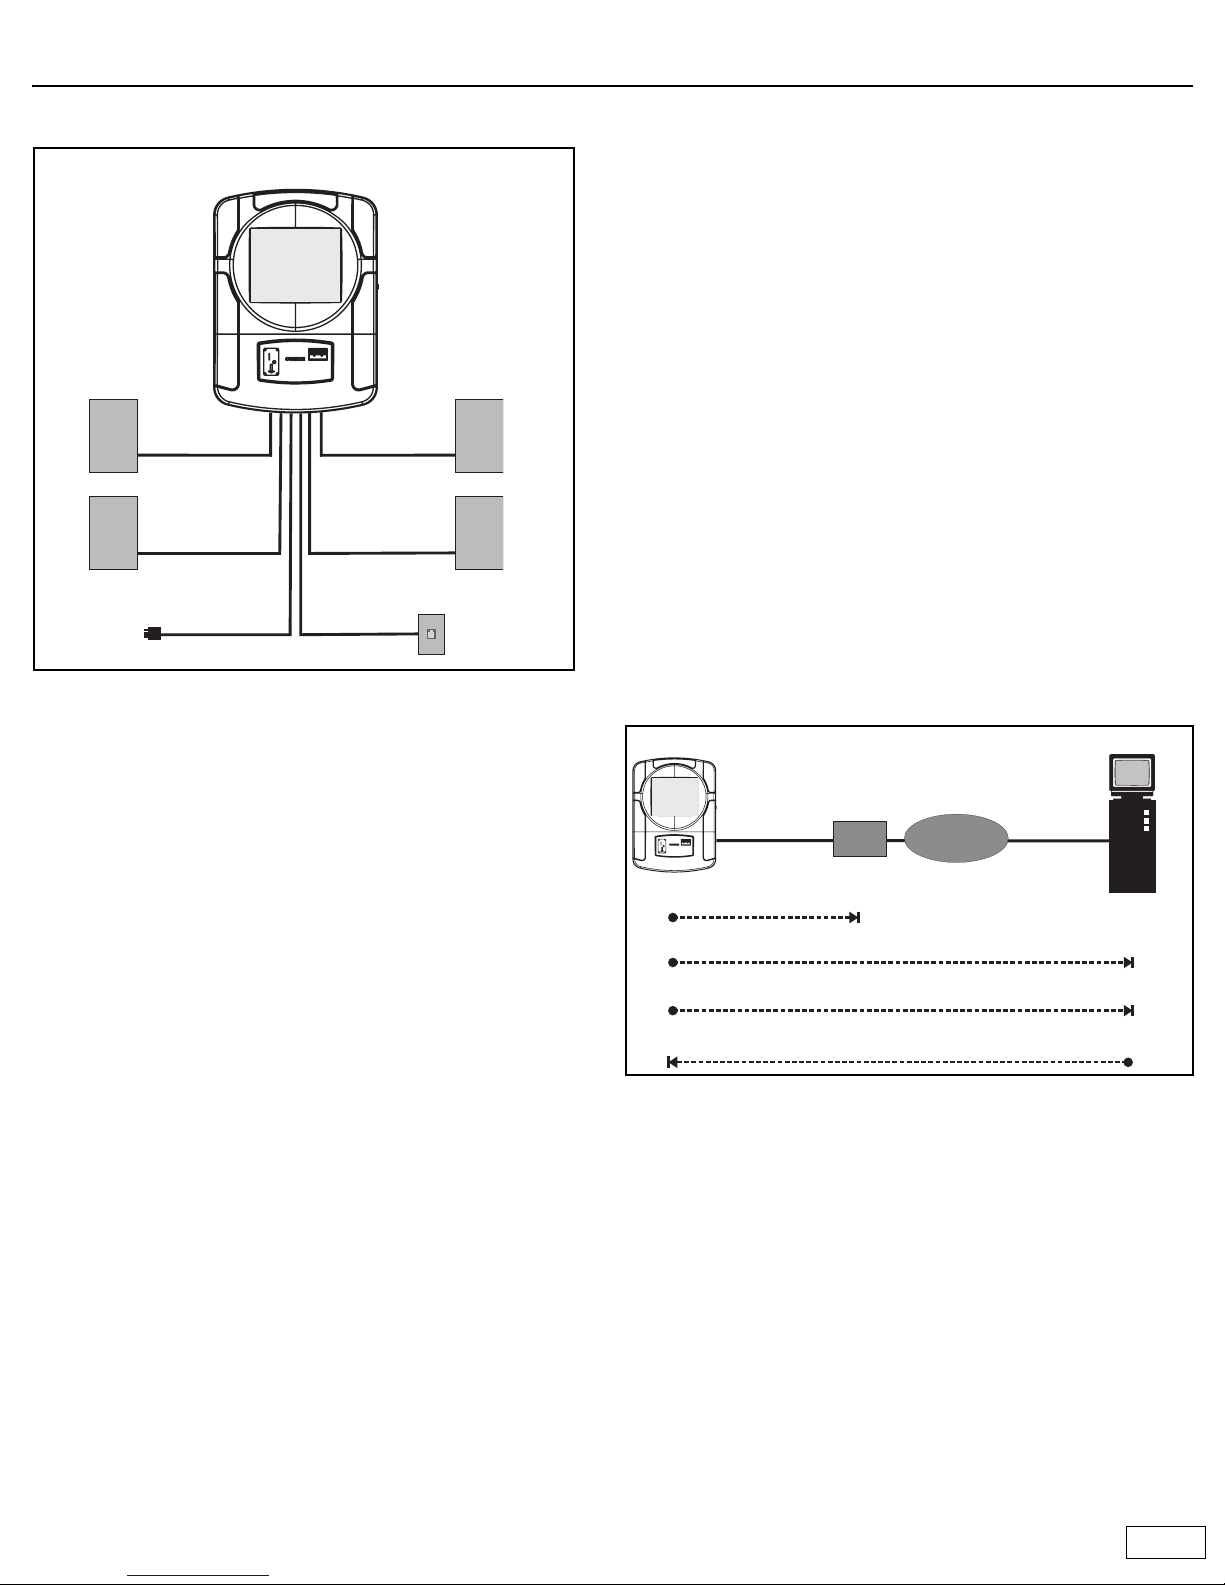
Wiring overview
Audio Input
Ovation can accept input from a microphone and an external sound
source. For instructions on how to make these connections, refer to the
Ovation Operator’s Manual.
Jukebox registration
To avoid unauthorized use of the jukebox, each jukebox has a registration
number assigned to it. To activate the jukebox, you must enter its
registration number. The jukebox then calls the TouchTunes server to
validate the number. If the registration number is valid, the server
activates the jukebox. If not, the jukebox remains inoperative.
Once a jukebox has been activated, all jukebox features come into effect.
Sleep mode
Sleep mode provides a way for operators to temporarily deactivate the
jukebox so it can be moved to a new location. Before the jukebox is
moved, it is placed into sleep mode. After arrival at its new location, the
jukebox must be re-activated using the appropriate registration number.
Important: Sleep mode must always be used when moving the jukebox.
Nightly song queue purge
This feature automatically deletes all unplayed songs that are in the queue
if the jukebox is turned off (using the Night Mode button) for more than
four hours. This way, when the jukebox is turned back on, a location is not
forced to play songs queued up the previous evening.
The four hour time period can be customized in the range of 1 to 14 hours.
To do this, you must contact the Touchtunes service hotline at 1-888-711-
5853.
This feature is on by default. To turn it off you must contact the
Touchtunes service hotline.
Nightly communications
Every night the jukebox calls the TouchTunes server. This call serves
several important purposes:
• Reports daily income: TouchTunes uses this information to calculate
revenue for the jukebox.
• Reports the number of plays for each song: This is required so that
TouchTunes can track its royalty obligations and make the
appropriate payments to music publishers.
• Downloads updates to the jukebox software (if required): This
ensures that whenever updates are available, all jukeboxes in the field
are automatically upgraded.
• Downloads new songs: Operators can create a list of songs they
want to add to the jukebox and the songs are automatically
downloaded when the jukebox calls the server. The jukebox also has a
Vote for Download feature. When enabled, it allows customers to
vote for their favorite songs. The song that obtains the most votes
every week is downloaded and added to the jukebox. If you signed up
for the revenue enhancement program, TouchTunes automatically
manages the songs on the jukebox for maximum profitability during
the nightly call.
• The jukebox uses the Internet to communicate with the TouchTunes
server. Using the area code of the location’s phone number, the
jukebox determines the nearest ISP (Internet service provider) to call.
Failure to communicate
A jukebox that fails to communicate with the TouchTunes server will
eventually be disabled. This occurs as follows:
• If the jukebox fails to communicate with the TouchTunes server for
several consecutive days, a red telephone icon appears in the top
right corner of the Attract screen. This warning icon will appear for
the next few days. If you touch this icon, the jukebox displays the
message “This jukebox will be disabled in XX days.”
• When the jukebox becomes inoperable, instead of the Attract screen
you will see the message “This jukebox has been deactivated. Please
contact your operator.”
Ovation
Left speaker Right speaker
Zone 1 Zone 1
Left speaker Right speaker
Zone 2 Zone 2
Phone line
AC power
ISP
Internet
Internet
TouchTunes Server
A connection is established with TouchTunes server via the Internet.
Jukebox
Jukebox calls nearest ISP.
Jukebox sends status information and song requests.
Server sends songs and new operating software.
Page 4
4 of 12
Installing the phone line
Ovation requires an analog telephone line to communicate with the
TouchTunes server. Once connected, Ovation will call out once daily at the
time you specify (typically during non-business hours). This daily
communication is critical for proper operation. It enables Ovation to
retrieve system software updates and download new music.
Ovation can usually share an existing phone line with other devices, such
as phones, fax machines, or alarm systems. A dedicated phone line is not
necessary. However, some devices, such as computerized telephones,
lottery terminals, and ATMs, can cause conflicts on a shared line. You can
usually resolve these conflicts by contacting the operator of the other
equipment and coordinating call and answer times.
• Alarm systems: Most current alarm systems communicate over
telephone wiring. These systems usually have the telephone line
connected directly from the demarcation point (service entry) to the
input side of the alarm. Telephones and Ovation should be connected
to the phone side of the alarm.
• Digital phone systems: If the location has a digital phone system, the
Ovation phone line must be connected to the analog line in front of
the digital phone system.
Running a new phone cable
Note: As of February 1, 1996, the telephone company states, for singleline residence or business telephone service, that the owner is
responsible for the installation and maintenance of telephone wiring
after the demarcation point.
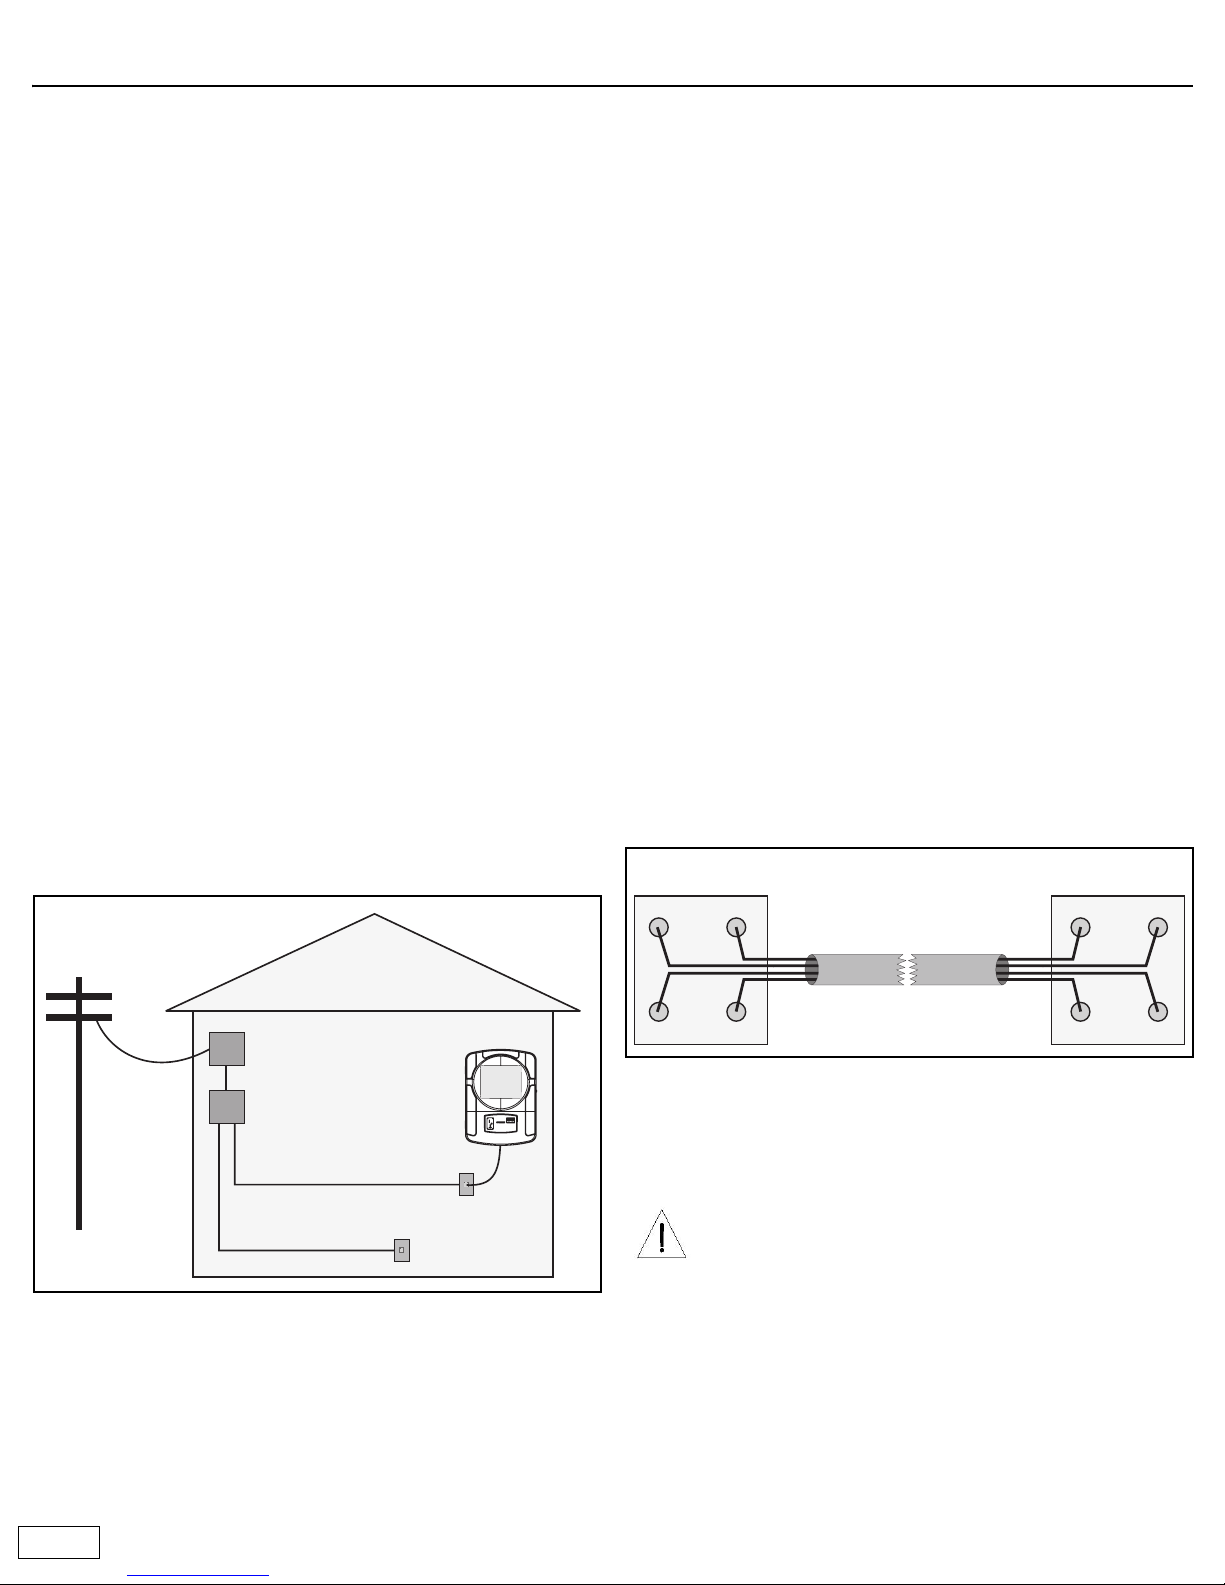
In most cases, you will need to run a new phone cable from the
demarcation point (also known as the telephone network interface, or
service entry) to the spot where Ovation will be installed.
The demarcation point is located where the outside phone line enters the
building. By running new, quality cable directly from this point to Ovation,
you can avoid potential problems caused by existing wire connections
that may be poorly made.
Recommended parts and tools
• Phone line polarity tester (available at Radio Shack).
• Phone cable with RJ11 connectors (7' long). Used to connect Ovation
to the phone jack.
• Four-conductor telephone modular wall jack.
• Four-conductor round telephone cable. Used to connect the phone
line from the demarcation point to the wall jack.
• Any analog phone without filters or a Butt-in set. Used to listen to the
newly installed phone line.
Installation tips
• Always use good quality cable and make the cable run as short as
possible. This will cut down on potential problems with line noise.
• Avoid using phone line splitters to tap into an existing jack.
• Make sure that the phone line is not routed over or near fluorescent
or neon lights. Electrical noise generated by these devices can
interfere with the phone line.
• It is not uncommon for a telephone line to pick up a radio station. To
diagnose this problem, use a cheap telephone without filtering, or a
Butt-In set. You must determine if the noise is on the telephone
company's equipment or being picked up on the inside wiring.
Disconnect the inside wiring at the demarcation point. If the noise
disappears, it is on the phone company's wiring and they must fix it.
• Wire both ends of the phone cable to the same colors (as indicated).
The jukebox generally uses the red and green wires for its phone line.
Typically, the green wire has positive electrical polarity and the red
wire is negative.
• Once installation is complete, use a polarity tester to verify the line.
• Make a call to any 877 prefix toll free number to ensure that calls to
this prefix are not blocked.
Demarcation point
Phone line
Wire distribution device
Existing phone line
New phone line for Ovation
Location
CAUTION: Telephone wires typically carry low voltage, but if
you are touching the wires when the phone rings, you can
receive a substantial jolt. Enough current is still sent through
the line to activate the old style mechanical ringing devices.
Do not work on phone lines during a thunder storm, since an
electrical strike can send excessive current down the line.
To minimize the risk, always make the connection to the live
phone line or to the demarcation point after you have
completed all other connections.
Demarcation point or
wire distribution device
New phone cable
BlackBlack RedRed
YellowYellow
GreenGreen
Modular jack
Page 5
5 of 12
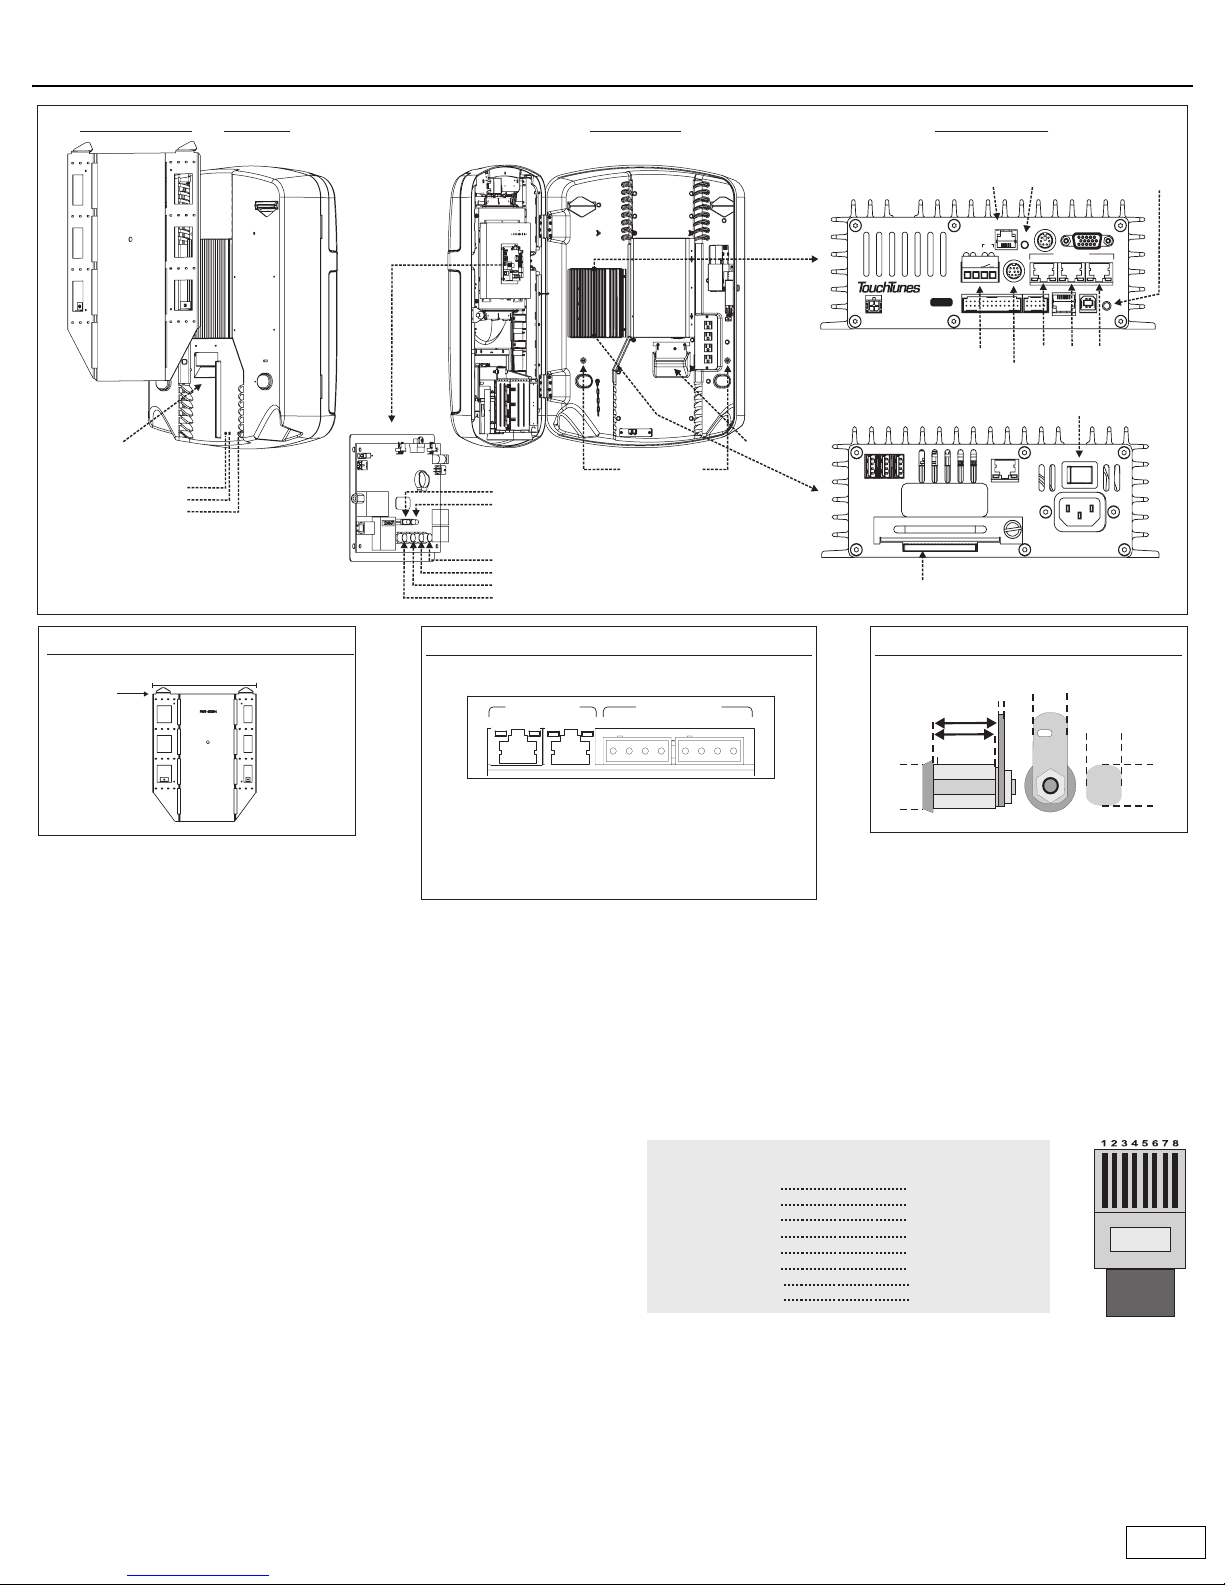
Ovation components
Rear panel
• Cable channels: All cables are routed through the cable channels on
the rear of the unit.
• Volume buttons: Provide manual control of the jukebox volume.
• Night Mode button: Turns off the monitor, lights, and bill collector.
The computer remains active so it can call the TouchTunes server.
Inside Ovation
• Wire strain-relief bracket: This is where cables are routed out of the
jukebox and into the cable channels. Once the bracket is tightened,
the cables are secure so they cannot be pulled out.
• Wall bracket screws: Used to secure the jukebox to the wall bracket.
Connector panels
• Phone line connector: Connects the jukebox to a phone line so it can
communicate with the TouchTunes server.
• Reset button: Press to restart the jukebox.
• Manager button: Activates the operator menu which enables you to
configure all Ovation settings.
• Microphone: For connection of a balanced, low-impedance (less than
600 ohms), dry contact microphone. Use the supplied four-position
Euroblock connector to attach the microphone cable.
• Auxiliary sound input: Use the supplied RCA-to-DIN adapters to
attach an auxiliary sound source input.
• Audio outs: Audio out 1 and 2 are connected to the integrated
jukebox amplifier by default. If required audio out 1, 2 and 3 can be
connected to external sound systems via standard category 5 cable.
You can purchase prewired cable, or wire your own cable as follows:
If you need RCA outputs, a category 5 to RCA converter (Bal/Umbal
DI box) is available from TouchTunes (part number 700003-001).
• Amplifier: Provides amplification for external speakers in two zones.
• System power switch: Turns off all power to the jukebox.
• Hard drive slot: The hard drive that holds all songs is installed here.
Mount top of bracket
65 inches from floor
25.1 inches
NETWORK
2
USB
13
ON OFF
Serial No.
ACT
LNK
100 - 120VAC
50/60Hz 2.0AMAX.
NOUSER-SERVICEABLE PARTS INSIDE
Bottom
System power switch
VIDEOKBDTELCO
AUDIO OUT
13
LINE IN
RST
USBDMX
MNG
COM1
MIC
12
P
W
R
D
I
A
G
HD
TO CTL
P/N: 300114-
2
SW
(-) (+)
Top
Connector Panels
Hard drive
Phone line connector
Mounting Height
Amplifier Connectors
5/8"
16 mm
5/8"
16 mm
7/64"
3 mm
7/64"
3 mm
7/8"
22 mm
7/8"
22 mm
1 1/8"
1"
0.120"
5/8"
16 mm
5/8"
16 mm
3/4"
19 mm
3/4"
19 mm
Audio out connectors
Wire strainrelief bracket
Volume increase
Volume decrease
Night mode button
Cable
channel
(Note: Buttons are slightly recessed.)
Wall bracket screws
Inside OvationRear PanelMounting Bracket
Lock
BZONEA BZONEA
-L+-R+ -L+-R+
Zone B is connected to Audio Out 2.
Zone A is connected to Audio Out 1.
Euroblock connectors provide audio out at
150W/4 Ohms per channel. Must be used with
full-range speakers.
Audio inputs
Speaker connectors
Connector lights
Green: Power.
Yellow: Sound presence, blink with
sound from mid-level and up.
Power/Standby lights (not shown)
Green: Amp is operating normally.
Red: Amp is in standby mode or an
abnormal condition has been
encountered (overheat, output short)
Reset button
Microphone connector
Auxilliary sound input
Manager button
Top
Manager button
Volume up
Volume down
Night mode button
Standby light
Power on light
Control Board
1
2
3
4
5
6
7
8
white + orange
orange
white + green
blue
white + blue
green
white + brown
brown
white + orange
orange
white + green
blue
white + blue
green
white + brown
brown
1
2
3
4
5
6
7
8
Near
End
Color Color
Far
End
Straight-through catagory 5 cable wiring
RJ45 connector
Page 6

6 of 12
Installation procedure
Refer to the illustrations on page 5 as you install the jukebox:
1 Attach the wall bracket
The top of the wall bracket must be mounted 65 inches (5' 5") from
the floor. Use a level to ensure that the bracket is level. Secure the
bracket to the wall using lag bolts and washers.
2 Hang the jukebox on the wall bracket
Hang the jukebox on the wall bracket using the flange hooks on the
rear. Allow the weight of the jukebox to set it into position.
3 Open the jukebox
The lock is located on the right side of the unit.
4 Turn off the power
Ensure that the system power switch is in the ‘0’ position.
5 Replace the lock (optional)
All Ovation jukeboxes are keyed alike. Therefore, for security
reasons, you may want to replace the lock. The lock is a tubular cam
lock. If you replace the lock, transfer the cam to the new lock
assembly.
6 Install the wall bracket screws
Install the wall bracket screws to lock the jukebox to the wall bracket.
7 Install the hard drive
Insert the hard drive into the slot labelled REMOVABLE HARD DISK
and push gently until it is fully seated. Hand tighten the thumb screw.
8 Remove the wire strain-relief bracket
Locate the wire strain-relief bracket. Loosen the two screws and
remove the bracket. This is the opening that all cables pass through.
This includes phone line, audio input/output, microphone, and
optional external light show cable.
9 Connect the phone line
Connect the phone line to the connector labelled TELCO. Route the
cable through the strain-relief bracket and either up or down the
cable channels on the back of the unit. Plug this cable into the
modular phone jack you installed earlier.
10 Connect external speakers
Ovation does not contain internal speakers. Therefore, you must
connect external speakers for the jukebox to play.
By default audio out 1 and 2 (on the connector panel) are connected
to amplifier zone A and B respectively.
Connect external speakers to zone A and B using the supplied
Euroblock connectors.
Route the cables through the strain-relief bracket and either up or
down the cable channels on the back of the unit.
11 Connect to an external sound system (optional)
If required, use audio out 3 (on the connector panel) to connect to an
external audio system.
Route the cable through the strain-relief bracket and either up or
down the cable channels on the back of the unit.
12 Connect the power cord
Plug the power cord into a properly grounded wall outlet.
13 Tighten the wire strength-relief bracket
14 Turn on the pow er
Toggle the system power switch to the ‘1’ position.
15 Close the jukebox
Make sure that the unit is locked and the key is removed.
16 Turn on the screen
Press the Night Mode button on the rear of the unit to activate the
screen.
CAUTION: Ovation components are heavy and represent a
serious safety hazard if their mounting system should fail.
Therefore, installation should only be performed by an
experienced installer or licensed contractor that is familiar
with standard rigging, mounting, and hanging practices,
as recognized by a licensed engineer or governmental
agency in your area.
CAUTION: The jukebox is NOT secure until these screws
are installed.
Page 7
7 of 12
Starting Ovation
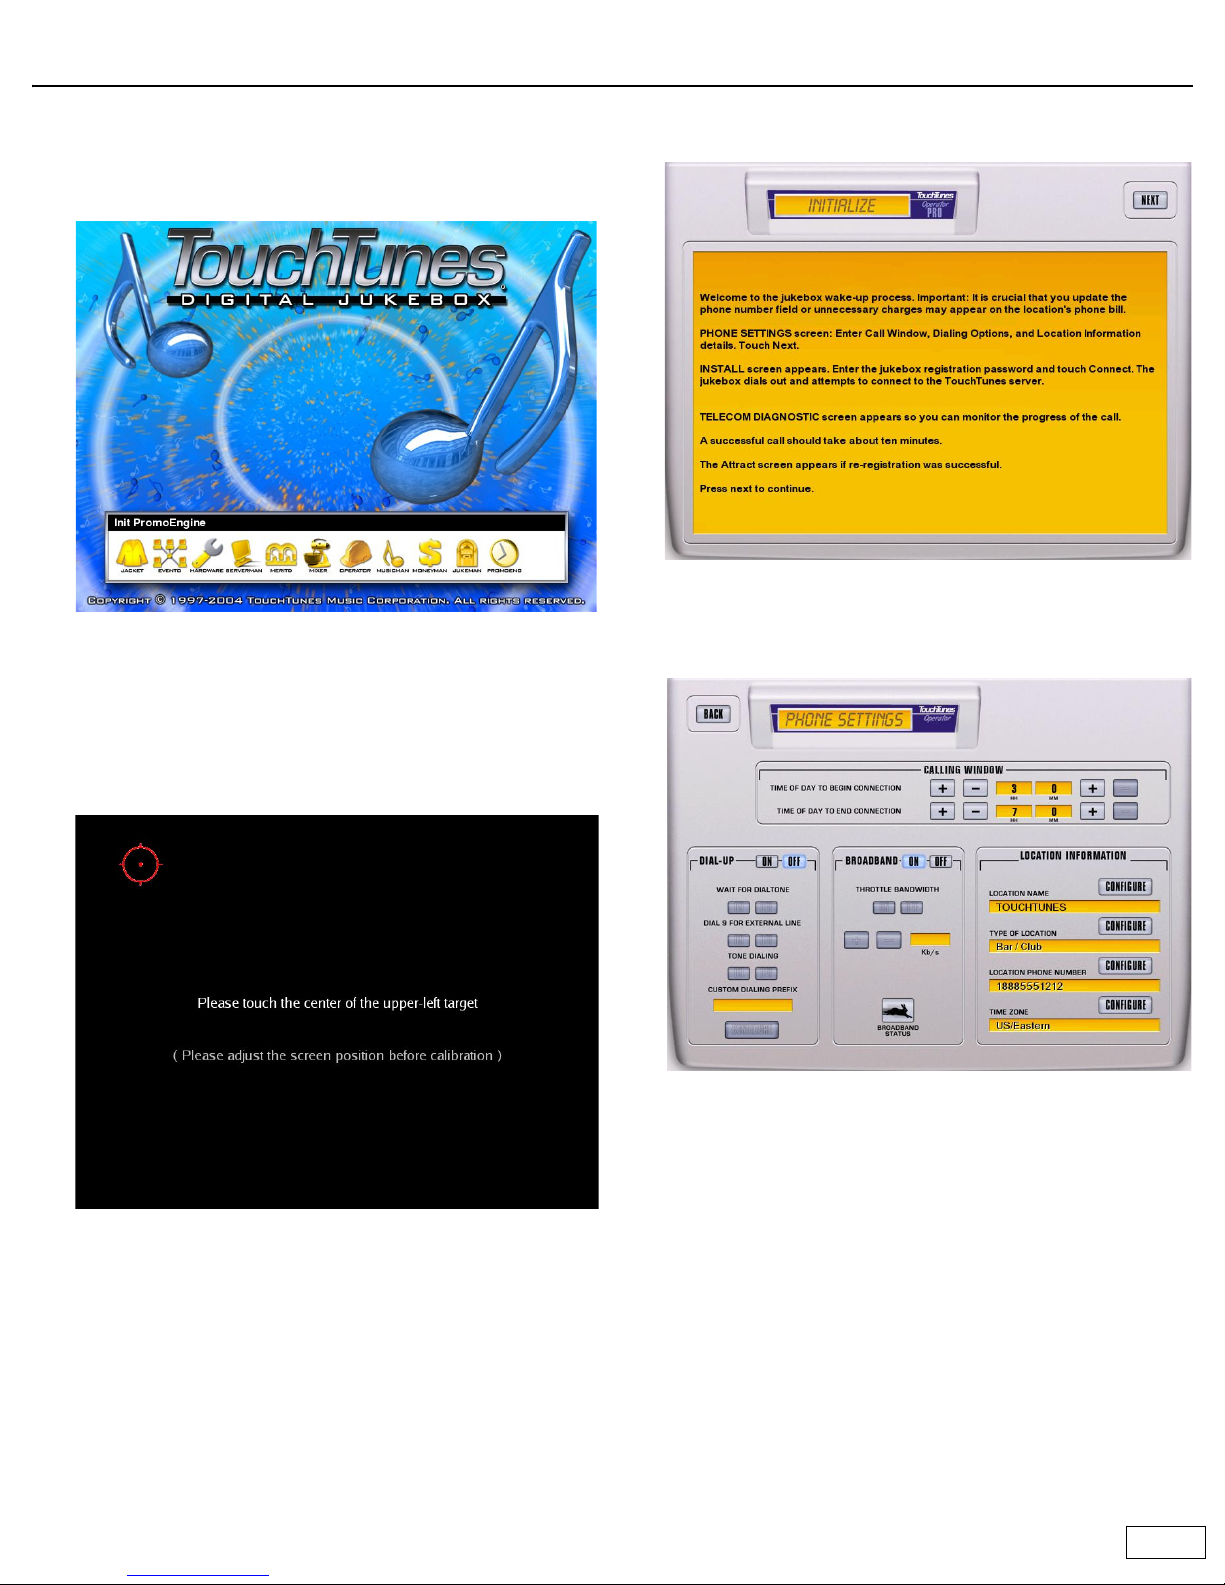
1 Startup
Turn on the power switch on the rear of the jukebox.
Once power is applied, Ovation will display a series of startup
messages, then the startup screen will open.
Icons at the bottom of the screen appear as each subsystem is
initialized. Total startup time can be up to 5 minutes. (The first time
the jukebox starts it may take longer, 5 to 15 minutes, depending on
the number of songs on the hard drive.) If the jukebox pauses on
any icon for more than five minutes, a problem may have occurred.
2 Calibrate the touchscreen
The Calibration screen opens.
To properly calibrate the touchscreen, stand directly in front of the
jukebox as a customer would and follow the onscreen directions.
3 Initialize screen
Once all subsystems are initialized the Initialize screen opens.
Touch NEXT to start the installation procedure.
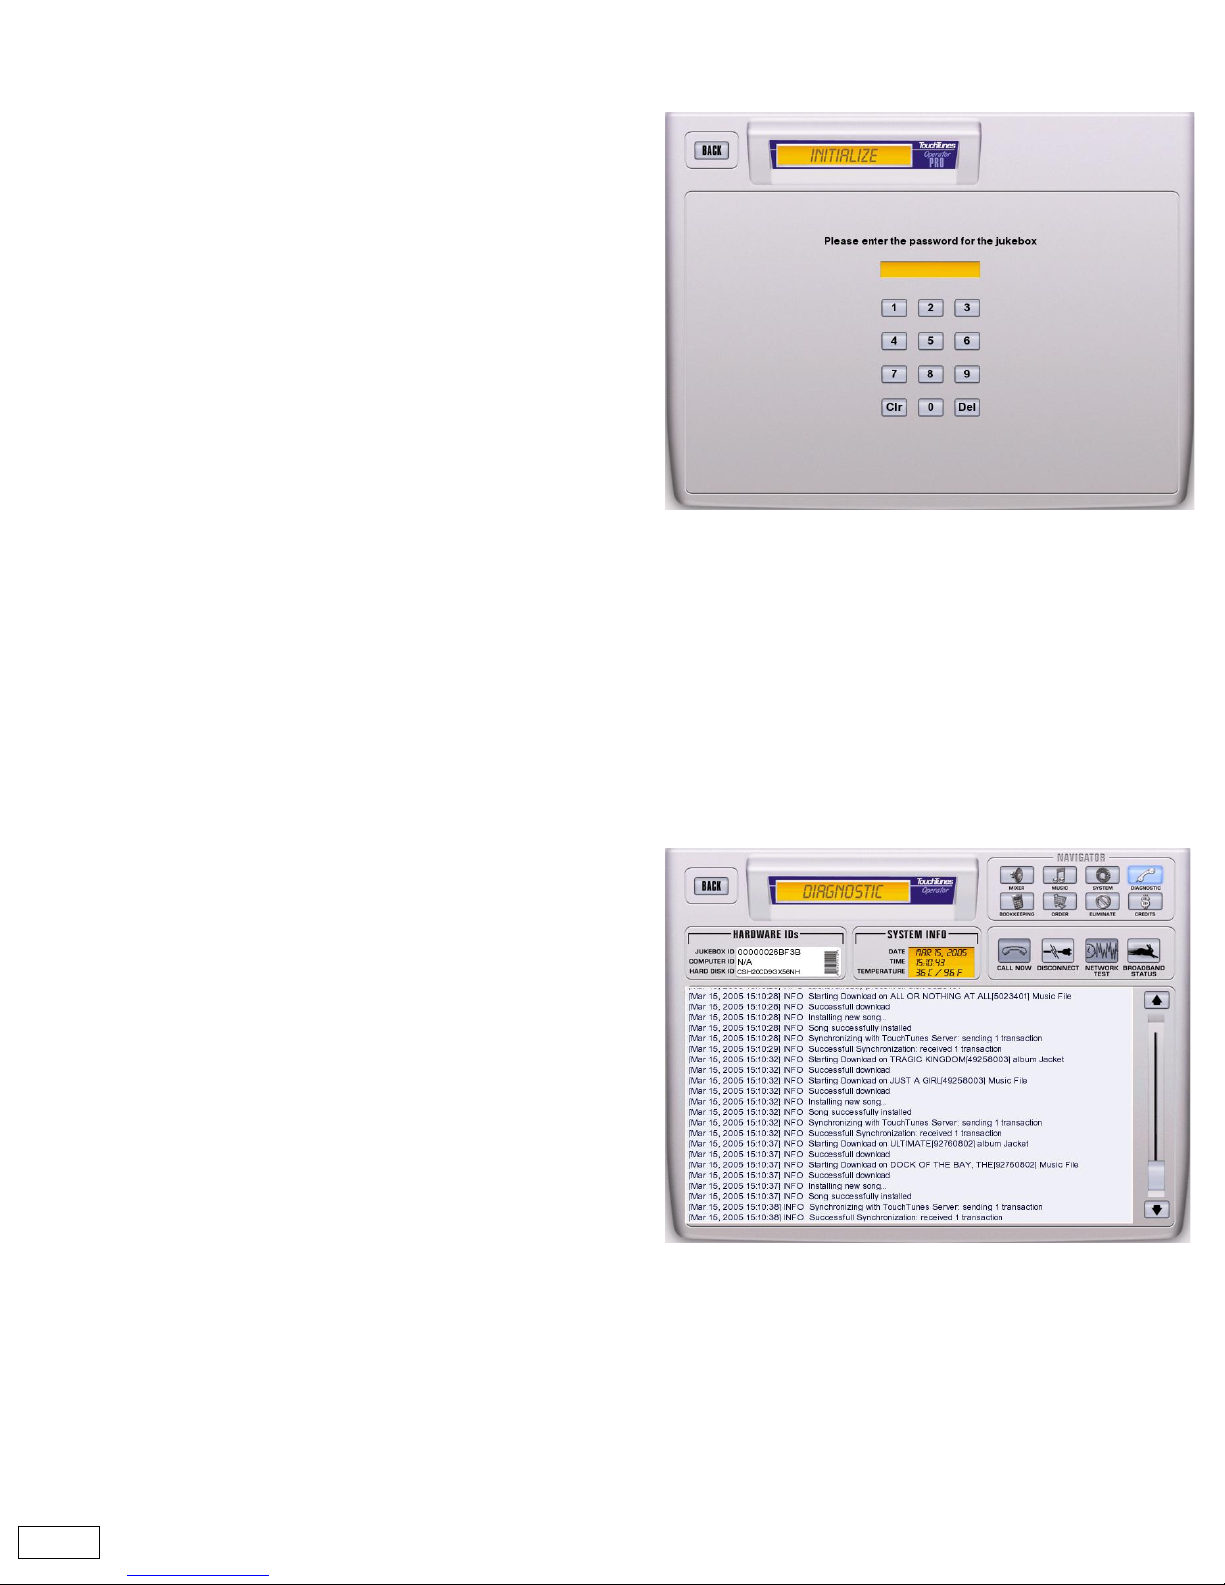
4 Provide phone and calling information
The Phone Settings screen opens.
a. In the
CALLING WINDOW box, set the time during which the
jukebox can use the phone line to call the TouchTunes server.
Time is specified using military time (i.e., 00:00 equals
midnight).
The more time you make available, the more songs the jukebox
will be able to download. It takes about 20 to 25 minutes to
download a single song. The busiest time for the TouchTunes
server is between 4 and 8 AM Eastern time. If you can set your
jukebox to call outside this time, you may get better
throughput.
•
TIME OF DAY TO BEGIN CONNECTION: Set this to one half hour
after the location is locked up for the night (i.e., the time the
last person leaves and locks the front door). The half hour
gives you a buffer in case things are running late one night.
•
TIME OF DAY TO END CONNECTION: Set this to one half hour
before the earliest person arrives and enters the location.
b. If using a dial-up connection, enable the
DIAL-UP option and set the following parameters:
Page 8
8 of 12
• WAIT FOR DAILTONE: Disable this option if the location has a
voice mail service installed on its line. When disabled, the
jukebox will not check for a dial tone before dialing out,
instead it will pause for two seconds then begin dialing.
•
DIAL 9 FOR EXTERNAL LINE: Enable this option if 9 needs to be
dialed to access an external line. For example, if a PBX is
installed at the location.
•
TONE DIALING: If the location uses pulse dialing, turn this
option off.
•
CUSTOM DIAL PREFIX: If an outgoing prefix needs to be dialed
before the phone number, touch the
CONFIGURE button, then
use the numeric keypad to enter the prefix.
• If the location has call waiting, you should enter the prefix to
disable it. In most cases this is *70. You may need to add a
pause to the end of this sequence, as sometimes there is a
delay before the dial tone returns. Use the # key to enter a
pause. For example, the sequence *70## disables call
waiting and then pauses twice before continuing to dial.
c. If using a broadband connection, enable the
BROADBAND option
and set the following parameters:
•
THROTTLE BANDWIDTH: Enable this option to limit the total
amount of bandwidth the jukebox will use. Touch the
+ and -
buttons to increase or decrease the limit.
d.
LOCATION INFORMATION identifies the jukebox to the TouchTunes
server. Touch the
CONFIGURE button next to each of the
following parameters to set them.
•
LOCATION NAME: Specify the name of the location.
•
TYPE OF LOCATION: Choose a type from the list.
•
LOCATION PHONE NUMBER: Enter the phone number of the
location. If you are in your shop, enter the phone number of
your shop. Later you will change this number to that of the
location.
Note: The jukebox uses the phone number you enter to
determine the most cost-effective way to call the TouchTunes
server. If you enter an incorrect number, it could result in
unnecessary charges on the location’s phone bill.
•
TIME ZONE: Choose the time zone that the location is in.
e. Touch NEXT.
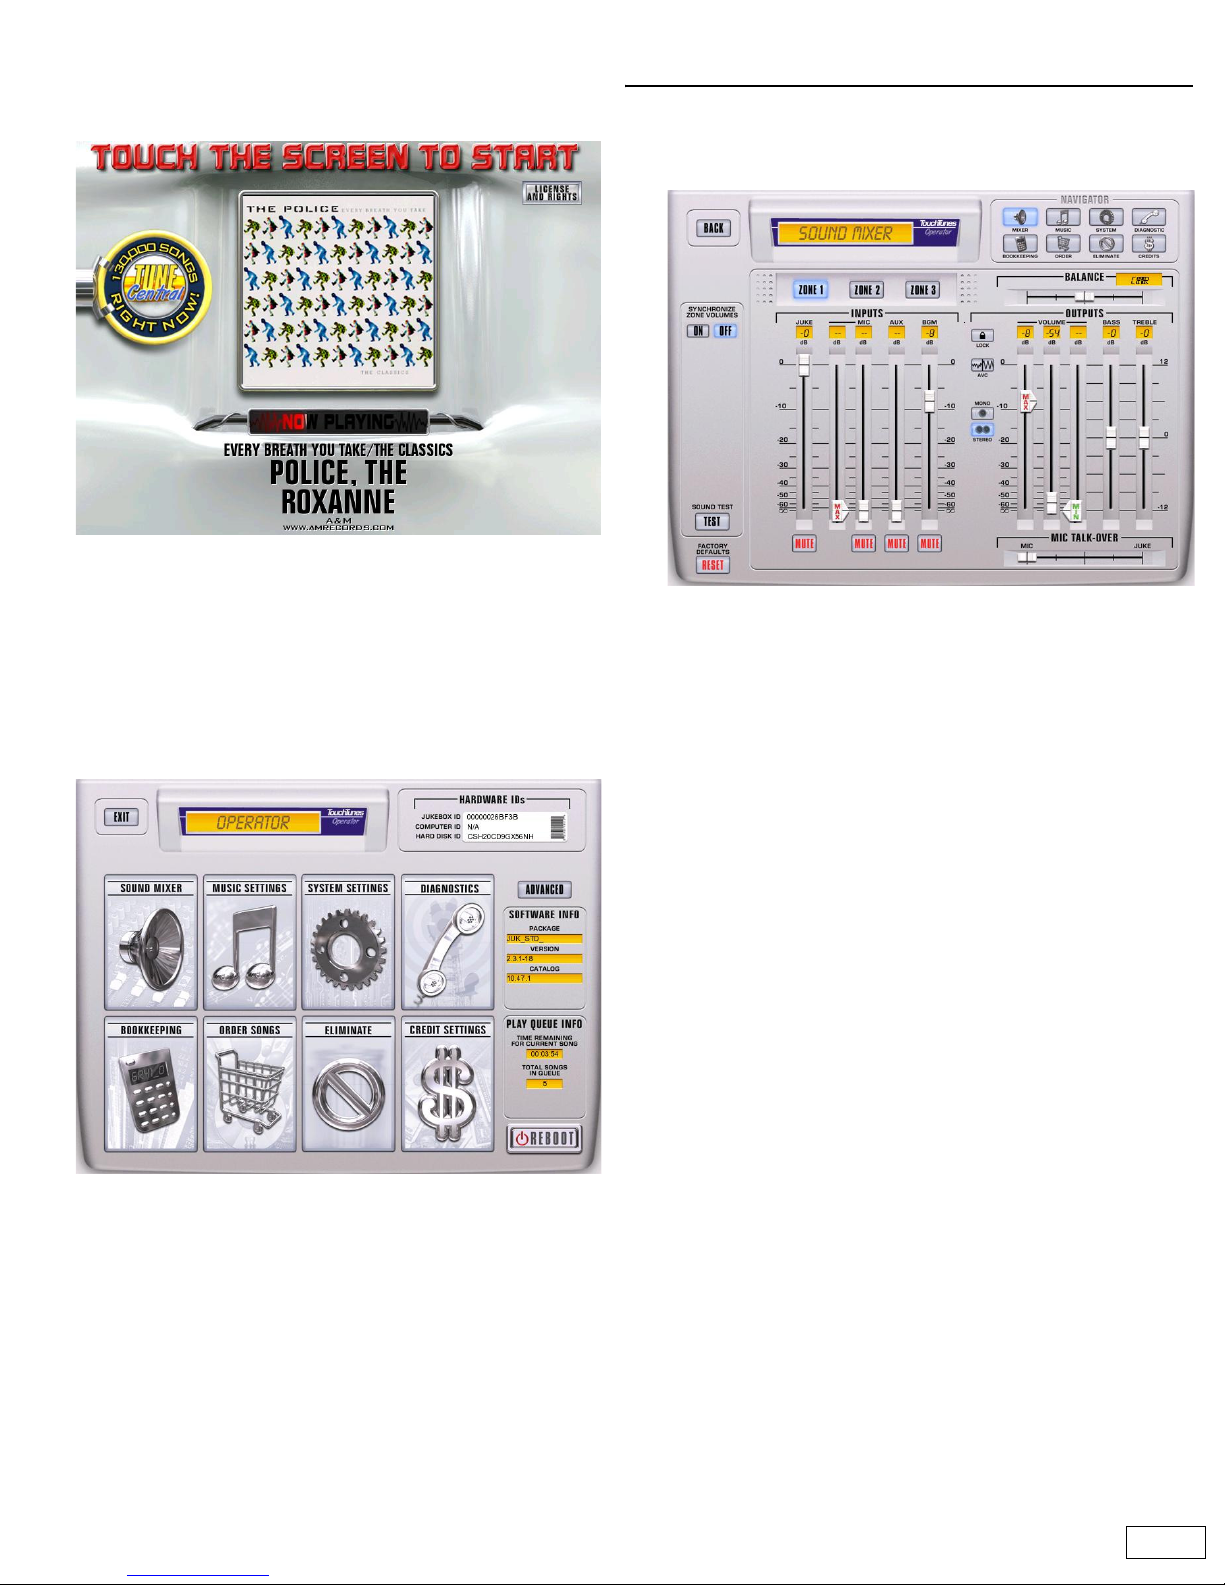
5 Specify the registration password
Enter the registration password and touch CALL.
The password should have been sent to you by fax prior to delivery
of the jukebox. If you did not receive your password, call TouchTunes
at 1-888-711-5853.
6 Monitor the call to the TouchTunes server
The jukebox will now dial out and attempt to connect to the
TouchTunes server. The Diagnostic screen opens, enabling you to
monitor the progress of the call. A successful call should take about
ten minutes to complete.
If the call fails, you will see an error message indicating the problem
that occurred. Refer to the Ovation Operator’s Manual for a
description of all error messages and advice on how to correct them.
The following screen shows a call in progress.
Page 9
9 of 12
If you successfully connected to the TouchTunes server and the
registration password you entered was correct, communications will
automatically finish and the
Attract screen will open. (If the
password was incorrect, you will be prompted to enter it again.)
Ovation is now operational.
7 Activate the Operator Menu
The Operator menu enables you to configure all Ovation settings. To
activate the Operator menu, press and release a manager button.
Two are available. One is located on the left side of the jukebox top
connector panel. The other is located on the control board. Refert to
the illustrations on page 5 for the exact location of each button.
The Operator menu has the following options.
Important: A safety feature automatically returns the jukebox to the
Attract screen and normal operation if you leave any operator screen
(except Telecom Diagnostics) idle for more than 1 minute.
Test and set sound levels
1 Open the Sound Mixer screen
On the Operator menu, touch SOUND MIXER. The Sound Mixer
screen opens.
2 Run the sound test
a. Under the heading SOUND TEST, touch TES T .
b. Listen to the test at all speaker positions to ensure everything
is functioning properly.
c. During the test use the OUTPUTS sliders to adjust the volume
of each zone.
• JUKE: Controls the gain applied to paid or free plays.
• MIC: Controls the gain applied to an external microphone.
• AUX: Controls the gain applied to an external line level
signal connected to the auxiliary inputs on the rear panel.
• BGM: Controls the gain applied to songs played by the
background music option.
Final output volume is controlled by the VOLUME slider.
The sound you hear during normal operation is governed by
these two rules:
a. The JUKEBOX sound source is played whenever there are
songs in the play queue. It can only be interrupted by:
• Pressing the PAUSE button on the remote control. This also
switches to the AUX sound source if one is connected.
• Pressing the TALK button on a connected microphone. This
fades down the JUKEBOX according to the setting for MIC
TALK-OVER JUKEBOX.
b. The jukebox automatically switches to the AUX source if the
jukebox is not in use and no song is currently playing, or the
jukebox was paused using the remote control.
3 When you are done
Touch BACK to return to the Operator menu.
Page 10
10 of 12
Define pricing
In this step you test the coin and bill acceptors, set pricing levels for
credits, and define the number of service and promotional credits that are
available.
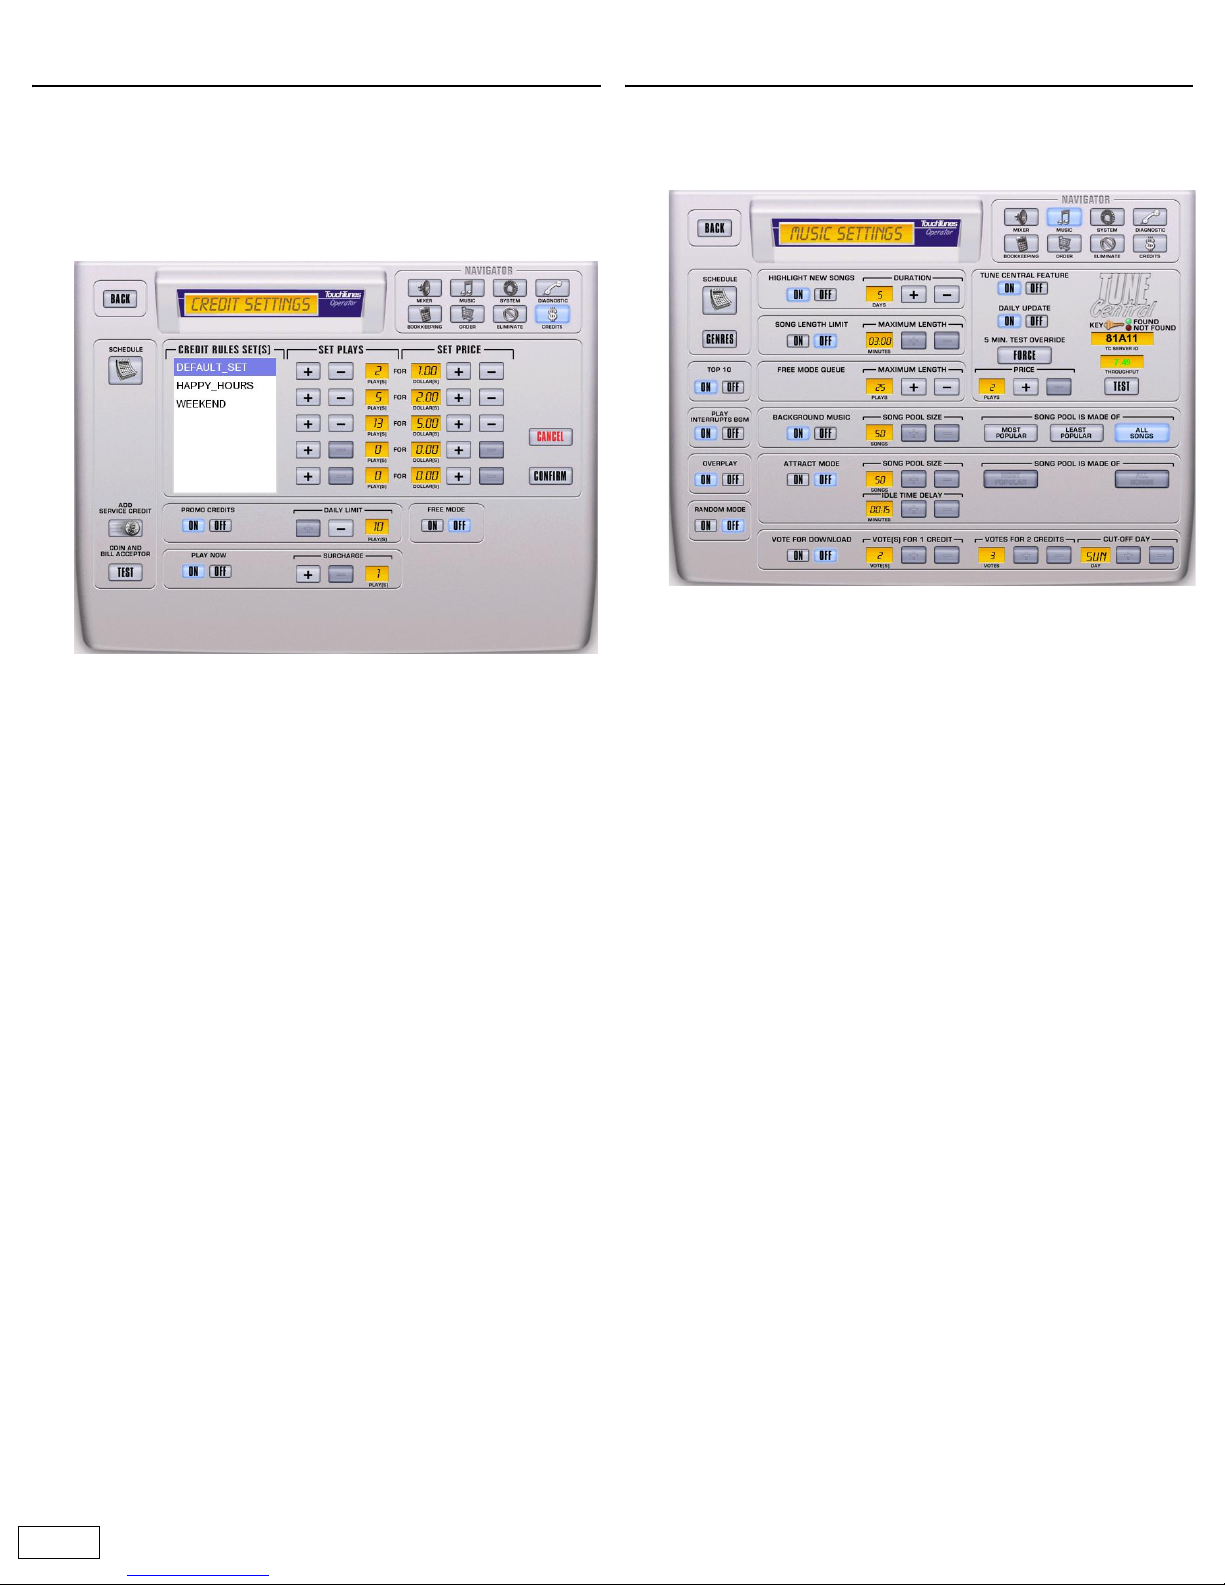
1 Open the Credit Settings screen
On the Operator menu, touch CREDIT SETTINGS. The Credit
Settings screen opens.
2 Set pricing levels
The jukebox features a flexible pricing system which enables you to
create multiple pricing schemes for use at different times of the day.
For example, you could use a different pricing structure during
Happy Hour or on Friday and Saturday nights. For details on this
feature, see the Ovation Operator’s Manual.
To set default prices, do the following:
a.
In the CREDIT RULES SET box, touch DEFAULT_SET.
b. In the SET PLAYS column, set the number of plays for each
level.
c. In the SET PRICE column, set the dollar amount for each level.
Note: The average price per song must decrease at each level.
The jukebox will automatically determine if the pricing you set
follows this rule. If not, the prices that are in error are displayed
in red and the BACK button disappears. You cannot exit this
screen until all price levels are valid.
d. Once you have set valid plays and pricing for all levels, touch
CONFIRM to store them, or touch CANCEL to return to
previously saved prices.
3 When you are done
Touch BACK to return to the Operator menu.
Define music settings
1 Open the Music Settings screen
On the Operator menu, touch MUSIC SETTINGS. The Music Settings
screen opens:
2 Adjust play queue options
a. Turn on OVERPLAY to have the jukebox ignore multiple plays
of a song. If the same song is added to the play queue more
than once, it is only played once. (Note that the currently
playing song is not counted.)
b. Turn on RANDOM MODE to have the jukebox play back songs
randomly, rather than in the order they were selected.
3 Configure Attract mode
When enabled, this feature causes the jukebox to automatically play
a song when it has been idle for a specified amount of time. For
details on scheduling, see the Ovation Operator’s Manual.
4 Configure Background music
This feature lets you define certain times during the week that the
jukebox will randomly play songs. You have control over the day and
time songs are played, how they are selected, and the volume level at
which they are played. Background music automatically stops if a
customer plays a song. It will automatically resume once the play
queue is empty. For details on scheduling background music, see the
Ovation Operator’s Manual.
5 Configure the Vote for download feature
When this feature is enabled, customers are prompted to vote for
their favorite song not currently on the jukebox, after they make a
paid selection. When the voting period expires, the song with the
most votes is downloaded.
6 Enable the Top 10 feature
When this feature is enabled, customers are able to select a song
from the ten most popular songs on the jukebox. The Top 10 icon is
only visible when a minimum of 10 songs on the jukebox have been
played at least once. This ensures that at least ten “top” songs exist.
7 Set the Song length limit
This option enables you to limit the playing time of songs.
When a song reaches the limit you set, it is faded out.
Page 11
11 of 12
Enable the remote control
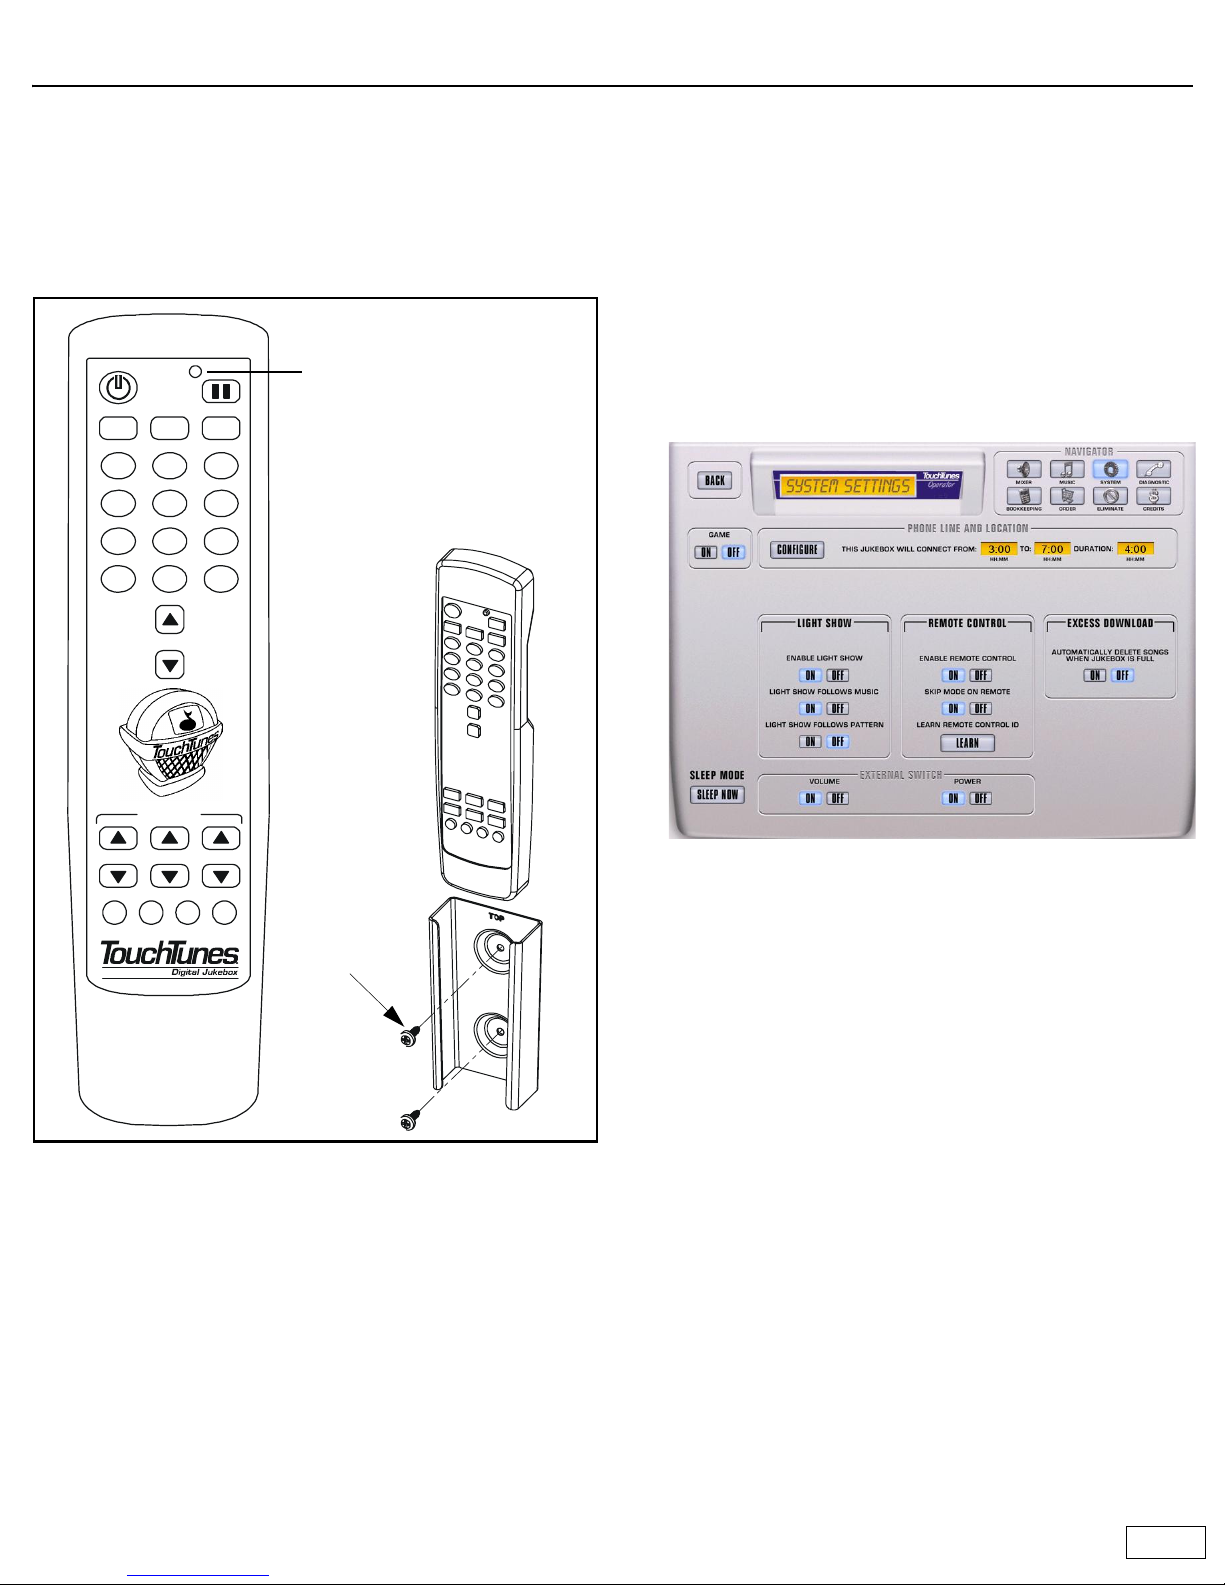
The remote control is RF-based. This eliminates the need to point it
directly at the jukebox when using it. It has a range of up to 200 feet
depending on the type of the obstructions between it and the jukebox.
Concrete and metal provide more of a barrier than wood or plaster. It can
also be affected by interference from other RF-based devices.
The remote control is powered by two 1.5V AAA batteries. Insert the
batteries in the compartment on the rear of the remote. Use only highquality alkaline batteries.
About the Carrier frequency
By default, the remote setup to communicate with Ovation II. If you need
to change it to communicate with another jukebox, do the following:
1. Press the PAUSE and F1 keys at the same time and hold them down
until the red indicator light blinks two times.
2. Enter the three-digit numeric code for the frequency you want to use.
• 027 for 27.145 MHz, which is compatible with jukeboxes that use the
old receiver/demodulator (Genesis I, II, Ovation, Rhapsody)
• 433 for 433.92 MHz for Ovation II. Default setting.
3. The red indicator light will light up for three seconds to confirm your
selection. If you enter an invalid code the light will blink five times.
1 Set the remote control ID
By default, the remote control ID is set to 000. Change it as follows:
a. Press the POWER and F4 keys at the same time and hold them
down until the red indicator light blinks two times.
b. Enter the new three-digit code to use. The new code must be in
the range 000 to 255.
c. The red indicator light will light up for three seconds to confirm
your selection. If you enter an invalid code the light will blink
five times.
2 Open the Systems Settings screen
On the Operator menu, touch SYSTEM SETTINGS. The System
Settings screen opens:
3 Enable the remote control
a. In the REMOTE CONTROL OPTIONS box, set ENABLE REMOTE
CONTROL to ON.
b. To allow the remote control to skip a song that is playing (P3
button), turn on SKIP MODE ON REMOTE.
c. Next to LEARN REMOTE CONTROL ID, touch LEARN.
d. Watch the monitor. When prompted, press the MIKE VOLUME
UP key on the remote control. The monitor will return to the
System Settings screen.
e. Touch BACK to return to the Operator menu.
f. Test the remote by raising and lowering the jukebox volume as
it is playing.
The red indicator light
flashes when the remote
transmits or when it is being
programmed.
P1 P2 P3
F1 F2 F3 F4
13
456
2
789
*
#
0
SKIP
ZONE 1 ZONE 2 ZONE 3
VOLUME
MIC VOL
Use the mounting bracket to
installed the remote control
on a wall for
easy access.
Fasten the
bracket to the
wall with two
screws as
illustrated.
Use screw
size #6.
Page 12

12 of 12
Explain operation to location staff
It is important that location personnel are familiar with the operation of
Ovation. Take a few minutes to cover the following topics with them.
Coin and bill mechanism
The jukebox accepts only $1, $5, $10, and $20 bills (old and new) four
ways, and US 25 cent and $1 coins.
Power
• Show the Night Mode switch on rear of jukebox.
• Explain that the Night Mode button turns off the jukebox monitor and
audio subsystem only. The computer inside the jukebox is always
running since it calls TouchTunes every night. For this reason, the
jukebox should never be turned off by pulling its plug or shutting
circuit breakers that cut power to its wall outlet.
• Explain that pushing the on/off button on the remote is the same as
pushing the Night Mode button.
Volume buttons
Show the backup volume control buttons on the rear of the jukebox and
explain that they can be used if the remote is broken, lost, or low on
battery power.
Customer interface
• Show how a song is selected and is played.
• Explain credit settings and the schedule you have set for them.
• Explain the following features if enabled: vote for download and
promotional game.
Songs
• Explain random play and overplay modes if you have enabled them.
• Mention that new songs can be added to the jukebox as needed. Staff
will know what customers want to hear and will be able to give you
valuable information in this regard.
• Explain that the jukebox calls out on the phone line every night (after
business hours) and that this is how songs are added. Indicate the
time range you set for the nightly call and caution staff against
picking up the phone during this period as it can disrupt
communications. If the jukebox is interrupted during a call it will
recover, sometimes by calling again. However, if the nightly call fails
for any reason, a phone icon will appear on the Attract screen. Staff
should call you if this occurs.
• Explain that if the jukebox is turned off (using the Night Mode button
on the rear) for more than four hours, the song queue is purged.
Attract mode/background music
Explain how attract mode and background music work and the schedule
you have set for them.
Remote control
Explain that the remote does not need to be pointed directly at the
jukebox, and will function through walls and other obstructions. Concrete
and metal provide more of a barrier than wood or plaster. The remote
control can also be affected by interference from other RF-based devices.
Remote key assignments and functionality
The keys on the remote are pre-programmed for the following functions.
Copyright © 2006 TouchTunes Music Corporation Printed in Canada
Key Function
Power Press to turn the jukebox monitor and audio
subsystem on or off. The jukebox computer
remains on. Equivalent to pressing the
Night Mode button on the jukebox (not
available on all models).
Pause Pauses the jukebox.
Numeric keys Used to program the remote and for future
use.
MIC VOL Raises and lowers the volume of the
microphone within the limits set on the
Mixer Settings screen.
P1 Give promotional credit: Press and release
this button to add a credit to the jukebox.
Credits are deducted from the promotional
credit count.
The promotional credit feature is enabled/
disabled on the Credit Settings screen.
P2 For future use.
P3/Skip Skip song: Quickly press and release this
button to stop playing the current song and
immediately skip forward to the next song
in the queue. The skip song feature is
enabled/disabled on the System Settings
screen.
Flush play queue: Press and hold this
button for four seconds to flush the entire
play queue.
VOLUME ZONE 1, 2, 3 Raises and lowers the volume of the
selected zone within the limits set on the
Sound Mixer screen.
F1, F2, F3, F4 For future use.
TouchTunes Digital Jukebox, Inc.
3, Commerce Place, 4th Floor
Montreal, Quebec,
Canada, H3E 1H7
TouchTunes Music Corporation
1280 Rose Road
Lake Zurich IL 60047
USA
Technical Support
888-711-5853
www.touchtunes.com
 Loading...